Take Control of 1Password (1.2.1) (2014)
Chapter 7. Edit 1Password Items
If you’ve been reading in linear order, you’ve already encountered numerous situations where you may need to edit 1Password items, which requires nothing more than clicking the Edit button, making your changes, and clicking Save (Mac) or OK (Windows). However, in this chapter I address a variety of changes that may not be obvious at first glance—including modifying labels, using custom fields, tweaking URLs for better results, and dealing with icons and thumbnails.
I also explain exactly what to do when you need to change a password and how to audit passwords that have accumulated over time to make sure they’re unique—and as strong as they should be. And I tell you about the new features in 1Password 4 for Mac that enable you to share individual passwords or even entire vaults with other people. I close the chapter with brief pointers on importing and exporting data.
Edit Saved Items
When 1Password’s automatic login saving feature saves your login credentials, it usually has all the information it needs to log you in on future visits to the site. However, in certain situations it can get confused, and even if it doesn’t, you may want to modify its behavior. For example, you may want to change the URL so it points at the sign-in page rather than the sign-up page (if they’re different). And, if 1Password fails to fill in your credentials, identity, or credit card information correctly, some minor tweaks may be needed.
Modify Item Attributes
Three attributes of 1Password items—especially login items—have a significant effect on how 1Password processes them in a Web browser:
· URLs: The URL in a login item’s Website (Mac) or Location (PC) field is the one for the page on which 1Password’s automatic login saving feature was used. If that’s the site’s regular sign-in page, you shouldn’t need to modify it. But if it points to a page used only for registration, then clicking the URL (or accessing it in any of the other ways discussed in Log In) could produce an error, since you’re already signed up! The easiest way to handle this is to navigate manually to the page on the site where you normally sign in, copy its URL from your browser’s address bar, and paste it into the Website/Location field, overwriting the one that’s there.
On a Mac, you can also add more URLs—fields labeled Website 2, Website 3, and so on appear as needed—to tell 1Password that there are other pages on which you can log in with the same credentials. If you have multiple login items for a given site—one for each page or subdomain where you log in with the same credentials—you can simplify things by combining all those URLs in a single login item.
Tip: What if a site has only a combined sign-up/sign-in page? If the field names are the same in both parts of the form, 1Password fills them all in, but that’s a problem only if Autosubmit “clicks” the wrong button. Your best bet on such sites is to disable Autosubmit (see the Submit bullet point ahead). However, if the field names are different in each part of the form, you can Change Web Form Details to make 1Password use the right ones.
· Display: The fact that a login item, identity, or credit card appears in the main 1Password app doesn’t mean that it has to show up in 1Password mini (Mac) or in your browser extensions (PC). Preventing an item from appearing while you’re in your browser means it won’t autofill or appear on the list if you press Command-\ or Control-. You might opt for this feature, for example, if you’ve disabled or deleted an account, moved to a new address, or canceled a credit card—you can keep a record of your old data in 1Password without cluttering your browsing experience.
To keep an item from displaying in your browser on a Mac, choose Never Display in Browser from the Display pop-up menu when editing an item. On a PC, select the item, click Edit, and deselect the Display in Web Browser(s) checkbox.
· Submit: As I explained in A Word about Autosubmit, you can choose, for each login, whether to automatically submit the form after filling in your credentials—always, never, or only when the global Automatically Submit Logins after Filling option is selected. The Submit pop-up menu lets you specify your preferences.
Use Custom Fields
In the Mac version of 1Password 4 only, you can add extra fields to any item and call them anything you like. This should rarely be necessary, since 1Password provides the most commonly needed fields, plus a generic Notes field. However, it could come in handy if, for example, you want a single software license item to contain license keys for multiple versions of the software, or if you want a login item to include several security questions and answers without overloading the Notes field.
When editing an item, you’ll see an area like the one in Figure 26. Click where it says “label” and type a label of your choice. Then click where it says “new field” and type whatever you want the field to contain. When you do this and press Tab or click outside that field, 1Password automatically adds another blank label and field below it so you can repeat the process as needed. If you add more than a few and want to label an entire set of custom fields, click where it says “Section” and type a section label. (1Password also adds an entirely new section as soon as you create your first custom label, so you can have multiple custom sections with multiple custom fields in each one.)

Figure 26: Add your own custom fields here.
You can rearrange custom fields by dragging the handle ![]() control up or down (it’s at the far right), and you can remove a custom field by clicking its delete
control up or down (it’s at the far right), and you can remove a custom field by clicking its delete ![]() button.
button.
After you’ve created a new custom field (except one in the Website section), you can designate it as a password if you like so that its contents will normally be rendered as bullets (unless you hold down the Option key). To do this, create and fill in a new custom field, and then press Tab or click outside the field. Then click the tiny black arrow to the right of the custom field and choose Password to designate that field as a password. Choose Text if you’d prefer to treat it as an ordinary text field.
Change Web Form Details
When 1Password automatically saves your credentials, it records all the fields on that page’s form, along with their values—not just your username and password. You can later see what all those fields are, edit their names or contents, or correct any mistakes (such as the wrong field being designated as “username”).
I’ll explain how to do this on a Mac first, and then Windows.
To see what 1Password has stored for any given login, click the Show Web Form Details button. The display expands to show the names and contents of all the form fields 1Password recorded (Figure 27), and the button now says Hide Web Form Details.
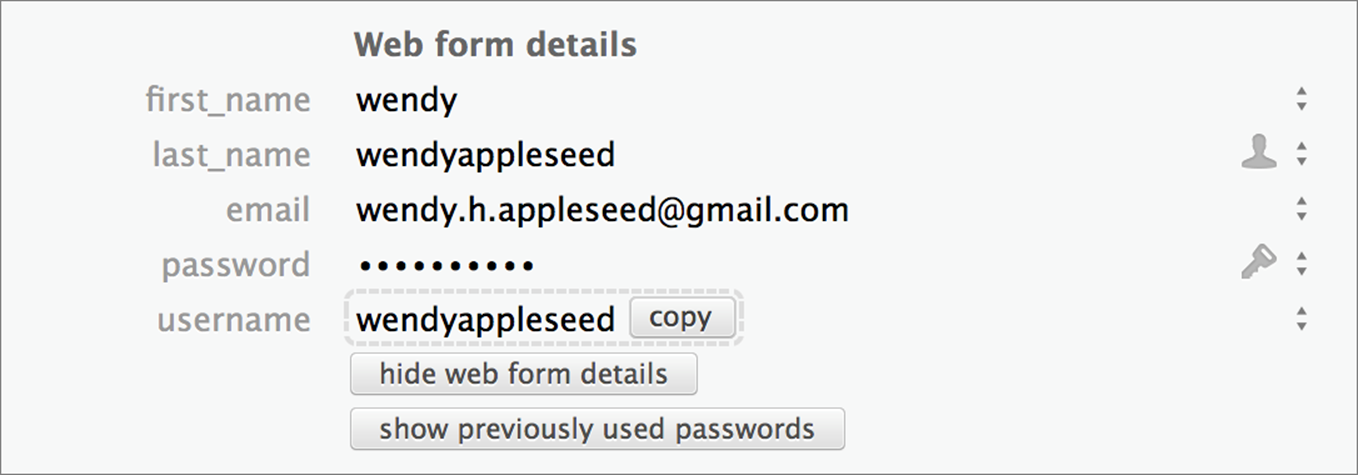
Figure 27: Click the Show Web Form Details button to see what form fields and values 1Password stored.
If you notice anything you’d like to change, click the Edit button and then click Show Web Form Details again. In edit mode, the fields include more controls (Figure 28).
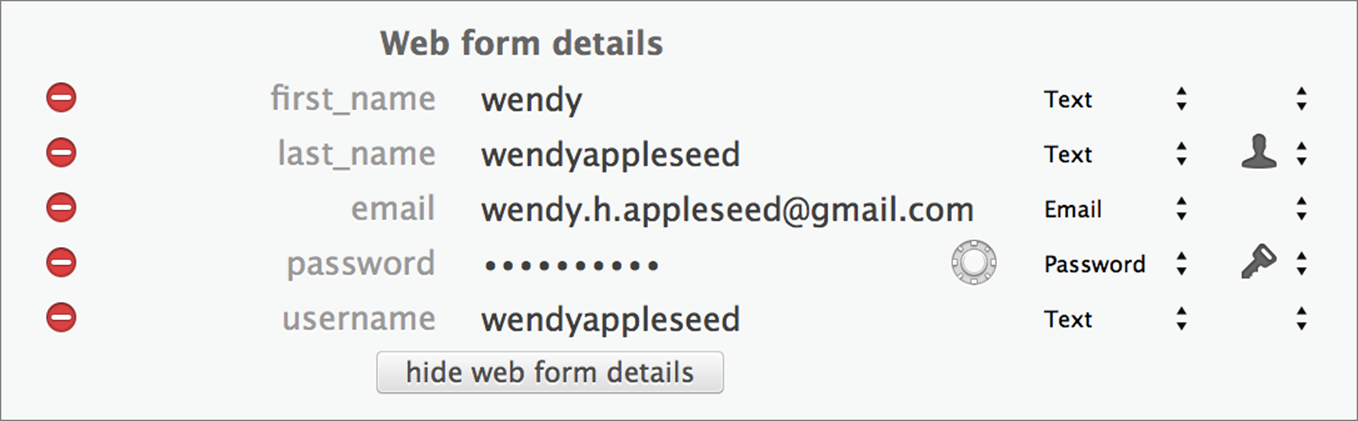
Figure 28: In edit mode, you can adjust form field contents.
Here’s what you need to know about editing Web form details:
· The field names shown here are what the form uses behind the scenes, not necessarily the way the fields were labeled on the page. Although you can edit field names, you shouldn’t, because if the field names don’t match what the form uses, they may not fill in properly.
· You can edit any field’s content by clicking in the field and typing, but bear in mind that this changes only 1Password’s record, not what the site stores. If you change your username or password, for example, you won’t be able to log in automatically until you make the corresponding changes on the site, too.
· The first pop-up menu to the right of the field contents lets you specify the type of information a field contains (such as Text, Email, or Number). It’s virtually never a good idea to mess with these.
· The rightmost column should display a Username ![]() icon and a Password
icon and a Password ![]() icon next to their respective fields. But sometimes 1Password guesses wrong. For example, if a site asks for both a username and an email address, 1Password assumes your username will be used for signing in, but some sites expect you to enter your email address, not your username, along with your password when you log in. So, if logging in doesn’t work properly, use the pop-up menus in the right column to tell 1Password which fields it should use for your “username” and password.
icon next to their respective fields. But sometimes 1Password guesses wrong. For example, if a site asks for both a username and an email address, 1Password assumes your username will be used for signing in, but some sites expect you to enter your email address, not your username, along with your password when you log in. So, if logging in doesn’t work properly, use the pop-up menus in the right column to tell 1Password which fields it should use for your “username” and password.
· To delete a field entirely, click its delete ![]() icon.
icon.
· As of version 4.4, you can’t add entirely new Web form fields—you can only modify or delete existing fields. AgileBits plans to let you add custom fields in a future update.
Note: On some login items, you may notice another button below Show Web Form Details, called Previously Used Passwords. I explain how to use that button in Work with Previously Generated Passwords.
You can also change Web form details in the Windows version of 1Password, but the procedure is a bit different:
1. Select a login item and click Edit to display its editing window.
2. At the bottom of the window, you’ll see the Web form values in a scrolling list. To edit a value, double-click it. A Login Field dialog box appears.
3. Make any desired changes to the field’s name, value, type, and designation (designation being whether the field is used for your username, password, or neither), click OK, and then click OK again.
4. To delete a field, select it and click Delete; to add a new field, click Add, fill in the details, and click OK.
On your next visit to the site, 1Password uses the new information.
Work with Icons & Thumbnails
In Software Licenses, I said that 1Password can store and display an icon for each app that you use. I also mentioned that you can add a custom photo to each of your identities in Fill Web Forms Using Identities. In fact, each item in 1Password 4 for Mac can have a unique icon or thumbnail. (In Windows, only logins and software licenses can currently have custom icons. I’ll come back to the Windows version at the end of this topic, in Add Thumbnails.) However, it may not be obvious where these images come from or how to manipulate them.
By default, 1Password displays generic icons for each item—for example, a generic application icon for all software licenses, a Visa logo for Visa credit cards, and a name badge icon for identities. If you want specific, unique icons, you can get them in either of two ways (which you can mix and match): enable rich icons or add custom icons.
Enable Rich Icons
When you enable rich icons, 1Password consults an image server that holds icons and thumbnails for a large number of apps and Web sites, and downloads any that match items in your vault. (If the image server doesn’t happen to have a matching image, the item retains its generic icon.)
To enable rich icons, go to 1Password > Preferences > General, and select the Use Rich Icons checkbox. 1Password downloads the icons, which may take a few minutes. To disable rich icons—which removes all existing rich icons (though not custom icons) from your 1Password items—deselect Use Rich Icons.
For logins, the image server delivers the site’s favicon—the tiny icon that appears next to the URL in your browser’s address bar. Often these are quite small, so when 1Password scales them up they may look fuzzy. As more Web sites update their favicons for Retina/HiDPI displays, they should get sharper.
For apps, the image server delivers the actual app icon, if available, although icons sometimes change from one version of an app to the next, so it may not always match the version you have installed.
Note: If you’re upgrading from version 3, some of your existing app icons may disappear due to the way version 4 depends on an image server. I explain how to add custom icons next.
Add Custom Icons
If 1Password’s image server doesn’t have an icon for a login or app, if you dislike the icon it delivers, or if you want to add an image for another item type, you can override any 1Password icon with a custom icon of your own—an app icon, a photograph, or pretty much any other graphic. You can do this even if rich icons are disabled.
To add a custom icon, first select the item in 1Password and click Edit. Then do any of the following:
· To add an application’s icon or a graphic file from disk, drag that application or file from the Finder onto the item’s icon in 1Password (Figure 29). In the Edit Picture dialog that appears, move the slider if you want to resize the image and click Done.
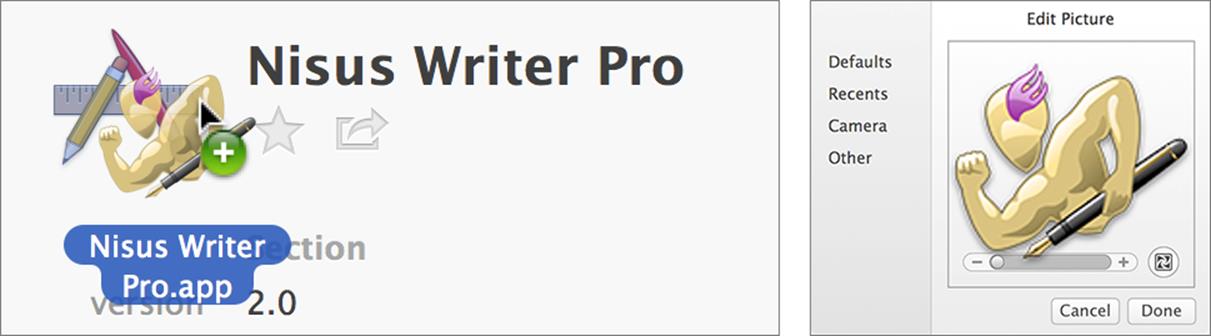
Figure 29: When you drag an application icon onto the generic icon in 1Password (left), an Edit Picture dialog (right) lets you resize or otherwise modify it.
· To use the contents of the Clipboard, click the icon in 1Password once to select it, and then choose Edit > Paste.
· Double-click the item’s icon to edit it. You can then resize it using the slider, click Defaults to use items from Apple’s icon library or Recents to use items from your iPhoto or Aperture library, click Camera to use your Mac’s iSight camera to take a picture, or click Other to navigate to a file on disk.
Add Thumbnails
In Windows, 1Password uses the term thumbnails (or “thumbs”) to refer to item-specific icons or graphics. They’re available only for login items and software licenses; all other item types use generic icons built into 1Password.
To add a thumbnail to a login item, double-click it and click Download Thumb. 1Password fetches the icon from the Web site and displays it in the Thumbnail field. If you did this previously and want to update the thumbnail, click Update Thumb. To delete the thumbnail, click Delete Thumb. Click OK to close the editing window.
To add a thumbnail to a software license, select the software license item, click Edit, and click Select Thumb. Navigate to the executable file for that app (usually located in C:\Program Files), select it, and click Open. To delete the thumbnail, click Delete Thumb. Click OK.
Update Old Passwords
When you decide to change a login’s password for any reason—such as realizing that your old password is too weak, or a particular site’s requirement to change your password every 90 days—you need to do so both on the site itself and within 1Password (possibly using 1Password’s password generator ). This common process seems to trip people up frequently, so I want to walk you through it. Once you go through the steps a couple of times, you’ll get the hang of it.
To update a login with a new password:
1. On the site whose password you want to change, log in as usual and locate the “Change Password” page, which is usually part of your account settings.
2. On a Mac, open 1Password mini by pressing Command-Option-\ (not Command-) or clicking the 1Password key ![]() icon in your browser’s toolbar; on a PC, open the browser extension by clicking the 1Password key
icon in your browser’s toolbar; on a PC, open the browser extension by clicking the 1Password key ![]() icon.
icon.
3. If the form asks for your existing password, navigate to your password for the site and copy it—don’t use Command-\ (Mac) or Control-\ (PC) to fill it in.
Specifically, in 1Password mini on a Mac, you can hover over the arrow ![]() to the right of the name and then click the Password field, or use the arrow keys to select the password and then press Return to copy it; on a PC, click the arrow
to the right of the name and then click the Password field, or use the arrow keys to select the password and then press Return to copy it; on a PC, click the arrow ![]() to the right of the login item’s name and then click the Password field to copy it. Then paste the password into the Current Password field.
to the right of the login item’s name and then click the Password field to copy it. Then paste the password into the Current Password field.
4. Now create a new password. Once again, open 1Password mini or the browser extension as in Step 2. Navigate to 1Password’s password generator, and create a new password that meets the site’s requirements. (If you need detailed assistance with this step, refer back to Generate Random Passwords.) Click Fill to fill in the new password field(s). Note that on a Mac (only), clicking Fill also copies the new password to your Clipboard.
5. Click the button to submit the form, so the site now knows your new password.
At this point, one of three things could happen:
§ On a Mac (only), you might see an Update Login dialog, which is similar to the Save Login dialog but with an Update button and different wording (Figure 30). If so, confirm the details (making any desired changes, such as choosing a different vault from the topmost pop-up menu or a different site from the second pop-up menu if 1Password didn’t guess the right one), click Update, and skip the rest of these steps. (The Update Login dialog should appear whenever you change your password on a site for which you have a login saved, but in my testing, it didn’t always appear when I changed a password.)
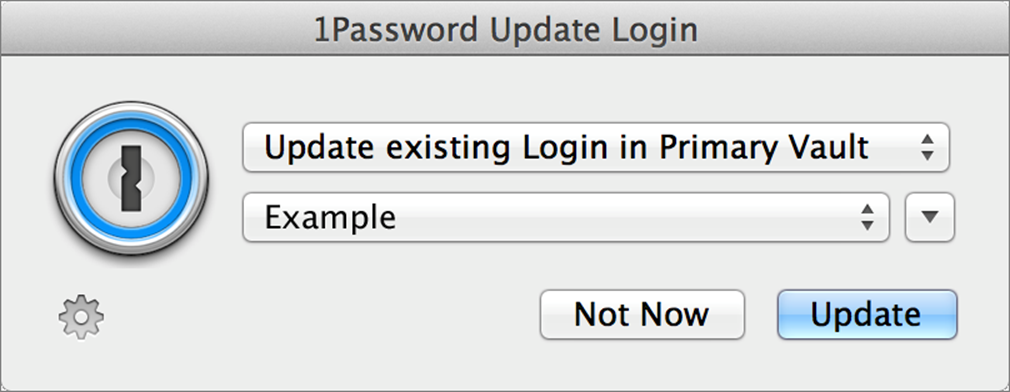
Figure 30: The Update Login dialog looks a lot like the Save Login dialog, the main difference being the option selected in the top pop-up menu.
§ The regular 1Password Save Login dialog may appear, indicating that 1Password doesn’t realize you’re updating a password and wants to save your credentials as a new login item. In this case, choose Update Existing Login from the top pop-up menu, select the desired login from the bottom pop-up menu, and skip the remaining steps. If the login you want to update isn’t there, click Not Now.
§ You may see neither an Update Login nor a Save Login dialog, which means 1Password doesn’t realize you’ve submitted a form at all. Continue with the next step.
6. Add the newly created password to 1Password. The process depends on your operating system:
§ Mac: Yet again, open 1Password mini as in Step 2. The current login should be selected at the top of the list. Press the Right arrow key or hover over the arrow ![]() to the right of the name to display its details; then click the Edit button. The main 1Password app opens, with that login selected and in edit mode. Select the entire password currently in the Password field, and then paste in the new password copied to your Clipboard in Step 4. Click Save.
to the right of the name to display its details; then click the Edit button. The main 1Password app opens, with that login selected and in edit mode. Select the entire password currently in the Password field, and then paste in the new password copied to your Clipboard in Step 4. Click Save.
§ Windows: Once more, open the browser extension as in Step 2. Click the password generator ![]() icon on the left, click View Password History, and then click the arrow
icon on the left, click View Password History, and then click the arrow ![]() to the right of the topmost password (the one you just created). Click the Password field to copy it. Now, still in the browser extension, click the login
to the right of the topmost password (the one you just created). Click the Password field to copy it. Now, still in the browser extension, click the login ![]() icon in the upper left. The current login should be selected at the top of the list. Press the Right arrow key or click the arrow
icon in the upper left. The current login should be selected at the top of the list. Press the Right arrow key or click the arrow ![]() to the right of the name to display its details; then click the Edit button. Select the entire password currently in the Password field, and then paste in the new password you copied a moment ago. Click Save.
to the right of the name to display its details; then click the Edit button. Select the entire password currently in the Password field, and then paste in the new password you copied a moment ago. Click Save.
Your new password is recorded on the site and in 1Password, ready for you to autofill on your next visit. (The previous password is saved, too, in case you ever need it—see Work with Previously Generated Passwords.)
Note: A different way to change passwords is to forgo 1Password mini or the browser extensions altogether—open the main 1Password app, edit the login item, create a new password, and manually copy and paste the old and new information into your browser. There’s nothing wrong with that approach except that it requires more manual switching, copying, and pasting.
Perform a Password Security Audit
The fact that 1Password can create super-strong passwords doesn’t mean all your passwords are automatically great. After all, you may have imported lots of existing weak passwords, and even if you use 1Password’s password generator, you may have opted for shorter or less-complex passwords than you should. So, once you’ve stored all your most important passwords in 1Password, it’s a good idea to perform a security audit—that is, make sure all your passwords are as strong as they need to be. You might want to repeat this procedure every six months or so, too, as your list of stored passwords grows.
You should look for three main security problems, the first two of which I discussed earlier in Learn Password Security Basics:
· Weak passwords: Each password should have enough entropy to resist most brute-force attacks.
· Duplicate passwords: Each account should have its own password.
· Old passwords: Passwords don’t get weaker with age, and unless a site requires you to change a password periodically—or there’s been a known or suspected security breach—there’s little to be gained by changing an otherwise strong, unique password. (This contradicts the advice of numerous security experts, and I go into details about the logical flaw in that advice in my book Take Control of Your Passwords, if you’re curious.) Even so, a password’s age could serve as a reminder that you haven’t checked recently to see if a password is as strong as the site allows, or whether a security breach might have occurred that you didn’t hear about.
1Password has built-in tools to help you identify and correct all these security problems. On a Mac, the easiest way to start is to hover over the Security Audit item in the sidebar, click Show, and then select a category underneath (each of which is basically a built-in smart folder), such as Weak Passwords or Duplicate Passwords. If you’re using a PC or you want greater control over the results, I explain alternative methods to accomplish the same things just ahead.
So, set aside some time, work your way through your weak, duplicate, and old passwords one by one, and change those that need changing (following the instructions just previously, in Update Old Passwords) to be both unique and strong. If you have a lot of problematic passwords, you might find it easiest to change just a few every day.
1Password Watchtower
1Password 4.4 for Mac adds integrated support for the 1Password Watchtower service, which points out passwords you should change due to sites that were vulnerable to the Heartbleed OpenSSL bug.
To use it, go to the Security Audit section of the sidebar and select Watchtower. The first time you use it, you must click the Enable button to turn on the service. Thereafter, when you have Watchtower selected in the sidebar, your logins are sorted by required action, most to least vulnerable, to address the Heartbleed vulnerability (use the header, as usual, to control sort order).
In addition, logins that 1Password deems potentially vulnerable display a red banner at the top—both in the main 1Password app and in 1Password mini. To learn more about the vulnerability, click the red banner and then click “Learn more.”
For more information on Heartbleed, read Heartbleed: Imagine no SSL encryption, it’s scary if you try on the AgileBits blog.
Find Weak Passwords
1Password 4 for Mac offers several ways to identify weak passwords:
· Use the Weak Passwords category in Security Audit: In the main 1Password app on a Mac, click Weak Passwords under the Security Audit heading in the sidebar. 1Password displays all items with passwords it categorizes as Weak (see the “Search by password strength” bullet point at the end of this list) or Terrible.
· Sort by password strength: In the main 1Password app, select Logins (or any category whose items include passwords) in the sidebar. Then, click the tiny heading above the main list and choose Password Strength from the menu. 1Password sorts your password by strength. You can then return to the same menu and choose either Weakest to Strongest (the default) or Strongest to Weakest. 1Password doesn’t give you a numerical value of strength, but it adds subheadings to the list (like Good and Excellent), and as you select each login, you can see a colored strength meter on the right.
· Search for weak logins: Click the tiny arrow on the left of the Search field, and choose Weak Logins from the menu. 1Password displays the advanced search controls, with the search criterion set to [Password strength] [is less than or equal to] [weak] (see Perform an Advanced Search). This filters the list to display only logins with passwords 1Password considers weak. Unlike the Weak Passwords category in Security Audit, which displays weak passwords in any item type, this command shows you only login items with weak passwords.
· Search by password strength: If searching for “weak” passwords isn’t specific enough for you, you can modify the Weak Logins search or create your own advanced search using the [Password strength] criterion, leaving the comparison set to [is less than or equal to] (for best results), and setting the value of the rightmost pop-up menu to any of the following, based on 1Password’s internal strength ranking scale of 0–100:
§ Terrible: 0–20
§ Weak: 21–35
§ Good: 36–60
§ Excellent: 61–90
§ Fantastic: 91–100
Note that you may have a different idea of what constitutes “weak” or “strong” than 1Password does. For example, my personal standard is that all passwords should be in at least the Excellent category, assuming the site or service allows that level of complexity.
1Password for Windows can also sort passwords by strength. Make sure Show Password Strength is selected in the View menu. Then click the Password column heading to sort by password strength; click it again to reverse the sort order. The Password column shows a colored bar representing each password’s relative strength.
Find Duplicate Passwords
On a Mac in the main 1Password app, you can locate duplicate passwords in either of two ways:
· Click Duplicate Passwords under the Security Audit heading in the sidebar. 1Password displays items across all categories that share passwords with at least one other login (Figure 31), and the heading changes to indicate how many duplicates were found.
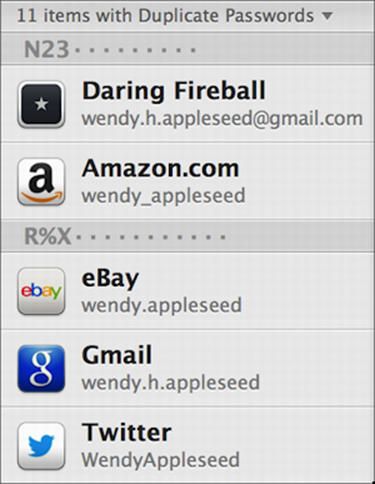
Figure 31: When you sort logins by duplicate passwords, the list (only a portion of which is shown here) changes to group your logins by password.
· Select Logins in the sidebar. Then, click the tiny heading above the main list (for example, ![]() “27 items sorted by Title”) and choose Show Duplicate Passwords from the pop-up menu. 1Password filters the list to show only logins that share passwords with at least one other login; the difference between this and the Duplicate Passwords category in Security Audit is that the latter shows all items with duplicated passwords, not just logins.
“27 items sorted by Title”) and choose Show Duplicate Passwords from the pop-up menu. 1Password filters the list to show only logins that share passwords with at least one other login; the difference between this and the Duplicate Passwords category in Security Audit is that the latter shows all items with duplicated passwords, not just logins.
1Password groups your logins by password. If the duplicates don’t fit without scrolling, it shows subheadings with the first three characters of the password (and the rest of the characters replaced with bullets).
Once you change a password so it’s no longer a duplicate, it disappears from this display. To return to a full list of logins, not just duplicates, choose a different sort criterion (such as Title) from the heading.
Note: Some duplicates are fine—for example, Flickr uses your Yahoo account, so it’s neither surprising nor problematic to find those two entries listed as duplicates. In cases like this, you may prefer to combine the two into a single login item with two Website fields.
On a Windows PC, choose View > Show Duplicated Passwords. Then select Duplicated Passwords in the sidebar. 1Password lists all logins that share a password with at least one other, sorted by password. However, you can’t tell from the list view which items share passwords with which others; you must examine each one individually.
Find Old Passwords
Bearing in mind that old doesn’t necessarily mean insecure (as I said at the beginning of this topic), you can display older passwords by clicking any of the following under the Security Audit heading in the sidebar on a Mac:
· 3+ years old
· 1–3 years old
· 6–12 months old
On a PC, the easiest way to find old passwords is to select Logins in the sidebar and then click the Modified column to sort your logins by date modified (click a second time to reverse the sort order).
Share 1Password Data
In 1Password for Windows and Android, sharing your 1Password data isn’t currently an option—sorry! However, 1Password for Mac and iOS each have two ways to share data (for details on the latter, see iOS, later).
Share a Vault
1Password 4 supports multiple vaults, each of which can have its own sync method. So, you can sync secondary vaults (containing items you want to share) with different locations from your primary vault, and make sure the other users who need access to that vault also sync to the same location. You can do this with either the Dropbox or folder sync method; iCloud doesn’t support syncing 1Password data between users, and in any case, only your primary vault can sync via iCloud.
To share a vault via Dropbox, follow these steps:
1. If you haven’t previously done so, create a new secondary vault following the instructions in Work with Multiple Vaults.
2. Make sure the secondary vault is active; if it is not, choose 1Password 4 > Switch to Vault > Your Secondary Vault’s Name.
3. Go to 1Password > Preferences > Sync.
4. Click Dropbox.
5. Click Choose Folder, and then navigate to a folder within your Dropbox folder–not the top level!—that you’ve shared with someone else. (If you don’t have such a folder, click New Folder to create one—we’ll share it in a moment.) Click Open.
6. Click Continue, followed by Start Syncing.
7. If the person or people with whom you want to share your new vault already have access to the folder you selected in Step 5, skip ahead to Step 8. Otherwise, log in to your Dropbox account at www.dropbox.com, select the folder by clicking in a blank area of its row in your main Dropbox folder list, click Invite to Folder, and follow the prompts to invite one or more other users. (In case it’s not obvious, the other people must have both Dropbox accounts and copies of 1Password 4.)
8. Each user who will access this shared vault must now open a Finder window, locate the new shared vault in Dropbox (it’ll have the name you gave it plus the extension .agilekeychain—for example, Family.agilekeychain), and double-click it.
9. In the dialog that appears (Figure 32), type a different name if desired and customize the icon and/or ring color, just as when creating a new vault. Enter the vault’s password and click Create Vault.
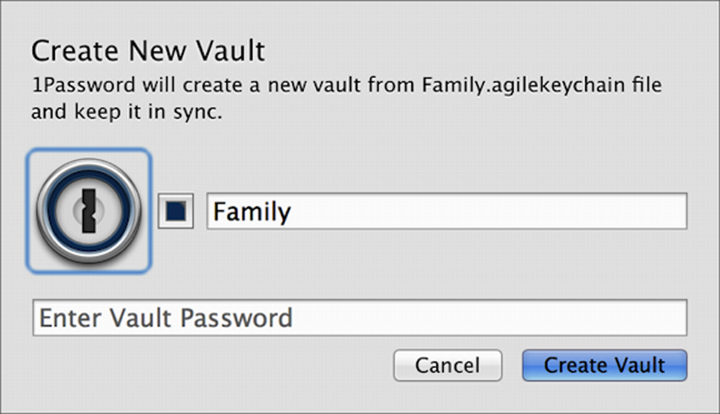
Figure 32: To add a shared vault to 1Password, double-click its file and then work through the Create New Vault dialog.
1Password adds the shared vault as a secondary vault—with syncing (via Dropbox, in this example) already set up.
If you want to sync via a shared local network volume or another cloud sync service such as SugarSync or SpiderOak, the directions will be similar except you’ll choose a folder sync instead of a Dropbox sync in Step 4, and the other person will have to use the relevant method to access the shared file in Step 8.
Share an Individual Item
In the main 1Password app, select an item and choose Item > Share > Email (to send it as an email attachment) or Item > Share > Messages (to send it with Apple’s Messages app). 1Password opens your default email client or Messages, as appropriate, and pastes in a long URL that begins with onepassword://share/1?d= followed by several lines of random-looking characters. If the recipient has 1Password installed, when she clicks that link, the item is added to her 1Password vault.
This technique is handy but not especially secure—that long string of characters obfuscates your username, password, and other item details but doesn’t encrypt them, and it wouldn’t take a great deal of cleverness to reverse the obfuscation scheme. For that matter, anyone with 1Password who got a copy of that URL could easily add the item to his copy of the app. And, if you should change the password in your copy of 1Password, you’d have to share it again in order for the other person’s copy to be updated.
Import & Export Data
You might want to import passwords from a spreadsheet or other password manager, and you might export to move to a different password manager (perish the thought!) or as an extra backup. As of version 4.3, 1Password for Mac can import data in comma-delimited text (.csv), LastPass (.csv), SplashID (.vid), or proprietary 1Password Interchange Format (.1pif) files, and it can export data as comma-delimited text, tab-delimited text (.txt), or .1pif files. The Windows version supports importing .1pif and .csv too, as well as RoboForm Passcards Export format, and it can export data in comma-delimited or tab-delimited text (.txt) files.
Note: 1Password can’t import from or export to Apple’s Keychain format, unfortunately, due to restrictions put in place by Apple.
Import
To import data, choose File > Import. Choose a file type from the File Format pop-up menu, navigate to the file with the data you want to import, and select it. For comma-delimited and LastPass files, also choose which category of data the file contains from the Import As pop-up menu (the choices are Login, Credit Card, Software License, and Secure Note). Now click Open. When importing delimited text files in Windows, a dialog appears listing columns (or field names) such as Title, Username, and Password, with a pop-up menu for each. Use these menus to match up 1Password’s fields as best you can with the field names in the text file, and click OK. 1Password merges the new data with what’s already in your vault.
Tip: To learn more about formatting .csv and .txt files for importing into 1Password, read the support article How can I import data from another application? on the AgileBits Web site.
Export
To export data on a Mac, select the items you want to export (unless you want to export everything) and choose File > Export > Selected Items or File > Export > All Items. Enter your master password when prompted to do so and click Continue. In the dialog that appears, give the file a name, choose a location, and choose your desired format from the File Format pop-up menu. (If you choose Comma Delimited Text (.csv) or Tab Delimited Text (.txt), also choose whether to export only Common Fields or All Fields; optionally select Include Column Labels to make it easier to tell which field means what; and rearrange the fields if you like.) Then click Save.
To export data on a PC, select the items you want to export (unless you want to export everything) and choose File > Export. From the Format pop-up menu, choose the format you want to use. Then select either All Logins or Selected Logins (“logins” here really means “items”). Click OK. Give the file a name, choose a location, and click Save.
Print 1Password Data
AgileBits originally resisted adding printing to 1Password 4, and I don’t blame them—by printing your passwords, you give up all the security of 1Password’s strong encryption! However, users demanded printing, so AgileBits obliged. Thus, you can print your passwords if you must, but please do so only if absolutely necessary—and preferably, only with individual items, not everything.
To print an individual item, select it and choose Item > Share > Print.
To print everything, choose File > Print, enter your master password, and click Continue.
All materials on the site are licensed Creative Commons Attribution-Sharealike 3.0 Unported CC BY-SA 3.0 & GNU Free Documentation License (GFDL)
If you are the copyright holder of any material contained on our site and intend to remove it, please contact our site administrator for approval.
© 2016-2026 All site design rights belong to S.Y.A.