Take Control of 1Password (1.2.1) (2014)
Chapter 6. Search & Organize Your 1Password Items
Over time, you’ll store hundreds—maybe thousands—of things in 1Password. But they’re only useful to you there if you can find them quickly and easily when you need to. So in this chapter, I review many of the ways in which you can search, organize, and view your 1Password items. I also tell you how to work with multiple vaults, a new feature in 1Password 4 for Mac and iOS.
But, before I get into any of this, I want to share my Professional Opinion, which is that you should ignore most of the features discussed in this chapter. I’m going to emphasize this point by putting it in a nice bold heading:
Make Your Life Simpler
In the next several pages, I’m going to tell you about folders, tags, favorites, advanced searches, smart folders, and all sorts of other tools that you could use to manage your 1Password data. But you don’t have to use any of them, and most people—even power users—will merely waste time and effort in the care and feeding of information that can take care of itself.
I have well over 1,300 items in my copy of 1Password (including more than 600 logins), accumulated over about 7 years. I don’t use folders, tags, or favorites—a simple search virtually always turns up exactly what I’m looking for—and I feel as though the time I could pour into organizing and categorizing would be better spent doing something enjoyable or enriching.
So, before you do any organizing at all, try using 1Password for a while without it, merely searching (see Perform a Basic Search) for what you need. If you find that searching isn’t cutting it for you, then start using the other tools—slowly. Don’t overdo it just because you can.
Nevertheless, even if you take no action now, you should be aware of what 1Password can do—especially how it sorts and displays your data—so you’re never confused about where something may be.
Understand the Sidebar Sections
1Password’s sidebar (Figure 20) lets you filter the display of your stored items in the main list. Click an item in the sidebar, and only the matching items show up in the list.
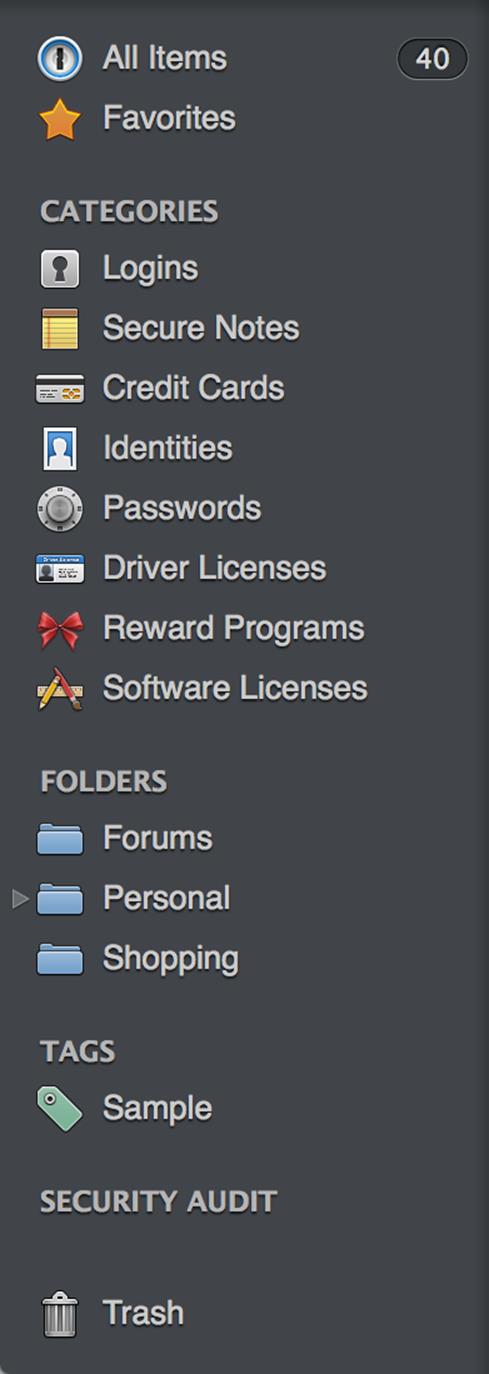
Figure 20: The sidebar in 1Password for Mac. (The Windows version is a bit different.)
Here’s what you’ll find in the sidebar:
· All Items (Mac only): Click here to see all items, from all categories, except those in the Trash.
· Favorites (Mac only): You can manually mark your most important 1Password items (of any sort) with a star to designate them as favorites. See Use Favorites.
· Categories: For each type of item you’ve stored in 1Password (such as logins, secure notes, credit cards, and stand-alone passwords) you’ll see the corresponding category listed in the sidebar. 1Password shows several common categories by default, even if you don’t have any items yet, but less-used categories (such as Memberships and Outdoor Licenses) appear only after you add items in those categories.
You can’t add your own categories, rename categories, or change which category an item belongs to. That’s because each category corresponds to one of 1Password’s built-in templates; they’re not merely arbitrary labels. (That’s what tags are for, as we’ll see in a moment.) However, on a Mac, you can drag any category up or down in the list to change its position.
Note: The Wallet group in Windows, which was also used in earlier versions of 1Password for Mac, no longer appears in 1Password 4 for Mac, although Credit Cards (and most other wallet items) still do. Similarly, while 1Password for Windows has an Accounts group (with subtypes for various services), 1Password 4 for Mac uses Logins for account types that don’t fit into one of its other categories.
· Folders: Like folders in the Finder or Windows Explorer, folders in 1Password (see Use Folders & Tags, ahead in this chapter) let you organize any or all of your items in a hierarchy. An item can go in only one folder, and you can nest folders if you like.
You can hide all the folders by hovering over the Folders label with your pointer and clicking Hide; display them again by clicking Show (in the same spot).
· Smart folders: Although not shown in Figure 20 (earlier), if you have any smart folders, they appear in the Folders group in the 1Password sidebar on a Mac, or above Trash on a Windows PC. They’re not really folders but rather saved searches. For example, you could do an advanced search for all logins created within the last 30 days and save it as a smart folder; its contents would change dynamically. See Perform an Advanced Search and Use Smart Folders, later in this chapter.
· Tags (Mac only): Tags (see Use Folders & Tags, ahead in this chapter) are words or phrases you create to describe items that share some characteristic. Whereas folders contain items, tags label items. So an item can be in only one folder at a time, but may have multiple tags (such as Work, Important, and Marketing).
As with folders, you can hide all the tags by hovering over the Tags label with your pointer and clicking Hide; display them again by clicking Show (in the same spot).
· Security Audit: This built-in set of smart folders identifies weak, duplicate, and old passwords (see Perform a Password Security Audit). These smart folders are hidden by default; you can display them by hovering over the Security Audit label and clicking Show; hide them again by clicking Hide (in the same spot).
· Trash: Just as in the Finder or Windows Explorer, the Trash holds items you delete until you’re sure you’ll never need them again, at which point you can empty the Trash, deleting them permanently. Read Use the Trash, later in this chapter, for details.
· Additional Windows categories: In the Windows version of 1Password, two other items may appear in the sidebar depending on whether the corresponding command is checked in the View menu:
§ Generated Passwords: 1Password remembers every password that you create and copy or fill in. That way, if you ever create a password but don’t save it in a login or other item, you still have a safety net that lets you retrieve it. I say more about the password history in Work with Previously Generated Passwords.
§ Duplicated Passwords: This sidebar entry filters the display to show only items that share their password with at least one other item. I discuss this further in Find Duplicate Passwords.
Use Favorites
If you have a few items in 1Password that you use frequently and want to be able to find as quickly as possible, you can mark them as favorites. This feature (not currently available in Windows) identifies important items with a star and displays them in the Favorites category, which appears at the top of your sidebar, at the top of the list in 1Password mini, and in a prominent spot in 1Password for iOS.
To mark an item as a favorite, select it in the main 1Password app and click the star ![]() icon under its name. (It’s unnecessary to click Edit first.) To remove the item from your list of favorites, click the star icon again.
icon under its name. (It’s unnecessary to click Edit first.) To remove the item from your list of favorites, click the star icon again.
There’s nothing more to say about favorites, but I’ll give you one piece of advice: use this feature sparingly. If you have more than a handful of favorites, they’ll get lost in the list, defeating the purpose. If you need to identify a larger number of frequently used items, folders or tags are a better choice.
Use Folders & Tags
Folders let you organize your 1Password items into a fixed hierarchy, if you find that useful. (Let me reiterate here that for many users, creating folders is wasted effort.) Any item can go in only one folder at a time, although you can choose to put only some items in folders and leave the rest uncategorized.
Tags (currently available in the Mac version but not for Windows) serve much the same purpose but address a different mindset. They let you identify items that share certain characteristics, but they don’t impose a structure—an item can have multiple tags at once. (And yes, an item can be in a folder and have tags at the same time.)
You’re free to use folders, tags, both, or (my personal preference) neither. If you like the rigid organization of everything in its place, folders may be to your liking. If you prefer freeform, overlapping categories (like labels in Gmail), you might be more of a tagger. Feel free to experiment to find what works best for you.
Work with Folders
To create a new folder, choose File > New Folder and type a name. You can move folders into other folders by drag-and-drop, and rename them by right-clicking (or Control-clicking) them and choosing Rename from the menu. To delete a folder, select it and press Delete—but pay attention, because deleting a folder also deletes its contents.
To add an item to a folder, drag it to that folder’s icon. To remove an item from a folder without putting it in another folder, right-click (or Control-click) it and choose Remove from Folder from the menu.
You can also add a newly created or updated item to a folder right in the Save Login or Update Login dialog—choose the folder from the Folder pop-up menu before clicking Save or Update.
Note: Folders are entirely independent of categories. That is, putting something in a folder doesn’t keep it from showing up in its usual category.
Work with Tags
To make a new tag, select an item and click Edit. Click in the Tags field and type a word or phrase, followed by Return. Then click Save. Newly created tags appear under Tags in the sidebar.
To apply an existing tag, once again go to the Tags field and begin typing the tag’s name. 1Password displays matching tags in a pop-up list, from which you can select a tag with the arrow keys or pointer to apply it to the item. Alternatively, you can apply an existing tag by dragging any item in your list to a tag in the sidebar.
You can also tag a newly created or updated item from within the Save Login or Update Login dialog—type the tag(s) in the Tags field before clicking Save or Update.
To delete a tag (which removes it from all items that used it), select the tag in the sidebar and press Delete. To rename a tag, select it in the sidebar, press Return to make it editable, type a new name, and press Return again. Tags can’t currently be reordered in the sidebar; they’re always in alphabetical order.
Switch Layouts
1Password offers multiple layouts (or views). You can switch between them by choosing either Left or Top from the View > Item List Layout submenu. (You can see the default layout in The 1Password App, Figure 1.) The Top layout (Figure 21) presents 1Password data as a table, with multiple columns you can move, resize, or sort by, just as in any OS X table view. Item details are shown in a pane at the bottom, and you can drag the divider bar up or down to vary how much room is allotted to each portion of the window.
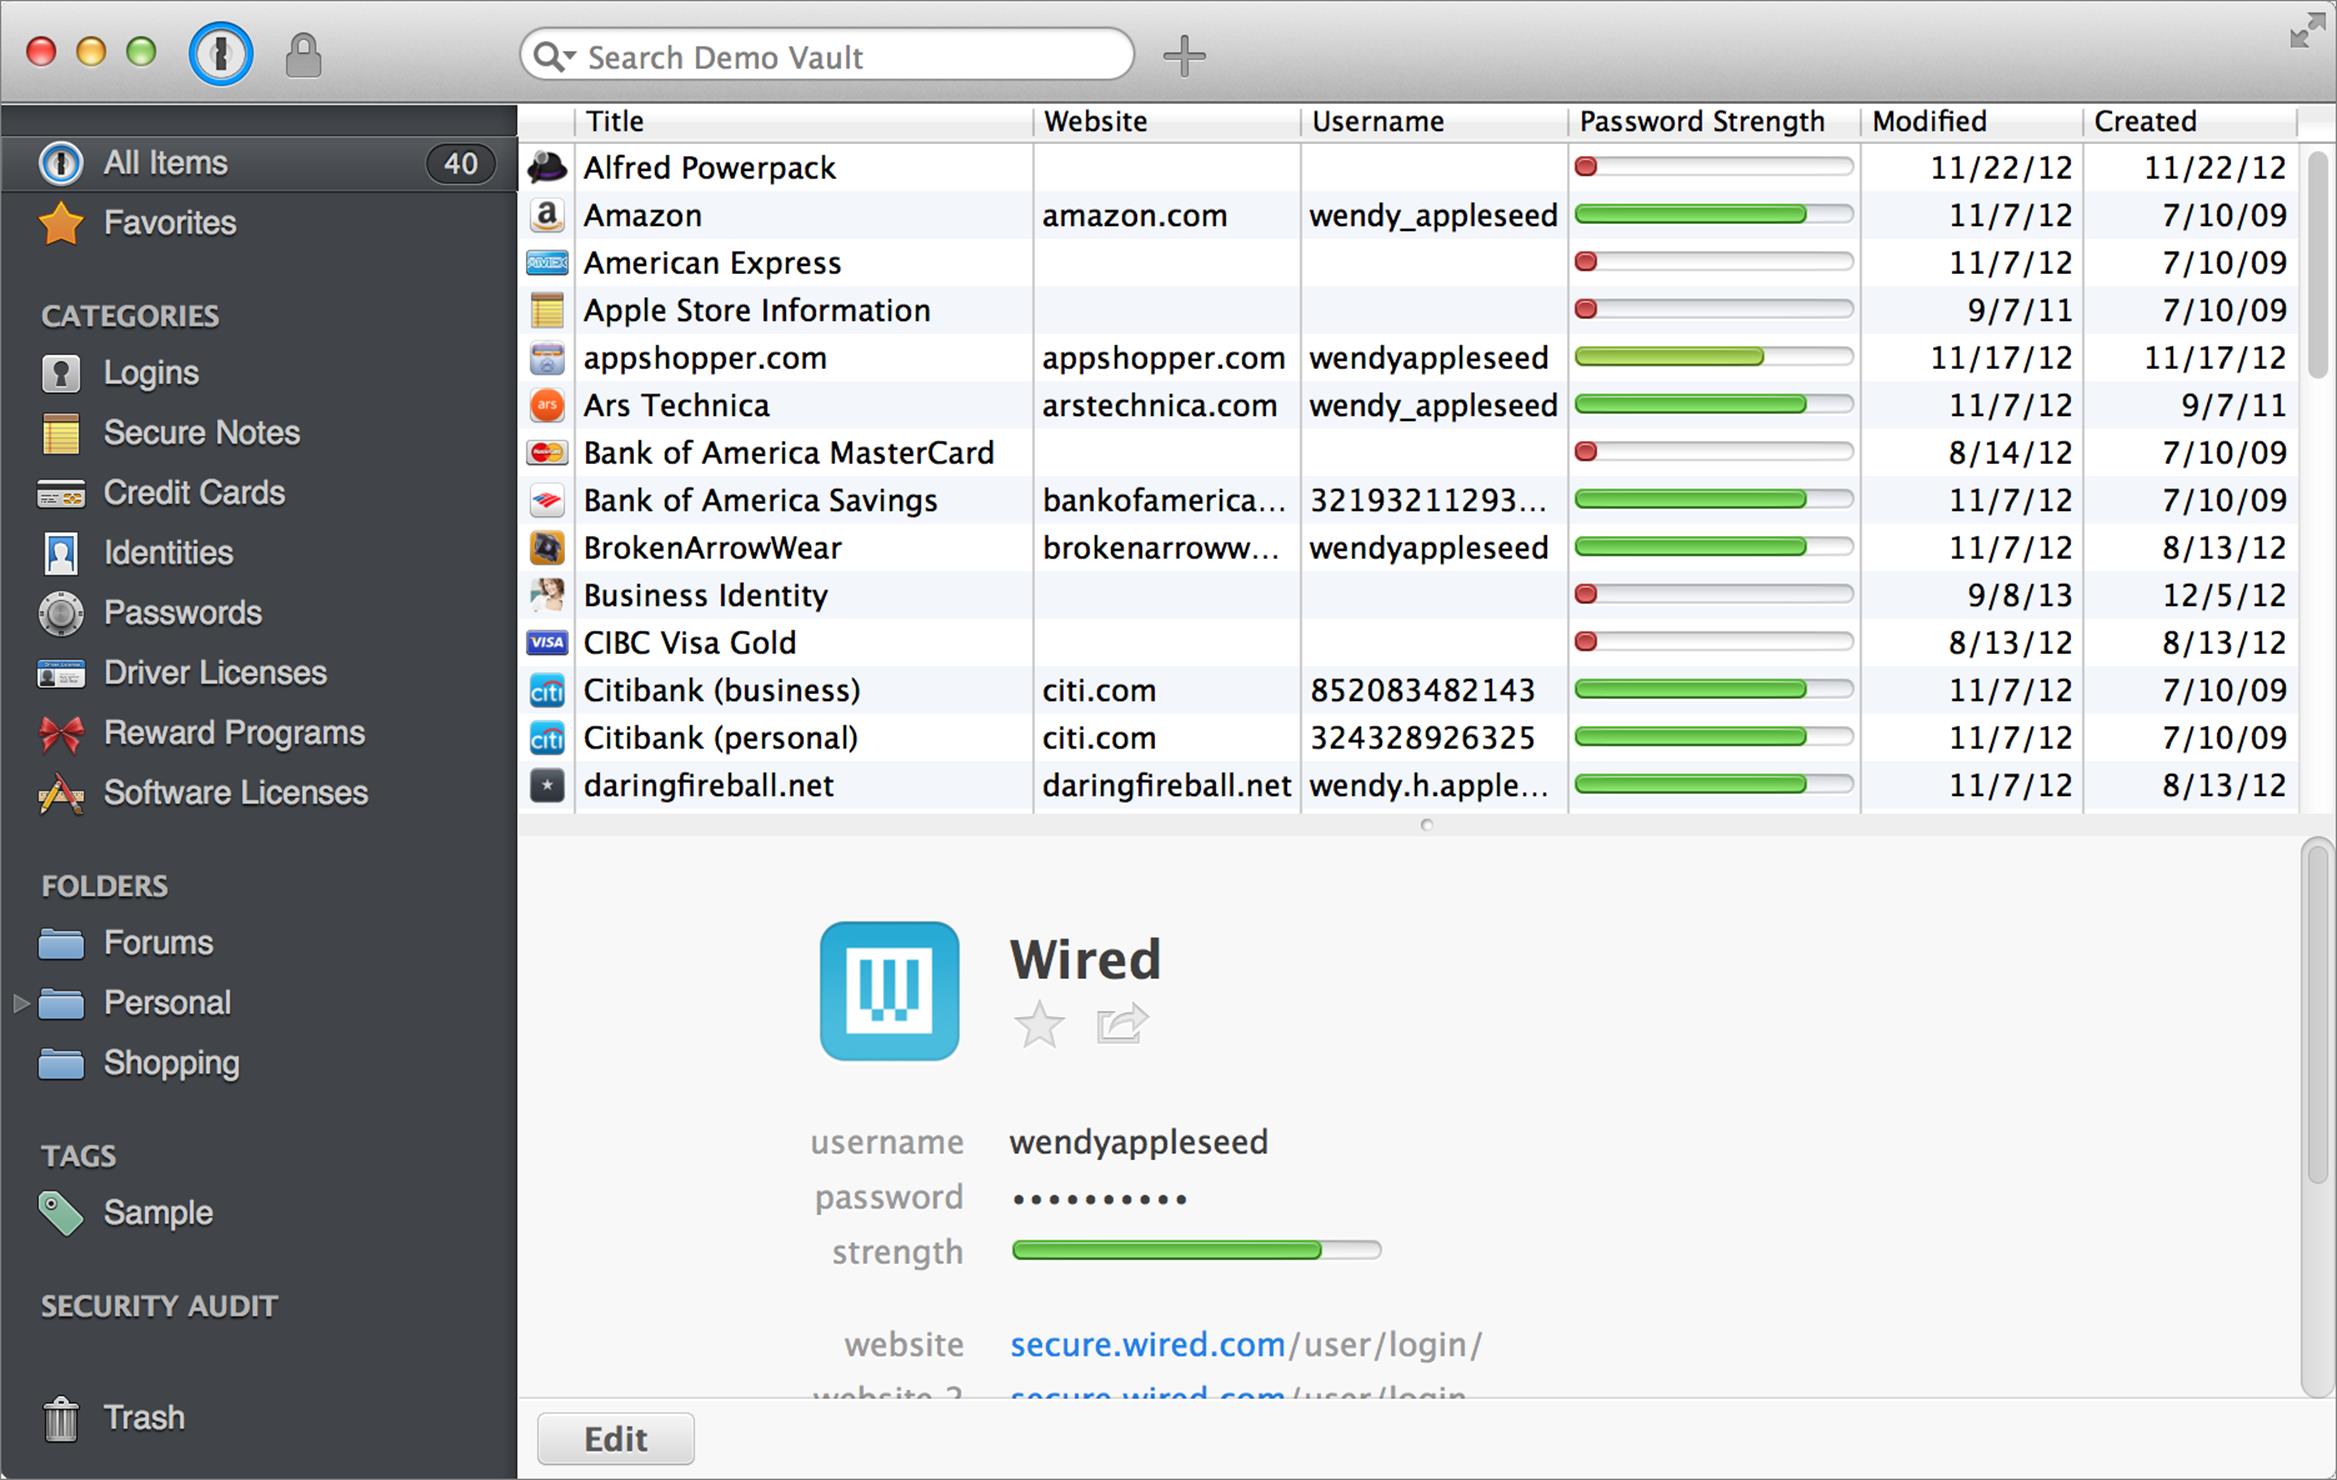
Figure 21: Switch to the Top layout and you can see a tabular representation of the 1Password data that’s selected in the sidebar.
Adjust the Sort Order
Your sorting options vary depending on your version of 1Password and which layout you’re using:
· On a Mac in the default Left layout, the items in 1Password’s main list are initially sorted by title, in ascending alphabetical order. To change the sort order, click the tiny heading above the main list (for example, ![]() “27 items sorted by Title”) to display a pop-up menu (Figure 22) with other sort options, which vary according to the type(s) of item you’re viewing. You can choose various sort criteria, such as Category, Date Created, and Password Age. You can also reverse the sort order by choosing Alphabetically Reversed (or a comparable command, such as Oldest to Most Recent) from the bottom of the menu.
“27 items sorted by Title”) to display a pop-up menu (Figure 22) with other sort options, which vary according to the type(s) of item you’re viewing. You can choose various sort criteria, such as Category, Date Created, and Password Age. You can also reverse the sort order by choosing Alphabetically Reversed (or a comparable command, such as Oldest to Most Recent) from the bottom of the menu.
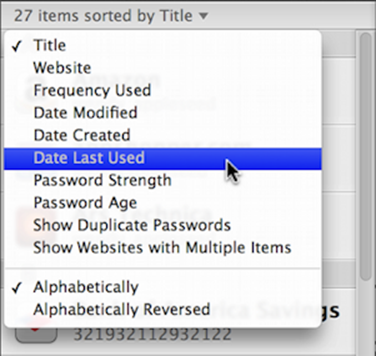
Figure 22: The subtle Sort Order pop-up menu (shown here as it appears for Logins) has lots of useful sorting options.
Although most of these sorting options are self-explanatory, I’ll call your attention later to a few that you may find especially useful.
· On the Mac in the Top layout shown a page or so previously, in Switch Layouts, you can click any column header to sort by that column; click a second time to reverse the sort order.
· In Windows, 1Password displays your items in a simple table view. Click a column heading to sort by that column; click it again to reverse the sort order.
Perform a Basic Search
Most of the time, you can find any item in 1Password by typing a few letters of the item’s title or domain name in the Search field. (If you have more than one vault, the Search field displays the name of the current vault so you know where you’re searching.) Matching results are displayed instantly. However, the details of where and how 1Password searches depend on where you’re conducting the search.
Search in the Main Mac App
When you open and unlock the main 1Password app, you can begin typing immediately to search your items—no need to manually click in the Search field. I’ve always found that to be a handy and thoughtful convenience feature.
When you use the Search field on a Mac, 1Password always searches your entire vault, regardless of what category or folder you may have selected. There are two search modes—Title only and All Fields. You can switch between them by clicking the tiny arrow on the left side of the Search field and choosing either Search Title or Search All Fields from the pop-up menu.
With the Search Title option, 1Password restricts its search to items’ Title fields (as you might expect). However, if a search doesn’t yield the results you’re looking for, you can go to the bottom of the item list in the Left layout view and click the Expand Search to All Fields button.
With the Search All Fields option (whichever way you apply it), 1Password searches all the fields in most items, including titles, usernames, passwords, Website fields, credit card numbers, identities software version numbers, and secure notes. Searches do not, however, include the license keys for software.
Search in 1Password mini
The Search field in 1Password mini on a Mac works much like the Search field in the main app; as of version 4.3, it can search all fields. However, it searches only titles and fillable URLs by default. To search all fields, click the tiny triangle on the left side of the search field and choose Search All Fields from the pop-up menu.
Search in the Windows App
To search 1Password in Windows, click the Find button on the toolbar and then type in the Search field. 1Password searches within titles, usernames, credit card numbers, and Website fields (in which case, unlike in OS X, it searches the full URL)—though not software version numbers.
Ordinarily, 1Password for Windows doesn’t search passwords or the contents of secure notes, but you can select the Include Notes and Passwords in Search (Slower) checkbox to do so, and as the label suggests, it does take longer to search those items.
Perform an Advanced Search
I find basic searches to be adequate nearly all the time, but if you have a large number of items in 1Password and need greater specificity, the Advanced Search feature (Mac only, at this point) can help. To perform an advanced search, do any of the following:
· Choose Edit > Find > Show Search Options.
· Press Command-Option-Control-F.
· Click the tiny arrow on the left side of the Search field and choose Show Search Options from the pop-up menu.
· Choose File > New Smart Folder.
When you do any of these things, additional controls (Figure 23) appear below the toolbar.

Figure 23: An advanced search gives you additional controls.
Initially, except when you use the File > New Smart Folder command, you’ll see only the first two rows; click the plus ![]() button on the right side to add a search criterion, such as the [Title] [begins with] row shown above.
button on the right side to add a search criterion, such as the [Title] [begins with] row shown above.
If you’ve used a smart folder in the Finder, a smart playlist in iTunes, or a smart mailbox in Mail, this interface should look familiar—you can build complex statements describing what you’re looking for. I won’t cover all the details because they’re largely self-explanatory, but the key features are:
· Where to search: From the Search pop-up menu at the top, choose All Items or a specific category, such as Logins or Secure Notes.
· All or any (or none): If you have two or more search criteria, use the pop-up menu to specify whether a match occurs if any of the criteria are met, or all of them are. There’s also a none option, to find all the items that don’t match your search criteria.
· Fields and matches: You can choose from dozens of fields in the pop-up menu shown as [Title] in Figure 23 (above). Depending on what you choose there, you’ll have various options in the second pop-up menu in that row, and often a text field. This allows you to create search criteria such as [Title] [contains] Apple, [Updated (day ago)] [is greater than] 5, or [Number of URLs] [is less than or equal to] 3.
You can add more criteria to narrow the search further by clicking the plus ![]() button on the right side.
button on the right side.
As soon as you fill out this form and press Tab, 1Password displays matching results.
If you want to save this search so you can repeat it later with a click, click the Save button and type a name. 1Password turns your search into a smart folder, which appears in the sidebar.
Use Smart Folders
Once you’ve saved an advanced search as a smart folder, you can click the smart folder in the sidebar to display current matching results.
You can rename a smart folder by selecting it, clicking it again, and then pausing a moment until the name field becomes editable. (You can also right-click or Control-click it and choose Rename.) To delete a smart folder, select it and press the Delete key—or right click (or Control-click) it and choose Delete—and click Delete to confirm.
To edit an existing smart folder, select it in the sidebar and then choose Edit > Find > Show Search Options, press Command-Option-Control-F, or click the tiny arrow on the left side of the Search field and choose Show Search Options from the pop-up menu. The advanced search controls appear, with the criteria from your smart folder already entered. You can then adjust them to your liking and click Save.
Work with Previously Generated Passwords
When you use 1Password to generate a new password, most of the time you’ll save it in a login item right after you fill it in on a Web page—or, if it’s a stand-alone password, you might create it and name it within the 1Password app. But if you forget to save a login, if a Web site doesn’t trigger the automatic login saving feature for some reason, if you create a new password in 1Password mini and forget to edit its title later, or if any other user or computer error occurs, you may find yourself not knowing the password you picked. So 1Password builds in safeguards to retain your generated passwords, just in case.
The weird thing is, 1Password has up to three independent places for storing previous passwords, and it may not be obvious where to look for any particular password.
The three places are as follows:
· Passwords (Mac)/Generated Passwords (PC): This sidebar category in the main 1Password app and 1Password mini lists every password that you’ve created and (successfully) filled or copied in 1Password mini (on a Mac) or in a browser extension (PC), as well as any passwords you’ve created in the main 1Password app with the File > New Item > Password command. Each password appears as a separate (and editable) item. In the main 1Password app on a Mac, to convert one of these to a login (in order to add fields such as Username), click Convert to Login.
· Individual login (and other) items: If you save a login item (or other item that includes a password, such as an email account), and later change its password in the main 1Password app (see Update Old Passwords), you can to view the passwords previously used for that login. To do this on a Mac, select the item and click the Previously Used Passwords button. Previous passwords appear in a pop-up view. In Windows, the Password History for each login appears at the bottom of the item’s details in the main list view.
· 1Password mini (Mac only): Starting in version 4.2, 1Password mini gives you access to the same previous passwords for each login item as in the main 1Password app. To access them, go to a signup or sign-in Web page for which you previously generated a password in 1Password mini. Then display 1Password mini by clicking the 1Password key ![]() icon in the menu bar or by pressing Command-Option-\, hover over the login name or select it with your arrow keys, and in the pop-up window (Figure 24) click Show Previously Used Passwords to see previous passwords for that site. Click one (or select it with the arrow keys and press Return) to copy it.
icon in the menu bar or by pressing Command-Option-\, hover over the login name or select it with your arrow keys, and in the pop-up window (Figure 24) click Show Previously Used Passwords to see previous passwords for that site. Click one (or select it with the arrow keys and press Return) to copy it.
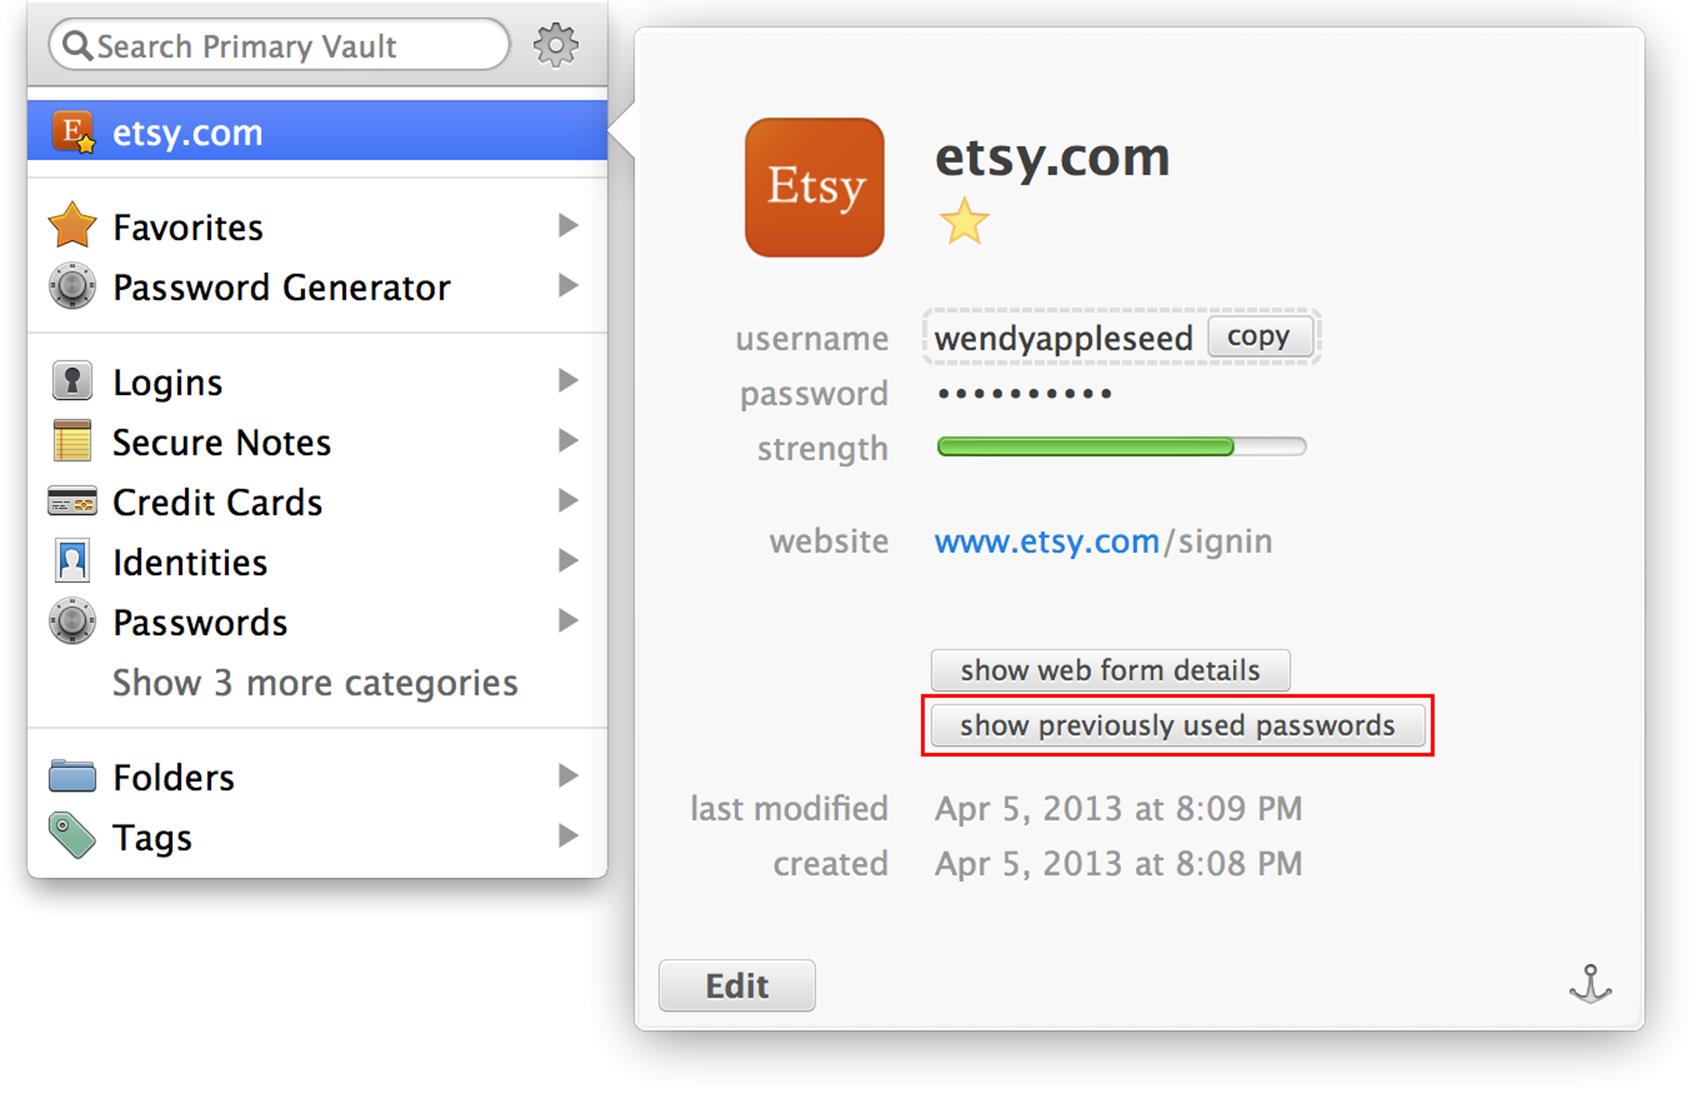
Figure 24: 1Password mini’s detail view has a button that displays previous passwords for the current site.
Tip: In some situations, you might generate a password separately from creating a login item, such that your vault now has two entries for the same password, one of which (the stand-alone password) is now redundant. To get rid of those superfluous password items on a Mac, choose Help > Tools > Remove Redundant Generated Passwords, and then click Move to Trash.
Use the Trash
When you delete an item in 1Password, it goes into 1Password’s private Trash area. Just like the Trash in OS X or the Recycle Bin in Windows, this lets you retrieve items later if need be (just drag them out of the Trash). Items in the Trash behave as they do elsewhere in 1Password, except when it comes to searching. On a Mac, searches in 1Password never match items in the Trash. On a PC, you can search in the Trash only when Trash is selected in the sidebar.
If you’re sure you won’t need the items in your Trash anymore, you can delete them permanently by choosing 1Password > Empty Trash (on a Mac) or File > Empty Trash (on a PC). Click OK to confirm.
Work with Multiple Vaults
A new feature in 1Password 4 for Mac and 1Password 4.5 for iOS—not yet available for Windows or Android—is support for multiple vaults. Although most users should find a single vault adequate for their needs, some people may want to compartmentalize their data. For example, you might want to have separate home and work vaults, or personal and family vaults. Or you may want an “archive” vault to store items you no longer actively use but don’t want to lose entirely.
Tip: This section mainly covers multiple vaults on a Mac; to learn more about multiple vaults on an iOS device, see Use Multiple Vaults in iOS.
Each vault can have its own password and can sync its own way. One benefit of this arrangement is that you can put passwords other people need to access in a shared vault that syncs among users (for example, in Dropbox) while keeping your passwords and other data in a private vault. (I discuss sharing vaults later, in Share 1Password Data.)
To create a new vault in 1Password on a Mac, choose 1Password > New Vault (Figure 25). Give the vault a name, type and repeat a master password for this vault, and enter an optional hint. But before you continue, you may want to customize the vault’s icon.
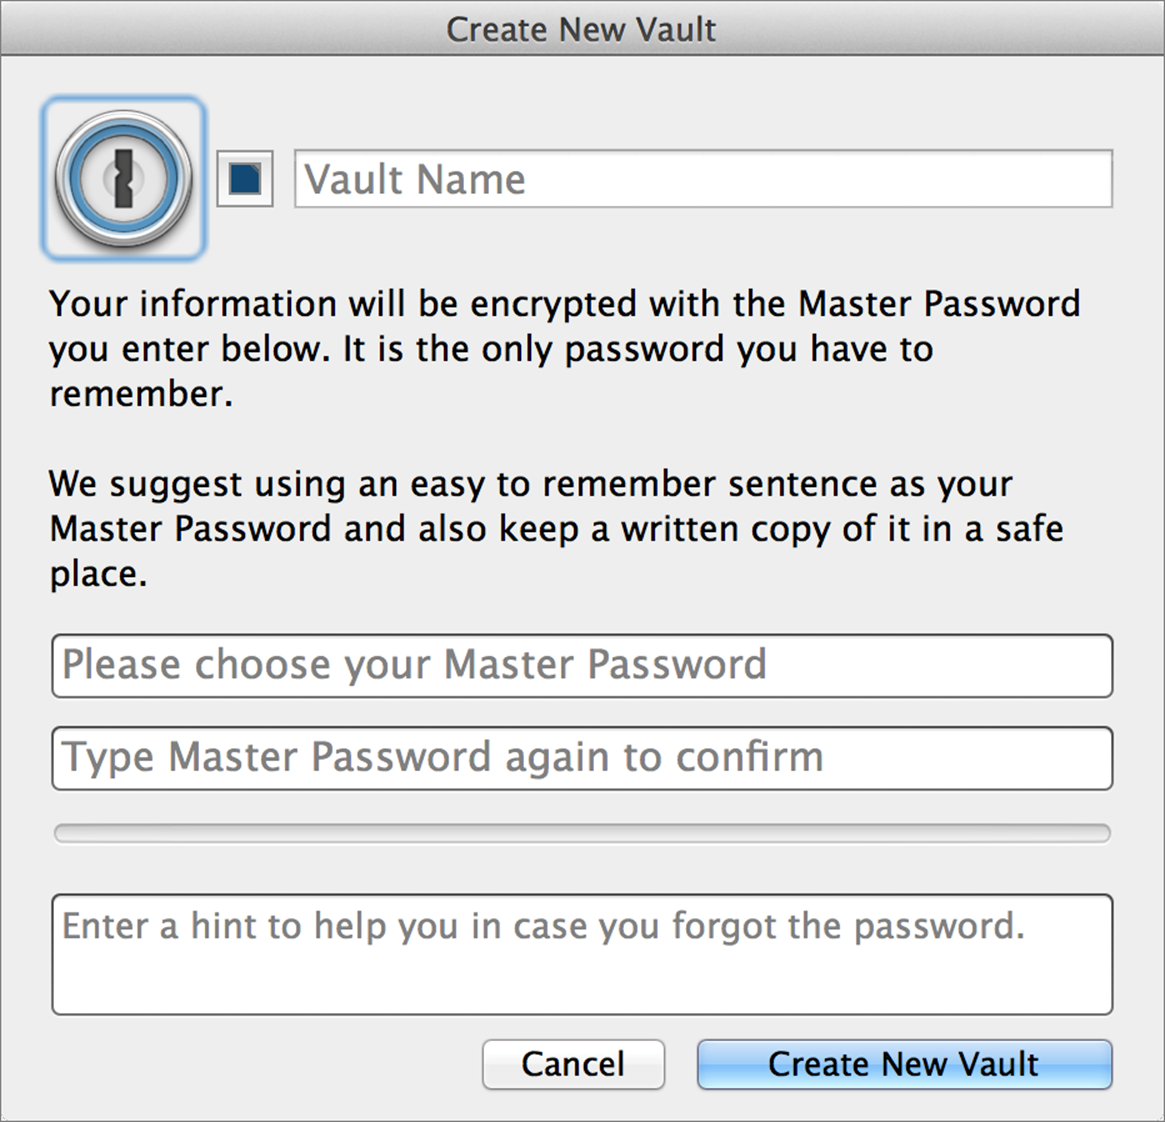
Figure 25: Choose the options for your new vault in this dialog.
You can change the color of the (normally blue) ring around the 1Password icon, replace the icon entirely with a picture of your choice, or both. To change the ring color, click the colored square between the icon and the Vault Name field, and then click a color in the color picker palette that appears. To change the entire icon, double-click it and then follow the procedure I explained in Add Custom Icons.
When you’re done customizing your vault, click Create New Vault.
Note: In version 4.4, you can’t edit a vault’s settings (including name and icon) after you create it. AgileBits plans to add this capability soon, but I don’t yet know what the process will be.
You can switch among vaults in any of these ways:
· Choose a different vault from the 1Password > Switch to Vault submenu, which is available even when 1Password is locked.
· Use a keyboard shortcut (as shown on the 1Password > Switch to Vault submenu)—Command-1 for your primary vault, Command-2 for the next one in the list, and so on.
· Click the vault icon in the 1Password toolbar (left of the lock ![]() icon) and choose another vault from the pop-up menu. The vault toolbar icon appears only if you have multiple vaults, and its appearance depends on whether the current vault has a custom icon.
icon) and choose another vault from the pop-up menu. The vault toolbar icon appears only if you have multiple vaults, and its appearance depends on whether the current vault has a custom icon.
· Click the vault icon in 1Password mini. This icon appears in the upper right when 1Password is unlocked, and above the password field when it’s locked.
Tip: When 1Password is locked, the master password field indicates which vault is active (and about to be unlocked, unless you switch). In the main 1Password app, the master password field says “Unlock Vault Name,” and in 1Password mini it just says “Vault Name.”
You can tell which vault is currently active even if you didn’t assign a custom icon, because its name appears in the Search field in the 1Password app and 1Password mini (for example, “Search Primary Vault” or “Search Family Vault”). It’s important to keep track because you can search and fill items only from the current vault. If you’re on a Web page for which you’ve saved a login and your credentials don’t appear when you press Command-\, a different vault may be active.
The vault you created when you first set up 1Password is your primary vault; other vaults are secondary. Although each vault has its own password, when you enter the master password for the primary vault, 1Password unlocks all your secondary vaults too. When 1Password locks (manually or automatically), all your vaults lock. However, if 1Password is locked, and you choose and unlock a secondary vault, only that vault unlocks.
Note: At present, launcher utilities such as LaunchBar, Alfred, and Quicksilver (see Launcher Utilities) can access only your primary vault, regardless of which one is active.
Initially, new secondary vaults you set up are stored only on your Mac. To sync them with other devices, make sure the secondary vault is active and follow the steps in Set Up Syncing. (The Sync pane of 1Password’s Preferences window applies to the currently active vault.) Note, however, that if your goal in syncing a secondary vault is to share it with someone else, you must use either Dropbox or folder sync. I explain this further in Share 1Password Data.
You can copy or move items from the current vault to another vault. To do so, select one or more items, choose Item > Share > Vault Name, and click Copy or Move, as you prefer. Be aware, however, that each vault stores its own, independent copy of those items, so if you edit an item in one vault (for example, changing a password) that won’t affect the corresponding item in any of your other vaults.
To delete a secondary vault, make sure it’s active, choose 1Password > Delete Vault Name Vault and click Delete Vault.
Tip: If you choose 1Password > New Demo Vault and click Create Demo Vault, you create a special vault full of fake sample data (such as what I’ve shown in this book) so you can demonstrate it to your friends without revealing any of your personal information! Use the password demo to unlock the Demo vault.
All materials on the site are licensed Creative Commons Attribution-Sharealike 3.0 Unported CC BY-SA 3.0 & GNU Free Documentation License (GFDL)
If you are the copyright holder of any material contained on our site and intend to remove it, please contact our site administrator for approval.
© 2016-2026 All site design rights belong to S.Y.A.