50 Android Hacks (2013)
Chapter 7. Useful libraries
In this chapter, we’ll cover two third-party libraries. The first one lets you use aspect-oriented programming inside an Android application. The second is a game framework. We’ll walk through what’s possible when you add them to your application.
Hack 31 Aspect-oriented programming in Android: Android v1.6+
Have you ever tried to add analytics, ads, and logs to an Android Activity? If you have, you know that your class can get polluted with a lot of code that has nothing to do with your Activity’s logic. In this hack, you’ll see how to solve this issue using aspect-oriented programming (AOP). As an example, we’ll add a log statement to the Activity’s onCreate() method using AOP to make sure that the Activity doesn’t get polluted.
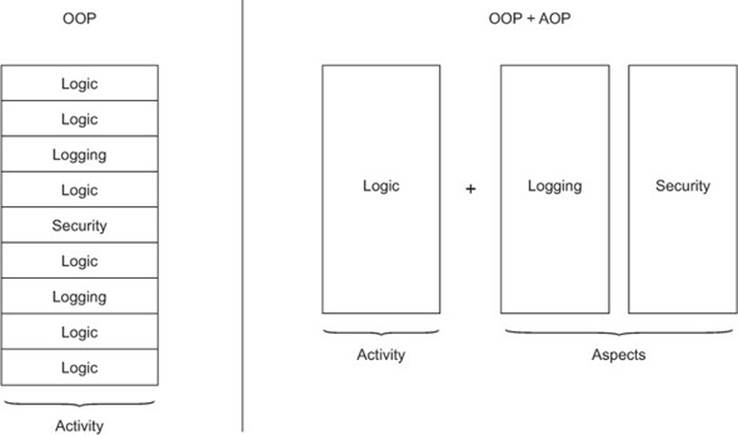
Aspect-oriented programming is a programming paradigm that aims to increase modularity by allowing the separation of cross-cutting concerns. Here’s a basic idea of how all of this works: we specify our cross-cutting concerns in a separated module (aspect), and we place the code that we want to be executed (either before or after our cross-cutting concern) in the separate module or modules. Figure 31.1 illustrates this concept.
Figure 31.1. AOP modularity
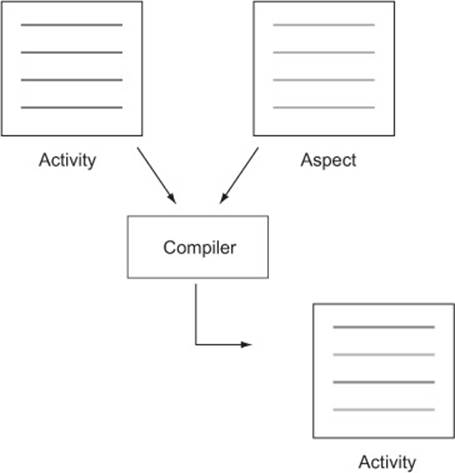
Inside Android, AOP can be implemented using a library called AspectJ. Since Android doesn’t support bytecode generation, we can’t use all the AspectJ features. One AspectJ feature that works in Android is called compile-time weaving. To understand how this works, you first need to understand when it happens. AspectJ will modify our code after it’s compiled to bytecode and before it’s converted to dex. There it’ll take care of adding the additional code to our cross-cutting concerns. See figure 31.2.
Figure 31.2. Building with AOP
To make AOP work, we’ll need to modify the build procedure. In this case, we’ll use Apache Maven because then we only need to add some dependencies to a pom.xml, and a build plugin makes everything extremely simple.
The Apache Maven plugin we’ll use is called aspectj-maven-plugin.
Let’s take a look at the aspectj-maven-plugin configuration inside the pom.xml build section:
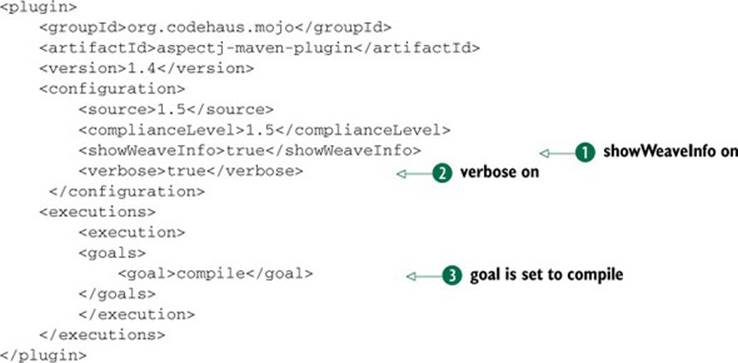
While developing aspects, turn the showWeaveInfo ![]() and verbose
and verbose ![]() flags on. This will log information about the weaving process, helping us understand how everything gets applied. Using compile
flags on. This will log information about the weaving process, helping us understand how everything gets applied. Using compile ![]() as goal tells the plugin to weave all the main classes. If we need to weave our test classes as well, we’ll need to add <goal>test-compile</goal>.
as goal tells the plugin to weave all the main classes. If we need to weave our test classes as well, we’ll need to add <goal>test-compile</goal>.
Because we didn’t specify a path for the code, the AspectJ plugin will look for files inside the src/main/directory. There we’ll create a java directory for the Java source code and an aspect folder for the aspects.
We’ve configured everything to start using AspectJ in our project. Because we want to clean our Activity from logs, we’ll now create a log aspect. We have two possibilities for creating an aspect: the AspectJ language syntax and the @AspectJ annotation style. The big difference is that the language syntax should be easier to write aspects in, since it was purposefully designed for that, whereas the annotation style follows regular Java compilation. Because we’re not doing something huge and our aspect is simple, we’ll use the annotation style.
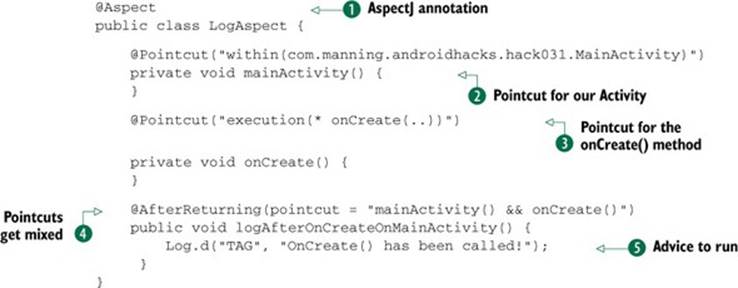
Inside the aspect folder is a file, LogAspect.java, that describes the aspect:
If you haven’t used AspectJ, here’s a small reference for understanding the code:
· A join point is a well-defined point in the program flow.
· A pointcut picks out certain join points and values at those points.
· A piece of advice is code that’s executed when a join point is reached.
Because we chose to use the annotation style, we’ll need to annotate the class with @Aspect ![]() . The first two methods from the class are annotated with @Pointcut. In this example, the first one creates a pointcut for our MainActivity
. The first two methods from the class are annotated with @Pointcut. In this example, the first one creates a pointcut for our MainActivity ![]() class and the second one for any method that is called onCreate()
class and the second one for any method that is called onCreate() ![]() . The third method is an advice. Because we’ve annotated it with @AfterReturning, the advice runs when the matched method execution returns normally. Note how the mainActivity() and onCreate pointcuts are mixed with an &&
. The third method is an advice. Because we’ve annotated it with @AfterReturning, the advice runs when the matched method execution returns normally. Note how the mainActivity() and onCreate pointcuts are mixed with an && ![]() . When you reach that join point, the advice code will get executed
. When you reach that join point, the advice code will get executed ![]() .
.
There’s more than one way to describe a join point. In the example, we mix two pointcuts, but you can easily find other ways of doing the same thing. Depending on what you want to achieve, you’ll need to start playing with pointcuts and advices.
31.1. The bottom line
In this example, you saw how to use AspectJ’s compile-time weaving to add logs to a method call inside an Activity, but imagine what’s possible. Don’t limit yourself to thinking that AOP is a way of moving lines of code to a different class. Go though your application design and analyze how this approach could improve your code modularity.
31.2. External links
http://en.wikipedia.org/wiki/Aspect-oriented_programming
http://eclipse.org/aspectj/doc/released/faq.php
http://mojo.codehaus.org/aspectj-maven-plugin/
http://williamd1618.blogspot.com/2011/04/android-and-aspect-oriented-programming.html
www.eclipse.org/aspectj/doc/next/progguide/starting-aspectj.html
Hack 32 Empowering your application using Cocos2d-x: Android v2.2+
Android provides different ways to present your application information to the user, but sometimes these might be insufficient. Imagine you want to add a graph view or a 3D animation to your application. How would you do that? Some developers might try using OpenGL for their views, but this means adding a layer of complexity, and not everyone knows how to code OpenGL.
In this hack, I’ll show you to how use the game framework called Cocos2d-x to add an edge to your applications.
32.1. What is Cocos2d-x?
Cocos2d started as a Python game framework to be used in a competition called PyWeek. The name comes from a city in Córdoba, Argentina, called Los Cocos. Later on, Ricardo Quesada, one of the creators of Cocos2d, ported it to Objective-C and Cocos2d for iPhone was born. Cocos2d for iPhone is better known that the Python version and is used in a bunch of games in the Apple App Store. Did you ever play Zombie Smash! or Feed me Oil? These are examples of Cocos2d for iPhone games that reached number one in the top paid iPhone apps chart.
Cocos2d-x is a C++ port of the Cocos2d for iPhone game engine. It’s a multiplatform, lightweight, developer-friendly, free, open source project and—guess what—it works in Android using the Android NDK.
32.2. Using Cocos2d-x
To show you what Cocos2d-x is capable of, we’ll create a normal Android application and we’ll make it snow. Using a particle system, we’ll add a chilling visual effect to our view. The finished work can be seen in figure 32.1.
Figure 32.1. Application with a make-it-snow effect

For starters, you should understand that Cocos2d-x uses OpenGL to draw everything. In Android, to draw OpenGL, the developer will need to use a SurfaceView. Let’s see how the SurfaceView works to understand how Cocos2d-x will get mixed into our application.
In the SurfaceView documentation (see section 32.4) we can read the following:
The SurfaceView is a special subclass of View that offers a dedicated drawing surface within the View hierarchy. The aim is to offer this drawing surface to an application’s secondary thread, so that the application isn’t required to wait until the system’s View hierarchy is ready to draw. Instead, a secondary thread that has reference to a SurfaceView can draw to its own Canvas at its own pace.
The last paragraph holds a lots of important information, so let me try to explain it in an easier way. Every time we add a widget or a custom view to our application, it gets added to the view hierarchy. Our complete tree of views (which forms our Activity) gets drawn in what’s called theUI thread. On the other hand, the SurfaceView gets its own thread to draw and it won’t use the UI thread. If the SurfaceView doesn’t use the UI thread to draw itself, how does Android deal with the mixture of the view hierarchy and surface views? To understand this, we must analyze the following paragraph (see section 32.4):
The surface is Z ordered so that it is behind the window holding its SurfaceView; the SurfaceView punches a hole in its window to allow its surface to be displayed. The view hierarchy will take care of correctly compositing with the Surface any siblings of the SurfaceView that would normally appear on top of it. This can be used to place overlays such as buttons on top of the Surface, though note however that it can have an impact on performance since a full alpha-blended composite will be performed each time the Surface changes.
The big conclusion we can get from this last paragraph is that we can mix both worlds but with certain restrictions. The SurfaceView will be placed in front of or in back of our view hierarchy. In our example, we’ll have our view hierarchy in the back and will place the SurfaceView in front of it. So let’s get started creating our view hierarchy first.
We’ll first create the XML for our Activity. Here’s the code:
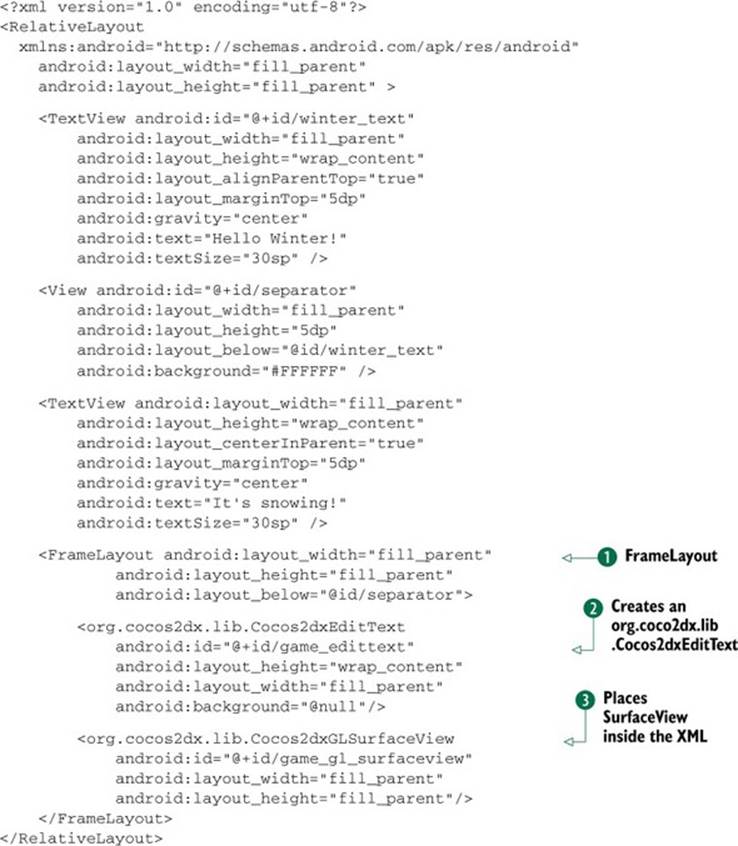
The layout has nothing special in it. I’ve organized the different views using a RelativeLayout. The interesting stuff is inside the FrameLayout ![]() . We can first see how an org.cocos2dx.lib.Cocos2dxEditText is created
. We can first see how an org.cocos2dx.lib.Cocos2dxEditText is created ![]() . The Cocos2dxEditText is needed by Cocos2d-x to show the keyboard when the game demands text input from the user. It’s not something that we’ll use, but it’s required. The other important element is the SurfaceView
. The Cocos2dxEditText is needed by Cocos2d-x to show the keyboard when the game demands text input from the user. It’s not something that we’ll use, but it’s required. The other important element is the SurfaceView ![]() . Placing the SurfaceView inside the XML offers an unique way of positioning and providing a width and height to our Cocos2d-x’s view. We could’ve used the whole screen, but I wanted to show you how we can use Android resources to place the SurfaceView on the screen without worrying about device sizes, pixel density, and so on.
. Placing the SurfaceView inside the XML offers an unique way of positioning and providing a width and height to our Cocos2d-x’s view. We could’ve used the whole screen, but I wanted to show you how we can use Android resources to place the SurfaceView on the screen without worrying about device sizes, pixel density, and so on.
Let’s continue with the Activity’s code. It’s just copied and pasted from the Cocos2d-x Hello World sample application. Here’s what it does:
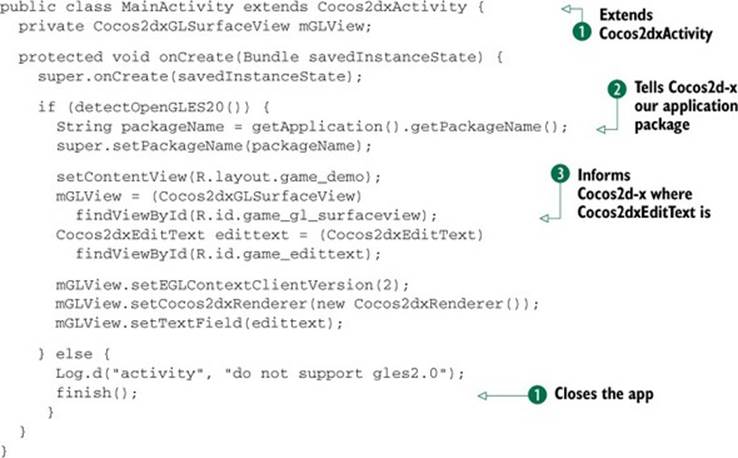
To use Cocos2d-x features in our Activity, we need to extend Cocos2dxActivity ![]() . We tell Cocos2d-x our application package
. We tell Cocos2d-x our application package ![]() . Cocos2d-x will use that package to read assets from the Assets folder. We also inform Cocos2d-x where the Cocos2dxEditText is
. Cocos2d-x will use that package to read assets from the Assets folder. We also inform Cocos2d-x where the Cocos2dxEditText is ![]() . If the device we’re running doesn’t support OpenGL 2.0, then we need to close the app
. If the device we’re running doesn’t support OpenGL 2.0, then we need to close the app ![]() .
.
We’ll also take the liberty of modifying Cocos2d-x’s Java code to place the SurfaceView on top of the view hierarchy and make its background translucent. To do so, we add the following lines in the initView() method of the Cocos2dxGLSurfaceView class:
setEGLConfigChooser(8, 8, 8, 8, 16, 0);
getHolder().setFormat(PixelFormat.TRANSLUCENT);
setZOrderOnTop(true);
Also add the following line in the onSurfaceCreated() method of the Cocos2dxRenderer class:
gl.glClearColor(0, 0, 0, 0);
We have all the Java code in place; we just need to write the C++ code to take care of the snow. Since this is just an example of what’s possible, I copied and pasted one of Cocos2d-x’s particle system tests that involves snow falling down. The code is all inside the HelloWorldScene.cpp file that comes with the sample code for this book.
If you’ve never used C++ in Android before, you should know that you need to use the Android NDK.
32.3. The bottom line
Using Cocos2d-x is a great way to improve how your application looks and an excellent way to avoid dealing with OpenGL directly. Unfortunately you’ll need to deal with its limitations and its complexity. You’ll need to write C++ code, deal with the NDK, and set up your views to place aSurfaceView correctly, among other things. In the end, it’s totally worth the effort.
32.4. External links
http://developer.android.com/sdk/ndk/index.html
http://www.cocos2d-x.org/
http://developer.android.com/guide/topics/graphics/index.html#on-surfaceview
http://www.cocos2d-iphone.org/archives/888
http://www.cocos2d-iphone.org/archives/1496
http://developer.android.com/guide/topics/graphics/2d-graphics.html
http://developer.android.com/reference/android/view/SurfaceView.html