50 Android Hacks (2013)
Chapter 6. Working with lists and adapters
Lists and adapters are two of the main concepts to master in Android development. In this chapter, you’ll learn several tips and tricks you can use with lists and adapters.
Hack 24 Handling empty lists: Android v1.6+
A common way to show data to the user in mobile platforms is to place it inside a list. When you do this, you need to handle two cases: the ordinary list full of items and an empty state. For the list, you’ll use a ListView, but how do you handle the empty state? Fortunately, there’s an easy way to achieve this. Let’s look at how to do it.
ListView and other classes that extend AdapterView easily handle emptiness through a method called setEmptyView(View). When the AdapterView needs to draw, it’ll draw the empty view if its Adapter is null, or the adapter’s isEmpty() method returns true.
Let’s try an example. Imagine we want to create an application to handle our TODO list. Our main screen will be a ListView with all our TODO items, but when we launch it for the first time, it’ll be empty. For our empty state, we’ll draw a nice image. Following is the XML layout:
<?xml version="1.0" encoding="utf-8"?>
<FrameLayout xmlns:android="http://schemas.android.com/apk/res/android"
android:layout_width="fill_parent"
android:layout_height="fill_parent">
<ListView android:id="@+id/list_view"
android:layout_width="fill_parent"
android:layout_height="fill_parent"/>
<ImageView android:id="@+id/empty_view"
android:layout_width="fill_parent"
android:layout_height="fill_parent"
android:src="@drawable/empty_view"/>
</FrameLayout>
The only thing missing is the onCreate() code, where we fetch the ListView and place the ImageView as the empty view. The code to use is the following:
@Override
public void onCreate(Bundle savedInstanceState) {
super.onCreate(savedInstanceState);
setContentView(R.layout.main);
ListView mListView = (ListView) findViewById(R.id.list_view);
mListView.setEmptyView(findViewById(R.id.empty_view));
}
Because we’re not setting an adapter to the ListView when we run this code, it’ll show the ImageView.
24.1. The bottom line
I must admit that I was late to learn about this trick. I kept hiding my ListViews when the adapter was empty. When you use the setEmpty(View) method, your code will be more compact and easier to read.
You can also try using a ViewStub as an empty view. Using a ViewStub as an empty view will guarantee that the empty view isn’t inflated when it’s not needed.
24.2. External links
http://developer.android.com/reference/android/widget/ListView.html
Hack 25 Creating fast adapters with a ViewHolder: Android v1.6+
If you’ve already been programming in Android, you’ve probably used the Adapter class. But for those of you who haven’t used the Adapter, it’s described in the Android documentation (see section 25.2) as follows:
An Adapter object acts as a bridge between an AdapterView and the underlying data for that view. The Adapter provides access to the data items. The Adapter is also responsible for making a View for each item in the data set.
In this hack, I’ll provide a short introduction on how the Adapter works so you can learn how to construct one quickly, making your application as responsive as possible.
The AdapterView is the abstract class for views that use an Adapter to fill themselves. A common subclass is the ListView. Both classes work together in a simple way. When the AdapterView is shown, it calls the Adapter’s getView() method to create and add the views as children. The Adapter will take care of creating the views in its getView() method. As you can imagine, instead of returning new views per row, Android offers a way to recycle them. Let’s first look at how this works and then how to take advantage of the recycling.
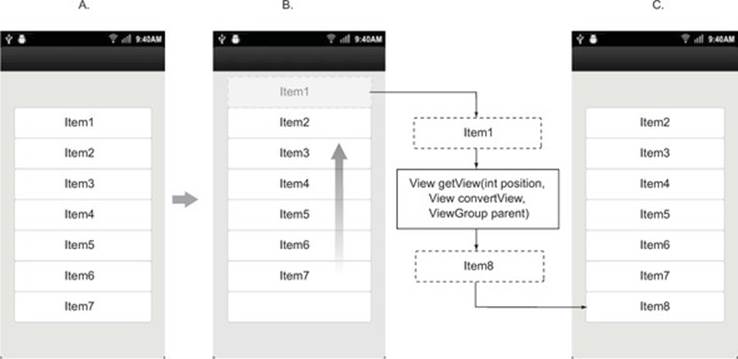
In figure 25.1, we see a recycling example in action. In A we see the list loaded for the first time. In B the user scrolls down and the view for Item 1 disappears—instead of freeing the memory, it’s sent to the recycler. When the AdapterView asks the Adapter for the next view, thegetView() method is called and we get a recycled view in the convertView parameter. This way if Item 5’s view is the same as Item 1’s view, we can change the text and return it. The populated row will end in the empty space in C.
Figure 25.1. Views being recycled by the Adapter
To explain this in a few words, when getView() is called, if convertView isn’t null, then we use convertView instead of creating a new view. We need to fetch each widget’s reference using convertView.findViewById() and populate it with the information from the model corresponding to the position.
Although this will work, we can tweak it further. To do so, we’ll use the ViewHolder pattern. The ViewHolder is a static class where we can save the row’s widgets to avoid the findViewById() calls every time getView() is called.
Let’s see an example of how it’s used. In the example, we’ll create an Adapter that inflates a view that has an ImageView and two TextViews. The code follows:
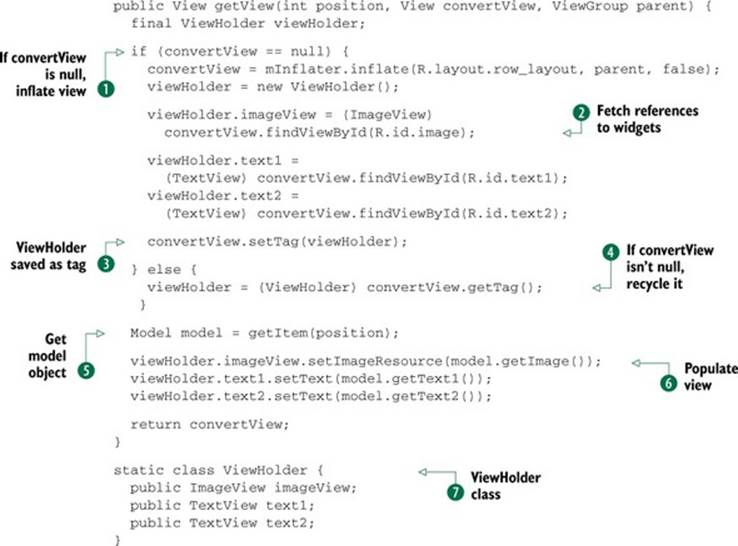
If the convertView is null, then inflate the view ![]() . When we create the view, we need to fetch the references to the widgets and save them inside the ViewHolder
. When we create the view, we need to fetch the references to the widgets and save them inside the ViewHolder ![]() . The ViewHolder gets saved as a tag
. The ViewHolder gets saved as a tag ![]() . If the convertView isn’t null, that means we can recycle it. We can get theViewHolder from the convertView’s tag
. If the convertView isn’t null, that means we can recycle it. We can get theViewHolder from the convertView’s tag ![]() . Then we get the model object, depending on the position
. Then we get the model object, depending on the position ![]() , and populate the view with information from the model
, and populate the view with information from the model ![]() . The ViewHolder class contains all of the widgets as public fields
. The ViewHolder class contains all of the widgets as public fields ![]() .
.
25.1. The bottom line
Almost every Android application uses some sort of list or gallery to present data. Because these kinds of widgets are subclasses of AdapterView, understanding how AdapterView works and how it interacts with an adapter is critical to making your application faster. The ViewHolderhack is an excellent way to achieve speed within lists.
25.2. External links
http://developer.android.com/reference/android/widget/Adapter.html
http://developer.android.com/training/improving-layouts/smooth-scrolling.html
Hack 26 Adding section headers to a ListView: Android v1.6+ Contr- ributed by Chris King
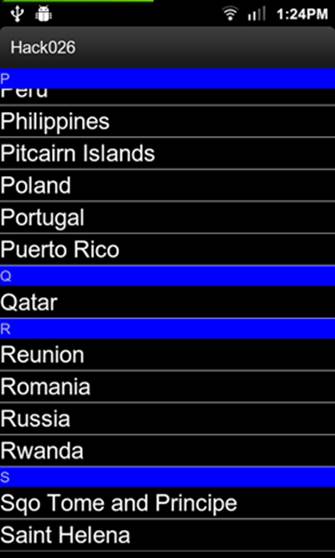
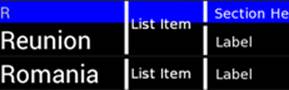
Imagine that you want to create a vacation-planning application that allows users to browse a list of popular destinations organized by country. To present a long list of data, you’ll want to include section information to help orient people within the list. For example, contacts applications will often group users by the first letter of their last name, and scheduling applications will group appointments by dates. You can accomplish this with a design similar to that used in the iPhone contacts screen, where a section header scrolls with the list, with the current section’s header always visible at the top of the screen. In figure 26.1, the highlighted letters are the section headers, and the lists below them contain the countries whose name begins with those letters. What you see in the figure is difficult to create in Android because ListView doesn’t have a concept of a section or a section header, only of items within the list.
Figure 26.1. A sectioned list of country names
Android developers often try to solve this problem by creating two types of list items: a regular item for data, and a separate item for section headers. We can do this by overriding the getViewTypeCount() method to return 2, and modifying our getView() method to create and return the appropriate type of item. In practice, however, this will lead to messy code. If our underlying list of data contains 20 items, our adapter will need to contain anywhere from 21 to 40 items, depending on how many sections it contains. This can lead to complicated code: the ListView might want to show the 15th visible item, which might be the 9th item in the underlying list.
A much simpler approach is to embed the section header within the list item, and then make it visible or invisible as needed. This greatly simplifies the logic for building the list and looking up items when the user makes a selection. We can create a special TextView that overlaps the top of the list, and update it when the list scrolls a new section into view.
26.1. Creating list layouts
To create an experience like that shown in the previous figure, start by writing the following XML for the section header R, the third header shown in the previous image. We’ll create this in a separate layout file so we can reuse it for headers that scroll with the list and the stationary header at the top:
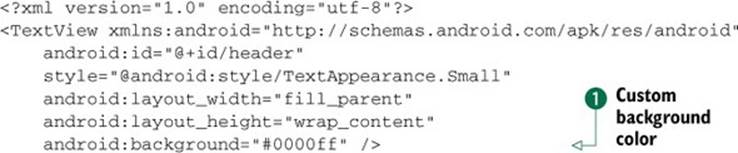
The text has a custom background color ![]() to distinguish it from regular text in the list. Now, write the following XML for the screen, including the stationary section header:
to distinguish it from regular text in the list. Now, write the following XML for the screen, including the stationary section header:
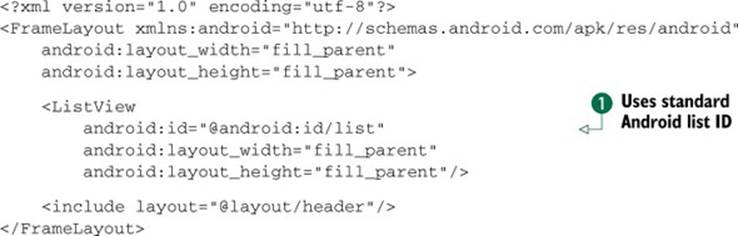
The list ![]() uses the standard Android list ID so we can use it in our subclass of ListActivity. Include the header in this frame, so it will overlap the list and show the current section.
uses the standard Android list ID so we can use it in our subclass of ListActivity. Include the header in this frame, so it will overlap the list and show the current section.
The last XML to create is the list item, which follows, and includes both the data field and the section header:
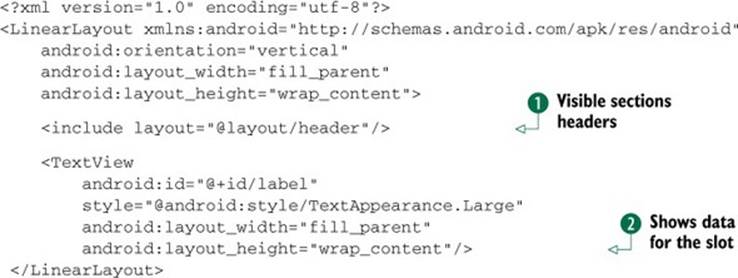
Our section header ![]() will be visible for items that start a new section, and are hidden otherwise. The label
will be visible for items that start a new section, and are hidden otherwise. The label ![]() will always show the data for this slot. The relationships between item, header, and label are shown in figure 26.2.
will always show the data for this slot. The relationships between item, header, and label are shown in figure 26.2.
Figure 26.2. List items with label and optional header
26.2. Providing visible section headers
Next, create an Adapter subclass that will configure the list items. Unlike other approaches to creating a sectioned list, only getView() needs to be overridden; we don’t need to return multiple types of views or convert between positions in the visible list and positions in the underlying data list:
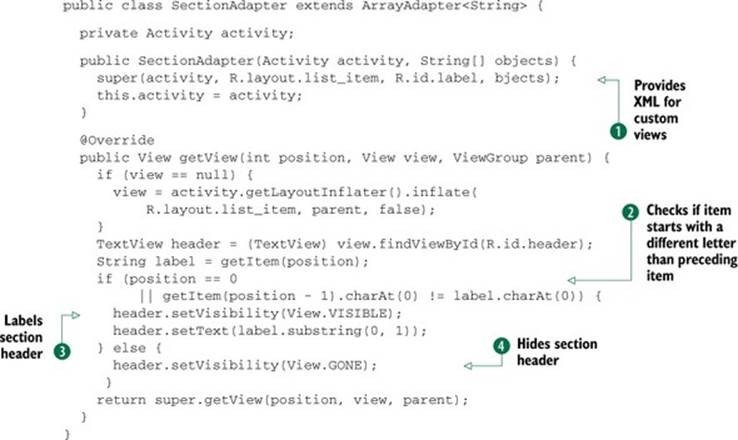
The ArrayAdapter parent class can do most of the work if we provide ![]() the XML for its custom views. After creating a list item, check to see whether it starts with a different letter than the preceding item
the XML for its custom views. After creating a list item, check to see whether it starts with a different letter than the preceding item ![]() . If it does, then it’s the first item in this section, and so we label the section header and make it visible
. If it does, then it’s the first item in this section, and so we label the section header and make it visible ![]() . Otherwise, we hide it
. Otherwise, we hide it ![]() .
.
Now that the section headers within the list are properly set, write a helper method that will configure the floating section header at the top of the screen:
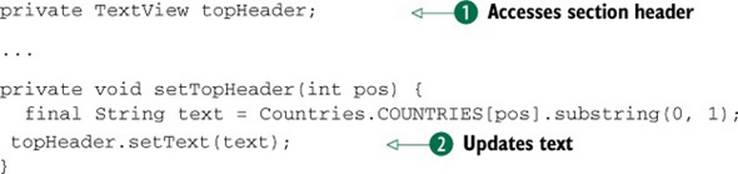
The instance variable ![]() lets us access the section header at the top of the screen. When we initially create or scroll the list, we’ll call this helper method, which finds the appropriate letter to use for this section and updates the text
lets us access the section header at the top of the screen. When we initially create or scroll the list, we’ll call this helper method, which finds the appropriate letter to use for this section and updates the text ![]() .
.
26.3. Wrapping up
Finally, bring it all together in the Activity’s onCreate() method. Configure the list and attach a new listener that updates the header when the list scrolls:
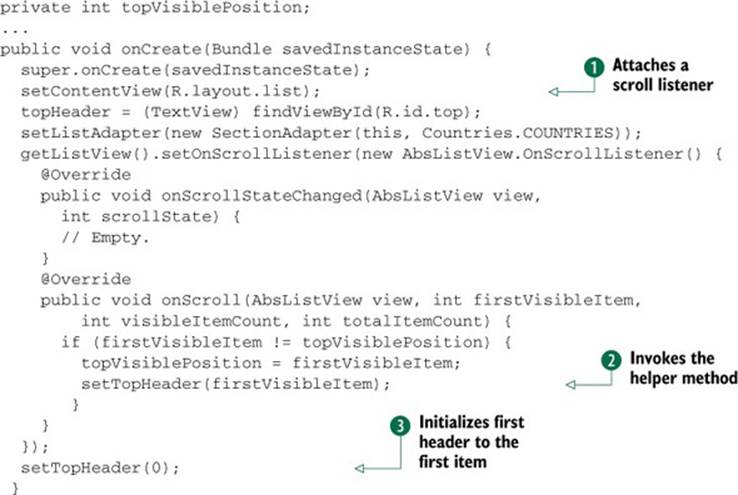
After configuring the UI ![]() , attach a scroll listener. When users scroll the list, check to see whether they’ve changed position, and if so, invoke the helper method
, attach a scroll listener. When users scroll the list, check to see whether they’ve changed position, and if so, invoke the helper method ![]() to update the floating header. Make sure to initialize the header to the first item
to update the floating header. Make sure to initialize the header to the first item ![]() when the list first appears.
when the list first appears.
26.4. The bottom line
Even though ListView doesn’t automatically support section headers, you can easily add them by embedding the headers within your list items and making them visible or hidden as appropriate. Although this hack’s example applies to an alphabetized list, the same approach can work for any type of sectioned grouping you’d like to create.
26.5. External links
http://developer.android.com/reference/android/widget/ListView.html
http://developer.android.com/reference/android/widget/BaseAdapter.html
Hack 27 Communicating with an Adapter using an Activity and a del- legate: Android v1.6+
A lot of Android widgets use an Adapter to populate themselves. Every Android widget that uses an undefined list of views will have an Adapter to fetch them. This means that after you learn how to use one, you’ll be able to operate a wide range of widgets easily. One benefit of this approach is that you can place all of the code related to the visual logic inside the Adapter. Why is this important? Because you can apply the concept of separation of concerns (SoC). Imagine that you need to show a list of telephone numbers with two different clickable widgets inside each row—the first one to remove the telephone number from the list, and the second one to make the call. Where would you place all of those click handlers?
In this hack, we’ll look at how to solve this problem using the Delegation pattern. This pattern will help us to move all of the business logic away from the Adapter and place it inside the Activity. We’ll create a simple application that adds numbers to a list and each row will have a Remove button to remove the phone number.
The idea is simple: we’ll add the Remove button click handler in the Adapter, but instead of removing the object there, we’ll call an Activity’s method through the delegate interface. The first thing we’ll create is the Adapter’s code:
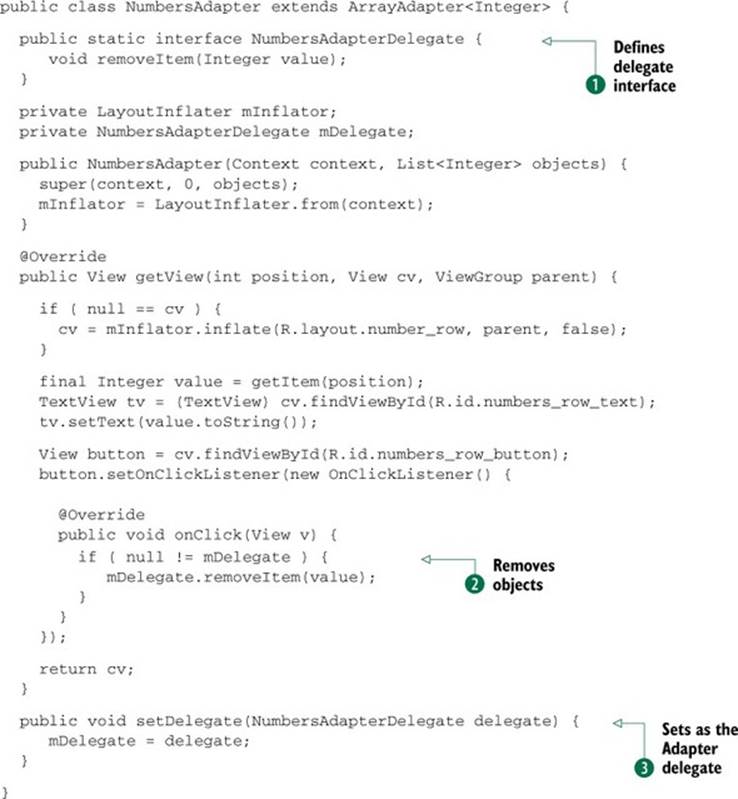
We define the delegate interface ![]() that will be used to handle removing the object
that will be used to handle removing the object ![]() . The Activity will need a way to set itself as the Adapter delegate, and for that we have a setter
. The Activity will need a way to set itself as the Adapter delegate, and for that we have a setter ![]() .
.
Now that we have the Adapter in place, let’s take a look at the Activity code:
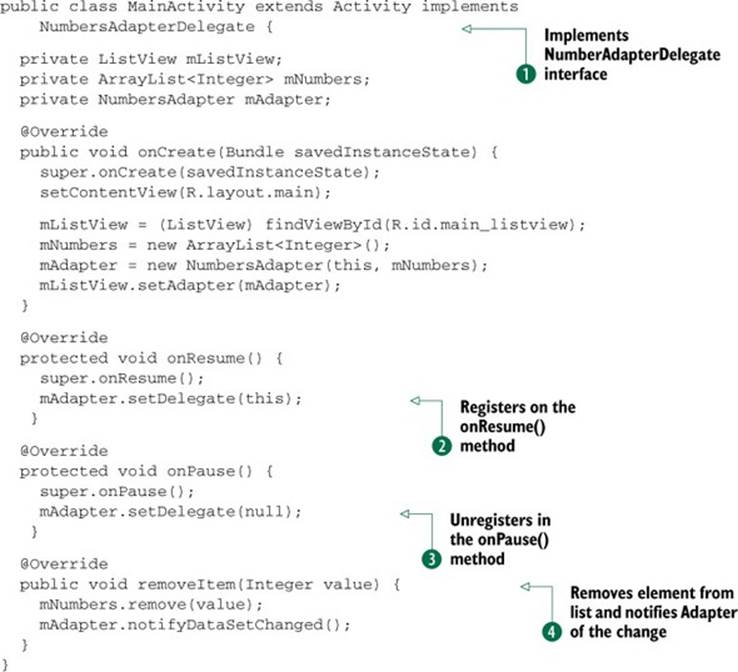
As you can see, the Activity implements the NumbersAdapterDelegate interface ![]() . Instead of setting the Activity as the Adapter’s delegate inside the onCreate() method, we register it in the onResume() method
. Instead of setting the Activity as the Adapter’s delegate inside the onCreate() method, we register it in the onResume() method ![]() and unregister it in the onPause() method
and unregister it in the onPause() method ![]() . We do this to be sure that the Activity is used as delegate when it’s shown in the screen. You can look at the delegate method
. We do this to be sure that the Activity is used as delegate when it’s shown in the screen. You can look at the delegate method ![]() , which removes the element from the list and notifies the Adapter of the change.
, which removes the element from the list and notifies the Adapter of the change.
27.1. The bottom line
The Delegation pattern is used a lot in iOS development. For instance, when you create an HTTP request, you can set a delegate to determine what to do when the request is finished. While coding for an iPhone application, I noticed that using the delegate organized my code.
This example is only the tip of the iceberg. The Delegation pattern can be used in lots of places in Android development. For example, you can also use Delegation to take actions depending on an HTTP request. Keep in mind that it exists and use it when it makes sense.
27.2. External links
http://en.wikipedia.org/wiki/Separation_of_concerns
http://en.wikipedia.org/wiki/Delegation_pattern
Hack 28 Taking advantage of ListView’s header: Android v1.6+
Sometimes as developers we need to achieve weird layouts based on a designer’s wireframes. Some months ago, I was involved with a project where the wireframes had an image gallery on top and a list of items on the bottom. It sounds simple—I placed an Android Gallery and aListView below it—but when the designer saw the application running he came to me and said, “I’d like to be able to scroll down to the point where the gallery disappears.”
In this hack, I’ll show how I created what the designer wanted: a gallery of images and a list of numbers where you can scroll down until the gallery disappears. The finished application can be seen in figure 28.1.
Figure 28.1. Demo application
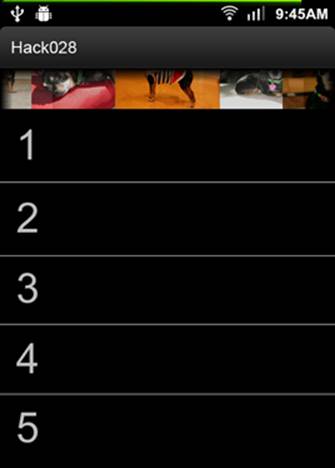
To do this kind of layout, you might be tempted to place the Gallery and ListView inside a ScrollView, but this wouldn’t work because a ListView is already a ScrollView. You can try it out, but you’ll run into issues because the ListView already handles scrolling.
Fortunately, the ListView provides methods to add custom headers and footers to it. Let’s look at the following code to see how to use those methods to place the Gallery as a ListView’s header:
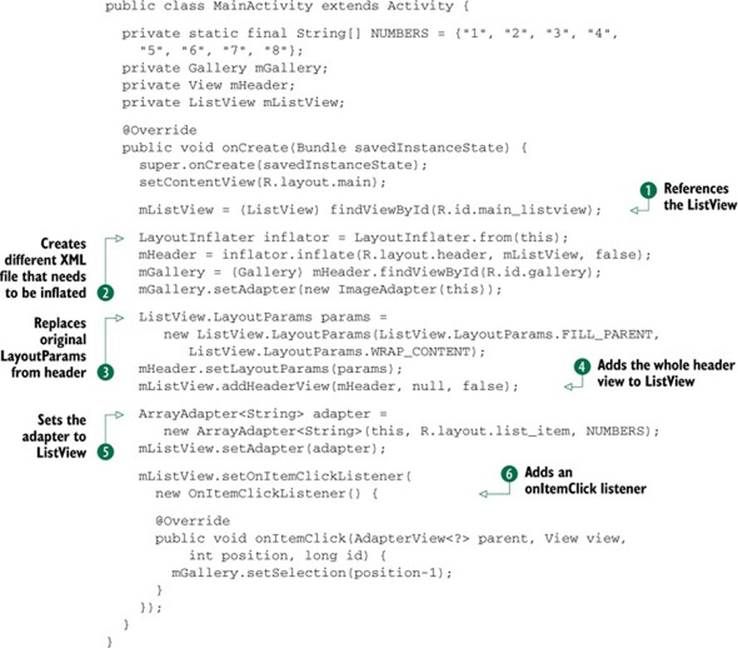
The code provides a reference to the ListView ![]() . This ListView will take the whole screen. For the header, we created a different XML file that needs to get inflated
. This ListView will take the whole screen. For the header, we created a different XML file that needs to get inflated ![]() . You can see that we make a second call to findViewById() inside the header view because we created aLinearLayout with the Gallery inside. It’s not needed, but we might add something else in the future. We replace the original LayoutParams from the header with the ListView version
. You can see that we make a second call to findViewById() inside the header view because we created aLinearLayout with the Gallery inside. It’s not needed, but we might add something else in the future. We replace the original LayoutParams from the header with the ListView version ![]() and then add the whole header view to the ListView
and then add the whole header view to the ListView ![]() . After setting the header, we set the adapter to the ListView
. After setting the header, we set the adapter to the ListView ![]() and, finally, we add an onItemClick listener
and, finally, we add an onItemClick listener ![]() that will take care of scrolling the images inside the gallery every time we hover over a number.
that will take care of scrolling the images inside the gallery every time we hover over a number.
28.1. The bottom line
Translating wireframes to real applications is hard—even more so when designers don’t know about the platform limitations or its possibilities. The developer might end up hacking Android’s code to make it as similar as possible. My best advice for this kind of situation is to try to get a good understanding of the framework and take it to the limit.
28.2. External links
http://developer.android.com/reference/android/widget/ListView.html
http://groups.google.com/group/android-beginners/browse_thread/thread/2d1a4b8063b2d8f7
Hack 29 Handling orientation changes inside a ViewPager: Android v1.6+
With the release of Compatibility Package revision 3, the ViewPager class was made available. If you’ve never used the ViewPager class, you should know it’s an implementation of a horizontal view swiper. What’s possible with the ViewPager class? You can create any kind of application that requires paginated views. The best part is that it works like an AdapterView, meaning that you use it as you’d use a ListView —simple.
Imagine you want to create a magazine-like application. Although the ViewPager class is an excellent ally to help you achieve this, it’s hard to handle different orientation changes depending on the page. In this hack I’ll show you how to use the ViewPager class and configure everything to make it work correctly.
For this hack, we’ll create a color viewer application. We’ll be able to swipe through colors and every page where (index % 2) == 0 will have a landscape version available. To create this we’ll need the following:
· An Activity that will hold the ViewPager and control the orientation changes
· A ColorFragment class that will show a color and some text in the middle of the screen
· A ColorAdapter class that will be in charge of creating the fragments and telling the Activity which fragment will be able to change the orientation configuration
· A ViewPager that will use the ColorAdapter to display our fragments
Let’s look at the Activity code to see how to do this:
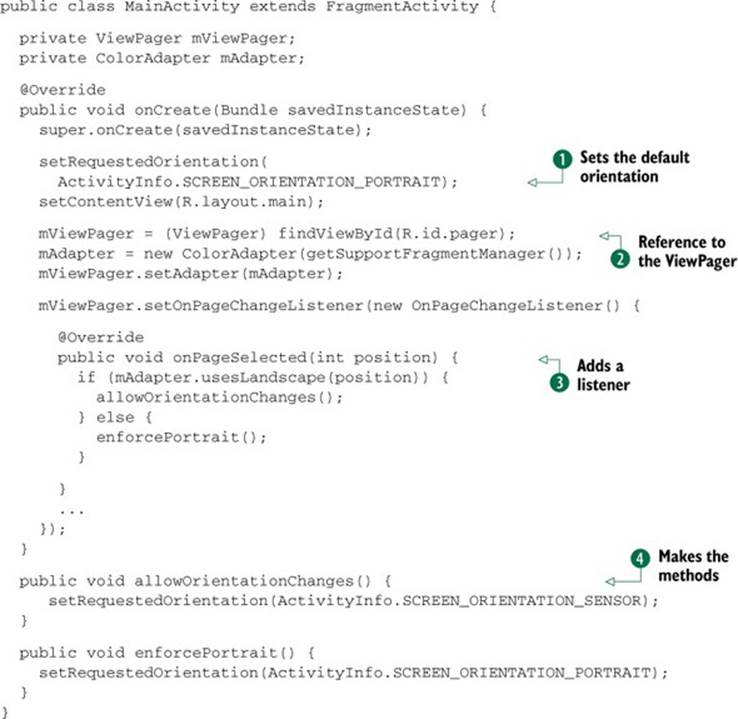
The first thing to do is set the default orientation to portrait ![]() . This means that if the view doesn’t specify whether it allows orientation changes, it’ll stay portrait. The code provides a reference to the ViewPager
. This means that if the view doesn’t specify whether it allows orientation changes, it’ll stay portrait. The code provides a reference to the ViewPager ![]() , and we’ll set the ColorAdapter to it. Add a listener
, and we’ll set the ColorAdapter to it. Add a listener ![]() when the page is changed, and inside it ask the Adapter whether to allow orientation changes. Finally, make the methods
when the page is changed, and inside it ask the Adapter whether to allow orientation changes. Finally, make the methods ![]() that take care of enabling or disabling the orientation changes using the setRequestedOrientation() method that comes from the Activity.
that take care of enabling or disabling the orientation changes using the setRequestedOrientation() method that comes from the Activity.
29.1. The bottom line
The ViewPager class brought a standardized implementation of a horizontal view swiper to Android, and the best thing is that it’s backward compatible to API level 4, which is Android 1.6. If you’ve never used it, try it out; it’s a nice tool to have.
On the other hand, in this hack you saw how to limit orientation changes in your views. Remember that it’s always better to support both orientations for every view. Your users will appreciate it if you allow them to position the device in different ways when using your application.
29.2. External links
http://android-developers.blogspot.com/2011/08/horizontal-view-swiping-with-viewpager.html
http://developer.android.com/sdk/compatibility-library.html
Hack 30 ListView’s choiceMode: Android v1.6+
Android’s ListView is one of the most important classes in the SDK. Apart from showing items in a scrollable list, it can also be used to pick stuff from that list. Imagine you need to create an Activity to let your user pick a country from a list. How would you do it? Would you handle the selection yourself? You could create a ListView and handle the selection yourself using click handlers, but in this hack I’ll provide a better way to do it.
In this hack, you’ll learn how to use a ListView to create a country picker. An example of this picker is shown in figure 30.1. When a country row is selected and you click on the Pick Country button, a Toast will be shown with the country name.
Figure 30.1. Country picker
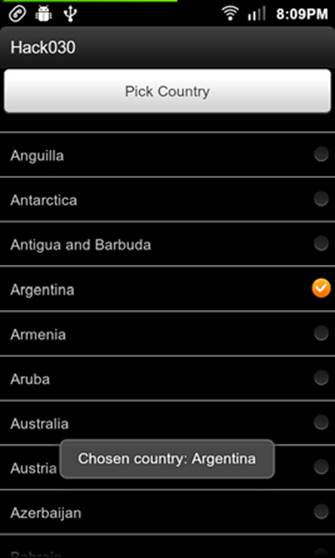
The ListView has something called choiceMode. In the documentation (see section 30.2), you’ll see the following explanation:
Defines the choice behavior for the view. By default, lists do not have any choice behavior. By setting the choiceMode to singleChoice, the list allows up to one item to be in a chosen state. By setting the choiceMode to multipleChoice, the list allows any number of items to be chosen.
In this case, we’ll use singleChoice as the choice-Mode, but if we wanted to pick several items from the list we’d use multipleChoice.
Another interesting feature of the ListView widget is that whether we use singleChoice or multipleChoice, they automatically save the selected position(s). You already know that the ListView will help us create the picker by setting the choice-Mode to singleChoice. Let’s create the Activity’s layout:
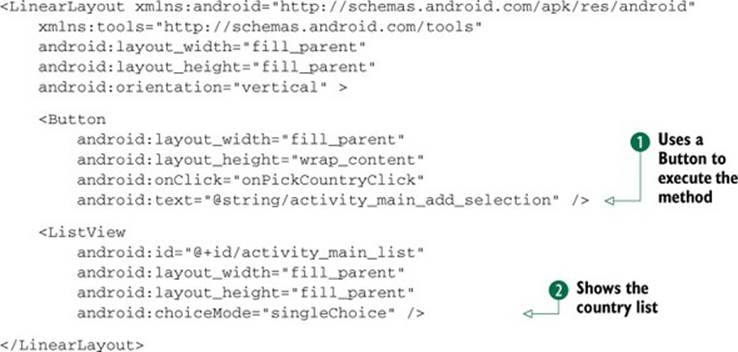
The layout is simple. We’ll use a Button ![]() to execute the method that handles the logic of retrieving the selected country, and a ListView with singleChoice
to execute the method that handles the logic of retrieving the selected country, and a ListView with singleChoice ![]() to show the country list.
to show the country list.
Now let’s create the custom row layout and the Activity source code. The row layout will use the following code:
<LinearLayout xmlns:android="http://schemas.android.com/apk/res/android"
xmlns:tools="http://schemas.android.com/tools"
android:layout_width="fill_parent"
android:layout_height="wrap_content"
android:orientation="horizontal" >
<TextView
android:id="@+id/country_view_title"
android:layout_width="0dp"
android:layout_height="wrap_content"
android:layout_weight="0.9"
android:padding="10dp" />
<CheckBox
android:id="@+id/country_view_checkbox"
android:layout_width="0dp"
android:layout_height="wrap_content"
android:layout_weight="0.1"
android:gravity="center_vertical"
android:padding="10dp" />
</LinearLayout>
The Activity will have the following code:
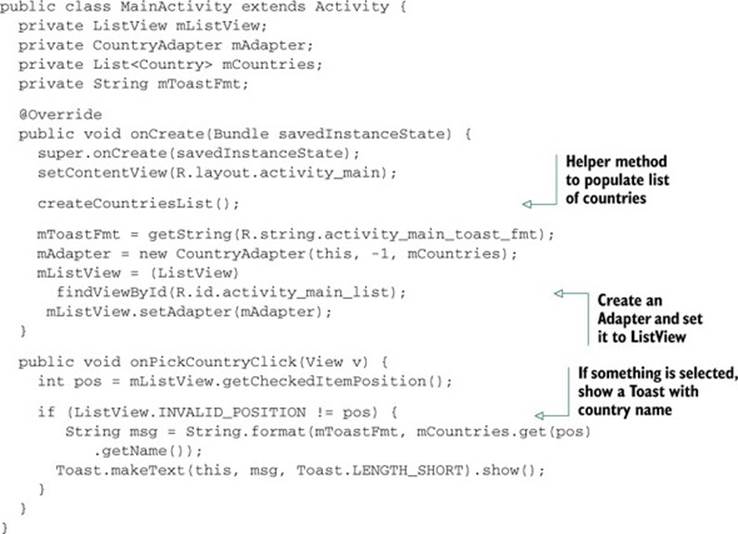
Sounds simple so far, right? It is, but there’s a trick to using it. We need to understand how the ListView sets a position to be checked or not to use it correctly.
If you stop reading this and search the web looking for code samples about the ListView’s choiceMode, you’ll notice that most of the results use a class called CheckedTextView for the row view, instead of a custom view as we did. If you look for the source code of that class, you’ll notice that it’s an extension of the TextView class, which implements the Checkable interface.
So the ListView is somehow using the Checkable interface to handle the view state. If you browse the ListView source code, you’ll find the following:
if (mChoiceMode != CHOICE_MODE_NONE && mCheckStates != null) {
if (child instanceof Checkable) {
((Checkable) child).setChecked(mCheckStates.get(position));
}
}
We need to make our custom row implement the Checkable interface if we want the ListView to handle the selection. Unfortunately, this is only possible when creating a custom view. Let’s create a class called CountryView. The code is the following:
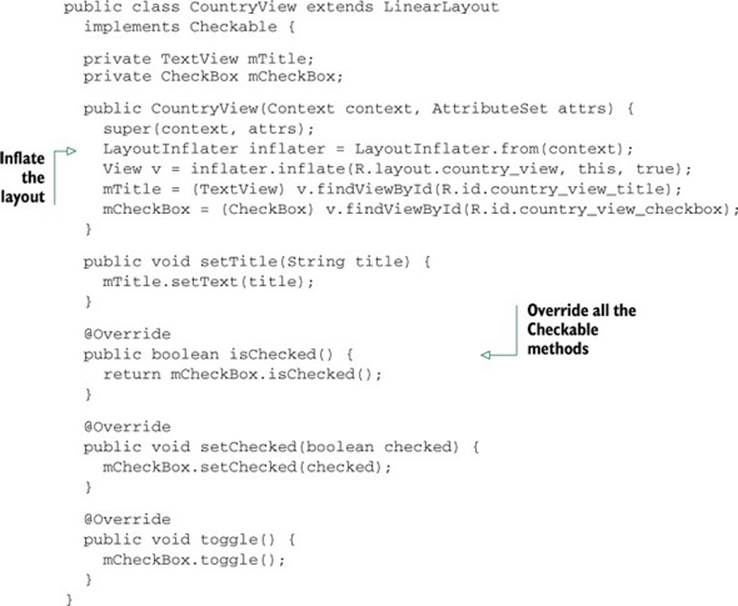
Notice how the Checkable interface methods are implemented. Every method calls the mCheckBox implementation. This means that when the ListView wants to select a row it will call the CountryView’s setChecked() method.
Everything is set. We can now run the application. You’ll notice that when you click on a row, the CheckBox won’t be ticked, but if you click over the CheckBox it is. You might also be able to check a row and when you scroll, you might see rows getting selected. What’s wrong?
The issue is that we’re adding a focusable widget, the CheckBox. The best way to solve this is to disallow the CheckBox to gain focus. And, because the ListView is the one that decides what should and shouldn’t be checked, we’ll also remove the CheckBox possibility of getting clicks. We do this by adding the following attributes to the XML:
android:clickable="false"
android:focusable="false"
android:focusableInTouchMode="false"
If we run the application now with this modification, everything will work as we’d expect.
30.1. The bottom line
This hack solves another issue brought on by the lack of Android documentation. Using the ListView’s choiceMode correctly requires reading the SDK source code, but when you understand how it works, it’s a great feature to use when you need to pick one or several items from a list.
30.2. External links
http://developer.android.com/reference/android/widget/AbsListView.html#attr_android:choiceMode
http://stackoverflow.com/questions/5612600/listview-with-choice-mode-multiple-using-checkedtext-in-a-custom-view