50 Android Hacks (2013)
Chapter 9. Ready-to-use snippets
Do you sometimes use the same code in different applications? If so, this chapter is for you. We’ll go through some code snippets that you can copy and paste into any Android application.
Hack 35 Firing up multiple intents: Android v2.1+
One of the nicest features about Android is the intent system. If you want to share something with another application, you can use an intent to do so. If you want to open a link, you have an intent for that. In Android, almost everything can be done with an intent.
If you use the mobile messenger app, WhatsApp, you might know that you can share images with your contacts from an image in the gallery or by taking a photo. The dialog presented to the user to pick an image from the gallery or to take a picture is shown in figure 35.1. Obviously, this was created with intents but, unfortunately, it can’t be done with only one.
Figure 35.1. Dialog to choose how to handle an action
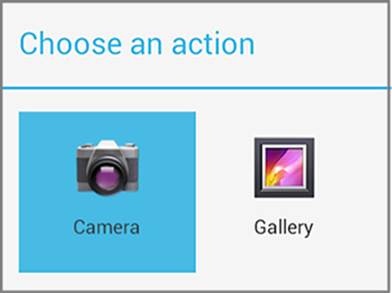
In this hack, we’ll analyze how this can be done. We’ll see which is the intent to take a photo, which is the intent to pick a picture from the gallery, and how to combine both.
35.1. Taking a picture
The intent to take a photo using the camera app is the following:
Intent takePhotoIntent = new Intent(MediaStore.ACTION_IMAGE_CAPTURE);
Intent chooserIntent = Intent.createChooser(takePhotoIntent,
getString(R.string.activity_main_pick_picture));
startActivityForResult(chooserIntent, TAKE_PICTURE);
35.2. Picking a picture from the gallery
To pick an image from the gallery, we do this:
Intent pickIntent = new Intent(Intent.ACTION_GET_CONTENT);
pickIntent.setType("image/*");
Intent chooserIntent = Intent.createChooser(pickIntent,
getString(R.string.activity_main_take_picture));
startActivityForResult(chooserIntent, PICK_PICTURE);
35.3. Mixing both intents
Since Android API level 5, we can create a chooser and add extra initial intents. This means that instead of using just one type of intent, we can use several. An example of usage:
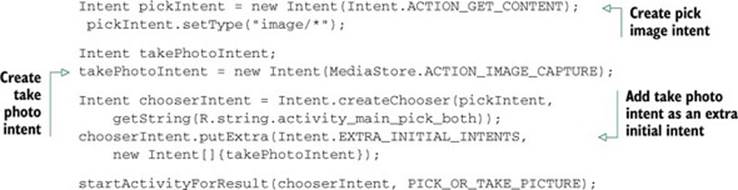
Using the previous code will show all applications that handle both intents, taking a photo and picking a picture. Remember that we need to override the onActivityResult() method inside our Activity to do something with the image picked/taken by the user.
35.4. The bottom line
It’s important that you understand how intents work. It’s a key part of the Android environment and using them correctly will make your app work well with other apps. For example, if your app uses the code shown here and inside the device there’s a file browser application, it’s likely that the apps will work together to provide the best experience for the user.
35.5. External links
www.whatsapp.com/
http://stackoverflow.com/questions/11021021/how-to-make-an-intent-with-multiple-actions
http://stackoverflow.com/questions/2708128/single-intent-to-let-user-take-picture-or-pick-image-from-gallery-in-android
Hack 36 Getting user information when receiving feedback: Android v1.6+
Listening to your users’ feedback is one of many ways to help make your application successful. User feedback can highlight which sections they enjoy the most, and they’ll likely ask for new features that help to improve your application. During my years as a developer in the Android market, I’ve noticed that every time I fix a bug or add a feature requested by a user, more people start downloading my application. What’s at play here is word of mouth. The preceding is a good scenario—users let the developer know what problem they’re having, though sometimes users don’t provide enough explanation, which makes it difficult to identify the problem.
In this hack, I’ll show you how to append users’ device information to their feedback emails. This means it’ll be easier to learn important details from your users and get their problems fixed as soon as possible.
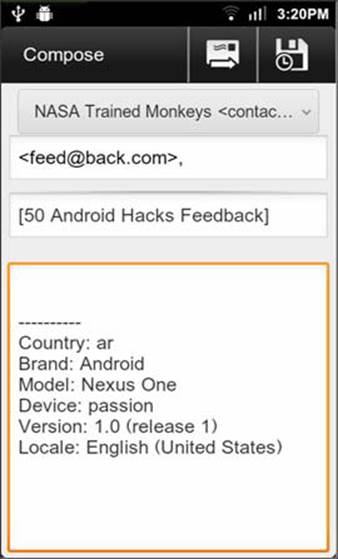
You can see the finished feature in figure 36.1. From the information provided, you can glean that I’m running the application version 1.0 from a Nexus One and that I’m in Argentina using an English locale.
Figure 36.1. Feedback email
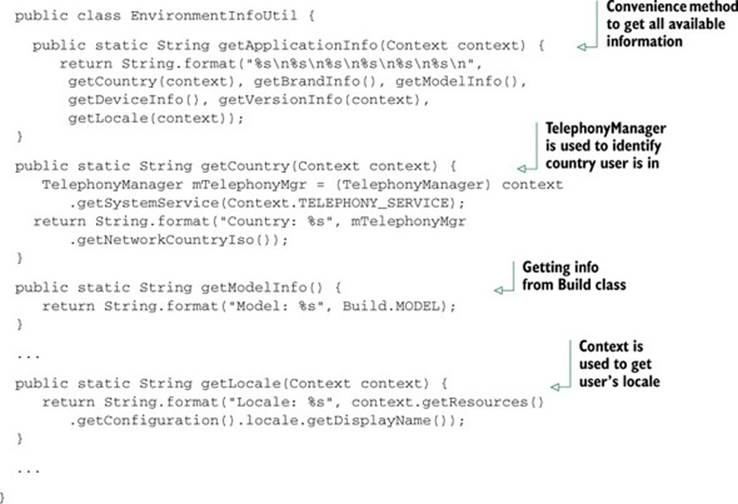
To create this, we’ll use two classes—one that takes care of collecting all of the information, and one that takes care of preparing the intent to send the email with feedback. Let’s first look at EnvironmentInfoUtil.java:
We already have a class that takes care of getting the information, but how do we send that through an email? We use the LaunchEmailUtil class:
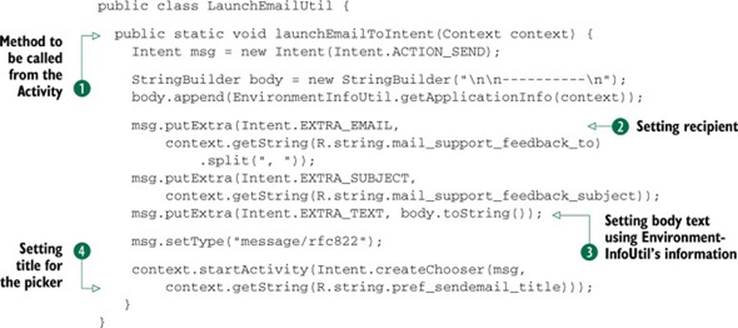
We can use this class from an Activity using the launchEmailToIntent() method ![]() . The logic is simple: we identify to whom we should send the email from strings.xml
. The logic is simple: we identify to whom we should send the email from strings.xml ![]() , and we provide a subject
, and we provide a subject ![]() . Just in case the user has more than one application that takes care of sending emails, we’ll create a picker with a custom title
. Just in case the user has more than one application that takes care of sending emails, we’ll create a picker with a custom title ![]() .
.
36.1. The bottom line
Being responsive to user feedback is a good way to improve your application’s popularity. Always remember to tell your users when you’re going to send private information.
36.2. External links
http://developer.android.com/reference/android/os/Build.html
http://developer.android.com/reference/android/telephony/TelephonyManager.html
Hack 37 Adding an MP3 to the media ContentProvider: Android v1.6+
If you’re an Android user, you should know that whenever you want to listen to new music on your device, the only thing you need to do is copy those files onto the external storage (usually an SD card). After the files are copied, you can open your music player and the files will be there. How does this work?
Inside Android is something called a ContentProvider. A ContentProvider is the correct way to offer data to external applications. For example, Android has a contacts ContentProvider. This means that inside your device is an application (Contacts) that offers aContentProvider to handle contacts. As you can imagine, you’ll also find a media ContentProvider.
When you copy your media files to the external storage, there’s a process that will browse all the folders looking for media, and it will add it to the media Content-Provider. After media’s added to the ContentProvider, everyone can use it.
Imagine you’re creating an application that downloads music. It’s important that every media file you download gets added to the media ContentProvider. Otherwise, the user will not be able to use that media from another application.
In this hack, we’ll look at two possible ways to add an MP3 file to the media Content-Provider. The demo application will hold two MP3 files in the res/raw folder and we’ll copy them to the external storage. After they’re copied, we can let the Content-Provider know that we’ve added new media.
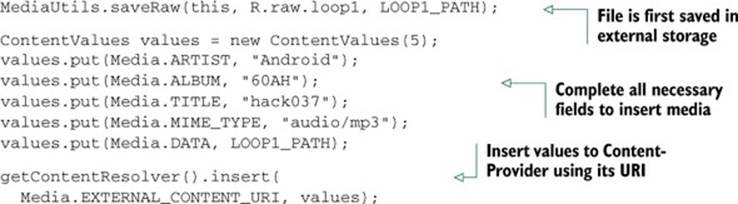
37.1. Adding the MP3 using content values
As with any other ContentProvider, we can add items to it using ContentValues. The code is the following:
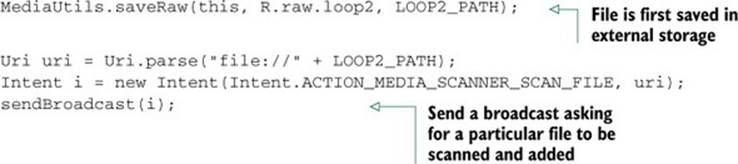
37.2. Adding the MP3 using the media scanner
The code included in the last section works fine, but it has a big problem. Some values were set by hand and perhaps it would be better to read them from the file. For example, the real author of loop1.mp3 is “calpomatt” and not “Android.” We’d know that by reading the MP3’s metadata.
Fortunately, there’s a way to avoid having to add those values by hand. The code is the following:
37.3. The bottom line
If you’re creating an application that handles media, you should pay attention to the media ContentProvider. Try understanding and using it correctly. It might be essential to your users.
37.4. External links
http://developer.android.com/guide/topics/providers/content-providers.html
http://stackoverflow.com/questions/3735771/adding-mp3-to-the-contentresolver
www.flashkit.com/loops/Pop-Rock/Rock/Get_P-calpomat-4517/index.php
www.flashkit.com/loops/Pop-Rock/Rock/_Hard-XtremeWe-6500/index.php
Hack 38 Adding a refresh action to the action bar: Android v2.1+
The ActionBar API was added to Android version 3.0 (Honeycomb). The idea behind the ActionBar pattern is to have a place where you locate the user inside your application and offer contextual actions.
You might have noticed that some applications have a refresh action in their ActionBars. You see a Refresh icon and when you press it, a refresh process runs while a ProgressBar spins. Unfortunately, the platform doesn’t contain a widget—it needs to be created by hand. In this hack, I’ll show you how to do it.
For the sake of compatibility we’ll use Jake Wharton’s ActionBarSherlock library. ActionBarSherlock offers the ActionBar API, but it can be used in older Android versions.
About ActionBarSherlock
You’ll need to know how to configure your application to use ActionBarSherlock to move on. You can learn how by visiting the library’s web page: http://actionbarsherlock.com/.
To add an ActionBar to an Activity, the first step is to make our application use the ActionBarSherlock theme. We can do this by using the following lines in the AndroidManifest.xml file:
<application
android:icon="@drawable/ic_launcher"
android:label="@string/app_name"
android:theme="@style/Theme.Sherlock">
The second step is to create an activity, but instead of extending Activity, we need to extend SherlockActivity. The code to show a progress icon in the action bar is the following:
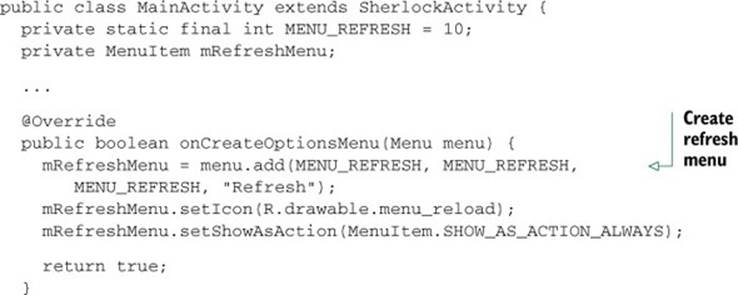
The result can be seen in figure 38.1.
Figure 38.1. Basic ActionBar

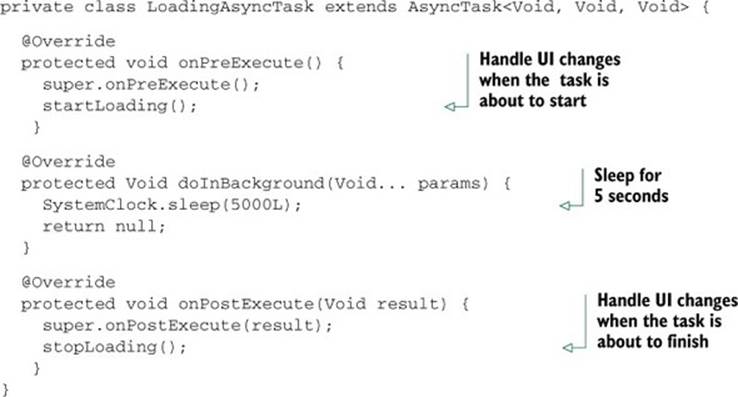
The next step is to handle what to do when a user presses the Refresh button in the action bar or the button in the middle of the screen. Both items should launch a background task. To simulate the background task, we’ll create an AsyncTask with the following code:
The execution of the AsyncTask is accomplished by a single method:
public void handleRefresh(View v) {
new LoadingAsyncTask().execute();
}
This method is called from the centered button from the Activity’s layout using the android:onClick property and from the action bar in the onOptionsItemSelected() method.
We have almost everything in place. The only missing part is how to handle UI changes when the background process starts and finishes. For the centered button, the logic is simple. We want to disable the button while the background task is working and enable it when finished. We can do this by using the setEnabled(boolean enabled) method. The big question here is how to replace the progress menu item with something spinning. To do that, we’ll use an ActionView.
The ActionView is explained in the documentation (see section 38.2):
An action view is a widget that appears in the action bar as a substitute for an action item’s button. For example, if you have an item in the options menu for “Search,” you can add an action view that replaces the button with a SearchView widget, as shown in figure [38.2].
Figure 38.2. An action bar with a collapsed ActionView for Search (top) and an expanded ActionView with the SearchView widget (bottom)

Because we’ll add the spinning widget through an ActionView, let’s create the view with XML:
<?xml version="1.0" encoding="utf-8"?>
<LinearLayout xmlns:android="http://schemas.android.com/apk/res/android"
style="?attr/actionButtonStyle"
android:layout_width="wrap_content"
android:layout_height="wrap_content"
android:addStatesFromChildren="true"
android:focusable="true"
android:gravity="center"
android:paddingLeft="4dp"
android:paddingRight="4dp" >
<ProgressBar
android:layout_width="30dp"
android:layout_height="30dp"
android:focusable="true" />
</LinearLayout>
Now that we have the XML, the rest is quite simple. This is how the startLoading() and stopLoading() methods handle the refresh menu item’s action view:
private void startLoading() {
mRefreshMenu.setActionView(R.layout.menu_item_refresh);
mButton.setEnabled(false);
}
private void stopLoading() {
mRefreshMenu.setActionView(null);
mButton.setEnabled(true);
}
38.1. The bottom line
This hack is an example of how to customize the action bar’s items. Nowadays, using an action bar is almost a must for every Android application, and thanks to Jake Wharton we have an Android library that backports the action bar to older platforms. It’s important to learn what’s possible and understand how it can fulfill your application use cases.
38.2. External links
http://developer.android.com/guide/topics/ui/actionbar.html
http://actionbarsherlock.com/
Hack 39 Getting dependencies from the market: Android v1.6+
It’s common in Android to find applications that use other applications to help perform tasks. Thanks to Android’s Intent system, you can ask other applications to help you finish a task. For example, instead of adding the logic to take a photo using the camera, you can ask the photo application to do it for you and return the result. Because you can create a program that offers its functionalities through an intent call, the market has lots of applications your application can use.
In this hack, we’ll see how to check if an application is installed before trying to launch an intent call. If it’s not installed, we’ll ask the user to get it from the market. For this example, we’ll use Layar. Layar is an application that offers a mobile browser that allows users to find various items based upon augmented reality technology. Developers can create something called a layer, which shows points of interest inside Layar’s browser. We’ll create an ordinary Android program that will have a link to a Layar’s layer. To create our application we’ll need the following:
· A way to know if Layar is installed
· Code to open the market to download Layar
· The intent call to open a specific layer
To check if Layar is installed, we’ll use the PackageManager class. The code to make this check is the following:
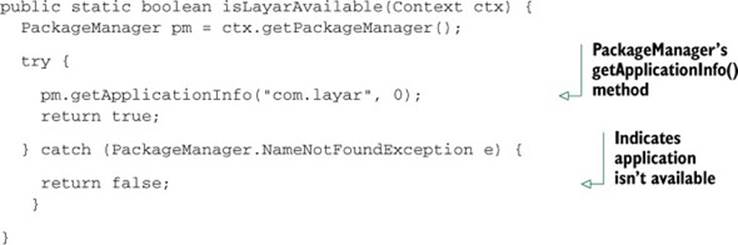
The easiest way to check if an application is available is to use PackageManager’s getApplicationInfo() method, using the application’s package name. If it exists, it’ll return an instance of ApplicationInfo populated with information collected from the AndroidManifest.xml’s<application> tag. If, while trying to get the application information, we get a NameNotFoundException, we can be sure that the application isn’t available.
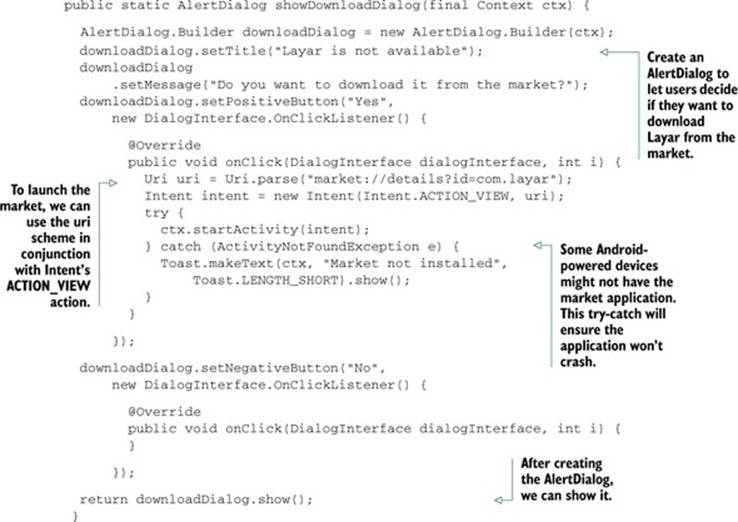
Now let’s run the code to open the market:
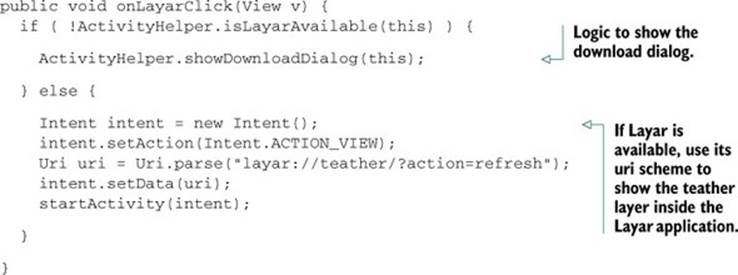
The final step is to add the login so we can decide if we should download Layar or launch our layer through an intent. This is the logic executed when a button is clicked:
39.1. The bottom line
A lot of applications are available that offer these kinds of intent APIs. Using them provides two important benefits. The first one is obvious: you’ll code less. The second is that your users might already be using the second application. This means they won’t need to learn a second way of doing things. For example, if you want your program to grab snapshots, instead of providing a new way to do it, you can ask it to use the photo application, which is well known by every Android user.
39.2. External links
http://layar.com/
http://developer.android.com/reference/android/content/pm/PackageManager.html
http://developer.android.com/reference/android/app/AlertDialog.html
Hack 40 Last-in-first-out image loading: Android v2.1+ Contribute- ed by William Sanville
One challenge that developers commonly face is displaying images from a network location. This challenge often comes in different forms, such as displaying many images in a list. An ideal solution for this type of challenge will include
· Maintaining a responsive UI
· Performing network and disk I/O outside the application’s UI thread
· Support for view recycling, as in the case of a ListView
· A caching mechanism for quickly displaying images
Many solutions to this problem use an in-memory cache for holding previously loaded images and a thread pool for queuing up images to load. But an often-overlooked feature is the order in which images are requested.
Consider the case of a ListView where each row contains an image. If a user “flings” the list in the downward direction, most image-loading solutions will request each image in the order its parent View is displayed on the screen. As a result, when the user stops scrolling, the rows currently on the screen, which are the most important rows at the current point in time, will load last. What you want is for the last-requested rows to “jump the queue” and be processed first.
40.1. Starting point: Android sample application
The Android Training section of the official documentation includes the article (see section 40.6) “Displaying Bitmaps Efficiently,” which we’ll use as our starting point. The article covers core concepts such as downsampling images to the proper size, using the LruCache class for in-memory caching (available in the Support Library, version 4), and a basic mechanism for performing work off the UI thread.
We’ll expand on this example application to meet the goal of loading the most recently requested images first. We’ll also make performance improvements over the original version by removing the problematic use of one AsyncTask instance per getView() call by the application’s adapter. The sample implementation makes it possible to cause a runtime exception when scrolling up and down several times, resulting in a RejectedExecutionException caused by too many AsyncTask instances, so that’s fixed in the final example.
40.2. Introducing executors
The AsyncTask solution isn’t suitable for large number of images, nor will it give us control over the priority of our tasks. Instead, we’ll use an executor service from the java.util.concurrent package and a priority queue to specify the order in which we request images. With the new implementation, we can maintain methods similar to AsyncTask, namely, cancelling tasks which have been pushed offscreen. Our last-in-first-out (LIFO) implementation will involve two classes, LIFOTask and LIFOThreadPoolProcessor.
Our new task object will maintain a static variable indicating the number of instances created. This will serve as the priority for the task, because a newly created task will have a higher counter. We use this counter to implement a compareTo() method, for sorting purposes later:
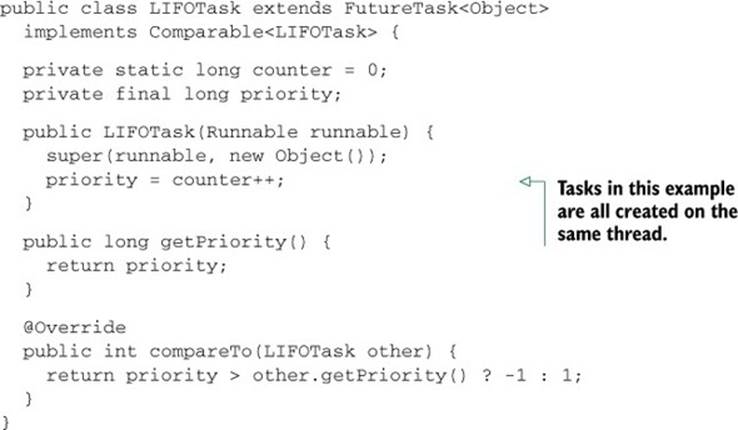
Our choice of base class here is important. We extend FutureTask, a class accepted by the executor classes because it exposes a cancel method, much like the old implementation using AsyncTask.
Building off the LIFOTask class, we’ll use its compareTo() method and the ThreadPoolExecutor class:
public class LIFOThreadPoolProcessor {
private BlockingQueue<Runnable> opsToRun =
new PriorityBlockingQueue<Runnable>(64, new Comparator<Runnable>() {
@Override
public int compare(Runnable r0, Runnable r1) {
if (r0 instanceof LIFOTask && r1 instanceof LIFOTask) {
LIFOTask l0 = (LIFOTask)r0;
LIFOTask l1 = (LIFOTask)r1;
return l0.compareTo(l1);
}
return 0;
}
});
private ThreadPoolExecutor executor;
public LIFOThreadPoolProcessor(int threadCount) {
executor = new ThreadPoolExecutor(threadCount, threadCount, 0,
TimeUnit.SECONDS, opsToRun);
}
public Future<?> submitTask(LIFOTask task) {
return executor.submit(task);
}
public void clear() {
executor.purge();
}
}
The noteworthy part of the class is the parameters passed to the ThreadPoolExecutor constructor. We let the client application choose the exact thread pool size, and choose a PriorityBlockingQueue to hold the incoming tasks that the client application submits. We then use thecompareTo() method of the LIFOTask object to get our desired ordering. Note that in this case, the keepAlive parameter is not applicable given the core and max thread pool sizes used.
40.3. UI thread—leaving and returning seamlessly
As Android developers, we know the importance of maintaining a responsive UI, so we offload time-consuming tasks, like I/O, to a background thread. Often, when this work is done, we want to update the UI. Android, much like other UI systems you may be familiar with, isn’t thread-safe. We must return to the main application thread before modifying any ImageViews. Attempting to modify the UI from outside the main thread will cause an exception.
The original implementation used the onPostExecute() method of AsyncTask. Because we’re replacing the use of AsyncTask with an executor, we’ll instead give a Runnable to our host activity. We’ll use the runOnUiThread() method of the Activity class, which will use aHandler under the hood to get our work added to the UI’s message queue.
Slipping something into the UI thread doesn’t come free of consideration. We have to be mindful of the following:
· ImageView instances may be recycled if a user scrolls in a ListView.
· The host activity may be destroyed before a task finishes.
As a result, every step of the Runnable used to process images checks if it should stop performing work. A stop condition is detected if the host activity sets a flag with ImageWorker’s setExitTasksEarly() method, which should be called from onPause(). Additionally, a stop condition is detected if the cancel() method of FutureTask is called.
40.4. Considerations
For use in a production application, the Android Training article suggests using a better disk-caching solution. The implementation provided in the original article is lacking in a few key areas. To provide a more complete example here, the disk cache implementation was modified to support rebuilding the disk cache upon application restarts, and no longer maintains two copies of downloaded files.
40.5. The bottom line
Time-consuming work, such as loading images, needs to be performed outside the UI thread. This will allow built-in components, such as ListView, to operate smoothly. You can give users a better experience by fine-tuning the order in which you load images using a LIFO queue.
Using a potentially unbounded number of AsyncTask instances is problematic, and the job can be better fulfilled by using executors. Additionally, Android provides a solid implementation of LruCache in the support library for implementing efficient caching solutions.
40.6. External links
http://developer.android.com/training/displaying-bitmaps/index.html
http://developer.android.com/tools/extras/support-library.html#Using
http://developer.android.com/reference/java/util/concurrent/ExecutorService.html
http://developer.android.com/reference/java/util/concurrent/FutureTask.html