50 Android Hacks (2013)
Chapter 10. Beyond database basics
If you’ve been developing Android applications, you may have used a database to persist information. In this chapter, we’ll cover some advanced tips for developers who are familiar with using databases in Android.
Hack 41 Building databases with ORMLite: Android v2.2+ Contribute- ed by William Sanville
Android applications usually have a requirement for some form of persistent storage, meaning data that’s saved between each time a user runs the application. To facilitate this need, Android ships with a relational database called SQLite. This hack covers creating an entire database instance using a tool called ORMLite, an Object-Relational Mapping (ORM) tool, as well as reading and writing data.
Our end goal is to create an application that displays articles broken down in categories and allows users to comment on each article. The finished application can be seen in figure 41.1.
Figure 41.1. Finished application
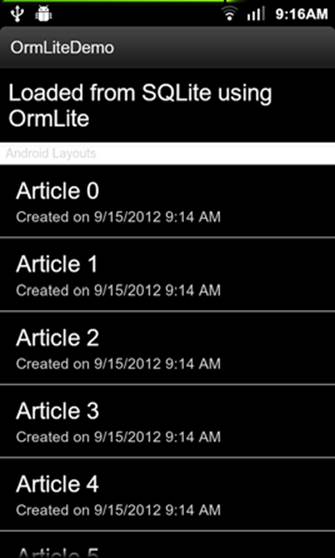
All database operations in this application are performed using ORMLite, rather than writing any SQL statements by hand. This approach can save time by reducing the amount of code needed to create the database schema.
41.1. A simple data model
The end result will have a list of categories and subcategories, with article titles. Clicking an article will bring the user to a new activity, which will display more article information, as well as allow the user to create comments. Graphically, our application will use the data model illustrated infigure 41.2.
Figure 41.2. Model
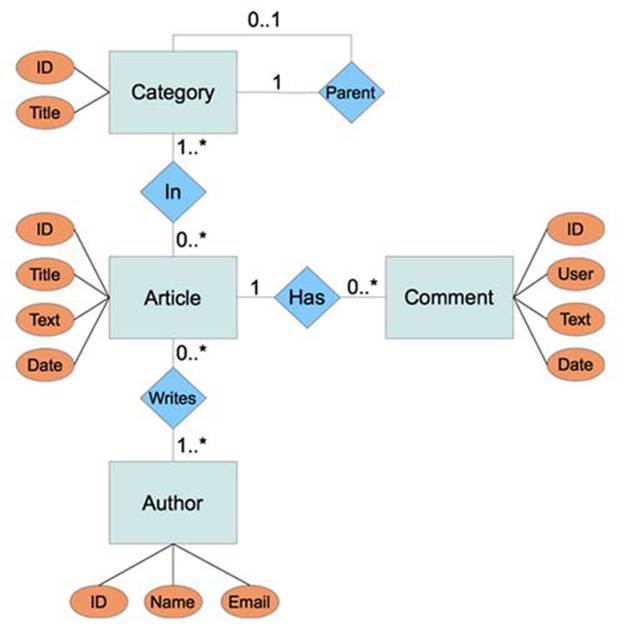
The diagram describes a database that allows the following:
· A Category has an ID and a title. It can also have one parent Category, but that isn’t required, because topmost categories won’t have a parent.
· An Article has an ID, title, body text, and a date indicating when it was created.
· An Author has an ID, name, and email address.
· Articles can belong to many different categories, and categories can have many articles.
· Articles can be written by multiple authors, and authors can write many articles.
· A Comment is about a single article and contains an ID, the name of the user who added the comment, some text, and a date indicating when it was created.
· Articles can have many comments.
When designing an application that needs a relational database, it’s useful to first start with a diagram of the data model like this one. This is known as an entity-relationship diagram (ER diagram). ER diagrams are used during the design stage of development to identify different entities and the relationships between them.
41.2. Getting started
ORMLite requires two JAR files from the releases section: core and android. This application uses version 4.41. After obtaining the dependencies, we’ll start creating our database schema.
The first step to using ORMLite is to implement the actual Java classes we’ll work with in our application. During this process, we’ll take special care to include annotations on our classes that will allow ORMLite to create the needed tables. This will also provide the ORM tool with information about how it should behave when querying the database for our objects, in the case of complex relations. Note that the annotations approach is one of several ways to specify the database schema generated by ORMLite.
The two most common annotations we’ll use with ORMLite are DatabaseTable and DatabaseField. These annotations will target classes and member variables respectively and will allow us to craft our resulting database tables. A simple implementation of the Article class might look like the following using annotations:
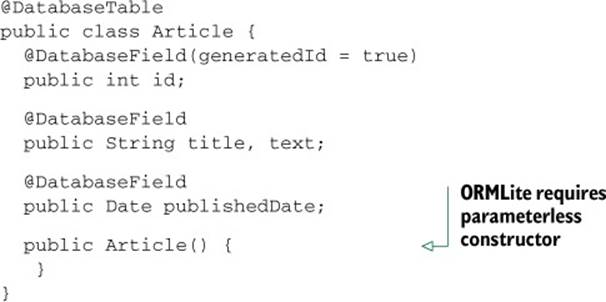
This class, when part of a full implementation, would result in the following CREATE TABLE SQL statement:
CREATE TABLE 'article'
('title' VARCHAR, 'publishedDate' VARCHAR, 'text' VARCHAR,
'id' INTEGER PRIMARY KEY AUTOINCREMENT);
Note the annotation on the field id. We specify the parameter generatedId = true to signify that this field is our primary key, and it should be automatically assigned by SQLite. Also note that, by default, ORMLite uses our class name as the SQL table and the names of the member variables as the columns of the table.
Last, observe that ORMLite requires a zero-parameter constructor on the classes it operates on. When ORMLite creates an instance of this class, in the case of a query which returns articles, it will use the parameterless constructor and set member variables using reflection (ORMLite can also use setters for member variables if preferred).
41.3. Rock-solid database schema
Building upon the first and simplest example of crafting a table from a Java class, we’ll demonstrate the following:
· Custom names for tables and columns
· Handling relationships between classes
· Referential integrity for relationships (API Level 8 and above)
· Cascading deletes (API Level 8 and above)
· Uniqueness constraints for cross references
Most real-world database instances will use these concepts and others. Even though we’re using an ORM tool to build our tables, we still have the expressive power to achieve a solid schema to enforce data consistency. For example, we might want to require that an article’s title and text must not be null. We also can ensure that if a category has a parent category, the parent must actually exist. Furthermore, we can specify that if an article is deleted, then all of its comments and mappings to categories will be deleted automatically by SQLite.
The first recommendation when defining our schema is to use final variables to define names for tables and columns. This, in practice, will make maintaining our code much easier in the scenario where a member variable is refactored or removed. Doing so will help cause compile-time errors, rather than tricky-to-spot runtime mistakes hidden away in SQL strings. Let’s define the Category class using this technique. We’ll declare public static final variables for the table and columns:
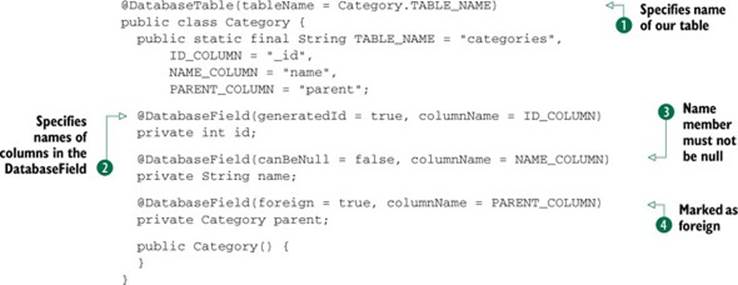
The additions here are many, and we’re not done yet. We now specify the name of our table in the DatabaseTable ![]() annotation and names of columns in the DatabaseField
annotation and names of columns in the DatabaseField ![]() annotations. We can use these public variables elsewhere in the host application for querying purposes.
annotations. We can use these public variables elsewhere in the host application for querying purposes.
Additionally, we require that the name member must not be null (columns can be null by default) ![]() . Finally, consider the annotation on the parent member. Any member variable which is defined as a table in our relation must be marked as foreign, using foreign = true
. Finally, consider the annotation on the parent member. Any member variable which is defined as a table in our relation must be marked as foreign, using foreign = true ![]() . This instructs ORMLite to only store the ID of the foreign object in the current table. Taking this class one step further, we can ensure that a parent category must exist. The final member declaration of the parent looks like the following:
. This instructs ORMLite to only store the ID of the foreign object in the current table. Taking this class one step further, we can ensure that a parent category must exist. The final member declaration of the parent looks like the following:
@DatabaseField(foreign = true, foreignAutoRefresh = true,
columnName = PARENT_COLUMN, columnDefinition = "integer references " +
TABLE_NAME + "(" + ID_COLUMN + ") on delete cascade")
private Category parent;
We can fine-tune the exact SQL used to define this column using columnDefinition. Here we have specified that the parent column has a foreign key to the categories table (the same table on which it is defined). This states that values in the parent column must either be null or exist in the categories table in the _id column. We also specify that records that refer to a parent category get deleted when the parent category is deleted. This is known as a cascading delete. This last technique is not required in a database, but for demonstration purposes we’ll include it. Our finished table for the Category class looks like the following:
CREATE TABLE 'categories' ('parent' integer references categories(_id)
on delete cascade, 'name' VARCHAR NOT NULL ,
'_id' INTEGER PRIMARY KEY AUTOINCREMENT )
The last concept in this section is specifying uniqueness in a column or combination of columns. Implementing the many-to-many relationship between articles and categories requires a cross-reference table. Put simply, a cross-reference table is used to match up entries from one table with entries from another. Therefore, we’ll define a two-column table to match IDs from articles to IDs from categories, logically storing which articles are in which categories. As an added sanity check, cross-reference tables usually include a constraint saying that the same combination of IDs can only appear in the table once. To express uniqueness, ORMLite uses two Boolean elements, unique and uniqueCombo. We’ll set uniqueCombo = true on the two member variables in the following class, ArticleCategory, which maps articles to categories:
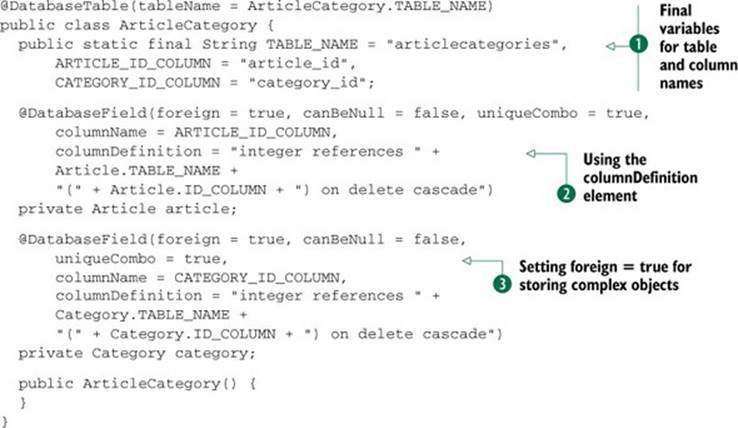
Notice the use of techniques described earlier, such as final variables for table and column names ![]() , referential integrity using the columnDefinition element
, referential integrity using the columnDefinition element ![]() , and the requirement of setting foreign = true
, and the requirement of setting foreign = true ![]() when storing complex objects. The resulting table is as follows:
when storing complex objects. The resulting table is as follows:
CREATE TABLE 'articlecategories'
('article_id' integer references articles(_id) on delete cascade,
'category_id' integer references categories(_id) on delete cascade,
UNIQUE ('article_id','category_id') );
Note the UNIQUE statement in the generated SQL.
41.4. SQLiteOpenHelper—your gateway to the database
SQLiteOpenHelper is an abstract class provided with Android that’s used to manage the interaction between the developer and the database file stored on a device. Developers are tasked with subclassing SQLiteOpenHelper and implementing two methods: onCreate() andonUpgrade(). The onCreate() method is where a developer specifies the exact schema of the database, and onUpgrade() is used in subsequent releases if a schema change is needed.
When using ORMLite, instead of extending SQLiteOpenHelper, we’ll instead extend OrmLiteSqliteOpenHelper to gain the benefits of using an ORM tool. We still, however, are tasked with implementing the onCreate() and onUpgrade() methods. Fortunately, all of the work done when carefully declaring the annotations on our classes makes this extremely easy. We’ll use static methods on the TableUtils class to create all of our needed tables. Under the hood, ORMLite will use Java’s reflection APIs to read our annotations and build the create table SQL statements we saw earlier.
Now that the hard work is already done, our implementation of the onCreate() method is the following:
@Override
public void onCreate(SQLiteDatabase sqLiteDatabase,
ConnectionSource connectionSource) {
try {
TableUtils.createTable(connectionSource, Category.class);
TableUtils.createTable(connectionSource, Article.class);
TableUtils.createTable(connectionSource, ArticleCategory.class);
TableUtils.createTable(connectionSource, Author.class);
TableUtils.createTable(connectionSource, ArticleAuthor.class);
TableUtils.createTable(connectionSource, Comment.class);
} catch (SQLException e) {
Log.e(TAG, "Unable to create tables.", e);
throw new RuntimeException(e);
}
}
Note that when using foreign keys, the ordering of these statements is critical. Since ArticleCategory’s table references the corresponding tables of Article and Category, it must be created after the tables it depends on.
At runtime, when ORMLite is first used to operate on the database, the onCreate() method will be called. At that time, looking at the logcat output will show us the exact statements used in the create process, for example:
INFO/TableUtils(2075): executed create table statement changed 1 rows:
CREATE TABLE 'categories'
('parent' integer references categories(_id) on delete cascade,
'name' VARCHAR NOT NULL , '_id' INTEGER PRIMARY KEY AUTOINCREMENT )
Implementing the onUpgrade() method will vary per application per upgrade. The simplest implementation involves dropping each table with TableUtils.dropTable() and then calling onCreate(). While perfectly suitable for development time, please be careful to ensure users do not incur data loss in a production environment. A solid implementation would likely transform data to the new schema, execute alter table statements if needed, and only drop a table if it’s no longer required.
Finally, because we’re targeting API Level 8 and up with this application, we can use foreign keys. However, foreign keys are not enabled by default. Doing so requires executing one line of SQL, which we can do when the database is opened by overriding onOpen(), as follows:
@Override
public void onOpen(SQLiteDatabase db) {
super.onOpen(db);
db.execSQL("PRAGMA foreign_keys=ON;");
}
41.5. Singleton pattern for database access
We’ll use our completed subclass of OrmLiteSqliteOpenHelper as a singleton in our host application. By maintaining a single instance of the helper class, our application will have a single connection to its SQLite database. In practice, this will eliminate the dangers of having multiple connections writing at the same time, which can result in failures at runtime.
Our model here includes one process, which has exactly one instance of our subclass, called DatabaseHelper. This instance can be used safely from multiple threads due to Java locking that Android does under the hood. Our implementation of the singleton pattern will look like this (with the nonsingleton parts omitted for brevity):
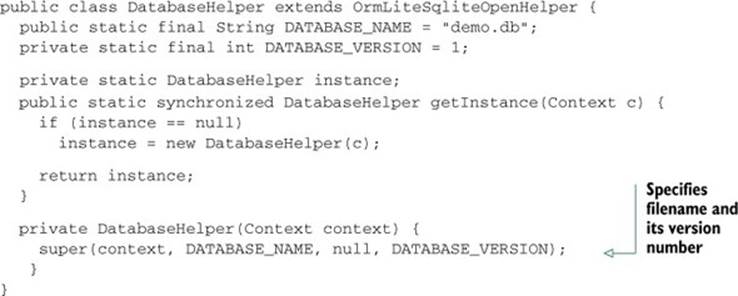
In the private constructor, we specify the filename of the database and its version number. The version number passed in the constructor works in conjunction with the onUpgrade() method mentioned in the earlier section.
41.6. CRUD operations made easy
Database developers will commonly refer to the abbreviation CRUD (create, read, update, and delete) when talking about requirements for an application. We’ll explore how to do these operations for the Java classes we implemented as part of this application.
Accessing our objects from the database will be done through an ORMLite class called a DAO (data access object). A DAO is a generic class with the type of the persisted class, and the type of its ID field. In the case of our cross-reference objects that don’t have an ID, such asArticleCategory, we’ll use Void for this type. On our DatabaseHelper singleton, we can obtain a DAO for each class using the getDao() method, passing in the appropriate class. For convenience, you may find it helpful to cast the result to use your actual generics, as in the following example. We’ll use that convention extensively in the demo application:
public class DatabaseHelper extends OrmLiteSqliteOpenHelper {
/* Remainder omitted */
public Dao<Article, Integer> getArticleDao() throws SQLException {
return getDao(Article.class);
}
After a DAO is obtained, it exposes a number of methods for creating, updating, deleting, and querying for objects. To create a Category record in the database, for example, we simply create a Category instance, fill out the information we want persisted, and call the create() method on the DAO. ORMLite will then set the ID field of our object that was assigned by the database. Suppose we wanted to create two categories, one nested in the other. We can do so like this:

Reading a single object given its ID field is as simple as calling the queryForId() method on the DAO. The DAO objects also expose updates and deletes to single objects just as easily. By passing in an instance with its ID field already set, these operations are just as easy. Suppose we know the ID of the first item created in the previous snippet. We can rename it as follows:
Category renamed = new Category(1, "Android Tutorials", null);
categoryDao.update(renamed);
We can also delete objects similarly:
Category toDelete = new Category();
toDelete.setId(2);
categoryDao.delete(toDelete);
When updating, it’s important that the source object has all appropriate member variables filled out. When deleting, all that’s required is the ID. In the above example, we could, of course, have passed in the original instances tutorials and programmingTutorials to the update and delete methods respectively.
41.7. Query builders
Operating on a single record in a database is as simple as it gets, and we can express more complicated queries that return multiple records and update and delete many records, as well, using the QueryBuilder, UpdateBuilder, and DeleteBuilder classes, all available from a DAO object by calling queryBuilder(), updateBuilder(), and deleteBuilder(), respectively.
First, let’s write a query that will return the names of all to- level categories in the database. We’ll use the same DAO object as before, of type Dao<Category, Integer>:
PreparedQuery<Category> query = categoryDao.queryBuilder()
.selectColumns(Category.NAME_COLUMN)
.where()
.isNull(Category.PARENT_COLUMN)
.prepare();
List<Category> topLevelNames = categoryDao.query(query);
The methods on the QueryBuilder class can be used to form a query using the typical SQL operators. You can use combinations of and(), or(), eq() for equals, not(), ge() for greater than or equals, and so on to form your where clause. The QueryBuilder and its update and delete counterparts use a fluent interface, meaning each method returns a reference to the same object, so developers will typically “chain” calls together for readability purposes.
In this example, we also do a projection by calling selectColumns() and specifying only the columns we want filled in on our resulting objects (just the name). After expressing our query, we call prepare() on the QueryBuilder, resulting in a typed PreparedQuery instance. Passing the result to the query() method will return our toplevel categories.
Continuing with builders, let’s look at some more examples. Suppose we want to count the number of child categories given an ID of the parent, which we denote as a variable, parentId. We can use another method exposed by the QueryBuilder to signal that we’re performing a count operation, setCountOf(). Then we use the countOf() method on our DAO:
PreparedQuery<Category> countQuery = categoryDao.queryBuilder()
.setCountOf(true)
.where()
.eq(Category.PARENT_COLUMN, parentId)
.prepare();
long children = categoryDao.countOf(countQuery);
Delete operations are very similar. Suppose we want to run a delete statement to remove any articles that are older than 30 days. We can do that using the DeleteBuilder class, as in the following example:
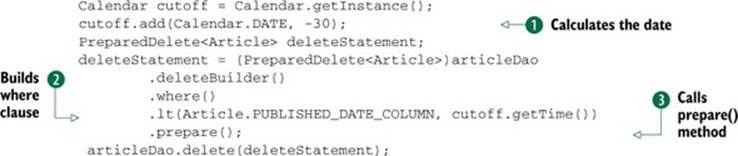
Let’s dissect the example. We first calculate the date that is 30 days prior ![]() . We use the lt() function to build our where clause
. We use the lt() function to build our where clause ![]() , specifying that we should delete values that are less than the given date. Finally, after calling the prepare() method
, specifying that we should delete values that are less than the given date. Finally, after calling the prepare() method ![]() , we must typecast this to aPreparedDelete. The reason for this is that the delete() method on our DAO doesn’t accept a PreparedQuery, which is the type that prepare() will return. We know ahead of time that this cast is correct. Note that in comparison operations, such as less-than, we must be careful to pass to the ORM the same type as we defined in our class. Here we pass in a Date, which corresponds to the member variable on the Article class:
, we must typecast this to aPreparedDelete. The reason for this is that the delete() method on our DAO doesn’t accept a PreparedQuery, which is the type that prepare() will return. We know ahead of time that this cast is correct. Note that in comparison operations, such as less-than, we must be careful to pass to the ORM the same type as we defined in our class. Here we pass in a Date, which corresponds to the member variable on the Article class:
private Date publishedDate;
Now, when an article is deleted, we must ensure that our data integrity is maintained. In this case, that means the IDs we delete with this statement should no longer appear in the Article to Category cross-reference table, and similarly, the IDs shouldn’t appear in the Comment class’s table. Fortunately for us, our delete statement also has a hidden feature. Because we took care when designing our database schema earlier, we specified a cascading delete on the ArticleCategory class to take care of this for us. We can also use the same strategy when implementing theComment class. Thus, the above delete query is all that’s needed to delete articles including any comments and their mappings to categories.
These examples are just some of the types of statements we can form using the builder objects. A full application will likely contain many more combinations of selecting data and performing inserts, updates, and deletes. Furthermore, we have yet to touch on the tricky subject of handling foreign object references and the options available when querying for data stored in different tables.
41.8. Data types and tricky foreign types
Up until this point, we’ve let ORMLite handle mapping our Java types to SQLite storage classes. We also haven’t shown complex queries that include data from more than one table. Fortunately, ORMLite allows us to tune its behavior using the same annotations we used when setting up our database schema.
The simplest change we can make is changing the storage class of a member variable, such as a date. By default, ORMLite will map the type java.util.Date to VARCHAR and store dates in the yyyy-MM-dd HH:mm:ss.SSSSSS format. If, for example, we wish to store dates as a number (as in number of milliseconds since the epoch), we can use the following modified annotation from the Article class:
@DatabaseField(canBeNull = false, dataType = DataType.DATE_LONG,
columnName = PUBLISHED_DATE_COLUMN)
private Date publishedDate;
This will result in a create table statement that uses the BIGINT storage class.
Now, let’s handle the case of a foreign object. We know that a Category can have a parent, but how should the ORM behave when we retrieve a Category that has one? Should the parent in its entirety be returned? What about the parent’s parent? ORMLite introduces foreign auto refresh to specify this behavior and foreign refresh level to configure it. In the default scenario, querying for a category will result in the parent being set, with only the ID field populated. The default behavior here will be the most efficient in terms of the SQL queries performed by the ORM. When enabling the auto-refresh features, developers should be aware of a potentially large amount of statements being executed, since the version at the time of writing (4.41) doesn’t perform joins, but instead, executes additional statements.
Here’s a concrete example for a one-to-one relation. Suppose we always want a Category’s parent refreshed. We can set foreignAutoRefresh = true on the annotation of the parent member variable, such as this:
@DatabaseField(foreign = true, foreignAutoRefresh = true,
canBeNull = true, columnName = PARENT_COLUMN,
columnDefinition = "integer references " + TABLE_NAME +
"(" + ID_COLUMN + ") on delete cascade")
private Category parent;
When enabling this feature, ORMLite will by default perform two levels of refresh. With the above definition of the annotation, ORMLite will populate a Category, its parent, and its grandparent (if available). The default of 2 can be changed using the maxForeignAutoRefreshLevelelement of the annotation. If anything, changing this value to 1 would be the most likely change (again, increasing this value will result in more SQL queries being executed).
Now, suppose we’re interested in a relation that is one-to-many, as in the case of one Article with potentially many comments. We can introduce a member variable on the Article class and annotate it as a ForeignCollectionField. We can use this field to either selectively refresh all the comments, or have it automatically happen when an article is loaded, as specified by the eager element. Here’s an example:
@DatabaseTable(tableName = Article.TABLE_NAME)
public class Article {
...
@ForeignCollectionField(eager = true)
private ForeignCollection<Comment> comments;
}
With this definition, ORMLite won’t add any extra columns to the generated table for the Article class. Instead, it will spin up a DAO and query for all the comments associated with each article. As you can imagine, this may be costly when querying for many articles if each article has many comments. Thus, we’ll see how to work with a non-eager collection, which can be tricky. Let’s remove the eager = true element from our annotation (false is the default):
@ForeignCollectionField
private ForeignCollection<Comment> comments;
Now, ORMLite won’t query for the associated comments by default. However, we must be careful when dealing with the comments variable, since its type is ForeignCollection. When the collection is non-eager, invoking any method on the collection will cause I/O, such as size() anditerator(). Also, our debugger may be calling iterator() for us, resulting in unexpected I/O and a strangely populated collection when we didn’t expect it. The ORMLite documentation recommends populating a collection of this form by using the toArray() method on the collection. Here’s one example of loading a single article, and then all of its comments:

Last, please consult the documentation (http://mng.bz/84k8) on properly calling close() on an iterator, such as one obtained from a ForeignCollection.
41.9. Raw SQL queries
Writing out a SQL query can often be much more efficient than relying on the ORM to build and execute the needed queries. This comes into play when dealing with data stored in multiple tables, as in the case with foreign objects discussed earlier. In performance-critical areas, it’s more efficient to write a SQL join rather than relying on the DAO methods to automatically or selectively refresh objects.
Performing a raw SQL query involves first obtaining a DAO, and then using one overload of the queryRaw() method. Each signature of the queryRaw() method expects a variable number of strings as the last parameter. This is to allow developers to parameterize queries and have the ORM handle escaping the values. This is extremely important when performing queries based on user input; otherwise, your database will be open to SQL injection attacks.
The overloads of queryRaw() allow us to fine-tune exactly what we receive as the result for our queries. Our choices are
· A list of string arrays, one array per result, in which each array holds the raw string values of the columns selected
· A list of object arrays, one array per result, which are typed based on our input
· A list of fully baked class instances, given a parameterized RawRowMapper
We’ll demo the RawRowMapper case, because it involves the most explanation, yet often results in code that is easiest to reuse. Suppose we want a list of all the articles in the database along with their category names (along with IDs). Using the ORM to perform this operation would result in an amount of queries that is proportional to the number of entries in the database. We can do better by using one query that joins three tables, namely, the tables for Article, Category, and the cross-reference class ArticleCategory. Our query will be this:
select a.title, a._id, c.name, c._id from articles a, categories c,
articlecategories ac
where ac.article_id = a._id and ac.category_id = c._id;
First, let’s define a class to hold our results:
class ArticleCategoryName {
public String articleTitle, categoryName;
public Integer articleId, categoryId;
}
Next, we implement the RawRowMapper, which will be invoked on each record returned by our query. Its job is to turn the raw string array representing the columns returned by the database into an instance of our desired type, which is ArticleCategoryName in this case (note the use of generics):
class ArticleWithCategoryMapper
implements RawRowMapper<ArticleCategoryName> {
@Override
public ArticleCategoryName mapRow(String[] columnNames,
String[] resultColumns) throws SQLException {
ArticleCategoryName result = new ArticleCategoryName();
result.articleTitle = resultColumns[0];
result.articleId = Integer.parseInt(resultColumns[1]);
result.categoryName = resultColumns[2];
result.categoryId = Integer.parseInt(resultColumns[3]);
return result;
}
}
When parsing results in the mapRow() method, it’s important to check for data consistency. Putting all the components together, we can get a list of all the article names and their categories using this:
GenericRawResults<ArticleCategoryName> rawResults;
String query = "select a.title, a._id, c.name, c._id from articles a,
categories c, articlecategories ac
where ac.article_id = a._id and ac.category_id = c._id";
ArticleWithCategoryMapper mapper = new ArticleWithCategoryMapper();
rawResults = articleDao.queryRaw(query, mapper);
List<ArticleCategoryName> results = rawResults.getResults();
41.10. Transactions
Transactions are a key component in database operations, because they allow multiple statements to be treated as a single atomic unit. A transaction guarantees that one of two possibilities will happen:
· All statements will be executed and committed if no errors are encountered.
· If an error is encountered at any point in a transaction, the entire transaction is rolled back.
As a convenience, ORMLite provides a class called TransactionManager that wraps the details of beginning a transaction, marking one as successful, and ending a transaction. A TransactionManager exposes just one interesting method, which is callInTransaction(). This method accepts a Callable, which is just like a Runnable, except Callable has a return value.
To run a transaction, we choose to expose this feature as a method of our OrmLiteSqliteOpenHelper subclass, DatabaseHelper:
public class DatabaseHelper extends OrmLiteSqliteOpenHelper {
public <T> T callInTransaction(Callable<T> callback) {
try {
TransactionManager manager;
manager = new TransactionManager(getConnectionSource());
return manager.callInTransaction(callback);
} catch (SQLException e) {
Log.e(TAG, "Exception occurred in transaction.", e);
throw new RuntimeException(e);
}
}
}
Running a transaction is as simple as putting our database operations inside a Callable. Here’s an example method that performs two writes inside a transaction and returns the resulting Article:
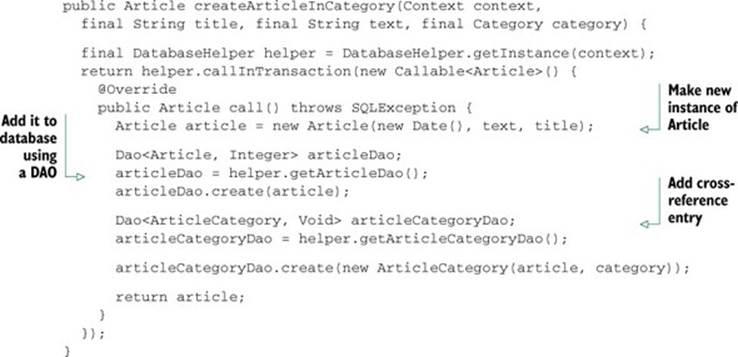
We chose to use a transaction in this case because we want both write operations to succeed, or in the case of failure, to have no writes committed. This approach is recommended when performing multiple writes, for data consistency. Additionally, transactions can in some cases increase the performance of a combination of statements, especially a mix of reads and writes.
41.11. The bottom line
ORMLite can greatly simplify database development in an Android application. It can be used to create an entire database instance just by properly annotating your Java classes. It also handles mapping database queries to instances of your classes, removing the need for boilerplate code.
For performance-critical operations that involve multiple tables, consider writing join statements by hand, and use the queryRaw() method on a DAO. This, in practice, will be much more efficient than querying additional tables one by one, as in the case of ORM-generated statements. Furthermore, consider using transactions to batch together several writes to ensure data consistency. Last, a singleton pattern is encouraged for your subclass of SQLiteOpenHelper to eliminate problems when writing from multiple threads.
41.12. External links
http://ormlite.com/javadoc/ormlite-core/doc-files/ormlite_1.html
http://ormlite.com/javadoc/ormlite-core/doc-files/ormlite_2.html#IDX195
http://touchlabblog.tumblr.com/post/24474750219/single-sqlite-connection
Hack 42 Creating custom functions in SQLite: Android v1.6+
Android uses SQLite for its databases. Although it offers a good API, you’ll sometimes feel a bit limited. What would you do if you want to sort results using a comparator? Did you ever try to implement a query that returns the distance between two GPS coordinates? One of SQLite’s biggest limitations is its lack of math functions, making some queries impossible to achieve.
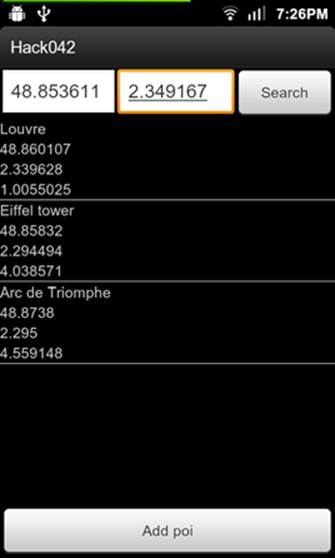
In this hack, I’ll show you how to use the Android NDK to provide custom functions to your SQLite queries. We’ll create an application that uses a custom SQLite function to calculate distances from different POIs (points of interest) in a database. This function will use the GPS coordinates of the POIs and the haversine formula to return the distance in kilometers.
We can see the application running in figure 42.1. In this figure, we see that different POIs from France were added. Later, the user searches using the Notre Dame de Paris’ GPS coordinates and the distance to the different POIs is shown.
Figure 42.1. Distance from Notre Dame to different POIs in France
To make this work, we’ll use the Android NDK. We’ll use Java to create POIs and insert them in the database using the ordinary SQLiteOpenHelper class, but when the user searches the database we’ll use an NDK call. We’ll first see how to handle the Java part, and afterward we’ll see the NDK code.
42.1. Java code
The idea to make this work correctly is to keep doing the simple database queries using the Java API and only use the NDK when we need to use a custom function. The interesting code in the Java part is the DatabaseHelper class. This class will be in charge of calling the NDK code when necessary.
Let’s check the DatabaseHelper’s code:
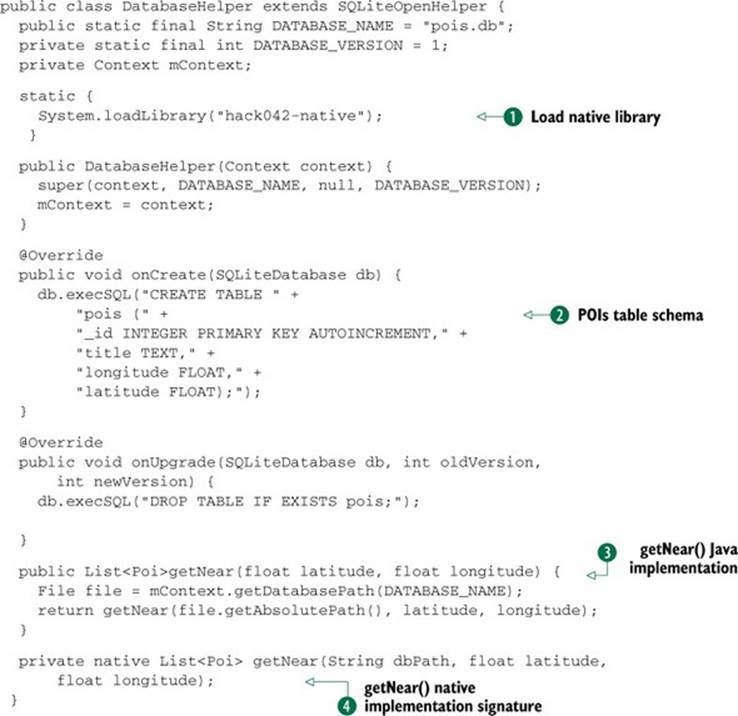
The fist important line is loading the native library ![]() . System.loadLibrary() is usually called from a static block. This means that when the class is loaded, it will also load the native library called hack042-native. In the onCreate() method
. System.loadLibrary() is usually called from a static block. This means that when the class is loaded, it will also load the native library called hack042-native. In the onCreate() method ![]() , we can learn what the database schema looks like. Our DatabaseHelper class contains a getNear()
, we can learn what the database schema looks like. Our DatabaseHelper class contains a getNear()![]() method that will be called when the user clicks on the Search button. This method is just a wrapper for its native version
method that will be called when the user clicks on the Search button. This method is just a wrapper for its native version ![]() . The Java version is the public one because the native implementation needs the database path, and only the DatabaseHelper class knows where it is.
. The Java version is the public one because the native implementation needs the database path, and only the DatabaseHelper class knows where it is.
42.2. Native code
We’ll use the NDK to query our database when we need to use custom functions. To do so, we’ll need to be able to operate with SQLite from the NDK, and that means we’ll need to compile it. Fortunately, it’s easier than you would expect. We simply add .c and .h file extensions. Adding sqlite3.c to the LOCAL_SRC_FILES inside the Android.mk file is enough to use it.
Inside main.cpp we have all the NDK code. We’ll need to do the following:
· Use JNI to create Java objects.
· Use the SQLite’s C/C++ API to query our database.
· Return a List<Poi> as a jobject.
Let’s take a look at the implementation of getNear():
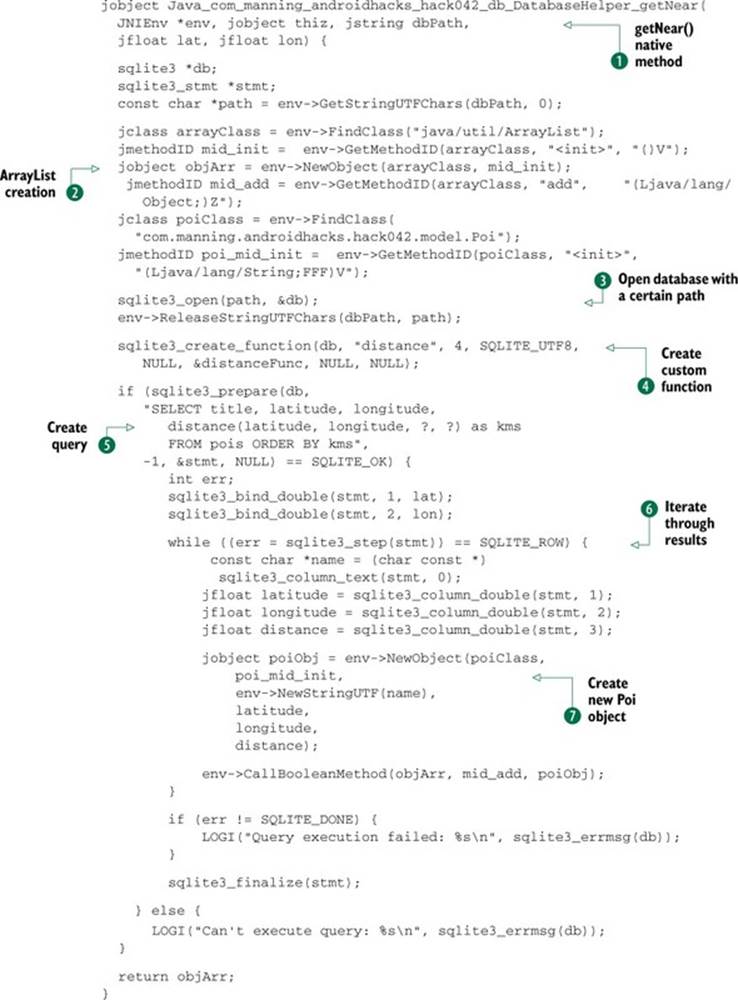
The first thing to notice is the difference between the Java and NDK signatures ![]() . Since we need to return a List<Poi>, we create a new ArrayList using JNI
. Since we need to return a List<Poi>, we create a new ArrayList using JNI ![]() . After that, we can open the database using the path provided
. After that, we can open the database using the path provided ![]() and create a custom function passing a function pointer
and create a custom function passing a function pointer ![]() . The distance() function is defined inside the main.cpp file. After the custom function is created, we can write our query using the distance() function
. The distance() function is defined inside the main.cpp file. After the custom function is created, we can write our query using the distance() function ![]() . The final step is iterating through the results
. The final step is iterating through the results ![]() , create a Poi object using the row data
, create a Poi object using the row data ![]() , and add it to the list.
, and add it to the list.
Now that we have all the native code in place, whenever we call the DatabaseHelper’s getNear() method, it will use the custom function created in this section.
42.3. The bottom line
Using the NDK might sound like a lot of work, but doing so will give you more flexibility. You might be thinking that instead of returning an array from native code, you could query the database through Java, calculate the distance and sort after doing the query. This is true, but if the database is big enough, using an array wouldn’t work. The best way to solve this is returning a Cursor from the native code. The implementation to return a Cursor would be much harder to code, but someone already did it. You can check the android-database-sqlcipher source code; it’s already implemented there. When you have a Cursor, you’ll be able to use a CursorAdapter as an adapter for your ListView, making everything extremely easy.
You should also know that there’s a way to avoid creating custom functions. You can precalculate values and insert them into the row. This might be sufficient, depending on the type of queries your application does.
42.4. External links
http://en.wikipedia.org/wiki/Haversine_formula
http://developer.android.com/reference/android/database/sqlite/package-summary.html
www.sqlite.org/capi3.html
www.movable-type.co.uk/scripts/latlong.html
www.thismuchiknow.co.uk/?p=71
https://github.com/sqlcipher/android-database-sqlcipher
Hack 43 Batching database operations: Android v2.1+
A good pattern inside Android applications is to save your data inside a database and show it in a ListView using a CursorAdapter. If you use a ContentProvider to handle the database operations, you can return a Cursor that will be updated whenever the data changes. This means that if you do everything correctly, you can work on the logic to modify the information inside a table from a background thread and the UI will update automagically. The problem with this approach is that when you do a large number of operations to the database, your Cursor will get updated frequently, making your UI flicker.
In this hack, we’ll see how to use batch operations to avoid this flickering, creating three possible implementations to understand the problem and find a solution:
· Without batching
· With batching
· With batching and using the SQLiteContentProvider class
The demo application is simple. It shows a list of numbers from 1 to 100. When the user clicks on the Refresh button, the old numbers are deleted and new ones are created. To accomplish this, we’ll code three different implementations of the following:
· An Activity to display the numbers
· An Adapter to create and populate the views for the ListView
· A ContentProvider to handle queries to the database
· A Service that will update the table through the ContentProvider
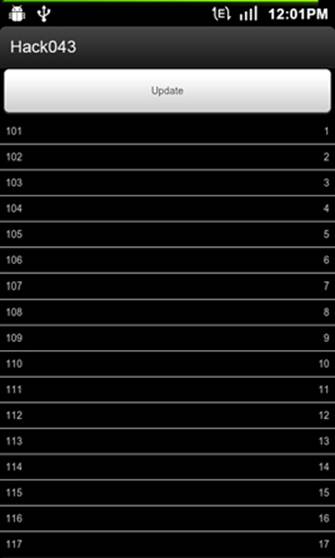
You can see the finished application in figure 43.1. Each row shows the database ID on the left and the generated number on the right.
Figure 43.1. List with numbers
As you an imagine, most of the code for the three solutions is similar. Every implementation will have its own Activity, Adapter, Service, and Content-Provider. Since you can go through the sample code, here we’ll only discuss the differences, which reside in the Service and in the ContentProvider.
43.1. No batch
This is the simplest example. Inside the Service, we just hit the ContentProvider whenever we want to do an operation to the table. Here’s the Service code:
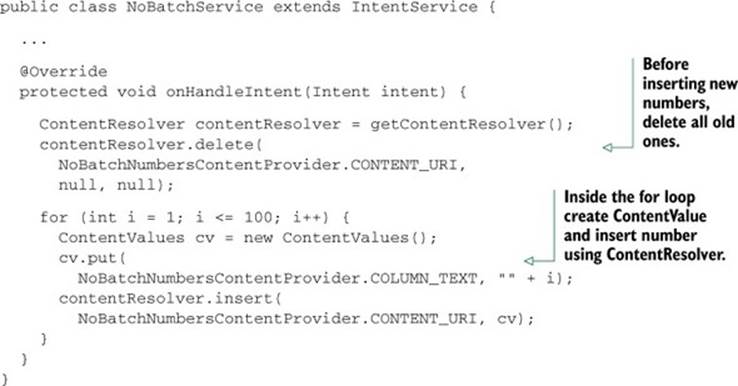
Try running the application and test this implementation. The best way of noticing the flickering is clicking on the Refresh button and trying to scroll over the list of numbers. You’ll find out that it’s very difficult to scroll.
This happens because every time we do an insert or a delete using the NoBatchNumbersContentProvider, it does this:
getContext().getContentResolver().notifyChange(uri, null);
This means that every Cursor retrieved from NoBatchNumbersContentProvider's query() method will be updated and the Adapter will make the ListView refresh itself.
43.2. Using batch operations
The second approach is using batch operations. Inside the ContentProvider class, we have the following method:
public ContentProviderResult[] applyBatch(
ArrayList<ContentProviderOperation> operations);
The idea is to create a list of ContentProviderOperations and apply them all together. In this case, the Service looks like this:
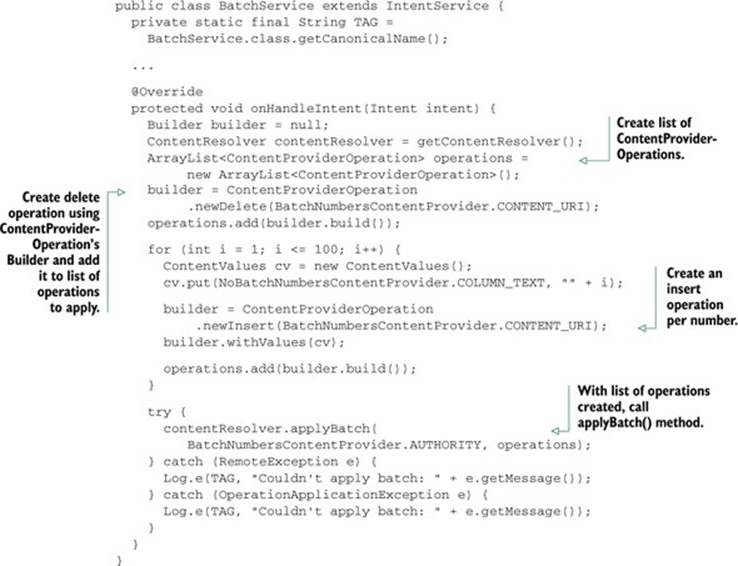
If you test this approach, you won’t notice any difference: the flickering is still there. Why?
If you go to Android’s ContentProvider implementation, you’ll notice that the applyBatch() method doesn’t do anything in particular. It just iterates through the operations and calls the apply() method, which will end up calling our insert() / delete() methods inside theBatchNumbersContentProvider class.
All this might sound awkward, but it’s exactly what the applyBatch() method documentation says (see section 43.5):
Override this to handle requests to perform a batch of operations, or the default implementation will iterate over the operations and call apply(ContentProvider, ContentProviderResult[], int) on each of them. If all calls to apply(ContentProvider, Content-Provider-Result[], int) succeed then a ContentProviderResult array with as many elements as there were operations will be returned. If any of the calls fail, it is up to the implementation how many of the others take effect.
43.3. Applying batch using SQLiteContentProvider
We already know that applying the changes in batch is the solution for our problem and we also know that we need to somehow modify the applyBatch() method inside our ContentProvider implementation to make this work. Fortunately, someone already did it.
There’s a class inside the Android Open Source Project (AOSP) called SQLiteContentProvider that doesn’t belong to the SDK. It’s inside com.android.providers .calendar. For this case, instead of extending ContentProvider, we’ll extend from SQLiteContentProvider.
The Service code is exactly the same as the second approach, so let’s look inside the SQLiteContentProvider’s applyBatch() method:
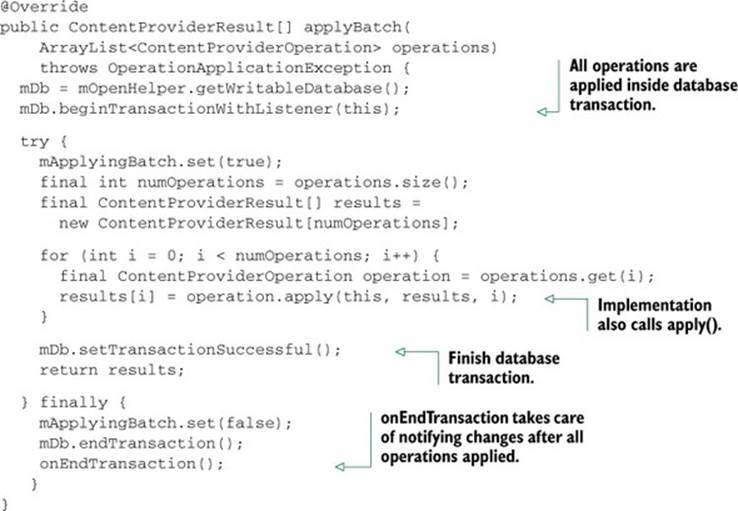
So far, we know that every operation is applied inside a database transaction, but this implementation still calls the apply() method for every operation. Why wouldn’t we get a notification for every insert() / delete()?
To understand why this works correctly, we need to read the SQLiteContentProvider’s insert() method:
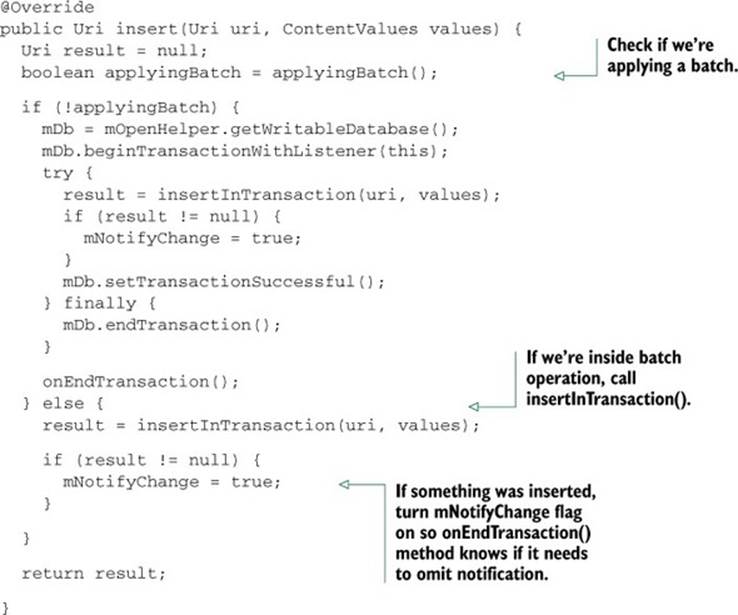
The logic for insertInTransaction() is inside our implementation. It’s the same as the others, but it lacks the notification logic.
If you run this implementation, you’ll see how the flicker disappeared because the UI will only be refreshed when all the operations get applied.
43.4. The bottom line
It’s a shame that the SQLiteContentProvider class doesn’t belong to the SDK. If your ContentProvider is using a SQLite database to store data, give it a try. Your UI will look more responsive and applying operations inside a single transaction will make everything run faster.
43.5. External links
http://developer.android.com/reference/android/content/ContentProvider.html
http://stackoverflow.com/questions/9801304/android-contentprovider-calls-bursts-of-setnotificationuri-to-cursoradapter-wh