50 Android Hacks (2013)
Chapter 11. Avoiding fragmentation
Fragmentation is a serious issue for Android developers. In this chapter, we’ll look at some tips on how to achieve certain tasks and still be backward compatible with older versions.
Hack 44 Handling lights-out mode: Android v1.6+
Since the early beginnings of Android, the whole system has had a status bar at the top of the screen. In Android Honeycomb, the status bar was moved to the bottom of the screen.
Applications such as games or image viewers need the full attention of the user, and most of them take the whole screen to display themselves. For instance, in the default Gallery application, when you click on an image, it’s shown full-screen without any other content.
Imagine you need to provide this feature in your application, and it needs to be compatible with every Android version. In this hack, we’ll build a simple toy application that will have a red background and, when we press it, the application will enter lights-out mode. We’ll take care of Android 2.x and 3.x separately, but then we’ll merge them into a single implementation.
44.1. Android 2.x
Let’s build the application with Android 2.x code first. In Android 2.x, we have the concept of full-screen mode. The idea behind full-screen mode is to allow the application’s window to use the entire display space.
We’re also interested in another concept: the application’s title. The application’s title is the gray bar we get on the upper part of the screen.
Let’s look at the code that creates the effect:
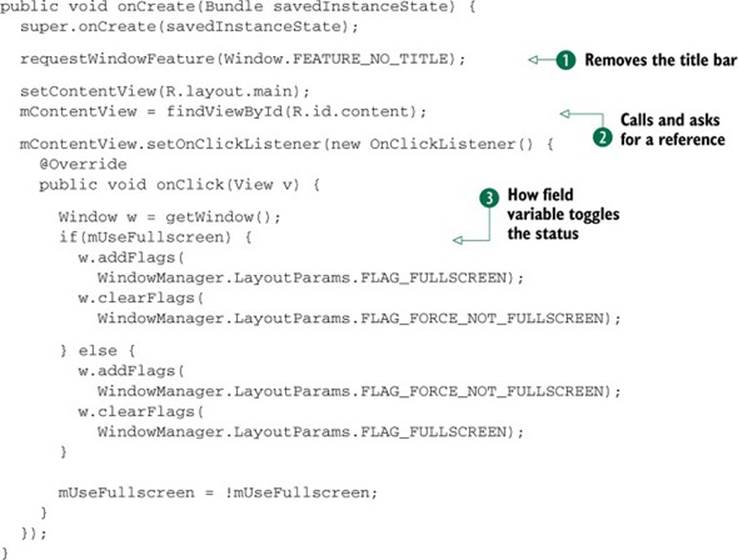
The code is self-explanatory. We first remove the title bar ![]() . This needs to be done before the setContentView() call is made. Afterward, we make an ordinary setContentView() call and ask for a reference to the root element of our view
. This needs to be done before the setContentView() call is made. Afterward, we make an ordinary setContentView() call and ask for a reference to the root element of our view ![]() . This element will work as an on/off switch for the full-screen mode.
. This element will work as an on/off switch for the full-screen mode.
The last part of the code states how the full-screen mode should work. You can see in ![]() how a field variable is used to toggle the status.
how a field variable is used to toggle the status.
44.2. Android 3.x
In Android 3.x, the concepts explained for Android 2.x vary a little. The title bar ended up being the action bar on the upper part of the screen, and the status bar went to the bottom of the screen.
An important change in Android 3.x is that there are no physical buttons; they’re all placed in the status bar. Because of that, the status bar can’t be dismissed, but it can be dimmed.
Here’s the code:
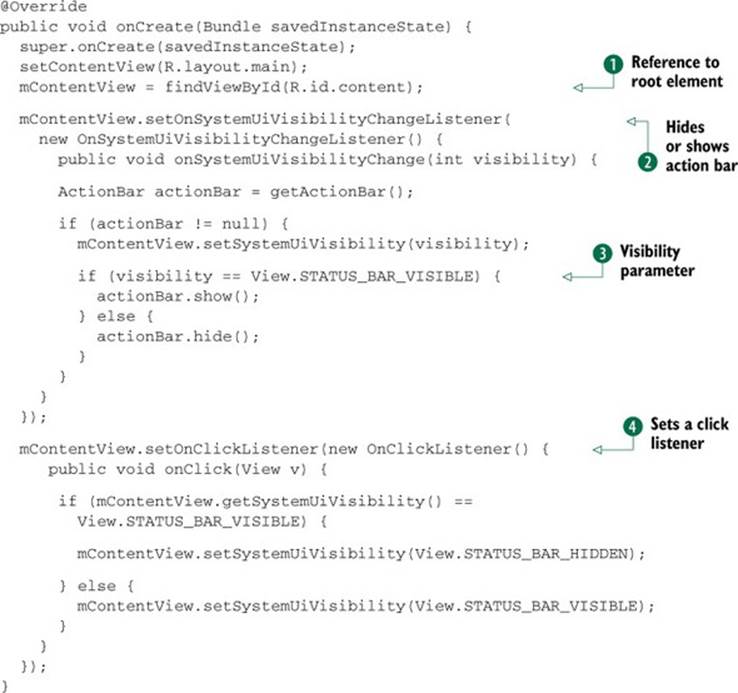
In a similar way to what we did before, we get a reference to the root element of our view ![]() . In Honeycomb, views have a new method called setOnSystemUiVisibilityChangeListener(). This was created to have a place to receive callbacks when the visibility of the system bar changes. We’ll use this method to hide or show the action bar, depending on the visibility parameter
. In Honeycomb, views have a new method called setOnSystemUiVisibilityChangeListener(). This was created to have a place to receive callbacks when the visibility of the system bar changes. We’ll use this method to hide or show the action bar, depending on the visibility parameter ![]() , as you can see in
, as you can see in ![]() . In
. In ![]() , we set a click listener to the root view where we toggle the system UI visibility, which basically means turning on and off the lights-out mode.
, we set a click listener to the root view where we toggle the system UI visibility, which basically means turning on and off the lights-out mode.
44.3. Merging both worlds in a single Activity
We showed how to handle both scenarios in the different Android versions, but it’d be nice if it were cross-compatible. We can create an Activity that checks which Android version the device has and runs the corresponding activity. The code to handle this is the following:
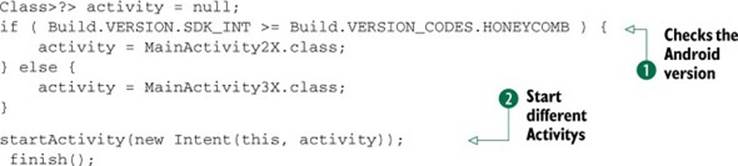
We used the Build class to check the Android version. The Build class has a VERSION_CODES ![]() inner class that can be used to check which version the device is running. Based on that, we start different Activitys
inner class that can be used to check which version the device is running. Based on that, we start different Activitys ![]() .
.
44.4. The bottom line
You’ll find out that everything we did here can be done using styles. Doing it with styles is OK if you’re not willing to support this feature dynamically.
You should be aware that hiding the status bar prevents the user from seeing notifications and might cause the user to close your app just to see what’s going on. On the other hand, using lights-out mode in Android is a cool way of immersing the user in your application experience.
44.5. External links
http://developer.android.com/reference/android/view/WindowManager.html
http://developer.android.com/reference/android/app/ActionBar.html
Hack 45 Using new APIs in older devices: Android v1.6+
With every Android release, a new set of APIs is made available. Most of the time, this means that developers will have new ways of showing their content or improving the device’s functionality. Commonly, when users acquire a new Android version on their device, they’ll want to take advantage of all the benefits that come with the new API, but you may still want users with older versions to be able to continue using your application. Is there a way to start using new APIs and still be backward compatible?
In this hack, we’ll see how to use new Android APIs and still be able to run on older devices. We’ll create a demo application that shows the number of times it was opened. That information will be persisted with the help of the SharedPreferences class. In the sample, we’ll use two APIs that are available in newer Android versions. The first one is a method that became available in Android v9. An apply() method was added to the SharedPreferences.Editor class. The second one is an API that became available in Android API Level 8. It allows us to declare inside the manifest whether we’ll allow our application to be installed on the SD card. Users with API Level 8 and up will be able to install the application on the SD card, while others will need to install on the device’s internal storage.
45.1. Using apply() instead of commit()
To edit a SharedPreferences class, we need to get an Editor and use its different methods to modify the SharedPreferences values. When we finish with all the pertinent modifications, we need to call commit().
Since Android version 9, the SharedPreferences.Editor has an apply() method to be used instead of commit(). What’s the difference between those two? Here’s the documentation explanation (see section 45.4):
Unlike commit(), which writes its preferences out to persistent storage synchronously, apply() commits its changes to the in-memory SharedPreferences immediately but starts an asynchronous commit to disk and you won’t be notified of any failures.
In short, the apply() method should be used instead of commit() if we don’t need the return value of the operation.
Since we want our demo application to be super-responsive, we want to use the apply() method to avoid slow commits to the disk in the UI thread. To accomplish that, we’ll borrow Brad Fitzpatrick’s code to use the apply() method when it’s available and fall back to commit() if it’s not. Brad Fitzpatrick is a developer working inside the Android team.
Let’s first take a look at our Activity’s code:
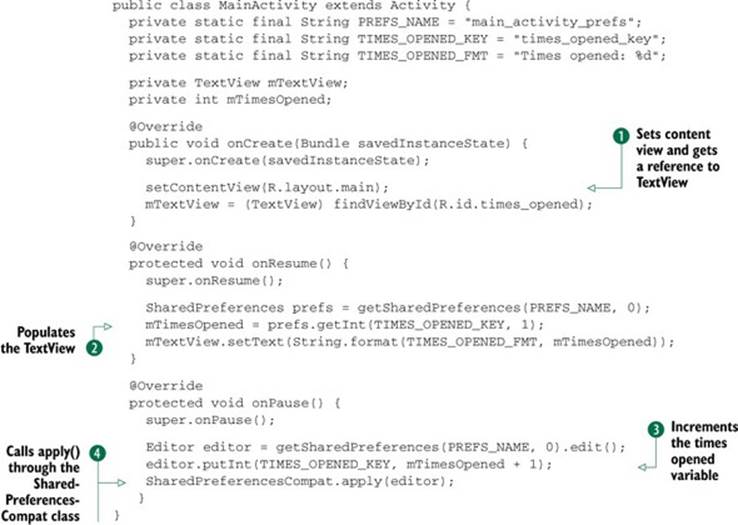
We first set the content view and get a reference to the TextView that will hold the information about how many times the app has been opened ![]() . In the onResume() method, we get the persisted information from the SharedPreferences and we populate the TextView
. In the onResume() method, we get the persisted information from the SharedPreferences and we populate the TextView ![]() . Finally, in the onPause() method, we get an Editor from the SharedPreferences and we increment the times opened variable
. Finally, in the onPause() method, we get an Editor from the SharedPreferences and we increment the times opened variable ![]() . Note that instead of calling apply() directly, we call it through the SharedPreferencesCompat class
. Note that instead of calling apply() directly, we call it through the SharedPreferencesCompat class ![]() .
.
Let’s take a look inside the SharedPreferencesCompat class to learn how it makes everything work:
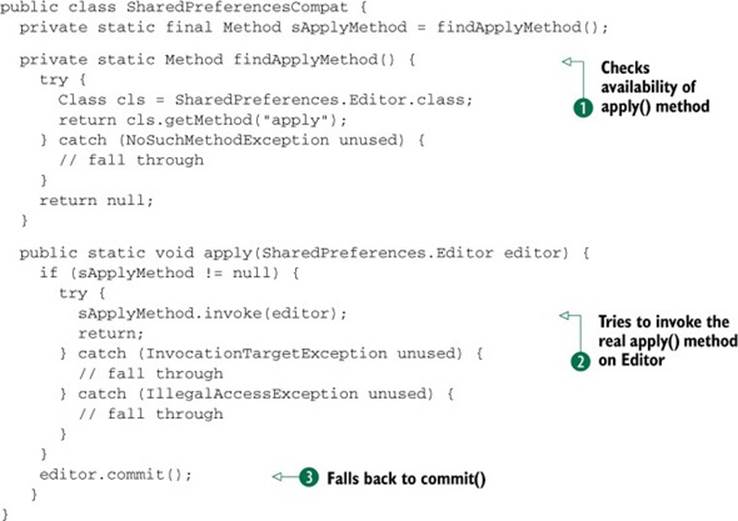
SharedPreferencesCompat uses Java’s reflection APIs to check the availability of the apply() method inside the SharedPreferences.Editor class ![]() . If it exists, the method is saved as a static variable. When the apply() method is called, it tries to invoke the real apply()method on the Editor passed as a parameter
. If it exists, the method is saved as a static variable. When the apply() method is called, it tries to invoke the real apply()method on the Editor passed as a parameter ![]() . If this call fails, it falls back to commit()
. If this call fails, it falls back to commit()![]() .
.
45.2. Storing the app on the SD card
After the previous section, we got a working application that shows how many times it was opened. Now we’ll add everything needed to make it install on the SD card instead of the internal storage.
Since Android version 8, you can add an attribute to your AndroidManifest by the name of android:installLocation. To understand what this does, let’s look at the documentation (see section 45.5):
It’s an optional feature you can declare for your application with the android:installLocation manifest attribute. If you do not declare this attribute, your application will be installed on the internal storage only and it cannot be moved to the external storage.
To make it work, we’ll need to modify AndroidManifest.xml with the following lines:
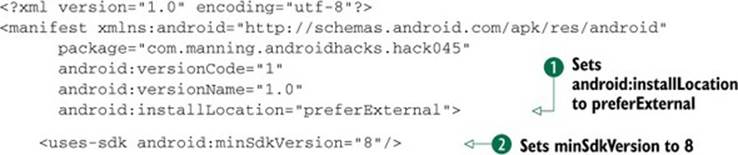
We set android:installLocation to preferExternal ![]() so our application gets installed on the SD card if possible. To be able to use this feature, we would need to set the minSdkVersion to 8
so our application gets installed on the SD card if possible. To be able to use this feature, we would need to set the minSdkVersion to 8 ![]() . If we leave the code like that, users won’t be able to install it on devices with an API level less than 8. To fix this, we can modify the last line with the following:
. If we leave the code like that, users won’t be able to install it on devices with an API level less than 8. To fix this, we can modify the last line with the following:
<uses-sdk android:minSdkVersion="4" android:targetSdkVersion="8" />
What we’re saying with that line is something like this: “Compile with API Level 8 JARs and use the new APIs, but let the application be installed on devices with API Level 4 onward.” Although this works, there are some caveats. Compiling against higher API levels will make available backward-incompatible classes and methods. To give you an example of this, if you call a method that’s not available in the running version, you’ll get a java.lang.VerifyError exception.
45.3. The bottom line
Using a compatibility class like SharedPreferencesCompat is common practice among Android developers. I recommend using the oldest supported device while developing to avoid this pitfall. When you find a newer API that won’t work in that device, create this type of compatibility class and choose what to do when it’s not available.
Also remember that the targetSdkVersion is an excellent way of using new Android features without leaving out users with older versions.
45.4. External links
http://android-developers.blogspot.com/2010/07/how-to-have-your-cupcake-and-eat-it-too.html
http://code.google.com/p/zippy-android/source/browse/trunk/examples/SharedPreferencesCompat.java
http://developer.android.com/reference/android/content/SharedPreferences.Editor.html#apply()
http://developer.android.com/guide/appendix/install-location.html
http://developer.android.com/reference/android/accounts/AccountManager.html
http://developer.android.com/training/search/backward-compat.html
Hack 46 Backward-compatible notifications: Android v1.6+
With the release of the Android version Jelly Bean, a new notification API became available. With this new API, the notifications now have actions. Actions allow the user to react to a notification without needing to enter an application. You can see an example of this in figure 46.1. The missed call notification offers the user two possible actions: call back or send a message to the caller.
Figure 46.1. Notifications in Jelly Bean

If your application uses notifications, it would be a great addition to support actions to improve the user experience. How can we use this new set of APIs but still be backward compatible? In this hack, we’ll see how to achieve this using Android’s support library.
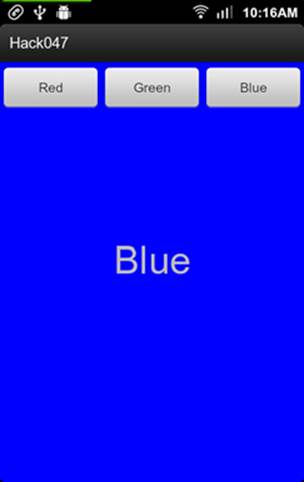
To see how it works, we’ll create a demo application that will mock a message application. Because the application will be backward compatible, it will have two possible flows—one using the notifications actions and one without them. To visualize this, you can see the possible flows using a device with Android v2.3.7 (see figure 46.2) without the new notification API, and one with Android v4.1.2 (see figure 46.3).
Figure 46.2. Android version 2.3.7
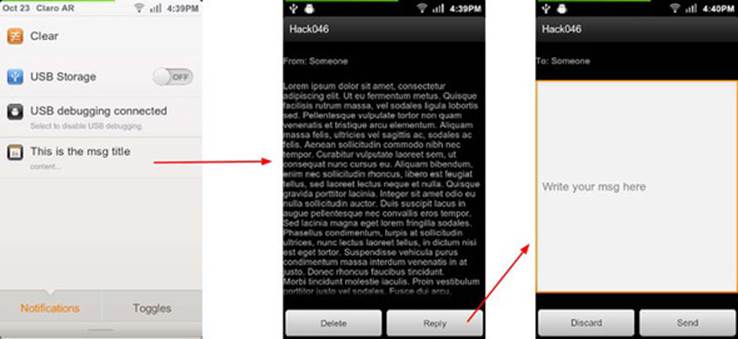
Figure 46.3. Android version 4.1.2
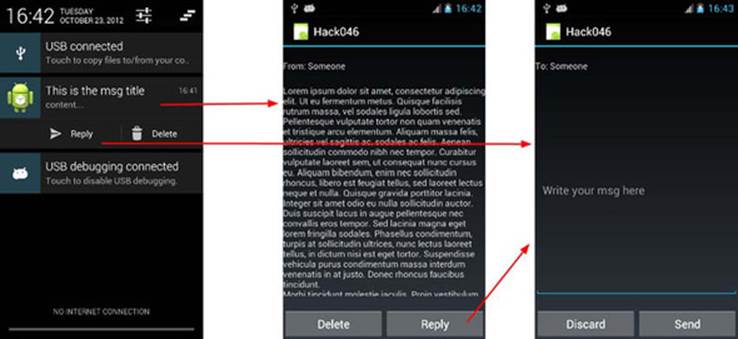
You’ll notice that without the new API, the user is obliged to enter the application. With the new API, users can delete a message without entering the application and they can reply directly without needing to go through the Activity holding the message.
Let’s now discuss how to create the application. We’ll need three Activitys:
· MainActivity— This will hold a button to launch the notification.
· MsgActivity— The message itself with Reply and Delete buttons.
· ReplyActivity— The Activity holding the reply EditText and the Discard and Send buttons.
There’s nothing out of the ordinary in those Activitys. You can read their code in this book’s sample code.
To handle all of the notification’s clicks, we need to use PendingIntents. The big difference between the PendingIntent and the Intent classes is that the former is used for later execution. From the documentation (see section 46.2):
By giving a PendingIntent to another application, you are granting it the right to perform the operation you have specified as if the other application was yourself (with the same permissions and identity). As such, you should be careful about how you build the PendingIntent: often, for example, the base Intent you supply will have the component name explicitly set to one of your own components, to ensure it is ultimately sent there and nowhere else.
The limitation to using PendingIntents is that we can’t do something like “Run this piece of code.” We can only launch an Activity, a Service or a BroadcastReceiver.
We’ll need to cover two types of operations in the application—the ones that don’t require a UI (delete, discard, send message) and those that do (read, reply to a message). Operations that don’t require a UI would ideally require back-end logic, so we’ll create a Service calledMsgService.
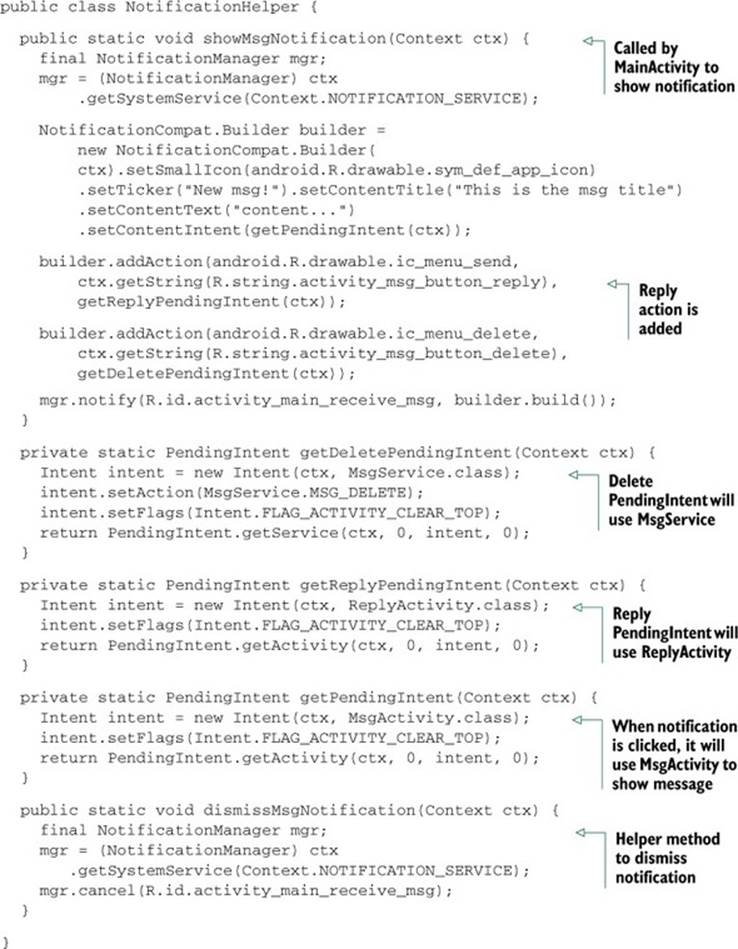
We’ll also create a static class called NotificationHelper that will be in charge of all the notification logic and the creation of the PendingIntents. It’s code is the following:
With the NotificationHelper class, we have everything we need to handle the notifications. We’ll now analyze part of the MsgService code. Because MsgService extends IntentService, this is the onHandleIntent() method:
@Override
protected void onHandleIntent(Intent intent) {
if ( MSG_RECEIVE.equals(intent.getAction()) ) {
handleMsgReceive();
} else if ( MSG_DELETE.equals(intent.getAction()) ) {
handleMsgDelete();
} else if ( MSG_REPLY.equals(intent.getAction()) ) {
handleMsgReply(intent.getStringExtra(MSG_REPLY_KEY));
}
}
We’ll have one method per possible action. For the sake of brevity, let’s take a look at handleMsgDelete():

In a complete implementation, we’d place some back-end logic to remove a message instead of creating a log ![]() . After the message is deleted, we can dismiss the notification with the help of the NotificationHelper class
. After the message is deleted, we can dismiss the notification with the help of the NotificationHelper class ![]() .
.
We learned how to create a backward-compatible notification and how to handle the different clicks using PendingIntents. How can we avoid replication of logic when the MsgActivity’s Delete button is pressed? The secret is to let the MsgService take care of everything. For example, let’s see what the Delete button click handler inside the MsgActivity does:
public void onDeleteClick(View v) {
Intent intent = new Intent(this, MsgService.class);
intent.setAction(MsgService.MSG_DELETE);
startService(intent);
finish();
}
As you can see, all of the logic is handled inside the Service.
46.1. The bottom line
The new notifications API is great. The possibility of performing certain actions from a notification creates new use cases, and with the help of the support library we can make sure we don’t leave behind users who run older versions.
46.2. External links
http://developer.android.com/tools/extras/support-library.html
http://developer.android.com/reference/android/app/PendingIntent.html
http://developer.android.com/reference/android/app/IntentService.html
Hack 47 Creating tabs with fragments: Android v1.6+
If you’ve been developing with Android for a while, you’ve most likely used the TabActivity class. This class allows developers to create tabs inside their applications so that users can switch between Activitys by pressing the Tab button. The big issue with the TabActivity class is that its developer ran into a lot of issues while trying to customize its look, and the class was deprecated with the release of fragments.
Although the Android SDK comes with classes such as TabHost and TabWidget to handle tabs, creating your own implementation gives you more control over your application. In this hack, I’ll show you how to avoid using the TabActivity class and instead use fragments to create a tab application. We’ll create a toy application that shows a different color in each tab. You can see the finished work in figure 47.1.
Figure 47.1. Custom tabs
47.1. Creating our tab UI
The first thing we’ll take care of is creating the UI for the tabs. For this task, we’ll create our own XML layout for the tabs. Using XML to design our tabs gives us the opportunity to place and size widgets as we like. In this case, we create a LinearLayout with buttons inside it. Here’s the XML:
<?xml version="1.0" encoding="utf-8"?>
<LinearLayout xmlns:android="http://schemas.android.com/apk/res/android"
android:layout_width="fill_parent"
android:layout_height="fill_parent"
android:orientation="horizontal"
android:background="@null">
<Button android:id="@+id/tab_red"
android:layout_height="wrap_content"
android:layout_width="0dp"
android:layout_weight="1"
android:text="Red" />
<Button android:id="@+id/tab_green"
android:layout_height="wrap_content"
android:layout_width="0dp"
android:layout_weight="1"
android:text="Green" />
<Button android:id="@+id/tab_blue"
android:layout_height="wrap_content"
android:layout_width="0dp"
android:layout_weight="1"
android:text="Blue" />
</LinearLayout>
47.2. Placing the tabs in an Activity
To avoid copying and pasting the tab layout around every Activity, we’ll use the include tag. Here’s MainActivity’s XML layout:
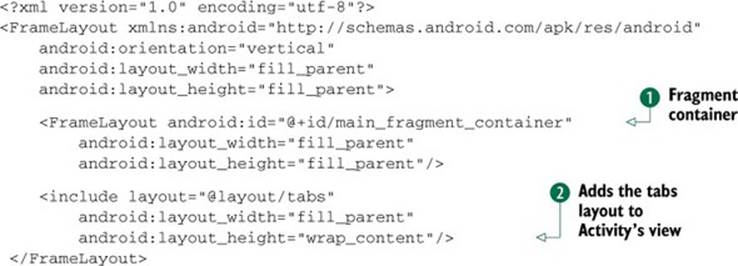
The FrameLayout in ![]() will be the fragment container. Every time the user presses on a tab, the Activity will take care of placing the corresponding fragment there. In
will be the fragment container. Every time the user presses on a tab, the Activity will take care of placing the corresponding fragment there. In ![]() we use the include tag to add the tab’s layout to the Activity’s view. Note that we place the include in the bottom for it to be drawn on top of the fragment container.
we use the include tag to add the tab’s layout to the Activity’s view. Note that we place the include in the bottom for it to be drawn on top of the fragment container.
We already have all the UI in place. Let’s see how we handle the logic from the Activity:
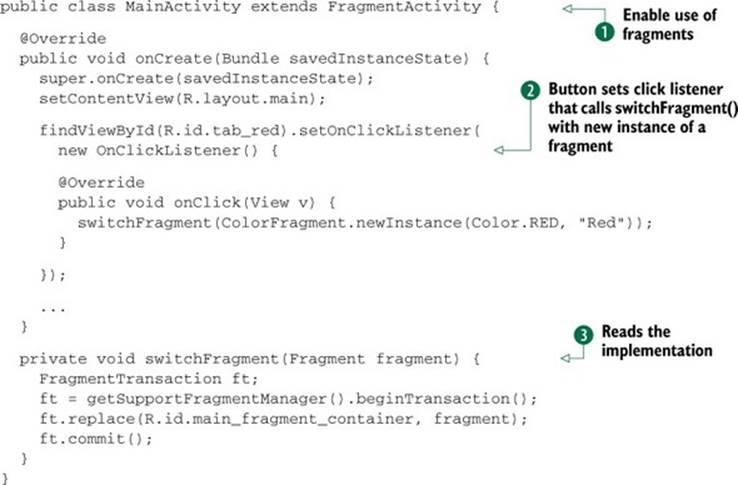
As you can see, our MainActivity class needs to extend FragmentActivity ![]() to be able to use fragments. One of the buttons is fetched and sets a click listener, which will call switchFragment() with a new instance of a fragment
to be able to use fragments. One of the buttons is fetched and sets a click listener, which will call switchFragment() with a new instance of a fragment ![]() . Finally, we can read the implementation of theswitchFragment() method
. Finally, we can read the implementation of theswitchFragment() method ![]() , which performs the logic to place the fragment inside the container.
, which performs the logic to place the fragment inside the container.
47.3. The bottom line
Creating your own implementation to handle tabs might sound like overkill, but for instance, if your tabs will need fancy animations, I recommend you use an approach similar to what we built in this hack. In the end, it’ll be easier to customize it if you have full control over your widgets.
47.4. External links
http://developer.android.com/reference/android/app/ActivityGroup.html
http://developer.android.com/reference/android/app/TabActivity.html