The Antivirus Hacker's Handbook (2015)
Part III. Analysis and Exploitation
Chapter 13. Dynamic Analysis
Dynamic analysis techniques, as opposed to static analysis techniques, are methods used to extract information based on the behavior of an application by running the target, instead of merely analyzing the source code or the disassembly listing of the target application.
Dynamic analysis techniques are performed on computer software and hardware by executing the program or programs in a real or virtualized environment in order to gather behavioral information from the target. You can use many different dynamic analysis techniques. This chapter focuses on two techniques: fuzzing and code coverage. The following sections will cover both techniques, with special emphasis on fuzzing.
Fuzzing
Fuzzing is a dynamic analysis technique that is based on providing unexpected or malformed input data to a target program in the hopes that it will cause the target to crash, thus leading to the discovery of bugs and, possibly, interesting vulnerabilities. Fuzzing is probably the most used technique to find bugs in computer programs because it is relatively easy to discover bugs with such techniques: even the most rudimentary fuzzer has the ability to uncover and find bugs. Performing simple fuzzing is extremely easy; however,doing it properly is not. I will discuss examples of really simple fuzzers that, nevertheless, find bugs. I will also discuss more complex and elaborate fuzzers that use code coverage to augment the bug-finding capabilities of these fuzzing tools or frameworks.
What Is a Fuzzer?
When people ask me what fuzzer I use, I usually answer by asking them, “What is a fuzzer to you?” For some people, a fuzzer is a simple mutator—a tool that takes input (as a template) and performs mutations on it, returning a different buffer based on the passed template. For others, a fuzzer is an elaborate tool that not only generates mutated files but also tries to run those files with the target application that they are trying to fuzz. Still others think of it as a comprehensive framework that lets them do more than just mutate files and test them against a target application. In my opinion, a fuzzer is actually the latter group: a complete framework that allows you to perform dynamic analysis against the target or targets of your choice. Such a framework should have at least the following components:
· Mutators—Algorithms that make random changes based on a buffer (a template) or based on a file format or protocol specification.
· Instrumentation tools—Libraries or programs that let you instrument (debug, catch exceptions, etc.) your target application in order to catch exceptions and errors. This part is optional for basic fuzzers.
A more complex fuzzing framework, however, should offer more components:
· Bug triaging tools
· Crash management
· Automatic crash analysis tools
· Proof-of-concept minimizing tools
· …
The last item in the list was intentionally left blank because, in fuzzing, many different analyses can be performed on the target (such as employing monitoring techniques that are not exclusively based on catching crashes) or over the generated proofs-of-concepts or crashes. In the following sections, I will demonstrate fuzzing techniques using a basic random mutation strategy without instrumentation or any kind of monitoring other than sitting and waiting for the target to crash. After that, I will move to more complete fuzzing solutions.
Simple Fuzzing
A simple but effective fuzzer can be created very easily by using a basic mutation strategy. For example, for fuzzing antivirus products, you can create a simple Python script that does the following:
1. Takes a file or set of files as input
2. Performs random mutations on the content of the passed files
3. Writes the newly generated files in a directory
4. Instructs the antivirus's on-demand scanner to scan the directory with all the mutated samples and wait until it crashes at some point
Such a Python script is very easy to write. For my initial experiments, I will create a simple generic fuzzer and use the Bitdefender Antivirus for Linux. In any case, the script will be generic and could easily support any other antivirus scanner for Windows, Linux, or Mac OS X, as long as a command-line scanner utility exists for the desired antivirus product and platform.
The following is the entire code of this basic fuzzer:
$ cat simple_av_fuzzer.py
#!/usr/bin/python
import os
import sys
import random
from hashlib import md5
#-----------------------------------------------------------------------
class CBasicFuzzer:
def __init__(self, file_in, folder_out, cmd):
""" Set the directories and the OS command to run after mutating.
"""
self.folder_out = folder_out
self.file_in = file_in
self.cmd = cmd
def mutate(self, buf):
tmp = bytearray(buf)
# Calculate the total number of changes to made to the buffer
total_changes = random.randint(1, len(tmp))
for i in range(total_changes):
# Select a random position in the file
pos = random.randint(0, len(tmp)-1)
# Select a random character to replace
char = chr(random.randint(0, 255))
# Finally, replace the content at the selected position with the
# new randomly selected character
tmp[pos] = char
return str(tmp)
def fuzz(self):
orig_buf = open(self.file_in, "rb").read()
# Create 255 mutations of the input file
for i in range(255):
buf = self.mutate(orig_buf)
md5_hash = md5(buf).hexdigest()
print "[+] Writing mutated file %s" % repr(md5_hash)
filename = os.path.join(self.folder_out, md5_hash)
with open(filename, "wb") as f:
f.write(buf)
# Run the operating system command to scan the directory with the av
cmd = "%s %s" % (self.cmd, self.folder_out)
os.system(cmd)
#-----------------------------------------------------------------------
def usage():
print "Usage:", sys.argv[0], "<filename> <output directory> " + \
"<av scan command>"
#-----------------------------------------------------------------------
def main(file_in, folder_out, cmd):
fuzzer = CBasicFuzzer(file_in, folder_out, cmd)
fuzzer.fuzz()
if __name__ == "__main__":
if len(sys.argv) != 4:
usage()
else:
main(sys.argv[1], sys.argv[2], sys.argv[3])
This very basic example creates a CBasicFuzzer class with only three methods: the constructor (__init__), mutate, and fuzz. The mutate method takes as input a string buffer, and then it replaces a random number of bytes in that buffer, at random locations, with random characters. The fuzz method reads a file (usually the input template), mutates the read buffer, and saves the mutated buffer as a new file (named by calculating the mutated buffer's MD5 hash); this process is repeated 255 times. Finally, after creating all the 255 mutations, it runs one operating system command to tell the antivirus scanner to scan that directory. In short, all the fuzzer does is create 255 mutated files, store them in a single directory, and finally instruct the antivirus software to scan that folder.
In the following example, the fuzzer is instructed to create 255 random mutations of the Executable and Linkable Format (ELF) program /bin/ls, write them in the out directory, and then run the bdscan command to tell Bitdefender Antivirus for Linux to analyze that directory:
$ python ../simple_av_fuzzer.py /bin/ls out/ bdscan
[+] Writing mutated file '27a0f868f6a6509e30c7420ee69a0509'
[+] Writing mutated file '9d4aa7877544ef0d7c21ee9bb2b9fb17'
[+] Writing mutated file '12055e9189d26b8119126f2196149573'
(…252 more files skipped…)
BitDefender Antivirus Scanner for Unices v7.90123 Linux-i586
Copyright (C) 1996-2009 BitDefender. All rights reserved.
This program is licensed for home or personal use only.
Usage in an office or production environment represents
a violation of the license terms
Infected file action: ignore
Suspected file action: ignore
Loading plugins, please wait
Plugins loaded.
/home/joxean/examples/tahh/chapter18/tests/out/
b69e85ab04d3852bbfc60e2ea02a0121 ok
/home/joxean/examples/tahh/chapter18/tests/out/
a24f5283fa0ae7b9269724d715b7773d ok
/home/joxean/examples/tahh/chapter18/tests/out/
dc153336cd7125bcd94d89d67cd3e44b ok
(…)
Even though this fuzzing method is rudimentary, it does work. The fuzzing results depend mainly on the quality of the targets (for example, how buggy the antivirus product is that you are testing against) and the quality of the input samples.
Automating Fuzzing of Antivirus Products
In the previous section, I created a basic fuzzer. It works in some cases, but if the target application crashes, some important questions are left unanswered: How does it crash? Where does it crash? Why does it crash? If the antivirus scanner crashes while analyzing the very first file, it will not continue analyzing all the other files in the directory; what can you do in this case? With such a simple fuzzing approach, how can you determine which file caused the antivirus scanner to crash? And how can you continue analyzing the other files?
The answer for most of these questions is always the same: combine automation with debugging. Writing a basic fuzzer, like the one in the previous section, is very easy. Writing a fuzzer that captures crash information, manages it, moves the proofs-of-concepts to other directories, and continues scanning all the other files is substantially more complex. Indeed, fuzzing can be done at varying levels of complexity: from taking a very simple approach, as when using approximately five lines of shell script, to using very complex frameworks that employ debuggers, code coverage, corpus distillation, and so on.
Using Command-Line Tools
One of the simplest examples of automation that answers some of the questions posed earlier addresses these questions using command-line tools, at least in Unix environments. For example, you can get information about crashes by running the command ulimit -c unlimited before running the antivirus scanner; then, if the target process crashes, the operating system generates a “core” dump file to disk. Also, to determine which file is crashing the antivirus, why not execute the antivirus scanner for each file instead of for the whole directory?
This section shows some modifications you can make to the sample Python fuzzer script used in the previous section. However, keep in mind that this approach is still a rudimentary form of monitoring the target. These are the steps that are covered here:
1. Run the command ulimit -c unlimited before executing the antivirus scanner.
2. Run the antivirus scanner for each file instead of for the whole directory.
3. If there is a “core” file, move it into some directory with the crashing proof-of-concept.
4. Instead of creating just 255 modifications, create random mutations continuously, until you stop the fuzzer.
Add the following lines right after the last import statement:
…
import shutil
#-----------------------------------------------------------------------
RETURN_SIGNALS = {}
RETURN_SIGNALS[138] = "SIGBUS"
RETURN_SIGNALS[139] = "SIGSEGV"
RETURN_SIGNALS[136] = "SIGFPE"
RETURN_SIGNALS[134] = "SIGABRT"
RETURN_SIGNALS[133] = "SIGTRAP"
RETURN_SIGNALS[132] = "SIGILL"
RETURN_SIGNALS[143] = "SIGTERM"
#-----------------------------------------------------------------------
def log(msg):
print "[%s] %s" % (time.asctime(), msg)
Then, I replace the code of the CBasicFuzzer.fuzz() method with the following code:
def fuzz(self):
log("Starting the fuzzer…")
orig_buf = open(self.file_in, "rb").read()
log("Running 'ulimit -c unlimited'")
os.system("ulimit -c unlimited")
# Create mutations of the input file until it's stopped
while 1:
buf = self.mutate(orig_buf)
md5_hash = md5(buf).hexdigest()
log("Writing mutated file %s" % repr(md5_hash))
filename = os.path.join(self.folder_out, md5_hash)
with open(filename, "wb") as f:
f.write(buf)
# Run the operating system command to scan the file we created
cmd = "exec %s %s > /dev/null" % (self.cmd, filename)
ret = os.system(cmd)
log("Running %s returned exit code %d" % (repr(cmd), ret))
if ret in RETURN_SIGNALS:
# If the exit code of the process indicates it crashed, rename
# the generated "core" file.
log("CRASH: The sample %s crashed the target.
Saving information…" % filename)
shutil.copy("core", "%s.core" % filename)
else:
# If the proof-of-concept did not crash the target, remove the
# file we just created
os.remove(filename)
At the beginning of the method fuzz(), after reading the original template file, the command ulimit -c unlimited runs. Then, instead of creating 255 files as the previous script did, it loops forever. The command was modified to run the scanner against each file while redirecting the output to /dev/null. Previously the scanner ran against the whole directory. Under Unix, the exit code of a process that crashed is actually the signal it crashed with. Therefore, after executing the antivirus command-line scanner (with os.system), the exit code is checked to detect whether the scanner crashed. For example, if the exit code is 139, it means that a SIGSEGV signal was raised for the process (a segmentation fault). If the exit code is in any of the interesting signals, the core file associated with the crashing file is copied; otherwise, it is removed. This fuzzer will keep generating modifications (mutations) based on the input template file forever, saving the core files (in case of a crash) and the proofs-of-concepts (the mutated input file causing the crash) in the output directory just created.
The following is the output of this fuzzer when used with Bitdefender Antivirus for Unix:
$ python ../simple_av_fuzzerv2.py mysterious_file out/ bdscan
[Mon Apr 20 12:39:05 2015] Starting the fuzzer…
[Mon Apr 20 12:39:05 2015] Running 'ulimit -c unlimited'
[Mon Apr 20 12:39:05 2015] Writing mutated file
'986c060db72d2ba9050f587c9a69f7d5'
[Mon Apr 20 12:39:07 2015] Running 'exec bdscan
out/986c060db72d2ba9050f587c9a69f7d5 > /dev/null' returned exit code 0
[Mon Apr 20 12:39:07 2015] Writing mutated file
'e5e4b5fe275971b9b24307626e8f91f7'
[Mon Apr 20 12:39:10 2015] Running 'exec bdscan
out/e5e4b5fe275971b9b24307626e8f91f7 > /dev/null' returned exit code 0
[Mon Apr 20 12:39:10 2015] Writing mutated file
'287968fb27cf18c80fc3dcd5889db136'
[Mon Apr 20 12:39:10 2015] Running 'exec bdscan
out/287968fb27cf18c80fc3dcd5889db136 > /dev/null' returned exit code 65024
[Mon Apr 20 12:39:10 2015] Writing mutated file
'01ca5841b0a0c438d3ba3e7007cda7bd'
[Mon Apr 20 12:39:11 2015] Running 'exec bdscan
out/01ca5841b0a0c438d3ba3e7007cda7bd > /dev/null' returned exit code
65024
[Mon Apr 20 12:39:11 2015] Writing mutated file
'6bae9a6f1a6cef21fe0d6eb31d1037a5'
[Mon Apr 20 12:39:11 2015] Running 'exec bdscan
out/6bae9a6f1a6cef21fe0d6eb31d1037a5 > /dev/null' returned exit code
65024
[Mon Apr 20 12:39:11 2015] Writing mutated file
'2e783b0aaad7e6687d7a61681445cb08'
(…)
[Mon Apr 20 12:39:19 2015] Writing mutated file
'84652cc61a7f0f2fbe578dcad490c600'
[Mon Apr 20 12:39:22 2015] Running 'exec bdscan
out/84652cc61a7f0f2fbe578dcad490c600 > /dev/null' returned exit code 139
[Mon Apr 20 12:39:22 2015] CRASH: The sample
out/84652cc61a7f0f2fbe578dcad490c600 crashed the target. Saving
information…
(…)
[Mon Apr 20 12:51:16 2015] Writing mutated file
'f6296d601a516278634b44951a67b0d4'
[Mon Apr 20 12:51:19 2015] Running 'exec bdscan
out/f6296d601a516278634b44951a67b0d4 > /dev/null' returned exit code 139
[Mon Apr 20 12:51:19 2015] CRASH: The sample
out/f6296d601a516278634b44951a67b0d4 crashed the target. Saving
information…
^C (Press Ctrl+C to stop it)
Bitdefender Antivirus crashes after a while, and both the core files and the offending mutated file are saved. After this, you can use gdb (or other tools) to inspect the core file and determine the reason for the crash:
$ LANG=C gdb --quiet bdscan f6296d601a516278634b44951a67b0d4.core
Reading symbols from bdscan…(no debugging symbols found)…done.
(…)
Core was generated by 'bdscan out/f6296d601a516278634b44951a67b0d4'.
Program terminated with signal SIGSEGV, Segmentation fault.
#0 0xf30beXXX in ?? ()
(gdb) x /i $pc
=> 0xf30beXXX: mov 0x24(%ecx,%edx,1),%eax
(gdb) i r ecx edx
ecx 0x23a80550 598213968
edx 0x9e181c8 165773768
(gdb) x /x $ecx
0x23a80550: Cannot access memory at address 0x23a80550
It seems that dereferencing the memory pointed at by the expression ECX+EDX+0x24 (which resolves to 0x23a80550) is invalid, thus causing the crash.
This is still a very immature fuzzer that does not record much information—only the most basic: core file and proof-of-concept. For example, it does not know how to group similar crashes. Also, because it runs the antivirus command-line scanner for each file serially, it is significantly slower.
In this section, the approach was focused on the Unix platform. The next section addresses fuzzing an antivirus that is specific to Windows.
Porting Antivirus Kernels to Unix
When the target antivirus runs exclusively in Windows, it is best to port the fuzzer, or at least the instrumentation part of the fuzzer, to another operating system that is more suitable for automation and fuzzing. For example, fuzzing at a medium to large scale with Windows is problematic nowadays. If you want to have small virtual machines where you can run your fuzzers, you are restricted to Windows XP targets. Otherwise, you can prepare 10GB to 20GB virtual machines with Windows 7. With Windows 8.1 and Windows 10, you can expect to increase the minimum required disk space for a working virtual machine. With Linux and other Unix systems, such as FreeBSD, you can have very small virtual machines. In some cases, it is very feasible to allocate 1GB or even 512MB of disk space for the virtual machine with the target application installed. Naturally, the less disk space that is required for the virtual machine, the easier it is to manage. Regarding memory requirements for the virtual machine with Windows XP, 1GB to 2GB of RAM is more than enough; in fact, 512MB of RAM is adequate. With Windows 7, the minimum recommended virtual machine memory allocation for fuzzing is 2GB, and the actual amount of RAM that works well in most cases is 4GB. (Using less RAM can cause a lot of false positive crashes due to low memory and allocation failures.)
Because of the increasing use of RAM and disk space in each new Windows version, it is tempting to try another approach to fuzzing: to find a way to fuzz Windows applications from Linux, using Wine (this process is briefly described in Chapter 2). Wine, which stands for “Wine Is Not an Emulator,” is a free and open-source implementation of Windows APIs for Linux. It can run Windows binaries unmodified on Unix systems, and it also allows you to run Windows-only binaries, such as DLLs, from native Unix applications. Wine does not emulate the code; instead, it executes the code natively at full speed, while trapping the syscalls and interruptions that should be handled in a real Windows operating system and handling them and rerouting them to the Linux kernel. Winelib, on the other hand, is a toolkit that can be used to write native Unix applications using the Windows SDK.
The following two approaches are useful for fuzzing a Windows antivirus on Unix systems:
· Reverse-engineer the core kernel and port with Winelib to Unix.
· Even simpler, run the independent command-line scanner, if there is any, in Linux or Unix using Wine.
The first approach, reverse-engineering the kernel and writing an interface for the antivirus kernel specific for Windows (for example, Microsoft Security Essentials), is the best approach because you do not rely on Wine or other layer emulation. However, this approach is very time-consuming. A reverse-engineer would need to first reverse-engineer the kernel to discover the interfaces used for loading the kernel, launching scans, and so on; discover the appropriate structures and enumerations; write the unofficial SDK; and, finally, write the tool that would run in a Unix-like environment. Naturally, this approach is prohibitive in many cases because of the number of human hours required. For long projects it is really a good approach, but for smaller projects it is excessive. Instead, you can use an ad hoc approach based on the same idea: rather than using Winelib (which requires more work from you), you can use Wine and run the independent command-line scanner.
Fuzzing with Wine
This section shows you how to use Wine to port the T3Scan Windows command-line scanner and run it under Linux. You can download T3Scan from http://updates.ikarus.at/updates/update.html.
You need both the t3scan.exe self-extracting program and the t3sigs.vdb (Virus Database) file. After downloading both files, run the t3scan.exe program via Wine by issuing the following command:
$ wine t3scan.exe
A dialog box shows up, asking whether you want to extract some files. Select the current directory and click Extract files. You can search for the current directory in the (usually available) Z: virtual Wine drive. Otherwise, type in the “.” directory. Alternatively, you can run the command to extract the tools on Windows and copy the resulting files, T3Scan.exe and t3.dll, to the current directory. In any case, after you have the three files, T3Scan.exe, t3.dll, and the virus database t3sigs.vdb, you can run the following command to test whether T3Scan is running:
$ wine T3Scan.exe
fixme:heap:HeapSetInformation (nil) 1 (nil) 0
Syntax: t3scan [options] <samples>
t3scan [options] <path>
Options:
-help | -h | -? This help
-filelist | -F <filename> Read input files from newline-separated
file <filename>
-logfile | -l <filename> Create log file
-maxfilesize | -m <n> Max. filesize in MB (default 64MB)
-n No simulation
-nosubdirs | -d Do not scan sub directories
-r <n> Max. recursive scans (default 8)
-vdbpath | -vp <directory> Path to signature database
Special options:
-noarchives | -na Do not scan archive content
-rtimeout <seconds> Stop recursively scanning files in an
archive after <seconds>
-sa Summarize archives: only the final result
for the archive is reported
-timeout <seconds> Stop scanning a single file after
<seconds>
-version | -ver Display the program, engine and VDB
version
-vdbver Display VDB version
-verbose | -v Increase the output level
-noadware Disable adware/spyware signatures
If you can see the output of the program, T3Scan is correctly working under Wine. Now, you need to adapt the simple fuzzer created in the previous sections to handle how Wine works. To do so, run a program via the Python function os.system(). In the case of a segmentation fault, SIGSEGV, it returns the exit code 139; for SIGBUS, it returns the exit code 138, and so on. However, using Wine, it is a bit different: to take the exit code, you need to shift it to the right by 8 bits, and then add 128 to it in order to get the signal code value. Therefore, you can keep using the same dictionary (named RETURN_SIGNALS) as before, after applying this formula. Add a flag to the fuzzer script so it knows whether you are running it with Wine. The diff patch for the code is as follows:
$ diff simple_av_fuzzerv2.py simple_av_fuzzer_wine.py
27c27
< def __init__(self, file_in, folder_out, cmd):
---
> def __init__(self, file_in, folder_out, cmd, is_wine = False):
32a33,34
> self.is_wine = is_wine
>
65c67
< cmd = "exec %s %s > /dev/null" % (self.cmd, filename)
---
> cmd = "%s %s" % (self.cmd, filename)
66a69
> ret = (ret >> 8) + 128
81c84
< print "Usage:", sys.argv[0], "<filename> <output directory>
<av scan command>"
---
> print "Usage:", sys.argv[0], "<filename> <output directory>
<av scan command> [--wine]"
84,85c87,88
< def main(file_in, folder_out, cmd):
< fuzzer = CBasicFuzzer(file_in, folder_out, cmd)
---
> def main(file_in, folder_out, cmd, is_wine=False):
> fuzzer = CBasicFuzzer(file_in, folder_out, cmd, is_wine)
89c92
< if len(sys.argv) != 4:
---
> if len(sys.argv) < 4:
91c94
< else:
---
> elif len(sys.argv) == 4:
92a96,97
> elif len(sys.argv) == 5:
> main(sys.argv[1], sys.argv[2], sys.argv[3], True)
The lines in bold are the new ones added to the simple fuzzer. After applying this patch, you can fuzz the Windows-only Ikarus command-line scanner as I did before with the native Bitdefender command-line scanner, as shown in the following example:
$ python simple_av_fuzzer_wine.py s_bio.lzh out "wine32 test/T3Scan.exe" \
--wine
[Mon Apr 20 18:55:23 2015] Starting the fuzzer…
[Mon Apr 20 18:55:23 2015] Running 'ulimit -c unlimited'
[Mon Apr 20 18:55:27 2015] Writing mutated file
'7ae0b2339d57dbc58dd748a426c3358b'
IKARUS - T3SCAN V1.32.33.0 (WIN32)
Engine version: 1.08.09
VDB: 20.04.2015 12:09:39 (Build: 91448)
Copyright ® IKARUS Security Software GmbH 2014.
All rights reserved.
Summary:
==========================================================
1 file scanned
0 files infected
Used time: 0:02.636
==========================================================
[Mon Apr 20 18:55:30 2015] Running 'wine32 test/T3Scan.exe
out/7ae0b2339d57dbc58dd748a426c3358b' returned exit code 128
[Mon Apr 20 18:55:34 2015] Writing mutated file
'7c774ed262f136704eeed351b3210173'
IKARUS - T3SCAN V1.32.33.0 (WIN32)
Engine version: 1.08.09
VDB: 20.04.2015 12:09:39 (Build: 91448)
Copyright ® IKARUS Security Software GmbH 2014.
All rights reserved.
Summary:
==========================================================
1 file scanned
0 files infected
Used time: 0:02.627
==========================================================
[Mon Apr 20 18:55:37 2015] Running 'wine32 test/T3Scan.exe
out/7c774ed262f136704eeed351b3210173' returned exit code 128
(…)
Now the fuzzer will work. If you provide it with the right input sample and wait for a while, it will eventually crash and save the relevant information to the selected output directory.
Problems, Problems, and More Problems
The current model of the fuzzer for antivirus products developed in the previous section suffers from a number of problems. For example, it runs one entire instance for each created file. It runs a single process for each created mutation. It implements only one (naïve) mutation strategy. It offers no fine-grain detail about why or how the application crashed. It also mutates only a single input template. What if the file format parser you are fuzzing is not buggy, or the bug does not manifest itself with the provided input template? I will both discuss and address some of these points in the following sections. The first step is to select or find good sample files to be used as input templates.
Finding Good Templates
Template files for fuzzers are the original files on which the fuzzers are going to base all modifications and mutations. In the previous examples, when I ran the fuzzer that I created for fuzzing Windows applications (using Wine), I used an LZH file, and in the very first fuzzer run, I used an ELF file. These are only two file formats from the very long list of formats that are supported by antivirus kernels. The list of file formats supported by antivirus products is mostly unknown, but some file formats are widely supported for almost all antivirus kernels. Such file formats include, but are not restricted to, compressors and archivers, EXE packers, Microsoft Office file formats, HTML, JavaScript, VBScript, XML, Windows LNK files, and more.
Finding good templates for fuzzing antivirus engines not only means finding file formats of some sort (for example, Windows PE files) and sub-formats (such as EXE packers) that the targeted antivirus product or products support but also means finding good templates for the specific format. For instance, if you want to fuzz OLE2 containers, such as Microsoft Word or Excel files, and restrict your template corpus to very basic Word or Excel documents, then you will be able to fuzz the features covered by that set (of template corpus) and not all the features supported by the product. It is almost impossible to fuzz the entire feature-set, but at least you can try to find better samples by using a technique called corpus distillation. This technique works by doing the following:
· It runs the first sample file against the target program under binary instrumentation using tools such as DynamoRIO or Intel PIN and records the different basic blocks that are executed.
· Another sample to be tested for quality is executed under instrumentation as with the previous basic sample and is only considered when new basic blocks (not executed before) are executed.
· New samples can be accepted only if they execute basic blocks that were not executed by the previous samples.
· If a sample only covers code that was already covered by the previous samples, there is no point in using that file as a template, because the feature-set it is using is already covered by previous samples.
There is only one half out-of-the-box tool I know for doing code coverage, and it is called PeachMinset. Go to community.peachfuzzer.com/v3/minset.html to learn how it works for a previous version of Peach (version 3).
Basically, PeachMinset functionality consists of two steps:
1. Collecting traces from the sample files
2. Computing the minimum set
The first step is a long process because it uses binary instrumentation to execute every single template file that exists. Computing the minimum set is faster because it just needs to compute the best set of files covering the most features possible.
The following is an example execution of the tool PeachMinset.exe, which internally uses the Intel PIN library, against a set of PNG files and a tool that consumes PNG files:
>peachminset -s pinsamples -m minset -t traces bin\pngcheck.exe %%s
] Peach 3 -- Minset
] Copyright (c) Deja vu Security
[*] Running both trace and coverage analysis
[*] Running trace analysis on 15 samples…
[1:15] Converage trace of pinsamples\basn0g01.png…done.
[2:15] Converage trace of pinsamples\basn0g02.png…done.
[3:15] Converage trace of pinsamples\basn0g04.png…done.
[4:15] Converage trace of pinsamples\basn0g08.png…done.
[5:15] Converage trace of pinsamples\basn0g16.png…done.
[6:15] Converage trace of pinsamples\basn2c08.png…done.
[7:15] Converage trace of pinsamples\basn2c16.png…done.
[8:15] Converage trace of pinsamples\basn3p01.png…done.
[9:15] Converage trace of pinsamples\basn3p02.png…done.
[10:15] Converage trace of pinsamples\basn3p04.png…done.
[11:15] Converage trace of pinsamples\basn3p08.png…done.
[12:15] Converage trace of pinsamples\basn4a08.png…done.
[13:15] Converage trace of pinsamples\basn4a16.png…done.
[14:15] Converage trace of pinsamples\basn6a08.png…done.
[15:15] Converage trace of pinsamples\basn6a16.png…done.
[*] Finished
[*] Running coverage analysis…
[-] 3 files were selected from a total of 15.
[*] Copying over selected files…
[-] pinsamples\basn3p08.png -> minset\basn3p08.png
[-] pinsamples\basn3p04.png -> minset\basn3p04.png
[-] pinsamples\basn2c16.png -> minset\basn2c16.png
[*] Finished
From a set of 15 PNG files, it selected only 3 files covering the features that all 15 files do. While fuzzing, reducing the number of template files to only the most appropriate ones is a time-saving approach that maximizes results.
Finding Template Files
In some cases, especially when talking about antivirus kernels, you will need to find sample files that are not common (that is, files that you will not discover generally on your hard disk). For finding such files, I can only make some basic recommendations:
· Google—You can search for files in indexed web directories using a query such as intitle:"index of /" .lzh. With this query, you will discover in indexed web directories files ending with the .lzh extension (a compression file format).
· More Google—The filetype:LZH query can produce interesting results. It usually works (but you will likely need to remove the results that relate to Facebook).
· VirusTotal—If you have access to the private version of VirusTotal, you will discover that there is at least one sample for every file format you may want to look for.
Another good way of finding template files for fuzzing antivirus products is to actually use their input files test suite. Of course, commercial antivirus suites do not provide their input files test suite, but you can find such a suite for the only open-source antivirus scanner ClamAV. You can download the source code from GIT (https://github.com/vrtadmin/clamav-devel) and then build it.
The test files are not available without compiling ClamAV (as they used to be in the past) because they are now dynamically generated. These sample files can be used as template files for fuzzing other antivirus products. They are a good starting point, and they cover a lot of file formats that most, if not all, antivirus kernels support. The currently included test files are as follows:
· samples/av/clam/clam.sis
· samples/av/clam/clam.odc.cpio
· samples/av/clam/clam.exe.html
· samples/av/clam/clam.ole.doc
· samples/av/clam/clam.d64.zip
· samples/av/clam/clam.mail
· samples/av/clam/clam_cache_emax.tgz
· samples/av/clam/clam.cab
· samples/av/clam/clam.arj
· samples/av/clam/clamav-mirror-howto.pdf
· samples/av/clam/clam.newc.cpio
· samples/av/clam/clam.exe.rtf
· samples/av/clam/clam.7z
· samples/av/clam/clam.ppt
· samples/av/clam/clam-v2.rar
· samples/av/clam/clam.tar.gz
· samples/av/clam/clam.pdf
· samples/av/clam/clam.impl.zip
· samples/av/clam/clam.zip
· samples/av/clam/clam.bin-le.cpio
· samples/av/clam/clam.exe.szdd
· samples/av/clam/clam.chm
· samples/av/clam/clam-v3.rar
· samples/av/clam/clam.exe.bz2
· samples/av/clam/clam.exe.mbox.base64
· samples/av/clam/clam.tnef
· samples/av/clam/clam.exe.binhex
· samples/av/clam/clam.bin-be.cpio
· samples/av/clam/clam.exe.mbox.uu
· samples/av/clam/clam.bz2.zip
Another recommendation is to use the PROTOS Genome Test Suite c10-archive. This is a big set of modified compressed files for the following file formats (extracted from their web page):
· ace 91518
· arj 255343
· bz2 321818
· cab 130823
· gz 227311
· lha 176631
· rar 198865
· tar 40549
· zip 189833
· zoo 163595
· total 1632691
You can download this set of mutated compressed files from https://www.ee.oulu.fi/research/ouspg/PROTOS_Test-Suite_c10-archive
Even when this testing suite is public—and it is possibly already included in many testing suites of antivirus products—you may be surprised by the actual number of antivirus products that fail with these files. If you take them as templates to mutate, you will be even more surprised.
Maximizing Code Coverage
Code coverage is a dynamic analysis technique that is based on instrumenting the target application while it is running, to determine the number of different instructions, basic blocks, or functions it executed. I briefly described code coverage earlier in this chapter when I discussed the PeachMinset.exe tool, which actually performs code coverage to determine which set of files handles the most features. However, using such a tool, you are restricted to the number of features that are exercised or covered by the input files.
If you do not discover any bugs within that exercised or discovered feature-set, you need to use one of the following approaches:
· Find more samples in the hope that they cover new features.
· Maximize the coverage of the sample files by using instrumentation.
I will discuss the second approach. You can maximize code coverage in a number of ways. Currently, the more interesting approaches that are being either researched or used are as follows:
· Using symbolic execution and SMT solvers. These tools translate the code executed or found in a target binary, get the predicates used in the code, abstract them, generate SMT formulas, and let the SMT solver find all possible modifications to the inputs that would cover more code.
· Performing random or half-random mutations to template files and running them under instrumentation to determine whether the newly added changes actually execute more instructions, basic blocks, or functions.
The first approach is used more often in research projects than in real life. SMT solvers are tools with great potential, but they tend to work only for toy projects because they require extremely large hardware setups. There are some real cases, such as Microsoft SAGE, but, as previously mentioned, they require a lot of resources. Today, you should not expect to run either SAGE or a SAGE clone at home against real targets with normal templates.
There is at least one impressive open-source SAGE-like tool: egas, from the MoFlow set of tools, which you can find at https://github.com/vrtadmin/moflow. However, as pointed out by one of its authors, the version of egas from 2014 was not meant to run with input buffers bigger than 4KB because it does not scale well. It would most likely take too long with real targets and medium to large inputs. I tried to use this tool against an unnamed antivirus product, and after one week of running it and consuming about 4GB of RAM, I simply stopped the tool without having achieved a result. However, such tools do actually discover real bugs. The problem is that the right setup, as of today, is too big for home-based projects, as demonstrated in the test I performed. Undoubtedly, egas is a very good research project that actually works, but, for now, it is restricted to small inputs.
Other approaches are easier to set up, require fewer resources, and find real bugs more quickly. They are based on the concept of maximizing code coverage using random or half-random modifications. Two more recent tools are listed here:
· American Fuzzy Lop (AFL)—A fuzzer based on the concepts explained in this section (a code-coverage assisted fuzzer) created by the well-known security researcher Michal Zalewski
· Blind Code Coverage Fuzzer (BCCF)—A fuzzer that is part of the Nightmare fuzzing framework, written by Joxean Koret, one of the authors of this book
Both tools work similarly, but they implement different algorithms. The following section will discuss BCCF, as you are going to use the Nightmare fuzzing suite for testing antivirus applications in the following sections.
Blind Code Coverage Fuzzer
The BCCF tool, part of the Nightmare fuzzing suite, is capable of performing the following actions:
· Maximizing sample files—It maximizes code coverage of one original template file.
· Discovering bugs—It finds bugs by covering a different set of features not covered by the original template file.
· Discovering new generations—It creates mutated files, based on random modifications made to the original template file, which can be used as new templates for other mutators in order to fuzz a different set of features than the ones covered by the original template file with different mutation strategies.
The most interesting features of this tool, or tools like this one, are that they can blindly discover new features and maximize the code covered by the original templates. This is very useful in many scenarios, such as these:
· You have only a handful of samples for some specific file format because it is too rare or old (or both) to obtain other samples.
· The samples you can gather from any source are too similar, always covering the same feature-set.
In such cases, BCCF will help. This tool uses either DrCov, a standard tool for code coverage from the great open-source project DynamoRIO, or a tool for Intel PIN that was contributed to the project. BCCF works by running the target under instrumentation with the original template file and performing modifications on the original input buffer in order to find modifications that cover new basic blocks. In short, this is how it works; however, the actual process is more complex.
BCCF first tries to measure the average number of basic blocks that are executed by the target application with the same input file. The minimum, maximum, and average are then calculated using a set of different mutation strategies. BCCF then performs random or half-random modifications and measures how many different basic blocks are executed. If new basic blocks are found, then a new generation is created, and this generation is used as the new template buffer. Additional modifications are applied to the new template buffer in order to discover more basic blocks that were not previously covered; however, if after a number of iterations for a given generation the number of basic blocks executed either is lower than before or remains stable, then the generation is dropped, and the previous one is used as the new template buffer.
This tool can run forever, or until you stop it, possibly finding bugs and discovering new generations that can be used as templates for other mutators, or it can run for a number of iterations until the file is maximized.
The following section will guide you through the installation and setup of BCCF for subsequent experiments.
Using Blind Code Coverage Fuzzer
To use BCCF, you need to install the Nightmare fuzzing suite, which is available from https://github.com/joxeankoret/nightmare/
To clone the GIT Repository in a directory of your choice on a Linux machine, you can issue the following command:
$ git clone https://github.com/joxeankoret/nightmare.git
Once you have it cloned, you have the following files and directories from the Nightmare fuzzing suite:
$ ls /path/to/nightmare
AUTHORS dependencies fuzzers lib LICENSE.txt NEWS.txt
README.md results samples TODO.txt COPYING.txt doc
fuzzersUpd LICENSE mutators presos README.txt runtime tasks
You need to install DynamoRIO, the default binary instrumentation toolkit used by BCCF. You can download it for your target operating system from https://github.com/DynamoRIO/dynamorio/wiki/Downloads
For this experiment, version 4.2.0-3 for Linux is used, but you can use whatever new version is available, as BCCF simply uses the standard tool DrCov. Once you have downloaded it, unpack it in a directory of your choice. Then, create a copy of the filefuzzers/bcf.cfg.example from the Nightmare installation directory and name it fuzzers/bcf.cfg. You need to edit this file to tell BCCF where DynamoRIO is installed and instruct BCCF to use it. At the very least, you need to add the following lines in the fuzzers/bcf.cfgconfiguration file:
#-----------------------------------------------------------------------
# Configuration for the BCF fuzzer
#-----------------------------------------------------------------------
[BCF]
templates-path=/path/to/nightmare/samples/some_dir
# Current options are: DynamoRIO, Pin
bininst-tool=DynamoRIO
# Use *ONLY* iterative algorithm instead of all algorithms?
#iterative=1
# Use *ONLY* radamsa instead of all the implemented algorithms?
#radamsa=1
[DynamoRIO]
path=/path/to/dynamorio/DynamoRIO-Linux-4.2.0-3/
After successfully configuring the binary instrumentation toolkit and the path where it is installed, you need to install the tool named Radamsa. Radamsa is a test case generator for robustness testing of a fuzzer (or a mutator). This tool tries to infer the grammar of the input files and then generate output according to the inferred grammar. Radamsa is the best mutator available today. To download and install it, issue the following commands:
$ curl http://haltp.org/download/radamsa-0.4.tar.gz \
| tar -zxvf - && cd radamsa-0.4 && make && sudo make install
Once you have installed Radamsa, you can test it from the command line by doing the following:
sh-4.3$ echo "Testing 123" | radamsa
Testing 2147483649
sh-4.3$ echo "Testing 123" | radamsa
-1116324324324323935052789
-1116324323935052789046909
sh-4.3$ echo "Testing 123" | radamsa
Testing 3
Testing 4294967292949672929496729294967292949672929496729294967292949672
sh-4.3$ echo "Testing 123" | radamsa
Testing3
ing3
ing3
As you can see, Radamsa is mutating the input string Testing 123 by generating different strings. Now, it is finally time to configure BCCF to work with your target. This example again uses the Bitdefender antivirus. Add the following lines to the file bcf.cfg:
#-----------------------------------------------------------------------
# Configuration for BitDefender
#-----------------------------------------------------------------------
[BitDefender]
# Command line to launch it
command=/usr/bin/bdscan --no-list
# Base tube name
basetube=bitdefender
# The tube the fuzzer will use to pull of samples
tube=%(basetube)s-samples
# The tube the fuzzer will use to record crashes
crash-tube=%(basetube)s-crash
# Extension for the files to be fuzzed
extension=.fil
# Timeout for this fuzzer
timeout=90
# Environment
environment=common-environment
# File to load/save the state with BCF fuzzer
#state-file=state.dat
current-state-file=current-state-bd
generation-bottom-level=-25
skip-bytes=7
save-generations=1
[common-environment]
MALLOC_CHECK_=2
The interesting parts of this configuration directive for fuzzing the Bitdefender antivirus are in bold. You need to specify the command to run, a time-out for the instrumentation toolkit, and the environment variables to set for the target. Set MALLOC_CHECK_ to 2 in order to catch bugs that the GNU LIBC library knows about.
Now, after successfully installing all the prerequisites and configuring BCCF, you can use the BCCF tool. You can check the command-line usage by simply running the bcf.py tool:
nightmare/fuzzers$ ./bcf.py
Usage: ./bcf.py (32|64) <config file> <section> <input_file> <output
directory> [<max iterations>]
The first argument to ./bcf.py is the architecture, 32bit or 64bit.
You can maximize the code covered by the Bitdefender antivirus for some sample file with the following command:
$ ./bcf.py 32 bcf.cfg BitDefender ../samples/av/sample.lnk out 100
[Wed Apr 22 13:41:04 2015 7590:140284692117312] Selected a maximum size
of 6 change(s) to apply
[Wed Apr 22 13:41:04 2015 7590:140284692117312] Input file is
../samples/av/041414-18376-01.dmp.lnk
[Wed Apr 22 13:41:04 2015 7590:140284692117312] Recording a total of 10
value(s) of coverage…
[Wed Apr 22 13:41:15 2015 7590:140284692117312] Statistics: Min 24581,
Max 24594, Avg 24586.400000, Bugs 0
[Wed Apr 22 13:41:15 2015 7590:140284692117312] Maximizing file in
100 iteration(s)
[Wed Apr 22 13:41:29 2015 7590:140284692117312] GOOD! Found an
interesting change at 0x0! Covered basic blocks 24604, original maximum 24594
[Wed Apr 22 13:41:29 2015 7590:140284692117312] Writing discovered
generation file 4d120a4e3bc360815a7113bccc642fedfd537479
(out/generation_4d120a4e3bc360815a7113bccc642fedfd537479.lnk)
[Wed Apr 22 13:41:29 2015 7590:140284692117312] New statistics:
Min 24594, Max 24604, Avg 24599.000000
[Wed Apr 22 13:41:33 2015 7590:140284692117312] GOOD! Found an
interesting change at 0x0!
Covered basic blocks 24605, original maximum 24604
[Wed Apr 22 13:41:33 2015 7590:140284692117312] Writing discovered
generation file e349166e31de0793af62e6ac11ecda20e8a759bd
(out/generation_e349166e31de0793af62e6ac11ecda20e8a759bd.lnk)
(…)
BCCF tries to maximize the code covered by the file sample.lnk doing a maximum of 100 iterations, and it stores the resulting file in the directory out. After a while, you see a message like the following one:
[Wed Apr 22 13:47:04 2015 7590:140284692117312] New statistics:
Min 24654, Max 24702, Avg 24678.000000
[Wed Apr 22 13:47:13 2015 7590:140284692117312] Iteration 100, current
generation value -2, total generation(s) preserved 8
[Wed Apr 22 13:47:18 2015 7590:140284692117312] File successfully
maximized from min 24581, max 24594 to min 24654, max 24702
[Wed Apr 22 13:47:18 2015 7590:140284692117312] File
out/51de04329d92a435c6fd3eef5930982467c9a25f.max written to disk
The original file covered a maximum of 24,594 basic blocks, and the maximized version now covers a total of 24,702 different basic blocks: 108 more basic blocks. You can use this maximized file as a new template for fuzzing your antivirus.
You can also tell the BCCF tool, instead of maximizing the file for a number of iterations, to do it forever, until you stop it by simply removing the last argument:
$ ./bcf.py 32 bcf.cfg BitDefender ../samples/av/041414-18376-01.dmp.lnk out
[Wed Apr 22 11:45:42 2015 28514:139923369727808] Selected a maximum size
of 7 change(s) to apply
[Wed Apr 22 11:45:42 2015 28514:139923369727808] Input file is
../samples/av/041414-18376-01.dmp.lnk
[Wed Apr 22 11:45:42 2015 28514:139923369727808] Recording a total of
10 value(s) of coverage…
[Wed Apr 22 11:45:51 2015 28514:139923369727808] Statistics: Min 24582,
Max 24588, Avg 24584.750000, Bugs 0
[Wed Apr 22 11:45:51 2015 28514:139923369727808] Fuzzing…
[Wed Apr 22 11:48:00 2015 28514:139923369727808] GOOD! Found an
interesting change at 0x0!
Covered basic blocks 24589, original maximum 24588
[Wed Apr 22 11:48:00 2015 28514:139923369727808] Writing discovered
generation file 064b4e7b6ec94a8870f6150d8a308111bb3b313e
(out/generation_064b4e7b6ec94a8870f6150d8a308111bb3b313e.lnk)
[Wed Apr 22 11:48:00 2015 28514:139923369727808] New statistics:
Min 24588, Max 24589, Avg 24588.500000
[Wed Apr 22 11:48:03 2015 28514:139923369727808] GOOD! Found an
interesting change at 0xa5e! Covered basic blocks 24596,
original maximum 24589
[Wed Apr 22 11:48:03 2015 28514:139923369727808] Writing discovered
generation file d5f30e9a01109eb87363b2e6cf1807c000d5b598
(out/generation_d5f30e9a01109eb87363b2e6cf1807c000d5b598.lnk)
[Wed Apr 22 11:48:03 2015 28514:139923369727808] New statistics:
Min 24589, Max 24596, Avg 24592.500000
(…)
[Wed Apr 22 13:39:42 2015 28514:139923369727808] Iteration 1915, current
generation value -10, total generation(s) preserved 7
[Wed Apr 22 13:39:45 2015 28514:139923369727808] GOOD! Found an
interesting change at 0x2712c! Covered basic blocks 30077,
original maximum 30074
[Wed Apr 22 13:39:45 2015 28514:139923369727808] Writing discovered
generation file 0d409746bd76a546d2e8ef4535674c60daa90021
(out/generation_0d409746bd76a546d2e8ef4535674c60daa90021.lnk)
[Wed Apr 22 13:39:45 2015 28514:139923369727808] New statistics:
Min 30074, Max 30077, Avg 30075.500000
[Wed Apr 22 13:40:28 2015 28514:139923369727808] Dropping current
generation and statistics as we have too many bad results
[Wed Apr 22 13:40:28 2015 28514:139923369727808] Statistics: Min 30071,
Max 30074, Avg 30072.500000, Bugs 0
[Wed Apr 22 13:40:28 2015 28514:139923369727808] Iteration 1927,
current generation value -7, total generation(s) preserved 7
(…)
In this example, the BCCF tool created a number of maximized files, and the last iteration at the time of checking successfully increased the code covered from a maximum of 24,588 basic blocks to 30,074 basic blocks: 5,486 more basic blocks!
Nightmare, the Fuzzing Suite
Nightmare is a distributed fuzzing suite with central administration. It focuses on Linux servers, although it works just as well in Windows and Mac OS X. You will use this fuzzing suite to dynamically test various antivirus products. Previous sections already indicated where you can download the Nightmare fuzzing suite, but just in case, here is the URL: https://github.com/joxeankoret/nightmare/
You can download a copy of the latest version of the fuzzing suite by issuing the following command to clone the repository:
$ git clone https://github.com/joxeankoret/nightmare.git
Once you have downloaded the installer, open doc/install.txt and follow each step. There is also an online copy of the install.txt file at https://github.com/joxeankoret/nightmare/blob/master/doc/install.txt
Basically, you need to install the dependencies that are required by Nightmare:
· Python—By default, this is installed in both Linux and Mac OS X but not in Windows.
· MySQL server— It will be used as the storage for crashes information.
· Capstone Python bindings—You need the Python bindings for this embedded disassembler library. You can download them from www.capstone-engine.org/download.html.
· Beanstalkd—You can install this program in Linux by simply issuing the command apt-get install beanstalkd.
· Radamsa—This is one of the multiple mutators that Nightmare uses. To download Radamsa, along with installation instructions, go to https://code.google.com/p/ouspg/wiki/Radamsa
Optionally, for some mutators (for example, the intelligent mutators for file formats such as MachO or OLE2 containers) and for binary instrumentation, you need to install the following dependencies:
· DynamoRIO—An open-source binary instrumentation toolkit, which you can download from www.dynamorio.org/.
· Zzuf—A multi-purpose fuzzer. You can install it in Linux by issuing the command apt-get install zzuf.
· Python macholib—A pure Python parser for MachO files, which you can download from https://pypi.python.org/pypi/macholib/
After you have successfully installed all the dependencies and created the MySQL database schema, you can finish setting up the Nightmare fuzzing suite by issuing the following command:
$ cd nightmare/runtime
$ python nightmare_frontend.py
It starts a web server listening by default at localhost:8080. You simply need to navigate using your favorite web browser to http://localhost:8080, click the Configuration link, and configure the samples path, the templates path, the installation path, the queue host server (the address where Beanstalkd is listening), and its port (by default, 11300), as shown in Figure 13.1.
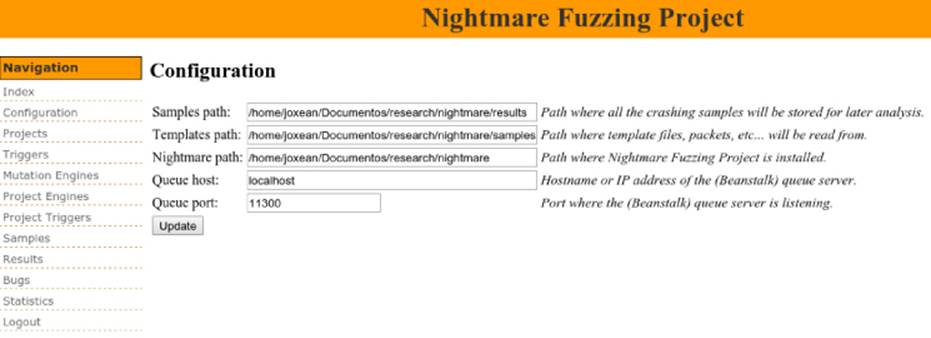
Figure 13.1 Final configuration of the Nightmare fuzzing suite
After configuring these fields, you only need to configure the targets to be fuzzed.
Configuring Nightmare
You start configuring Nightmare by setting up the ClamAV antivirus for Linux as your target. You need to install it on a Linux machine by issuing the following command:
$ sudo apt-get install clamav
To add a new fuzzing target to Nightmare, you can click the Projects link. A web page appears, similar to Figure 13.2.
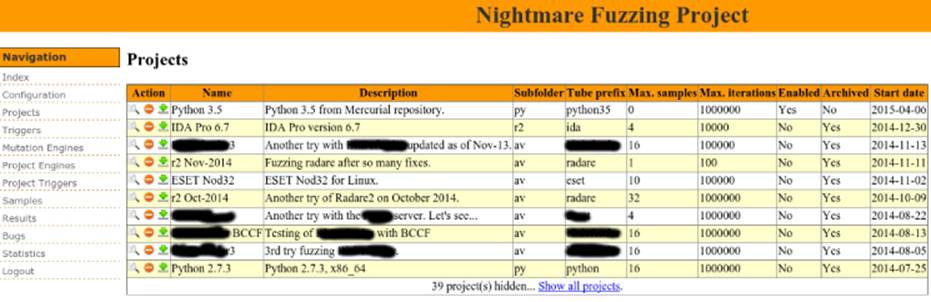
Figure 13.2 Starting a new fuzzing project in Nightmare
Fill in the fields for the new project. Add a name for the project, an optional description, and the subfolder inside $NIGHTMARE_DIR/samples/ with all the sample files that you will use as templates. Specify the tube prefix, which is the name of a Beanstalk's tube, to push jobs for the workers. Indicate the maximum number of samples to always maintain in the queue (for multiprocessing or multi-nodes), as well as the maximum number of iterations without a crash before you stop the project. Once you have filled in all the fields, click Add New Project and voilà! You have a new project.
Next, you need to assign mutation engines to the project. On the left side of the interface, you see the Project Engines link; click it, and then select the mutation engines that you want. In the case of antivirus products, the following engines are recommended:
· Radamsa multiple—This creates a ZIP file with multiple (10) mutated files inside.
· Simple replacer multiple—This creates a ZIP file with multiple files, but instead of using Radamsa, it replaces one randomly selected character with a randomly selected part of the original buffer.
· Charlie Miller multiple—This works like the previous options, but this time using an algorithm that Charlie Miller demonstrated at CanSecWest in 2008.
In general, it is always best to create bundles with multiple files as opposed to creating just a single file and running a full instance of the antivirus engine for each file you create.
Finding Samples
The next step is to find the right samples for this project. If you do not have any, you can click the Samples link on the left side of the interface. It uses Google to automatically download files that have specified the file format. For this test, try to download some PDF files to fuzz ClamAV. Click the Samples link and then fill in the form, as shown in Figure 13.3.
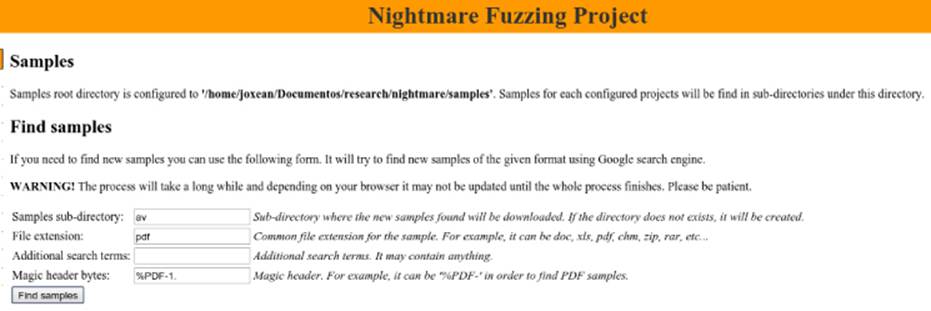
Figure 13.3 Finding samples with the Nightmare fuzzing suite
Go grab a coffee—it will take some time. After a while, you will have a set of freshly downloaded PDF files in the samples/av subdirectory.
Configuring and Running the Fuzzer
To configure the fuzzer, you need to go to the directory nightmare/fuzzers, edit the file generic.cfg, and add the following lines:
#-----------------------------------------------------------------------
# Configuration for ClamAV
#-----------------------------------------------------------------------
[ClamAV]
# Command line to launch it
command=/usr/bin/clamscan --quiet
# Base tube name
basetube=clamav
# The tube the fuzzer will use to pull of samples
tube=%(basetube)s-samples
# The tube the fuzzer will use to record crashes
crash-tube=%(basetube)s-crash
# Extension for the files to be fuzzed
extension=.fil
# Timeout for this fuzzer
timeout=90
# Environment
environment=clamav-environment
[clamav-environment]
MALLOC_CHECK_=3
As before with the BCCF fuzzer, you need to set up the command to run, the environment variables before running the target, and the time-out. However, this time, you also need to configure other variables, such as the tube prefix (or base tube) where the jobs for this fuzzing project will be left, as well as the crash tube (the tube where all the crashing information will be left). Once you have everything configured, open a terminal and execute the following commands:
$ cd nightmare/fuzzers
joxean@box:˜/nightmare/fuzzers$ ./generic_fuzzer.py generic.cfg ClamAV
An output similar to this appears in the terminal:
[Wed Apr 22 19:07:35 2015 19453:140279998961472] Launching fuzzer,
listening in tube clamav-samples
The fuzzer starts waiting for jobs indefinitely. You need to run another command to really start fuzzing this project.
In another terminal, run the following command to create samples for your project:
$ cd nightmare/runtime
$ python nfp_engine.py
[Wed Apr 22 19:11:35 2015 20075:139868713940800] Reading configuration
from database…
[Wed Apr 22 19:11:35 2015 20075:139868713940800] Configuration value
SAMPLES_PATH is /home/joxean/nightmare/results
[Wed Apr 22 19:11:35 2015 20075:139868713940800] Configuration value
TEMPLATES_PATH is /home/joxean/nightmare/samples
[Wed Apr 22 19:11:35 2015 20075:139868713940800] Configuration value
NIGHTMARE_PATH is /home/joxean/nightmare
[Wed Apr 22 19:11:35 2015 20075:139868713940800] Configuration value
QUEUE_HOST is localhost
[Wed Apr 22 19:11:35 2015 20075:139868713940800] Configuration value
QUEUE_PORT is 11300
[Wed Apr 22 19:11:35 2015 20075:139868713940800] Starting generator…
[Wed Apr 22 19:11:35 2015 20075:139868713940800] Creating sample for
ClamAV from folder av for tube clamav mutator Radamsa multiple
[Wed Apr 22 19:11:35 2015 20075:139868713940800] Generating mutated file
/home/joxean/nightmare/results/tmpfZ8uLu
[Wed Apr 22 19:11:35 2015 20075:139868713940800] Putting it in queue and
updating statistics…
[Wed Apr 22 19:11:35 2015 20075:139868713940800] Creating sample for
ClamAV from folder av for tube clamav mutator Radamsa multiple
[Wed Apr 22 19:11:35 2015 20075:139868713940800] Generating mutated file
/home/joxean/nightmare/results/tmpM4wbSE
[Wed Apr 22 19:11:35 2015 20075:139868713940800] Putting it in queue and
updating statistics…
[Wed Apr 22 19:11:35 2015 20075:139868713940800] Creating sample for
ClamAV from folder av for tube clamav mutator Radamsa multiple
[Wed Apr 22 19:11:35 2015 20075:139868713940800] Generating mutated file
/home/joxean/nightmare/results/tmp44Nk6G
[Wed Apr 22 19:11:36 2015 20075:139868713940800] Putting it in queue and
updating statistics…
[Wed Apr 22 19:11:36 2015 20075:139868713940800] Creating sample for
ClamAV from folder av for tube clamav mutator Radamsa multiple
[Wed Apr 22 19:11:36 2015 20075:139868713940800] Generating mutated file
/home/joxean/nightmare/results/tmptRy_Je
[Wed Apr 22 19:11:37 2015 20075:139868713940800] Putting it in queue and
updating statistics…
(…)
The nfp_engine.py scripts creates samples and puts them in the queue. Now, if you go back to the terminal where the fuzzer was waiting for jobs, you should see something similar to the following:
$ python generic_fuzzer.py generic.cfg ClamAV
[Wed Apr 22 19:14:47 2015 20324:140432407086912] Launching fuzzer,
listening in tube clamav-samples
[Wed Apr 22 19:14:47 2015 20324:140432407086912] Launching debugger with
command /usr/bin/clamscan --quiet /tmp/tmpbdMx7p.fil
[Wed Apr 22 19:14:52 2015 20324:140432407086912] Launching debugger with
command /usr/bin/clamscan --quiet /tmp/tmpwxEVO2.fil
(…)
[Wed Apr 22 19:15:37 2015 20324:140432407086912] Launching debugger with
command /usr/bin/clamscan --quiet /tmp/tmptBJ0cr.fil
LibClamAV Warning: Bytecode runtime error at line 56, col 9
LibClamAV Warning: [Bytecode JIT]: recovered from error
LibClamAV Warning: [Bytecode JIT]: JITed code intercepted runtime error!
LibClamAV Warning: Bytecode 40 failed to run: Error during bytecode
execution
(…)
[Wed Apr 22 19:16:55 2015 20324:140432407086912] Launching debugger with
command /usr/bin/clamscan --quiet /tmp/tmpRAoDQ2.fil
LibClamAV Warning: cli_scanicon: found 6 invalid icon entries of 6 total
[Wed Apr 22 19:17:57 2015 20324:140432407086912] Launching debugger with
command /usr/bin/clamscan --quiet /tmp/tmpOOIWnE.fil
LibClamAV Warning: PE file contains 16389 sections
(…)
You finally have the fuzzer running! It will launch the target process, clamscan, under a debugging interface and will record any crash that happens in the target during the course of this project. You can view the statistics and results, if any, in the front-end web application. Go back to the web application and click the Statistics link. You should see results similar to those shown in Figure 13.4.
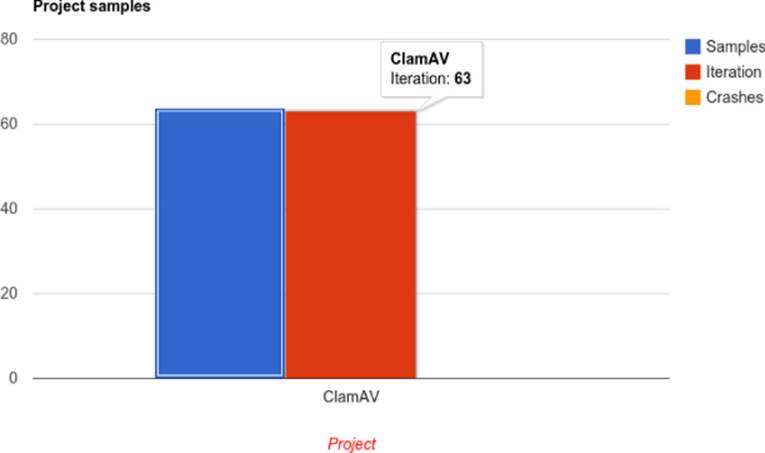
Figure 13.4 View your fuzzing statistics.
Eventually, if you are lucky enough and you have selected a good set of template files, the target process crashes. Once you have at least one crash, you can click the Results link. A window similar to the one in Figure 13.5 appears.
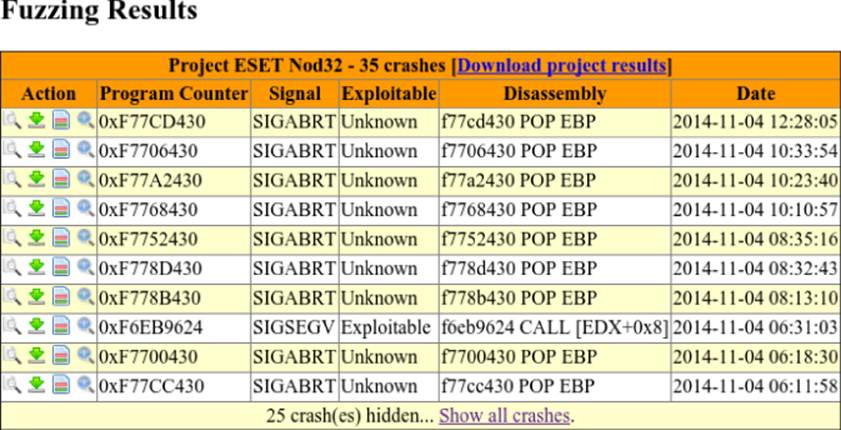
Figure 13.5 View your fuzzing results.
You can download the crashing samples, and a diff with all the changes that were made to the file, in order to create an input that triggers the bug and inspects the register values, the calls stack, and so on.
Summary
Dynamic analysis techniques encompass a set of methods that are used to extract runtime and behavior information from applications. This chapter covered two dynamic analysis techniques: fuzzing and code coverage.
Fuzzing is a technique that is based on providing unexpected or malformed input data to a target program, trying to crash it. Fuzzing tools, ranging from simple fuzzers to advanced fuzzers, usually have the following feature-set:
· Mutators—These algorithms make changes to a template, input file, or protocol or file format specification.
· Instrumentation tools—These are libraries or programs that let you instrument your target application in order to record instructions and basic blocks execution and catch exceptions and errors, among other things.
· Bug triaging and crash management tools—These tools make it easy to capture crashing samples, classify them, and generate reports that will help investigate the crash.
· Code coverage tools—These tools help you find new code paths that could potentially be buggy.
For fuzzers to work effectively, it is important that you choose the right input files to be used as the template. When choosing templates files, consider the functionality they exercise when opened in the target program. To find template files, look for certain file types on your computer, use Google search queries (using the filetype filter), or download test files from other available antivirus test suites and use those test files as templates.
Code coverage is a dynamic analysis technique that is based on instrumenting the target application while it is running to determine the number of different instructions, basic blocks, or functions it executed. Code coverage is usually part of a fuzzer suite. Its goal is to find new code paths that have not been yet explored and that could reveal relevant bugs. This chapter touches on two code coverage techniques:
· Using symbolic execution and SMT solvers to translate the code executed or found in a target binary, get the predicates used in the code, abstract them, generate SMT formulas, and let the SMT solver find all possible modifications to the inputs that would cover more code
· Performing random or half-random mutations to template files and running them under instrumentation to determine whether these new mutations actually lead to the discovery of new code path execution
Putting it all together, a fuzzer works like this:
1. The fuzzer starts with a template file and a target program.
2. The template file is mutated and a new file is generated.
3. The new input file is passed to the target program, which happens to be running under instrumentation tools.
4. Crashes are recorded along with the input file that caused the crash.
5. Input files that cause new code blocks execution, as captured during instrumentation, may be used as templates for another iteration of the fuzzer.
6. All of the above constitute one round or iteration. The whole process may be repeated indefinitely until the desired number of iterations is achieved or enough bugs have been discovered.
Toward the end of the chapter, a hands-on section was devoted to showing you how to install, configure, and use the Nightmare fuzzing suite.
Equipped with all this practical knowledge, you are now confidently set to start fuzzing antivirus software, or any other application for that matter.
The next chapter covers how to find and exploit bugs in the antivirus that is running locally, when the attacker has already gained initial access to the target via remote exploitation, for example.