The Antivirus Hacker's Handbook (2015)
Part I. Antivirus Basics
Chapter 2. Reverse-Engineering the Core
The core of an antivirus product is the internal engine, also known as the kernel. It glues together all important components of the AV while providing supporting functionality for them. For example, the scanners use the API exported by the core to analyze files, directories, and buffers, as well as to launch other analysis types.
This chapter discusses how you can reverse-engineer the core of an antivirus product, what features are interesting from an attacker's viewpoint, and some techniques to make the reverse-engineering process easier, especially when the antivirus software tries to protect itself against being reverse-engineered. By the end of the chapter, you will use Python to write a standalone tool that interfaces directly with the core of an AV product, thus enabling you to perform fuzzing, or automated testing of your evasion techniques.
Reverse-Engineering Tools
The de facto tool for reverse-engineering is the commercial IDA disassembler. During the course of this book, it is assumed that you have a basic knowledge of IDA because you will be using it for static and dynamic analysis tasks. Other tools that this chapter covers are WinDbg and GDB, which are the standard debuggers for Windows and Linux, respectively. The examples will also use Python for automating typical reverse-engineering tasks both from inside IDA and using the IDAPython plug-in and for writing standalone scripts that do not rely on other third-party plug-ins.
Because this chapter covers malware and researching AV evasion techniques, it is recommended that you use virtualization software (such as VMware, VirtualBox, or even QEMU) and carry out the experimentation in a safe, virtualized environment. As you will see in the following sections, debugging symbols will be helpful to you when they are present, and the Linux version of an AV is most likely to have debugging symbols shipped with it.
For the rest of the book, it is recommended that you keep two virtual machines handy—one with Windows and the other with Linux—in case you want to do hands-on experimentation.
Command-Line Tools versus GUI Tools
All current antivirus products offer some kind of GUI interface for configuring them, viewing results, setting up scheduled scans, and so on. The GUI scanners are typically too dense to reverse-engineer because they do not interact exclusively with the antivirus kernel also with many other components. Simply trying to discern which code handles GUI painting, refreshing, window events, and so on is a significant task that involves both static and dynamic work. Fortunately, some of today's antivirus products offer command-line-independent scanners. Command-line tools are smaller than their GUI counterparts and are often self-contained, making them the most interesting target to start the reverse-engineering process.
Some AV software is designed to run in a centralized server, and therefore the scanning core is used by the server component rather than by the command-line tools or the GUIs. In such cases, the server will expose a communication protocol for the command-line tools to connect to and interface with. That does not mean that the server component has to exist in its own machine; instead, it can still run locally as a system service. For example, Avast for Linux and Kaspersky antivirus products have a server, and the GUIs or command-line scanners connect to it, issue the scan queries through it, and then wait for the results. In such cases, if you attempt to reverse-engineer the command-line tool, you will only learn about the communication protocol, or if you are lucky, you may find remote vulnerabilities in the servers, but you will not be able to understand how the kernel works. To understand how the kernel works, you have to reverse-engineer the server component, which, as mentioned before, is hosting the kernel.
In the following sections, the server component from Avast AV for Linux will be used as an example.
Debugging Symbols
On the Windows platform, it is unusual for products to ship with the corresponding debugging symbols. On the other hand, on Unix-based operating systems, debugging symbols often ship with third-party products (usually embedded in the binaries). The lack of debugging symbols makes reverse-engineering of the core of the antivirus product or any of its components a difficult task at first because you do not have function or label names that correspond to the disassembly listing. As you will see, there are tricks and tools that may help you discover some or all of the symbols for your target antivirus product.
When an AV product exists for various platforms, it does not make sense for the company to have different source code for these different platforms. As such, in multi-platform AV products, it is very common for the kernel to share all or some of the source code base between the various platforms. In those situations, when you reverse the core on one platform, reversing it on another platform becomes easier, as you shall see.
There are exceptions to this. For example, the AV product may not have a core for a certain platform (say, for Mac OS X) and may license it from another AV vendor. The AV vendor may decide to integrate another existing product's kernel into its own product so it only needs to change names, copyright notices, and the other resources such as strings, icons, and images. This is the case with the Bitdefender product and its engine, where many companies purchase licenses for the engine.
Returning to the original question about how to get a partial or full understanding of how the executable images work, you need to check whether the product you want to analyze offers any version for Unix-based operating systems (Linux, BSD, or Mac OS X), and you hope that the symbols are embedded in the binaries. If you are lucky, you will have symbols on that platform, and because the core is most likely the same between different operating system versions (with a few differences such as the use of OS-specific APIs and runtime libraries), you will be able to transfer the debugging symbols from one platform to another.
Tricks for Retrieving Debugging Symbols
Having established that on Unix-based operating systems you are more likely to have debugging symbols for AV products, this section uses the F-Secure antivirus products as an example. Consider the fm library (fm4av.dll in Windows, and libfm-lnx32.so in Linux). Windows does not have debugging symbols for that library, but the Linux version includes many symbols for this and other binaries.
Figure 2.1 shows the functions list discovered by IDA for the Windows version.
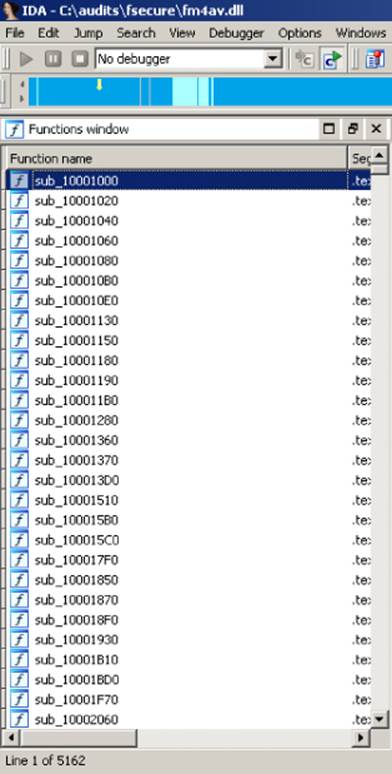
Figure 2.1 F-Secure for Windows library fm4av.dll as displayed in IDA
Figure 2.2 shows the functions list with meaningful names, pulled by IDA from the embedded symbols in the binary, for the very same library but for the Linux version.
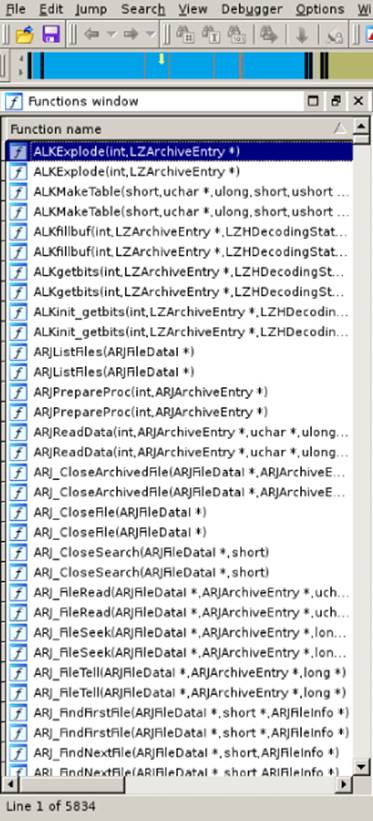
Figure 2.2 F-Secure for Linux library libfmx-linux32.so as seen in IDA
Considering that antivirus kernels are almost equal, with only a few exceptions between platforms, you can start by reverse-engineering the Linux version. The functionality will be similar in the Windows version. You can port the symbols from the Linux version to the Windows version using third-party commercial binary diffing products such as zynamics BinDiff. You can perform the bindiffing on both libraries and then import the matched symbols from the Linux version to the Windows version by right-clicking the Matched Functions tab and selecting Import Functions and Comments (see Figure 2.3).

Figure 2.3 Importing symbols from Linux to Windows
In many situations, unlike the case of F-Secure, which has partial symbols, you may retrieve full symbols with variable and even label names. In those cases, the same techniques can be applied.
Figure 2.4 shows a section of disassembly of one library of Comodo Antivirus for Linux with full symbols.
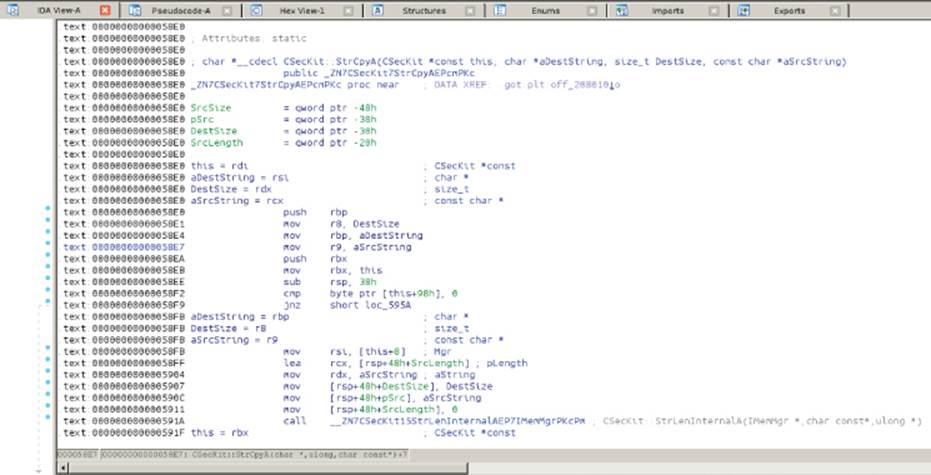
Figure 2.4 Disassembly of Comodo for Linux library libPE32.so showing full symbols
Porting symbols between operating systems is not 100-percent reliable for various reasons. For example, different compilers are used for Windows, Linux, BSD, and Mac OS X. While on Unix-based platforms, GCC (and sometimes Clang) is the most used compiler, this is not the case for Windows, where the Microsoft compiler is used. This means that the very same C or C++ code will generate different assembly code for both platforms, making it more difficult to compare functions and port symbols. There are other tools for porting symbols, like the Open Source IDA plug-in Diaphora, created by Joxean Koret, one of the the authors of this book, using the Hex-Rays decompiler-generated Abstract Syntax Tree (AST) for comparing function graphs, among other techniques.
Debugging Tricks
The previous sections focused exclusively on using static analysis techniques to get information from the antivirus product you want to reverse-engineer. This section focuses on dynamic analysis approaches to reverse-engineering the antivirus product of your choice.
Antivirus products, like malware, generally try to prevent reverse-engineering. The AV executable modules can be obfuscated, sometimes even implementing different obfuscation schemes for each binary (as in the case of the Avira kernel). The AV executables may implement anti-debugging tricks that make it difficult for a researcher to understand how the malware detection algorithm operates. These anti-debugging tricks are designed to make it more difficult to debug the components of an antivirus to get a real idea of how they detect malware or how some specific parser bug can be exploited leading to attacker controlled code execution.
The following sections offer some advice for debugging antivirus software. All the debugging tips and tricks focus exclusively on Windows because no antivirus has been observed trying to prevent itself from being debugged on Linux, FreeBSD, or Mac OS X.
Backdoors and Configuration Settings
While antivirus products generally prevent you from attaching to their services with a debugger, this protection is not difficult to bypass when you employ reverse-engineering techniques. The self-protection mechanisms (as the antivirus industry calls them) are usually meant to prevent malware from attaching to an antivirus service, to create a thread in the context of the antivirus software, or to forbid killing the antivirus processes (a common task in malware products). They are not meant to prevent users from disabling the antivirus in order to debug it or to do whatever they want with it. Actually, it would make no sense to prevent users from disabling (or uninstalling) the product.
Disabling the self-protection mechanism of the antivirus product is one of the first steps you must carry out to start any dynamic analysis task where a debugger is involved, unless there is a self-contained command-line analysis scanner (as in the cases of the Avirascancl tool or the Ikarus t3 Scan tool). Command-line scanners do not usually try to protect themselves because, by their nature, they are not resident and are invoked on demand.
The methods to disable the antivirus self-protection mechanism are not commonly documented because, from the point of view of the antivirus companies, this information is only relevant to the support and engineering people: they actually need to debug the services and processes to determine what is happening when a customer reports a problem. This information is not made public because a malware writer could use it to compromise a machine running the antivirus software. Most often, modifying one registry key somewhere in the registry hive enables you to debug the AV services.
Sometimes a programmer backdoor may allow you to temporarily disable the self-protection mechanism, as in the case of the old versions of Panda Global Protection. Panda provided a library, called pavshld.dll (Panda Antivirus Shield), which exported one function that received only one parameter: a secret GUID. When passed, this GUID disabled the antivirus software. While there is no tool to call this function, you could easily create a tool to load this library dynamically and then call this function with the secret key, thereby disabling Panda's shield and allowing you to start performing dynamic analysis tasks with OllyDbg, IDA, or your favorite debugger. This vulnerability is discussed more in Chapter 14.
The self-protection mechanisms of an antivirus product can be implemented in userland by hooking special functions and implementing anti-debugging tricks. In kernel-land, they can be implemented using a device driver. Today's antivirus software generally implements self-protection mechanisms using kernel drivers. The latter is the correct approach, because relying on userland hooks would be a bad decision for many reasons, the simplest of which is that the hooks can be simply removed from userland processes, as discussed in Chapter 9.
If a kernel-land driver was used for the sole purpose of protecting the AV from being disabled, then it may be sufficient for you to simply prevent the kernel driver from loading, which would thus disable the self-protection mechanism.
To disable kernel drivers or system services under Windows, you would simply need to open the registry editor tool (regedit.exe), go to HKEY_LOCAL_MACHINE\System\CurrentControlSet\Services, search for any driver installed by the appropriate antivirus product, and patch the appropriate registry value. For example, say that you want to disable the self-protection mechanism (called “anti-hackers”) on the Chinese antivirus product Qihoo 360. You would need to change the Start value for the 360AntiHacker driver (360AntiHacker.sys) to 4 (see Figure 2.5), which corresponds to the SERVICE_DISABLED constant in the Windows SDK. Changing the service start type to this value simply means that it is disabled and will not be loaded by Windows. After changing this value, you may need to reboot.

Figure 2.5 How to disable the 360AntiHacker driver
It is worth mentioning that the antivirus is likely going to forbid you from disabling the driver with an “Access Denied” error message or another less meaningful message. If this occurs, you can reboot Windows in safe mode, disable the driver, and then reboot again in normal mode.
Some antivirus products may have a single driver that implements core functionality in addition to the self-protection mechanism. In that case, disabling the driver will simply prevent the antivirus from working correctly because higher components may need to communicate with the driver. If this occurs, you only have one option: kernel debugging.
Kernel Debugging
This section focuses on how to use a kernel debugger to debug both the antivirus drivers and the user-mode processes. Kernel debugging is the least painful method of attaching a debugger to an antivirus process, while avoiding all the anti-debugging tricks based on the user mode. Instead of disabling the antivirus drivers that perform self-protection, you debug the entire operating system and attach, when required, to the desired userland process. This task must be performed using one of the debuggers (WinDbg or Kd) from the Debugging Tools for Windows package or the WDK (see Figure 2.6).
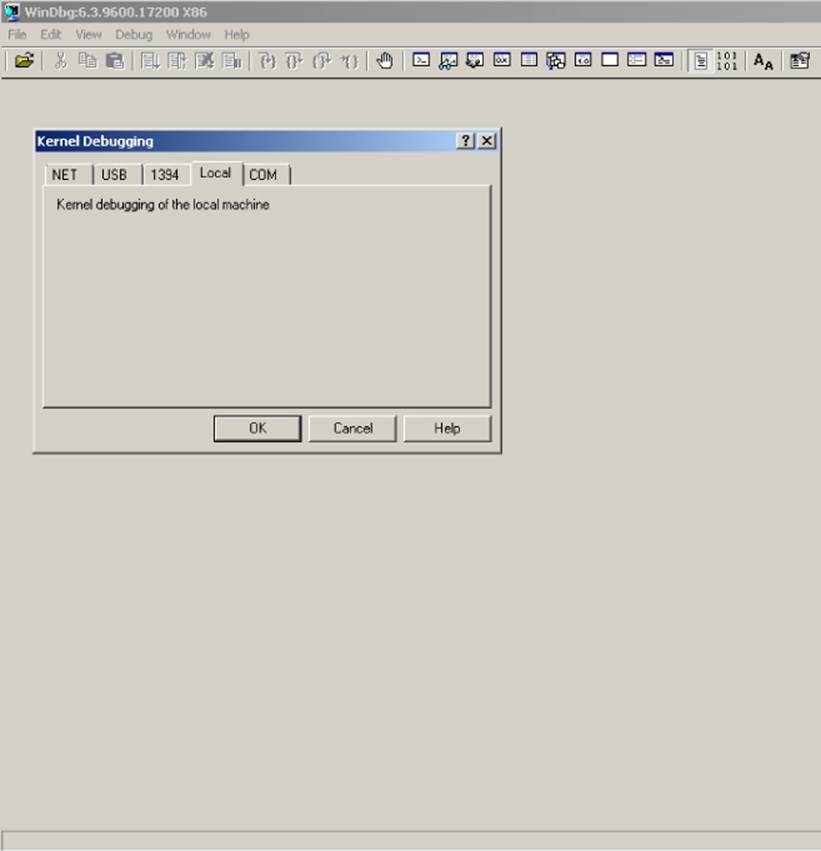
Figure 2.6 The WinDbg debugger
To perform kernel debugging, you need to create a virtual machine with either the commercial VMware product or the open-source VirtualBox. The examples in this book use VirtualBox because it is free.
After creating a virtual machine with Windows 7 or any later version, you need to configure the operating system boot options to allow kernel debugging. In the old days of Windows XP, Windows 2000, and so on, you could perform kernel debugging by editing the file c:\boot.ini. Since Windows Vista, you need to use the bcdedit tool. To accomplish that, just open a command prompt (cmd.exe) with elevated privileges (run as administrator), and then execute the following two commands:
$ bcdedit /debug on
$ bcdedit /dbgsettings serial debugport:1 baudrate:115200
The first command enables kernel debugging for the current operating system. The second command sets the global debug settings to serial communications, using the port COM1 and a baud-rate of 115,200, as shown in Figure 2.7.
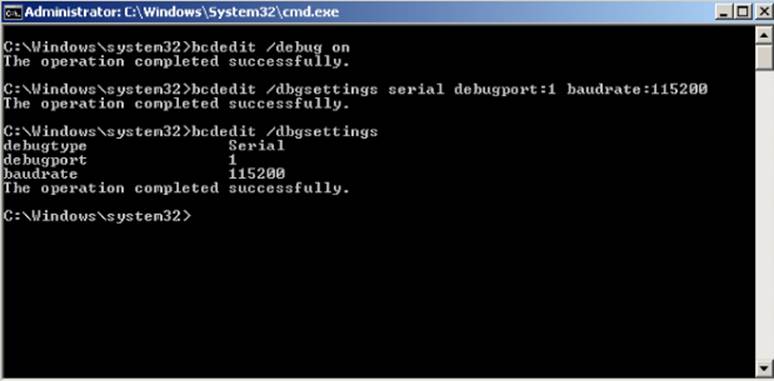
Figure 2.7 Setting up kernel debugging on Windows 7 with bcdedit
After successfully configuring debugging for the current operating system, you need to shut down the current virtual machine to set up the remaining configuration settings, this time, from VirtualBox:
1. Right-click the virtual machine, select Settings, and, in the dialog box that appears, click Serial Ports on the left side.
2. Check the Enable Serial port option, select COM1 at Port Number, and then select Host Pipe from the drop-down menu for Port mode.
3. Check the Create Pipe option, and enter the following path in the Port/File Path: \\.\pipe\com_1 (as shown in Figure 2.8).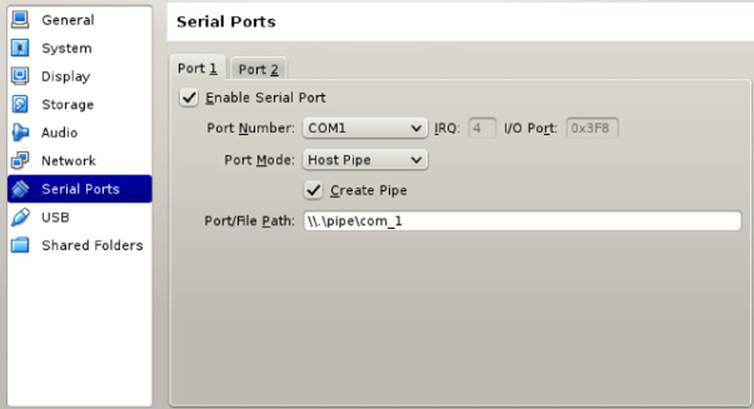
Figure 2.8 Setting up debugging in VirtualBox
4. After you have correctly completed the previous steps, reboot the virtual machine and select the operating system that says “Debugger Enabled” in its description. Voilà! You can now debug both kernel drivers and user-mode applications without worrying about the self-protection mechanism of the corresponding antivirus software.
Note
These steps assume that you are working in a Windows host running VirtualBox. Setting up kernel debugging for Windows in a Linux or Mac OS X host is a problematic process that, at the very least, requires two virtual machines and is largely dependent on the host operating system version. Although you can set up kernel debugging in a Linux or Mac OS X host with both VMware and VirtualBox, this can be very difficult. It is recommended that, when possible, you use a Windows host to perform kernel debugging.
Debugging User-Mode Processes with a Kernel-Mode Debugger
It is also possible with a kernel-mode debugger to debug just user-mode processes instead of the kernel. To do so, you have to connect the kernel debugger (WinDbg, for example) and type commands that allow the debugger to switch the current execution context to the execution context of the desired process.
The required steps are listed here:
1. Open WinDbg in an elevated command prompt, and select File→Kernel Debug from the main menu.
2. In the dialog box, go to the COM tab and enter the value of the Port or File you set previously. Check the Pipe option.
3. Configure the symbols path to point to the remote Microsoft symbol server and instruct WinDbg to reload the symbols by issuing the following commands:
.sympath srv*http://msdl.microsoft.com/download/symbols
.reload
After you set the symbols path, WinDbg will be able to debug with the help of the public symbols.
This example uses the F-Secure retail antivirus for Windows; you want to debug its user-mode service, F-Secure Scanner Manager 32-bit (fssm32.exe). To do this from WinDbg in kernel mode, you need to list all the processes running in the debugged host, search for the actual process to debug, switch the current execution context, and then start debugging.
To list all the user-mode processes from kernel mode, execute the following command:
> !process 0 0
You can filter out results by process name by appending the name of the process to the end of the command, as shown here:
> !process 0 0 fssm32.exe
PROCESS 868c07a0 SessionId: 0 Cid: 0880 Peb: 7ffdf000 \
ParentCid: 06bc
DirBase: 62bb7000 ObjectTable: a218da58 HandleCount: 259.
Image: fssm32.exe
The output string process 868c07a0 points to an EPROCESS structure. Pass this EPROCESS address to the following command:
.process /r /p 868c07a0.
The modifiers /r /p are specified so the context switch between kernel and user mode happens automatically so you can debug the fssm32.exe process after running this command:
lkd> .process /r /p 868c07a0
Implicit process is now 868c07a0
Loading User Symbols
..............................................
After the context switch takes place, you can list all the user-mode libraries loaded by this process with the command lm:
lkd> lm
start end module name
00400000 00531000 fssm32 (deferred)
006d0000 006ec000 fs_ccf_id_converter32 (deferred)
00700000 0070b000 profapi (deferred)
00750000 00771000 json_c (deferred)
007b0000 007cc000 bdcore (deferred)
00de0000 00e7d000 fshive2 (deferred)
01080000 010d2000 fpiaqu (deferred)
01e60000 01e76000 fsgem (deferred)
02b20000 02b39000 sechost (deferred)
07f20000 07f56000 daas2 (deferred)
0dc60000 0dc9d000 fsuss (deferred)
0dce0000 0dd2b000 KERNELBASE (deferred)
10000000 10008000 hashlib_x86 (deferred)
141d0000 14469000 fsgeme (deferred)
171c0000 17209000 fsclm (deferred)
174b0000 174c4000 orspapi (deferred)
178d0000 17aad000 fsusscr (deferred)
17ca0000 1801e000 fsecr32 (deferred)
20000000 20034000 fsas (deferred)
21000000 2101e000 fsepx32 (deferred)
(…)
Now you can debug user-mode processes from kernel mode. If you would like to learn more debugging tricks for WinDbg, it is highly recommended that you read Chapter 4 in Practical Reverse Engineering (Dang, Gazet, Bachaalany, and Josse 2014; Wiley, ISBN-13: 978-1-118-78731-1).
Analyzing AV Software with Command-Line Tools
Sometimes, you may be lucky enough to find a completely self-contained command-line tool. If this is the case, you don't need to mess with the antivirus in order to disable the protection mechanism or to set up kernel debugging. You can use any debugger you want to dynamically analyze the core of the antivirus product. There are various types of antivirus software for Windows that offer such command-line tools (Avira and Ikarus are two examples). However, many antivirus products do not offer any independent command-line tool for Windows because either they dropped this feature or it is exclusively used by the engineers or the support people. If that is the case, you may want to find out which other operating systems are supported. If there is a Linux, BSD, or Mac OS X version, odds are that there is an independent, self-contained command-line tool that you can debug. This is the case with Avira, Bitdefender, Comodo, F-Secure, Sophos, and many others.
Debugging the command-line tool does not mean you are going to always debug it interactively with a tool such as WinDbg, IDA, OllyDbg, or GDB. You may want to write fuzzers using a debugging interface, such as the LLDB bindings, Vtrace debugger (from Kenshoto), or PyDbg and WinAppDbg Python APIs.
Note
A fuzzer, or fuzz-testing tool, is a program written with the intent to feed a given program invalid or unexpected input. Depending on the program you are fuzzing, the input may vary. For example, when fuzzing an antivirus, you feed the AV modified or incomplete samples. The goal of fuzzers will vary, from finding software bugs or software security bugs, to discovering how a program operates under certain input, and so on. In order to write fuzzers, you need a way to automate the task of modifying the input and then feeding it to the program to be fuzzed. Usually fuzzers run hundreds, if not thousands, of input mutations (modifications to the inputs) before they catch noteworthy bugs.
Porting the Core
This section discusses how to decide what platform and tools to automate. Choosing the appropriate operating system for automation and the right tool from the AV to be emulated puts you on the right path for your reverse-engineering and automation efforts.
For automation in general or fuzz automation, the best operating systems are Unix based, especially Linux because it requires less memory and disk space and offers a plethora of tools to automate tasks. In general, it is easier to run a set of Linux-based virtual machines with QEMU, KVM, VirtualBox, or VMware than to do the same with a set of Windows virtual machines. Because of this, it is recommended that you run the fuzzing automations with antivirus software in Linux. Antivirus companies, like regular software companies, usually try to target popular operating systems such as Windows. If the antivirus product does not have a Linux version, but only Windows versions, it will still be possible to run the Windows version of the AV scanner using the Wine (Wine Is Not an Emulator) emulator, at almost native speed.
Wine software is best known for running Windows binaries in non-Windows operating systems, such as Linux. Winelib (Wine's supporting library), on the other hand, can be used to port Windows-specific applications to Linux. Some example applications that were successfully ported to Linux using Winelib were Picasa (an image viewer for organizing and editing digital photos, created by Google), Kylix (a compiler and integrated development environment once available from Borland but later discontinued), WordPerfect9 for Linux from Corel, and WebSphere from IBM. The idea behind using Wine or Winelib is that you can choose to run Windows-only command-line tools using Wine or reverse-engineer the core libraries to write a C or C++ wrapper for Linux, using Winelib, that invokes functions exported by a Windows-only DLL.
Both mechanisms can be used successfully to run automations with, for example, the Windows-only command-line tool Ikarus t3 Scan (as shown in Figure 2.9) and the mpengine.dll library used by the Microsoft Security Essentials antivirus product (again, exclusive to Windows). This option is recommended when there is no other way to automate the process of running the targeted antivirus product under Linux because the automation in Windows environments is too complex or requires excessive resources.
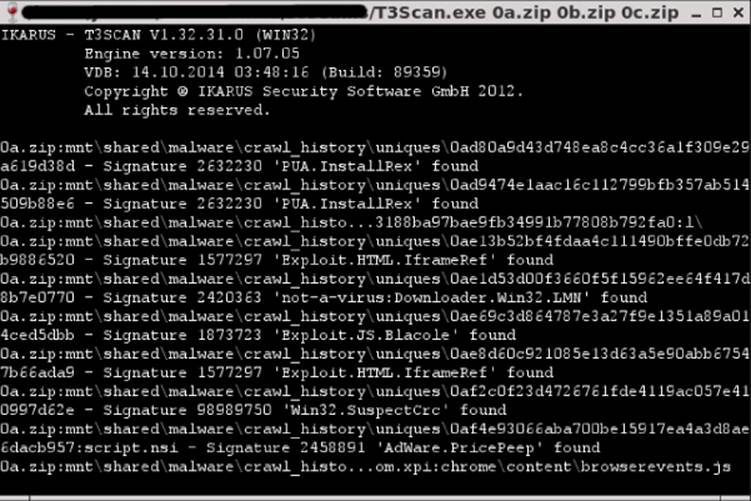
Figure 2.9 Ikarus t3 Scan running in Linux with Wine
A Practical Example: Writing Basic Python Bindings for Avast for Linux
This section gives you a practical example of how to reverse-engineer an antivirus component to create bindings. In short, when bindings are discussed here, they refer to writing tools or libraries that you can plug in to your fuzzers. The idea is that once you can interact with your own tools instead of with the tools supplied by the antivirus vendor, you can automate other tasks later (such as creating your own scanner or fuzzer). This example uses Avast antivirus for Linux as a target and the Python language as the automation language. This antivirus version is so simple that reverse-engineering it with the aim of writing bindings should take only an hour or two.
A Brief Look at Avast for Linux
Avast for Linux has only two executables: avast and scan. The first executable is the server process responsible for unpacking the virus database file (the VPS file), launching scans, querying URLs, and so on. The second executable is the client tool to perform these queries. Incidentally, the distributed binaries contain partial symbols, as shown in Figure 2.10, which shows the client tool scan.
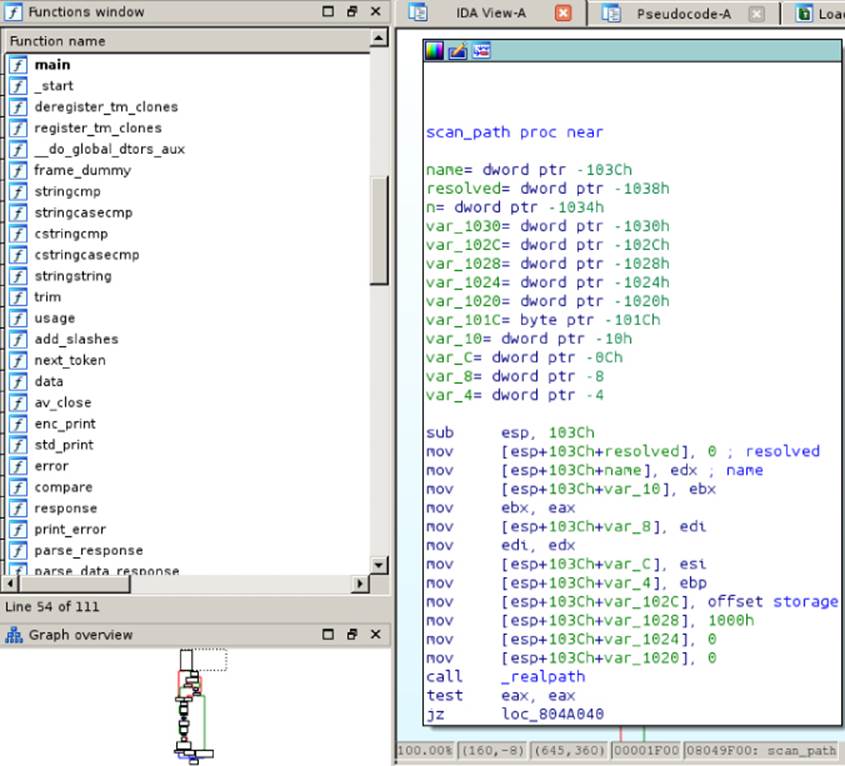
Figure 2.10 A list of functions and disassembly of the scan_path function in the “scan” tool from Avast
Thanks to the partial symbols, you can start analyzing the file with IDA and easily determine what it does. Start with the main function:
.text:08048930 ; int __cdecl main(int argc, const char **argv,
const char **envp)
.text:08048930 public main
.text:08048930 main proc near ; DATA XREF: _start+17 o
.text:08048930
.text:08048930 argc = dword ptr 8
.text:08048930 argv = dword ptr 0Ch
.text:08048930 envp = dword ptr 10h
.text:08048930
.text:08048930 push ebp
.text:08048931 mov ebp, esp
.text:08048933 push edi
.text:08048934 push esi
.text:08048935 mov esi, offset src ; "/var/run/avast/scan.sock"
.text:0804893A push ebx
.text:0804893B and esp, 0FFFFFFF0h
.text:0804893E sub esp, 0B0h
.text:08048944 mov ebx, [ebp+argv]
.text:08048947 mov dword ptr [esp+28h], 0
.text:0804894F mov dword ptr [esp+20h], 0
.text:08048957 mov dword ptr [esp+24h], 0
.text:0804895F
.text:0804895F loc_804895F: ; CODE XREF: main+50 j
.text:0804895F ; main+52 j …
.text:0804895F mov eax, [ebp+argc]
.text:08048962 mov dword ptr [esp+8],offset shortopts ; "hvVfpabs:e:"
.text:0804896A mov [esp+4], ebx ; argv
.text:0804896E mov [esp], eax ; argc
.text:08048971 call _getopt
.text:08048976 test eax, eax
.text:08048978 js short loc_8048989
.text:0804897A sub eax, 3Ah ; switch 61 cases
.text:0804897D cmp eax, 3Ch
.text:08048980 ja short loc_804895F
.text:08048982 jmp ds:off_804A5BC[eax*4] ; switch jump
At address 0x08048935, there is a pointer to the C string /var/run/avast/scan.sock, which is loaded into the ESI register. Later on, there is a call to the function getopt with the string hvVfpabs:e:. These are the arguments that the scan tool supports and the previous path and Unix socket that the client tool needs to connect to. You can verify it later on, at the address 0x08048B01:
.text:08048B01 lea edi, [esp+0BCh+socket_copy]
.text:08048B05 mov [esp+4], esi
.text:08048B05 ; ESI points to our previously set socket's path
.text:08048B09 mov [esp], edi ; dest
.text:08048B0C mov [esp+18h], dl
.text:08048B10 mov word ptr [esp+42h], 1
.text:08048B17 call _strcpy
.text:08048B1C mov dword ptr [esp+8], 0 ; protocol
.text:08048B24 mov dword ptr [esp+4], SOCK_STREAM ; type
.text:08048B2C mov dword ptr [esp], AF_UNIX ; domain
.text:08048B33 call _socket
The pointer to the socket's path is copied (using strcpy) to a stack variable (stack_copy), and then it is used to open a Unix domains socket. This socket is then connected via the connect function call to the scan.sock socket:
.text:08048B50 mov eax, [esp+0BCh+socket]
.text:08048B54 lea edx, [esp+42h]
.text:08048B58 mov [esp+4], edx ; addr
.text:08048B5C mov [esp], eax ; fd
.text:08048B5F neg ecx
.text:08048B61 mov [esp+8], ecx ; len
.text:08048B65 call _connect
.text:08048B6A test eax, eax
It is now clear that the client (command-line scanner) wants to connect to the server process and send it scan requests using sockets. The next section looks at how the client communicates with the server.
Writing Simple Python Bindings for Avast for Linux
In the previous section, you established what the client program does; now, you verify this theory by trying to connect to the socket from the Python prompt:
$ python
>>> import socket
>>> s = socket.socket(socket.AF_UNIX, socket.SOCK_STREAM)
>>> sock_name="/var/run/avast/scan.sock"
>>> s.connect(sock_name)
It works! You can connect to the socket. Now you need to determine what the client tool sends to the server and what responses it receives. Right after the connect call, it calls the function parse_response and expects the result to be the magical value 220:
.text:08048B72 mov eax, [esp+0BCh+socket]
.text:08048B76 lea edx, [esp+0BCh+response]
.text:08048B7A call parse_response
.text:08048B7F cmp eax, 220
Now you try to read 1,024 bytes from the socket after connecting to it:
$ python
>>> import socket
>>> s = socket.socket(socket.AF_UNIX, socket.SOCK_STREAM)
>>> sock_name="/var/run/avast/scan.sock"
>>> s.connect(sock_name)
>>> s.recv(1024)
'220 DAEMON\r\n'
Mystery solved: you know now that the 220 error response code comes directly from the server as an answer. In your bindings, you need to get the number that is received from the welcome message that the Avast daemon sends and check if the answer is 220, which means everything is all right.
Continuing with the main function, there is a call to the av_close function. The following is its disassembly:
.text:08049580 av_close proc near
.text:08049580 fd = dword ptr -1Ch
.text:08049580 buf = dword ptr -18h
.text:08049580 n = dword ptr -14h
.text:08049580
.text:08049580 push ebx
.text:08049581 mov ebx, eax
.text:08049583 sub esp, 18h
.text:08049586 mov [esp+1Ch+n], 5 ; n
.text:0804958E mov [esp+1Ch+buf], offset aQuit ; "QUIT\n"
.text:08049596 mov [esp+1Ch+fd], eax ; fd
.text:08049599 call _write
.text:0804959E test eax, eax
.text:080495A0 js short loc_80495C1
.text:080495A2
.text:080495A2 loc_80495A2: ; CODE XREF: av_close+4D
.text:080495A2 mov [esp+1Ch+fd], ebx ; fd
.text:080495A5 call _close
.text:080495AA test eax, eax
.text:080495AC js short loc_80495B3
The client then calls av_close after finishing its tasks, which sends the string QUIT\n to the daemon, to tell it that it has finished and that it should close the client connection.
Now you create a minimal class to communicate with the Avast daemon, basically to connect and successfully close the connection. This is the content of basic_avast_client1.py containing your first implementation:
#!/usr/bin/python
import socket
SOCKET_PATH = "/var/run/avast/scan.sock"
class CBasicAvastClient:
def __init__(self, socket_name):
self.socket_name = socket_name
self.s = None
def connect(self):
self.s = socket.socket(socket.AF_UNIX, socket.SOCK_STREAM)
self.s.connect(self.socket_name)
banner = self.s.recv(1024)
return repr(banner)
def close(self):
self.s.send("QUIT\n")
def main():
cli = CBasicAvastClient(SOCKET_PATH)
print(cli.connect())
cli.close()
if __name__ == "__main__":
main()
You try your script:
$ python basic_avast_cli1.py
'220 DAEMON\r\n'
It works! You have your own code to connect to the daemon server and close the connection. Now it is time to discover more commands, including the most interesting one: the command to analyze a sample file or directory.
At address 0x0804083B, there is an interesting function call:
.text:08048D34 mov edx, [ebx+esi*4]
.text:08048D37 mov eax, [esp+0BCh+socket]
.text:08048D3B call scan_path
Because you have partial symbols, you can easily determine what this function is for: to scan a path. Take a look at the scan_path function:
.text:08049F00 scan_path proc near ; CODE XREF: main+40B
.text:08049F00 ; .text:08049EF1
.text:08049F00
.text:08049F00 name = dword ptr -103Ch
.text:08049F00 resolved = dword ptr -1038h
.text:08049F00 n = dword ptr -1034h
.text:08049F00 var_1030 = dword ptr -1030h
.text:08049F00 var_102C = dword ptr -102Ch
.text:08049F00 var_1028 = dword ptr -1028h
.text:08049F00 var_1024 = dword ptr -1024h
.text:08049F00 var_1020 = dword ptr -1020h
.text:08049F00 var_101C = byte ptr -101Ch
.text:08049F00 var_10 = dword ptr -10h
.text:08049F00 var_C = dword ptr -0Ch
.text:08049F00 var_8 = dword ptr -8
.text:08049F00 var_4 = dword ptr -4
.text:08049F00
.text:08049F00 sub esp, 103Ch
.text:08049F06 mov [esp+103Ch+resolved], 0 ; resolved
.text:08049F0E mov [esp+103Ch+name], edx ; name
.text:08049F11 mov [esp+103Ch+var_10], ebx
.text:08049F18 mov ebx, eax
.text:08049F1A mov [esp+103Ch+var_8], edi
.text:08049F21 mov edi, edx
.text:08049F23 mov [esp+103Ch+var_C], esi
.text:08049F2A mov [esp+103Ch+var_4], ebp
.text:08049F31 mov [esp+103Ch+var_102C], offset storage
.text:08049F39 mov [esp+103Ch+var_1028], 1000h
.text:08049F41 mov [esp+103Ch+var_1024], 0
.text:08049F49 mov [esp+103Ch+var_1020], 0
.text:08049F51 call _realpath
.text:08049F56 test eax, eax
.text:08049F58 jz loc_804A040
.text:08049F5E
.text:08049F5E loc_8049F5E: ; CODE XREF: scan_path+1CE j
.text:08049F5E mov ds:storage, 'NACS'
.text:08049F68 mov esi, eax
.text:08049F6A mov ds:word_804BDE4, ' '
There is a call to the function realpath (which is to get the true real path of the given file or directory) and you can also see the 4-byte string (in little-endian format) SCAN, followed by some spaces. Without actually reverse-engineering the entire function, and given the format of the previous command implemented for the close method in the basic Python bindings for Avast, it seems that the command you want to send to the daemon to scan a file or directory is SCAN /some/path.
Now you add the additional code that sends the scan command to the daemon and see the result it returns:
#!/usr/bin/python
import socket
SOCKET_PATH = "/var/run/avast/scan.sock"
class CBasicAvastClient:
def __init__(self, socket_name):
self.socket_name = socket_name
self.s = None
def connect(self):
self.s = socket.socket(socket.AF_UNIX, socket.SOCK_STREAM)
self.s.connect(self.socket_name)
banner = self.s.recv(1024)
return repr(banner)
def close(self):
self.s.send("QUIT\n")
def scan(self, path):
self.s.send("SCAN %s\n" % path)
return repr(self.s.recv(1024))
def main():
cli = CBasicAvastClient(SOCKET_PATH)
print(cli.connect())
print(cli.scan("malware/xpaj"))
cli.close()
if __name__ == "__main__":
main()
When you run the script, you get the following output:
$ python basic_avast_cli1.py
'220 DAEMON\r\n'
'210 SCAN DATA\r\n'
This code does not produce useful data because you need to read more packets from the socket as the command 210 SCAN DATA\r\n tells the client that more packets will be sent, with the actual response. Actually, you need to read until you receive a packet with the form 200 SCAN OK\n. Now you can modify the code of the member as follows (a lazy approach that, nevertheless, works):
def scan(self, path):
self.s.send("SCAN %s\n" % path)
while 1:
ret = self.s.recv(8192)
print(repr(ret))
if ret.find("200 SCAN OK") > -1:
break
Now you try the code again. This time, you see a different output with the data you expected:
$ python basic_avast_cli1.py
'220 DAEMON\r\n'
'210 SCAN DATA\r\n'
'SCAN /some/path/malware/xpaj/00908235ee9e267fa2f4c83fb4304c63af976cbc\t
[L]0.0\t0 Win32:Hoblig\\ [Heur]\r\n'
'200 SCAN OK\r\n'
None
Marvelous! The Avast server answered that the file 00908235ee9e267fa2f4c83fb4304c63af976cbc was identified as the malware Win32:Hoblig. Now you have a working set of basic Python bindings that, at the very least, can scan paths (either files or directories) and get the scan result; therefore, you can adapt the code to write a fuzzer based on the protocol format. You may want to check whether Avast antivirus for Windows uses the same protocol, and port your bindings to Windows; if this is not the case, then you may want to continue fuzzing under Linux and attach GDB or another debugger to the /bin/avast daemon and use your bindings to feed malformed (fuzzed) input files to the Avast server and wait for it to crash. Remember, the core is the same for both Windows and Linux (although, according to the Avast authors, the Linux core version is not always the latest version of their core). If you have a crash in the Linux version of the tool, the odds of it affecting the Windows version are very high. Indeed, this very same method has been used to find a vulnerability parsing RPM files in the Linux version that affected all Avast-supported platforms.
The Final Version of the Python Bindings
You can download the final version of the Python bindings from the following GitHub project page: https://github.com/joxeankoret/pyavast.
The bindings are exhaustive, covering almost all protocol features discovered in April 2014.
A Practical Example: Writing Native C/C++ Tools for Comodo Antivirus for Linux
If a server is available, interfacing with one that is listening for commands on a given port is an easy way to automate tasks with various antivirus products. Unlike AVG or Avast for Linux, not all products offer such a server interface. In those cases, you need to reverse-engineer the command-line scanner, if there is one, as well as the core libraries, to reconstruct the required internal structures, the relevant functions, and their prototypes so you know how to call those functions using automation.
This example creates an unofficial C/C++ SDK for Comodo Antivirus for Linux. Fortunately for you, it comes with full symbols, so discovering the interfaces, structures, and so on will be relatively easy.
Start by analyzing the Comodo command-line scanner for Linux (called cmdscan), which is installed in the following directory:
/opt/COMODO/cmdscan
Open the binary in IDA, wait until the initial auto-analysis finishes, and then go to the main function. You should see a disassembly like this one:
.text:00000000004015C0 ; __int64 __fastcall main(int argc, char **argv,
char **envp)
.text:00000000004015C0 main proc near
.text:00000000004015C0
.text:00000000004015C0 var_A0= dword ptr -0A0h
.text:00000000004015C0 var_20= dword ptr -20h
.text:00000000004015C0 var_1C= dword ptr -1Ch
.text:00000000004015C0
.text:00000000004015C0 push rbp
.text:00000000004015C1 mov ebp, edi
.text:00000000004015C3 push rbx
.text:00000000004015C4 mov rbx, rsi ; argv
.text:00000000004015C7 sub rsp, 0A8h
.text:00000000004015CE mov [rsp+0B8h+var_1C], 0
.text:00000000004015D9 mov [rsp+0B8h+var_20], 0
.text:00000000004015E4
.text:00000000004015E4 loc_4015E4:
.text:00000000004015E4
.text:00000000004015E4 mov edx, offset shortopts ; "s:vh"
.text:00000000004015E9 mov rsi, rbx ; argv
.text:00000000004015EC mov edi, ebp ; argc
.text:00000000004015EE call _getopt
.text:00000000004015F3 cmp eax, 0FFFFFFFFh
Here, it's checking the command-line options s:vh with the standard getopt function. If you run the command /opt/COMODO/cmdscan without arguments, it prints out the usage of this command-line scanner:
$ /opt/COMODO/cmdscan
USAGE: /opt/COMODO/cmdscan -s [FILE] [OPTION…]
-s: scan a file or directory
-v: verbose mode, display more detailed output
-h: this help screen
The command-line options identified in the disassembly, s:vh, are documented. The most interesting one in this case is the -s flag, which instructs the tool to scan a file or directory. Continue analyzing the disassembly to understand how this flag works:
.text:00000000004015F8 cmp eax, 's'
.text:00000000004015FB jz short loc_401613
(…)
.text:0000000000401613 loc_401613:
.text:0000000000401613 mov rdi, cs:optarg ; name
.text:000000000040161A xor esi, esi ; type
.text:000000000040161C call _access
.text:0000000000401621 test eax, eax
.text:0000000000401623 jnz loc_40172D
.text:0000000000401629 mov rax, cs:optarg
.text:0000000000401630 mov cs:src, rax ; Path to scan
.text:0000000000401637 jmp short next_cmdline_option
When the -s flag is specified, it checks whether the next argument is an existing path by calling access. If the argument exists, it saves the pointer to the path to scan (a filename or directory) in the src static variable and continues parsing more command-line arguments. Now you can analyze the code after the command-line arguments are parsed:
.text:0000000000401649 loc_401649: ; CODE XREF: main+36 j
.text:0000000000401649 cmp cs:src, 0
.text:0000000000401651 jz no_filename_specified
.text:0000000000401657 mov edi, offset dev_aflt_fd ; a2
.text:000000000040165C call open_dev_avflt
.text:0000000000401661 call load_framework
.text:0000000000401666 call maybe_IFrameWork_CreateInstance
The code checks whether the path to scan, src, was specified; if not, it goes to a label that shows the usage help and exits. Otherwise, it calls an open_dev_avflt function, then load_framework, and later maybe_IFramework_CreateInstance. You do not really need to reverse-engineer the open_dev_avflt function, as the device /dev/avflt is not actually required for scanning. Skip that function and go directly to load_framework, the function that is responsible for loading the Comodo kernel. The following is the entire pseudo-code for this function:
void *load_framework()
{
int filename_size; // eax@1
char *self_dir; // rax@2
int *v2; // rax@3
char *v3; // rax@3
void *hFramework; // rax@6
void *CreateInstance; // rax@7
char *v6; // rax@9
char filename[2056]; // [sp+0h] [bp-808h]@1
filename_size = readlink("/proc/self/exe", filename, 0x800uLL);
if ( filename_size == -1 ||
(filename[filename_size] = 0,
self_dir = dirname(filename), chdir(self_dir)) )
{
v2 = __errno_location();
v3 = strerror(*v2);
LABEL_4:
fprintf(stderr, "%s\n", v3);
exit(1);
}
hFramework = dlopen("./libFRAMEWORK.so", 1);
hFrameworkSo = hFramework;
if ( !hFramework )
{
v6 = dlerror();
fprintf(stderr, "error is %s\n", v6);
goto LABEL_10;
}
CreateInstance = dlsym(hFramework, "CreateInstance");
FnCreateInstance = (int (__fastcall *)
(_QWORD, _QWORD, _QWORD, _QWORD))CreateInstance;
if ( !CreateInstance )
{
LABEL_10:
v3 = dlerror();
goto LABEL_4;
}
return CreateInstance;
}
The decompiled code looks nice, doesn't it? You could just copy this function from the pseudo-code view to your C/C++ source file. In summary, the pseudo-code does the following:
· It resolves its path by reading the symbolic link created by the Linux kernel /proc/self/exe, and then makes that path the current working directory.
· It dynamically loads the libFRAMEWORK.so and resolves the function CreateInstance and stores the pointer into the FnCreateInstance global variable.
· The CreateInstance function simply loads the kernel, which seems to reside inside libFRAMEWORK.so, and resolves the base function required to create a new instance of the framework.
Next, you need to reverse-engineer the maybe_IFramework_CreateInstance function:
.text:0000000000401A50 maybe_IFrameWork_CreateInstance proc near
.text:0000000000401A50
.text:0000000000401A50 hInstance= qword ptr -40h
.text:0000000000401A50 var_38= qword ptr -38h
.text:0000000000401A50 maybe_flags= qword ptr -28h
.text:0000000000401A50
.text:0000000000401A50 push rbp
.text:0000000000401A51 xor esi, esi
.text:0000000000401A53 xor edi, edi
.text:0000000000401A55 mov edx, 0F0000h
.text:0000000000401A5A push rbx
.text:0000000000401A5B sub rsp, 38h
.text:0000000000401A5F mov [rsp+48h+hInstance], 0
.text:0000000000401A68 lea rcx, [rsp+48h+hInstance]
.text:0000000000401A6D call cs:FnCreateInstance
The function the program resolved before, FnCreateInstance, is being called now, passing a local variable called hInstance. Naturally, it is going to create an instance of the Comodo Antivirus interface. Right after it creates the instance, the following pseudo-code is executed:
BYTE4(maybe_flags) = 0;
LODWORD(maybe_flags) = -1;
g_FrameworkInstance = hInstance;
cur_dir = get_current_dir_name();
hFramework = g_FrameworkInstance;
cur_dir_len = strlen(cur_dir);
if ( hFramework->baseclass_0->CFrameWork_Init(
hFramework,
cur_dir_len + 1,
cur_dir,
maybe_flags, 0LL) < 0 )
{
fwrite("IFrameWork Init failed!\n", 1uLL, 0x18uLL, stderr);
exit(1);
}
free(cur_dir);
This code is initializing the framework by calling hFramework->baseclass_0->CFrameWork_Init. It receives the hFramework instance that was just created, the directory with all the other kernel files, the size of the given directory path buffer, and what appears to be the flags given to the CFrameWork_Init. The current directory is the path of the actual cmdscan program, /opt/COMODO/, as it changed the current working directory earlier. After this, more functions are called in order to correctly load the kernel:
LODWORD(v8) = -1;
BYTE4(v8) = 0;
if ( g_FrameworkInstance->baseclass_0->CFrameWork_LoadScanners(
g_FrameworkInstance,
v8) < 0 )
{
fwrite("IFrameWork LoadScanners failed!\n", 1uLL, 0x20uLL, stderr);
exit(1);
}
if ( g_FrameworkInstance->baseclass_0->CFrameWork_CreateEngine(
g_FrameworkInstance, (IAEEngineDispatch **)&g_Engine) < 0 )
{
fwrite("IFrameWork CreateEngine failed!\n", 1uLL, 0x20uLL, stderr);
exit(1);
}
if ( g_Engine->baseclass_0->CAEEngineDispatch_GetBaseComponent(
g_Engine,
(CAECLSID)0x20001,
(IUnknown **)&g_base_component_0x20001) < 0 )
{
fwrite("IAEEngineDispatch GetBaseComponent failed!\n",
1uLL,
0x2BuLL, stderr);
exit(1);
}
This loads the scanner routines by calling CFrameWork_LoadScanners, it creates a scanning engine by calling CFrameWork_CreateEngine, and it gets a base dispatcher component, whatever it means for them, by calling CAEEngineDispatch_GetBaseComponent. Although the next part can be safely ignored, it is good to understand the functionality anyway:
v4 = operator new(0xB8uLL);
v5 = (IAEUserCallBack *)v4;
*(_QWORD *)v4 = &vtable_403310;
pthread_mutex_init((pthread_mutex_t *)(v4 + 144), 0LL);
memset(&v5[12], 0, 0x7EuLL);
g_user_callbacks = (__int64)v5;
result = g_Engine->baseclass_0->CAEEngineDispatch_SetUserCallBack
(g_Engine, v5);
if ( result < 0 )
{
fwrite("SetUserCallBack() failed!\n", 1uLL, 0x1AuLL, stderr);
exit(1);
}
This code is used to set a few callbacks. For example, you could install callbacks to be notified every time a new file is opened, created, read, written, and so on. Do you want to write a generic unpacker using the Comodo engine? Install a notification callback and wait for it to be called, copy the temporary file or buffer, and you are done! Generic unpackers based on antivirus engines are popular.
This is interesting, but the purpose of this demonstration is to reverse-engineer the core to get sufficient information about how to write a C/C++ SDK to interact with the Comodo kernel. Now that the maybe_IFrameWork_CreateInstance function has been analyzed, go back and look at the main function. The next code after the call to the previously analyzed function will be similar to the following pseudo-code:
if ( __lxstat(1, filename, &v7) == -1 )
{
v5 = __errno_location();
v6 = strerror(*v5);
fprintf(stderr, "%s: %s\n", filename, v6);
}
else
{
if ( verbose )
fwrite("-----== Scan Start ==-----\n", 1uLL, 0x1BuLL, stdout);
if ( (v8 & 0xF000) == 0x4000 )
scan_directory(filename, verbose, (__int64)&scanned_files,
(__int64)&virus_found);
else
scan_stream(filename, verbose, &scanned_files,
&virus_found);
if ( verbose )
fwrite("-----== Scan End ==-----\n", 1uLL, 0x19uLL, stdout);
fprintf(stdout, "Number of Scanned Files: %d\n",
(unsigned int)scanned_files);
fprintf(stdout, "Number of Found Viruses: %d\n",
(unsigned int)virus_found);
}
This code checks whether the path pointed out by the global variable src exists. If it does, the code calls either scan_directory or scan_stream, depending on the flags returned by the call to __lxstat. The function to scan directories is likely calling scan_stream for each discovered element. You can now delve deeper into this function to see what it does:
int __fastcall scan_stream(
char *filename,
char verbose,
_DWORD *scanned_files,
_DWORD *virus_found)
(…)
SCANRESULT scan_result; // [sp+10h] [bp-118h]@1
SCANOPTION scan_option; // [sp+90h] [bp-98h]@1
ICAVStream *inited_to_zero; // [sp+E8h] [bp-40h]@1
memset(&scan_option, 0, 0x49uLL);
memset(&scan_result, 0, 0x7EuLL);
scan_option.ScanCfgInfo = (x1)-1;
scan_option.bScanPackers = 1;
scan_option.bScanArchives = 1;
scan_option.bUseHeur = 1;
scan_option.eSHeurLevel = 2;
base_component_0x20001 =
*(struct_base_component_0x20001_t **)g_base_comp;
scan_option.dwMaxFileSize = 0x2800000;
scan_option.eOwnerFlag = 1;
inited_to_zero = 0LL;
result = base_component_0x20001->pfunc50(
g_base_comp,
(__int64 *)&inited_to_zero,
(__int64)filename,
1LL,
3LL,
0LL);
This code segment is really interesting. It starts by initializing a SCANRESULT and a SCANOPTION object and specifying the required flags, such as whether archives should be scanned, the heuristic enabled, and so on. Then, the code calls a member function, pfunc50, passing a lot of arguments to it, such as the base component, the filename, and so on. You do not know what the function pfunc50 does, but do you really need it? Remember, the current task is not to fully understand how the Comodo kernel works but, rather, to interface with it. Continue with the following code:
err = result;
if ( result >= 0 )
{
memset((void *)(g_user_callbacks + 12), 0, 0x7EuLL);
err = g_Engine->baseclass_0->CAEEngineDispatch_ScanStream(g_Engine,
inited_to_zero, &scan_option, &scan_result);
(…)
This is the code that is actually scanning the file. It seems that the local variable inited_to_zero that was passed to the call to pfunc50 has all the required information to analyze the file. It is given to the function call CAEEngineDispatch_ScanStream, as well as other arguments. The most interesting of these arguments are the SCANOPTION and SCANRESULT objects, which have an obvious purpose: to specify the scanning options and get the results of the scan. CAEEngineDispatch_ScanStream is also initializing some global callbacks to zero, but you can skip this part and all the other parts in this function that use the callbacks. The next interesting part is the following one:
if ( err >= 0 )
{
++*scanned_files;
if ( verbose )
{
if ( scan_result.bFound )
{
fprintf(stdout, "%s ---> Found Virus, Malware Name is %s\n",
filename, scan_result.szMalwareName);
result = fflush(stdout);
}
else
{
fprintf(stdout, "%s ---> Not Virus\n", filename);
result = fflush(stdout);
}
}
}
This code snippet checks whether the local variable err is not zero, increments the scanned_files variable, and prints out the discovered malware name if the bFound member of the SCANRESULT object evaluates to true. The last step in this function is to simply increase the count of viruses found if a malware was detected:
if ( scan_result.bFound )
{
if ( err >= 0 )
++*virus_found;
}
It's now time to go back to the main function. The last code after calling the scan_* functions is the following one:
uninit_framework();
dlclose_framework();
close_dev_aflt_fd(&dev_aflt_fd);
This is the code for cleaning up; it un-initializes the framework and cancels any possible remaining scan:
g_base_component_0x20001 = 0LL;
if ( g_Engine )
{
g_Engine->baseclass_0->CAEEngineDispatch_Cancel(g_Engine);
result = g_Engine->baseclass_0->CAEEngineDispatch_UnInit(
g_Engine, 0LL);
g_Engine = 0LL;
}
if ( g_FrameworkInstance )
{
result = g_FrameworkInstance->baseclass_0->CFrameWork_UnInit(
g_FrameworkInstance, 0LL);
g_FrameworkInstance = 0LL;
}
Finally, you close the used libFRAMEWORK.so library:
void __cdecl dlclose_framework()
{
if ( hFrameworkSo )
dlclose(hFrameworkSo);
}
You now have all the information required to write your own C/C++ to interface with Comodo Antivirus! Fortunately, this antivirus ships with all the necessary structures, so you can export all the structure and enumeration definitions to a header file. To do so, in IDA, select View→Open Subviews→Local Types, right-click the Local Types window, and select the Export to Header File option from the pop-up menu. Check the Generate Compilable Header File option, select the correct path to write the header file, and click Export. After you fix compilation errors in it, this header file can be used in a common C/C++ project. The process of fixing the header file in order to use it with a common compiler is a nightmare. However, in this case, you do not need to go through this process. You can download the header file from https://github.com/joxeankoret/tahh/tree/master/comodo.
Once you download this header file, you can get started. First, you create a command-line tool similar to Comodo cmdscan, but one that exports more interesting internal information. You start by adding the following required include files:
#include <stdio.h>
#include <stdlib.h>
#include <unistd.h>
#include <string.h>
#include <pthread.h>
#include <dlfcn.h>
#include <libgen.h>
#include <errno.h>
#include <sys/types.h>
#include <sys/stat.h>
#include <fcntl.h>
#include "comodo.h"
These are the header files that you will need. You can now copy most of the pseudo-code created by the Hex-Rays decompiler into your project. However, you should do it step-by-step instead of copying the entire decompiled file. Start by adding the required calls to initialize, scan, and clean up the core in the function main:
int main(int argc, char **argv)
{
int scanned_files = 0;
int virus_found = 0;
if ( argc == 1 )
return 1;
load_framework();
maybe_IFrameWork_CreateInstance();
scan_stream(argv[1], verbose, &scanned_files, &virus_found);
printf("Final number of Scanned Files: %d\n", scanned_files);
printf("Final number of Found Viruses: %d\n", virus_found);
uninit_framework();
dlclose_framework();
return 0;
}
In this code, the first command-line argument represents the file to scan. You start by loading the framework and creating an instance. You then call scan_stream, which shows a summary of the scanned files and then un-initializes the framework and unloads the library that was used. You need to implement many functions here: load_framework, maybe_IFrameWork_CreateInstance, scan_stream, uninit_framework, and dlclose_framework. You can simply copy these functions from the Hex-Rays decompiler: go through each function and copy the pseudo-code. It will look like this:
//----------------------------------------------------------------------
void uninit_framework()
{
g_base_component_0x20001 = 0;
if ( g_Engine )
{
g_Engine->baseclass_0->CAEEngineDispatch_Cancel(g_Engine);
g_Engine->baseclass_0->CAEEngineDispatch_UnInit(g_Engine, 0);
g_Engine = 0;
}
if ( g_FrameworkInstance )
{
g_FrameworkInstance->baseclass_0->CFrameWork_UnInit(
g_FrameworkInstance, 0);
g_FrameworkInstance = 0;
}
}
//----------------------------------------------------------------------
int scan_stream(char *src, char verbosed,
int *scanned_files,
int *virus_found)
{
struct_base_component_0x20001_t *base_component_0x20001;
int result;
HRESULT err;
SCANRESULT scan_result;
SCANOPTION scan_option;
ICAVStream *inited_to_zero;
memset(&scan_option, 0, sizeof(SCANOPTION));
memset(&scan_result, 0, sizeof(SCANRESULT));
scan_option.ScanCfgInfo = -1;
scan_option.bScanPackers = 1;
scan_option.bScanArchives = 1;
scan_option.bUseHeur = 1;
scan_option.eSHeurLevel = enum_SHEURLEVEL_HIGH;
base_component_0x20001 = *
(struct_base_component_0x20001_t **)g_base_component_0x20001;
scan_option.dwMaxFileSize = 0x2800000;
scan_option.eOwnerFlag = enum_OWNER_ONDEMAND;
scan_option.bDunpackRealTime = 1;
scan_option.bNotReportPackName = 0;
inited_to_zero = 0;
result = base_component_0x20001->pfunc50(
g_base_component_0x20001,
(__int64 *)&inited_to_zero,
(__int64)src,
1LL,
3LL,
0);
err = result;
if ( result >= 0 )
{
err = g_Engine->baseclass_0->CAEEngineDispatch_ScanStream
(g_Engine, inited_to_zero, &scan_option, &scan_result);
if ( err >= 0 )
{
(*scanned_files)++;
if ( scanned_files )
{
//printf("Got scan result? %d\n", scan_result.bFound);
if ( scan_result.bFound )
{
printf("%s ---> Found Virus, Malware Name is %s\n", src,
scan_result.szMalwareName);
result = fflush(stdout);
}
else
{
printf("%s ---> Not Virus\n", src);
result = fflush(stdout);
}
}
}
}
if ( scan_result.bFound )
{
if ( err >= 0 )
(*virus_found)++;
}
return result;
}
//----------------------------------------------------------------------
int maybe_IFrameWork_CreateInstance()
{
char *cur_dir;
CFrameWork *hFramework;
int cur_dir_len;
CFrameWork *hInstance;
int *v8;
int *maybe_flags;
hInstance = 0;
if ( FnCreateInstance(0, 0, 0xF0000, &hInstance) < 0 )
{
fwrite("CreateInstance failed!\n", 1uLL, 0x17uLL, stderr);
exit(1);
}
BYTE4(maybe_flags) = 0;
LODWORD(maybe_flags) = -1;
g_FrameworkInstance = hInstance;
cur_dir = get_current_dir_name();
hFramework = g_FrameworkInstance;
cur_dir_len = strlen(cur_dir);
if ( hFramework->baseclass_0->CFrameWork_Init
(hFramework, cur_dir_len + 1, cur_dir, maybe_flags, 0) < 0 )
{
fwrite("IFrameWork Init failed!\n", 1uLL, 0x18uLL, stderr);
exit(1);
}
free(cur_dir);
LODWORD(v8) = -1;
BYTE4(v8) = 0;
if ( g_FrameworkInstance->baseclass_0-
>CFrameWork_LoadScanners(g_FrameworkInstance, v8) < 0 )
{
fwrite("IFrameWork LoadScanners failed!\n", 1uLL, 0x20uLL, stderr);
exit(1);
}
if ( g_FrameworkInstance->baseclass_0-
>CFrameWork_CreateEngine(g_FrameworkInstance, (IAEEngineDispatch **)
&g_Engine) < 0 )
{
fwrite("IFrameWork CreateEngine failed!\n", 1uLL, 0x20uLL, stderr);
exit(1);
}
if ( g_Engine->baseclass_0->CAEEngineDispatch_GetBaseComponent(
g_Engine,
(CAECLSID)0x20001,
(IUnknown **)&g_base_component_0x20001) < 0 )
{
fwrite("IAEEngineDispatch GetBaseComponent failed!\n",
1uLL, 0x2BuLL, stderr);
exit(1);
}
return 0;
}
//----------------------------------------------------------------------
void dlclose_framework()
{
if ( hFrameworkSo )
dlclose(hFrameworkSo);
}
//----------------------------------------------------------------------
void load_framework()
{
int filename_size;
char *self_dir;
int *v2;
char *v3;
void *hFramework;
char *v6;
char filename[2056];
filename_size = readlink("/proc/self/exe", filename, 0x800uLL);
if ( filename_size == -1 || (filename[filename_size] = 0, self_dir =
dirname(filename), chdir(self_dir)) )
{
v2 = __errno_location();
v3 = strerror(*v2);
fprintf(stderr, "Directory error: %s\n", v3);
exit(1);
}
hFramework = dlopen("./libFRAMEWORK.so", 1);
hFrameworkSo = hFramework;
if ( !hFramework )
{
v6 = dlerror();
fprintf(stderr, "Error loading libFRAMEWORK: %s\n", v6);
exit(1);
}
FnCreateInstance = (FnCreateInstance_t)dlsym(hFramework,
"CreateInstance");
if ( !FnCreateInstance )
{
v3 = dlerror();
fprintf(stderr, "%s\n", v3);
exit(1);
}
}
You only need to add the forward declarations of the functions right after the last include directive, as well as the global variables:
//----------------------------------------------------------------------
// Function declarations
int main(int argc, char **argv, char **envp);
void uninit_framework();
int scan_stream(char *src, char verbosed,
int *scanned_files,
int *virus_found);
int maybe_IFrameWork_CreateInstance();
void dlclose_framework();
void load_framework();
void scan_directory(char *src,
unsigned __int8 a2,
__int64 a3, __int64 a4);
//----------------------------------------------------------------------
// Data declarations
char *optarg;
char *src;
char verbose;
__int64 g_base_component_0x20001;
__int64 g_user_callbacks;
CAEEngineDispatch *g_Engine;
CFrameWork *g_FrameworkInstance;
typedef int (__fastcall *FnCreateInstance_t)(_QWORD, _QWORD, _QWORD,
CFrameWork **);
int (__fastcall *FnCreateInstance)(
_QWORD, _QWORD, _QWORD, CFrameWork **);
void *hFrameworkSo;
vtable_403310_t *vtable_403310;
You are now done with the very basic version of the Comodo command-line scanner. You can compile it with the following command in a Linux machine:
$ g++ cmdscan.c -o mycmdscan -fpermissive \
-Wno-unused-local-typedefs -ldl
In order to test it, you need to copy it to the /opt/COMODO directory, using the following command:
$ sudo cp mycmdscan /opt/COMODO
You can now test this program to see whether it is working like the original cmdscan from Comodo:
$ /opt/COMODO/mycmdscan /home/joxean/malware/eicar.com.txt
/home/joxean/malware/eicar.com.txt ---> Found Virus , \
Malware Name is Malware
Number of Scanned Files: 1
Number of Found Viruses: 1
It works! Now, it is time to print more information regarding the detected or undetected file. If you look at the SCANRESULT structure, you will find some interesting members:
struct SCANRESULT
{
char bFound;
int unSignID;
char szMalwareName[64];
int eFileType;
int eOwnerFlag;
int unCureID;
int unScannerID;
int eHandledStatus;
int dwPid;
__int64 ullTotalSize;
__int64 ullScanedSize;
int ucrc1;
int ucrc2;
char bInWhiteList;
int nReserved[2];
};
You can, for example, get the signature identifier that matched your malware, the scanner identifier, and the CRCs (checksums) that were used to detect your file, as well as whether the file is white-listed. In the scan_stream routine, you replace the line printing the discovered malware name with the following lines:
printf("%s ---> Malware: %s\n",
src,
scan_result.szMalwareName);
if ( scan_result.unSignID )
printf("Signature ID: 0x%x\n", scan_result.unSignID);
if ( scan_result.unScannerID )
printf("Scanner : %d (%s)\n",
scan_result.unScannerID,
get_scanner_name(scan_result.unScannerID));
if ( scan_result.ullTotalSize )
printf("Total size : %lld\n", scan_result.ullTotalSize);
if ( scan_result.ullScanedSize )
printf("Scanned size: %lld\n", scan_result.ullScanedSize);
if ( scan_result.ucrc1 || scan_result.ucrc2 )
printf("CRCs : 0x%x 0x%x\n",
scan_result.ucrc1,
scan_result.ucrc2);
result = fflush(stdout);
Now, replace the line where the Not virus line is printed with the following lines:
printf("%s ---> Not Virus\n", src);
if ( scan_result.bInWhiteList )
printf("INFO: The file is white-listed.\n");
result = fflush(stdout);
The last step is to add the following function before the scan_stream routine to resolve scanner identifiers to scanner names:
//----------------------------------------------------------------------
const char *get_scanner_name(int id)
{
switch ( id )
{
case 15:
return "UNARCHIVE";
case 28:
return "SCANNER_PE64";
case 27:
return "SCANNER_MBR";
case 12:
return "ENGINEDISPATCH";
case 7:
return "UNPACK_STATIC";
case 22:
return "SCANNER_EXTRA";
case 29:
return "SCANNER_SMART";
case 16:
return "CAVSEVM32";
case 6:
return "SCANNER_SCRIPT";
case 9:
return "SIGNMGR";
case 21:
return "UNPACK_DUNPACK";
case 13:
return "SCANNER_WHITE";
case 24:
return "SCANNER_RULES";
case 8:
return "UNPACK_GUNPACK";
case 10:
return "FRAMEWORK";
case 3:
return "SCANNER_PE32";
case 5:
return "MEMORY_ENGINE";
case 23:
return "UNPATCH";
case 2:
return "SCANNER_DOSMZ";
case 4:
return "SCANNER_PENEW";
case 0:
return "Default";
case 17:
return "CAVSEVM64";
case 20:
return "UNSFX";
case 19:
return "SCANNER_MEM";
case 14:
return "MTENGINE";
case 1:
return "SCANNER_FIRST";
case 18:
return "SCANNER_HEUR";
case 26:
return "SCANNER_ADVHEUR";
case 11:
return "MEMTARGET";
case 25:
return "FILEID";
default:
return "Unknown";
}
}
This information was extracted from the following interesting enumeration that was already available in the IDA database (remember that you have full symbols):
enum MemMgrType
{
enumMemMgr_Default = 0x0,
enumMemMgr_SCANNER_FIRST = 0x1,
enumMemMgr_SCANNER_DOSMZ = 0x2,
enumMemMgr_SCANNER_PE32 = 0x3,
enumMemMgr_SCANNER_PENEW = 0x4,
enumMemMgr_MEMORY_ENGINE = 0x5,
enumMemMgr_SCANNER_SCRIPT = 0x6,
enumMemMgr_UNPACK_STATIC = 0x7,
enumMemMgr_UNPACK_GUNPACK = 0x8,
enumMemMgr_SIGNMGR = 0x9,
enumMemMgr_FRAMEWORK = 0xA,
enumMemMgr_MEMTARGET = 0xB,
enumMemMgr_ENGINEDISPATCH = 0xC,
enumMemMgr_SCANNER_WHITE = 0xD,
enumMemMgr_MTENGINE = 0xE,
enumMemMgr_UNARCHIVE = 0xF,
enumMemMgr_CAVSEVM32 = 0x10,
enumMemMgr_CAVSEVM64 = 0x11,
enumMemMgr_SCANNER_HEUR = 0x12,
enumMemMgr_SCANNER_MEM = 0x13,
enumMemMgr_UNSFX = 0x14,
enumMemMgr_UNPACK_DUNPACK = 0x15,
enumMemMgr_SCANNER_EXTRA = 0x16,
enumMemMgr_UNPATCH = 0x17,
enumMemMgr_SCANNER_RULES = 0x18,
enumMemMgr_FILEID = 0x19,
enumMemMgr_SCANNER_ADVHEUR = 0x1A,
enumMemMgr_SCANNER_MBR = 0x1B,
enumMemMgr_SCANNER_PE64 = 0x1C,
enumMemMgr_SCANNER_SMART = 0x1D,
};
To finish, compile the file with the previously used g++ command, copy it to /opt/COMODO, and re-run the application; this time, you get more information:
$ g++ cmdscan.c -o mycmdscan -fpermissive \
-Wno-unused-local-typedefs -ldl
$ sudo cp mycmdscan /opt/COMODO
$ /opt/COMODO/mycmdscan /home/joxean/malware/eicar.com.txt
/home/joxean/malware/eicar.com.txt ---> Found Virus,
Malware Name is Malware
Scanner : 12 (ENGINEDISPATCH)
CRCs : 0x486d0e3 0xa03f08f7
Number of Scanned Files: 1
Number of Found Viruses: 1
According to this information, you now know that the file is detected by the engine called ENGINEDISPATCH and that it is using CRCs to detect the file. You are using the EICAR testing file, but if you were working on a different file, you could evade detection, for example, by changing the CRC. You can continue adding more features to this tool: you can add support for recursively checking directories and working in quiet mode by printing only relevant information, such as white-listed (not infected) files and detected files. You can also use it as the basis of a library to integrate it into your own tools for research purposes.
The final version of this tool, with more features than the original Comodo command-line scanner, is available at https://github.com/joxeankoret/tahh/tree/master/comodo.
Other Components Loaded by the Kernel
The kernel is usually responsible for opening files, iterating over all the files inside a compressed file or buffer, and launching signature scans or generic detections and disinfections against known malware. Nevertheless, some tasks are specifically performed not by the kernel but by other sub-components, such as plug-ins, generic detection modules, heuristics, and so on. These modules, typically plug-ins, are loaded by the kernel and often perform the most interesting tasks. For example, the Microsoft Security Essentials antivirus kernel (mpengine.dll) launches generic detection and disinfection routines written in C++.NET, and the Lua scripting language then extracts them from the database files distributed with the product and the daily updates. Bitdefender does the same with binary plug-ins (XMD files) that contain code and are loaded dynamically. Kaspersky loads its plug-ins and disinfection routines by re-linking new object files distributed as updates to the kernel. In short, every antivirus does it in a completely different way.
Statically or dynamically reverse-engineering the part of the kernel that is responsible for interfacing with plug-ins is key to actually reverse-engineering the signatures, generic detections, and so on. Without being able to analyze how these plug-ins are decrypted, decompressed, loaded, and launched, you cannot fully understand how the antivirus works.
Summary
This chapter covered a lot of prerequisite material that will be helpful throughout the rest of this book. Its main focus was to illustrate how to reverse-engineer the antivirus core and other relevant components in order to write an antivirus client library for automation and fuzzing purposes, in case a command-line scanner was not provided.
Many other important topics were also covered:
· Leveraging the debug symbols when available to ease the reverse-engineering process—Because most AV products use the same code base, it is possible to reverse-engineer the components on the platform where symbols are present and then port the symbols to another platform where they are not present. Tools such as zynamics BinDiff and Joxean Koret's Diaphora were mentioned.
· The Linux operating system is the operating system of choice when it comes to fuzzing and automation—The Wine emulator and its sister project Winelib can be used to run or port Windows command scanners under Linux.
· Bypassing antivirus self-protection—Usually the Linux version of AVs do not self-protect, unlike their Windows counterpart. A few tricks about how to bypass antivirus self-protection that keep you from being able to debug the antivirus were shown.
· Setting up the work environment—You saw how to set up virtual machines in order to debug antivirus drivers and services. In addition, WinDbg kernel debugging was covered, along with various commands showing how to do kernel and user-mode debugging from kernel mode WinDbg.
Finally, this chapter concluded with a lengthy and systematic hands-on walkthrough on how to write a client library for the Comodo Antivirus.
The next chapter discusses how plug-ins are loaded and how you can extract and understand this functionality.
All materials on the site are licensed Creative Commons Attribution-Sharealike 3.0 Unported CC BY-SA 3.0 & GNU Free Documentation License (GFDL)
If you are the copyright holder of any material contained on our site and intend to remove it, please contact our site administrator for approval.
© 2016-2026 All site design rights belong to S.Y.A.