CCNP Security SISAS 300-208 Official Cert Guide (2015)
Part V: Advanced Secure Network Access
Chapter 16. Certificate-Based User Authentications
This chapter covers the following exam topics:
![]() Describe identity store options
Describe identity store options
![]() EAP types
EAP types
![]() Network authorization enforcement
Network authorization enforcement
![]() Identify issues using authentication event details in Cisco ISE
Identify issues using authentication event details in Cisco ISE
![]() Redirect ACL
Redirect ACL
![]() URL redirect policy
URL redirect policy
![]() Describe features and functionality of authentication and authorization
Describe features and functionality of authentication and authorization
Certificates used to be reserved for organizations that had large security operations (SecOps) teams or for closed-loop systems that hid the certificate usage from the admin, such as Active Directory. Many IT professionals hear the words certificate, X.509, or PKI and run away quietly, pretending they didn’t hear.
Well, in today’s world of mobile devices, bring-your-own-device IT models, and borderless networks, certificates are quickly becoming the norm. Certificates don’t need to be complicated; the concepts can be and are very relatable to everyday, real-world aspects of your daily life.
“Do I Know This Already?” Quiz
The “Do I Know This Already?” quiz enables you to assess whether you should read this entire chapter thoroughly or jump to the “Exam Preparation Tasks” section. If you are in doubt about your answers to these questions or your own assessment of your knowledge of the topics, read the entire chapter. Table 16-1 lists the major headings in this chapter and their corresponding “Do I Know This Already?” quiz questions. You can find the answers in Appendix A, “Answers to the ‘Do I Know This Already?’ Quizzes.”
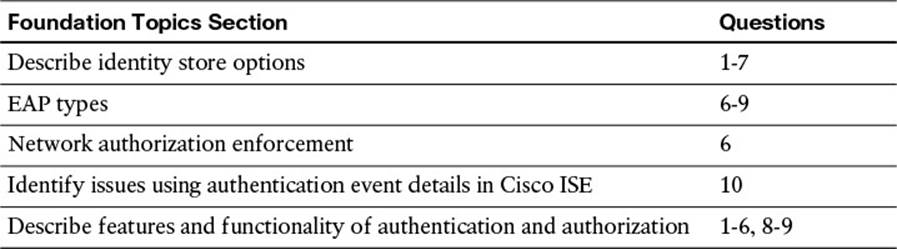
Table 16-1 “Do I Know This Already?” Section-to-Question Mapping
Caution
The goal of self-assessment is to gauge your mastery of the topics in this chapter. If you do not know the answer to a question or are only partially sure of the answer, you should mark that question as wrong for purposes of the self-assessment. Giving yourself credit for an answer you correctly guess skews your self-assessment results and might provide you with a false sense of security.
1. Which of the following is required for ISE to trust a client certificate?
a. The client’s private key must be imported into ISE’s Certificate Store.
b. The signing CA’s public key must be imported to ISE’s Certificate Store.
c. The signing CA’s private key must be imported into ISE’s Certificate Store.
d. The signing CA must be part of the Internet’s master PKI hierarchy.
2. What determines a digital certificate’s validity period?
a. Any time leading up to the date listed in the Certificate Expiration field of the X.509 certificate.
b. A certificate is always valid until it is added to the Certificate Revocation List (CRL).
c. Any time leading up to the date listed in the Revocation Date field of the X.509 certificate.
d. The time span between the dates listed in the Valid-From and Valid-To fields of the X.509 certificate.
3. True or False? Certificate Revocation List (CRL) is the only revocation status mechanism supported by ISE.
a. True
b. False
4. True or False? ISE will ignore the CRL distribution point listed in the X.509 client certificate.
a. True
b. False
5. How does ISE validate proof of possession for a client’s certificate?
a. ISE encrypts data with a combination of ISE’s private key and the client’s public key.
b. ISE encrypts data with a combination of ISE’s public key and the client’s private key.
c. ISE sends a message to the end user, requesting a screen shot of the private key.
d. ISE encrypts data with a combination of ISE’s private key and the client’s private key.
6. Which of the following accurately describes how an Active Directory user is authorized when using certificate-based authentication?
a. When Active Directory is the certificate authority (CA), ISE sends the full certificate to the CA and it cross-references it to the end user to which the certificate was issued, returning the AD Group Membership and other attributes to ISE.
b. It is not possible to perform Active Directory user authorization when performing certificate-based authentication.
c. Cisco ISE uses CAP to identify the principle identity from the X.509 attributes and then performs the lookup in Active Directory using that identity. Active Directory returns the AD Group Membership and other attributes to ISE.
d. This process requires a dual authentication. The first authentication is for the digital certificate, and then the user is prompted for his username and password for the Active Directory component.
7. Which is the most common authentication protocol for network access when using certificates?
a. EAP-TTLS
b. EAP-TLS
c. EAP-FAST
d. EAP-GTC
8. Which of the following lists accurately describes the components required for ISE to process certificate-based authentications?
a. ISE is capable of processing certificate-based authentications by default, and no additional configuration is required.
b. EAP-TLS enabled in the Allowed Protocols, a CAP, Signing CA’s Public Certificate added to the Certificate Store with the Trust for Client Authentication attribute enabled, and either CRL or OCSP configured.
c. EAP-TLS enabled in the Allowed Protocols, a CAP, Signing CA’s Public Certificate added to the Certificate Store with the Trust for Client Authentication attribute enabled, and an authorization rule for the extracted identity.
d. EAP-TLS enabled in the Allowed Protocols, a CAP, Signing CA’s Public Certificate added to the Certificate Store with the Trust for Client Authentication attribute enabled.
9. What does the Download CA certificate chain link on the Microsoft CA provide an ISE administrator?
a. A form for the admin to fill out and request the CA administrator send its public key, including any intermediary CAs.
b. Configures the Windows client to provide the signer’s public key during the authentication process, along with its own (hence, its certificate chain).
c. Downloads a PKCS file, which is a certificate chain file that will contain the public certificates for the CA and any intermediate CA in the hierarchy.
d. Redirects the admin to a new page where she can purchase the public key from the certificate authority.
10. Live Log provides a glance at a lot of information, including a brief failure reason. What should an admin do to find a more detailed explanation of the failed certificate authentication and a possible resolution?
a. From Live Log, navigate to Operations > Reports > Failed Authentications.
b. From Live Log, click the Details icon, which will launch the authentication details report.
c. Immediately email Aaron Woland of Cisco and ask him why this isn’t working.
d. Call Cisco TAC because if the detail is not in Live Log, it doesn’t exist.
Foundation Topics
Certificate Authentication Primer
The subject of certificate authentication does not have to be scary; there are a few universal truths when discussing certificate-based authentications. Standard certificate authentication is the same, regardless of whether the certificate authority is built by Microsoft, Cisco, Symantec, Entrust, and so on.
Let’s start with a quick definition of a certificate. A certificate is a signed document that represents an identity. When thinking of a certificate, try to relate it to a passport, a driver’s license, or another personal identification card. That identification card is meant to represent you and prove you are who you say you are.
How does a business or security checkpoint know to trust that identification?

When presented with a certificate, an authentication server will perform the following checks (at a minimum):
1. Determine whether a trusted authority has signed the digital certificate.
2. Examine both the start and end dates to determine whether the certificate has expired.
3. Verify whether the certificate has been revoked (you could use OCSP or CRL check).
4. Validate that the client has provided proof of possession.
Let’s examine these four items one at a time:
Determine Whether a Trusted Authority Has Signed the Digital Certificate
The signing of the certificate really has two parts.
The first part is that the certificate must have been signed correctly (following the correct format and so on). If it is not, it will be discarded immediately. Next, the signing certificate authority’s (CA’s) public key must be in the list of trusted certificates, and that certificate must be trusted for purposes of authentication. Using Cisco ISE as an example, a copy of the signing CA’s public key must be stored at Administration > System > Certificates > Certificate Store, and it must have the Trust for client authentication use-case.
Figure 16-1 shows ISE’s certificate store and the Trust for Client Auth field.

Figure 16-1 Administration > System > Certificates > Certificate Store.
Figure 16-2 shows the details of the public key belonging the Active Directory CA and has the Trust for Client Authentication check box enabled.
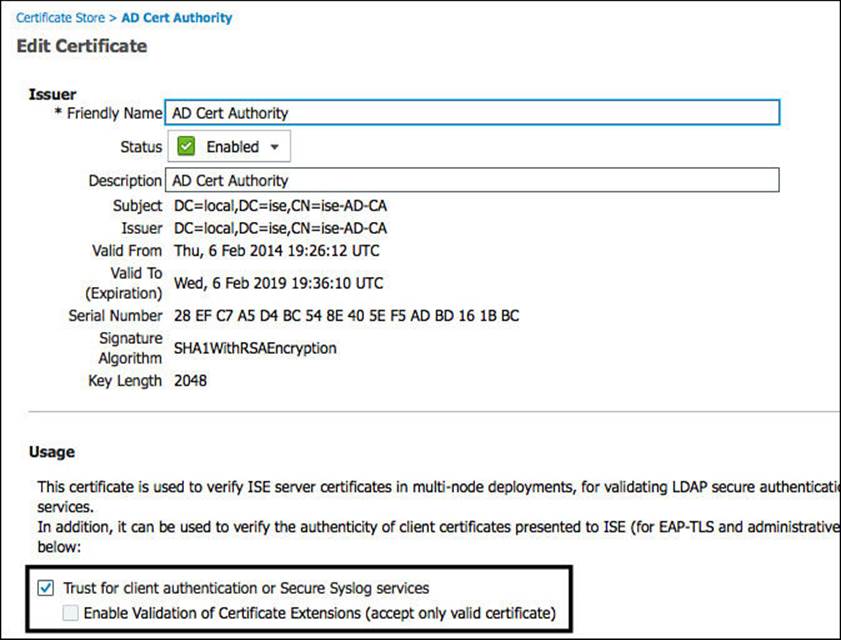
Figure 16-2 Active Directory CA certificate details.
So not only does ISE “trust” certificates that have been signed by this CA, but it also trusts those certificates for a specific use-case (client authentication). If a client presents a certificate and that certificate has not been signed by a CA that is trusted for client authentication, then the authentication will fail. It’s exactly like someone entering the wrong password or a bartender spotting a fake ID. Access rejected!
Examine Both the Start and End Dates to Determine Whether the Certificate Has Expired
Continuing to use the driver’s license or passport as an example, two dates are usually listed on the document: the date issued and the date it expires. If you try to use an expired license or an expired passport, it should be denied. For example, if you were trying to get through security at an airport and presented the TSA agent with an expired driver’s license, he is not supposed to allow you through the gate.
The picture on the identity is still clearly you, and it was obviously a valid identification card once, so why would they ever reject it? Ultimately, because the signing authority (DMV) is no longer warrantying that the document is valid, that’s why.
A certificate will also have two dates listed in it: a date issued and date it is valid until (when it expires). The authentication server performs a similar check to what the TSA agent does and should reject any certificate that is not within its validity range. In other words, it will check to see whether the certificate is valid for the date and time at which the authentication request comes in.
This is one reason Network Time Protocol (NTP) is so important when working with certificates. Many of us have seen problems where time was out of sync. For example, a certificate was presented on January 10, 2014, at 11:11 a.m., but its “valid-from” value started on January 10 at 11:30 a.m. In this example, the certificate was issued for a time 19 minutes in the future. This was because of a time sync issue where the CA thought it was 20 minutes later than the authentication server, so the brand-new certificate was not valid yet! This type of problem is so common you would laugh (or cry).
Figure 16-3 shows a certificate and highlights the Valid-From and Valid-To attributes.
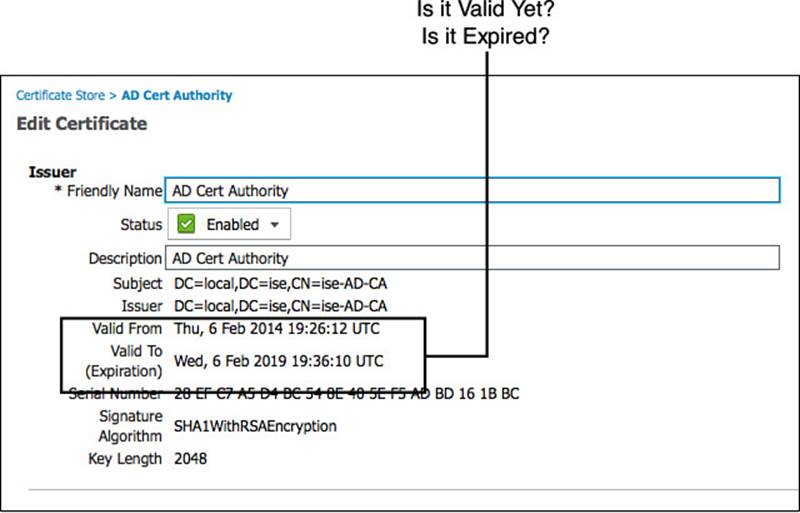
Figure 16-3 Certificate validity period.
Verify Whether the Certificate Has Been Revoked
Pretend for a moment that you are driving down the road and are pulled over by a police officer. The officer asks for your driver’s license and proof of insurance. You hand him a driver’s license, which is immediately checked for evidence of authenticity—that is, does it look like a valid driver’s license or a forgery? Okay, it’s not a forgery. Check. Next, expiration? It is not expired. Check. Now the officer asks you to wait while he goes back to his squad car.
While in the squad car, the officer performs some authorization checks (are you a registered owner of the car you were driving, and so on). Those are not important for this hypothetical scenario, though. What is important is that the officer must make sure your valid driver’s license was not revoked by the Department of Motor Vehicles. A quick lookup on the computer into the DMV records shows that your driver’s license was revoked for too many DWIs. The cold steel of the handcuffs and the rough shove into the back of the squad car as you are hauled off to jail make you reevaluate your life choices.
Certificate authentication has the same capability (not the handcuffs, I’m talking about the lookup into the DMV to check on revocation status). Every CA should also have a service to publish a list of certificates that have been revoked. The two main ways to do this today are
![]() Certificate Revocation List (CRL)—This is basically a signed list that the CA publishes on a website that can be read by authentication servers. The file is periodically downloaded and stored locally on the authentication server; when a certificate is being authenticated, the server examines the CRL to see whether the client’s cert was revoked. A CRL could be compared to the police officer having a list of suspended drivers in his squad car. Much like that list, the CRL is downloaded and cached for a period of time and therefore might not be valid in some cases (such as a certificate that has been reinstated).
Certificate Revocation List (CRL)—This is basically a signed list that the CA publishes on a website that can be read by authentication servers. The file is periodically downloaded and stored locally on the authentication server; when a certificate is being authenticated, the server examines the CRL to see whether the client’s cert was revoked. A CRL could be compared to the police officer having a list of suspended drivers in his squad car. Much like that list, the CRL is downloaded and cached for a period of time and therefore might not be valid in some cases (such as a certificate that has been reinstated).
![]() Online Certificate Status Protocol (OCSP)—This is the preferred method for revocation checks in most environments today because it provides near real-time updates. OCSP allows the authentication server to send a real-time request (similar to an HTTP web request) to the service running on the CA or another device and checking the status of the certificate right then and there. OCSP could be compared to the police officer using the computer in the squad car and doing a lookup into the DMV’s database.
Online Certificate Status Protocol (OCSP)—This is the preferred method for revocation checks in most environments today because it provides near real-time updates. OCSP allows the authentication server to send a real-time request (similar to an HTTP web request) to the service running on the CA or another device and checking the status of the certificate right then and there. OCSP could be compared to the police officer using the computer in the squad car and doing a lookup into the DMV’s database.
If the certificate has been revoked, then access is denied. Enjoy the lights and sirens on the way to jail.
Figure 16-4 shows an example of the configuration screen for a trusted certificate in the Cisco ISE GUI. With each trusted certificate, you have the ability to configure where to check for OCSP or CRL on a per-trusted CA basis. When ISE is authenticating a certificate that has been signed by that particular root (or it’s subordinates), ISE will use the configured service to lookup revocation status.
Figure 16-4 Configuration for certificate revocation checking.
It’s very important for you to understand that checking for certificate revocation is an option. You’ll notice that neither check box for CRL or OCSP are on by default; they require the admin to configure the URL or the service location. It is also critical to understand what behavior will happen if the service is not available or the status of the certificate is unknown—that is, how does the authentication policy handle exceptions? Is it configured to “fail-open” or “fail-closed”?
The client’s certificate itself will have an extension called CRL Distribution Points, which can be populated with the URI where the authentication server may locate the CRL. Figure 16-5 illustrates this certificate attribute. However, it is important to note that Cisco ISE will ignore this field and use only the configured CRL point shown in Figure 16-4.
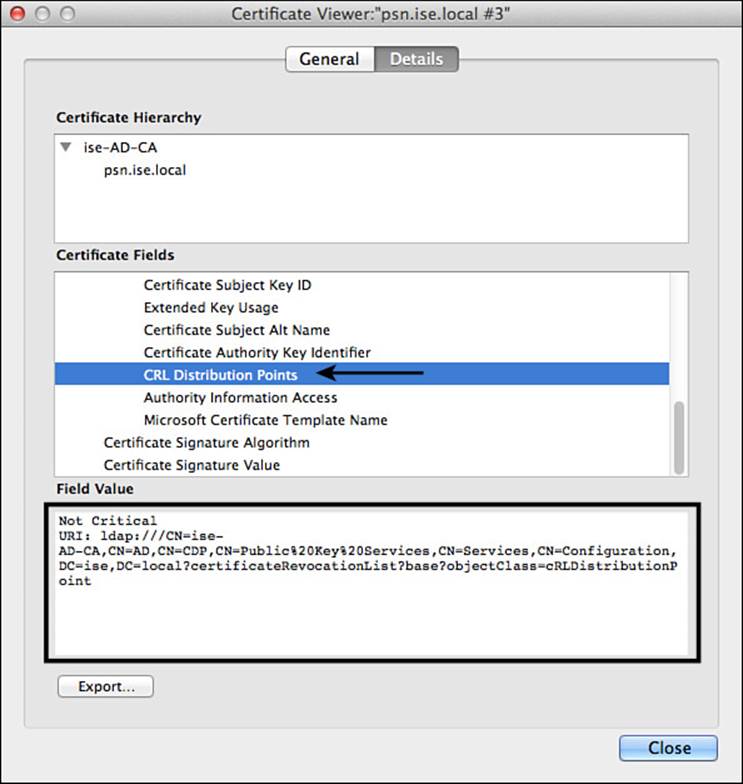
Figure 16-5 CRL distribution points attribute.
Another interesting factoid about managing revocation lists is that in the previous section where we discussed the certificate expiration, we looked at the fields Valid-From and Valid-To. These fields form the validity period, which defines the period of time that the signing CA warrants it will maintain revocation information regarding that certificate. When the certificate expires, the CA is no longer responsible for maintaining a record of its revocation status. This helps keep CRL and OCSP lists at manageable sizes.
Validate That the Client Has Provided Proof of Possession
Is there a way for an authentication server to be sure the client truly owns the certificate? Think of the example of being pulled over by a police officer for speeding (yes, again). You hand the officer a driver’s license, and she evaluates it. The results of the evaluation are as follows:
![]() It is a valid driver’s license, and has it been issued by a trusted signer (the state DMV)?
It is a valid driver’s license, and has it been issued by a trusted signer (the state DMV)?
![]() It has not expired yet, so that is no problem.
It has not expired yet, so that is no problem.
![]() The police officer uses the computer to validate with the DMV that the driver’s license has not been revoked.
The police officer uses the computer to validate with the DMV that the driver’s license has not been revoked.
All three of those have passed their evaluation checks. However, the picture on the driver’s license is a picture of a woman with long, flowing brown hair and hazel eyes, yet you yourself are a bald, elderly man. OOPS! This “valid” driver’s license was not issued to you—the proof of possession has failed! Again—jail time!
Certificate authentications do something similar. There will be some throwaway piece of data that must be encrypted and decrypted. Successfully encrypting and decrypting that data ensures that the client has both the public and private keys, and therefore it is the proof of possession. This ensures that someone did not just grab the client’s public key and try to present that as being his own. If the client cannot provide proof of possession, then the authentication will fail—Access-Reject.
Certificates (specifically, X.509 certificates) are part of a Public Key Infrastructure (PKI) and can be used for asymmetric encryption. Each certificate is really part of a key-pair consisting of a public key and a private key. The public key is a certificate that is seen by anyone and everyone. The private key is one that only the owner should ever see or possess.
What makes this interesting is that something that has been encrypted using the private key can be decrypted only by using the public key. Additionally, if something was encrypted using the public key, it can be decrypted only by using the private key. These public and private keys are mathematically married. That is why the proof of possession works to ensure the endpoint truly has the full key-pair and not just a copy of the public key. The throwaway data is encrypted with the combination of the authentication server’s private key and the client’s public key (the certificate sent for authentication). Then the endpoint must decrypt the data with the combination of its private key and the server’s public key.
A Common Misconception About Active Directory
Microsoft Active Directory (AD) has a certificate authority built in to it that can be enabled as a full enterprise-wide PKI. In fact, it’s the single most common CA type used today. When the AD certificate authority is used to issue the certificates, many administrators think this is the same as an Active Directory authentication. This is not the case.
What can often confuse people with regard to Authentication Authorization and Accounting (AAA) is the difference between authentication and authorization. They often blend so much. A certificate issued by Active Directory Certificate Services is still just an X.509 certificate. It will go through all the authentication validation of any other certificate, regardless of the fact that the CA was integrated into AD. Authenticating the certificate itself is not using Kerberos, such as AD authentications do; it doesn’t retrieve any Active Directory attributes, such as group membership; and no AD permission/rights are assigned because of the certificate itself.
What is possible, however, is to examine a field of the certificate and then to do a separate lookup into AD based on that field during the authorization phase. For example, a certificate with a subject of Aaron is sent via EAP-TLS. The certificate is validated through the four functions of certificate authentication, and it passes all four. Now it’s time for the authorization. ISE will take the certificate subject (Aaron) and do a lookup into AD for that username. This is where group membership and other policy conditions are examined and the specific authorization result issued.
Cisco ISE uses something called a Certificate Authentication Profile (CAP) to examine a specific field and map it to a username for authorization. Figure 16-6 shows a sample CAP.

Figure 16-6 Allowed Protocols Services.
Note
Cisco ISE will also do a courtesy check to validate whether the machine or account has been disabled in AD. If the account were disabled in AD, then the authorization will be to deny access.
Please note, this is a very different process from an Active Directory authentication, which uses Kerberos, meaning AD logs will be recorded differently. There are solutions on the market that examine AD log files and use that information to help tie together usernames and IP addresses for single-sign-on to web proxy servers, identity-enabled firewalls, and other services (Cisco Context Directory Agent [CDA] is one such example).
If the authentication was a certificate-based authentication (EAP-TLS) but the user was authorized from an AD lookup, that process will most likely not provide the right types of logging for those identity-enabled firewalls or web proxies.
EAP-TLS
More often than not, when talking about certificate authentication with wired and wireless local area networks (LANs), EAP-TLS will be used as the authentication protocol. Yes, it’s completely possible to use EAP-GTC or maybe some other EAP type, but EAP-TLS is the mainstream protocol. It’s used natively, or as the inner-method with tunneled EAP types such as PEAP, EAP-FAST, EAP-TTLS, and TEAP.
With Cisco ISE, you could enable the use of EAP-TLS from a preconfigured supplicant or use the bring-your-own-device (BYOD) onboarding functionality with ISE that will provision the native supplicant for Windows, MAC, iOS, and Android devices in addition to issuing that device a certificate for use with EAP-TLS.
For more on EAP methods, see Chapter 4, “EAP over LAN (also Known as 802.1X).” For more on device onboarding, see Chapter 17, “Bring Your Own Device.”
Configuring ISE for Certificate-Based Authentications
For ISE to process a certificate-based authentication, some basic configuration is required:
![]() The allowed protocols for the authentication must allow a protocol that will use certificates:
The allowed protocols for the authentication must allow a protocol that will use certificates:
![]() A CAP must be created and used in the authentication rule:
A CAP must be created and used in the authentication rule:
![]() The CAP should define which certificate field will be the Principle Username X.509 Attribute.
The CAP should define which certificate field will be the Principle Username X.509 Attribute.
![]() Optionally, you can add that CAP to an identity source sequence (ISS) that includes Active Directory for authorization purposes.
Optionally, you can add that CAP to an identity source sequence (ISS) that includes Active Directory for authorization purposes.
![]() Cisco ISE must be configured to trust the client certificates:
Cisco ISE must be configured to trust the client certificates:
![]() Those certificates must be trusted for client authentication.
Those certificates must be trusted for client authentication.
![]() Optionally, you can configure OCSP or CRL checking for the CAs.
Optionally, you can configure OCSP or CRL checking for the CAs.
![]() Configure the authorization policy.
Configure the authorization policy.
Validate Allowed Protocols
To process a certificate-based authentication, the Allowed Protocols definition will need to permit EAP-TLS. The definition can be configured to allow native EAP-TLS itself, within a tunneled EAP type such as PEAP or EAP-FAST, or possibly allowing all options regardless of using native or tunneled transport.
From the ISE GUI, do the following:
Step 1. Navigate to Policy > Policy Elements > Results > Authentication > Allowed Protocols.
In Chapter 10, “Authentication Policies,” you created an Allowed Protocols definition named ALL EAP Types, as shown in Figure 16-6. If you did not create this one already, feel free to skip Step 2 and follow along using whichever Allowed Protocols definition you will be using in your own policy.
Step 2. Click All EAP Types.
Step 3. Ensure that EAP-TLS is enabled natively, as well as within the PEAP and EAP-FAST tunnels, as shown in Figure 16-7.
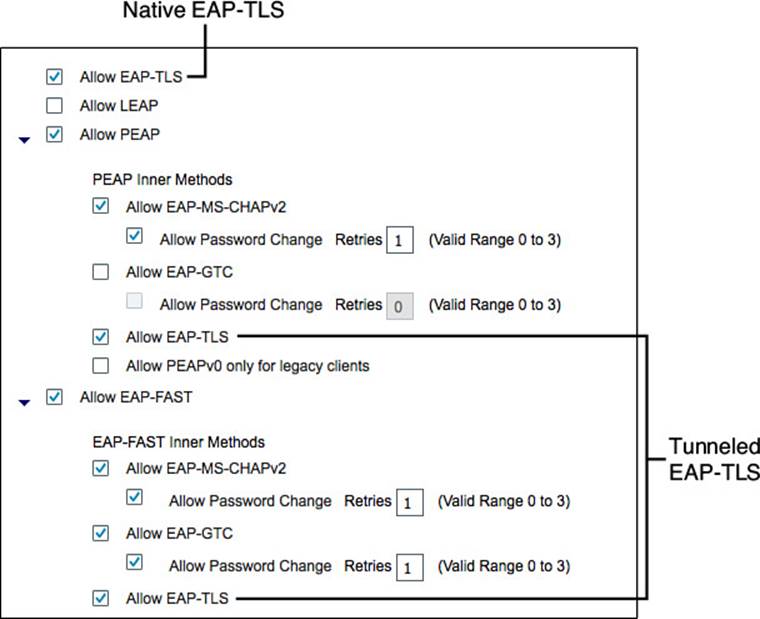
Figure 16-7 EAP-TLS enabled natively and within the EAP tunnels.
Now you are certain that EAP-TLS is allowed in this particular Allowed Protocols definition. Next, you will ensure there is a CAP for the Authentication Identity Store.
Certificate Authentication Profile
As described in Chapter 3, “Identity Management,” and Chapter 10, ISE uses a certificate authentication profile as the identity source for certificate-based authentications. In reality, the authentication is simply validation of the certificate, as described in detail within this chapter.
Keep in mind that a certificate is really just a signed document and that the document has many fields that can be read. A CAP is used to capture the identity from one of the fields of the certificate. This is known as the Principle Username X.509 Attribute.
To verify the CAP has been created correctly, take a look at the CAP you created in Chapter 10.
From the ISE GUI, do the following:
Step 1. Navigate to Administration > Identity Management > External Identity Sources > Certificate Authentication Profile.
Step 2. Click the CAP you created in Chapter 10 (ATW_CAP in the example). If you have not created one yet, click Add.
Figure 16-8 shows the sample CAP that was created in Chapter 10. Notice in the figure that the Principle Username X509 Attribute is configured to use the Common Name attribute from the certificate’s subject field as the Principle Username.
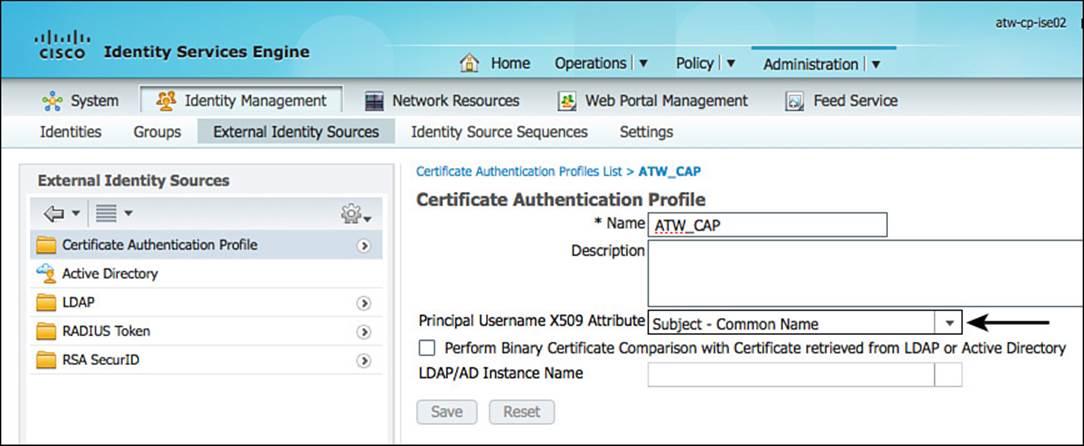
Figure 16-8 Certificate authentication profile.
As described throughout this chapter, certificate-based authentications validate that a trusted authority signed the certificate and that the certificate has not been revoked. There is an additional capability to use AD or LDAP and to perform a bit-for-bit comparison of the client certificate against the copy of the certificate stored in AD. This is not a very common use-case, but it does exist for those corner cases where it’s required.
Note
When you are using certificate-based authentications for Windows AD member computers and want to use Machine Access Restriction (MAR), a special configuration is required. Because MAR is a property of Active Directory, if the machine is using certificates (EAP-TLS) for authentication, the certificate authorization profile needs to enable the option Perform Binary Certificate Comparison with Certificate Retrieved from LDAP or Active Directory with the Active Directory as the source for comparison.
Verify That the Authentication Policy Is Using CAP
You have just ensured a CAP exists to use with the authentication policy. Now you will examine the authentication policy and ensure the CAP is being used for EAP-TLS traffic.
In Chapter 10, you configured a detailed authentication policy that was very specific regarding which identity store to use with EAP protocol. This was designed to help you learn how the authentication policies work. At the end of the chapter, you modified the configuration to be simple but still work with all the use cases throughout this book. Now, you will verify that the policy is ready for certificate-based authentications.
You will ensure that there is an authentication rule for 802.1X configured to use the ALL EAP Types Allowed Protocols definition and that it will use the CAP as the identity source or within an SISS.
From the ISE GUI, follow these steps:
Step 1. Navigate to Policy > Authentication. The authentication policy should look similar to what is shown in Figure 16-9.
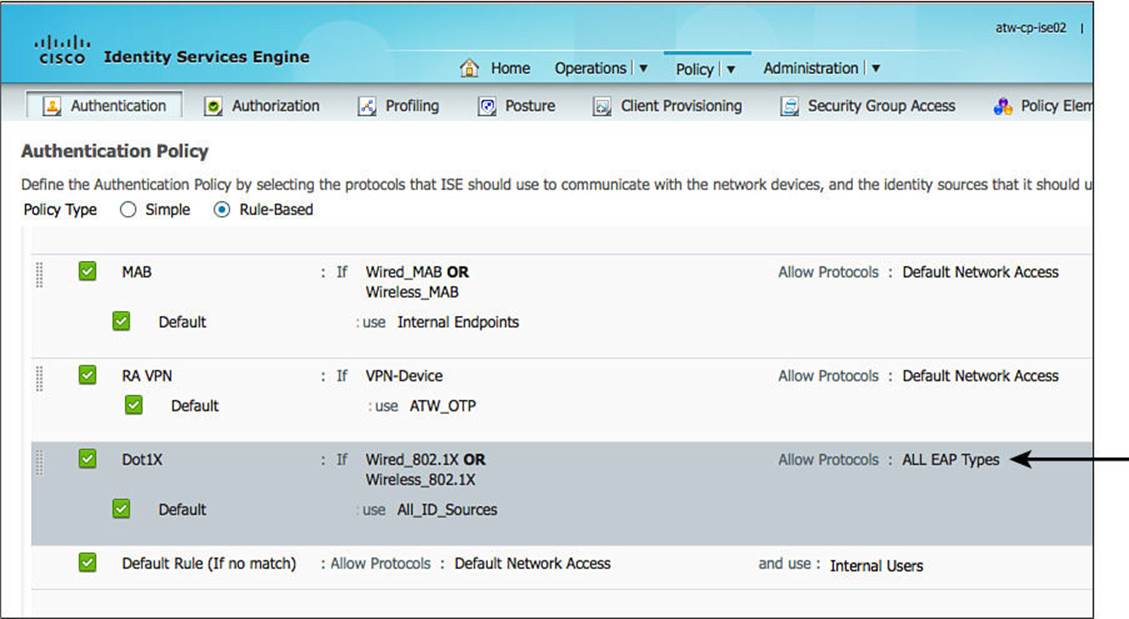
Figure 16-9 Simplified authentication policy from Chapter 10.
Step 2. Visually ensure that the Allowed Protocols is set for ALL EAP Types, as displayed in Figure 16-9.
Step 3. Edit the Dot1X rule.
Step 4. Hover over the identity source, which should be All_ID_Sources, and ensure that the Certificate Authentication Profile Name is there, such as ATW_CAP in this example (see Figure 16-10).
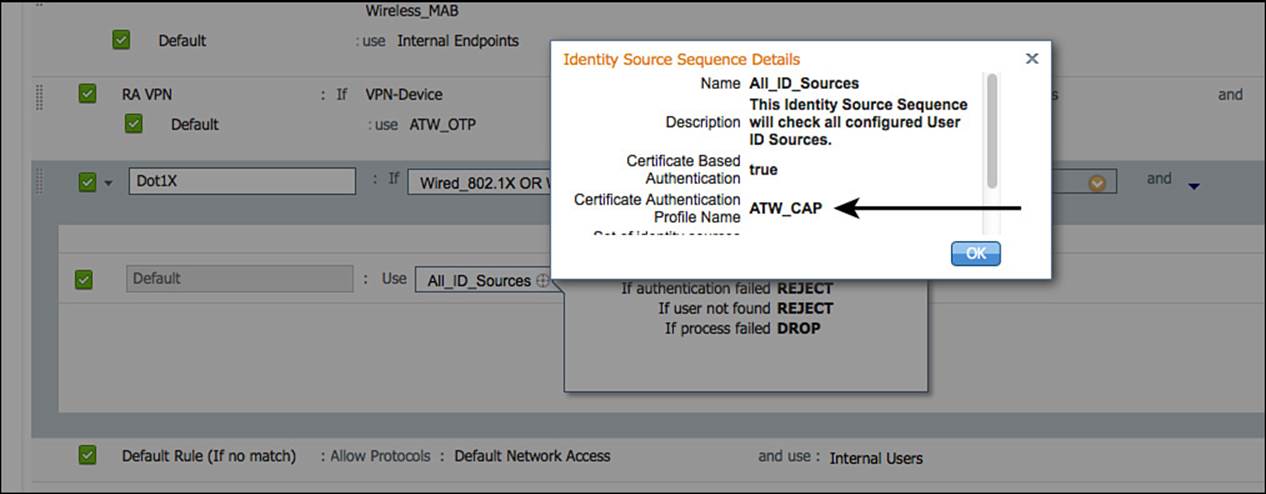
Figure 16-10 All_ID_Sources ISS contains the CAP.
Note
You could also examine this ISS by navigating to Administration > Identity Source Sequences and editing All_ID_Stores.
Step 5. Click Done.
You’ve now ensured that the Dot1X authentication rule will permit EAP-TLS and will authenticate to an ISS that includes the CAP. The authentication rule has been confirmed as ready, and you will now think about the authorization policy.
Authorization Policies
With the CAP, you specified which field to use for the principle identity. That identity can be used in the authorization policy, just as if a user typed in her ID and provided a password. You can examine AD group membership or other AD attributes for that identity, as well as compare fields in the certificate itself. You might choose to authorize the session based on the signing CA or perhaps assign a particular virtual LAN (VLAN) because the organizational unit (OU) of the certificate states it is for the HR department (for example).
To help foster a better understanding of certificate-based authorizations, let’s create an authorization rule for employees to gain access to the network.
From the ISE GUI, do the following:
Step 1. Navigate to Policy > Authorization.
Step 2. Duplicate the rule named Employee Limited by selecting Duplicate Above from the drop-down arrow next to Edit.
Step 3. Rename the duplicated rule Employee Limited_Certificate.
Step 4. For the conditions, select Add a New Attribute / Value from the condition Picker (the + sign).
Step 5. Select Network Access > Authentication Method EQUALS x509_pki, as shown in Figure 16-11.

Figure 16-11 Employee Limited_Certificate conditions.
Step 6. Add another New Attribute / Value, and then select Certificate. You are doing this just to see which values are there; you are not adding another attribute at this time.
Step 7. Delete the unused attribute from the conditions list, so your conditions look like the ones in Figure 16-11.
Step 8. Add the condition to the Library for reuse in other rules, and name the new condition x509_PKI, as shown in Figure 16-11.
Step 9. Click Done.
Step 10. Click Save.
Figure 16-11 shows the Employee Limited_Certificate conditions. Your end result should look the same.
You’ve just created a policy that used a signed document and X.509 certificate and ran authorization against the AD membership of a user ID, using the Employees Group from Active Directory. This is due to the CAP extracting that identity from a field in that certificate and using that extracted identity for the authorization.
Additionally, you saw the options of using other information from the certificate to help make your authorization decisions.
You will examine these types of policies in more detail in Chapter 17.
Ensuring the Client Certificates Are Trusted
A step that is often overlooked is to ensure that ISE trusts the client certificate. For a certificate to be trusted for client authentication, you must trust the CA that has signed the certificate.
Keep in mind that X.509 provides for a hierarchy that enables scale. A certificate authority can actually belong to a full “tree” of CAs, all stemming from the root CA. Figure 16-12 illustrates this concept, showing a root CA with two subordinate CAs. Below the subordinate CA is the certificate holder (a tablet). When ISE is presented with the certificate, it should trust all the CAs in the path. Using Figure 16-12 as an example, ISE should trust the subordinate CA and the root CA.

Figure 16-12 X.509 PKI hierarchy.
When trusting a certificate authority, keep in mind that each of the CAs that are in the signing hierarchy must also be trusted.
Importing the Certificate Authority’s Public Certificate
To trust a certificate authority, you start by downloading the CA’s public certificate and adding that certificate to the Certificate Store under Administration > System > Certificates > Certificate Store. This process was covered in detail within Chapter 9, “Initial Configuration of Cisco ISE.”
Figure 16-13 shows a simple example of connecting to the website of your CA to begin the download process (the URL for a Windows CA is http://[fqdn-of-CA]/certsrv/).
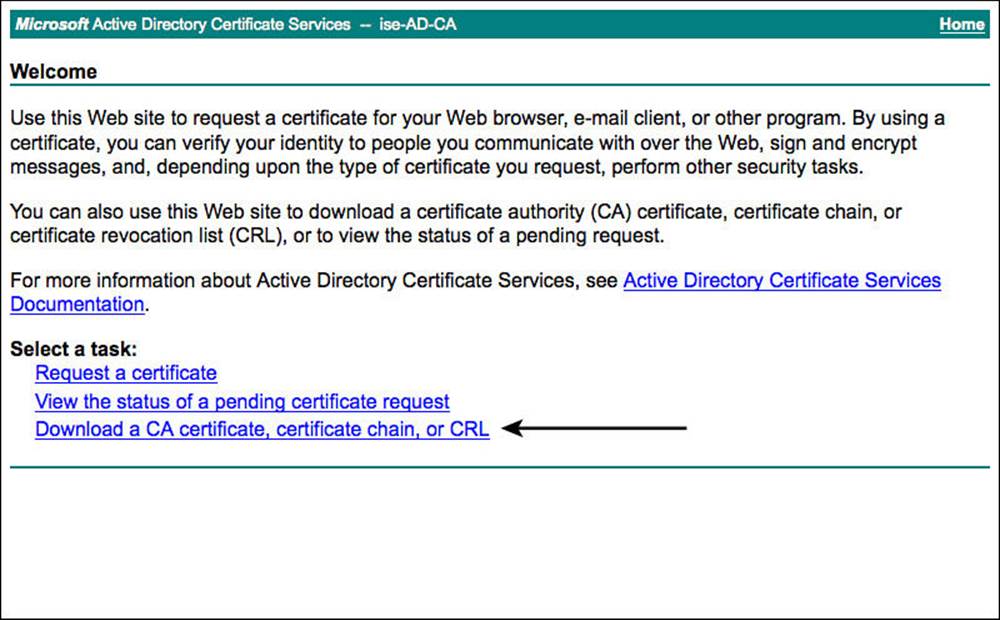
Figure 16-13 Connecting to a CA’s website.
Figure 16-14 shows a simple example of downloading the public certificate from a Windows CA.
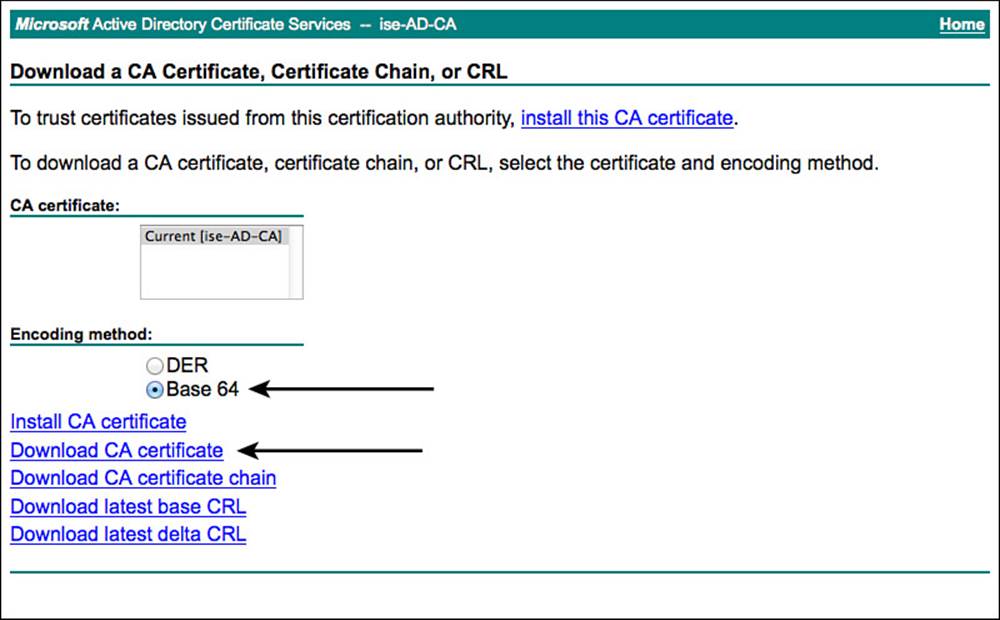
Figure 16-14 Downloading a public certificate.
When possible, avoid the use of certificate chain files (these have a .pkcs extension). Always use BASE-64–encoded files instead of DER-encoded files.
When you have your root CA and all the intermediate CAs’ public certificates downloaded, you can add them to ISE.
From the ISE GUI, repeat these steps for the root CA and every intermediate CA:
Step 1. Navigate to Administration > System > Certificates > Certificate Store.
Step 2. Click Import.
Step 3. Click Browse.
Step 4. Select the downloaded public certificate.
Step 5. Provide a Friendly Name to help identify the certificate in the list.
Step 6. Select Trust for Client Authentication or Secure Syslog Services.
Step 7. Provide a description.
Step 8. Click Submit.
Figure 16-15 displays the importing of a public certificate from the root CA.
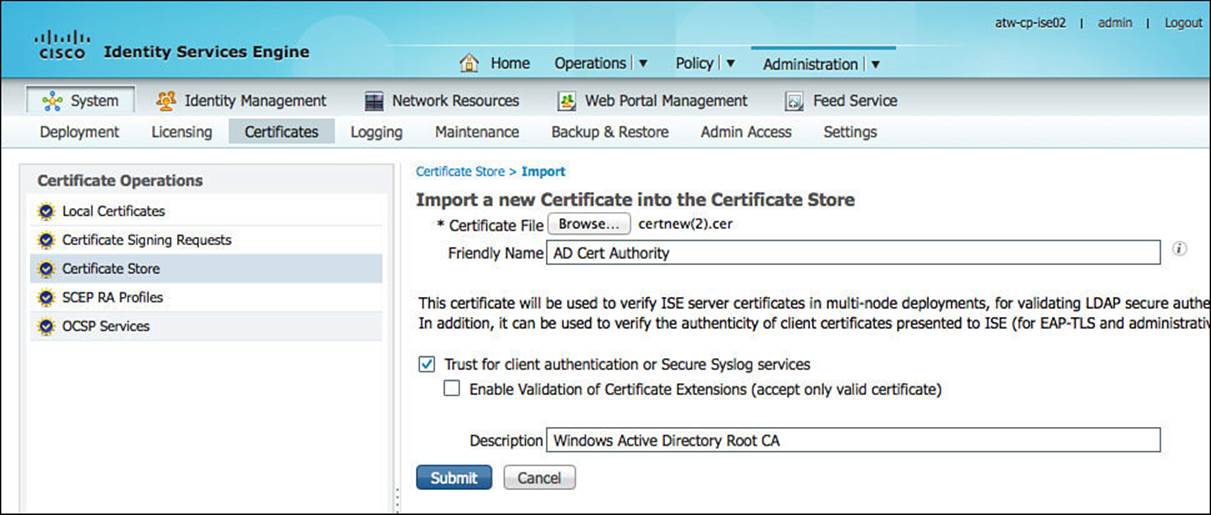
Figure 16-15 Importing a public certificate.
Configuring Certificate Status Verification (optional)
At this point, all certificates signed by that CA are trusted as a valid authentication. Commonly in production environments, it is not good enough to just trust the certificate—you must also know whether those certificates have been revoked. That requires the use of either CRLs or OCSP.
Within the certificate trust you just created for client authentication, you can specify the CRL or OCSP configuration.
From the ISE GUI, do the following:
Step 1. Navigate to Administration > System > Certificates > Certificate Store.
Step 2. Select the certificate you just added for client authentication.
Step 3. Scroll down to Certificate Status Validation.
Step 4. Select Validate against OCSP Server.
Step 5. Choose the correct OCSP provider from the drop-down. If you have not configured an OCSP provider yet, please see Chapter 9 for details.
Step 6. Click Save.
Figure 16-16 displays the importing of a public certificate from the root CA.
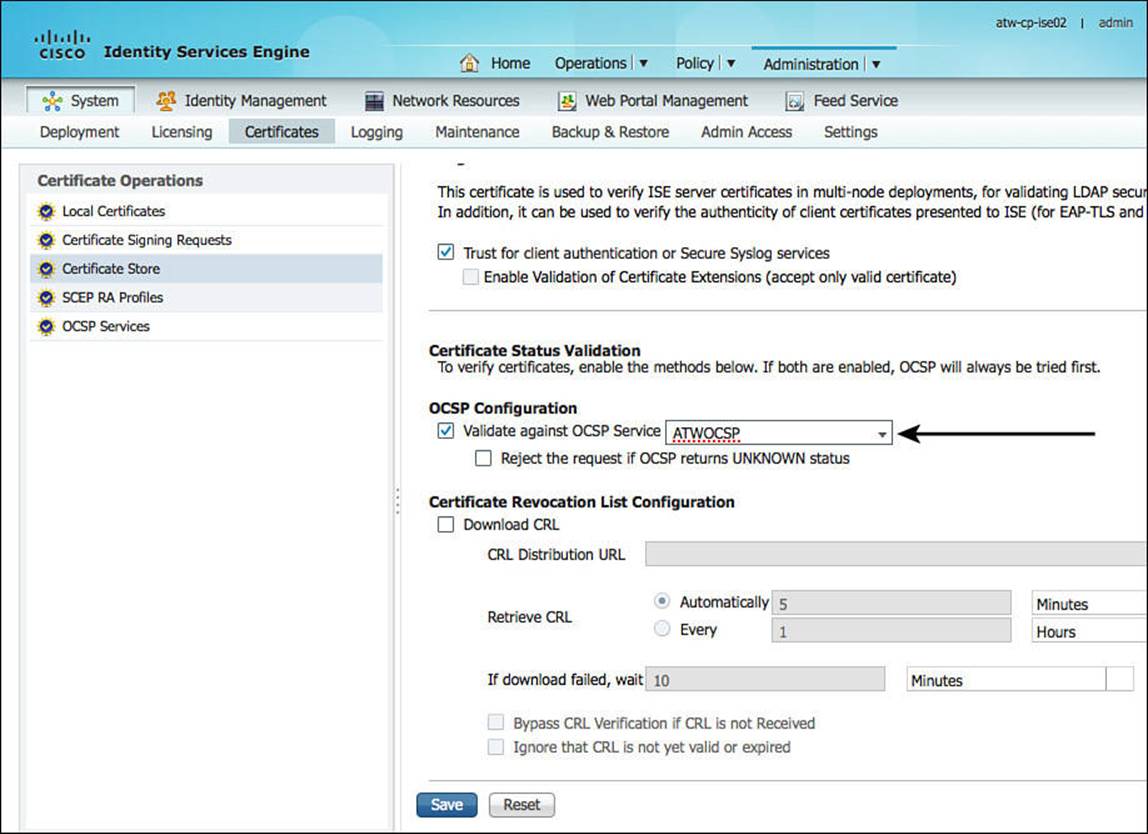
Figure 16-16 Importing a public certificate.
You are now all set to begin fully authenticating client certificates.
Verifying Certificate Authentications
To verify that a certificate authentication is working, you first need to have certificates provisioned. So, it’s a bit of a chicken-and-egg issue for those of you following along in the book. However, assuming you have a client that is already configured to use a certificate for authentication, you can follow along with your own install. If you don’t have clients configured yet, don’t worry—you can still follow along.
Cisco ISE has a phenomenally useful tool built in to it, commonly called Live Log. Live Log provides a near real-time view of all incoming authentications, change of authorizations (CoAs), and more.
Identifying a failed authentication is rather straightforward: failed authentications are highlighted. Figure 16-17 shows Live Log with two failed authentications (the image was cropped to fit better in the print of this book). Notice in the figure that the authentication is using EAP-TLS for the protocol with a method of dot1x. If you so choose, you can filter in Live Log so that only the protocol you are looking for is displayed, which makes it easier to find your entry of interest. For example, you can enter TLS in the Authentication Protocol field of Live Log, and only those entries will be displayed.

Figure 16-17 Live Log with failed authentication attempts.
To learn more about the attempted authentication, you click the Details icon. This icon looks a bit like a piece of paper with a magnifying glass over it, and it is in the Details column of Live Log. When you click that icon, it pops up another window with the Authentication Details report, which is displayed in Figure 16-18. Figure 16-18 is a cropped screen capture of the details report to make it more legible in this book. As you examine Figure 16-18, notice the text intended to point out the reason the authentication failed.
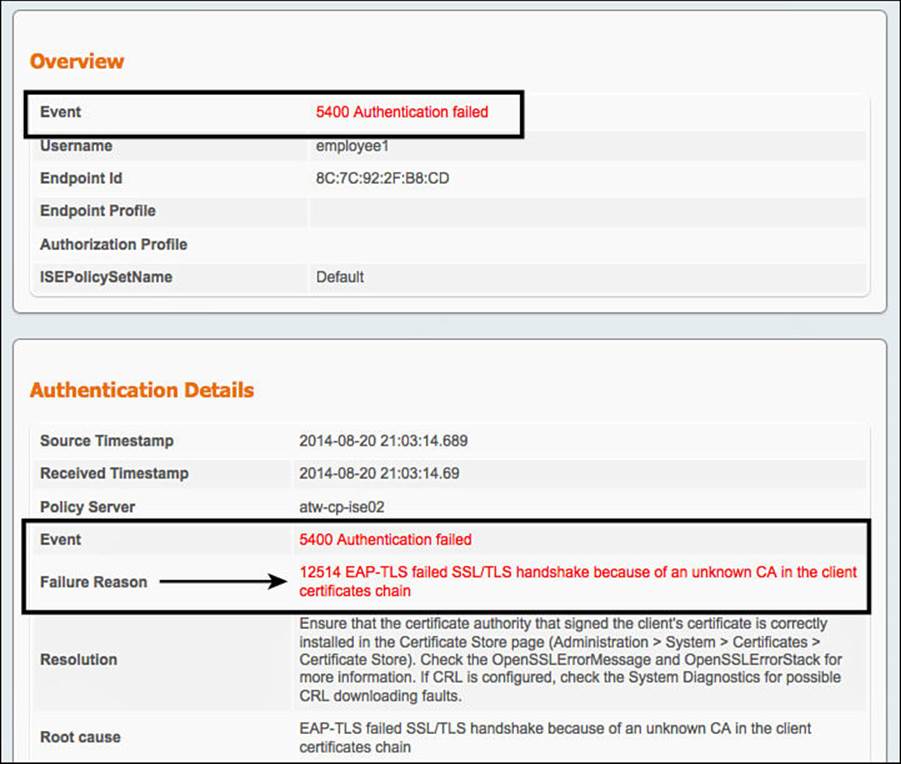
Figure 16-18 Excerpt from the authentication details report.
In fact, a field in the report named Failure Reason contains a fairly detailed message that reads: “12514 EAP-TLS failed SSL/TLS handshake because of an unknown CA in the client certificates chain.” That message has just informed you that the signing CA, or one of the CAs in the chain, is not trusted by ISE. There is even a resolution field in the report that will help guide you in your journey to locate a fix for the issue.
The authentication details report is very thorough and is the top tool used to resolve the majority of TAC cases related to authentications. For an example of a full authentication details report, see Figure 16-20.
In this example, we have resolved the issue and trusted the signing CA, and now the same endpoint is authenticating successfully. Figure 16-19 shows a cropped screen capture of the Live Log with the successful EAP-TLS authentication that results in Internet-only access.
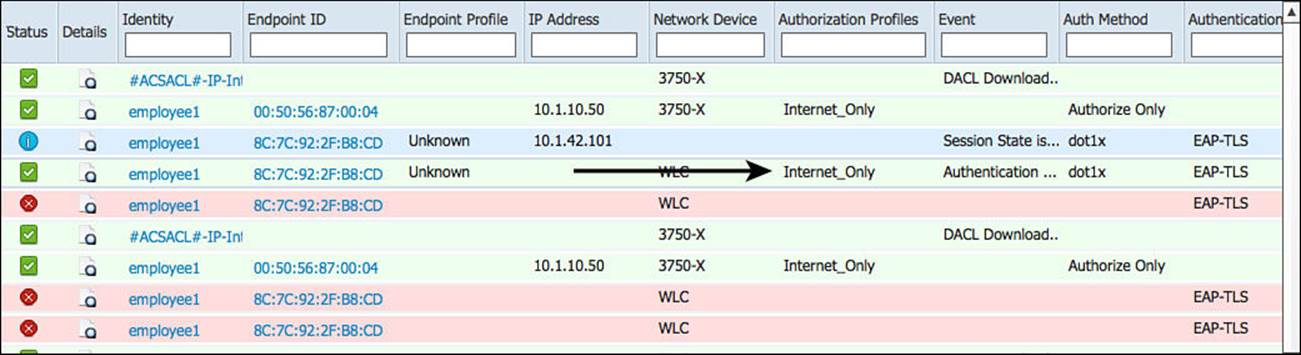
Figure 16-19 Live Log with successful authentication.
Clicking the Details icon launches the authentication details report for the successful authentication. Figure 16-20 is too small for most to read, but it will give you a solid idea of the sheer amount of data that exists in the report.
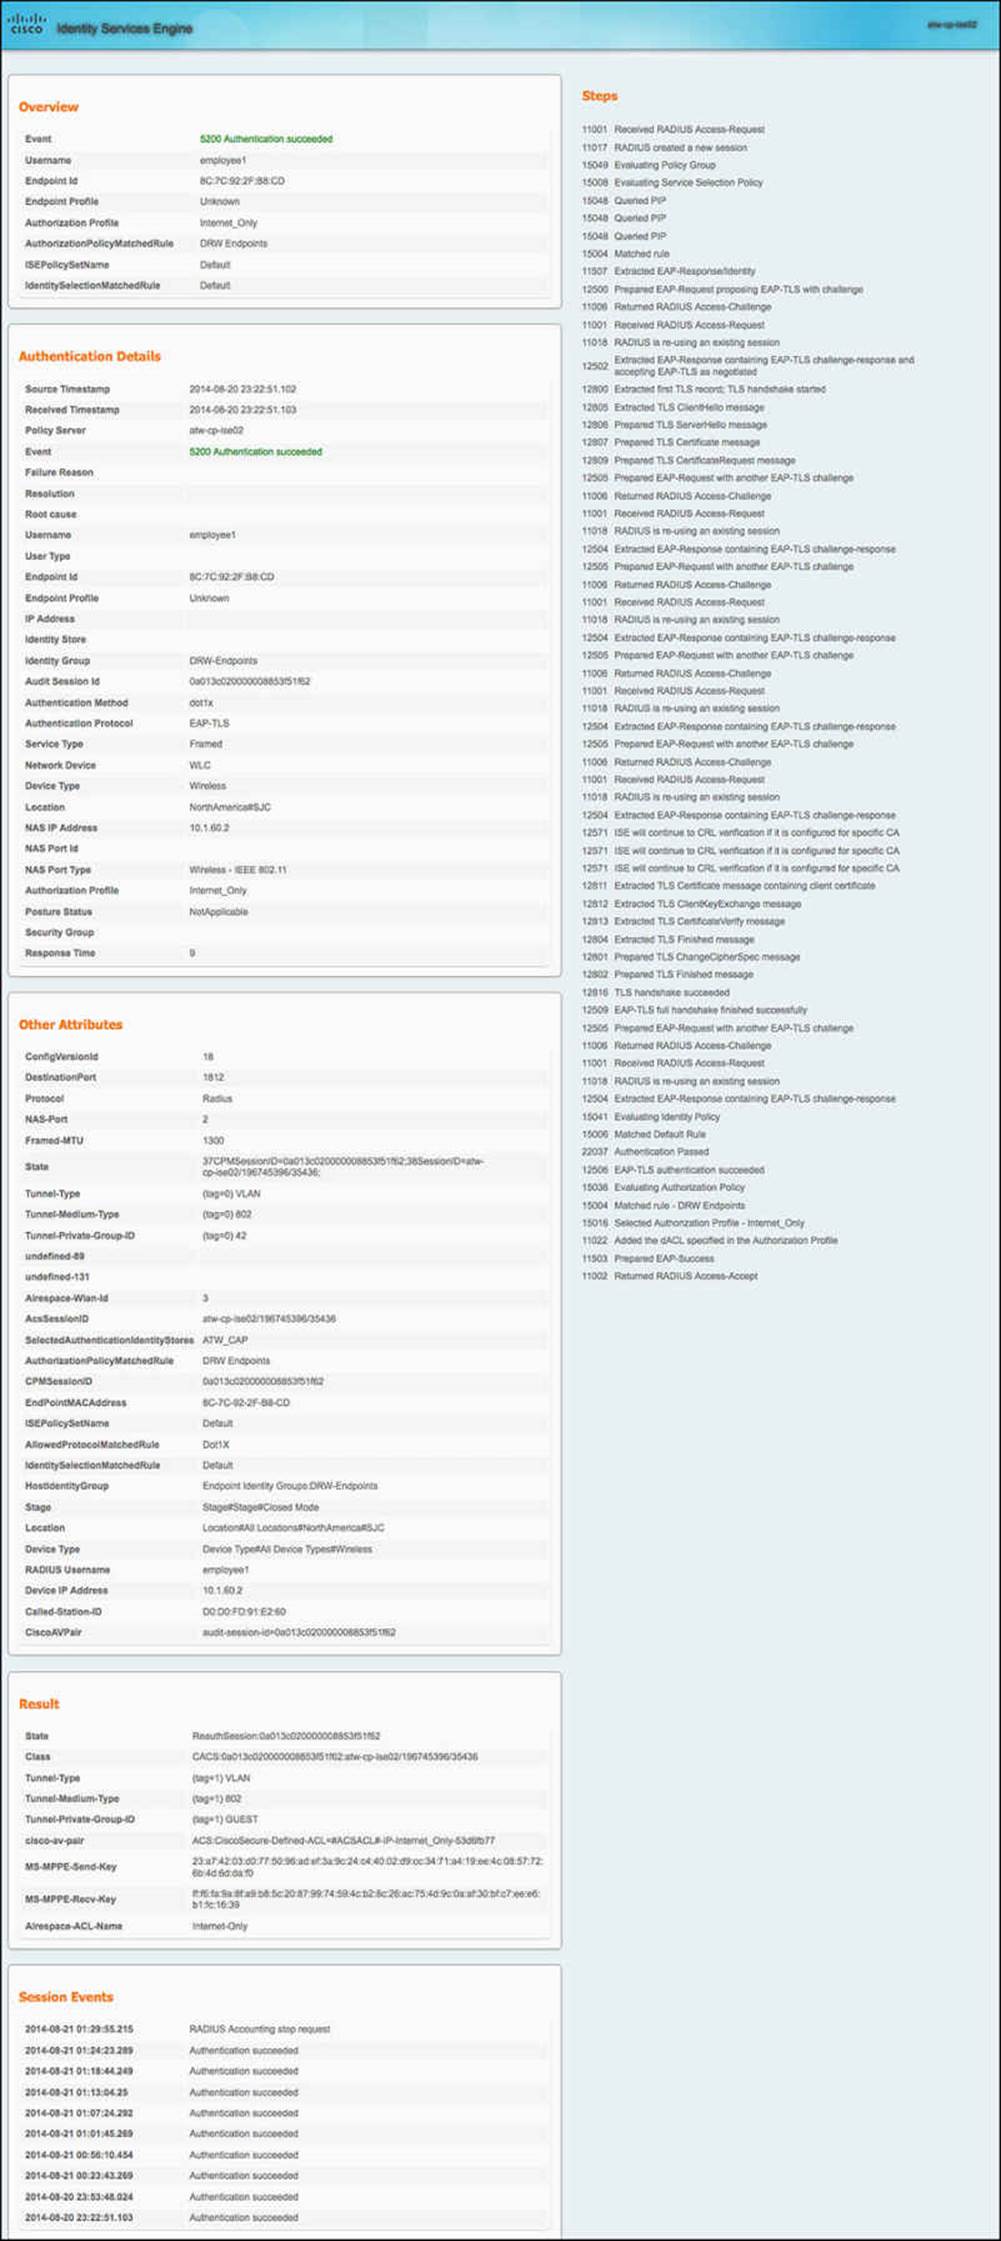
Figure 16-20 Full authentication details report.
This completes the chapter on certificate-based authentications. The topic will be covered again in Chapter 17.
Exam Preparation Tasks
Review All Key Topics
Review the most important topics in the chapter, noted with the key topics icon in the outer margin of the page. Table 16-2 lists a reference of these key topics and the page numbers on which each is found.
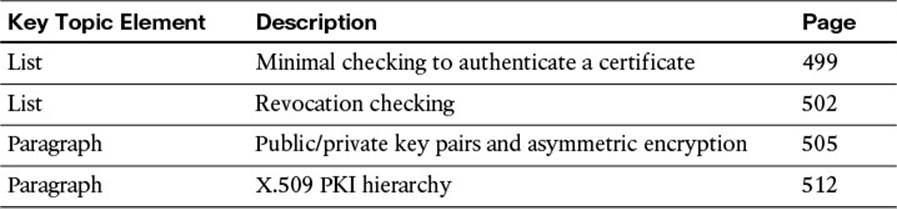
Table 16-2 Key Topics for Chapter 16
Define Key Terms
certificate
trusted authority
certificate authority
PKI
key-pair
public key
private key
CAP
Principle Username X.509 Attribute