CCNP Security SISAS 300-208 Official Cert Guide (2015)
Part II: “The Triple A” (Authentication, Authorization, and Accounting)
Chapter 4. EAP Over LAN (Also Known As 802.1X)
This chapter covers the following exam topics:
![]() EAP Types
EAP Types
![]() Describe Supplicant, Authenticator, Authentication Server
Describe Supplicant, Authenticator, Authentication Server
![]() Supplicant Options
Supplicant Options
![]() Network Access Devices
Network Access Devices
Back in the early 2000s the IEEE standardized a solution for port-based network access control, known as 802.1X. It was predicted to revolutionize networking as we knew it, and no device would be able to plug in and communicate on a network without the user identifying himself and being authorized again. Well, here we are a decade later and 802.1X is really starting to catch on.
The three fundamental components of 802.1X are the supplicant, the authenticator, and the authentication server. This chapter explains those components, along with critical elements to an 802.1X solution, such as the various EAP types that can be used. A perfect companion topic for EAP types is the exploration of supplicants, which wraps up our chapter.
“Do I Know This Already?” Quiz
The “Do I Know This Already?” quiz enables you to assess whether you should read this entire chapter thoroughly or jump to the “Exam Preparation Tasks” section. If you are in doubt about your answers to these questions or your own assessment of your knowledge of the topics, read the entire chapter. Table 4-1 lists the major headings in this chapter and their corresponding “Do I Know This Already?” quiz questions. You can find the answers in Appendix A, “Answers to the ‘Do I Know This Already?’ Quizzes.”
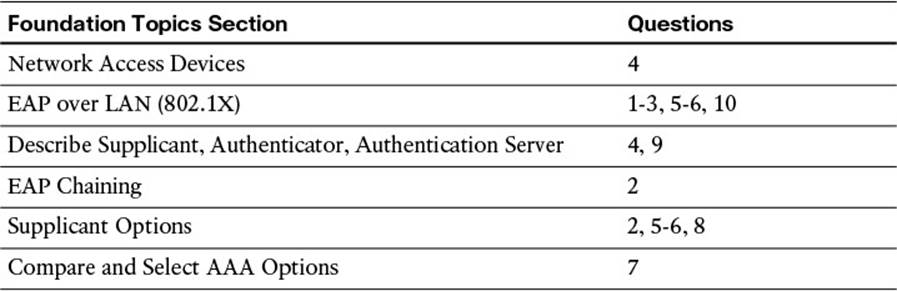
Table 4-1 “Do I Know This Already?” Section-to-Question Mapping
Caution
The goal of self-assessment is to gauge your mastery of the topics in this chapter. If you do not know the answer to a question or are only partially sure of the answer, you should mark that question as wrong for the purposes of the self-assessment. Giving yourself credit for an answer you correctly guess skews your self-assessment results and might provide you with a false sense of security.
1. Which of the following is true?
a. The authenticator decides whether the supplicant is allowed on the network.
b. The EAP communication occurs between the supplicant and the authentication server.
c. The supplicant uses RADIUS to communicate the user’s identity to the authentication server.
d. The authenticator uses EAP to send the user’s credentials to the authentication server.
2. Which supplicant(s) is capable of EAP chaining?
a. Windows Native Supplicant
b. Cisco AnyConnect NAM
c. Cisco Secure Services Client (CSSC)
d. Odyssey Client
3. What is the purpose of an outer identity?
a. The outer identity is used for dual-factor authentications such as a username/password combined with a one-time password (OTP).
b. The outer identity provides a mechanism to modify the actual identity of the end user or device to allow for identity spoofing.
c. The outer identity provides a mechanism to authenticate the identity of the endpoint during the tunnel establishment phase.
d. The outer identity represents the machine, whereas the inner identity represents the user during EAP chaining.
4. True or False? IEEE 802.1X may use TACACS+ to communicate the EAP identity to the authentication server.
a. True
b. False
5. True or False? The supplicant is required to trust the certificate of the authentication server before it will form the TLS tunnel within which the EAP transaction will occur.
a. True
b. False
6. What is the name of the “secure cookie” used with EAP-FAST that can be used in lieu of a certificate, or even in addition to a certificate?
a. Protected password file (PPF)
b. Shadow credential file (SCF)
c. Private authorization credential (PAC)
d. Protected access credential (PAC)
7. True or False? MSCHAPv2 may be used to perform machine authentication with an LDAP connection to Active Directory.
a. True
b. False
8. True or False? A machine authentication may use EAP-FAST.
a. True
b. False
9. What are the three main components of IEEE 802.1X?
a. Agent, broker, authentication server
b. Supplicant, authorizer, authorization server
c. Authentication server, supplicant, authenticator
d. EAP, RADIUS, TLS
10. True or False? A tunneled EAP type is able to use native EAP types as its inner method.
a. True
b. False
Foundation Topics
Extensible Authentication Protocol
Extensible Authentication Protocol (EAP) is an authentication framework that defines the transport and usage of identity credentials. EAP encapsulates the usernames, passwords, certificates, tokens, one-time password (OTPs), and so on that a client is sending for purposes of authentication.
EAP has become the de facto standard of authentication protocols. It is used for many authentication methods including VPN, but most importantly IEEE 802.1X is a ratified standard for using EAP over LAN (EAPoL).
EAP over LAN (802.1X)
IEEE 802.1X (commonly referred to as Dot1x) is defined as a standard for “port-based network access control” for local area and metropolitan area networks. The standardization of a network-based authentication framework was the catalyst for all identity-based networking that we see today. The three main components to 802.1X are the supplicant, the authenticator, and the authentication server; these are illustrated in Figure 4-1 and described in Table 4-2.

Figure 4-1 Components of 802.1X.

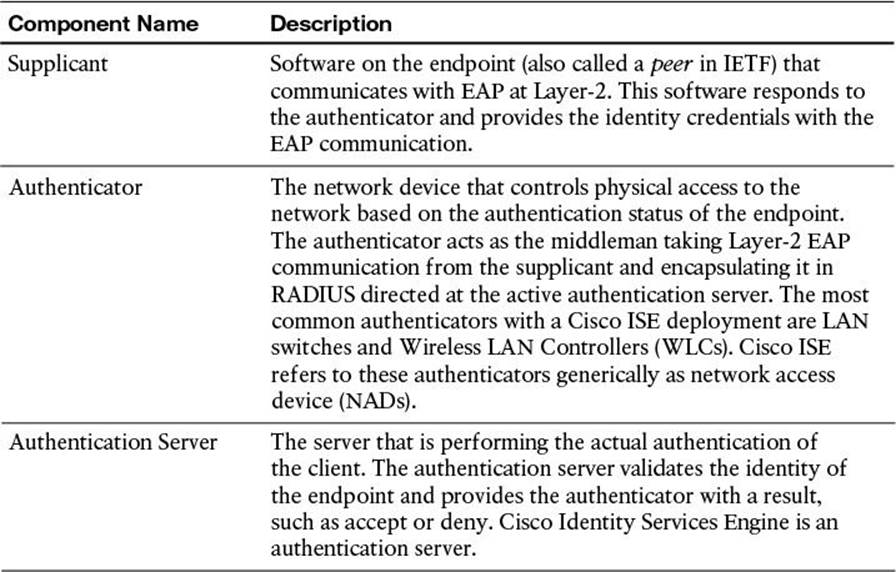
Table 4-2 802.1X Components
While reviewing Figure 4-1 and Table 4-2, keep in mind that the authenticator (switch or WLC) acts as the middleman or proxy. The actual EAP identity exchange and authentication is occurring between the supplicant and the authentication server. The switch or WLC has no idea of which EAP type is in use or whether the user’s credentials are valid. It simply takes the unmodified EAP frame and encapsulates it within the RADIUS packet sent to the authentication server and authorizes the port if the authentication server tells it to. Therefore, the EAP authentication itself is completely transparent to the authenticator. Figure 4-2 displays the communication through a successful authentication.
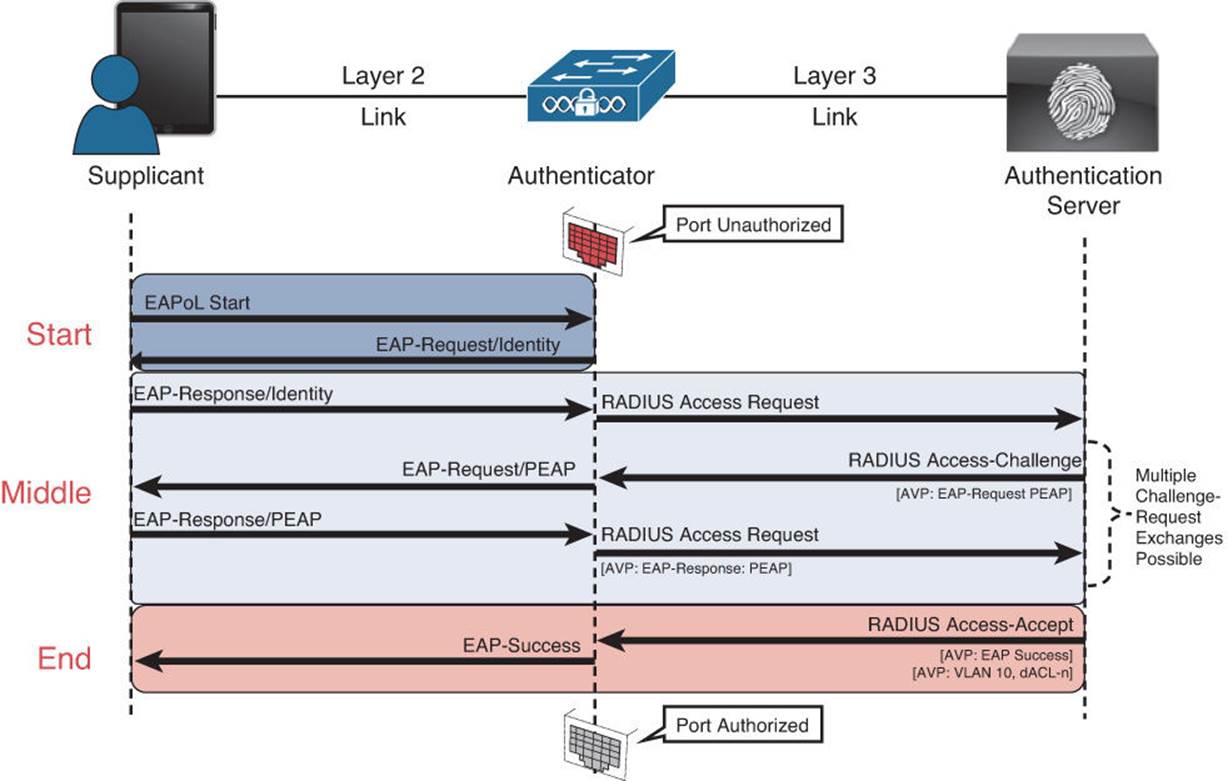
Figure 4-2 Authentication communication.
The authentication can be initiated by either the authenticator or the supplicant. The authenticator initiates authentication when the link state changes from down to up or periodically as long as the port remains up and unauthenticated. The switch sends an EAP request/identity frame to the endpoint to request its identity. Upon receipt of the frame, the client’s supplicant responds with an EAP response/identity frame. However, enhancements were made to allow the supplicant to trigger the authenticator to request an identity by sending an EAPoL_Start message at any time. This enhancement provided for a much better end-user experience with 802.1X.
EAP Types
There are many EAP types, and each one has its own benefit and downside. The EAP type defines the authentication mechanism to be used with EAP, which is usually self-evident in its name. Most of EAP types are not discussed in this book, due to lack of adoption or lack of inclusion in the exam blueprint, such as EAP-Kerberos.
The EAP types can be broken down into two categories: native EAP types and tunneled EAP types. A tunneled EAP type simply uses a nontunneled EAP inside a Transport Layer Security (TLS) tunnel between the supplicant and the authenticator. See Figures 4-3 and 4-4 for a graphical representation of native and tunneled EAPs.
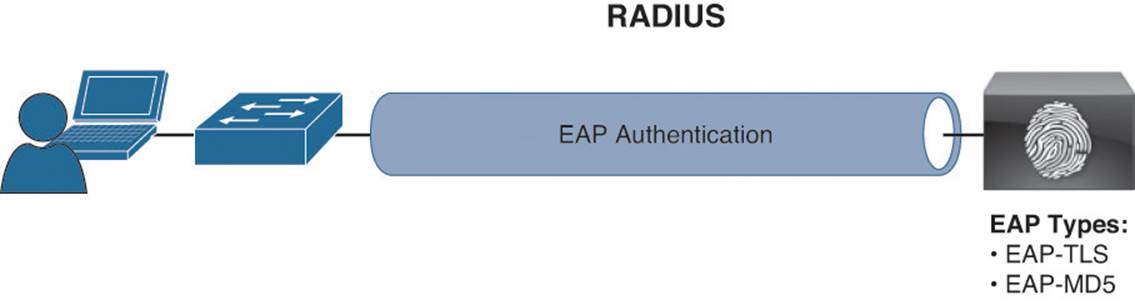
Figure 4-3 Native EAP methods.
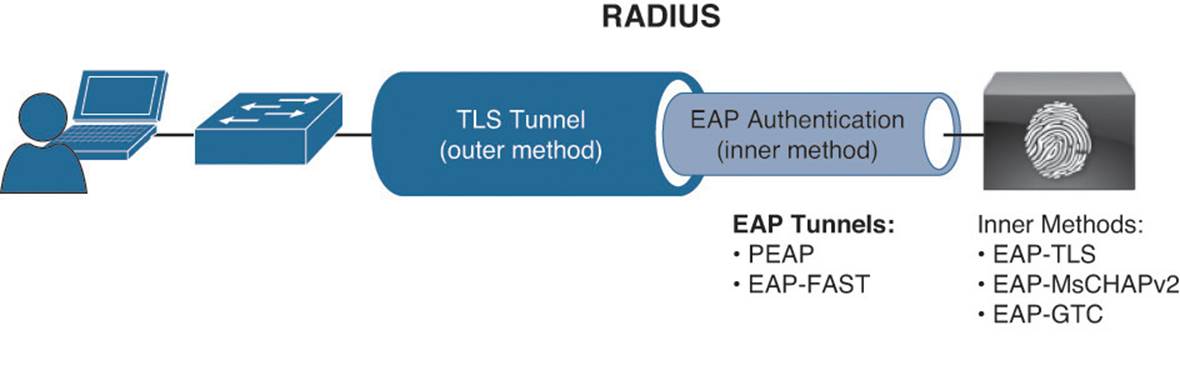
Figure 4-4 Tunneled EAP methods.
Native EAP Types (Nontunneled EAP)
Native EAP types include the following:
![]() EAP-MD5—Uses a message digest algorithm to hide the credentials in a HASH. The HASH is sent to the server where it is compared to a local hash to see whether the credentials were accurate. However, EAP-MD5 does not have a mechanism for mutual authentication. That means the server is validating the client, but the client does not authenticate the server (that is, it does not check to see whether it should trust the server). EAP-MD5 is common on IP phones, and it is also possible that some switches will send MAC authentication bypass (MAB) requests using EAP-MD5.
EAP-MD5—Uses a message digest algorithm to hide the credentials in a HASH. The HASH is sent to the server where it is compared to a local hash to see whether the credentials were accurate. However, EAP-MD5 does not have a mechanism for mutual authentication. That means the server is validating the client, but the client does not authenticate the server (that is, it does not check to see whether it should trust the server). EAP-MD5 is common on IP phones, and it is also possible that some switches will send MAC authentication bypass (MAB) requests using EAP-MD5.
![]() EAP-TLS—An EAP type that uses TLS to provide the secure identity transaction. This is similar to SSL and the way encryption is formed between your web browser and a secure website. EAP-TLS has the benefit of being an open IETF standard and is considered to be universally supported.
EAP-TLS—An EAP type that uses TLS to provide the secure identity transaction. This is similar to SSL and the way encryption is formed between your web browser and a secure website. EAP-TLS has the benefit of being an open IETF standard and is considered to be universally supported.
EAP-TLS uses X.509 certificates and provides the ability to support mutual authentication, where the client must trust the server’s certificate, and vice versa. It is considered among the most secure EAP types because password capture is not an option; the endpoint must still have the private key.
Note
EAP-TLS is quickly becoming the EAP type of choice when supporting BYOD in the Enterprise.
![]() EAP-MSCHAPv2—An EAP type in which the client’s credentials are sent to the server encrypted within an MSCHAPv2 session. This allows for simple transmission of username and password, or even computer name and computer passwords, to the RADIUS server, which in turn authenticates them to Active Directory (AD).
EAP-MSCHAPv2—An EAP type in which the client’s credentials are sent to the server encrypted within an MSCHAPv2 session. This allows for simple transmission of username and password, or even computer name and computer passwords, to the RADIUS server, which in turn authenticates them to Active Directory (AD).
Note
Cisco ISE does not currently support EAP-MSCHAPv2 as a native EAP, only within a tunneled EAP.
![]() EAP-GTC—EAP-Generic Token Card (GTC) was created by Cisco as an alternative to MSCHAPv2 that allows generic authentications to virtually any identity store, including OTP token servers, LDAP, Novell E-Directory, and more.
EAP-GTC—EAP-Generic Token Card (GTC) was created by Cisco as an alternative to MSCHAPv2 that allows generic authentications to virtually any identity store, including OTP token servers, LDAP, Novell E-Directory, and more.
Note
Cisco ISE does not currently support EAP-GTC as a native EAP, only when it is inside a tunneled EAP.
Tunneled EAP Types
The previously mentioned native EAP types send their credentials immediately, while tunneled EAP types form an encrypted tunnel first and then transmit the credentials within that tunnel.

Note
It is important to understand that tunneled EAP methods work similarly to the way a secure tunnel is formed between a web browser and a secure website (such as a banking site). The tunnel is formed first, normally using only the certificate of the server (one way trust); then the user enters her banking login credentials within that secure tunnel.
![]() PEAP—Protected EAP (PEAP) was originally proposed by Microsoft and is an EAP tunnel type that has quickly become the most popular and widely deployed EAP method in the world. PEAP forms a potentially encrypted TLS tunnel between the client and server using the x.509 certificate on the server in much the same way the SSL tunnel is established between a web browser and a secure website. After the tunnel has been formed, PEAP uses another EAP type as an “inner method,” authenticating the client using EAP within the outer tunnel.
PEAP—Protected EAP (PEAP) was originally proposed by Microsoft and is an EAP tunnel type that has quickly become the most popular and widely deployed EAP method in the world. PEAP forms a potentially encrypted TLS tunnel between the client and server using the x.509 certificate on the server in much the same way the SSL tunnel is established between a web browser and a secure website. After the tunnel has been formed, PEAP uses another EAP type as an “inner method,” authenticating the client using EAP within the outer tunnel.
![]() EAP-MSCHAPv2—Using this inner method, the client’s credentials are sent to the server encrypted within an MSCHAPv2 session. This is the most common inner method because it allows for simple transmission of username and password, or even computer name and computer password, to the RADIUS server, which in turn authenticates them to Active Directory.
EAP-MSCHAPv2—Using this inner method, the client’s credentials are sent to the server encrypted within an MSCHAPv2 session. This is the most common inner method because it allows for simple transmission of username and password, or even computer name and computer password, to the RADIUS server, which in turn authenticates them to Active Directory.
![]() EAP-GTC—This inner method was created by Cisco as an alternative to MSCHAPv2 and enables generic authentications to virtually any identity store, including OTP token servers, LDAP, Novell E-Directory, and more.
EAP-GTC—This inner method was created by Cisco as an alternative to MSCHAPv2 and enables generic authentications to virtually any identity store, including OTP token servers, LDAP, Novell E-Directory, and more.
![]() EAP-TLS—While rarely used, and not widely known, PEAP is capable of using EAP-TLS as an inner method.
EAP-TLS—While rarely used, and not widely known, PEAP is capable of using EAP-TLS as an inner method.
![]() EAP-FAST—Flexible Authentication via Secure Tunnel (FAST) is similar to PEAP. FAST was created by Cisco Systems as an alternative to PEAP that enables faster reauthentications and supports faster wireless roaming. Just like PEAP, FAST forms a TLS outer tunnel and then transmits the client credentials within that TLS tunnel. Where FAST differs from the PEAP is the ability to use protected access credentials (PACs). A PAC can be thought of like a secure “cookie,” stored locally on the host as proof of a successful authentication.
EAP-FAST—Flexible Authentication via Secure Tunnel (FAST) is similar to PEAP. FAST was created by Cisco Systems as an alternative to PEAP that enables faster reauthentications and supports faster wireless roaming. Just like PEAP, FAST forms a TLS outer tunnel and then transmits the client credentials within that TLS tunnel. Where FAST differs from the PEAP is the ability to use protected access credentials (PACs). A PAC can be thought of like a secure “cookie,” stored locally on the host as proof of a successful authentication.
![]() EAP-MSCHAPv2—Using this inner method, the client’s credentials are sent to the server encrypted within an MSCHAPv2 session. This is the most common inner method because it allows for simple transmission of username and password, or even computer name and computer password to the RADIUS server, which in turn authenticates them to Active Directory.
EAP-MSCHAPv2—Using this inner method, the client’s credentials are sent to the server encrypted within an MSCHAPv2 session. This is the most common inner method because it allows for simple transmission of username and password, or even computer name and computer password to the RADIUS server, which in turn authenticates them to Active Directory.
![]() EAP-GTC—This inner method was created by Cisco as an alternative to MSCHAPv2 that enables generic authentications to virtually any identity store, including OTP token servers, LDAP, Novell E-Directory, and more.
EAP-GTC—This inner method was created by Cisco as an alternative to MSCHAPv2 that enables generic authentications to virtually any identity store, including OTP token servers, LDAP, Novell E-Directory, and more.
![]() EAP-TLS—EAP-FAST is capable of using EAP-TLS as an inner method. This has become quite popular with EAP chaining.
EAP-TLS—EAP-FAST is capable of using EAP-TLS as an inner method. This has become quite popular with EAP chaining.
With tunneled EAPs, there is a concept of inner and outer identities. The inner identity is easiest to explain. It is the user’s or device’s actual identity credentials sent with the native EAP protocol. The outer identity is typically set to “anonymous.” It’s the identity that is used between the supplicant and the authentication server for the initial TLS tunnel setup.
Cisco ISE is able to read that outer identity and use it to help make identity store selection decisions. Put simply, that outer identity can contain information (such as domain name) that tells Cisco ISE to submit the credentials to Active Directory, LDAP, or some other identity store. Most supplicants hide this option from the end user, and only administrators see the outer identity. However, one supplicant that does expose it to the end user is the native Android supplicant, as shown in Figure 4-5. One point of humor to this author is that the Android supplicant refers to the outer identity as the “Anonymous Identity,” which is an oxymoron.
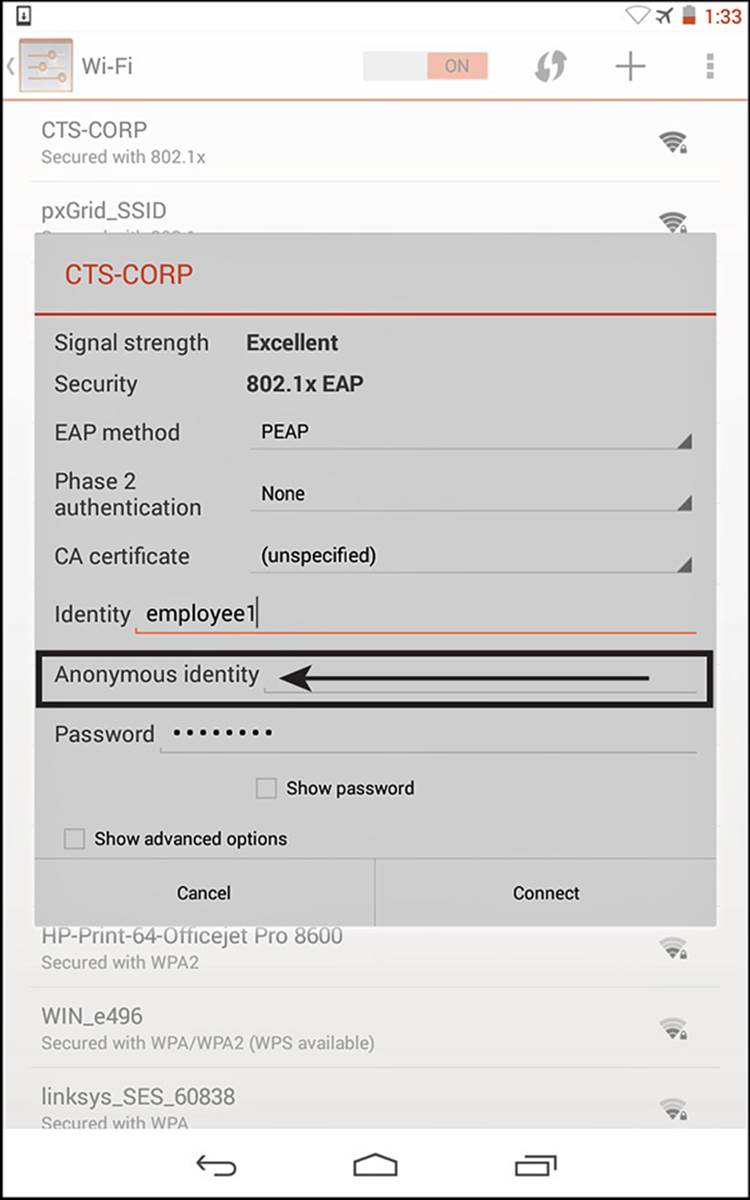
Figure 4-5 Android supplicant exposes the outer identity.
Summary of EAP Authentication Types
Table 4-3 shows a comparison of common EAP authentication types.
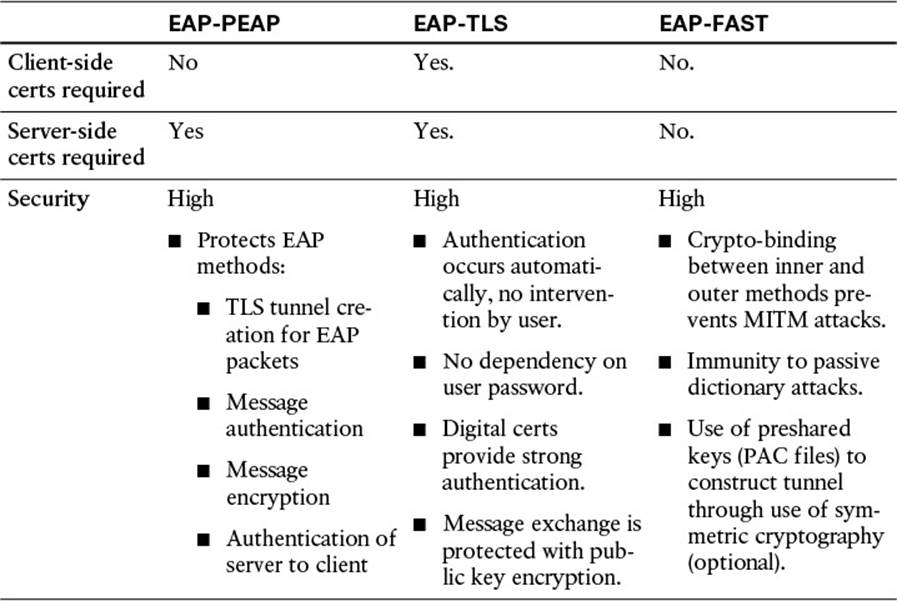
Table 4-3 EAP Comparison
EAP Authentication Type Identity Store Comparison Chart
Selecting the appropriate EAP type is dependent on the operating system, 802.1X supplicant, and supported back-end credential database or identity store. The comparison is displayed in Table 4-4.

Table 4-4 EAP Authentication Type Identity Store Comparison
Network Access Devices
Cisco ISE refers to the authenticator role as a network access device (NAD). The NAD serves multiple roles. Yes, it is an authenticator for 802.1X and will proxy EAP communications from a supplicant to the authentication server. The NAD is also what is commonly referred to as a policy enforcement point (PEP). The NAD is responsible for enforcing whatever authorization result it receives from the authentication server (Cisco ISE in this case).
In simple terms, a NAD is the Access Layer device but can be any device that is going to send RADIUS authentication requests to Cisco ISE. Common NAD types include
![]() Wired Ethernet switches
Wired Ethernet switches
![]() Wireless LAN Controllers
Wireless LAN Controllers
![]() Cisco adaptive security appliances (ASAa)
Cisco adaptive security appliances (ASAa)
Enforcement types are covered in more detail, but to provide a little color to this subject, common enforcement types include the following:
![]() Dynamic VLAN (dVLAN) assignment
Dynamic VLAN (dVLAN) assignment
![]() Downloadable access control lists (dACLs)
Downloadable access control lists (dACLs)
![]() Security group tags (SGTs)
Security group tags (SGTs)
![]() Airespace ACL names (for use with Wireless LAN Controllers)
Airespace ACL names (for use with Wireless LAN Controllers)
![]() URL redirections
URL redirections
Network access devices are an incredibly important part within the authentication system known as secure access. It is doing so much more than simply passing frames at Layer-2. These devices are the security enforcement devices; they apply the policy to the end user. These devices are doing functionality that used to be available only in overlay appliances, such as URL redirection and enabling agent discovery of the active posture server. These topics are covered in much more depth; however, it is important to stress just how key these devices actually are to the success of an 802.1X deployment. Intelligence at the edge is an absolute requirement to ensure success.
Supplicant Options
The bulk of this chapter is about 802.1X itself. That would never be complete without discussing the client side of the authentication flow, the supplicant. As described earlier in the chapter, a supplicant is the software on an endpoint that understands how to communicate with EAP on the LAN. A supplicant must be configured to use credentials, either stored credentials (such as a certificate) or with the user’s username and password.
Windows Native Supplicant
The single most common supplicant in wired networks is the Windows native supplicant. One reason this supplicant is so popular is that it is built in to the most common business desktop operating system in the world. Besides that, it offers one truly beneficial feature that no other supplicant has been able to compete with: It is fully controllable from a central Active Directory group policy. That fact alone has made the supplicant appear very attractive to desktop managers of corporations all over the world.
Note
In the authors’ experience, companies tend to start off their 802.1X projects utilizing this supplicant. However, the first time any major troubleshooting is required, they quickly start looking at more premium supplicants such as Cisco’s AnyConnect NAM or the Odyssey client.
To use the Windows native supplicant, the service must first be started. It is unintuitively named Wired AutoConfig, and the default state of the service is manual. This will need to be changed to Automatic for the supplicant to be enabled at each boot. There is also a WLAN AutoConfig service for the wireless supplicant, which is set to automatic by default.
At this point in the chapter, we will take a guided tour of the Windows native supplicant. This exercise will hopefully drive home some of the points made previously, surrounding EAP types and inner versus outer methods. If you have a Windows 7 or Windows 8 device at your disposal, feel free to follow along.
From the Windows services control applet, do the following:
Step 1. Locate Wired AutoConfig from the list of services as shown in Figure 4-6, and double-click it to enter the service properties.
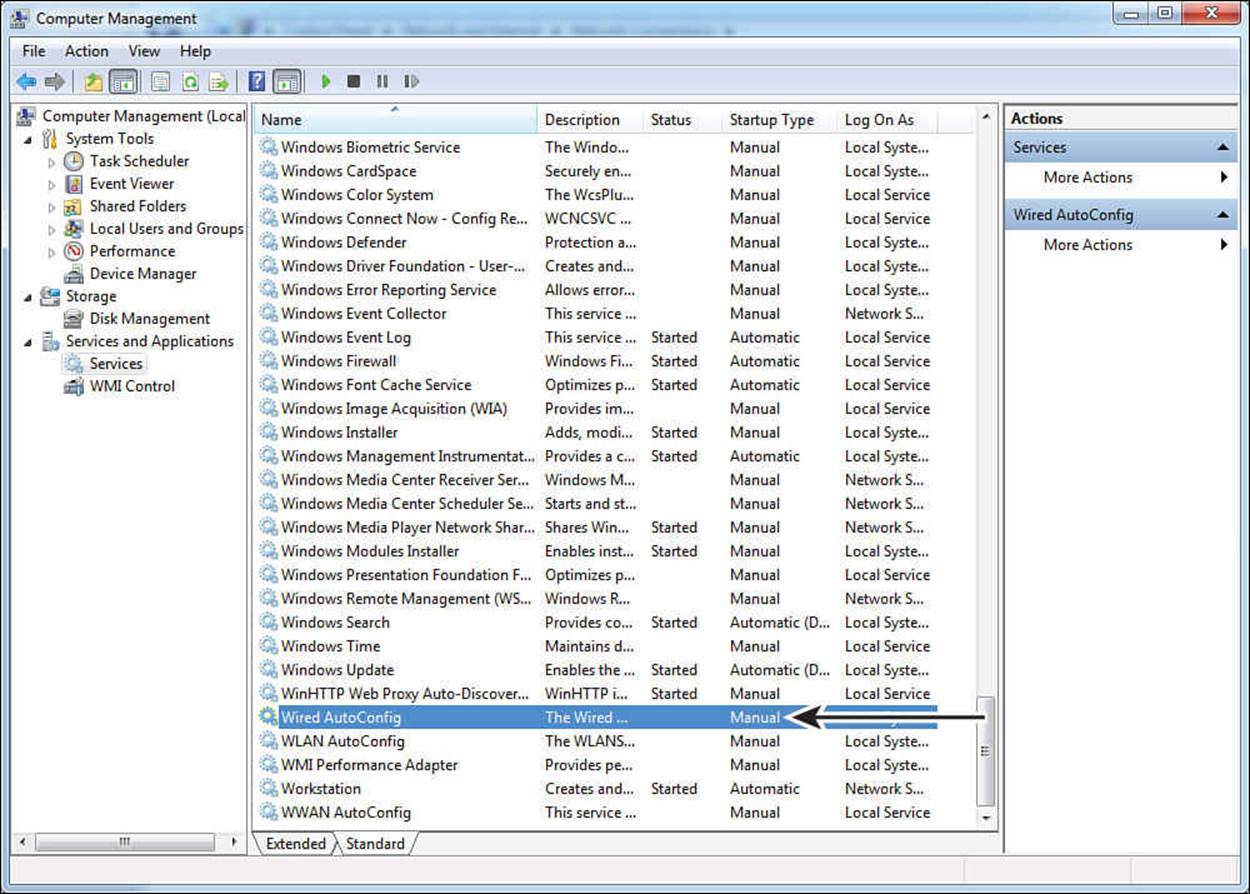
Figure 4-6 Windows service control applet.
Step 2. Change the startup type value to Automatic, as shown in Figure 4-7.
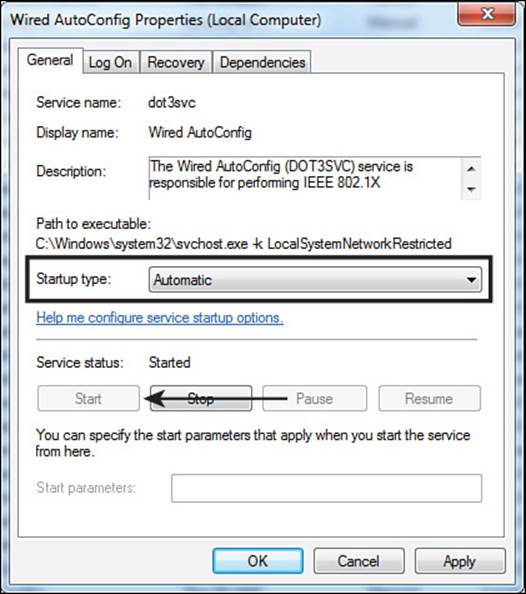
Figure 4-7 Wired AutoConfig service properties.
Step 3. Click Start to enable the supplicant. This will also populate the wired NIC properties page with an authentication tab, as shown in Figure 4-8.
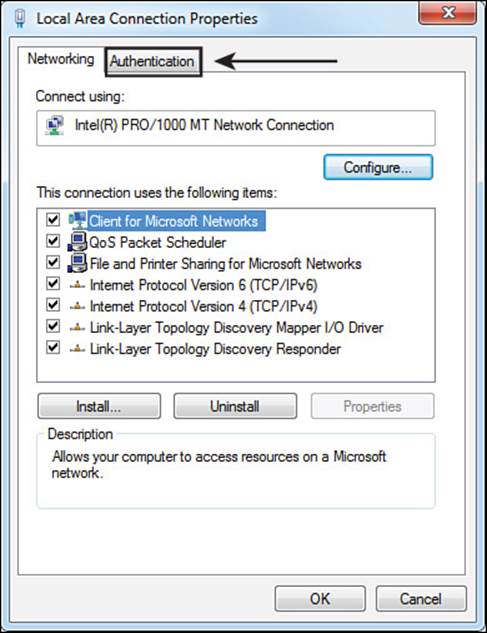
Figure 4-8 Wired AutoConfig service properties.
Navigate to Control Panel > Network and Internet > Network Connections.
Step 4. Select the Authentication tab, as shown in Figure 4-9.
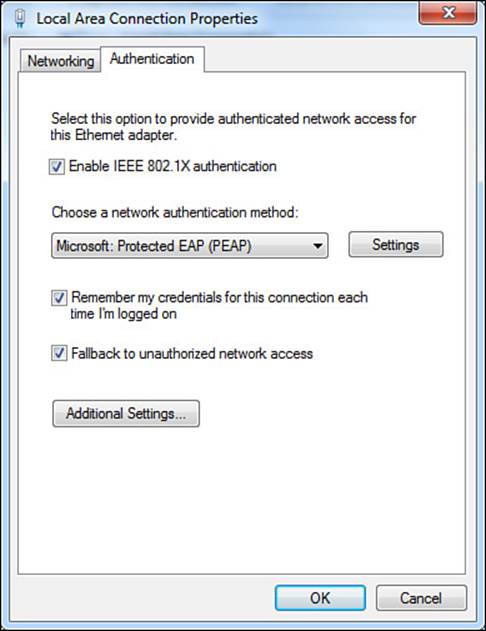
Figure 4-9 Authentication tab.
As shown in Figure 4-9, the Authentication tab has a check box to enable or disable IEEE 802.1X authentication. It also has a check box to allow the supplicant to store (remember) the credentials, thus not prompting the end user for his credentials at each network login.
The last check box is to Fallback to Unauthorized Network Access. This setting basically states that if the network device is not an authenticator (that is, it does not send EAP identity requests), the network connection should still work. If this setting was unchecked and the user plugs into a non–802.1X-enabled switch, the connection would be treated as if the authentication failed and the user would not have network access. It’s a good idea to leave this setting enabled to ensure positive user experience.
There are two more areas for additional settings. The first is the Settings button for the selected network authentication method. As shown in Figure 4-10, the default network authentication method is to use PEAP. Do the following:

Figure 4-10 Protected EAP properties.
Step 1. Click the Settings button. The Protected EAP Properties page opens, as shown in Figure 4-10.
The first thing in the Protected EAP Properties page that should stand out is the check box for Validate Server Certificate, as shown in Figure 4-10. With this setting enabled, the supplicant is required to trust the certificate from the RADIUS server (802.1X authentication server) before it will form the secure TLS tunnel. Disabling this setting turns off that level of authentication and the supplicant would form a tunnel and send EAP credentials to any RADIUS server.
An option to specify the servers that are allowed is available, as well as which certificates to trust. This setting provides even more strict security control over which RADIUS servers are allowed to receive the supplicant’s credentials, although it is rarely used because of the ever-changing environments at customers.
In the Trusted Root Certificate Authorities area, the administrator is able to select which specific root CAs are trusted for authentication. The next check box is to not prompt a user to authorize new servers or trusted certificate authorities. By leaving this check box disabled, a user will not be prompted to trust a certificate that is not explicitly trusted in the list above the check box.
In the Select Authentication Method area of the properties page, the administrator is provided with an option to select the inner method for PEAP, which can be either Secured Password (EAP-MSCHAPv2) or Smart Card or Other Certificate (which will use EAP-TLS as the inner method for certificate authentication).
Step 2. Click Configure for Secured Password (EAP-MSCHAPv2) to bring up the properties page, as shown in Figure 4-11.
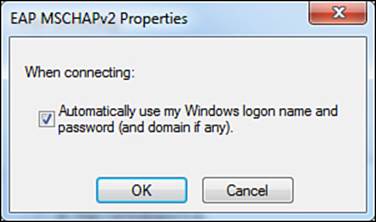
Figure 4-11 EAP MSCHAPv2 properties.
The only configurable option for this inner method is to automatically use the Windows logon credentials, also called single sign-on.
Step 3. Click OK to close the EAP-MSCHAPv2 Properties window.
Step 4. Change the Select Authentication Method to Smart Card or Other Certificate, and click the Configure button to bring up the properties window.
The properties window shown in Figure 4-12 give the administrator the option to select the use of a smart card or a certificate that is stored on the local computer. Along with that choice is a selection for simple certificate selection. A windows machine might be storing many different certificates that have multiple purposes. By enabling simple certificate selection, the list of certificates will be filtered down to only identity certificates, thereby simplifying the experience of choosing the correct certificate.

Figure 4-12 EAP MSCHAPv2 properties.
Just like the outer method of PEAP, this inner method of (EAP-TLS) has the options to validate server certificates, specify specific servers to trust, allow the administrator to select trusted root certificate authorities, and control the prompting to trust new servers. There is even an ability to specify a different username for this connection (inner identity).
Step 5. Click OK or Cancel to return to the Protected EAP Properties page.
Step 6. Return the Select Authentication Method to the default of Secured Password, as shown in Figure 4-13.
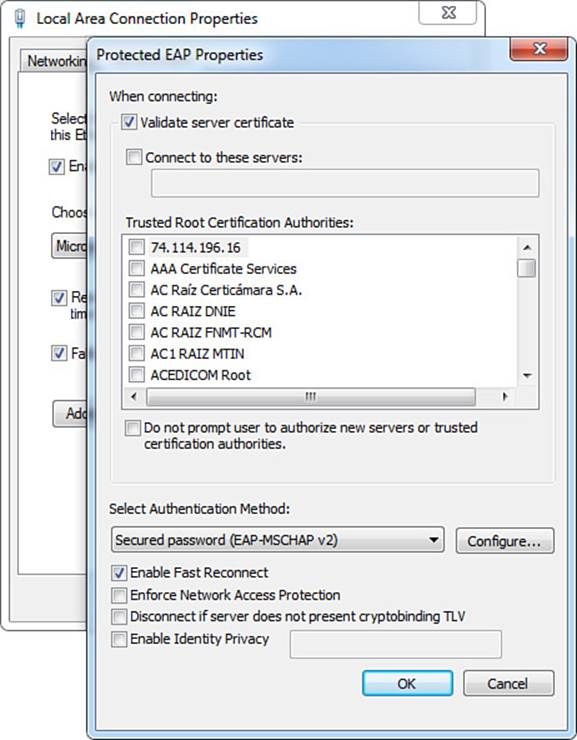
Figure 4-13 Back to the protected EAP properties.
The only other relevant setting in the Protected EAP properties page is the Enable Identity Privacy check box. This option allows the administrator to set the outer identity. Leaving this unchecked causes the outer identity to be set to anonymous.
Step 7. Click Cancel to return to the Authentication tab, as shown in Figure 4-14.
Figure 4-14 Back to the Authentication tab.
The only remaining option to cover is the Additional Settings button. This is where the supplicant has some additional authentication options related to mode and sign-on timing.
Step 8. Click the Additional Settings button. The advanced settings are displayed as shown in Figure 4-15.
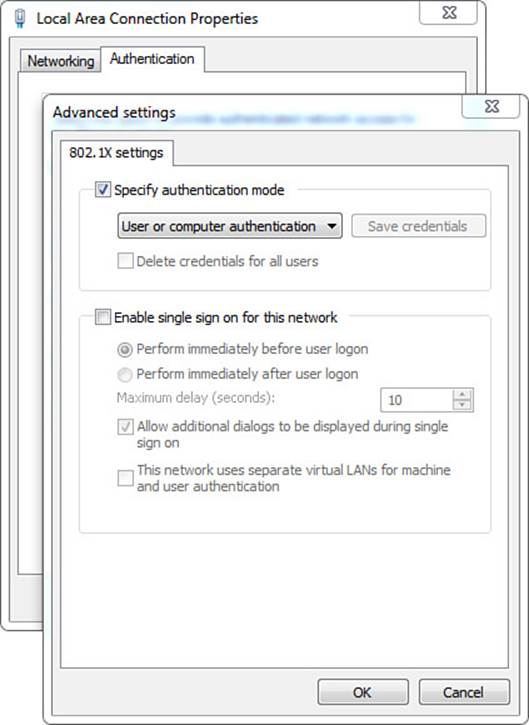
Figure 4-15 Advanced Settings tab.
Let us cover these settings in reverse order, starting with Enable Single Sign On for This Network first. This setting enables the administrator to allow or disallow the logging in to the workstation before the 802.1X authentication occurs. Selecting Perform Immediately Before User Logonsends the EAPoL_Start message and allows the supplicant to perform the EAP exchange before allowing the user to interact with the workstation interface (that is, before the start button and desktop are displayed to the end user). The maximum delay setting puts a timer on how long the supplicant should wait for success before allowing the user to interact with the desktop or logging the user off.
The Perform Immediate After User Logon option enables the user to interact with the desktop immediately, which could include the ability to respond to prompts where the supplicant is asking the user to enter the username and password. One last choice on the bottom half of this tab is This Network Uses Separate Virtual LANs for Machine and User Authentication. This option will make more sense after you have read the next section, but ultimately it forces the supplicant to do an IP release/renew and attempt to get a new IP address when the user logs in.
Now, let’s return to the first item of note in the Advanced settings tab, which is the Specify Authentication Mode check box. The options under this check box are User or Computer Authentication, Computer Authentication, User Authentication, and Guest Authentication (see Figure 4-16).
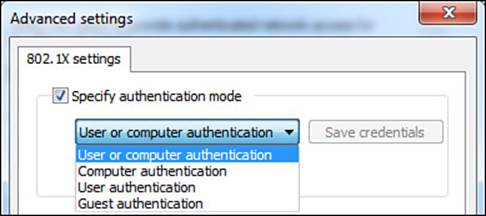
Figure 4-16 Authentication mode choices.
This concludes our guided tour through the Windows native supplicant, and it is the perfect time to introduce a new topic that is specific to Microsoft Windows operating systems: user authentication versus computer authentication.
User Authentication
This is the normal authentication that one thinks of when discussing 802.1X and network access control. It provides the identity credentials of the user to the authentication server, allowing for role-based access control to the network. The buzz on the street with the 802.1X standard was all about knowing who was accessing your network before allowing them onto the network.
User authentication on a Microsoft Windows device is able to use a username, password, user-issued certificate, or even a smart card. With these Windows devices there is a separate certificate store for user-issued certificates. Each user who logs in to a Windows workstation will have her own certificate store, and therefore authenticate differently to the network.
Machine Authentication (a.k.a. Computer Authentication)
Microsoft Windows workstations have a very powerful management system, known as Active Directory. Maybe you’ve heard of it? Well, AD needs to remain in contact with the computers it manages for policy updates and other management tasks. The IEEE 802.1X standard came out, and with no user logged in to the computer, no network access was granted. This concept broke the communication between the AD managed computer, as well as not allowing the user’s Kerberos authentication to reach Active Directory, which didn’t allow the credentials to be passed down to the supplicant itself—especially in the instances where the user’s password was expired.
This should sound an awful lot like a denial of service (DoS) because it truly was. Microsoft (quite brilliantly) designed a way to solve this problem and prevent this chicken-and-egg scenario. They created multiple states for their supplicant: a machine state and a user state.
Whenever there was no interactive user logged in to the workstation (that is, no one had pressed CTRL-ALT-DEL and logged in to the computer), the machine was able to log in to the network with its own credentials. As soon as a user interactively logged in to the system, the supplicant would send a new EAPoL_Start message into the network, triggering a whole new authentication of the user’s credentials.
Active Directory negotiates a password with a Windows workstation when it joins AD, which the machine-state supplicant is able to use as the credential. Additionally, the computer maintains its own system store for certificates that is separate from the users’ certificate stores. Therefore, machine authentication (also called computer authentication) is capable of using a computer name and password (PEAP-MSCHAPv2) or a machine certificate (EAP-TLS, PEAP-EAP-TLS).
Figure 4-17 illustrates the computer starting with machine authentication, and then a user logging in to the system, thereby causing a new authentication with user authentication.
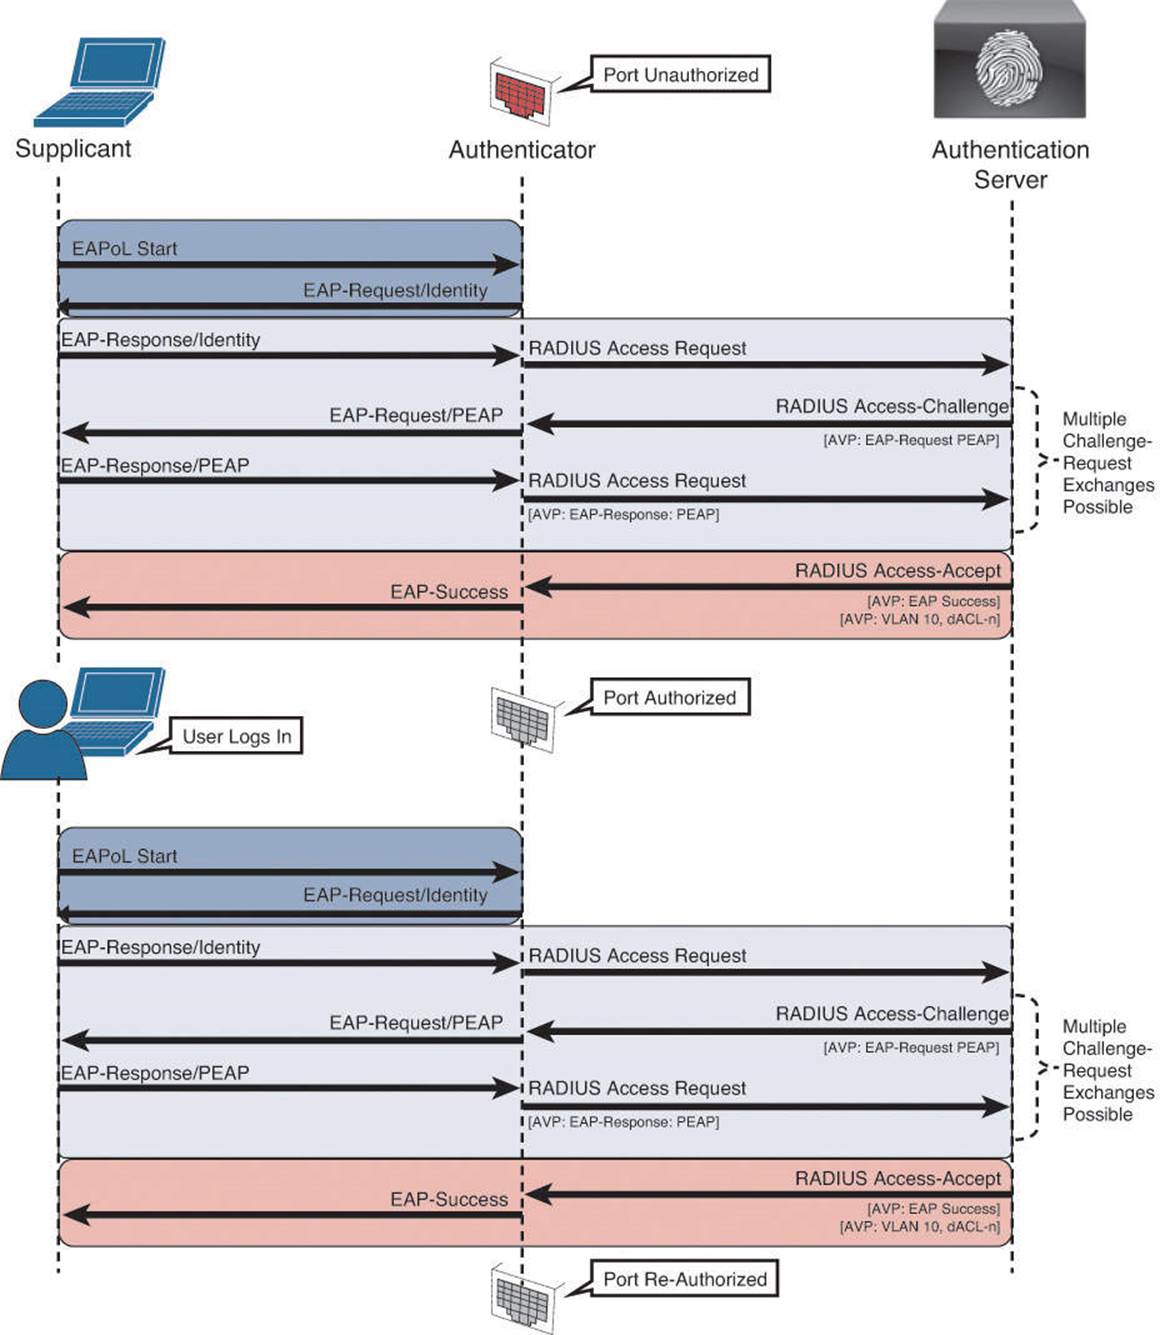
Figure 4-17 Multiple supplicant states.
This concludes the section on the Windows native supplicant, as well as the explanation of user and machine authentications.
Cisco AnyConnect NAM Supplicant
The Cisco AnyConnect Secure Mobility Client (also called AnyConnect) is another one of those products that is really multiple products in one. Most people are familiar with it as Cisco’s premier VPN client, but it is actually more than that. The software itself is modularized with several modules in existence today that can be installed on the system directly or even pushed down in an update from a Cisco ASA to the software loaded on the Windows workstation. Figure 4-18 shows the module choices when installing AnyConnect on a Windows system.
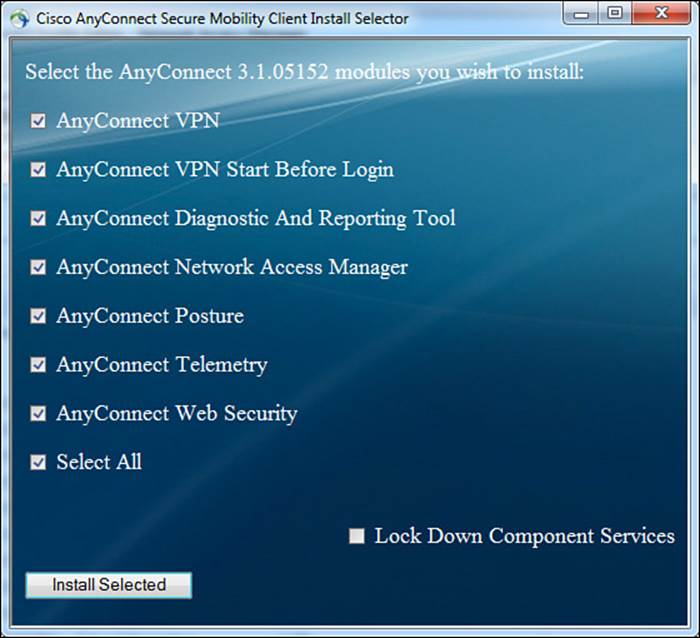
Figure 4-18 Cisco AnyConnect Secure mobility client modules.
The key modules that are of interest to Cisco ISE and this exam in particular are the AnyConnect Network Access Manager (NAM) and the AnyConnect Diagnostics and Reporting Tool (DART). To provide you with a little bit of history, many years ago in a galaxy far, far away there was a product known as the Cisco Trust Agent. This product has since been announced as end of life, so don’t waste any time memorizing the name. The point of interest of this product is that it contained a supplicant in it that was OEM’d from a company named Meeting House. Since that time, Cisco has acquired Meeting House and packaged its supplicant as the Cisco Secure Services Client (CSSC).
Why have you bothered to read that little tidbit of history that only this author finds interesting? Because that CSSC client is one of the most widely deployed non-native supplicants for Windows in the world, and Cisco used to charge around $50 per seat for it. Starting with AnyConnect 3.1, that same enterprise-class supplicant got integrated into the AnyConnect client as the Network Access Module and is licensed at no charge.
There are two main ways to configure the NAM supplicant. One is to use a standalone AnyConnect Profile Editor for NAM. The other is to use the Profiler Editor on Cisco’s ASA itself.
Let’s walk through the configuration of AnyConnect NAM. The Standalone Profiler Editor enables administrators to build configurations; the end user will never see these screens. The editor contains the following views:
![]() Client Policy—This view is for configuration options for connection, wired/wireless/3G mobile broadband, and end user and administrative settings. Many of the items in this section will look familiar as many of the options were also in the Windows native supplicant.
Client Policy—This view is for configuration options for connection, wired/wireless/3G mobile broadband, and end user and administrative settings. Many of the items in this section will look familiar as many of the options were also in the Windows native supplicant.
![]() Authentication Policy—This view is for configuration options related to authentication requirements for user-created networks. In other words, it is where an administrator can restrict which types of networks the end user is permitted to connect to when not at the corporate location.
Authentication Policy—This view is for configuration options related to authentication requirements for user-created networks. In other words, it is where an administrator can restrict which types of networks the end user is permitted to connect to when not at the corporate location.
![]() Networks—This view is where the administrator defines networks available to all groups or specific groups. In other words, this is where the administrator would define the corporate network and the security to use on the corporate wired and wireless networks.
Networks—This view is where the administrator defines networks available to all groups or specific groups. In other words, this is where the administrator would define the corporate network and the security to use on the corporate wired and wireless networks.
![]() Network Groups—This view is where defined network connections can be assigned to a particular group, which enables easier management of network connections.
Network Groups—This view is where defined network connections can be assigned to a particular group, which enables easier management of network connections.
At this point in the chapter, we will take a guided tour of the Standalone Profiler Editor. If you have a Windows 7 or Windows 8 device at your disposal, feel free to download the standalone editor from www.cisco.com and follow along.
Client Policy
This view is for configuration options for connection, wired/wireless/3G mobile broadband, and end user and administrative settings. Many of the items in this section will look familiar as many of the options were also in the Windows native supplicant. We will examine the options in the Client Policy view, as visible in Figure 4-19.
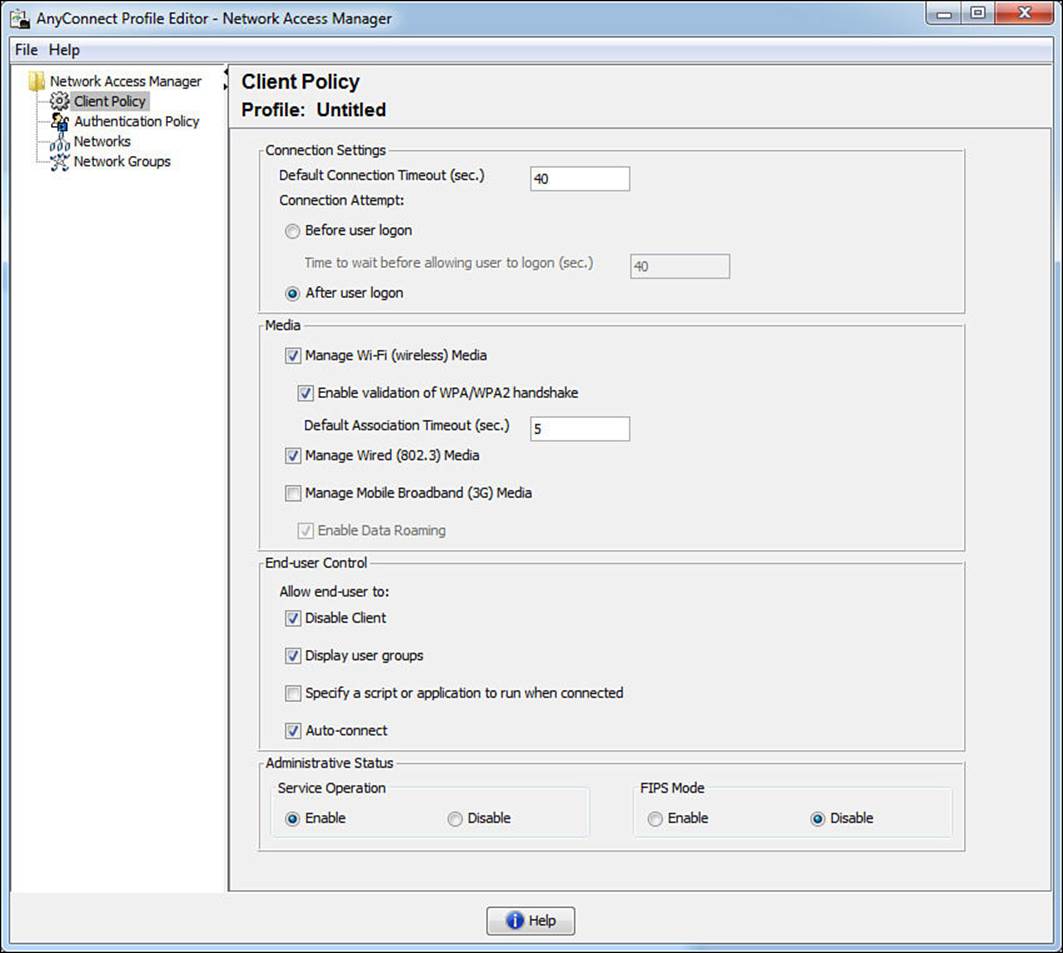
Figure 4-19 Client Policy view.
The first section, Connection Settings, is similar to the single sign-on settings with the native supplicant, where the administrator defines whether the supplicant performs authentication before or after allowing the user to interact with the desktop. You can compare these setting with those inFigure 4-15.
The next section, Media, defines if end users should be able to use AnyConnect NAM and join wired and wireless networks. Note that 3G broadband adapter cards must be Windows 7 logo certified; otherwise, the 3G cards will be incompatible.
With the End User Control section, the administrator defines if the end user will be allowed to perform certain functions. Disable Client allows end users to disable NAM and use the Windows native supplicant. Display User Group makes user-created groups created from CSSC 5.x visible and capable of a connection. Even though they do not correspond to administrator-defined groups, they appear under the local group. User-created networks defined in AnyConnect NAM will appear under here as well.
Specify a Script or Application to Run When Connected enables users to specify a script or an application to run after the network connection is successfully established. The scripting settings are specific to one user-configured network and allow the user to specify a local file (.exe, bat, or .cmd) to run when that network gets to a connected state. Many enterprises use this to trigger group policy object (GPO) refresh from Active Directory or to map network drives.
Auto-Connect allows NAM to automatically connect to administratively defined network connections without user interaction.
Administrative Status has two sub-settings. If you disable Service Operation, the system can use the native supplicant and connection manager when the device is not on an administrative network, instead of having AnyConnect NAM take over as the connection manager and supplicant for the entire system all the time. The FIPS Mode setting is for Federal Information Processing Standard (FIPS 140-2 Level 1), which is a U.S. government standard that specifies security requirements for cryptography modules. If you enable FIPS mode, the NAM performs cryptographic operations in a way that meets the government requirements.
Note
There are many more complexities to FIPS mode; simply enabling this setting is not enough. Please see the official Cisco AnyConnect administrative documentation for more information on FIPS mode.
Authentication Policy
This view is where an administrator can restrict which types of networks the end user is permitted to connect to when not at the corporate location. Some organizations are very specific about which security levels are required for their corporate owned assets, and this is one way of controlling that. As you will see in Figure 4-20, the settings on this tab let the administrator get very specific on the types of wireless key management (WPA/WPA2) types to which an end user can connect, as well as very specific on the EAP types that may be employed on those networks.
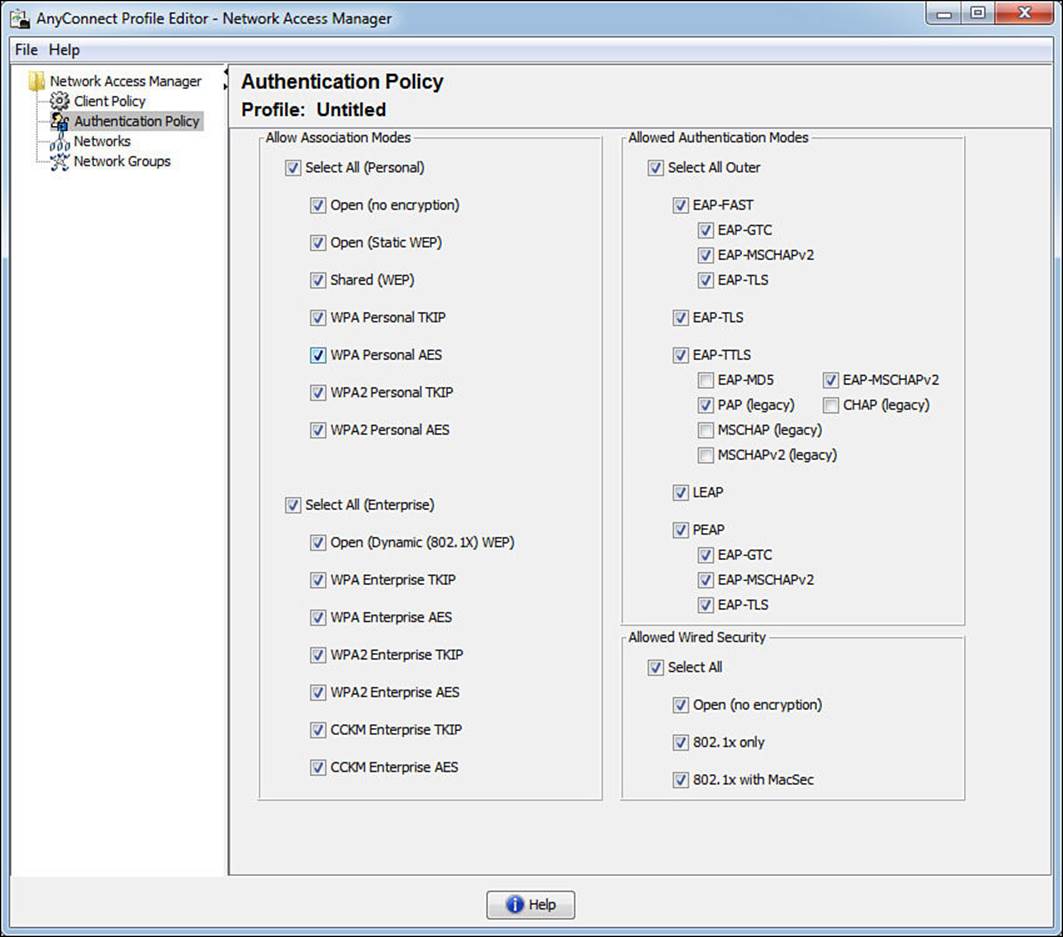
Figure 4-20 Authentication policy.
Networks
This view is where the administrator defines the corporate network and the security to use on the corporate wired and wireless networks. As shown in Figure 4-21, there is a default network named wired. This default network has all security disabled and is there to ensure that the supplicant will work in a plain-Jane, nonauthenticating wired network.
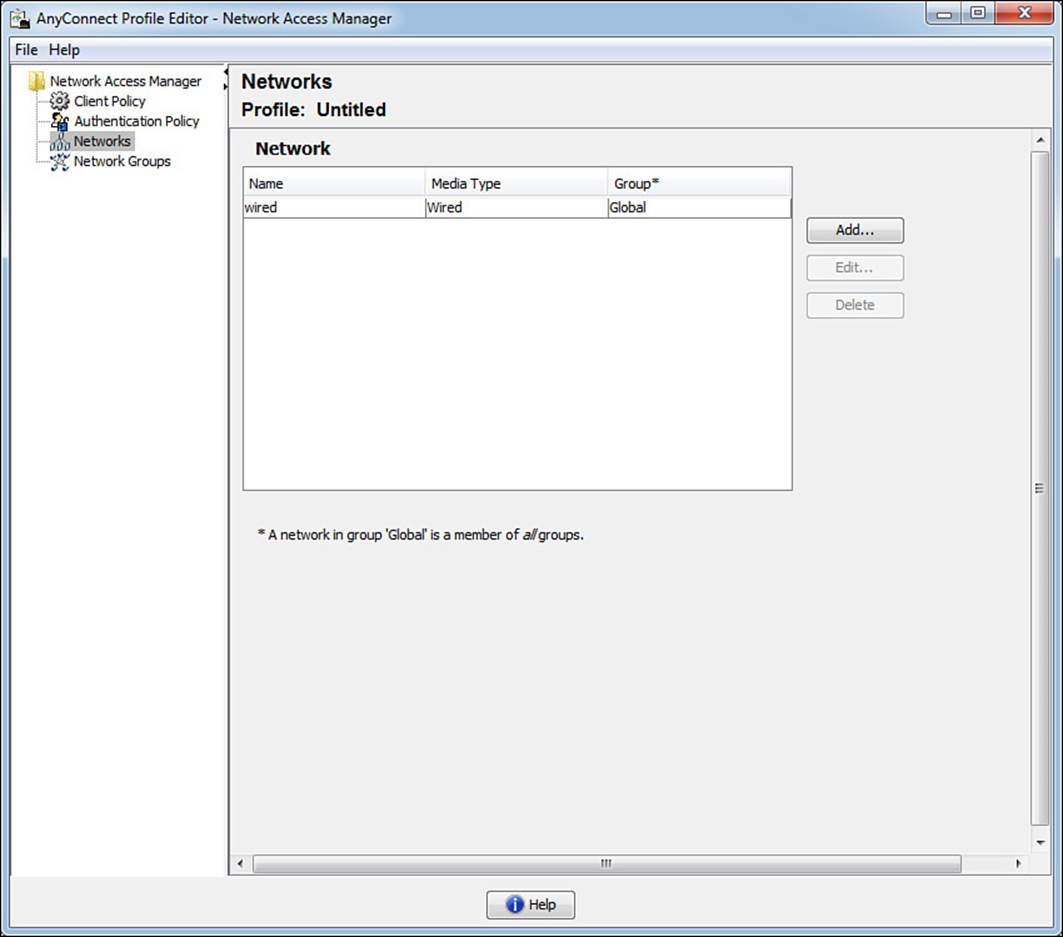
Figure 4-21 Networks tab.
Where things get interesting is when we click Add. Clicking this button starts a wizard that walks the administrator through creating administratively defined networks, as shown in Figure 4-22.
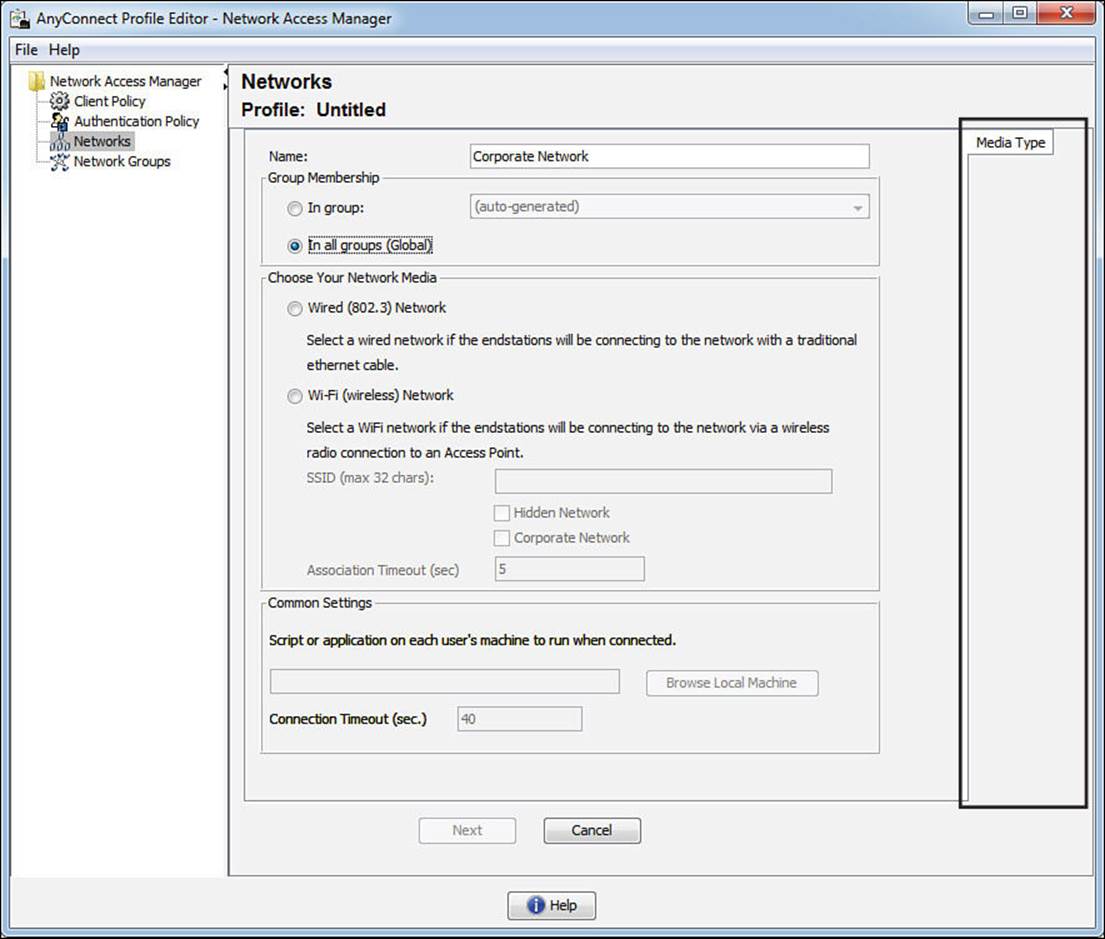
Figure 4-22 Adding a new network.
As an administrator builds the network profile, the wizard dynamically adds new tabs to the right side, which is highlighted in Figure 4-22. Selecting a wired (802.3) network adds a security level tab, as shown in Figure 4-23.
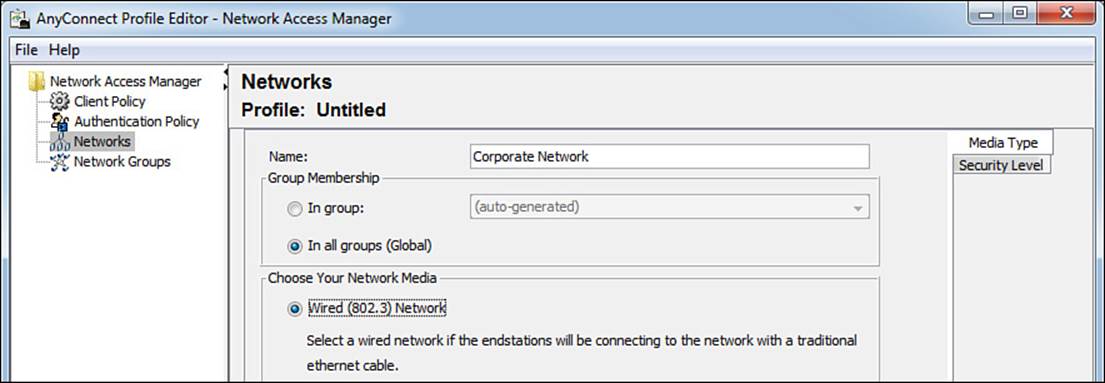
Figure 4-23 Adding the Security Level tab.
Clicking Next will bring you to that next tab, or you can click the tab directly. The result is shown in Figure 4-24.
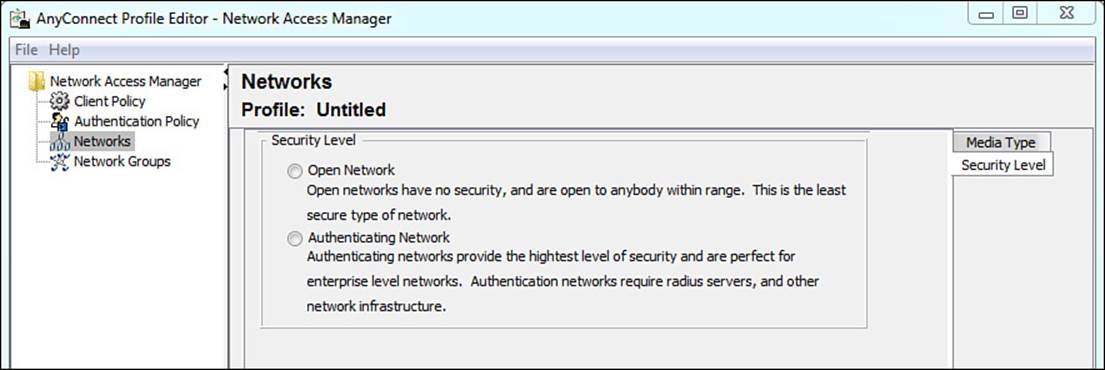
Figure 4-24 Security Level tab.
Because we are talking about corporate networks and this is an exam about secure network access, we will certainly be choosing the authenticating network option. As this option is selected, notice the Connection Type tab that appears in the right margins. Figure 4-25 shows the Security Level settings now that the profile is configured for an authenticating network.
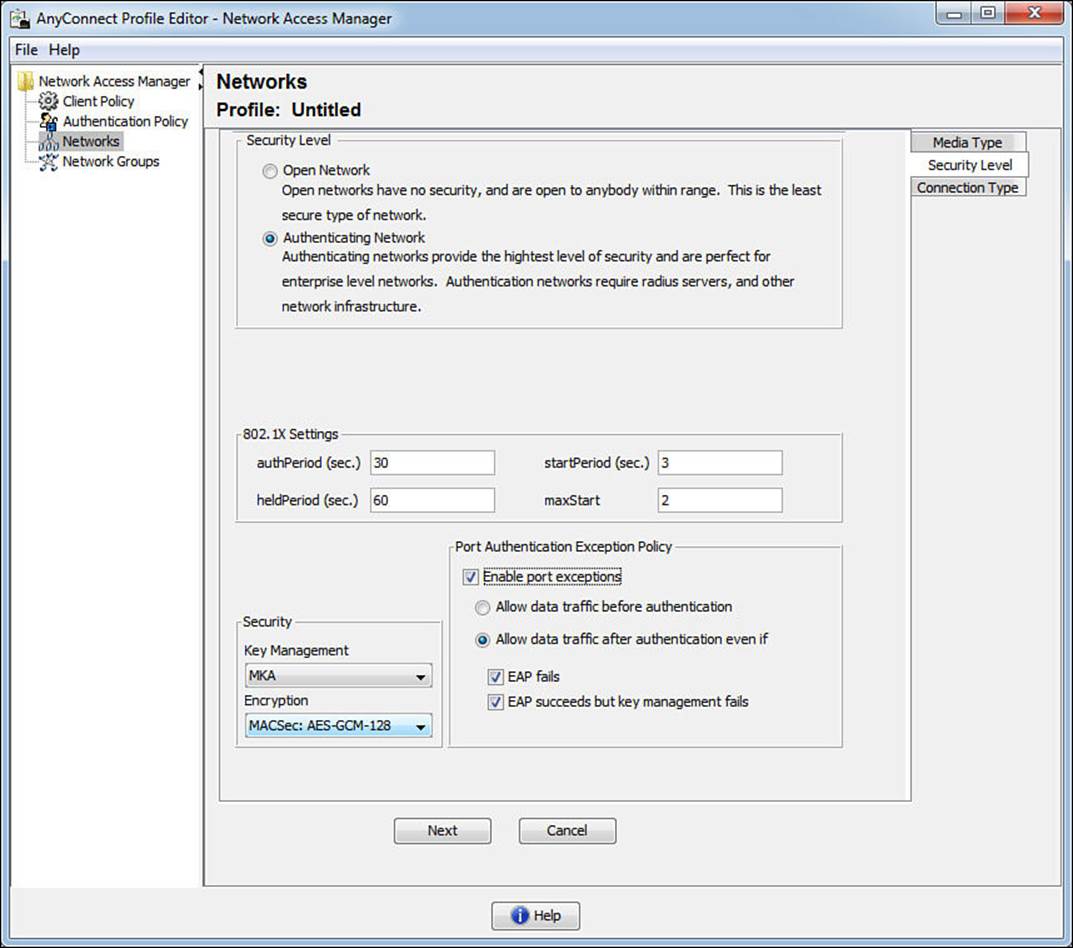
Figure 4-25 Security Level tab with an authenticating network.

Notice the 802.1X timers that are available for the administrator to tune. Also pay attention to the Security section where Key Management can be turned on for Layer-2 MACSec encryption between the supplicant and the switch. This provides AES-GCM-128-bit encryption over the wire. Lastly, when enabled, the Port Authentication Exception Policy allows the supplicant to control whether the client can send data immediately upon link (prior to an authentication) or after the authentication with options about sending data even if EAP fails and even if MACSec fails to negotiate. Environments, like certain government institutions, require such strict controls that they demand the ability to deny traffic if it cannot be encrypted.
Clicking Next brings us to the Network Connection Type. The settings here should seem familiar becuse they are asking for machine authentication, user authentication, or both. Selecting Machine and User Connection adds four new tabs to the right side. Clicking Next opens the Machine Auth tab.
Selecting the EAP method populates the lower portion of the tab, as shown in Figure 4-26. In the figure, we have chosen EAP-FAST for the tunneled EAP method, and you can see just how much control is given to the administrator for customizing the behavior of the supplicant. The inner method is fully selectable for EAP-MSCHAPv2 or EAP-GTC, or EAP-TLS (authenticate using a certificate).
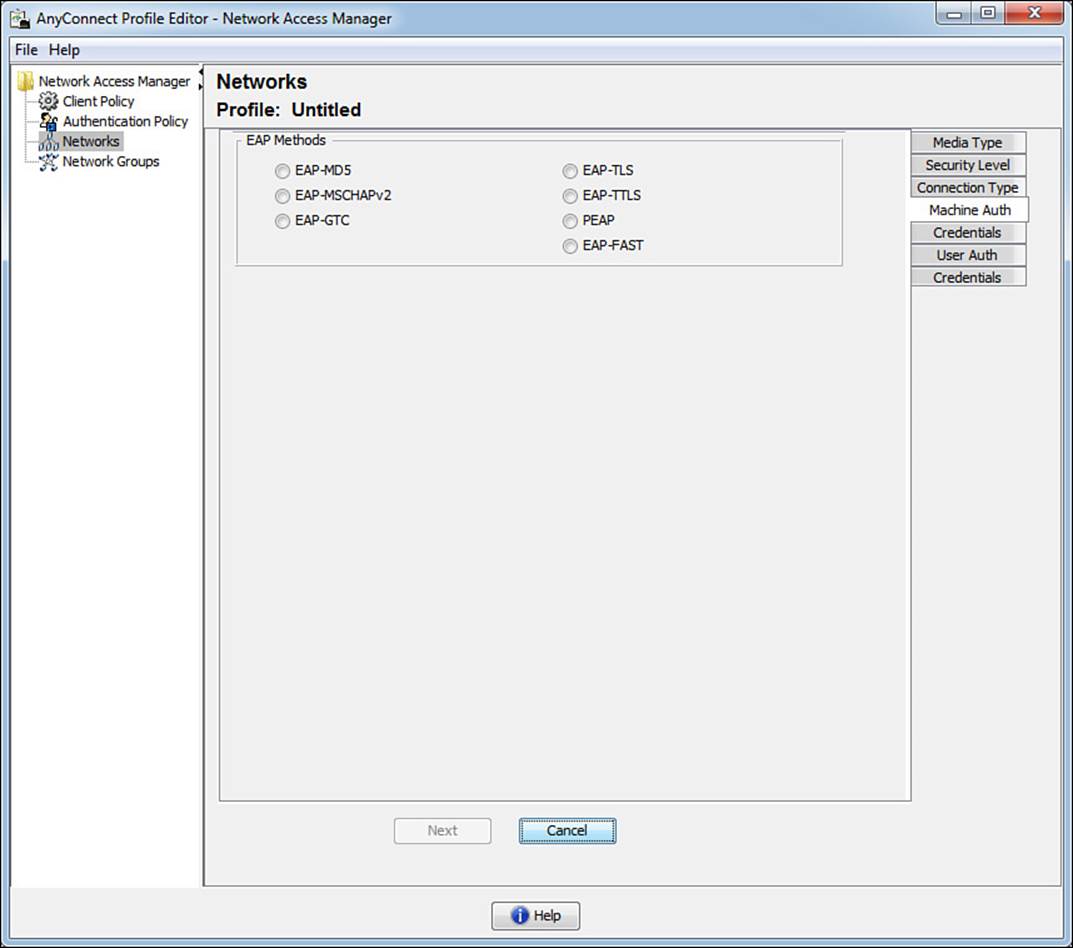
Figure 4-26 Machine Auth tab.
Clicking Next opens the Certificates tab, as shown in Figure 4-27. Why the Certificates tab? We chose a password based authentication method, didn’t we? This tab is defining the certificates to trust for the outer method, the forming of the TLS tunnel. AnyConnect NAM provides powerful and flexible rules to filter which certificates to trust, which is beyond the scope of this exam and book. It also provides the choice to the administrator to trust any Root CA already trusted by the operating system or to specify the trusted Root CA in the profile.
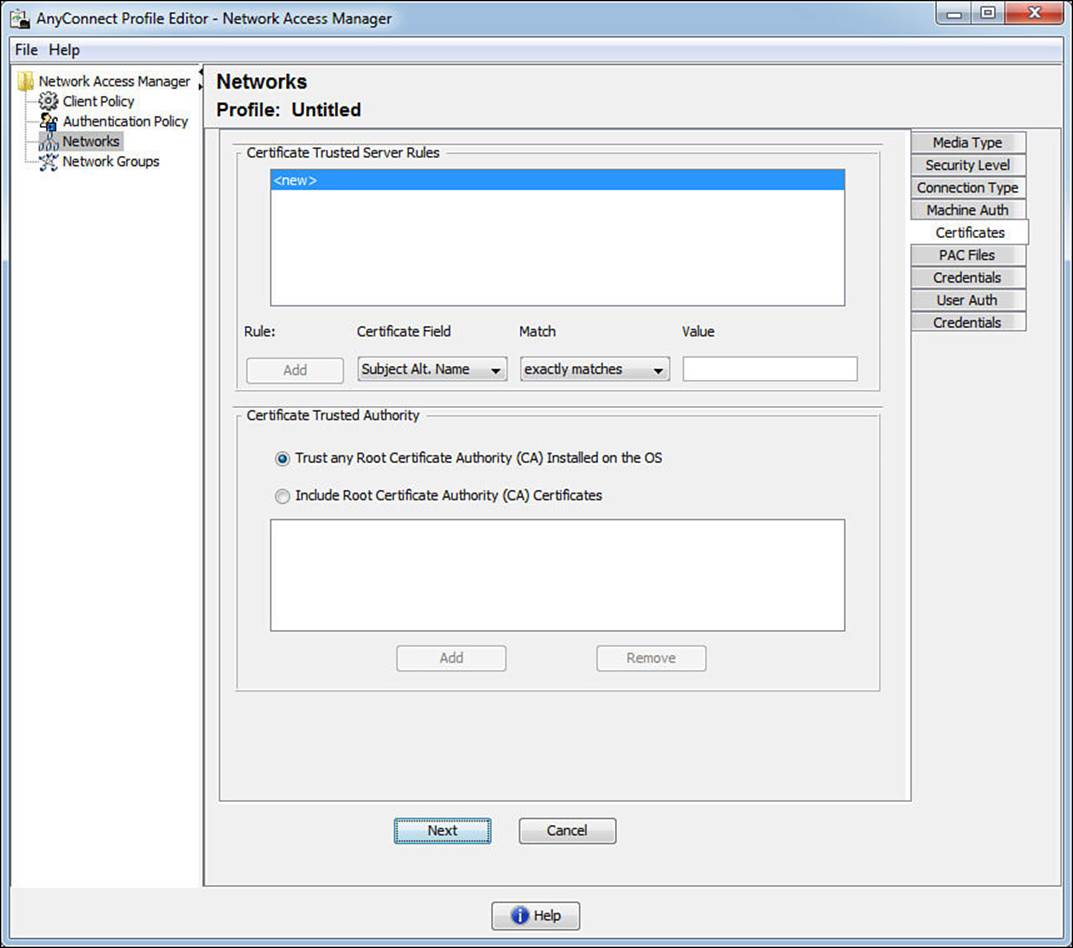
Figure 4-27 Machine Auth: Certificates tab.
Clicking Next opens the PAC files tab, as shown in Figure 4-28. This is specific to EAP-FAST, which has the option of using PAC files. A PAC file can be viewed a lot like a secure cookie. It’s an encrypted trusted file that can be used in lieu of or in addition to a certificate for setting up a secure communication channel with the RADIUS server. This configuration option provides the administrator a way to distribute the server’s PAC file in the NAM profile for secure tunnel establishment without the need for certificates.
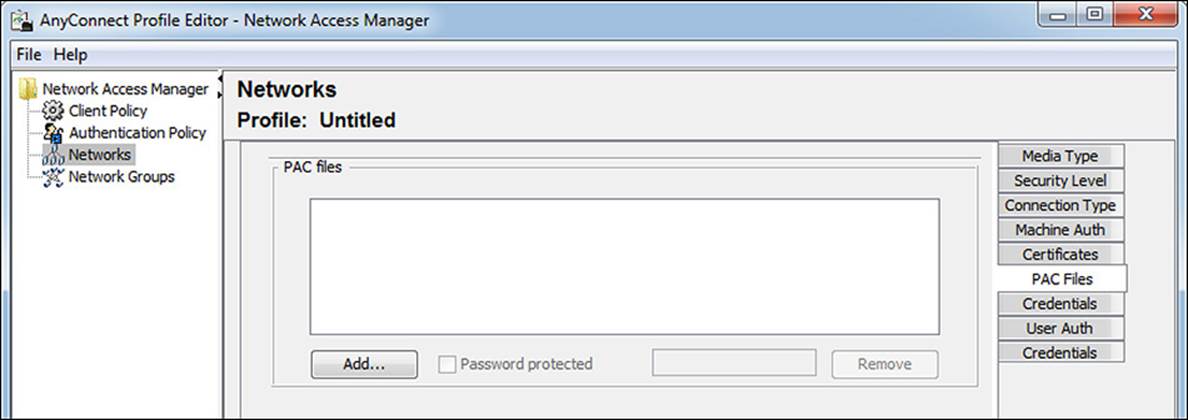
Figure 4-28 Machine Auth: PAC Files tab.
Click Next to get to the Credentials tab, as shown in Figure 4-29. This tab should also reinforce the concept of the inner and outer identity with a tunneled EAP. Because this is EAP-FAST, there is a notion of both. The Unprotected Identity is the outer identity. This is a machine authentication, so the outer identity begins with host/, and you can see that the outer identity is set to anonymous by default. An administrator can choose to add a value to this outer identity to aid ISE in making the identity store selection for the authentication. For example, by appending @[domain] to the end of the unprotected identity, a rule could be configured on ISE to route the authentication to the correct Active Directory or LDAP instance. The protected identity pattern is the inner identity—in other words, it is the actual Active Directory machine account name. With the machine credentials, the default is to use the machine’s password that was autogenerated when the computer joined AD. However, if something special was required, the administrator has the ability to enter a static password.

Figure 4-29 Machine Auth: Credentials tab.
Clicking Next opens the first tab of the user authentication, as shown in Figure 4-30. Take notice of the concept that a different EAP method could be selected for the user authentication. It does not have to be the same as the machine authentication. If you select EAP-FAST, you will notice all the same choices are available as were with the machine auth, with one exception. There is an option to extend user connection beyond logoff. This option permits the supplicant to remain authenticated as that user, even when the user is no longer logged in.
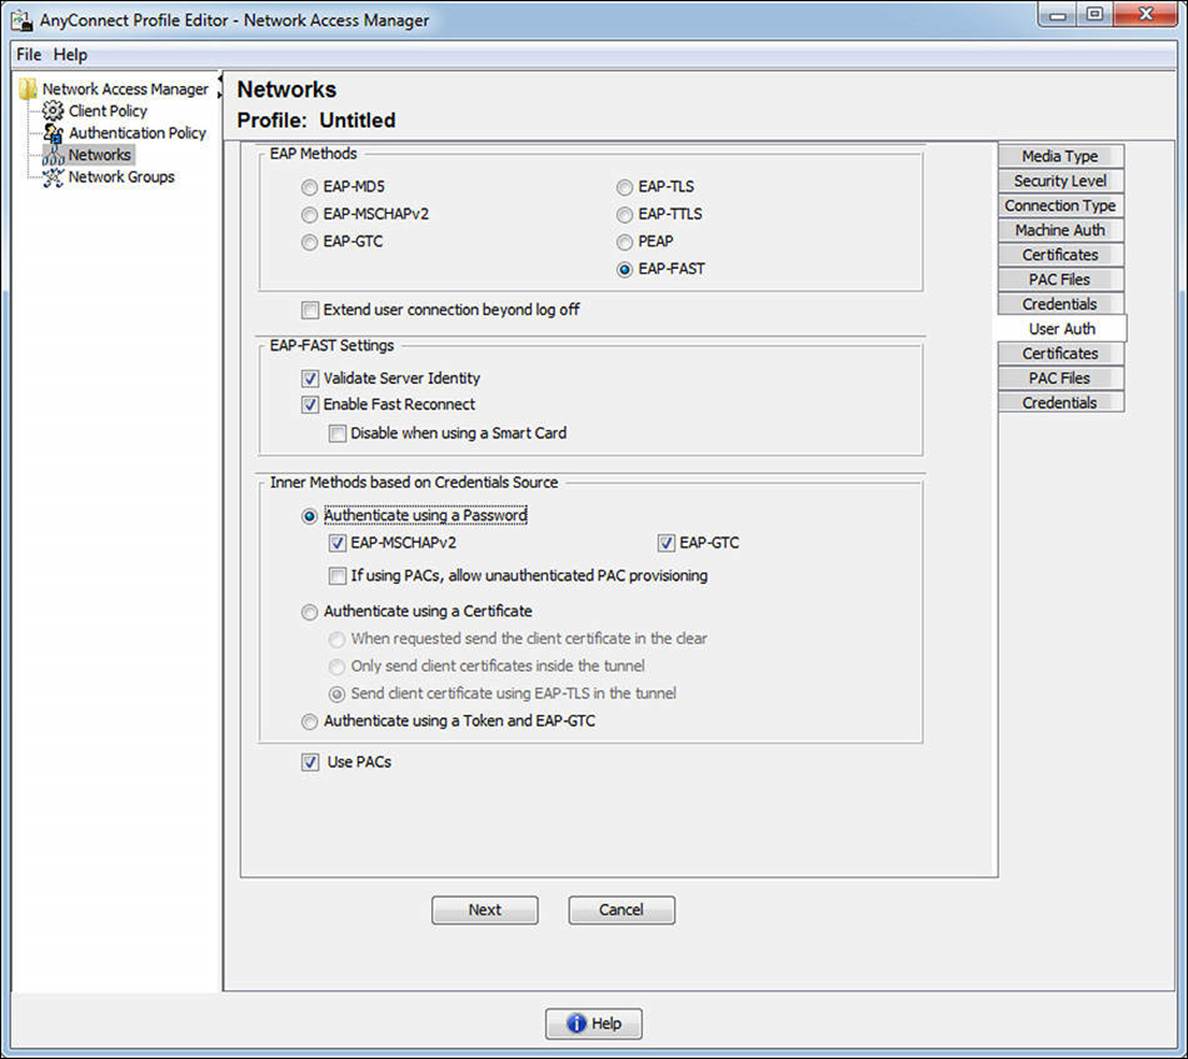
Figure 4-30 User Auth tab.
Clicking Next opens the Certificates tab for the user certificates. Just like the machine certificates, the administrator is provided with options to specify certificates, include them with the profile, and more. Clicking Next again displays the PAC files tab for users, which again is exactly like that of the Machine Auth PAC files tab.
Clicking Next opens our final tab for the Network wizard—the User Credentials tab, which is displayed in Figure 4-31. As with the Machine Auth Credentials tab, there are fields for an unprotected (outer) identity and a protected (inner) identity. There are also options for using single-sign-on credentials, prompting for the user’s credentials, and for using static credentials.
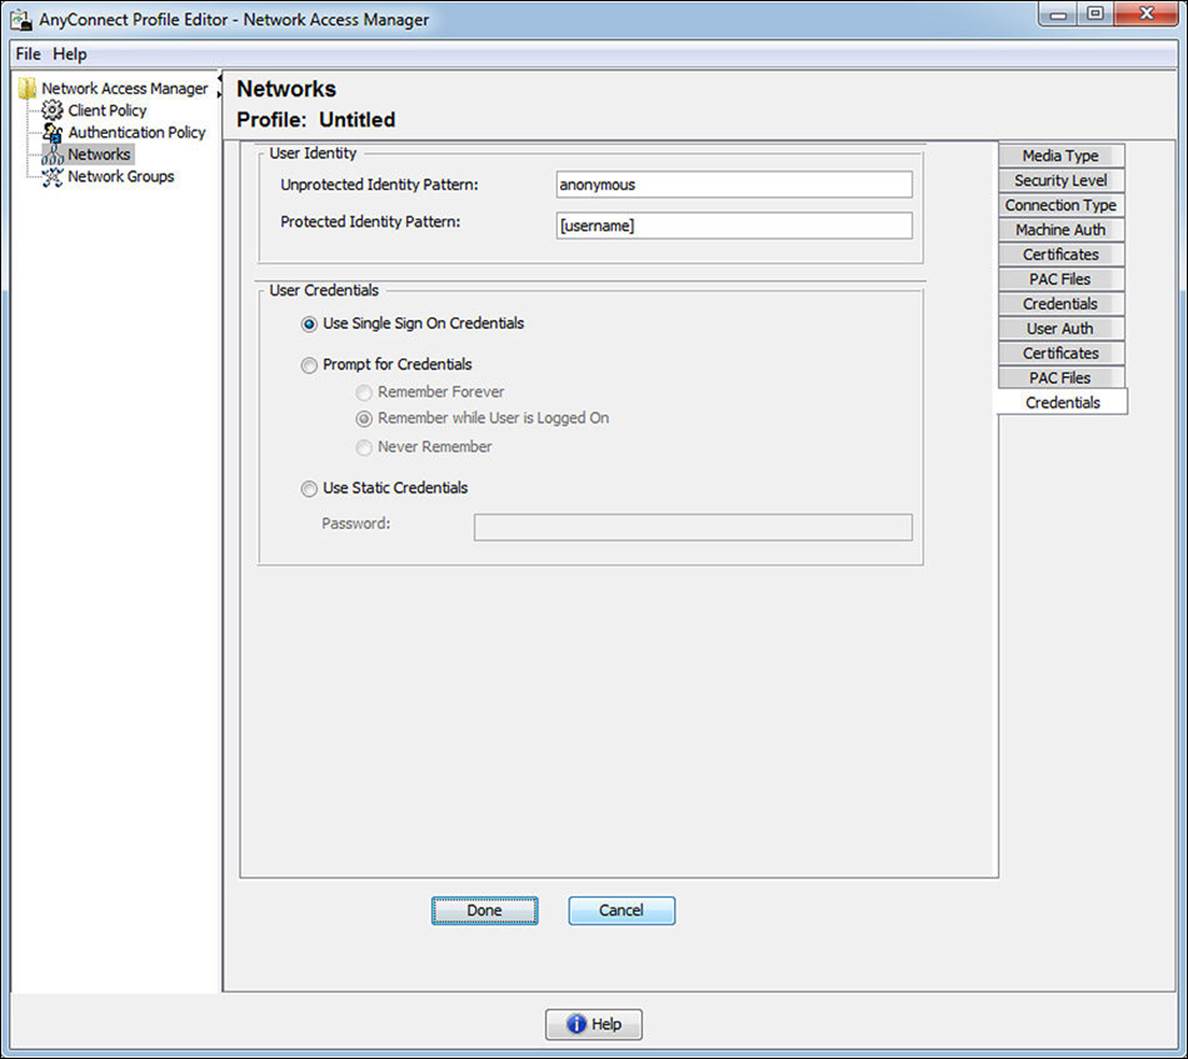
Figure 4-31 User Auth: Credentials tab.
Click Done and notice the new network configuration has been added to the list, as shown in Figure 4-32.
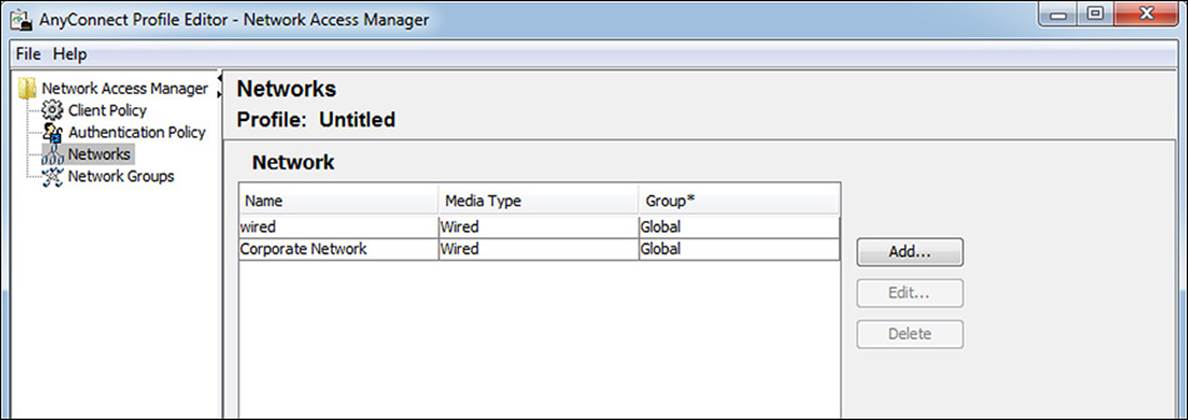
Figure 4-32 Network added.
Network Groups
As shown in Figure 4-33, the Network Groups view enables the administrator to organize network profiles into logical groupings for easier use.
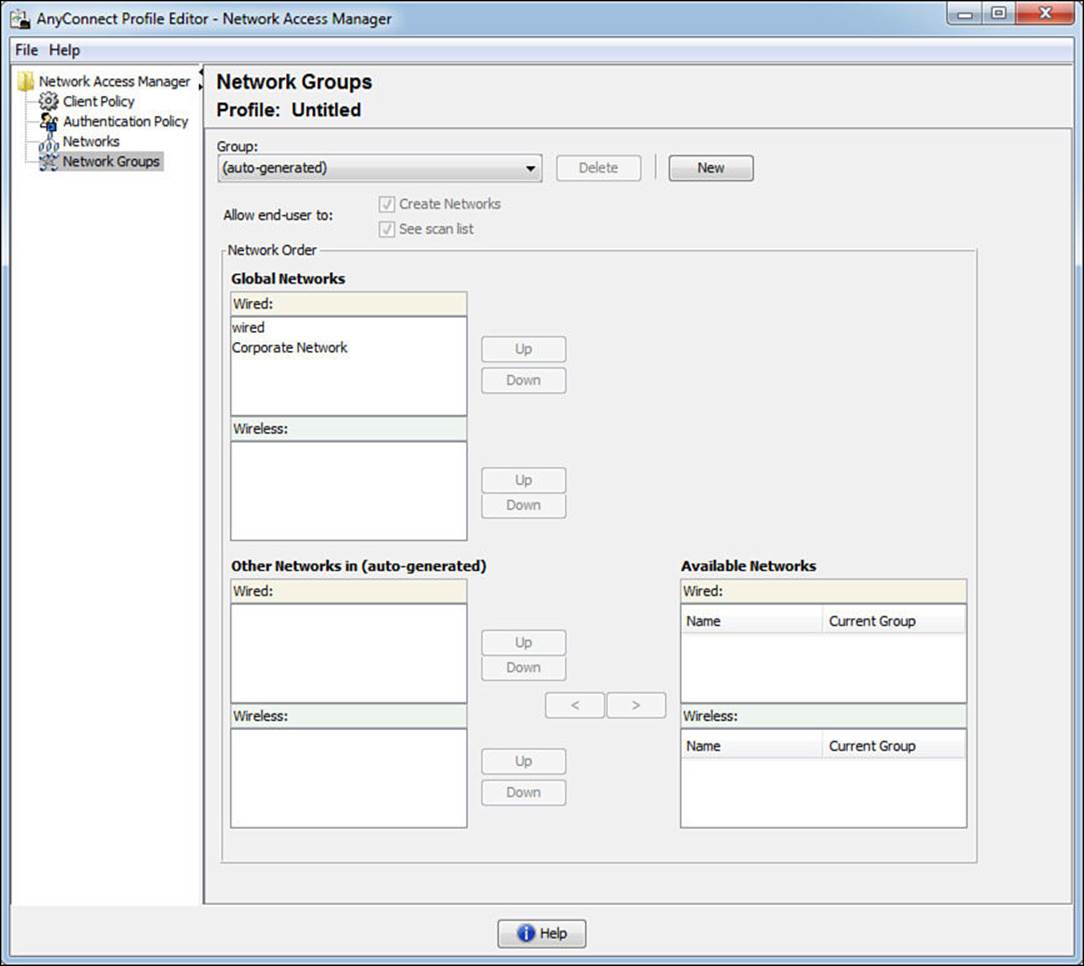
Figure 4-33 Network groups.
Implementing AnyConnect NAM Profiles
Now that a custom AnyConnect NAM profile has been created, it must be pushed out to all the NAM clients in the network. There is no magical configuration management solution from Cisco that will ensure that all endpoints get the latest profile. This is left up to the company’s existing software deployment mechanisms, such as Active Directory Group Policy, SCCM, IBM Big Fix, or another software management solution. Another option is to publish the configuration on the Cisco ASA, where the profiles get updated the next time a user VPNs into the company.
The file must be saved with a filename of configuration.xml and needs to be store in the %SystemDrive%\ProgramData\Application Data\Cisco\Cisco AnyConnect Secure Mobility Client\Network Access Manager\newConfigFiles directory, as shown in Figure 4-34. When NAM starts, it reads in this configuration data. The location of the file depends on the Windows Version as well as the AnyConnect version. The example in this paragraph will work for Windows 7 and Windows 8 with AnyConnect version 3.1.
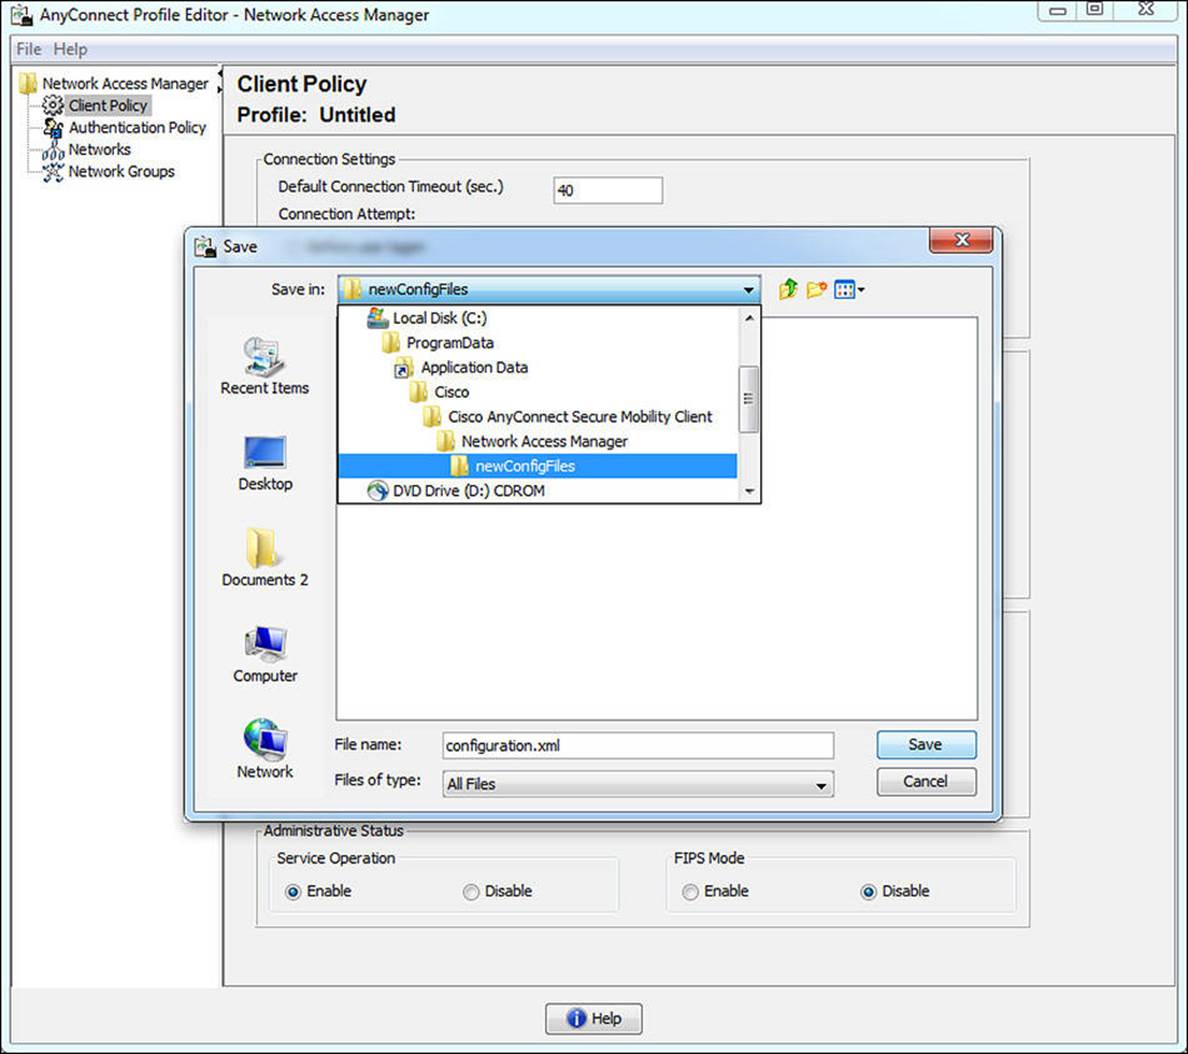
Figure 4-34 Saving configuration.xml.
The end user experience is clean and simple. The GUI with which the end user interacts is shown in Figure 4-35.
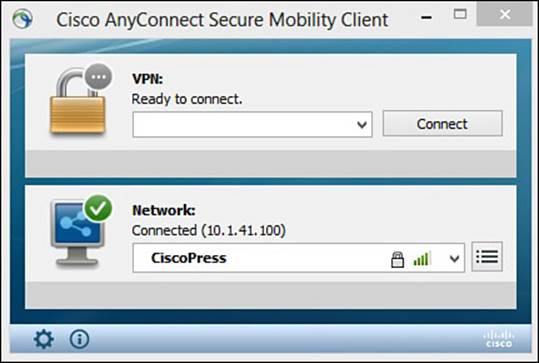
Figure 4-35 End user GUI.
EAP Chaining
Having a machine and user authentication sounds like a great thing. If a machine is able to successfully authenticate to AD, then it must be a company asset and therefore managed by the company (company official software packages and so on). Then knowing the user is an authorized user to be on the company network is of course a desirable state to be in. That is the entire point of 802.1X to begin with.
However, the two states are completely separate. Each EAP session is completely unaware of the other EAP session. There have been enhancements to RADIUS servers over the years to attempt to track the machine and user auth states and provide a way to join them together. Many of Cisco’s customers, including some of the very largest corporations in the world, have needed the ability to authorize not only the user, but also the machine, and ensure that the two were authorized together.
Cisco went a step further than what is available with industry standards and created an enhancement to EAP-FAST. Now with EAP-FASTv2, a differentiation was made to have a user PAC and a machine PAC. After a successful machine authentication, ISE will issue a machine PAC to the client. Then when processing a user authentication, ISE will request the machine PAC to prove that the machine was successfully authenticated, too. This is the first time in 802.1X history that multiple credentials have been able to be authenticated within a single EAP transaction, and it is known as EAP chaining. The IETF is creating a new open standard based on EAP-FASTv2; at the time this book was published, it was to be referred to as EAP-TEAP (tunneled EAP), which should eventually be supported by all major vendors. This topic is revisited in Chapter 17, “Bring Your Own Device.”
Note
As of the time this book was published, the only supplicant to support EAP chaining is Cisco AnyConnect NAM 3.1 and newer. The only RADIUS server to support EAP chaining is Cisco ISE 1.1.1 and newer.
Exam Preparation Tasks
Review All Key Topics
Review the most important topics in the chapter, noted with the key topics icon in the outer margin of the page. Table 4-5 lists a reference of these key topics and the page numbers on which each is found.
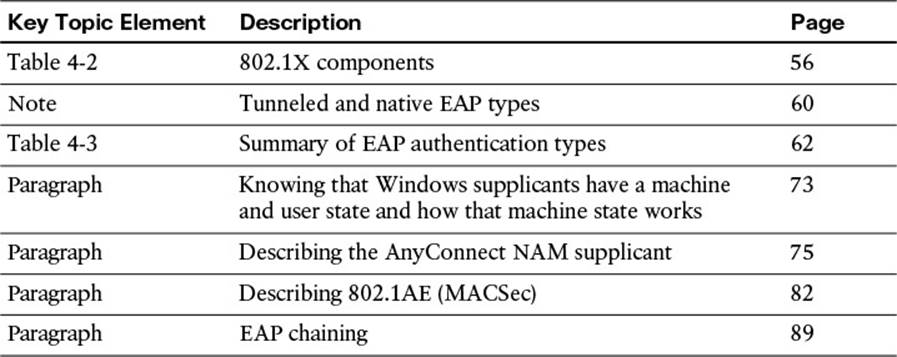
Table 4-5 Key Topics Found in Chapter 4
Define Key Terms
Define the following key terms from this chapter, and check your answers in the glossary:
Extension Authentication Protocol (EAP)
EAP over LAN
native EAP
tunneled EAP
supplicant
authenticator
authentication server
network access device (NAD)
AnyConnect NAM
AnyConnect DART