Drush for Developers Second Edition (2015)
Chapter 2. Keeping Database Configuration and Code Together
One of the most remarkable articles that I read when I started to learn Drupal is The Development -> Staging -> Production Workflow Problem in Drupal (http://www.developmentseed.org/blog/2009/jul/09/development-staging-production-workflow-problem-drupal), by Development Seed. Dated back to 2009, yet it still outlines, with such clarity, one of the most important challenges in Drupal projects; the fact that although a part of Drupal's configuration resides in the database and not in code, these must evolve together under a version control system such as Git.
This quote in particular really did hit me:
"The ideal development workflow involves communication in both directions. Content needs to be migrated upstream to staging and development servers, and configuration needs to be migrated downstream to staging and production."
Let's dissect this:
Content needs to be migrated upstream to staging and development servers...
This means that the database should be copied from production to other environments (staging, development, and your local environment) on a regular basis in order to test code and configuration changes against recent content. This process helps you to verify that a copy of the production environment's database updates with new code as you would expect. This should eliminate surprises when deploying a new release to production.
Now, let's see the second statement:
…configuration needs to be migrated downstream to staging and production.
By configuration, the article refers to custom code plus exported configuration such as user roles, content types, fields, layouts, and so on. These two are pushed from your local environment downstream to other environments (development, staging, and production).
Both streams have something in common: either when we install the production environment's database on our local environment or when we deploy new code, the database needs to be updated. Updating means going through a list of steps that can be accomplished via Drupal's administration interface or using Drush. In this chapter, we will automate this process, which we will call the update path.
Meeting the update path
The update path is a list of steps that update the database of a Drupal project so that it is in sync with the code.
Running the update path in a Drupal project involves the following steps:
1. Rebuilding Drupal's registry.
2. Running database updates.
3. Importing configuration.
4. Clearing caches.
In the following sections, we will dive deeper into each of the preceding steps. These can be accomplished manually with Drupal's administration interface. However, this is a tedious process. Ideally, we would like to make the deployment process as straightforward as possible, so here is how we can automate the preceding steps with Drush commands in a Bash script that we will save as /home/juampy/scripts/update_path.sh:
#!/bin/sh
#
# Run the update path in the current project.
#
# Usage:
# Change directory into a Drupal project and run:
# sh /path-to-this-script/update_path.sh
#
# You may need to change permissions on this script with the following:
# chmod u+x /path-to-this-script/update_path.sh
echo "Starting update path"
# 1. Registry Rebuild.
drush --verbose registry-rebuild --no-cache-clear
# 2. Run database updates.
drush --verbose --yes updatedb
# 3. Clear the Drush cache.
# Sometimes Features may need this due to a bug in Features module.
drush cache-clear drush
# 4. Revert all features.
drush --verbose --yes features-revert-all
# 5. Clear all caches.
drush --verbose cache-clear all
echo "Update path completed."
Tip
Downloading the example code
You can download the example code files for all Packt books you have purchased from your account at http://www.packtpub.com. If you purchased this book elsewhere, you can visit http://www.packtpub.com/support and register to have the files e-mailed directly to you.
What we are doing in the preceding script is rebuilding some of the data structures that Drupal stores in the database from most generic to most specific. You would run this script when:
· You have just downloaded a copy of the production environment's database
· You have just pulled in the most recent version of the project's source code
· You have made changes in the site's configuration and want to revert them back
· You have just deployed a new release into a different environment (for example, staging)
Keeping configuration in sync with the code is critical in order to work within a team and to avoid unexpected results when deploying code to other environments.
All the commands in the script use the --verbose option. This helps us to verify that Drush is loading the right context, and if there are any PHP warnings or notices during the process, we will see them. The output generated when running the script is quite long because of the --verbose option, but at its simplest form, it would be like the following code:
$ cd /home/juampy/projects/drupal
$ sh /home/juampy/scripts/update_path.sh
Starting update path
There were 896 files in the registry before and 896 files now.
Registry has been rebuilt. [success]
No database updates required [success]
Current state already matches defaults, aborting. [ok]
'all' cache was cleared. [success]
Update path completed.
In the preceding execution, the registry did not change, no database updates were run nor were features reverted. In the following sections, we will look into more detail on each of the steps of the update path in order to discover how to solve some of the challenges we might find when upgrading the database with new code.
Rebuilding the registry
Drupal's registry system is an autoloading mechanism for PHP classes and interfaces. It keeps track of the location of the file that contains each class in order to load it whenever it is required. Classes can be autoloaded by listing them at the files[] section of the.info file of a module.
There are scenarios where Drupal enters in a deadlock caused by a missing class that is required during an early stage of the bootstrap process. You might face this error while upgrading a module or after moving an installed module into a different directory.
In the following sections, we will create a scenario where Drupal's registry will break and then fix it by running the registry-rebuild Drush command.
Preparing the trap
Beware! Proceed with the following steps on a testing environment.
The trap to break Drupal's registry will consist of:
1. Installing Field collection (https://www.drupal.org/project/field_collection) and Entity (https://drupal.org/project/entity) modules.
2. Adding a field of type Field collection to the Page content type.
3. Creating a node of type Page.
4. Moving the Entity module to a different location within the sites/all/modules directory.
Let's start by downloading and installing the Field collection module in a Drupal project:
$ cd /home/juampy/projects/drupal
$ drush pm-download field_collection
Project field_collection (7.x-1.0-beta7) downloaded to /.../sites/all/modules/contrib/field_collection. [success]
$ drush --yes pm-enable field_collection
The following projects have unmet dependencies:
field_collection requires entity
Would you like to download them? (y/n): y
Project entity (7.x-1.5) downloaded to/.../sites/all/modules/contrib/entity. [success]
Project entity contains 2 modules: entity_token, entity.
The following extensions will be enabled: field_collection, entity
Do you really want to continue? (y/n): y
entity was enabled successfully. [ok]
field_collection was enabled successfully. [ok]
Drush took care of downloading the dependency of Field collection on the Entity module and installed it automatically. Let's move on to the next step, where we will set up a scenario where Drupal's registry system will crash. We need to add a Field collection field to a content type (for example, the Basic Page content type). We can do so by opening a browser and navigating to Structure | Content Types | Basic Page | Manage Fields. Alternatively, we can run the following Drush command:
$ drush field-create page items,field_collection,field_collection_embed
http://default/admin/structure/types/manage/page/fields/items
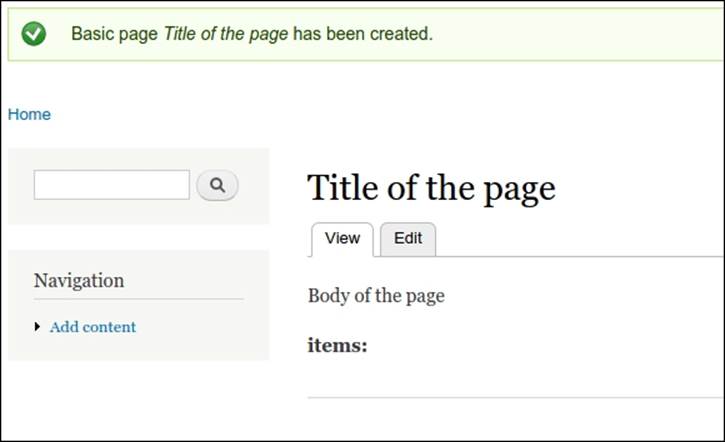
The command returned a URL to further edit the field settings. We now need to create a node of type Basic Page. Open your browser and navigate to Add Content | Basic Page:
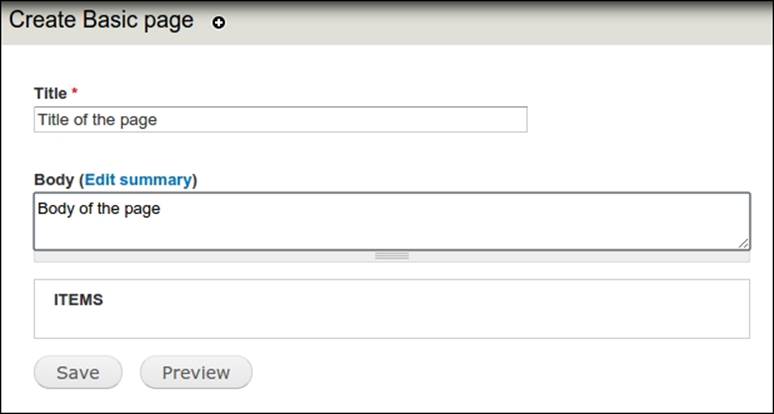
Once we click Save, we can see the page node's full display:
Breaking the registry
Now, let's break the registry by moving the Entity module to a different location. Currently, it is installed at sites/all/modules/contrib/entity. We will move it to sites/all/modules, where Drupal should be able to find it too:
$ mv sites/all/modules/contrib/entity sites/default/modules/
After moving the Entity module and reloading the node page in the browser, we will see a PHP error that refers to the Entity class not being found:
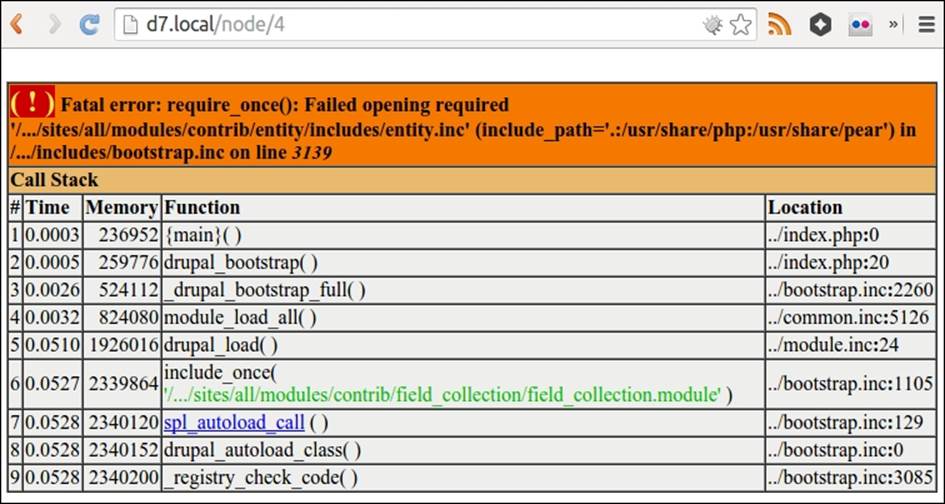
If we open other pages of our website, we will experience the same error. Normally, when we see an error like this in a Drupal project, the first thing we would try will be to clear all caches. However, in this case, this solution won't work as we will face the same error when Drush bootstraps Drupal:
$ drush cache-clear all
require_once(/.../sites/all/modules/contrib/entity/includes/entity.inc):failed to open stream: No such file or directory [warning]
Rebuilding Drupal's registry
This is the time when Registry Rebuild kicks in to help. Let's first download it into sites/all/drush/commands. The reason for using this path and not sites/all/modules/contrib is that Registry Rebuild is not a module. It just implements a PHP script and a Drush command. By placing it at sites/all/drush/command, Drush can discover it automatically and it will be available when we deploy this project to other environments:
$ drush @none pm-download \
--destination=sites/all/drush/commands registry_rebuild
The directory sites/all/drush/commands does not exist.
Would you like to create it? (y/n): y
Project registry_rebuild (7.x-2.2) downloaded to /.../sites/all/drush/commands/registry_rebuild. [success]
Project registry_rebuild contains 0 modules: .
Note the use of @none right before the command name while downloading Registry Rebuild. The @none alias is a Drush site alias. In essence, a Drush alias contains an array that defines where a Drupal project is and how it can be accessed. The @none Drush site alias is a special one as it tells Drush not to attempt bootstrapping a Drupal project at all. We need @none in this case because if we don't use it, Drush would discover that our current directory is a Drupal project and would try to bootstrap it, thus crashing again. We will cover site aliases in Chapter 5, Managing Local and Remote Environments.
In the preceding output, Drush informs us that Registry Rebuild does not have any modules. However, it just implements the registry-rebuild command, which we will use now to fix Drupal's registry:
$ drush registry-rebuild
The registry has been rebuilt via registry_rebuild (A). [success]
All caches have been cleared with drush_registry_rebuild_cc_all. [success]
The registry has been rebuilt via drush_registry_rebuild_cc_all (B). [success]
All caches have been cleared with drush_registry_rebuild_cc_all. [success]
All registry rebuilds have been completed. [success]
Now, if we open again the node page in our web browser or navigate through our Drupal site, we won't see any errors. The drush cache-clear all command will work as well.
It is safe to rebuild the registry as it ensures that Drupal can bootstrap successfully. This is the reason why it is executed in the first place at the update_path.sh script.
Running database updates
Right after rebuilding the registry, the next thing that needs to be done to get code and configuration in sync is to run all pending database updates found in Drupal core, contributed, and custom modules. A database update can involve creating new tables to store field data, add indexes, populate existing data, and so on.
Creating a database update involves implementing hook_update_N() (https://api.drupal.org/api/drupal/modules%21system%21system.api.php/function/hook_update_N/7). This hook has the following signature: hook_update_N(&$sandbox), where $sandbox is an array that keeps track of the state and progress of the database update. Let's see it in action with a practical example; imagine that we want to add a Boolean field to our Basic Page content type called Flag with a default value of 0 (zero). Here is Drupal's administration interface where we will add the field:
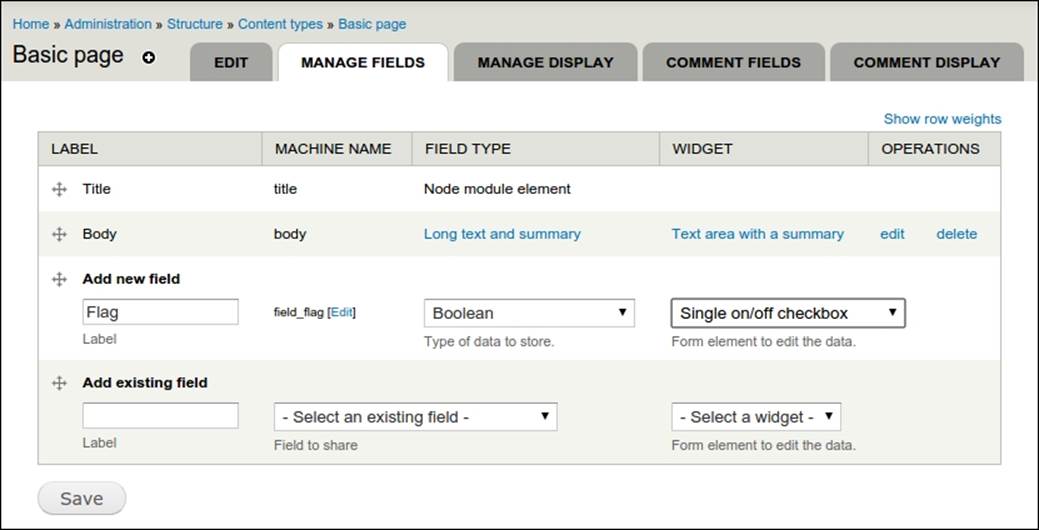
There is a problem with this setup; although the new content of type Page will have the Flag field set to zero, the existing content has a value of NULL because the table that stores data for our new Flag field is empty. This will cause the Views conditions or custom code that relies on the Flag field to be zero to return odd results. See the following SQL query, where we list the contents of the table containing data for the Flag field:
$ cd /home/juampy/projects/example
$ drush sql-cli
Welcome to the MySQL monitor. Commands end with ; or \g.
mysql> select * from field_data_field_flag;
Empty set (0.00 sec)
Confirmed! There is no value for existing content at the Flag field. We need to write a database update that sets field_flag = 0 on the existing content. Assuming that we have a custom module called mymodule already installed at sites/all/modules/custom/mymodule, here is a database update for mymodule.install:
<?php
/**
* @file
*
* Install hook implementations for module mymodule.
*/
/**
* Set default value of 0 for field_flag on existing content.
*/
function mymodule_update_7100(&$sandbox) {
// Load up all Basic Page nodes.
$query = new EntityFieldQuery();
$query->entityCondition('entity_type', 'node')
->entityCondition('bundle', 'page');
$results = $query->execute();
// Loop over each page node and set field_flag to 0.
foreach (node_load_multiple(array_keys($results['node'])) as $node) {
$node->field_flag[LANGUAGE_NONE][0]['value'] = 0;
node_save($node);
}
}
Note
If you have a large amount of content, this database update should make use of the Batch API so that it can process nodes in chunks in order to avoid hitting memory limits or timeouts. Take a look at the Code section athttps://api.drupal.org/api/drupal/modules%21system%21system.api.php/function/hook_update_N/7 for further documentation.
Now, let's run database updates to see the database update in action:
$ drush --verbose updatedb
Mymodule 7100 Set default value of 0 for field_flag on existing content.
Do you wish to run all pending updates? (y/n): y
Executing mymodule_update_7100 [notice]
Performed update: mymodule_update_7100 [ok]
'all' cache was cleared. [success]
Finished performing updates. [ok]
Once we have run database updates, we can verify that the existing content has the right default values by inspecting the database:
$ drush sql-cli
Welcome to the MySQL monitor. Commands end with ; or \g.
mysql> select entity_id, field_flag_value from field_data_field_flag;
+-----------+------------------+
| entity_id | field_flag_value |
+-----------+------------------+
| 1 | 0 |
| 2 | 0 |
| 3 | 0 |
| 4 | 0 |
+-----------+------------------+
We can see that each node has a value of 0 for the Flag field, which is what we initially wanted. Now that we know how to write and execute database updates in Drush, let's move on to the next step in the update path.
Managing features
The Features module is the standard tool to export configuration into code for Drupal projects, so it can be under version control systems such as Git. The Features module is not perfect though and it can frustrate you at times until you understand how it works and its limitations (at least, that has been my personal experience with it so far). However, with the examples that we will see in this chapter, you will get a good understanding of it. Drush will be present throughout the whole process, of course.
There are two processes that we will use while working with the Features module:
· Exporting configuration from the database into a module's code: This can be achieved through the features-export command
· Importing configuration components located in a module's code into the database: This can be achieved through the features-revert command.
A common scenario involving these two processes is when you add a new field in your local environment and want this field to be installed in the development environment. You would export the field into the code at your local environment, then push your changes to the repository, and finally log in to the development environment to pull code changes and import the new configuration. Let's see the whole process with an example.
Note
Feature components can be safely exported into custom modules that already contain code in their module file.
Exporting configuration into code
Let's start by taking the field we added in the previous section (field_flag) and export it into a custom module. The first thing to do is to download and install the Features module:
$ drush pm-download features
Project features (7.x-2.2) downloaded to/.../sites/all/modules/contrib/features. [success]
$ drush --yes pm-enable features
The following extensions will be enabled: features
Do you really want to continue? (y/n): y
features was enabled successfully. [ok]
Once the Features module has been installed, we can export the field into code. A field is composed of a field base, which contains the field definition and default settings, and a set of field instances. Each instance represents a field attached to an entity. In this case, we have one field base (field_flag) and one field instance (the Flag field attached to the Basic Page content type). We are going to export these two into the existing custom module mymodule. The first thing we need to do is to figure out the machine name of the field base:
$ drush features-components
Enter a number to choose which component type to list.
[0] : Cancel
[1] : all
[2] : dependencies
[3] : field_base
[4] : field_instance
[5] : filter
[6] : image
[7] : menu_custom
[8] : menu_links
[9] : node
[10] : taxonomy
[11] : user_permission
[12] : user_role
[13] : views_view
3
Available sources
field_base:body
field_base:field_flag
field_base:comment_body
field_base:field_tags
field_base:field_image
We found it. field_base:field_flag is the field base of our Flag field. Let's export it into the module mymodule:
$ drush features-export mymodule field_base:field_flag
Module located at sites/all/modules/custom/mymodule will be updated. Do you want to continue? (y/n): y
Created module: mymodule in sites/all/modules/custom/mymodule [ok]
Now, we will repeat the operation for the field instance of Flag:
$ drush features-components
Enter a number to choose which component type to list.
[0] : Cancel
[1] : all
[2] : dependencies
[3] : field_base
[4] : field_instance
[5] : filter
[6] : image
[7] : menu_custom
[8] : menu_links
[9] : node
[10] : taxonomy
[11] : user_permission
[12] : user_role
[13] : views_view
4
Available sources
field_instance:comment-comment_node_article-comment_body
field_instance:comment-comment_node_page-comment_body
field_instance:node-article-body
field_instance:node-article-field_image
field_instance:node-article-field_tags
field_instance:node-page-body
field_instance:node-page-field_flag
Gotcha, the field instance is called field_instance:node-page-field_flag. Now, we can export it into the module mymodule:
$ drush features-export mymodule field_instance:node-page-field_flag
Module located at sites/all/modules/custom/mymodule will be updated. Do you want to continue? (y/n): y
Created module: mymodule in sites/all/modules/custom/mymodule [ok]
That's it. Now, we have the field base and field instance of the Flag field exported into code. Let's move on to the next step.
The user interface to export the feature components is more user friendly than the command-line interface; so, when in doubt, open it in a browser by navigating to Structure | Features | Create / Recreate and then select which components you want to export. Importing configuration into the database.
Let's try to delete the Flag field in our local environment and then run features-revert on the module mymodule so that its configuration gets imported into the database. The result should be that the Flag field gets reinstalled:
$ drush field-delete field_flag
Do you want to delete the field_flag field? (y/n): y
Drush has deleted the Flag field. We will now list the available fields to verify that field_flag is not present:
$ drush field-info fields
Field name Field type
comment_body text_long
body text_with_summary
field_tags taxonomy_term_reference
field_image image
It is now confirmed that field_flag is not listed in the preceding code. Now, we will revert the module mymodule, so the exported Flag field that it contains gets installed back into the database again:
$ drush features-revert mymodule
Do you really want to revert mymodule.field_base? (y/n): y
Reverted mymodule.field_base. [ok]
Do you really want to revert mymodule.field_instance? (y/n): y
Reverted mymodule.field_instance. [ok]
Finally, let's list again the available fields in the database:
$ drush field-info fields
Field name Field type
comment_body text_long
body text_with_summary
field_tags taxonomy_term_reference
field_image image
field_flag list_boolean
As we can see, in the preceding output, the field has been installed in our database. This was, at the bare minimum, the process of exporting and then importing configuration using the Features module. This strategy is used to apply new configuration in other environments, which is what we will do in the following section: Running the update path on a different environment.
The examples that we covered so far in this chapter taught us to write database updates and export configuration into a module. This should be enough insight to deploy our code into a different environment (for example, the development environment), and then run the updatepath.sh script in order to import the new configuration.
Running the update path on a different environment
So far in this chapter, we created a Flag field, exported it to an existing custom module called mymodule, and then wrote a database update that sets its default value to zero on the existing content. Let's suppose that we have committed this code to a version control system such as Git and then deployed it to the development environment, where:
· Drush is installed
· The Features module is installed in the Drupal project
· The custom module mymodule was installed, but it did not have the new code that we just deployed
· The script that contains the update path is located at /var/www/exampledev/update_path.sh
If we run the update path script on this environment, we should expect the Flag field to be added and set to zero for the existing content. Let's run it to see if we are right:
(Development) $ cd /var/www/exampledev/docroot
(Development) $ sh -x ../update_path.sh
Starting update path for 'current site'
We have initiated the execution of the update path script. We added the -x flag so that we can see each command within update_path.sh being executed and listed in the following output with a plus sign at the start of the line:
+ drush --verbose registry-rebuild
The registry has been rebuilt via registry_rebuild (A). [success]
All caches have been cleared with drush_registry_rebuild_cc_all. [success]
The registry has been rebuilt via drush_registry_rebuild_cc_all (B). [success]
There were 139 files in the registry before and 139 files now. All caches have been cleared with drush_registry_rebuild_cc_all. [success]
All registry rebuilds have been completed. [success]
The first step was completed and the registry has been rebuilt. Now, let's see the database update in action:
+ drush --verbose --yes updatedb
Mymodule 7100 Set default value of 0 for field_flag on existing content.
Do you wish to run all pending updates? (y/n): y
Executing mymodule_update_7100
Performed update: mymodule_update_7100 [ok]
'all' cache was cleared. [success]
+ drush --verbose cache-clear drush
'drush' cache was cleared. [success]
Our custom database update was completed successfully. Now, it's time to revert the exported components with the Features module:
+ drush --verbose --yes features-revert-all
The following modules will be reverted: mymodule
Do you really want to continue? (y/n): y
Reverted mymodule.field_base. [ok]
Reverted mymodule.field_instance. [ok]
The Features module found new components in the module mymodule and imported them; so, the new Flag field has been created. We complete the process by moving on to the last step that consists of clearing all caches:
+ drush --verbose --yes cache-clear all
'all' cache was cleared. [success]
+ echo Update path completed.
Update path completed.
Analyzing results
The update path was completed successfully. Let's check whether the Flag field has been created:
(Development) $ drush field-info fields
Field name Field type
comment_body text_long
body text_with_summary
field_tags taxonomy_term_reference
field_image image
field_flag list_boolean
This is correct. The Flag field exists in the database. Now, let's make sure that the existing content has the correct default value:
(Development) $ drush sql-cli
Welcome to the MySQL monitor. Commands end with ; or \g.
mysql> select * from field_data_field_flag;
Empty set (0.00 sec)
Wait! Why does the existing content not have the Flag field set to zero when we ran this same database update in our local environment? The reason is that the update path script runs database updates before importing configuration, so by the time our database update was executed, the Flag field was not installed yet. In the following section, we will fix this by programmatically installing the field during the database update.
We could alter the update path script so that it runs drush features-revert-all before running database updates, but this would make it impossible to make changes in the database before importing a new configuration.
Reverting the feature components programmatically
As we saw in the previous section, there are cases where we need to import configuration manually before we run database updates. Therefore, we will add a new database update to the module mymodule where we do the following:
· Import the Flag field configuration located at module mymodule
· Make sure that the field is created and throws an error otherwise
· Set a default value for this field for the existing content
Here is sites/all/modules/custom/mymodule/mymodule.install with the new database update:
<?php
/**
* @file
*
* Install hook implementations for module mymodule.
*/
/**
* Dummy database update.
*/
function mymodule_update_7100(&$sandbox) {
// This database update failed so we have moved the code
// to the next database update with a few adjustments.
}
/**
* Set default value of 0 for field_flag on existing content.
*/
function mymodule_update_7101(&$sandbox) {
// Import field Flag into the database.
$items['mymodule'] = array('field_base', 'field_instance');
features_revert($items);
// Make sure that the field Flag has been installed.
if (empty(field_info_instance('node', 'field_flag', 'page'))) {
$t_args = array('@function' => __FUNCTION__);
throw new DrupalUpdateException(t('Field flag was not found in update @function.', $t_args));
}
// Load up all Basic Page nodes.
$query = new EntityFieldQuery();
$query->entityCondition('entity_type', 'node')
->entityCondition('bundle', 'page');
$results = $query->execute();
// Loop over each Page node and set field_flag to 0.
foreach (node_load_multiple(array_keys($results['node'])) as $node) {
$node->field_flag[LANGUAGE_NONE][0]['value'] = 0;
node_save($node);
}
}
We removed code at mymodule_update_7100() as it failed and then added a new database update at mymodule_update_7101() where it first installs the Flag field before we work with it. Now, we can push this database update to the development environment. Once the code is here, we can run the update path script again:
(Development) $ cd /var/www/exampledev/docroot
(Development) $ sh ../scripts/update_path.sh
Starting update path.
...
Executing mymodule_update_7101 [notice]
WD features: Revert completed for mymodule / field_base. [notice]
WD features: Revert completed for mymodule / field_instance. [notice]
Performed update: mymodule_update_7101 [ok]
...
Update path completed.
As we can see, in the preceding code, the feature components in the module mymodule were imported during the database update, thus installing the Flag field. The following code confirmed that the Flag field was created:
// Make sure that the field Flag has been installed.
if (empty(field_info_instance('node', 'field_flag', 'page'))) {
$t_args = array('@function' => __FUNCTION__);
throw new DrupalUpdateException(t('Field flag was not found in update @function.', $t_args));
}
We can finally verify that the existing content has the default value of 0 for the Flag field:
(Development) $ drush sql-cli
Welcome to the MySQL monitor. Commands end with ; or \g.
mysql> select entity_id, field_flag_value from field_data_field_flag;
+-----------+------------------+
| entity_id | field_flag_value |
+-----------+------------------+
| 8 | 0 |
| 9 | 0 |
| 10 | 0 |
| 11 | 0 |
| 12 | 0 |
| 13 | 0 |
+-----------+------------------+
6 rows in set (0.00 sec)
Yippee! The field has been installed and it has the right value for the existing content.
Summary
Keeping code and configuration together is one of the most important challenges in a Drupal project. In this chapter, we covered a strategy to accomplish this challenge, using a script that we called the update path. Next, we went through each of its steps in detail, explaining some useful scenarios in order to gain further insight into what these are meant to accomplish.
We started by explaining what Drupal's registry is and how to make sure that it does not break while bootstrapping, using the registry-rebuild Drush command. We actually broke the registry of a sample Drupal project and demonstrated how Registry Rebuild can get it back to work.
The next step in the update path discussed running database updates. We wrote a custom database update on a module and then executed it using Drush. The last step on the update path consisted of importing configuration using the Features module. Thanks to the Features module, we are able to export all sorts of configuration from a Drupal project into code, so it can be under version control and then deployed in other environments.
In the next chapter, we will dive into running tasks in Drupal projects. Drush has a lot of tools in its belt for this, which we will discover through practical examples.