Praise for Gray Hat Hacking: The Ethical Hacker’s Handbook, Fourth Edition (2015)
PART III. Advanced Malware Analysis
CHAPTER 22. Analyzing 64-bit Malware
As users shift to new technologies, so do the malware authors. Since the introduction of the AMD64 architecture, users have been slowly migrating to the new platform. Much time has passed since then, and today persistent malware has to keep up with the pace and support the new architecture. Different architecture introduces some new challenges for both sides. Like malware authors, the researchers have to keep up with the changes and build new tools and techniques. Because AMD64 natively supports the Intel 32-bit instruction set, the transition is not so challenging, and new architecture will feel very familiar. Still, there are some small differences that should be noted. Also, the new architecture requires the reverser’s toolbox to be updated to keep up with the changes.
In this chapter, we cover the following topics:
• The notable differences between the 64-bit architecture and the 32-bit architecture
• The process of reverse-engineering malware
Overview of the AMD64 Architecture
In 2003, AMD released its first Opteron processor, which was based on the new 64-bit architecture. Its importance came from the fact that it natively supported the Intel x86 instruction set and therefore was fully backward compatible with existing software at the time. Some of the commonly used synonyms for this architecture are AMD64, x86_64, and x64. Today, AMD64 is the prevalent desktop processor architecture, and in time, Intel followed AMD and implemented this architecture under the Intel64 name. Multicore processors such as i3, i5, i7, and others are all based on the AMD64, and most software can be found in 32- and 64-bit versions. Following is a list of Microsoft Windows operating systems that come in 64-bit versions:
• Windows XP Professional x64 Edition
• Windows Server 2003 x64 Edition
• Windows Vista x64 Edition
• Windows 7 x64 Edition
• Windows 2008 (R2 only available as 64-bit version)
 NOTE Intel64 is the same architecture as AMD64, and is discussed in this chapter. Intel has developed another 64-bit architecture called Itanium. That architecture is not related to the Intel64 or Intel x86.
The new architecture brings several noticeable changes that become evident while reverse-engineering 64-bit code.
The general-purpose registers EAX, EBX, ECX, EDX, ESI, EDI, EBP, and ESP have been extended to 64 bits and can be accessed by replacing “E” prefix with “R”: that is, RAX, RBX, RCX, RDX, RSI, RDI, RBP, and RSP, respectively. The instruction pointer register EIP has also been extended and renamed using the same template as RIP. All registers present in x86 can still be accessed by their old names, which means that general-purpose registers are available in four different sizes. For example, the RAX register can be accessed as follows:
• 8 bit AL and AH
• 16 bit AX
• 32 bit EAX
• 64 bit RAX
The good news is that eight new general-purpose registers have been introduced: R8, R9, R10, R11, R12, R13, R14, and R15. These registers can be used to hold more variables in the CPU, resulting in faster operations and less use of stack space. With the introduction of additional registers, x64 also has a new calling convention that will be discussed later.
The new architecture also defines a new 64-bit virtual address format to support bigger physical and virtual address space. This means computers can have more RAM, and programs have more virtual space to use. Currently, only 48 bits (from the theoretical 64) can be used in virtual addressing to access up to 256TB of RAM, whereas 52 bits can be used for physical addresses.
AMD64 Calling Conventions
Based on the compiler implementations, there are two AMD64 calling conventions for two major operating systems:
• GCC implementation Uses the System V calling convention on Linux/Unix-like operating systems.
• Visual Studio implementation Extends the Microsoft __fastcall calling convention on Windows operating systems.
System V Calling Convention
The System V calling convention for the AMD64 architecture is used by the following popular operating systems:
• Solaris
• GNU/Linux
• FreeBSD
• Mac OS X
This convention passes the first six arguments in the following register order:
• RDI, RSI, RDX, RCX, R8, and R9
The floating point arguments are passed in the following register order:
• XMM0, XMM1, XMM2, XMM3, XMM4, XMM5, XMM6, and XMM7
In cases where a function takes more arguments than the number of argument registers, the rest will be passed over the stack.
To see how this calling convention looks in practice, let’s examine a dummy function:

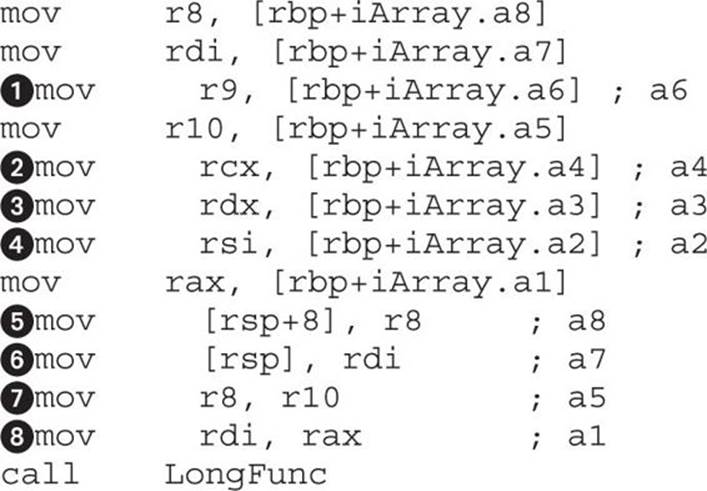
The LongFunc function takes eight arguments, which is more than the six registers available for passing integer arguments. The last two arguments will be passed on the stack. The arguments passed through registers follow the order of the function declaration. In the previous example, the first argument goes in RDI, the next one in RSI, and so on. The remaining two arguments, a7 and a8, will be passed over the stack like on the x86 architecture. Arguments are pushed on the stack from the end, so the argument a8 is pushed before a7. To illustrate this point, the following is an example of the previous function compiled on Linux with the gcc compiler:
This was generated using IDA Pro after the following function declaration was applied to the LongFunc:
![]()
NOTE IDA uses __fastcall to define the AMD64 calling convention and distinguishes the respective Windows and Linux versions via the appropriate Compiler (for example, GNU C++ or Visual C++) and Pointer Size (for example, 64 bit) settings, accessed from the Options | Compiler menu.
In the previous listing, the arguments passed by registers are labeled ![]() ,
, ![]() ,
, ![]() ,
, ![]() ,
, ![]() , and
, and ![]() (that is, from EDI to R9) and those passed over the stack are labeled
(that is, from EDI to R9) and those passed over the stack are labeled ![]() and
and ![]() .
.
Microsoft Windows Calling Convention
The Microsoft AMD64 calling convention implementation is based on the x86 __fastcall calling convention. Unlike the x86 version, the 64-bit version passes the first four arguments in the following registers:
• RCX, RDX, R8, and R9
The floating point arguments are passed in the following register order:
• XMM0, XMM1, XMM2, and XMM3
All other arguments are passed over the stack, in order, from right to left.
To see how this calling convention looks in practice, let’s again examine the dummy function from the previous section:

The LongFunc function takes eight arguments, which is more than the four registers available in the Windows __fastcall calling convention. The last four arguments will be passed on the stack. The arguments passed through registers follow the order of the function declaration. In the previous example, the first argument goes in RCX and the following ones in RDX, R8, and R9. The remaining four arguments, a5, a6, a7, and a8, will be passed on the stack like in the x86 architecture. Arguments are pushed on the stack from the right side in the following order: a8, a7, a6,and a5. For illustration purposes, the following is an example of the previous function compiled on Windows with Visual Studio:
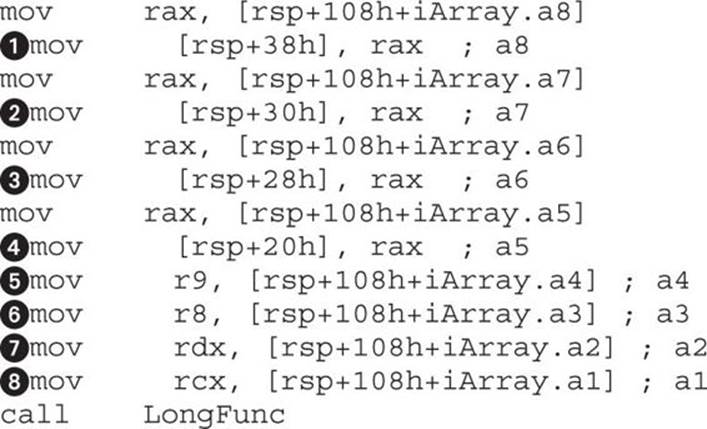
This listing was generated using IDA after the following function declaration was applied to the LongFunc:
![]()
In the preceding listing, the arguments passed by registers are labeled ![]() to
to ![]() (from RCX to R9) and those passed over the stack are
(from RCX to R9) and those passed over the stack are ![]() to
to ![]() .
.
Decrypting C&C Domains
A common task for malware researchers is getting a list of all command and control (C&C) domains that are used in a particular malware sample. An easy way to get this information is to run the desired sample through one or more sandbox tools that produce a report on the malware activity and sometimes even contain packet captures of network communication. If that doesn’t produce results, you can always run the sample and collect the needed information by monitoring network traffic and extracting data from the captures. The mentioned techniques can give you only a part of the picture if usage of specific domains is not exhibited during the runtime for whatever reason. Some malware samples use the time and date to choose the C&C domain, so you might consider leaving a sample running for a while and hopefully you will observe all used domains. The only way to definitively determine all the used domains and understand the way they are chosen is to reverse engineer the malware sample. This might seem a tedious process, but some techniques can be used to make it faster.
Following are some common ways malware stores C&C information such as domain names and/or IP addresses:
• Information is stored in plain text inside the sample.
• Information is obfuscated/encrypted and stored inside the sample.
• A domain-name generator algorithm (DGA) is used to build different domains based on some parameter, usually time.
• Information is stored inside a configuration file that may be additionally encrypted.
In this section, we will analyze a 64-bit component of Tidserv, also known as Alureon, TDSS, and TDL. This is a fairly complex malware sample that contains 32- and 64-bit components with functionality such as backdooring the infected computer, installing a kernel rootkit, protecting the malware from antivirus products, and more. More specifically, we will analyze a component named CMD64 (MD5: E6B6942F902DB54E9BAB058805BA0377), which is encrypted in the resources section of the dropper (MD5: a92829c419ed7387f4fa7ad2ba250017).
The quest for the C&C domains begins with the configuration file that was found encrypted in the dropper resource section. The recovered file has the following content, which has the potential of being the information we are looking for:
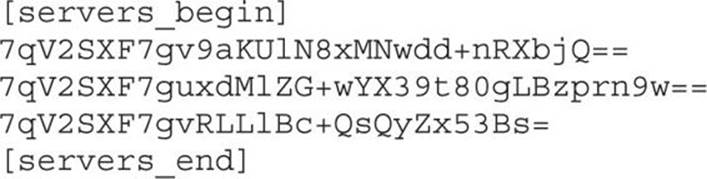
The equal signs at the end of the strings hint at the possible use of BASE64 encoding. Unfortunately, things are not always simple, and decoding the strings in Python doesn’t return anything obvious:

To get the information about the encryption and encoding used to obfuscate this data, we must look at the sample code. At this point, three good indicators can be used to find the needed information:
• Some interesting data is located between [servers_begin] and [servers_end].
• Some kind of encoding that looks like BASE64 is used to obfuscate information.
• There is a strong possibility that an extra layer of encryption is used to additionally protect server information.
After opening the CMD64 sample in IDA, we need to perform an exploratory analysis. This relatively quick look at the binary should provide the following insights about the analyzed sample:
• A quick scroll through the function code should give us a feel about the code structure and any protections/obfuscations used. A simple heuristic for detecting obfuscations is to use the IDA graph view and scroll through the code section (blue part) in the overview navigator. Obfuscated code tends to fall into two categories: complex graph structure with many nodes and connections, and very long nodes with little branches. If the code mostly falls into these categories, it could indicate potential analysis challenges. There are, of course, legitimate reasons why non-obfuscated functions may look like that, such as complex code with switch statements or hash functions.
• Strings window (invoked by pressing F12) can provide a lot of information in case of unencrypted strings. Strings can give hints about malware functionality, C&C information, and other interesting data that speeds up the reversing process. String obfuscation is probably used when there is a small number of printable strings presented in a binary and the data section seems to be filled with random data with cross-references to code sections.
• The Imports window, accessible from View | Open subviews | Imports, contains the names of the system API functions used by the program. This information can provide important hints about the functionality of the program without actually analyzing the code. There are cases, though, when the import table doesn’t contain all the functions used by the program, so this information should be taken with caution. Some functions are not commonly found in legitimate applications but are usually found in malware. The presence of these functions doesn’t necessarily mean the application is malicious, but it does indicate a potentially interesting sample.
• Here is a list of some of the Windows API functions commonly used by malware: ShellExecute, GetThreadContext, CreateProcessA, Read/WriteProcessMemory, CreateRemoteThread, ZwUnmapViewOfSection, OpenProcess, SetWindowsHookEx, VirtualProtectEx,FindResource, and LockResource.
After performing the initial analysis, we can observe the following in the target binary:
• There seem to be only a few functions in the binary. All except one seem to have normal-looking control flow (CF), without any complex graphs. However, one function (sub_180002FC0) has a very long CFG, but is still not a complex-looking graph. It could be some kind of obfuscation or just bad coding style, where all functionality is implemented in one function. The control flow graph of this function is shown in Figure 22-1.
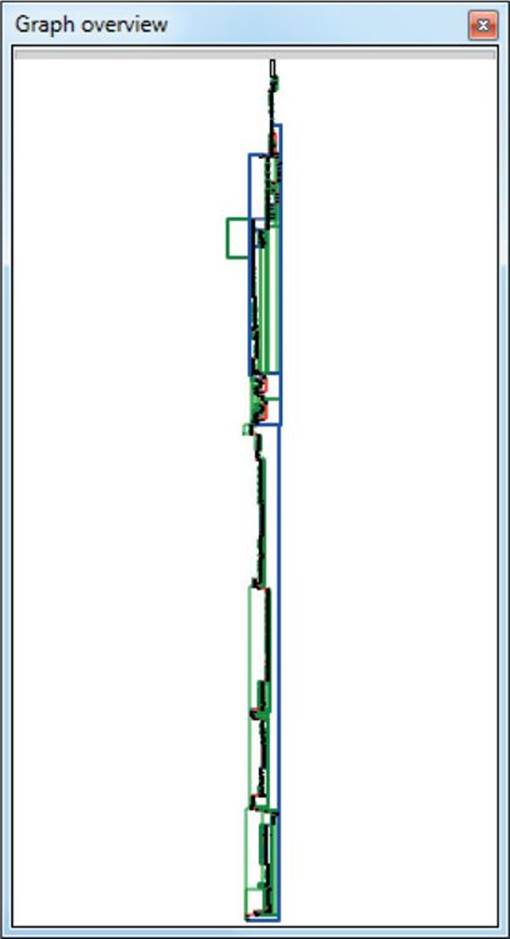
Figure 22-1 Control flow graph view for sub_180002FC0
• The Strings window brings good news because it shows many cleartext strings that seem related to the threat functionality, as shown in Figure 22-2. The strings [servers_begin] and [servers_end] can be immediately related to the malware configuration file. To keep track of this finding, we can double-click the [servers_begin] string at address 0x18000A4A8 in the Strings window and press ALT-M to add the IDA bookmark for that location. After the exploratory analysis, we will get back to these findings. Another string that looks like a User-Agent and seems related to the malware network communication is Mozilla/5.0 (Windows; U; Windows NT 6.0; en-US; rv:1.9.1.1) GeckaSeka/20090911 Firefox/3.5.1.
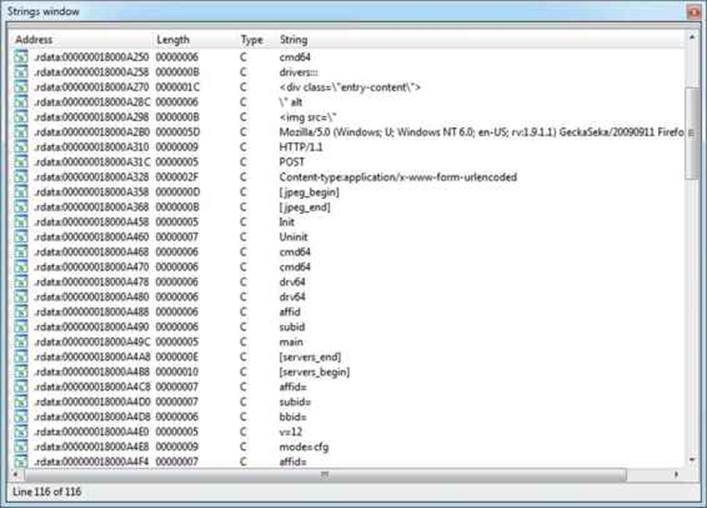
Figure 22-2 The Tidserv Strings window
• Finally, by opening the Imports windows and looking at the API names, as shown in Figure 22-3, we can observe a few things:
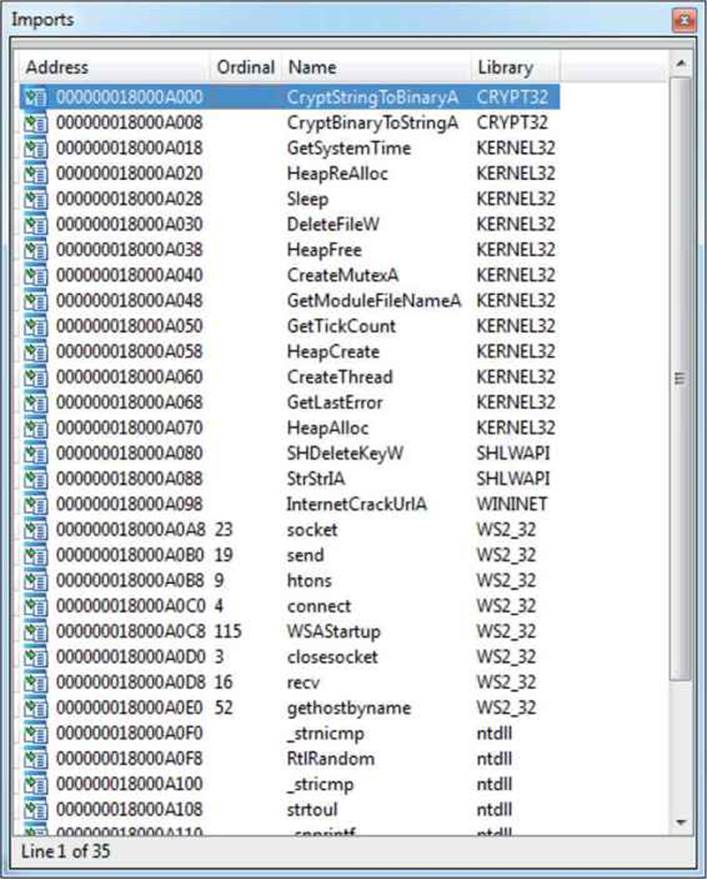
Figure 22-3 The Tidserv Imports window
• The many network-related functions indicate the sample has networking capabilities and therefore seems like a good candidate to look for any C&C functionality. Some of the network-related APIs are socket, send, recv, htons, gethostbyname, connect, WSAStartup, andInternetCrackUrlA.
• We can see some traces of cryptographic functionality because the sample imports two functions from the CRYPT32 library. The following two functions can be used to find any crypto capabilities of the sample: CryptStringToBinaryA and CryptBinaryToStringA.
• The existence of the CreateMutexA import indicates the sample may be using a mutex to ensure that multiple copies of the threat are not running at the same time. The mutex names can serve as good indicators of compromise and should be always noted in the threat analysis report.
NOTE All the interesting things discovered in the exploratory analysis phase should be noted and marked up in the IDB. One way to keep track of these findings is with IDA bookmarks. A bookmark can be added by positioning the cursor at the desired address, pressing ALT-M, and giving the bookmark a meaningful name. You can see the list of available bookmarks by pressing CTRL-M.
Let’s return to the original task of finding the C&C domains defined in the configuration file. Here is where we currently are:
• The configuration file contains obfuscated strings between the [servers_begin] and [servers_end] tags, which we believe are the C&C domains.
• The CMD64 sample has a code reference to strings that indicates parsing of the configuration file. These strings have been bookmarked in IDA.
• The two crypto functions referenced in the Imports section could be related to the encoded/encrypted server list strings.
It is time to review the findings from the exploratory step and continue our analysis. We continue by opening the Bookmarks window with CTRL-M and selecting the bookmark name for the 0x18000A4A8 address. This will jump to the selected location in the IDA View window:
![]()
To find the locations in code where this string is used and understand the process of parsing the configuration file, we press CTRL-X. There is only a single location (0x180003621) where the string is used, which makes the analysis easier.
NOTE In cases when there are multiple referenced locations, it is useful to first have a quick look at all of them before proceeding and deciding on a location to follow and analyze next.
At this point, it is necessary to understand the code around the 0x180003621 address and determine whether it contains relevant functionality. There are two ways to proceed in this case:
• Top-down approach Code is followed linearly (line by line) in order to understand its functionality and find the desired information. This approach can be very time consuming, and sometimes it’s very difficult to understand the big picture about the code’s functionality while slowly advancing through it.
• Hybrid top-down approach Data-flow analysis is used to go over the code as quickly as possible and identify the parts relevant to the question at hand. With this approach, numerous premises are assumed to explain the code functionality, but not all of them need to be proved or are necessarily correct. The assumed model that explains the code is used during analysis until it has been proven wrong or insufficient, at which point it has to be corrected and refined to work again.
In our case, the hybrid top-down approach will be used to discover the code functionality. This approach usually requires several passes to find and understand all the necessary functionality.
The analysis starts from the address of the code reference to the [servers_begin] string, at 0x180003621. Here is the assembly listing for the code around the string reference:
![]()
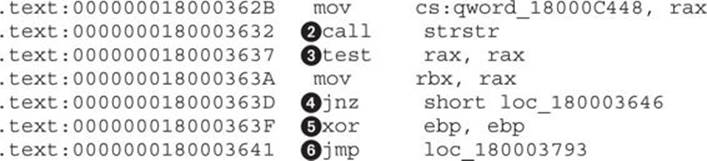
By reading this listing, we can make several key observations:
• The strstr() function![]() is used to find the beginning of the servers section in the configuration file.
is used to find the beginning of the servers section in the configuration file.
• The R13 register![]() most probably points to the whole configuration file because it is used as an argument to strstr().
most probably points to the whole configuration file because it is used as an argument to strstr().
• The test![]() checks whether the servers section is found and, if it is, continues to the address 0x180003646
checks whether the servers section is found and, if it is, continues to the address 0x180003646![]() .
.
• The code at ![]() and
and ![]() is for handling a failure to find the configuration section. Zeroing out the EBP register is a good indicator that it will contain an important value related to the server list parsing. The JMP instruction at the end of the listing reveals the address of the end of the server-parsing functionality. This pattern of jumping to the end of the functional code unit is very useful in finding code boundaries. It gives information about how long the code is that implements a specific functionality. We rename the destination of the jump by positioning the cursor over the address, pressing N, and providing the name _servers_parsing_end.
is for handling a failure to find the configuration section. Zeroing out the EBP register is a good indicator that it will contain an important value related to the server list parsing. The JMP instruction at the end of the listing reveals the address of the end of the server-parsing functionality. This pattern of jumping to the end of the functional code unit is very useful in finding code boundaries. It gives information about how long the code is that implements a specific functionality. We rename the destination of the jump by positioning the cursor over the address, pressing N, and providing the name _servers_parsing_end.
NOTE In version 6.4, IDA finally improved identifier highlighting. In this version, IDA is able to highlight all uses of a specific register, taking into account different register sizes. This means that selecting the EAX register will also highlight the following occurrences: AL, AX, EAX, and RAX. This is especially useful when performing data-flow tracking on 64-bit programs by just following the highlighted lines.
Continuing from the previous listing, let’s move down and look at the next section:
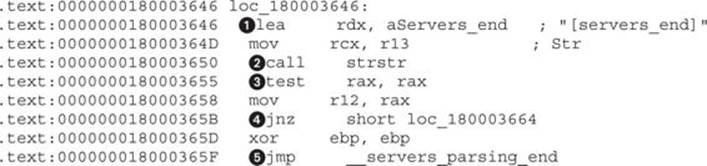
The code is almost the same as in the previous listing. At ![]() , the string is loaded and passed to strstr() at
, the string is loaded and passed to strstr() at ![]() . At
. At ![]() , a check is performed to see whether the string was found, and a successful conditional jump is taken at
, a check is performed to see whether the string was found, and a successful conditional jump is taken at ![]() . In case the string was not found, a jump, like in previous listing, is taken at
. In case the string was not found, a jump, like in previous listing, is taken at ![]() to the end of the server-parsing code.
to the end of the server-parsing code.
From the previous two listings, it’s evident that code is trying to isolate the server’s part in the configuration file. Moving on, we skip some code in the upcoming listings for the sake of brevity and to illustrate that some code can be skipped and you still have a good understanding of the code functionality.

This code listing is a good example of how small details can influence your understanding of code based on the context in which it appears. The byte-compare instruction at ![]() by itself has no real meaning, but if we think of it in the context of string parsing, then the constant 0Ahrepresents \n, the ASCII linefeed character. Further, at
by itself has no real meaning, but if we think of it in the context of string parsing, then the constant 0Ahrepresents \n, the ASCII linefeed character. Further, at ![]() , a counter register is incremented each time a new line is encountered, which means it’s used to count the number of lines or the number of servers that exist in the configuration section. The counter is saved to a global variable at
, a counter register is incremented each time a new line is encountered, which means it’s used to count the number of lines or the number of servers that exist in the configuration section. The counter is saved to a global variable at ![]() . Because we have an idea about the purpose of the global variable, we immediately rename it to iNumberOfServers. At
. Because we have an idea about the purpose of the global variable, we immediately rename it to iNumberOfServers. At ![]() , the offset register RAX is incremented to iterate over the configuration section, and at
, the offset register RAX is incremented to iterate over the configuration section, and at ![]() , the loop is closed to point to
, the loop is closed to point to ![]() .
.
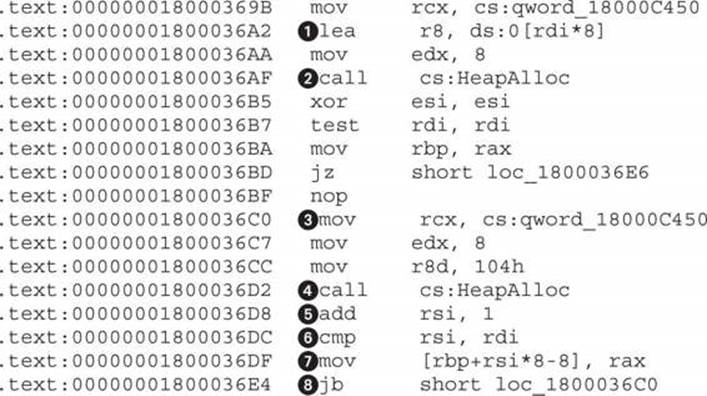
This code is responsible for allocating space for all the servers in the configuration file. First, at ![]() is a calculation for how much space it takes to store pointers to a number of servers specified in RDI register. In previous code listings, we have seen that RDI is used to count the number of servers (or lines) from the configuration. Here, that number is multiplied by 8, which is the size of a 64-bit pointer, and the resulting size is allocated at
is a calculation for how much space it takes to store pointers to a number of servers specified in RDI register. In previous code listings, we have seen that RDI is used to count the number of servers (or lines) from the configuration. Here, that number is multiplied by 8, which is the size of a 64-bit pointer, and the resulting size is allocated at ![]() by calling HeapAlloc. After space for pointers is allocated, a second round of allocations starts at
by calling HeapAlloc. After space for pointers is allocated, a second round of allocations starts at ![]() and runs in a loop until
and runs in a loop until ![]() . TheRSI register at
. TheRSI register at ![]() is used as a counter and compared to RDI at
is used as a counter and compared to RDI at ![]() to check whether all pointers have been filled. At
to check whether all pointers have been filled. At ![]() , the allocated memory is stored in the pointer location pointed to by the RBP register while RSI is used as an offset.
, the allocated memory is stored in the pointer location pointed to by the RBP register while RSI is used as an offset.
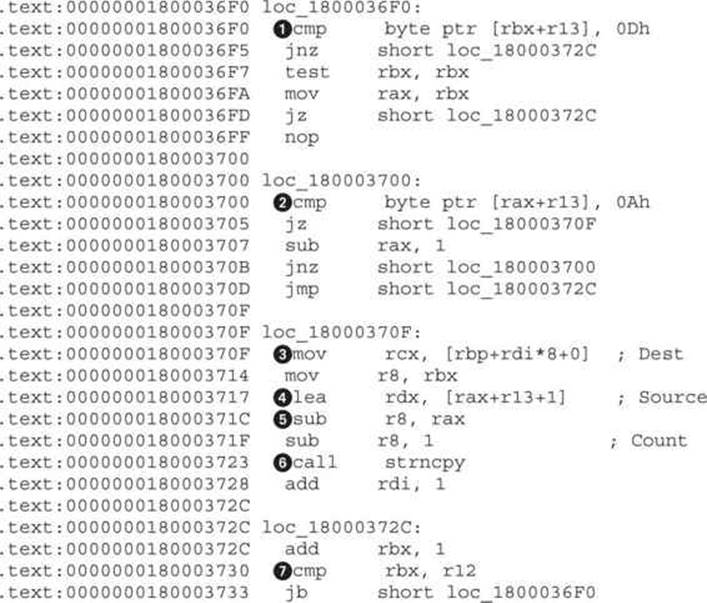
This code copies the server strings in the already allocated memory. At ![]() and
and ![]() , the code searches for the start (0Ah or \n) and end (0Dh or \r) locations of the server string. The code looks for these two specific tokens because each server string is located on a separate line, which is delimited by \r\n characters:
, the code searches for the start (0Ah or \n) and end (0Dh or \r) locations of the server string. The code looks for these two specific tokens because each server string is located on a separate line, which is delimited by \r\n characters:
…\r\nServer1\r\nServer2\r\n…
By looking for data between \n and \r, the code can extract only the server string and skip delimiters. Locations ![]() ,
, ![]() , and
, and ![]() load the destination, source, and size, respectively, for the string-copy function at
load the destination, source, and size, respectively, for the string-copy function at ![]() . The compare at
. The compare at ![]() checks whether all strings have been copied to their new locations and, if not, jumps to
checks whether all strings have been copied to their new locations and, if not, jumps to ![]() .
.

Continuing our analysis, we reach the end of the server-parsing code at the __servers_parsing_end label![]() . The move instruction
. The move instruction![]() stores the pointer to the new servers array in RBP to the global variable. Finally, we rename this global variable to pServerList. At this point, there is still no explanation for how the server strings are decoded or decrypted, but we do have information on where the list is stored in memory. By cross-referencing all the locations at which the pServerList pointer is used, we know that one of them has to actually de-obfuscate the strings.
stores the pointer to the new servers array in RBP to the global variable. Finally, we rename this global variable to pServerList. At this point, there is still no explanation for how the server strings are decoded or decrypted, but we do have information on where the list is stored in memory. By cross-referencing all the locations at which the pServerList pointer is used, we know that one of them has to actually de-obfuscate the strings.
Go to the address of the pServerList at 0x18000C440 and press CTRL-X to get all the cross-references to this variable, as shown here:
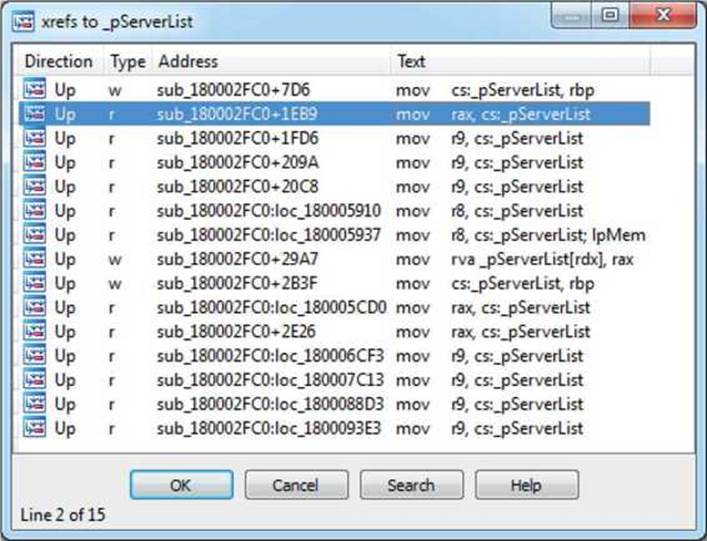
The first result will be skipped because it has already been analyzed and its type is w (write). We are interested in r (read) types, which signify places where the variable is used. We continue analysis by looking at the function sub_180002FC0+1EB9.
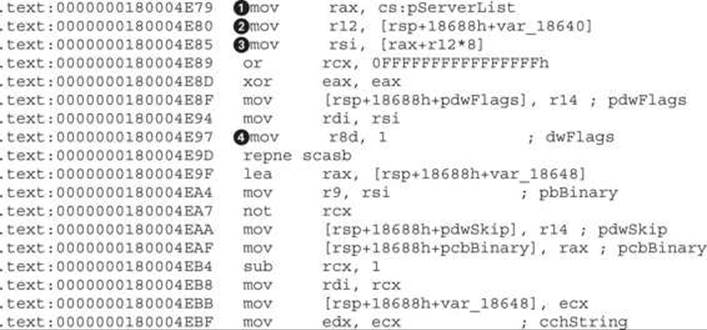
When we go to the address 0x180004E79, one thing should immediately jump to our attention: a call to CryptStringToBinaryA. This is a clear indicator that some kind of cryptographic operation is going on:
![]()
Before starting this analysis, we apply the function prototype for CryptStringToBinaryA by positioning cursor on it, pressing Y, and setting the following as the prototype:

First, to check that the input to the crypto function at ![]() is actually one of the strings in pServerList, we backtrack the argument to its source location and confirm that the pszString argument in RSI
is actually one of the strings in pServerList, we backtrack the argument to its source location and confirm that the pszString argument in RSI![]() actually comes from RAX
actually comes from RAX![]() and pServerList
and pServerList![]() . The counter at
. The counter at ![]() is used to loop over all loaded servers in the array. The dwFlags argument
is used to loop over all loaded servers in the array. The dwFlags argument![]() defines the type of conversion the crypto function will perform. Based on the MSDN documentation, the constant 1 belongs to CRYPT_STRING_BASE64. To apply the correct enum to the constant, we click the number and press M, which opens the enum windows. If the CRYPT_STRING_BASE64 is not already in the menu, select <NEW> and type the enum name until it appears.
defines the type of conversion the crypto function will perform. Based on the MSDN documentation, the constant 1 belongs to CRYPT_STRING_BASE64. To apply the correct enum to the constant, we click the number and press M, which opens the enum windows. If the CRYPT_STRING_BASE64 is not already in the menu, select <NEW> and type the enum name until it appears.
NOTE By default, IDA loads only some enum constants. If the specific enum constant is not in the enums window but is defined in Microsoft libraries, it has to be manually loaded or defined. In case of CRYPT_STRING_BASE64, it is necessary to first load the correct type library. Go to View | Open subviews | Type libraries or press SHIFT-F11. In the new windows, select Ins from the right-click window or press the INSERT key and select mssdk_win7. Now the CRYPT_STRING_* enums will be available in the enums list.
Calling CryptStringToBinaryA and decoding the string without errors gives a good indication that server strings are, indeed, BASE64-encoded data. However, because servers are not printable after decoding, there is another layer of obfuscation. To find out what it is, we have to follow the code a little bit more.
Just after the call to decode strings, there is a very familiar code snippet that is very often found in malware:

This listing shows a RC4 key-scheduling algorithm. A small loop iterates over 0x100 values and initializes the array (var_185B8) with the values. RC4 is one of the very common encryption algorithms that malware authors use because of its simple algorithm that brings more security over the usual XOR with a constant key.
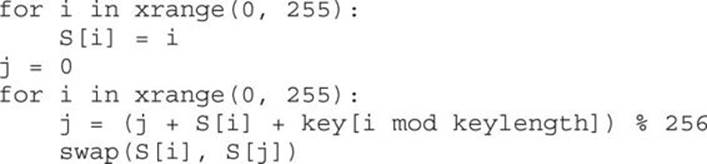
NOTE The RC4 key-scheduling algorithm can be quickly identified by its two loops, which are responsible for generating a permutation table that is then used for encrypting and decrypting data. The first loop will initialize a 256-byte memory array with integers from 1 to 256. The following loop is responsible for permuting the array based on the supplied key. Here is pseudo-code for the algorithm to be used for identification of RC4:
To confirm it is actually RC4, we look at the loop that permutes the RC4 array:
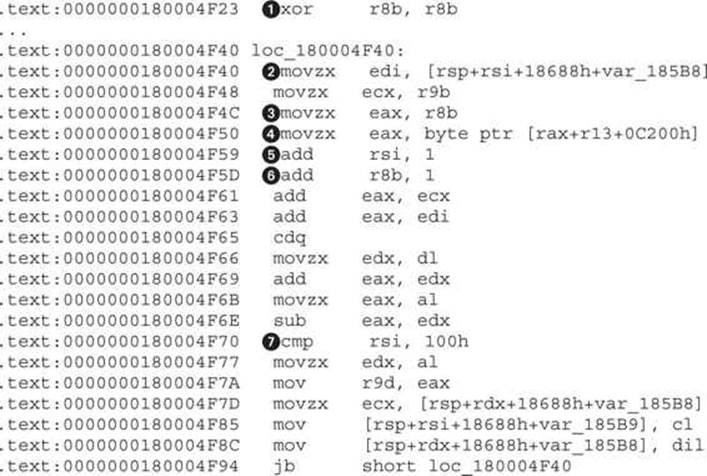
The array permutation loop contains the most important information about RC4—the key. By identifying the key, we can take it out and decrypt the server strings without running the sample. Without understanding the code in the previous listing, we know that there are only two locations from which the decryption key can be loaded: ![]() and
and ![]() . In the array-initialization code, we have determined that the var_185B8 array contains the RC4 table and therefore cannot point to the key, so that excludes
. In the array-initialization code, we have determined that the var_185B8 array contains the RC4 table and therefore cannot point to the key, so that excludes ![]() . To find the address of the key, we need to decompose the expression at
. To find the address of the key, we need to decompose the expression at ![]() . The RAX
. The RAX![]() is initialized from R8
is initialized from R8![]() . The register R8 is initialized to 0 at
. The register R8 is initialized to 0 at ![]() and incremented by 1, once per loop iteration, at
and incremented by 1, once per loop iteration, at ![]() . This is a strong indicator that this register is used as a counter and doesn’t point to the key. This leaves register R13, which needs to be backtracked in the code to find its value. Highlighting R13 and following it up to the initialization address leads to the following code:
. This is a strong indicator that this register is used as a counter and doesn’t point to the key. This leaves register R13, which needs to be backtracked in the code to find its value. Highlighting R13 and following it up to the initialization address leads to the following code:
.text:0000000180004A0C lea r13, cs:180000000h
The only missing part to write the decryption code is the key length. The length will be equal to the maximum offset of RAX![]() , but as RAX gets the value of R8B
, but as RAX gets the value of R8B![]() , we need to check whether there are any constraints for its value. R8 is incremented by 1 at
, we need to check whether there are any constraints for its value. R8 is incremented by 1 at ![]() in each loop, like RSI at
in each loop, like RSI at ![]() . This means that the maximum value of RSI is checked at
. This means that the maximum value of RSI is checked at ![]() to be 0x100 (or 256), which gives it the key length 256 at address 0x18000C200. The full address comes from the initial value of R13 (0x180000000), to which a constant of 0xC200 is added at
to be 0x100 (or 256), which gives it the key length 256 at address 0x18000C200. The full address comes from the initial value of R13 (0x180000000), to which a constant of 0xC200 is added at ![]() .
.
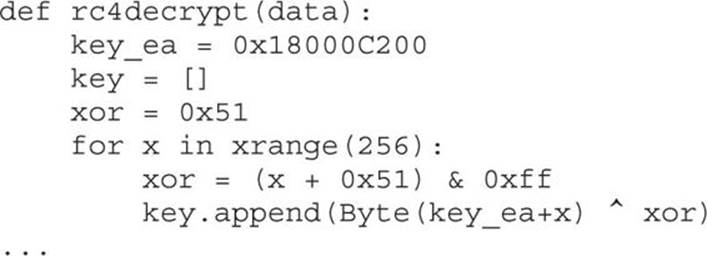
To test all of this, we write a IDAPython script that will decode and decrypt server strings using the discovered key:
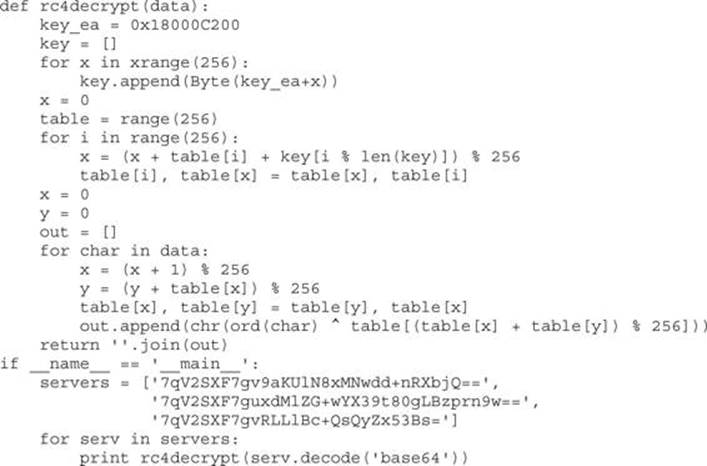
Running the script gives the following output for the encoded strings:
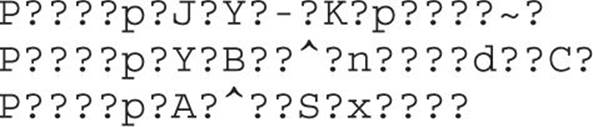
The given output doesn’t look valid, and if we assume the code was correctly implemented, this means the key is not correct. We need to perform the check one more time for all cross-references to the address of the key buffer and see whether the key is somehow modified before usage.
NOTE Another way to check whether the key data is modified before it’s used for decryption would be with dynamic analysis using a debugger. Placing a memory breakpoint on the location of the key would reveal whether there are code locations that modify the key.
To find all the references to the key location, we will use a new technique. Searching for strings in IDA can be easily defended against, but in this case, we are not dealing with obfuscated code, so a string-searching approach can be a quick solution.
The string search window can be invoked by pressing ALT-T. In this window, we specify 180000000 as a string and tick the “Find all occurrences” option. Fortunately, there are only nine results, as shown here:
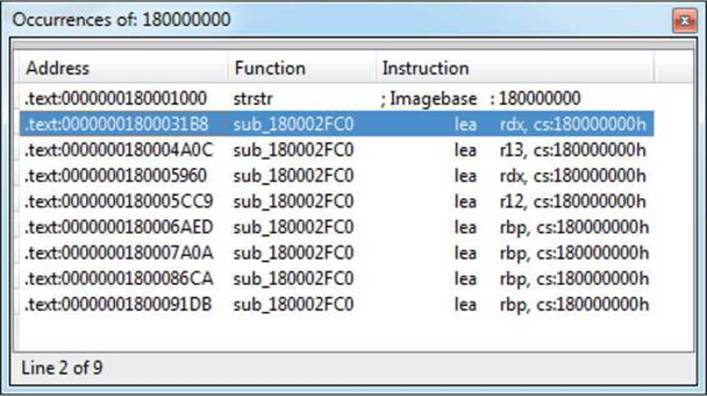
The first result is not interesting because it points to the strstr function, so we’ll take the following one at 0x1800031B8 (highlighted in the illustration). Just below that address is the following code:

This is exactly what we were looking for. The key is XORed at ![]() with a value calculated at
with a value calculated at ![]() . The size of decryption is 0x100 and is defined at
. The size of decryption is 0x100 and is defined at ![]() . The initial value of the XOR key is 0x51, as the RCX register is initialized to 0 (from R15) outside the loop at
. The initial value of the XOR key is 0x51, as the RCX register is initialized to 0 (from R15) outside the loop at ![]() and doesn’t influence the start value.
and doesn’t influence the start value.
By incorporating this new information, we can modify the previous script to XOR the key before loading and then test it again:
Output in IDA finally gives the full domains for the C&C servers:
http://dfsvegasmed.com
http://wahinotisifatu.com
http://owtotmyne.com
Example 22-1: Decrypting C&C Domains
NOTE This exercise is provided as an example rather than as a lab due to the fact that in order to perform the exercise, malicious code is needed.
This example exercise aims to give practical training for the methods and techniques described in the previous section. After reading the chapter, you should be able to reproduce the analysis and decrypt the server strings by yourself.
A component named CMD64 (MD5: E6B6942F902DB54E9BAB058805BA0377), which is part of Backdoor.Tidserv, will be analyzed. This component is located and encrypted in the resources section of the dropper (MD5: a92829c419ed7387f4fa7ad2ba250017).
NOTE We are dealing with malicious code, so be extra careful when dealing with the malware sample and never run it outside an isolated environment such as a virtual machine.
1. Download the sample with MD5: E6B6942F902DB54E9BAB058805BA0377 from www.virustotal.com and place it in your analysis environment (preferably a virtual one).
2. Open the sample in your favorite disassembler and follow the approach outlined in this chapter to find the string decryption routine.
3. Understand the string loading into memory, decoding, and decryption.
4. Write a script to decrypt the server list.
5. Additionally, you might want to decrypt the server list via dynamic analysis using a debugger. This would require setting up breakpoints at locations after the decryption and bypassing any anti-debugging protection.
Successfully completing this exercise should give you a solid foundation for malware analysis. Making assumptions is a major component of reverse engineering, and understanding the thought process involved will improve their correctness. This exercise also gives you practical experience for analyzing common malware configuration files.
Summary
As the popularity of the AMD64 architecture rises in the consumer market, malware authors are also starting to shift their attention to it. The success of this new architecture is in its backward compatibility with the old Intel x86 architecture, which allows all programs aimed at the old architecture to run without much problem on the new one. Currently, the only incentive for malware to be compiled as a 64-bit binary is the ability to inject code into other 64-bit processes and load kernel drivers that have to be 64-bit executables.
From a reverse-engineering perspective, the new architecture brings some changes to the calling convention and stack layout, but the instruction set will be familiar to all those used to x86. Adoption of the new architecture is still slow in the security community, so not all common tools support it. However, this is slowly changing for the better. Overall, it will take some time to get used to the small differences and the different tools, but as the demand rises, so will the availability and support of old and new tools.
The given walkthrough for finding the decrypted version of server strings hopefully gives you insight into the process of thinking when reverse engineering malware. Developing this process is a personal thing and is acquired via experience. Even though it might seem like it is unnecessary to hone this skill and just resort to debugging, there are situations where debugging is not possible or is very costly to set up. It is those cases that will make a difference and set you apart from others using only a single approach to reverse engineering.
For Further Reading
Backdoor.Tidserv www.symantec.com/security_response/writeup.jsp?docid=2008-091809-0911-99&tabid=2.
BASE64 algorithm en.wikipedia.org/wiki/Base64.
IDA Pro FindCrypt www.hexblog.com/?p=27.
IDA Pro FindCrypt2 www.hexblog.com/?p=28.
IDA Set function/item type www.hex-rays.com/products/ida/support/idadoc/1361.shtml.
“Microsoft PE COFF Specification” msdn.microsoft.com/en-us/library/windows/hardware/gg463119.aspx.
“Overview of x64 Calling Conventions,” MSDN msdn.microsoft.com/en-us/library/ms235286.aspx.
RC4 algorithm en.wikipedia.org/wiki/RC4.
System V AMD64 ABI x86-64.org/documentation/abi.pdf.
Top-down and bottom-up design en.wikipedia.org/wiki/Top-down_and_bottom-up_design.
“X86 Calling Conventions” en.wikipedia.org/wiki/X86_calling_conventions#x86-64_calling_conventions.