Cyber Operations: Building, Defending, and Attacking Modern Computer Networks (2015)
8. Logging
Mike O’Leary1
(1)
Department of Mathematics, Towson University, Towson, MD, US
Introduction
An administrator running a network needs to understand what is happening on that network, making an understanding of logs essential. Not only do logs help determine how the network is functioning, they can also provide clues to the activities of malicious actors on a network. However, because an attacker that gains root or administrative privileges can modify any logs saved on that system, an administrator needs to know how to set up a distributed logging system so that logs on one system are stored on a different system.
This chapter starts with the basics of logging on Linux, including the syslog standard and a brief introduction to three common daemons (syslogd, syslog-ng, and rsyslog) that were commonly used between 2008 and 2013. The reader will learn how to configure each, both for local logging and as part of a distributed logging system. Different techniques to enable the spoofing of log entries locally and over the network are provided.
Windows uses a fundamentally different approach to logging. Windows uses audit policies to determine what is to be recorded, and the chapter covers how to configure these using the Advanced Audit Policy Configuration tools. Windows logs can be queried not only with the built-in Event Viewer tool, but can also be queried with PowerShell scripts. In an example, these are used to identify the activities of the attacker from the previous chapter who created additional domain administrator accounts during their attack. Windows includes tools that can be used to view the logs on other Windows systems; it also has the ability to use subscriptions to aggregate logs from different systems in one location. Examples of Group Policy for these alternatives are developed.
The open source tool NXLog is introduced. NXLog can be configured to forward logs on a Windows system to a Linux system using syslog.
Logging in Linux
Linux systems use syslog as their preferred format for system logs. An informal standard for many years, the syslog protocol was codified in RFC 3164 and then updated in RFC 5424. Syslog messages contain a plain text message, a timestamp, and either the hostname or the IP address of the sending system. They also include two additional values: a facility, which identifies the type of message; and a priority, which determines its importance. The allowable facilities include
· auth: Used for security/authorization messages. (Code 4)
· authpriv: Used for security/authorization messages. Also known as security, though that name is deprecated. (Code 10)
· cron: Used for the cron scheduler. (Code 9)
· daemon: Used for system daemons without separate facility values. (Code 3)
· ftp: Used for the ftp server. (Code 11)
· kern: Used solely for kernel messages. (Code 0)
· local0, local1, ..., local7: Available for local system use. (Codes 16–23)
· lpr: Used for the print subsystem. (Code 6)
· mail: Used for the mail server. (Code 2)
· news: Used for the news server (NNTP; see, e.g., RFC 977). (Code 7)
· syslog: Used for messages generated by the log server itself. (Code 5)
· user: Default facility; used for generic messages. (Code 1)
· uucp: Used for the (now obsolete) Unix to Unix Copy system (UUCP). (Code 8)
The priorities are, in decreasing order of severity:
· emerg (emergency) (Code 0)
· alert (Code 1)
· crit (critical) (Code 2)
· err (error) (Code 3)
· warning (Code 4)
· notice (Code 5)
· info (informational) (Code 6)
· debug (Code 7)
Log messages can be stored locally in files, broadcast to all users, or sent over the network to one or more receiving hosts. Here is a short snippet of the log file /var/log/syslog on an Ubuntu 12.04 system showing three typical log messages.
Oct 10 12:11:25 betelgeuse anacron[851]: Job `cron.weekly’ terminated
Oct 10 12:11:25 betelgeuse anacron[851]: Normal exit (2 jobs run)
Oct 10 12:17:01 betelgeuse CRON[2130]: (root) CMD ( cd / && run-parts --report /etc/cron.hourly)
These messages were sent by the (local) host named Betelgeuse near noon on October 10, and all are related to the cron scheduler.
Different daemons have been used to implement syslog logging on Linux systems. The most common daemon in use on CentOS/Mint/OpenSuSE/Ubuntu is rsyslogd, which is used by CentOS 6.0-6.5, Mint 8-16, OpenSuSE 11.2-13.1, and Ubuntu 9.10-13.10. An older daemon named syslogd, is used by CentOS 5.2-5.10, Mint 5-7, and Ubuntu 8.04-9.04. OpenSuSE 11.0 and 11.1 use syslog-ng.
Each syslog daemon is configured differently. Configuration files for syslogd and rsyslogd share many common elements, while syslog-ng takes a fundamentally different approach.
As an example of an rsyslogd configuration, consider a CentOS 6.3 system. On this distribution, the primary configuration file for rsyslogd is /etc/rsyslog.conf. That file contains four main sections: a list of loaded modules, a list of global directives, a list of rules, and a collection of forwarding rules. The rules section has the content:
File 8-1. Rules section of the file /etc/rsyslog.conf on CentOS 6.3
# Log all kernel messages to the console.
# Logging much else clutters up the screen.
#kern.* /dev/console
# Log anything (except mail) of level info or higher.
# Don’t log private authentication messages!
*.info;mail.none;authpriv.none;cron.none /var/log/messages
# The authpriv file has restricted access.
authpriv.* /var/log/secure
# Log all the mail messages in one place.
mail.* -/var/log/maillog
# Log cron stuff
cron.* /var/log/cron
# Everybody gets emergency messages
*.emerg *
# Save news errors of level crit and higher in a special file.
uucp,news.crit /var/log/spooler
# Save boot messages also to boot.log
local7.* /var/log/boot.log
The file is generally self-explanatory. For example, consider the line
authpriv.* /var/log/secure
This indicates that any log message from the authpriv facility is sent to the file /var/log/secure regardless of its priority. *.info;mail.none;authpriv.none;cron.none /var/log/messages
This sends messages from any facility of priority level info or higher to /var/log/messages, with the exceptions that no messages from the mail, authpriv, or cron facility should be sent.
The directive for mail has the structure
mail.* -/var/log/maillog
This sends all messages from the mail facility to the file /var/log/maillog. The dash before the file name indicates that the file does not need to be synced after every write. Automatic file sync has been disabled by default since version 3 of rsyslogd, so the dash here has no effect. This default behavior can be changed by uncommenting the corresponding directive in the global section of /etc/rsyslog.conf, which has the default content
# File syncing capability is disabled by default. This feature is usually not required,
# not useful and an extreme performance hit
#$ActionFileEnableSync on
Most of the destinations listed are local files; one exception is the destination for messages of priority emergency (*.emerg) where the destination is simply “*”. These messages are sent to all users using wall. The wall command can also be used outside of syslog; for example
[sbanach@Antares ∼]$ wall "This is a test"
[sbanach@Antares ∼]$
Broadcast message from sbanach@Antares.stars.example (pts/2) (Sun Oct 5 21:05:57 2014):
This is a test
Other rsyslogd based distributions are configured similarly. On an OpenSuSE 12.1 system, configuration is spread across three files. The primary file is /etc/rsyslog.conf, while /etc/rsyslog.d/remote.conf contains configuration information for remote logging, and /etc/rsyslog.early.conf contains only those statements for rsyslogd that are safe to run before the network or remote file systems become available.
Ubuntu 12.04 and Mint 12 use three files. The primary file is /etc/rsyslog.conf which determines the loaded modules and global directives. The file /etc/rsyslog.d/50-default.conf contains most rules, while /etc/rsyslog.d/20-ufw.conf contains rules specifically for the Ubuntu firewall (UFW).
Another difference between CentOS and OpenSuSE on one hand, and Ubuntu or Mint on the other, is the destination for most logs. Unlike CentOS or OpenSuSE, Ubuntu 12.04 and Mint 12 use the log directive
*.*;auth,authpriv.none -/var/log/syslog
This stores most log messages in the file /var/log/syslog rather than /var/log/messages. Changes to syslog configuration can be made by changing the appropriate configuration file; for example to configure Ubuntu 12.04 to log most messages to /var/log/messages add the line below to /etc/rsyslog.d/50-default.conf
*.*;auth,authpriv.none /var/log/messages
Then restart syslog with the commanddhilbert@betelgeuse:∼$ sudo service rsyslog restart
After this change most log messages have two different destinations: /var/log/syslog and /var/log/messages. When a log message can be sent to more than one destination, all destinations receive the log message.
The process is similar on OpenSuSE systems running rsyslogd; however some versions of OpenSuSE (11.3, 12.1, 12.2) name the service syslog, even though the daemon is rsyslogd. For example, OpenSuSE 12.1 reports
arcturus:∼ # service rsyslog status
service: no such service rsyslog
arcturus:∼ # service syslog status
redirecting to systemctl
syslog.service - System Logging Service
Loaded: loaded (/lib/systemd/system/syslog.service; enabled)
Active: active (running) since Mon, 06 Oct 2014 09:07:26 -0400; 5h 12min ago
Process: 666 ExecStart=/sbin/rsyslogd -c 5 -f /etc/rsyslog.early.conf (code=exited, status=0/SUCCESS)
Process: 664 ExecStartPre=/var/run/rsyslog/addsockets (code=exited, status=0/SUCCESS)
Process: 625 ExecStartPre=/bin/systemctl stop systemd-kmsg-syslogd.service (code=exited, status=0/SUCCESS)
Main PID: 691 (rsyslogd)
CGroup: name=systemd:/system/syslog.service
└ 691 /sbin/rsyslogd -c 5 -f /etc/rsyslog.early.conf
OpenSuSE 12.3 and 13.1 name the service rsyslog.
The configuration for systems that use syslog instead of rsyslog is similar. For CentOS, Mint, and Ubuntu systems that use syslog, the primary configuration file is /etc/syslog.conf and the service is named syslog. The contents of that file for CentOS 5.10 match what has been presented from the rules section of the CentOS 6.3 configuration file /etc/rsyslog.conf.
The syslog-ng daemon uses a fundamentally different structure for its configuration file, which on OpenSuSE 11.0 and 11.1 is located in /etc/syslog-ng/syslog-ng.conf. In this approach a log is a combination of a source, a filter, and a destination. OpenSuSE 11.0 and 11.1 for example configure a source named src with the directives
source src {
# include internal syslog-ng messages
# note: the internal() soure is required!
#
internal();
# the default log socket for local logging:
#
unix-dgram("/dev/log");
};
Next are filters; the default syslog-ng.conf file defines many such filters, but the relevant ones are
filter f_iptables { facility(kern) and match("IN=") and match("OUT="); };
filter f_messages { not facility(news, mail) and not filter(f_iptables); };
When the Linux firewall iptables logs information about a (usually dropped) packet, it includes the source and destination IP addresses in the log message from the kernel using “IN=” and “OUT=” in the text of the message. All such messages are collected by the filter f_iptables. The filter f_messages consists of all messages not collected by the f_iptables filter whose facility is neither news nor mail.
A destination for the logs is defined through the directive
destination messages { file("/var/log/messages"); };
This defines the destination messages as the file /var/log/messages.
The final component is the directive
log { source(src); filter(f_messages); destination(messages); };
This tells syslog_ng that all messages from the source src that match the filter f_messages are to be sent to the destination messages.
After any changes are made to the configuration file, restart the daemon; although the daemon is syslog-ng, the name of the service is syslog.
pollux:∼ # service syslog restart
Shutting down syslog services done
Starting syslog services done
Spoofing Log Messages
An unprivileged local user can generate arbitrary fake or malicious logs. Consider the tool logger, which is installed on most Linux systems.
acauchy@aldeberan ∼ $ man logger
LOGGER(1) BSD General Commands Manual LOGGER(1)
NAME
logger — a shell command interface to the syslog(3) system log module
SYNOPSIS
logger [-isd] [-f file] [-p pri] [-t tag] [-u socket] [message ...]
DESCRIPTION
Logger makes entries in the system log. It provides a shell command
interface to the syslog(3) system log module.
Using this tool, a user can craft log messages with specified facilities and priorities.
acauchy@aldeberan ∼ $ logger -p kern.alert "I can write my own log entries?"
Yes!
acauchy@aldeberan ∼ $ sudo tail -n 1 /var/log/syslog
Oct 6 22:46:59 aldeberan acauchy: I can write my own log entries?
Attackers that find this interface insufficiently flexible can write programs that directly interact with the logging system. Documentation to do so is included in the man (3) page for syslog. Consider the following C program.
Program 8-1. C code log.c; a program to send a custom local syslog message
#include<syslog.h>
int main(int argc, char* argv[])
{
const char log_ident[] = "named [31337]";
const int log_option = LOG_NDELAY ;
const int log_facility = LOG_SYSLOG;
openlog(log_ident, log_option, log_facility);
syslog(LOG_CRIT, "I just experienced a critical error!");
closelog();
return(0);
}
After this program is run, it appears to a system administrator that the named process, with PID 31337, just had a critical error:
acauchy@aldeberan ∼ $ gcc -Wall -pedantic log.c -o log
acauchy@aldeberan ∼ $ ./log
acauchy@aldeberan ∼ $ tail -n1 /var/log/syslog
Oct 6 22:51:58 aldeberan named [31337]: I just experienced a critical error!
Remote Logging
All three daemons (syslogd, rsyslogd, and syslog-ng) allow for logs to be sent to remote destinations. To configure either syslogd or rsyslogd to do so over the default UDP/514, instead of providing a file name as a destination, provide the IP address of the destination system, preceded by “@”. Consider the directive
*.* @10.0.2.28
This sends all messages, regardless of facility or priority, to the host 10.0.2.28 via UDP/514. Add this line to /etc/rsyslog.d/50-default.conf on an Ubuntu 12.04 system and restart the rsyslog service. A subsequent Wireshark capture shows the syslog data in transit.
No. Time Source Destination Protocol Length Info
5 20.639477000 10.0.2.18 10.0.2.28 Syslog 176 AUTHPRIV.NOTICE: Oct 10 14:45:54 betelgeuse sudo: dhilbert : TTY=pts/0 ; PWD=/home/dhilbert ; USER=root ; COMMAND=/usr/sbin/service rsyslog restart
Frame 5: 176 bytes on wire (1408 bits), 176 bytes captured (1408 bits) on interface 0
Ethernet II, Src: CadmusCo_bf:64:9f (08:00:27:bf:64:9f), Dst: CadmusCo_40:19:69 (08:00:27:40:19:69)
Internet Protocol Version 4, Src: 10.0.2.18 (10.0.2.18), Dst: 10.0.2.28 (10.0.2.28)
User Datagram Protocol, Src Port: 50617 (50617), Dst Port: syslog (514)
Syslog message: AUTHPRIV.NOTICE: Oct 10 14:45:54 betelgeuse sudo: dhilbert : TTY=pts/0 ; PWD=/home/dhilbert ; USER=root ; COMMAND=/usr/sbin/service rsyslog restart
Notice that the traffic is sent in plain text, unencrypted. If a netcat listener is running on the target (and the proper port is opened in the firewall), then it receives the log messages.
[root@Spica ∼]# nc -l -u -v 514
Connection from 10.0.2.18 port 514 [udp/syslog] accepted
<85>Oct 10 14:45:54 betelgeuse sudo: dhilbert : TTY=pts/0 ; PWD=/home/dhilbert ; USER=root ; COMMAND=/usr/sbin/service rsyslog restart
The first component of the received syslog message, <85> represents the facility and the priority for the message. It is formed by multiplying the code number for the facility by 8 and adding the priority. In this example, the facility is authpriv (code 10) and the priority is notice (code 5) yielding 85. Wireshark parsed this code for the user and displayed it as part of the packet capture.
The syslog-ng daemon uses different configuration directives to send logs to remote systems. Configure a destination for the logs, but instead of specifying a local file, specify a remote IP address and port. Then use a log directive with a source, filter, and destination to send the messages. As an example, consider the directives
destination remote_logs { udp("10.0.2.28" port(514)); };
log { source(src); filter(f_messages); destination(remote_logs); };
Add these to /etc/syslog-ng/syslog-ng.conf on an OpenSuSE 11.0 system, and restart the daemon. If the destination has a netcat listener running on the proper port, then the log messages are displayed. [root@Spica ∼]# nc -l -u -v 514
Connection from 10.0.2.32 port 514 [udp/syslog] accepted
<45>Oct 10 15:28:08 pollux syslog-ng[3760]: syslog-ng version 1.6.12 starting
Notice that the facility and priority differ from the similar message sent when rsyslogd restarted; here the facility is syslog at priority level notice.
One disadvantage of using UDP as a protocol is that data transfer is unreliable. Both syslog-ng and rsyslogd permit the user to send logging data to remote hosts using TCP. To send log messages via TCP/514 on a syslog-ng based system like OpenSuSE 11.0, add the following directives to /etc/syslog-ng/syslog-ng.conf and restart syslog
destination remote_logs { tcp("10.0.2.28" port(514)); };
log { source(src); filter(f_messages); destination(remote_logs); };
On an rsyslogd based system like Ubuntu 12.04, to send log messages via TCP/514, add the directive below to /etc/rsyslog.d/50-default.conf and restart the daemon.
*.* @@10.0.2.28
On syslog-ng systems, the destination port is controlled by the port directive; on rsyslogd (TCP or UDP) the port number is specified by appending a colon and the port number to the IP address. For example, the directive below sends logs to 10.0.2.28 via TCP/1514.
* @@10.0.2.28:1514
Note that on CentOS systems, if SELinux is in enforcing mode, then by default it blocks attempts by rsyslogd to send data via TCP on ports other than 514. Not only can syslog daemons send logs to remote sites, they can be configured to process the results, storing the results locally in files or forwarding them on to other hosts. On a system running rsyslogd (like a CentOS 6.3 server), to allow rsyslogd to receive log messages from UDP/514, uncomment the lines in /etc/rsyslog.conf
# Provides UDP syslog reception
$ModLoad imudp
$UDPServerRun 514
To allow rsyslogd to receive log messages from TCP/514, uncomment the lines
# Provides TCP syslog reception
$ModLoad imtcp
$InputTCPServerRun 514
In each case, the appropriate port must be opened in the firewall and the service needs to be restarted. The situation for other rsyslogd systems is similar; the preferred configuration file for OpenSuSE is /etc/rsyslog.d/remote.conf while for Ubuntu and Mint it is /etc/rsyslog.conf. Some systems including Ubuntu 12.04 suffer from a bug where they are unable to use rsyslogd to listen on TCP ports less than 1024; attempts to do so fail with the a log entry
Oct 11 10:12:17 Bubble rsyslogd-2077: Could not create tcp listener, ignoring port 514. [try http://www.rsyslog.com/e/2077 ]
This is a known bug ( https://bugs.launchpad.net/ubuntu/+source/rsyslog/+bug/789174 ); the solution is to use TCP ports above 1024.
The syslogd daemon can be used to process log files received remotely, though solely through UDP/514. This is controlled through a flag passed to the daemon on program start. On CentOS 5.2, the file /etc/sysconfig/syslog contains these flags. Include the -r flag in the syslogd options
# Options to syslogd
# -m 0 disables ’MARK’ messages.
# -r enables logging from remote machines
# -x disables DNS lookups on messages recieved with -r
# See syslogd(8) for more details
SYSLOGD_OPTIONS="-r -m 0"
Save the file and restart the daemon.
To configure a syslog-ng system to receive logs from remote hosts (TCP or UDP), either create a new source or update the default source. For example, to allow an OpenSuSE 11.0 system to receive remote logs on TCP/514 as part of the default source, update the source to include
source src {
#
# include internal syslog-ng messages
# note: the internal() soure is required!
#
internal();
#
# the default log socket for local logging:
#
unix-dgram("/dev/log");
#
# uncomment to process log messages from network:
#
tcp(ip("0.0.0.0") port(514));
};
Once the change is made, save the file and restart the daemon.
Systems that accept remote logs are at an even greater danger of receiving spoofed log entries. Suppose that the host 10.0.2.32 is listening for logs on UDP/514. Consider the following Python script
Code 8-2. Python script log_spoof.py that sends syslog messages to a target, spoofing the source IP
#!/usr/bin/python
from scapy.all import IP,UDP,Raw,send
import time
priority = 3 # error
facility = 1 # user
code = ’<’ + str(8 * facility + priority) +’>’
timestamp = time.strftime("%b %d %H:%M:%S")
message = "Host named [31337] I just experienced a critical error"
packet = IP(dst="10.0.2.32", src="10.0.2.26")
packet = packet/UDP(dport=514, sport=31337)
packet = packet/Raw(code + timestamp + " " + message)
send(packet,verbose=0)
When run, this sends a properly formatted syslog message to the target spoofing the source address as 10.0.2.26 (which is not the IP address of the sending system!). The receiving log server records the entry
pollux:∼ # tail -n1 /var/log/messages
Oct 11 12:29:25 Aldeberan named [31337] I just experienced a critical error
Notice that the log server performed a DNS lookup on the source of the packet (10.0.2.26) and replaced the text “Host” in the message with the proper hostname for the spoofed IP address.
Log Rotation
Logs cannot be kept indefinitely; as they continue to expand in size, they will eventually consume all system resources. The logrotate tool is used on Linux systems to compress, archive, rotate, and delete log files. Configuration directives for logrotate are contained in the file /etc/logrotate.conf. As a typical example, consider this portion of that file on a CentOS 5.2 system.
File 8-2. Portion of the file /etc/logrotate.conf on CentOS 5.2
# see "man logrotate" for details
# rotate log files weekly
weekly
# keep 4 weeks worth of backlogs
rotate 4
# create new (empty) log files after rotating old ones
create
# uncomment this if you want your log files compressed
#compress
# RPM packages drop log rotation information into this directory
include /etc/logrotate.d
This is, for the most part, self-explanatory. Logs are rotated each week, and four weeks of older logs are kept, uncompressed. Additional directives for individual log files are provided by files in the directory /etc/logrotate.d; these can override the default values in /etc/logrotate.conf.
The logrotate tool itself is called by a cron job; on the example CentOS 5.2 system the actual script is /etc/cron.daily/logrotate. The /etc/crontab file contains the line
02 4 * * * root run-parts /etc/cron.daily
This indicates that daily cron jobs, including logrotate, run at 4:02 each morning.
Logging in Windows
Windows systems take a fundamentally different approach to logging. The primary tool for viewing logs on Windows systems is Event Viewer (Figure 8-1). On Windows Server 2008, launch it by navigating Start ➤ Administrative Tools ➤ Event Viewer. On Windows Server 2012, Event Viewer is available from the tools menu on Server Manager. On desktop systems such as Windows 7 and 8, Event Viewer can be started from the Control Panel, navigating through System and Security. It can also be run from the command line, as eventvwr.msc.
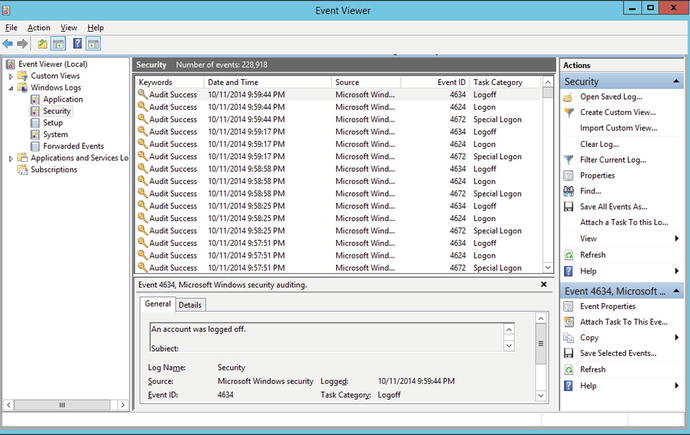
Figure 8-1.
Windows Event Viewer on Windows 2012 R2
There are four main logs: application logs, security logs, system logs, and setup logs. The setup log contains information from the system installation process. The system log records data from Windows itself, while the application log is used by programs. Events in the security log are often called audits, and are generated by a range of security events, including logon/logoff, privilege usage, and object access.
Audit policies, which determine what is recorded in the security log, can be configured in one of three different ways: via local policy, via group policy, and directly from the command line with the tool auditpol.exe. To modify local security policy, from the Control Panel navigate to System and Security ➤ Administrative Tools ➤ Local Security Policy (Figure 8-2).
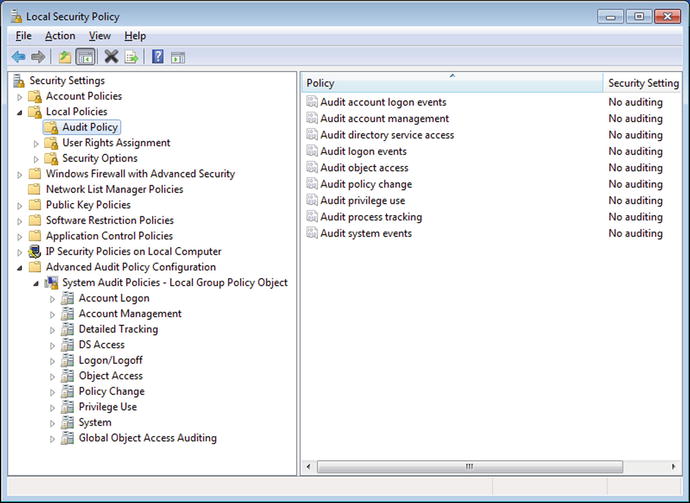
Figure 8-2.
Local Security Policy on Windows 7
There are two types of audit policy settings, the basic policies in Security Settings ➤ Local Policies ➤ Audit Policy, and the advanced settings in Security Settings ➤ Advanced Audit Policy Configuration ➤System Audit Policies. These settings are handled differently, and changes should not be made in both locations; indeed Microsoft goes so far as to say, “Using both advanced and basic audit policy settings can cause unexpected results.”1
To configure Advanced Audit Policy from the command line, use the tool auditpol. To see the categories and their current effective setting, run
C:\Windows\system32>auditpol /get /category:*
System audit policy
Category/Subcategory Setting
System
Security System Extension No Auditing
System Integrity Success and Failure
IPsec Driver No Auditing
Other System Events Success and Failure
Security State Change Success
Logon/Logoff
Logon Success and Failure
Logoff Success
Account Lockout Success
IPsec Main Mode No Auditing
IPsec Quick Mode No Auditing
IPsec Extended Mode No Auditing
Special Logon Success
Other Logon/Logoff Events No Auditing
Network Policy Server Success and Failure
User / Device Claims No Auditing
Object Access
File System No Auditing
Registry No Auditing
Kernel Object No Auditing
SAM No Auditing
Certification Services No Auditing
Application Generated No Auditing
Handle Manipulation No Auditing
File Share No Auditing
Filtering Platform Packet Drop No Auditing
Filtering Platform Connection No Auditing
Other Object Access Events No Auditing
Detailed File Share No Auditing
Removable Storage No Auditing
Central Policy Staging No Auditing
Privilege Use
Non Sensitive Privilege Use No Auditing
Other Privilege Use Events No Auditing
Sensitive Privilege Use No Auditing
Detailed Tracking
Process Creation No Auditing
Process Termination No Auditing
DPAPI Activity No Auditing
RPC Events No Auditing
Policy Change
Authentication Policy Change Success
Authorization Policy Change No Auditing
MPSSVC Rule-Level Policy Change No Auditing
Filtering Platform Policy Change No Auditing
Other Policy Change Events No Auditing
Audit Policy Change Success
Account Management
User Account Management Success
Computer Account Management Success
Security Group Management Success
Distribution Group Management No Auditing
Application Group Management No Auditing
Other Account Management Events No Auditing
DS Access
Directory Service Changes No Auditing
Directory Service Replication No Auditing
Detailed Directory Service Replication No Auditing
Directory Service Access Success
Account Logon
Kerberos Service Ticket Operations Success
Other Account Logon Events No Auditing
Kerberos Authentication Service Success
Credential Validation Success
Changing policies from the command line can be accomplished with commands such as these
C:\Windows\system32>auditpol /set /subcategory:logoff /failure:enable
The command was successfully executed.
The impact of the change can then be checked.
C:\Windows\system32>auditpol /get /category:logon/logoff
System audit policy
Category/Subcategory Setting
Logon/Logoff
Logon Success and Failure
Logoff Success and Failure
Account Lockout Success
IPsec Main Mode No Auditing
IPsec Quick Mode No Auditing
IPsec Extended Mode No Auditing
Special Logon Success
Other Logon/Logoff Events No Auditing
Network Policy Server Success and Failure
User / Device Claims No Auditing
Advanced audit policies can also be changed via group policy on Windows Server 2008 R2, 2012, and 2012 R2. From the Group Policy Editor, navigate Computer Configuration ➤ Policies ➤ Windows Settings ➤ Security Settings ➤ Advanced Audit Policy Configuration ➤ Audit Policies.
Event Viewer provides a reasonable interface to the various Windows logs, allowing searches and filtering. However PowerShell provides a more flexible interface to the logs. Consider for example the domain controller cassini.corp.saturn.test from Chapter 7. In that chapter, an attacker compromised a domain member, escalated privileges to SYSTEM, compromised a domain admin account, and added two new domain admins to the network. That information is recorded in the security logs on the domain controller. The following PowerShell script (Logs.psl) searches the security logs for any instance of the string “A user account was created” after the indicated date.
Code 8-3. Powershell script Logs.psl, used to search the security log for events containing the phrase “A user account was created” after a given start date
$start = get-date 9/12/2014
$secevents = get-eventlog -logname Security -Message "*A user account was created*" -after $start
$secevents | format-list -property *
When this script is run, the log entries for the new account are displayed to the screen.
PS C:\Users\fhaber> C:\Users\fhaber\Desktop\Logs.ps1
EventID : 4720
MachineName : cassini.corp.saturn.test
Data : {}
Index : 174646
Category : (13824)
CategoryNumber : 13824
EntryType : SuccessAudit
Message : A user account was created.
Subject:
Security ID: S-1-5-21-2774461806-4257634802-1797393593-1179
Account Name: fhaber
Account Domain: CORP
Logon ID: 0x1e897f
New Account:
Security ID: S-1-5-21-2774461806-4257634802-1797393593-1228
Account Name: jverne
Account Domain: CORP
... Output Deleted ...
EventID : 4720
MachineName : cassini.corp.saturn.test
Data : {}
Index : 174512
Category : (13824)
CategoryNumber : 13824
EntryType : SuccessAudit
Message : A user account was created.
Subject:
Security ID: S-1-5-21-2774461806-4257634802-1797393593-1179
Account Name: fhaber
Account Domain: CORP
Logon ID: 0x1dd924
New Account:
Security ID: S-1-5-21-2774461806-4257634802-1797393593-1227
Account Name: iasimov
Account Domain: CORP
... Output Deleted ...
A subsequent search of the logs can be made with a PowerShell script such as this
Code 8-4. PowerShell script LogSearch.ps1 to search the security log for events from the user iasimov after a given date
$start = get-date 9/12/2014
$secevents = get-eventlog -logname Security -Message "*iasimov*"
$secevents | format-list -property * | Out-File "C:\Users\fhaber\Desktop\results.txt"
This finds all of the log entries with the new user iasimov and stores them in a plain text file for subsequent analysis.
Another attack from Chapter 7 was a brute force attack, where 88,394 passwords were used by the Metasploit module auxiliary/scanner/smb/smb_login to try to log in to a known domain administrator account. This attack leaves traces across the Windows logs. Failed login attempts are recorded by the Security log as Event ID 4625. It is possible to use PowerShell to look through the logs for such events, but a brute force attack leaves many such events. Instead, a better approach is simply to count the number of failed login attempts on a given day. This can be done quickly and easily with the Sysinternals tool psloglist.exe.
c:\SysinternalsSuite> psloglist.exe -i 4625 -s Security -b 9/13/2014 -a 9/12/2014 | find /c /v ""
PsLoglist v2.71 - local and remote event log viewer
Copyright (C) 2000-2009 Mark Russinovich
Sysinternals - www.sysinternals.com
9
This command looks through the security log (the -s switch) for events with id 4625 (the -i switch) that occurred before 9/13/2014 (the -b switch) and on or after 9/12/2014 (the -a switch). This is then piped to the find command, which counts (/c) the number of times the null string "" does not appear (/v). Effectively, this counts the number of lines in the output. The first line states the source of the log, so this result shows that there were eight failed login attempts on 9/12/2014. The brute force attack the next day is easily spotted.
c:\SysinternalsSuite> psloglist.exe -i 4625 -s Security -b 9/14/2014 -a 9/13/2014 | find /c /v ""
PsLoglist v2.71 - local and remote event log viewer
Copyright (C) 2000-2009 Mark Russinovich
Sysinternals - www.sysinternals.com
88397
A check of any of these log entries in Event Viewer show not only the failed login attempt, but the IP address of the system making the request:
<EventData>
<Data Name="SubjectUserSid">S-1-0-0</Data>
<Data Name="SubjectUserName">-</Data>
<Data Name="SubjectDomainName">-</Data>
<Data Name="SubjectLogonId">0x0</Data>
<Data Name="TargetUserSid">S-1-0-0</Data>
<Data Name="TargetUserName">fhaber</Data>
<Data Name="TargetDomainName">corp</Data>
<Data Name="Status">0xc000006d</Data>
<Data Name="FailureReason">%%2313</Data>
<Data Name="SubStatus">0xc000006a</Data>
<Data Name="LogonType">3</Data>
<Data Name="LogonProcessName">NtLmSsp </Data>
<Data Name="AuthenticationPackageName">NTLM</Data>
<Data Name="WorkstationName">azMMmDS7olozCy7G</Data>
<Data Name="TransmittedServices">-</Data>
<Data Name="LmPackageName">-</Data>
<Data Name="KeyLength">0</Data>
<Data Name="ProcessId">0x0</Data>
<Data Name="ProcessName">-</Data>
<Data Name="IpAddress">10.0.4.252</Data>
<Data Name="IpPort">36140</Data>
</EventData>
The defender now knows that a brute force attack appears to have been launched from 10.0.4.252, targeting the domain administrator fhaber.
An attacker with administrative privileges can clear logs using PowerShell via the command
PS C:\Windows\system32> Clear-EventLog -log Application, Security, System
This clears the application, security, and system logs. A subsequent check of the security log shows that it contains a single entry indicating that the log was cleared.
PS C:\Windows\system32> Get-EventLog -logname Security
Index Time EntryType Source InstanceID Message
----- ---- --------- ------ ---------- -------
288266 Oct 12 20:49 SuccessA... Microsoft-Windows... 1102 The audit log was cleared....
Unlike the generic Linux logging system, Windows can generate log entries when particular files are accessed / modified / changed. To illustrate the process, create a file, for example, on the Desktop named test.txt. Navigate test.txt (right-click) ➤ Properties ➤ Security ➤ Advanced ➤ Auditing, then authenticate (Figure 8-3). Click add to create an auditing entry. Each auditing entry has two components. The first is the collection of users that are being audited. It is important to be broad; if a user is not explicitly listed in an auditing entry, then their access remains unaudited. The second component of an auditing entry are the types of file access that are to be audited. These follow the usual Windows file permissions. Audits can be generated if a user successfully uses privileges on a file, or if a user attempts to access a file without the necessary permissions, or both.
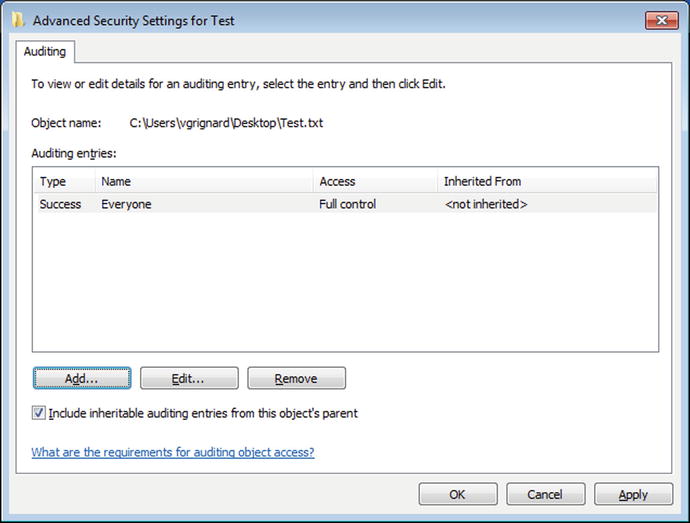
Figure 8-3.
Configuring Auditing on a File on Windows 7
Once the changes have been made and applied to the file properties, make some changes to the file and check the security log for the results.
PS C:\Windows\system32> get-eventlog -logname security | select -first 4
Index Time EntryType Source InstanceID Message
----- ---- --------- ------ ---------- -------
3248 Oct 12 13:11 SuccessA... Microsoft-Windows... 4616 The system time was changed....
3247 Oct 12 13:11 SuccessA... Microsoft-Windows... 1100 The event logging service has shut down
3246 Oct 12 09:26 SuccessA... Microsoft-Windows... 4719 System audit policy was changed....
3245 Oct 12 09:26 SuccessA... Microsoft-Windows... 4719 System audit policy was changed....
Though auditing has been correctly configured on the file, no entries appear in the security log. Although this process set the auditing policy for the file, Windows ignores those settings unless file level auditing is enabled in the system’s audit policy. Verify that the required settings have not (yet) been enabled:
PS C:\Windows\system32> auditpol /get /subcategory:"file system"
System audit policy
Category/Subcategory Setting
Object Access
File System No Auditing
Make the needed changes via group policy, or make the change from the command prompt
PS C:\Windows\system32> auditpol /set /subcategory:"file system" /success:enable /failure:enable
The command was successfully executed.
Subsequent modification of the audited file yield the expected entries in the security log.
PS C:\Windows\system32> get-eventlog -logname security | select -first 4
Index Time EntryType Source InstanceID Message
----- ---- --------- ------ ---------- -------
3259 Oct 12 21:19 SuccessA... Microsoft-Windows... 4663 An attempt was made to access an object
3258 Oct 12 21:19 SuccessA... Microsoft-Windows... 4663 An attempt was made to access an object
3257 Oct 12 21:19 SuccessA... Microsoft-Windows... 4663 An attempt was made to access an object
3256 Oct 12 21:19 SuccessA... Microsoft-Windows... 4663 An attempt was made to access an object
Rotating Windows Logs
Windows logs are kept at a fixed size; on Windows Servers the default is 20480 KB. The system administrator determines what should occur when the full size is reached; either older events can be overwritten (the default), or the file can be archived, or the administrator can be required to manually clear the log. This is controlled through the properties of the log; these can be found in Event Viewer. Right-click on a log, and select Properties to obtain a dialog box like Figure 8-4
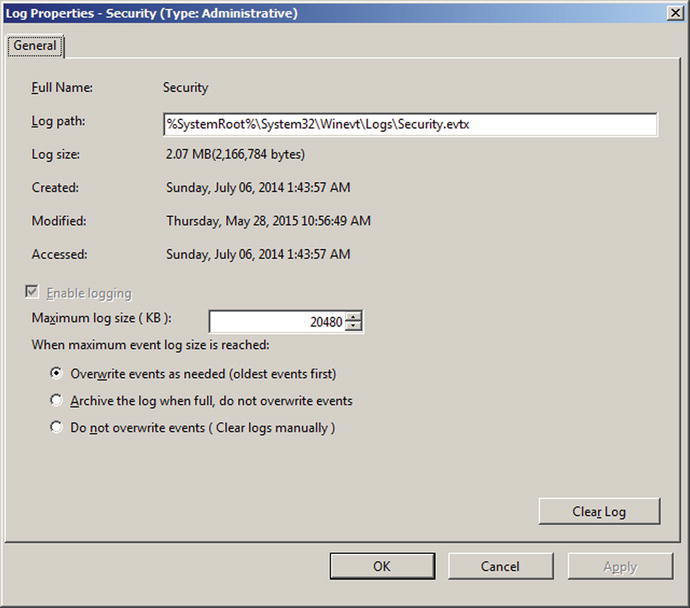
Figure 8-4.
Properties of the Security Log on Windows Server 2008 R2
.
Remote Windows Logs
It is possible to use Event Viewer on one computer to view the logs on another Windows computer. From Event Viewer, select Action ➤ Connect to Another Computer. Be sure to select Event Viewer (Local) in the navigation pane, or the option to connect to another computer will not appear in the Action menu. Enter the remote system name, and the account details (if different) for the other machine.
The firewall must allow the connection to the remote system. Group policy can be used to allow remote log access across the domain. From the Group Policy Editor, navigate through Computer Configuration ➤ Policies ➤ Windows Settings ➤ Security Settings ➤ Windows Firewall with Advanced Security ➤ Inbound Rules. Right-click and select New Rule. For the rule type, choose Predefined, and select Remote Event Log Management. Once this policy is linked, Event Viewer on one domain member can be used to view the logs on another domain member.
PowerShell also allows a domain administrator on one computer to view the logs on another computer by specifying the computer name as part of the command.
PS C:\Windows\system32> get-eventlog -logname security -computername HELENE | select -first 4
Index Time EntryType Source InstanceID Message
----- ---- --------- ------ ---------- -------
1692 Oct 12 22:10 SuccessA... Microsoft-Windows... 4616 The system time was changed....
1691 Oct 12 22:10 SuccessA... Microsoft-Windows... 1100 The event logging service has shut down.
1690 Oct 12 21:56 SuccessA... Microsoft-Windows... 4616 The system time was changed....
1689 Oct 12 21:56 SuccessA... Microsoft-Windows... 1100 The event logging service has shut down.
This requires that the Remote Registry service is running on the remote target. To use Group Policy to ensure that the service is running, from the Group Policy Management Editor navigate Computer Configuration ➤ Windows Settings ➤ Security Settings ➤ System Services. Select the entry for the Remote Registry service, and define the policy so that the service starts up automatically.
A different approach to Windows log aggregation is through the use of subscriptions. Subscriptions rely on Windows Remote Management (WinRM) for proper functioning. WinRM can be configured through the command line on each host, but it is simpler to do so via Group Policy for the domain as a whole. There are four steps that need to made in the Group Policy Editor
· Enable Windows Remote Management Service: Navigate Computer Configuration ➤ Policies ➤ Windows Settings ➤ Security Settings ➤ System Services. Select the Windows Remote Management Service (WS-Management) and configure it to start up automatically.
· Start Windows Remote Management Service: Navigate Computer Configuration ➤ Preferences ➤ Control Panel Settings ➤ Services. Configure a new Service (Figure 8-5). Choose the WinRM service, set startup to Automatic and the service action to Start Service. Under the recovery tab, configure the computer to restart the service if it fails.
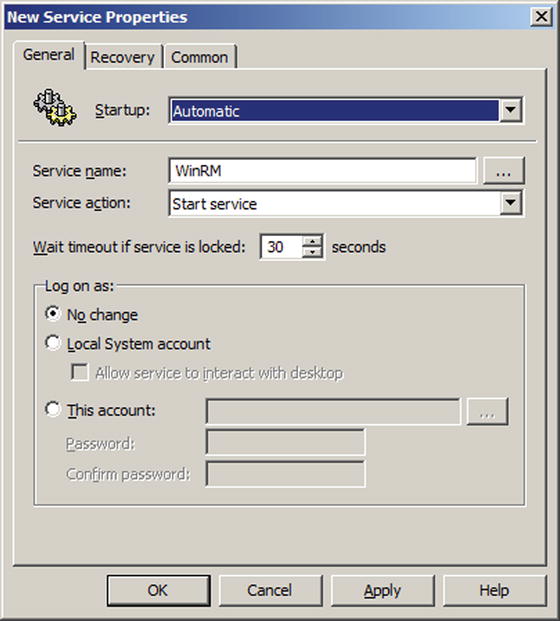
Figure 8-5.
Configuring the WinRM Service Properties in the Group Policy Editor on Windows Server 2008 R2
· Configure Windows Remote Management Service: Navigate Computer Configuration ➤ Policies ➤ Administrative Templates ➤ Windows Components ➤ Windows Remote Management ➤ WinRM Service. Select the option “Allow remote server management through WinRM” on Windows Server 2012 or “Allow automatic configuration of listeners” on Windows Server 2008. Enable it, and configure the IPv4 and IPv6 filters as appropriate. Note that if the filters are left blank, the service will not listen on any address.
· Open the proper port (TCP/5985) in the firewall: Navigate Computer Configuration ➤ Policies ➤ Windows Settings ➤ Security Settings ➤ Windows Firewall with Advanced Security ➤ Inbound Rules. Create a new rule; from the list of predefined rules select Windows Remote Management.
To set up a subscription, start Event Viewer. From the navigation pane select Subscriptions. The first time this is used the user is informed that the Windows Event Collector Service must be running and configured; enable the service. Right-click on Subscriptions, and then select Create Subscription (Figure 8-6). Give the subscription a name and a description. The user can choose from the various logs as destinations, but the default destination, Forwarded Events, is a reasonable choice. For the subscription type, choose Collector Initiated, and select the computer(s). Be sure to test the connection; if the connectivity test does not succeed, then it is likely that there is a problem with the WinRM service or the firewall. Select the events that are to be forwarded; these can be filtered by the log or the source, and can be further filtered by level, category, user, or keyword. By default, a machine account is used to connect to the remote computer to collect the logs; this account usually does not have sufficient privileges to do so. Press the advanced button and select a user and password that has such privileges.
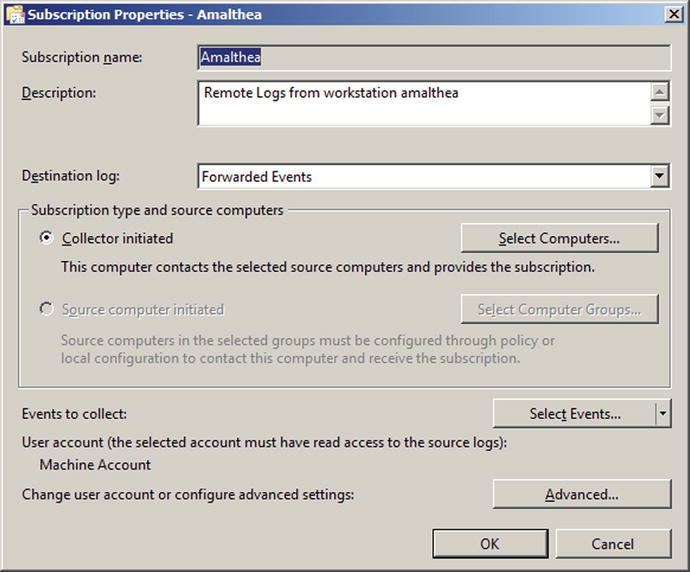
Figure 8-6.
Configuration of a Windows Subscription on Windows Server 2008 R2
When the process is complete, right-click on the subscription and select its runtime status; no errors should be reported.
Once the configuration is complete, log entries from the remote system will appear in the Forwarded Events log.
Log entries in the Forwarded Events log can also be accessed via PowerShell using the cmdlet Get-WinEvent.
PS C:\Users\Administrator> get-WinEvent -logname ForwardedEvents | select -first 4
TimeCreated ProviderName Id Message
----------- ------------ -- -------
10/13/2014 2:36:39 PM Service Control Manager 7036 The WinHTTP Web Proxy Auto...
10/13/2014 2:32:25 PM Service Control Manager 7036 The Multimedia Class Sched...
10/13/2014 2:29:25 PM Service Control Manager 7036 The Portable Device Enumer...
10/13/2014 2:27:30 PM Service Control Manager 7036 The Network Connections se...
Integrating Windows and Linux Logs
It is possible to aggregate logs from both Windows and Linux systems on the same host using a variety of commercial tools. One open source tool that can forward Windows event logs to Linux systems using the syslog protocol is NXLog. It is available for download at http://nxlog.org/products/nxlog-community-edition/download , including a Windows installer.
Once NXLog is installed on a Windows system, it must be configured. The primary configuration file is located at C:\Program Files (x86)\nxlog\conf\nxlog.conf on 64-bit systems and at C:\Program Files\nxlog\conf\nxlog.conf on 32 bit systems. To use NXLog to send Windows logs to a Linux system, a number of changes need to be made to this configuration file. First, the ROOT variable needs to be properly set; this is the path to the NXLog directory. To use syslog for the output format, the corresponding syslog extension (xm_syslog) needs to be loaded. Finally, the output module needs to be configured with the destination log server (e.g., 10.0.9.190), port (e.g., TCP/514), and told how to configure the output (syslog). The result is an nxlog.conf file (on a 64-bit Windows 2012 system) in the form
File 8-3. Example configuration file C:\Program Files (x86)\nxlog\conf\nxlog.conf on Windows Server 2012
define ROOT C:\Program Files (x86)\nxlog
Moduledir %ROOT%\modules
CacheDir %ROOT%\data
Pidfile %ROOT%\data\nxlog.pid
SpoolDir %ROOT%\data
LogFile %ROOT%\data\nxlog.log
<Extension syslog>
Module xm_syslog
</Extension>
<Input in>
Module im_msvistalog
</Input>
<Output out>
Module om_tcp
Host 10.0.9.190
Port 514
Exec to_syslog_bsd();
</Output>
<Route 1>
Path in => out
</Route>
NXLog is configured to start automatically, but once changes are made to the configuration file, it should be restarted. Navigate Control Panel ➤ System and Security ➤ Administrative Tools ➤ Services. Select the nxlog service, right-click and select start or restart as appropriate.
Once started, NXLog begins to send syslog formatted log messages to the selected destination. These follow the syslog standards, and so are in plain text.
root@kali:∼# cat packet
No. Time Source Destination Protocol Length Info
8325 5393.954839000 10.0.9.191 10.0.9.190 RSH 190 Client -> Server data
Frame 8325: 190 bytes on wire (1520 bits), 190 bytes captured (1520 bits) on interface 0
Ethernet II, Src: CadmusCo_b7:1c:b9 (08:00:27:b7:1c:b9), Dst: CadmusCo_b4:b3:97 (08:00:27:b4:b3:97)
Internet Protocol Version 4, Src: 10.0.9.191 (10.0.9.191), Dst: 10.0.9.190 (10.0.9.190)
Transmission Control Protocol, Src Port: 49162 (49162), Dst Port: shell (514), Seq: 14181, Ack: 1, Len: 136
Remote Shell
Client -> Server Data
0000 08 00 27 b4 b3 97 08 00 27 b7 1c b9 08 00 45 02 ..’.....’.....E.
0010 00 b0 40 1a 40 00 80 06 92 af 0a 00 09 bf 0a 00 ..@.@...........
0020 09 be c0 0a 02 02 ed 5f 7b 72 34 0b de ef 50 18 ......._{r4...P.
0030 08 05 a3 07 00 00 3c 31 34 3e 4f 63 74 20 31 39 ......<14>Oct 19
0040 20 31 34 3a 31 37 3a 35 35 20 6d 69 72 61 63 68 14:17:55 mirach
0050 2e 61 6e 64 72 6f 6d 65 64 61 2e 74 65 73 74 20 .andromeda.test
0060 4d 69 63 72 6f 73 6f 66 74 2d 57 69 6e 64 6f 77 Microsoft-Window
0070 73 2d 53 65 72 76 65 72 4d 61 6e 61 67 65 72 2d s-ServerManager-
0080 4d 61 6e 61 67 65 6d 65 6e 74 50 72 6f 76 69 64 ManagementProvid
0090 65 72 5b 32 38 32 30 5d 3a 20 47 65 74 20 62 70 er[2820]: Get bp
00a0 61 20 72 65 73 75 6c 74 20 74 61 73 6b 20 63 6f a result task co
00b0 6d 70 6c 65 74 65 3a 20 30 78 38 2e 0d 0a mplete: 0x8...
Notice that this log message was sent with facility user and priority info. It appears in the logs (/var/log/messages) on the destination (10.0.9.190) in the form
[root@alpheratz ∼]# tail –n 1 /var/log/messages
Oct 19 14:17:55 mirach.andromeda.test Microsoft-Windows-ServerManager-ManagementProvider[2820]: Get bpa result task complete: 0x8.#015
EXERCISES
1.
Run the Firefox XCS Code Execution attack against an Ubuntu 12.04 x64 system. Escalate privileges to root using CVE-2013-2094. Show that the exploit leaves no trace in either /var/log/syslog or /var/log/auth.log.
2.
Use tail with the -f option to follow Linux logs continuously.
3.
Write a PowerShell script to search the security logs to find all instances where a member was added to a security-enabled global group.
4.
Exploit a Windows system, escalating privileges to SYSTEM. Run the clearev command from within Meterpreter to clear the Application, Security, and System logs on the target.
5.
Use the tool eventcreate.exe on a Windows system to generate a custom log entry. Can it be used to add entries to the security log? Can it be used to spoof log entries?
6.
Use the PowerShell cmdlet write-eventlog to generate a custom log entry. Can it be used to add entries to the security log? Can it be used to spoof log entries?
7.
Print out the last five entries from the Windows security log in plain text with the command
C:\Windows\system32>wevtutil qe Security /c:5 /f:Text
8.
Windows log subscriptions use HTTP on TCP/5985. Run a Wireshark packet capture, collecting the HTTP traffic between the hosts. Can the log data be extracted from the packets? What about the authentication credentials?
Notes and References
The RFC specifications for syslog can be found online at
· RFC 5424 http://tools.ietf.org/html/rfc5424 (current)
· RFC 3164 http://tools.ietf.org/html/rfc3164 (now obsolete)
For a more complete introduction to the rsyslog syntax, check out the documentation page for the project, at http://www.rsyslog.com/doc/master/index.html .
Table 8-1.
Default Syslog Daemon by Linux Distribution
|
Ubuntu 8.04 |
syslogd 1.5.0 |
Mint 5 |
syslogd 1.5.0 |
|
Ubuntu 8.10 |
syslogd 1.5.0 |
Mint 6 |
syslogd 1.5.0 |
|
Ubuntu 9.04 |
syslogd 1.5.0 |
Mint 7 |
syslogd 1.5.0 |
|
Ubuntu 9.10 |
rsyslogd 4.2.0 |
Mint 8 |
rsyslogd 4.2.0 |
|
Ubuntu 10.04 |
rsyslogd 4.2.0 |
Mint 9 |
rsyslogd 4.2.0 |
|
Ubuntu 10.10 |
rsyslogd 4.2.0 |
Mint 10 |
rsyslogd 4.2.0 |
|
Ubuntu 11.04 |
rsyslogd 4.6.4 |
Mint 11 |
rsyslogd 4.6.4 |
|
Ubuntu 11.10 |
rsyslogd 5.8.1 |
Mint 12 |
rsyslogd 5.8.11 |
|
Ubuntu 12.04 |
rsyslogd 5.8.6 |
Mint 13 |
rsyslogd 5.8.6 |
|
Ubuntu 12.10 |
rsyslogd 5.8.6 |
Mint 14 |
rsyslogd 5.8.6 |
|
Ubuntu 13.04 |
rsyslogd 5.8.11 |
Mint 15 |
rsyslogd 5.8.11 |
|
Ubuntu 13.10 |
rsyslogd 5.8.11 |
Mint 16 |
rsyslogd 5.8.11 |
|
CentOS 5.2 |
syslogd 1.4.1 |
Open SuSE 11.0 |
syslog-ng 1.6.12 |
|
CentOS 5.3 |
syslogd 1.4.1 |
Open SuSE 11.1 |
syslog-ng 2.0.9 |
|
CentOS 5.4 |
syslogd 1.4.1 |
Open SuSE 11.2 |
rsyslogd 4.4.1 |
|
CentOS 5.5 |
syslogd 1.4.1 |
Open SuSE 11.3 |
rsyslogd 5.4.0 |
|
CentOS 5.6 |
syslogd 1.4.1 |
Open SuSE 11.4 |
rsyslogd 5.6.3 |
|
CentOS 5.7 |
syslogd 1.4.1 |
Open SuSE 12.1 |
rsyslogd 5.8.5 |
|
CentOS 5.8 |
syslogd 1.4.1 |
Open SuSE 12.2 |
rsyslogd 5.8.11 |
|
CentOS 5.9 |
syslogd 1.4.1 |
Open SuSE 12.3 |
rsyslogd 7.2.5 |
|
CentOS 5.1 |
syslogd 1.4.1 |
Open SuSE 13.1 |
rsyslogd 7.4.4 |
|
CentOS 6.0 |
rsyslogd 4.6.2 |
||
|
CentOS 6.1 |
rsyslogd 4.6.2 |
||
|
CentOS 6.2 |
rsyslogd 4.6.2 |
||
|
CentOS 6.3 |
rsyslogd 5.8.10 |
||
|
CentOS 6.4 |
rsyslogd 5.8.10 |
||
|
CentOS 6.5 |
rsyslogd 5.8.10 |
The National Security Agency has a best practices document titled “Spotting the Adversary with Windows Event Log Monitoring” available at https://www.nsa.gov/ia/_files/app/Spotting_the_Adversary_with_Windows_Event_Log_Monitoring.pdf .
Though the license for NXLog is an open source license, it is not one of the traditional open source licenses (GPL, BSD, MIT, Apache), and is not currently on the list of licenses approved by the Open Source Initiative (OSI). The NXLog public license is available at http://nxlog.org/nxlog-public-license , while the list of licenses approved by OSI is at http://opensource.org/licenses/alphabetical .
Footnotes
1
http://technet.microsoft.com/en-us/library/ff182311(v=ws.10).aspx#BKMK_3 .
© Mike O'Leary 2015
Mike O'LearyCyber Operations10.1007/978-1-4842-0457-3_9
All materials on the site are licensed Creative Commons Attribution-Sharealike 3.0 Unported CC BY-SA 3.0 & GNU Free Documentation License (GFDL)
If you are the copyright holder of any material contained on our site and intend to remove it, please contact our site administrator for approval.
© 2016-2026 All site design rights belong to S.Y.A.