How to Attack and Defend Your Website (2015)
Chapter 1. Web Technologies
Abstract
In this chapter we go over the basic web application technologies, including web servers, client-side versus server-side programming languages, databases and their related workflow. We then use some useful tools, Burp Suite and the Damn Vulnerable Web App (DVWA) to understand HTTP, and POST, and GET requests.
Keywords
web servers
server-side programming languages
client-side programming languages
JavaScript
SQL (Structured Query Language)
HTML
URL encoding
POST requests
GET requests
intercepting proxy
Note: Before starting Chapter 1, please download Lesson 0 (http://www.concise-courses.com/learn/web-application-security/setup/), which provides instructions on setting up your computer to perform the exercises in this book.
1.1. Web servers
The primary function of a web server is to store, process, and deliver web pages to clients. Client requests are processed by Hypertext Transfer Protocol (HTTP), the basic network protocol used to distribute information on the World Wide Web. Pages delivered are most frequently HTML documents that may include images, style sheets, and scripts, in addition to text content.
There is nothing mysterious about web servers, they work in a similar way to a file share on your Mac or Windows PC.
1.2. Client-side versus server-side programming languages
Web servers interpret some programming languages before presenting them to the user. These are called server-side programming languages. The developer writes the code for a web page, you as a web user request that page, and the server prepares that page, and then that content is sent to you through your web browser. Examples of server-side programming languages include: PHP, ASP, Python, and Java.
Client-side languages are different. Client-side languages are also code written by application developers. When a user requests a page, however, client-side languages are executed and interpreted by the user’s browser, not by the web server. An example of a client-side language is JavaScript.
In summary, server-side languages are interpreted by the server, before actually getting to the user. Client-side languages are interpreted by the browser after they are sent to the user.
1.3. JavaScript – what is it?
JavaScript executes in your browser, not on the server. That is an extremely important concept to remember. Generally, JavaScript is found between script tags (<script> </script>) on a page.
1.4. What can JavaScript do?
JavaScript is a powerful language because it can redirect and manipulate a user’s browser: it can edit and change HTML on a page; it can change the look and feel of a page; change the style of a page; and it can log a user in and out of an application. Simply put, that which can be done in a browser can be done in JavaScript (and more!).
1.5. What can JavaScript not do?
JavaScript cannot directly interact with the server’s file system because it is not running on the server; it is running in the browser. Therefore, JavaScript cannot make your browser send data from one domain to another; this is called cross-domain restrictions. In some special cases, this can be worked around, but in general it cannot, for example, transfer data from the web server hosting www.concise-courses.com to the web server hosting www.elsevier.com.
1.6. Databases
A database provides persistent data storage with quick access to that data. The most common ones are SQL (Structured Query Language) databases. SQL databases store data in tables and columns, and rows, and keys. Data is retrieved by using queries written in a structured syntax (hence the name). SQL syntax allows a website or a web application to retrieve, insert, and update records in a database.
1.7. What about HTML?
HTML is a markup language that is generally static, and, with the adoption of HTML5, is getting more complicated and becoming a better attack surface.
1.8. Web technologies – putting it together
The typical flow for a web application is the following: a user requests content (a webpage) through their web browser, and a web server serves that content via the folder that is shared with the world. The server-side scripting language is interpreted (PHP, ASP, Python, etc.) along with (possibly) data from a database, and the output is incorporated, and passed onto the user’s browser. At the same time that the server-side content is received, the user’s browser determines whether there is any client-side script, that is, code that is executed locally, typically JavaScript, Flash, or ActionScript. If there is, it executes it. The last step in this process is for the browser to render the end result, and the user is able to navigate the page.
1.9. Digging deeper
Most web application developers understand this workflow, but they do not always understand the technologies and protocols that power it. As hackers, we want to understand the application better than the people who built it, and then make it do what we want!
1.10. Hypertext Transfer Protocol (HTTP)
Hypertext Transfer Protocol (HTTP) is the language of the web and is what defines how browsers request and how servers receive content.
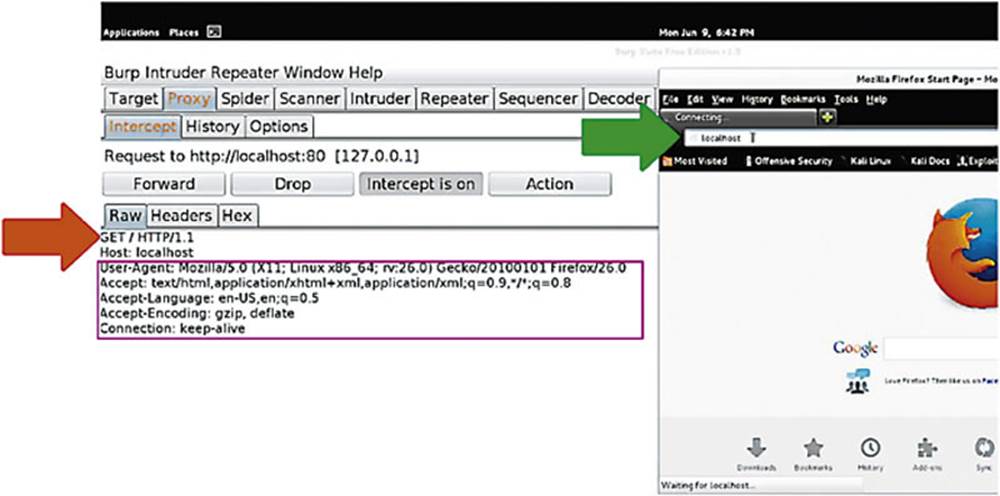
IMAGE 1
Using a tool called Burp Suite, we can take a look at what an HTTP request looks like. We are going to open our browser and type “localhost” in the URL bar, which is going to connect to our local Linux machine (this can be any domain, such as google.com). Within Burp Suite we can see that the action we just took executes a GET request. This GET request (see the left arrow on Image 1) was generated by requesting the landing page of localhost (see the right arrow on Image 1).
We are going to use Burp Suite to start tweaking these raw requests, which we would normally not be able to do in a browser.
HTTP headers (see the box on Image 1) generally pass information from a browser to the web server of the web application. The user agent, for example, gives a web server information about yourself. In our example, you can see that we are running Firefox 26.0 and that we are using a 64-bit Linux machine, and so forth. The most important element to concentrate on is that HTTP headers all follow the same format. Referring to the image, think of the “Accept” statement as a “key” and the description as a “value,” together forming a key-value pair that is being passed onto the web application (these are concepts familiar in programming).
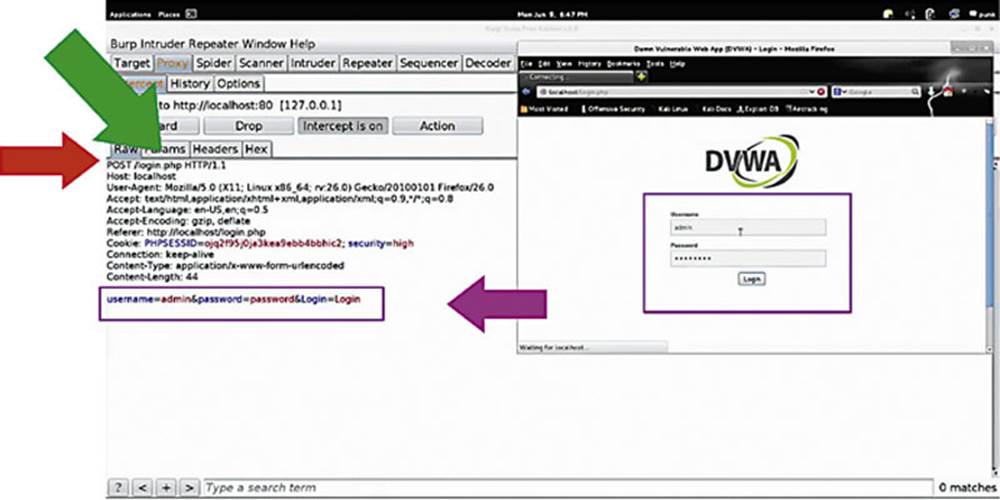
IMAGE 2
That is a GET request, now let us look at POST requests. The POST request, in this example, is the result of logging into an application, the Damn Vulnerable Web Application (DVWA), specifically the “/login.php” page (see the left arrow in Image 2). We are posting data, giving information to the application to be used in some way, in this case the username and password to log in to the application (see the right arrow on Image 2).
There is the usual boilerplate information, for example the HTTP 1.1 protocol (see diagonal arrow on Image 2) and the host information, localhost. The data in the box of the image is another set of key-value pairs, the username “key” has the “value” of “admin” and the password “key” has the “value” of “password.”
In summary, POST requests are meant to pass data to an application, such as a login, username, and password, whereas GET requests are meant to request data from the web application.
1.11. Verbs
GET and POST are called verbs. As we saw, GET requests pass information via the URL using a parameter in the URL. POST requests pass information via their own parameters, but they are not visible in the URL. It can be confusing that both GET and POST requests can pass information to the application, but these two actions are meant for different purposes. Typically, POST requests are used for sensitive data such as usernames and passwords, so they are not visible in the URL. Developers, however, tend to use one or the other interchangeably.
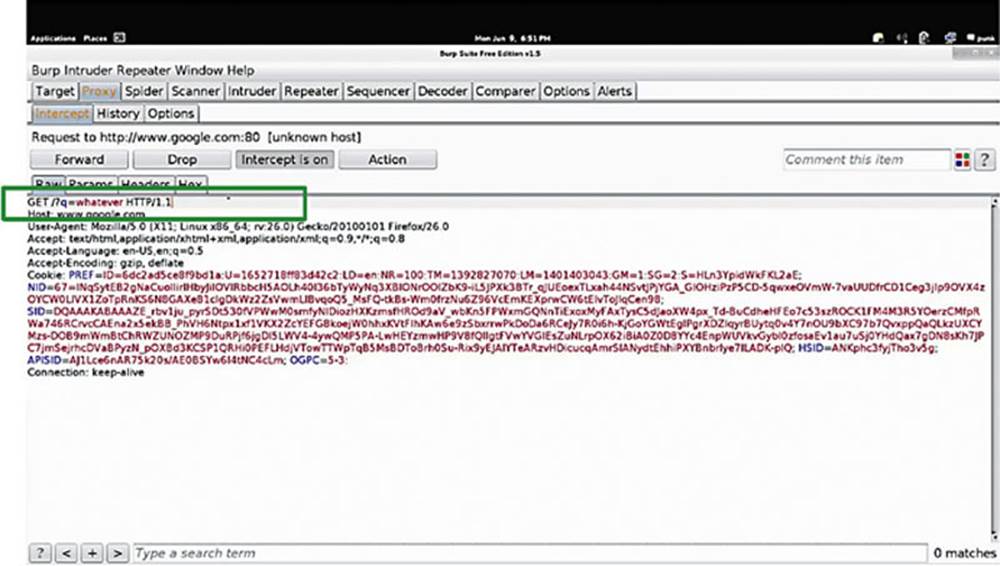
IMAGE 3
For this next example I am sending a GET request to google.com with the “q = whatever” parameter attached to it, (refer to the box in Image 3). This is going to tell Google that the search query (q) that “I want to use the word ‘whatever’ in my search request.”
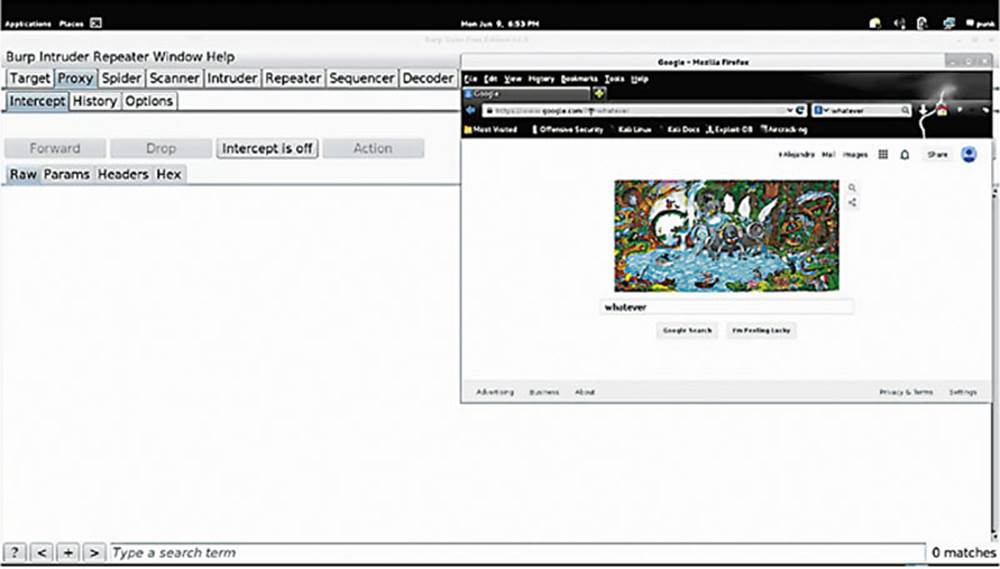
IMAGE 4
Image 4 shows what this search query looks like in a browser. I am passing in “q = whatever” into the URL bar which auto-populates “whatever” into the search bar, and now I can conduct a Google search on that word.
1.12. Special characters and encodings
URL percent encoding is used to pass special HTTP characters through the HTTP protocol safely when using GET and POST parameters. The reason for encoding is that some characters have special meanings in HTTP. Special characters in HTTP include things like line breaks, spaces, and so forth.
1.13. Cookies, sessions, and authentication
The HTTP protocol does not know some important things like whether we are a specific user, or if we are allowed to be on a certain page. To assist with this, applications issue cookies, and session tokens to keep track of what a user has or has not done on the application, for example logging in.
Cookies and session tokens are values passed along in HTTP requests marking that a user has performed a certain action already. Cookies might persist if they are stored in a web browser, but session tokens are generally removed after a browsing session is complete.
1.14. Short exercise: Linux machine setup
Our first exercise is to get Burp Suite up and running1, and to allow traffic to flow through it. Burp Suite is our main attack and reconnaissance tool, you have already seen it in action in several of the previous examples.
In Image 5 you can see we are in our terminal, in the tools directory, where we have already downloaded the .jar file for Burp Suite. To open the tool we simply type in the terminal:
java – jar burpsuite_free_v1.5.jar
Press Enter, and Burp Suite will automatically open.
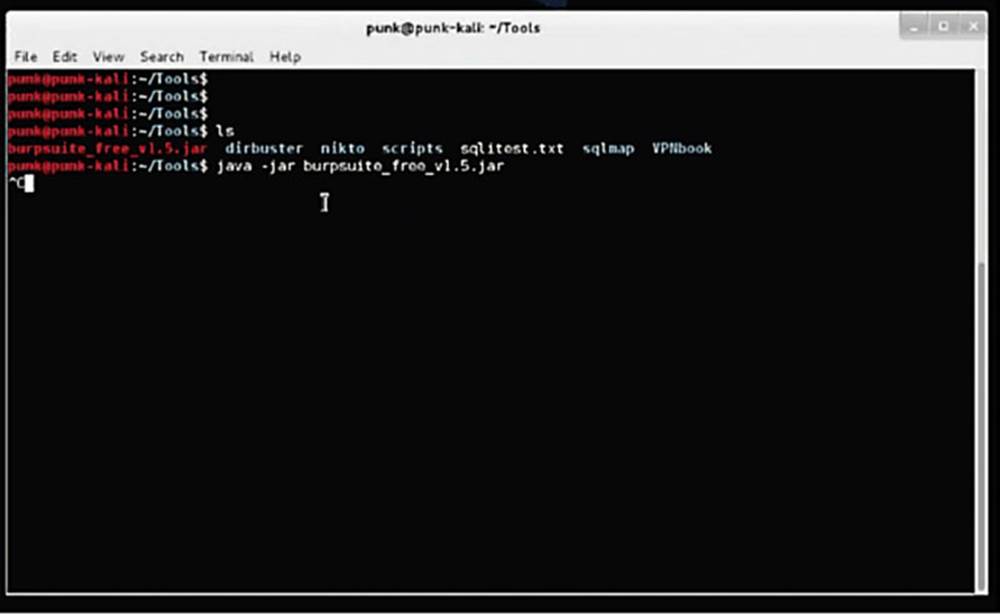
IMAGE 5
Further, let us open our web browser and configure it to use Burp Suite. Navigate to Firefox > Preferences > Advanced > Network Tab.
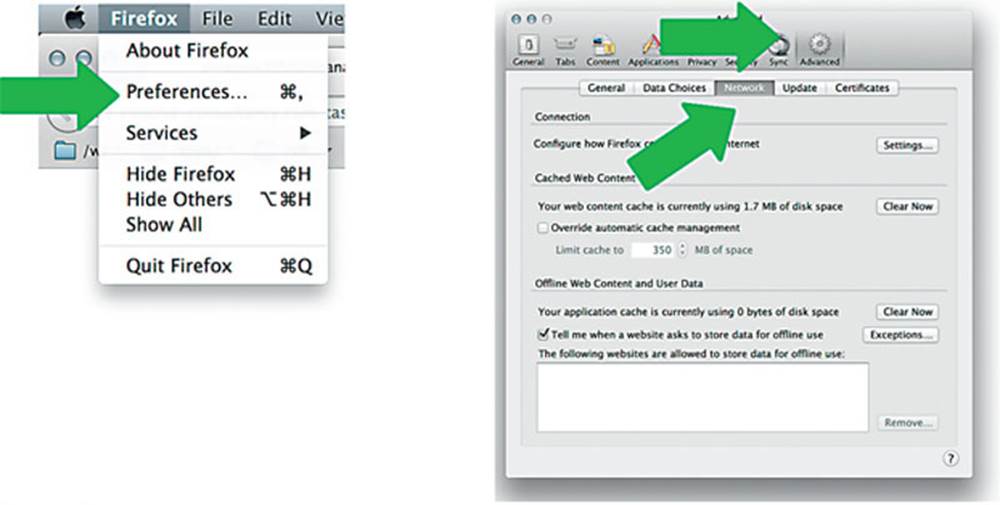
IMAGE 6
A default setup will state “No proxy,” we need to change this to “Manual proxy configuration.” In the HTTP proxy field enter “127. 0.0.1” (your local IP) and Port 8080.
Make sure that the “No proxy for” field is completely empty.
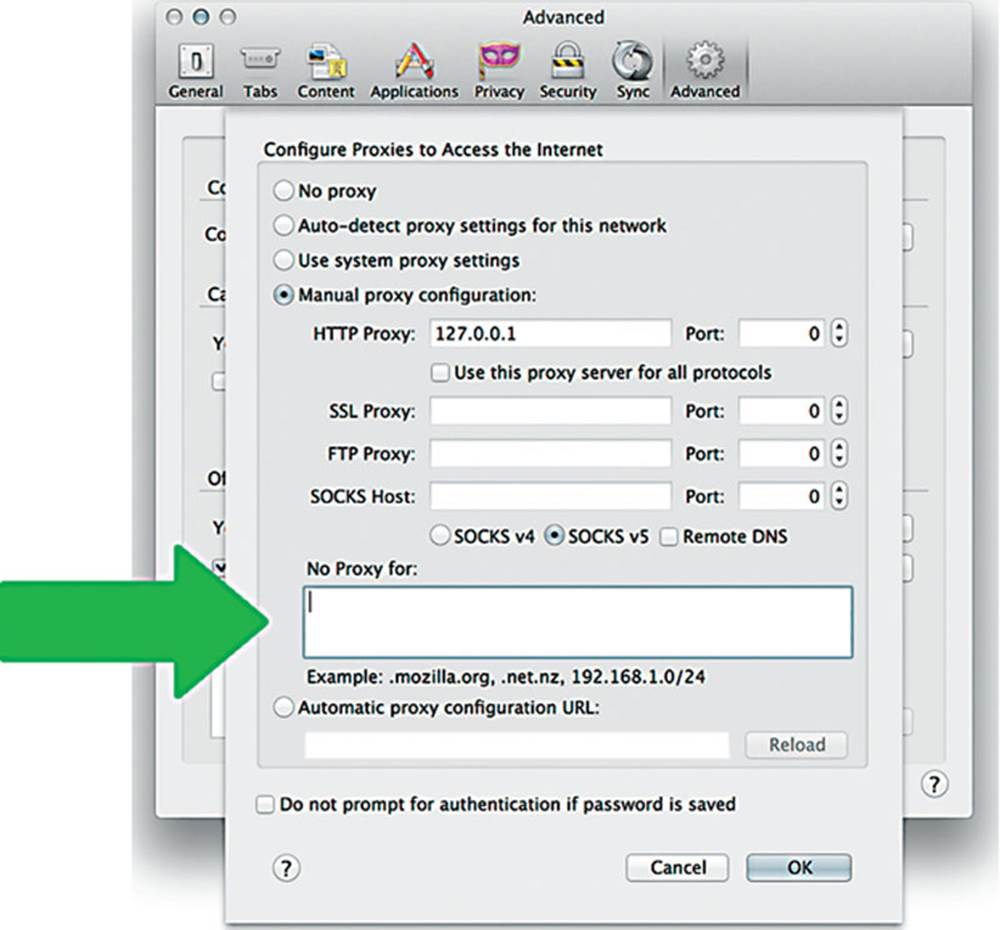
IMAGE 7
You can leave all other settings as they are. Your browser is now configured to use Burp Suite.
1.15. Using the Burp Suite intercepting proxy
Burp Suite is a fully featured web application attack tool: it does almost anything that you could ever want to do when penetration testing a web application.
One of Burp Suite’s main features is its ability to intercept HTTP requests. Normally HTTP requests go from your browser straight to a web server and then the web server response is sent back to your browser. With Burp Suite, however, HTTP requests go from your browser straight to Burp Suite, which intercepts the traffic.
In Burp Suite you can then tweak the raw HTTP in various ways before forwarding the request on to the web server. Essentially this tool is acting as a proxy, a “man in the middle,” between you and the web application, allowing you to have finer control over the exact traffic you are sending and receiving.
Our goal with the Burp intercepting proxy feature is to tweak requests so they still follow the rules of HTTP, but can make the application act unexpectedly.
1.16. Why is the intercepting proxy important?
Your browser constrains your interaction with web applications by only allowing very specific HTTP requests. Using client or server-side programming and code, the HTTP requests are directed to you by the website developer. A website developer, for example, might have written a contact form on a page that will constrain the HTTP traffic by limiting what you can enter into the form. Burp Suite allows you to break free from the browser and web application and tweak the raw HTTP request so you can send any traffic that you want: this is very important to remember.
In the following examples you will see many references to the intercept feature. An important element to note here is that if you find yourself trying to use your browser later and it appears to be frozen, or takes a very long time to load, check to make sure that you have not left “Intercept” on in Burp Suite.
1.17. Short exercise – using the Burp Suite decoder
The goal of this exercise is to understand and tweak an HTTP request and properly encode characters within the HTTP protocol so that the reflected page outputs a “+” sign.
Exercise steps:
1. Login to the DVWA and go to the XSS Reflected page.
2. The first step in understanding how to hack a website is to understand how a normal user would use the website. For example, you might enter your name and you receive an “echo” or reply back with a “hello” in front of it.
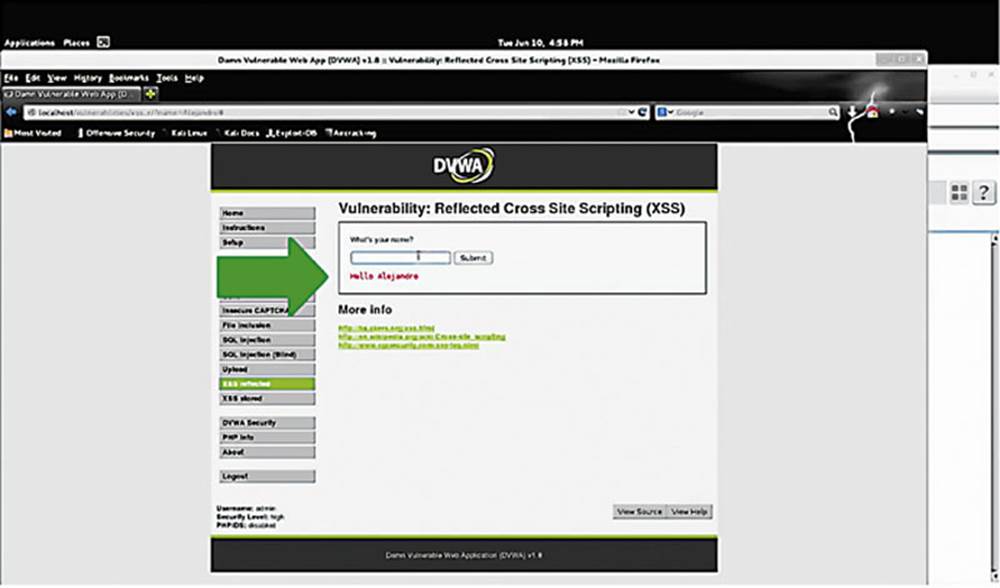
IMAGE 8
3. Now you want to intercept that request, so go to Burp Suite, hit the Proxy tab and turn “Intercept” on.
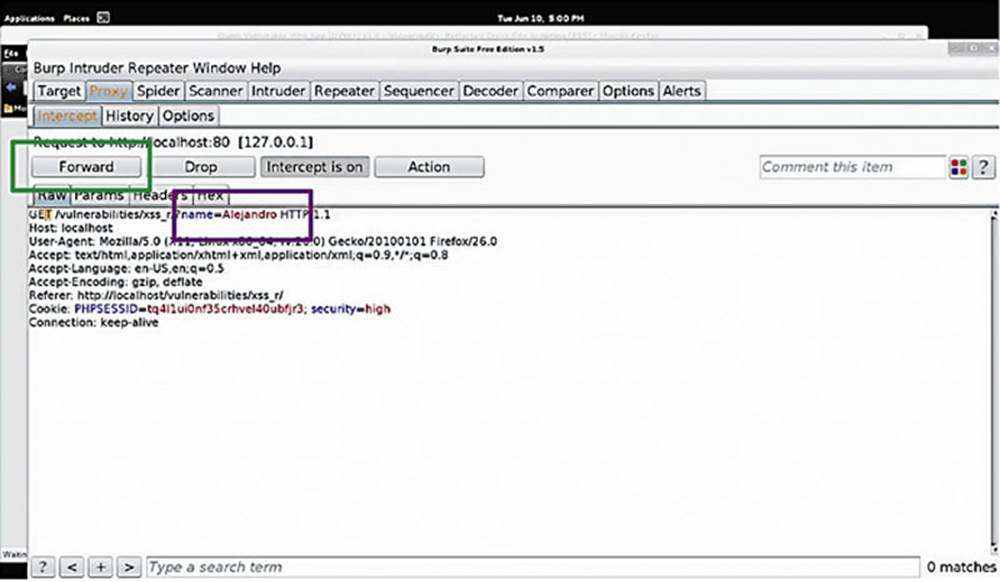
IMAGE 9
4. Back in DVWA, enter your name in the text box and hit Submit again. Go back to Burp Suite and you can see that it has captured the HTTP request – it is a GET request, submitting a parameter called “name” with the value that you entered, in our example “Alejandro” (see bottom box in Image 9).
5. Now forward the request on to the web server by hitting “Forward” (see the top box Image 9). Back in DVWA you will see it echoing the name you entered.
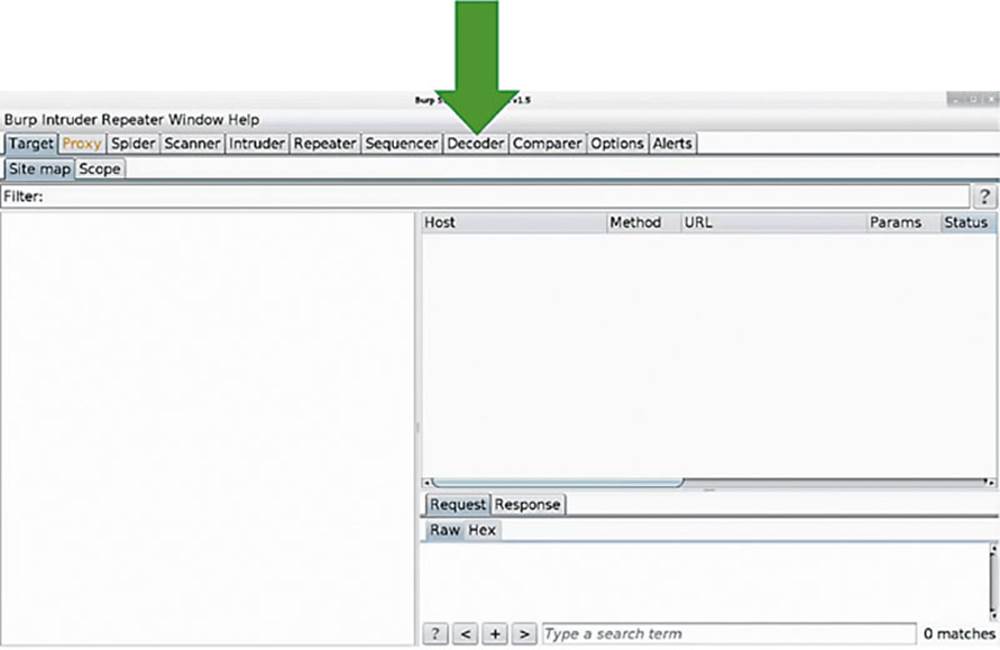
IMAGE 10
Now we want to understand HTTP encoding, so we will try to get the page to echo a “+” sign, which is a special character in HTTP.
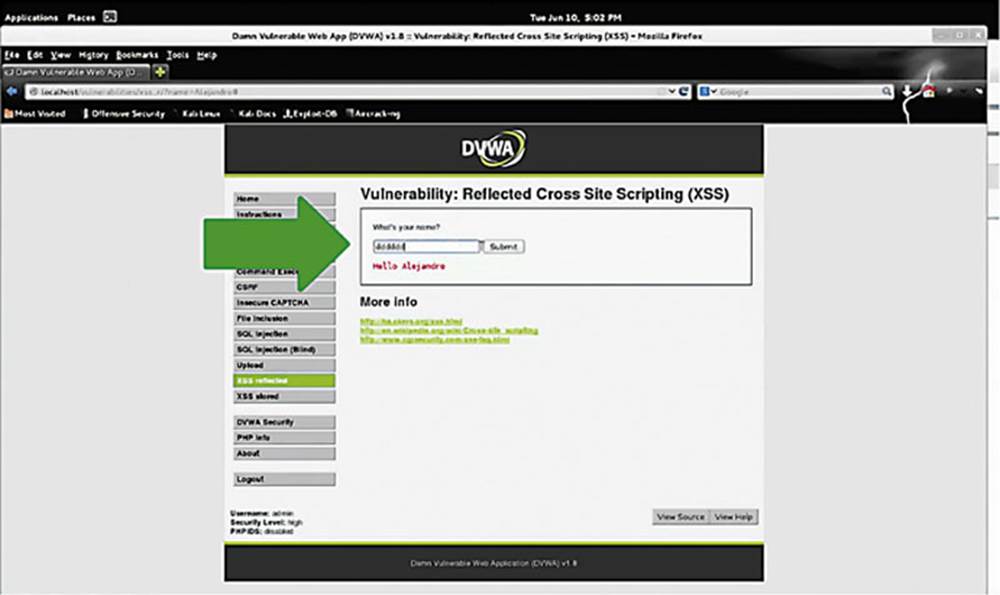
IMAGE 11
1. Go back to the DVWA and submit something random so it can be intercepted (see arrow in Image 11).
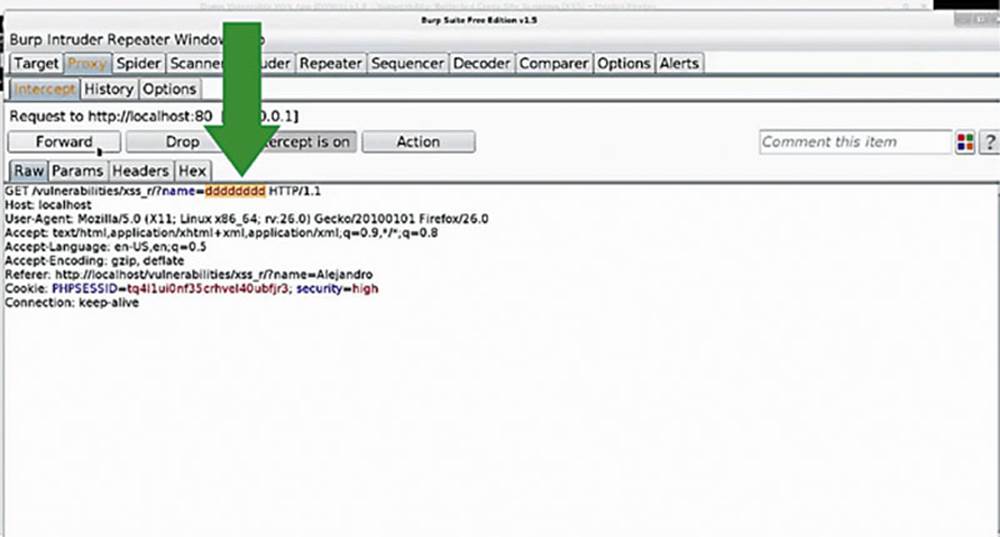
IMAGE 12
2. Go to the intercepted HTTP request in Burp Suite. We see that all Burp Suite is doing is echoing back whatever you type in to the value of this parameter. If you were to forward this, it would say “hello dddddddd” (See arrow in Image 12).
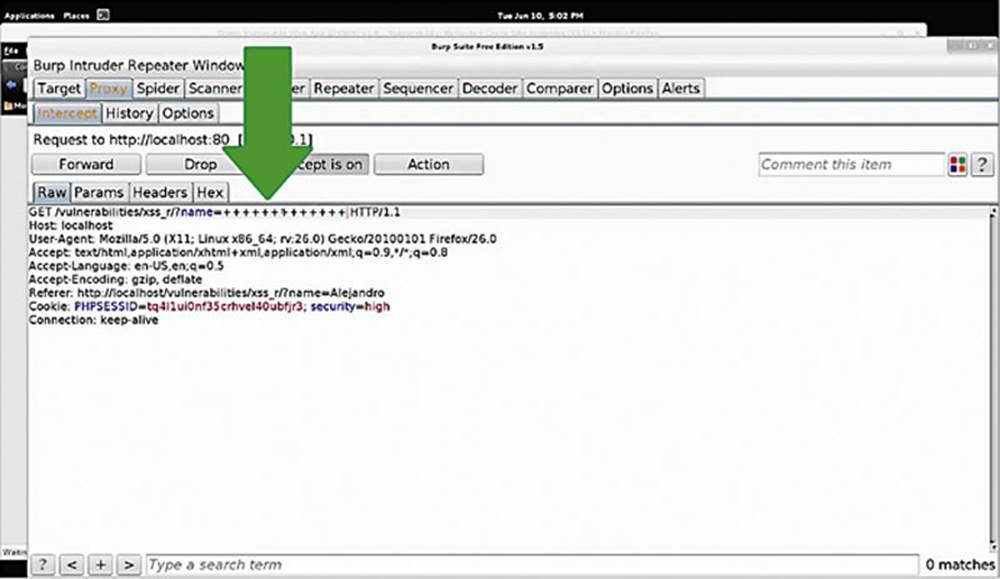
IMAGE 13
3. Enter several “+” signs in place of your name, (so it reads “name = ++ + + + +”), and hit “Forward” (see arrow in Image 13).

IMAGE 14
4. Back in the DVWA you will see that there is no output for your name – why not? Well, “+” is a special character in HTTP, it indicates a space. A literal space would break the HTTP protocol, so it needs to be represented by something, and that something is the “+.” In order to get the web application to echo this symbol, we have to do something special.
5. Go back and repeat steps 1–3, but this time, instead of just entering the “+” symbols into the raw HTTP request, enter them into the Decoder tab of Burp Suite.
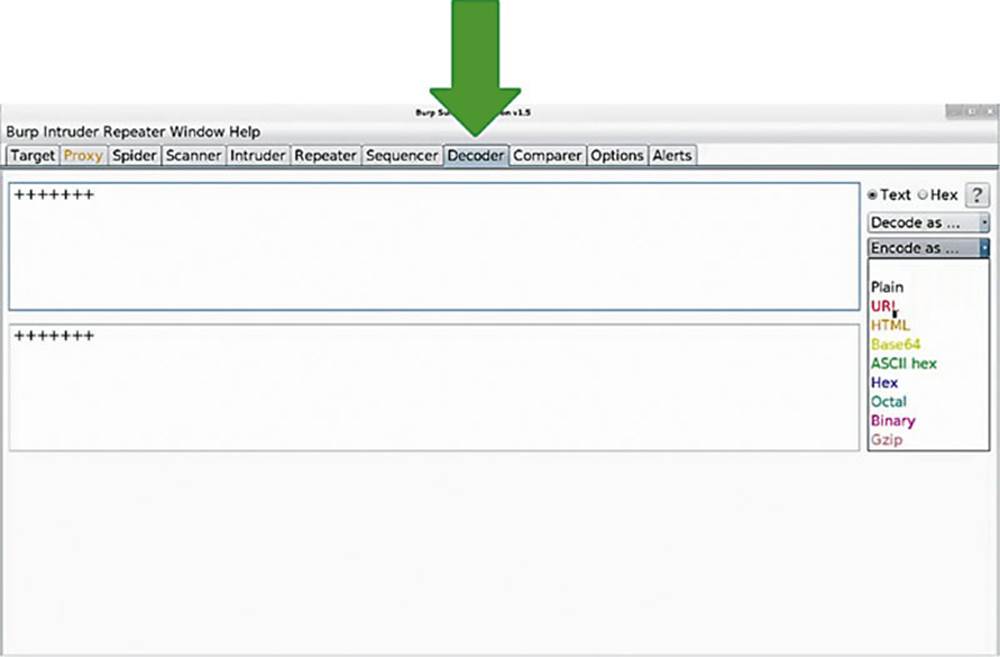
IMAGE 15
6. Here we can encode this string as a URL. In the “Encode as” dropdown on the right select URL (see Image 15). This will translate the “+” sign so that when it passes the string to the application it will be interpreted as the literal “+” sign, not a space.
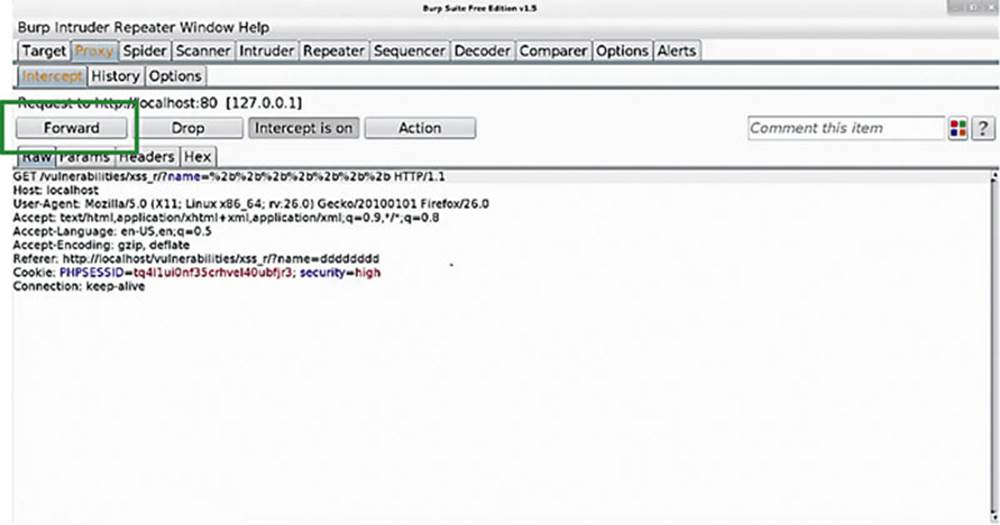
IMAGE 16
7. Copy-paste the URL-encoded string from the Decoder tab into your raw HTTP request in the “name =” field. Then forward that along to the application and you will see your string of “+” signs echoed into the application.
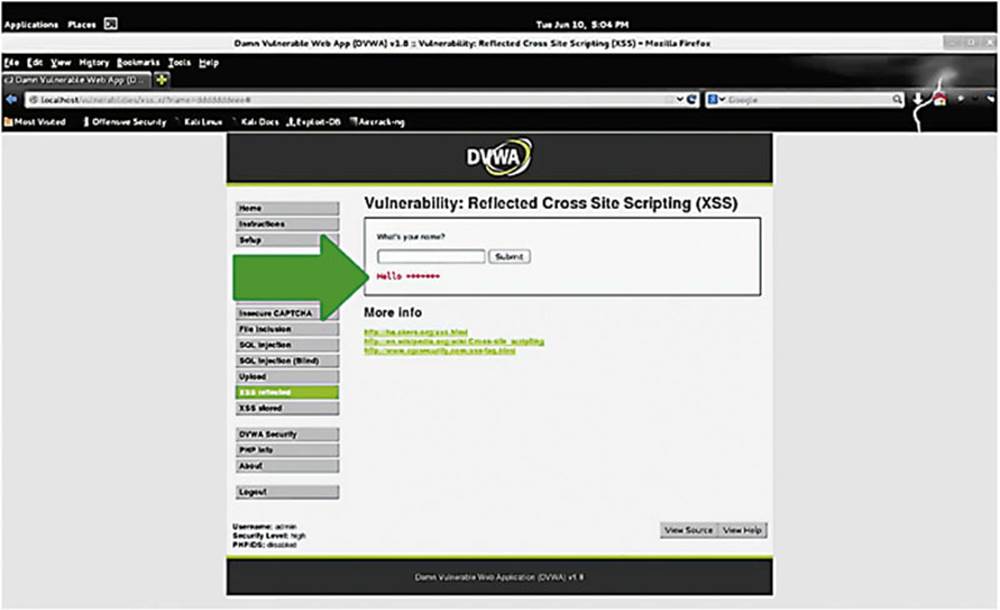
IMAGE 17
Hopefully after this exercise you have a good idea of how to use Burp Suite as an intercepting proxy and how to tweak the raw HTTP request and encode special characters.
1.18. Short exercise – getting comfortable with HTTP and Burp Suite
The goal of this exercise is to get comfortable with how HTTP passes information to an application.
Exercise steps:
1. Your Burp Suite interception proxy should be set to “Intercept Off.”
2. Open up DVWA, login, and go to the Command Execution page.
3. Enter an IP address in the box (you can just use 127.0.0.1) and check out the functionality.
4. Now turn “Intercept On” and go through the same process.
Answer the following questions:
• Is this using a POST or GET request to pass information?
• What else might this application be interacting with? (A database? Client-side scripts? The underlying operating system?)
• Is the DVWA using a cookie? If so, what for?
Go to the XSS Stored page of DVWA, repeat the process, and answer the same questions.
1.18.1. Solution
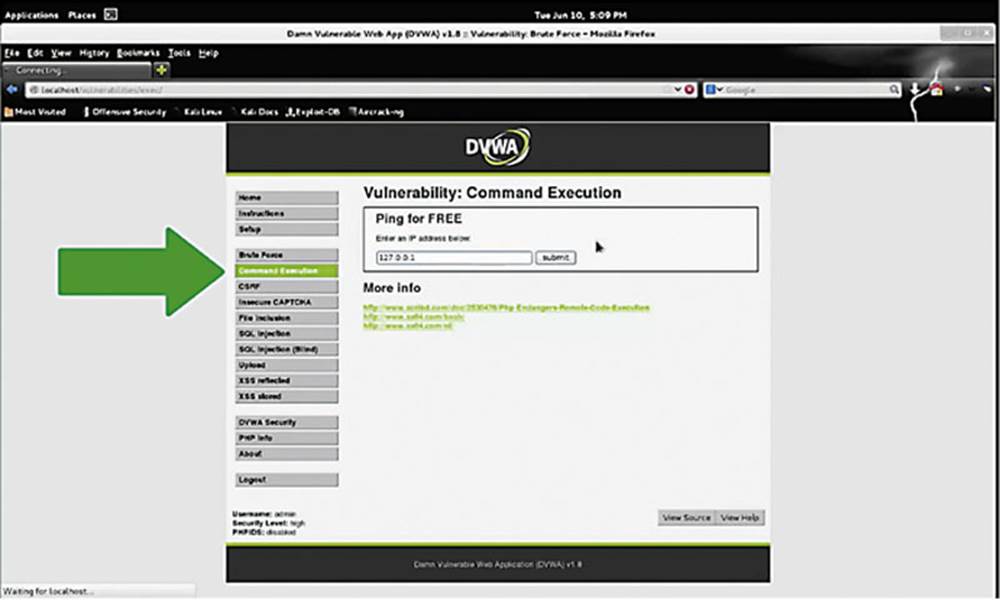
IMAGE 18
The first step is to understand what this application is trying to do for a typical user. So, on the Command Execution page, enter the loopback address, 127.0.0.1, submit it, and see what happens.
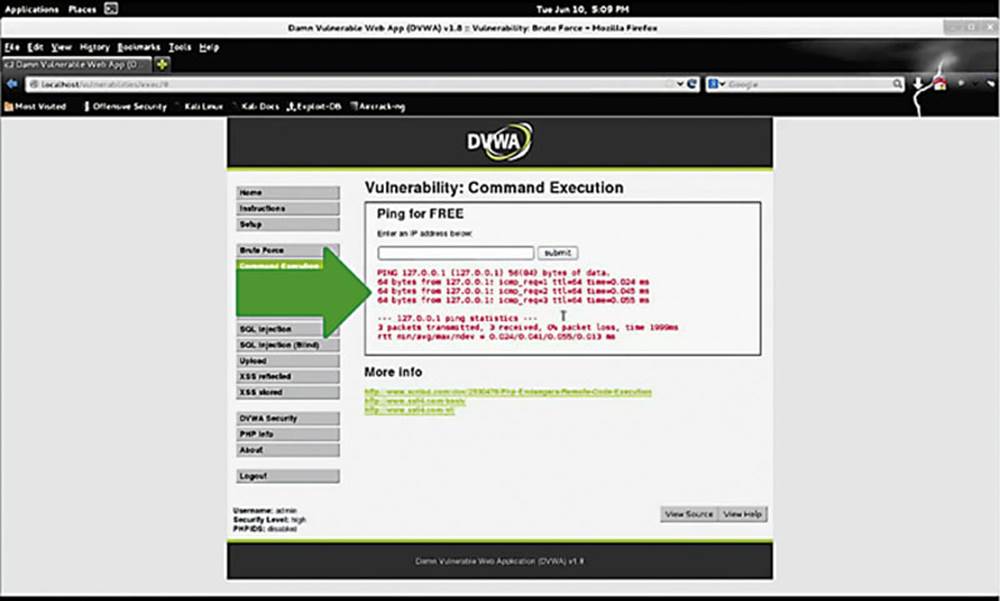
IMAGE 19
The web application is pinging that IP address, which sends a request to that IP and waits for a response to see if that host is “alive.” We see the results of the pings, telling us that the packet (the “ping”) is transmitted and received, with 0% packet loss, meaning the host is alive.
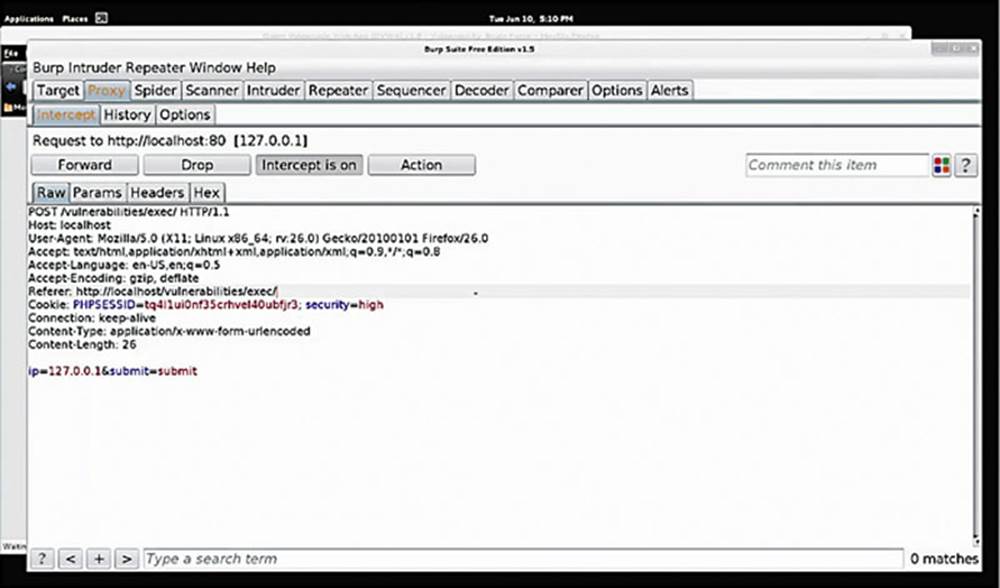
IMAGE 20
Now we will use Burp Suite to examine this traffic to better understand it.
Looking at the captured request, we notice that it is POSTing some information to/vulnerabilities/exec, so the answer to the first question is that the application is using a POST request.
We also see that it is passing the IP address in two parameters, “ip = 127.0.0.1&submit = submit” which is all very standard.
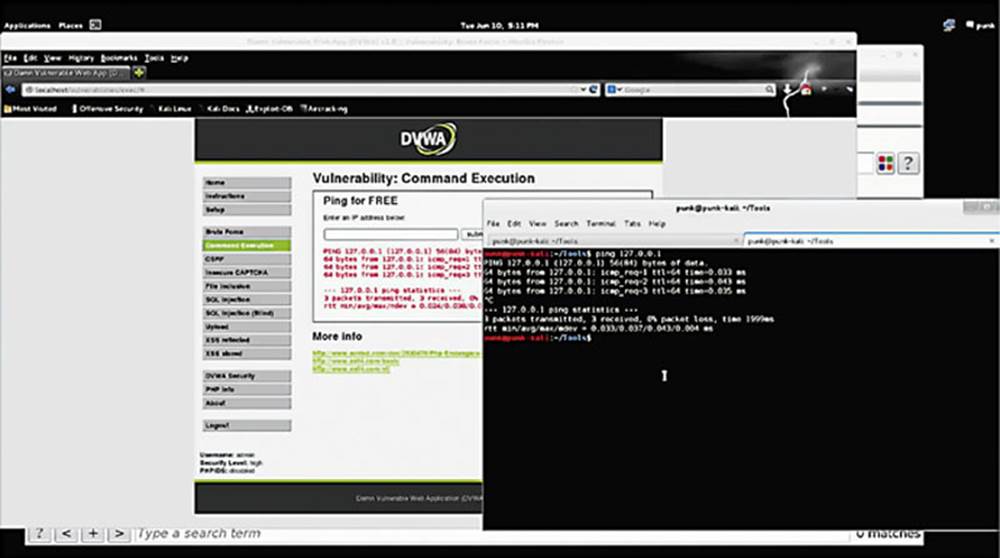
IMAGE 21
Those familiar with Linux will understand the output in Image 21, but now let us see what happens when we ping 127.0.0.1 in the terminal. That output is almost exactly the same as what we see in the application. That tells us that this application is using the underlying operating system to perform a ping, and then give us back those results. All it is doing is submitting whatever IP you enter into the box into the ping command in your terminal, and then taking that output and dumping it to the application. The answer to the next question, therefore, is that it is interacting with the underlying operating system.
In terms of the actual workflow of the page, we enter an IP address that is submitted via a POST request, that information is sent to our underlying operating system, which performs a ping, then the application grabs that output and dumps it to the page.
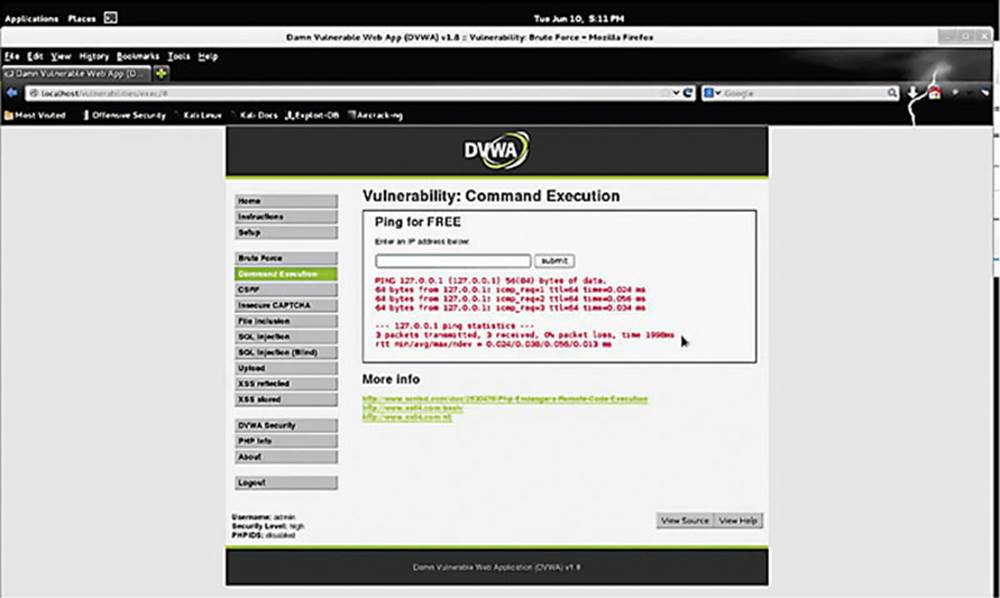
IMAGE 22
Now let us look at the XSS Stored page, which is a dummy guest book-signing page. As a first step, try to use it as a normal user to get a general feel of how the application works. We notice that our name and message is stored on the page as soon as we click “Sign Guestbook.”
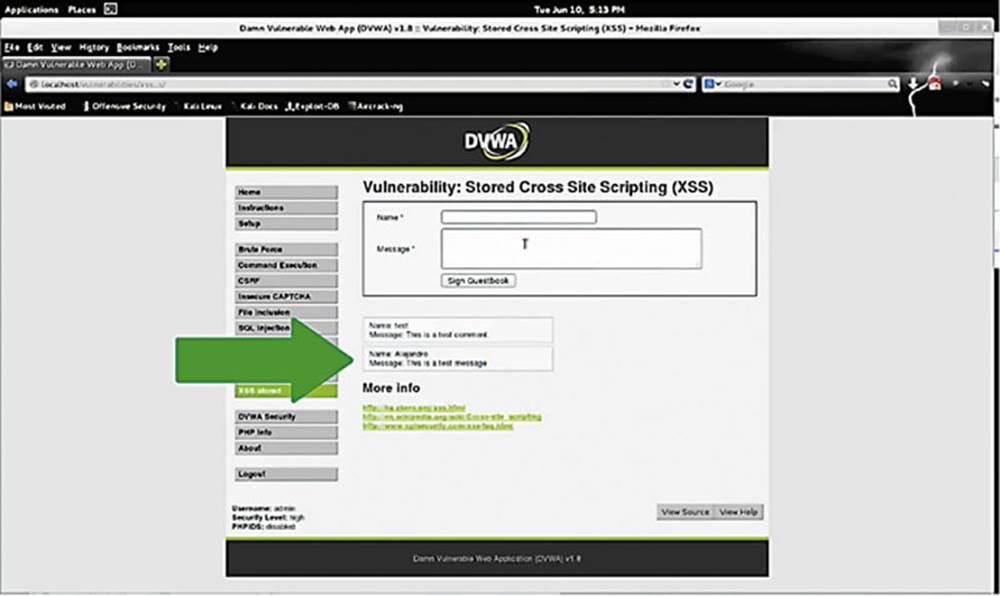
IMAGE 23
Back in Burp Suite turn “Intercept On” and see what happens when we enter a different message.
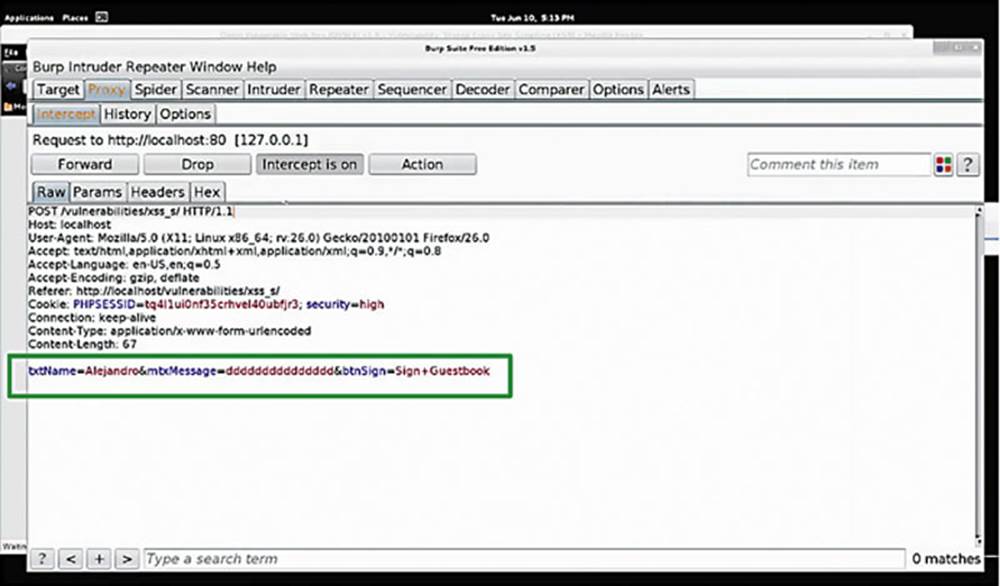
IMAGE 24
We can see that it is using a POST request to/vulnerabilities/xss_s and submitting our information through these two parameters: “TxtName” and “MtxMessage” (refer to box on Image 24).
We can reason that there must be some sort of persistent storage within this application because the name and message are persistently available on the page – if you reload the page you will see that information again, it does not go away. Because the information is persistent, we know that it must be stored in a database.
Now turn “Intercept Off” in Burp Suite and refresh the DVWA page (see Image 25).
IMAGE 25
You will see that the messages have persisted on the page (see Image 26).
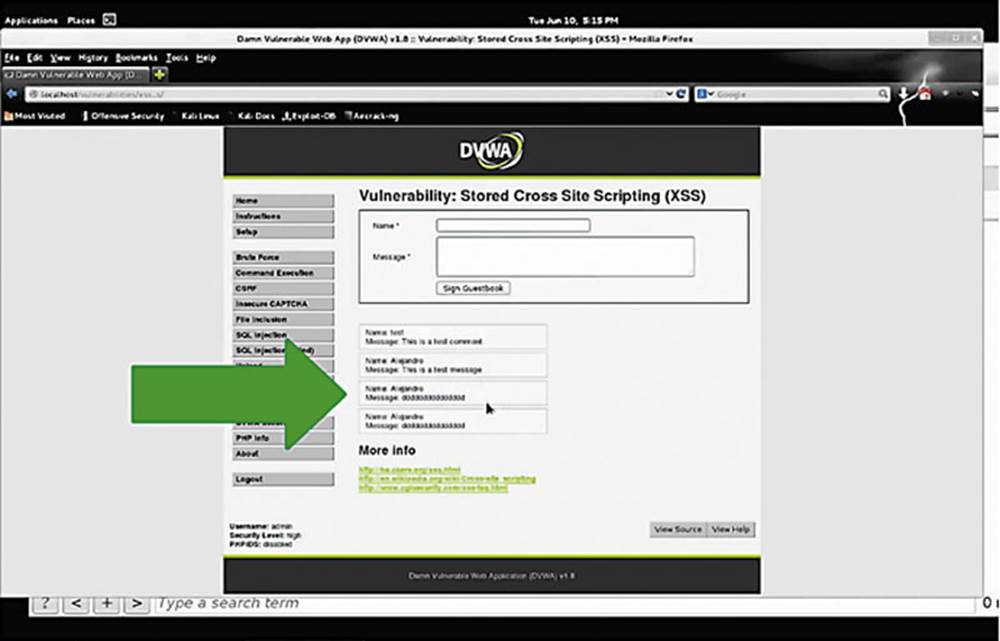
IMAGE 26
Remember that we mentioned SQL previously – to retrieve information from the database the application must be executing SQL query, or command.
To recap, the workflow of this page is: a user enters a name and a message, which gets passed as a POST request, and the information is stored into the database and retrieved via a SQL command each time that page is loaded.
1.19. Understanding the application
Our goal in this section is to understand how an application works.
We need to ask the following questions:
• What technologies is an application using?
• Is there anything obviously dangerous going on in the application?
• How does the application pass data back and forth? What are some of the places where user input is being passed?
• Where is the database being queried? Is user input being used here to actually query the database?
• Where is the application displaying user-supplied input?
• Where is user-supplied input actually being printed to the page? (Printed data on a page is something that can often times be very dangerous because it is a significant cause of bugs in a website).
1.20. The Burp Suite site map
The Burp Suite site map is going to give us a better understanding of how an application works. It is always a great idea to take notes on all your observations when playing with an application.
1.21. Discovering content and structures
Effective web hacking is quite formulaic, with the first step being “content discovery.” Click on absolutely everything in an application and monitor the HTTP requests to understand how the data is being used. This can be a monumental task, especially for a large website, or application, but you can use the Burp Suite Spider to help you.
1.22. Understanding an application
Patience is paramount when trying to understand an application. If you discover technologies that you do not understand, search online for more information. Googling HTTP requests, for example, is a fast, simple, and effective way to learn what they are doing.
1 Please Download “Getting Your Hacking Lab Set Up at: http://www.concise-courses.com/learn/web-application-security/setup/
All materials on the site are licensed Creative Commons Attribution-Sharealike 3.0 Unported CC BY-SA 3.0 & GNU Free Documentation License (GFDL)
If you are the copyright holder of any material contained on our site and intend to remove it, please contact our site administrator for approval.
© 2016-2026 All site design rights belong to S.Y.A.