BackTrack – Testing Wireless Network Security (2013)
Chapter 1. Installing and Configuring BackTrack
In this chapter, we are going to look at the following with respect to using BackTrack:
· Downloading and configuring BackTrack
· Installing BackTrack
· Updating BackTrack
· Validating the interfaces
· Customizing Gnome
· Creating a virtual machine
Before we focus on downloading, installing and configuring Backtrack, I will provide a brief introduction to Backtrack. The BackTrack distribution is actually a combination of two different distributions merged together. There are many distributions that are available, but BackTrack distribution has been created specifically for professional security and penetration testing. The BackTrack distribution was the result of a merger between the two distributions Whax and Auditor. For a brief on some of the distributions, including Auditor, you can find a presentation that I gave at Black Hat in 2005 via this link:
http://www.blackhat.com/presentations/bh-usa-05/bh-us-05-cardwell.pdf
The name BackTrack comes from the term backtracking, which is the name of a search algorithm.
Downloading and configuring BackTrack
The BackTrack distribution comes in a variety of formats; the format you choose is largely a matter of personal preference and your comfort with creating virtual machines. Each one of the distributions has the same tools; they only differ in the utilities that are available with the desktop once you enter the windowing environment. The available distributions come in either a 32-bit or 64-bit distribution; most users will be fine with 32-bit distributions. The main consideration is the amount of random accessory memory (RAM) you will have available for the installation. If you can allocate more than 4 GB of RAM, you can choose the 64-bit distribution; if not then go with the 32-bit option. BackTrack will work with as little as 1 GB of RAM, but the tools you use within it might need more, so 2 GB or more is recommended.
An important point to note is that you should always verify the image files of anything you download. That is why there is an MD5 hash for each of the downloads. If you do not know how to do this, you can do a search for it on the Internet. There are a number of tools that can be downloaded to assist you with verifying the hash of a file.
The ISO file allows you to take the image and burn it to a DVD, allowing you to boot from the image and run BackTrack from the DVD. Alternatively, you can also mount the image using a virtualization tool and boot it that way.
For our purposes, we will use the virtual machine, as it is easy to use and has been configured with the tools; this allows you to copy and paste within the VM and have a full screen virtual environment. We will also include steps later in the chapter for booting the ISO image in VMware Workstation, as that will result in the identical interface that will be experienced when booting from a DVD image. VMware Workstation was one of the first virtual environment software products and allows us to run multiple computers on one machine.
BackTrack can be downloaded from its official website at http://www.BackTrack-linux.org/downloads/. Once you go to the website, you will see that there is a registration request there; this is optional, and downloading the distribution is not required. On theDownloads page, you will see a drop-down window that you will use to select the version of the distribution that you want to download. Once you click on the drop-down window, the other windows will be populated as displayed in the next screenshot:
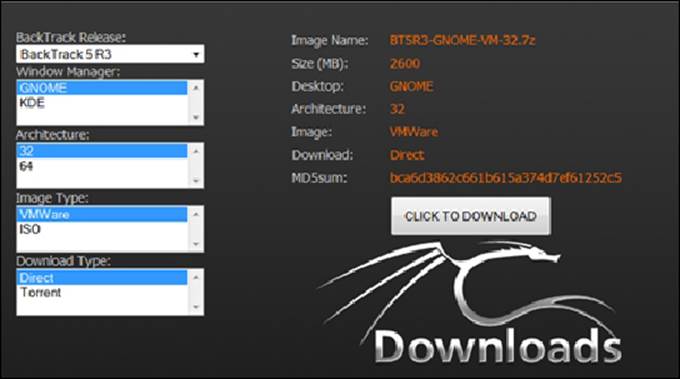
We will be using the BackTrack 5 R3 distribution with the window manager Gnome (32-bit) and the VMware image installation for the book; download the image, and then we will continue with the installation.
Installing BackTrack
Once you have downloaded the image, you will need to have certain VMware software to run the image; you can get the software from www.vmware.com. VMware Player is smaller with fewer options, although VMware Workstation contains many features. Both versions have a trial version available, and it is recommended that you select one and try it out. For this book, we are using VMware Workstation Version 9 as that is the latest version as of this writing. To access the software downloads page, go tohttp://www.vmware.com/products/workstation/index.html. VMware software allows you to perform many functions in a virtual environment, and this can be an additional security measure for you. If you are using a Mac, you will need to download VMware Fusion for that; refer to http://www.vmware.com/products/fusion/overview.html. Also, if you want to use the ISO image to create a DVD and boot from that, you can do that too. The way in which we start BackTrack is the only thing that differs from the other distributions; once they start, they all require the same number of steps to be configured and used.
You may also want to note here that there are more virtualization products than VMware, and if you want to try others, you may; some of the popular, free ones are:
· VirtualBox – https://www.virtualbox.org/wiki/Downloads
· Xen – http://www.xen.org/products/downloads.html
· Hyper-V – http://www.microsoft.com/en-us/server-cloud/hyper-v-server/default.aspx
Hyper-V requires you to have either Windows Server 2008 or Windows Server 2012 installed. There are two reasons why we are using VMware Workstation in this book:
· It has fantastic documentation and support
· The image from BackTrack has the tools installed, and this makes for much better user experience
As always, software is a matter of personal preference and taste, so try different versions and see which one works best for you.
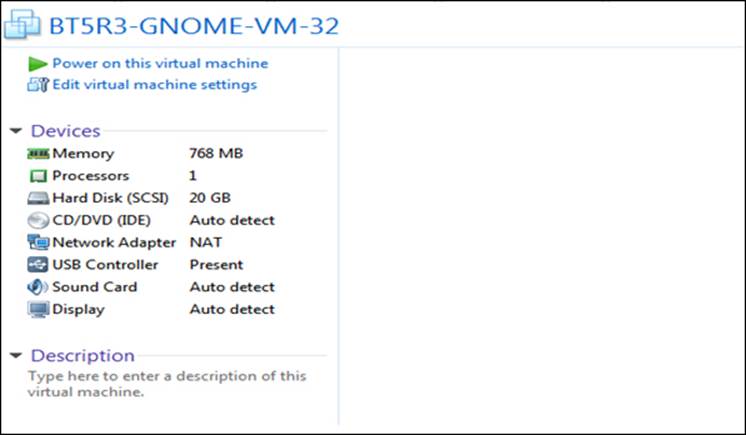
The procedure for starting the tool once you have downloaded the virtual machine is pretty straightforward. Open the image in the virtual machine tool you are using and check the settings. You should see a screen similar to the one shown in the next screenshot. You want to check that there is a network adapter present, and that the RAM is set to a value that you can support on your host machine. As a reminder, 2 GB of RAM is recommended. An example is shown in the next image where the RAM is not sufficient and would need to be changed; you do this by clicking on Edit virtual machine settings. Once you have configured this, click on Power on this virtual machine. If you are prompted before the VM boots up, leave the default settings, as they are and let the machine boot.
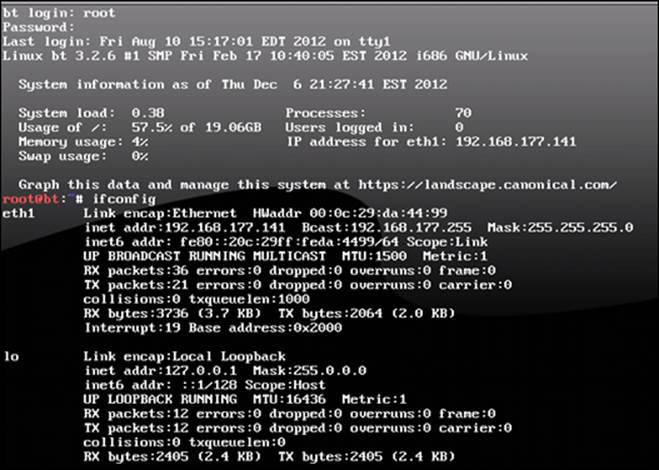
Once the machine has booted, you will need to log in with root as the ID and a password of toor (root in reverse). This will bring you to the shell interface of BackTrack. We want to start up the windowing environment, but before we do that, we want to check and verify that our network has started. Enter ifconfig; you should see a result similar to in the next screenshot:
In some versions of the BackTrack distribution, you might not have an interface named eth1. If you only have the lo (loopback) interface, you have to start the network; the way to do this is by using /etc/init.d/networking start. This will start your network.
root@bt:~# /etc/init.d/networking start
To avoid having to do this the next time you start BackTrack, enter the update-rc.d networking defaults command. This will change the configuration, and each time you start BackTrack, the network will be started for you.
root@bt:~# update-rc.d networking defaults
There is a possibility that when you restart, you will not get a network address; this is rare with the latest software, but just in case, you might want to enter the ifconfig command again.
root@bt:~# ifconfig
If you are not connected to the network, that is, if you don't have an IP address, you can enter dhclient.
root@bt:~# dhclient
Next, you want to start the XWindows environment; you do this by entering the startx command in the command shell.
root@bt:~# startx
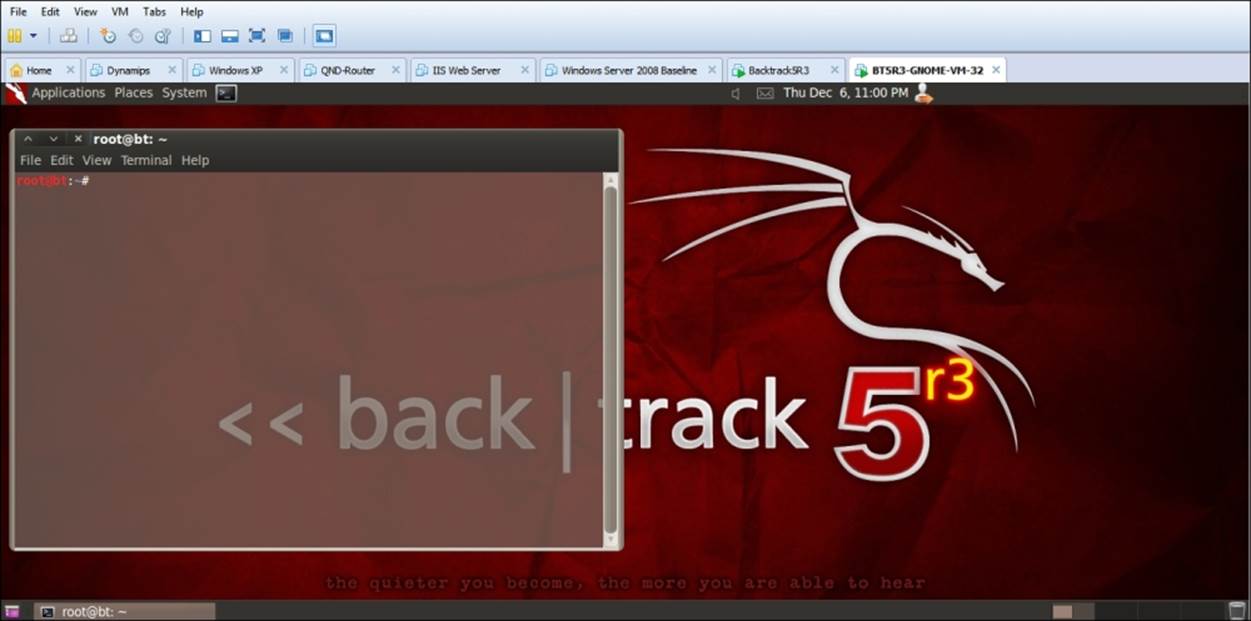
This will start the XWindows Gnome desktop. Once the window comes up, the first thing you want to do is to open a shell on your desktop. You can accomplish this by going to Applications | Accessories | Terminal. The next thing you want to do is to fix your display within the virtual environment inw the VMware Workstation menu at the top of the screen. Navigate to View | Fit Guest Now to correct the display; your screen should now be in fullscreen mode, as shown in the following screenshot:
Next, you want to change the password from the default value of toor, which is not a strong password. And to be honest, everyone knows it; so let us change it now. In your command shell terminal window, enter passwd.
root@bt:~# passwd
This will start the password change process. Enter a password of your choice; it will not echo on the screen as you type it in, and you will be requested to re-enter your password to confirm it. Make sure you do not forget your password, as it can be a challenge to recover it; it is not impossible, but it is a challenge nonetheless and is beyond the scope of this book.
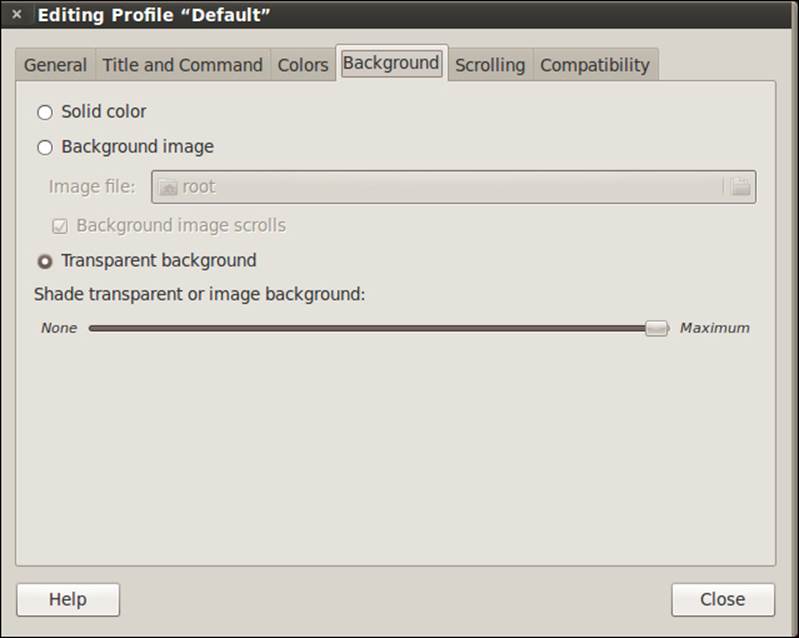
As you can see from the previous screenshot, there is a transparent background in the shell. There is a simple procedure to customize your shell, and we will do that now. I prefer to have a white background with black text, which we will now configure. In the title of the terminal window, navigate to Edit | Profile Preferences. Once the window opens, you want to click on Background; this is where you will set the transparency of the shell window. My preference is to have no transparency, click on Transparent Background, then drag the slider to the right and set it to Maximum as shown in the next screenshot:
The next thing we will set is the actual colors of the terminal windows. We do this by clicking on Colors and then setting the colors for the terminal as identified in the following screenshot:
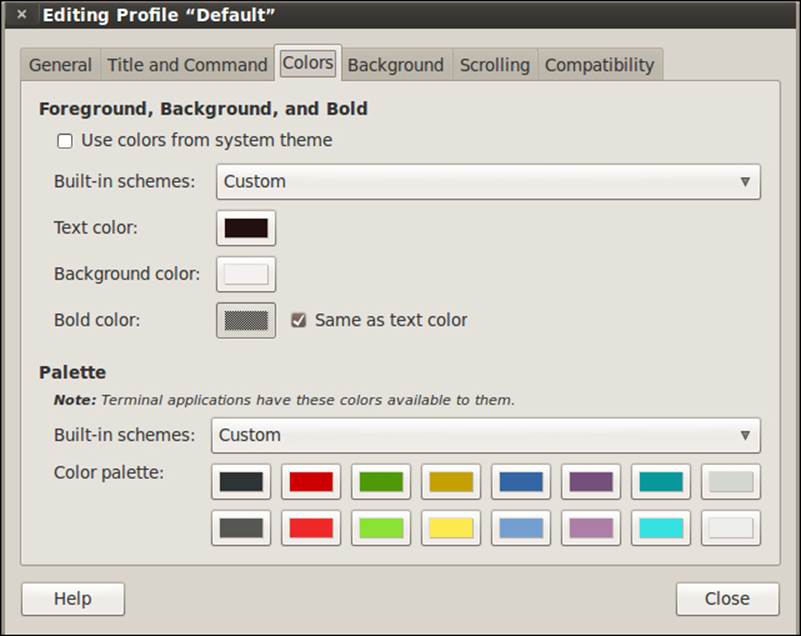
Once you have set the colors and transparency for the terminal, you should have a shell with the colors that you prefer and customized in your profile, so that each time you open a terminal window it will be configured to your preferences.
Updating BackTrack
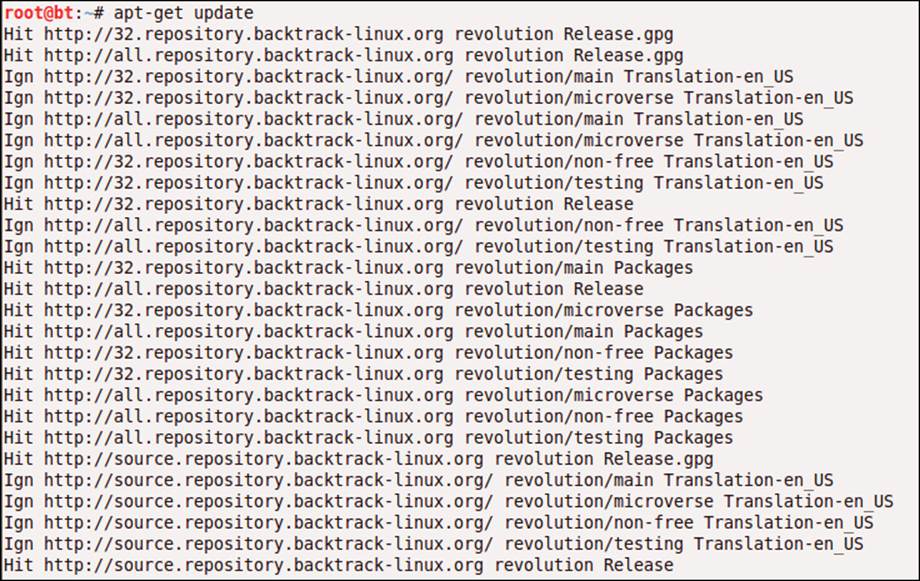
Now that we have set up the basics on our BackTrack machine, we want to update the tool and make sure that it is current. The developers of BackTrack have instituted an update capability using the apt-get utility. The first thing we want to do is to update the package. This requires a working Internet connection on your host; verify this by opening a web browser window and accessing a website. Once you have verified that you are connected to the Internet, go back to the BackTrack machine and enter the apt-get updatecommand in a terminal window.
root@bt:~# apt-get update
Once you have entered the command, you should see a display similar to the one shown in the next screenshot:
Once the update has finished, there should be a message saying that the update was successful. Once the update is complete, the next thing to do is to upgrade the distribution itself; we do that also with the apt-get command. Enter apt-get dist-upgrade in the terminal window.
root@bt:~# apt-get dist-upgrade
The output of this command should be similar to the one in the following screenshot:
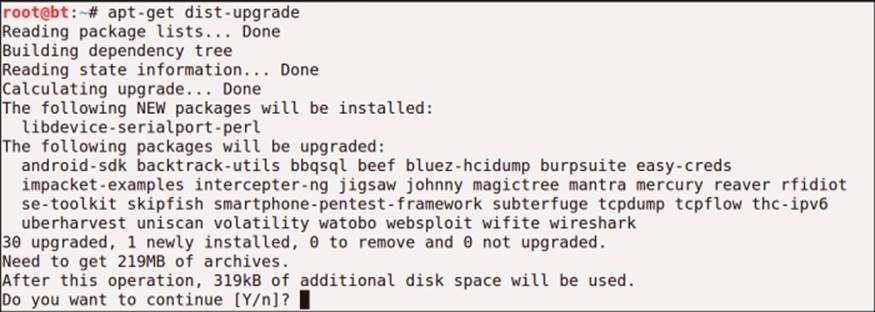
The output indicates the packages that are available and will be upgraded. Once you have reviewed them, you are ready to do the upgrade; enter Y to start the upgrade. Once the upgrade has finished, you are done with the main updates and upgrades for BackTrack.
Validating the interfaces
There is one more thing we want to correct when it comes to our network, because there is a problem with the allocation of the interfaces at boot time when you make copies of a Linux virtual machine. If you enter ifconfig and your interface does not say eth0, you should correct the network.
root@bt:~# ifconfig
We do this by opening the configuration file and removing all references to the network interfaces that are there. In your shell, enter gedit.
root@bt:~# gedit
This will open the graphical editor that is contained within the Gnome distribution. In the editor, navigate to File | Open; when the window opens, navigate to the configuration file that is located at /etc/udev/rules.d/. To navigate to the folder, click on the File Systemfolder in the window. This will put you in the root of the file system; then, it is only a matter of drilling down until you get into the rules.d folder. Select and open the 70-persistent-net.rules file. Once you are in the file, delete the old interfaces that are there; highlight the line that starts with # PCI Device and all the lines after that right up to the end of the file, and then delete them as shown in the next screenshot:
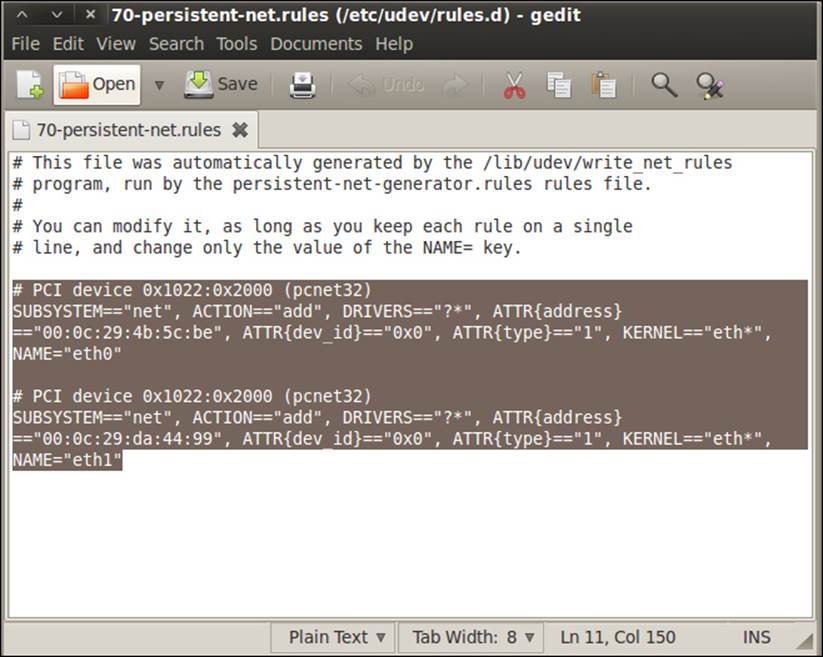
Once you have deleted the interface references, save the file, and quit the program. Click on Save and then Quit. This will return you to the terminal window and your shell. Now, enter reboot and let the machine reboot and regenerate your interfaces.
Once the machine reboots, log in to the machine with the username root and whatever password you set earlier (you do remember it, right?). Once you are logged in, start XWindows by entering the startx command.
root@bt:~# startx
Once XWindows has started, open the terminal window by using the shortcut on the toolbar or by navigating to Applications | Accessories | Terminal. If you have not done so already, correct your display by navigating to Edit | Fit Guest Now in VMware Workstation.
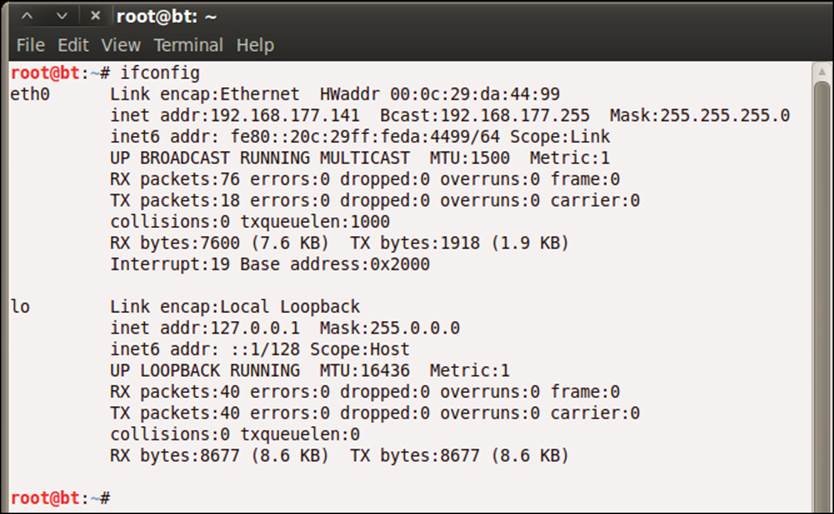
We now want to check and verify that our network interfaces are correct; we do this by using our ifconfig command. Enter ifconfig in the terminal window. As we have removed the extra information that was in the 70-persistent-net.rules file, we should now see that our interface is eth0 and not something else; this is shown in the next screenshot. For some reason, when you copy virtual machines, there is a possibility that the programmer did an append to the file and did not overwrite the entries that are in the file; if you make three or four copies of the virtual machine, it will show eth5 or eth6. Again, we will have to correct it by deleting the entries that are in the 70-persistent-net.rules file. This is the same process for many of the Linux virtual machines when you copy them.
Customizing Gnome
We now have a working, functional, and updated instance BackTrack. Remember to update and upgrade the tool often. We are using the Gnome desktop, we will now discuss some of the methods of customizing the Gnome desktop to suit our tastes. You can skip this section if you are happy with the default desktop or if you have configured Gnome before. For those of you who want to personalize and change the dark look of the Gnome desktop, this section is for you.
There are three main areas we will consider when customizing the Gnome desktop. They are:
· Background
· Theme
· Fonts
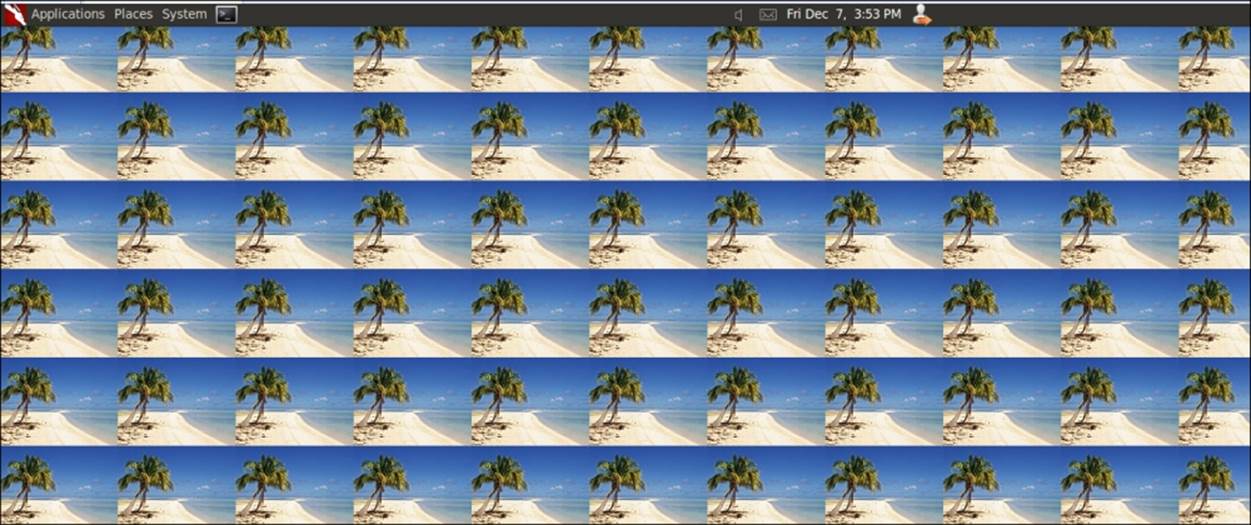
To change your background, navigate to System | Preferences | Appearance | Background. As you can see, there are not many background types stored by default, so click on Get more backgrounds online. You now have many backgrounds to choose from. I like to visit island locations, so I am going to select the Fakarava Coconut Tree background. Once you have selected your background, right-click on it and select Set as Desktop Background. You will notice that when you open it, the image does not occupy the entire screen; to make the image fullscreen, select the drop-down menu item stretch, or select tile to have multiple copies of the image displayed on the desktop. The resolution can present challenges, so use tile if the resolution does not match the Gnome settings on your machine. After you have finished configuring the settings, click on Set as Desktop Background. The next screenshot shows my desktop with the tile setting displayed:
The next thing we want to customize is our theme; we do this the same way we customized the background. Navigate to System | Preferences | Appearance | Theme.
This time, we have three themes to choose from instead of the two stock backgrounds; we also have the option to get more themes online, but for our purposes, the New Wave option is the one we will use. Click on New Wave, and then click on Close. If you refer to the next screenshot, we now have less of a "dark" look to our menu items. Again, this is largely a matter of personal preference, and you should experiment with the different options and select the one that works for you.
New wave theme
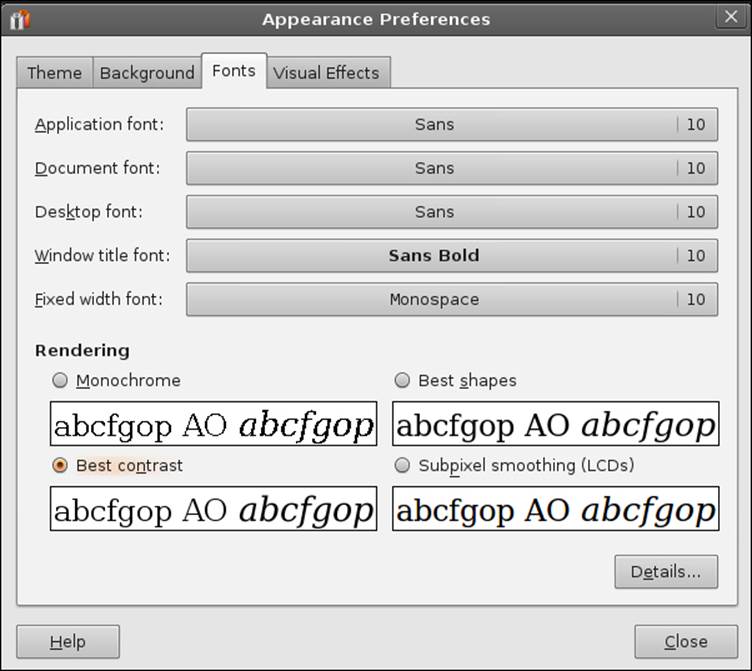
Now it is time to look at changing the fonts for our desktop. We access the font setting by navigating to System | Preferences | Appearance | Fonts. As you can see, there are many fonts from which to choose; again, it is a matter of personal preference and taste. The options are shown in the following screenshot:
Creating a virtual machine
Before we wrap up this chapter, I am sure some of the readers would like to create their own virtual machine or even boot from a DVD. This section has been included for them. I am also one of those who would choose to create their own virtual machine rather than download a prebuilt one. As you will discover, when you take this route, it works well until you attempt to install tools within the virtual machine. As of this writing, there is no easy procedure for this, and it takes quite a lot of time to accomplish it using the current methods that are available.
To get started, the first thing we have to do is to create a virtual machine. For this, we use the virtual machine wizard within VMware Workstation by navigating to File | New Virtual Machine. This will start the virtual machine wizard; leave the default setting ofTypical, and click on Next. On the next window, we want to direct the wizard to our ISO image. So, click on the Installer disc image file (the ISO file), and then browse to the location and select the ISO image you downloaded for BackTrack, as shown in the following screenshot:
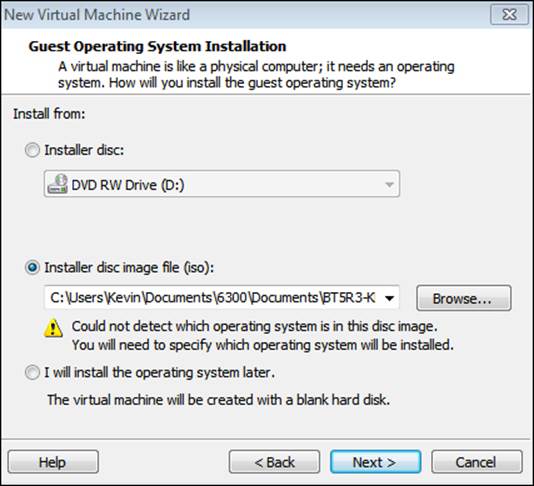
Once you have selected the ISO image, you will notice that the wizard cannot detect the operating system; we will have to specify it. This is normal behavior and nothing to be alarmed about; after reading the message, click on Next.
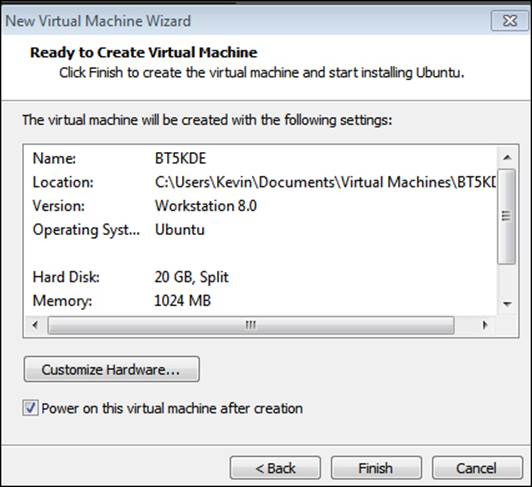
The operating system selection should be set to Linux by default. You just need to select the type of Linux operating system by clicking on the drop-down arrow and selecting the Ubuntu option since this is what the Black Hat distribution is based. Once you click onNext, you will have the option to name your virtual machine and the location to store it in. If you would like to change the name, this is the place to do that. Once you have set the name and location you want to use, click on Next. Leave the size and other settings at their default values, and click on Next. On the next screen, you have a chance to review your hardware settings, and if need be, to customize them. If you are comfortable with the default RAM of 1 GB, click on Finish. The following screenshot shows what your hardware should look like:
Once you click on Finish, the wizard will boot the virtual machine. Since we have configured it to use the ISO image, it will boot from there. At the prompt, click anywhere on the black area and then press Enter to boot BackTrack. Once the OS has booted, you will be automatically logged in; for reference, remember that the username is root and the password is toor, and you should change it after installation.
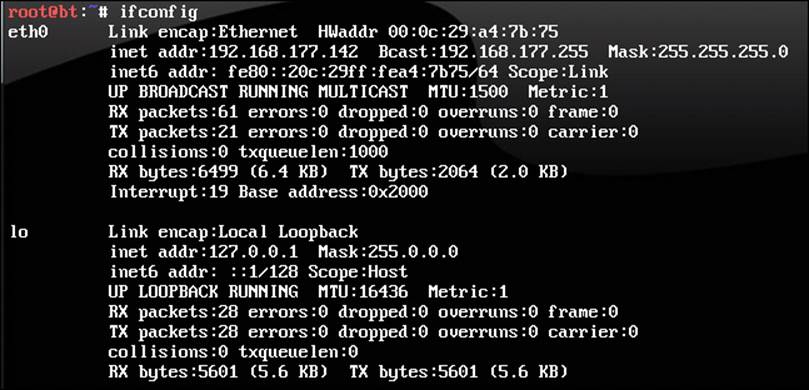
If you want to verify your network settings, enter ifconfig; as you will see, the interface is properly set at eth0 since we booted this from the ISO image and did not copy it. This is reflected in the following screenshot:
In the command prompt, enter startx to launch the desktop and window environment.
root@bt:~# startx
Once the desktop has started, you will notice that you now have an icon on the desktop for installing the OS to the hard disk. If you are in a virtual environment, that is the recommended next step.
To install BackTrack to the hard disk, there is a series of steps to be followed:
1. Click on the Install BackTrack icon, and start the installation process.
2. When a window comes up, select the language for the install, and click on Forward.
3. If you are happy with what the installation wizard finds for the time zone and the current time, click on Forward.
4. Select your preferred keyboard layout, and click on Forward.

At this point, you are at the "prepare the hard disk for installation" stage; make sure you are in a virtual machine and not a bootable DVD, because this will erase the hard drive! If you are not sure, do not proceed until you are. If you want to make sure, refer to the next screenshot and notice that the message This computer has no operating systems on it. is identified:

Now that we have covered that and you have verified that you are not going to destroy your system, click on Forward.
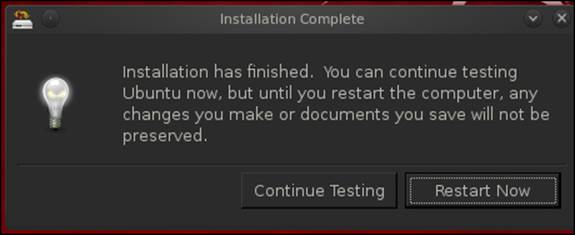
The installation is now ready to start; this is your last chance to ensure you do not erase your hard drive. If you are comfortable with this, click on Install. After some time, the installation will successfully complete (hopefully), and you will see a message like the one in the following screenshot:
After the installation is complete, you will notice that you cannot adjust the display by selecting the Fit Guest Now option because it is grayed out; this is because you do not have the VMware tools installed. You can manually install the tools, but it is not a simple and straightforward procedure. Those who want to try it can access the step-by-step instructions at http://www.BackTrack-linux.org/wiki/index.php/VMware_Tools. Again, this process requires updating the kernel and then rebuilding it. The procedure does work, but it is a time-consuming process; only attempt it if you want to go through a challenging process and have a couple of hours to spare. The majority of you will prefer to download the virtual machine that is preconfigured and offered on the BackTrack distribution site.
Tip
Downloading the example code
You can download the example code files for all Packt books you have purchased from your account at http://www.packtpub.com. If you purchased this book elsewhere, you can visit http://www.packtpub.com/support and register to have the files e-mailed directly to you.
Summary
In this chapter we covered a little bit of the history of BackTrack and discussed the different types of installation options. After installing the operating system, we configured it and corrected a virtualization anomaly that caused the interfaces to not be correctly identified. We also covered some standard configuration changes that you can make to your BackTrack desktop to personalize your install. The chapter concluded with how to use the ISO image to create your own virtual machine and customize it and also how to install it to the hard disk.
You should have BackTrack working and configured before we proceed to the next chapter and discuss and select a wireless card for our tools.