BackTrack – Testing Wireless Network Security (2013)
Chapter 2. Working with the Wireless Card
In this chapter, we are going to look at the following topics with respect to using BackTrack:
· Checking card compatibility
· Detecting the wireless card during the boot process
· Detecting the wireless card using iwconfig
· Wireless card modes
· Protocol analysis with the wireless card
Now that we have a configured and updated BackTrack, it is time to turn our attention to working with our wireless card. Unfortunately, with the Linux operating system, this is not as straightforward as we would hope. The work that will need to be done depends on a number of factors. Out of all of the factors, the most important one is that Linux goes by the chipset of the card.
Checking card compatibility
There are a number of factors to consider when we work with a wireless card in Linux, and the most important one is to know what the chipset of our wireless card is. This is because we have to know whether we have a driver to support the card, and it takes work to determine what that chipset is. The challenging cards are normally the ones that are built into laptops; in most cases, this card will not work in BackTrack without doing some work and spending some time on it.
The first place to look for information, whether or not your card will work, is on the BackTrack website. There is a listing of supported cards on the BackTrack website at http://www.BackTrack-linux.org/wiki/index.php/Wireless_Drivers. The site is shown in the next screenshot:
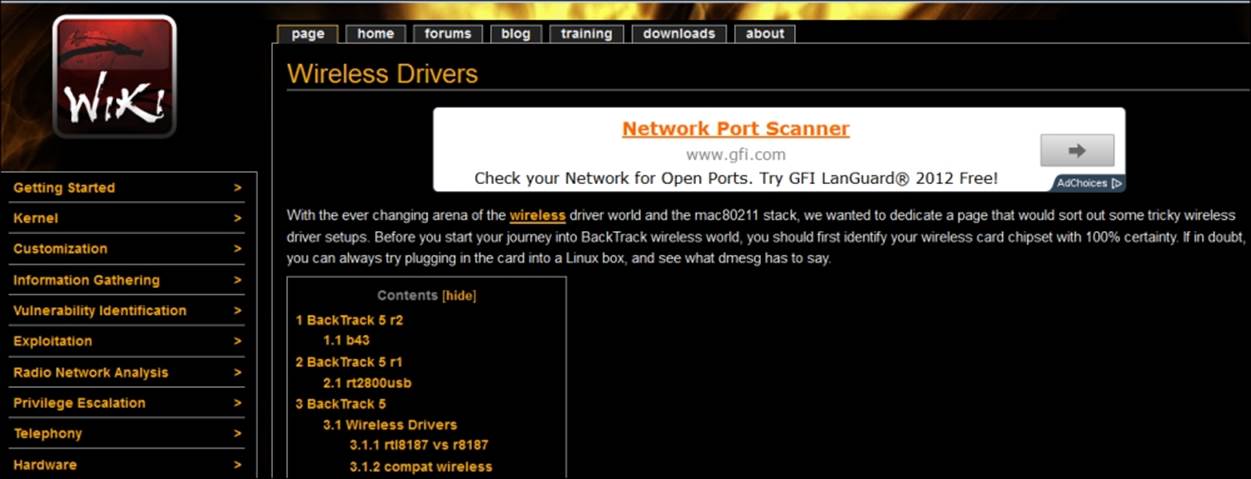
Getting a wireless card to work can be a challenging process, and it is often time-consuming. However, there are times when you do get lucky and the card is recognized at boot, but more often than not, it takes additional work. When we use virtualization, it is rare for the card to be recognized at boot; this is especially the case with BackTrack. It is not impossible, but we still go through the steps to verify whether there is more work to do. If, however, you are using the boot DVD or another method without the virtual machine, there is a slight chance that your built-in card has been recognized, but again, there is just a chance, so that is why we go through the process.
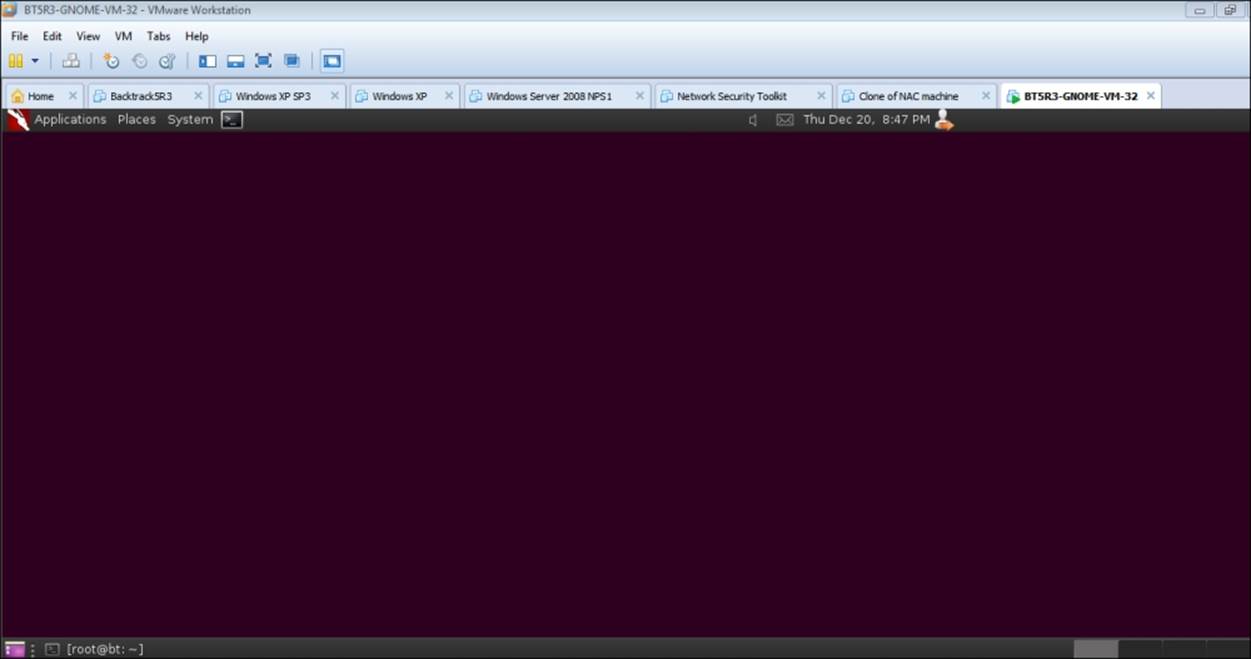
If you have not already done so, start up your BackTrack machine. Once it starts up, log in with the username root, and the password should be whatever you configured it to be. As a reminder, the password is toor if you are using a default configuration. After you log in, start the windowing environment by entering startx.
root@bt:~# startx
This should place you in the windowing environment. Your screen should look similar to the one shown in the following screenshot:
Detecting the wireless card during the boot process
Now that we have the Gnome desktop started, the next thing we will do is open a terminal window. You can do this by clicking on the shortcut icon, or go the long way by navigating to Application | Accessories | Terminal. The result is that a terminal window opens. In this terminal window, enter the dmesg command.
root@bt:~# dmesg
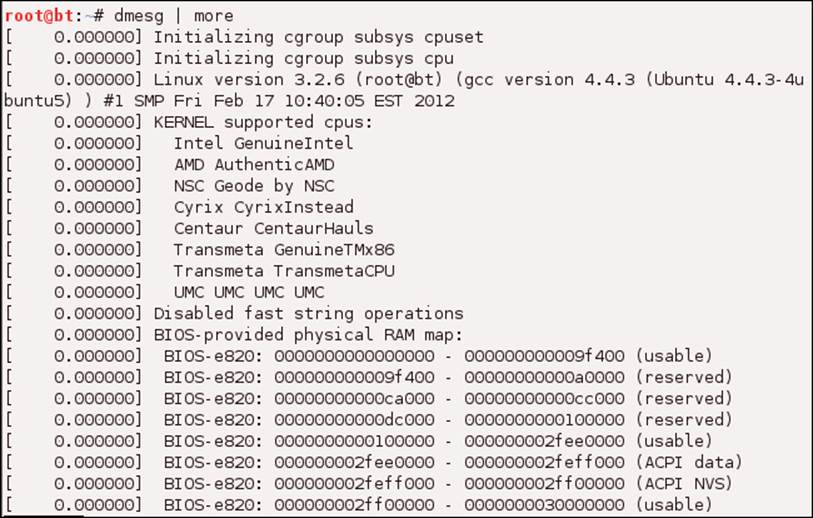
The result of this command will make you scroll your screen a lot. The dmesg command displays the contents of the ring buffer. Do not worry if you do not know what a buffer is, just think of it as a place used to store data. This ring buffer that is displayed contains the messages that the system displays as it reads and encounters the hardware and devices of your machine. To scroll up and view this would be a bit of a challenge, but the one thing to remember about Linux is that they have devised ways for us to do this much more efficiently. The first method we will look at is the more option; enter the following in the terminal window:
root@bt:~# dmesg | more
This command will display the data from the output one page at a time. To go to the next page, press the Space bar, and to go line-by-line, use the Enter key. The more command, used with dmesg, is shown in the next screenshot:
Again, this is probably not the best option, so we will look at option two. Option number two is to use the less command by entering the following into the terminal window:
root@bt:~# dmesg | less
The saying that we use in Linux, "less is more", is because unlike the more command in which the text scrolls on as you go through it, the less command allows you to use the Page Up, Page Down, and arrow keys without having the page scroll away from you! This is why less really is more.
We still have the challenge of looking through all of this ring buffer stuff to find our wireless card, even if it is there. Fortunately, we have another option that is even better than the other two! We will explore this now. Rather than looking through the output line-by-line, we can use a powerful utility named grep. The grep tool is an essential one within the Linux toolset that is used extensively when searching for a string.
The grep tool will search a file for the specified string, and then display the corresponding line(s) containing that string. With respect to dmesg and the message for which we are looking, we search for the following two components:
· wireless
· wlan0
The grep search queries for these two strings, as shown in the next screenshot:
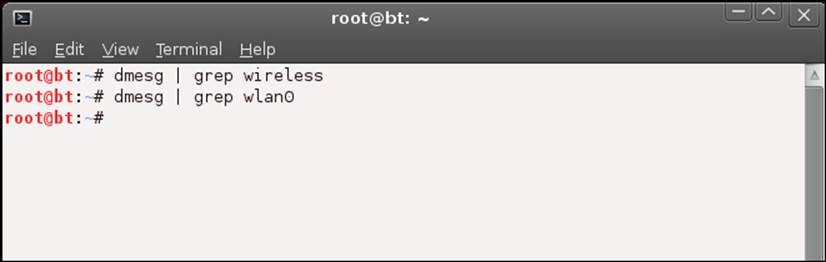
If you have not already done so, enter these two commands, and see if your output matches what is displayed in the previous screenshot. Unfortunately, in most cases, this is what you will see; this means that during the boot process, the wireless device was not detected. There are a number of things we can do to see if we can get the card recognized after the boot, and we will do that in a moment.
Detecting the wireless card using iwconfig
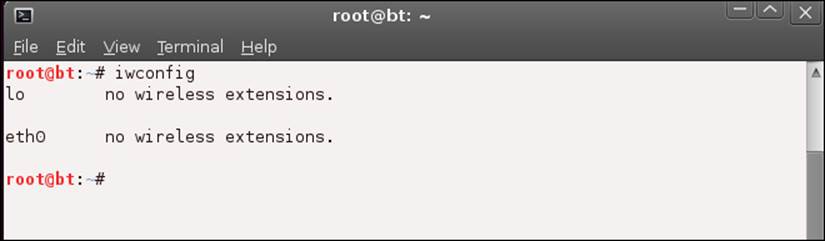
The next thing we want to do is to look at the iwconfig tool. In your terminal window, enter iwconfig:
root@bt:~# iwconfig
A sample output of this command is shown in the following screenshot; it shows that there are no wireless cards currently recognized on this machine.
At this time, you are probably wondering what we have to do to get the card recognized? Unfortunately, if the card is not one among those that are recommended, it can become a daunting task. So, we will try a few more things before we reveal the guaranteed way to get a wireless card that we know will work within the BackTrack distribution.
When you are in a virtual environment, you can see whether the device is listed or just not connected. We do this by clicking on Removable Devices under the VM menu. This will bring up a list of removable devices found on the machine, which is displayed in the following screenshot:
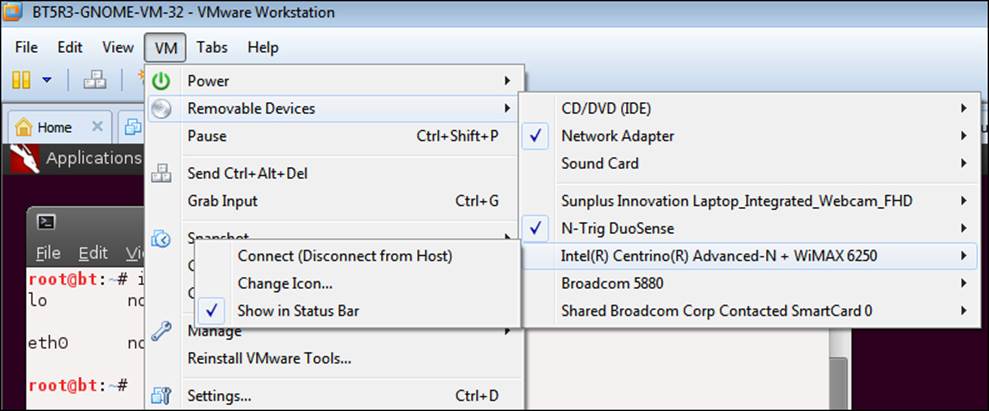
The process now is to connect each device by selecting the available wireless card in the host OS, and then use the iwconfig command again, and see if you get lucky; if you do, then that's it! It is more than likely that you will not get lucky with this method. So, in reality, the best solution is to purchase a wireless card that will work with BackTrack, and more importantly, support the features that you will need with the tools. There are two that I highly recommend, both of which are inexpensive. They are the following:
· Wi-Fire (www.hfield.com)
· Alpha AWUS036H (http://www.alphawireless.com/)
Both of these cards are USB, which means they should work as soon as you put them in; also, as already mentioned, they are inexpensive. The Alpha card will give you 1000 mW of power, which is the highest transmission on signal power that is allowed by the Federal Communications Commission (FCC). The FCC regulates interstate and international communications by radio, television, wire, satellite, and cable in the U.S. and U.S. territories. Other countries may have different regulations.
Configuring the wireless card
I am sure there are some of you who still want to try and get your card working, so we have a few more steps you can try, and we will cover them now. Having said that, it is highly recommended that you use one of the two cards mentioned earlier.
The next thing to try is the airmon-ng command. There is very little chance that your card will be here when it is nowhere else, but we can never say never, because this is electronics! In your terminal window, enter airmon-ng., using the following command:
root@bt:~# airmon-ng
The output of this command is shown in the next screenshot:
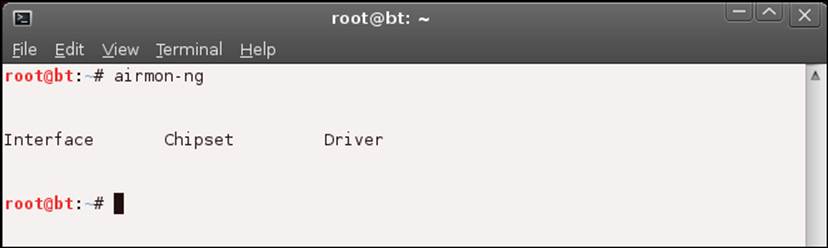
Once again we have failed! The card is not recognized, so now it is a matter of searching the Internet and trying to find a fix to get your card working. One alternative is to use any external card you may have. If you have an external card, plug it in and go through the same steps as before. There are two places to go to try and read more about getting your card operational. They are http://www.BackTrack-linux.org/forums/showthread.php?t=34469 and http://www.youtube.com/watch?v=MxTErUIBlyo. Once again, it is highly recommended that you purchase one of the USB wireless cards mentioned previously. It will save you a lot of time and stress, because even a direct PCI card may not be detected even if the card is supported. A simple search on the Internet can also provide more information when you are having difficulties.
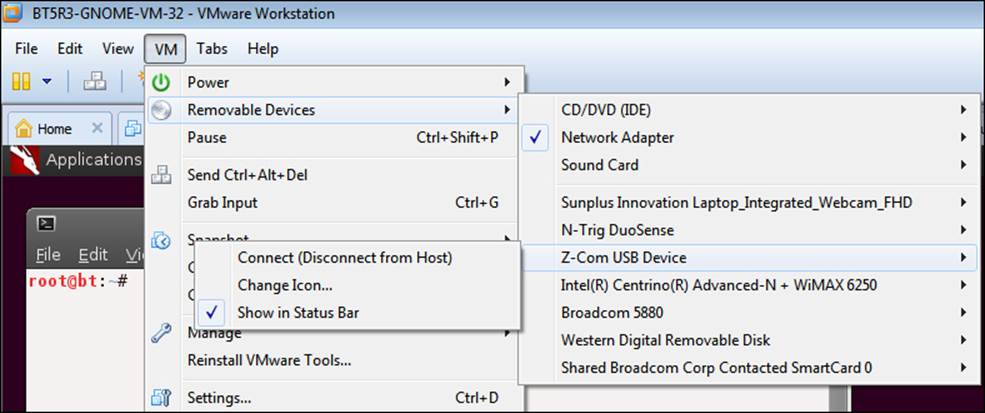
If you have a recognized card or a USB external card, there are several steps to follow to identify the card. For the purposes of this book, the card that is being used is the Wi-Fire card from hField Technologies. The first thing that you need to do is insert the card into the USB port of the computer. Depending on the setup, you may or may not connect to it on the virtual machine. To get the card recognized in BackTrack, we have to connect to it using the VM configuration. We do this by clicking on Removable Devices under the VM menu and looking for the card listed there. The example in the next screenshot shows that the Wi-Fire card is showing up as Z-Com USB Device. If you are using another card, it is a matter of trial and error to determine what it is called, unless you get lucky and the card has a recognizable name (which is rare).
Once you have identified your card, click on Connect (Disconnect from Host). After you have connected, you should see if the dmesg command can see the card. In your terminal window, enter the following command:
root@bt:~# dmesg | grep wlan0
Hopefully, you will see something similar to what is shown in the next screenshot:
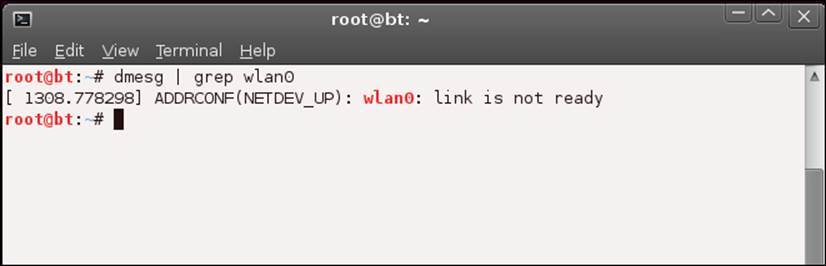
If you do not see any indication of wlan0, you can reboot the system and see whether it recognizes the card after the reboot. As a reminder, to reboot the system, enter reboot in a terminal window:
root@bt:~# reboot
Now that you have the wlan0 device listed in the output of dmesg, you need to start up the wireless card; before you do that, enter the following command into a terminal window:
root@bt:~# iwconfig
You should now see that there is an adaptor that has wireless extensions. The next screenshot shows that the wlan0 interface has wireless extensions:
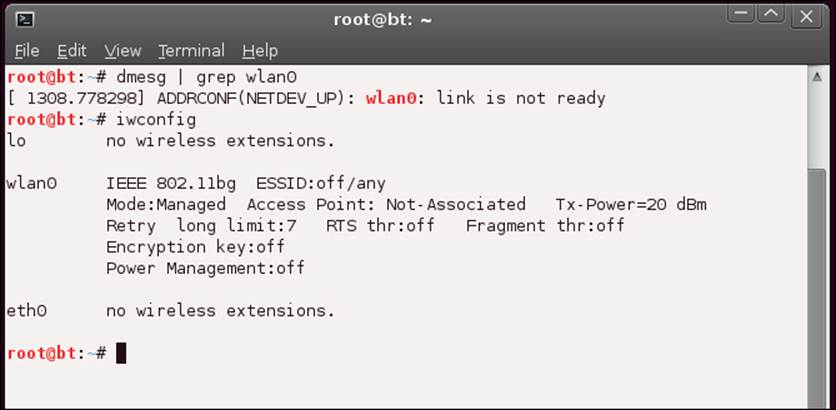
Finally we have a wireless card that is in BackTrack and is recognized! This, as you have discovered, is no small feat. Let us now review some of the specifications of what we are examining here. The device is wlan0, it supports 802.11 b/g, and as of now, it is not associated with any ESSID (Extended Service Set Identification). The mode that the card is in is called Managed, which we will discuss later. The power is set at 20 dBm. For most of you, this is probably not how you understand power measurement; this is because most of us think of power in terms of milliwatts (mW) when it comes to wireless devices. For those of you who would like to know the math, dBm is decibel-milliwatt, and is the electrical power unit in decibels (dB) referenced to 1 milliwatt (mW). The formula is as follows:
· The power in decibel-milliwatts is equal to the base 10 logarithm of the power in milliwatts (P(mW))
P(dBm) = 10 log10( P(mW) / 1mW)
· The power in milliwatts (P(mW)) is equal to 10 raised by the power in decibel milliwatts, P(dBm), divided by 10
P(mW) = 10(P(dBm)/10)
For most of us, this is way too much to think about. For that, there is a table that we can use as a reference, which is as follows:
Power (dBm) |
Power (dBW) |
Power (watt) |
Power (mW) |
20 dBm |
-10 dBW |
100 mW |
100 mW |
30 dBm |
0 dBW |
1 W |
1000 mW |
From the table, you can see that 20 dBm is equivalent to 100mW, and that is the default setting currently on wlan0. We can of course change this, but for now, we will leave it as it is. It is also important to note that the maximum power you can legally transmit is 1 Watt or 1000 mW in the U.S.; if you refer to the table, you can see that it is equivalent to 30 dBm.
Now that we have the particulars out of the way, we can bring up our network card. We do this using the versatile ifconfig command. Enter ifconfig wlan0 up in the terminal window:
root@bt:~# ifconfig wlan0 up
The command should complete and not provide any feedback (you will not see any output, just the command prompt window) but the card has started. You can verify this by repeating our ifconfig command:
root@bt:~# ifconfig
The output of the command with the card up and working is shown in the next screenshot:
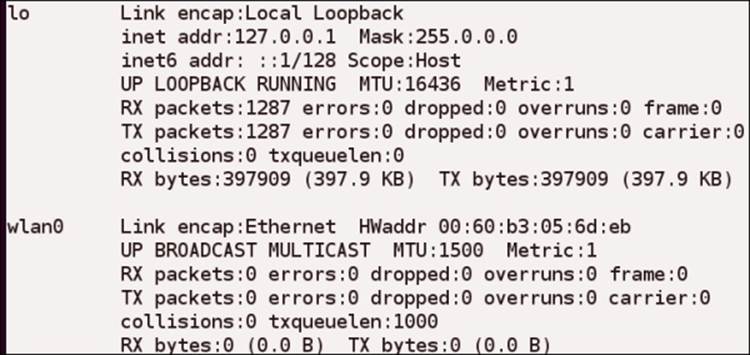
As you refer to the previous screenshot, notice that lo and wlan0 represent names of the network interfaces on the machine, with lo referring to the loopback address and wlan0 referring to the wireless card. You can see that lo has an INET address. This is becauselo is configured as 127.0.0.1 on the machine. The wlan0 card does not have this line because an address has not been assigned.
Wireless card modes
At this point, it is important that we establish what we want to accomplish with the BackTrack tool. We really are not interested in using the wireless card to connect to an access point, because what we want to do is to use the card differently. When you connect a wireless card to an access point, you are using one of the modes of the card. That mode is the managed mode, which is the mode that the card is in, as shown earlier. When you want to analyze network traffic (or "sniff", as it is commonly referred to), you put the card in a promiscuous mode. With our wireless cards, we do not call the mode promiscuous; we instead call it the monitor mode. The best way to put a card into the monitor mode is to use a tool, and we will do that in a moment. First off, we will see how to use the BackTrack card to connect to the network, just in case at times you want to be able to do this.
The tool we will use now is the one that is GUI-based. We could do the entire configuration without using the GUI, but as our main focus is analyzing the traffic, we will stick with the GUI for this one time. The tool we are going to use is the Wicd Network Manager. We can access this tool from the desktop menu by going to Applications | Internet | Wicd Network Manager. This should open the tool, and you should see a window similar to the one shown in the next screenshot:
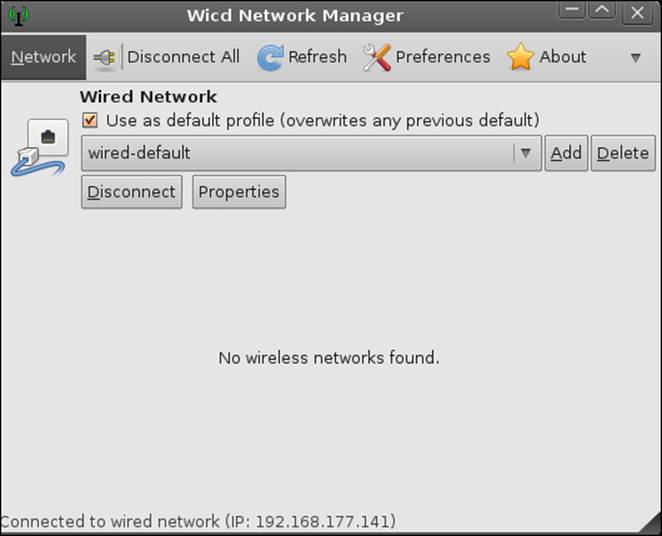
Oh no! We still do not have a wireless network. What are we going to do? Why is this so complicated? Before you panic, let us look at the reason why no wireless networks are found. Remember, we knew that our wireless card was on because we verified it from the command line. This is the catch with these things; we should verify them on the command line first and then work with the GUI. The way to look at this is, the GUI is not really that intelligent because it is going to reflect whatever the programmer has set up by default. We do not have this problem on the command line because we are controlling the actual lowest level of the device.
With a GUI, this may or may not be the case, depending on what the programmers were thinking when they wrote the code. Coming from a programming background, I can honestly say that most programmers just try to get the code to work and meet the objectives of the specification, and they cannot determine what is in the user's mind. The first thing you see when you look at the window is that it is based on a profile, and that the default profile is wired; so there is a possibility that this profile does not include the wireless information that we need. Let us now look deeper into this. Click on Preferences. This will open the window that allows us to set preferences, and it is displayed in the next screenshot:
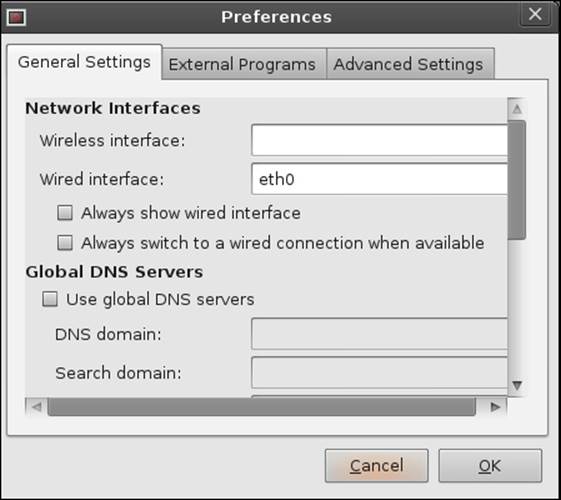
See! All our panic was for nothing, because the configuration in the default state does not have a wireless interface listed. So if we put the wireless interface in, maybe this will work! Unfortunately, "maybe" does not cut it when it comes to wireless in BackTrack, so what we will do is we will verify it! Remember, we verify all assumptions when it comes to security!
Enter wlan0 in the box for Wireless interface: as shown in the following screenshot:
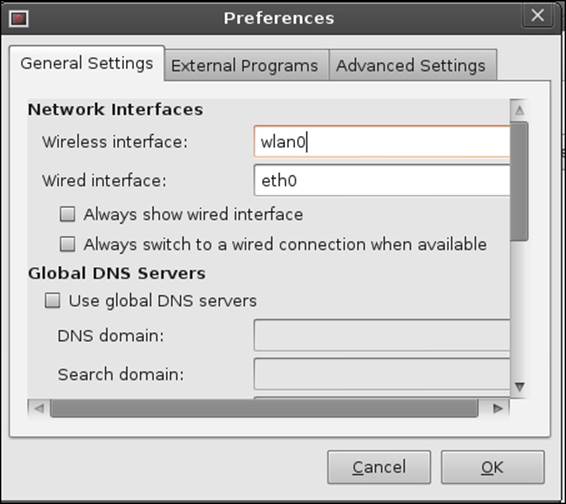
It should be obvious, but we will state it here just to make sure; if you have another name for the interface, then you should enter whatever the interface is called instead of entering wlan0. To check, you can identify the name of the interface using the ifconfigcommand. Once you have entered the necessary information, click on OK.
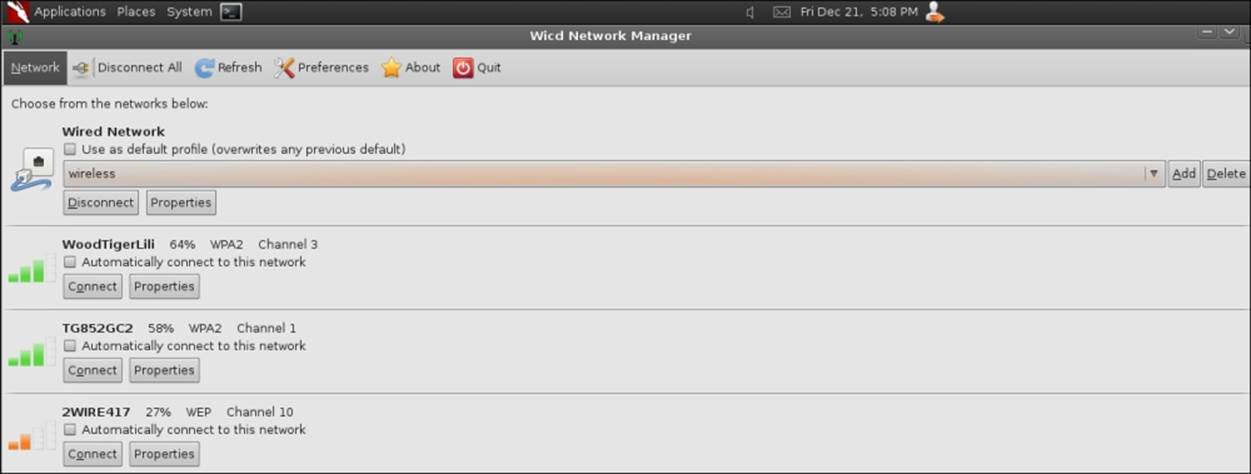
At this point, we want to save our settings, and we will do this now by clicking on the Add button. Enter the name wireless for your profile, and click on OK. You will notice that we still do not have any wireless networks showing. We need to click on the Refreshbutton, and then the tool should scan and look for our wireless networks. An example of this is shown in the following screenshot:
Protocol analysis with the network card
It is disturbing that we continue to see networks using the Wired Equivalent Privacy (WEP) algorithm. We will get into the weaknesses of WEP and show how easy it is to obtain the WEP key for an attacker and also for you if you are working with your own network or have written the authorization to test someone else's network. There is absolutely no reason you or anyone else should be using WEP to protect a wireless network. Now that you know how to get your card to work, you can click on a network and connect to it if you like by clicking on the Connect button. An example of a connection to the WoodTigerLili network is shown in the following screenshot:

Once we are connected, we can treat this like any other wireless connection. You can verify that it is connected by entering the ifconfig wlan0 command in a terminal window:
root@bt:~# ifconfig wlan0
The output of a connected adapter is shown in the next screenshot:
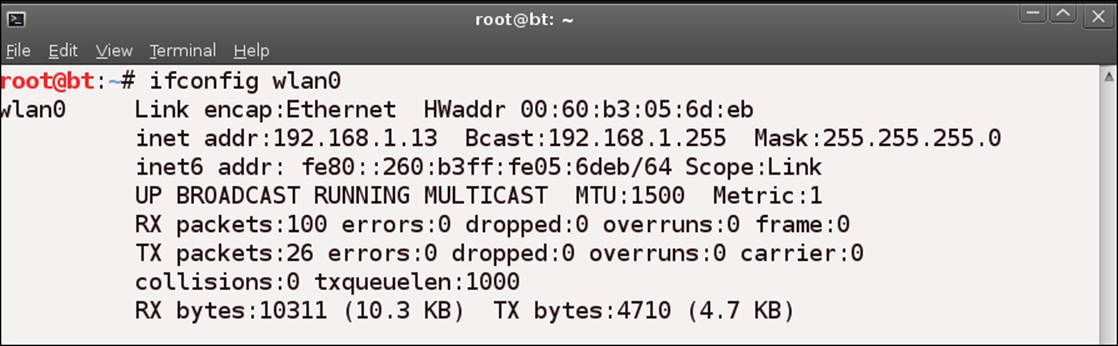
As you may have noticed, this is just showing us the IP address and network information, like any other card. Wouldn't it be better to see the actual wireless information? Fortunately, we have a command for this as we do for most of the things we want to do. Enter the following command to see the information on the wireless network:
root@bt:~# iwconfig wlan0
A sample of the output from this command is shown in the next screenshot:
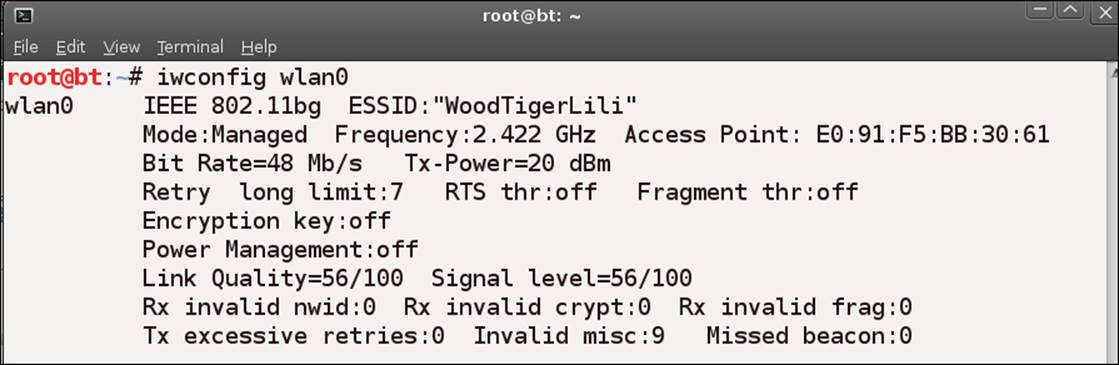
Earlier, we discussed that there are a number of modes when it comes to a wireless card. There are only two that are of concern to us, and they are as follows:
· Managed
The mode for connecting to an access point
· Monitor
The mode for "sniffing" network data
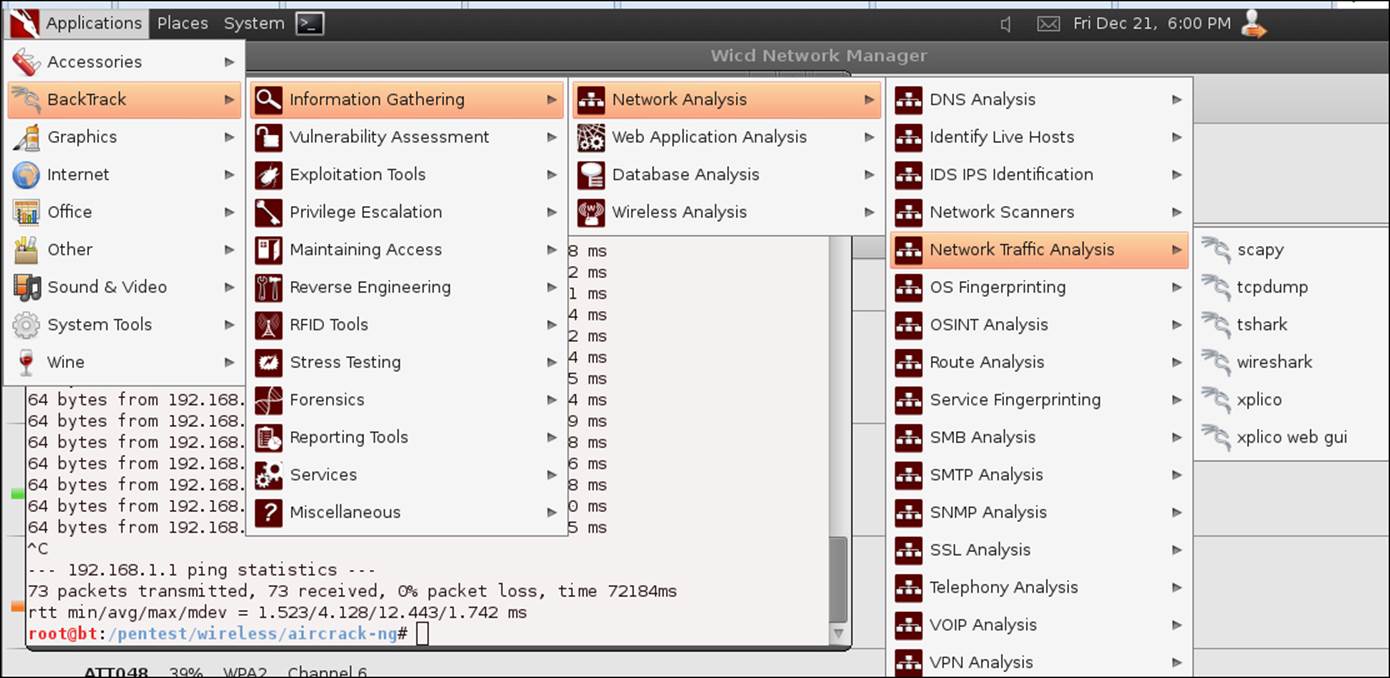
Once you are in the managed mode on a network card in Linux, you cannot see the wireless network traffic; this is why we use an external card in addition to the card that we have on our machine. The reason for this is we want to be able to analyze our wireless traffic using the powerful tools that are contained within the BackTrack distribution. So, for our purposes, we will not be connecting to our wireless card within BackTrack; we will leave the card in the monitor mode for using our tools. We will now verify that we are only able to see the Ethernet (802.3) data when we are connected, and not the wireless (802.11) traffic, which is what we want to be able to use once we unleash the powerful tools of BackTrack. What this means is with 802.3 traffic, you will see the normal web traffic and other normal network information; with 802.11 traffic, you will see the wireless data that is used to communicate over wireless networks. To view network packets, we will turn to a very powerful protocol analyzer tool that is not only available in BackTrack but also available for Windows and is free! The tool we will use is named Wireshark (www.wireshark.org). Wireshark is a powerful protocol analyzer that allows us to look at the network traffic. We can access the tool in BackTrack by going to Applications |BackTrack | Information Gathering | Network Analysis | Network Traffic Analysis | Wireshark. An example of this is shown in the next screenshot:
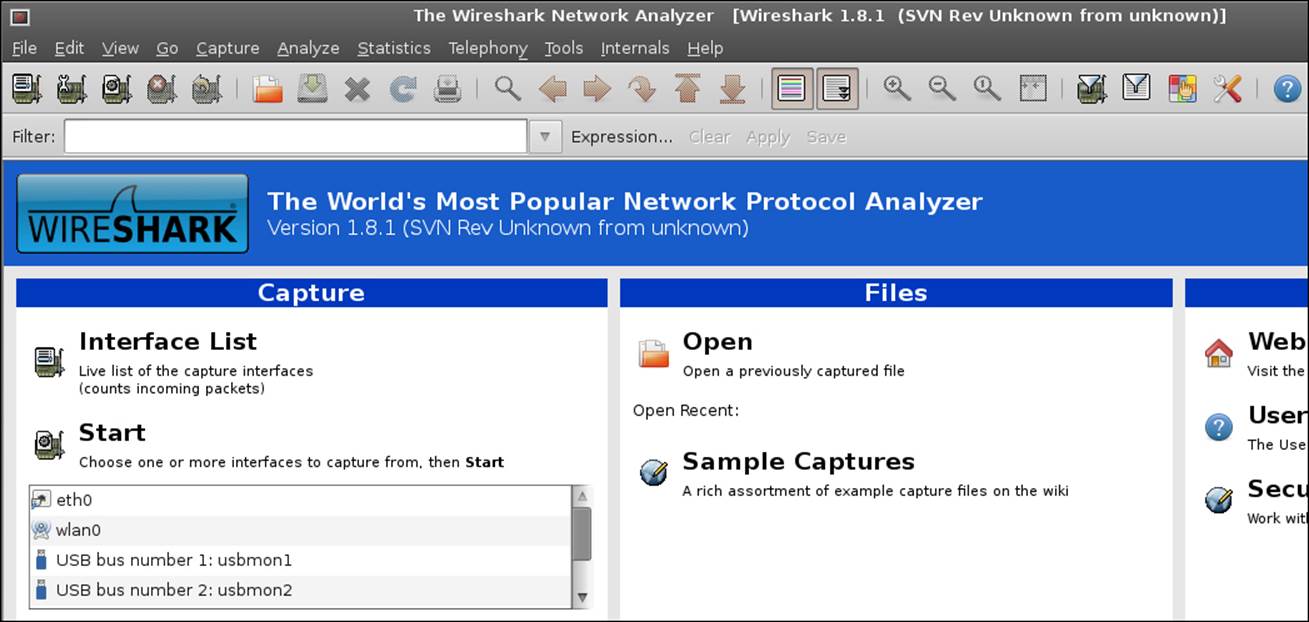
Once you have done this, you will see the application open, after which you will be in the main window. Once you are in the main window, you should see an area on the left-hand side of the screen that provides a listing of the interfaces that are available on the machine. As we have done before, we want to use the interface that is used for our wireless connection, wlan0. If you get a window that pops up and displays a warning that you are running as the root user, click on OK to acknowledge the message, and then click and place a checkmark in the Don't show this message again checkbox. An example of the Wireshark main window is shown in the following screenshot:
Select the wlan0 interface, and click on Start. You should now be ready to capture some packets. As what you are capturing depends on your settings, you may or may not be seeing traffic; so in either case, it is a simple matter of generating some traffic. In your BackTrack tool, go to Applications | Accessories | Terminal and open a terminal window. When the window opens, enter ifconfig and determine what network your wlan0 interface is on.
root@bt:~# ifconfig
This will be indicated by the INET address, which is the IP address of your wireless network card. Once you have discovered this, you just want to enter ping <ip address of the network>. If you are in a virtual machine, the host machine is usually the first node. The following screenshot shows a ping to the host machine from the BackTrack machine:

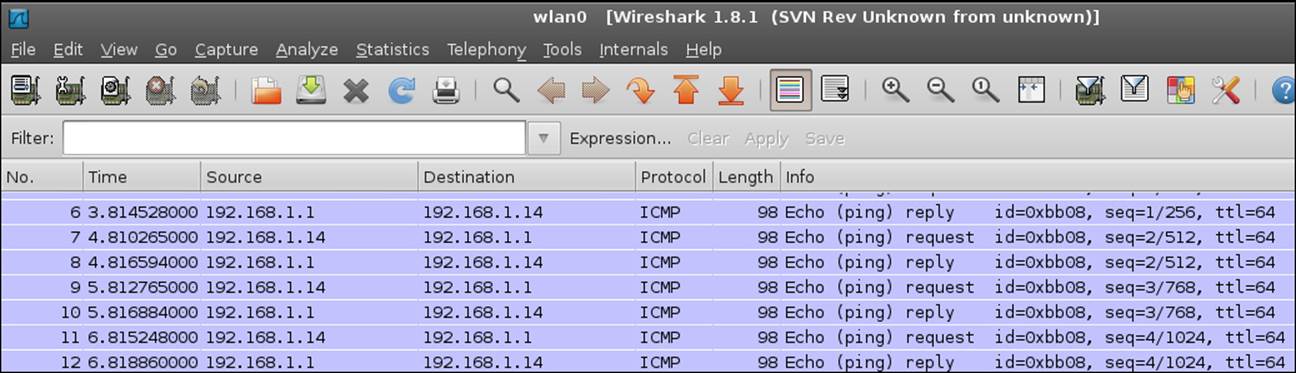
We should now be able to see the data that Wireshark captured. Note that if you do not add the –c option to your ping request, it will ping forever—well not really forever—but it will not stop without intervention and you will have to stop it by pressing Ctrl + C. In case you are not aware of this key combination, it will get you out of virtually every program that is running in Linux. In your Wireshark application, click on Stop under Capture. You should see your ICMP packet information as shown in the following screenshot:
Summary
This concludes the chapter. In this chapter, we got to experiment with getting your wireless card working in BackTrack; as you discovered, it is no small task. We also saw the recommendation that you make a small investment and get one of the cards that is supported by BackTrack. We saw two USB cards, Wi-Fire and Alpha. Either of these cards will allow you to use the full power of the BackTrack tools. In the next chapter, we will look at how to use the tools to explore the wireless zones around you.