QuickBooks 2014: The Missing Manual (2014)
Part III. Managing Your Business
Chapter 18, Keeping Track of Financial Tasks
Chapter 19, Managing QuickBooks Files
Chapter 20, Managing Inventory
Chapter 21, Working with Sales Tax
Chapter 22, Budgeting and Planning
Chapter 23, Tracking Finances with Reports and Graphs
Chapter 18. Keeping Track of Financial Tasks
Attention to detail. Follow-through. These are a couple of the things that keep customers coming back for more. Following up on promises or calling to check that an issue was resolved successfully is good business. But sending reorder brochures after customers have made purchases can just make them mad. In addition, paying a bill late can result in a whopping late fee. Conversely, you can leave money on the table if you don’t take advantage of early payment discounts.
If you use other programs for managing customer relationships and keeping track of what you need to do, you can record these types of details there. But if you tend to work in QuickBooks all day long, the program has several features that can help you stay in customers’ and vendors’ good graces by tracking what’s been going on and what still needs to be done.
QuickBooks’ to-dos are preferable to papering the edges of your computer monitor with sticky notes, although you might prefer to keep to-dos in a program that you keep running constantly, like your email or calendar program, so that you see reminders when you need them. This chapter kicks off by explaining how to create and manage to-dos in QuickBooks.
If you collect info about customers, vendors, and employees, QuickBooks’ notes feature can keep them close at hand. For instance, you could record one note to document a customer’s problem with an order, and then record another note to document how he wants you to use his credit. And if a note spawns an action item or two, you can create new to-dos as you write up your comments. In this chapter, you’ll learn how to create and manage notes, and how to create new to-dos at the same time.
Finally, reminders about when to perform bookkeeping tasks can help prevent late fees and keep income rolling in. QuickBooks’ reminders prod you into action when it’s time to send invoices, pay bills, reorder inventory, and so on. You can even create reminders for QuickBooks to-dos. This chapter shows you how to turn on reminders for the activities you don’t want to forget, and how to tell QuickBooks when to remind you. This chapter also shows you how to use the Calendar window to see when transactions and to-dos are due.
Tracking To-Dos
QuickBooks can help you track business to-dos like phone calls to make, emails to send, and tasks to complete. You can create to-dos for customers, leads who aren’t yet customers, vendors, employees, or just for yourself. This section shows you how to create and keep track of to-dos.
Creating a To-Do
QuickBooks gives you several ways to open the Add To Do dialog box so you can create to-dos:
§ In the Customer, Vendor, or Employee Center: Select a customer, job, vendor, or employee, and then click the To Do’s tab at the bottom of the center’s window. Then, click Manage To Dos→Create New.
§ In the Lead Center: Select a lead and then, on the To Do’s tab at the bottom of the center’s window, click the To Do button.
§ In the To Do List window: Open the global To Do List by choosing Company→To Do List. Then, at the bottom of the window, click To Do, shown in Figure 18-1 (background).
Once the Add To Do dialog box is open, follow these steps:
1. In the Type drop-down list, choose the kind of to-do you want to create.
To-dos can be calls, faxes, emails, meetings, appointments, or tasks.
2. In the Priority box, choose High, Medium, or Low.
Assigning a priority is a good way to keep track of your most important to-dos. In the To Do List window, you can sort your to-dos by any field, including Priority, as described on Editing a To-Do.
3. If the to-do is associated with someone, turn on the With checkbox, and then specify who it involves.
In the drop-down list below the checkbox, choose Lead, Customer, Vendor, or Employee. Then, in the drop-down list below that, choose the specific lead, customer, vendor, or employee associated with the to-do, as shown in Figure 18-1 (foreground).
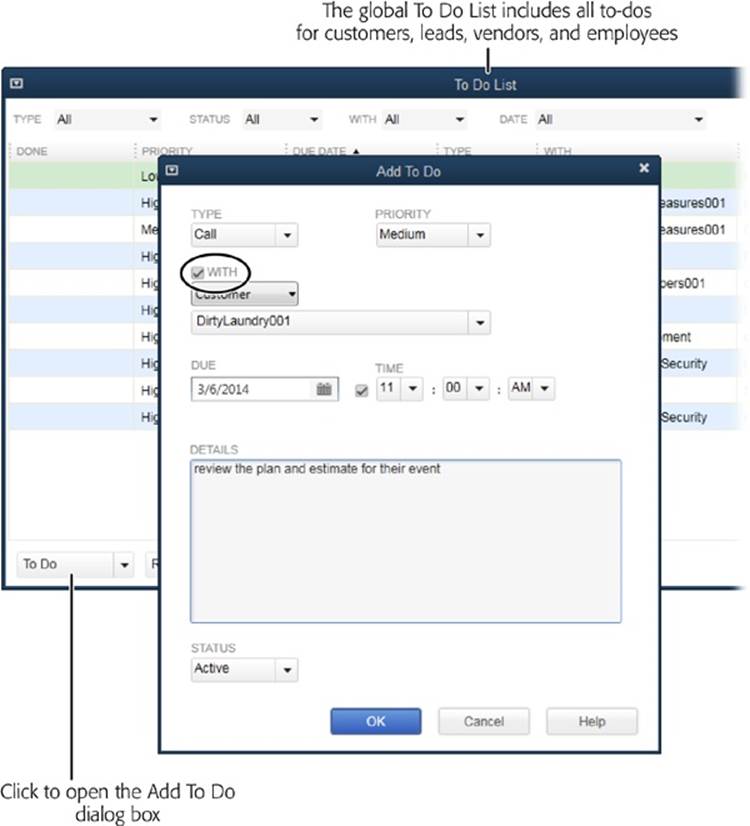
Figure 18-1. If a to-do is a task or communication with someone, turn on the With checkbox (circled) and then specify the person or company it’s connected to. However, a to-do doesn’t have to be associated with someone. For example, you may just want a reminder to submit your quarterly income tax form. In a situation like that, simply leave the With checkbox turned off.
4. Specify the due date and time.
In the Due box, QuickBooks automatically selects the current date, so be sure to choose the date by which you want to complete this to-do. To specify a time, turn on the checkbox to the left of the first Time box, and then set the time. If you want to keep your records complete and record a to-do that you’ve already finished, choose a date in the past, and then choose Done in the Status box (which you’ll learn about in a sec).
5. In the Details box, type information about the to-do.
By filling in the Details box, you can remind yourself what you want to do or delegate the to-do to someone else.
6. In the Status box, choose Active.
Active represents to-dos that aren’t complete yet. Later on, you can edit the to-do and change its status to Done when the task is complete, or Inactive if you no longer need to perform the task.
7. Click OK to save the to-do.
It appears in the To Do List window. This window includes all the to-dos you create.
To see just the to-dos for a specific person or company, open the Customer, Lead, Vendor, or Employee Center. There, select the customer, lead, vendor, or employee you’re interested in, and then click the To Do’s tab at the bottom of the center.
Editing a To-Do
The To Do List window (Figure 18-2) is your one-stop shop for editing to-dos, whether you created them for customers, leads, vendors, or employees. Open this window by choosing Company→To Do List. Then double-click the to-do you want to edit. The fields in the Edit To Do dialog box that opens are the same as the ones in the Add To Do dialog box. Simply make whatever changes you want, and then click OK.
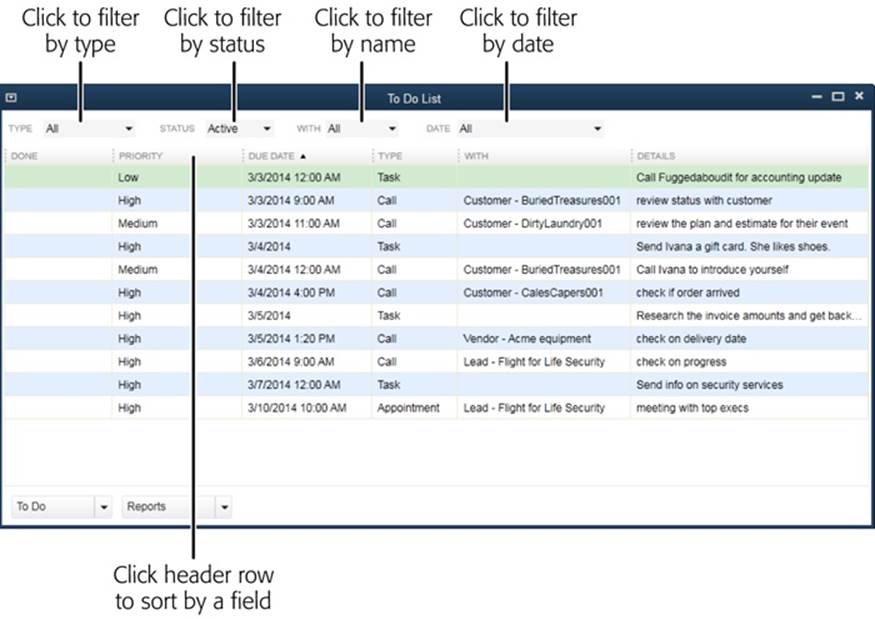
Figure 18-2. You can view or edit to-dos in this window. Double-click a to-do to edit it, or view specific to-dos by choosing a value from the Type, Status, With, or Date drop-down list. To sort the table by a field, click the field’s name in the table’s header row. A down arrow appears to the field’s right because QuickBooks initially sorts in ascending order. Click the arrow to sort in descending order.
To delete a to-do, first click it in the To Do List window’s table. Then, at the bottom of the window, click the down arrow to the To Do button’s right, and then choose Delete Selected To Do. Or, in the Customer, Vendor, or Employee Center, select a customer, job, vendor, or employee, and then click the To Do’s tab at the bottom of the center’s window. Select the to-do that you want to delete, and then click Manage To Dos→Delete Selected To Do. (In the Lead Center, select a lead and then, on the To Do’s tab at the bottom of the center’s window, click the To Do button and choose Delete Selected To Do.)
Viewing To-Dos
The To Do List window shows all the to-dos that you’ve created, and it lets you filter to-dos in several ways. For example, filtering by date is a great way to see what’s on deck for the next few days. Or you can filter by type to see all the calls you need to make. On the other hand, you could filter by name to review what’s going on with a customer before you meet with her.
You sort to-dos in the To Do List window by clicking a column heading, such as Priority, or filter the list by choosing entries in the drop-down lists at the top of the window:
§ Filter by type. Click the Type box and then choose the kind of to-do you want to see, such as calls you need to make. Once you do that, the table displays only to-dos of that type.
§ Filter by status. To focus on tasks that aren’t complete yet, in the Status drop-down list, choose Active.
§ Filter by name. To see to-dos for just leads, customers, vendors, or employees, choose a category in the With drop-down list.
§ Filter by date. To see to-dos that are due during a specific time period, choose the period in the Date drop-down list.
NOTE
To-dos also appear in the QuickBooks Calendar (Your Financial Calendar). And if you want QuickBooks to remind you about to-dos, you can set up reminders for them (Reminders).
Adding Notes
In QuickBooks 2012 and earlier versions, there was only one note box for all the notes you added to a customer’s or job’s record. But in QuickBooks 2013, you’re able to add as many separate notes as you want to customers, leads, vendors, and employees. To view them, simply open the appropriate center (Customer Center, Vendor Center, and so on), select the record you want (customer, job, lead, vendor, or employee), and then click the Notes tab in the lower-right part of the window. All the notes for the selected record appear, as demonstrated with a customer in Figure 18-3 (background).
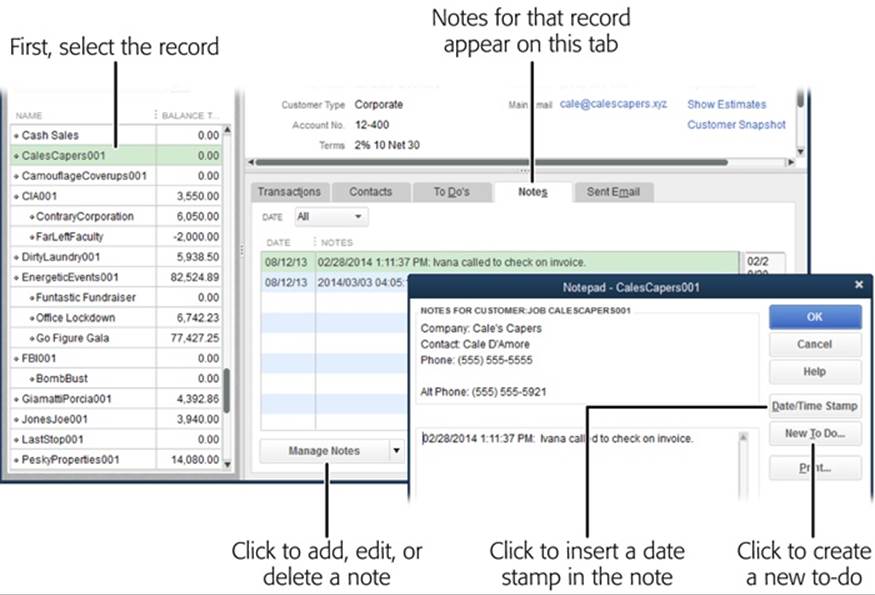
Figure 18-3. You can add a date and time to an entry by clicking the Date/Time Stamp button. To print the note, click Print. To add a reminder of what you want to do and when, click New To Do. (Page 486 describes how to create and manage to-dos.)
On the Notes tab, you can add, edit, and delete notes in the same way you work with to-dos (Tracking To-Dos):
§ Add a note. With a record selected, on the Notes tab, click Manage Notes→Add New. The Notepad dialog box opens with the record’s contact information filled in as shown in Figure 18-3 (foreground). To keep track of when conversations happen, click Date/Time Stamp before you start typing. If you’re adding a note about something that happened on a day other than today, you have to type in the date.
§ Edit a note. Select the note you want to edit, and then click Manage Notes→Edit Selected Note.
§ Delete a note. Select the note you want to delete, and then click Manage Notes→Delete Selected Note.
NOTE
In the Lead Center, you can only add notes—you can’t edit or delete them. However, you can edit and delete notes once you convert a lead to a customer (Managing Leads).
The Notes tab displays all the notes you’ve added for the selected record. To limit the notes to a date range, click the Date box and choose the time period you want, such as “This Month-to-date.”
Reminders
QuickBooks reminds you when to perform many accounting and business tasks, so you can save your brain cells for remembering more important things—like your anniversary. Even if your brain is the size of a small planet, you’re likely to rely on QuickBooks’ reminders to nudge you when it’s time to print checks, print or email invoices, remind your customers to pay overdue invoices, deposit payments, and so on. And when you turn on reminders for to-dos, the program can give you hints about any task that you don’t want to forget, whether it’s for a customer, vendor, employee, or yourself.
To open the Reminders window, shown in Figure 18-4, choose Company→Reminders. Alternatively, you can click the “View reminders” icon at the top right of the QuickBooks menu bar; the icon looks like an alarm clock and includes a flag that indicates how many reminders are waiting for you. (See Reminders to learn how to make QuickBooks open the Reminders window every time you open a company file.) You can tell QuickBooks whether you want it to display summaries or individual reminders. A summary displays a heading and the total amount of money for that category. With details, you see each transaction on a separate line.
TIP
In the Reminders window, click Collapse All or Expand All to switch every category to a summary or details, respectively.

Figure 18-4. The way information is displayed in this window depends on what settings you choose in QuickBooks’ Reminders preferences, shown in Figure 18-5. To adjust your preferences, click the Set Preferences button shown here, or choose Edit→Preferences→Reminder.
Out of the box, QuickBooks automatically sets every kind of reminder to show a summary, but you can tell the program what you want reminders for and when you want to be reminded. To customize your reminders, choose Edit→Preferences→Reminders, and then click the Company Preferences tab. (Reminders settings apply to everyone who logs into the company file, and you need administrator privileges to change them.)
As shown in Figure 18-5, you can specify the level of detail for each type of reminder and, in some cases, when you want QuickBooks to remind you. The Show Summary options tell QuickBooks to display a single reminder and the total amount of money in the Reminders window, like the “Purchase Orders to Print” row in Figure 18-4. The Show List options display each transaction on a separate line instead, as shown below the “Money to Deposit” heading in Figure 18-4; QuickBooks displays one line with the total amount of money to deposit, followed by a line showing each payment.
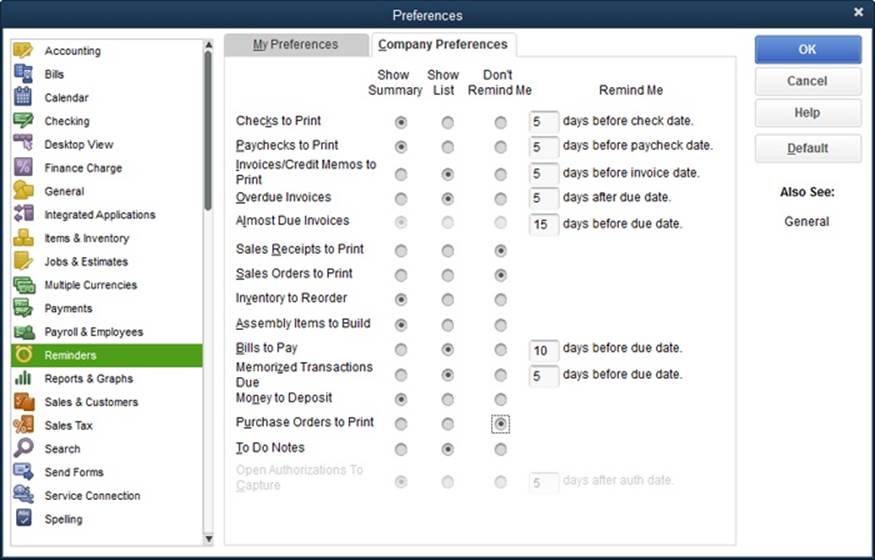
Figure 18-5. You can choose how and when QuickBooks reminds you to order inventory, pay bills, and so on. For transactions like bills that require action by a specific date, you can tell QuickBooks how far in advance to remind you. If you don’t want a reminder for a specific type of transaction, choose the Don’t Remind Me option.
NOTE
You can set up reminders only if you’ve turned on the corresponding feature. For example, if you don’t use QuickBooks inventory, the “Inventory to Reorder” reminder preference is dimmed.
QuickBooks can generate reminders for the following transactions:
§ Checks to Print. This reminder tells you that you’ve got checks queued up to print. (You add checks to the queue by turning on the Print Later checkbox in the Write Checks window [Writing Checks Without Entering Bills].) You can also specify how many days’ notice you want before the date you entered to print the checks.
§ Paychecks to Print. This reminder tells you that paychecks are waiting to be printed. You can specify how many days’ notice you want before the payroll date you entered.
§ Invoices/Credit Memos to Print. To print invoices or credit memos in batches, as described on Printing One Form, in the Create Invoices window, turn on the Print Later checkbox. This reminder notifies you about unprinted invoices or credit memos. You can specify how many days’ notice you want before the invoice or credit memo date you entered.
§ Overdue Invoices. This reminder warns you about invoices that have passed their due dates with no payment from the customer. You can specify how many days overdue an invoice needs to be before QuickBooks reminds you.
§ Almost Due Invoices. This reminder tells you about invoices that are due soon. QuickBooks automatically selects the Show Summary option for this reminder, and you can’t change it. However, you can change the number of days before the due date.
§ Sales Receipts to Print. If you queued up sales receipts to print as a batch (Printing One Form), this is the reminder about printing them. QuickBooks reminds you as soon as you have any sales receipts to print.
§ Sales Orders to Print. This preference is available only if you use QuickBooks Premier or Enterprise, and it reminds you to print sales orders you’ve queued up.
§ Inventory to Reorder. When you create Inventory Part items in QuickBooks, you can set a reminder for when you need to reorder inventory (Purchasing Inventory). This reminder warns you when a sales form you create reduces the number of items on hand below your reorder point. (QuickBooks generates a reminder immediately.)
§ Assembly Items to Build. This preference is available only if you use QuickBooks Premier or Enterprise. It warns you when the quantity of assembled items drops below your build point (Creating Inventory Items).
§ Bills to Pay. This reminder nudges you about bills you have to pay. (Entering bills is described on Entering Bills.) You can specify how many days’ notice you want before the date the bills are due.
§ Memorized Transactions Due. When you memorize transactions, you can specify a date for the next occurrence (Creating a Memorized Transaction). This reminder tells you about recurring memorized transactions. You can specify how many days’ notice you want before the next scheduled occurrence.
§ Money to Deposit. When you receive payments, you can group them with other undeposited funds so you aren’t running to the bank every five minutes as checks pour in. If you want to put your money to work as soon as possible, turn on this checkbox to receive a reminder as soon as you have any funds to deposit.
§ Purchase Orders to Print. This reminder gives you a prod about purchase orders you haven’t yet printed.
§ To Do Notes. To-do items can include dates, as described on Tracking To-Dos. This reminder shows you when to-do items are due.
NOTE
The Open Authorizations To Capture setting is grayed out unless you use QuickBooks Enterprise.
Your Financial Calendar
The Calendar window (Figure 18-6) acts as a dashboard that shows when transactions and to-dos were entered or are due. To open it, choose Company→Calendar, or click the Calendar icon on the icon bar or in the Home page’s Company panel.
NOTE
Unfortunately, there’s no way to exchange the to-dos and transactions on this calendar with an external calendar like Google Calendar or the one in Microsoft Outlook. To see QuickBooks to-dos and transactions on a calendar, you have to launch QuickBooks and open the Calendar window.
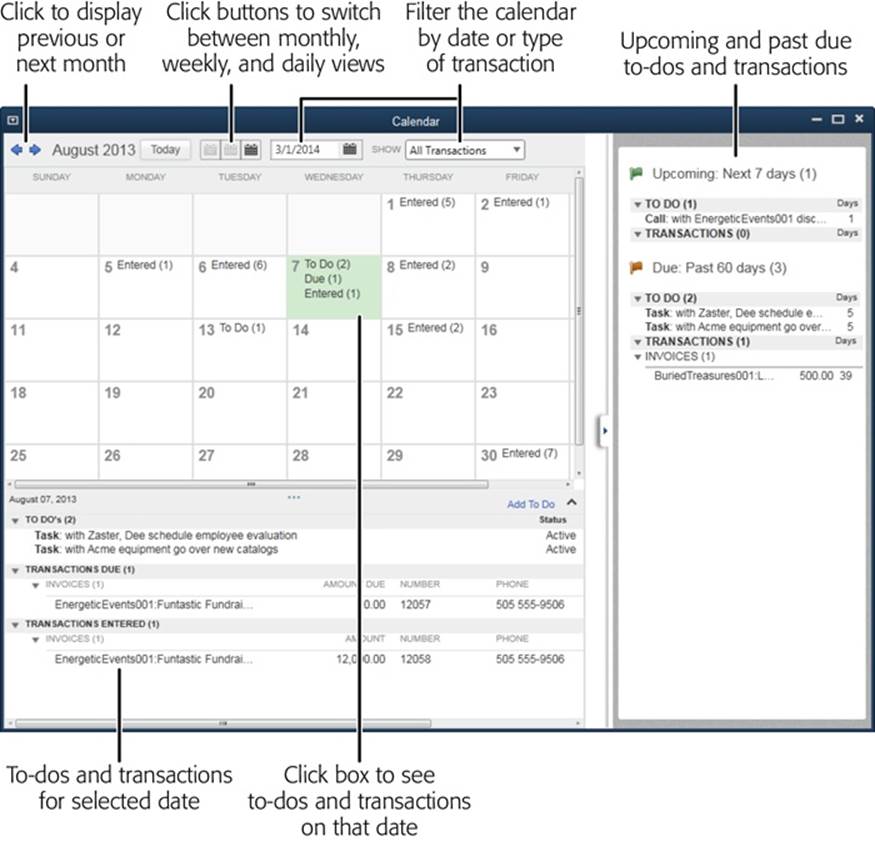
Figure 18-6. Each square shows what happened or is supposed to happen on that day. Click a date square to see the transactions due on that day. The words “To Do” indicate that there’s a to-do that is due on that day; “Due” indicates that transactions are due on that day; and “Entered” shows how many transactions were recorded with that date. The panel on the right shows all the to-dos and transactions that are coming up or past due as of today.
NOTE
The Calendar window’s toolbar includes icons and boxes for controlling your view. Here’s what they do from left to right: Click a blue arrow to move to the previous or next time period. Click Today to select the square for today’s date. Click the icons to display one day, one week, or one month, from left to right. Use the Show drop-down list to pick the transactions you want to see in the calendar.
Out of the box, the Calendar window has three panes:
§ The calendar initially displays an entire month. Each square in the calendar summarizes the transactions and to-dos for that day, as shown in Figure 18-6. For example, click on a given day, and you see the to-dos and transactions due on that day. Double-click a to-do to open it in the Edit To Do dialog box, or double-click a transaction to open it in its corresponding window (Create Invoices for an invoice, for example).
TIP
To see more detail in the calendar, switch to a weekly or even a daily view. At the top of the window, click the first button to the right of the Today button to display a single day in the calendar pane. The daily view shows transactions and to-dos for a day, similar to what you see in the bottom pane of the Calendar. Click the second button to display a weekly view.
§ The Upcoming and Due pane on the right lists the to-dos and transactions that are on deck or past due as of today, which is incredibly handy for staying on top of your bookkeeping and business activities. Double-click a to-do to open the Edit To Do dialog box with the details about what you’re supposed to do and when. Double-click a transaction to open it in its corresponding window.
§ The activity pane at the bottom of the window lists the to-dos and transactions that were entered or are due on the date you select in the calendar. The customer’s telephone number is listed for invoices, which is handy if you want to call and find out when you can expect a payment. If a day is particularly busy, you can expand this pane by pointing your cursor at the three blue dots at the top of the pane and then dragging.
NOTE
To hide the “Upcoming and Due” pane, click the right arrow on its left edge; to restore this pane, click the left arrow on the Calendar pane’s right edge. To collapse the activity pane, click the up arrow at its top right; to expand the pane, click the down arrow. If you click the Daily View button at the top of the window (put your cursor over each button to see a tooltip with the button’s name), the calendar disappears; to restore the calendar, click the Weekly View or Monthly View button.
All materials on the site are licensed Creative Commons Attribution-Sharealike 3.0 Unported CC BY-SA 3.0 & GNU Free Documentation License (GFDL)
If you are the copyright holder of any material contained on our site and intend to remove it, please contact our site administrator for approval.
© 2016-2026 All site design rights belong to S.Y.A.