QuickBooks 2014: The Missing Manual (2014)
Part III. Managing Your Business
Chapter 22. Budgeting and Planning
As you’ve no doubt noticed in business and in life, the activities that cost money almost always seem to outnumber those that bring money in. Most companies want to make money and most nonprofits want to do the most with the funds they have, so budgeting and planning are essential business activities.
Like any kind of plan, a budget is an estimate of what’s going to happen. Your actual results will never exactly match the numbers you estimate in your budget. (If they do, someone’s playing games with your books.) But comparing your actual performance to your budget can tell you that it’s time to crack the whip on the sales team, rein in your spending, or both.
Budgeting in QuickBooks is both simple and simplistic. The program handles basic budgets and provides some shortcuts for entering numbers. However, you can’t see whether your budget is working as you build it, and playing what-if games with budgets requires some fancy footwork. (The box on Budgets and Forecasts describes one way to create multiple budgets for the same time period.)
The easiest way to handle budgets is to craft them with a spreadsheet program like Excel. You can use all of Excel’s commands to massage the numbers and then import your budgetary masterpiece into QuickBooks so you can compare your actual performance with the budget. This chapter explains your budgeting options, teaches you how to import budgets from other programs, and provides an overview of QuickBooks’ budget reports.
TIP
QuickBooks also includes a Cash Flow Projector (it lives on the Company→Planning & Budgeting submenu). This wizard provides a forecast of cash flow similar to what you can obtain by running a Cash Flow Forecast report (Generating Tax Reports), so it’s not covered in this book.
Types of Budgets
To most people, the word “budget” means a profit and loss budget—one that estimates what your income and expenses will be over a period of time. QuickBooks profit and loss budgets are based on the income and expense accounts in your chart of accounts (see Chapter 3) and typically span your company’s fiscal year.
Balance sheet budgets aren’t as common, but you can create them in QuickBooks as well. Balance sheets are snapshots of your assets and liabilities, and balance sheet budgets follow the same format by showing the ending balances for your asset, liability, and other balance sheet accounts.
NOTE
Most companies plan for major purchases and their accompanying loans outside of the budgeting process. For example, if a company needs an asset to operate, executives usually analyze costs, benefits, payback periods, internal rates of return, and so on before making purchasing decisions. They evaluate cash flow to decide whether to borrow money or use cash generated by operations. But after that, the additional income generated by the asset and the additional interest expense associated with any loans show up in the profit and loss budget.
QuickBooks’ profit and loss budgets come in three flavors, each helpful in its own way:
§ Company profit and loss. The most common type of budget includes all the income and expenses for your entire company. This is the budget that management strives to follow—whether that’s to produce the net profit that keeps shareholders happy or to generate the cash needed to run the company. With QuickBooks’ Budget vs. Actual report (Budget vs. Actual Report), you can compare your actual results with your budget.
§ Customer or job budget. A customer- or job-based profit and loss budget forecasts the income and expenses for a single customer or job. Projects that come with a lot of risk have to offer the potential for lots of profit to be worthwhile. By generating a profit and loss budget for a customer or job, you can make sure that the profitability meets your objectives.
§ Class budget. If you use classes to track income and expenses, you can create profit and loss budgets for each class. Class budgets work particularly well when you track income and expenses for independent sections of your company: regions, business units, branches, partners, and so on.
Ways to Build Budgets
If you’ve just started a business, you may have a business plan that includes estimates of your income and expenses. Or you may have run your business for a while without a budget and now want to create a budget using past performance as a starting point. Either way, there’s a method for building a QuickBooks budget. But the easiest approach is to build your budget outside QuickBooks and import the results. Here are your options and what each has to offer:
GEM IN THE ROUGH: BUDGETS AND FORECASTS
If you have QuickBooks Premier or Enterprise, you’ll see the Set Up Forecast entry on the Company→Planning & Budgeting submenu. The window that opens when you choose Set Up Forecast is strikingly similar to the Set Up Budgets window. In fact, other than replacing the word “Budgets” with “Forecast,” they’re identical. So how do you decide whether to use a budget or a forecast?
You can have only one budget for a given period loaded in QuickBooks—for example, a 2014 profit and loss budget. A forecast lets you create another set of planning numbers for the same timeframe. So you can create a profit and loss budget for 2014 and a separate forecast for the same fiscal year, using the budget to reflect your most likely results and the forecast to show the numbers under more optimistic (or pessimistic) conditions.
QuickBooks has reports that compare your actual performance with budgets and forecasts (Reports→Budgets & Forecasts), so you can use either feature to compare your estimated numbers with your actual performance.
The bottom line: Use budgets unless you want a second set of planning numbers readily available. If you decide to create forecasts instead of—or in addition to—budgets, the instructions in this chapter apply to them, too.
§ From previous year’s actual results. If this is your first budget and you have at least a year’s worth of data in QuickBooks, you can use that existing data as a starting point (Creating Budgets in QuickBooks) and edit only the values that change.
§ From scratch. This method can be tedious because you have to estimate and fill in all the budget numbers (although, as you’ll learn on Filling in Budget Values, QuickBooks does offer some data entry shortcuts). Fortunately, you only have to use this approach for your first budget. (The next section explains how to create a budget from scratch in QuickBooks.)
§ From data in another program. The best way to build a budget is to create it in a program like Excel and then import it into QuickBooks. Setting up a spreadsheet for your company budget in Excel or some other program offers several advantages. After you set up the Excel file with rows for each account and columns for months and other fields, you can save it as a template for creating future budgets. If you’re an Excel whiz, you can use that program’s tools to quickly create and fine-tune your budget. You also can copy that file to create what-if scenarios or next year’s budget based on the previous year’s budget. You can read about building a budget with Excel starting on Creating and Copying Budgets with Excel.
Creating Budgets in QuickBooks
The Set Up Budgets wizard is the place to go for profit and loss budgets; balance sheet budgets; budgets for customers, jobs, and classes; and budgets built from scratch or from previous year’s data. Even if you use Excel to build your budgets (Creating and Copying Budgets with Excel), theSet Up Budgets wizard can help jump-start your Excel spreadsheet.
Before you dive into building a budget, you have to perform two setup steps if you want your budgets to work properly:
§ Fiscal year. QuickBooks uses the first month of your fiscal year as the first month of the budget. To check that you defined your fiscal year correctly, choose Company→My Company. In the window that appears, at the top right of the Company Information section, click the Edit button (its icon looks like a pencil). On the left side of the Company Information dialog box, click Report Information, and then make sure that the month in the Fiscal Year box is correct.
§ Active accounts. QuickBooks budgets cover only the accounts that are active in your chart of accounts. To activate any accounts you want to budget, press Ctrl+A to open the Chart of Accounts window, and then turn on the “Include inactive” checkbox. (If no accounts are inactive, this checkbox is grayed out.) For any inactive account that you want in your budget, click the X to the left of the account’s name to reactivate it.
To start the budget wizard, choose Company→Planning & Budgeting→Set Up Budgets. Depending on whether you already have a budget in QuickBooks, the program displays one of two different wizards. The Create New Budget wizard, shown in Figure 22-1, appears if this is your first budget in this company file. If you already have at least one budget in your company file, QuickBooks opens the Set Up Budgets wizard instead and displays your most recent budget. To create a new budget in that wizard, click the Create New Budget button to launch the wizard shown inFigure 22-1.
![In the Create New Budget wizard, you first tell QuickBooks about the year and type of budget you want to create.On the second screen (not shown), you can specify whether the budget works with customers, jobs, or classes. (You’ll only see the option for creating class budgets if you’ve turned on QuickBooks’ class feature [page 640].)](quickbooks.files/image240.jpg)
Figure 22-1. In the Create New Budget wizard, you first tell QuickBooks about the year and type of budget you want to create. On the second screen (not shown), you can specify whether the budget works with customers, jobs, or classes. (You’ll only see the option for creating class budgets if you’ve turned on QuickBooks’ class feature [page 640].)
The steps for setting up a new budget are the same whether QuickBooks displays the Create New Budget wizard automatically or you click the Create New Budget button in the Set Up Budgets wizard:
1. On the Create a New Budget screen (Figure 22-1), choose a fiscal year and budget type, and then click Next.
QuickBooks automatically fills in the next calendar year (perhaps assuming that you’re done budgeting for the current year). Click the up and down arrows to the box’s right to choose the fiscal year you’re budgeting for.
Below the year setting, the program automatically selects the “Profit and Loss (reflects all activity for the year)” option, because most budgets cover income and expenses for a year. If you want to create a balance sheet budget instead, select the “Balance Sheet (reflects ending balance)” option.
NOTE
If you create a balance sheet budget, you don’t have to set any additional criteria before you build the budget for your balance sheet accounts. In the Create New Budget wizard, clicking Next displays a screen that simply tells you to click Finish. When you do, a table containing your balance sheet accounts appears in the Set Up Budgets window, and you can begin typing ending balances.
2. On the Additional Profit and Loss Budget Criteria screen, select the flavor of profit and loss budget you want, and then click Next.
QuickBooks automatically selects the “No additional criteria” option, which creates the most common type of budget: a profit and loss budget for the entire company. (The next section explains how to create Customer:Job and Class budgets.)
3. On the “Choose how you want to create a budget” screen, tell QuickBooks how you want to fill in the initial budget data.
Keep the “Create budget from scratch” option selected if you want to create a blank budget. If you go this route, jump to Jobs & Estimates to learn how to enter data in the Set Up Budgets wizard.
If you have actual data that you want to use as a foundation for your budget, select “Create budget from previous year’s actual data” instead. This option transfers the monthly income and expense account totals from the previous year into the budget.
4. Click Finish.
QuickBooks opens the Set Up Budgets window, which includes a monstrous table. The rows represent each active account in your chart of accounts; each column is one month of the fiscal year. If you opted to create a budget for a customer, job, or class, the window includes either the Current Customer:Job drop-down list containing all your active customers and jobs or the Class drop-down list containing all your active classes. Before you start entering values for a customer, job, or class budget, choose the customer, job, or class from this list.
The section Filling in Budget Values explains how to fill in the cells in this table.
NOTE
If your monitor’s resolution is less than 1024 x 768, the Set Up Budgets window also includes the Show Next 6 Months button, because your screen can’t display the entire year. In that case, QuickBooks initially displays January through June. Click Show Next 6 Months to display July through December (the button’s label changes to Show Prev 6 Months).
Creating Customer:Job or Class Budgets
In QuickBooks, there’s no way to store several versions of a fiscal-year budget that covers your entire operation. But you can create additional budgets for the same fiscal year for different customers and jobs, or for classes.
NOTE
Class budgets work the way Customer:Job budgets do. In fact, if you replace every instance of “Customer:Job” in the following tutorial with “Class,” you’ll have the instructions for creating Class budgets.
Here’s how to work with Customer:Job or Class budgets:
1. Choose Company→Planning & Budgeting→Set Up Budgets as you would for a regular budget. At the Set Up Budgets window’s top right, click the Create New Budget button.
The Create New Budget window opens. QuickBooks automatically fills in the next calendar year and selects the “Profit and Loss” option. If you want to create a budget for a different year or of a different type, choose the year and/or type.
2. When the year and budget type are what you want, click Next.
The “Additional Project and Loss Budget Criteria” screen appears.
3. On this screen, select the flavor of profit and loss budget you want, and then click Next.
To create a Customer:Job or class budget, select the Customer:Job option or Class option, respectively. (You only see the Class option if you’ve turned on the class tracking preference [Accounting].)
4. On the “Choose how you want to create a budget” screen, choose the appropriate option, and then click Finish.
QuickBooks adds the Current Customer:Job box to the Set Up Budgets window between the Budget list and the table.
5. In the Current Customer:Job drop-down list, choose the customer or job that you want to budget, as shown in Figure 22-2.
Any budgetary numbers you’ve previously entered for the customer or job for the selected fiscal year appear in the budget table.
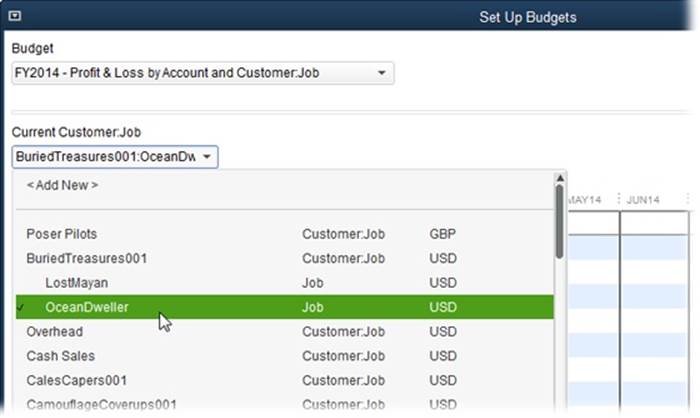
Figure 22-2. The Current Customer:Job drop-down list displays both customers and jobs so you can create budgets for customers or specific jobs. (Jobs are indented beneath their corresponding customers.)
6. In the budget table, fill in values for the Customer:Job budget (see Filling in Budget Values to learn how).
Unlike a budget for your entire operation, Customer:Job budgets may have values for only a few accounts. For example, for a job that includes products, services, and reimbursable expenses, your budget may have values only for income accounts and the expense accounts for reimbursable expenses.
7. When you’re finished entering values, click Save.
If you choose another customer or job without clicking Save, QuickBooks asks if you want to record the budget. In the Recording Budget message box, click Yes.
8. If you want to create a budget for another customer, job, or class, in the Set Up Budgets window’s Budget drop-down list, choose the Customer:Job or Class budget for the fiscal year you want to budget.
The Budget drop-down list includes an entry like “FY2014 - Profit & Loss by Account and Customer:Job” for customer or job budgets. Class budgets show up in the Budget drop-down list looking something like “FY2014 -Profit & Loss by Account and Class.”
9. In the Current Customer:Job or Current Class drop-down list, choose the customer, job, or class that you want to create a budget for. Fill in the budget values, and then click Save.
After you’ve created specialized budgets like these, you can revisit any of them by selecting a budget like “FY2014 - Profit & Loss by Account and Customer:Job” or “FY2014 - Profit & Loss by Account and Class” in the Budget drop-down list, and then selecting the customer, job, or class in the Current Customer:Job or Current Class drop-down list.
Filling in Budget Values
Regardless of which type of budget you create, the way you fill in and edit values in QuickBooks is the same. To add budget values to an account, in the Set Up Budgets window’s Account column, click the account. When you do, QuickBooks automatically selects the cell in the first month column in that row. If you’re filling in the entire year’s worth of numbers, type the value for the first month, press Tab to move to the next month, and continue until you’ve entered values for all 12 months. The Annual Total column displays the total for all months, as shown in Figure 22-3.
Filling in a few budget cells is usually enough to convince you that data entry shortcuts are in order. Luckily, QuickBooks gives you two ways to enter values faster, both described next. The box below explains what some of the buttons at the bottom of the Set Up Budgets window do.
UP TO SPEED: MANAGING BUDGETS
In the Set Up Budgets window, several buttons help you manage the budgeting work you do in QuickBooks. Although you’re probably familiar with their functions based on similar buttons in other windows, here’s a quick overview:
§ Clear. Click this button to delete all the values in a budget—for every account and every month. This is the button to click if you want to start over. (If you click this button by accident, don’t worry: QuickBooks displays a confirmation box where you can click No to preserve the numbers you’ve entered.)
§ Save. When you’ve added or updated all the values in a budget, click this button to save your work. You can also click Save so you don’t lose the work you’ve done so far. And even if you forget to click this button, if you click OK or choose another budget, QuickBooks asks whether you want to record the one you’ve been working on.
§ OK. Clicking this button records the values you’ve entered and closes the Set Up Budgets window.
§ Cancel. Clicking this button closes the window without saving your work.
Copying Across Columns
Because budgets are estimates, you don’t need extraordinarily detailed or precise values. In the Set Up Budgets window, you can copy a number from one cell in a row to all the cells to its right in the same row, as demonstrated in Figure 22-3.
TIP
If the account names and bud get values are hopelessly truncated and you have screen real estate to spare, enlarge the Set Up Budgets window by dragging a corner or maximizing it. The columns show more of the cell contents as you enlarge the window. To resize a specific column to make it wider or narrower, put your cursor over the vertical line to the right of the column’s header. When the cursor turns into a two-headed arrow, drag right or left.

Figure 22-3. To copy the value in a cell into the remaining cells in that row, start by selecting the cell, like the cell for Service Government for March 2014 shown here. Then click Copy Across to make QuickBooks copy “30,000” into the cells for April through December.
This shortcut is fabulous when a monthly expense remains the same throughout the year, like office rent, for example. But it also works if a price changes midyear. For instance, suppose the corporate concierge you’ve hired to run errands for your employees announces that his rates are going up in May. If your budget contains the old rate in every month, click the cell for May and type the new rate. Then click Copy Across, and QuickBooks lists the new rate for May through December.
TIP
If you mistakenly add values to cells that should be blank, Copy Across is the fastest way to empty a row. Clear the first month’s cell by selecting its value and then pressing Backspace. Then click Copy Across to have QuickBooks clear all the other cells in that row.
Adjust Row Amounts
The Set Up Budgets window’s Adjust Row Amounts button lets you increase or decrease monthly values by a specific dollar amount or percentage. Say you created a budget from the previous year’s data, but you want to increase all the values in the current year by 10 percent. Or maybe your company is growing quickly and you want to apply some heat to your sales force by increasing the target income each month. In that case, you can tell QuickBooks to compound the increase, so each month’s sales target is a little higher than the previous month’s value.
Changing all the cells in a row by a fixed dollar amount isn’t as useful as you might think, because Copy Across basically does the same thing in most cases. But when you change budget amounts by percentages or compound increases each month, QuickBooks takes care of the calculations for you. Here’s how to adjust row amounts in both of these ways:
1. Click the row you want to adjust.
If you want to start the adjustment in a specific month, click the cell for the starting month.
2. Click the Adjust Row Amounts button.
QuickBooks opens the Adjust Row Amounts dialog box and, in the “Start at” box, automatically selects the option that you chose the last time you opened this dialog box. “1st month” starts adjustments in the first month of the fiscal year. To start with the month you selected instead, choose “Currently selected month” (if you select this option, QuickBooks displays the “Enable compounding” checkbox, which is explained in step 5).
NOTE
The Adjust Row Amounts feature is for adjusting existing budget values, not for filling in blank cells. For example, if you select the “Increase each remaining monthly amount in this row by this dollar amount or percentage” option and then type 100 in the text box, QuickBooks adds 100 to the values in the month cells. So if the January cell is set to 1,000, it increases to 1,100. However, if the remaining months’ cells are zero (0), they increase only to 100.
3. Select the appropriate option for how the prices change.
QuickBooks automatically selects the “Increase each remaining monthly amount in this row by this dollar amount or percentage” option because prices usually go up. But if prices are decreasing, select the option that begins with “Decrease each remaining monthly amount” instead.
4. In the text box for the option you selected, type the dollar amount or percentage, and then click OK.
For example, if the landlord tells you that rent is going up 5 percent, in the box for the Increase option, type 5%, and QuickBooks increases the value in all the remaining cells by 5 percent. So if your rent was $5,000 a month, the values in all the remaining months change to $5,250.
To add a dollar amount to the remaining cells instead, type that dollar value. For example, to add $1,000 a month to the Rent cells, in the box for this option, type 1000. Each subsequent cell in the Rent row increases by 1,000. (Of course, you can do the same thing by typing the new rent amount in the cell for the first month to which it applies and then clicking Copy Across.)
5. If you chose “Currently selected month” in the “Start at” box in step 2, the “Enable compounding”checkbox appeared; turn it on if you want to adjust each month’s value based on the previous month’s value.
When you compound dollar amounts, QuickBooks adds the dollar amount you specify to the next month’s value. For example, if January’s value is 10,000 and you change the value by 1,000, February’s value becomes 11,000, March’s value increases by another 1,000 to 12,000, and so on, as shown in Figure 22-4.
You can also compound by percentage. If you turn on the “Enable compounding” checkbox and then type a percentage in the text box, QuickBooks increases the next month’s value by the percentage you specify. If January’s value is 10,000 and you increase it by 10 percent, February’s value becomes 11,000, March’s value increases another 10 percent to 12,100, and so on.
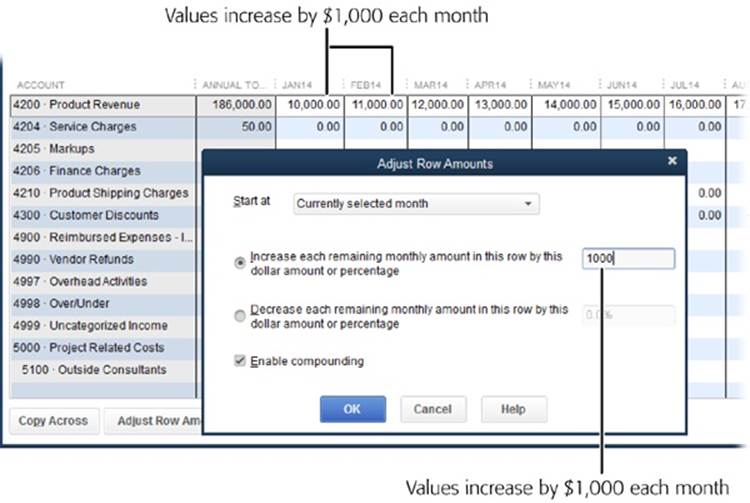
Figure 22-4. When you compound values, QuickBooks increases the previous month’s value by the amount you specify, as shown here. If January’s value is 10,000 and you increase it by $1,000, February’s value is 11,000, March’s value increases another $1,000 to 12,000, and so on.
Creating and Copying Budgets with Excel
QuickBooks’ budget reports can help you plan for the future and evaluate whether your business is going boom or bust. However, the program’s tools for building and editing budgets (Creating Budgets in QuickBooks) don’t compare to what you can do with a program like Excel.
QuickBooks keeps only one budget at a time for the same type of budget and time period—for example, the profit and loss budget for fiscal year 2014—and it doesn’t offer a feature for copying a budget. That’s where a spreadsheet program comes in handy. You can easily copy a budget spreadsheet, make the changes you want, and then import the final product into QuickBooks. For example, you might create next year’s budget from this year’s. Or you might experiment with what-if scenarios including a bare-bones budget in case a client with shaky finances disappears and a second happy-dance budget if you snag that big new project.
There are three parts to working on budgets with Excel:
1. Export the accounts from your company file.
2. Edit budget values in Excel.
3. Import the final budget into your company file.
The following sections describe each step in detail.
Exporting Your Budget
Exporting a budget is the easiest way to create an Excel spreadsheet with the accounts from your chart of accounts and the additional information that QuickBooks needs to import the spreadsheet when it’s finished. This section explains the steps for getting the budget ready to export and then how to create the export file.
QuickBooks exports only accounts that contain at least one value. So if you already have a budget with numbers in it, you can skip to the steps for creating the export file (at the bottom of this page). However, if your budget is blank, you need to add at least one budget value to each account. Here’s what you do:
1. In the Set Up Budgets window (Company→Planning and Budgeting→Set Up Budgets), in the Budget drop-down list, choose the budget you want to add values to.
The budget table appears with the accounts in the first column, the annual total in the second column, and columns for each month of the year.
2. Enter a value in the January cell for each account in the budget, as shown in Figure 22-5.
Click the first cell in the first month’s column (labeled something like Jan 14), and then type 1. Then, fill in the rest of the cells in that first column.
3. When all the cells in the January column contain values, click Save. Then click OK to close the Set Up Budgets window.
That’s it! Your budget is now ready to export.
NOTE
If you have more than one budget in your company file, you can’t export only the budget you want to work with—when you export QuickBooks’ Budgets list, the export file includes entries for every budget for every fiscal year. So if you created budgets for customers, jobs, and classes, you’ll get entries for those, too. When you work on the budgets in a spreadsheet, you can ignore the entries for those other budgets, but the best approach is to delete the extraneous rows so you can focus on one budget at a time.
Here’s how to export QuickBooks budgets:
1. Choose File→Utilities→Export→Lists to IIF Files.
QuickBooks opens an Export dialog box with checkboxes for each type of list you can export.
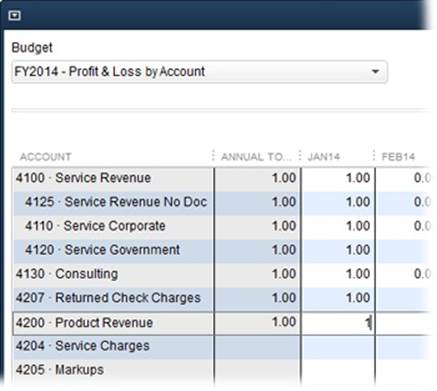
Figure 22-5. Using your keyboard is the fastest way to fill in these cells. Click the first cell in the first month’s column, and then press the 1 key to enter a placeholder value. Next, press the down arrow to move to the next cell in the column, and then press the 1 key again. Rinse and repeat until the entire first month’s column contains values.
2. In this first Export dialog box, turn on the Budgets checkbox, and then click OK.
QuickBooks opens a second Export dialog box, which looks like a Save As dialog box. However, the “Save as type” box is automatically set to “IIF Files (*.IIF).”
3. In the second Export dialog box, navigate to the folder where you want to save the exported file and, in the “File name” box, replace “*.IIF” with the name for your export file.
To keep your files organized, save all your exported files in a single folder called something like Export_Files. Name the exported file something like QBBudgets.iif.
4. Click Save to export the budgets.
When a QuickBooks Information box appears telling you that the export was successful, click OK to dismiss it.
Working with a Budget in Excel
If your company file contains only one budget, you can open the exported file in Excel and start editing the budget values. If, on the other hand, you exported several budgets, your work will flow more smoothly if you format the file. Here are the steps for opening and working on a budget in Excel:
1. In a spreadsheet program like Excel, open the exported file.
IIF files are tab-delimited text files (see Deleting Items). To open one in Excel, choose File→Open. In the Open dialog box, click the down arrow to the right of All Excel Files and choose All Files from the drop-down menu so you can see all the files in your folders. Navigate to the folder that contains the IIF export file and double-click its filename. The Text Import Wizard appears. You don’t have to specify any special formats to tell Excel how to read the file, so just click Finish to import the file into Excel.
2. In Excel, to change the order of the budget rows to show budgets by fiscal year, select all the rows below the one that begins with !BUD (Figure 22-6, background). Then, choose Data→Sort and sort the workbook first by start date (STARTDATE) and then by account (ACCNT).
Before you sort the data, rows for different years’ budgets and account names are in no particular order. By sorting the rows first by start date, you can see all the entries for each fiscal year grouped together. (If you have Customer:Job budgets, you can also sort by the CUSTOMER column.) This sort method intersperses income and expense accounts, but because companies typically have fewer income accounts, you can quickly move the rows for income accounts above the expense accounts. Once you do that, you can add subtotals for your income and expenses, and calculate your net profit.
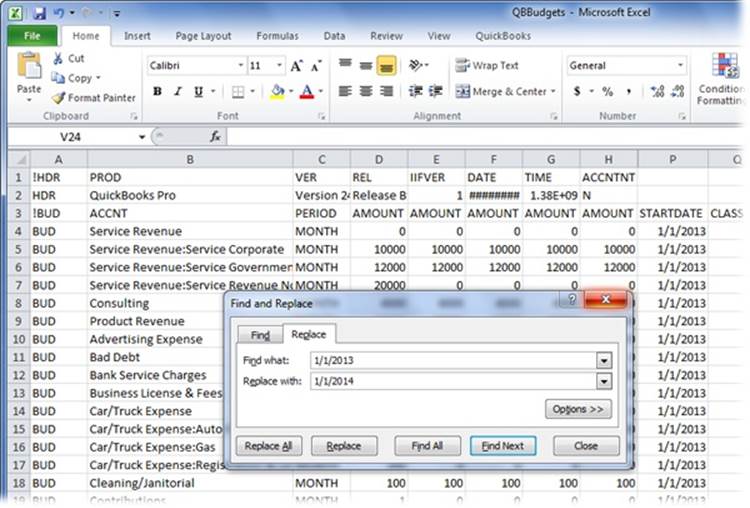
Figure 22-6. The entries for 2013 budgets include “1/1/2013” in the STARTDATE column. (Entries for Customer:Job or class budgets include the customer and job name in the CUSTOMER column or the class name in the CLASS column.) To turn an exported 2013 budget into a 2014 budget, change the contents of these cells to “1/1/2014.”
3. To edit this file to represent only one budget, delete all the rows for budgets that you aren’t changing.
The STARTDATE column contains the date that the fiscal year for the budget begins. So, for example, if you want to remove all the budgets except the one for fiscal year 2014, delete all the rows that have a date other than 1/1/2014 in the STARTDATE column.
4. If you want to use an existing budget to create next year’s budget, simply change the year in the STARTDATE column.
Use Excel’s Replace command (press Ctrl+H or, on the Home tab, click Find & Select→Replace) to change the year to the new budget (as shown in Figure 22-6, foreground). For example, the budget entries for 2013 budgets include “1/1/2013” in the STARTDATE column. To create a budget for 2014, change the contents of these cells to “1/1/2014.”
5. To modify budget numbers, edit the budget values in the Excel worksheet.
NOTE
If you create several what-if budgets in Excel, be sure to copy just the data for your final budget into a file for importing into QuickBooks. Compare the keywords and column headings in the budget file you exported with those in the file you plan to import to make sure that the data will import the way you want. For example, a row that begins with !BUD lists the keywords that identify columns, such as ACCNT for your accounts and AMOUNT for your budget values. (Rows for budget entries have to begin with a cell containing the keyword BUD.) For more on importing and exporting data, see Chapter 26.
6. In Excel, choose File→Save As. In the Save As dialog box, save the modified file with a new filename.
In the Save As dialog box, leave the file type set to “Text (Tab delimited) (*.txt).”
Now you’re ready to import the file into QuickBooks.
Importing a Budget into QuickBooks
After you create or edit your budget in Excel, importing it into QuickBooks is easy. Here are the steps:
1. To import the modified IIF file into QuickBooks, choose File→Utilities→Import→IIF Files.
QuickBooks opens the Import dialog box and, in the “Files of type” box, automatically chooses “IIF Files (*.IIF).” If you don’t see your file, in the “Files of type” box, choose “All Files (*.*)” instead.
2. Double-click the name of the IIF file that contains your edited budget.
When a QuickBooks Information box appears telling you that the import was successful, click OK to dismiss it.
3. Choose Company→Planning & Budgeting→Set Up Budgets.
If you created a budget for a new fiscal year, in the Set Up Budgets window, the Budget drop-down list now contains an entry for that year’s budget. If you used a spreadsheet to edit an existing budget, in the Budget drop-down list, choose the entry for that budget to see the updated values in the budget table.
NOTE
If you’re experimenting with several budgets for the same time period, you can import one and then run budget reports to examine it more closely. Just remember to finish by importing the budget you finally decide to use.
Running Budget Reports
A budget gives you a target to aim for. The Set Up Budgets window lets you type values for income and expense accounts, but it doesn’t show you whether your budget results in a net profit or loss. For that, you need a budget report (or your budget exported to a spreadsheet program, as described on Exporting Your Budget). And to compare your business performance with your budget, you need a budget report that shows budget and actual numbers side by side. QuickBooks provides four types of budget reports: one to review budgets you’ve created and three to compare your performance with your plan. This section describes the various reports, what they’re useful for, and how to create and format them.
NOTE
To learn about all the options for customizing any QuickBooks report, see Chapter 23. And the box on Memorizing Budget Reports explains how to memorize a customized report.
The Budget Overview Report
The Set Up Budgets window shows your accounts and the values you enter for each month, but it doesn’t tell you whether your budget produces a profit or loss. The Budget Overview report shows budget numbers for each account and month, too, but it also subtotals values if you use top-level accounts and subaccounts in your chart of accounts, as shown in Figure 22-7. To see whether you earn enough income to cover expenses, at the bottom of the report, look at the net income value (income minus expenses) for each month and for the entire year.
To run the Budget Overview Report, choose Reports→Budgets→Budget Overview. In the Budget Report dialog box, first choose the budget you want to view and then a layout (explained in a moment). When you click Finish, QuickBooks opens the Budget Overview report window. (The Modify Report dialog box might appear depending on the report settings [Reports and Graphs] you’ve chosen. If you see that dialog box, simply click Cancel to close it.)
NOTE
The Budget Overview report includes only accounts that have budget values.
Report Layouts
If you create a report for a profit and loss budget for your entire company, the only layout option in the Budget Report dialog box is Account By Month, which lists the accounts in the first column with each subsequent column showing one month of the fiscal year. You can change the columns to different durations in the Profit & Loss Budget Overview window (Figure 22-7).
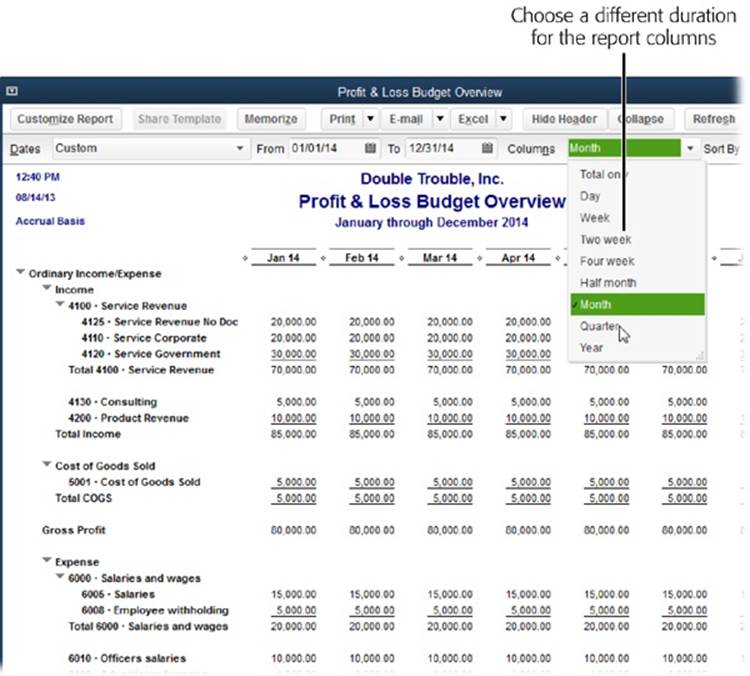
Figure 22-7. Although you build budgets month by month, many businesses (particularly ones with shareholders) focus on quarterly performance. To view your budget by quarter instead of by month, in the Columns drop-down list, choose Quarter.
On the other hand, if you choose a Customer:Job budget in the Budget Report dialog box and then click Next, the Budget Report dialog box includes these layout options:
§ Account By Month lists accounts in the first column and months of the fiscal year in the subsequent columns. The values in the monthly columns represent the totals for all the Customer:Job budgets you’ve created.
§ Account By Customer:Job lists accounts in the first column and includes additional columns for each customer or job you’ve budgeted. Each customer and job column shows its annual totals.
§ Customer:Job by Month adds a row for each customer and additional rows for each job that customer has. The columns are for each month of the fiscal year. The value for a job and month represents the total budgeted value for all accounts.
Budget vs. Actual Report
The Budget vs. Actual report (Reports→Budgets→Budget vs. Actual) compares the budget you created with the actual income and expenses your business achieved. Run this report monthly for early warnings that your performance is veering off track. For example, if your income is short of your target, the “% of Budget” column shows percentages less than 100 percent; if you’re making more than you planned, this column shows percentages greater than 100 percent. On the other hand, expenses greater than 100 percent indicate that costs are ballooning beyond your budget.
This report includes four columns for each time period in the report: the first four columns show the actual value, budgeted value, and the dollar value and percentage difference between the first two values for the first time period. The next four columns include data related to the second time period, and so on. The column with the heading for a month and year (like “Jan 14” or, for a quarter, “Jan-Mar 14”) is your actual performance. The Budget column includes the budgeted values for the same time period. You can also see the difference between the two values for that time period in dollars (in the Over Budget column) and percentage (in the “% of Budget” column).
TIP
If the numbers in your report don’t seem right, the culprit could be the wrong choice of accrual or cash reporting (About This Book explains the difference). Click Customize Report and then, on the Display tab, click the Accrual or Cash option to match your reporting style. See Company-Wide Report Preferences to learn how to change the reporting preference for accrual or cash reporting.
Profit & Loss Budget Performance Report
The Profit & Loss Budget Performance report (Reports→Budgets→Profit & Loss Budget Performance) also compares budgeted and actual values but initially shows the actual values for the current month so far with the budgeted values for the entire month in the Budget column. Two additional columns show the actual and budgeted values for the year to date. The rightmost column shows the budget for the entire year.
Use this report to check your performance before the end of each month. Because the budget numbers represent the entire month, you shouldn’t expect a perfect match between actual and budgeted values. But if your income or expenses are way off the mark, you can take corrective action.
Budget vs. Actual Graph
To see a graph comparing your budget to actual performance, choose Reports→Budgets→Budget vs. Actual Graph. If the report window can’t display all the bars at the same time, click Next Group in the window’s button bar to display the bars for the next several accounts. This graph displays the differences between your budgeted and actual values in two ways:
§ The upper bar graph shows the difference between your actual and budgeted net income for each month. When your actual net income exceeds the budgeted value (meaning you made more money than you planned), the bar is blue and appears above the horizontal axis. If the actual net income is less than budgeted, the bar is red and drops below the horizontal axis.
§ The lower bar graph sorts accounts, customers, or classes (depending on the report you choose by clicking “P&L by Accounts,” “P&L by Accounts and Jobs,” or “P&L by Accounts and Classes” in the report window’s button bar) that are the furthest from your budgeted values (either above or below). For example, if you click “P&L by Accounts and Jobs,” the bars show the customers and jobs that exceeded your budget by the largest amount or fell the furthest short.
UP TO SPEED: MEMORIZING BUDGET REPORTS
When you generate budget reports, it takes several clicks to specify the budget and layout you want to see. In addition, after the report window opens, you might click Customize Report to change the date range, the columns that appear, and so on. All in all, getting the budget report you really want might require a dozen or more small customizations.
Rather than reapply all these tweaks each time you generate the report, memorize the customized report so you can regenerate it with just one click. Here’s how:
1. In the report window’s button bar, click Memorize. QuickBooks opens the Memorize Report dialog box.
2. In the Name box, type a name for the customized report, such as P&L Budget vs. Actual 2014.
3. If you want to save the report in a special group, turn on the Save in Memorized Report Group checkbox and then, in the drop-down list, choose the group. For example, you might store budget reports in the Company group. (If you don’t save the report to a special group, QuickBooks adds it to the Memorized Report submenu, described in a sec.)
4. Click OK.
To run the report, choose Reports→Memorized Reports. If you didn’t save the report to a group, choose the report’s name on the Memorized Reports submenu. If you did save it to a group, in the Memorized Reports submenu, choose the group and then the report’s name.
To learn how to add a report to your Favorite Reports, see Finding Frequently Used Reports.