QuickBooks 2014: The Missing Manual (2014)
Part IV. QuickBooks Power
Chapter 25. Configuring Preferences to Fit Your Company
An organization’s approach to accounting often depends on the type of business it is and its objectives, policies, procedures, and industry. For example, maybe you use inventory tracking and payroll—but maybe you don’t. The way you and your accountant like to work also influences your organization’s accounting practices. For instance, you might prefer the simplicity of cash accounting to the more intimate pairing of income and expenses that accrual accounting offers (see About This Book).
Enter QuickBooks, which has the Herculean task of satisfying every nuance of business operation and personal proclivity. The program’s preferences are configurable settings that accommodate different business approaches and personal tastes. During installation, QuickBooks picks the settings likely to work for a majority of organizations. And if you set up your company file by using the QuickBooks Setup feature (Options for Creating a Company File), you might already have most preferences set the way you want.
But you can change the program’s preferences for each company file to match the way you work, such as whether you create estimates for jobs you go after and how you calculate the amount of inventory that’s available. Preferences also let you turn on QuickBooks’ features, such as estimates, sales tax, inventory, and payroll. Using QuickBooks for a while can make it clear which preferences you need to change. This chapter presents all the program’s preferences and helps you determine which settings are appropriate for you and your organization.
NOTE
You can toggle most preferences at any time, but you can’t turn some preferences off once you turn them on, such as the multiple currencies preference. Before you change any preferences, back up your company file. Then feel free to tweak and tinker with your preferences.
Preferences: The Basics
You can’t complain that QuickBooks doesn’t offer enough preference settings—the program gives you 23 categories of preferences that control the program’s behavior. Each category has several settings, so finding the ones that do what you want is the biggest challenge. To view and set preferences, open the Preferences dialog box by choosing Edit→Preferences.
On the left side of the dialog box is a pane that lists each preference category, as shown in Figure 25-1. To display the settings within a category, click the appropriate entry in this pane. QuickBooks highlights the icon you click to indicate that it’s selected.
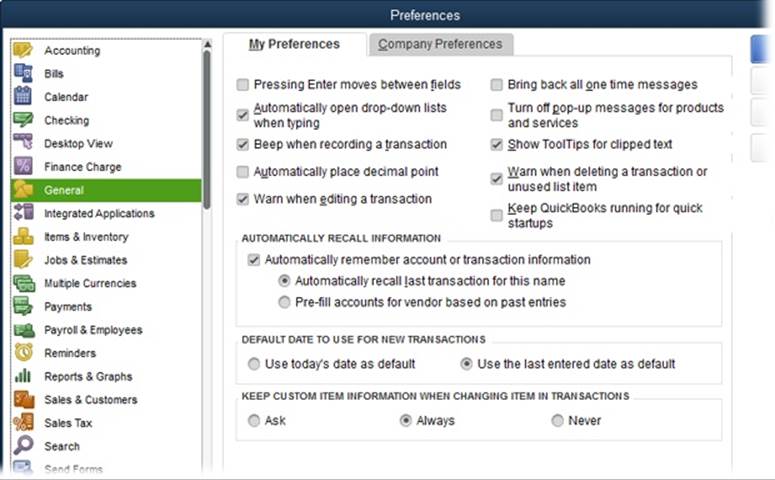
Figure 25-1. The first time you open the Preferences dialog box, QuickBooks displays the General preference category, which is the seventh category in the left pane. (The categories are listed alphabetically, not in order of importance.) On subsequent visits to this dialog box, Quick-Books selects the last category you chose during your previous visit.
TIP
On the right side of the Preferences dialog box, the Also See list identifies other preference categories that affect the one you’re currently viewing.
To accommodate both company-wide and personal preferences, QuickBooks includes two tabs for each category:
§ My Preferences. As you might expect, this tab contains options that people who log into QuickBooks can set for their QuickBooks sessions alone. For example, in the Desktop View category, you can choose options to determine whether you see multiple windows and whether QuickBooks saves the desktop when you close the company file—without forcing your tastes on everyone else.
§ Company Preferences. Some preferences have to remain consistent for everyone in an organization. For example, the IRS won’t tolerate some financial reports produced using cash accounting and others using accrual accounting (see About This Book for the pros and cons of each method). The settings on this tab ensure consistency because they apply to everyone who logs into your company file. To make sure company preferences are set properly, only folks who log in as QuickBooks administrators (Setting Up the Administrator) can change the settings on this tab.
NOTE
If you’re puzzled by QuickBooks’ habit of opening the Preferences dialog box to a My Preferences tab that has no preferences, rest assured that Intuit has its reasons. Because only QuickBooks administrators can change settings on the Company Preferences tab, QuickBooks displays the My Preferences tab to avoid taunting the majority of people who log into the company file by showing them preferences they can’t modify.
When you click OK to close the Preferences dialog box, QuickBooks saves the changes you made in the current category. But what if you’re on an energetic mission to reset preferences in several categories? If you change preferences in one category and then click the icon for another category, QuickBooks asks you whether you want to save the changes in the category you’re about to leave. Make sure you save what you want by selecting one of the following options:
§ Click Yes to save the changes in the current category before switching to the category whose icon you clicked.
§ Click No to discard your changes and move on to the category whose icon you clicked.
§ Click Cancel to discard your changes and remain in the current category so you can make other choices.
The rest of this chapter explains each category of preferences. They’re listed here in alphabetical order, just as they are in the Preferences dialog box. You’ll also find preferences mentioned throughout this book where they apply to specific bookkeeping tasks.
Accounting
These preferences control key accounting practices, such as requiring accounts assigned to transactions and closing the books at the end of a fiscal year. Accounting practices stay the same throughout a company, so the preferences in this category all reside on the Company Preferences tab. Here’s what they do:
NOTE
In QuickBooks Premier and Enterprise, the My Preferences tab has one preference: the “Autofill memo in general journal entry” checkbox. You can keep the debit and credit sides of journal entries linked by adding memos to the lines of the entries. Leave this checkbox on if you want QuickBooks to copy the memo you enter in the first line of a journal entry to every subsequent line of the entry.
§ Use account numbers. If you follow a numbering standard for your accounts (Organizing Account Numbers shows a common one), turn on this checkbox so you can assign a number, in addition to a name, to each account you create.
TIP
When you assign an account to a transaction—such as applying your rent check to the Rent expense account—you can locate the account in the Account drop-down list by typing either its number or the first few letters of its name.
§ Require accounts. If remembering details isn’t your strong suit, keeping this checkbox turned on forces you to assign an account to every item and transaction you create, which, in turn, creates a trail that you, your accountant, and the IRS can follow. With this checkbox turned on, when you click Record without an assigned account, QuickBooks informs you that you have to enter an account. To record the transaction, in the Warning message box, click OK, and then choose the account in the transaction’s Account field. After that, when you click Record again, QuickBooks completes the transaction.
If you turn this checkbox off and record transactions without assigned accounts, QuickBooks assigns the transaction amounts to either the Uncategorized Income or Uncategorized Expense account. For example, if you receive a payment from a customer and don’t assign an account to the deposit, that income posts to the Uncategorized Income account.
WARNING
If the IRS decides to audit your tax returns, you’ll have to go back and move your uncategorized income and expenses into the right accounts to prove that you paid the right amount of taxes. And, if you happened to pay too little, the IRS will charge you penalties and interest.
§ Show lowest subaccount only. If you use only top-level accounts in your chart of accounts, you have no need for this behavior. And if you don’t use account numbers, this checkbox is grayed out. But if your chart of accounts is a hierarchy of accounts and subaccounts, as described in the box on Adding Detail with Subaccounts, turn on this checkbox so Account fields show only the subaccount number and name instead of the full account path from the top-level account to the lowest subaccount. Figure 3-4 shows examples of both behaviors.
§ Use class tracking for transactions. If you want to track your business in more ways than accounts, items, customer types, and job types can offer, you can use classes (Categorizing with Classes) to add another level of categorization to your reports. For example, you can create classes to track business units’ income and expenses, regardless of which types of customers they support or the type of work they do. To activate the Class feature, turn on this checkbox, which adds a Class field to every transaction window.
§ — Prompt to assign classes. If you turn on the Class feature, reports organized by class won’t accurately reflect your business performance unless you assign classes to all your class-related transactions. Turn on this checkbox so that QuickBooks reminds you when you forget to enter a class assignment for a transaction.
§ Automatically assign general journal entry number. Journal entries get their name from the traditional approach to accounting, in which accountants assign credits and debits to accounts in paper-based journals. There’s no reason to turn this checkbox off. With it on, QuickBooks makes sure that each journal entry has a unique number. When you create a new journal entry, QuickBooks increments the previous journal entry number by one, as shown in Figure 25-2, which makes it easier for you and your accountant to refer to the correct journal entries.
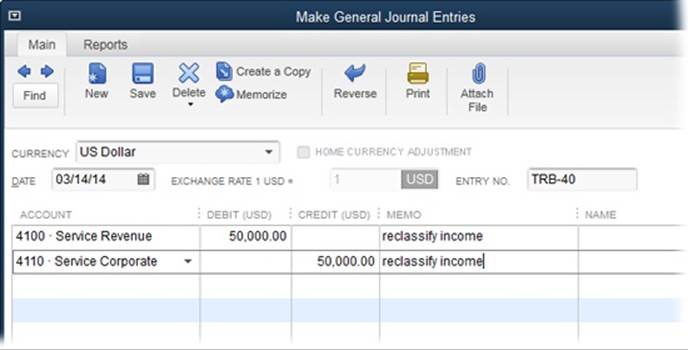
Figure 25-2. QuickBooks follows your lead in numbering journal entries. For your first journal entry, you can type a journal entry code, such as your initials and a sequence number (TRB-1, for example). As you create additional journal entries, QuickBooks increments the journal entry number to TRB-2, TRB-3, and so on.
NOTE
If the previous journal entry number is blank, QuickBooks won’t automatically assign a number to the next journal entry. So if you notice that QuickBooks has begun to shirk its automatic numbering duties, look for a blank journal entry number, and add numbers to any existing journal entries that don’t have them. After that, when you add a new journal entry, QuickBooks will number it correctly.
§ Warn when posting a transaction to Retained Earnings. QuickBooks automatically turns on this checkbox, and it’s a good idea to leave it on. The program creates a Retained Earnings account to track past profits that you’ve retained in the company’s coffers. For example, if your company earned $50,000 in 2014 and didn’t distribute that money to the owners or as profit-sharing bonuses to employees, the money becomes Retained Earnings once your fiscal year 2015 begins. QuickBooks updates the balance in the account automatically at the beginning of a new fiscal year by transferring the previous year’s net profit into it. With this preference turned on, QuickBooks warns you when you try to post a transfer directly to the Retained Earning account and inadvertently create inaccurate records. (See the box on Net Income and Retained Earnings to learn how to differentiate your most recent year’s retained earnings from earlier retained earnings.)
§ Date warnings. If your books are up to date, then dates far in the past or future are usually mistakes. To receive warnings for dates like those, leave the “Warn if transactions are _ day(s) in the past” and “Warn if transactions are _ day(s) in the future” checkboxes turned on. The boxes are initially set to 90 for past dates and 30 for future dates, but you can change them.
§ Closing date. After producing the financial reports for a fiscal year and paying corporate income taxes, most companies close their books, which means locking the transactions so no one can change anything. By closing the books, you ensure that your past transactions continue to match what you submitted to your accountant, reported to the IRS, and communicated to your shareholders.
When you use QuickBooks, your QuickBooks company file is synonymous with your “books.” Therefore, you close your books by clicking Set Date/Password here, and then adjust the following settings in the “Set Closing Date and Password” dialog box:
§ — Exclude estimates, sales orders, and purchase orders from closing date restrictions. Estimates, sales orders, and purchase orders are non-posting transactions—they don’t affect your account balances, so they don’t affect the financial reports you generate, either. Initially, this is turned off so QuickBooks warns you when you edit those types of transactions if they’re dated before the closing date. To turn off the warnings, simply turn on this checkbox.
§ — Closing Date. Pick the appropriate date here. For example, if you run your company on a calendar year and just reported and paid taxes for 2014, type or choose 12/31/2014.
§ — Password. You can assign a password so that you can edit, delete, or create transactions that alter account balances in closed books. To do so, type the password in the Closing Date Password and Confirm Password boxes, and then click OK. That way, if you have to edit a transaction prior to the closing date, you’ll first have to type the password to tell QuickBooks you mean it.
Bills
This category lets you specify how you want to handle bills that vendors send you. The My Preferences tab is empty, so these settings all appear on the Company Preferences tab:
§ Bills are due _ days after receipt. Initially, QuickBooks sets this preference so that bills you enter show a due date 10 days after the date of the bill. For instance, if you receive a bill dated June 15 and you enter that date in the Enter Bills window’s Date field, QuickBooks automatically changes the Bill Due field to June 25. This value is fine in most cases. If a bill arrives that’s due in a different number of days, you can simply change its due date in the Enter Bills window’s Bill Due field.
NOTE
If you assign terms to your vendors (Entering Address Information), then when you choose a vendor in the Enter Bills window, the program calculates the bill’s due date based on the bill’s Date field and those terms.
§ Warn about duplicate bill numbers from same vendor. Surely you don’t want to pay the same bill twice, so be sure to leave this checkbox turned on so QuickBooks warns you that you’re entering a bill with the same number as one you already entered from the same vendor.
§ Paying bills. If you want QuickBooks to automatically apply to your bills any credits and discounts to which you’re entitled, turn on the “Automatically use credits” and “Automatically use discounts” checkboxes. For example, if you’ve earned an early payment discount and also have a $100 credit, QuickBooks applies these adjustments to your bill before calculating the total. When you turn on the “Automatically use discounts” checkbox, in the Default Discount Account drop-down list, choose the account to which you usually post the discounts you take, such as an expense account specifically for vendor discounts.
Calendar
QuickBooks’ Calendar window (Your Financial Calendar) shows you when transactions and to-dos are due, so you can be sure to perform the tasks you’re supposed to, such as paying bills and following up on open invoices. Calendar preferences are all on the My Preferences tab, so that each person who works in the company file can choose what he sees:
§ Calendar settings. The preferences in this section control the calendar’s appearance. You can see one day, one week, or month at a time. If you choose “Remember last view” in the “Calendar view” drop-down list, QuickBooks opens the calendar to the last duration you selected. For the weekly view, you can specify whether you want to see Monday through Friday or the entire week. Initially, the Show preference is set to All Transactions, but you can change it to Transactions Due or choose a specific type of transaction, such as Invoice, Received Payment, or Bill.
§ Upcoming & past due settings. On the right side of the Calendar window is a pane that lists to-dos and transactions that are coming up or overdue. You can use the Display drop-down menu here to tell QuickBooks to show or hide this pane, or better yet, show the pane only if there are upcoming or past due items. Initially, the Calendar window shows what’s coming up in the next 7 days and what was due in the past 60 days. You can change the period in the future to up to 31 days, while the past due period can shrink to as few as 14 days.
Checking
Checking preferences let you adjust company-wide settings to control the appearance of the checks your company prints through QuickBooks. On the My Preferences tab for this category, you can tell QuickBooks which accounts to select automatically for several types of financial transactions, as shown in Figure 25-3. This section explains your options.
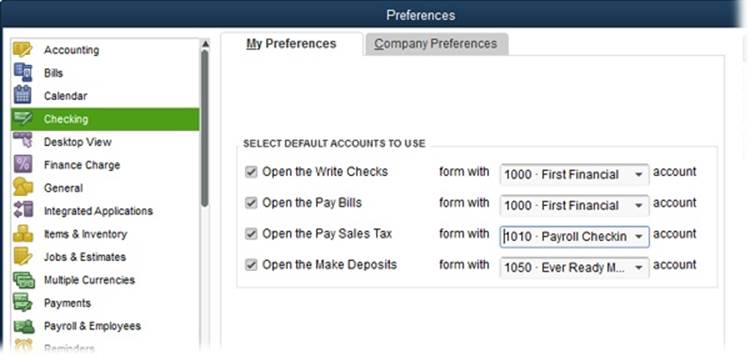
Figure 25-3. When you choose accounts here, you have one less field to fill in for each banking transaction. For example, if you always deposit money into your money market account, you can adjust these settings so the Write Checks window selects your checking account, whereas the Make Deposits window selects your money market account.
Choosing the Bank Accounts You Use
If you have only one bank account, you can ignore the preferences for default accounts and QuickBooks will automatically choose that account for writing checks, paying bills, paying sales tax, and making deposits. But suppose your company has stores in several states and each store has its own checking account. Because these options are on the My Preferences tab, each person who logs into QuickBooks can choose her store’s bank accounts for financial transactions. For example, the person in Miami wants the Florida checking account to appear in the Write Checks window, but the person in New York wants to see the Manhattan checking account. To save some time (and to prevent folks from selecting the wrong account in a drop-down list), set your accounts according to the following guidelines:
§ Open the Write Checks form with _ account. In this drop-down list, choose the account you typically use to write checks. That way, when you open the Write Checks window, QuickBooks automatically fills in the Bank Account field with the account you specify here.
§ Open the Pay Bills form with _ account. For this preference, choose the account you typically use to pay bills, which is often the same checking account that you chose in the “Open the Write Checks form with” preference. When you open the Pay Bills window, QuickBooks automatically fills in the Account field at the bottom right of the window with the account you specify here.
§ Open the Pay Sales Tax form with _ account. If you collect sales tax from your customers (see Chapter 21), you have to remit the taxes you collect to the appropriate tax authority, such as the state where your business is located. When it’s time to send the taxes in, you open the Pay Sales Tax dialog box and create a payment. This preference sets the account that QuickBooks uses in that dialog box’s Pay From Account field.
§ Open the Make Deposits form with _ account. Unlike the other options on the My Preferences tab, this preference sets up the account you typically use when you deposit money. For many small businesses, the deposit account and checking account are one and the same. But some businesses deposit money into an account that pays interest and then transfer money into a checking account only when it’s time to pay bills. After you choose the account you use to deposit money, QuickBooks automatically puts it in the Make Deposits window’s Deposit To field.
Settings for Company Checks
Although a company might have several checking accounts, QuickBooks assumes that company checks should look the same no matter who prints them. Most preferences on the Checking category’s Company Preferences tab let you set the company standard for printing checks from QuickBooks. (If you use preprinted checks and write them out by hand, you can skip some of these options.) Here’s what these preferences do:
§ Print account names on voucher. If the checks you print include check stubs, you might as well turn on this checkbox. When you do, QuickBooks prints the name of the account you used to pay the check on the stub. If you use only one bank account, printing the account name might not seem all that useful. But with this preference turned on, QuickBooks also prints the Payroll item on the stub for payroll checks and, on checks used to purchase inventory, it prints the name of the inventory item you purchased—both of which can help you keep track of where your money is going.
NOTE
Regardless of how you set the “Print account names on voucher” preference, QuickBooks always prints the payee, date, memo, amount, and total amount on check stubs.
§ Change check date when non-cleared check is printed. When you turn on this checkbox, QuickBooks inserts the date that you print checks as the check date, which is just fine in most situations. You can then enter checks into QuickBooks over several days but date all the checks with the day you print them. Leave this checkbox turned off if you want to control the check dates—for example, to defer payments for a few days by post-dating checks with the date the payees receive them.
§ Start with payee field on check. If you always write checks from the same account, or you use the “Open the Write Checks form with” preference to specify an account (Checking), pressing Tab in the Write Checks window to skip the Bank Account field for each check transaction gets old quickly. When you turn on this checkbox, you can save one pesky keystroke each time you write a check. Turning on this preference also makes it so that the Enter Credit Card Charges window opens with the cursor in the Purchased From box.
§ Warn about duplicate check numbers. Not surprisingly, when this checkbox is turned on, QuickBooks warns you if you’re trying to record a check with the same number as one you already entered.
§ Autofill payee account number in check memo. Just as you assign account numbers to your customers, the vendors you do business with assign your company an account number, too. Printing account numbers on the checks you write helps vendors credit your account, even if the check gets separated from its accompanying payment slip. If you enter your company’s account number in each vendor record in QuickBooks (Entering Address Information), be sure to leave this checkbox on to print these account numbers on your checks.
Choosing Company-Wide Payroll Accounts
If you don’t use QuickBooks’ payroll features, don’t bother with these preferences. If you do use Intuit Payroll Services (Intuit Payroll Services), the two settings in the Select Default Accounts To Use section of the Company Preferences tab let you set the accounts you use for payroll. (These settings are on the Company Preferences tab because most companies centralize payroll no matter how regional other operations are.) Here are your options:
§ Open the Create Paychecks form with _ account. In this drop-down list, choose the account you use to write payroll checks. If you use QuickBooks payroll, then when you open the Create Paychecks window, the program automatically fills in the Bank Account field with the account you specify here.
§ Open the Pay Payroll Liabilities form with _ account. In this drop-down list, choose the account you use to pay payroll taxes.
TIP
A separate bank account for payroll simplifies reconciling your regular checking account, particularly if your company has numerous employees and weekly paychecks. Otherwise, you’ll have to reconcile dozens or even hundreds of paychecks each month in addition to the other checks you write.
Selecting a Bank Feeds Mode
QuickBooks lets you choose between two versions of the Bank Feeds Center: Express mode is more flexible and powerful than Classic mode, but you can switch between the two modes anytime by selecting an option in this section of the Checking category’s Company Preferences tab.QuickBooks’ Online Banking Modes explains in detail how the two modes work.
If you select the Express Mode option, you can tell QuickBooks to create renaming rules for the transactions you download. The “Create rules automatically” checkbox is turned on initially, which means that the program sets up a new renaming rule each time you edit a downloaded transaction’s payee. That way, the next time you download a transaction from that payee, the program automatically fills in the edited name. If you turn this checkbox off, QuickBooks doesn’t create renaming rules for you. In addition, the “Always ask before creating a rule” checkbox is also turned on initially, which means that, when you edit a downloaded transaction’s payee name and approve the transaction, the Rule Creation dialog box opens. To save the rule that QuickBooks created, click OK. To discard it, click Don’t Create Any Rules.
If you select the Classic Mode option, payee aliasing (which is similar, though not identical, to renaming rules) options appear. The On radio button is initially selected. QuickBooks’ Online Banking Modes explains the differences between Express mode’s renaming rules and Classic mode’s payee aliasing. To turn off payee aliasing, select the Off radio button.
Desktop View
Each person can customize her own QuickBooks desktop with the settings on the My Preferences tab in this category—these choices don’t affect anybody else who logs into QuickBooks. On the other hand, the Company Preferences tab includes preferences that control what appears on the QuickBooks Home page for everyone who uses this company file.
Window Preferences
You can keep your desktop neat with only one window at a time, or you can view multiple windows:
§ One Window. If you’re not good at multitasking or you prefer full-size windows, choose this option so that QuickBooks displays only one full-size window at a time. Although you can still open multiple windows, they’re stacked on top of one another so you see only the top one. With this approach, you can switch windows by choosing them in the Open Window List (choose View→Open Window List to display it) or on the program’s main menu bar, choose Window and then select the name of the window you want to display.
§ Multiple Windows. If you like to view several windows at once or want to size windows based on how much information they display, as shown in Figure 25-4, choose this option. When you do, the Window menu includes items for arranging windows, such as Cascade and Tile Vertically.
NOTE
You can also switch between one and multiple windows by choosing View→One Window or View→Multiple Windows.
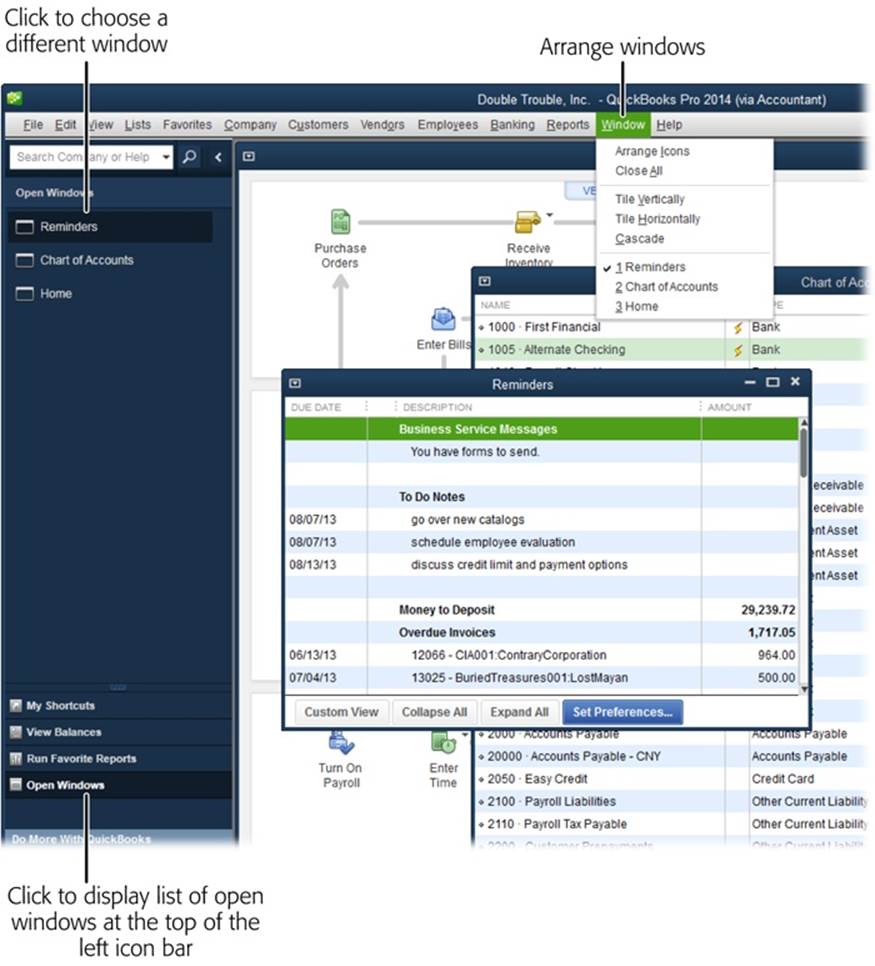
Figure 25-4. The Multiple Windows option displays several windows at the same time. In this mode, you can click a window to bring it to the front, reposition it by dragging its title bar, or resize it by dragging its edges and corners.
Preferences for Saving the Desktop
The My Preferences tab in the Desktop View category includes four choices for what QuickBooks does with the windows that are open when you exit the program. For example, if you have the windows arranged just the way you like, you can save your QuickBooks desktop so the windows open in exactly the same arrangement the next time you log in. You can also choose when to display the Home page and whether to use colored or gray icons in the top icon bar. Here’s the lowdown on the options in the My Preferences tab’s Desktop section:
§ Save when closing company. If you typically continue bookkeeping tasks from one QuickBooks session to the next, this option saves the open windows and their positions when you exit the program. The next time you log in, QuickBooks opens the same windows and positions them where they were last time so you can finish entering the remaining 300 checks you have to write.
§ Save current desktop. If you have a favorite arrangement of windows that works well for the bulk of your efforts in QuickBooks, you can save that arrangement and display it every time you log in. To do so, first open the windows you want and position them. Then open the Preferences dialog box, choose this option, and then click OK. From then on, the next time you open the Preferences dialog box, QuickBooks adds the “Keep previously saved desktop” option (explained below) to the My Preferences tab.
§ Don’t save the desktop. Choosing this option displays a desktop with only the menu bar, the icon bar, the Home page, and the Reminders window. This makes QuickBooks open faster, and the menu bar, icon bars, and Home page give you fast access to the windows and dialog boxes you use regularly.
§ Keep previously saved desktop. Once you’ve saved a desktop you like, this option appears on the My Preferences tab of the Desktop View category. In fact, once you choose “Save current desktop” and click OK to close the Preferences dialog box, QuickBooks automatically selects this option the next time you open the dialog box. With this option selected, QuickBooks opens with the desktop as it was when you selected “Save current desktop,” regardless of which windows you’ve opened since then or how you’ve rearranged them. If you want to save a new desktop arrangement, arrange your windows how you want them, select “Save current desktop,” and then click OK.
§ Show Home page when opening a company file. QuickBooks’ Home page shows the entire workflow of your accounting tasks, as well as links to oft-opened windows like the Chart of Accounts. Keep this checkbox turned on to see the Home page each time you log in. If you turn this checkbox off, the Home page appears only if it’s open when you save your desktop or if you open it by choosing Company→Home Page.
§ Switch to colored icons/light background on the Top Icon Bar. If you use the top icon bar (Menus and the Icon Bars), its out-of-the-box color scheme is light-gray icons on a dark-gray background. If you turn on this checkbox, that changes to blue, green, and yellow icons on a light-gray background, as shown in Figure 25-5 (if you’re reading an electronic version of this book, that is; in the printed book, all the figures are black and white).
NOTE
The Windows Settings section in the Desktop View category’s My Preferences tab has two buttons: Display and Sounds. These buttons take you to the appropriate category of the Windows control panel to change your Windows settings, where any changes you make affect every program on your computer, not just QuickBooks.
§ Company File Color Scheme. If you work on several different company files, you can assign a different color to each of them so you can tell them apart. In this drop-down list, choose a color (there are 15 to choose from). As soon as you do that, QuickBooks changes the title bars of the QuickBooks main window and all open windows in QuickBooks, as shown in Figure 25-5. If you don’t like the result, choose a different color.
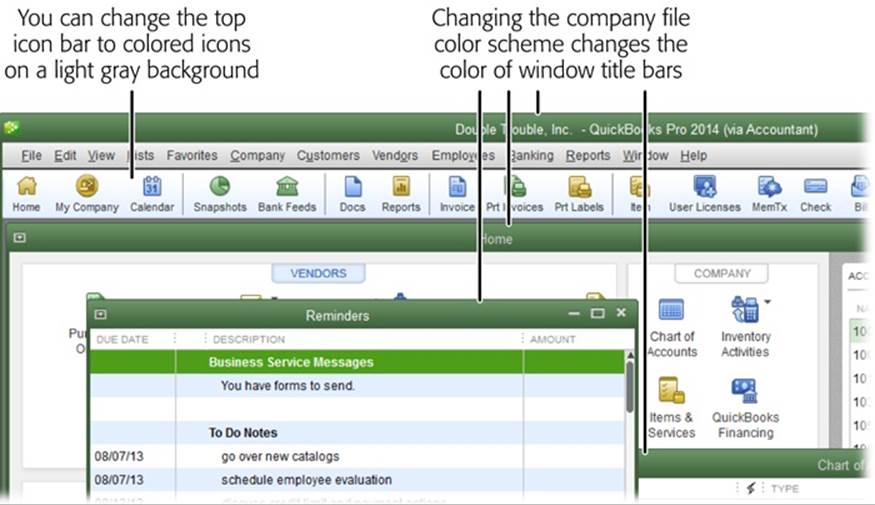
Figure 25-5. The top icon bar starts out with gray icons on a dark-gray background. Turn on the “Switch to colored icon/light background on the Top Icon Bar” checkbox to switch to a more colorful color scheme. If you choose a different Company File Color Scheme setting, when you open that company file, QuickBooks changes the main window’s title bar and any other open windows’ title bars to that color.
Customizing the Home Page
The Home page has three horizontal panels for tasks related to vendors, customers, and employees, and additional panels for other accounting staples. The Company Preferences tab of the Desktop View category is where you can customize what appears there. See Customizing the Home Page for the full story on customizing the Home Page.
Finance Charge
If you’re lucky enough to have customers who always pay on time or if you run a nonprofit organization that graciously accepts donations, you can bypass this preference category. But if you want to add an incentive for customers to pay on time, these preferences determine your level of persuasion.
Because you probably want a consistent policy for charging customers for late payments, all the preferences in the Finance Charge category appear on the Company Preferences tab. That means only someone logged into QuickBooks as an administrator can change these settings. (To learn how to add the finance charges configured here to the invoices you create, see Previewing Statements.)
TIP
If you plan to charge late fees, include the finance charge terms in your contracts. Your customers are less likely to complain if the added charges aren’t a surprise.
Here are the finance charge preferences you can set and what they mean to your customers:
§ Annual Interest Rate (%). Type the interest rate that you charge per year for overdue payments. For example, if you charge 18 percent per year, type 18 in this box. QuickBooks adds the percent sign and calculates the finance charge due by prorating the annual interest date to the number of days that a payment is late.
§ Minimum Finance Charge. If you charge a minimum finance charge no matter how inconsequential the overdue amount, type that value in this box. For example, to charge at least $20, type 20. (If you work with more than one currency, you still specify your minimum finance charge in your home currency. QuickBooks then converts the amount to the customer’s currency when you apply finance charges.)
§ Grace Period (days). Just like the grace period that you probably appreciate on your mortgage, the grace period in QuickBooks is the number of days that a payment can be late before finance charges kick in. In this box, type the number of days of grace you’re willing to extend to your customers.
§ Finance Charge Account. Choose the account you use to track finance charges you collect. Most companies create an Other Income account (Creating an Account) to track these charges, which are interest income.
§ Assess finance charges on overdue finance charges. If a customer goes AWOL and doesn’t pay the bill or the finance charges, you could consider levying finance charges on the finance charges that the customer already owes. For example, if your customer owes $100 in finance charges and you assess an 18 percent finance charge, turning on this checkbox would result in an additional $18 the first year on the outstanding charges alone.
NOTE
Most companies find it excessive to tack finance charges on overdue finance charges. Moreover, you should check the lending laws that apply to your location and business—some laws restrict your ability to charge interest on outstanding interest payments.
§ Calculate charges from. You can calculate finance charges from two different dates, depending on how painful you want the finance-charge penalty to be. Choosing the “due date” option here is the more lenient approach; it tells QuickBooks to assess finance charges only on the days that an invoice is paid past its due date. For example, if the customer pays 10 days late, QuickBooks calculates the finance charges for 10 days. If you want to assess finance charges from the date on the invoice, choose the “invoice/billed date” option instead. In that case, if the customer pays 10 days late on a Net 30 invoice (meaning payment is due within 30 days after the invoice date), QuickBooks calculates finance charges based on 40 days—the 30 days until the invoice was due and the 10 days that the payment was late.
§ Mark finance charge invoices “To be printed.” If you want QuickBooks to remind you to print invoices with finance charges, turn on this checkbox. Invoices that you haven’t printed yet then appear as alerts in the Reminders window. If you send statements to your customers, turn off this checkbox, because the finance charge invoices you generate will be included on the statements you create.
General
QuickBooks selects the General preferences category the very first time you open the Preferences dialog box. Most of the General preferences appear on the My Preferences tab, so you can make QuickBooks work the way you do, but a few preferences apply to everyone who works on the company file.
Tuning QuickBooks to Your Liking
The following settings on the My Preferences tab can help you fine-tune QuickBooks’ 'margin-top:0cm;margin-right:0cm;margin-bottom:0cm; margin-left:18.0pt;margin-bottom:.0001pt;text-indent:-18.0pt;line-height:normal; vertical-align:baseline'>§ Pressing Enter moves between fields. In the Windows world, pressing the Enter key usually activates the default button in a dialog box, while the Tab key advances the cursor to the next field. If you press Enter in QuickBooks and find that a dialog box or window closes unexpectedly, this checkbox can provide some relief. When you turn it on, pressing Enter moves the cursor between fields in a dialog box or window rather than closing it. However, because Enter no longer closes dialog boxes and windows, you have to press Ctrl+Enter or click a button—such as OK, Record, Save & Close, or Save & New (depending on the dialog box or window)—to do so.
§ Automatically open drop-down lists when typing. This setting makes drop-down menus spring open as soon as you type a letter in a field. You can then click the entry you want, as shown in Figure 25-6.
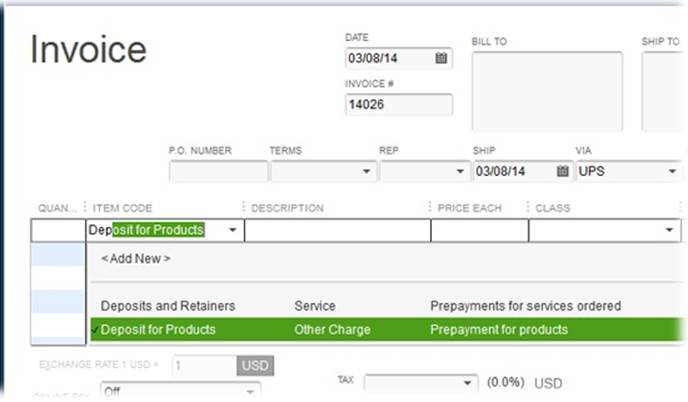
Figure 25-6. With the “Automatically open drop-down lists when typing” preference turned on, drop-down lists appear as soon as you begin typing an entry in a field, so you can simply keep typing or click an entry. The list displays only choices that match what you’ve typed so far. The list shown here includes “Deposits and Retainers” and “Deposit for Products” after typing dep.
§ Beep when recording a transaction. If you like auditory assurance that your software is working, leave this checkbox turned on to have QuickBooks beep when it records a transaction. (Remember, you’ll hear the beeps only if you haven’t muted the audio on your computer.) If you prefer peace and quiet, simply turn off this setting.
§ Automatically place decimal point. When you turn on this checkbox, Quick-Books places decimals so that the last two numbers you type represent cents. For example, typing 19995 automatically becomes 199.95. (If you want to enter a whole dollar, type a period at the end of the number.) Having QuickBooks place decimal points in numbers for you can be quite addictive once you get used to it, particularly if you haven’t graduated to rapid-fire entry on your computer’s numeric keypad—or if you work on a laptop and haven’t realized that your keyboard has a numeric keypad.
§ Warn when editing a transaction. QuickBooks turns on this checkbox automatically, which means that the program displays a warning if you edit a transaction and attempt to leave it (for instance, by clicking another transaction) without explicitly saving the change. If you inadvertently modify a transaction, like a check or invoice, this warning gives you a chance to either save the changes or exit without saving.
If you decide to turn off this feature, QuickBooks automatically records transactions that aren’t linked to other transactions. However, if a transaction has links—such as a payment that links to a customer invoice—you need to save it after you change it regardless of how you’ve set this preference.
§ Bring back all one time messages. One-time messages instruct beginners in the ways of QuickBooks, but for experienced folks, dismissing these messages simply consumes valuable time. If you were overly enthusiastic about hiding one-time messages and find yourself in need of QuickBooks’ mentoring, turn this checkbox on.
§ Turn off pop-up messages for products and services. Initially, QuickBooks displays pop-up messages about other products and services that Intuit offers. If you’re content with what QuickBooks offers out of the box, turn this checkbox on.
§ Show ToolTips for clipped text. Text in QuickBooks fields is often longer than what you can see onscreen. For example, if you see the text “Make sure you always” in a text box, you’ll want to read the rest of the message. This checkbox, which is turned on initially, tells QuickBooks to display the entire contents of a field when you position your cursor over it.
§ Warn when deleting a transaction or unused list item. QuickBooks turns this checkbox on automatically, so you have to confirm that you want to delete a transaction (such as a deposit or a check) or a list item that’s never been used in a transaction. Caution is a watchword in the financial world, so although QuickBooks lets you delete transactions, it’s a good idea to leave this setting on to make sure you’re deleting what you want. If you turn off this checkbox, you can delete a transaction or unused list item without confirmation.
NOTE
Regardless of how this preference is set, QuickBooks won’t let you delete a list item, such as a customer type or shipping method, if it’s been used in even one transaction. Hiding Entries explains how to delete or inactivate list items.
§ Keep QuickBooks running for quick startups. If you fire up QuickBooks frequently, turn on this checkbox so the program launches faster (because it stays running in the background). In fact, with this setting, QuickBooks even launches in the background when you reboot your computer. If you turn off this checkbox, QuickBooks doesn’t run in the background or use your computer’s memory, so it takes longer to start up. That could be just what you want if your machine is short on memory and you want all your other programs to run more quickly.
§ Automatically remember account or transaction information. Say you write checks each month to the same vendor, for the same amount, and post them to the same account. Out of the box, QuickBooks turns on the “Pre-fill accounts for vendor based on past entries” option in this section, which means that the program automatically fills in the accounts you use consistently for vendor transactions. But since you can set up pre-fill accounts for vendors with other QuickBooks features (Sales Tax Settings), the “Automatically recall last transaction for this name” option gives you more bang for the buck. With that option selected, when you type a name in a transaction, QuickBooks fills in the rest of the fields with the values you used in the last transaction for that name.
However, AutoRecall has a couple of limitations: It can’t recall a transaction in one account if the previous transaction was in another account, and it can recall transactions only for bills, checks, and credit card charges. For other transactions—such as purchase orders, invoices, sales receipts, and credit memos—you have to fill in all the fields or use a memorized transaction.
§ Default date to use for new transactions. In this section of the My Preferences tab, choose the “Use today’s date as default” option if you want QuickBooks to put the current date in the Date field of every new transaction you create.
If you create invoices over the course of several days but want each one to reflect the first day of the month, for example, choose the “Use the last entered date as default” option instead. Then, in the first invoice you create, type the date you want for all your invoices. For subsequent invoices, QuickBooks fills in the Date field with the date you entered on the previous invoice. When you want to use a new date (after all the month’s invoices are complete), simply type it in your next transaction.
TIP
When the “Use the last entered date as default” option is selected, be sure to check the Date box in a transaction window (like Create Invoices) to make sure it’s the one you want.
§ Keep custom item information when changing item in transactions. This setting determines how QuickBooks responds when you change an item in a transaction after customizing its description. Say you add an item to an invoice, edit the description in the invoice, and then realize that you added the wrong item. When you choose a new item to replace it, if you’ve selected the Ask option for this setting, QuickBooks asks whether you want to use the edited description for the new item. The Always option automatically applies the edited description to the new item. And the Never option discards the edited description and uses the description from the new item’s record.
Company-Wide General Preferences
The Company Preferences tab includes four preferences, shown in Figure 25-7. Remember, only a QuickBooks administrator can change these settings. Here’s what they do:
§ Time format. You can enter hours as either decimal numbers that represent hours and fractions of hours, or as hours and minutes separated by a colon, as you can see in Figure 25-7. This preference tells QuickBooks which way to display time values.
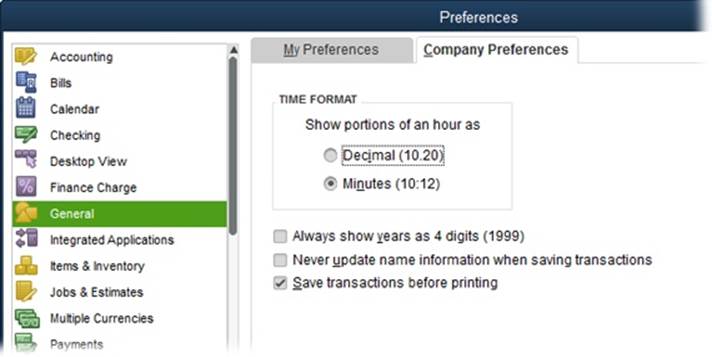
Figure 25-7. To display hours and minutes as decimals, choose the Decimal option. With this setting, if you type 15:45 (15 hours and 45 minutes) in a time field, QuickBooks converts that to 15.75. To display hours and minutes instead, choose the Minutes option. With this setting, QuickBooks displays the entry 5.4 as 5:24.
§ Always show years as 4 digits (1999). Turning on this setting tells QuickBooks to display all four digits of the year whether you type two digits or four. For example, if you type 14, then QuickBooks displays 2014. Turning off this checkbox makes the program display years as two digits. When you type a two-digit number for a year, QuickBooks translates numbers from 00 through 42 as years 2000 through 2042; 43 through 99 become 1943 through 1999.
TIP
If you turn off the “Always show years as 4 digits” checkbox, QuickBooks does as it’s told and displays only two digits for the year. If a date field shows 40 and you want to see whether that stands for 1940 or 2040, in the date field, click the Calendar icon. The Calendar shows both the month and the full four-digit year.
§ Never update name information when saving transactions. QuickBooks initially turns this checkbox off so that, when you edit the name of a customer or vendor, for example, the program asks if you want to replicate that change back in the original record—on the Customer:Job List or Vendor List. The only situation where you might want to change this behavior (by turning on this checkbox) is if you use generic names, such as Donor or Member. If you receive donations and your donors want receipts with their names and addresses filled in, you don’t want the names and addresses you enter on sales receipts to alter your generic donor record.
§ Save transactions before printing. QuickBooks turns this checkbox on initially, and it’s a good idea to leave it that way. It tells the program to save transactions before you print them so that the transactions in QuickBooks are the same as the ones you print. If you turn this checkbox off, you could print the transaction with one set of data and then close the dialog box or window without saving that data, thus making your QuickBooks records different from your paper records.
Integrated Applications
As you’ll learn in more detail in Chapter 26, QuickBooks plays well with other programs, like Microsoft Excel and Word, and oodles of third-party applications. For example, by integrating Microsoft Outlook with QuickBooks, you can easily keep your contact information synchronized in both programs. And other software companies create all sorts of programs that integrate with QuickBooks for tasks like inventory tracking, project tracking, creating barcodes, and so on. If you’re a QuickBooks administrator, the Integrated Applications preferences category is where you control which programs can interact with QuickBooks and the extent of their interaction. For example, you can use another program to produce estimates and then transfer the completed estimates into QuickBooks to fill out invoices and other forms.
To access these preferences, choose Edit→Preferences and click the Integrated Applications category. Here’s a guide to adjusting the settings on the Company Preferences tab to allow or restrict other programs’ access to your QuickBooks company file:
§ Don’t allow any applications to access this company file. The quickest way to prevent other programs from using a QuickBooks company file is to turn on this checkbox. When you do so, QuickBooks doesn’t allow integrated programs to access the file and stops displaying screens requesting access. If you want QuickBooks to display access screens, leave this checkbox off.
§ Notify the user before running any application whose certificate has expired. The most security conscious of administrators might turn on this checkbox to see a warning if a program trying to access the QuickBooks company file has an expired certificate. But an expired certificate doesn’t mean that the program has changed or has morphed into malicious code—only that the certificate has expired. For most administrators, leaving this checkbox off is preferable.
§ Applications that have previously requested access to this company file. When programs request access to a company file, QuickBooks displays an access screen to the QuickBooks administrator, who has to approve or deny access. Programs that have received approval to access your company file appear in this list. To deny access to one of these programs, click its checkmark in the Allow Access column, or select the program and then click Remove.
Items & Inventory
These preferences apply mainly to what QuickBooks does when you create purchase orders or invoices for inventory. The first setting on the Company Preferences tab is the most important: You tell QuickBooks that you want to track inventory by turning on the “Inventory and purchase orders are active” checkbox, which activates the program’s inventory-related features (Chapter 20) and adds icons like Purchase Orders and Receive Inventory to the Home page. (The box on Using Sales Orders for Backorders describes the inventory preferences you can set if you use QuickBooks Premier or Enterprise.) If you turn inventory tracking on, here are the other settings you may want to adjust:
§ Warn about duplicate purchase order numbers. Leave this checkbox on if you want QuickBooks to alert you when you’re creating a purchase order with the same number as one you already entered.
§ Warn if not enough inventory quantity on hand (QOH) to sell. In QuickBooks Pro, you can turn this checkbox on so QuickBooks will warn you if you prepare an invoice to sell more doodads than you have in stock. Suppose you sell 500 quarts of sesame soy swirl frozen yogurt, but you have only 400 quarts in stock. When you attempt to save the invoice for the 500-quart order, QuickBooks displays a message box informing you of the shortage. But QuickBooks doesn’t go any further than that. You can save the invoice, but it’s up to you to order more inventory. Besides giving you a heads-up that inventory is low, this setting helps you keep your customers happy, since you can ask them if they want to wait for a backorder to be filled.
Jobs & Estimates
If you create estimates or document job progress in QuickBooks, head to the Jobs & Estimates preferences category to set up your progress terminology and estimating features.
POWER USERS’ CLINIC: ADVANCED INVENTORY SETTINGS
Unless you use QuickBooks Enterprise, the Advanced Inventory Settings button (on the Items & Inventory category’s Company Preferences tab) is grayed out. To see if these settings are worth the cost of upgrading, click the “Learn about serial #/lots, FIFO and multi-location inventory” link.
If you don’t opt for QuickBooks Enterprise, you can obtain a few additional inventory preferences by upgrading from QuickBooks Pro to QuickBooks Premier, which lets you adjust the following settings:
§ When calculating Quantity Available for my inventory, deduct. QuickBooks Premier tracks two quantities for inventory items. Quantity On Hand is the actual number of items sitting in inventory. Quantity Available can equal Quantity On Hand, but you can also tell QuickBooks to remove the number of items on sales orders or used in pending builds (when you build products out of components) from the Quantity Available number. If you use sales orders (Using Sales Orders for Backorders) to track orders that haven’t been invoiced, QuickBooks automatically turns on the “Quantity on Sales Order” checkbox here. With this setting selected, QuickBooks calculates the number of inventory items available by deducting the number of items on sales orders from the number of items on hand, which helps prevent you from accidentally selling out-of-stock items. If you turn this checkbox off, the quantity available reflects only the inventory that’s been invoiced and shipped, so you won’t know that your inventory is low until you start filling the sales orders you created.
§ Warn if not enough inventory to sell. In QuickBooks Premier, you can specify whether you want the program to warn you when the quantity being sold is greater than the quantity on hand or the quantity available. Because quantity available is equal to or less than the quantity on hand, choosing that option is the safest route.
§ Unit of measure. In QuickBooks Premier and Enterprise, you can specify units of measure for inventory items. To do this, in the Unit of Measure section, click the Enable button. You can then select Single U/M Per Item to define one unit of measure per inventory item. If you use QuickBooks Enterprise and some QuickBooks Premier editions (Accountant, Contractor, and Manufacturing & Wholesale), you can assign more than one unit of measure, in case you sell wine by the bottle, by the case, and by the barrel, for example. To do that, select the Multiple U/M Per Item option.
You define units of measure in the Create Item or Edit Item window (Creating Inventory Items). To open the Unit of Measure dialog box to the “Select a Unit of Measure Type” screen in either of those windows, in the Unit of Measure box, click the down arrow, and then choose the measure you want. To add a new unit of measure, click <Add New> in the drop-down list.
QuickBooks includes five job-status options, which are all listed on the Company Preferences tab in this category: “Pending,” “Awarded,” “In progress,” “Closed,” and “Not awarded.” Despite the fields’ names, you can type any term you want in any of the five boxes. For example, you can type Waiting in the Pending box, Whoopie! in the Awarded box, and Finally! in the Closed box. Then, when you edit a job and display the Job Status drop-down list (Creating a New Job), you can choose from these custom terms.
Here are the other settings on the Company Preferences tab for this category:
§ Do you create estimates? Choose the Yes option only if you want to create estimates in QuickBooks, as described on Estimating Jobs, so the program adds the Estimates icon to the Home page. If you create estimates in a program other than QuickBooks, choose the No option.
§ Do you do progress invoicing? Also known as “partial billing,” progress invoicing means that you invoice your customer for work as you go instead of billing for the entire job at the end. For example, if you’re building a shopping mall, you don’t want to carry the costs of construction until shoppers walk in the front door—you want to charge your client as you meet milestones. To create invoices for portions of your estimates, choose the Yes option. That way, you can invoice for part of an estimate and show how much you billed previously, as described in detail onComparing Estimates to Actuals.
NOTE
If you choose the No option, you can still create progress invoices from your entire estimate. After you bring the whole estimate into your invoice, remove entries until the invoice includes only what you want to bill. The flaw in this approach is that you can’t show previous totals billed or compare the billed and remaining amounts with your estimate.
§ Warn about duplicate estimate numbers. Leave this checkbox on if you want QuickBooks to alert you if you’re creating an estimate with the same number as one you already entered.
§ Don’t print items that have zero amount. This checkbox is grayed out unless you select Yes in the “Do you do progress invoicing?” section. If you do use progress invoicing, you might not charge for every estimated item on every progress invoice. To keep your progress invoices tidy, suppress the items that you’re not charging for by leaving this checkbox turned on.
Multiple Currencies
If you use only one currency, you can skip these preferences, because QuickBooks automatically selects the “No, I use only one currency” option. But if you have customers who pay you in other currencies or vendors who want to be paid in their countries’ currencies, you can turn on the multiple currency preference. Just know that once you turn this setting on, it’s on for good. If you stop doing business with foreign-currency customers and vendors, you can simply skip the currency boxes in QuickBooks’ windows and dialog boxes (the program automatically fills them in with your home currency, as shown in Figure 25-8).
To turn on multiple currencies, choose Edit→Preferences→Multiple Currencies, and then click the Company Preferences tab. Select the “Yes, I use more than one currency” option. QuickBooks initially sets the home currency to US Dollar, but you can change that in the “Select the home currency you use in transactions” drop-down list.

Figure 25-8. In transaction windows and dialog boxes, QuickBooks initially fills in the Currency box with your home currency, as shown here. However, after you set up a customer or vendor to use a foreign currency, QuickBooks automatically uses that currency instead.
Payments
In this category, the Receive Payments section of the Company Preferences tab lets you set the following options:
§ Automatically apply payments. You’ll probably want to turn this checkbox off so that you can choose the customer invoices to which you want to apply payments you receive. With this checkbox on, QuickBooks applies customer payments to invoices for you. If a payment doesn’t match any of the invoice amounts, QuickBooks applies the payment to the oldest invoices first, which could mask the fact that a payment wasn’t received or that a customer’s check was for the wrong amount.
§ Automatically calculate payments. This preference, on the other hand, is one you’ll want to keep turned on. When you receive a payment from a customer, in the Receive Payments window’s Amount box, you typically type the amount that the customer sent. Then, as you choose the invoices to apply the payment to, QuickBooks calculates the payment for you. If the customer underpaid, QuickBooks asks if you want to keep the underpayment or write off the amount that the customer didn’t pay. When this checkbox is off, as you choose invoices, you also have to enter the amount of the payment that you want to allocate to each invoice.
§ Use Undeposited Funds as a default deposit to account. If you typically collect a few payments before heading to the bank to deposit them, leave this checkbox turned on so QuickBooks automatically adds payments you receive to the Undeposited Funds account. With this setting turned on, QuickBooks doesn’t display the “Deposit to” box in the Receive Payments window because payments automatically get stowed in the Undeposited Funds account. If you want a say in whether to deposit payments right away, turn this checkbox off. That way, in the Receive Payments window’s Deposit To field, you can choose a bank account to deposit funds immediately, or you can choose Undeposited Funds to collect several payments before you make a deposit.
NOTE
The rest of the Payments category’s Company Preferences tab has options for accepting payments via Intuit’s PaymentNetwork, which lets you send and receive payments online. See Adding a Message to the Customer for the full scoop on online payments.
Payroll & Employees
Perhaps the most annoying thing about employees is their insistence on being paid. Sad to say, but using QuickBooks for payroll doesn’t eliminate the need to pay your employees, and it can only simplify the task so much. If you choose one of the QuickBooks payroll service options, head to the Payroll & Employees preference category to configure your payroll service and how it operates. (Chapter 15 tells the full payroll story: what Intuit’s various payroll services offer and how to sign up for one, setting up employee records, running payroll, and remitting payroll taxes.) Payroll and employee preferences appear on the Company Preferences tab, so only QuickBooks administrators can set them.
The QuickBooks Payroll Features section gives you three options for choosing a payroll service. Here’s some info that can help you determine which one to choose:
§ Full payroll. This is the option you want if you use an Intuit payroll service to figure out payroll amounts or if you calculate payroll yourself and use Quick-Books’ features to produce the necessary documents. With this option selected, you can produce documents such as paychecks; payroll reports; and payroll forms, including 940s (employer federal unemployment taxes), 941s (employer quarterly federal taxes), W-2s (employee wage and tax statement), and W-3s (transmittal of W-2s).
§ No payroll. Choose this option if you don’t run payroll in any way or you use a third-party payroll service. For example, if you’re a sole proprietor and pay yourself by taking owner’s draws, or if you use an outside payroll service such as Paychex or ADP and have no need to print payroll documents or assign payroll costs to jobs, choose this option. With this option selected, you don’t see payroll-related features in the Employees menu or in the Employee Center.
NOTE
If you have transactions from prior payrolls and then switch to using an outside payroll service, the past payroll data remains in your QuickBooks file.
§ Online Payroll. If you use Intuit Online Payroll, choose this option. When you use this service, you can also run payroll without QuickBooks.
The Payroll & Employees preference category has plenty of additional settings that are intimately linked to payroll. For example, you can specify the deductions and payroll items that affect every employee, and control the fields that appear on paychecks and paycheck stubs. See Chapter 15to learn how to set up these preferences.
Whether you run payroll or not, here’s the lowdown on the remaining preferences that don’t relate to payroll:
§ Display employee list by. If your company employs only a few people, you can choose the First Name option so that QuickBooks sorts the Employee List by first names. However, if you have hundreds of employees, choose the Last Name option. Regardless of which option you choose, QuickBooks prints paychecks with employee first names first and last names last.
§ Mark new employees as sales reps. If only a few of your employees act as customer contacts and receive commissions, you can reserve the Sales Rep List for them by leaving this checkbox off and adding names to that list manually (Sales Rep List). But if you consider every employee a potential sales rep, turn on this checkbox so that QuickBooks automatically adds every employee you create to the Sales Rep List, saving you a five-step process each time.
§ Display employee social security numbers in headers on reports. QuickBooks automatically turns off this checkbox, which is preferable if you want to protect your employees’ financial privacy.
Reminders
QuickBooks can remind you when it’s time to perform tasks like printing checks, paying bills, or depositing money. You can even turn on reminders for to-dos so the program can remind you about tasks that you don’t want to forget. Reminders describes how reminders work and how to set preferences so you receive the reminders you want when you want them.
In the Reminders preference category, the My Preferences tab has only one setting: “Show Reminders List when opening a Company file.” Turn this checkbox on to tell QuickBooks to display the Reminders List window whenever you open your company file. In QuickBooks 2014, the “View reminders” icon appears at the top right of the program’s main window. The icon looks like an alarm clock, and the numbered label to its right shows how many reminders await you. To open the Reminders window, click this icon.
The Company Preferences tab contains settings for different types of reminders, which are available only if you’ve turned on the corresponding feature. For example, if you don’t use QuickBooks inventory, the “Inventory to Reorder” reminder is grayed out. See Reminders to learn the difference between the Show Summary and Show List options for each reminder. And Reminders describes how to specify the level of detail you want to see in the Reminders List window and, in some cases, when you want QuickBooks to remind you.
Reports and Graphs
Each person who logs into QuickBooks can specify a few preferences for the reports and graphs he generates. And QuickBooks administrators can modify settings that apply to every report and graph their company produces.
Preferences for the Reports You Generate
Here’s a guide to the personal preferences shown in Figure 25-9 and the effects they have:
§ Prompt me to modify report options before opening a report. The reports you want usually require small tweaks—a different date range, perhaps—so turning on this checkbox works for most people. With this checkbox turned on, QuickBooks automatically opens the Modify Report window when you generate a report so you can make any changes you want. (Click OK to view the results.) If you leave this checkbox turned off then, in a report window, click Customize Report to make changes.
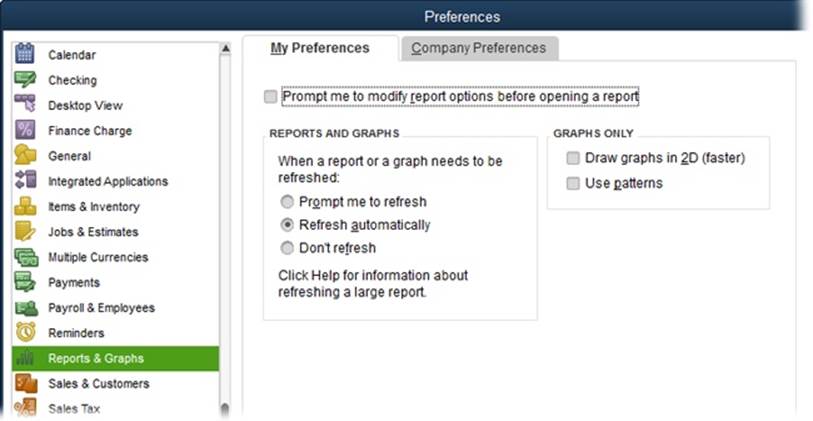
Figure 25-9. Keeping reports up to date with the information in your company’s QuickBooks file can be time-consuming. To accommodate the inclinations of each person who logs into the program, the settings on the My Preferences tab control how QuickBooks updates reports and graphs.
§ Reports and graphs. This set of preferences lets you decide what QuickBooks should do when a report or graph needs to be refreshed because the data within it has changed. You can choose one of the following options (QuickBooks automatically selects the first option unless you change it):
§ — Prompt me to refresh. If your QuickBooks file changes frequently and you don’t want to wait while the program refreshes every report you have open, choose this option. When you do, QuickBooks reminds you to refresh reports when you’ve changed data that affects them. For example, suppose you generated a Profit & Loss report and then received a payment for a customer; with this setting selected, QuickBooks would prompt you to refresh the report. When you’re ready to refresh a report or graph, in the report’s window, simply click Refresh.
§ — Refresh automatically. If numerous people are frantically changing data in the company file, as often happens as year-end approaches, this option can slow your work. However, if it’s critical that your reports and graphs are always accurate, choose this option so QuickBooks automatically refreshes reports and graphs whenever the underlying data changes.
§ — Don’t refresh. If you find yourself distracted by refreshes or even prompts about refreshing, choose this option. That way, QuickBooks won’t refresh your reports and graphs or remind you—no matter how significant the changes to the underlying data. When you’ve finished your report and graph customizations, click Refresh to generate the report with the current data.
§ Draw graphs in 2D (faster). If you care about time more than fancy graphics, turn on this checkbox. QuickBooks then displays graphs in two dimensions, which is faster than drawing the 3-D graphs it generates if you leave this checkbox off.
§ Use patterns. When you turn on this checkbox, QuickBooks uses black-and-white patterns instead of colors to differentiate areas on graphs. If you leave this checkbox off, QuickBooks displays colors on color monitors and shades of gray on black-and-white monitors.
Company-Wide Report Preferences
The Company Preferences tab has several preferences for the reports and graphs you generate for your company. If you’re a QuickBooks administrator, use the following preferences to format reports and graphs:
§ Summary Reports Basis. Nothing starts adrenaline flowing like financial reports that aren’t what you expect, particularly when IRS auditors are dropping by to peruse your company’s books. Be sure to choose the correct option here—Cash or Accrual (Company-Wide Report Preferences explains the difference)—so that the reports you generate accurately reflect your financial performance.
§ Aging Reports. You can control how QuickBooks calculates age for invoices, statements, and bills. If you choose the “Age from due date” option, the program shows the number of days between the due date and the current date. If you choose “Age from transaction date” instead, QuickBooks shows the number of overdue days from the date of the transaction to the current date. For example, suppose an invoice is dated September 1 with a due date of October 1. On October 10, the “Age from due date” option shows the invoice’s age as 10 days, whereas the “Age from transaction date” option shows the invoice’s age as 40 days.
§ Reports – Show Items By. Reports initially list items by name and description, but you can choose a different option here to show only the name or only the description.
§ Reports – Show Accounts By. Reports typically list accounts by name. If you use especially short account names, you can use the account descriptions in reports instead. You can also show both names and descriptions.
§ Statement Of Cash Flows. Although QuickBooks does a great job of associating your accounts with the Operating, Investing, and Financing categories of the Statement of Cash Flows report, some companies are bound to require a customized cash flow report. In that case, click Classify Cash here to open the Classify Cash dialog box. (See The Statement of Cash Flows to learn how to generate and customize a cash flow statement for your company.)
§ Default formatting for reports. If you want to set up standards for all your reports, turn on this checkbox. Then click the Format button to open the Report Format Preferences dialog box. The settings in this dialog box are the same ones that appear in the Modify Report dialog box’s Header/Footer and Fonts & Numbers tabs (Report Headers and Footers). You can choose the information that you want to appear in headers and footers, and whether they’re aligned to the left, right, or center of the page. You can also choose formatting for the report’s text and numbers.
§ Collapse Transactions. This checkbox is turned off initially, which means that QuickBooks may list the same transaction multiple times in a report, such as the Profit & Loss Detail report. For example, if an invoice contains several different products that all use the same income account, you’ll see a line for each of those products in the report. If you want to make your reports more concise, turn this checkbox off. That way, QuickBooks includes only one line for each transaction within each account group. Using the example from above, the Profit & Loss Detail report would contain only one line for that invoice within the product income account group.
Sales & Customers
These preferences, shown in Figure 25-10, control how QuickBooks handles sales you make to your customers, including the shipping method you use and whether the program notifies you that you’ve created a duplicate invoice number.
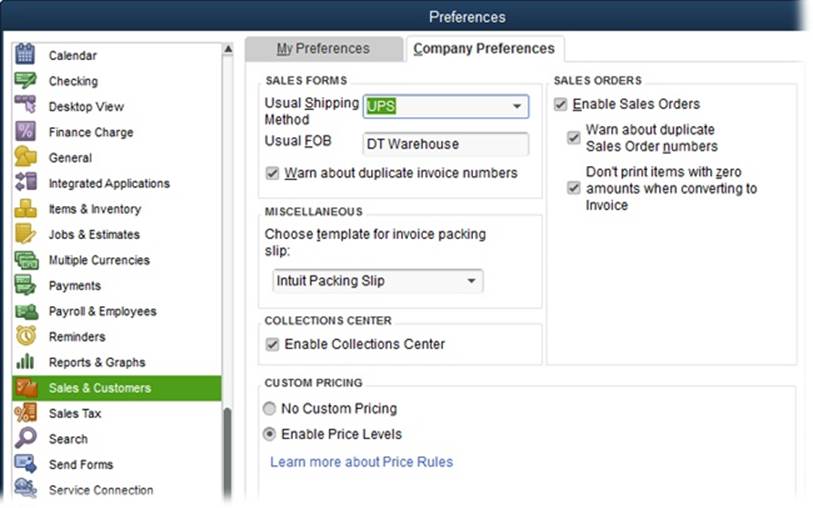
Figure 25-10. Company preferences in the Sales & Customers category affect the information that appears on invoices. This tab also lets you turn on other sales-related features like sales orders, price levels, and the Collections Center.
The My Preferences tab has options that tell the program what to do about outstanding billable time and expenses. Here’s what each one does:
§ Prompt for time/costs to add. If you typically bill for time and expenses, select this option. That way, the “Choose Billable Time and Costs” dialog box (Figure 10-17) opens automatically when you create an invoice for a customer who has outstanding billable time charges or expenses.
§ Don’t add any. Select this option if you rarely have time or expenses to invoice and don’t want to see the “Choose Billable Time and Costs” dialog box or receive a reminder that outstanding time and expenses exist.
§ Ask what to do. This option merely adds an additional step to what the “Prompt for time/costs to add” option does because you have to tell QuickBooks whether or not to open the “Choose Billable Time and Costs” dialog box. Selecting the “Prompt for time/costs to add” option instead is your best bet.
Here’s a guide to the Sales & Customers preferences on the Company Preferences tab, all of which only QuickBooks administrators can change:
§ Usual Shipping Method. If you negotiate a sweet deal with a shipping company and use it whenever possible, choose that company in this drop-down list. When you do, QuickBooks automatically selects this method in sales forms’ Ship Via (or Via) fields. If the method you want to use isn’t on the list, choose <Add New> to open the New Ship Method dialog box (Customer Message List).
§ Usual FOB. FOB stands for “free on board” and represents the location at which the customer becomes responsible for the products you ship. For example, suppose you ship products from your warehouse in Severance, Colorado, and you use Severance as your FOB location. As soon as your shipments leave Severance, the customer becomes the official owner of the products and is responsible for them if they get lost, damaged, or stolen in transit. Type a brief description of your FOB location in this box, and QuickBooks then puts this info in the FOB field on invoices and other sales forms.
§ Warn about duplicate invoice numbers. Turn on this checkbox if you want QuickBooks to alert you when you create an invoice with the same number as one you already entered.
§ Choose template for invoice packing slip. If you ship products to customers, you can print a packing slip from QuickBooks to include in your shipments. To specify the packing slip you want to use, choose it in this drop-down list. From then on, when you create an invoice and choose Print→Packing Slip (Printing Packing Slips), QuickBooks automatically uses the template you selected. QuickBooks initially selects its predefined packing slip (Intuit Packing Slip) here, but you can create your own, as described on Customizing Forms.
§ Enable Collections Center. If your customers always pay on time, you can turn this checkbox off. On the other hand, if you regularly get after customers to pay up, the Collections Center can help (see Receiving Payments for Invoiced Income). When you turn this checkbox on, you’ll see the Collections Center icon in the Customer Center’s toolbar. Income Tracker, introduced in QuickBooks 2014, provides another way to see the customer payments that are overdue.
§ Custom Pricing. You can set multiple prices for the items you sell by using price levels. To do so, select the Enable Price Levels option here. Then refer to pages Creating a Price Level and Applying Price Levels to learn how to define and apply price levels, respectively.
§ Sales orders. This preference is available only in QuickBooks Premier and Enterprise, which let you use sales order to record customer orders before you create invoices. To do so, turn on the Enable Sales Orders checkbox. With it turned on, you can tell QuickBooks to warn you when you create a sales order with duplicate numbers, and to leave off any items with zero amounts when you convert the sales order into an invoice.
Sales Tax
Charging sales tax can be a complicated business, as the number of preferences on the Sales Tax category’s Company Preferences tab indicates. If you don’t charge sales tax, in the “Do You Charge Sales Tax?” area, simply leave the No option selected and move on to more important endeavors. If you do charge sales tax, you’ll learn how to adjust the rest of these preferences as you set up Sales Tax items, charge sales tax, and pay sales tax to the appropriate authorities as explained in Chapter 21 starting on Receiving Inventory and Bills Simultaneously).
Search
The Search box (which is located at the top of the left icon bar, or at the right end of the top icon bar) lets you search your company file to find customers, vendors, and other names; transactions like invoices and bills; amounts; dates; or text within memos, notes, and descriptions. If you use the top icon bar, on the My Preferences tab in this category, the “Show Search Box in the Icon Bar” checkbox is turned on automatically, which makes the Search box easy to access at all times. If you turn this checkbox off, you can access the search feature by choosing Edit→Search. (If you use the left icon bar or hide both icon bars, these preferences are grayed out because the Search box appears at the top of the left icon bar.)
Sometimes, you want to find things in your company file, like an invoice number or an inventory item. Other times, you want to search QuickBooks help files to find out how to do something in the program. Out of the box, QuickBooks sets the “Choose where to search by default” setting to “Let me choose where I search each time.” That way, when you type in the Search box in the top or left icon bar, you can choose “Search company file” or “Help” from the box’s drop-down menu. However, if you’re a whiz at QuickBooks, you can choose the “Search my company file” option instead, so that QuickBooks automatically searches your company file for whatever you type in the Search box. If you usually need help on using QuickBooks, select the “Search QuickBooks help” option instead.
NOTE
QuickBooks always searches your company file when you choose Edit→Search.
The Company Preferences tab contains settings that control how often QuickBooks updates the data it uses to search. Because these updates make the program run a little slower, you have to compromise between performance and up-to-date information. QuickBooks initially turns on the “Update automatically” checkbox, and that’s usually what you want. In the “Update every” drop-down list, choose a frequency for the automatic updates. In most cases, 30 or 60 minutes works well. If you want to update search info now, click Update Now. If you turn this checkbox off, QuickBooks might run a little faster, but you then have to click the Update Now button to be sure that you’re searching up-to-date info in your company file.
Send Forms
As you’ve learned throughout this book, you can include a cover note when you send invoices, purchase orders, and other business forms via email. For example, if you email a purchase order, you can include details about the delivery in the note. Or you can include a cover note along with an invoice to add some personal interaction with your customer. When you email an invoice or other form, QuickBooks opens an Outlook email window—or, if you use a Web-based email service or the dialog box corresponding to the form you’re sending—with your note filled in. The program attaches your invoice or other sales form to the email as an Adobe PDF file.
The settings in this preference category let you tell QuickBooks about your email program and email address, and set up templates for the messages you send.
Setting Your Send Preferences
On the My Preferences tab, QuickBooks automatically turns on the “Auto-check the ‘Email Later’ checkbox if customer’s Preferred Delivery Method is e-mail” checkbox. That way, you don’t have to remember whether customers prefer to receive paperwork by email or snail mail.
If you want to send QuickBooks email using Microsoft Outlook, select the Outlook option. (This option is available only if Outlook is installed on your computer.) If you use a Web-based email service, select the Web Mail option, as shown in Figure 25-11, and then click Add to tell QuickBooks about your email service. In the Add Email Info dialog box, fill in your email address and select your email provider (Gmail, Yahoo, or Hotmail/Live [Microsoft’s online email service], for example). QuickBooks then fills in the Server Name and Port fields with the typical settings for the provider you specified. If you use an email provider other than the ones on the list, you have to fill in the server name and port manually. See Printing Packing Slips to learn about the QuickBooks E-mail option.
Figure 25-11. If you use a Web-based email service like Gmail or Yahoo, you can set QuickBooks up to send communications through that service. Select the Web Mail option as shown here, click the Add button (not shown), and then specify the settings for your web-mail account.
Customizing Messages
QuickBooks includes standard messages for each type of form you send via email. If you want to customize the messages you send out, any QuickBooks administrator can change them. (In QuickBooks 2014, you can create more than one template for a transaction type. However, you can choose the template you want to apply to a message only if you use Web Mail, not Outlook, to send messages from QuickBooks.) You can create standard notes for invoices, estimates, statements, sales orders, sales receipts, credit memos, purchase orders, reports, pay stubs, overdue invoices, almost-due invoices, and payment receipts. If your company has standard letters on file, you can simply copy and paste the contents of those letters from another program, such as Microsoft Word, into QuickBooks, as explained below.
To configure a standard note for a particular type of form, in the Preferences dialog box, go to the Send Forms category, click the Company Preferences tab, and then follow these steps:
1. In the Show drop-down list, choose the form you want to customize.
For example, if you want to set up a cover letter to go with your invoices, choose Invoices.
2. To create a new template, click Add Template. To edit an existing template, select it in the template table, and then click Edit.
The Add Email Template or Edit Email Template dialog box opens. The Add Email Template displays a sample message.
3. If you’re creating a new template, in the Template Name box, type the name of the template.
To tell QuickBooks to use this template automatically, turn on the Default checkbox.
4. To insert a field in the subject or message, click to position your cursor in the text. Then click the Insert Field button and choose the field you want to insert.
For example, to tell QuickBooks to insert a name with the first name followed by the last name, choose Name-First-Last.
5. Edit the content of the note using typical editing techniques.
For instance, click in the text to position the cursor where you want to add text, drag your cursor to select text you want to replace, or double-click a word to select it. To use a standard letter that’s stored in another program, open the letter in that program and copy the text, and then paste it into QuickBooks by pressing Ctrl+V.
To make sure everything is spelled correctly, click the Check Spelling button at the dialog box’s bottom left, and QuickBooks alerts you to any suspect words in the Subject line or body of your letter.
6. To save the changes to your notes, click Save.
If you created a new template, it appears in the template table.
Service Connection
If your company uses QuickBooks’ services, such as bank feeds, QuickBooks administrators can control how people log into those services by adjusting the settings in the Service Connection preference category. (The easiest way to learn about or sign up for these services is to choose Help→Add QuickBooks Services and then click the Learn More button or link for the one you want.)
As explained in a moment, each person who uses QuickBooks services can control the behavior of online sessions, but security is a company-wide issue, so the options for whether to prompt for a password appear on the Company Preferences tab. Here are the service connection preferences that administrators can set and when you might want to use them:
§ Automatically connect without asking for a password. Choosing this option automatically logs people into the QuickBooks Business Services network without a login name or password. This option is appropriate if you’re the only person who accesses the network or you aren’t concerned about security.
§ Always ask for a password before connecting. Choose this option if you want your employees to provide a login name and password each time they access QuickBooks Business Services. This option is handy if several people access the services or different people have different privileges with the services you use.
§ Allow background downloading of service messages. If you want QuickBooks to check for messages and updates when your Internet connection isn’t tied up with other work, leave this checkbox turned on. QuickBooks then checks the Intuit website periodically and downloads updates or messages. If you turn this checkbox off, you can check for updates at a convenient time by choosing Help→Update QuickBooks.
If you aren’t a QuickBooks administrator, you can still make some choices about your connection to QuickBooks Business Services. On the My Preferences tab, the “Give me the option of saving a file whenever I download Web Connect data” checkbox lets you decide when to process downloaded transactions. If you want QuickBooks to ask you whether to process downloaded transactions immediately or save them to a file, leave this checkbox on. If you turn it off, QuickBooks immediately processes downloaded transactions.
You can launch QuickBooks by downloading WebConnect data or by double-clicking a QuickBooks file that contains WebConnect data you downloaded previously. When you open the program this way, you often want to continue working in QuickBooks after you process the downloaded transactions. To keep QuickBooks open after it processes transactions, leave the “If QuickBooks is run by my browser, don’t close it after WebConnect is done” checkbox turned on.
Spelling
QuickBooks’ spell checker helps you find common misspellings in most text fields. Spell checking is a personal preference: Each person who logs into a company file can choose whether to use spell checking by leaving the “Always check spelling before printing, saving, or sending supported forms” checkbox on or turning it off.
If you leave spell checking on, you can choose words that you want the spell checker to ignore. For example, you can tell it to ignore Internet addresses, words that contain numbers, words that begin with a capital letter, words that are in all uppercase letters, and words with a mixture of upper- and lowercase letters.
When QuickBooks checks spelling in transactions you record, such as item descriptions in invoices, you can click Add to add custom words to the program’s dictionary so that QuickBooks won’t flag those unusual spellings in future transactions. You’ll see the custom words you’ve added in the Word table on the My Preferences tab. To remove a custom word from the dictionary, in the table, click its “Delete?” cell to add a checkmark.
Tax: 1099
The Company Preferences tab in this category begins with the most important 1099 question: “Do you file 1099-MISC forms?” If you don’t use 1099 vendors such as self-employed subcontractors, or you delegate 1099 generation to your accountant, simply choose the No option and ignore the rest of the preferences in this category. If you do file 1099-MISC forms, you can specify the accounts you use to track 1099 vendor payments and the minimum amount you have to report to the IRS. To learn how to map accounts to 1099 boxes and generate 1099s, flip to 1099s.
Time & Expenses
In this category, the first setting on the Company Preferences tab tells QuickBooks whether you track time at all. If you do, select the Yes option. Then you can choose the first day of the workweek that appears if you use weekly timesheets in Quick-Books (see Filling out Weekly Timesheets). The “Mark all time entries as billable” checkbox is initially turned on, which means QuickBooks automatically marks time records as billable. If you bill only some of your time, turn this checkbox off. That way, you can turn on the Billable checkbox or cell to designate time as billable.
The Invoicing Options section has settings related to how you handle billable time and expenses on invoices:
§ Create invoices from a list of time and expenses. This checkbox is available only in QuickBooks Premier and Enterprise. If you turn it on, the Customer menu includes the “Invoice for Time & Expenses” option, which lets you view a list of all your unbilled time and expenses and select the customers you want to bill, as described on Using Invoice for Time & Expenses.
§ Track reimbursed expenses as income. Companies differ in their approach to reimbursed expenses, as explained on Handling Reimbursable Expenses. Some assign reimbursed expenses as income and then deduct the expenses as costs. The method you choose doesn’t affect the profit you earn—the reason for tracking reimbursable expenses as income is to charge sales tax on those expenses. If you want to post reimbursed expenses to an income account, turn on this checkbox.
§ Mark all expenses as billable. This checkbox is initially turned on, which means QuickBooks automatically marks all your expenses as billable. If only some of your expenses are billable to your customers, turn this checkbox off so you can turn on the Billable checkbox or cell to designate specific expenses as billable to a customer or job.
§ Default Markup Percentage. Suppose you’re an interior decorator and you mark up the furniture and bric-a-brac you sell by a standard percentage. When you specify your markup percentage in this box and then create a new item (Creating Items), QuickBooks calculates the item’s sales price based on its cost. For example, if you create an inventory part for a black leather sofa and enter its cost as $10,000, a 20 percent markup results in a sales price of $12,000. If you charge a different markup on only a few of the things you sell, then simply modify the sales price that QuickBooks calculates.
§ Default Markup Account. To assign the income from your markup percentage to a specific account, select it in this drop-down list. You can choose an account dedicated to markup income or simply assign markup to your product-related income account.