QuickBooks 2014: The Missing Manual (2014)
Part I. Setting Up QuickBooks
Chapter 3. Setting Up a Chart of Accounts
If you’ve just started running a business and keeping your company’s books, all this talk of accounts, credits, and debits might have you flummoxed. Accounting is a cross between mathematics and the mystical arts; its goal is to record and report the financial performance of an organization. The end result of bookkeeping and accounting is a set of financial statements (Generating Financial Reports), but the starting point is the chart of accounts.
In accounting, an account is more than a real-world account you have at a financial institution; it’s like a bucket for holding money used for a specific purpose. When you earn money, you document those earnings in an income account, just as you might toss the change from a day’s take at the lemonade stand into the jar on your desk. When you buy supplies for your business, that expense shows up in an expense account that works a lot like the shoebox you throw receipts into. If you buy a building, its value ends up in an asset account. And if you borrow money to buy that building, the mortgage owed shows up in a liability account.
Accounts come in a variety of types to reflect whether you’ve earned or spent money, whether you own something or owe money to someone else, as well as a few other financial situations. Your chart of accounts is a list of all the accounts you use to track money in your business.
Neophytes and experienced business folks alike will be relieved to know that you don’t have to build a chart of accounts from scratch in QuickBooks. This chapter explains how to get a ready-made chart of accounts for your business and what to do with it once you’ve got it. If you want to add or modify accounts in your chart of accounts, you’ll learn how to do that, too.
NOTE
Industry-specific Premier editions of QuickBooks include a Chart of Accounts, an Item List, Payroll items, and preferences already tuned to your industry (such as construction, manufacturing, nonprofit, professional services, or retail). The industry-specific editions also have features unique to each industry, like enhanced job costing in the Contractor edition. These features may save you time during setup and your day-to-day bookkeeping, but you have to decide whether you want to spend a few hundred dollars more than the QuickBooks Pro price tag to get them.
Acquiring a Chart of Accounts
When you create a new QuickBooks company file and choose an industry (Company Information), the program automatically sets up the chart of accounts with accounts that are typical for that industry. For example, if you choose a product-oriented industry, you’ll see an income account for product or parts income, while a service-oriented business gets an income account for service or labor income. If your company is like many small businesses, the chart of accounts that QuickBooks creates includes everything you need.
However, if you want to customize your chart of accounts to mirror your company’s needs, the easiest—although probably not the cheapest—way to get a chart of accounts is from your accountant. Accountants understand the accounting guidelines set by the Financial Accounting Standards Board (FASB—pronounced “faz bee”), a private-sector organization that sets standards with the SEC’s blessing. When your accountant builds a QuickBooks chart of accounts for you, you can be reasonably sure that it includes all the accounts you need to track your business and that those accounts conform to accounting standards. If you’re a business owner and want a specific account or want to see your business financials in a particular way, ask your accountant what type of accounts to use and how to set them up.
NOTE
Don’t worry—getting an accountant to build a chart of accounts for you probably won’t bust your budget, since the accountant won’t start from scratch. Many financial professionals maintain spreadsheets of accounts and build a chart of accounts by importing a customized account list into QuickBooks. Or, they may keep QuickBooks company files around to use as templates for new ones.
If you don’t want to pay an accountant to create a chart of accounts for you, how about finding one built by experts and available at no charge? A quick search on the Web for “QuickBooks chart of accounts” returns links to sites with predefined charts of accounts. For example, in the not-for-profit world, the National Center for Charitable Statistics website (http://nccs.urban.org/projects/ucoa.cfm) includes downloadable QuickBooks files that contain the Unified Chart of Accounts for nonprofits (known as the UCOA). You can download a QuickBooks backup file of a nonprofit company file, complete with a chart of accounts (see Restoring Backups to learn how to restore a backup file), an .iif file that you can import into QuickBooks, or a backup file for the Mac version of QuickBooks.
NOTE
If you have an Excel spreadsheet with your company account information, you can import that info directly into your company file. Importing with the Excel Import Wizard Templates has the full story on importing from Excel.
If you run a restaurant, you can go to www.rrgconsulting.com/restaurant_coa.htm and download a free .iif file with a restaurant-oriented chart of accounts that you can import into QuickBooks, as explained in the next section.
Importing a Chart of Accounts
If you download an .iif file with a chart of accounts, you can import that file into a QuickBooks company file. Because you’re importing a chart of accounts, you want to create your company file with basic info about your company and as few accounts as possible in the chart of accounts list. Here’s how you create a QuickBooks company file with bare-bones information and then import a chart of accounts from an .iif file:
1. Choose File→New Company; in the QuickBooks Setup dialog box that appears, click Express Start.
If you see a screen that asks for your email address and password, enter the email address and password for your Intuit account, and then click Continue.
2. On the “Tell us about your business” screen, enter your company’s name, type, and Tax ID. In the Industry box, enter Other/None, and then click Continue.
3. On the “Enter your business contact information” screen, do just that.
See Chapter 1 for details. If you click Preview Your Settings and then click the Chart of Accounts tab, you see that the accounts list is empty, which is what you want. Click OK to close the preview window.
4. After you finish filling in your contact info, click Create Company File.
QuickBooks creates your company file and then displays the “You’ve got a company file! Now add your info” screen in the QuickBooks Setup dialog box.
5. To close the QuickBooks Setup dialog box, click Start Working, and then click the X at the top right of the Quick Start Center window that appears.
You can also close the QuickBooks Setup dialog box by clicking the X at the window’s upper right.
6. Choose File→Utilities→Import→IIF Files.
QuickBooks opens the Import dialog box to the folder where you stored your company file and sets the “Files of type” box to “IIF Files (*.IIF).”
7. Navigate to the folder that contains the .iif file you want to import, select the file, and then click Open.
A message box appears that shows how the import is progressing. If all goes well, QuickBooks then displays a message box that tells you that it imported the data successfully; click OK. If QuickBooks ran into problems with the data in the .iif file, it tells you that it didn’t import the data successfully. In that case, you have to open the .iif file in a text editor or Excel and correct the account info. (You can see what information QuickBooks expects by exporting an account list, as described on Exporting Lists and Addresses.)
To admire your new chart of accounts, in the QuickBooks Home page’s Company panel, click Chart of Accounts (or press Ctrl+A). Now that your chart of accounts is in place, you can add more accounts, hide accounts you don’t need, merge accounts, or edit the accounts on the list. The rest of this chapter explains how to do all these things.
Planning the Chart of Accounts
A chart of accounts is a tool for tracking your company’s finances at a relatively high level—it helps you produce financial statements (see Generating Financial Reports) and prepare your business tax returns. When setting up your chart of accounts, bear in mind that it will be easier to work with if you keep the number of accounts to a minimum. (The income statements for even ginormous global corporations typically fit on a single page.) This section helps you figure out which accounts you need and provides guidelines for naming and numbering them.
Do You Need Another Account?
QuickBooks offers several features—including items, jobs, and classes—that can provide details about your company’s performance without you having to add additional accounts. So before you create an account, think about whether another feature can track the information you want instead. Here’s a brief description of what each feature does and when to use it:
§ Accounts. When you create transactions in QuickBooks, the program allocates money to accounts in your chart of accounts. Then, when you run a Profit & Loss report (Generating a Profit & Loss Report), you see financial results by account. So create a new account if you want to see a particular pool of money broken out in your financial reports. For example, add an income account for services you’re offering in addition to your product sales.
NOTE
Subaccounts (Creating an Account) are an option if you want to break one category into several smaller pieces, such as divvying travel expenses up into airfare, lodging, transportation, and meals.
§ Items. In QuickBooks, items track details about what you buy and sell. For example, you might create dozens of items for each specific service you provide, such as cutting down trees, cutting logs, chipping wood, splitting wood, and hauling trash. However, each of those items can be assigned to the same services income account. Chapter 5 provides the full story on items.
§ Jobs. If you work on different projects for the same customer, you can create jobs in QuickBooks (Creating Jobs in QuickBooks). That way, you can assign invoices to specific jobs and track income by job. You can also track job expenses by making bills or other expenses billable to specific jobs.
§ Classes. If your business is broken into segments, such as regions, business units, or partners in a partnership, you can turn to classes (Categorizing with Classes). You can assign a class to each transaction, such as an invoice or bill, which lets you track income and expenses acrossaccounts, customers, and vendors. For example, if you create a class for each business unit in your company, you can assign the appropriate class to each transaction you record. Then, a Profit & Loss report by class (Other Profit & Loss Reports) will produce an income statement for each business unit.
Naming and Numbering Accounts
Account names and numbers make it easy for accountants, bookkeepers, and company employees to find the accounts they need. In addition, with standardized naming and numbering, you can compare your company’s financial performance with others in your industry. This section suggests some rules to follow as you set up naming and numbering conventions.
If you accept the accounts that QuickBooks recommends when you set up your company file, then they already have assigned names and numbers, as shown in Figure 3-1. You might think this lets you off the hook. But by taking the time to learn standard account numbers and names, you’ll find working with accounts more logical and understand more of what your accountant and bookkeeper say.
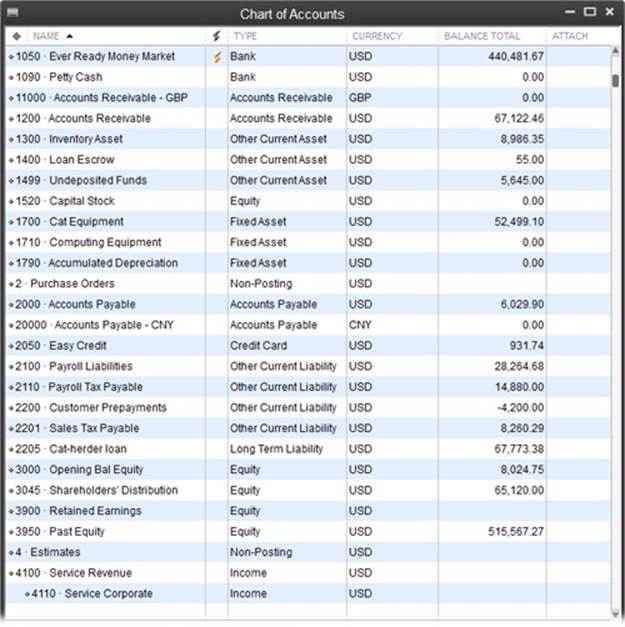
Figure 3-1. Accounts that QuickBooks adds to your chart of accounts during setup come with assigned names and numbers, as you can see here. To open the Chart of Accounts window, press Ctrl+A. If you don’t see account numbers in this window, page 49 tells you how to display them.
Organizing Account Numbers
Account numbers are initially turned off when you create a new company file in QuickBooks (Viewing Account Numbers explains how to display them), and you don’t have to use them. However, account numbers make it easier for your bookkeeper or accountant to work with your financial records. This section explains the typical numbering convention that financial folks use.
Companies reserve ranges of numbers for different types of accounts, so they can identify the type of account by its number alone. Business models vary, so you’ll find account numbers carved up in different ways depending on the industry. Think about your personal finances: You spend money on lots of different things, but your income derives from a precious few sources. Businesses and nonprofits are no different. So you might find income accounts numbered from 4000 to 4999 and expense accounts using numbers anywhere from 5000 through 9999 (see Table 3-1).
Table 3-1. Typical ranges for account numbers
|
RANGE |
ACCOUNT TYPE |
|
1000–1999 |
Assets |
|
2000–2999 |
Liabilities |
|
3000–3999 |
Equity |
|
4000–4999 |
Income |
|
5000–5999 |
Cost of goods sold, cost of sales, job costs, or general expenses |
|
6000–7999 |
Expenses, overhead costs, or other income |
|
8000–9999 |
Expenses or other expenses |
NOTE
Most businesses use the same account-numbering scheme up until the number 4999. After that, things can differ because some companies require more income accounts, but in most businesses, expense accounts are the most numerous.
Account numbering conventions don’t just carve number ranges up for account types. If you read annual reports as a hobby, you know that companies further compartmentalize their finances. For example, assets and liabilities get split into current and long-term categories. (Current means something that’s expected to happen within the next 12 months, such as a loan that’s due in 3 months; long-term is anything beyond 12 months.) Typically, companies show assets and liabilities progressing from the shortest to the longest term, and the asset and liability account numbers follow suit. Here’s one way to allocate account numbers for current and progressively longer-term assets:
§ 1000–1099. Immediately available cash, such as a checking account, savings account, or petty cash.
§ 1100–1499. Assets you can convert into cash within a few months to a year, including Accounts Receivable, inventory assets, and other current assets.
§ 1500–1799. Long-term assets, such as land, buildings, furniture, and other fixed assets.
§ 1800–1999. Other assets.
Companies also break expenses down into smaller categories. For example, many companies keep an eye on whether their sales team is doing its job by tracking sales expenses separately and monitoring the ratio of sales to sales expenses. Sales expenses often appear in the 5000–5999 range. QuickBooks reinforces this standard by automatically creating a Cost of Goods Sold account numbered 5001. (You can create as many Cost of Goods Sold accounts as you need to track expenses that relate directly to your income, such as the cost of purchasing products you sell, as well as what you pay your salespeople.) Other companies assign overhead expenses to accounts in the 7000–7999 range, so they can assign a portion of those expenses to each job performed.
TIP
When you add new accounts to your chart of accounts, increment the account number by 5 or 10 to leave room in the numbering scheme for similar accounts you might need in the future. For example, if your checking account number is 1000, assign 1010 or 1015 to your new savings account rather than 1001.
In QuickBooks, an account number can be up to seven digits long, but the program sorts numbers beginning with the leftmost digit. So if you want to categorize in excruciating detail, slice your number ranges into sets of 10,000. For example, assets range from 10000 to 19999; income accounts span 40000 to 49999, and so on.
NOTE
Because QuickBooks sorts accounts by number, beginning with the leftmost digit, account 4100020 appears before account 4101.
Viewing Account Numbers
If you want to see or hide account numbers in QuickBooks, here’s how to turn them on or off:
1. Choose Edit→Preferences→Accounting, and then in the Preferences dialog box, click the Company Preferences tab.
You have to be a QuickBooks administrator (Setting Up the Administrator) to open this tab.
2. Turn on the “Use account numbers” checkbox to show account numbers.
To hide them, turn off this checkbox.
3. Click OK to close the Preferences dialog box.
With this setting turned on, account numbers appear in the Chart of Accounts window, account drop-down lists, and account fields. In addition, the Add New Account and Edit Account windows display the Number box so you can add or modify an account’s number.
NOTE
Turning off the “Use account numbers” checkbox doesn’t remove account numbers you’ve already added; it simply hides them in the spots mentioned above. You can see them again by turning the checkbox back on. However, you can’t add account numbers to any accounts you create while the checkbox is turned off. If you create an account anyway, you can then edit it (Working with Accounts) after you turn on the “Use account numbers” checkbox to add an account number.
Choosing Good Account Names
Account names should be meaningful, both to you and your accountant (or bookkeeper). In addition, your accounts should be unique in name and function because you don’t need two accounts for the same type of income, expense, or financial bucket. For example, if you consider advertising and marketing two distinctly different activities, then create an account for each. But if advertising and marketing blur in your mind, then create one account with a name like “Marketing & Advertising.”
NOTE
Because accounts represent high-level categories, stick to names that summarize the income or expense, such as Service Income and Product Income. If your account names are something like Tom’s Consulting, Dick’s Consulting, and Harry’s Consulting, your accounts and their names are too specific—and might cause confusion if Rosie takes over Harry’s work.
QuickBooks does its part to enforce unique account names. Say you try to create a new expense account named Postage, but an account by that name already exists. QuickBooks displays the message, “This name is already in use. Please use another name.” What QuickBooks can’t do is ensure that each account represents a unique category of money. Without a naming standard, you could end up with multiple accounts with unique names, each representing the same category, as shown by the following names for accounts used to track postage:
|
Expense-postage |
|
Postage |
|
Postage and delivery |
|
Shipping |
If you haven’t used QuickBooks before, here are some rules you can apply to help make your account names consistent:
§ Word order. If you include the account type in the name, then append it to the end of the name. You’ll spot “Postage Expense” more easily than “Expense Postage.”
§ Consistent punctuation. Choose “and” or “&” for accounts that cover more than one item, like “Dues and Subscriptions.” And decide whether to include apostrophes, as in “Owners Draw” or “Owners’ Draw.”
§ Spaces. Decide whether to include spaces for readability or to eliminate them for brevity; for example, “Dues & Subscriptions” vs. “Dues&Subscriptions.”
§ Abbreviation. If you abbreviate words in account names, then choose a standard abbreviation length. If you go with four-letter abbreviations, for example, “Postage” would become “Post.” For a three-letter abbreviation, you might use “Pst.”
WARNING
QuickBooks won’t enforce your naming standards. So after you set the rules for account names, write them down so you don’t forget them. A consistent written standard encourages everyone (yourself included) to trust and follow the naming rules. Also, urge everyone to display inactive accounts (Deleting Accounts) and scan the chart of accounts for synonyms to see if such an account already exists before creating a new one. These rules are easier to enforce if you limit the number of people who can create and edit accounts (What the Access Areas Represent).
Creating Accounts and Subaccounts
As the box on Making Sense of Account Types explains, different types of accounts represent dramatically different financial animals. The good news is that every type of account in QuickBooks shares most of the same fields, so you need to learn only one account-creation procedure.
If you look closely at the chart of accounts list in Figure 3-1, you’ll notice that accounts fall into two main categories: those with balances and those without. If you’re really on your toes, you might also notice that accounts with balances are the ones that appear on the Balance Sheet report. (Accounts without balances appear on the Profit & Loss report.) To learn more about financial statements and the accounts they reference, see Chapter 23.
Creating an Account
After you’ve had your business for a while, you won’t add new accounts very often. However, you might need one if you start up a new line of income, take on a mortgage for your new office building, or want a new expense account for the subcontractors you hire to manage your workload.
Creating accounts in QuickBooks is simple, which is a refreshing change from many accounting tasks. Before you can create an account, you have to open the Chart of Accounts window. Because the chart of accounts is central to accounting, you have several ways to open this window:
§ Press Ctrl+A (which you can do from anywhere in the program).
§ At the top right of the Home page, in the Company panel, click Chart of Accounts.
§ In the menu bar, choose Lists→Chart of Accounts.
The Chart of Accounts window works much like other list windows. For example, you can sort the account list by different columns or drag accounts in the list to different locations. (See Sorting Lists to learn how to sort and rearrange lists.)
TIP
You can create accounts on the fly by choosing <Add New> in any Account drop-down list. Suppose you create a new Service item (in the Item List window, press Ctrl+N) and want a new income account to track revenue for that service. In the New Item dialog box, scroll to the top of the Account drop-down list and then choose <Add New>. In the Add New Account dialog box that appears, fill in the various fields, and then click Save & Close. Back in the New Item dialog box, QuickBooks fills in the Account field with the new account, and you can finish creating your item.
UP TO SPEED: MAKING SENSE OF ACCOUNT TYPES
QuickBooks’ account types are standard ones used in finance. Here’s a quick introduction to the different types and what they represent:
§ Bank. Accounts that you hold at a financial institution, such as a checking, savings, money market, or petty cash account.
§ Accounts Receivable. The money that your customers owe you, like outstanding invoices and goods purchased on credit.
§ Other Current Asset. Things you own that you’ll use or convert to cash within 12 months, such as prepaid expenses.
§ Fixed Asset. Things your company owns that decrease in value over time (depreciate), like equipment that wears out or becomes obsolete.
§ Other Asset. If you won’t convert an asset to cash in the next 12 months and it isn’t a depreciable asset, then it’s—you guessed it—an other asset. A long-term note receivable is one example.
§ Accounts Payable. This is a special type of current liability account (money you owe in the next 12 months) that represents what you owe to vendors.
§ Credit Card. Just what it sounds like: a credit card account.
§ Other Current Liability. Money you owe in the next 12 months, such as sales tax and short-term loans.
§ Long Term Liability. Money you owe after the next 12 months, like mortgage payments you’ll pay over several years.
§ Equity. The owners’ equity in your company, including the original capital invested in the company and retained earnings. (Money that owners withdraw from the company also shows up in an equity account but reduces the value of the account.)
§ Income. The revenue you generate through your main business functions, like sales or consulting services.
§ Cost of Goods Sold. The cost of products and materials that you held originally in inventory but then sold. You can also use this type of account to track other expenses related to your sales, such as commissions and what you pay subcontractors to do work for your customers.
§ Expense. The money you spend to run your company.
§ Other Income. Money you receive from sources other than business operations, such as interest income.
§ Other Expense. Money you pay out for things other than business operations, like interest.
§ Non-posting Account. QuickBooks creates non-posting accounts automatically when you use features such as estimates and purchase orders. For example, when you create an estimate (Creating an Estimate), you don’t want that money to appear on your financial reports, so QuickBooks stores those values in non-posting accounts.
Once you’ve opened the Chart of Accounts window, here’s how to create an account:
1. Press Ctrl+N to open the Add New Account window.
Alternatively, on the menu bar at the bottom of the Chart of Accounts window, click Account→New. Or, right-click anywhere in the Chart of Accounts window, and then choose New from the shortcut menu. No matter which method you use, QuickBooks opens the Add New Account window shown in Figure 3-2.
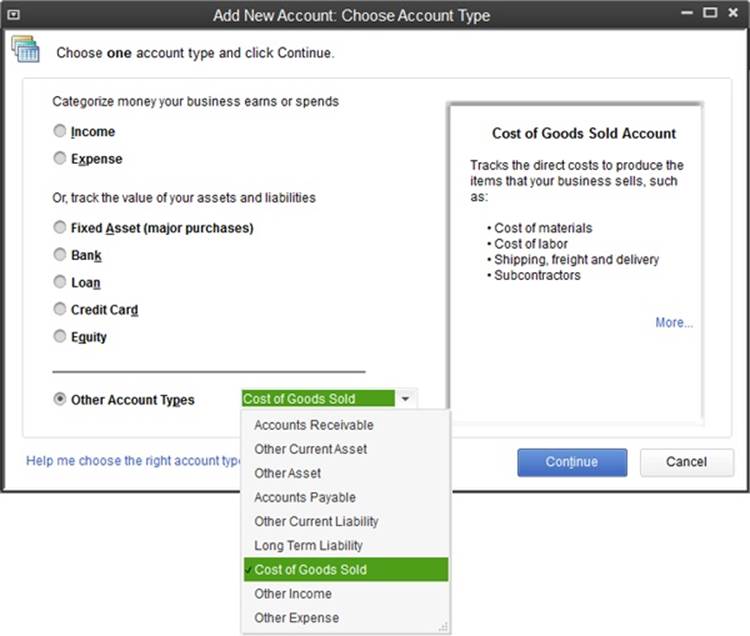
Figure 3-2. If you aren’t sure which type to choose for your new account, read the box on page 52. When you select one of the options here, a description with examples of that type of account appears on the right side of the window. Click More to read a Help topic that explains when to use that type of account.
2. Select the type of account you want to create, such as Bank for a bank account, and then click Continue.
The Add New Account window lists the most common kinds of accounts. If you don’t see the type you want—Cost of Goods Sold, for example—select the Other Account Types option, and then choose from the drop-down menu (Figure 3-2).
3. In the Number box in the upper right of the Add New Account window (Figure 3-3), type the chart of accounts account number you want to use. (If you don’t see the Number box, flip to Viewing Account Numbers to learn how to display it.)
If you keep the Chart of Accounts window in view while creating new accounts, you can review the account numbers for similar types of accounts. That way, you can give the new account a number that’s 5 or 10 higher than an existing account number, so that the new one snuggles in nicely with its compatriots in the chart of accounts.
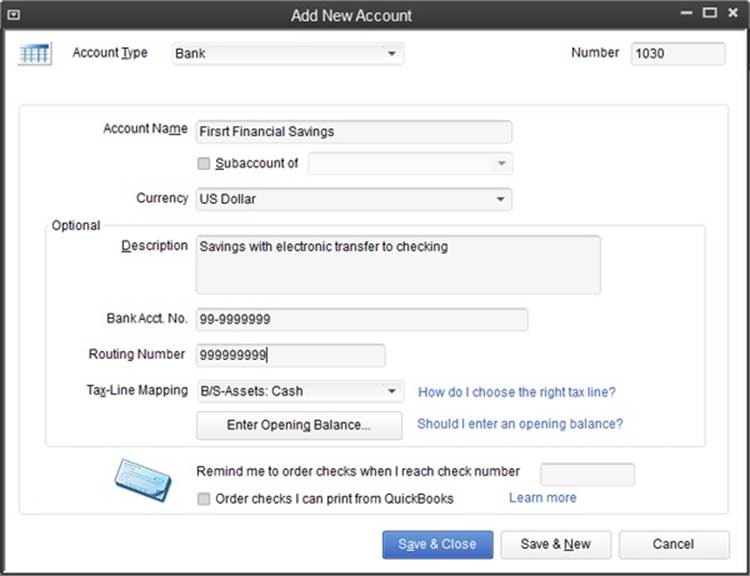
Figure 3-3. The Bank account type includes every account field except the Note field, and includes a few fields that you won’t find in any other account type, such as Bank Acct. No. and Routing Number. If you want QuickBooks to remind you to order checks, in the “Remind me to order checks when I reach check number” field, type the check number you want to use as a trigger. And if you want the program to open a browser window to an Intuit site where you can order supplies, turn on “Order checks I can print from QuickBooks.” If you get checks from somewhere else, just reorder checks the way you normally do.
4. In the Account Name box, type a name for the account.
See Choosing Good Account Names for tips on standardizing account names.
NOTE
If you create an account and don’t see one of the fields mentioned here, it simply doesn’t apply to that account type.
5. If you want the account to be a subaccount, then turn on the “Subaccount of” checkbox. Then, in the drop-down list, choose the account that you want to act as the parent.
Subaccounts are a good way to track your finances in more detail, as the box on Adding Detail with Subaccounts explains. In the chart of accounts, subaccounts are indented below their parent accounts to make the hierarchy easy to see, as shown at the bottom of Figure 3-1.
TIP
When you use subaccounts, QuickBooks displays both the parent account’s name and the subaccount’s name in the Account fields throughout the program, which often makes it impossible to tell which account a transaction uses, as you can see in Figure 3-4 (top). If you want to see only the lowest-level subaccount in Account fields, head to the Accounting section of the Preferences dialog box and turn on the “Show lowest subaccount only” checkbox, which is on the Company Preferences tab (see Accounting).
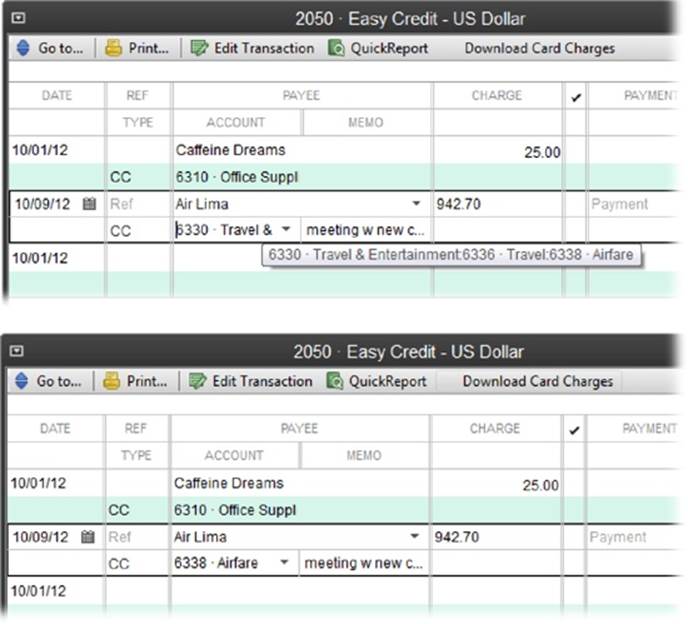
Figure 3-4. Top: QuickBooks combines the names of parent accounts and their subaccounts into one long name in Account fields and drop-down lists, like the travel example shown here. In many instances, only the top-level account is visible unless you scroll within the Account field. Bottom: When you turn on the “Show lowest subaccount only” checkbox, the Account field shows the subaccount number and name instead, which is exactly what you need to identify the assigned account (in this case, Airfare).
UP TO SPEED: ADDING DETAIL WITH SUBACCOUNTS
Say your company’s travel expenses are sky high and you want to start tracking what you spend on different types of travel, such as airfare, lodging, and limousine services. Subaccounts make it easy to track details like these. Subaccounts are nothing more than partitions within a higher-level account (called the parent account).
When you post transactions to subaccounts only (not the parent account), your reports show the subtotals for the subaccounts and a grand total for the parent account, such as the Travel account (number 6336, say) and its subaccounts Airfare (6338), Lodging (6340), and Transportation (6342), for example.
Subaccounts also come in handy for assigning similar expenses to different lines on a tax form. For example, the IRS doesn’t treat all travel expenses the same: You can deduct only half of your meal and entertainment expenses, while other travel expenses are fully deductible. Meals and Entertainment are separate subaccounts from Travel for this very reason.
6. If you’ve turned on QuickBooks’ multiple currency preference, the Currency box appears below the “Subaccount of” checkbox. If the currency for the account is different from the one listed there, choose the right currency in the drop-down list.
If you do business in more than one currency, see Multiple Currencies to learn how to set up multiple currencies in QuickBooks.
7. To add a description of the account, fill in the Description box.
For instance, you can define whether a bank account is linked to another account or give examples of the types of expenses that apply to a particular expense account. The Description field can hold up to 256 characters, which should be more than enough.
8. If you see a field for an account number—such as Bank Acct. No., Credit Card Acct. No., or simply Account No.—type in the number for your real-world account at your financial institution (checking account, savings account, loan, and so on).
If the account type you chose in step 2 doesn’t include a field for an account number, you see the Note field instead, which you can use to store any additional information you want to document about the account.
9. For a bank account, in the Routing Number box, type your bank’s routing number.
This is the nine-digit number in funny-looking font at the bottom of your checks.
10.To associate the account with a tax form and a specific line on that form, in the Tax-Line Mapping drop-down list, choose the entry for the appropriate tax form and tax line.
The Tax-Line Mapping field is set to <Unassigned> if you haven’t specified the tax form that your company files with the IRS. See Business Contact Information to learn how to choose a tax form for your company.
If QuickBooks hasn’t assigned a tax line for you, you can scan the entries in the drop-down list for a likely match. If you don’t find an entry that seems right or if QuickBooks tells you the one you chose isn’t compatible with the account type, your best bet is to call your accountant or the IRS. You can also get a hint for an appropriate tax line for the account you’re creating by examining one of QuickBooks’ sample files (Options for Creating a Company File).
To remove a tax line from an account, in the drop-down list, choose <Unassigned>.
NOTE
Below the Tax-Line Mapping field, you may see the Enter Opening Balance button. It’s easy to figure out the opening balance for a brand-new account—it’s zero—so you can ignore this button. But if you’re setting up QuickBooks with accounts that existed prior to your QuickBooks start date, those accounts do have opening balances. Even so, clicking the Enter Opening Balance button isn’t the best way to specify an opening balance for an account you’re adding to your company file. The box on Doing Opening Balances Right explains how to specify opening balances for all your accounts in just a few steps.
11.Click the Save & New button to save the current account and create another one.
To save the account you just created and close the Add New Account window, click Save & Close instead. Click Cancel to discard the account-in-progress and close the Add New Account window.
12.If the Set Up Bank Feed dialog box appears, click Yes if you want to set up a bank account for online services.
When you click Yes, QuickBooks’ windows close while you go through the setup process. (See Chapter 24 to learn about online services and QuickBooks.) If you want to set up Bank Feeds later—or never—click No.
FREQUENTLY ASKED QUESTION: DOING OPENING BALANCES RIGHT
When I add an account to my company file, can I just click the Enter Opening Balance button and type the balance I want to start with in the Opening Balance field? That seems the most logical place for it.
You can, but your accountant may not be too happy about it. Filling in the Opening Balance field from the Add New Account window (or in the Edit Account window, for that matter) automatically adds that balance to the Opening Bal Equity account, which accountants consider sloppy bookkeeping. Instead, they usually recommend creating a journal entry from your trial balance for most of your accounts.
The three exceptions are your Accounts Receivable (AR), Accounts Payable (AP), and bank accounts. Because QuickBooks requires customer names and vendor names in journal entries that contain AR and AP accounts, you’re better off creating invoices and bills to define your AR and AP opening balances. With bank accounts, you can enter your previous reconciled balance in the Opening Balance field and then bring the account up to date by recording all the transactions since your last reconciliation. If you work with an accountant, ask her how she’d like you to enter opening balances—or better yet, have her do it.
Whoa! What’s a journal entry? What’s a trial balance?
Here’s the deal: Journal entries (Reclassifying Payroll Withholdings) are mechanisms for moving money between accounts—on paper, that is. A trial balance (Viewing Your Trial Balance) is a report (from your accountant or your old accounting system) that lists all your accounts with their balances in either the Debit or Credit column. In the days of paper-based ledgers, bean counters totaled the Debit and Credit columns. If the totals weren’t equal, the accountant had to track down the arithmetic error. Happily, QuickBooks’ digital brain does the math for you, without errors. But it’s up to you to set up the journal entry properly in the first place.
If you look at the trial balance on the first day of your fiscal year, it’s quite simple—it includes balances only for your balance sheet accounts, not income and expense accounts. You can use these values to fill in a journal entry to assign all your accounts’ opening balances: First, set the journal entry’s date to the last day of the previous fiscal year; that way, you can start fresh for your current fiscal year. Next, for each account except your AR and AP accounts, add a line in the journal entry with the account name and the balance from your trial balance report in either the Debit or Credit column. (If you didn’t use the Opening Balance field to set your bank account balances, you can include your bank accounts in the journal entry, too.) Finally, create invoices and bills to define the opening balances for your AR and AP accounts.
To see what an opening balance journal entry looks like, head to Creating Journal Entries.
Working with Accounts
From time to time, you might need to modify your accounts to, for example, change an account’s name or description. If you no longer need an account, you can hide it to keep your chart of accounts list tidy. On the other hand, if you created an account by mistake, you can delete it. And merging accounts comes in handy if you find several accounts that represent the same thing. This section describes how to make all these changes to accounts.
Modifying Accounts
If you stick to your account numbering and naming conventions, you’ll have few reasons to edit accounts. But just in case, the Edit Account window lets you tweak an account’s name or description, adjust its number to make room for new accounts, or change its level in the chart of accounts hierarchy.
You’re not likely to change an account’s type unless you chose the wrong one when you created the account. If you do need to change the account type, back up your QuickBooks file first (see Backing Up Manually) in case the change has effects that you didn’t anticipate. Also, note that QuickBooks has several restrictions on changing account types. You can’t change an account’s type if:
§ It has subaccounts.
§ It’s an Accounts Receivable or Accounts Payable account. (You also can’t change other types of accounts to AR or AP accounts.)
§ QuickBooks automatically created the account, like Undeposited Funds.
To modify an account, in the Chart of Accounts window, select the account you want to edit and then press Ctrl+E or click Account→Edit Account. In the Edit Account window that appears, make your changes, and then click Save & Close.
Hiding Accounts
If you create an account by mistake, you can delete it (you’ll learn how in a sec). However, because QuickBooks drops your financial transactions into account buckets and you don’t want to throw away historical information, you’ll usually want to hide accounts that you don’t use anymore instead of deleting them.
Records of past transactions are important, whether you want to review the amount of business you’ve received from a customer or the IRS is asking unsettling questions. When you hide an account in QuickBooks, the account continues to hold your historical transactions, but it doesn’t appear in account lists, so you can’t choose it by mistake with a misplaced mouse click. For example, you wouldn’t delete your Nutrition Service income account just because you’ve discontinued your nutrition consulting service to focus on selling your new book, The See Food Diet. The income you earned from that service in the past needs to stay in your records.
Hiding and reactivating accounts (Figure 3-5) can also come in handy if QuickBooks created a chart of accounts for you based on the industry you chose during setup (Company Information). If the chart of accounts it created includes accounts you don’t think you need, simply hide thoseaccounts for the time being. That way, if you find yourself saying, “Gosh, I wish I had an account for the accumulated depreciation of vehicles,” the solution might be as simple as reactivating a hidden account.
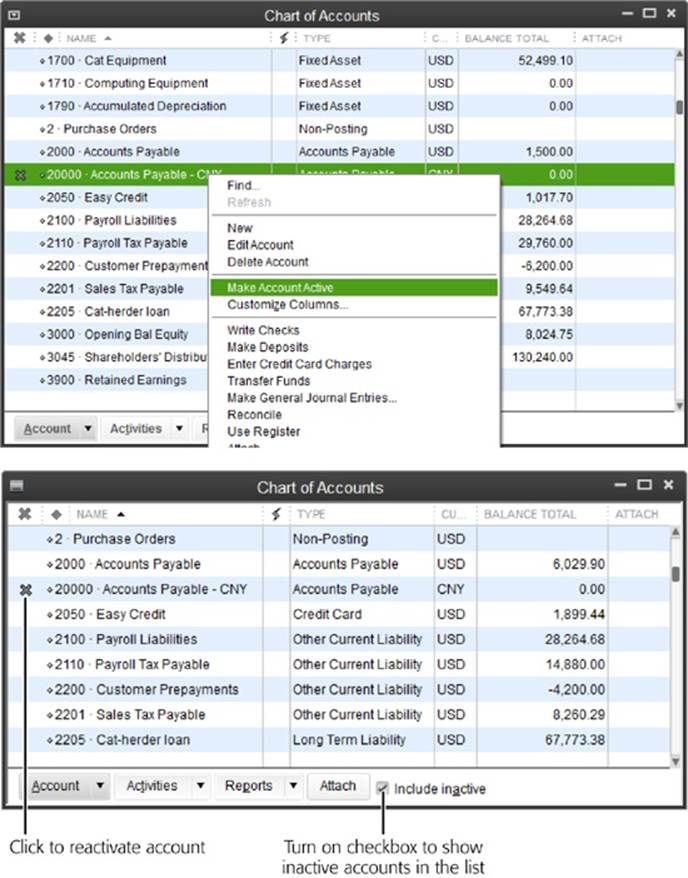
Figure 3-5. Top: To hide an account, in the Chart of Accounts window, right-click the account and choose Make Account Inactive from this shortcut menu. The account and any subaccounts that belong to it disappear from the list. Bottom: To reactivate a hidden account, first display all your accounts by turning on the “Include inactive” checkbox at the bottom of the Chart of Accounts window. When you do that, QuickBooks adds a column with an X as its heading and displays an X in that column for every hidden account in the list. To un-hide an account, click the X next to its name. If the account has subaccounts, QuickBooks displays the Activate Group dialog box; there, click Yes to reactivate the account and all its subaccounts.
Deleting Accounts
You can delete an account only if nothing in QuickBooks references it in any way. An account with references is a red flag that deleting it might not be the right choice. If you try to delete such an account, QuickBooks displays a message box telling you it can’t delete the account and recommends making it inactive instead. If that isn’t enough to deter you, the sheer tedium of removing references to an account should nudge you toward hiding the account instead. If you insist on deleting an account, here are the conditions that prevent you from doing so and what you have to do to remove these constraints:
§ An item uses the account. If you create any items that use the account as an income account, expense account, cost of goods sold account, or inventory asset account, you can’t delete it. You have to edit the items to use other accounts first, as described on Working with Items.
§ The account has subaccounts. You have to delete all subaccounts before you can delete the parent account.
§ Payroll uses the account. You can’t delete an account if your payroll setup uses it.
§ A transaction references the account. If you created even one transaction that uses the account, either edit that transaction to use a different account or hide the account if you want to keep the transaction the way it is.
§ The account has a balance. An account balance comes from either an opening balance transaction or other transactions that reference the account. You remove an account balance by deleting all the transactions in the account (or reassigning them to another account).
To delete transactions, in the Chart of Accounts window, double-click the account’s name. For accounts with balances, QuickBooks opens a register window where you can select a transaction and then press Ctrl+D to delete it. For accounts without balances, QuickBooks opens an Account QuickReport window. To delete a transaction that appears in the report, double-click the transaction. QuickBooks then opens a window related to that transaction (for instance, the Write Checks window appears if the transaction is a check). Right-click anywhere in that window and choose Delete Check or the corresponding delete command for the type of transaction.
After you’ve deleted all references to the account, in the Chart of Accounts window, select the account you want to delete, and then press Ctrl+D or choose Account→Delete Account. QuickBooks asks you to confirm that you want to delete the account; click OK.
Merging Accounts
Suppose you find multiple accounts for the same purpose—Postage and Mail Expense, say—lurking in your chart of accounts. No problem! You can merge the accounts into one and then remind everyone who creates accounts in QuickBooks about your naming conventions. (If you haven’t gotten around to setting up naming conventions, see Choosing Good Account Names for some guidelines.)
TIP
Before you merge accounts, see what your accountant thinks. There’s no going back once you’ve merged two accounts—they’re combined for good. And the QuickBooks audit trail (Checking for Problems) doesn’t keep track of this kind of change.
QuickBooks sweeps all the transactions from the account you merge into the account you keep, so you can merge accounts only if they’re the same type. (As an experienced manager, you can imagine the havoc that merging income and expense accounts would cause in your financial statements.) In addition, accounts must be at the same level in the chart of accounts list; in other words, they both have to be parent accounts or subaccounts. To move an account to another level, in the Chart of Accounts window, position your cursor over the small diamond to the left of the account’s name. When the cursor turns into a four-headed arrow, drag to the left or right so that the account is indented the same amount as the other account.
NOTE
If you find two accounts with similar names but different types, those accounts might not represent the same thing. For instance, an expense account named Telephone Ex. probably contains your monthly telephone service costs, while an asset account named Telephone Eq. might represent the money you invested in a big telephone switch that your mega-corporation owns. In this situation, the accounts are different types and should be separate, although more meaningful names and descriptions would help differentiate them.
Here’s how to eliminate an extraneous account:
1. Switch to single-user mode, as described on Switching Between Multi- and Single-User Mode.
You have to be in single-user mode to merge accounts. Be nice to your fellow QuickBooks users by making these changes outside of working hours. If you have to merge accounts during the workday, remember to tell your coworkers they can log into the program after you’ve switched the company file back to multiuser mode.
2. Press Ctrl+A to open the Chart of Accounts window. Then, in the chart of accounts list, click the name of the account you want to eliminate and then press Ctrl+E.
The Edit Account window opens.
3. In the Edit Account window, change the account number and name to match the values for the account you want to keep.
As long as you get the letters and numbers right, QuickBooks takes care of matching uppercase and lowercase for you.
If you don’t remember the number and name of the account you’re keeping, drag the Chart of Accounts window and the Edit Account window so you can see both at the same time. (If QuickBooks won’t let you do that, you might have the One Window preference turned on; seeDesktop View to learn how to change your settings to display multiple windows.)
4. In the Edit Account window, click Save & Close, read the message informing you that the name is in use and asking if you want to merge the accounts, and then click Yes.
In the chart of accounts list, the account you renamed disappears, and any transactions for that account are now associated with the account you kept.