QuickBooks 2017 All-In-One For Dummies (2016)
Book 3
Bookkeeping Chores
Chapter 4
Managing Cash and Bank Accounts
IN THIS CHAPTER
![]() Writing and printing checks
Writing and printing checks
![]() Making deposits and transferring funds
Making deposits and transferring funds
![]() Using the register
Using the register
![]() Working with the Edit menu
Working with the Edit menu
![]() Reconciling your accounts
Reconciling your accounts
![]() Using the other QuickBooks banking tools
Using the other QuickBooks banking tools
QuickBooks provides several tools that make working with your bank accounts easier, such as a special window for recording the checks you’ve written. QuickBooks also lets you easily record deposits into accounts. Additionally, QuickBooks includes tools for easily recording transfers between accounts, for reconciling bank accounts, and for performing online banking transactions. This chapter talks about all these features.
 If you’ve used QuickBooks’s little-brother product, Quicken, much of the information that you see here will be familiar. The QuickBooks banking tools look like the popular Quicken checkbook program. (This is good news for the 10 million or so Quicken users.)
Writing Checks
Obviously, any business writes checks to pay bills and to pay employees. QuickBooks includes a command and a window specifically for the purpose of recording and possibly printing checks.
Recording and printing a check
To record or print checks, choose the Banking ⇒ Write Checks command. When QuickBooks displays the Write Checks window, as shown in Figure 4-1 , take the following steps to write a check:
1. Use the Bank Account drop-down list to select the correct account on which to write a check.
2. Use the No. (check number) field to identify the check number.
If you don’t know the check number yet because you haven’t printed the check, leave the No. field blank. Then select the Print Later check box, which appears on the Main tab of the Write Checks window.
When you select the Print Later check box, QuickBooks displays the phrase To Print in the No. field.
3. Use the Date field to record the date that the check is written or will be written.
You can enter the check date in mm/dd/yyyy format. You can also enter dates as simply mmdd or m/dd, and QuickBooks transforms them to mm/dd/yyyy. Thus, 8/12, 0812, and 0812/2017 are all valid ways to enter the same date, if the current year is 2017.
Alternatively, you can click the small calendar button that appears to the right of the Date field. When you click the calendar button, QuickBooks displays a pop-up calendar. To select a day shown on the calendar, click the day. The pop-up calendar also includes a pair of buttons that you can click to scroll back and forth through the months.
4. Use the Pay to the Order Of field to identify the individual or business that you’re paying with the check.
If the check that you’re recording is the first check that you’ve ever made out to the payee, you must type the payee’s name in the Pay to the Order Of field. If you’ve previously paid the payee, you can click the arrow button at the right end of the Pay to the Order Of field. When you do, QuickBooks displays a list of previous payees. You can select a payee from this list by clicking the name.
5. Move the selection cursor to the Dollars (or amount) field and type the check amount.
QuickBooks writes out the check amount on the line below the Pay to the Order Of field.
6. (Optional) Provide an address.
If you want, you can use the address block to provide the payee’s address. Note that QuickBooks writes the payee name on the first line of the address block when you fill in the Pay to the Order Of field. You can add the other lines to the address block manually. Note, though, that if you’ve previously entered an address for a payee (such as when you last recorded a check to the payee), QuickBooks reuses this address information for subsequent checks.
You can edit the address information shown in the Write Checks window.
You need to record the address only if you’re going to print the check and the address will show through the address window or when you’re creating an online payment — something I talk about later in this chapter.
7. (Optional) Provide a memo description.
You can use the Memo field to provide or record additional information. If you’re going to print the check, for example, you can use the Memo field to identify your account number or the invoice number that the check pays. If you’re simply recording checks and won’t be printing checks, you can use the Memo field to record more proprietary or confidential information.
8. (Optional) Select the Pay Online check box on the Memo tab.
So here’s the deal: If you’ve told your bank that you want to do the online banking thing and have followed its instructions for setup, you can select the Pay Online check box (which appears after you’ve set up online banking — it won’t show up in our figures for our fictitious Pine Lake Porcelain since, not surprisingly, no bank would open an actual account for our fake company). This setting tells QuickBooks to transmit this check information to your bank, along with instructions to the bank to make the payment.
More information on setting up online banking is available later in this chapter.
To transmit the payment instructions to the bank later, choose Banking ⇒ Bank Feeds ⇒ Bank Feeds Center, click Send, and enter your personal identification number (PIN) when QuickBooks asks for it. Note that QuickBooks doesn’t display the Bank Feeds command until you set up an account for online banking.
9. Distribute the check amount to the appropriate expense or asset accounts.
If the check pays for a particular expense or purchases a particular asset, click the Expenses tab. Then use the lines or rows of the Expenses tab to identify the account and the amount that the check pays. To record a $50 check that pays supplies expense, for example, use the Account column of the Expenses tab to select the office-supplies expense account; then use the Amount column to identify the amount of the office supplies. Optionally, use the Memo column to provide a memo description of that line of expense detail. Equally optionally, use the Customer:Job column and the Class column to further describe and categorize the line of account detail information. If you categorize the expense as one incurred for a particular customer or job, you can use the Billable? column to indicate whether this item should be billed to the customer later (see Figure 4-2 ).
If a check pays for several types of expenses, the Expenses tab should show several lines.
If you write a check to purchase an asset, the Expenses tab doesn’t show an expense account; instead, its tab shows an asset account. If you buy a $5,000 piece of machinery, you may distribute, or categorize, that $5,000 check to an asset account. In this case, the Account column of the Expenses tab shows the asset account name and the Amount column shows the amount of the asset purchased.
10.Describe the items that the check purchases.
Figure 4-3 shows the Items tab of the Write Checks window. You use the Items tab when you write a check to purchase items shown and described in your Item list. If you write a $1,000 check to buy 1,000 $1 items for inventory, you use the Items tab. To use the Items tab, identify the item being purchased by entering the item code or name in the Item column. Optionally, edit the item description shown in the Description column. Then use the Qty, Cost, and Amount columns to describe the number of items and the total cost of the items purchased. As with the Expenses tab, QuickBooks gives you the option of further classifying an item by using the Customer:Job, Billable?, and Class columns.
Book 3, Chapter 3 describes how items and the Item list work in QuickBooks. If you’re unsure how to work with items, refer to that chapter.
11.To print a check, click the Print button.
The Print option is in the top menu above the bank account you’ve selected to pay out of. Alternatively, if you want to print checks in a batch, after you’ve recorded the very last check that you want to print, click the down arrow below the Print button. When QuickBooks displays the Print menu, choose its Print Batch command. QuickBooks displays the Select Checks to Print dialog box, as shown in Figure 4-4 . Select the checks that you want to print by clicking them. Use the First Check Number box to identify the number of the first check form to use for printing. Then click OK.
When QuickBooks displays the Print Checks dialog box, as shown in Figure 4-5 , use the Check Style area to identify the type of check forms on which you’re printing. If you’re using standard or wallet-style checks, you also need to indicate the number of checks. Then click the Print button.
You can also print check forms in a batch by choosing the File ⇒ Print Forms ⇒ Checks command. When you choose this command, QuickBooks displays the Select Checks to Print dialog box. Identify which checks you want to print, click OK, and use the Print Checks dialog box to finish printing your checks.
12.After you describe the check and the reasons for writing the check, click either the Save & Close or the Save & New button in the Write Checks window.
The Save & Close button saves the check and also closes the Write Checks window. Click the Save & New button to save the check and then redisplay the Write Checks window so that you can record another check. If you don’t want to save the check, click the Clear button.
The Write Checks window provides several buttons on the Main tab: Previous, Next, Print, and Find. I describe the Print button in an earlier step, but let me note here that the Previous and Next buttons page back and forth to the checks that you’ve already written. The Find button displays the Find Checks dialog box, which you can use to describe a check similar to the one you’re looking for. After you describe the check you’re looking for, click the Find button in the Find Checks dialog box.
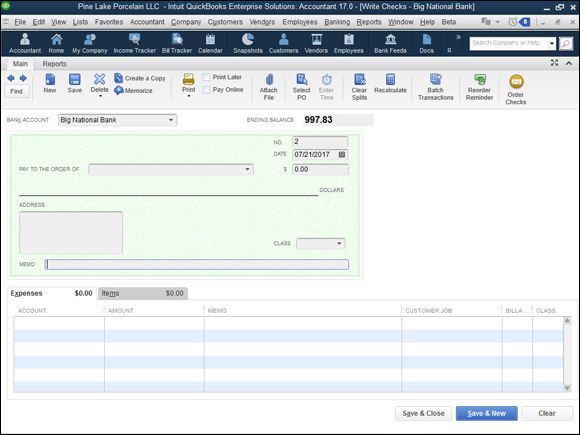
FIGURE 4-1: The Write Checks window.
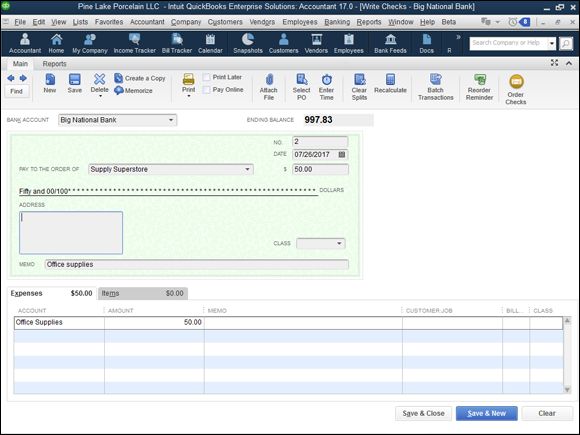
FIGURE 4-2: The Write Checks window, filled out to record an expense.
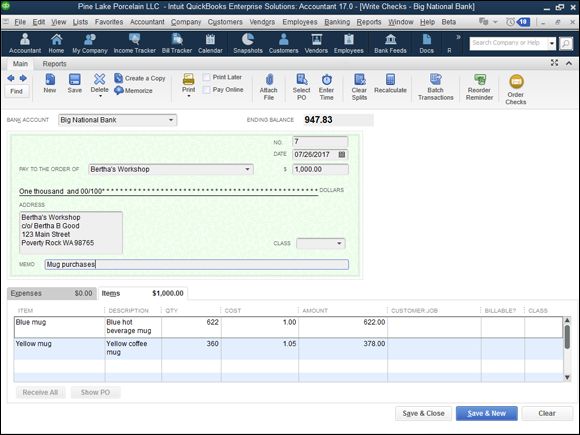
FIGURE 4-3: The Write Checks window, displaying the Items tab.
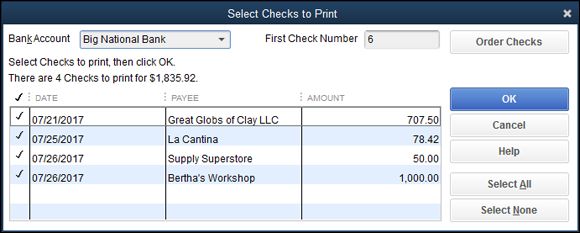
FIGURE 4-4: The Select Checks to Print dialog box.
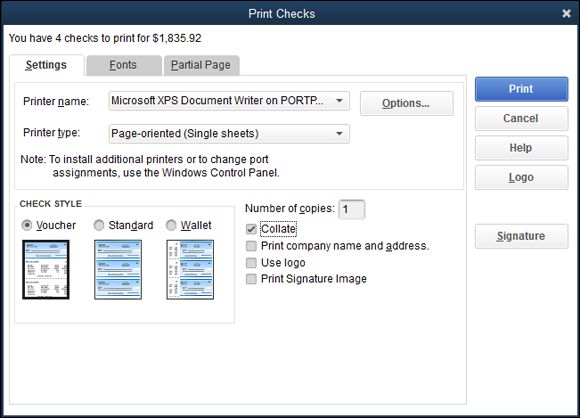
FIGURE 4-5: The Print Checks dialog box.
Customizing the check form
While I’m on the subject of printing check forms, I’ll quickly make a couple of observations. If you click the Fonts tab of the Print Checks dialog box, QuickBooks displays a couple of buttons you can click to specify what fonts QuickBooks should use for printing check forms (see Figure 4-6 ).
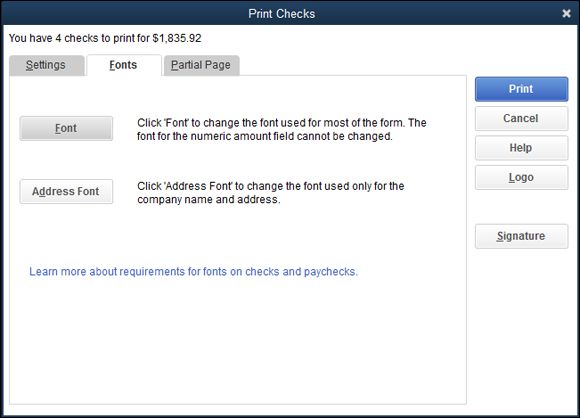
FIGURE 4-6: The Fonts tab of the Print Checks dialog box.
If you click the Font button, for example, QuickBooks displays the Select Font dialog box, shown in Figure 4-7 . You select the font you want from the Font list box, any special type style (such as bold or italic) from the Font Style list box, and the point size from the Size list box. You can experiment with different font settings and see the combined effect in the Sample box.
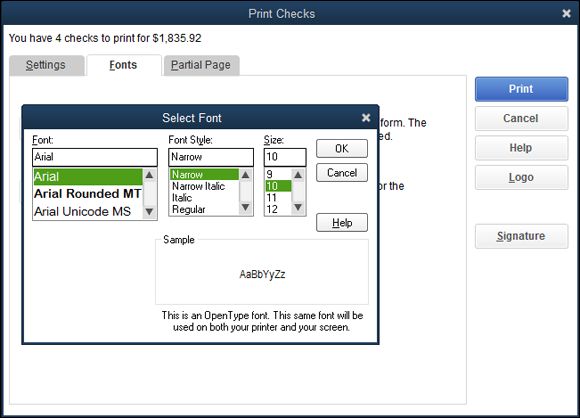
FIGURE 4-7: The Select Font dialog box.
If you click the Partial Page tab, QuickBooks displays the dialog box shown in Figure 4-8 . Use this tab’s buttons to tell QuickBooks how you feed a partial page of check forms through your printer.
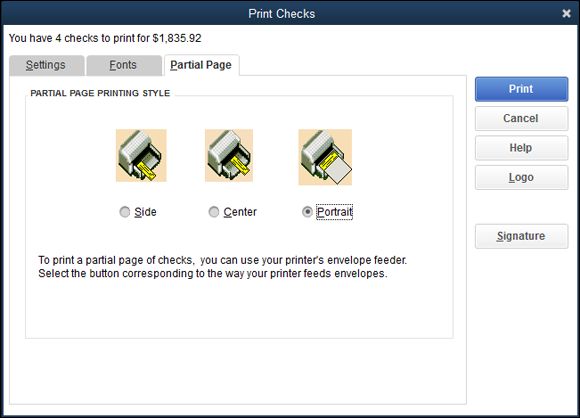
FIGURE 4-8: The Partial Page tab of the Print Checks dialog box.
One final tidbit about customizing check forms: If you click the Logo button (available in the Print Checks dialog box, as shown in Figure 4-8 ), QuickBooks displays a little dialog box that lets you tell QuickBooks it should print a logo on your checks. To print a logo, you need an image file for the logo (perhaps something you’ve created in Paint or another image-editing program). This little dialog box just lets you tell QuickBooks where the logo image file is located.
Making Bank Deposits
QuickBooks also supplies a command and window for recording bank deposits. To record bank deposits, follow these steps:
1. Choose the Banking ⇒ Make Deposits command.
QuickBooks displays the Payments to Deposit dialog box, shown in Figure 4-9 . The dialog box shows any payments previously recorded by means of the Receive Payments and Enter Sales Receipts commands, which appear on the Customers menu. (Note that QuickBooks goes right to the Make Deposits window, shown in Figure 4-10 later in this section, and skips the Payments to Deposit dialog box if there are no pending deposits to make.)
2. Use the Payments to Deposit dialog box to select the payments you want to deposit.
You can select all the payments listed by clicking the Select All button. You can select individual payments by clicking them. QuickBooks marks selected payments with a check mark.
3. Click OK.
QuickBooks displays the Make Deposits window, shown in Figure 4-10 .
4. Use the Deposit To drop-down list to identify the bank account into which you’re depositing the funds.
5. Use the Date box to identify the deposit date.
You can enter the date in mm/dd/yyyy fashion, or you can click the small calendar button to the right of the Date field. On the calendar that appears, click the day that you want the Date field to show.
6. (Optional) Provide a memo description.
Initially, QuickBooks uses the Memo field to describe the transaction as a deposit. This is, obviously, a pretty good description of a deposit transaction. If you want to change the memo description to something else even more useful — such as daily cash sales or something like that — replace the contents of the Memo box.
Perhaps the best use for the box was suggested by the accountant who reviewed this manuscript: You can use this field to further describe any unusual transactions, such as refunds of expenses, rebates, asset sale proceeds, and so forth.
As you may know either from working with QuickBooks or from the discussion of making sales in Book 3, Chapter 1 , you have the option of telling QuickBooks (whenever you receive a payment) that the payment should be directly deposited to the bank account or lumped with other payments in an undeposited funds bucket.
Not all customer payments appear in the Make Deposits window. As discussed in Book 3, Chapter 1 , you can also indicate that a customer payment should be deposited in a bank account directly from two windows: the Receive Payments window and the Enter Sales Receipts window. These direct-into-the-account payments don’t appear in the Make Payments window. You actually record these bank account deposits at the same time that you record the customer payment or the sales receipt.
7. Record any additional deposit amounts.
If you want to include as part of the deposit some other payment that’s not listed initially in the Make Deposits window, you can use the next empty row of the list to describe this payment. To describe the payment, use the Received From column to identify the customer, vendor, or other individual or business making the payment. Use the From Account column to identify the account that should be credited for this payment. In the case of a customer payment that’s a sale, for example, your sales revenue account should be the one recorded in the From Account column. Use the other columns of the Make Deposits window — Memo, Chk No., Pmt Meth., Class, and Amount — to provide the other details of the payment.
8. Identify any cash-back amount.
If you’re making a $1,000 deposit but want to hold $100 of the deposit back as cash, you record a cash-back amount. To record a cash-back amount, use the Cash Back Goes To drop-down list to identify the account that should be adjusted for the cash back. Use the Cash Back Memo field to describe the reason for the cash-back transaction. Finally, enter the cash-back amount in the cleverly titled Cash Back Amount box. If you want to hold $100 of cash back for an owner draw, for example, you may enter owner draws (suppose that this is an account) in the Cash Back Goes To box. Then you may use the Cash Back Memo field to further describe the reason for the draw. Or not. Finally, you enter the cash-back amount, $100 , in the Cash Back Amount box.
9. Save the deposit transaction.
As is the case with other QuickBooks transaction-entry windows, click either the Save & Close or the Save & New button to save your deposit transaction. Note that after you’ve saved the deposit transaction, QuickBooks records the deposit in the appropriate bank account. This deposit transaction total — which appears in the Deposit Total field at the bottom of the window — is the amount that appears in your bank statement. It’s also the amount that appears in the bank account register. (I talk about bank account registers a little later in the chapter.)
The Make Deposits window also provides Previous and Next buttons that enable you to page back and forth through your deposit transactions. The Print button in the Make Deposits window lets you print a deposit list. The Payments button lets you redisplay the Payments to Deposit dialog box. The History button lets you display a transaction history for the selected payment. Finally, the Attach button opens a dialog box that you can use to attach a document (such as a PDF image of a check) to the deposit.
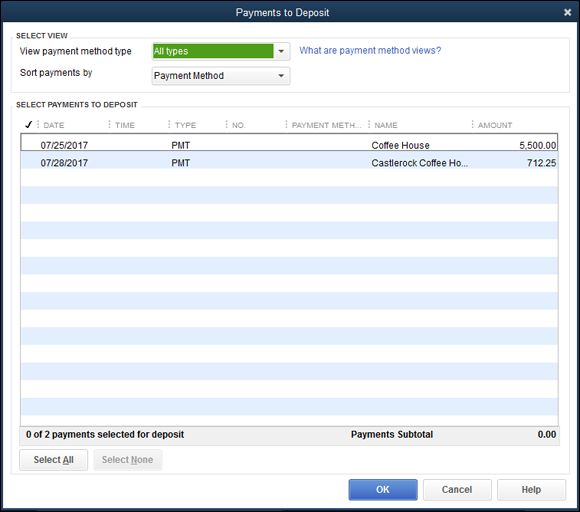
FIGURE 4-9: The Payments to Deposit dialog box.
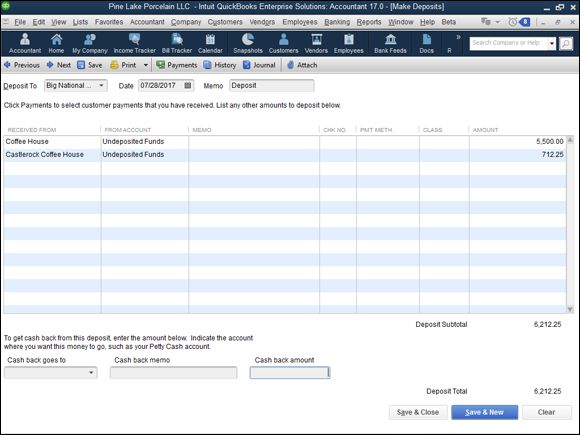
FIGURE 4-10: The Make Deposits window.
Transferring Money between Bank Accounts
The Banking menu supplies a useful command for transferring money between bank accounts. To transfer money between accounts, you can choose the Banking ⇒ Transfer Funds command. When you do so, QuickBooks displays the Transfer Funds Between Accounts dialog box, as shown in Figure 4-11 .
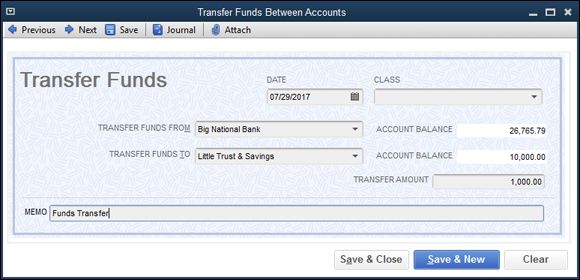
FIGURE 4-11: The Transfer Funds Between Accounts dialog box.
To use the Transfer Funds Between Accounts dialog box, follow these steps:
1. Use the Date field to identify the transfer date.
You can enter the date in mm/dd/yyyy format, or you can click the small calendar button that appears to the right of the Date field. When QuickBooks displays the calendar, click the day that corresponds to the date you want to enter in the Date field.
2. Use the Transfer Funds From drop-down list to select the bank account from which you’re moving funds.
You can enter the bank account name in the box, or you can click the drop-down arrow at the right end of the box and choose a bank account from the list that QuickBooks supplies.
3. Use the Transfer Funds To drop-down list to identify the bank account that receives the transferred funds.
The Transfer Funds To list works like the Transfer Funds From list.
4. Use the Transfer Amount box to identify the amount of the transfer.
If you transfer $1,000 from your savings to your checking account, for example, the transfer amount is $1,000. (This is what Figure 4-11 shows.)
5. (Optional) Provide a memo description for the transfer transaction.
If you want (and this is no big deal), you can use the Memo box to provide some brief memo description of the funds transfer.
6. Save the transfer transaction.
To save your transfer transaction, click either the Save & Close or the Save & New button. Alternatively, if you don’t want to save the transfer transaction, click the Clear button.
Working with the Register
You can record checks, deposits, and account transfers by using the commands described in the preceding paragraphs of this chapter, but you have another method available, too: You can use the Register window. The Register window looks like the regular paper register that you use to keep track of transactions for a bank account. QuickBooks allows you to enter transactions directly into an account register.
Recording register transactions
To enter a bank account transaction directly into an account register, follow these steps:
1. To display an account register, choose the Banking ⇒ Use Register command.
Sometimes, when you choose the Banking ⇒ Use Register command, QuickBooks displays the Use Register dialog box (see Figure 4-12 ). Sometimes, it displays the actual register (see Figure 4-13 ).
The Use Register dialog box asks you to select the bank account that you want to display in a register. To select the account that you want to use, open the Select Account drop-down list, select the bank account, and then click OK. QuickBooks displays the Register window, shown in Figure 4-13 .
If QuickBooks shows the register of an account other than what you want to see, choose Banking ⇒ Use Register again. The Use Register dialog box (refer to Figure 4-12 ) should appear.
The Use Register dialog box actually lets you select any balance sheet account. You can select a nonbank account, too.
2. Use the Date column of the register to record the date of the deposit, payment, or transfer.
You can enter a date by using mm/dd/yyyy date format. Or you can click the small calendar button to the right of the Date field to display the month that shows the date and then click the day button that corresponds to the date you want to enter.
3. (Optional) Assign a transaction number.
Use the Number column to uniquely identify the transaction. In the case of check transactions, for example, use the Number field to record the check number. For transfers and deposits, you may not need to record a number.
4. Use the Payee field to record the payee for a check, the customer paying a deposit, or some other bit of information in the case of a transfer transaction.
Note that you can select an existing customer, vendor, or a name from one of the QuickBooks lists by clicking the down-arrow button at the right end of the Payee field. When you do this, QuickBooks displays a list of names. Click the one that you want to select.
5. Provide the transaction amount.
Use the Payment column if you’re describing a check transaction or a transfer that moves money from the account. Use the Deposit column if you’re describing a deposit into the account or transfer into the account. Enter the amount of the transaction in the appropriate column — Payment or Deposit — by using dollars and cents.
6. Identify the account.
For check transactions, you use the Account field to identify the expense that a check pays or the asset that a check purchases. For deposit transactions, you use the Account field to identify the sales revenue account that the deposit represents. For Transfer transactions, use the Account field to identify the other bank account involved in the transaction. You can enter the Account name in the Account box, or you can open the Account drop-down list and select the account that you want.
7. (Optional) Provide a memo description.
If you want, use the Memo field to provide a brief description of the payment, deposit, or transfer transaction.
8. (Optional) Split the transaction.
If a transaction needs to be assigned to more than one account, click the Splits button. QuickBooks then displays the Splits area in the register window, shown in Figure 4-14 . The Splits area lets you split a transaction among several accounts. A check that pays both office supplies and rent expenses, for example, can be split between these two expense accounts. Similarly, a deposit transaction that represents both product revenue and service revenue can be split between these two accounts. When you finish with the Splits area, click its Close button.
You can erase the Splits detail by clicking the Clear button. You can also tell QuickBooks to recalculate the payment or deposit amount by using the split transaction data simply by clicking the Recalc button.
The Splits area also lets you do something that isn’t possible inside the regular register: You can use the Splits area to record customer and job information, class information, and billing information. To do this, use the Customer:Job column, the Billable column, and the Class column.
9. To record a transaction in the register, click the Record button.
QuickBooks recalculates the account balance and adjusts the ending balance for the new transaction.
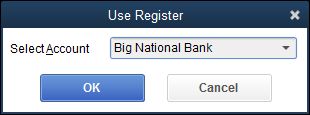
FIGURE 4-12: The Use Register dialog box.
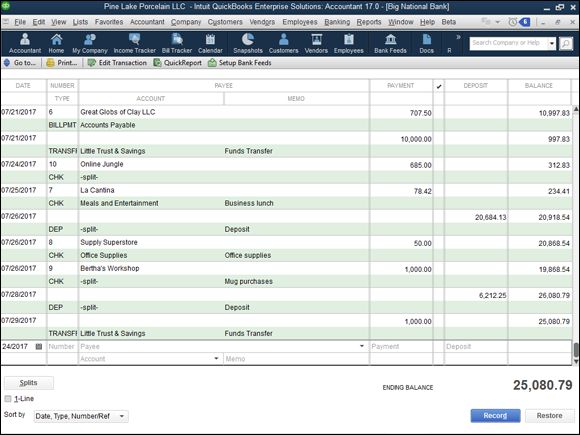
FIGURE 4-13: The Register window, showing transactions that affect the bank account.
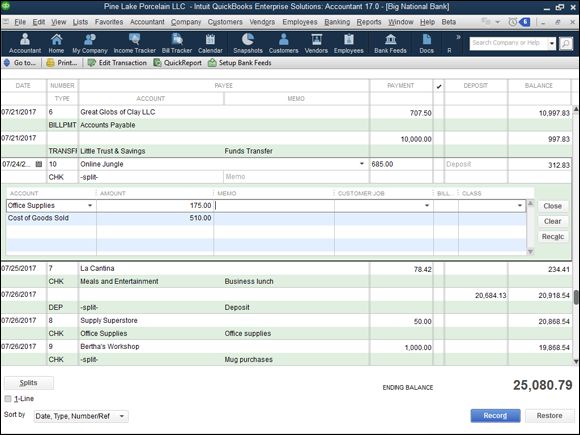
FIGURE 4-14: The Register window, showing the Splits area.
Using Register window commands and buttons
The Register window provides several buttons and boxes to enable you to more easily work with the Register window and control the way it looks.
The Go To button
Clicking the Go To button displays the Go To dialog box, as shown in Figure 4-15 . The Go To dialog box lets you search for a transaction in the Register window, such as a transaction in which the Payee/Name uses some name. You can click the Back and Next buttons to move to the previous or next transactions that also match the search criteria. To remove the Go To dialog box from the QuickBooks program window, of course, click Cancel.
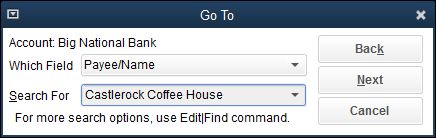
FIGURE 4-15: The Go To dialog box.
The Print button
The Print button, when clicked, displays the Print Register dialog box (see Figure 4-16 ). The Print Register dialog box lets you print a copy of the register for the account. The Print Register dialog box provides Date Range From and Date Range Through boxes, where you specify the range of dates you want on the printed register. The Print Register dialog box also provides a Print Splits Detail check box, which you can select to tell QuickBooks that you want to see the split transaction detail.
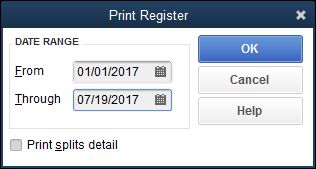
FIGURE 4-16: The Print Register dialog box.
The Edit Transaction button
The Edit Transaction button, when clicked, tells QuickBooks to display whatever window you used to originally record the selected transaction. Remember that the Register window shows all the transactions for the bank account. These transactions include, for example, checking account transactions that you recorded when using the Write Checks window. If you click the Edit Transaction button when the selected transaction is one that you originally recorded in the Write Checks window, QuickBooks displays that transaction again in the Write Checks window. Edit the transaction in the Write Checks window, and click either Save & Close or Save & New to save your changes.
The QuickReport button
Click the QuickReport button to display a report that summarizes register information for the payee or name in the selected transaction. If the selected transaction is a check written to Great Globs of Clay, clicking QuickReport builds a quick-and-dirty report that shows the transactions we have paid to Great Globs of Clay (see Figure 4-17 ).
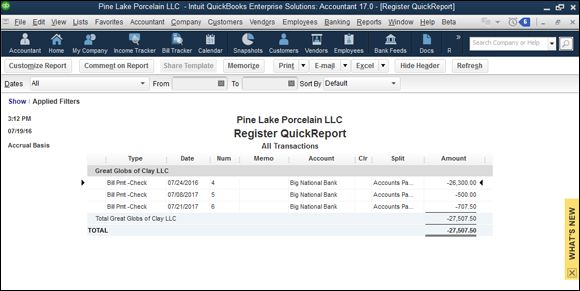
FIGURE 4-17: A sample QuickReport.
The Download Bank Statement button
Click the Download Bank Statement button to tell QuickBooks that you want to use the Internet to connect to your bank’s computer and download recent transactions. Note that you need to prearrange this service with your bank and that this button is called Setup Bank Feeds until you set up an online account. (For more information about QuickBooks’s online banking features, see “Bank Feeds command ” later in this chapter.)
The 1-Line check box
QuickBooks lets you display a one-line or a two-line version of the register (see Figure 4-18 ). By default, QuickBooks assumes that you want the two-line version of the register, but you can display a more compact, one-line version of the register by selecting the 1-Line check box.
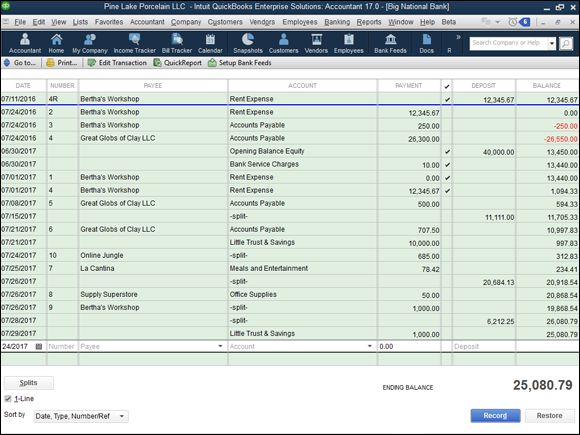
FIGURE 4-18: A one-line version of the register.
The Sort By box
The Sort By drop-down list lets you choose how QuickBooks arranges register information. QuickBooks lets you arrange register information by date, by amount, by order entry date, and by several other sorting methods as well. To change the way that QuickBooks orders or organizes the information in the register, open the Sort By drop-down list, and choose the ordering sequence that you want.
Using Edit Menu Commands
In the preceding paragraphs of this chapter, I describe how to record check transactions, deposit transactions, and transfers between accounts, and how to use the register. You often don’t need to know any more than I’ve already described to use the windows discussed and record the transactions described. Know, however, that when you’re working with a register, the Edit menu provides several other useful commands for entering new transactions, editing existing transactions, and reusing transaction information:
· Edit Check/Deposit: This command is equivalent to the Edit Transaction button (which appears in the Register window). If you choose the Edit Check/Deposit command, QuickBooks displays the Write Checks window so that you can edit the transaction with that tool.
The command name changes depending on the selected transaction. You see the Edit Check command if the selected transaction is a check. You see the Edit Deposit command if the selected transaction is a deposit.
· New Check: This command displays the Write Checks window so that you can record a new check transaction and record it in the register.
· Delete Check: The Delete Check command deletes the selected transaction from the register. (The name of this command changes depending on the transaction selected in the register.)
· Memorize Check: This command, which appears when appropriate, memorizes the selected transaction, adds the check information to the memorized transaction list, and thereby allows you to reuse the check information at some point in the future. (If you have a transaction that you record frequently, such as every month, memorizing the transaction and then reusing it often saves you data entry time.)
· Void Check: This command, which also appears when appropriate, lets you void the selected check transaction.
· Copy/Paste: The Copy command copies the currently selected check. If you choose the Paste command, QuickBooks pastes the just-copied check into the next empty row of the register.
· Go To Transfer: This command goes to the other side of a transfer transaction. The Go To Transfer command, obviously, makes sense and works only if the selected transaction is a transfer.
· Transaction History: This command displays a window that lists all the transactions related to the current selected transaction. Typically, you use this Transaction History command when the selected transaction is a customer payment. In this case, the Transaction History window would list all the transactions related to the customer payment transaction. You can use the Transaction History window to go quickly to one of the related transactions. Simply click the transaction listed. You can also edit transactions shown in the Transaction History window. Click the transaction and then click the Edit Payment button to do this.
· Notepad: Choose this command to display the Notepad dialog box so you can jot down free-form information about the selected transaction’s payee. The Notepad dialog box includes a Date Stamp button you can use to record the time when you jot a note and a Print button you can use to print hard copies.
· Change Account Color: This command displays the Change Account Color dialog box, which lets you choose another color for the striping shown in the Register window. To select another color, click the color square that shows the color that you want and then click OK.
· Use Register: This command displays the Use Register dialog box, which lets you select the account that you want to display in a register.
· Use Calculator: This command, predictably, displays the Windows Calculator. If you have questions about how to work with the Windows Calculator, refer to the Windows documentation, the Windows Help file, or a book such as Windows 10 For Dummies, 2nd Edition, by Andy Rathbone (John Wiley & Sons, Inc.).
· Find: The Find command displays either the Simple tab of the Find window, shown in Figure 4-19 , or the Advanced tab of the Find window, shown later in this section. Both tabs allow you to search your register and find transactions.
To use the Simple tab, use the Transaction Type, Customer:Job, Date, Invoice #, and Amount boxes to describe the transaction you want. Enter as much information as you can, but note that if you enter incorrect information, QuickBooks (obviously) won’t be able to find the transaction you’re looking for. After you describe the transaction in as much detail as you can, click the Find button. QuickBooks displays a list of transactions that match your search criteria (see Figure 4-20 ). To go to a particular transaction, click the transaction in the list and then click the Go To button.
The Advanced tab, shown in Figure 4-21 , lets you describe a much more precise and complex set of search criteria. Essentially, you can describe in painful detail a filter that QuickBooks should apply to each field that’s recorded for a transaction. If you want to filter based on the account, for example, select the account entry in the Filter list. Then open the Account drop-down list, and choose one of the account groupings that QuickBooks displays. In Figure 4-21 , the All Accounts entry is selected so all accounts show, but you can choose the Select Accounts entry instead to display a dialog box that you can use to individually select the accounts you want to look for. The Include Split Detail? radio buttons let you indicate whether you want to use split detail information. After you describe the filter or filters you want to use, click the Find button. As with the Simple tab of the Find window, QuickBooks displays a list of all the transactions that match your filter. To go to one of the transactions listed, click it and then click the Go To button.
The Report button, which appears on both on the Simple tab and the Advanced tab, creates a report of all the transactions that the Find command has found. You can print this report — QuickBooks displays it in a regular report window — by choosing the File ⇒ Print Report command or by clicking the Print button that appears at the top of the Report window. The Simple and Advanced tabs of the Find window also include a Reset button. I should say that if you want to start your search over by using a new set of search criteria or filtering criteria, simply click the Reset button.
· Search: This command opens a search window that you can use to search for specific information within your company file.
· Preferences: This command enables you to change the way that QuickBooks works so that it best matches your firm’s accounting requirements. Book 2, Chapter 3 discusses the Preferences command in detail.
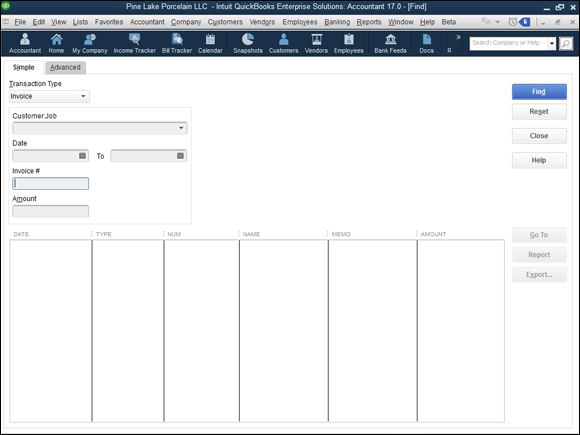
FIGURE 4-19: The Simple tab of the Find window.
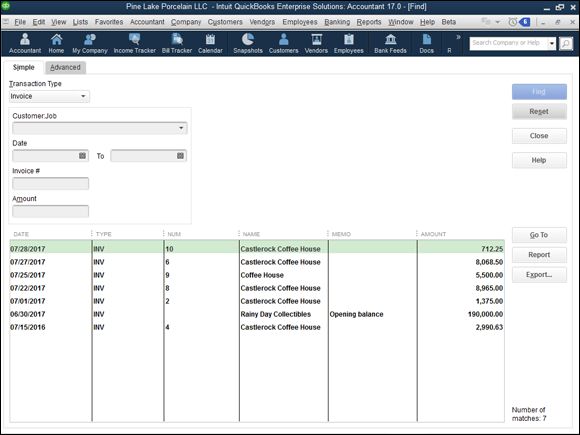
FIGURE 4-20: Results of a simple search in the Find window.
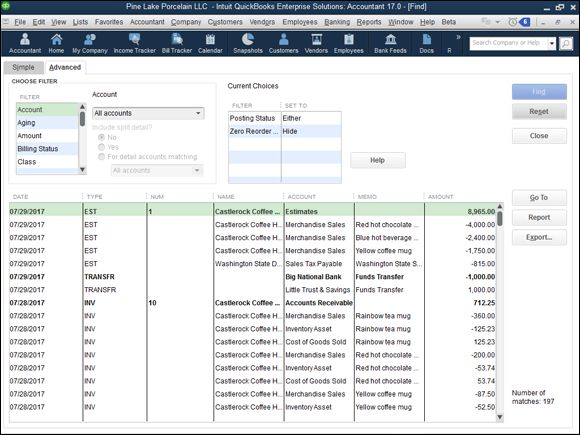
FIGURE 4-21: The Advanced tab of the Find window.
Reconciling the Bank Account
You can reconcile a bank account with surprising speed in QuickBooks. To reconcile the bank account, choose the Banking ⇒ Reconcile command. QuickBooks displays the Begin Reconciliation dialog box, shown in Figure 4-22.

FIGURE 4-22: The Begin Reconciliation dialog box.
To begin reconciling your account, follow these steps:
1. Choose the account that you want to reconcile from the Account drop-down list.
2. Use the Statement Date box to identify the ending date of the bank statement that you’re using in your reconciliation.
As is always the case with date fields in QuickBooks, you enter the date in mm/dd/yyyy date format or click the calendar button and use it to select the correct date.
3. Enter the ending balance shown on your bank account statement in the Ending Balance box.
4. Use the Service Charge and Interest Earned boxes to identify the amount of any service charge or of any interest, the date of any such transaction, and the account that you use to track those charges.
If your bank statement shows a service charge, enter the service charge amount in the first Service Charge box. Enter the date of the service charge transaction in the Service Charge Date box. Finally, choose an appropriate expense account for tracking service charges from the Service Charge Account drop-down list. (Bank charges, for example, is a good account to track service charges.)
In a similar fashion, use the Interest Earned boxes to describe any interest earned on a business account.
5. Review the statement information.
After you enter information about the bank account, the statement date, the ending balance, and any service charge or interest earned information, take a moment to review the information and confirm that it is correct. You’ll have a whale of a time reconciling an account if the amount that you’re trying to reconcile to is incorrect.
6. After you make sure that everything is hunky-dory, click the Continue button.
QuickBooks displays the Reconcile window, as shown in Figure 4-23 .
7. To identify checks and payment transactions that have cleared your bank account, click the transactions that have cleared.
The Reconcile window displays two lists of transactions: a list of checks and payments, which appears on the left, and a list of deposits and other credits, which appears on the right. When you click a transaction, QuickBooks marks the transaction with a check mark, indicating that a transaction has cleared. You can mark all the transactions in a list as cleared by clicking the Mark All button. To mark all the transactions in a list as uncleared, click the Unmark All button.
Use the Deposits and Other Credits list to identify those deposit transactions that have cleared the bank account. You identify a cleared deposit transaction in the same way that you identify a cleared check or payment transaction. You can click a transaction, which causes QuickBooks to mark the transaction as cleared. You can also use the Mark All and Unmark All buttons to mark or unmark all the deposits and other credit transactions at one time.
If you realize that as part of the reconciliation, you’ve incorrectly entered the service charge, interest earned, ending balance, or any other information, click the Modify button. QuickBooks redisplays the Begin Reconciliation dialog box (refer to Figure 4-22 ). Make the necessary changes, and click Continue to return to the Reconcile window.
8. Verify that the cleared balance equals the ending balance.
If you provided correct information in the Begin Reconciliation dialog box (refer to Figure 4-22 ), and you correctly identified all the transactions that have cleared your account, the ending balance should equal the cleared balance, as shown in Figure 4-24 .
9. When the ending balance equals the cleared balance, click the Reconcile Now button.
QuickBooks permanently records your cleared transactions as cleared and redisplays the Register window. If you can’t reconcile an account, you can click the Leave button. QuickBooks saves your half-completed reconciliation so that you can come back later and finish it.
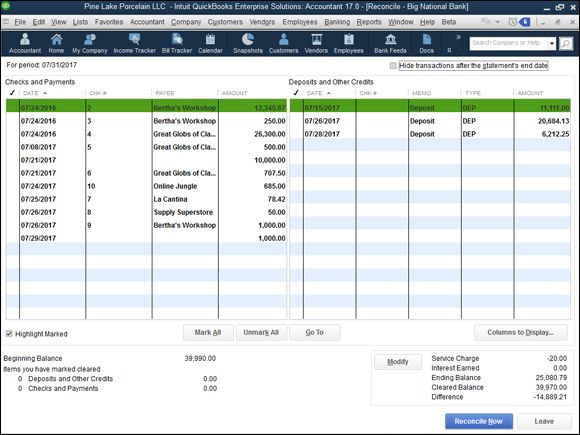
FIGURE 4-23: The Reconcile window.
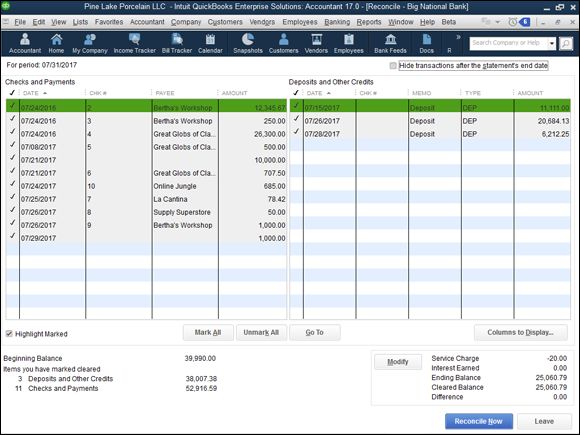
FIGURE 4-24: The Reconcile window when the reconciliation is complete.
WHEN YOUR ACCOUNT WON’T BALANCE
If your account won’t reconcile, the problem stems from one of several conditions. None of the conditions is hard to describe, but all of them can be pretty hard to fix. Here’s a quick overview of what may be causing you trouble and what may be preventing you from reconciling your account:
· Are you working with the right account? That sounds pretty dumb, doesn’t it? But if you have several bank accounts, you may be trying to reconcile the wrong account or using the wrong statement to reconcile your account.
· Are you missing any transactions? If the bank has recorded transactions that you haven’t, this causes your ending balance to not equal your cleared balance. Look on your statement for any transactions that you’re missing or forgot to record; then record these transactions, and mark them as cleared.
· Have you recorded transactions correctly? This may also sound silly, but if you recorded the transaction, and you’re a few pennies off or a few dollars off — perhaps you’ve transposed a couple of numbers — you won’t be able to reconcile your account. I commonly find that I’ve entered a transaction or two wrong per month. (Maybe this is because my fingers are too arthritic to correctly record amounts.) But it’s probably very common when you’re entering dozens and dozens of transactions to occasionally record a transaction wrong. The occasional errors need to be fixed before you can reconcile an account.
Note that it’s quite likely — especially when you’re getting started — that you won’t be able to reconcile an account because of multiple errors. If you do something like record a transaction erroneously and then forget to record a couple of transactions, you’ll need to fix each of these errors to reconcile your account.
One final tip: Reconciling an account is much easier if you’re using online banking. I talk about how online banking works a little later in this chapter.
Can I interject a couple of tangential comments here? Good. If you want, you can print a little report that summarizes your reconciliation after you click the Reconcile Now button. (QuickBooks gives you this option in a dialog box that it displays.) You can also click the Previous Reports button to display a dialog box that lets you print other old reconciliation reports. You can click the Discrepancy Report button to produce a report that lists transactions that have been edited since you last reconciled the account. Finally, you can click the column headings used in the Reconciliation window to sort and re-sort the bank account information.
Reviewing the Other Banking Commands
Earlier in this chapter, I describe the most common and useful banking commands. You may not need to use the other commands provided on the Banking menu. Nevertheless, my compulsive personality requires that I describe these other commands.
Order Checks & Envelopes command
The Order Checks & Envelopes command displays a submenu of commands you use to order QuickBooks checks and envelopes or to get information about ordering QuickBooks checks and envelopes.
Enter Credit Card Charges command
If you set up a credit card account — this is a credit card account that you or your business would use to charge transactions — you can choose the Banking ⇒ Enter Credit Card Charges command to display a window you can use to enter credit card charges.
When you choose the Enter Credit Card Charges command, the Enter Credit Card Charges window appears (see Figure 4-25 ). You can figure out how this window works without my help, I’m sure. You identify the credit card account for which you want to record transactions, and you describe the credit card purchase by using the field at the top of the screen. Then you use the Expenses and Items tabs — these tabs work the same way as the similar tabs in the Write Checks window — to detail the reasons and the accounts affected by your charge.
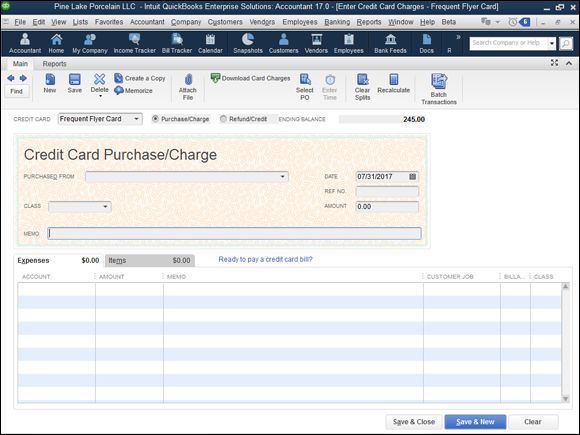
FIGURE 4-25: The Enter Credit Card Charges window.
If you click the Download Card Charges button (which appears in the Enter Credit Card Charges window), assuming that you’ve set up credit card accounts that allow for online services, QuickBooks downloads recent credit card transactions directly into the credit card register. Perhaps obviously, for this command to work, several prerequisites must be met:
· You need a credit card account already set up.
· You need to have set up the credit card account for online services.
· You need an Internet connection so that QuickBooks can grab the credit card transactions from the credit card company.
Bank Feeds command
The Bank Feeds command displays a submenu of commands that you use to conduct online banking and to see which financial institutions (banks, savings and loans, and credit unions) let you do online banking. If you want to do online banking — which can save businesses a ton of time — call your existing bank and ask whether it provides the service. If it does, ask for a sign-up packet and for specific instructions on how to get going with online banking. If you don’t like the idea of calling your bank directly, choose the Set Up Bank Feed for Account command from the Bank Feeds submenu. This command walks you through the process of applying for and setting up online financial services.
If you want to learn more about online banking, you choose the Participating Financial Institutions command to see which banks play well with QuickBooks. And you can choose the Learn about Online Bill Payment command for online bill payment options when your bank doesn’t play well with QuickBooks but you don’t want to change banks.
The Bank Feeds submenu also provides the Import Web Connect File command, which lets you open a transaction file from your bank (if that’s the way your bank does online banking); and the Change Bank Feeds Mode command, which lets you tweak the way the online banking window looks.
 Can I close out this discussion of online banking with an editorial comment? Online banking is a real time-saver for business owners. If you’re not using online banking, you really should have a pretty darn good reason for not doing so.
Loan Manager
The Loan Manager command displays a window that lists loan accounts you’ve set up. This listing of loan accounts, by itself, isn’t all that special, but the Loan Manager window does something else that is special: If you click the Add a Loan button, QuickBooks collects loan information from you so that it can break loan payments into principal and interest.
Other Names list
The Other Names list displays a window that lists all the other names you’ve used to record transactions. Individuals and businesses that appear in your Other Names list aren’t customers, vendors, or employees. In other words, the Other Names list includes names that don’t neatly fit into one of the standard categories.