QuickBooks 2017 All-In-One For Dummies (2016)
Book 3
Bookkeeping Chores
Chapter 3
Tracking Inventory and Items
IN THIS CHAPTER
![]() Viewing your Item list
Viewing your Item list
![]() Expanding the Item list
Expanding the Item list
![]() Changing items
Changing items
![]() Modifying physical counts and inventory values
Modifying physical counts and inventory values
![]() Modifying prices and price levels
Modifying prices and price levels
![]() Dealing with a manufacturing firm’s inventory
Dealing with a manufacturing firm’s inventory
If you’ve worked with QuickBooks, you won’t be surprised to hear that the Item list is a key piece of your QuickBooks accounting system. The Item list identifies each of the things that you sell. The Item list also identifies other things that appear in your invoices and — if you use them — purchase orders.
In this chapter, I talk about how you work with the QuickBooks Item list — more specifically, how you look at and use the information in the Item list to track and tally what you sell. I explain how to add information to the list and how to edit information that’s already in the list. What’s more, I talk about three accounting tasks that are related to your Item list: adjusting physical inventory accounts for inventory shrinkage or spoilage, adjusting price levels of your inventory items, and (if you manufacture inventory) using QuickBooks to handle inventories of manufactured goods.
Looking at Your Item List
QuickBooks provides a bunch of ways to see the information that you’ve stored in your Item list. You may already know some of this stuff if you’ve worked with QuickBooks a bit; some of it may be new to you. In any case, the next sections review the nearly half-dozen ways that you can see the items in your Item list.
Using the Item Code column
One important point to consider as you look at the Item Code column and Item Code drop-down list in the Create Invoices window (see Figure 3-1 ) is space. Note that the Item Code column is pretty narrow. Note also that the Item Code drop-down list in Figure 3-1 provides the item code (the left column), the item type, and a more lengthy item description. Though you do have quite a bit of space for a description, you can’t go hog wild.
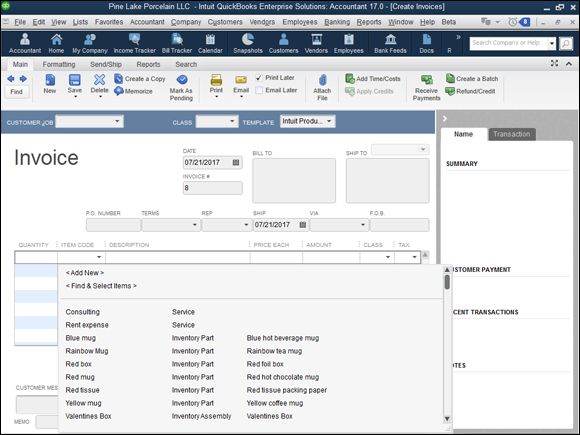
FIGURE 3-1: The Item Code column and drop-down list in the Create Invoices window.
 I’m using self-explanatory item codes in this reference, as you can see in Figure 3-1 . In real life, your codes may be far more cryptic.
Using the Item List window
If you choose the Lists ⇒ Item List command, QuickBooks displays the Item List window, as shown in Figure 3-2 . The Item List window identifies the item code or name, the description, the type of item (I talk more about this in the next section of the chapter), the account that gets credited when you sell some of the items, and the inventory stocking and pricing information (if you supply that).
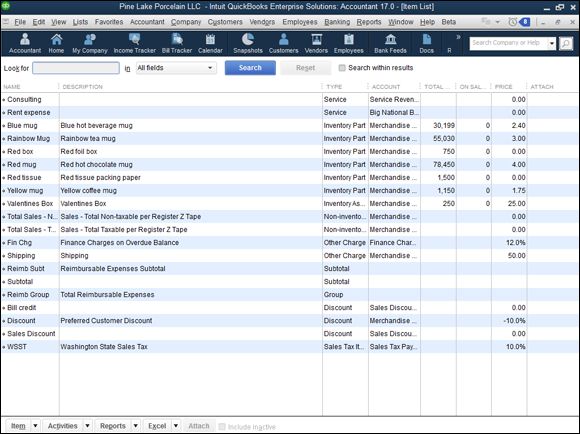
FIGURE 3-2: The Item List window.
The Item list provides a good way to quickly see what items you can put in invoices and purchase orders. The Item list also provides a quick and convenient way to see stocking levels and prices.
If you want more information about an item shown in the Item List window, you can double-click the item. When you double-click the item, QuickBooks displays the Edit Item window, as shown in Figure 3-3 . Essentially, the Edit Item window displays all the information available about a particular item. You can use this window to change bits of item information. Later in this chapter, in “Editing Items ,” I describe how to do this.
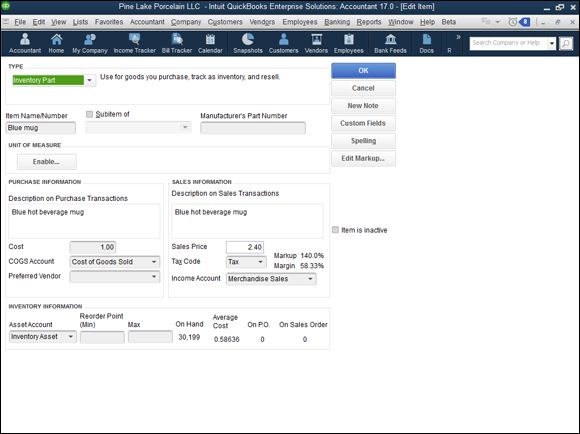
FIGURE 3-3: The Edit Item window.
Using inventory reports
I mention one other thing because it’s so darn useful. As you’d expect, QuickBooks supplies several interesting, useful inventory reports. If you choose the Reports ⇒ Inventory command, for example, QuickBooks displays a submenu of inventory reports. The submenu provides reports that give inventory valuations, inventory stock levels, and a worksheet that you can use to physically count the inventory on store shelves or in the warehouse.
Book 4, Chapter 2 describes how you produce reports in QuickBooks and how you customize those reports. If you want to find out more about reports and report customization, see that chapter.
Adding Items to the Item List
You can add a bunch of types of items to the Item list. Remember that as noted in the early paragraphs of this chapter, the Item list stores descriptions of anything that you stick in an invoice or purchase order.
When you think about this for a minute, you realize that you have different types of items. If you’re a retailer, for example, the inventory that you sell may appear in an invoice. If you provide discounts to different sorts of customers, discounts may appear in an invoice as a line item. If you’re in a state that taxes sales, sales tax appears as a line item in an invoice.
You describe different items in different ways. You describe an inventory item that may appear in an invoice differently from the way you describe a sales tax that you’re required to charge.
Given this disparity, I first describe the general process for adding an item to the Item list. After you know the big-picture stuff, I talk about the items that appear in the Item list individually. Sound okay? I’ll get started.
Adding an item: Basic steps
To add an item to your Item list, follow these steps:
1. Choose the Lists ⇒ Item List command .
QuickBooks displays the Item List window (an example of which appears in Figure 3-2 , earlier in this chapter).
2. To display the Item menu, click the Item button, which appears in the bottom-left corner of the Item List window.
QuickBooks displays the Item menu.
3. Choose the New command.
This command tells QuickBooks to display the New Item window, as shown in Figure 3-4 .
4. Use the boxes of the New Item window to describe the item that you want to add.
Your first step is to identify the type of item that you want to add. Based on the type of item, QuickBooks supplies other boxes that you use to describe the item. (I go into more detail about this in the following paragraphs, so don’t get freaked out — yet.)
5. Save the item.
After you use the boxes in the New Item window to describe the item that you want to add, click OK. QuickBooks adds the item that you just described in the Item list.
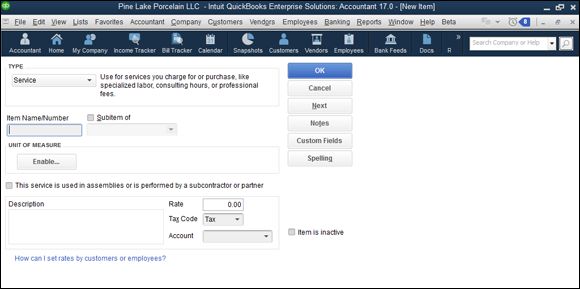
FIGURE 3-4: The New Item window.
The step-by-step approach described in the preceding paragraphs is the conventional way to add an item, but you can also add items on the fly. If you’re using the Create Invoices window or the Create Purchase Orders window, you can open the Item drop-down list and choose Add New Entry. When you do this, QuickBooks displays the New Item window (refer to Figure 3-4 ). Then you use the New Item window to add the item in the manner discussed here.
Adding a service item
You use service items to purchase or bill for items that represent service. Take my example. I’m a CPA in Redmond, Washington. One of the things that I do is prepare tax returns for individuals and businesses. When I bill a client for preparing his or her tax return, the line item that appears in the invoice for Tax Return Preparation is a service item.
In your business, you probably have service items, too. A health-care provider, such as a dentist or doctor, provides treatment or performs procedures. Dentists might fill cavities. Doctors might perform physicals or give vaccinations. These activities represent services.
Even retailers and contractors — businesses that you typically think of as selling tangible physical goods — often sell services. A retailer may gift-wrap a purchase, which is a service. A contractor may provide services such as painting and cleanup.
To add a service item, display the New Item window (refer to Figure 3-4 , earlier in this chapter), and choose Service from the Type drop-down list. In the Item Name/Number box, give the service a brief code or name. If the service is a subitem, select the Subitem Of check box and identify the parent item.
Select the check box titled This Service Is Used in Assemblies or Is Performed by a Subcontractor or Partner if the service is provided by (as the window suggests) a subcontractor, owner, or partner. You indicate which services are performed by subcontractors, owners, and partners because these parties are subject to different tax accounting rules.
Next, use the Description box to describe the service. Your description appears in invoices and purchase orders, so you want to be thoughtful here. Use the Rate box to describe the price or rate per unit of service. Use the Tax Code drop-down list to indicate whether the service is taxable. Finally, use the Account drop-down list to identify which income account should be credited when the item is sold to some customer, client, or patient.
Adding an inventory part
Inventory parts are those items in invoices and purchase orders that represent physical goods that you buy, hold, and sell. If you’re a retailer, all that stuff that’s sitting out on the shelves of your store represents inventory. If you’re a manufacturer, the raw materials that you buy and then use to assemble your products represent inventory.
To set up an inventory part, display the New Item window and choose Inventory Part from the Type drop-down list. QuickBooks displays the Inventory Part version of the New Item window, as shown in Figure 3-5 .
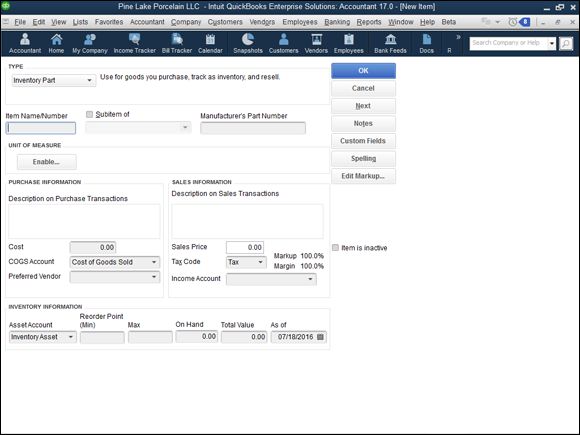
FIGURE 3-5: The Inventory Part version of the New Item window.
Use the Item Name/Number box to provide a descriptive but brief code or name for the item. If the item is a subitem of some other parent item, select the Subitem Of check box and then identify the parent item by using the Subitem Of text box.
The Purchase Information and Sales Information boxes let you determine the information that appears in purchase orders and invoices. The Description on Purchase Transactions box in the Purchase Information area, for example, lets you provide the text that QuickBooks displays in purchase orders. You can also guess at the purchase cost by using the Cost text box. Specify the cost of goods sold (COGS) account that should be debited when this item is sold by choosing it from the COGS Account drop-down list, and identify the preferred vendor for purchases of this item by choosing that vendor from the Preferred Vendor drop-down list.
The Sales Information boxes provide the information that QuickBooks needs to correctly include the item in an invoice. The Description on Sales Transactions box provides a space that you can use to supply the description that QuickBooks should use for this item on your invoice. The Sales Price box enables you to provide your price for the item. If you’re subject to sales tax, you see (and should use!) the Tax Code drop-down list to specify whether the item is taxable or nontaxable for sales tax purposes. Finally, the Income Account drop-down list lets you specify which income account should be credited when this item is sold.
If you’re confused about seeing three Account drop-down lists in the Inventory Part version of the New Item window, keep in mind that when you sell an item, you track the income by crediting an income account and the cost of goods sold by debiting the cost of goods sold account.
Use the Inventory Information boxes to describe how QuickBooks should handle inventory tracking for the item. Use the Asset Account drop-down list, for example, to specify which account QuickBooks should use to track the dollar investment in this item. Typically, you use the Inventory Asset account, but you can conceivably use some other asset account. Use the Reorder Point boxes to identify the inventory stocking level at which you want QuickBooks to alert you to reorder the item. If you have inventory on hand for this item, enter the quantity that you have on hand and the value that you have on hand in the On Hand and Total Value boxes. You also specify the date as of which your quantity and value information is correct by using the As Of box.
 You really shouldn’t be entering inventory balances for an inventory item when you set it up in the Item list. You should be entering or changing inventory quantities and values when you purchase the inventory (recorded in the Create Purchase Orders window or the Write Checks window) and when you sell the inventory (typically recorded in the Create Invoices window or the Sales Receipts window). If you enter a quantity other than zero or a total value other than zero in the New Item window, you also need to make a journal entry to record the other half of the transaction. If this “other half” business sounds complicated, just trust me: You shouldn’t be entering quantity or value information in this window. If you do understand this “other half” business that I’m referring to, you should know better than to enter quantity or value information in the New Item window!
You can click the Spelling button to check the spelling of words and phrases that you’ve entered in the New Item window. You can also click the Next button to save the information that you’ve entered for an item and redisplay the New Item window so you can add another item.
Adding a noninventory part
To add a noninventory part — which is a tangible good that you sell but for which you don’t track inventory — display the New Item window and choose Non-Inventory Part from the Type drop-down list. When QuickBooks displays the Non-Inventory Part version of the New Item window (see Figure 3-6 ), give the noninventory part a name or code by using the Item Name/Number box. If the new item is a subitem, select the Subitem Of check box and then identify the parent item by using the Subitem Of text box. Use the Description box to provide the description that should go in invoices that bill for this noninventory part. Obviously, you enter the price in the Price box. Use the Tax Code drop-down list to identify whether the item is subject to sales tax. Finally, use the Account drop-down list to identify the income account that should be credited for sales of this noninventory part.
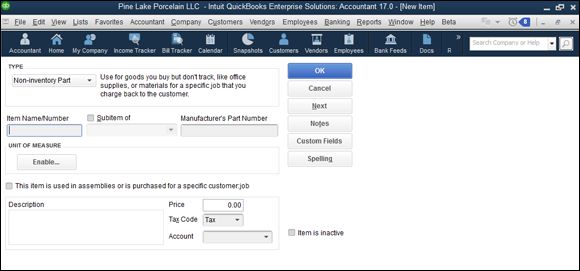
FIGURE 3-6: The regular Non-Inventory Part version of the New Item window.
Note the check box labeled This Item Is Used in Assemblies or Is Purchased for a Specific Customer:Job. If you select that check box, QuickBooks displays a slightly different version of the Non-Inventory Part window, as shown in Figure 3-7 . This version of the window includes Purchase Information and Sales Information areas that work the same way as the Purchase Information and Sales Information areas supplied by the regular Inventory Part version of the New Item window. (Refer to Figure 3-5 and the discussion of Figure 3-5 earlier in the chapter.)
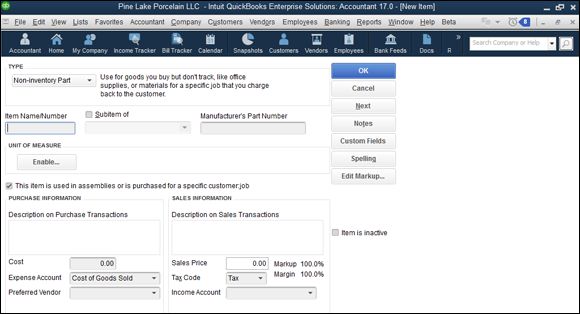
FIGURE 3-7: The kooky Non-Inventory Part version of the New Item window.
Adding an other-charge item
An other-charge item is an item that you use to purchase or bill for things such as miscellaneous labor or services; materials that you aren’t tracking as inventory; and special charges, such as for delivery or setup or rush jobs.
To set up an other-charge item, display the New Item window and choose Other Charge from the Type drop-down list. When you do, QuickBooks displays the Other Charge version of the New Item window, as shown in Figure 3-8 . To finish setting up your other charge item, give the charge a name or code or abbreviation by using the Item Name/Number box. If the other charge item is a subitem, select the Subitem Of check box and then identify the parent item by using the Subitem Of text box. Obviously, you use the Description box to provide a description of the charge. (Remember that this description appears in your invoices.) Use the Amount or % box to identify how the charge gets calculated or billed. Use the Tax Code drop-down list to identify the charge as subject to sales tax — or not subject to sales tax. Use the Account drop-down list to identify the income account that should be credited when you bill for this other charge.
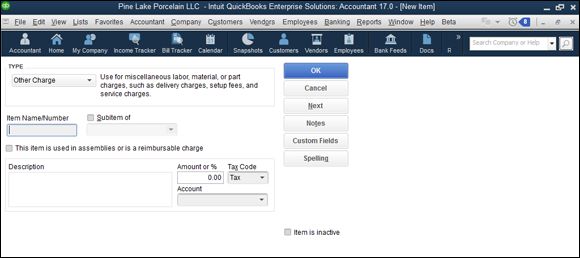
FIGURE 3-8: The Other Charge version of the New Item window.
If you select the check box titled This Item Is Used in Assemblies or Is a Reimbursable Charge, QuickBooks adds a second set of boxes to the New Item window. One set of boxes, labeled Purchase Information, provides information that goes in purchase orders or is used to record purchases and purchase orders. The other set of boxes, labeled Sales Information, goes in invoices and sales receipts to record the actual sale or billing for the other charge.
If you want to enter an other charge that should be calculated as a percentage, you must enter the % symbol in the Amount or % box. To include an other-charge item in invoices that equals 25 percent of the previous item in the invoice, for example, enter 25% in the Amount or % box.
Adding a subtotal item
If your purchase order, sales receipt, or invoice includes a subtotal line item, you create a subtotal item in your Item list. To do this, display the New Item window and choose Subtotal from the drop-down list. Next, give the subtotal item a name or abbreviation, and use the Description box to describe the subtotal. Finally, check the column or columns you want QuickBooks to subtotal. (Usually, you want just the amount column to be totaled, but you can also have the quantity, price, and cost columns totaled, too.) Figure 3-9 shows the Subtotal version of the New Item window.
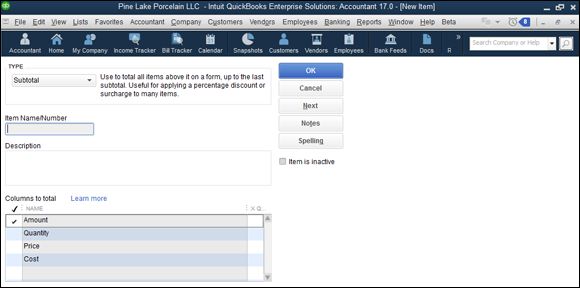
FIGURE 3-9: The Subtotal version of the New Item window.
If you’re using other charge items that are calculated as a percentage or discount items that are calculated as a percentage, you almost certainly need a subtotal item. An other charge that is calculated as a percentage typically would be calculated as a percentage of a subtotal item. Similarly, a discount item that’s calculated as a percentage is calculated as a percentage of a subtotal item.
Adding a group item
A group item lets you more easily invoice customers when, from the customer’s perspective, he or she is buying a single item, but from your perspective, you’re actually selling several items. This definition sounds curious at first, but let me give you a quick example. Suppose that you’re a florist who does booming business on Valentine’s Day. Your best-selling items may be red roses and pretty crystal vases. But you probably don’t sell individual roses and individual vases. You actually sell a dozen roses with a single vase. Although you want to individually track purchases of dozens of red roses and individual crystal vases in your purchase orders, in your invoices to customers, you want to bill for “a dozen red roses in a crystal vase.”
At the end of the chapter, I describe another item type: inventory assembly, which works similarly to the group item type. The inventory assembly item type is for manufacturers.
If that example doesn’t make sense, imagine a more complex floral arrangement, including a dozen red roses, a crystal vase, baby’s breath, flower preservative, tissue-paper wrapping, ribbon, a box, and so forth. In this case, do you really want an invoice that shows perhaps 20 items? Or do you want an invoice that shows a single item: a dozen red roses in a crystal vase? This is why you create group items. A group item lets you create a single item that you use in invoices, but this group item actually combines a bunch of individual items that you’re probably using in your purchase orders.
To create a group item, display the New Item window and choose Group from the Type drop-down list. When QuickBooks displays the group version of the New Item window (see Figure 3-10 ), use the Group Name/Number box to give the group item a name or code. Use the Description box to give the group item an appropriate description. Use the Item, Description, and Qty columns at the bottom of the window to identify the individual items and item quantities that combine to make a group.
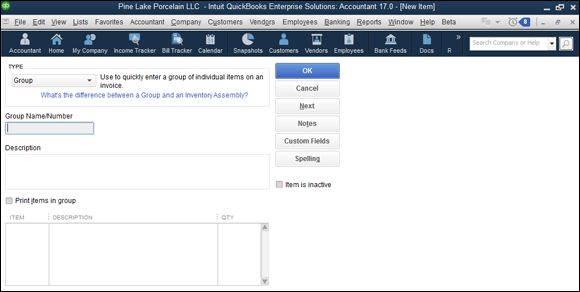
FIGURE 3-10: The Group version of the New Item window.
Adding a discount item
A discount item subtracts either a fixed amount or a percentage from a subtotal. To set up a discount item, display the New Item window and choose the Discount entry from the Type drop-down list. When you do, QuickBooks displays the Discount version of the New Item window, as shown in Figure 3-11 .
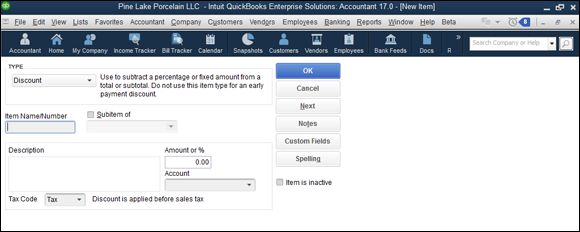
FIGURE 3-11: The Discount version of the New Item window.
To set up your discount item, enter a name or abbreviation for the discount in the Item Name/Number box. If the discount item is a subitem, select the Subitem Of check box and then identify the parent item by using the Subitem Of text box. Typically, you describe the discount by using the Description box. Enter the amount of the discount in the Amount or % box as either a dollar amount or as a percentage. (If you do enter the discount as a percentage, be sure to include the percentage symbol.) Use the Account drop-down list to specify which account gets debited for the discount. Finally, use the Tax Code drop-down list to indicate whether the discount is applied before sales tax. (In other words, indicate whether the discount is subject to sales tax.)
If you set up a discount item that calculates the discount as a percentage, you probably also need a subtotal item. Then, in your invoices, follow the subtotal item with the discount item. In this manner, you can easily calculate the discount percentage by looking at the subtotal amount.
Adding a payment item
If you sometimes accept payments at or before the point you invoice a customer, you can create a payment item and then add the payment item to the bottom of the invoice. If you do this, the invoice, the payment amount, and the net amount due all appear in the same document. That’s pretty cool.
To set up a payment item, display the New Item window and choose Payment from the drop-down list. QuickBooks displays the Payment version of the New Item window, shown in Figure 3-12 . Use the Item Name/Number box to give the payment item a code or name such as “payment.” Use the Description box to provide a nice description of the payment. (No kidding, you may want to include the phrase Thank you as part of the payment description, such as Payment … thank you! ) Use the Payment Method drop-down list to identify the method of payment: American Express, check, cash, Discover, MasterCard, or Visa, as appropriate. Finally, use the radio buttons — Group with Other Undeposited Funds and Deposit To — to identify what happens to the money received as part of the payment. If you indicate that the money is deposited, you also choose the correct bank account from the Deposit To drop-down list.
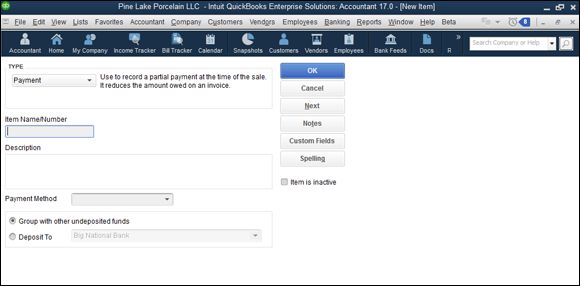
FIGURE 3-12: The Payment version of the New Item window.
Adding a sales tax item
If you sell items that are subject to sales tax, you also include line items in your invoices that charge for and track these sales taxes. To do this, you create sales tax items. To create a sales tax item, display the New Item window and choose Sales Tax Item from the Type drop-down list. When you do, QuickBooks displays the Sales Tax Item version of the New Item window, as shown in Figure 3-13 . Use the Sales Tax Name box to identify or provide an abbreviation for the sales tax. Use the Description box to give the sales tax a description. Finally, use the Tax Rate (%) box to identify the sales tax rate and the Tax Agency (Vendor That You Collect For) drop-down list to identify the tax agency that you’ll pay.
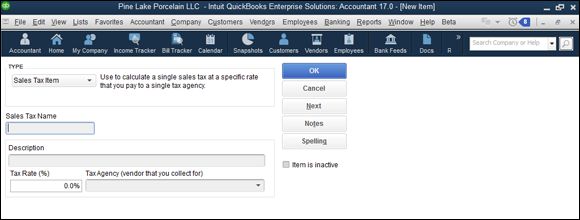
FIGURE 3-13: The Sales Tax Item version of the New Item window.
Setting up a sales tax group
In many jurisdictions, although businesses may charge a single sales tax on sales, the sales tax actually gets distributed to several tax agencies. A firm may be required to charge a 9 percent sales tax, for example, but perhaps 1 percent goes to the local city government, another 2 percent goes to the county government, and the remaining 6 percent goes to the state government. In this case, you can set up a sales tax group, which appears as a single line item invoice. The sales tax group is actually made up of individual tax items, however.
To add a sales tax group, display the New Item window and choose Sales Tax Group from the Type drop-down list. QuickBooks displays the Sales Tax Group version of the New Item window, as shown in Figure 3-14 . Enter a name or an abbreviation for the sales tax in the Group Name/Number box. Provide an appropriate description in the Description box. Then use the Tax Item column to identify the individual tax items that comprise the sales tax group. Note that you should have already set up the tax items that you want to add to the sales tax group.

FIGURE 3-14: The Sales Tax Group version of the New Item window.
Adding custom fields to items
If you’ve worked much with the New Item window, or if you’ve paid particularly close attention to the figures shown in the last few pages of this chapter, you may have noticed the Custom Fields command button that appears in many, although not all, of the New Item windows (refer to Figure 3-12 ).
The Custom Fields button enables you to add your own custom fields to the Item list. To add a custom field, click this button. When you do, QuickBooks displays a message box and then a small dialog box labeled Custom Fields for Unnamed Item.
When QuickBooks displays the Custom Fields for Unnamed Item dialog box, click the Define Fields button. QuickBooks displays the Set Up Custom Fields for Items dialog box, as shown in Figure 3-15 . To add custom fields for the item, use the Label column to name the fields and then check the Use column for each field you want to appear. If you want to add a custom field for Insured Value, for example, enter the label Insured Value in the first row of the Label column, and check the Use column.
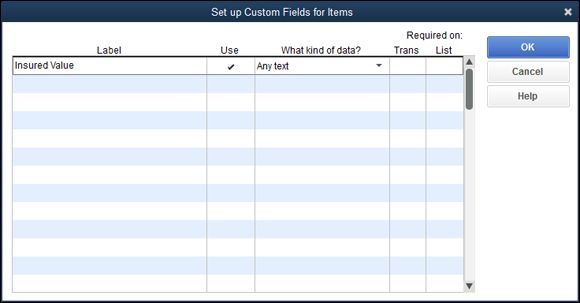
FIGURE 3-15: The Set Up Custom Fields for Items dialog box.
Note: If you’re working with the Enterprise Solutions version of QuickBooks (which is what Figure 3-15 actually shows), QuickBooks provides a What Kind of Data? column that you can use to specify the type of information that can be entered in the new custom field: text, numbers, and so on. Use the Required on Trans and Required on List columns to tell QuickBooks you want to specify the items for which the custom field is required. When you select either Required column, QuickBooks displays another dialog box that lets you select the types of items that need the custom field.
When you click OK, QuickBooks redisplays the Custom Fields for Unnamed Item dialog box, as shown in Figure 3-16 . The dialog box now shows the new custom field — in this example, Insured Value.
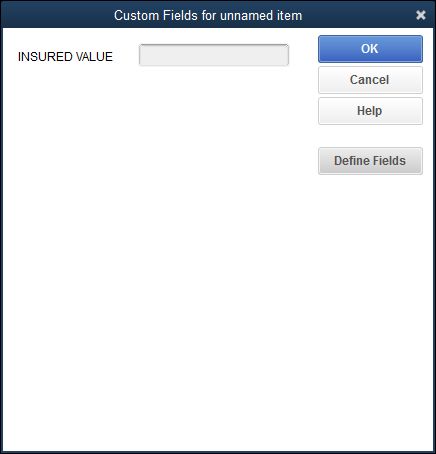
FIGURE 3-16: The Custom Fields for Unnamed Item dialog box.
Note that custom fields are available for all items. Also note that you see custom fields for items by displaying the item’s information in the New Item window or the Edit Item window and then clicking the Custom Fields button.
Editing Items
You can change item information. To do so, display the Item List window and then double-click the item. When you do this, QuickBooks displays the Edit Item window, which resembles the New Item window. The difference is that the Edit Item window is already filled in with the item information. To change some bit of item information, edit the contents of the field with the information to be updated. Click OK to save your changes.
Adjusting Physical Counts and Inventory Values
Inventory shrinkage, spoilage, and (unfortunately) theft all combine to reduce the inventory that you physically have. To record these inventory reductions, you periodically physically count your inventory and then update your QuickBooks records with the results of your physical counts.
I don’t spend any time in this book talking about approaches to providing physical counts; you probably have better ideas than I do about how to do that. You presumably know what works best in your business. I can tell you, however, that to record your physical count information in QuickBooks, you use a special tool. Specifically, you use the Adjust Quantity/Value on Hand command. This command is available to you in two places. If you display the Item list, click the Activities button (which appears at the bottom of the Item List window) and choose the Adjust Quantity/Value on Hand command. You can also choose the Vendors ⇒ Inventory Activities ⇒ Adjust Quantity/Value on Hand command. Choosing either command displays the Adjust Quantity/Value on Hand window, shown in Figure 3-17 .
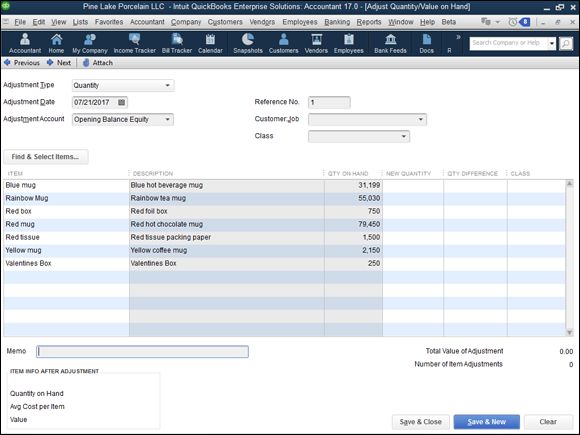
FIGURE 3-17: The Adjust Quantity/Value on Hand window.
To use the Adjust Quantity/Value on Hand window, follow these steps:
1. Use the Adjustment Type drop-down list to indicate what you’re adjusting.
You can adjust the quantity or the value or both the quantity and the value of the items you’re holding in inventory. Just choose the appropriate entry from the Adjustment Type drop-down list: Quantity, Total Value, or Quantity and Total Value.
2. Use the Adjustment Date box to record the date of your physical count.
In other words, you want to adjust your quantities as of the day you took or completed the physical inventory count.
3. Use the Adjustment Account drop-down list to identify the expense account that you want to use to track your inventory shrinkage expense.
4. (Optional) Provide a reference number (if you use numbers) to uniquely and meaningfully identify or cross-reference the transaction.
5. (Optional) Identify the Customer:Job and class.
If it’s appropriate (in many cases, it won’t be), use the Customer:Job drop-down list to identify the customer and job associated with this inventory shrinkage. In a similar fashion, if appropriate, use the Class drop-down list to identify the class that you want to use for tracking this inventory shrinkage.
6. Supply the correct inventory quantities.
The Item, Description, and Qty on Hand columns of the Adjust Quantity/Value on Hand window identify the inventory items that you’re holding and the current quantity counts. Use the New Quantity column to provide the correct physical count quantity of the item. After you’ve entered the new quantity, QuickBooks calculates the quantity difference and shows this value in the Qty Difference column.
You can actually enter a value in the New Quantity column or the Qty Difference column. QuickBooks calculates the other quantity by using the current quantity information that you supply. If you enter the new quantity, QuickBooks calculates the quantity difference by subtracting the new quantity from the current quantity. If you enter the quantity difference, QuickBooks calculates the new quantity by adjusting the current quantity for the quantity difference.
7. Adjust the value.
If you chose Total Value or Quantity and Total Value from the Adjustment Type drop-down list in Step 1, QuickBooks displays an expanded version of the Adjust Quantity/Value on Hand window, as shown in Figure 3-18 . This window lets you enter both the correct physical count quantity and the updated value for the inventory item. You enter the physical count quantity, obviously, in the New Quantity column. You enter the new updated value in the New Value column. You probably use this version of the Adjust Quantity/Value on Hand window only if you’re using a lower-of-cost or market inventory valuation method. Both financial accounting standards and tax accounting rules allow you to mark down your inventory to the lower of its original cost or its fair market value. If you’re doing this — and how you do this is beyond the scope of this book — you enter the new inventory value in the New Value column.
 Essentially, using the lower-of-cost or market inventory evaluation method just means that you do what it says. You keep your inventory valued at its original cost or, if its value is less than its original cost, at its new value. Obviously, assessing the value of your inventory is a little tricky. But if you have questions, you can ask your CPA for help. One thing to keep in mind, however, is that you can’t go changing your accounting methods willy-nilly without permission from the Internal Revenue Service. And changing your inventory valuation method from cost, say, to lower-of-cost or market is a change in accounting method.
8. Provide a memo description.
If you want to further describe the quantity or value adjustment, use the Memo box for this purpose. You may want to reference the physical count worksheets, the people performing the physical count, or the documentation that explains the valuation adjustment.
9. Save the adjustment.
After you’ve used the Adjust Quantity/Value on Hand window to describe the quantity changes or value changes in your inventory, click either the Save & Close button or the Save & New button to save the adjustment transaction. As you probably know at this point in your life, Save & Close saves the transaction and closes the window. Save & New saves the transaction but leaves the window open in case you want to make additional changes.
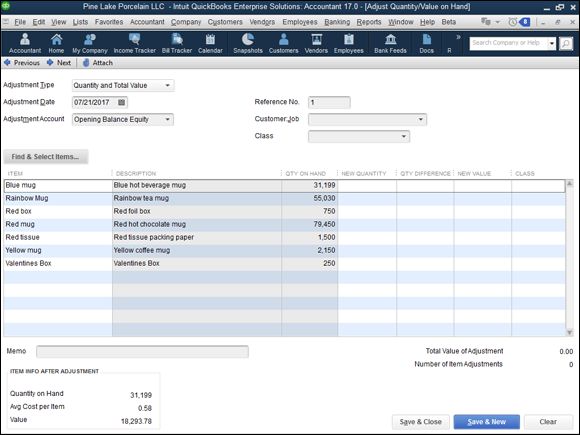
FIGURE 3-18: The expanded version of the Adjust Quantity/Value on Hand window.
Adjusting Prices and Price Levels
QuickBooks provides a couple of handy commands and tools that you can use to change the prices that you charge customers for your products and services. In the following sections, I describe both of these handy aids.
Using the Change Item Prices command
The Change Item Prices command, which appears on the Customers menu, displays the Change Item Prices dialog box, as shown in Figure 3-19 . This dialog box lets you change prices of a bunch of items at one time by an amount or percentage. To use the Change Item Prices dialog box, first select the items whose prices you want to change by clicking the check-mark column. Next, use the Adjust Price of Marked Items by (Amount or %) box to specify the dollar amount or the percentage amount by which you want to change the price. If you want to change the price of selected items by $2, for example, enter $2 in the box. If you want to change the price of selected items by 5 percent, enter 5% in the box. Use the Based On drop-down list to indicate the base to which you want to add the amount of percentage. After you identify the items that you want to reprice and the way that you want to reprice them, click the Adjust button. QuickBooks recalculates the prices and displays this information in the New Price column. If you want to change the prices for the items selected, click OK.

FIGURE 3-19: The Change Item Prices dialog box.
If you don’t like the prices listed in the New Price column, you can just keep tinkering with the value in the Adjust Price of Marked Items by (Amount or %) box, clicking the Adjust button to refresh the numbers in the New Price column, and clicking OK only when you’re satisfied.
Using price levels
Price levels are kind of weird; they let you individually adjust the price of an item up or down. If you’ve agreed to discount items by 10 percent for a certain customer, for example, you can easily do this by using a price level to knock the price down by 10 percent whenever you’re invoicing that customer.
To use price levels, you first have to set up the price levels by using the Price Level List command. After you set up your price levels, you adjust prices by using price levels when you create an invoice. I describe how both tasks work.
Creating a price level
To create a price level, choose the Lists ⇒ Price Level List command. When you do, QuickBooks displays the Price Level List window (not shown). To create a price level, click the Price Level button and then choose Price Level ⇒ New. QuickBooks displays the New Price Level window, as shown in Figure 3-20 . Name the price level change by using the Price Level Name box. Select the items to which you want to apply the price level by clicking them. (QuickBooks marks selected items with a check.) Then use the Adjust Price of Marked Items to Be boxes to indicate that this price level increases or decreases the sales price some percentage higher or lower than the standard price. Finally, use the Round Up to Nearest drop-down list to specify whether and how QuickBooks should round off its calculations. Figure 3-20 , for example, shows a price level change that decreases the sales price by 10 percent. If you click the Adjust button, QuickBooks shows the adjusted price in the Custom Price column.
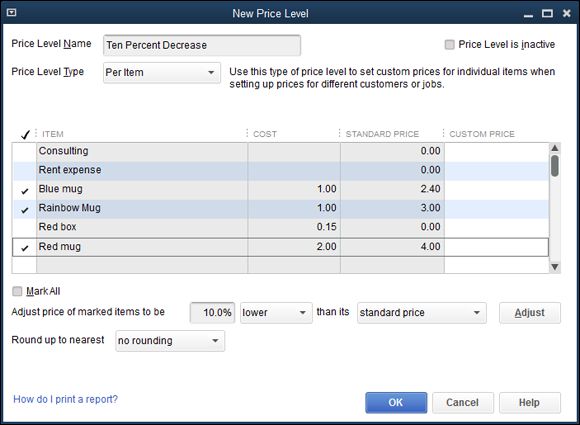
FIGURE 3-20: The New Price Level window.
Using a price level
To use a price level, you create an invoice in the usual way. Click the Price Each column for the item that you want to reprice by using the price level. When you do, QuickBooks turns the Price Each column into a drop-down list. If you click the arrow button that opens the drop-down list, QuickBooks displays both the base rate price and any price levels. If you choose a price level, QuickBooks adjusts the price for the price level change. In Figure 3-21 , selecting the 10 percent price level change bumps the price from $4.00 to $3.60. In other words, the “Ten Percent Decrease” price level change decreases the default price by 10 percent, or 40 cents.
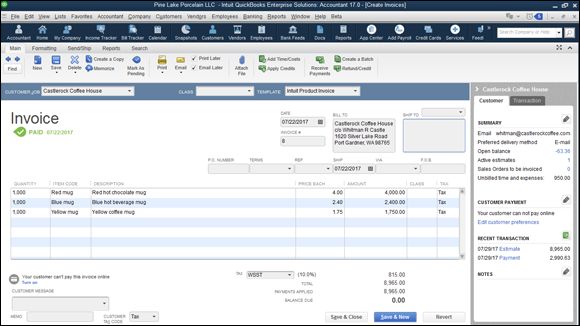
FIGURE 3-21: Choosing a price level with the Create Invoices window.
QuickBooks also lets you set a default price level for a customer. When such a default price level is set, QuickBooks automatically uses the appropriate price level when you choose that customer. The Price Level box appears on the Additional Info tabs of the New Customer and Edit Customer windows.
Enabling advanced pricing
One more thing you should know about setting prices. QuickBooks also provides an advanced pricing function, which you turn on by choosing the Edit ⇒ Preferences command, selecting the Sales & Customers preference, clicking the Company Preferences tab, and then selecting the Enable Advanced Pricing button.
When you enable advanced pricing, you convert any price levels you’ve previously defined (see preceding paragraphs) to price rules that you can tell QuickBooks to apply to items, item types, particular vendors, customers, customer types, and job types.
After you turn on advanced pricing, you can choose the Lists ⇒ Price Rule List command to display the Price Rule List window. To convert a price level to a working price rule, double-click the new price rule and then use the Edit Price Rule dialog box (not shown) to describe the rules QuickBooks should use for automatically repricing some item according to your specified rules. This is an Enterprise-only feature.
Managing Inventory in a Manufacturing Firm
Tracking inventory in a manufacturing firm is more difficult than in other types of businesses. When you boil down everything to its essence, the problem stems from a couple of tricky accounting requirements:
· In a manufacturing environment, the manufacturer combines raw materials items into finished-goods items. This means — and this is the challenging part — that the manufacturing process reduces the inventory count and value for some items (the raw materials or the components) and at the same time increases the count and value of the other, finished-goods items.
· In a manufacturing environment, the rules say that you don’t just count the value of items in the finished-goods-item inventory values. You also count the cost of labor and factory overhead used in manufacturing the items.
QuickBooks solves the first problem related to manufacturing inventory, but it doesn’t solve or address the second problem. Fortunately, as long as you’re a small manufacturer, you probably don’t need to worry too much about the second problem. You should ask your CPA about this. But don’t worry — Congress and the Internal Revenue Service have provided a bunch of loopholes that make the accounting easier for the small guys.
Handling manufactured inventory the simple way
If you’re using QuickBooks Pro or some earlier versions of QuickBooks Premier, you don’t have the ability to account for the manufacture of inventory in QuickBooks. The best that you can do is group items to combine into individual items in a customer’s invoice. This approach sounds sloppy, but it isn’t quite as bad as you may think at first blush. You can choose to show only the group item in a customer invoice. This means — getting back to the example of the florist selling red roses and vases — that the florist can “manufacture” a crystal vase of a dozen red roses and then show the manufactured item as a group item in the customer’s invoice.
The one thing that’s problematic about the “just use a group item” approach is that it doesn’t give you a way to track the finished goods’ inventory values.
Performing inventory accounting in QuickBooks
To account for the manufacture of inventory in QuickBooks Premier or QuickBooks Enterprise Solutions, you add inventory assembly items to the Item list for those items that you manufacture. You also record the manufacture of items as you … well, manufacture them.
Suppose that Pine Lake Porcelain mostly just buys and resells coffee mugs and other porcelain doodads. But also suppose that once a year, Pine Lake Porcelain assembles a collection of red coffee mugs into a boxed St. Valentine’s Day gift set. In this case, QuickBooks can record the assembly of a boxed gift set that combines, for example, four red coffee mugs, a cardboard box, and some tissue-paper wrapping.
Adding inventory assembly items
To describe manufactured items, follow these steps:
1. Choose Lists ⇒ Item List.
QuickBooks displays the Item List window.
2. Click the Item button in the Item List window, and choose New from the drop-down list.
QuickBooks displays the New Item window.
3. Choose the Inventory Assembly item from the Type drop-down list.
QuickBooks displays the Inventory Assembly version of the New Item window, as shown in Figure 3-22 .
4. Specify the account to use for tracking this item’s cost when you sell it.
QuickBooks suggests the Cost of Goods Sold account. If you’ve created other accounts for your COGS, however, choose the other appropriate account.
5. Describe the manufactured item.
Type a description of the item that you want to appear in documents that your customers see, such as invoices. (QuickBooks suggests the same description that you used in the Description on Purchase Transactions text box as a default.)
6. Enter the amount that you charge for the item in the Sales Price box.
7. Indicate whether the manufactured item is subject to sales tax by using the Tax Code drop-down list.
8. Use the Income Account drop-down list to specify the account that you want QuickBooks to use for tracking the income from the sale of the item.
9. Identify the components that go into the finished item.
Use the Bill of Materials list to identify the individual component items and the quantities needed to make the inventory assembly. Each component item goes on a separate line in the list. Not to be too redundant, but do note that you identify both the component item and the number of component items needed.
10.Identify the asset account.
Specify the other current asset account that you want QuickBooks to use for tracking this inventory item’s value.
11.Select a build point.
Use the Build Point boxes to specify the lowest inventory quantity of this item that can remain before you manufacture more. When the inventory level drops to this quantity, QuickBooks adds a reminder to the Reminders list, notifying you that you need to make more of the item.
12.Ignore the On Hand and the Total Value boxes.
See that On Hand box? Leave it set to zero. To enter a number now is to record an uncategorized transaction, and you don’t want to do that. Go ahead and leave the Total Value field set to zero, too.
13.Leave the As Of box empty, or enter the current date.
It doesn’t matter.
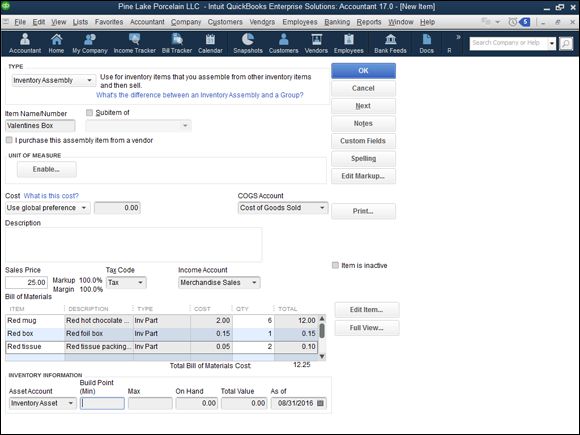
FIGURE 3-22: The Inventory Assembly version of the New Item window.
Recording manufacture or assembly of items
To build some assembly, choose the Vendors ⇒ Inventory Activities ⇒ Build Assemblies command. QuickBooks displays the Build Assemblies window, as shown in Figure 3-23 . All you do is choose the thing that you want to build from the Assembly Item drop-down list and then enter the quantity that you (or some hapless co-worker) built in the Quantity to Build box in the bottom-right corner. (In Figure 3-23 , I’ve created an assembly — Valentines Box — that consists of some colorful mugs, an attractive gift box, and some scented tissue paper.) Then you click either the Build & Close or Build & New button. (Click the Build & New button if you want to record the assembly of some other items.)
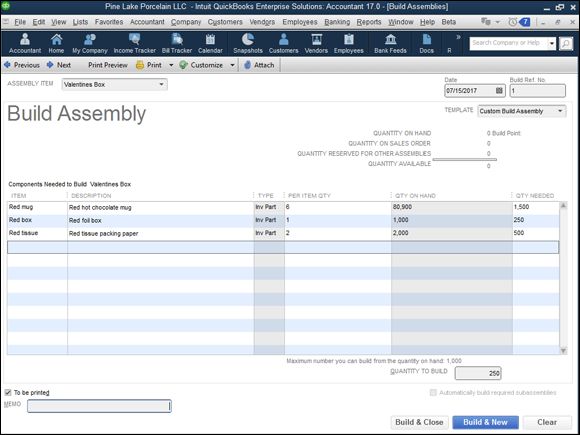
FIGURE 3-23: The Build Assemblies version of the New Item window.
While I’m on the subject, let me make a handful of observations about the Build Assemblies window and the Build Assemblies command:
· In the top-right corner of the window, QuickBooks shows the quantity of the assembly that you have on hand and the number of customers who have placed orders. That’s pretty useful information to have, so remember that it’s there.
· A table in the Build Assemblies window shows you what goes into your product. Not that you care, but this is a bill of materials.
· At the bottom of the bill of materials list, QuickBooks shows you the maximum number of assemblies that you can make, given your current inventory holdings.
· When you build an item, QuickBooks adjusts the inventory item counts. If you make boxed gift sets, each with four red mugs and two wrapping tissues, QuickBooks reduces the item counts of red mugs and wrapping tissues, and increases the item counts of the boxed gift sets when you record building the assembly.
 Some of the components used in an assembly may not be inventory items. You can use noninventory parts in an assembly.
Managing multiple inventory locations
QuickBooks Enterprise Solutions lets you deal with the record-keeping challenge of storing inventory in multiple locations. To turn on this capability, called Advanced Inventory Tracking, choose the Edit ⇒ Preferences command, click Items and Inventory, click the Company Preferences tab, and then click the Advanced Inventory Settings button. If you’re using the Enterprise Solutions version of QuickBooks, QuickBooks displays dialog boxes that allow you to build a list of inventory sites, and also adds fields to appropriate windows and dialog boxes so you can track inventory items by site. If you’re not using the Enterprise Solutions version of QuickBooks, QuickBooks displays information about how you can upgrade to Enterprise Solutions.