Activiti 5.x Business Process Management Beginner's Guide (2014)
Chapter 2. Modeling Using the Activiti Modeler
Business people are used to visualizing the business processes through graphical representations such as flowcharts and UML diagrams. However, when it comes to the execution of the business process, there is a technical gap between the design of a business process shown in the flowchart and the language that executes the business process, for example, WSBPEL.
In the previous chapter, we had an overview of Activiti, covering topics such as downloading and installing Activiti and creating a simple process within Activiti. In this chapter, we will understand what BPM is, its lifecycle and elements, and how to create a business process using the BPM elements in the Activiti Modeler.
In this chapter, we will cover the following topics:
· Business Process Modeling (BPM)
· Modeling principles and lifecycle
· BPM standards
· BPMN elements
· BPM using the Activiti Modeler
· Importing and exporting a model
· Deploying a model to the Activiti Engine
Understanding Business Process Modeling
BPM, with respect to system engineering, provides methods and techniques to make a business process more efficient, adaptive, and effective to accomplish business tasks. We will use the BPMN 2.0 modeling notations for designing our business process with the Activiti Engine. It provides a comprehensive approach to aligning an organization's business process as per the client's requirement. With the help of BPM, organizations can be more effective, efficient, and capable of accepting changes rather focusing on a traditional hierarchical management approach.
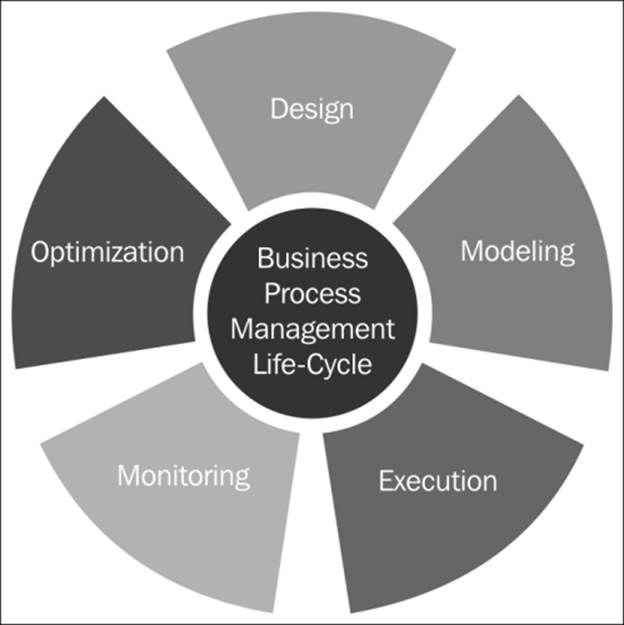
The BPM lifecycle
The creation of a business process comprises the five phases of business process management, commonly known as the BPM lifecycle. The five phases are as follows:
· Design
· Modeling
· Execution
· Monitoring
· Optimization
Each phase is designed to implement a successful process solution.
With the help of the BPM lifecycle, one can understand that implementing a business process is an ongoing process due to the changes occurring within the business environment. The five phases of the BPM lifecycle are as follows:
The design phase
The design phase of a lifecycle is responsible for the identification and design of a business process. The areas focused on within this phase are identifying activities, analyzing possible changes within the organization, defining service-level agreements, and specifying process details, such as actors, notifications, and escalations, within the business process. The main purpose of this phase is to ensure that a correct and efficient theoretical design is prepared. This phase belongs to the process owners who are deciding the process flow for the organization.
Modeling
Modeling is the second phase of the cycle; it's where the business process is validated and fully specified. In the design phase, the theoretical design is prepared, whereas in this phase, the theoretical business process is designed using various BPMN elements. This phase is mainly the responsibility of system analysts and integrators.
Execution
Once the theoretical design is transformed into a model, it can be implemented in the business process application. Now, it's time to automate the execution of the business process. This is the phase where the services are defined to automate the business process. The languages used to create the services are WSBPEL and BPMN 2.0. This phase belongs to the developers who are developing the business process.
Monitoring
The monitoring phase keeps track of the individual processes. Performance monitoring for each and every process can be provided statistically, and the states of the process can also be maintained. In the monitoring phase, problems within a business process can be identified and corrective steps can be taken to improve it.
Optimization
The optimization phase is the last phase of the lifecycle. In this phase, the performance information of the process is fetched from the monitoring phase and improvements within the process and changes in the business requirement are identified. Once the optimization phase is completed, the business process again goes into the design phase and the cycle is completed.
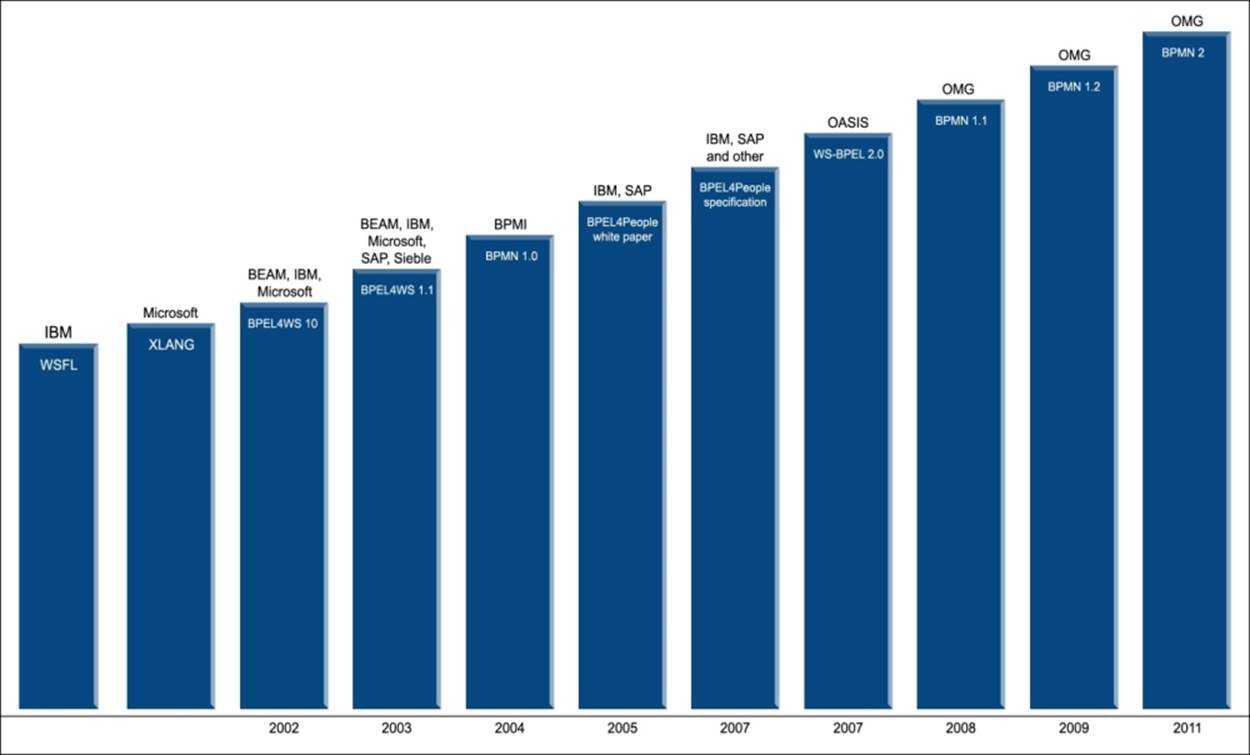
Understanding the BPM standards
Various BPM standards have been introduced for process development, but all of them have certain limitations. The latest version in use is the BPMN 2.0 standard. This standard supports both designing as well as programming language functionalities. In the previous standards, this functionality was missing. When the business analyst would design a business process, it was difficult for the developers to add certain technical details to it, but the BPMN 2.0 standard made their lives easy. In the following figure, we will be looking at how the BPMN 2.0 standard has made life easier:
Getting started with BPMN elements
The simple diagrams that BPMN consists of to represent the business workflow prove to be helpful for both business users and developers. The four basic categories of BPMN elements are as follows:
· Flow objects
· Connecting objects
· Swim lanes
· Artifacts
Flow objects
Flow objects consist of various shapes that represent the core elements of business process representation, which characterize the behavior of a business process. To represent the flow of the object, three elements are used: events, activities, and gateways.
Events
Events can be considered as the actions that occur during the business process. They are represented using a circle in a business process diagram. An intermediate event is represented using concentric circles. There are three types of events: start, intermediate, and end.
The start event
The start event indicates the start of your business process. It is represented using a single circle. In your business process, you should have only one start event. The start event can be represented as follows:

Intermediate event
Intermediate event refers to the events taking place between the start and end of the business process. These events do not affect the business process as they do not start or terminate the business process. You can have n number of intermediate events within your business process. The intermediate events are represented using concentric circles, as follows:

The end event
The end event is represented using a thick-bordered circle as follows, and indicates the end of your business process; there should be at least one end event within your business process:

Activities
Activities represent the tasks or work that is being performed within a business process. The shape that represents the activities in a BPMN is a round-cornered rectangle. There are various types of activities, such as task, Sub-Process, and the call activity.
Task
A task activity is used in a business process when there is an activity to be implemented within a process. It is represented by a round-cornered rectangle. Tasks can be used when there are some actions to be performed in your business process. Various types of tasks are provided by BPMN, such as the script task, user task, service task, and mail task. A task is represented as follows:

The following are the different types of tasks:
· Script task: This task is used for the automation of a task. We can have our logic implemented here.
· User task: This task can be used in a business process when human interaction is required for the business, for example, when details are to be filled or verified by a human.
· Mail task: This is a type of service task that has services implemented to send e-mails or notifications from the process.
· Service task: This refers to a custom task in which you want some specific operations to be done. Similar to the mail task, which is a type of service task that is used to send e-mails from the process, we have a custom service written for the process.
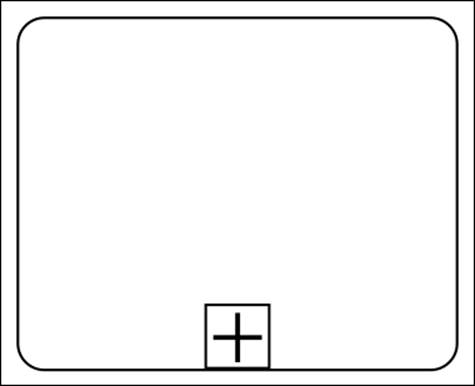
Sub-Process
A Sub-Process is a task that is used to represent levels within our business process. This task is useful when we want to display the leveled diagram of a business process. A Sub-Process will be represented as follows:
The call activity
With the help of the call activity, we can re-use a global process or task that is available within the process engine. On executing the call activity, the control of execution is transferred to the global process or task. A call activity is represented as follows:
Gateways
Gateways are used to handle the forking and joining of paths within the business process. The main aim of gateways is to control the flow of a business process. The diamond shape represents a gateway. The types of gateways available are exclusive gateways,event-based gateways, inclusive gateways, and parallel gateways.
Exclusive gateways
We can use an exclusive gateway when we want to proceed with one path from the multiple paths defined. So, we can compare the exclusive gateway to an if-else statement of the programming concept. An exclusive gateway can be represented as follows:

Inclusive gateways
An inclusive gateway can be used when we want to execute the paths for which the conditions specified for them are satisfied. We can compare the inclusive gateway to multiple if statements. An inclusive gateway is represented as follows:

Parallel gateways
In a parallel gateway, all the outgoing paths will be executed without checking any conditions. Hence, in a parallel gateway, we need not specify any conditions for execution.

Event-based gateways
In this gateway, the paths will be executed based on the events that satisfy the conditions.

Connecting objects
To represent a basic framework of a business process structure, connecting objects are required. Each flow object can be connected using the connecting objects. These connecting objects can be represented using the following types: sequence flow, message flow, and association.
Sequence flow
Sequence flow represents the order of execution of activities in a business process. It is represented by a solid line with an arrow, as follows:
![]()
Message flow
Message flow is represented using a dashed line with an open arrow, as follows; it is used to show the messages that are being passed within the business process and cannot be used to connect the activities:
![]()
Associations
Associations are used to represent a relationship between the flow object and artifacts or data within the business process; it is graphically represented using a dotted line with an open arrowhead, as follows:

Swim lanes
Swim lanes are just used for visualization purposes. With the help of swim lanes, one can easily organize the activities of a business. Swim lanes are represented using two objects: the lane and the pool.
Pool
The pool represents an entity within a business process. It can consist of various lanes. When working with pools, we cannot connect to the activities outside the pool boundary. It is represented as follows:

Lanes
A lane is a subportion of a pool. Lanes are used to organize the business process as per the roles or functions being performed. They are represented as follows:
Artifacts
Artifacts are used to provide additional information in BPMN diagrams so that the use of the notation within the business process can be stated clearly and is understood by others. There are three types of artifacts: data object, group, and annotation.
Data object
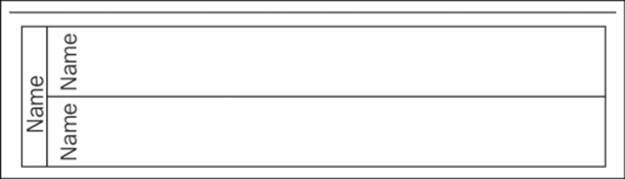
The data object artifact is useful for the person who is viewing the business process. With the help of this artifact, one can get an idea regarding the data required or produced within an activity. It is represented by an image of a piece of paper folded at the top-right corner, as follows:

Group
With the help of the group artifact, one can clearly identify the activities or nodes that are grouped together. It is represented using a round-cornered rectangle with dashed lines, as follows:

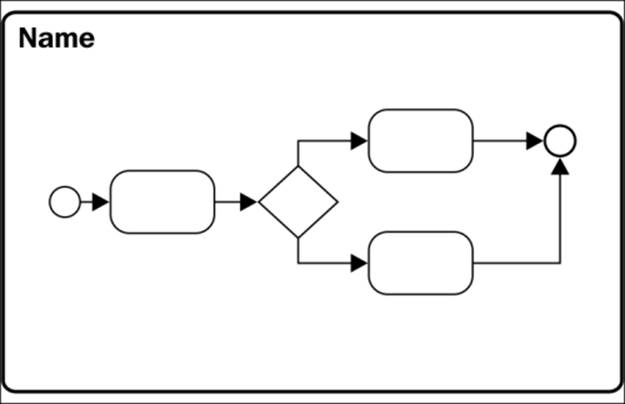
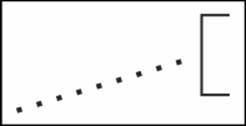
Annotation
The annotation artifact is used to add some additional comments to the business process. It is represented as follows:
Installing the Activiti Modeler
So far, we have gained only a theoretical knowledge of Activiti. Now it's time to try some hands-on modeling and designing of a business process using the Activiti Modeler. So, to design a process, you will have to configure the Activiti Modeler, which we will be looking at in the upcoming sections.
Time for action – Business Process Modeling using the Activiti Modeler
In the previous chapter, we created an employee leave process using the BPMN2.0 XML format. Now we will create a business process using the Activiti Modeler. It is a web-based BPM component available as a part of the Activiti Explorer web application. The main aim of the modeler is to support all the BPMN elements and extensions supported by the Activiti Engine. Perform the following steps to start modeling using the Activiti Modeler:
1. To start modeling a business process, you need to start your Activiti Engine if you haven't already.
2. If you are using a Windows operating system, you can browse to your apache-tomcat folder where you have installed the Activiti war file (../apache-tomcat/bin/) and execute the startup.bat file.
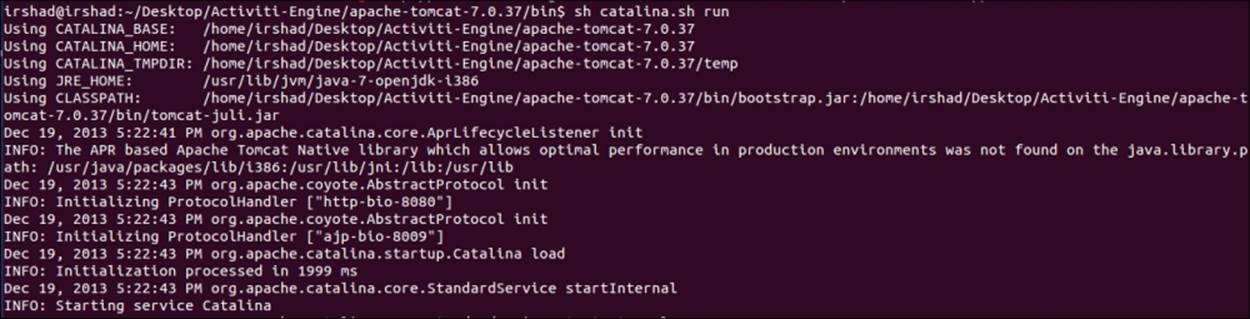
3. As we will be using a Linux system, we will start Apache Tomcat from the command prompt. Navigate to ../apache-tomcat/bin from your terminal and execute the sh catalina.sh run command to run your Tomcat server. You will get an output similar to the following screenshot:
4. Once Apache Tomcat is up and running successfully, you can open a browser and browse to the Activiti-Explorer page using the http://localhost:8080/activiti-explorer/ URL. This URL will open the Activiti Explorer login page. You have to provide the username as kermit and the password as kermit as well. The login page looks as follows:

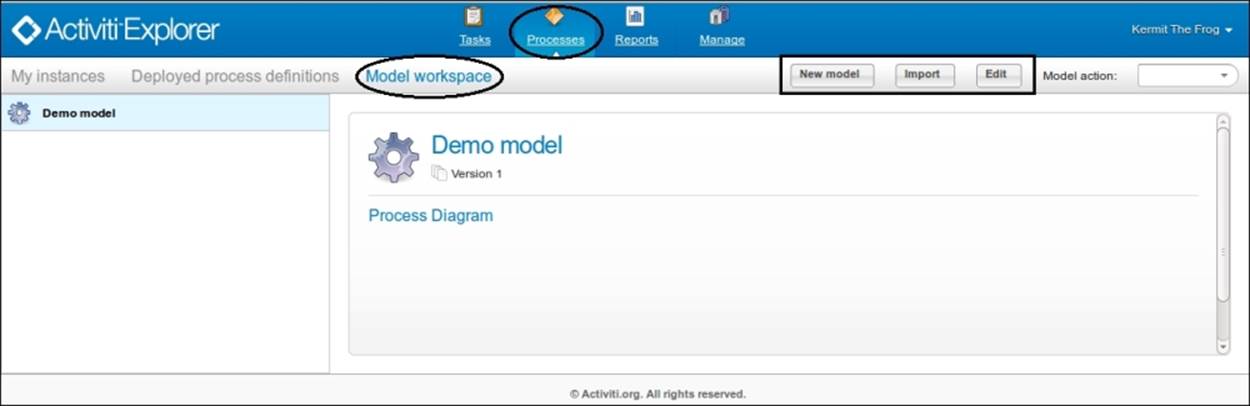
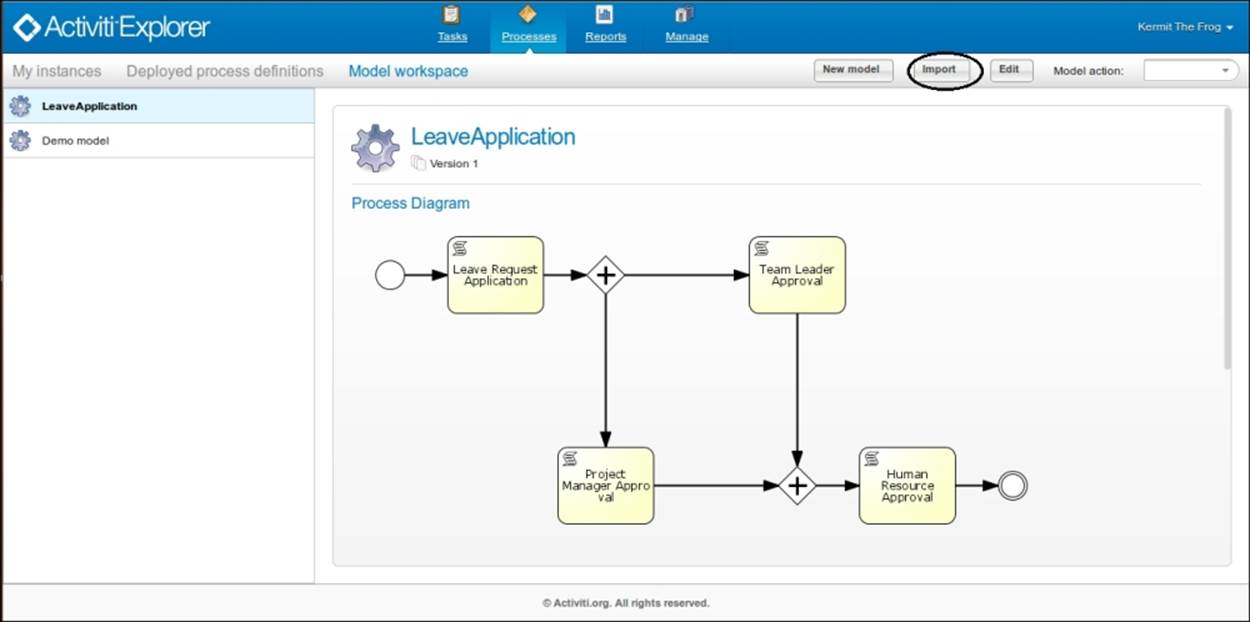
5. On successful login, navigate to the Processes tab, as you have to model a process using the modeler. Go to the Model workspace section in the Processes tab. As you can see in the following screenshot, there are various buttons available at the top-right corner, which we will also have a look at:
6. In the left pane of the window shown in the previous screenshot, you can see that there is a Demo model available for reference purposes. If you want to edit an existing process, you can select it from the left pane and click on the Edit button. On selecting theEdit button, the Activiti Modeler will open the selected process in the edit mode and you can edit the existing process as per the new requirement, as shown in the following screenshot:
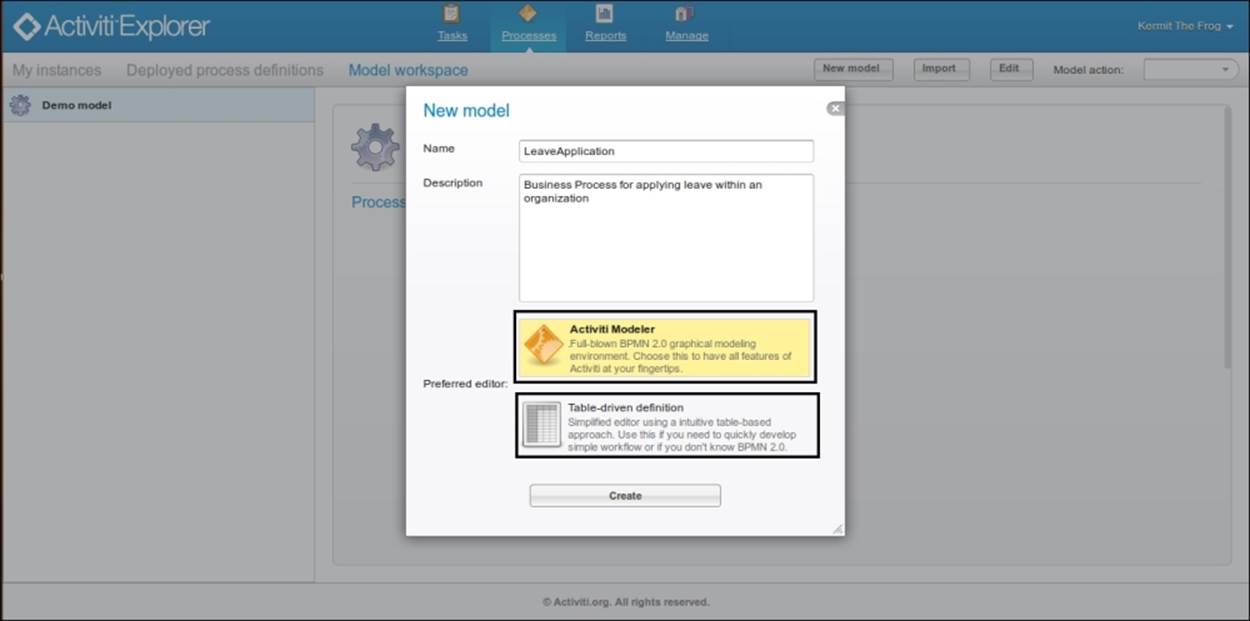
7. But, if you want to model a new process using the modeler, select the new model button from the menu bar shown in the next screenshot.
8. On selecting the new model button, a pop-up window opens in which you have to provide the details of your business process. Enter the name as LeaveApplication and the description as Business process for applying leave within an organization and select theActiviti Modeler option, as shown in the following screenshot:
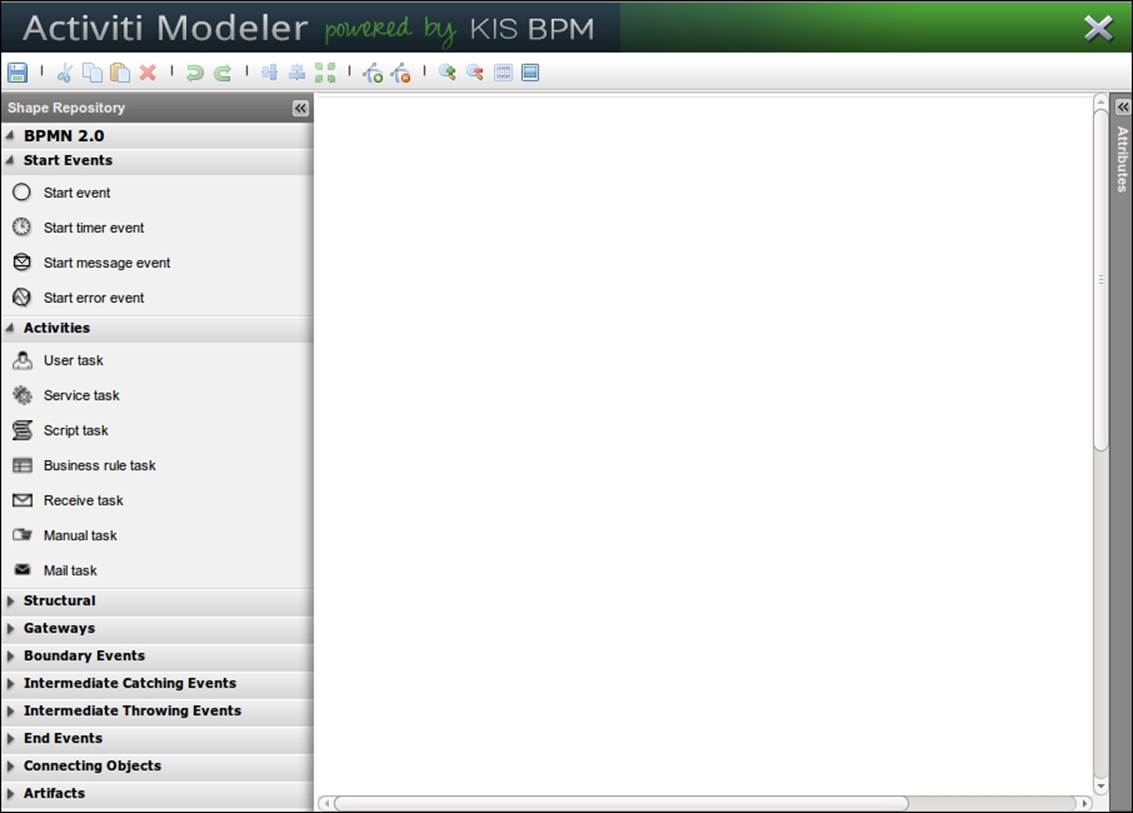
9. On creating the business process using the graphical editor, the Activiti Modeler opens with a blank canvas on which you can design your own new business process using the BPM Notations available in the left panel, as shown in the following screenshot:
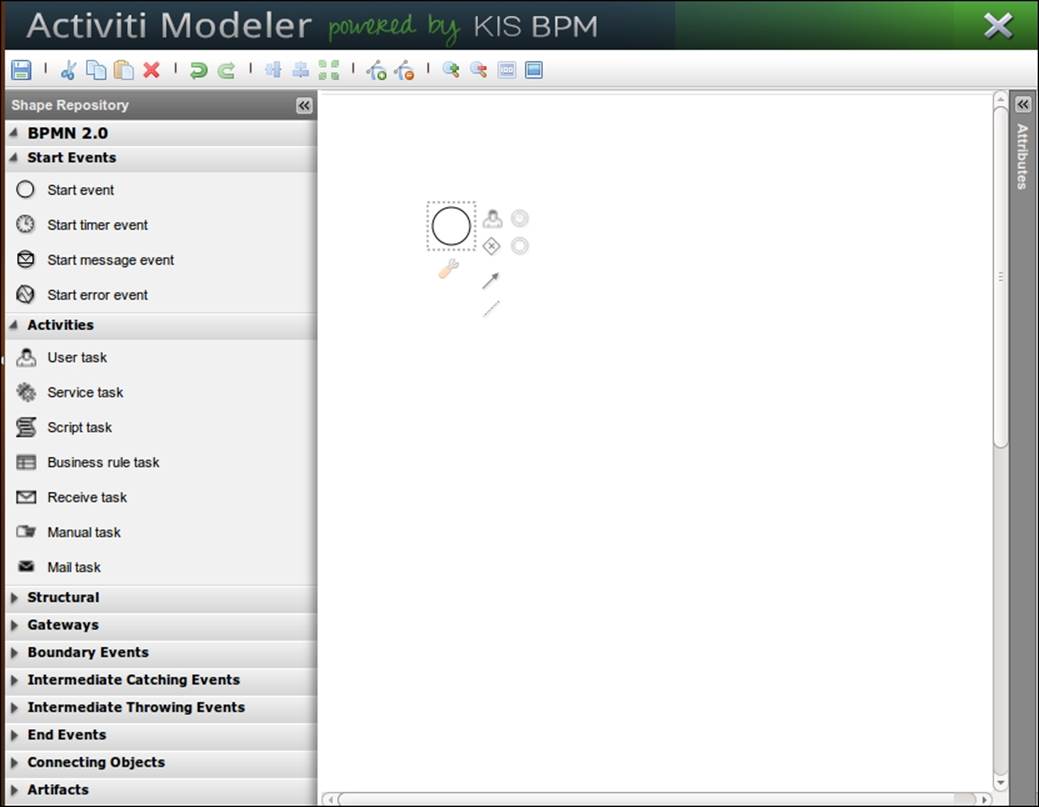
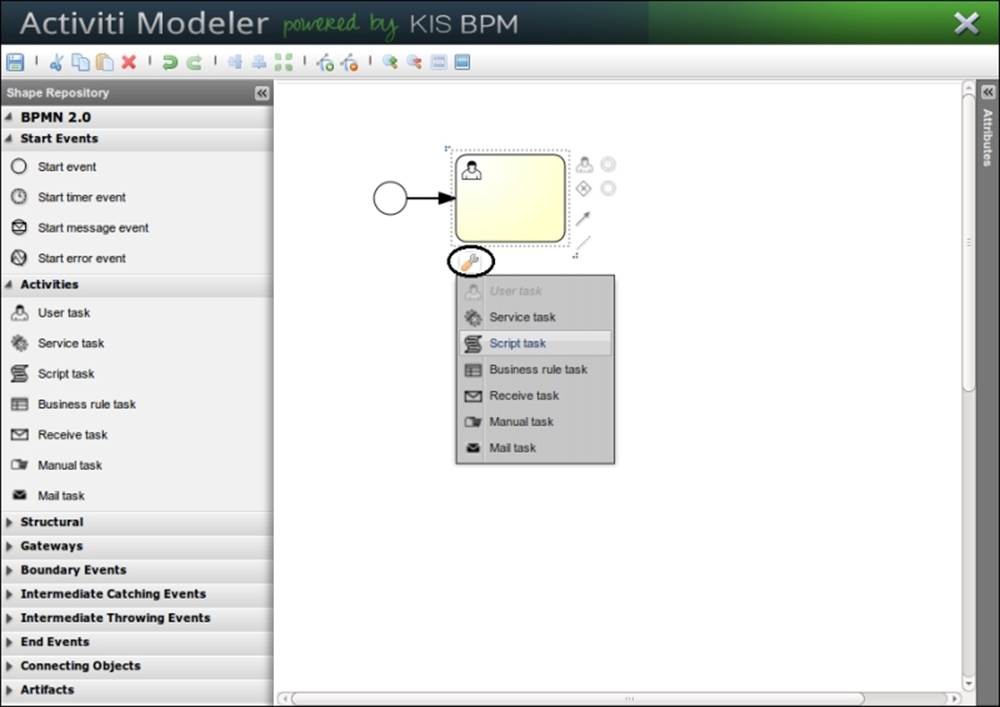
10. To start the process, we require a start node for the process. You can just drag the Start event node from the left pane to the white canvas. To add other nodes, you similarly drag them to the canvas. Alternatively, as you can see in the following screenshot, there are various icons available with the Start event node; using these icons, we can add the appropriate nodes as required:
11. Now, to add a script task, you can either drag the Script task node from the left pane to the canvas or add a node by selecting the human icon from the Start event node and changing its type to script. On changing the type to script, the icon of the node will change from a human to a script. To change the type, you will have to select the Transform shape option available at the bottom-left corner of the node, as shown in the following screenshot:
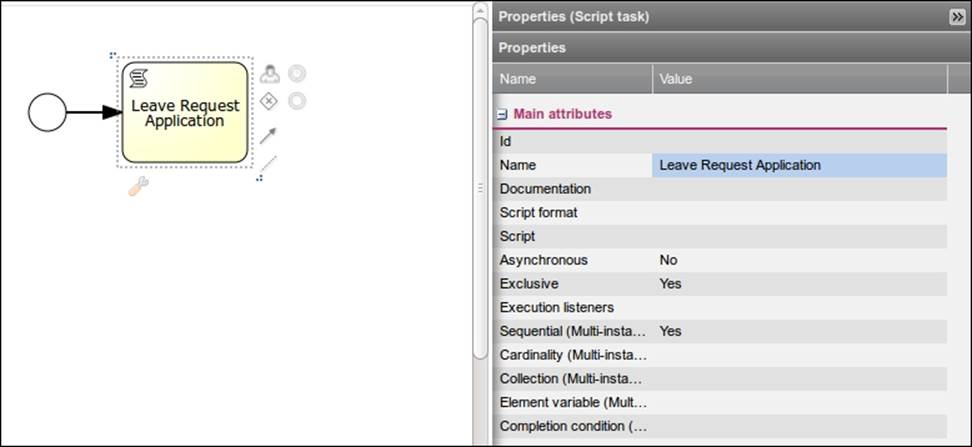
12. To change the name displayed on the node, we need to edit the properties of the node. The Properties pane will be available on the right-hand side of the modeler. As seen in the following screenshot, you can select the node and change the Name property toLeave Request Application:
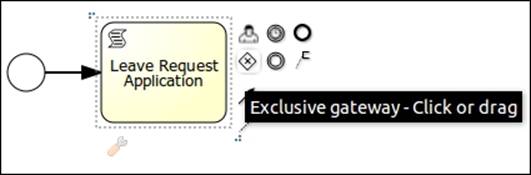
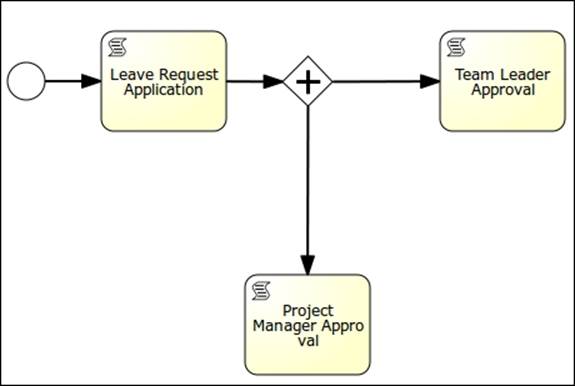
13. Now, we will split our business process by adding a gateway to it. In the following screenshot, you can see how we can split our business process by adding a gateway:
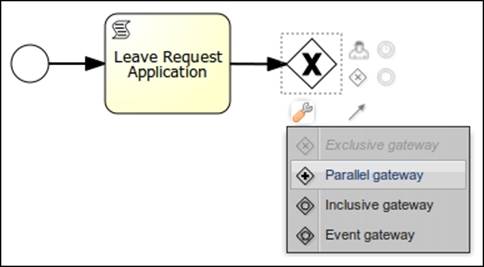
14. As we want to execute paths without checking their conditions, we will change the gateway to Parallel gateway from the default, which is Exclusive gateway.
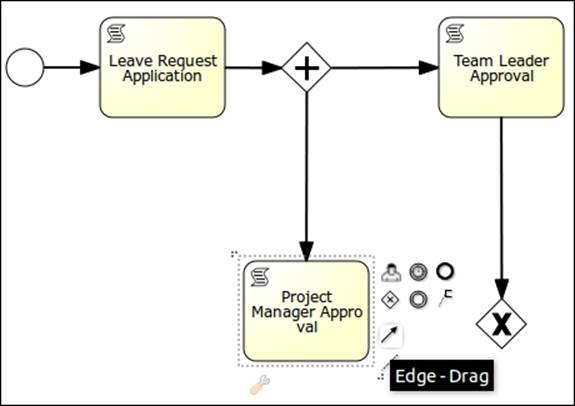
15. Now, we will have two script nodes on the parallel gateway waiting for approval from the team leader and project manager.
16. As we have used the parallel gateway to split our business process, we also have to use it for the purpose of joining the nodes. From the Project Manager Approval script node, we will drag an edge to the gateway. The result of this can be seen in the following screenshot:
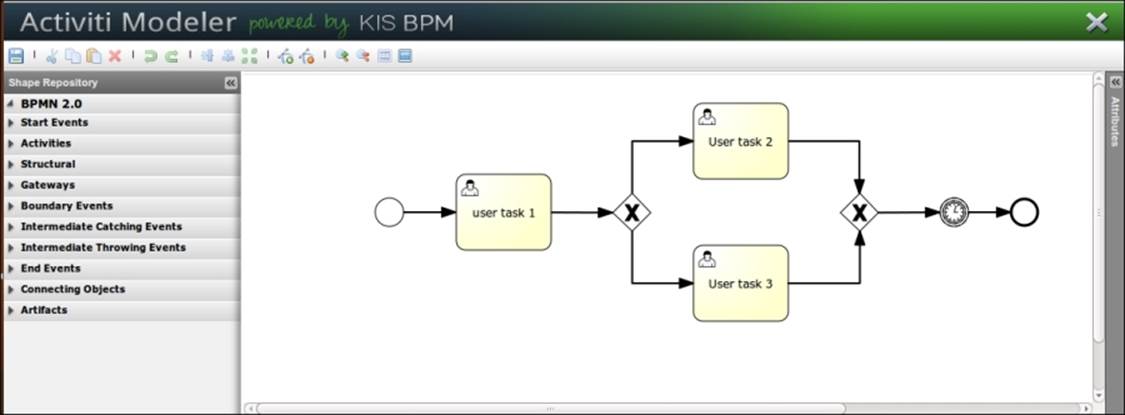
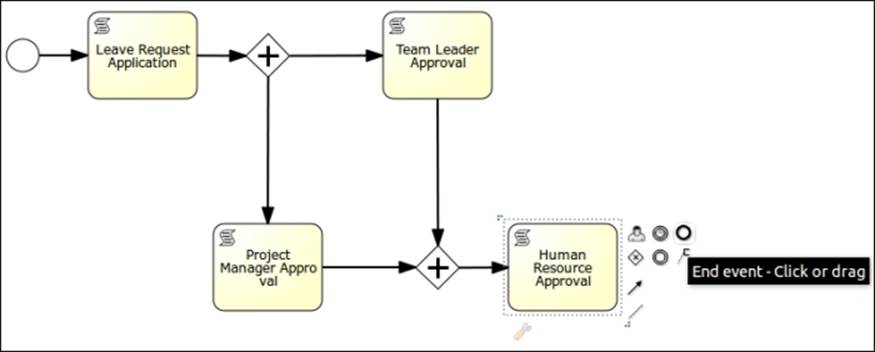
17. After the join gateway, we will add the Human Resource Approval script node, and after that script node, we need to add an end event to terminate the business process. The result of this can be seen in the following screenshot:
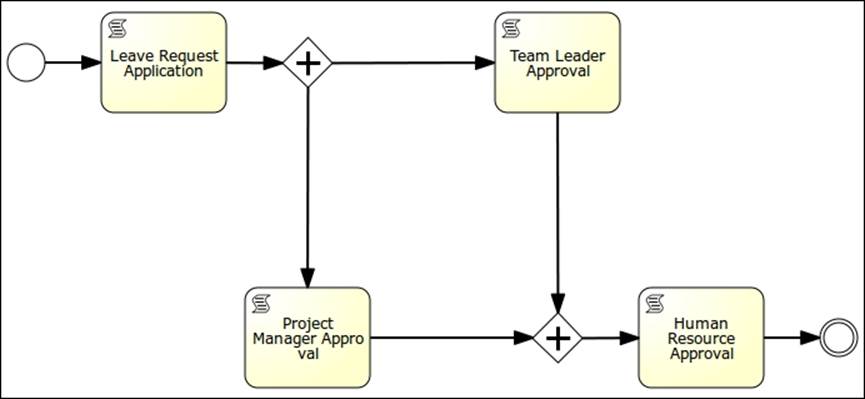
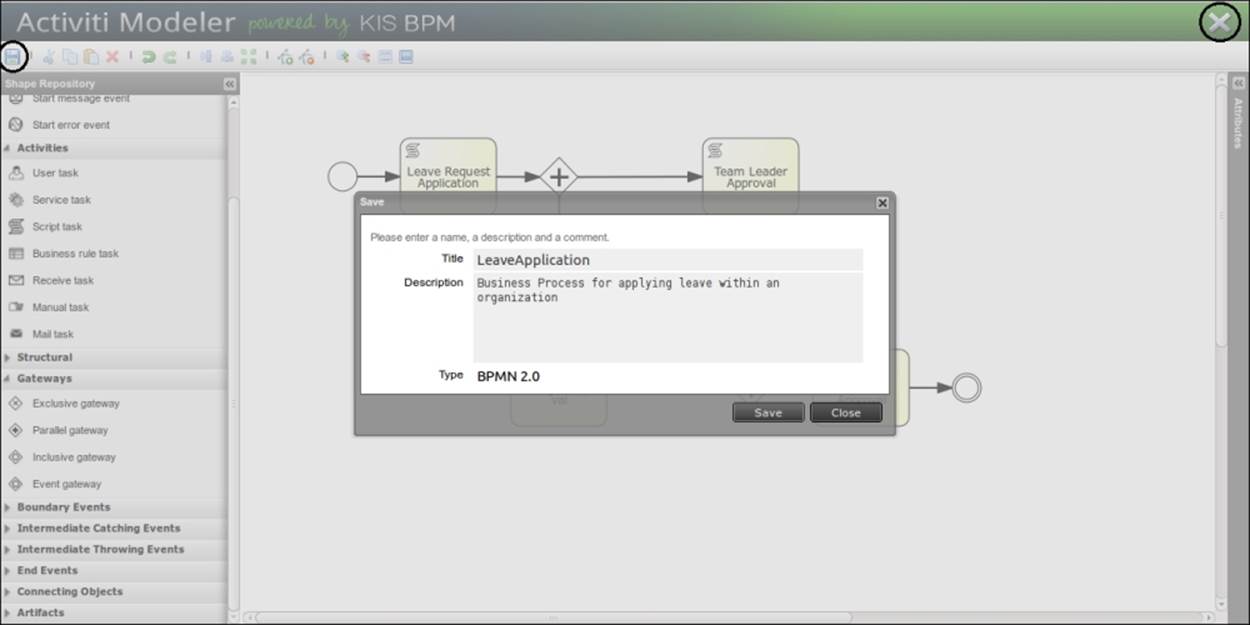
18. On completion of the business process, it will look as shown in the following screenshot:
19. To save the process in a modeler, there is a save icon available at the top-left corner of the modeler window, or you can even press the Ctrl + S keys. After saving the process, you can close the modeler window by clicking on the close icon at the top-right corner of the modeler window, as shown in the following screenshot:
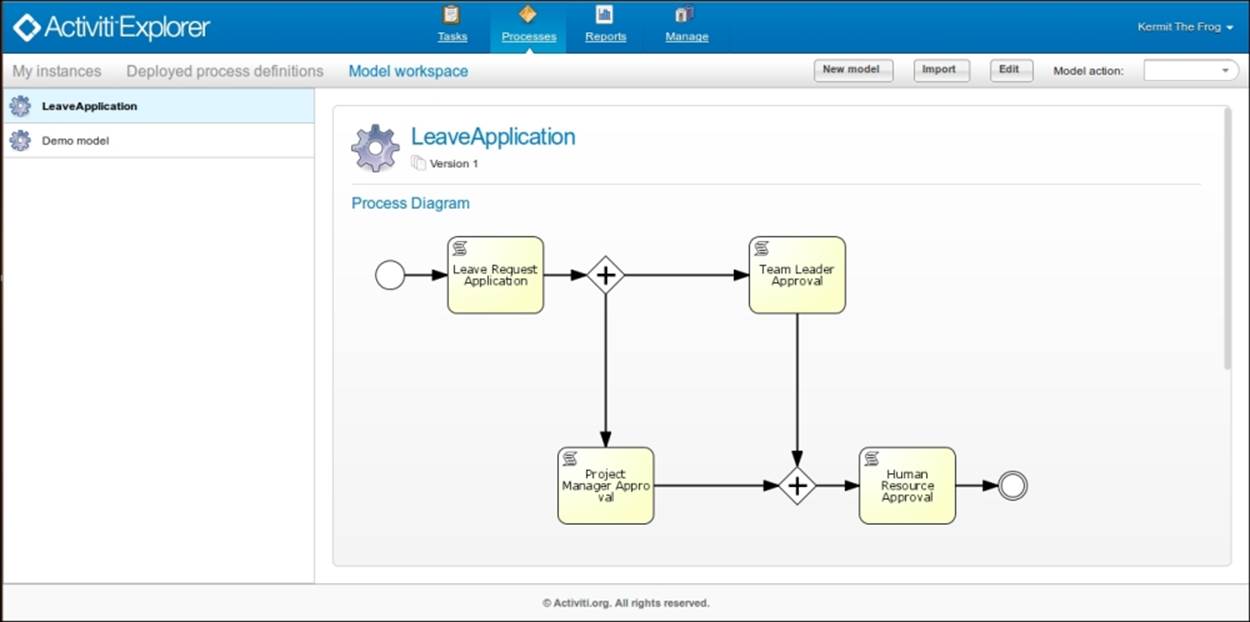
20. On closing the modeler window, you will find your process available in the left pane along with the Demo model, as shown in the following screenshot:
What just happened?
We had a look at the Activiti Modeler and learned how to create a process using it. We also learned how to use the various nodes available for process creation.
Time for action – import and export of a model
Now, as you are familiar with business process creation using the modeler, you are capable of designing a business process for presentation purposes. The process is approved and now has to be executed by the development team. For this, the modeler provides an export and import functionality so that you can either export or import an existing process from or to the modeler. Perform the following steps to import or export a model:
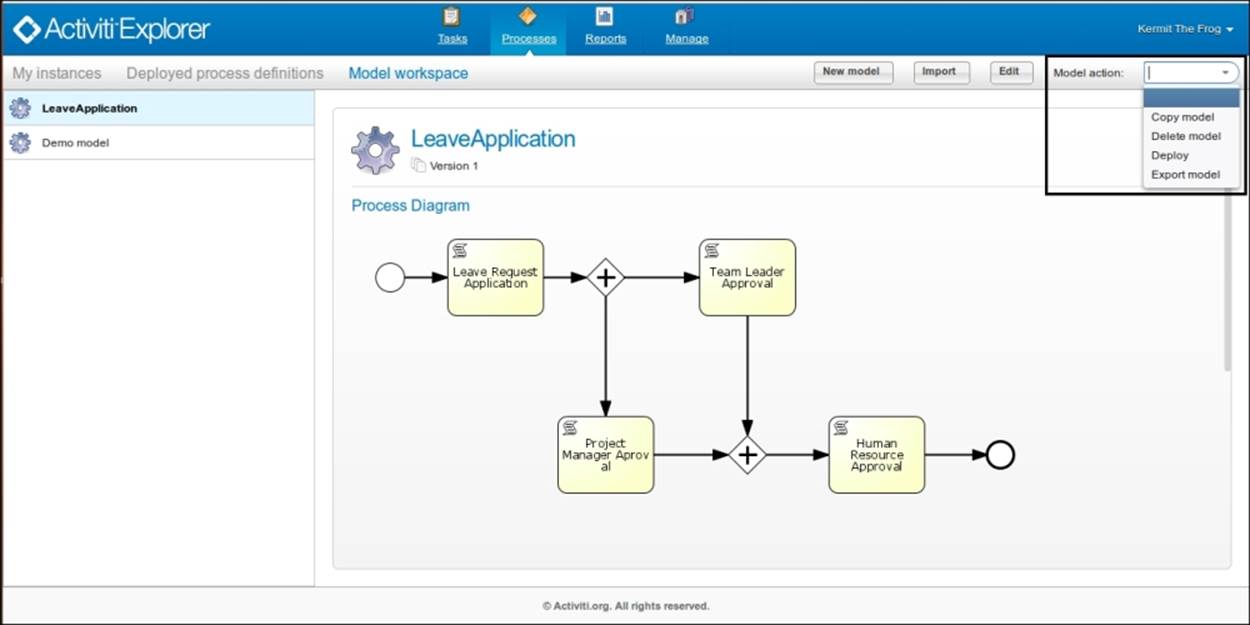
1. We will now export a business process. For performing an export, you can select the process to be exported, and from the Model action drop-down menu, you need to select the Export model option.
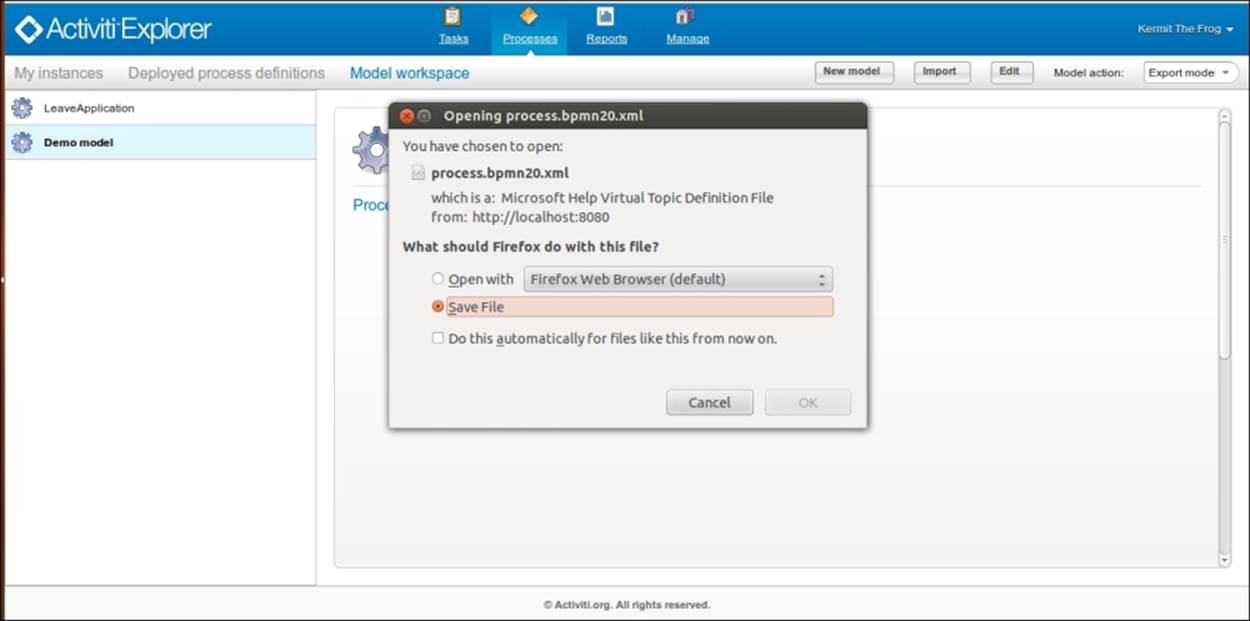
2. On selecting the Export model option, the modeler will provide a window that will save our business process in a bpmn20.xml format, and we can use the exported file in Eclipse and edit the process for execution:
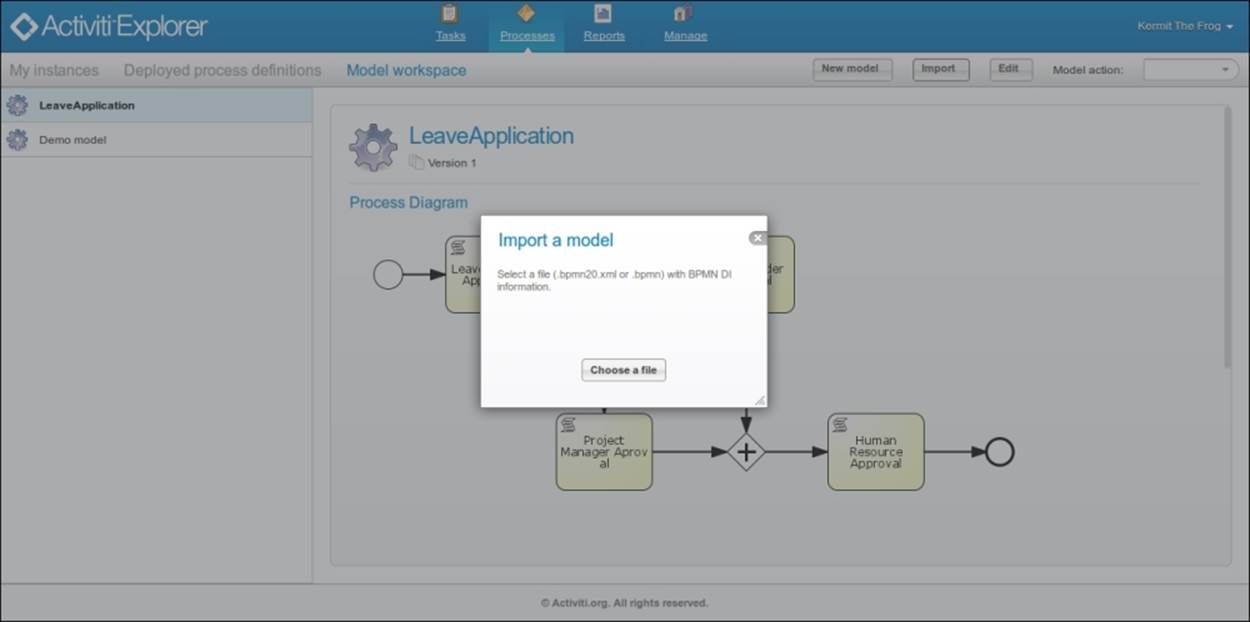
3. If you already have a business process created and want to view that process in the Activiti Modeler, you can use the Import button available at the top-right corner of the window:
4. On selecting the Import button, the following window will pop up that clearly indicates that you can import files only with the .bpmn20.xml and .bpmn extensions, as shown in the following screenshot:
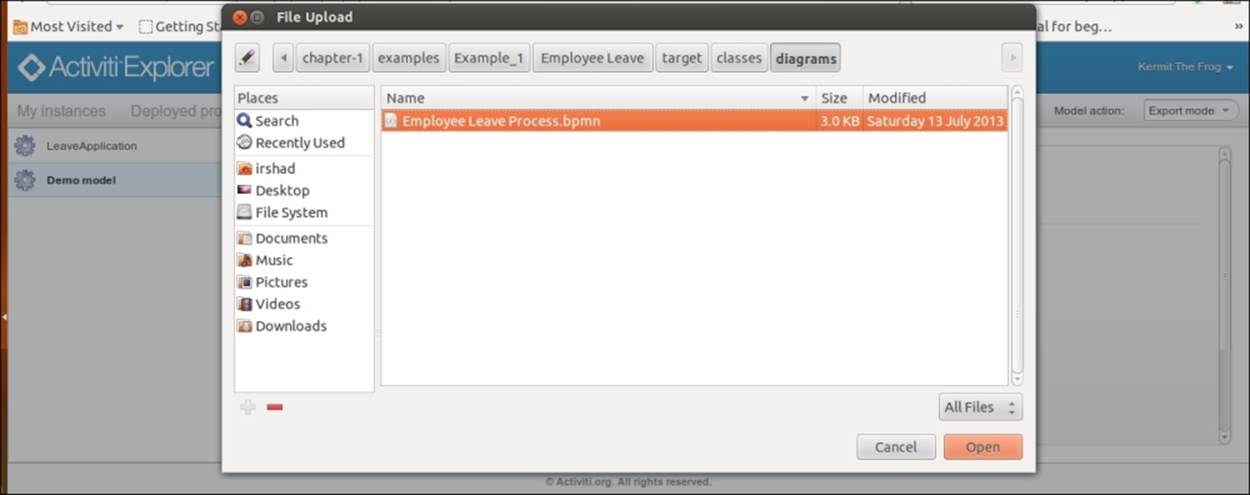
5. In the previous chapter, we created an example using the Eclipse editor. So, we will import that example to the Activiti Modeler. Browse to the path where the .bpmn file is located and import the file as shown in the following screenshot:
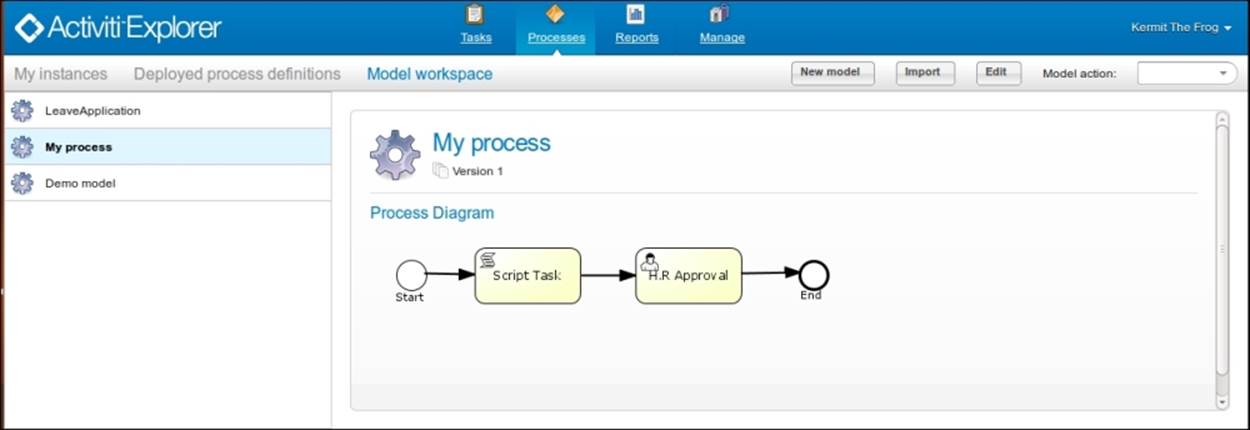
6. After the import operation, you can see the process available in the list on the left pane:
What just happened?
We came across how to import and export the business process from or to the Activiti Explorer.
Time for action – deploying a model into the Activiti Engine
After creating the business process, it's now time to deploy it into the Activiti Engine:
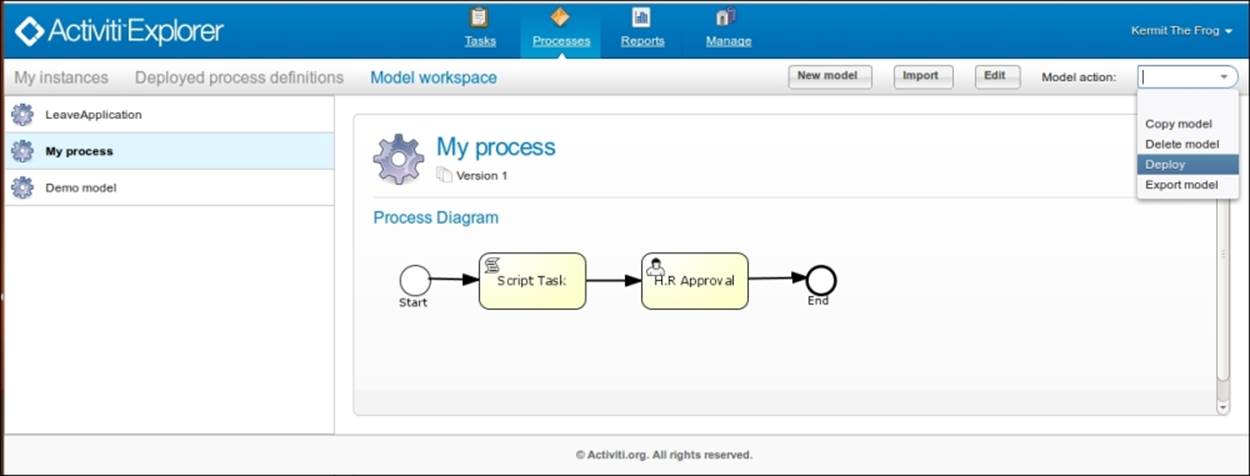
1. To deploy a process into the Activiti Engine, you need to select the process, and from the Model action drop-down menu, select the Deploy option:
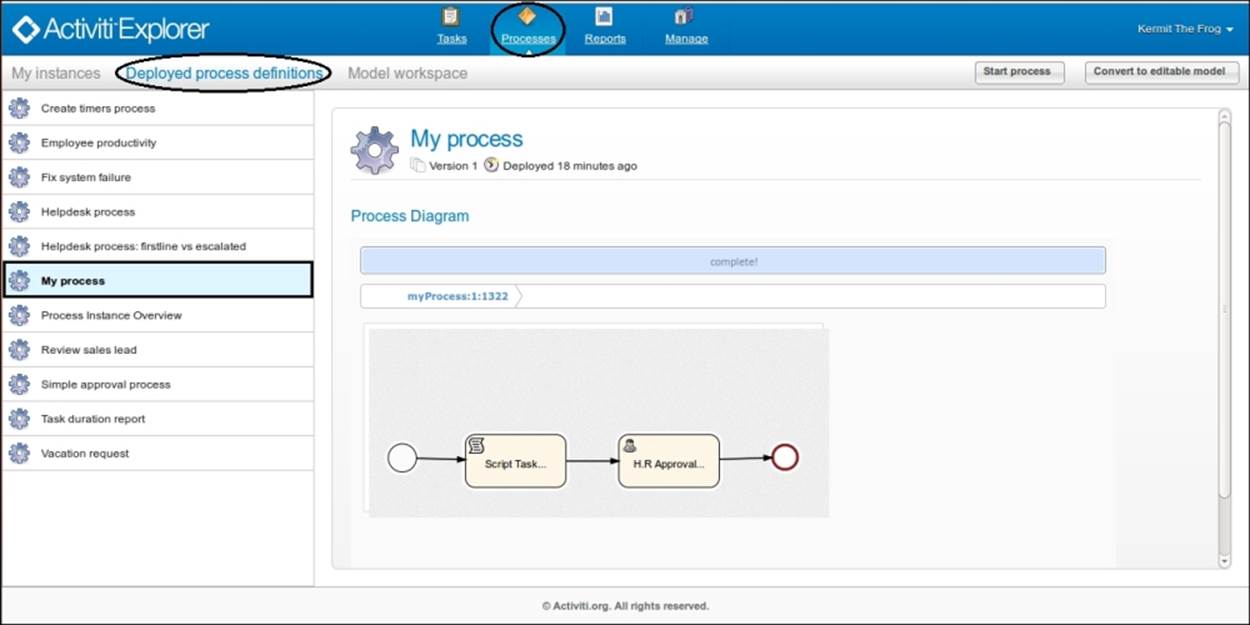
2. After the successful deployment of the business process, you can find it in the Deployed process definitions menu. You can even start executing the process by selecting the Start process button at the top-right corner of the window:
What just happened?
After the creation, import, and export of the business process, there was the curiosity to execute the process in a working environment. So, we deployed the business process into the process engine.
Summary
So far, we have gained knowledge regarding BPM, the lifecycle of BPM, the history of BPM, and the current standards in use for modeling business processes. We also had a look at the various BPM elements used for modeling a business process. In this chapter, we also learned how to install, configure, and use the Activity Modeler.
In the next chapter, we will learn how to configure the Activiti Designer in Eclipse, use the designer to design a business process, and how to test it. So, in the next chapter, we will perform a completely hands-on exercise using an example.
All materials on the site are licensed Creative Commons Attribution-Sharealike 3.0 Unported CC BY-SA 3.0 & GNU Free Documentation License (GFDL)
If you are the copyright holder of any material contained on our site and intend to remove it, please contact our site administrator for approval.
© 2016-2025 All site design rights belong to S.Y.A.