Activiti 5.x Business Process Management Beginner's Guide (2014)
Chapter 3. Designing Your Process Using the Activiti Designer
In the previous chapter, we learned about the Activiti Modeler and how we can use it to design a process. We are now able to import and export models using the Activiti Modeler. Using the Activiti Modeler to design a business process is mostly preferred by business analysts and architects because it is a web-based designing tool and is easy to use. However, when it comes to designing an executable business process, the Modeler doesn't seem helpful; for this, Activiti provides an Eclipse-based tool called Activiti Designer.
In this chapter, we will discuss the following topics:
· Introduction to the Activiti Designer
· Configuring the Activiti Designer with Eclipse
· Designing the first process
· Testing the process
· Importing the process to the Activiti Modeler
Understanding the Activiti Designer
The Activiti Designer is an Eclipse-based workflow designing tool of Activiti. It is only supported by Eclipse Juno or Eclipse Indigo. There is a difference between a Designer and a Modeler, even though both are used for designing business processes.
The difference is that the Activiti Modeler is a web-based process designing tool and cannot be used to provide technical details to the business process, whereas the Activiti Designer is used to design the business process as well as provide technical details to your business process.
Time for action – downloading and installing the Activiti Designer
It's time to use the Activiti Designer to design a business process. To start designing a process using the Activiti Designer, you need to configure Eclipse with the Activiti Designer by performing the following steps:
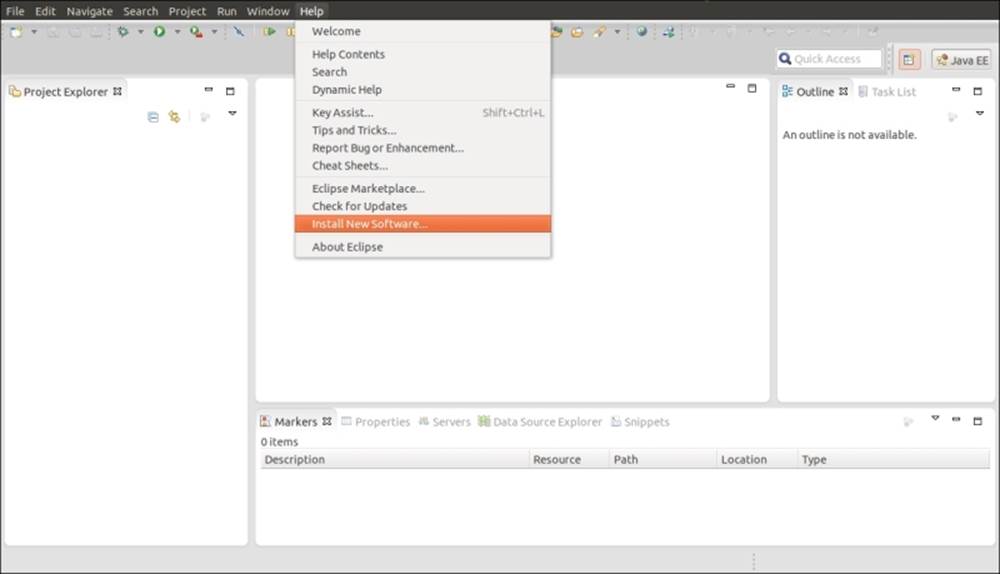
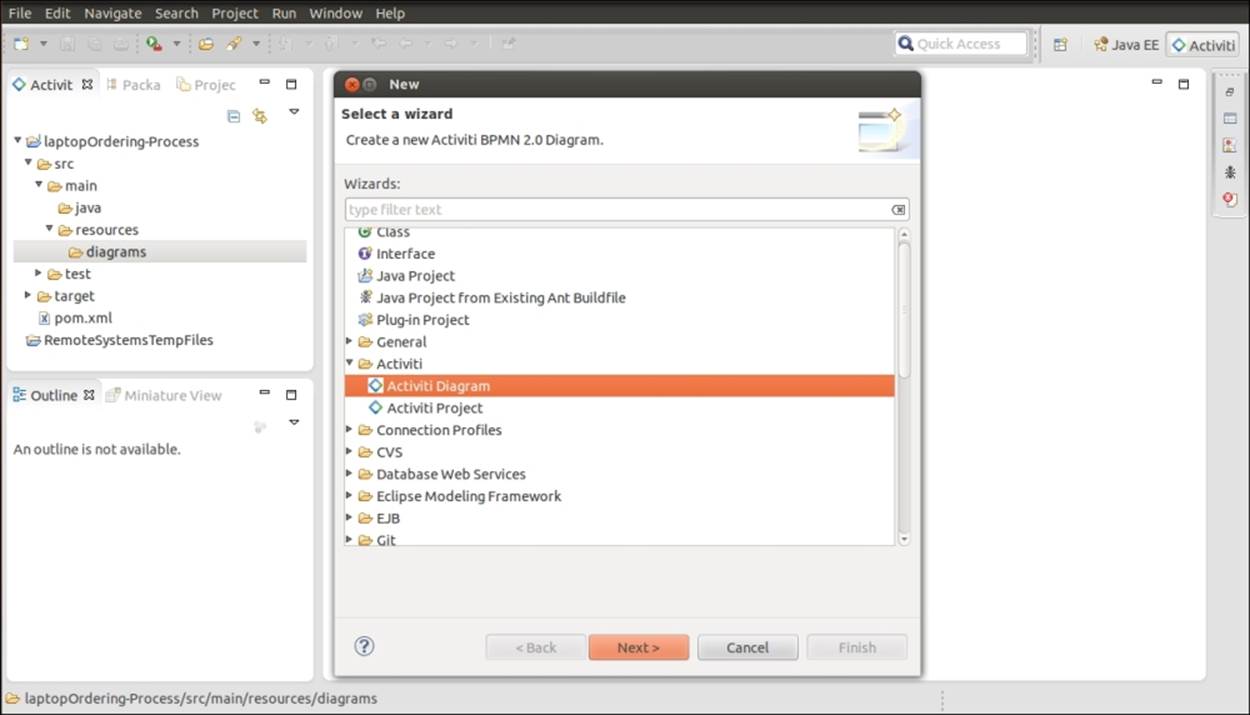
1. For configuring Eclipse with the Designer, you need to navigate to Help | Install New Software…, as shown in the following screenshot:
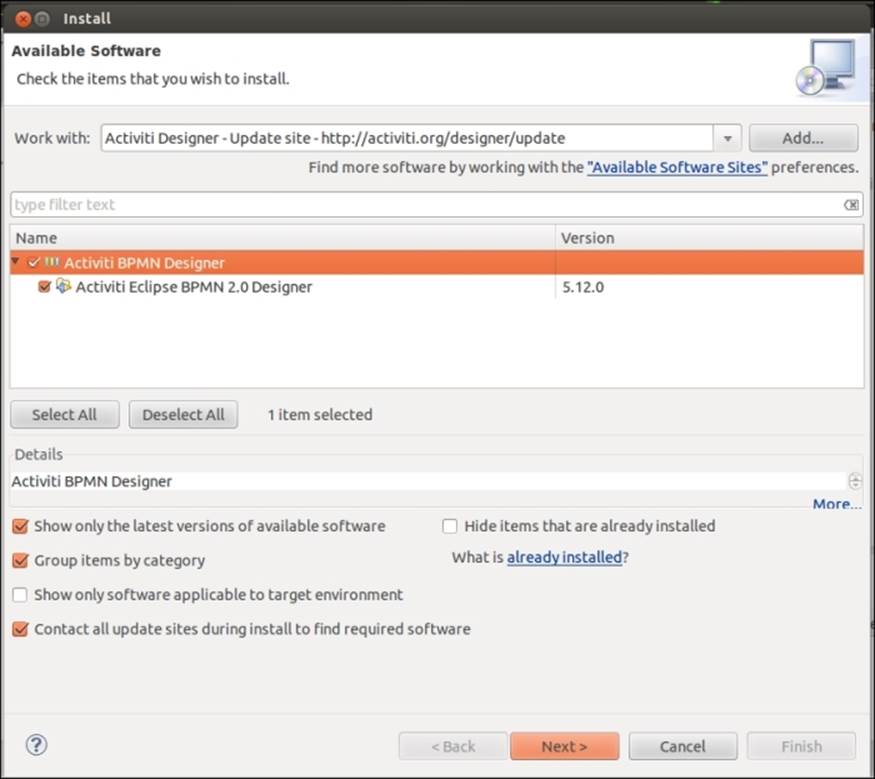
2. In the following screenshot, you can see the pop-up window where you have to provide the URL for the Activiti Designer, http://activiti.org/designer/update, which will fetch the latest Activiti Designer plugin for Eclipse; after the successful update, restart Eclipse:
What just happened?
We have just configured the Activiti Designer using the Activiti update site's URL. This URL fetches the updated Activiti Designer.
Time for action – designing your first process
We have designed a business process using the Activiti Modeler. To add technical details to a business process, we have to design a business process using the Activiti Designer. So, let's design a business process in the Activiti Designer by performing the following steps:
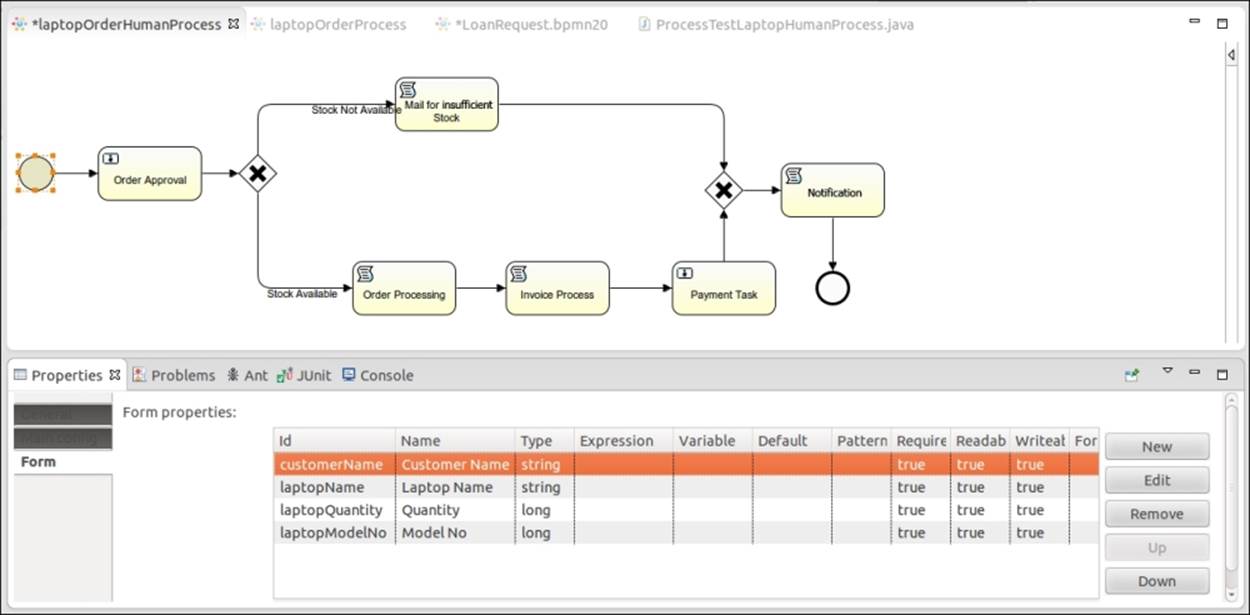
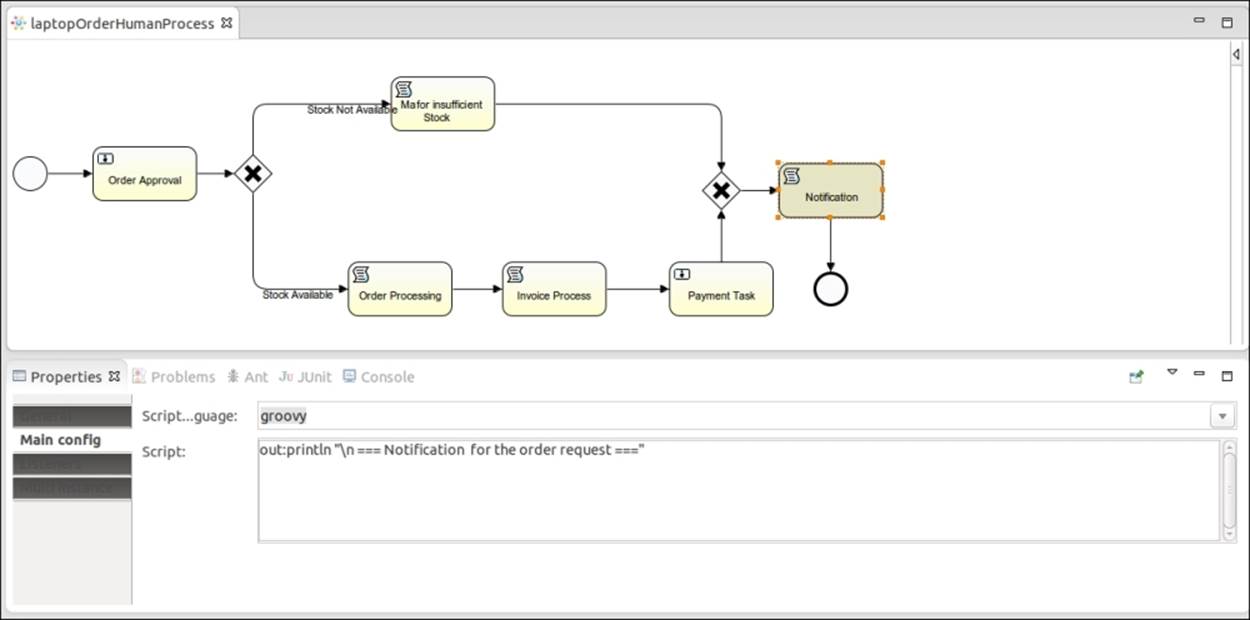
1. After configuring the Activiti Designer in Eclipse, we will design an executable process. So, let's take the example of the laptop ordering process, as shown in the following diagram:
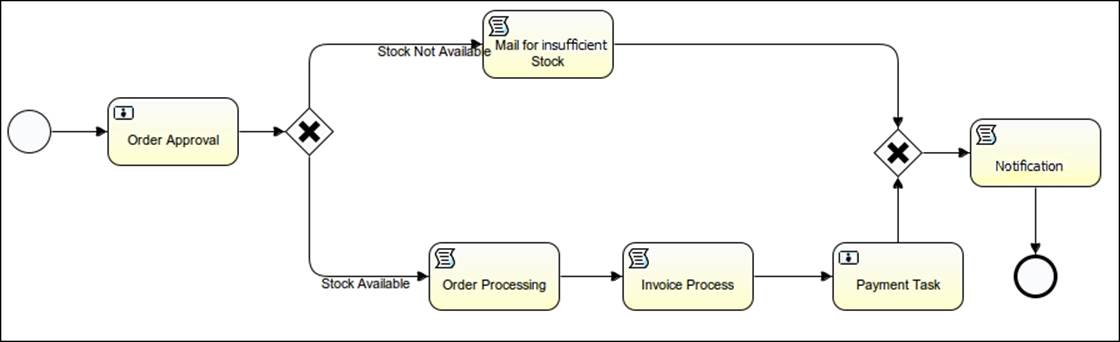
2. In the laptop ordering process, we will have three user tasks and three script tasks.
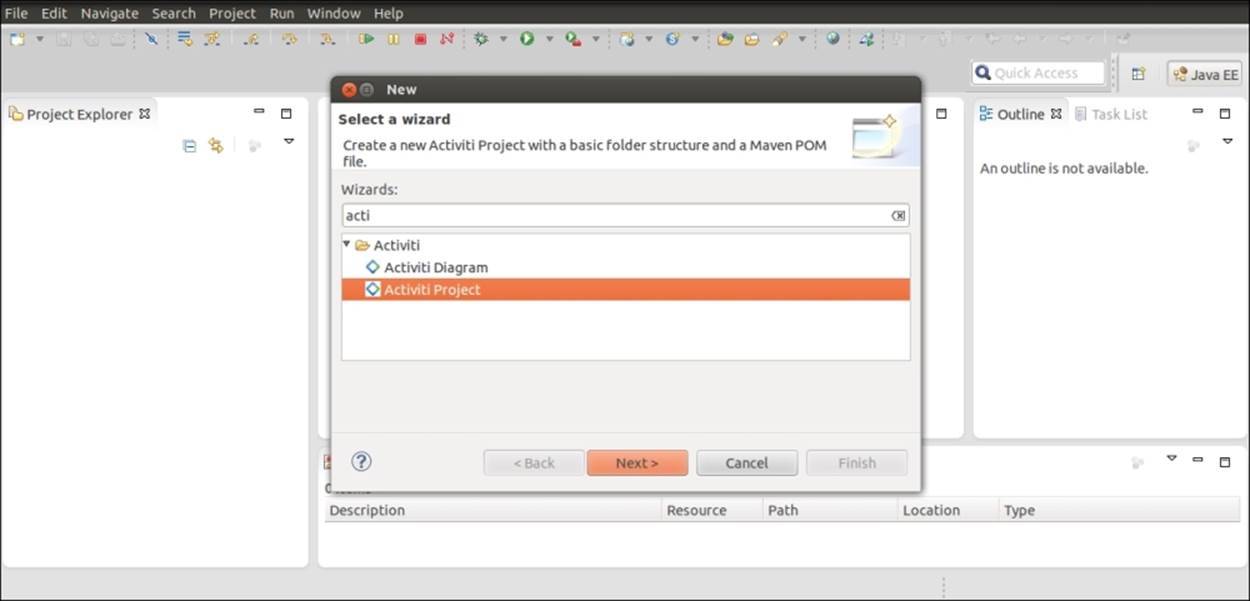
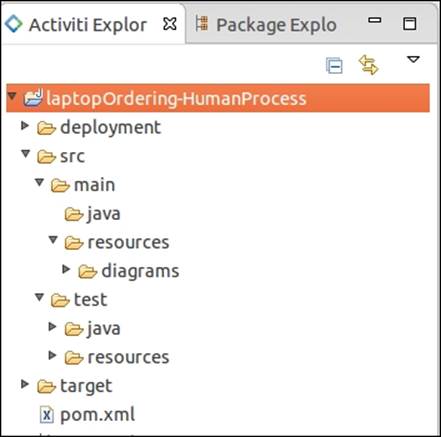
3. We will create a new Activiti project to start the process creation; for that, we have to navigate to File | New | Activiti Project and provide a name, for example, laptopOrdering-HumanProcess.
4. Upon the successful creation of the Activiti project, we will have created a directory structure as shown in the following screenshot. In the main directory, we can have the production environment's implementation files, and in the test directory, we can have the test environment's implementation files; there is also a pom.xml file available, which can convert the Activiti project to a Maven project and execute it as such.
5. Now we will design the process diagram using the Activiti Diagram option by navigating to File| New | Other | Activiti Diagram, which can be found at src | main | resources | diagrams with the name laptopOrderingProcess.
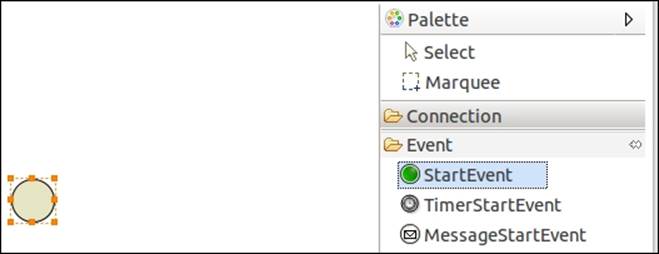
6. Once the laptopOrderingProcess.bpmn file is created, drag-and-drop a StartEvent option from the Event tab available in the Palette section on the right-hand side of the screen, as shown in the following screenshot:
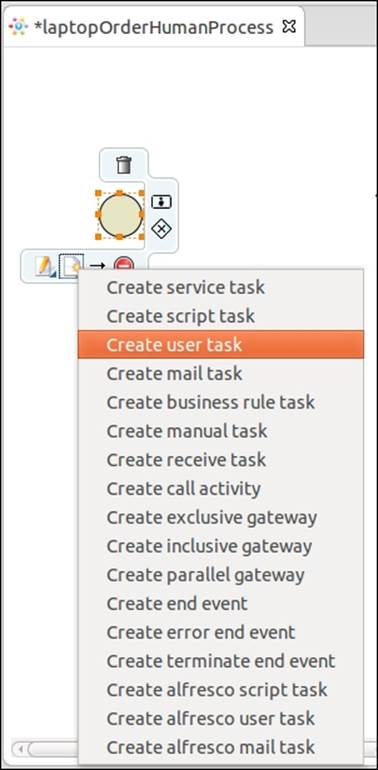
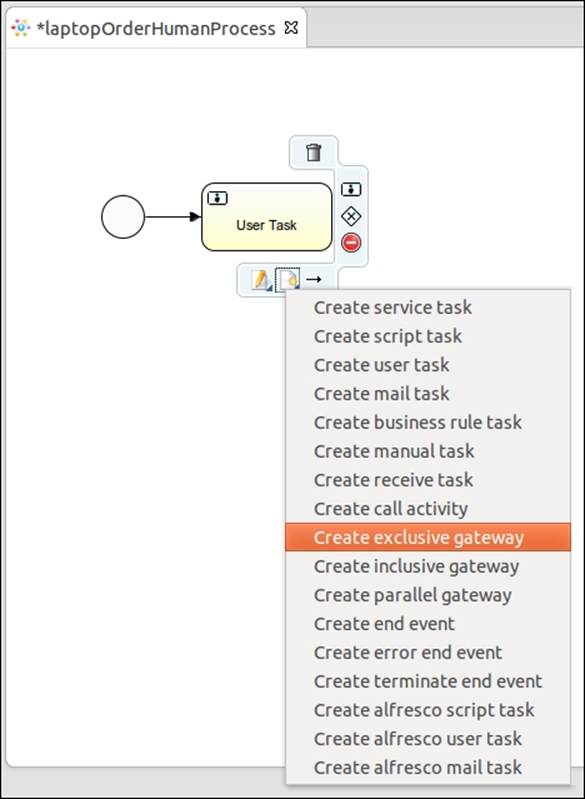
7. We can place the next node by selecting it from the start node itself. As we want a user task connected after the start node, we will select the Create user task option from the list shown in the following screenshot:
8. Now based on the output provided by the execution of the user task, the process has to decide which path to execute. To decide the path, a gateway is used. There are three types of gateways available: inclusive, exclusive, and parallel; they are explained inChapter 2, Modeling Using the Activiti Modeler. In this process, we will be using the exclusive gateway:
9. We will design the entire process flow using script tasks, user tasks, and the exclusive gateway.
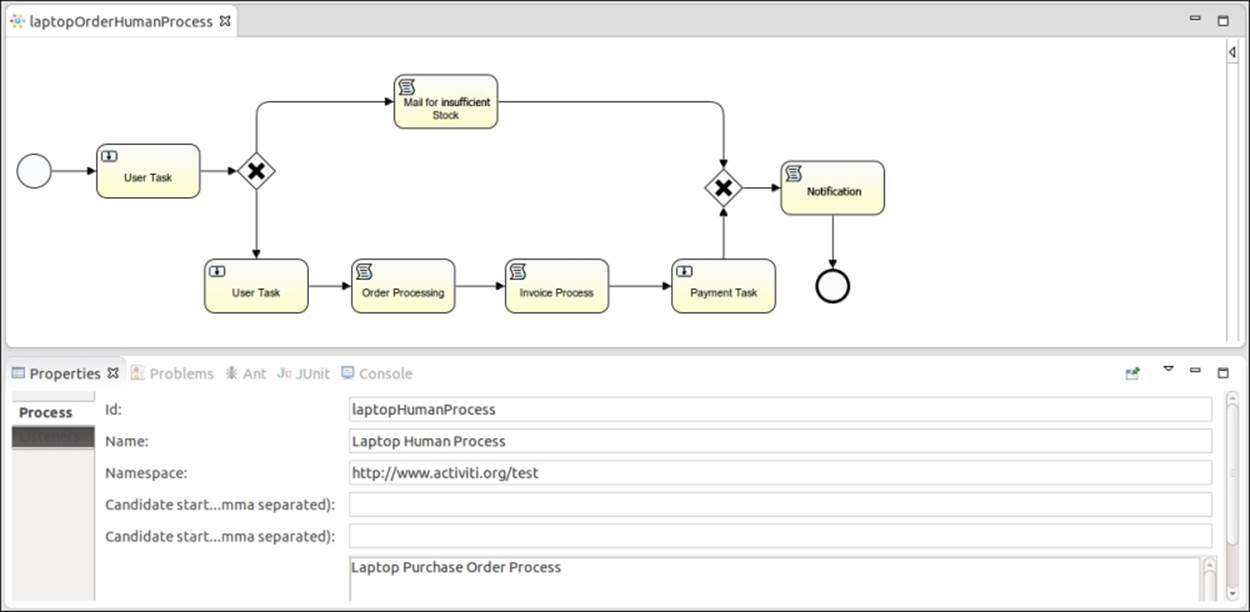
10. After designing the entire process, we will populate the properties of the business process and the nodes used.
11. We will start by populating the properties of our business process. We will provide a unique name and ID for our process. For that, we need to select the white canvas and open the Properties window in which these properties can be specified, as shown in the following screenshot:
12. We want some values to be provided at the start of the process. For this, populate the form properties of the start node, select the start node, open the Properties window, and select the Form tab from the Properties window, as shown in the following screenshot:
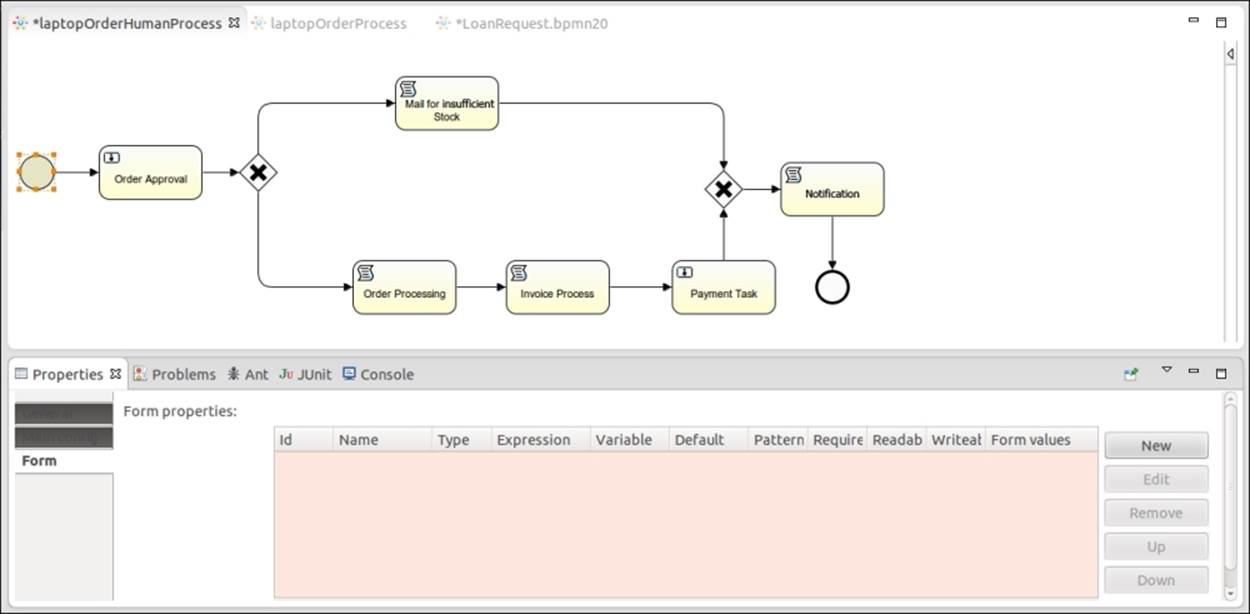
13. To add a new form property, select the New option; this will open a form where variable declarations can be made. At the start of the process, the customer will provide some information about the laptop to be ordered, such as the laptop name, quantity, model number, and customer name. We will declare these variables using the form property, as shown in the following screenshot:
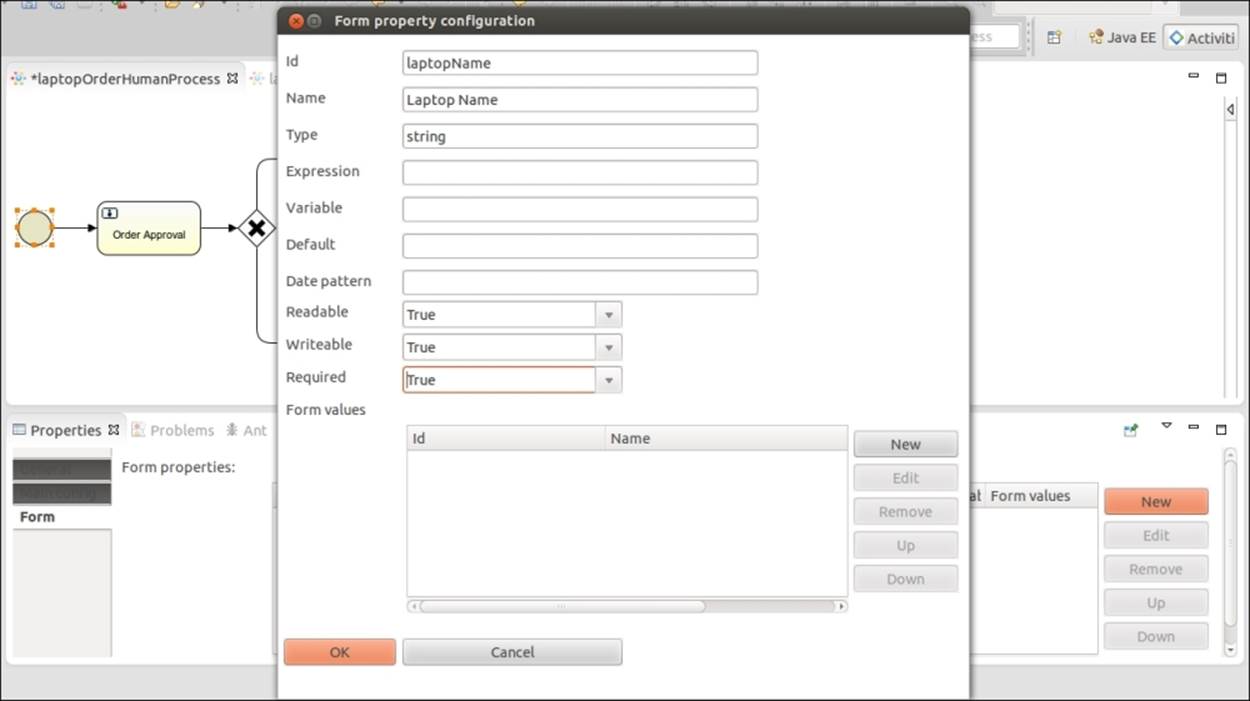
14. Activiti supports only certain data types, such as boolean, long, string, enum, and date. There are other properties, such as Readable, Writeable, and Required, that are by default set to true. We will look at the instances in which these properties need to be set to false. So, the form properties that we are setting in the start event will be visible to the user when they start the process.
15. Once the customer provides the details regarding the laptop, they should be passed to the Order Approval user task. This task will be assigned to a specific user who will either approve or reject the order. To assign this task to a specific user, populate theAssignee property of the user task. By default, there are three users available. All these properties are available in the Main Config tab of the user task properties.
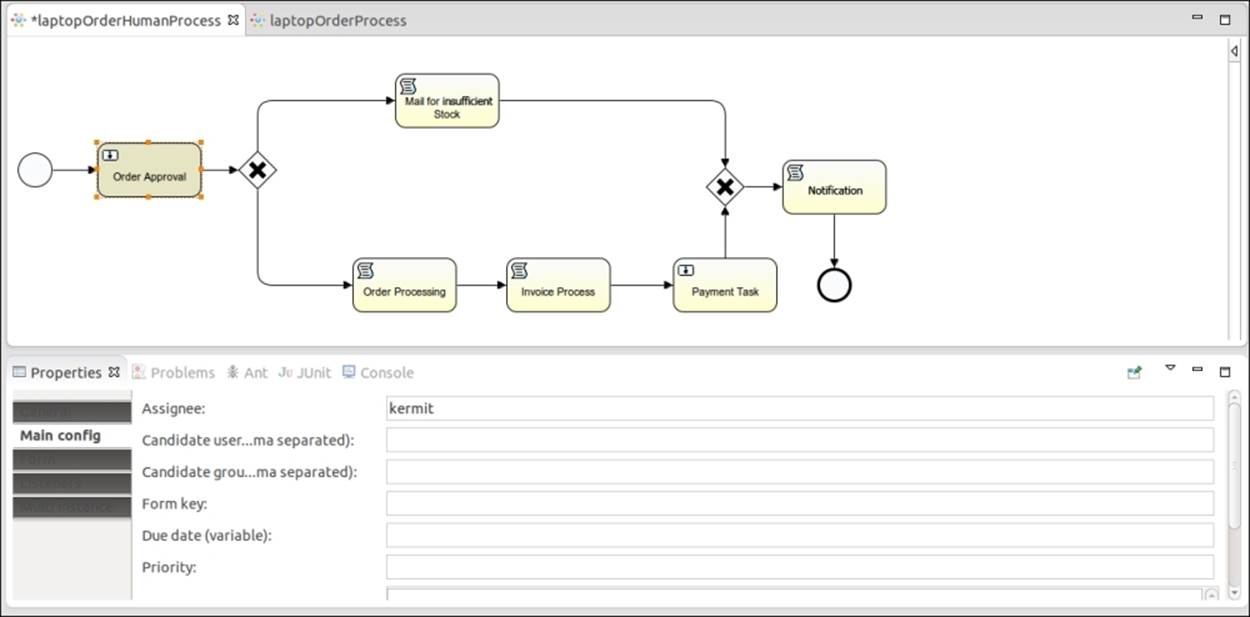
Note
If you want to assign a task to multiple users, you will have to populate the Candidate user comma separated property in this field and provide the names with comma-separated values. If you want the task to be assigned to a group, populate theCandidate group comma separated property with group names.
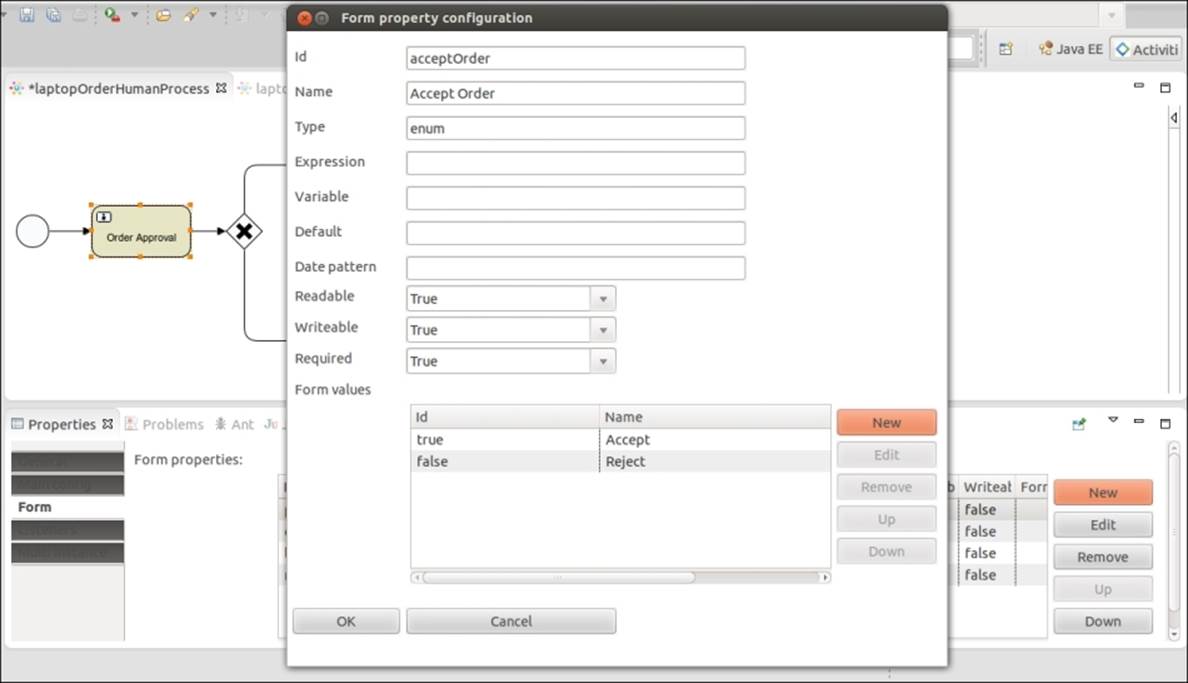
16. The user task is only responsible for accepting and rejecting orders. The user task also has form properties; we will be setting Type as enum and in Form values we will provide the values to be displayed, as shown in the following screenshot:
17. To display the details provided by the user, we will have to populate the Expression property. In the Expression property, we have to use the ${id} syntax. As shown in the following screenshot, the Expression values are the IDs that were provided by us in the start node, and the Writeable and Required properties are set to false as these values cannot be edited:
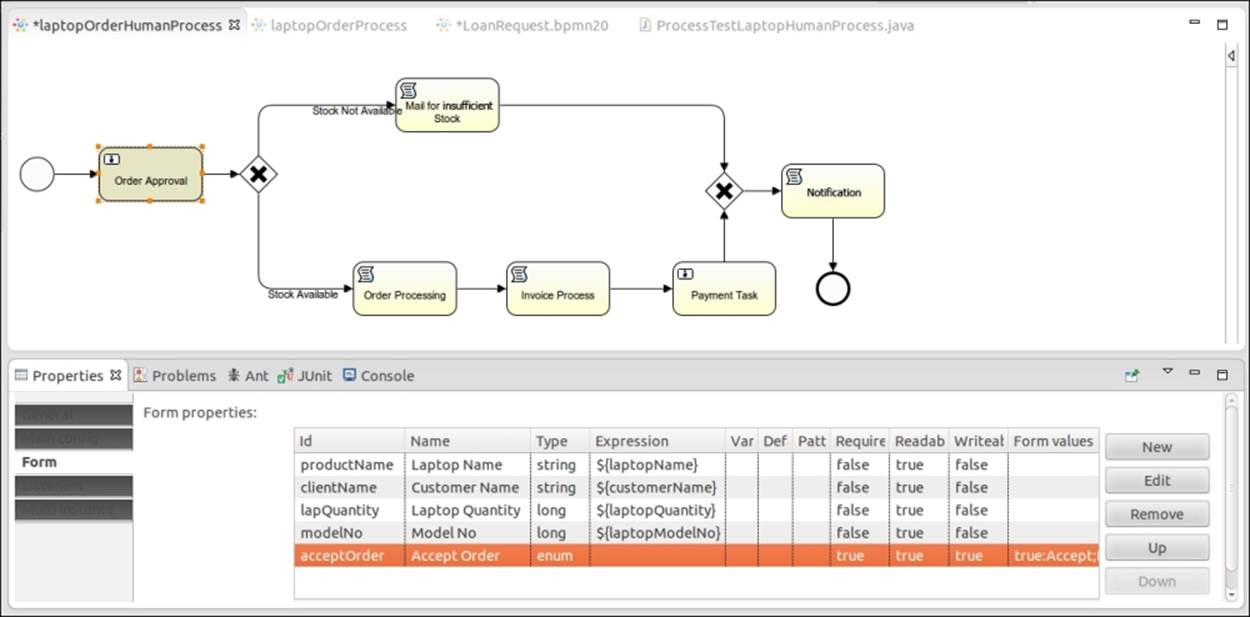
18. We have defined an exclusive gateway connected after the Order Approval task; it checks the output provided by the Order Approval task, that is, whether the order is accepted or rejected. There are two outgoing connections from the gateway: one for insufficient stock and another for accepting the order. To provide conditions, we have to make changes in the Condition property of the Stock Not Available flow with the acceptOrder value. This is the form property defined in the Order Approval task. So, here we are checking whether or not the output is set to false. If it is, follow the path shown in this screenshot:
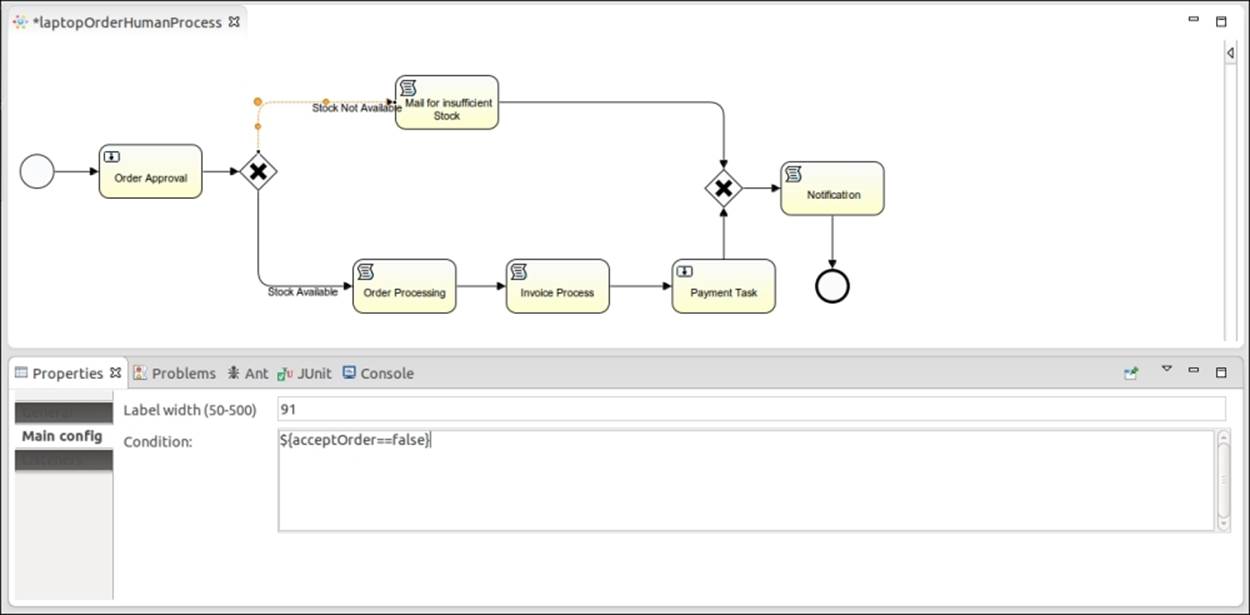
Note
Conditions can be defined on the paths but not on the gateway.
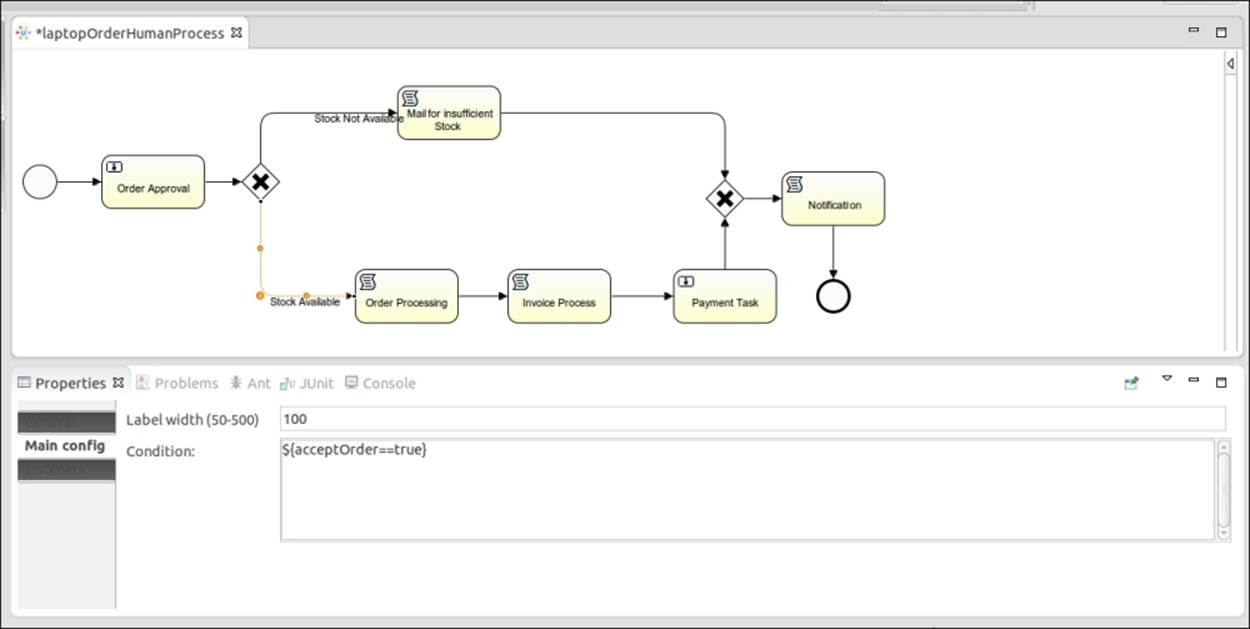
19. In the other flow conditions property, we are checking whether or not the output is set to true. If it is, follow the path shown in this screenshot:
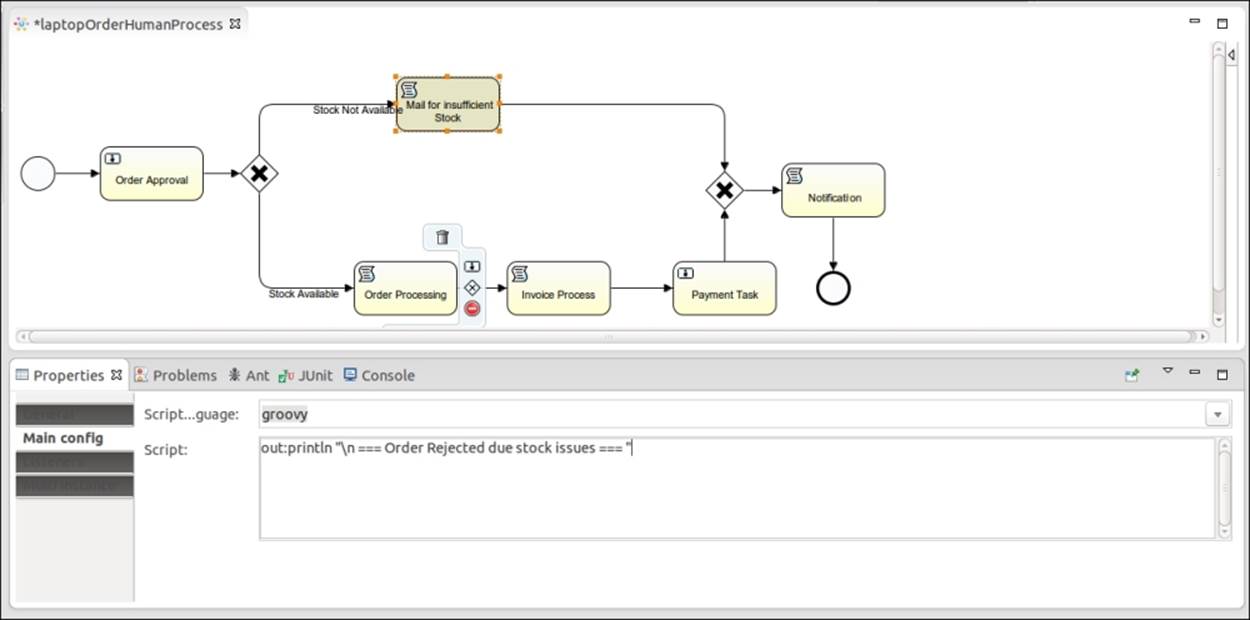
20. If the acceptOrder values are set to false, a script task named Mail for insufficient stock is executed. For this script task, we have set the Script Language property to groovy, and in the Script property, we have just printed a simple message to display on the console. Similarly, if the output is set to true, the Order Processing script task should be executed first and then the Invoice Process script task and the Payment Task user task, as shown in the following screenshot:
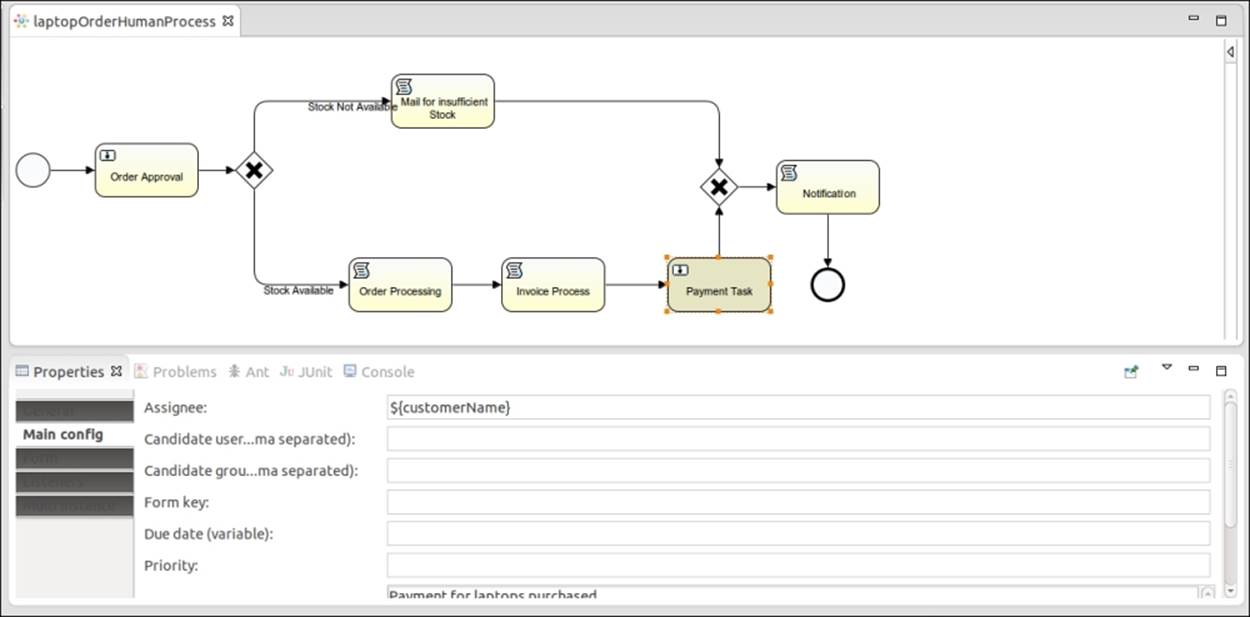
21. For the Payment Task user task, we are going to dynamically assign users. In the following screenshot, you can see that the Assignee property is populated with ${id}, customerName, which is the form property field of the start event; this was the name provided at the start of the process. The Payment Task will be assigned to the particular user who has been assigned.
22. After the Payment Task and Mail for insufficient Stock tasks are completed, we have to add an exclusive gateway that has two incoming connections and one outgoing connection. This means that if any of the incoming flow is executed, the process will proceed to the Notification script task, the message defined in the Script property will be displayed, and the process will be terminated as there is an end node defined after the Notification task is executed, as shown in the following screenshot:
What just happened?
We have just finished discussing process creation using the Activiti Designer and also gained some knowledge regarding the various nodes and how to populate their properties. Now you should be able to design your own process using the Activiti Designer by adding technical details to your process.
Time for action – testing your process
Once the process is designed, you need to test it before deploying it to the Activiti Engine or production environment by performing the following steps:
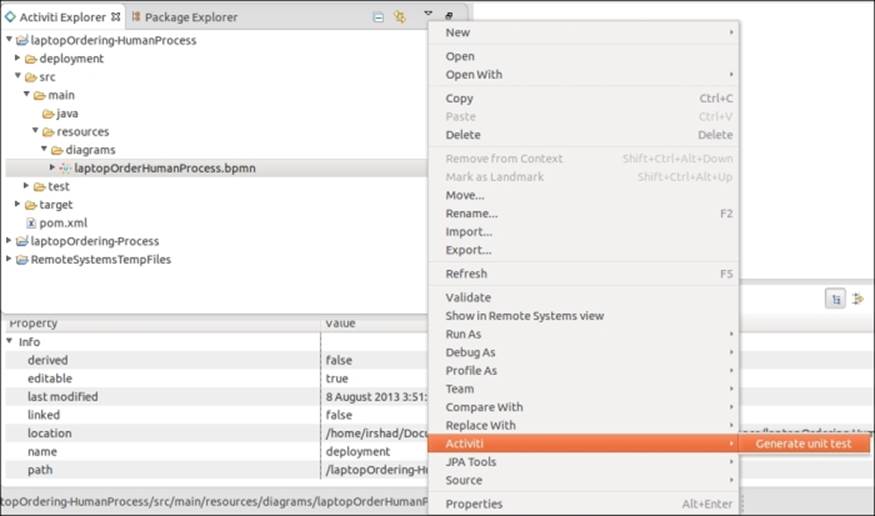
1. Now we will create a test file to test our Activiti process. To create a test file, we have to select the process file .bpmn, right-click on it, and select Activiti from the list. It will contain the Generate Unit test option; select it or just click on it.
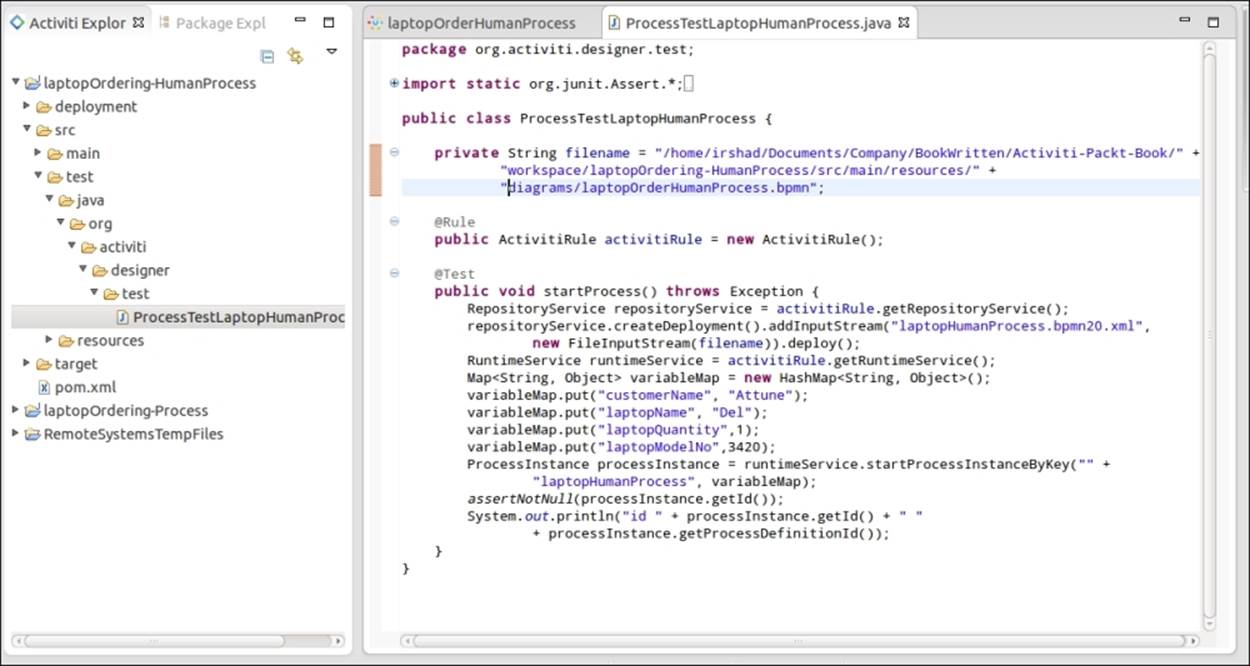
2. Clicking on the option will generate a test file in the test folder as shown in the following screenshot, as the class file contains the path of the .bpmn file and the methods to execute the process. In the class file, there is also a map variable that is populated withcustomerName, laptopName, laptopQuantity, and laptopModelNo. These are the form properties defined in the start node of the process. These variables are passed to the process using the following code:
ProcessInstanceprocessInstance = runtimeService.startProcessInstanceByKey("laptopHumanProcess", variableMap);
This code snippet is shown in the following screenshot:
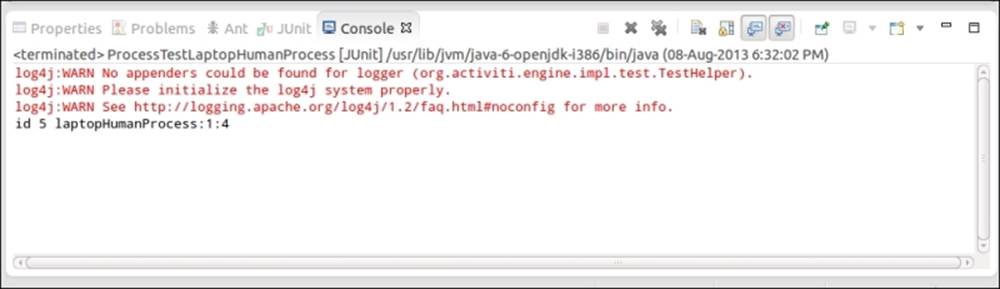
3. To test the business process, run the class file as a JUnit test. If your process is completed successfully, you will get the following screenshot; if not, an error message will be displayed on the screen:
What just happened?
After successfully designing the process, we have gone through the testing phase of the process. In this section, we saw how to create a test file for our process and run it to check whether or not the process created is working properly.
Time for action – importing a process from the Activiti Modeler to the Activiti Designer
Now, you are familiar with designing a process using the Activiti Designer and testing it using Eclipse. Now let's say a business process has already been designed by a business analyst and the developer has been asked to add technical details to the existing process. As in Chapter 2, Modeling Using the Activiti Modeler, we have designed a business process using the Activiti Modeler and exported and saved it. Now we will see how to import that process to the Activiti Designer. In this section, we will look at how to import a process from the Activiti Modeler to the Activiti Designer by performing the following steps:
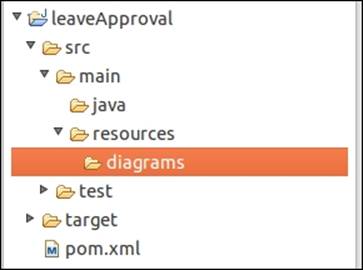
1. To import a process to the Activiti Designer, we have to copy the process created in Chapter 2, Modeling Using the Activiti Modeler to the Eclipse project. Create a new project in Eclipse as we did in the Designing your first process section. Just create a project; do not create an Activiti diagram in it.
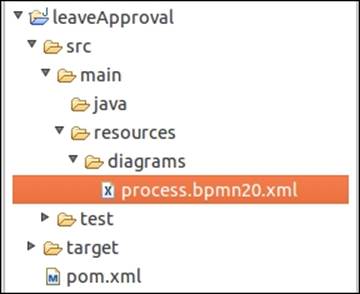
2. After creating the project in Eclipse, paste the process' bpmn20.xml file in the diagrams folder of the project created, as shown in the following screenshot:
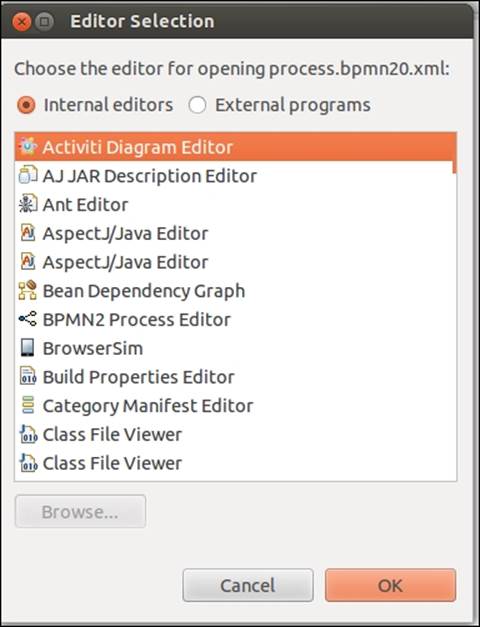
3. To open the process in Designer mode, right-click on the process.bpmn20.xml file, browse through it, and open it in another window.
4. This will open a pop-up window. Select Activiti Diagram Editor from the pop-up window, as shown in the following screenshot:
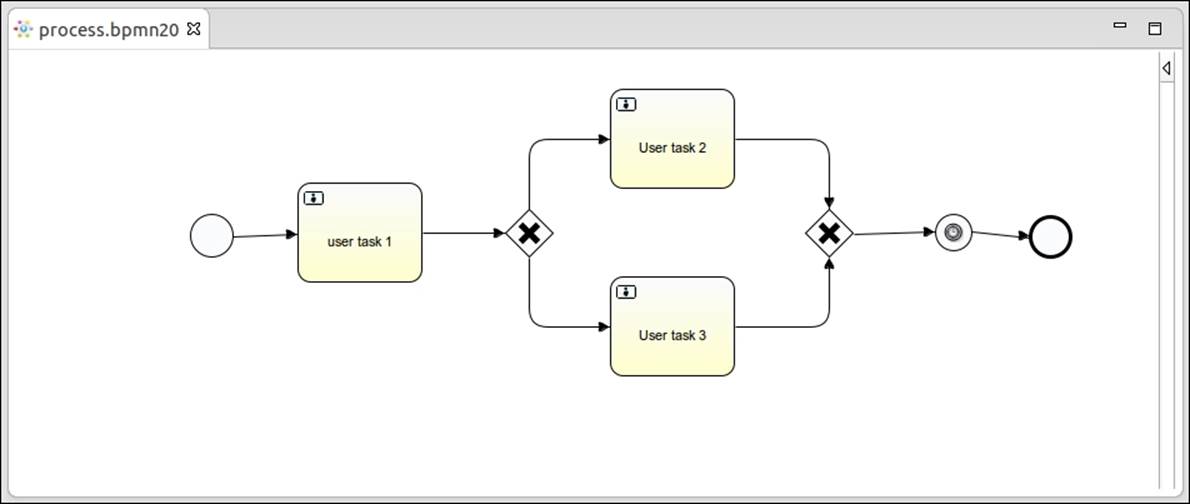
5. Opening the process using the Activiti Designer Editor will open it in graphical mode. Here, you can edit the process, add technical details to it, and again deploy it to the Modeler.
What just happened?
Now you're familiar with designing a process using the Activiti Designer and testing it in Eclipse. After testing the process, we need to import the process to the Modeler. In this section, we learned how to import our process to the Modeler.
Have a go hero
Create a driving license business process using the Activiti Designer. At the start of the event, use one form to get applicants' information, such as their name, age, and type of license. Then check the age condition in a script task; if all the conditions are satisfied, allocate the document approval task to the DMV officer. So for the approval task, take one human task. Send a confirmation message to the applicant about the status of their application, which can be either approved or rejected.
Pop quiz – the Activiti Designer
Q1. What is the name of the property that is used for executing Groovy script in a script task?
1. Flow condition
2. Script
3. Id
4. Form properties
Q2. How many different gateways are available?
1. 2
2. 3
3. 4
4. 1
Summary
This chapter was completely focused toward getting hands on with the Designer to get a clear understanding of business processes; how to design one, the forms for tasks, and so on.
By now, you should have gained some knowledge regarding the Activiti Designer and be able to install the Activiti Designer in Eclipse. Using the Activiti Designer, you can design a business process and add technical details to it, as we have also covered designing forms for human interaction. You should also be able to test your business process using the Activiti Designer. We have also covered the importing of a process from the Activiti Modeler to the Activiti Designer and how to add technical details to it.
In the next chapter, we will have a look at deploying the business process in the Activiti Engine.
All materials on the site are licensed Creative Commons Attribution-Sharealike 3.0 Unported CC BY-SA 3.0 & GNU Free Documentation License (GFDL)
If you are the copyright holder of any material contained on our site and intend to remove it, please contact our site administrator for approval.
© 2016-2026 All site design rights belong to S.Y.A.