Activiti 5.x Business Process Management Beginner's Guide (2014)
Chapter 6. The Activiti ProcessEngine API
In the previous chapter, we came across various functionalities and configured a mail engine in Activiti. In this chapter, we will be interacting with the process engine using various APIs of Activiti, such as RuntimeService, FormService, ManagementService, and HistoryService.
In this chapter, we will cover the following topics:
· An overview of APIs and services
· API for the start process instance and deploying the process
· API for working with user tasks
· API for querying historic activities
We can interact with the Activiti process engine using various Activiti process APIs and services. To look into the various APIs, let's see an overview of the APIs and their services.
Overview of the APIs and services
Activiti Engine provides different types of functionalities. To implement these functionalities, Activiti provides various services within the APIs (Application Programming Interfaces) to interact with Activiti. To achieve the functionalities of Activiti, we need to use the ProcessEngine API, which is an entry point of the process engine. We can use the various services of Activiti using the ProcessEngine API. The ProcessEngine API and the services objects are thread-safe.
Using the ProcessEngine API, we can use various services, such as RuntimeService, RepositoryService, TaskService, ManagementService, IdentityService, HistoryService, and FormService. Each service API offers a unique service. Let's see how these will help us:
· RepositoryService: This is mainly used to deploy process definitions. It provides operations for the management and deployment of process definitions. We can delete, query, deploy, and retrieve process definitions.
· IdentityService: This provides an interface for the management of groups and users. It is also useful for authentication in Activiti.
· FormService: This provides service in the form of startform and taskform. We can use this service for getting inputs from the user.
· TaskService: This provides functionality related to various user tasks. We can start a task, assign a task, or create a new standalone task.
· ManagementService: This is a service for administrative and maintenance operations on the process engine. These operations will typically not be used in a workflow-driven application, but are used in, for example, the operational console.
· RuntimeService: This is used to retrieve and store process variables. It is also used for querying on process instances and executions.
· HistoryService: We can use this service to get historical data.
Let's see each service in detail.
Delving into the process engine
The process engine is the heart of Activiti and is used to take advantage of the various services in Activiti. Using the ProcessEngine API, we can interact with the Activiti Engine and perform various functionalities. The ProcessEngine objects are thread-safe, so we can keep a reference for the whole server. It provides access to all the services that expose the workflow operations. An end-user application will require only one central Process Engine instance. A process engine is built through a ProcessEngineConfiguration instance and is a costly operation that should be avoided. For that purpose, it is advised that you store it in a static field or at a JNDI location (or something similar). This is a thread-safe object, so no special precautions need to be taken. The ProcessEngine class will scan for two files: one is activiti.cfg.xml and the other is activiti-context.xml.
The process engine uses Spring, so first a Spring application context is created and then the process engine is obtained from that application context. In Activiti, all services are stateless, so we can easily run Activiti on multiple nodes in a cluster environment, with each pointing to the same database. For configuring a process engine, you have to use the following API:
ProcessEngine processEngine = ProcessEngines.getDefaultProcessEngine()
RuntimeService
RuntimeService deals with starting new process instances of process definitions. This service is used to retrieve and store process variables. The data available in the process variables is specific to the given process instance. In a given process instance, various types of gateways can be used. These process variables determine the path to continue the process. We can also query on process instances and executions using RuntimeService. Executions are a representation of the token concept introduced by BPMN 2.0. RuntimeService points to the process that is being executed. Lastly, RuntimeService is used whenever a process instance is waiting for an external trigger and the process needs to be continued. A process instance can have various wait states, and RuntimeService contains various operations to signal to the instance that the external trigger is received and the process instance can be continued. The API used for RuntimeService is as follows:
RuntimeService runtimeService = processEngine.getRuntimeService();
RepositoryService
RepositoryService is considered the main service for interacting with the Activiti Engine. With the help of this service, we can manage and manipulate the business process. Using this service, we can perform the following actions:
· Deployment of a process into the repository
· Querying the deployed process from the process engine
· Suspending and activating the deployed process
To access RepositoryService, use the following API:
RepositoryService repositoryService = processEngine
.getRepositoryService();
Time for action – deploying the process
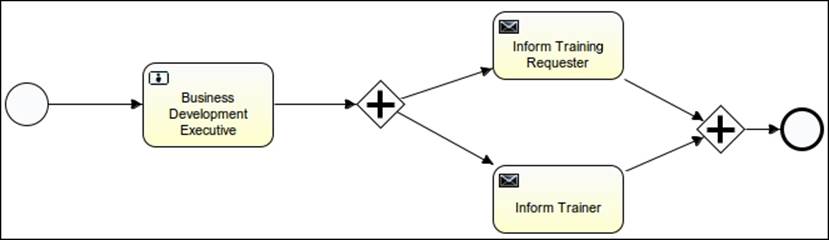
As we have discussed certain repositories, we will now use them to deploy processes. To start with the deployment, we will take an example of the Attune University where a customer registers for a training. So, in this process, the customer will provide their name, e-mail ID, date, and the topic for which they want training. Once they submit their request, it will be sent to the BDE, who will check whether or not the trainer is available on the specified date. Then, he will schedule the training with the trainer and a mail will be sent to both the trainer and trainee regarding the training schedule. The process will look as shown in the following screenshot:
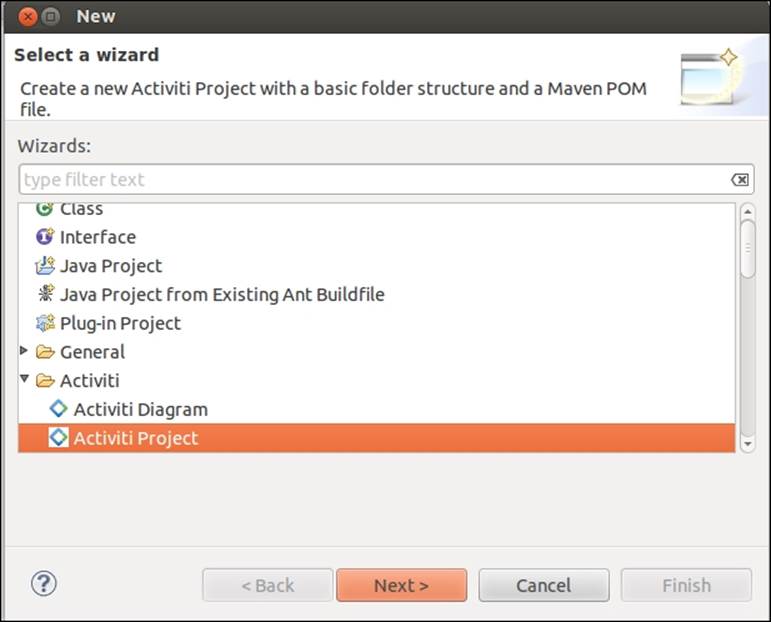
1. To start the implementation, we will create a new Activiti project named AttuneUniversity-Process in Eclipse by navigating to File | New | Other | Activiti Project:
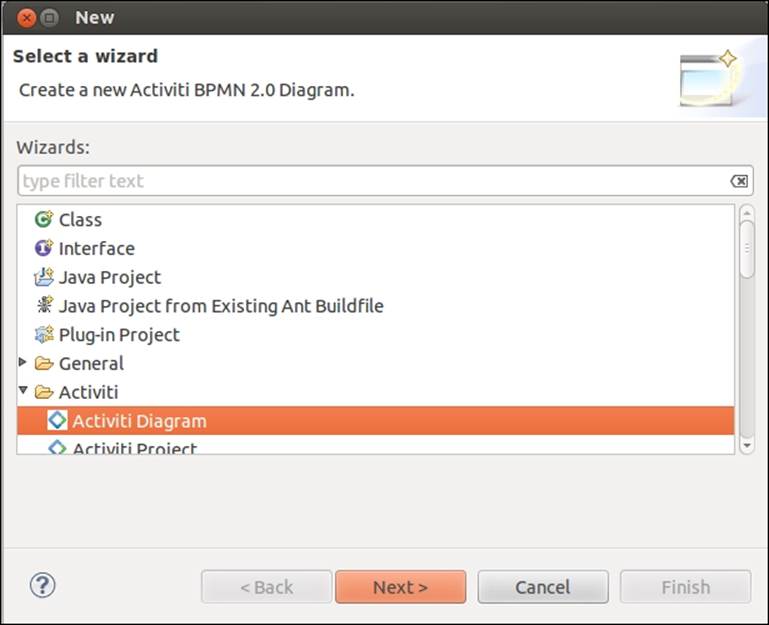
2. On successful creation of the project, we will create an Actviti diagram in it with the name trainingRequest. We can do that by navigating to File | New | Other | Activiti Diagram.
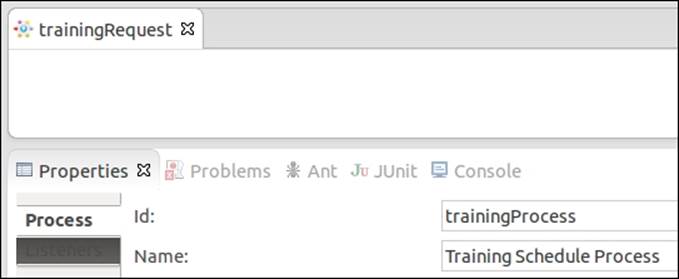
3. First, we will provide an ID and name for the business process. To do that, open the Properties window as shown in the following screenshot:
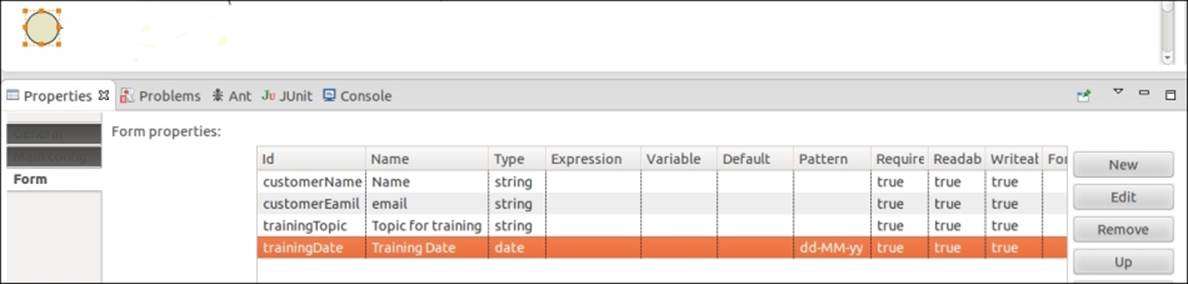
4. Now drag-and-drop the Start node into the canvas and populate the Properties Form tab to accept values from the user as in the following screenshot:
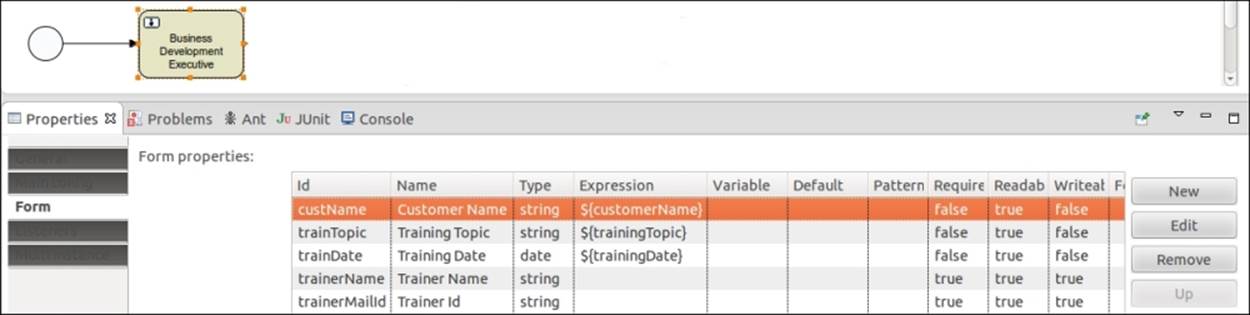
5. Create a user task called Business Development Executive where the business developer will be able to view the customer's request for training and accordingly assign a trainer for them:
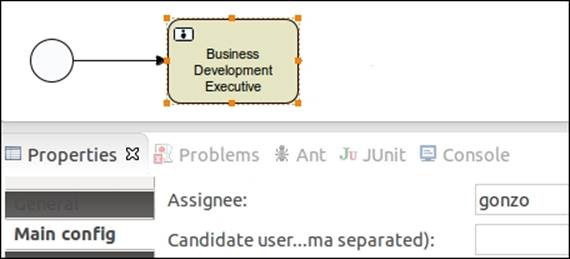
6. We will assign the user task to gonzo so that he can perform the task and execute the process:
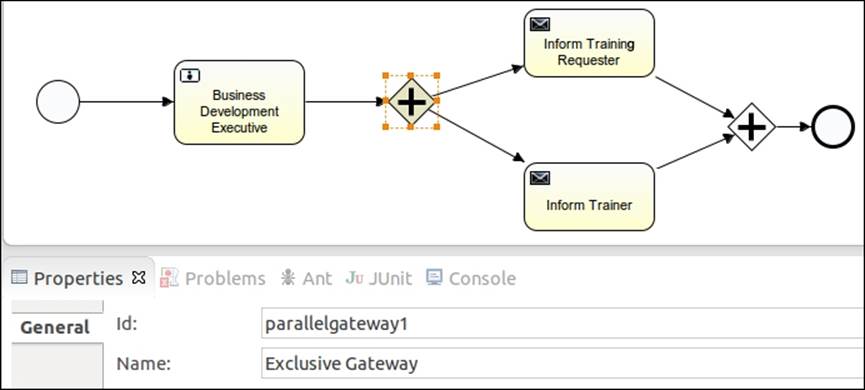
7. Now, as we want an e-mail to be sent to both the trainer and the trainee regarding the schedule, we will insert a parallel gateway and two mail tasks:
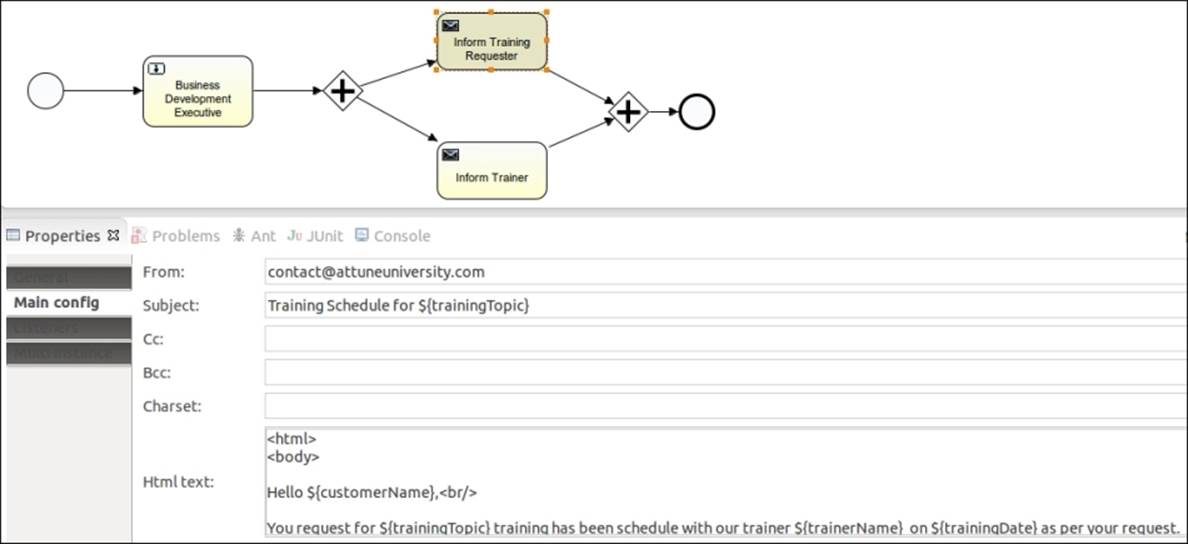
8. As we are sending e-mails to both the trainer and the trainee, we have to populate the properties of the Mail task, as shown in the following screenshot; the mail will be sent to the trainee and will contain trainingTopic with the name of the trainer, trainerName,and the date of training, trainingDate:
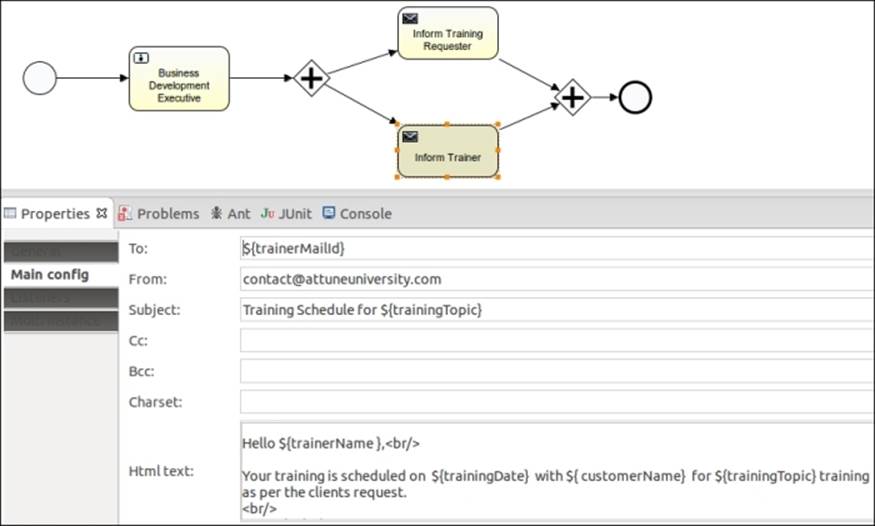
9. A similar e-mail will also be sent to the trainer, containing customerName, trainingDate, and trainingTopic:
10. We have created the business process using the Eclipse designer and now we want to deploy it into the process engine, but this time using the ProcessEngine API.
11. We will create a class ExecuteProcess having a main method configuring standalone process engine with database, as in the following code:
12. ProcessEngine processEngine = ProcessEngineConfiguration
13. .createStandaloneProcessEngineConfiguration()
14. .setJdbcDriver("com.mysql.jdbc.Driver")
15. .setJdbcUrl("jdbc:mysql://localhost:3306/activiti_book")
16. .setJdbcPassword("root").setJdbcUsername("root")
.buildProcessEngine();
17. Now, to deploy the process into the repository, we have to invoke RepositoryService; so, implement the following code within the class file for the deploying process:
18.RepositoryService repositoryService = processEngine
19. .getRepositoryService();
20.
21.// Deploying The process into the repository
22.repositoryService.createDeployment().addInputStream(
23. "trainingRequest.bpmn20.xml", ReflectUtil
24. .getResourceAsStream("diagrams/trainingRequest.bpmn"))
.deploy();
25. Now, to deploy the process into the repository, we need to fetch the RepositoryService instance of the process engine that we have created. For the deployment, we need to create a deployment file in which to place our process. The createDeployment method will create the deployment file for us. As we have a .bpmn file, we need to generate a .bpmn20.xml file for the deployment.
What just happened?
So far, we have seen how to create and configure a process engine using API and using the process engine, we deployed the business process into the process engine through API.
Time for action – starting a new process instance
As we have deployed the process into the Activiti Engine, now we have to start the process instance. For that, we have to perform the following steps:
1. To start the process using API, we have to implement the given code in the class file:
2. // Starting the Deployed Process
3.
4. Date date = new Date();
5. Map<String, Object> variables = new HashMap<String, Object>();
6.
7. variables.put("customerName", "Irshad");
8. variables.put("customerEamil", "irshad.mansuri@attuneinfocom.com");
9. variables.put("trainingTopic", "Activiti");
10.variables.put("trainingDate", date);
11.
12.RuntimeService runtimeService = processEngine.getRuntimeService();
13.ProcessInstance processInstance = runtimeService
.startProcessInstanceByKey("trainingProcess", variables);
14. Here, we are creating a Map variable to pass values from the class files to the business process. We have declared the form variables in our process, so we are populating them to execute the business process.
15. To start the business process, we are creating a runtime instance for our process. We need to provide the processId and pass the variables for execution.
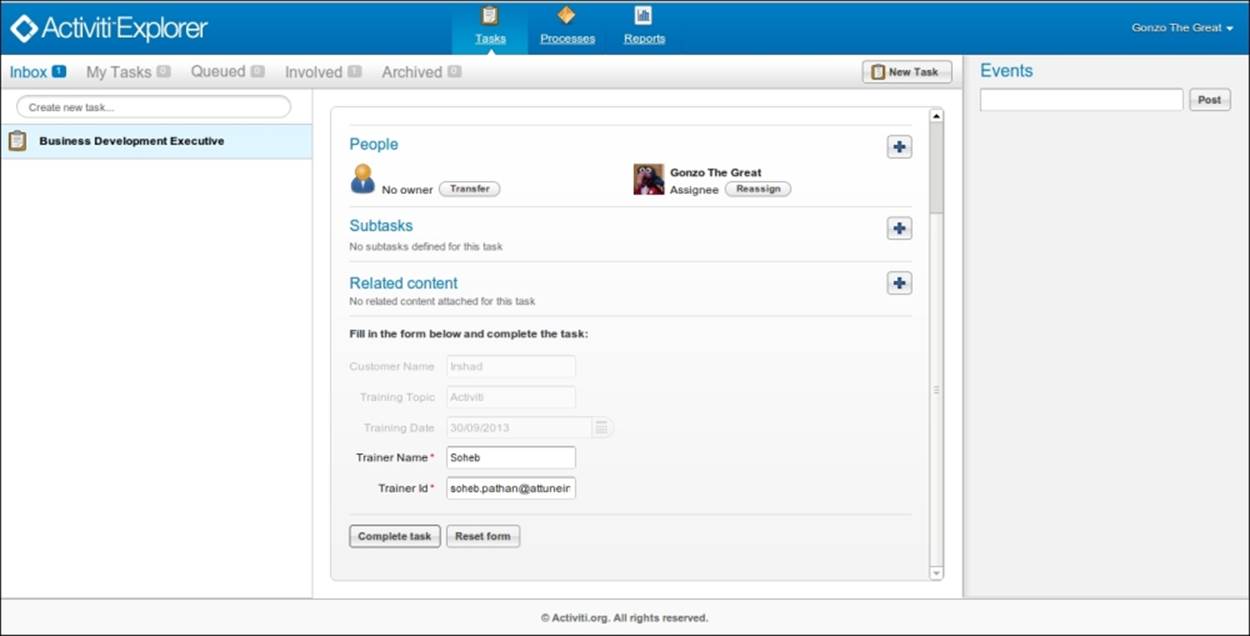
16. After executing the preceding code, you can log in with a gonzo user who is assigned a BDE task. On logging in with the gonzo user, you will find a form with the details of the trainee. Provide the name and e-mail ID of the trainer to whom you want to assign the training, as shown in the following screenshot:
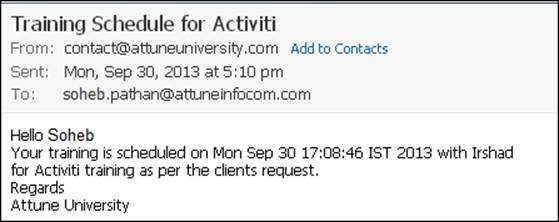
17. On completion of the preceding task, an e-mail will be delivered to both the trainee as well as the trainer with the training details.
18. The following screenshot shows the e-mail received by the trainer:
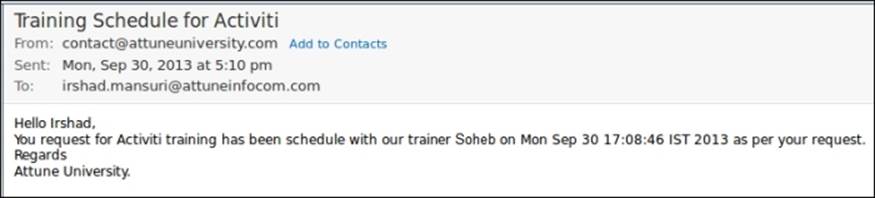
19. The following screenshot shows the e-mail received by the trainee:
What just happened?
We learned how we can use RuntimeService with the process instance. We were using start instances using Activiti Explorer, but now we know how to start process instances through API.
TaskService
TaskService is used to access all kinds of operations related to Task and Form. Using TaskService, we can claim a task, create attachments, assign a user to a task, create a standalone task that is not related to process instances, create task-related queries, and change the ownership of a task to another user. It is possible to delete a task through the TaskService API.
Time for action – querying for user tasks
Now, let's see how we can query user tasks. Let's say we want to find the tasks available for users of the engineering group; so, we will perform the following steps:
1. To fetch the list of tasks, we have to create a class file, ListTaskDemo, with the following code:
2. public class ListTaskDemo {
3. public static void main(String ar[])
4. {
5. ProcessEngine processEngine = ProcessEngineConfiguration
6. .createStandaloneProcessEngineConfiguration()
7. .setJdbcDriver("com.mysql.jdbc.Driver")
8. .setJdbcUrl("jdbc:mysql://localhost:3306/activiti_book")
9. .setJdbcPassword("root").setJdbcUsername("root")
10. .buildProcessEngine();
11. TaskService taskService = processEngine.getTaskService();
12.
13.List<Task> tasks = taskService.createTaskQuery().taskCandidateGroup("engineering").list();
14.
15. for(Task task : tasks)
16.{
17. System.out.println("Task available for Engineering group: " +
18. task.getName());
19.}
20. }
}
21. Deploy the previous training process into the Activiti Explorer.
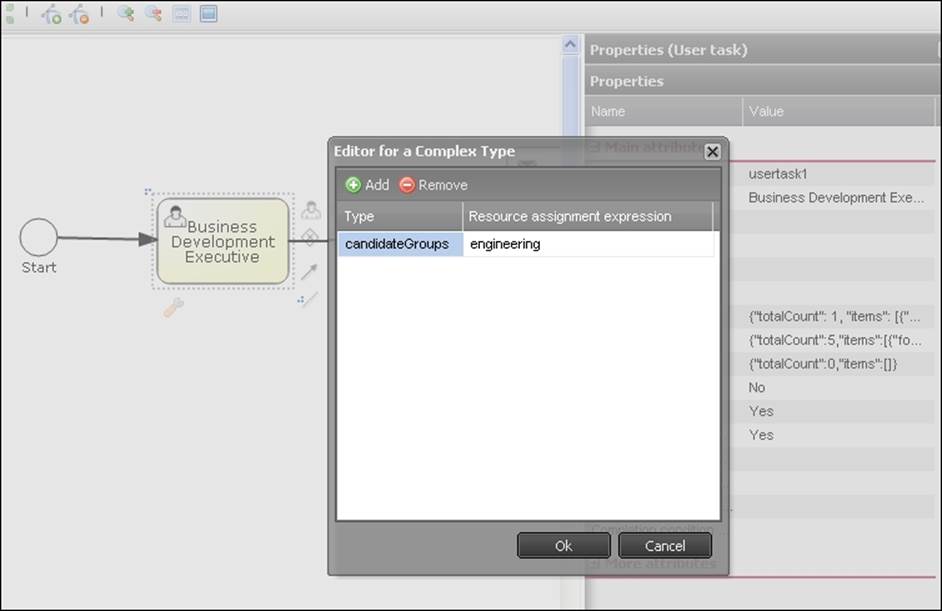
22. Edit the Business Development Executive task. Assign it to the engineering group as shown in the following screenshot:
23. After making the changes, we have to redeploy the process to put them in effect.
24. Once the changes are deployed, we have to restart the process instance. We can start the process instance either from the Activiti Explorer or re-execute the class in which the API for starting the process is implemented:
25. Execute the ListTaskDemo class.
26. We will get the following output:
Task available for Engineering group: Business Development Executive
What just happened?
We saw how to use TaskService for different purposes. We have learned how to query a user task using API. We also learned to list out the available tasks for a particular group.
Time for action – creating and completing user tasks
We can create and complete user tasks using the various service APIs of Activiti. In the previous example, we saw how to find a task allocated to a particular group or user. Now, let's see how to complete a user task using the API. We will create a new process for this task.
In this example, we will create a process in which at the start event, we will have one form from which we get information about training requirements and then we connect the flow of the process with the BDE task as in the previous example. Then, we will find the task allocated to gonzo and complete the gonzo task using the API. Then, the trainer information will be available to the Kermit user. We will have to perform the following steps to complete the user task using the API:
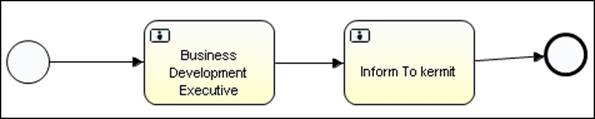
· We will design a training request process as we discussed previously.
· The process should look like the one shown in the following screenshot:
1. Now deploy this process into the Activiti Explorer.
2. Create a Java class and write the following code:
3. public static void main(String ar[])
4. {
5. ProcessEngine processEngine = ProcessEngineConfiguration
6. .createStandaloneProcessEngineConfiguration()
7. .setJdbcDriver("com.mysql.jdbc.Driver")
8. .setJdbcUrl("jdbc:mysql://localhost:3306/activiti_book")
9. .setJdbcPassword("root").setJdbcUsername("root")
10. .buildProcessEngine();
11.
12. TaskService taskService = processEngine.getTaskService();
13.
14. List<Task> tasks =
15. taskService.createTaskQuery().taskAssignee("gonzo").list();
16.
17. for(Task task : tasks)
18.{
19. System.out.println("Task available for Gonzo: " + task.getName());
20.}
21.
22. Task task = tasks.get(0);
23. Map<String, Object> taskVariables = new HashMap<String, Object>();
24. taskVariables.put("trainerName", "MustakKhan");
25. taskVariables.put("trainerMailId", "Mustakkhan@attuneinfocom.com");
26. taskService.complete(task.getId(), taskVariables);
}
Note
As we can see in the preceding code, first it is getting the process engine and then using TaskService to fetch the currently executing task list. So we can get the available tasks for the gonzo user and then, using the taskservice.complete method, complete the task for the gonzo user in five lines
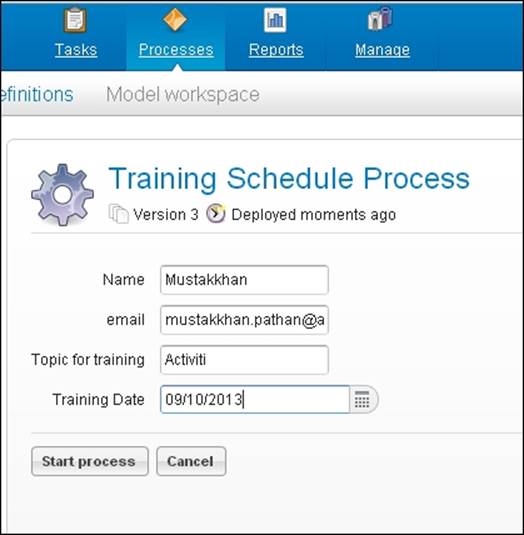
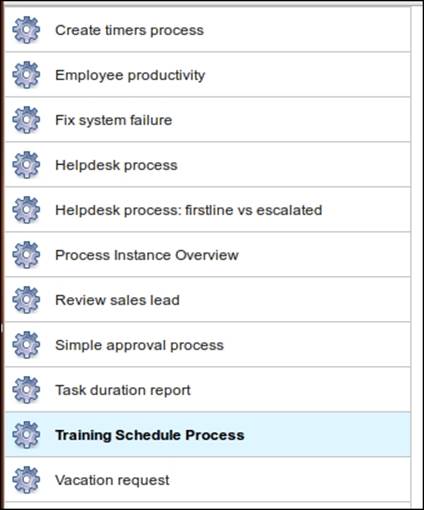
27. Now, let's start the Training Schedule Process from the Activiti Explorer as shown in the following screenshot:
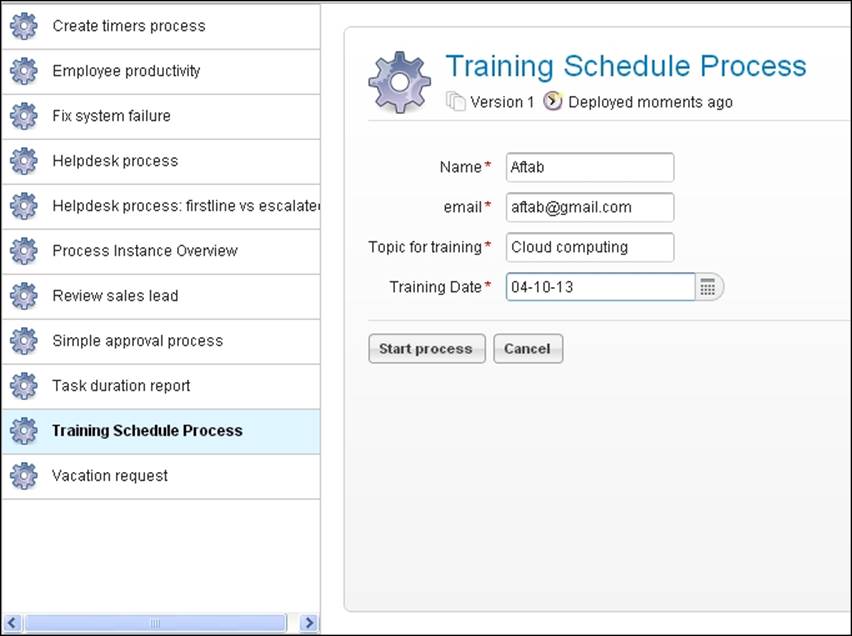
28. As shown in the following screenshot, a task that is assigned to the gonzo and also available to the BDE:
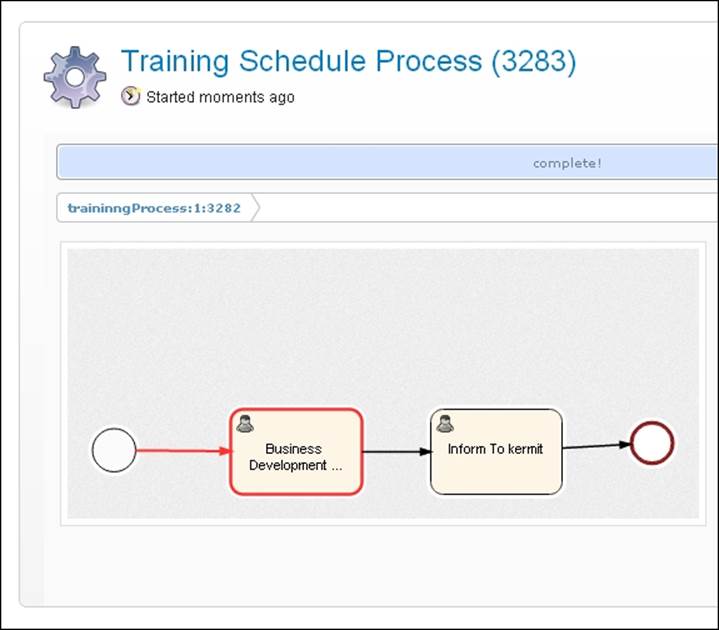
29. We want to complete this gonzo BDE task using an API; so, let's execute the Java class.
30. Now, the gonzo task has been completed. Refresh the page. You can see in the following screenshot that a task is available for Kermit:
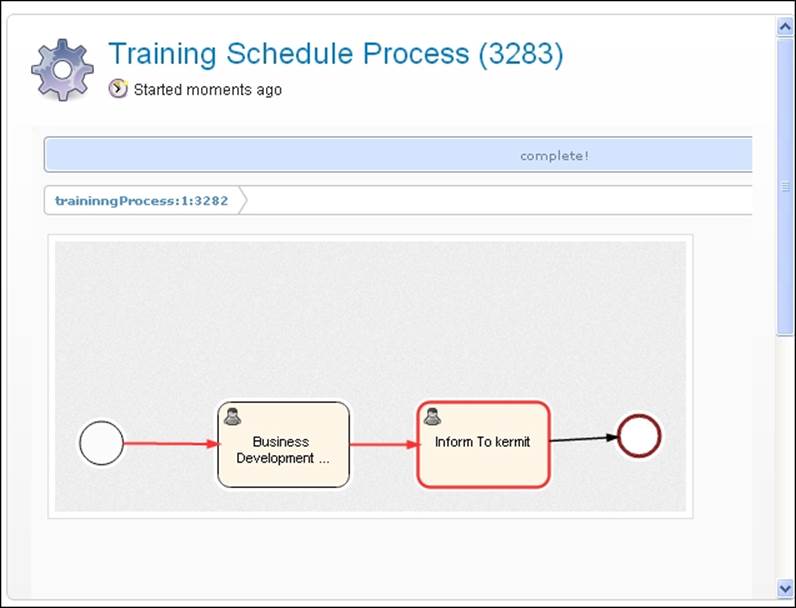
31. Now, we have to complete the Kermit task for the successful completion of the process.
What just happened?
We saw how to use the user TaskService and TaskService using the ProcessEngine API. We learned how to complete a task using TaskService.
Time for action – suspending a process
So far, we have seen how to configure a process engine, deploy a process into the process engine, start a process, and query for a user task using an API.
Now, if there is a requirement to suspend a process, you can implement it using an API. We have already created a training process and now we want to suspend the process for some time. You can follow the ensuing steps to do so:
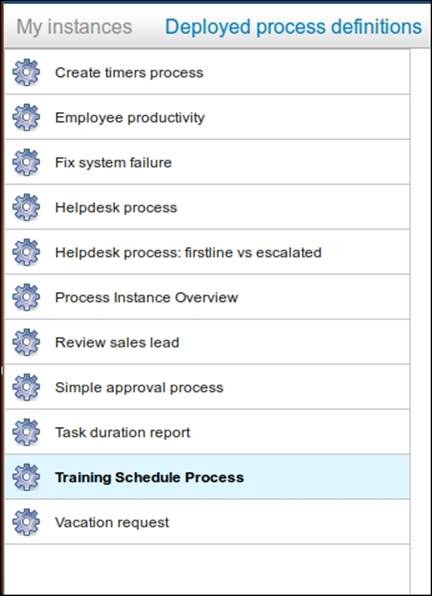
1. Before suspending a process, just make sure that Training Schedule Process is available in the Deployed process definitions tab:
2. Now create a SuspensionActivation class file to suspend the process with the following code in the class file:
3. ProcessEngine processEngine = ProcessEngineConfiguration
4.
5. .createStandaloneProcessEngineConfiguration()
6. .setJdbcDriver("com.mysql.jdbc.Driver")
7. .setJdbcUrl("jdbc:mysql://localhost:3306/activiti_book")
8. .setJdbcPassword("root").setJdbcUsername("root")
9. .buildProcessEngine();
10.
11.RepositoryService repositoryService = processEngine
12. .getRepositoryService();
13.
repositoryService.suspendProcessDefinitionByKey("traininngProcess");
14. Once we finish with the coding part, just execute the class file and then browse to the Activiti Explorer and check for Training Schedule Process in the Deployed process definitions tab:

15. If you don't find your process within the list, it means you have suspended the process successfully.
16. So, once you suspend the process, it cannot be restarted for execution.
17. To reactivate the process, you can add the following code within your SuspensionActivation class file:
18.ProcessEngine processEngine = ProcessEngineConfiguration
19.
20. .createStandaloneProcessEngineConfiguration()
21. .setJdbcDriver("com.mysql.jdbc.Driver")
22. .setJdbcUrl("jdbc:mysql://localhost:3306/activiti_book")
23. .setJdbcPassword("root").setJdbcUsername("root")
24. .buildProcessEngine();
25.
26.RepositoryService repositoryService = processEngine
27. .getRepositoryService();
28.
repositoryService.activateProcessDefinitionByKey("traininngProcess");
29. On execution of the following code, you will again be able to see Training Schedule Process in the process list, as shown in the following screenshot:
30. The preceding code will activate the process, and you can continue further executing the business process.
What just happened?
Recently, we learned the use of the suspendProcessDefinition and activateProcessDefinition methods of repositoryService. So, with their help, we can suspend and reactivate our processes.
ManagementService
ManagementService is used to maintain operations performed on the process engine. With the help of this service, we can upgrade the schema, fetch the executed commands and properties of the process engine, and execute the table page query for fetching table row data. ManagementService cannot be used in the workflow application. This service is just for managing your business process and not for executing any operations on the business process.
IdentityService
IdentityService is used for managing users and groups. We can create, update, delete, and update group and user information. Activiti doesn't perform checks on users at runtime, because in production you may have used a user management protocol such as LDAP. Using IdentityService, we can programmatically query for users and groups. We can delete a particular user or group. We can also create a new user and group.
Time for action – working with users
IdentityService is used to manage users and groups in Activiti. Now, let's see a demo for working with users. To implement IdentityService, we have to follow the ensuing steps:
1. We will create a class file where we will use IdentityService. Write the following code in it:
2. ProcessEngine processEngine = ProcessEngineConfiguration
3. .createStandaloneProcessEngineConfiguration()
4. .setJdbcDriver("com.mysql.jdbc.Driver")
5. .setJdbcUrl("jdbc:mysql://localhost:3306/activiti_book")
6. .setJdbcPassword("root").setJdbcUsername("root")
7. .buildProcessEngine();
8.
9. IdentityService identityService=processEngine.getIdentityService();
10.
11. List<Group> partofuser =identityService.createGroupQuery().groupMember("gonzo").list();
12.
13.System.out.println("Gonzo is a part of following group");
14.
15.for(Group partofuse:partofuser)
16.{
17. System.out.println("Group name:"+partofuse.getName());
}
18. Once you are done implementing the code, we will have to execute it to view the results.
19. The result of the preceding code will list all the groups to which the specified user belongs, as follows:
20.Gonzo is a part of following group
21.Group name:Management
22.Group name:Marketing
23.Group name:Sales
Group name:User
What just happened?
We learned about IdentityService. Now, we are able to manage users and groups using IdentityService. We saw how to find a user's group using the group query, which is a part of IdentityService.
HistoryService
HistoryService is used to get historical data from the Activiti Engine, such as the following:
· When a particular process was started
· Which task has been completed by whom
· What the execution time was for a process or task
So, with the help of HistoryService, we can generate reports for the business process and identify the efficiency of the business process execution.
Time for action – querying historical activities
Using HistoryService, we can get historical data such as names of the finished process instances and when a process started and was completed.
We will follow the ensuing steps to fetch some historical data from the database for a specific task:
1. We will create a new Activiti project within the Eclipse IDE.
2. Within the Activiti project, create a class file HistoricData.
3. Write the following code in HistoricData:
4. package com.activiti;
5.
6. import java.security.Identity;
7. import java.util.HashMap;
8. import java.util.List;
9. import java.util.Map;
10.
11.import org.activiti.engine.HistoryService;
12.import org.activiti.engine.IdentityService;
13.import org.activiti.engine.ProcessEngine;
14.import org.activiti.engine.ProcessEngineConfiguration;
15.import org.activiti.engine.ProcessEngines;
16.import org.activiti.engine.TaskService;
17.import org.activiti.engine.history.HistoricActivityInstance;
18.import org.activiti.engine.identity.Group;
19.import org.activiti.engine.identity.GroupQuery;
20.import org.activiti.engine.identity.User;
21.import org.activiti.engine.runtime.ProcessInstance;
22.import org.activiti.engine.task.Task;
23.
24.
25.
26.public class HistoricData {
27.
28. public static void main(String ar[])
29. {
30. ProcessEngine processEngine = ProcessEngineConfiguration
31. .createStandaloneProcessEngineConfiguration()
32. .setJdbcDriver("com.mysql.jdbc.Driver")
33. .setJdbcUrl("jdbc:mysql://localhost:3306/activiti_book")
34. .setJdbcPassword("root").setJdbcUsername("root")
35. .buildProcessEngine();
36.
37. HistoryService history=processEngine.getHistoryService();
38.
39. List<HistoricActivityInstance> processinstance=history.createHistoricActivityInstanceQuery().taskAssignee("kermit").list();
40.
41. for(HistoricActivityInstance pi:processinstance)
42. {
43. System.out.println("Historic Process Instances for kermit:"+pi.getProcessDefinitionId());
44.
45. }
46.
47. }
}
48. Execute the HistoricData.java class so it will display all the process instances that were assigned to the Kermit user, as shown in the following screenshot:
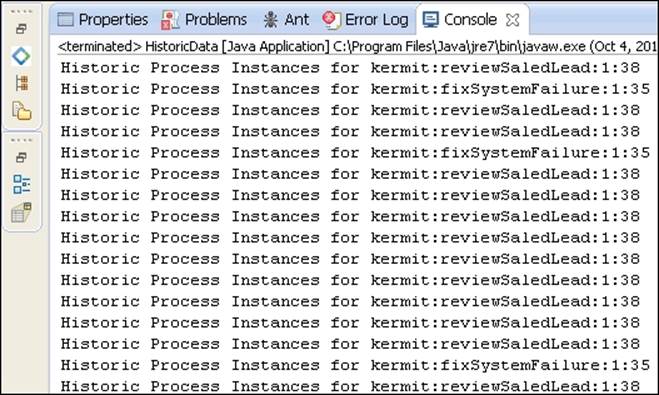
49. If we changed the username from kermit to gonzo, the output would be as follows:
Historic Process Instances for gonzo: traininngProcess:1:3282
What just happened?
We learned the types of historical data that are maintained by the Activiti Engine. Now we know how to use HistoryService for different purposes. We executed a task to get a list of the process instances that were assigned to a specific user.
FormService
FormService is a part of the Activiti Engine. It is used to access various form data. It is also used to render forms for starting new process instances and completing tasks. Using getStartFormData, we can retrieve all the data necessary for rendering a form to start a new process instance.
Time for action – unit testing and debugging processes
Before deploying any piece of code into production, every organization performs some testing on it. Similarly, Activiti performs tests on the process—even the debugging of the process is possible in Activiti. Now, we will perform some testing on our Training Schedule Process. We will perform the following steps to do this:
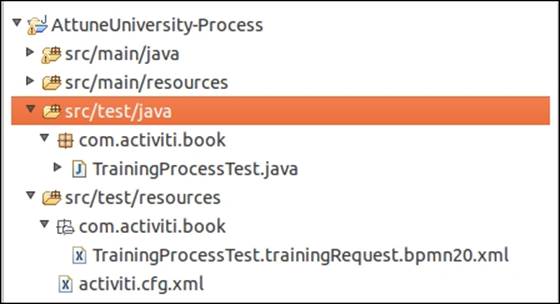
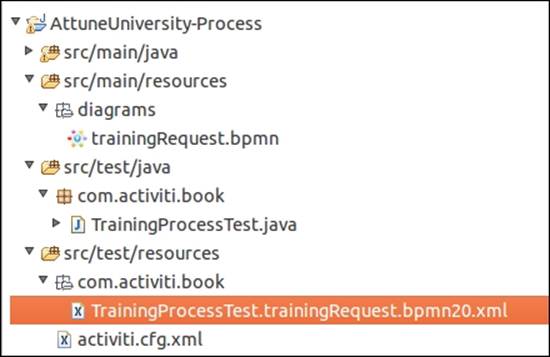
1. As we are performing a test on the process, we need to create the following files within the sr/test/java and src/test/resources folder structure of AttuneUniversity-Process:
2. Create a test class file in which to perform the testing on your business process with the given code. Within the test file, we are creating a rule engine, populating the variables with values to check the output, and passing those values to the business process, as follows:
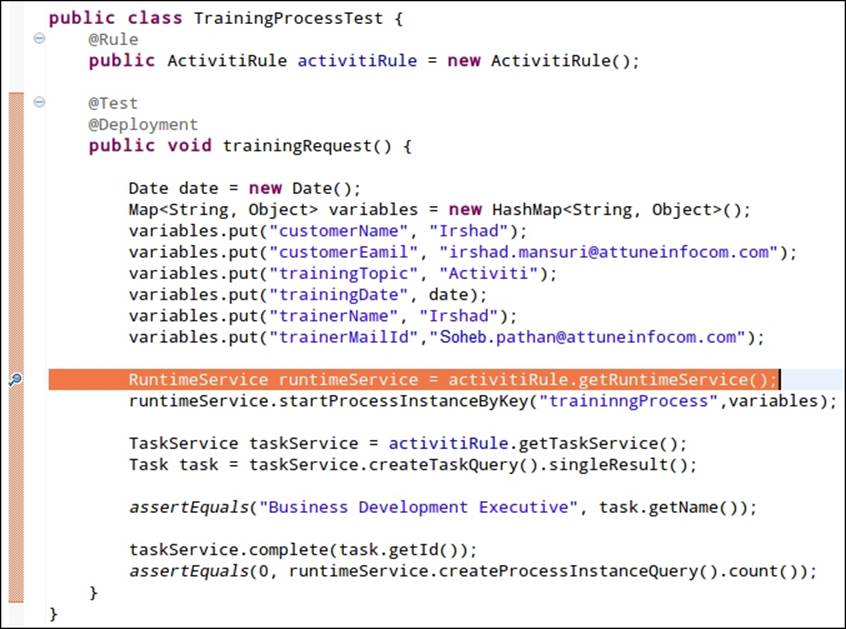
3. public class TrainingProcessTest {
4. @Rule
5. public ActivitiRule activitiRule = new ActivitiRule();
6.
7. @Test
8. @Deployment
9. public void trainingRequest() {
10. Date date = new Date();
11. Map<String, Object> variables = new HashMap<String, Object>();
12. variables.put("customerName", "Irshad");
13. variables.put("customerEamil",
14. "irshad.mansuri@attuneinfocom.com");
15. variables.put("trainingTopic", "Activiti");
16. variables.put("trainingDate", date);
17. variables.put("trainerName", "Irshad);
18. variables.put("trainerMailId","Soheb.pathan@attuneinfocom.com");
19.
20. RuntimeService runtimeService = activitiRule.getRuntimeService();
21. runtimeService.startProcessInstanceByKey("traininngProcess",
22. variables);
23.
24. TaskService taskService = activitiRule.getTaskService();
25. Task task = taskService.createTaskQuery().singleResult();
26.
27. assertEquals("Business Development Executive", task.getName());
28.
29. taskService.complete(task.getId());
30. assertEquals(0, runtimeService.createProcessInstanceQuery()
31. .count());
32. }
}
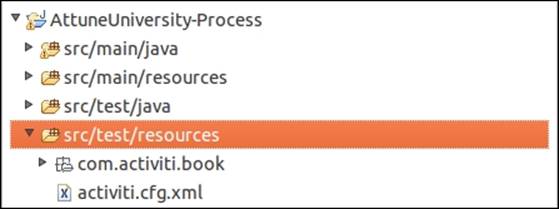
33. After creating the test file, we need to create a configuration file, activiti.cfg.xml, to configure the Activiti Engine. You can copy the activiti-standalone-context.xml file from your Activiti installation path /Activiti-Engine/apache-tomcat-7.0.37/webapps/activiti-explorer/WEB-INF/ activiti-standalone-context.xml and place it within src/test/resources, as shown in the following screenshot:
34. Now, copy your trainingrequest.bpmn file from the diagrams folder, paste it in the src/test/resources folder structure, and rename your test class file with the bpmn20.xml extension:
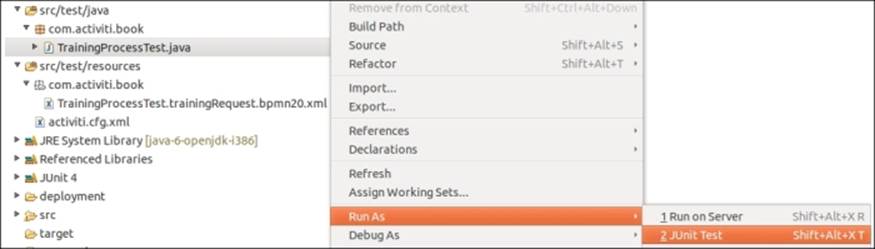
35. After performing all the preceding steps, it's now time to execute the test file. So right-click on your test class file and navigate to Run As | Junit Test as shown in the following screenshot; this will start the testing of the application:
36. To check whether or not the test was successful, you can open the Junit console in Eclipse and check it out as shown in the following screenshot; if there's any error, there would be an error stack trace. So, the following screenshot shows that the testing was successful:

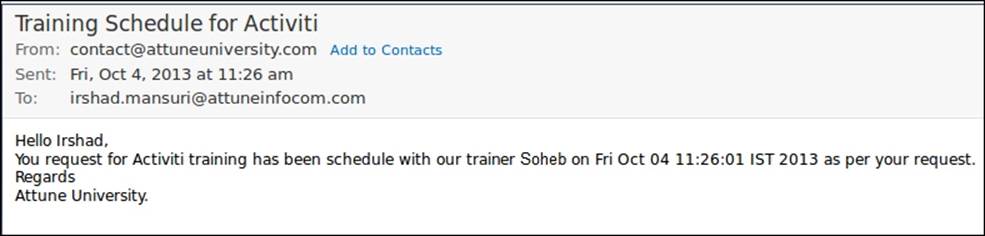
37. To check the output, you can check out the e-mail you will have received about it, as shown in the following screenshot:
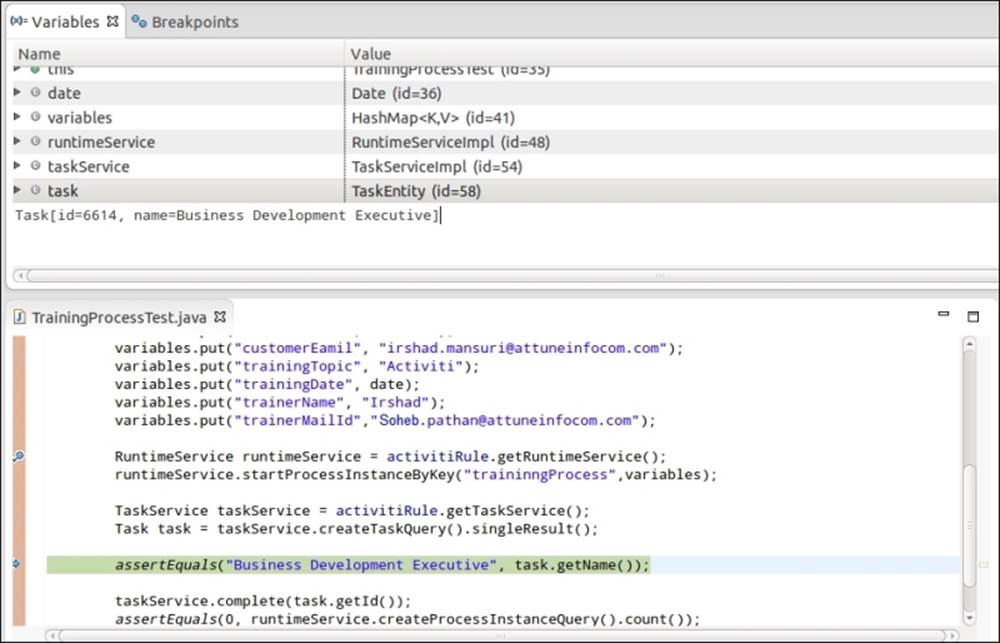
38. To debug your process in Eclipse, place a debug point within your code at the location from where you want to start debugging, as shown in the following screenshot:
39. To start debugging the process, execute your test code in the debug mode. So, when you right-click on your test class file, there will be an option for debugging. Select it and the debugging process will start. You can continue debugging using the F6 key:
What just happened?
We just saw how to test and debug our business process before deploying it into the production environment. With the help of testing and debugging, we can easily identify whether or not our process will work fine. If there are any issues with the process, we can identify them with the help of a debugging operation.
Have a go hero
Having gone through the chapter, feel free to attempt the following tasks:
· Create new users and add them into groups using an API
· Find out when a process was started and completed
· Claim a task using an API
· Perform Junit testing for all the examples from our previous chapters
Pop quiz – the Activiti ProcessEngine API
Q1. Which service is at the heart of Activiti?
1. FormService
2. ProcessEngine
3. IdentityService
4. RuntimeService
Q2. Which service is used to assign a group to a specific user?
1. HistoryService
2. IdentityService
3. ProcessEngine
4. TaskService
Q3. What is the name of the service that is used for the start process instance?
1. ManagementService
2. IdentityService
3. FormService
4. RuntimeService
Summary
We learned about various Activiti services in this chapter. We have also learned how to deploy and start a process instance using APIs. We have seen how to list out various allocated tasks for a specific user. We have seen how to use HistoryService and RuntimeService. In the next chapter, we will learn about the REST API. We will see how to use various Activiti services using the REST API.