Activiti 5.x Business Process Management Beginner's Guide (2014)
Chapter 5. Development Using the Process Engine
In the previous chapter, we learned about the different functionality of the Activiti Explorer. We learned how to deploy and start a process and monitor the current process. The Process Engine is the heart of Activiti. The Process Engine of Activiti contains different layers. Each layer has a different functionality. In this chapter, we will take a look at how to configure the Process Engine for development and using a mail task to send mails. The rest of the topics that will be covered in this chapter are mentioned below.
This chapter covers the following topics:
· The development environment
· The Process Engine's configuration
· The logging configuration
· The mail server configuration
Each layer of the Process Engine plays a major role in Activiti. Before looking at the Process Engine, let's take a look at the Activiti development environment.
Understanding the Activiti development environment
The Activiti Engine contains various libraries. Each library has a unique functionality. The following is a detailed explanation of each layer of the Activiti Engine:
· The Activiti Engine has a Spring layer at the top. So, we can take advantage of the Spring framework within Activiti itself.
· The second layer is the Activiti Engine that contains components for the core functionality of Activiti and the specification for BPMN 2.0.
· The third layer is the PVM (Process Virtual Machine), which is capable of converting a graphical representation to the state model.
All these layers are shown in the following diagram:
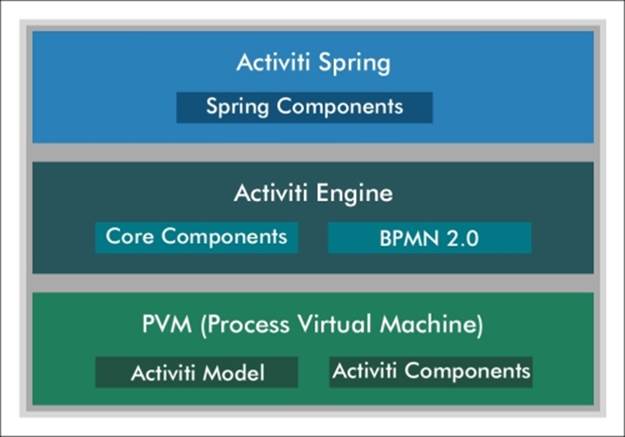
The Activiti Spring layer
Activiti supports the Spring functionality, which is an optional layer. We can take advantage of Spring in Activiti. The Process Engine can be configured as the Spring bean. We can start the Spring integration using org.activiti.spring.ProcessEngineFactoryBean. For the configuration of activiti-spring-version, the JAR file available in the Activiti lib is useful. We can configure Persistency using the Spring framework in Activiti. Activiti libraries contain spring-jdbc-version.jar, spring-orm-version.jar and spring-web-version.jar for various functionality using Spring.
The Activiti Engine layer
Activiti Engine is a core layer of Activiti. It provides engine interfaces to achieve the core functionality of Activiti. Major functionality is provided by the Engine layer. This layer contains core interfaces and the BPMN 2.0 specification. We have to add the required libraries to the build path to use the Activiti Engine in the development environment.
PVM
Process Virtual Machine is embedded with the Activiti Engine. It is responsible for converting the BPMN 2.0 engine stuff to the state model of the Activiti Engine.
Setting up the Activiti development environment
In Chapter 1, Installing Activiti, we saw how we can install the Activiti Explorer on a web server. In Chapter 2, Modeling Using the Activiti Modeler, we went through using the Activiti Modeler for designing workflows and in Chapter 3, Designing Your Process Using the Activiti Designer, we went through using the Activiti Designer to design the workflows. However, to understand how it actually works, we need to understand the workings of the development environment behind the scenes.
As mentioned earlier, the Activiti Engine is a separate layer that can be used independently. It consists of the engine interface, which we will be covering in Chapter 6, The Activiti ProcessEngine API, and also implements the BPMN 2.0 specification. The next layer is the process virtual machine layer, which supports the other processes' languages. The entire engine component is implemented using the activiti-engine-version.jar file.
Hence, to deal with the development, we have to use activiti-engine.version.jar. In Chapter 1, Installing Activiti, we have already deployed Activiti in a Tomcat web server. So, this JAR file will be available within the path apache-tomcat-7.0.37/webapps/activiti-explorer/WEB-INF/lib, as shown in the following screenshot:
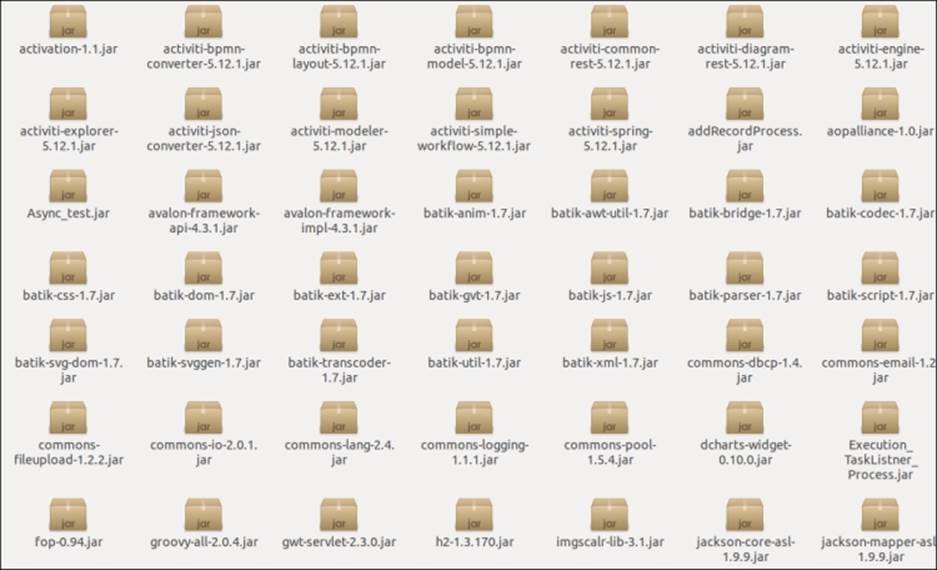
All the libraries required for development will be available within this folder. If you don't want to use the JAR file, you can use Maven. Activiti, by default, creates a Maven project; it makes dependency management easy. You have only configured your pom.xml file with the required dependencies as in the following code:
<project xmlns="http://maven.apache.org/POM/4.0.0" xmlns:xsi="http://www.w3.org/2001/XMLSchema-instance"
xsi:schemaLocation="http://maven.apache.org/POM/4.0.0 http://maven.apache.org/maven-v4_0_0.xsd">
<modelVersion>4.0.0</modelVersion>
<groupId>org.activiti.examples</groupId>
<artifactId>activiti-examples</artifactId>
<version>1.0-SNAPSHOT</version>
<packaging>jar</packaging>
<name>BPMN 2.0 with Activiti - Examples</name>
<properties>
<activiti-version>5.9</activiti-version>
</properties>
<dependencies>
<dependency>
<groupId>org.activiti</groupId>
<artifactId>activiti-engine</artifactId>
<version>${activiti-version}</version>
</dependency>
<dependency>
<groupId>com.h2database</groupId>
<artifactId>h2</artifactId>
<version>1.2.132</version>
</dependency>
</project>
In the preceding pom.xml file, you can see that there is an activiti-engine dependency for the Activiti Engine and an h2 dependency for configuring the process with an in-memory H2 database. In this case, if you want to perform unit testing for your development, you need to add the unit testing dependency as well.
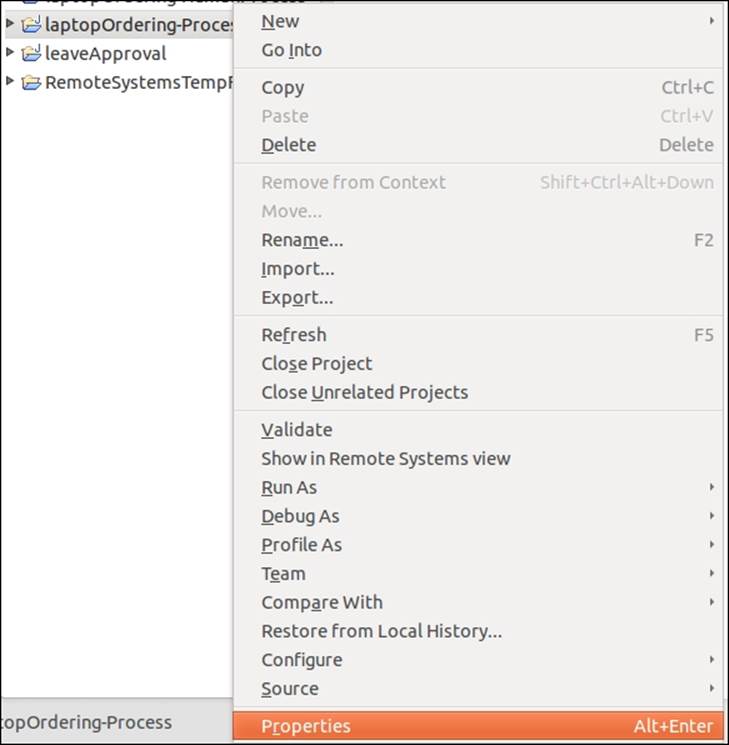
If you are not comfortable with Maven, don't worry; all the JAR files are available in the lib folder, so you can import them to your Eclipse project. For that, you will have to perform the following steps:
1. Select the project for importing libraries, right-click on it, and browse through the Properties option. We can select the Properties option as shown in the following screenshot:
2. On selecting the Properties option, a window will pop up. From that window, select Java Build Path; this displays all the libraries associated with the project. By default, it will not have any Activiti Engine libraries associated with it.
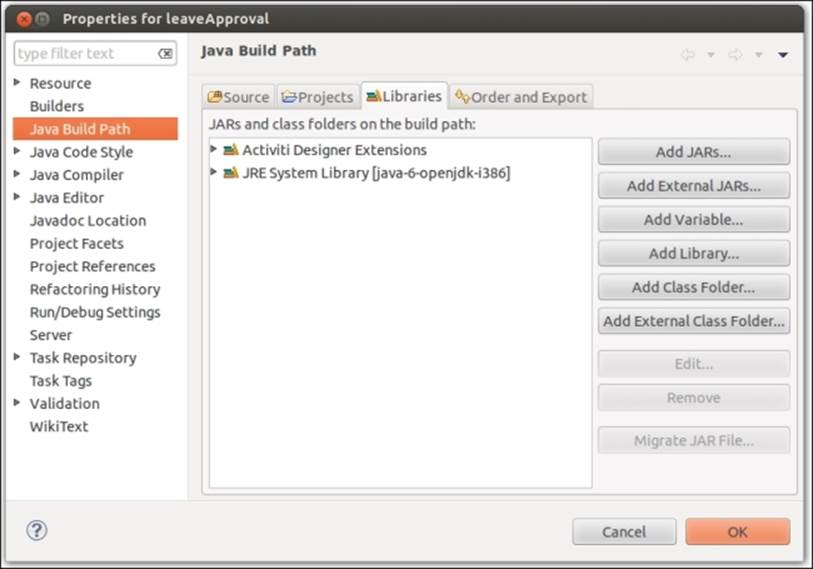
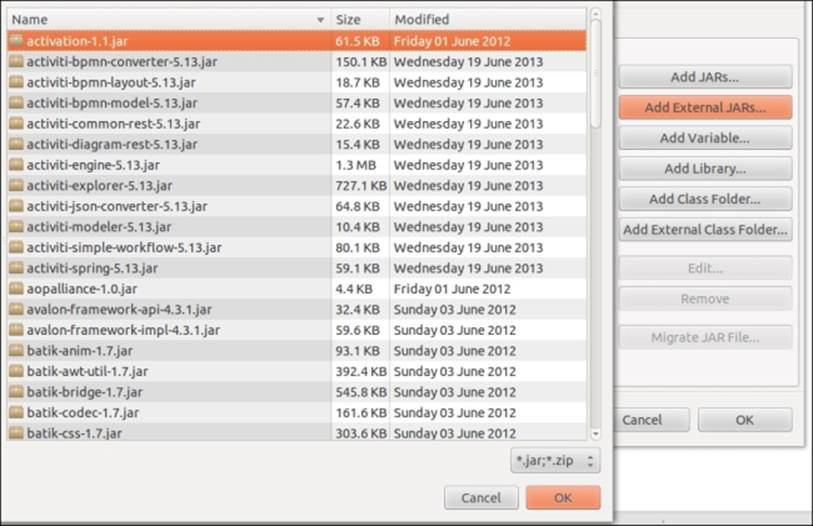
3. To add the JAR files, select Add External JARs in the window. On selecting this option, another window will pop up in which you need to browse to the path where your JAR files are located, for example, /apache-tomcat-7.0.37/webapps/activity-explorer/WEB-INF/lib. By going to the given path, you can select the JAR file required for your development.
Configuring the Activiti Process Engine
We can configure the Activiti Process Engine using an XML file known as activiti.cfg.xml. We have to configure a bean in activiti.cfg.xml for the Process Engine's configuration.
We have to define the following bean as follows:
<bean id="processEngineConfiguration" class="org.activiti.engine.impl.cfg.StandaloneProcessEngineConfiguration">
This bean is used to generate the Process Engine. Different types of classes are available to configure the Process Engine. We can choose which class to use depending on the environment. Choose the appropriate class for your environment so that the number of properties used for configuring the engine can be minimized.
We can use the following classes:
· org.activiti.spring.SpringProcessEngineConfiguration: This can be used when we have configured the Process Engine in Spring.
· org.activiti.engine.impl.cfg.StandaloneInMemProcessEngineConfiguration: This is the appropriate class for unit testing. The H2 in-memory database is used by default. A database will be automatically created when the engine starts and dropped when it shuts down. We don't have to put extra effort into the configuration.
· org.activiti.engine.impl.cfg.JtaProcessEngineConfiguration: This is used with the Jta transaction when the engine runs in the standalone mode.
· org.activiti.engine.impl.cfg.StandaloneProcessEngineConfiguration: The Process Engine is used in a standalone way. Transactions will be conducted by Activiti itself. By default, the database will only be checked when the engine boots.
We can point the Activiti Engine to the production database using the Spring environment. Let's see how we can configure the production database.
Time for action – configuring a database
In the previous chapter, we saw how to set up a production database using the db.properties file. Here, we will see how to set up a database using Spring.
To configure a database, we have to define the following properties in the datasource bean:
· jdbcDriver: This property defines a driver name for a particular database
· jdbcURL: This property mentions the JDBC URL of the database
· username: This property defines the username to connect to the database
· password: This property defines the password to connect to the database
Perform the following steps to configure a database:
1. Create a database named activiti in MySql.
2. Open the activiti-standalone-context.xml file from apache-tomcat-7.0.34\webapps\activiti-explorer\WEB-INF.
3. Make the following changes to the datasource bean:
4. <bean id="dataSource" class="org.springframework.jdbc.datasource.DriverManagerDataSource">
5. <property name="driverClassName" value="com.mysql.jdbc.Driver" />
6. <property name="url" value="jdbc:mysql://localhost:3306/activiti" />
7. <property name="username" value="root" />
8. <property name="password" value="root" />
</bean>
9. Add the Mysql-coonector-version.jar file to the library of the Activiti Explorer.
10. If your Tomcat server is running, restart it.
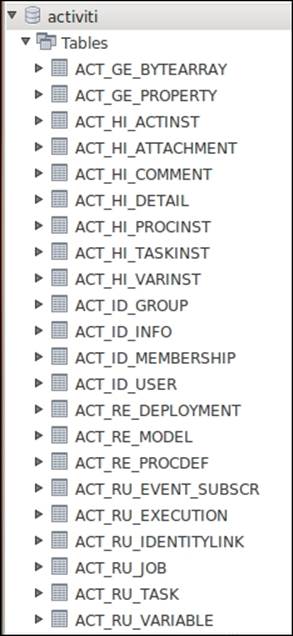
11. To check whether or not the DB is populated, you can open the activiti database in MySql; you will find all the default tables populated, as shown in the following screenshot:
What just happened?
We have learned to configure a database using the Spring bean. In the development environment, debugging is very useful. Logging shows errors in detail so that you can solve them easily.
Time for action – the logging configuration
The logger is responsible for capturing the message to be logged along with certain metadata and passing it to the logging framework. After receiving the message, the framework calls the formatter with the message. The formatter formats it for output. The framework then hands the formatted message to the appropriate appender for disposition.
Activiti uses the SLF4J logging framework. To use the SLF4J logging framework in Activiti, we need to add SFL4J-binding.jar to our project. By default, Activiti uses NOP-logger; it will not log anything other than a warning.
To add the log4j12 dependency to Maven, open your Activiti project and add the following code to the pom.xml file:
<dependency>
<groupId>org.slf4j</groupId>
<artifactId>slf4j-log4j12</artifactId>
<version>1.7.5</version>
</dependency>
The Log4j binding is configured with the Activiti Explorer and Activiti REST web apps. To use Log4j in Activiti, create the log4j-config.xml file using the following code:
< ?xml version="1.0" encoding="UTF-8" ?>
<!--<span class="hiddenSpellError" pre=""-->DOCTYPE log4j:configuration SYSTEM "log4j.dtd">
xmlns:log4j="http://jakarta.apache.org/log4j/">
<appender name="console" class="org.apache.log4j.ConsoleAppender">
<param name="Target" value="System.out"/>
<layout class="org.apache.log4j.PatternLayout">
-5p %c %x - %m%n"/>
</layout>
</appender>
<appender name="fileAppender" class="org.apache.log4j.RollingFileAppender">
<param name="File" value="demoApplication.log"/>
<layout class="org.apache.log4j.PatternLayout">
-5p %c %x - %m%n"/>
</layout>
</appender>
<root>
<priority value ="debug"></priority>
<appender -ref ref="console"></appender>
<appender -ref ref="fileAppender"></appender>
</root>
The Log4j-config.xml file has all the runtime configurations used by Log4j. This file will contain the appender information, log-level information, and output filenames for file appenders.
What just happened?
We have seen the logging configuration. Now we know which dependency is required to use the log framework in Activiti.
Time for action – configuring the mail server
We can send an e-mail using Activiti. Activiti provides an e-mail task to send a number of e-mails. It can be possible using an external mail server with SMTP. The e-mail task is implemented as a service task in Activiti. To send an e-mail, we have to configure some properties of e-mails for the Activiti Engine.
To send real e-mails, we have to configure the following properties in activiti-standalone-context.xml:
· mailServerHost: This property is used to define the hostname of your mail server
· mailServerPort: This property is used to define a port for the SMTP server
· mailServerDefaultFrom: This property is used to set a default e-mail address
· mailServerUsername: This property is used to specify a username for an authentication
· mailServerPassword: This property is used to specify a password for your mail
· mailServerUseSSL: This property is required for SSL communication
Let's see an example using an e-mail task by performing the following steps:
1. Open activiti-standalone-context.xml from apache-tomcat-7.0.33\webapps\activiti-explorer\WEB-INF\ and add the following properties:
2. <bean id="processEngineConfiguration" class="org.activiti.spring.SpringProcessEngineConfiguration">
3. ………
4. <property name="mailServerHost" value="smtp.gmail.com" />
5. <property name="mailServerPort" value="465" />
6. <property name="mailServerUsername" value="giveyouremailidhere" />
7. <property name="mailServerPassword" value="*******"/>
<property name="mailServerUseSSL" value="true"/>
8. As we are configuring the properties file, we have to restart the server.
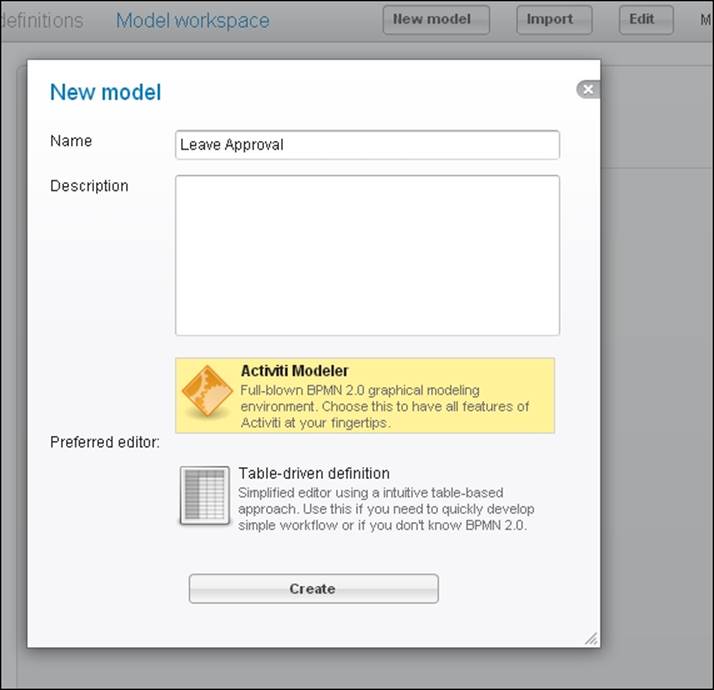
9. Design a process for Leave Approval using the Activiti Modeler, as shown in the following screenshot:
10. We will design the process as shown in the following flowchart:
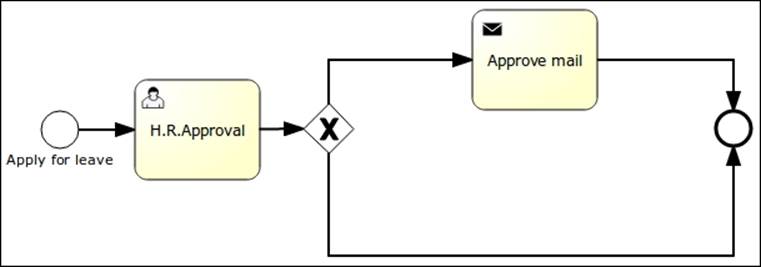
11. The user starts the process and fills in some information. Then the H.R.Approval task is assigned to the kermit user. When kermit approves, an approval mail will be sent to the user who started the process.
12. For mail configuration, we have to populate some properties to send an e-mail, as shown in the following screenshot:
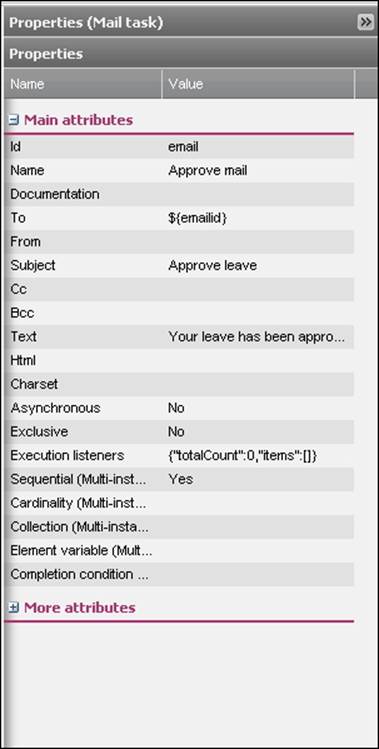
Note
The properties of an e-mail task contain To, From, Cc, Bcc, Text, and Html. We have defined To for sending a mail to the person who started the process. We can include other recipients in the Cc and Bcc. If we want to send a simple message, we can use theText property. If we want to send a hyperlink or a formatted message, we can use the HTML code within the Html property.
13. There is a process.bpmn20 file in the code example of this book. You can import this file using the import model option and deploy the process as follows:
14.<?xml version="1.0" encoding="UTF-8"?>
15.<definitions xmlns="http://www.omg.org/spec/BPMN/20100524/MODEL" xmlns:xsi="http://www.w3.org/2001/XMLSchema-instance" xmlns:activiti="http://activiti.org/bpmn" xmlns:bpmndi="http://www.omg.org/spec/BPMN/20100524/DI" xmlns:omgdc="http://www.omg.org/spec/DD/20100524/DC" xmlns:omgdi="http://www.omg.org/spec/DD/20100524/DI" typeLanguage="http://www.w3.org/2001/XMLSchema" expressionLanguage="http://www.w3.org/1999/XPath" targetNamespace="http://www.activiti.org/test">
16.<process id="process" isExecutable="true">
17.<startEvent id="start" name="Apply for leave">
18.<extensionElements>
19.<activiti:formProperty id="name" name="name" type="string"></activiti:formProperty>
20.<activiti:formProperty id="nodays" name="Total Days" type="long"></activiti:formProperty>
21.<activiti:formProperty id="emailid" name="Email id" type="string"></activiti:formProperty>
22.</extensionElements>
</startEvent>
The preceding code is for the start event node in which we are defining a form to fetch the values from the user for the number of days required for leave. So, whenever an employee starts this process, they will be asked to provide the preceding details. The code for creating a user task is as follows:
<userTask id="hrApproval" name="H.R.Approval" activiti:assignee="kermit">
<documentation>Leave requested by ${name}</documentation>
<extensionElements>
<activiti:formProperty id="accept" name="Do you Approved ?" type="boolean"></activiti:formProperty>
</extensionElements>
</userTask>
The preceding code snippet is used for creating a user task. This user task will be assigned to a specific user; let us say kermit, who is part of the HR team. He will display the name of the person who has applied for leave and has asked that their leave application be either approved or rejected.
23. The following line of code is used for the implementation of the mail task within the business process. The mail task itself is one of the service tasks provided by Activiti. With the help of this task, the mail-sending functionality is implemented. The e-mail ID provided by the user will be taken from the start node.
24.<sequenceFlow id="sid-6993F3A0-8898-4776-A71A-024300A11DBA" sourceRef="start" targetRef="hrApproval"></sequenceFlow>
25.<exclusiveGateway id="sid-790E9ECF-B12B-4BFC-B1BA-9332F48DC346"></exclusiveGateway>
26.<sequenceFlow id="sid-66FCA025-2413-469A-8FD3-61AECE3C13BA" sourceRef="hrApproval" targetRef="sid-790E9ECF-B12B-4BFC-B1BA-9332F48DC346"></sequenceFlow>
27.
28.<serviceTask id="email" name="Approve mail" activiti:type="mail">
29.<extensionElements>
30.<activiti:field name="to">
31.<activiti:expression>${emailid}</activiti:expression>
32.</activiti:field>
33.<activiti:field name="subject">
34.<activiti:string>Approve leave</activiti:string>
35.</activiti:field>
36.<activiti:field name="text">
37.<activiti:string>Your leave has been approved.</activiti:string>
38.</activiti:field>
39.</extensionElements>
</serviceTask>
40. The following sequence flows will be executed based on the input provided by the kermit user in the user task; if the accept property is set to true, the mail task flow will be executed and if it is set to false, the end node flow will be executed:
41.<endEvent id="sid-AEED2815-DCEC-4EDC-83C7-9ABCF57EA2B8"></endEvent>
42.
43.<sequenceFlow id="aprov" sourceRef="sid-790E9ECF-B12B-4BFC-B1BA-9332F48DC346" targetRef="email"><conditionExpression xsi:type="tFormalExpression"><![CDATA[${accept=='true'}]]></conditionExpression>
</sequenceFlow>
44. The following code is used for defining your entire process:
45.<sequenceFlow id="sid-3342C68C-A334-4743-B0CF-E94F2AD1C37E" sourceRef="email" targetRef="sid-AEED2815-DCEC-4EDC-83C7-9ABCF57EA2B8"></sequenceFlow>
46.
47.<sequenceFlow id="sid-6E2C6C1D-0493-4A09-8521-A6616823BCF6" sourceRef="sid-790E9ECF-B12B-4BFC-B1BA-9332F48DC346" targetRef="sid-AEED2815-DCEC-4EDC-83C7-9ABCF57EA2B8"></sequenceFlow>
48.
</process>
49. The following code is used to represent your entire process in a graphical format; the bpmndi:BPMNDiagram tag is used to convert your process to the graphical format:
50.<bpmndi:BPMNDiagram id="BPMNDiagram_process">
51.<bpmndi:BPMNPlanebpmnElement="process" id="BPMNPlane_process">
52.<bpmndi:BPMNShapebpmnElement="start" id="BPMNShape_start">
53.<omgdc:Bounds height="30.0" width="30.0" x="60.0" y="126.0"></omgdc:Bounds>
54.</bpmndi:BPMNShape>
55.<bpmndi:BPMNShapebpmnElement="hrApproval" id="BPMNShape_hrApproval">
56.<omgdc:Bounds height="80.0" width="100.0" x="135.0" y="101.0"></omgdc:Bounds>
57.</bpmndi:BPMNShape>
58.<bpmndi:BPMNShapebpmnElement="sid-790E9ECF-B12B-4BFC-B1BA-9332F48DC346" id="BPMNShape_sid-790E9ECF-B12B-4BFC-B1BA-9332F48DC346">
59.<omgdc:Bounds height="40.0" width="40.0" x="270.0" y="120.0"></omgdc:Bounds>
60.</bpmndi:BPMNShape>
61.<bpmndi:BPMNShapebpmnElement="email" id="BPMNShape_email">
62.<omgdc:Bounds height="80.0" width="100.0" x="375.0" y="45.0"></omgdc:Bounds>
63.</bpmndi:BPMNShape>
64.<bpmndi:BPMNShapebpmnElement="sid-AEED2815-DCEC-4EDC-83C7-9ABCF57EA2B8" id="BPMNShape_sid-AEED2815-DCEC-4EDC-83C7-9ABCF57EA2B8">
65.<omgdc:Bounds height="28.0" width="28.0" x="600.0" y="126.0"></omgdc:Bounds>
66.</bpmndi:BPMNShape>
67.<bpmndi:BPMNEdgebpmnElement="aprov" id="BPMNEdge_aprov">
68.<omgdi:waypoint x="287.1014492753623" y="122.89855072463769"></omgdi:waypoint>
69.<omgdi:waypoint x="280.0" y="81.0"></omgdi:waypoint>
70.<omgdi:waypoint x="375.0" y="83.62068965517241"></omgdi:waypoint>
71.</bpmndi:BPMNEdge>
72.<bpmndi:BPMNEdgebpmnElement="sid-6993F3A0-8898-4776-A71A-024300A11DBA" id="BPMNEdge_sid-6993F3A0-8898-4776-A71A-024300A11DBA">
73.<omgdi:waypoint x="90.0" y="141.0"></omgdi:waypoint>
74.<omgdi:waypoint x="135.0" y="141.0"></omgdi:waypoint>
75.</bpmndi:BPMNEdge>
76.<bpmndi:BPMNEdgebpmnElement="sid-6E2C6C1D-0493-4A09-8521-A6616823BCF6" id="BPMNEdge_sid-6E2C6C1D-0493-4A09-8521-A6616823BCF6">
77.<omgdi:waypoint x="310.0" y="140.0"></omgdi:waypoint>
78.<omgdi:waypoint x="440.0" y="140.0"></omgdi:waypoint>
79.<omgdi:waypoint x="454.0" y="242.0"></omgdi:waypoint>
80.<omgdi:waypoint x="602.1948192271975" y="147.52580274266163"></omgdi:waypoint>
81.</bpmndi:BPMNEdge>
82.<bpmndi:BPMNEdgebpmnElement="sid-3342C68C-A334-4743-B0CF-E94F2AD1C37E" id="BPMNEdge_sid-3342C68C-A334-4743-B0CF-E94F2AD1C37E">
83.<omgdi:waypoint x="475.0" y="85.0"></omgdi:waypoint>
84.<omgdi:waypoint x="545.0" y="85.0"></omgdi:waypoint>
85.<omgdi:waypoint x="545.0" y="140.0"></omgdi:waypoint>
86.<omgdi:waypoint x="600.0" y="140.0"></omgdi:waypoint>
87.</bpmndi:BPMNEdge>
88.<bpmndi:BPMNEdgebpmnElement="sid-66FCA025-2413-469A-8FD3-61AECE3C13BA" id="BPMNEdge_sid-66FCA025-2413-469A-8FD3-61AECE3C13BA">
89.<omgdi:waypoint x="235.0" y="140.52380952380952"></omgdi:waypoint>
90.<omgdi:waypoint x="270.188679245283" y="140.18867924528303"></omgdi:waypoint>
91.</bpmndi:BPMNEdge>
92.</bpmndi:BPMNPlane>
93.</bpmndi:BPMNDiagram>
</definitions>
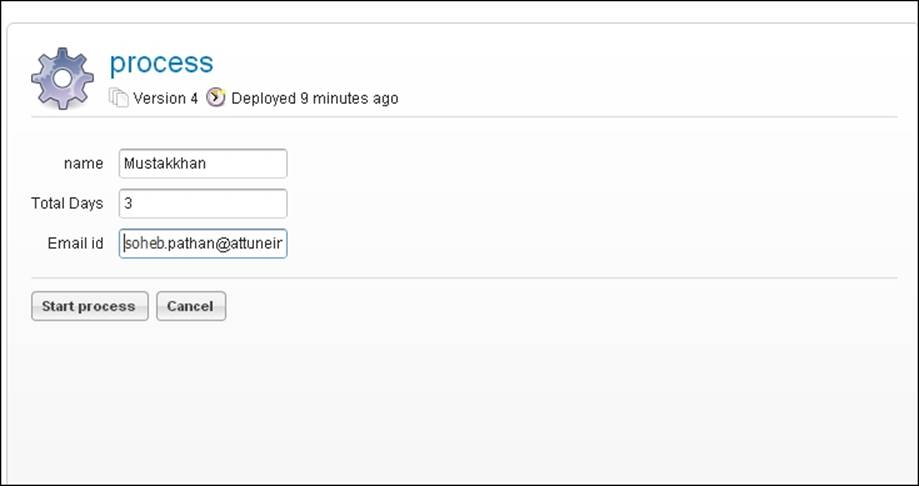
94. Once your process is deployed successfully, you can test it by logging in to the Activiti Engine as a gonzo user and starting the leave process.
95. At the start of the process, a form will pop up that asks for the leave information of the respective employee, as shown in the following screenshot:
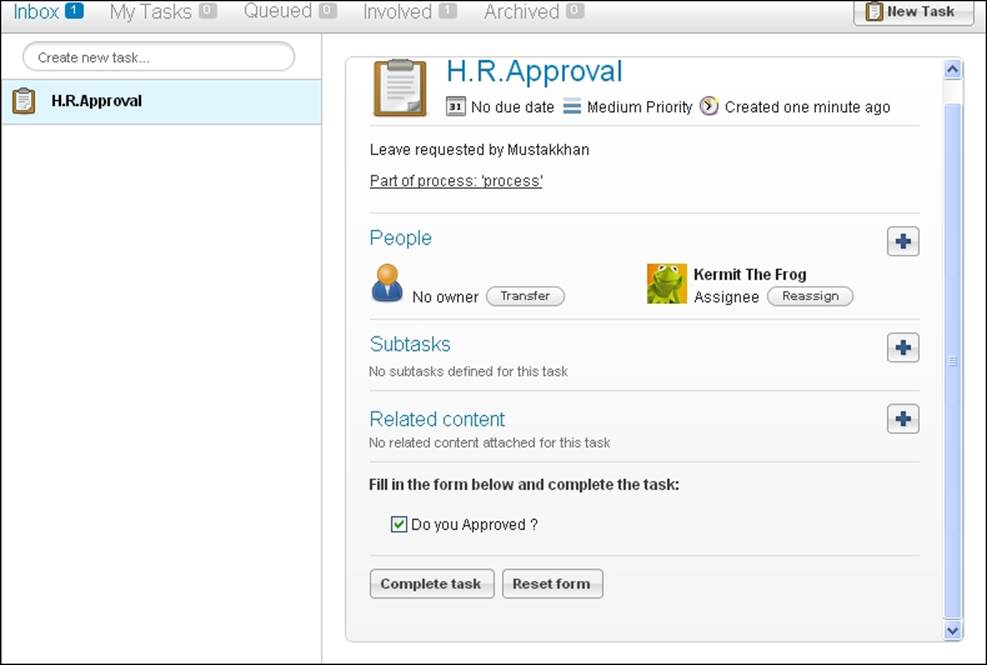
96. As there is a user task after the start node, log in as a kermit user. In Inbox folder of the kermit user, there will be an H.R.Approval task, as shown in the following screenshot:
.

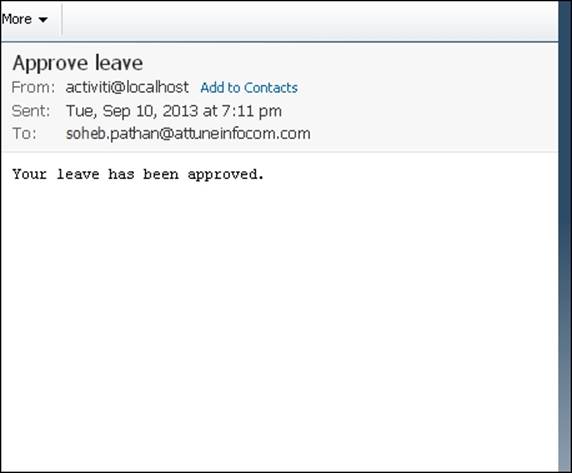
97. Now the leave will be approve. So, a leave approval e-mail will be sent to user.
98. To check whether or not the mail has been received, the user needs to log in to the mail account entered at the start of the process. They would have received a mail for leave approval, as shown in the following screenshot:
What just happened?
We have seen how to use the e-mail task in Activiti. Now we know which configuration is required in activiti-standalone-context.xml to send mails using Activiti. We configured the e-mail task in Activiti to send an e-mail from the leave approval process workflow.
Time for action – running the Activiti Engine
So far, we have created a process using the Designer and Modeler and deployed it using the Activiti Explorer. We have seen that configuration can be done using activiti-standalone-context.xml. Similar configurations can also be done using the ProcessEngine class. In this section, we will take a look at this and in Chapter 6, The Activiti ProcessEngine API, we will see more details regarding various APIs.
We can create the Activiti Process Engine using the org.activiti.engine.ProcessEngines class. To configure the Process Engine, we have to create the activiti.cfg.xml file.
Let's see how we can run the Activiti Engine.
Firstly, we can create an instance of ProcessEngine as follows:
ProcessEngineprocessEngine = ProcessEngines.getDefaultProcessEngine()
This instance will search for the activiti.cfg.xml file and create a Process Engine based on the configuration defined in that file.
We can configure the file using the following configuration properties:
<beans xmlns="http://www.springframework.org/schema/beans"
xmlns:xsi="http://www.w3.org/2001/XMLSchema-instance"
xsi:schemaLocation="http://www.springframework.org/schema/beans http://www.springframework.org/schema/beans/spring-beans.xsd">
<bean id="processEngineConfiguration" class="org.activiti.engine.impl.cfg.StandaloneProcessEngineConfiguration">
<property name="jdbcUrl" value="jdbc:h2:mem:activiti;DB_CLOSE_DELAY=1000" />
<property name="jdbcDriver" value="org.h2.Driver" />
<property name="jdbcUsername" value="sa" />
<property name="jdbcPassword" value="" />
<property name="databaseSchemaUpdate" value="true" />
<property name="jobExecutorActivate" value="false" />
<property name="mailServerHost" value="mail.demo.com" />
<property name="mailServerPort" value="25" />
</bean>
</beans>
This configuration is done for the Spring environment.
It is not mandatory to create the configuration of ProcessEngine in the Spring environment. We can also create an object of ProcessEngineConfiguration programmatically in the configuration file. We can also use a different bean ID.
Using the following code, we can create ProcessEngine:
ProcessEngineConfiguration.createProcessEngineConfigurationFromResourceDefault();
ProcessEngineConfiguration.createProcessEngineConfigurationFromResource(String resource);
ProcessEngineConfiguration.createProcessEngineConfigurationFromResource(String resource, String beanName);
ProcessEngineConfiguration.createProcessEngineConfigurationFromInputStream(InputStream inputStream);
ProcessEngineConfiguration.createProcessEngineConfigurationFromInputStream(InputStream inputStream, String beanName);
All the ProcessEngineConfiguration.createXXX() methods return a ProcessEngineConfiguration instance that can be used further.
ProcessEngine is created after calling the buildProcessEngine() method as follows:
ProcessEngineprocessEngine = ProcessEngineConfiguration.createStandaloneInMemProcessEngineConfiguration()
.setDatabaseSchemaUpdate(ProcessEngineConfiguration.DB_SCHEMA_UPDATE_FALSE)
.setJdbcUrl("jdbc:h2:mem:my-own-db;DB_CLOSE_DELAY=1000")
.setJobExecutorActivate(true)
.buildProcessEngine();
What just happened?
We learned about the class that is used to create the Process Engine. Now we know which properties are required in the activiti.cfg.xml file for the Process Engine. We learned to create the Activiti Process Engine without using the Spring environment.
Have a go hero
Now that you've gone through the chapter, feel free to attempt the following activities:
· Configuring Activiti with the Oracle database
· Adding the e-mail task for order confirmation in the laptop order process that we saw in Chapter 2, Modeling Using the Activiti Modeler
Pop quiz – the Activiti Process Engine
Q1. Which bean ID is used for configuring the mail server's properties?
1. transactionManager
2. datasource
3. ProcessEngineConfiguration
4. processEngine
Q2. Which file is used to configure the production database in the Spring environment?
1. db.properties
2. activiti-standalone-context.xml
3. web.xml
4. rebel.xm
Q3. Which layer is optional in Activiti?
1. The Activiti Spring layer
2. The Activiti Engine layer
3. The PVM layer
4. The Activiti components
Summary
We have learned how to set up a production database in the Spring environment. Now we can send an actual e-mail using the e-mail task in Activiti. We have also learned about the Activiti Engine and logging framework. In the next chapter, we will see an overview of APIs and different services. We will also learn about the different types of APIs for Activiti.
All materials on the site are licensed Creative Commons Attribution-Sharealike 3.0 Unported CC BY-SA 3.0 & GNU Free Documentation License (GFDL)
If you are the copyright holder of any material contained on our site and intend to remove it, please contact our site administrator for approval.
© 2016-2026 All site design rights belong to S.Y.A.