Ansible: Up and Running (2015)
Chapter 13. Docker
The Docker project has taken the IT world by storm. I can’t think of another technology that was so quickly embraced by the community. This chapter covers how to use Ansible to create Docker images and deploy Docker containers.
WHAT IS A CONTAINER?
A container is a form of virtualization. When you use virtualization to run processes in a guest operating system, these guest processes have no visibility into the host operating system that runs on the physical hardware. In particular, processes running in the guest are not able to directly access physical resources, even if these guest processes are provided with the illusion that they have root access.
Containers are sometimes referred to as operating system virtualization to distinguish them from hardware virtualization technologies.
In hardware virtualization, a program called the hypervisor virtualizes an entire physical machine, including a virtualized CPU, memory, and devices such as disks and network interfaces. Because the entire machine is virtualized, hardware virtualization is very flexible. In particular, you can run an entirely different operating system in the guest than in the host (e.g., running a Windows Server 2012 guest inside of a RedHat Enterprise Linux host), and you can suspend and resume a virtual machine just like you can a physical machine. This flexibility brings with it additional overhead needed to virtualize the hardware.
With operating system virtualization (containers), the guest processes are isolated from the host by the operating system. The guest processes run on the same kernel as the host. The host operating system is responsible for ensuring that the guest processes are fully isolated from the host. When running a Linux-based container program like Docker, the guest processes also must be Linux programs. However, the overhead is much lower than that of hardware virtualization, because you are running only a single operating system. In particular, processes start up much more quickly inside containers than inside virtual machines.
Docker is more than just containers. Think of Docker as being a platform where containers are a building block. To use an analogy, containers are to Docker what virtual machines are to IaaS clouds. The other two major pieces that make up Docker are its image format and the Docker API.
You can think of Docker images as similar to virtual machine images. A Docker image contains a filesystem with an installed operating system, along with some metadata. One important difference is that Docker images are layered. You create a new Docker image by taking an existing Docker image and modifying it by adding, modifying, and deleting files. The representation for the new Docker image contains a reference to the original Docker image, as well as the file system differences between the original Docker image and the new Docker image. As an example, the official nginx docker image is built as layers on top of the official Debian Wheezy image. The layered approach means that Docker images are smaller than traditional virtual machine images, so it’s faster to transfer Docker images over the Internet than it would be to transfer a traditional virtual machine image. The Docker project maintains a registry of publicly available images.
Docker also supports a remote API, which enables third-party tools to interact with it. In particular, Ansible’s docker module uses the Docker remote API.
The Case for Pairing Docker with Ansible
Docker containers make it easier to package your application into a single image that’s easy to deploy in different places, which is why the Docker project has embraced the metaphor of the shipping container. Docker’s remote API simplifies the automation of software systems that run on top of Docker.
There are two areas where Ansible simplifies working with Docker. One is in the orchestration of Docker containers. When you deploy a “Dockerized” software app, you’re typically creating multiple Docker containers that contain different services. These services need to communicate with each other, so you need to connect the appropriate containers correctly and ensure they start up in the right order. Initially, the Docker project did not provide orchestration tools, so third-party tools emerged to fill in the gap. Ansible was built for doing orchestration, so it’s a natural fit for deploying your Docker-based application.
The other area is the creation of Docker images. The official way to create your own Docker images is by writing special text files called Dockerfiles, which resemble shell scripts. For simpler images, Dockerfiles work just fine. However, when you start to create more-complex images, you’ll quickly miss the power that Ansible provides. Fortunately, you can use Ansible to create playbooks.
Docker Application Life Cycle
Here’s what the typical life cycle of a Docker-based application looks like:
1. Create Docker images on your local machine.
2. Push Docker images up from your local machine to the registry.
3. Pull Docker images down to your remote hosts from the registry.
4. Start up Docker containers on the remote hosts, passing in any configuration information to the containers on startup.
You typically create your Docker image on your local machine, or on a continuous integration system that supports creating Docker images, such as Jenkins or CircleCI. Once you’ve created your image, you need to store it somewhere it will be convenient for downloading onto your remote hosts.
Docker images typically reside in a repository called a registry. The Docker project runs a registry called Docker Hub, which can host both public and private Docker images, and where the Docker command-line tools have built-in support for pushing images up to a registry and for pulling images down from a registry.
Once your Docker image is in the registry, you connect to a remote host, pull down the container image, and then run the container. Note that if you try to run a container whose image isn’t on the host, Docker will automatically pull down the image from the registry, so you do not need to explicitly issue a command to download an image from the registry.
When you use Ansible to create the Docker images and start the containers on the remote hosts, the application lifecycle looks like this:
1. Write Ansible playbooks for creating Docker images.
2. Run the playbooks to create Docker images on your local machine.
3. Push Docker images up from your local machine to the registry.
4. Write Ansible playbooks to pull Docker images down to remote hosts and start up Docker containers on remote hosts, passing in configuration information.
5. Run Ansible playbooks to start up the containers.
Dockerizing Our Mezzanine Application
We’ll use our Mezzanine example and deploy it inside of Docker containers. Recall that our application involves the following services:
§ Postgres database
§ Mezzanine (web application)
§ Memcached (in-memory cache to improve performance)
§ nginx (web server)
We could deploy all of these services into the same container. However, for pedagogical purposes, I’m going to run each service in a separate container, as shown in Figure 13-1. Deploying each service in a separate container makes for a more complex deployment, but it allows me to demonstrate how you can do more complex things with Docker and Ansible.
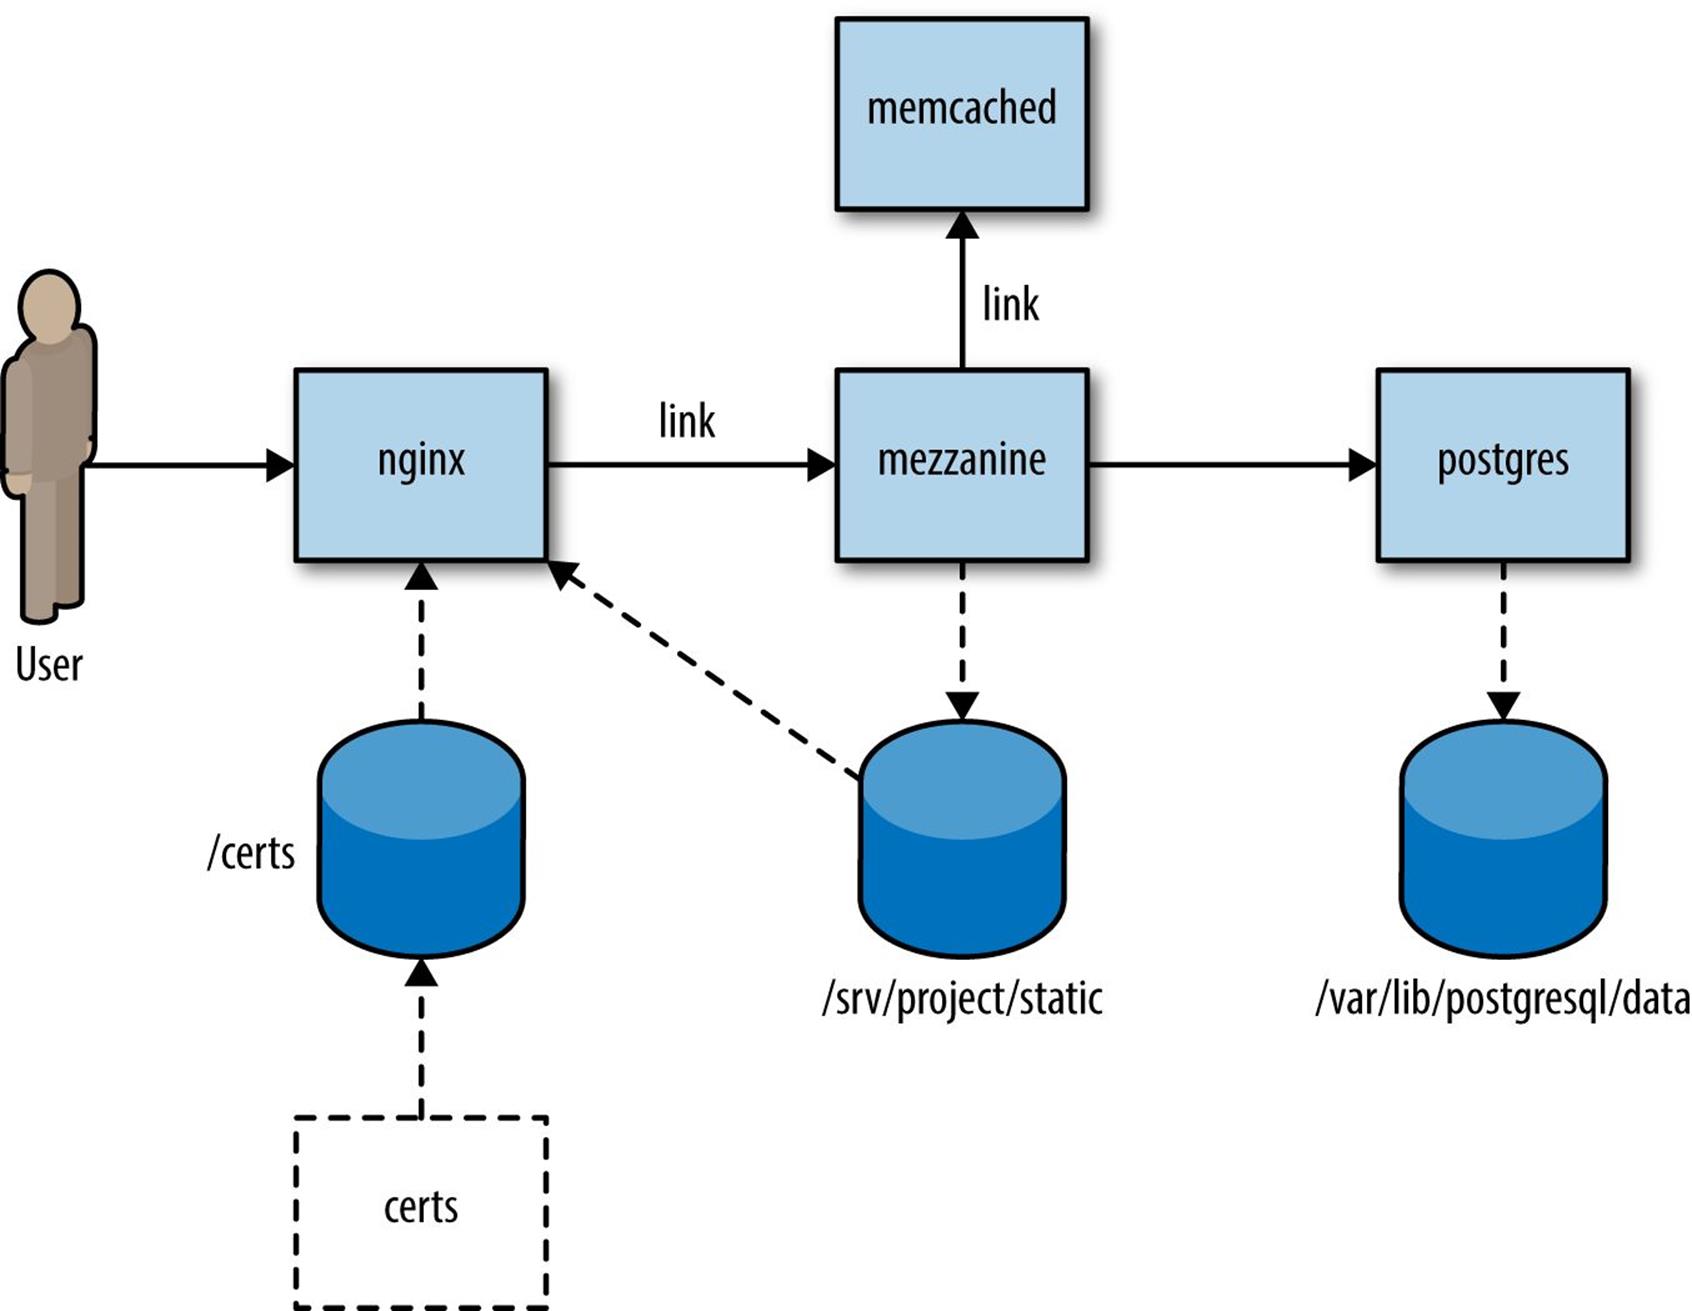
Figure 13-1. Deploying Mezzanine as Docker containers
Each box represents a Docker container that runs a service. Containers that communicate with each other using TCP/IP are connected by solid lines. The nginx container is the only one that must respond to requests from the outside world. It proxies web requests to the Mezzanine application, so it connects to the Mezzanine container. The Mezzanine container must access the database, so it connects to the Postgres container. It must also connect to the Memcached container in order to access the in-memory cache provided by Memcached to improve performance.
The cylinders represent Docker volumes that containers export and import. For example, the Mezzanine container exports the volume /srv/project/static, and the nginx container imports this volume.
The nginx service must serve static content such as JavaScript, CSS, and images, including files uploaded by Mezzanine users. (Recall that Mezzanine is a CMS that allows users to upload files such as images.) These files are in the Mezzanine container, not the nginx container. To share files across these containers, we configure the Mezzanine container to store the static file content in a volume, and we mount the volume into the nginx container.
Containers that share volumes (in our deployment, nginx and mezzanine) must be running on the same host, but otherwise we could deploy each container on a separate host. In a real deployment, we’d likely deploy Memcached on the same host as Mezzanine, and we’d put Postgres on a separate host. In our example, I’m going to use container linking (see “Linking Docker Containers”) to link the nginx, Mezzanine, and Memcached containers together (hence the link annotation on the diagram). Mezzanine will communicate with Postgres over the port exposed by the Postgres container, in order to demonstrate both ways of connecting together containers that run on the same host.
LINKING DOCKER CONTAINERS
If two Docker containers are running on the same host, you can use a feature called linking containers so that the two containers can be networked together. Linking is unidirectional, so if container A is linked to container B, then processes in A can connect to network services running in B.
Docker will inject special environment variables into one of the containers. These variables contain IP addresses and ports so that one container can access services in the other container, as well as update the /etc/hosts file so that one container can access the other by hostname. For more details, see the official Docker documentation about container.
Finally, there’s a dashed box in the diagram labeled “certs.” This is a Docker data volume that contains the TLS certificates. Unlike the other containers, this one is stopped; it exists only to store the certificate files.
Creating Docker Images with Ansible
In this chapter, I’m going to use the method recommended by the Ansible project for creating images with Ansible. In a nutshell, the method is:
1. Use an official Ansible base image that has Ansible installed in it.
2. In the Dockerfile, copy the playbooks into the image.
3. Invoke Ansible from the Dockerfile.
Note that we won’t be creating all of our images with Ansible. In one case, we’ll be able to use an existing image right off-the-shelf…er…Docker registry. In other cases, we’ll build the Docker image with a traditional Dockerfile.
We need to create Docker images for each of the boxes depicted in Figure 13-1.
Mezzanine
Our Mezzanine container image is the most complex one, and we’ll be using Ansible to configure it.
The official Ansible base images are hosted on the Docker registry. As of this writing, there are two base images available:
§ ansible/centos7-ansible (CentOS 7)
§ ansible/ubuntu14.04-ansible (Ubuntu 14.04).
We’ll be using the Ubuntu 14.04 image. To create this image, I have a mezzanine directory that contains the following files:
§ Dockerfile
§ ansible/mezzanine-container.yml
§ ansible/files/gunicorn.conf.py
§ ansible/files/local_settings.py
§ ansible/files/scripts/setadmin.py
§ ansible/files/scripts/setsite.py
There’s the Dockerfile for building the Docker image, the playbook itself (mezzanine-container.yml), and several other files that we’re going to copy into the image.
Example 13-1 shows what the Dockerfile looks like for building the Mezzanine image.
Example 13-1. Mezzanine Dockerfile
FROM ansible/ubuntu14.04-ansible:stable
MAINTAINER Lorin Hochstein <lorin@ansiblebook.com>
ADD ansible /srv/ansible
WORKDIR /srv/ansible
RUN ansible-playbook mezzanine-container.yml -c local
VOLUME /srv/project/static
WORKDIR /srv/project
EXPOSE 8000
CMD ["gunicorn_django", "-c", "gunicorn.conf.py"]
We copy the playbook and associated files into the container and then execute the playbook. We also create a mount point for /srv/project/static, the directory that contains the static content that the nginx container will serve.
Finally, we expose port 8000 and specify gunicorn_django as the default command for the container, which will run Mezzanine using the Gunicorn application server. Example 13-2 shows the playbook we use to configure the container.
Example 13-2. mezzanine-container.yml
- name: Create Mezzanine container
hosts: local
vars:
mezzanine_repo_url: https://github.com/lorin/mezzanine-example.git
mezzanine_proj_path: /srv/project
mezzanine_reqs_path: requirements.txt
script_path: /srv/scripts
tasks:
- name: install apt packages
apt: pkg={{ item }} update_cache=yes cache_valid_time=3600
with_items:
- git
- gunicorn
- libjpeg-dev
- libpq-dev
- python-dev
- python-pip
- python-psycopg2
- python-setuptools
- name: check out the repository on the host
git:
repo: "{{ mezzanine_repo_url }}"
dest: "{{ mezzanine_proj_path }}"
accept_hostkey: yes
- name: install required python packages
pip: name={{ item }}
with_items:
- south
- psycopg2
- django-compressor
- python-memcached
- name: install requirements.txt
pip: requirements={{ mezzanine_proj_path }}/{{ mezzanine_reqs_path }}
- name: generate the settings file
copy: src=files/local_settings.py dest={{ mezzanine_proj_path }}/
local_settings.py
- name: set the gunicorn config file
copy: src=files/gunicorn.conf.py dest={{ mezzanine_proj_path }}/gunicorn.conf.py
- name: collect static assets into the appropriate directory
django_manage: command=collectstatic app_path={{ mezzanine_proj_path }}
environment:
# We can't run collectstatic if the secret key is blank,
# so we just pass in an arbitrary one
SECRET_KEY: nonblanksecretkey
- name: script directory
file: path={{ script_path }} state=directory
- name: copy scripts for setting site id and admin at launch time
copy: src=files/scripts/{{ item }} dest={{ script_path }}/{{ item }} mode=0755
with_items:
- setadmin.py
- setsite.py
The Example 13-2 playbook is similar to the playbook from Chapter 6, with the following differences:
§ We don’t install Postgres, nginx, Memcached, or Supervisor, which is discussed in Chapter 5, into the image.
§ We don’t use templates to generate local_settings.py and gunicorn.conf.py.
§ We don’t run the Django syncdb or migrate commands.
§ We copy setadmin.py and setsite.py scripts into the container instead of executing them.
We don’t install the other services into the image because those services are implemented by separate images, except for Supervisor.
WHY WE DON’T NEED SUPERVISOR
Recall that our deployment of Mezzanine originally used Supervisor to manage our application server (Gunicorn). This meant that Supervisor was responsible for starting and stopping the Gunicorn process.
In our Mezzanine Docker container, we don’t need a separate program for starting and stopping the Gunicorn process. That’s because Docker is itself a system designed for starting and stopping processes.
Without Docker, we would use Supervisor to start Gunicorn:
$ supervisorctl start gunicorn_mezzanine
With Docker, we start up a container containing Gunicorn, and we use Ansible to do something like this:
$ docker run lorin/mezzanine:latest
We don’t use templates to generate local_settings.py because when we build the image, we don’t know what the settings will be. For example, we don’t know what the database host, port, username, and password values should be. Even if we did, we don’t want to hardcode them in the image, because we want to be able to use the same image in our development, staging, and production environments.
What we need is a service discovery mechanism so that we can determine what all of these settings should be when the container starts up. There are many different ways of implementing service discovery, including using a service discovery tool such as etcd, Consul, Apache ZooKeeper, or Eureka. We’re going to use environment variables, since Docker lets us specify environment variables when we start containers. Example 13-3 shows the local_settings.py file we are using for the image.
Example 13-3. local_settings.py
from __future__ import unicode_literals
import os
SECRET_KEY = os.environ.get("SECRET_KEY", "")
NEVERCACHE_KEY = os.environ.get("NEVERCACHE_KEY", "")
ALLOWED_HOSTS = os.environ.get("ALLOWED_HOSTS", "")
DATABASES = {
"default": {
# Ends with "postgresql_psycopg2", "mysql", "sqlite3" or "oracle".
"ENGINE": "django.db.backends.postgresql_psycopg2",
# DB name or path to database file if using sqlite3.
"NAME": os.environ.get("DATABASE_NAME", ""),
# Not used with sqlite3.
"USER": os.environ.get("DATABASE_USER", ""),
# Not used with sqlite3.
"PASSWORD": os.environ.get("DATABASE_PASSWORD", ""),
# Set to empty string for localhost. Not used with sqlite3.
"HOST": os.environ.get("DATABASE_HOST", ""),
# Set to empty string for default. Not used with sqlite3.
"PORT": os.environ.get("DATABASE_PORT", "")
}
}
SECURE_PROXY_SSL_HEADER = ("HTTP_X_FORWARDED_PROTOCOL", "https")
CACHE_MIDDLEWARE_SECONDS = 60
CACHE_MIDDLEWARE_KEY_PREFIX = "mezzanine"
CACHES = {
"default": {
"BACKEND": "django.core.cache.backends.memcached.MemcachedCache",
"LOCATION": os.environ.get("MEMCACHED_LOCATION", "memcached:11211"),
}
}
SESSION_ENGINE = "django.contrib.sessions.backends.cache"
TWITTER_ACCESS_TOKEN_KEY = os.environ.get("TWITTER_ACCESS_TOKEN_KEY ", "")
TWITTER_ACCESS_TOKEN_SECRET = os.environ.get("TWITTER_ACCESS_TOKEN_SECRET ", "")
TWITTER_CONSUMER_KEY = os.environ.get("TWITTER_CONSUMER_KEY ", "")
TWITTER_CONSUMER_SECRET = os.environ.get("TWITTER_CONSUMER_SECRET ", "")
TWITTER_DEFAULT_QUERY = "from:ansiblebook"
Note how most of the settings in Example 13-3 make reference to an environment variable by calling os.environ.get.
For most of the settings, we don’t use a meaningful default value if the environment variable doesn’t exist. There is one exception, the location of the memcached server:
"LOCATION": os.environ.get("MEMCACHED_LOCATION", "memcached:11211"),
I do this so that the default will handle the case where we use container linking. If I link the Memcached container with the name memcached at runtime, then Docker will automatically resolve the memcached hostname to the IP address of the Memcached container.
Example 13-4 shows the Gunicorn configuration file. We could probably get away with hardcoding 8000 as the port, but instead I’ve allowed the user to override this by defining the GUNICORN_PORT environment variable.
Example 13-4. gunicorn.conf.py
from __future__ import unicode_literals
import multiprocessing
import os
bind = "0.0.0.0:{}".format(os.environ.get("GUNICORN_PORT", 8000))
workers = multiprocessing.cpu_count() * 2 + 1
loglevel = "error"
proc_name = "mezzanine"
The setadmin.py and setsite.py files are unchanged from the originals in Examples 6-17 and 6-18. We copy these into the container so that we can invoke them at deployment time. In our original playbook, we copied these files to the host at deploy time and executed them, but Docker doesn’t yet support a simple way to copy files into a container at runtime, so instead we just copied them into the image at build-time.
The Other Container Images
Our Mezzanine example uses some additional Docker images that we do not use Ansible to configure.
Postgres
We need an image that runs the Postgres service. Fortunately, the Postgres project has an official image in the Docker registry. I’m going to use an official image, so there’s no need for us to create our own. Specifically, I’m going to use the image that contains Postgres version 9.4, which is named postgres:9.4.
Memcached
There’s no official Memcached image, but the Dockerfile to build one is very simple, as shown in Example 13-5.
Example 13-5. Dockerfile for Memcached
FROM ubuntu:trusty
MAINTAINER lorin@ansiblebook.com
# Based on the Digital Ocean tutorial: http://bit.ly/1qJ8CXP
# Update the default application repository sources list
RUN apt-get update
# Install Memcached
RUN apt-get install -y memcached
# Port to expose (default: 11211)
EXPOSE 11211
# Default Memcached run command arguments
CMD ["-m", "128"]
# Set the user to run Memcached daemon
USER daemon
# Set the entrypoint to memcached binary
ENTRYPOINT memcached
Nginx
There is an official Dockerfile Nginx image that we can use. We need to use our own configuration file for nginx so that it reverse proxies to the Mezzanine application. The official nginx image is configured so that we could put our custom nginx.conf file on the local filesystem of the host and mount it into the container. However, I prefer to create a self-contained Docker image that doesn’t depend on configuration files that are outside of the container.
We can build a new image using the official image as a base and add our custom nginx configuration file into it. Example 13-6 shows the Dockerfile and Example 13-7 shows the custom nginx configuration file we use.
Example 13-6. Dockerfile for custom nginx Docker image
FROM nginx:1.7
RUN rm /etc/nginx/conf.d/default.conf \
/etc/nginx/conf.d/example_ssl.conf
COPY nginx.conf /etc/nginx/conf.d/mezzanine.conf
Example 13-7. nginx.conf for nginx Docker image
upstream mezzanine {
server mezzanine:8000;
}
server {
listen 80;
listen 443 ssl;
client_max_body_size 10M;
keepalive_timeout 15;
ssl_certificate /certs/nginx.crt;
ssl_certificate_key /certs/nginx.key;
ssl_session_cache shared:SSL:10m;
ssl_session_timeout 10m;
ssl_ciphers (too long to show here);
ssl_prefer_server_ciphers on;
location / {
proxy_redirect off;
proxy_set_header Host $host;
proxy_set_header X-Real-IP $remote_addr;
proxy_set_header X-Forwarded-For $proxy_add_x_forwarded_for;
proxy_set_header X-Forwarded-Protocol $scheme;
proxy_pass http://mezzanine;
}
location /static/ {
root /srv/project;
access_log off;
log_not_found off;
}
location /robots.txt {
root /srv/project/static;
access_log off;
log_not_found off;
}
location /favicon.ico {
root /srv/project/static/img;
access_log off;
log_not_found off;
}
}
Nginx doesn’t natively support reading in configuration from environment variables, so we need to use a well-known path for the location of the static content (/srv/project/static). We specify the location of the Mezzanine service as mezzanine:8000; when we link the nginx container to the Mezzanine container; then Docker will ensure that the mezzanine hostname resolves to the Mezzanine container’s IP address.
Certs
The certs Docker image is a file that contains the TLS certificate used by nginx. In a real scenario, we’d use a certificate issued from a certificate authority. But for the purposes of demonstration, the Dockerfile for this image generates a self-signed certificate forhttp://192.168.59.103.xip.io, as shown in Example 13-8.
Example 13-8. Dockerfile for certs image
FROM ubuntu:trusty
MAINTAINER lorin@ansiblebook.com
# Create self-signed cert for 192.168.59.103
RUN apt-get update
RUN apt-get install -y openssl
RUN mkdir /certs
WORKDIR /certs
RUN openssl req -new -x509 -nodes -out nginx.crt \
-keyout nginx.key -subj '/CN=192.168.59.103.xip.io' -days 3650
VOLUME /certs
Building the Images
I did not use Ansible itself to build the Docker images. Instead, I just built them on the command line. For example, to build the Mezzanine image, I wrote:
$ cd mezzanine
$ docker build -t lorin/mezzanine .
Ansible does contain a module for building Docker images, called docker_image. However, that module has been deprecated because building images isn’t a good fit for a tool like Ansible. Image building is part of the build process of an application’s lifecycle; building Docker images and pushing them up an image registry is the sort of thing that your continuous integration system should be doing, not your configuration management system.
Deploying the Dockerized Application
NOTE
We use the docker module for deploying the application. As of this writing, there are several known issues with the docker module that ships with Ansible.
§ The volumes_from parameter does not work with recent versions of Docker.
§ It does not support Boot2Docker, a commonly used tool for running Docker on OS X.
§ It does not support the wait parameter that I use in some examples in this section.
There are proposed fixes for all of these issues awaiting review in the Ansible project. Hopefully by the time you read this, these issues all will have been fixed. There is also a pending pull request to support detach=no, which has the same behavior as wait=yes in the examples here. In the meantime, I have included a custom version of the docker module in the code sample repository that has fixes for these issues. The file is ch13/playbooks/library/docker.py.
Example 13-10 shows the entire playbook that orchestrates the Docker containers in our Mezzanine deployment. The sensitive data is in a separate file, shown in Example 13-11. You can think of this as a development setup, because all of the services are running on the control machine.
Note that I’m running this on Mac OS X using Boot2Docker, so the Docker containers actually run inside of a virtual machine, rather than on localhost. This also means that I can invoke Docker without needing it to be root. If you’re running this on Linux, you’ll need to use sudo or run this as root for it to work.
Since this is a large playbook, let’s break it down.
Starting the Database Container
Here’s how we start the container that runs the Postgres database.
- name: start the postgres container
docker:
image: postgres:9.4
name: postgres
publish_all_ports: True
env:
POSTGRES_USER: "{{ database_user }}"
POSTGRES_PASSWORD: "{{ database_password }}"
Whenever you start a Docker container, you must specify the image. If you don’t have the postgres:9.4 image installed locally, then Docker will download it for you the first time it runs. We specify publish_all_ports so that Docker will open up the ports that this container is configured to expose; in this case, that’s port 5432.
The container is configured by environment variables, so we pass the username and password that should have access to this service. The Postgres image will automatically create a database with the same name as the user.
Retrieving the Database Container IP Address and Mapped Port
When we started up our Postgres container, we could have explicitly mapped the container’s database port (5432) to a known port on the host. (We’ll do this for the nginx container.) Since we didn’t, Docker will select an arbitrary port on the host that maps to 5432 inside of the container.
Later on in the playbook, we’re going to need to know what this port is, because we need to wait for the Postgres service to start before we bring up Mezzanine, and we’re going to do that by checking to see if there’s anything listening on that port.
We could configure the Mezzanine container to connect on the mapped port, but instead I decided to have the Mezzanine container connect to port 5432 on the Postgres container’s IP address, which gives me an excuse to demonstrate how to retrieve a Docker container’s IP address.
When the Docker module starts one or more containers, it sets information about the started container(s) as facts. This means that we don’t need to use the register clause to capture the result of invoking this module; we just need to know the name of the fact that contains the information we’re looking for.
The name of the fact with the information is docker_containers, which is a list of dictionaries that contains information about the container. It’s the same output you’d see if you used the docker inspect command. Example 13-9 shows an example of the value of thedocker_containers fact after we start a postgres container.
Example 13-9. docker_containers fact after starting postgres container
[
{
"AppArmorProfile": "",
"Args": [
"postgres"
],
"Config": {
"AttachStderr": false,
"AttachStdin": false,
"AttachStdout": false,
"Cmd": [
"postgres"
],
"CpuShares": 0,
"Cpuset": "",
"Domainname": "",
"Entrypoint": [
"/docker-entrypoint.sh"
],
"Env": [
"POSTGRES_PASSWORD=password",
"POSTGRES_USER=mezzanine",
"PATH=/usr/lib/postgresql/9.4/bin:/usr/local/sbin:/usr/local/bin:
/usr/sbin:/usr/bin:/sbin:/bin",
"LANG=en_US.utf8",
"PG_MAJOR=9.4",
"PG_VERSION=9.4.0-1.pgdg70+1",
"PGDATA=/var/lib/postgresql/data"
],
"ExposedPorts": {
"5432/tcp": {}
},
"Hostname": "71f40ec4b58c",
"Image": "postgres",
"MacAddress": "",
"Memory": 0,
"MemorySwap": 0,
"NetworkDisabled": false,
"OnBuild": null,
"OpenStdin": false,
"PortSpecs": null,
"StdinOnce": false,
"Tty": false,
"User": "",
"Volumes": {
"/var/lib/postgresql/data": {}
},
"WorkingDir": ""
},
"Created": "2014-12-25T22:59:15.841107151Z",
"Driver": "aufs",
"ExecDriver": "native-0.2",
"HostConfig": {
"Binds": null,
"CapAdd": null,
"CapDrop": null,
"ContainerIDFile": "",
"Devices": null,
"Dns": null,
"DnsSearch": null,
"ExtraHosts": null,
"IpcMode": "",
"Links": null,
"LxcConf": null,
"NetworkMode": "",
"PortBindings": {
"5432/tcp": [
{
"HostIp": "0.0.0.0",
"HostPort": ""
}
]
},
"Privileged": false,
"PublishAllPorts": false,
"RestartPolicy": {
"MaximumRetryCount": 0,
"Name": ""
},
"SecurityOpt": null,
"VolumesFrom": [
"data-volume"
]
},
"HostnamePath": "/mnt/sda1/var/lib/docker/containers/71f40ec4b58c3176030274a
fb025fbd3eb130fe79d4a6a69de473096f335e7eb/hostname",
"HostsPath": "/mnt/sda1/var/lib/docker/containers/71f40ec4b58c3176030274afb0
25fbd3eb130fe79d4a6a69de473096f335e7eb/hosts",
"Id": "71f40ec4b58c3176030274afb025fbd3eb130fe79d4a6a69de473096f335e7eb",
"Image": "b58a816df10fb20c956d39724001d4f2fabddec50e0d9099510f0eb579ec8a45",
"MountLabel": "",
"Name": "/high_lovelace",
"NetworkSettings": {
"Bridge": "docker0",
"Gateway": "172.17.42.1",
"IPAddress": "172.17.0.12",
"IPPrefixLen": 16,
"MacAddress": "02:42:ac:11:00:0c",
"PortMapping": null,
"Ports": {
"5432/tcp": [
{
"HostIp": "0.0.0.0",
"HostPort": "49153"
}
]
}
},
"Path": "/docker-entrypoint.sh",
"ProcessLabel": "",
"ResolvConfPath": "/mnt/sda1/var/lib/docker/containers/71f40ec4b58c3176030274
afb025fbd3eb130fe79d4a6a69de473096f335e7eb/resolv.conf",
"State": {
"Error": "",
"ExitCode": 0,
"FinishedAt": "0001-01-01T00:00:00Z",
"OOMKilled": false,
"Paused": false,
"Pid": 9625,
"Restarting": false,
"Running": true,
"StartedAt": "2014-12-25T22:59:16.219732465Z"
},
"Volumes": {
"/var/lib/postgresql/data": "/mnt/sda1/var/lib/docker/vfs/dir/4ccd3150c8d
74b9b0feb56df928ac915599e12c3ab573cd4738a18fe3dc6f474"
},
"VolumesRW": {
"/var/lib/postgresql/data": true
}
}
]
If you wade through this output, you can see that the IP address and mapped port are in the NetworkSettings part of the structure:
"NetworkSettings": {
"Bridge": "docker0",
"Gateway": "172.17.42.1",
"IPAddress": "172.17.0.12",
"IPPrefixLen": 16,
"MacAddress": "02:42:ac:11:00:0c",
"PortMapping": null,
"Ports": {
"5432/tcp": [
{
"HostIp": "0.0.0.0",
"HostPort": "49153"
}
]
}
},
Here’s how we extract out the IP address (172.17.0.12) and the mapped port number (49153) and assign them to variables using the set_fact module: [source,yaml+jinja]
- name: capture database ip address and mapped port
set_fact:
database_host: "{{ docker_containers[0].NetworkSettings.IPAddress }}"
mapped_database_port: "{{ docker_containers[0].NetworkSettings.Ports[
'5432/tcp'][0].HostPort}}"
Waiting for the Database to Start Up
The documentation for the official Postgres Docker image contains the following caveat:
If there is no database when postgres starts in a container, then postgres will create the default database for you. While this is the expected behavior of postgres, this means that it will not accept incoming connections during that time. This may cause issues when using automation tools, such as fig, that start several containers simultaneously.
This is a great use case for the wait_for module, which will block playbook execution until the service accepts TCP connection requests:
- name: wait for database to come up
wait_for: host={{ docker_host }} port={{ mapped_database_port }}
Note the use of the docker_host variable for specifying the host running Docker. Here’s how this variable is defined up in the vars section. I’ve added a line break for clarity, but it should all be on one line.
docker_host: "{{ lookup('env', 'DOCKER_HOST') |
regex_replace('^tcp://(.*):\\d+$', '\\\\1') | default('localhost', true) }}"
The issue is that the Docker host will depend on whether you’re running on Linux, and therefore running Docker directly on your control machine, or whether you’re running on Mac OS X, and are using Boot2Docker to run Docker inside of a virtual machine.
If you’re running Docker locally, then docker_host should be set to localhost. If you’re running Boot2Docker, then it should be set to the IP address of the virtual machine.
If you’re running Boot2Docker, then you need to have an environment variable named DOCKER_HOST defined. Here’s what mine looks like:
DOCKER_HOST=tcp://192.168.59.103:2375
I need to extract the 192.168.59.103 part of that, if DOCKER_HOST is defined. If it’s not defined, then I want to default to localhost.
I used the env lookup plug-in to retrieve the value of the DOCKER_HOST environment variable:
lookup('env', 'DOCKER_HOST')
To extract the IP address, I used the regex_replace filter, which is a custom Jinja2 filter defined by Ansible that allows you to do regular expression (note the number of backslashes required):
regex_replace('^tcp://(.*):\\d+$', '\\\\1')
Finally, I used the standard default Jinja2 filter to set a default value of localhost for the variable docker_host if the DOCKER_HOST environment variable wasn’t defined. Because the env lookup returns an empty string, I needed to pass true as the second argument to the default filter to get it to work properly. See the Jinja2 documentation for more details:
default('localhost', true)
Initializing the Database
To initialize the database, we need to run the Django syncdb and migrate commands. (In Django 1.7, you only need to run migrate, but Mezzanine defaults to Django 1.6).
We need to run the Mezzanine container for this, but instead of running Gunicorn, we want to pass it the appropriate syncdb and migrate commands, as well as run the setsite.py and setadmin.py scripts to set the site ID and the admin password.
- name: initialize database
docker:
image: lorin/mezzanine:latest
command: python manage.py {{ item }} --noinput
wait: yes
env: "{{ mezzanine_env }}"
with_items:
- syncdb
- migrate
- name: set the site id
docker:
image: lorin/mezzanine:latest
command: /srv/scripts/setsite.py
env: "{{ setsite_env.update(mezzanine_env) }}{{ setsite_env }}"
wait: yes
- name: set the admin password
docker:
image: lorin/mezzanine:latest
command: /srv/scripts/setadmin.py
env: "{{ setadmin_env.update(mezzanine_env) }}{{ setadmin_env }}"
wait: yes
We use the command parameter to specify the syncdb and migrate commands.
We use the wait parameter so that the module will block until the process completes. Otherwise, we could have a race condition where the database setup has not completed yet when we start up Mezzanine.
Note the use of the env parameter to pass environment variables with the configuration information, including how to connect to the database service. I put all of the environment variables into a mezzanine_env variable that’s defined like this:
mezzanine_env:
SECRET_KEY: "{{ secret_key }}"
NEVERCACHE_KEY: "{{ nevercache_key }}"
ALLOWED_HOSTS: "*"
DATABASE_NAME: "{{ database_name }}"
DATABASE_USER: "{{ database_user }}"
DATABASE_PASSWORD: "{{ database_password }}"
DATABASE_HOST: "{{ database_host }}"
DATABASE_PORT: "{{ database_port }}"
GUNICORN_PORT: "{{ gunicorn_port }}"
When we set the site ID, we need to add the additional two environment variables, which I defined in a setsite_env variable:
setsite_env:
PROJECT_DIR: "{{ project_dir }}"
WEBSITE_DOMAIN: "{{ website_domain }}"
We need to combine the mezzanine_env and setsite_env dicts into a single dict and pass that to the env parameter.
Unfortunately, there’s no simple way to combine two dicts in Ansible, but there’s a workaround. Jinja2 has an update method that lets you merge one dictionary into another. The problem is that calling this doesn’t return the merged dictionary; it just updates the state of the dictionary. Therefore, you need to call the update method, and then you need to evaluate the variable. The resulting env parameter looks like this:
env: "{{ setsite_env.update(mezzanine_env) }}{{ setsite_env }}"
Starting the Memcached Container
Starting the Memcached container is straightforward. We don’t even need to pass it environment variables since Memcached doesn’t need any configuration information. We also don’t need to publish any ports since only the Mezzanine container will connect to it via linking.
- name: start the memcached container
docker:
image: lorin/memcached:latest
name: memcached
Starting the Mezzanine Container
We link the Mezzanine container with the Memcached container and pass it configuration information via the environment.
We also run another container with the same image to run cron, since Mezzanine uses cron to update information from Twitter:
- name: start the mezzanine container
docker:
image: lorin/mezzanine:latest
name: mezzanine
env: "{{ mezzanine_env }}"
links: memcached
- name: start the mezzanine cron job
docker:
image: lorin/mezzanine:latest
name: mezzanine
env: "{{ mezzanine_env }}"
command: cron -f
Starting the Certificate Container
We start the container that holds the TLS certificates. Recall that this container doesn’t run a service, but we need to start it so that we can mount the volume into the nginx container.
- name: start the cert container
docker:
image: lorin/certs:latest
name: certs
Starting the Nginx Container
Finally, we start the Nginx container. This container needs to expose ports 80 and 443 to the world. It also needs to mount volumes for the static content and the TLS certificates. Finally, we link it to the Mezzanine container so that the Mezzanine hostname will resolve to the container that runs Mezzanine:
- name: run nginx
docker:
image: lorin/nginx-mezzanine:latest
ports:
- 80:80
- 443:443
name: nginx
volumes_from:
- mezzanine
- certs
links: mezzanine
And that’s it! If you’re running Docker locally on your Linux machine, you should now be able to access Mezzanine at http://localhost and https://localhost. If you’re running Boot2Docker on OS X, you should be able to access it at the IP address of your Boot2Docker VM, which you can get by doing:
boot2docker ip
On my machine, it’s at http://192.168.59.103 and https://192.168.59.103, or you can use xip.io and access it at https://192.168.59.103.xip.io.f1326.20.
The Entire Playbook
Example 13-10 shows the entire playbook, and Example 13-11 shows the contents of the secrets.yml file.
Example 13-10. run-mezzanine.yml
#!/usr/bin/env ansible-playbook
---
- name: run mezzanine from containers
hosts: localhost
vars_files:
- secrets.yml
vars:
# The postgres container uses the same name for the database
# and the user
database_name: mezzanine
database_user: mezzanine
database_port: 5432
gunicorn_port: 8000
docker_host: "{{ lookup('env', 'DOCKER_HOST') |
regex_replace('^tcp://(.*):\\d+$', '\\\\1') | default('localhost', true) }}"
project_dir: /srv/project
website_domain: "{{ docker_host }}.xip.io"
mezzanine_env:
SECRET_KEY: "{{ secret_key }}"
NEVERCACHE_KEY: "{{ nevercache_key }}"
ALLOWED_HOSTS: "*"
DATABASE_NAME: "{{ database_name }}"
DATABASE_USER: "{{ database_user }}"
DATABASE_PASSWORD: "{{ database_password }}"
DATABASE_HOST: "{{ database_host }}"
DATABASE_PORT: "{{ database_port }}"
GUNICORN_PORT: "{{ gunicorn_port }}"
setadmin_env:
PROJECT_DIR: "{{ project_dir }}"
ADMIN_PASSWORD: "{{ admin_password }}"
setsite_env:
PROJECT_DIR: "{{ project_dir }}"
WEBSITE_DOMAIN: "{{ website_domain }}"
tasks:
- name: start the postgres container
docker:
image: postgres:9.4
name: postgres
publish_all_ports: True
env:
POSTGRES_USER: "{{ database_user }}"
POSTGRES_PASSWORD: "{{ database_password }}"
- name: capture database ip address and mapped port
set_fact:
database_host: "{{ docker_containers[0].NetworkSettings.IPAddress }}"
mapped_database_port: "{{ docker_containers[0].NetworkSettings.Ports[
'5432/tcp'][0].HostPort}}"
- name: wait for database to come up
wait_for: host={{ docker_host }} port={{ mapped_database_port }}
- name: initialize database
docker:
image: lorin/mezzanine:latest
command: python manage.py {{ item }} --noinput
wait: True
env: "{{ mezzanine_env }}"
with_items:
- syncdb
- migrate
register: django
- name: set the site id
docker:
image: lorin/mezzanine:latest
command: /srv/scripts/setsite.py
env: "{{ setsite_env.update(mezzanine_env) }}{{ setsite_env }}"
wait: yes
- name: set the admin password
docker:
image: lorin/mezzanine:latest
command: /srv/scripts/setadmin.py
env: "{{ setadmin_env.update(mezzanine_env) }}{{ setadmin_env }}"
wait: yes
- name: start the memcached container
docker:
image: lorin/memcached:latest
name: memcached
- name: start the mezzanine container
docker:
image: lorin/mezzanine:latest
name: mezzanine
env: "{{ mezzanine_env }}"
links: memcached
- name: start the mezzanine cron job
docker:
image: lorin/mezzanine:latest
name: mezzanine
env: "{{ mezzanine_env }}"
command: cron -f
- name: start the cert container
docker:
image: lorin/certs:latest
name: certs
- name: run nginx
docker:
image: lorin/nginx-mezzanine:latest
ports:
- 80:80
- 443:443
name: nginx
volumes_from:
- mezzanine
- certs
links: mezzanine
Example 13-11. secrets.yml
database_password: password
secret_key: randomsecretkey
nevercache_key: randomnevercachekey
admin_password: password
Because the Docker project is relatively young, much of the tooling is still in flux, and Docker deployment patterns are still evolving. Many of these emerging tools likely will have functionality that overlaps with Ansible when it comes to orchestrating containers.
Even if another tool emerges to dominate the world of Docker orchestration, I still believe Ansible will continue to be a useful tool for operators and developers.