Ansible: Up and Running (2015)
Chapter 2. Playbooks: A Beginning
Most of your time in Ansible will be spent writing playbooks. A playbook is the term that Ansible uses for a configuration management script. Let’s look at an example: installing the nginx web server and configuring it for secure communication.
If you’re following along in this chapter, you should end up with the files listed here:
§ playbooks/ansible.cfg
§ playbooks/hosts
§ playbooks/Vagrantfile
§ playbooks/web-notls.yml
§ playbooks/web-tls.yml
§ playbooks/files/nginx.key
§ playbooks/files/nginx.crt
§ playbooks/files/nginx.conf
§ playbooks/templates/index.html.j2
§ playbooks/templates/nginx.conf.j2
Some Preliminaries
Before we can run this playbook against our Vagrant machine, we need to expose ports 80 and 443, so we can access them. As shown in Figure 2-1, we are going to configure Vagrant so that requests to ports 8080 and 8443 on our local machine are forwarded to ports 80 and 443 on the Vagrant machine. This will allow us to access the web server running inside Vagrant at http://localhost:8080 and https://localhost:8443.
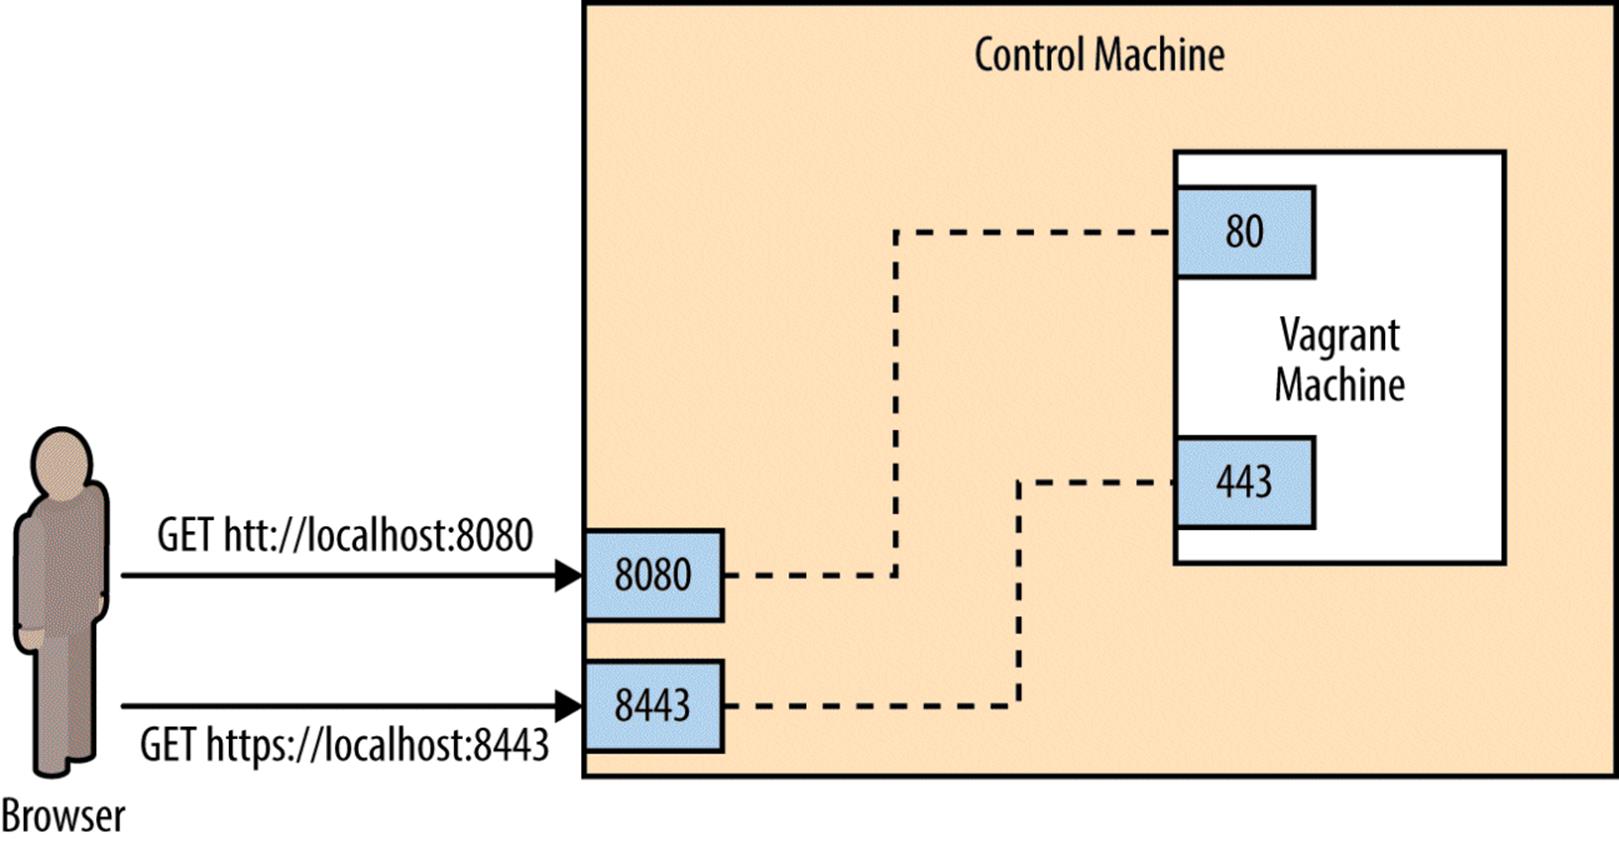
Figure 2-1. Exposing ports on Vagrant machine
Modify your Vagrantfile so it looks like this:
VAGRANTFILE_API_VERSION = "2"
Vagrant.configure(VAGRANTFILE_API_VERSION) do |config|
config.vm.box = "ubuntu/trusty64"
config.vm.network "forwarded_port", guest: 80, host: 8080
config.vm.network "forwarded_port", guest: 443, host: 8443
end
This maps port 8080 on your local machine to port 80 of the Vagrant machine, and port 8443 on your local machine to port 443 on the Vagrant machine. Once you make the changes, tell Vagrant to have them go into effect by running:
$ vagrant reload
You should see output that includes:
==> default: Forwarding ports...
default: 80 => 8080 (adapter 1)
default: 443 => 8443 (adapter 1)
default: 22 => 2222 (adapter 1)
A Very Simple Playbook
For our first example playbook, we’ll configure a host to run an nginx web server. For this example, we won’t configure the web server to support TLS encryption. This will make setting up the web server simpler, but a proper website should have TLS encryption enabled, and we’ll cover how to do that later on in this chapter.
First, we’ll see what happens when we run the playbook in Example 2-1, and then we’ll go over the contents of the playbook in detail.
Example 2-1. web-notls.yml
- name: Configure webserver with nginx
hosts: webservers
sudo: True
tasks:
- name: install nginx
apt: name=nginx update_cache=yes
- name: copy nginx config file
copy: src=files/nginx.conf dest=/etc/nginx/sites-available/default
- name: enable configuration
file: >
dest=/etc/nginx/sites-enabled/default
src=/etc/nginx/sites-available/default
state=link
- name: copy index.html
template: src=templates/index.html.j2 dest=/usr/share/nginx/html/index.html
mode=0644
- name: restart nginx
service: name=nginx state=restarted
WHY DO YOU USE “TRUE” IN ONE PLACE AND “YES” IN ANOTHER?
Sharp-eyed readers might have noticed that Example 2-1 uses True in one spot in the playbook (to enable sudo) and yes in another spot in the playbook (to update the apt cache).
Ansible is pretty flexible on how you represent truthy and falsey values in playbooks. Strictly speaking, module arguments (like update_cache=yes) are treated differently from values elsewhere in playbooks (like sudo: True). Values elsewhere are handled by the YAML parser and so use the YAML conventions of truthiness, which are:
YAML truthy
true, True, TRUE, yes, Yes, YES, on, On, ON, y, Y
YAML falsey
false, False, FALSE, no, No, NO, off, Off, OFF, n, N
Module arguments are passed as strings and use Ansible’s internal conventions, which are:
module arg truthy
yes, on, 1, true
module arg falsey
no, off, 0, false
I tend to follow the examples in the official Ansible documentation. These typically use yes and no when passing arguments to modules (since that’s consistent with the module documentation), and True and False elsewhere in playbooks.
Specifying an nginx Config File
This playbook requires two additional files before we can run it. First, we need to define an nginx configuration file.
Nginx ships with a configuration file that works out of the box if you just want to serve static files. But you’ll almost always need to customize this, so we’ll overwrite the default configuration file with our own as part of this playbook. As we’ll see later, we’ll need to modify this configuration file to support TLS. Example 2-2 shows a basic nginx config file. Put it in playbooks/files/nginx.conf.1
Example 2-2. files/nginx.conf
server {
listen 80 default_server;
listen [::]:80 default_server ipv6only=on;
root /usr/share/nginx/html;
index index.html index.htm;
server_name localhost;
location / {
try_files $uri $uri/ =404;
}
}
NOTE
An Ansible convention is to keep files in a subdirectory named files and Jinja2 templates in a subdirectory named templates. I’ll follow this convention throughout the book.
Creating a Custom Homepage
Let’s add a custom homepage. We’re going to use Ansible’s template functionality so that Ansible will generate the file from a template. Put the file shown in Example 2-3 in playbooks/templates/index.html.j2.
Example 2-3. playbooks/templates/index.html.j2
<html>
<head>
<title>Welcome to ansible</title>
</head>
<body>
<h1>nginx, configured by Ansible</h1>
<p>If you can see this, Ansible successfully installed nginx.</p>
<p>{{ ansible_managed }}</p>
</body>
</html>
This template references a special Ansible variable named ansible_managed. When Ansible renders this template, it will replace this variable with information about when the template file was generated. Figure 2-2 shows a screenshot of a web browser viewing the generated HTML.
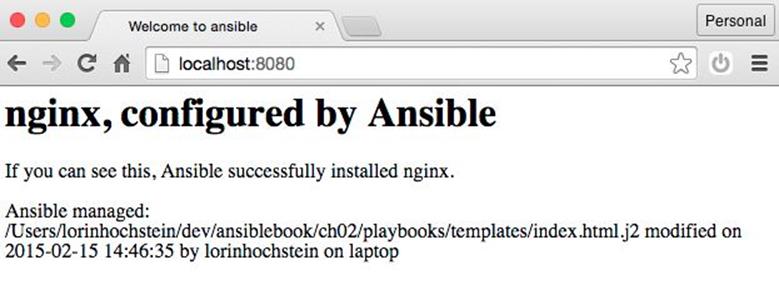
Figure 2-2. Rendered HTML
Creating a Webservers Group
Let’s create a “webservers” group in our inventory file so that we can refer to this group in our playbook. For now, this group will contain our testserver.
Inventory files are in the .ini file format. We’ll go into this format in detail later in the book. Edit your playbooks/hosts file to put a [webservers] line above the testserver line, as shown in Example 2-4. This indicates that testserver is in the webservers group.
Example 2-4. playbooks/hosts
[webservers]
testserver ansible_ssh_host=127.0.0.1 ansible_ssh_port=2222
You should now be able to ping the webservers group using the ansible command-line tool:
$ ansible webservers -m ping
The output should look like this:
testserver | success >> {
"changed": false,
"ping": "pong"
}
Running the Playbook
The ansible-playbook command executes playbooks. To run the playbook, do:
$ ansible-playbook web-notls.yml
Example 2-5 shows what the output should look.
Example 2-5. Output of ansible-playbook
PLAY [Configure webserver with nginx] *********************************
GATHERING FACTS ***************************************************************
ok: [testserver]
TASK: [install nginx] *********************************************************
changed: [testserver]
TASK: [copy nginx config file] ************************************************
changed: [testserver]
TASK: [enable configuration] **************************************************
ok: [testserver]
TASK: [copy index.html] *******************************************************
changed: [testserver]
TASK: [restart nginx] *********************************************************
changed: [testserver]
PLAY RECAP ********************************************************************
testserver : ok=6 changed=4 unreachable=0 failed=0
COWSAY
If you have the cowsay program installed on your local machine, then Ansible output will look like this instead:
_______________________________________
< PLAY [Configure webserver with nginx] >
---------------------------------------
\ ^__^
\ (oo)\_______
(__)\ )\/\
||----w |
|| ||
If you don’t want to see the cows, you can disable cowsay by setting the ANSIBLE_NOCOWS environment variable like this:
$ export ANSIBLE_NOCOWS=1
You can also disable cowsay by adding the following to your ansible.cfg file.
[defaults]
nocows = 1
If you didn’t get any errors,2 you should be able to point your browser to http://localhost:8080 and see the custom HTML page, as shown in Figure 2-2.
NOTE
If your playbook file is marked as executable and starts with a line that looks like this:3
#!/usr/bin/env ansible-playbook
then you can execute it by invoking it directly, like this:
$ ./web-notls.yml
WHAT’S THIS “GATHERING FACTS” BUSINESS?
You might have noticed the following lines of output when Ansible first starts to run:
GATHERING FACTS **************************************************
ok: [testserver]
When Ansible starts executing a play, the first thing it does is collect information about the server it is connecting to, including which operating system is running, hostname, IP and MAC addresses of all interfaces, and so on.
You can then use this information later on in the playbook. For example, you might need the IP address of the machine for populating a configuration file.
You can turn off fact gathering if you don’t need it, in order to save some time. We’ll cover the use of facts and how to disable fact gathering in a later chapter.
Playbooks Are YAML
Ansible playbooks are written in YAML syntax. YAML is a file format similar in intent to JSON, but generally easier for humans to read and write. Before we go over the playbook, let’s cover the concepts of YAML that are most important for writing playbooks.
Start of File
YAML files are supposed to start with three dashes to indicate the beginning of the document:
---
However, if you forget to put those three dashes at the top of your playbook files, Ansible won’t complain.
Comments
Comments start with a number sign and apply to the end of the line, the same as in shell scripts, Python, and Ruby:
# This is a YAML comment
Strings
In general, YAML strings don’t have to be quoted, although you can quote them if you prefer. Even if there are spaces, you don’t need to quote them. For example, this is a string in YAML:
this is a lovely sentence
The JSON equivalent is:
"this is a lovely sentence"
There are some scenarios in Ansible where you will need to quote strings. These typically involve the use of {{ braces }} for variable substitution. We’ll get to those later.
Booleans
YAML has a native Boolean type, and provides you with a wide variety of strings that can be interpreted as true or false, which we covered in “Why Do You Use “True” in One Place and “Yes” in Another?”.
Personally, I always use True and False in my Ansible playbooks.
For example, this is a Boolean in YAML:
True
The JSON equivalent is:
true
Lists
YAML lists are like arrays in JSON and Ruby or lists in Python. Technically, these are called sequences in YAML, but I call them lists here to be consistent with the official Ansible documentation.
They are delimited with hyphens, like this:
- My Fair Lady
- Oklahoma
- The Pirates of Penzance
The JSON equivalent is:
[
"My Fair Lady",
"Oklahoma",
"The Pirates of Penzance"
]
(Note again how we didn’t have to quote the strings in YAML, even though they have spaces in them.)
YAML also supports an inline format for lists, which looks like this:
[My Fair Lady, Oklahoma, The Pirates of Penzance]
Dictionaries
YAML dictionaries are like objects in JSON, dictionaries in Python, or hashes in Ruby. Technically, these are called mappings in YAML, but I call them dictionaries here to be consistent with the official Ansible documentation.
They look like this:
address: 742 Evergreen Terrace
city: Springfield
state: North Takoma
The JSON equivalent is:
{
"address": "742 Evergreen Terrace",
"city": "Springfield",
"state": "North Takoma"
}
YAML also supports an inline format for dictionaries, which looks like this:
{address: 742 Evergreen Terrace, city: Springfield, state: North Takoma}
Line Folding
When writing playbooks, you’ll often encounter situations where you’re passing many arguments to a module. For aesthetics, you might want to break this up across multiple lines in your file, but you want Ansible to treat the string as if it were a single line.
You can do this with YAML using line folding with the greater than (>) character. The YAML parser will replace line breaks with spaces. For example:
address: >
Department of Computer Science,
A.V. Williams Building,
University of Maryland
city: College Park
state: Maryland
The JSON equivalent is:
{
"address": "Department of Computer Science, A.V. Williams Building,
University of Maryland",
"city": "College Park",
"state": "Maryland"
}
Anatomy of a Playbook
Let’s take a look at our playbook from the perspective of a YAML file. Here it is again, in Example 2-6.
Example 2-6. web-notls.yml
- name: Configure webserver with nginx
hosts: webservers
sudo: True
tasks:
- name: install nginx
apt: name=nginx update_cache=yes
- name: copy nginx config file
copy: src=files/nginx.conf dest=/etc/nginx/sites-available/default
- name: enable configuration
file: >
dest=/etc/nginx/sites-enabled/default
src=/etc/nginx/sites-available/default
state=link
- name: copy index.html
template: src=templates/index.html.j2 dest=/usr/share/nginx/html/index.html
mode=0644
- name: restart nginx
service: name=nginx state=restarted
In Example 2-7, we see the JSON equivalent of this file.
Example 2-7. JSON equivalent of web-notls.yml
[
{
"name": "Configure webserver with nginx",
"hosts": "webservers",
"sudo": true,
"tasks": [
{
"name": "Install nginx",
"apt": "name=nginx update_cache=yes"
},
{
"name": "copy nginx config file",
"template": "src=files/nginx.conf dest=/etc/nginx/
sites-available/default"
},
{
"name": "enable configuration",
"file": "dest=/etc/nginx/sites-enabled/default src=/etc/nginx/sites-available
/default state=link"
},
{
"name": "copy index.html",
"template" : "src=templates/index.html.j2 dest=/usr/share/nginx/html/
index.html mode=0644"
},
{
"name": "restart nginx",
"service": "name=nginx state=restarted"
}
]
}
]
NOTE
A valid JSON file is also a valid YAML file. This is because YAML allows strings to be quoted, considers true and false to be valid Booleans, and has inline lists and dictionary syntaxes that are the same as JSON arrays and objects. But don’t write your playbooks as JSON — the whole point of YAML is that it’s easier for people to read.
Plays
Looking at either the YAML or JSON representation, it should be clear that a playbook is a list of dictionaries. Specifically, a playbook is a list of plays.
Here’s the play4 from our example:
- name: Configure webserver with nginx
hosts: webservers
sudo: True
tasks:
- name: install nginx
apt: name=nginx update_cache=yes
- name: copy nginx config file
copy: src=files/nginx.conf dest=/etc/nginx/sites-available/default
- name: enable configuration
file: >
dest=/etc/nginx/sites-enabled/default
src=/etc/nginx/sites-available/default
state=link
- name: copy index.html
template: src=templates/index.html.j2
dest=/usr/share/nginx/html/index.html mode=0644
- name: restart nginx
service: name=nginx state=restarted
Every play must contain:
§ A set of hosts to configure
§ A list of tasks to be executed on those hosts
Think of a play as the thing that connects hosts to tasks.
In addition to specifying hosts and tasks, plays also support a number of optional settings. We’ll get into those later, but three common ones are:
name
A comment that describes what the play is about. Ansible will print this out when the play starts to run.
sudo
If true, Ansible will run every task by sudo’ing as (by default) the root user. This is useful when managing Ubuntu servers, since by default you cannot SSH as the root user.
vars
A list of variables and values. We’ll see this in action later in this chapter.
Tasks
Our example playbook contains one play that has five tasks. Here’s the first task of that play:
- name: install nginx
apt: name=nginx update_cache=yes
The name is optional, so it’s perfectly valid to write a task like this:
- apt: name=nginx update_cache=yes
Even though names are optional, I recommend you use them because they serve as good reminders for the intent of the task. (Names will be very useful when somebody else is trying to understand your playbook, including yourself in six months.) As we’ve seen, Ansible will print out the name of a task when it runs. Finally, as we’ll see in Chapter 14, you can use the --start-at-task <task name> flag to tell ansible-playbook to start a playbook in the middle of a task, but you need to reference the task by name.
Every task must contain a key with the name of a module and a value with the arguments to that module. In the preceding example, the module name is apt and the arguments are name=nginx update_cache=yes.
These arguments tell the apt module to install the package named nginx and to update the package cache (the equivalent of doing an apt-get update) before installing the package.
It’s important to understand that, from the point of the view of the YAML parser used by the Ansible frontend, the arguments are treated as a string, not as a dictionary. This means that if you want to break up arguments into multiple lines, you need to use the YAML folding syntax, like this:
- name: install nginx
apt: >
name=nginx
update_cache=yes
Ansible also supports a task syntax that will let you specify module arguments as a YAML dictionary, which is helpful when using modules that support complex arguments. We’ll cover that in “Complex Arguments in Tasks: A Brief Digression”.
Ansible also supports an older syntax that uses action as the key and puts the name of the module in the value. The preceding example also can be written as:
- name: install nginx
action: apt name=nginx update_cache=yes
Modules
Modules are scripts5 that come packaged with Ansible and perform some kind of action on a host. Admittedly, that’s a pretty generic description, but there’s enormous variety across Ansible modules. The modules we use in this chapter are:
apt
Installs or removes packages using the apt package manager.
copy
Copies a file from local machine to the hosts.
file
Sets the attribute of a file, symlink, or directory.
service
Starts, stops, or restarts a service.
template
Generates a file from a template and copies it to the hosts.
VIEWING ANSIBLE MODULE DOCUMENTATION
Ansible ships with the ansible-doc command-line tool, which shows documentation about modules. Think of it as man pages for Ansible modules. For example, to show the documentation for the service module, run:
$ ansible-doc service
If you use Mac OS X, there’s a wonderful documentation viewer called Dash that has support for Ansible. Dash indexes all of the Ansible module documentation. It’s a commercial tool ($19.99 as of this writing), but I find it invaluable.
Recall from the first chapter that Ansible executes a task on a host by generating a custom script based on the module name and arguments, and then copies this script to the host and runs it.
There are over 200 modules that ship with Ansible, and this number grows with every release. You can also find third-party Ansible modules out there, or write your own.
Putting It All Together
To sum up, a playbook contains one or more plays. A play associates an unordered set of hosts with an ordered list of task_. Each task is associated with exactly one module.
Figure 2-3 is an entity-relationship diagram that depicts this relationship between playbooks, plays, hosts, tasks, and modules.

Figure 2-3. Entity-relationship diagram
Did Anything Change? Tracking Host State
When you run ansible-playbook, Ansible outputs status information for each task it executes in the play.
Looking back at Example 2-5, notice that the status for some of the tasks is changed, and the status for some others is ok. For example, the install nginx task has status changed, which appears as yellow on my terminal.
TASK: [install nginx] *********************************************************
changed: [testserver]
The enable configuration, on the other hand, has status ok, which appears as green on my terminal:
TASK: [enable configuration] **************************************************
ok: [testserver]
Any Ansible task that runs has the potential to change the state of the host in some way. Ansible modules will first check to see if the state of the host needs to be changed before taking any action. If the state of the host matches the arguments of the module, then Ansible takes no action on the host and responds with a state of ok.
On the other hand, if there is a difference between the state of the host and the arguments to the module, then Ansible will change the state of the host and return changed.
In the example output just shown, the install nginx task was changed, which meant that before I ran the playbook, the nginx package had not previously been installed on the host. The enable configuration task was unchanged, which meant that there was already a configuration file on the server that was identical to the file I was copying over. The reason for this is that the nginx.conf file I used in my playbook is the same as the nginx.conf file that gets installed by the nginx package on Ubuntu.
As we’ll see later in this chapter, Ansible’s detection of state change can be used to trigger additional actions through the use of handlers. But, even without using handlers, it is still a useful form of feedback to see whether your hosts are changing state as the playbook runs.
Getting Fancier: TLS Support
Let’s move on to a more complex example: We’re going to modify the previous playbook so that our webservers support TLS. The new features here are:
§ Variables
§ Handlers
TLS VERSUS SSL
You might be familiar with the term SSL rather than TLS in the context of secure web servers. SSL is an older protocol that was used to secure communications between browsers and web servers, and it has been superseded by a newer protocol named TLS.
Although many continue to use the term SSL to refer to the current secure protocol, in this book, I use the more accurate TLS.
Example 2-8 shows what our playbook looks like with TLS support.
Example 2-8. web-tls.yml
- name: Configure webserver with nginx and tls
hosts: webservers
sudo: True
vars:
key_file: /etc/nginx/ssl/nginx.key
cert_file: /etc/nginx/ssl/nginx.crt
conf_file: /etc/nginx/sites-available/default
server_name: localhost
tasks:
- name: Install nginx
apt: name=nginx update_cache=yes cache_valid_time=3600
- name: create directories for ssl certificates
file: path=/etc/nginx/ssl state=directory
- name: copy TLS key
copy: src=files/nginx.key dest={{ key_file }} owner=root mode=0600
notify: restart nginx
- name: copy TLS certificate
copy: src=files/nginx.crt dest={{ cert_file }}
notify: restart nginx
- name: copy nginx config file
template: src=templates/nginx.conf.j2 dest={{ conf_file }}
notify: restart nginx
- name: enable configuration
file: dest=/etc/nginx/sites-enabled/default src={{ conf_file }} state=link
notify: restart nginx
- name: copy index.html
template: src=templates/index.html.j2 dest=/usr/share/nginx/html/index.html
mode=0644
handlers:
- name: restart nginx
service: name=nginx state=restarted
Generating TLS certificate
We need to manually generate a TLS certificate. In a production environment, you’d purchase your TLS certificate from a certificate authority. We’ll use a self-signed certificate, since we can generate those for free.
Create a files subdirectory of your playbooks directory, and then generate the TLS certificate and key:
$ mkdir files
$ openssl req -x509 -nodes -days 3650 -newkey rsa:2048 \
-subj /CN=localhost \
-keyout files/nginx.key -out files/nginx.crt
It should generate the files nginx.key and nginx.crt in the files directory. The certificate has an expiration date of 10 years (3,650 days) from the day you created it.
Variables
The play in our playbook now has a section called vars:
vars:
key_file: /etc/nginx/ssl/nginx.key
cert_file: /etc/nginx/ssl/nginx.crt
conf_file: /etc/nginx/sites-available/default
server_name: localhost
This section defines four variables and assigns a value to each variable.
In our example, each value is a string (e.g., /etc/nginx/ssl/nginx.key), but any valid YAML can be used as the value of a variable. You can use lists and dictionaries in addition to strings and Booleans.
Variables can be used in tasks, as well as in template files. You reference variables using the {{ braces }} notation. Ansible will replace these braces with the value of the variable.
Consider this task in the playbook:
- name: copy TLS key
copy: src=files/nginx.key dest={{ key_file }} owner=root mode=0600
Ansible will substitute {{ key_file }} with /etc/nginx/ssl/nginx.key when it executes this task.
WHEN QUOTING IS NECESSARY
If you reference a variable right after specifying the module, the YAML parser will misinterpret the variable reference as the beginning of an in-line dictionary. Consider the following example:
- name: perform some task
command: {{ myapp }} -a foo
Ansible will try to parse the first part of {{ myapp }} -a foo as a dictionary instead of a string, and will return an error. In this case, you must quote the arguments:
- name: perform some task
command: "{{ myapp }} -a foo"
A similar problem arises if your argument contains a colon. For example:
- name: show a debug message
debug: msg="The debug module will print a message: neat, eh?"
The colon in the msg argument trips up the YAML parser. To get around this, you need to quote the entire argument string.
Unfortunately, just quoting the argument string won’t resolve the problem, either.
- name: show a debug message
debug: "msg=The debug module will print a message: neat, eh?"
This will make the YAML parser happy, but the output isn’t what you expect:
TASK: [show a debug message] ************************************************
ok: [localhost] => {
"msg": "The"
}
The debug module’s msg argument requires a quoted string to capture the spaces. In this particular case, we need to quote both the whole argument string and the msg argument. Ansible supports alternating single and double quotes, so you can do this:
- name: show a debug message
debug: "msg='The debug module will print a message: neat, eh?'"
This yields the expected output:
TASK: [show a debug message] ************************************************
ok: [localhost] => {
"msg": "The debug module will print a message: neat, eh?"
}
Ansible is pretty good at generating meaningful error messages if you forget to put quotes in the right places and end up with invalid YAML.
Generating the Nginx Configuration Template
If you’ve done web programming, you’ve likely used a template system to generate HTML. In case you haven’t, a template is just a text file that has some special syntax for specifying variables that should be replaced by values. If you’ve ever received an automated email from a company, they’re probably using an email template as shown in Example 2-9.
Example 2-9. An email template
Dear {{ name }},
You have {{ num_comments }} new comments on your blog: {{ blog_name }}.
Ansible’s use case isn’t HTML pages or emails — it’s configuration files. You don’t want to hand-edit configuration files if you can avoid it. This is especially true if you have to reuse the same bits of configuration data (say, the IP address of your queue server or your database credentials) across multiple configuration files. It’s much better to take the info that’s specific to your deployment, record it in one location, and then generate all of the files that need this information from templates.
Ansible uses the Jinja2 template engine to implement templating. If you’ve ever used a templating library such as Mustache, ERB, or the Django template system, Jinja2 will feel very familiar.
Nginx’s configuration file needs information about where to find the TLS key and certificate. We’re going to use Ansible’s templating functionality to define this configuration file so that we can avoid hard-coding values that might change.
In your playbooks directory, create a templates subdirectory and create the file templates/nginx.conf.j2, as shown in Example 2-10.
Example 2-10. templates/nginx.conf.j2
server {
listen 80 default_server;
listen [::]:80 default_server ipv6only=on;
listen 443 ssl;
root /usr/share/nginx/html;
index index.html index.htm;
server_name {{ server_name }};
ssl_certificate {{ cert_file }};
ssl_certificate_key {{ key_file }};
location / {
try_files $uri $uri/ =404;
}
}
We use the .j2 extension to indicate that the file is a Jinja2 template. However, you can use a different extension if you like; Ansible doesn’t care.
In our template, we reference three variables:
server_name
The hostname of the web server (e.g., www.example.com)
cert_file
The path to the TLS certificate
key_file
The path to the TLS private key
We define these variables in the playbook.
Ansible also uses the Jinja2 template engine to evaluate variables in playbooks. Recall that we saw the {{ conf_file }} syntax in the playbook itself.
NOTE
Early versions of Ansible used a dollar sign ($) to do variable interpolation in playbooks instead of the braces. You used to dereference variable foo by writing $foo, where now you write {{ foo }}. The dollar sign syntax has been deprecated; if you encounter it in an example playbook you find on the Internet, then you’re looking at older Ansible code.
You can use all of the Jinja2 features in your templates, but we won’t cover them in detail here. Check out the Jinja2 Template Designer Documentation for more details. You probably won’t need to use those advanced templating features, though. One Jinja2 feature you probably will use with Ansible is filters; we’ll cover those in a later chapter.
Handlers
Looking back at our web-tls.yml playbook, note that there are two new playbook elements we haven’t discussed yet. There’s a handlers section that looks like this:
handlers:
- name: restart nginx
service: name=nginx state=restarted
In addition, several of the tasks contain a notify key. For example:
- name: copy TLS key
copy: src=files/nginx.key dest={{ key_file }} owner=root mode=0600
notify: restart nginx
Handlers are one of the conditional forms that Ansible supports. A handler is similar to a task, but it runs only if it has been notified by a task. A task will fire the notification if Ansible recognizes that the task has changed the state of the system.
A task notifies a handler by passing the handler’s name as the argument. In the preceding example, the handler’s name is restart nginx. For an nginx server, we’d need to restart it6 if any of the following happens:
§ The TLS key changes
§ The TLS certificate changes
§ The configuration file changes
§ The contents of the sites-enabled directory change
We put a notify statement on each of the tasks to ensure that Ansible restarts nginx if any of these conditions are met.
A few things to keep in mind about handlers
Handlers only run after all of the tasks are run, and they only run once, even if they are notified multiple times. They always run in the order that they appear in the play, not the notification order.
The official Ansible docs mention that the only common uses for handlers are for restarting services and for reboots. Personally, I’ve only ever used them for restarting services. Even then, it’s a pretty small optimization, since we can always just unconditionally restart the service at the end of the playbook instead of notifying it on change, and restarting a service doesn’t usually take very long.
Another pitfall with handlers that I’ve encountered is that they can be troublesome when debugging a playbook. It goes something like this:
1. I run a playbook.
2. One of my tasks with a notify on it changes state.
3. An error occurs on a subsequent task, stopping Ansible.
4. I fix the error in my playbook.
5. I run Ansible again.
6. None of the tasks report a state change the second time around, so Ansible doesn’t run the handler.
Running the Playbook
As before, we use the ansible-playbook command to run the playbook.
$ ansible-playbook web-tls.yml
The output should look something like this:
PLAY [Configure webserver with nginx and tls] *********************************
GATHERING FACTS ***************************************************************
ok: [testserver]
TASK: [Install nginx] *********************************************************
changed: [testserver]
TASK: [create directories for tls certificates] *******************************
changed: [testserver]
TASK: [copy TLS key] **********************************************************
changed: [testserver]
TASK: [copy TLS certificate] **************************************************
changed: [testserver]
TASK: [copy nginx config file] ************************************************
changed: [testserver]
TASK: [enable configuration] **************************************************
ok: [testserver]
NOTIFIED: [restart nginx] *****************************************************
changed: [testserver]
PLAY RECAP ********************************************************************
testserver : ok=8 changed=6 unreachable=0 failed=0
Point your browser to https://localhost:8443 (don’t forget the “s” on https). If you’re using Chrome, like I am, you’ll get a ghastly message that says something like, “Your connection is not private” (see Figure 2-4).
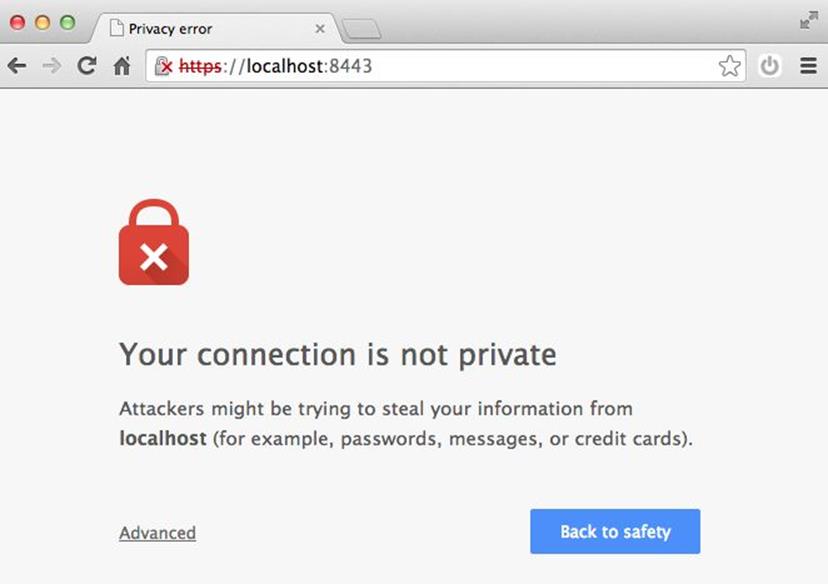
Figure 2-4. Browsers like Chrome don’t trust self-signed TLS certificates
Don’t worry, though; that error is expected, as we generated a self-signed TLS certificate, and web browsers like Chrome only trust certificates that have been issued from a proper authority.
We covered a lot of the “what” of Ansible in this chapter, describing what Ansible will do to your hosts. The handlers we discussed here are just one form of control flow that Ansible supports. In a later chapter, we’ll see iteration and conditionally running tasks based on the values of variables.
In the next chapter, we’ll talk about the “who”; in other words, how to describe the hosts that your playbooks will run against.
1 Note that while we call this file nginx.conf, it replaces the sites-enabled/default nginx server block config file, not the main /etc/nginx.conf config file.
2 If you encountered an error, you might want to skip to Chapter 14 for assistance on debugging.
3 Colloquially referred to as a “shebang.”
4 Actually, it’s a list that contains a single play.
5 The modules that ship with Ansible all are written in Python, but modules can be written in any language.
6 Alternatively, we could reload the configuration file using state=reloaded instead of restarting the service.