Learning Internet of Things (2015)
Chapter 6. The XMPP Protocol
In the previous chapter, we saw the benefits of using message brokers to cross firewall boundaries. But the MQTT protocol is limited to a single communication pattern: the publish/subscribe pattern. This is useful in cases where a thing only publishes data and has many consumers of its data, and where data is homogenous and most reported data items are actually used. If individually tailored messages, momentary values, or real-time or bidirectional communication is important, or if data is seldom used compared to the frequency with which it is updated, other communication patterns would be more appropriate.
In this chapter, we will introduce the Extensible Messaging and Presence Protocol (XMPP) protocol. The XMPP protocol also uses message brokers to bypass firewall barriers. But apart from the publish/subscribe pattern, it also supports other communication patterns, such as point-to-point request/response and asynchronous messaging, that allow you to have a richer communication experience. You will learn about:
· The basic operations available in XMPP
· How to add XMPP support to a generic device
· How to use provisioning to add an extra layer of security for your device
· How to communicate between our devices using XMPP
· How to configure your network using the provisioning server
Tip
All the source code presented in this book is available for download. The source code for this chapter and the next can be downloaded from https://github.com/Clayster/Learning-IoT-XMPP
XMPP basics
XMPP was originally designed for use in instant messaging applications (or chat). It is an open protocol, standardized by Internet Engineering Task Force (IETF), as are HTTP and CoAP. Even though it was first designed for chat applications, it lends itself very well to other applications, such as the ones for IoT, due to its flexibility and richness of communication patterns. Before we start using XMPP in our projects, it might be a good idea to have a quick overview of what XMPP is.
Federating for global scalability
The XMPP architecture builds on the tremendous success and global scalability of the Simple Mail Transfer Protocol (SMTP). The difference is that XMPP is designed for real-time instantaneous messaging applications, where smaller messages are sent with as little latency as possible and without any persistence.
XMPP uses a federated network of XMPP servers as message brokers to allow clients behind separate firewalls to communicate with each other. Each server controls its own domain and authenticates users on that domain. Clients can communicate with clients on other domains through the use of federation where the servers create connections between themselves in a secure manner to interchange messages between their domains. It is this federation that allows you to have a globally scalable architecture. All of this happens at the server level, so there is nothing that clients need to worry about. They only need to ensure that they maintain the connection with their respective servers, and through the servers, each of them will have the possibility to send messages to any other client in the federated network. It is this architecture of federation that makes XMPP scalable and allows you to make billions of devices communicate with each other in the same federated network.
The following illustration shows how clients (C1, C2, and C3) behind firewalls connect to different servers (S1, S2, and S3) in a federated network to exchange messages:
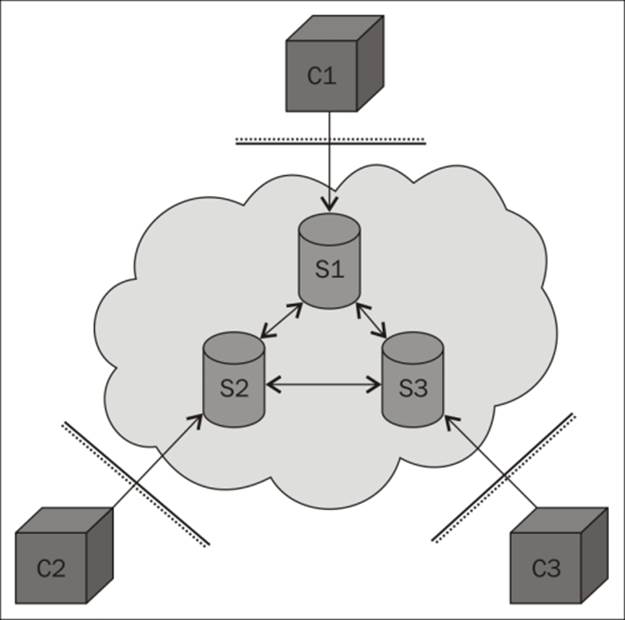
A small federated XMPP network
Providing a global identity
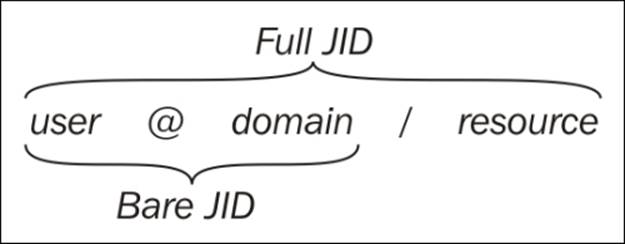
XMPP servers do more than relay messages between clients. They also provide each client with an authenticated identity. If the server is a public server in the global federated network of XMPP servers, it is a global identity. When clients connect, the servers make sure the clients authenticate themselves by providing their corresponding client credentials, which would consist of a username and password. This authentication is done securely using an extensible architecture based on Simple Authentication and Security Layer (SASL). The connection can also be switched over to Transport Layer Security (TLS) through negotiation between the client and the server, encrypting the communication between them. The identity of the client is often called XMPP address or Jabber ID(JID).
Note
The XMPP protocol was developed in a project named Jabber. For this reason, many terminologies retain this name.
Each connection is also bound to a specific resource, which is normally a random string. Together, the username, domain name, and resource constitute the full JID of a connection, while only the username and domain name constitute the bare JID of an account.
Authorizing communication
Another important reason for using XMPP servers to relay communication instead of serverless peer-to-peer technologies is to assure the clients that only authorized communication will be relayed. This feature comes in handy, especially for small devices with limited decision-making capabilities. The server does so by ensuring that the full JID identifier instead of only the bare JID identifier is used to communicate with the application or device behind it. The reason is twofold:
· First, multiple clients might use the same account at the same time. You need to provide the resource part of the full JID for the XMPP Server to be able to determine which connection the corresponding message should be forwarded to. Only this connection will receive the message. This enables the actual clients to have direct communication between them.
· Second, only trusted parties (or friends) are given access to the resource part once the thing or application is connected. This means that, in turn, only friends can send messages between each other, as long as the resource parts are sufficiently long and random so they cannot be guessed and the resource part is kept hidden and not published somewhere else.
Sensing online presence
To learn about the resource part of a corresponding client, you send a presence subscription to its bare JID. If accepted by the remote client, you will receive presence messages every time the state of the contact is changed, informing you whether it is online, offline, away, busy, and so on. In this presence message, you will also receive the full JID of the contact. Once a presence subscription has been accepted by the remote device, it might send you a presence subscription of its own, which you can either accept or reject. If both the parties accept it and subscribe to the presence from each other, then parties are said to be friends.
Note
In XMPP, there might be multiple clients that use the same bare JID. In solutions where this is the case, you would need to keep track of all the full JIDs reported to you for each bare JID. But for all the examples in this book, we assume that each thing has its own JID and that only the corresponding thing will use its JID.
If you, during development time, use another client to connect to an account used by a live thing, you might confuse it with its friends as your connection will send presence messages to all these friends. They might therefore direct the communication to the last application that was connected. When this application is closed down, you will need to reset, reconnect, or reset the presence status in the corresponding thing for its friends to be updated of the correct full JID to communicate with.
XMPP servers maintain lists of contacts for each account and their corresponding presence subscription statuses. These lists are called rosters. The client only needs to connect and then receive its roster from the server. This makes it possible to move the application between physical platforms and unnecessary to store contact information in the physical device.
Using XML
XMPP communication consists of bidirectional streams of XML fragments. The reason for using XML has been debated since it affects message sizes negatively when compared to binary alternatives, but it has many positive implications as well. These can be listed as follows:
· Having a fixed content format makes the interchange and reuse of data simpler
· XML is simple to encode, decode, and parse, making data telegrams well-defined
· Using a text format makes telegrams readable by humans, which makes documentation and debugging simpler
· XML has standard tools for searching validation and transformation, which permits advanced operations and analysis to be performed on data without previous knowledge about message formats
· Through the use of XML namespaces, messages can be separated between protocol extensions and versioning is supported
Tip
In cases where the message size is important, there are methods in XMPP that help compress XML to very efficient binary messages using Efficient XML Interchange (EXI).
Communication patterns
XMPP supports a rich set of communication patterns. It does this by providing three communication primitives called stanzas. We've already presented the first of these, the presence stanza. This is used to send information about oneself to interested and authorized parties. The second is the message stanza. This is used to send asynchronous messages to a given receiver. The third is the iq stanza, short for information/query. This stanza is used to provide a request/response communication pattern. A request is sent to a given receiver, which returns a response or an error, as appropriate.
There are four different kinds of receivers of stanzas. First, you have the peer. To communicate with a peer, you provide the full JID of the peer connection as the destination address of your stanza. Then you have a server. To communicate with a server directly, you use the domain name of the server as the destination address. A server might host server components of various kinds. These might be internal or external components hosted by external applications. These components are addressed using a corresponding subdomain name and can be dynamically discovered using simple requests to the server. Finally, you have a contact. To communicate with a contact, which is implicitly handled by your server and the server handling the contact, depending on the type of message, you need to use the base JID of the contact as the address.
Further communication patterns are provided by different server components hosted by the XMPP servers. Examples of such patterns include the publish/subscribe pattern, where data items are propagated to the subscribers, and the multicast pattern (in XMPP, this is called the multiuser chat), where messages are propagated to the members of a room in real time.
Extending XMPP
So, through the use of XML, XMPP provides a protocol that is open, easy to use, extensible, and flexible. This has led to a series of extensions being created. Anybody can create proprietary extensions to XMPP, but there exists an open forum called XMPP Standards Foundation (XSF) that publishes a set of extensions which are openly reviewed and discussed within the forum and free for anybody to use. These extensions are called XMPP Extension Protocols (XEPs). XSF publishes such extensions to promote interoperability. Anybody can apply to become a member and thus work to promote the development of new or existing extensions.
Note
XSF manages lists of extensions, the available server and client software, client libraries, and so on. XSF can be found at http://xmpp.org/. Specifically, all XMPP extensions can be found at http://xmpp.org/extensions/.
Procedural extensions that are accepted for publication pass through three levels of acceptance. First, there is the experimental stage where an extension is recognized as the factor that would provide a solution for an important use case but is still under discussion and can undergo significant changes in the process. The next step is the draft stage where the extension has undergone extensive discussion and technical review. Any changes made to an extension in this stage should always be made in a backward-compatible manner if possible. The last stage is the final stage where changes are no longer made.
At the time of writing this, there is a sequence of new experimental extensions published by XSF, aimed at IoT. We will use these extensions in our examples. To improve interoperability, the source code for the implementation of these extensions has also been included in the Clayster.Library.IoT library. These extensions include extensions to communicate with sensor data or control actuators, sending asynchronous events based on subscriber-specific conditions. They also include extensions to register devices securely and provision the services in the networks. Furthermore, all our examples will avoid the storage of sensitive information centrally. Instead, data will be made available on request and only given to a trusted few by the owner-approved parties.
Connecting to a server
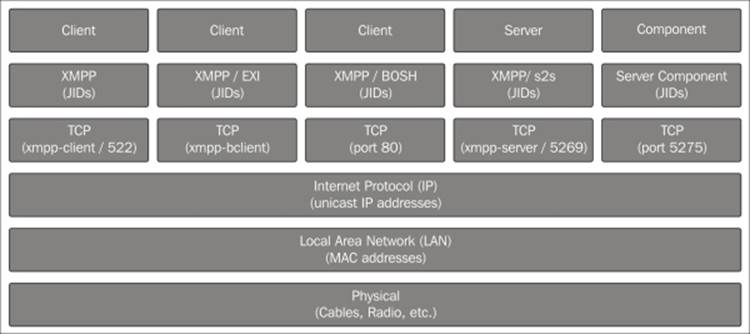
There are various methods available to connect to an XMPP server. The most common method, the one we will use in the examples in this book, is for a client to connect through a normal TCP socket connection to either xmpp-client service if access to DNS-SRV records is available, or port 5222 if not. XML fragments are then transported in both the directions, as described in RFC 6120-6122.
Tip
EXI compression can be negotiated over this connection if supported by the server. An alternative binding method is to connect to the xmpp-bclient service directly to avoid having to switch over from XML to an EXI compressed XML.
An alternative way to connect to an XMPP server is by using Bidirectional streams Over Synchronous HTTP (BOSH). This allows clients with access to only the HTTP protocol to use XMPP as well. Some servers also publish XMPP over web socket interfaces. This makes it possible to access the XMPP network for clients, such as web browsers and so on.
XMPP servers also receive connections from other XMPP servers. This is part of the federation feature of XMPP. These servers connect to each other using the xmpp-server service name if DNS-SRV records are available, or port 5269 if not.
A final method worth mentioning to connect to a server is through a special port (5275) that the server components can connect to. This port must not be open on the Internet but can be used to extend the functionality of the XMPP server, as described earlier. The following diagram displays the functionality of the XMPP server with respect to the Internet architecture:
Provisioning for added security
In this chapter, we will introduce several new communication patterns that are useful for things in IoT. One such paradigm is the creation of identity, where things by themselves create their own identity on the network. Once a thing has created an identity on the network, we will introduce a way to register the thing, discover it, and safely claim ownership of it. Once the ownership has been claimed, we can then use the provisioning extension to delegate trust to a trusted third party, a provisioning server, which we will then use to control who can connect to our devices and what they can do.
To achieve discovery and provisioning, which work as server components, we will need support from a server that hosts such components. For this reason, we will use the XMPP server available at thingk.me. This server also has a web interface at http://thingk.me/where users can control their claimed devices.
Adding XMPP support to a thing
We are now ready to start implementing support for XMPP in our devices. We will begin with the sensor. Most of the implementation needed is generic and will be reused in all our projects created so far. Device-specific interfaces will be described afterwards. TheClayster.Library.Internet.XMPP namespace has an XMPP client that allows us to communicate using the XMPP primitives and register custom message handlers and IQ handlers.
Connecting to the XMPP network
To connect to the XMPP network, we first need to instantiate an XMPP client. To do this, we need a JID, a password, the name of the XMPP server and its port number, and the ISO code of the default language we use by default:
xmppClient = new XmppClient (xmppSettings.Jid,
xmppSettings.Password, xmppSettings.Host,
xmppSettings.Port, "en");
If automatic account creation is supported by the server but requires a signature to make sure malicious account creation is not allowed, you also need to provide a key and secret. Such a key and secret is obtained by the corresponding service provider. If not supported or desired, you can omit these lines of code:
xmppClient.SignatureKey = xmppSettings.ManufacturerKey;
xmppClient.SignatureSecret = xmppSettings.ManufacturerSecret;
Note
Automatic account creation is defined in the XMPP extension XEP-0077: In-band Registration. Signing account creation requests is defined in the XMPP extension XEP-0348: Signing Forms.
When connecting to an XMPP server, the client will validate the certificate provided by the server to make sure it corresponds to the domain. If, for some reason, the certificate does not validate, the default action is to abort the connection attempt. If you connect to a server where you know the certificate does not validate the domain or if the certificate is self-signed, you can override this validation as follows:
xmppClient.TrustCertificates = true;
Tip
To make certificates validate properly on Raspberry Pi, you might need to install CA certificates on the device. Refer to Appendix O, Certificates and Validation, for more information on how to do this.
Additionally, if you want to view the actual communication that takes place, you need to register a line listener with the client in the same way you did for other protocols:
xmppClient.RegisterLineListener (
new ConsoleOutLineListenerSink (BinaryFormat.ByteCount));
Finally, we open the connection as follows. The parameter to the Open method tells the client that we will allow an account to be created if it is not found on the server. If an account is created, it will be done so using the credentials already provided:
xmppClient.Open (true);
When terminating the application, it is important to call the static Terminate method on the XmppClient class. This method makes sure the heart beat thread is gracefully terminated. This thread ensures the connections are alive even when nothing is being communicated:
XmppClient.Terminate ();
Monitoring connection state events
All the operations in XMPP are asynchronous. This means that the Open method we just discussed only starts the connection process. Any state changes, successes, or failures are reported by raising different events. There are various event handlers defined on the XMPP client that the application can use to keep track of the state and progress of the connection attempt.
To learn whether an account was successfully created, we can register an event handler on the OnAccountRegistrationSuccessful event. In the same way, we can use the OnAccountRegistrationFailed event to detect a permanent failure when an account is not found and a new account could not be created:
xmppClient.OnAccountRegistrationFailed += (Client, Form) =>
{
xmppPermanentFailure = true;
Client.Close ();
};
Tip
During the life cycle of a client, we can monitor how the client changes between the Offline, Connecting, Authenticating, Connected, and Error states by using an OnStateChange event handler.
Notifying your friends
Once the client has been successfully authenticated by the server (or an account created), the OnConnected event is raised. The first thing we must do once this is done is set the desired presence of the client. This presence will be distributed to friends subscribing to presence notifications to alert them of the new status of the connection. It will also alert them of the current resource bound to the connection, enabling them to communicate with your application. This is done as follows:
xmppClient.OnConnected += (Client) =>
{
Client.SetPresence (PresenceStatus.Online);
Handling HTTP requests over XMPP
We have defined a lot of HTTP resources in the previous chapters. It is possible for the web server to serve HTTP requests that come over XMPP connections as well. By calling the following method during application initialization, HTTP requests can be served, both by clients with IP access to the device (normal HTTP) and friends over the XMPP network.
HttpServer.RegisterHttpOverXmppSupport (6000, 1024 * 1024);
The first number represents the maximum number of bytes to be sent in a single message and should result in messages smaller than the smallest maximum allowed stanza size (10000 bytes). If a response is larger, a chunked service will be used, where the response will be divided into chunks and sent in a sequence of messages. As chunks are base64-encoded, 6000 bytes are encoded as 8000 bytes, leaving some margin for the XML encapsulating the chunk. The second number is an upper limit for the chunked service where the corresponding content should be transferred using a streaming option instead. In our examples, HTTP requests over XMPP will be used to fetch the camera picture from our camera device. It already has an HTTP resource to retrieve a camera image. Using this single method call, we will make sure it is possible to retrieve the same image over the XMPP network as well.
Note
HTTP over XMPP transport is defined in an extension called XEP-0332: HTTP over XMPP transport.
Providing an additional layer of security
We are now theoretically ready to communicate with anybody who is our friend. But who can we be friends with? Who is allowed to befriend us? What are they allowed to read or control once they are befriended? Should we pre-program this? Should friendships be manually configured using another XMPP client, such as a chat client, or should we build in logic for this to be configured remotely? These questions are important to consider during the architectural design phase of a project. We don't just want anybody to be able to connect to the device and do anything with it.
Things connected to the Internet differ a lot in various ways from other machines that are connected to the Internet but operated by humans. Some of them are listed as follows:
· Things need to make all the decisions without help from a human operator.
· It might be difficult to update the firmware on the device, compared to updating software on a PC.
· Multiple things probably collaborate together at the same time, forming part of a larger eco-system. It might be easy to control settings in one device, but how do you administer multiple devices across the Internet? Do you want to log in to each one and set them individually?
The basics of provisioning
Instead of making an implementation that will handle all the considerations we just discussed into each device we will create, we will take the opportunity to use another method in this chapter. In this method, we will delegate trust to a third party called provisioning server and let it tell each device what is permitted and to what extent. Instead of trying to implement individual privacy solutions in each device we will create, we will delegate this responsibility to a trusted third party where it is both easier and more practical to implement security decision logic than doing this in each device. It is also easier for the owner of the things to administrate since all the rules can be configured in one place. And it does not violate privacy or integrity of data since the provisioning server only stores simple rules concerning who can talk to whom and about what, not the actual data that belongs to the owner, which can be sensitive.
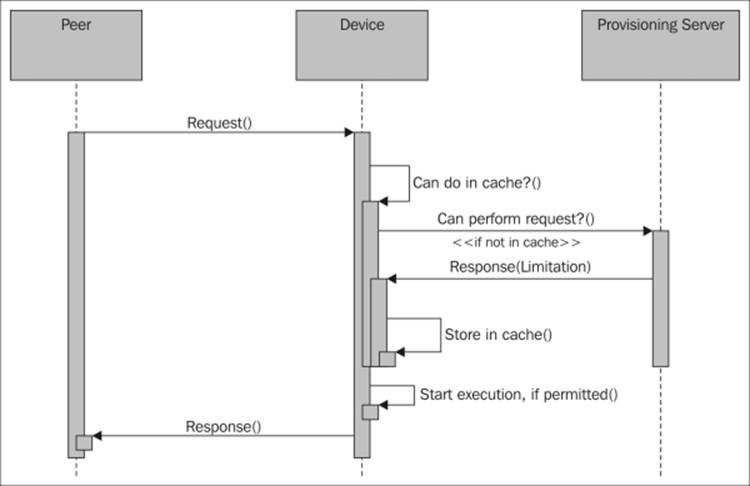
The principle is easy: if somebody wants to do something with the device, the device asks the provisioning server whether it is allowed and to what extent. When the response is returned from the provisioning server, the device responds to the original request accordingly. If the question is new, the provisioning server flags the owner that a new situation has arisen that it needs input on. The owner then responds, and the provisioning server learns and uses this knowledge to respond to future questions of the same sort.
The basic principle behind delegated trust
Note
To avoid bottlenecks, the device actually only asks once for each new type of request it receives and then remembers the response. The provisioning server can then ask the device to forget the previous responses if the rules were to change. The details of how the provisioning protocol works is described in the XMPP extension called XEP-0324: IoT - Provisioning.
Before the provisioning server can give any meaningful responses to queries, the provisioning server needs to know who the device actually is and who its owner is. This connection between the thing's identity and owner is done by a Thing Registry. The thing first registers itself, possibly with its newly created identity together with some information or metadata about itself.
Then, it provides this metadata to its owner in some way. We will do this using a QR code that contains the metadata that is encoded. It is assumed that anybody who has access to this code (which might be on a sticker on the box) and presents it first to the registry is also the owner of the thing. So, the owner scans the QR code and sends an ownership claim to the registry, which then returns a receipt with the JID of the thing, if claimed. The registry also informs the thing that the thing has been claimed and who its owner is.
Note
QR code is discussed in more detail in Appendix Q, QR-Code. Thing registries and how things register themselves and are discovered is further described in the XMPP extension called XEP-0347: IoT - Discovery.
Once the thing has been claimed by an owner, the provisioning server knows who can decide what the thing is allowed to do.
Initializing the Thing Registry interface
At this point, we will assume we know the address of the Thing Registry interface we want to use. We keep the address in xmppSettings.ThingRegistry. So, before we open the XMPP connection, we check whether we have an address and call a special setup method to initialize the Thing Registry interface:
if (!string.IsNullOrEmpty (xmppSettings.ThingRegistry)) SetupThingRegistry ();
A class named ThingRegistry helps us handle communication with a Thing Registry and is defined in the Clayster.Library.IoT.Provisioning namespace. It has three events we need to provide handlers for. OnClaimed event is raised when the device has been claimed by its owner. OnRemoved event is raised when the owner removes the device from the registry database but maintains ownership of the device. Finally, the OnDisowned event is raised when the owner disowns the thing, making it possible for the thing to be claimed by a new owner. This can be done as follows:
private static void SetupThingRegistry ()
{
xmppRegistry = new ThingRegistry (xmppClient,
xmppSettings.ThingRegistry);
xmppRegistry.OnClaimed += OnClaimed;
xmppRegistry.OnRemoved += OnRemoved;
xmppRegistry.OnDisowned += OnDisowned;
}
Registering a thing
To facilitate registration of the device from different parts of the code, we need to create a method for it. A Thing Registry has two purposes. The first is to match things with their owners. The second is to be a bulletin board of public things. A public thing is a thing that has been successfully claimed that the owner agrees to make public. Public things can be searched for using the tags provided by them, including numerical tags such as location. So we need to differ between registering a thing without an owner and registering an update for a public thing that has an owner. As shown in the following code, we begin with a case where the thing doesn't have an owner yet:
private static void RegisterDevice ()
{
if (xmppRegistry != null)
{
if (string.IsNullOrEmpty (xmppSettings.Owner))
{
We continue by performing a registration, which is simple. The device simply registers a set of tags, comprising metadata about the device. The tags will become associated with the JID of the sender at the registry. Each tag has a name and a value. The value can be either a string or a number. The first parameter to the Register method tells the registry whether the device is self-owned or not. This is shown in the following code:
xmppRegistry.Register (false,
new StringTag ("MAN", "clayster.com"),
new StringTag ("MODEL", "LearningIoT-Sensor"),
new StringTag ("KEY", xmppSettings.Key));
Note
A special tag named KEY is neither displayed to anybody, nor is it searchable. It is also removed from the registry once the thing has been claimed. The purpose is to provide a random string, such as a GUID, unique to the thing itself. The thing can be claimed only with access to the complete set of tags.
Any tag names can be used. But there exists a list of predefined tag names for interoperability between things. These are listed in XEP-0347; refer to http://xmpp.org/extensions/xep-0347.html#tags.
A registration will only be effective if the thing is not claimed before. If claimed, the request is ignored by the registry and the OnClaimed event will be raised with the JID of the current owner.
Also, note that a successful registration removes all the previous metadata in the registry corresponding to the JID of the sender.
Updating a public thing
If the thing has an owner and it is public, we make a similar call where we register updates to the metadata. In this case, previous metadata will be updated, and the tags that are not available in the request will be maintained as they are. We also avoid using the KEYtag as seen in the following code:
}
else if (xmppSettings.Public)
{
xmppRegistry.Update (
new StringTag ("MAN", "clayster.com"),
new StringTag ("MODEL", "LearningIoT-Sensor"),
new NumericalTag ("LAT", -32.976425),
new NumericalTag ("LON", -71.531690));
}
}
Claiming a thing
Once the thing is claimed, the OnClaimed event is raised. This event contains information about who the owner is and whether the owner has chosen to keep the thing private or publish it as a public thing in the registry. We update our internal settings with this information and call the RegisterDevice method to update the metadata in the registry accordingly. This is shown in the next code snippet:
private static void OnClaimed (object Sender, ClaimedEventArgs e)
{
xmppSettings.Owner = e.Owner;
xmppSettings.Public = e.Public;
xmppSettings.UpdateIfModified ();
RegisterDevice ();
}
Removing a thing from the registry
The owner (or the thing) can remove the thing from the Thing Registry and thus make it private. When this happens, the OnRemoved event is raised. Since the thing is now private, it doesn't need to update the registry with any metadata any longer. We update our information as follows:
private static void OnRemoved (object Sender,NodeReferenceEventArgs e)
{
xmppSettings.Public = false;
xmppSettings.UpdateIfModified ();
}
Disowning a thing
If an owner wants to pass on the ownership of the device to another or give it away, the owner starts by disowning the thing in the provisioning server. When this happens, the OnDisowned event is raised:
private static void OnDisowned (object Sender, NodeReferenceEventArgs e)
{
xmppSettings.Owner = string.Empty;
xmppSettings.Public = false;
xmppSettings.UpdateIfModified ();
In our event, we also remove the owner from our roster. This makes sure that the previous owner will not be able access the device again without the permission of the new owner. This is done as follows:
string Jid = XMPPSettings.Owner;
if (!string.IsNullOrEmpty (Jid))
{
XmppContact Contact = xmppClient.GetLocalContact (Jid);
if (Contact != null)
xmppClient.DeleteContact (Contact);
}
In this event, it is also important to re-register the thing so that it gets an opportunity to be reclaimed. We also make sure we display the QR code again since it gives the new owner a chance to see and use it to claim the device. The QR code is displayed again with the following code:
RegisterDevice ();
if (xmppSettings.QRCode != null)
DisplayQRCode ();
}
Tip
QR code is discussed in more detail in Appendix Q, QR-Code.
Initializing the provisioning server interface
In the same way as for the Thing Registry interface, we set up the provisioning server interface if we have an address for it. This is done before we open the XMPP connection with the following code:
if (!string.IsNullOrEmpty (xmppSettings.ProvisioningServer))
SetupProvisioningServer ();
The ProvisioningServer class in the Clayster.Library.IoT.Provisioning namespace handles communication with the provisioning server. Apart from a reference to our XMPP client and the address to the provisioning server, this class takes a third parameter, representing the number of unique questions to remember the answers for in the provisioning cache. Questions represent friendship requests, readout requests, and control requests, and the number should represent a number that can be stored and still encompass the estimated number of different queries expected in a normal operation to avoid spamming the provisioning server. Using a cache this way makes sure that each unique question is only forwarded to the provisioning server once, as long as rules do not change. This can be done with the following code snippet:
private static void SetupProvisioningServer ()
{
xmppProvisioningServer = new ProvisioningServer (xmppClient, xmppSettings.ProvisioningServer, 1000);
The provisioning server interface also has two events we should provide event handlers for. The OnFriend event is raised when the provisioning server recommends a new friendship, and OnUnfriend is raised when an existing friendship needs to be removed. This is done as follows:
xmppProvisioningServer.OnFriend += OnFriend;
xmppProvisioningServer.OnUnfriend += OnUnfriend;
Handling friendship recommendations
In the OnFriend event, we receive a JID of a recommended friendship. To create a friendship, we start by subscribing to its presence. The contact will make a decision whether to accept or deny the presence subscription request. If it accepts the presence subscription request, it will probably send a presence subscription request back to the sender as well. When both have accepted each other's presence subscriptions, we will see them as friends:
private static void OnFriend (object Sender, JidEventArgs e)
{
xmppClient.RequestPresenceSubscription (e.Jid);
}
Handling requests to unfriend somebody
The OnUnfriend event is raised when the provisioning server recommends that you remove an existing friendship. You can do this easily by simply removing the corresponding contact from your roster:
private static void OnUnfriend (object Sender, JidEventArgs e)
{
XmppContact Contact = xmppClient.GetLocalContact (e.Jid);
if (Contact != null)
xmppClient.DeleteContact (Contact);
}
Searching for a provisioning server
Previously, we assumed that we know the address of the Thing Registry or the provisioning server. But what if we don't? We can have it pre-programmed or preconfigured or deduce it from the domain of the XMPP server. It can be a JID or a server component address. If a Thing Registry or provisioning server is hosted as components on the current XMPP server, we can also find it dynamically by going through all the published components and analyzing their capabilities. In our applications, we will use the latter because the XMPP server at thingk.me hosts both the Thing Registry and provisioning server as a subcomponent on the same server.
To start a search for the components on the server, we will issue a standard service discovery request to the server. We will do this in the OnConnected event handler, right after having our presence status set if a Thing Registry or provisioning server has not been initialized already:
if (xmppRegistry == null || xmppProvisioningServer == null)
Client.RequestServiceDiscovery (string.Empty,
XmppServiceDiscoveryResponse, null);
The response to this query will contain a set of features. The available components are reported as items. So, we need to check whether such items are supported by the server, and if they are, perform a service items discovery request to the server, as follows.
private static void XmppServiceDiscoveryResponse (
XmppClient Client, XmppServiceDiscoveryEventArgs e)
{
if (Array.IndexOf<string> (e.Features, XmppClient.NamespaceDiscoveryItems) >= 0)
Client.RequestServiceDiscoveryItems (Client.Domain, XmppServiceDiscoveryItemsResponse, null);
}
The response will contain a set of items. We loop through this and perform an individual service discovery request on each item, if it has a JID, to learn what features are supported by each one. This is done with the following code:
private static void XmppServiceDiscoveryItemsResponse (XmppClient Client, XmppServiceDiscoveryItemsEventArgs e)
{
foreach (XmppServiceDiscoveryItem Item in e.Items)
{
if (!string.IsNullOrEmpty (Item.Jid))
Client.RequestServiceDiscovery (Item.Jid, Item.Node, XmppServiceDiscoveryItemResponse, Item);
}
}
In each response, we check the Features array to confirm whether the urn:Xmpp:iot:discovery namespace is present. If it is, it means the corresponding Jid is an address to a Thing Registry:
private static void XmppServiceDiscoveryItemResponse (XmppClient Client, XmppServiceDiscoveryEventArgs e)
{
XmppServiceDiscoveryItem Item = (XMPPServiceDiscoveryItem)e.State;
if (Array.IndexOf<string> (e.Features, "urn:xmpp:iot:discovery") >= 0)
{
XmppSettings.ThingRegistry = Item.Jid;
SetupThingRegistry ();
}
In the same way, we can check for the presence of the urn:xmpp:iot:provisioning namespace. If it is, it means the corresponding JID is an address to a provisioning server:
if (Array.IndexOf<string> (e.Features,
"urn:xmpp:iot:provisioning") >= 0)
{
xmppSettings.ProvisioningServer = Item.Jid;
SetupProvisioningServer ();
}
Providing registry information
We can now update our information accordingly. If we have found a Thing Registry, we make sure to display a QR code for the owner. If not available, we request for one. Finally, we register the device in the registry as follows:
xmppSettings.UpdateIfModified ();
if (!string.IsNullOrEmpty (xmppSettings.ThingRegistry))
{
if (xmppSettings.QRCode == null)
RequestQRCode ();
else if (string.IsNullOrEmpty (xmppSettings.Owner))
DisplayQRCode ();
RegisterDevice ();
}
}
We need to provide similar logic at the end of our OnConnected event handler if a Thing Registry and provisioning server address are already configured and a service discovery request is not issued.
Now both the owner and the registry have sufficient information to claim the device.
Tip
QR code is discussed in more detail in Appendix Q, QR-Code.
Maintaining a connection
For a device to be able to receive requests, it needs to ensure its connection is open. In a network, a lot can happen. Servers and network could go down, services might need to be updated, and power could fail. All these things lead to the connection being dropped. For this reason, it is important to manage these events and try to reconnect. The first thing we can do is try to reconnect when a working connection is dropped. We can do this in a response to an OnClosed event if no permanent error is detected.
If this does not work and a connection is not possible for some time, we need to regularly check the state of the connection using some arbitrary interval. In our downloadable example code, every minute we check for either a missing connection or whether the client is in an Error or Offline state. If so, we recycle the connection by closing it and opening it again.
Negotiating friendships
A friendship between two peers in XMPP is where both peers subscribe to each other's presence. In order to negotiate such friendships, special presence stanzas are sent between each peer. The friendship negotiation involves the XMPP servers of each device, and negotiation is done using bare JIDs. The following illustration shows a simplified sequence of a friendship negotiation between two peers, where we only involve the two peers and hide the implicit server communication that also takes place.
The four specific presence types used are Subscribe, Subscribed, Unsubscribe, and Unsubscribed. To subscribe to the presence of somebody else, or "ask to be friends with them," you send a Subscribe presence stanza to its bare JID. If you want to accept such a request, you respond with a Subscribed presence stanza; if not, you respond with an Unsubscribed presence stanza. To unsubscribe your presence subscription, you send an Unsubscribe presence stanza. But this is not the same as removing the friendship since the other may continue to subscribe to your presence. If you want to remove a friendship, it's better to delete the contact from the roster directly. The following diagram shows the simplified friendship negotiations:
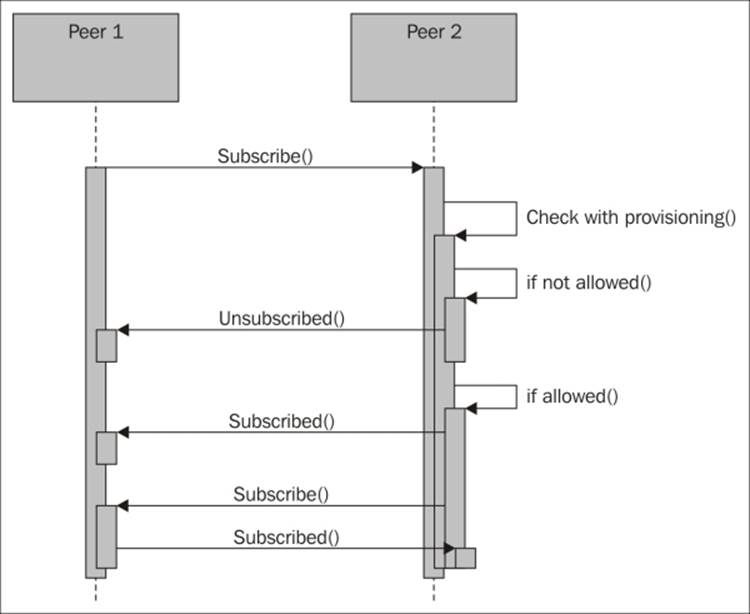
Simplified friendship negotiation
Handling presence subscription requests
We implement the logic explained in the previous section in an event handler for the OnPresenceReceived event as follows:
xmppClient.OnPresenceReceived += (Client, Presence) =>
{
switch (Presence.Type)
{
We begin with presence subscription requests. If we are not connected with a provisioning server that helps us decide with whom we can connect, we will reject all the incoming requests with the following code:
case PresenceType.Subscribe:
if (xmppProvisioningServer == null)
Client.RefusePresenceSubscription (Presence.From);
If a provisioning server is detected, we ask it whether we can be friends with the peer requesting the subscription:
else
{
xmppProvisioningServer.IsFriend (Presence.From, e =>
{
If the provisioning server approves the friendship, we accept the presence subscription and return a request of a presence subscription of our new protofriend if it is a peer, that is, it has a JID and not only a domain or subdomain address. The request can be sent as follows:
if (e.Result)
{
Client.AcceptPresenceSubscription (Presence.From);
if (Presence.From.IndexOf ('@') > 0)
Client.RequestPresenceSubscription (Presence.From);
If the provisioning server does not approve of the friendship, we simply refuse the subscription and delete the contact:
}
else
{
Client.RefusePresenceSubscription (Presence.From);
XmppContact Contact = xmppClient.GetLocalContact (Presence.From);
if (Contact != null)
xmppClient.DeleteContact (Contact);
}
}, null);
}
break;
If a peer requests to unsubscribe from its presence subscription to our device, we simply acknowledge the request:
case PresenceType.Unsubscribe: Client.AcceptPresenceUnsubscription (Presence.From);
break;
The received presence stanzas of the type Subscribed and Unsubscribed are receipts we receive after a peer has processed our requests. In our application, we don't need to react to these.
Continuing interrupted negotiations
Since friendship relationships are negotiated using multiple asynchronous messages, things can go wrong if one or both of the peers are interrupted or their connections closed during the process. It is important to have this possibility in mind. Fortunately, it is easy to recover from such interruptions. When the client connects, it loads its roster from the server. The roster contains all the JIDs' contacts and their corresponding presence subscription status. The OnRosterReceived event is raised when the XMPP client has received the roster from the server after having connected successfully.
To continue with interrupted negotiations, we can add an event handler for this event and loop through all the contacts received to see whether any one of them has unfinished friendship negotiations. Each contact will have an Ask property, and if this is set toSubscribe, it would mean that the contact is asking to subscribe to our presence. We can handle it as a new incoming friendship request.
It can also be so that the contact is successfully subscribed to our presence but we are not subscribed to the presence of the contact. The Subscription property of each contact tells us who subscribes to whom. In a friendship relationship, the value is Both. But if the value is To or From, only one is subscribed to the other. From means a presence subscription from the contact of your presence exists. Is it because we should be friends or because we're unfriending the contact? We need to ask the provisioning server, and if allowed, we continue and request for the presence subscription from the contact. Otherwise, we properly delete the contact from the roster.
Adding XMPP support to the sensor
Now that we have the devices connected to the XMPP network, adding the appropriate sensor interfaces is easy. The Clayster.Library.IoT.XmppInterfaces namespace contains a series of classes that handle most of the interfaces we need.
Adding a sensor server interface
The XMPP extension XEP-0323: IoT – Sensor Data specifies how sensor data can be interchanged over the XMPP network. It defines a request/response model, similar to the one we have used already, where a client asks a server for sensor data. In our sensor, we therefore create an XmppSensorServer object as soon as we have both an XMPP client created and a provisioning server defined. Its OnReadout event is raised whenever data is to be sent somewhere. All of the negotiation with the provisioning server has already been taken care of, including the possible limitations of the original request. This is done with the help of the following code:
xmppSensorServer = new XmppSensorServer (xmppClient,
xmppProvisioningServer);
xmppSensorServer.OnReadout += OnReadout;
The actual readout of the sensor is simple. It fits into our already defined sensor data export we use for other protocols. We simply call the ExportSensorData method defined in previous chapters.
Tip
For an example on how you can access these sensor values through a chat session with the sensor, refer to Appendix P, Chat Interfaces.
Updating event subscriptions
The XmppSensorServer class also handles event subscriptions according to a ProtoXEP: IoT – Events. This makes it possible for clients to request for sensor data based on the change in conditions. To make sure all subscriptions are updated accordingly, we need to inform the sensor server interface when new momentary values are available. We do this as follows:
if (XMPPSensorServer != null)
{
xmppSensorServer.MomentaryValuesUpdated (
new KeyValuePair<string, double> (
"Temperature", temperatureC),
new KeyValuePair<string, double> (
"Light", lightPercent),
new KeyValuePair<string, double> (
"Motion", motionDetected ? 1 : 0));
}
Note
This extension has not been approved by the XSF at the time of writing this. Anyway, it can be used as a simple way to subscribe to sensor data events, but with conditions. You can view this work in progress at http://xmpp.org/extensions/inbox/iot-events.html.
Publishing contracts
When things interconnect, they need to analyze each other to see what capabilities they have. One way to do this is to use the XMPP service discovery query to figure out what it features. When the sensor is queried by a peer, it will learn that it is a sensor and that it can be read. But what values are supported? One way to find this out is to read the sensor and see what it supports. However, this requires some extensive analysis of incoming data, which may vary in content and order. Another method is to retrieve a list of interoperability interfaces or contracts, as defined by a ProtoXEP: IoT - Interoperability. Here, each reference corresponds to a contract, as shown in the next code, where the sender promises to work in accordance with the corresponding contract:
xmppInteroperabilityServer = new XmppInteroperabilityServer (
xmppClient,
"XMPP.IoT.Sensor.Temperature",
"XMPP.IoT.Sensor.Temperature.History",
"Clayster.LearningIoT.Sensor.Light",
"Clayster.LearningIoT.Sensor.Light.History",
"Clayster.LearningIoT.Sensor.Motion",
"Clayster.LearningIoT.Sensor.Motion.History");
All contracts are ordered into the form of a tree structure. Contracts that begin with XMPP.IoT are defined in the proto-XEP. But you can define any contract you want. In our example, we inform the interested party that the sensor is a temperature sensor that supports historical values. We also define our own light sensor and motion sensor contracts with History. These will be used later by the controller to easily detect whether the connected peer is the sensor it is looking for.
Note
This extension has not been sent to the XSF and therefore neither approved nor published by the XSF. It can be used anyway as a simple way to interchange references with contracts between things. You can view this work in progress athttp://htmlpreview.github.io/?https://github.com/joachimlindborg/XMPP-IoT/blob/master/xep-0000-IoT-Interoperability.html.
Adding XMPP support to the actuator
Like with the sensor project, adding the final interfaces for our actuator is a minor task. The device will register itself as LearningIoT-Actuator instead of LearningIoT-Sensor for instance. Adding a sensor server interface to the actuator is done in more or less the same way as described for the sensor, except that the names and types of the fields and momentary values are different. In this section, we will discuss the actuator-specific interfaces that need to be considered.
The contracts we will use for the actuator are as follows:
xmppInteroperabilityServer = new XmppInteroperabilityServer (
xmppClient,
"XMPP.IoT.Actuator.DigitalOutputs",
"XMPP.IoT.Security.Alarm",
"Clayster.LearningIoT.Actuator.DO1-8");
Adding a controller server interface
The XMPP extension XEP-0325: IoT - Control specifies how control operations in IoT can be performed using the XMPP protocol. It defines an asynchronous messaging model and a parallel request/response model, where a client sends control commands to a server. The client can also request for a set of available controllable parameters in the server. There is a class we can use that implements this extension for us. It is called XmppControlServer.
In our actuator, we therefore create an instance of this class as soon as we have both an XMPP client created and a provisioning server defined. The constructor requires a list of control parameters defining what parameters should be controllable through the interface. These parameters should match the corresponding fields that are readable through the sensor server interface. Each control parameter is defined by the following parameters:
· Data type of the underlying value
· Control parameter's name
· The current value
· Delegate to the callback method, which is called when the parameter is read
· Delegate to the callback method, which is called when the parameter is set
· A title string
· A tooltip string
· Possible range
Some of the parameters are used when creating a control form for the corresponding parameters, and they are meant for end users and for input form validation. The Clayster.Library.IoT.XmppInterfaces.ControlParameters namespace contains classes for the different types of control parameters supported by XEP-0325. We create our control server as follows. We've replaced a sequence of repetitive parameters with an ellipsis ("…"):
xmppControlServer = new XmppControlServer (
xmppClient, xmppProvisioningServer,
new BooleanControlParameter ("Digital Output 1",
() => wsApi.GetDigitalOutput (1),
(v) => wsApi.SetDigitalOutput (1, v),
"Digital Output 1:", "State of digital output 1."),
...,
new BooleanControlParameter ("Digital Output 8",
() => wsApi.GetDigitalOutput (8),
(v) => wsApi.SetDigitalOutput (8, v),
"Digital Output 8:", "State of digital output 8."),
new BooleanControlParameter ("State",
() => wsApi.GetAlarmOutput (),
(v) => wsApi.SetAlarmOutput (v),
"Alarm Output:","State of the alarm output."),
new Int32ControlParameter ("Digital Outputs",
() => (int)wsApi.GetDigitalOutputs (),
(v) => wsApi.SetDigitalOutputs ((byte)v),
"Digital Outputs:", "State of all digital outputs.",
0, 255));
Adding XMPP support to the camera
Enabling XMPP in our camera is also easy, except that we will register our camera as LearningIoT-Camera instead of LearningIoT-Sensor. Previously, our camera has only worked in the local area network using UPnP. Since UPnP is based on HTTP, the camera image will be automatically available over XMPP if we make sure to activate HTTP over XMPP support, as described earlier in this chapter.
We also need to provide a sensor interface with an event infrastructure, similar to the one provided by UPnP. The simplest way to do this is by converting the camera into a sensor and reporting the corresponding camera parameters as sensor data fields. Since the sensor data model supports events, we can achieve the same thing over XMPP like we did with local HTTP using UPnP. The actual implementation closely mimics what we did with the sensor project, and we refer interested readers to the downloadable source code for the project if they are interested in the details.
Adding XMPP support to the controller
The controller project is different from the previous projects in that it will be a client of the other three projects. It will still need to register itself (using the model name LearningIoT-Controller) with the Thing Registry and use provisioning where applicable so that the provisioning server can be used to connect all the devices together by recommending who should befriend whom.
Setting up a sensor client interface
Once we have the JID of the sensor, we can request for or subscribe to data from it using the XmppSensorClient class:
xmppSensorClient = new XmppSensorClient (xmppClient);
Subscribing to sensor data
We initialize our relationship with the sensor by subscribing to the Light and Motion field values from it using the following code. We also specify that we want information when the light has changed to one unit of a percent, or if the motion has changed from true to false (which corresponds to a numerical change of one).
private static void InitSensor (string Jid)
{
xmppSensorClient.SubscribeData (-1, Jid, ReadoutType.MomentaryValues, null, new FieldCondition[]
{
FieldCondition.IfChanged ("Light", 1), FieldCondition.IfChanged ("Motion", 1)
},
null, null, new Duration (0, 0, 0, 0, 1, 0), true, string.Empty, string.Empty, string.Empty,NewSensorData, null);
}
The subscription call takes a sequence of parameters, as follows:
· An optional sequence number (-1) that can be used to identify the subscription.
· The Jid of the sensor.
· The types of fields you want.
· Any underlying nodes to read (null in our case since the sensor is not a concentrator).
· A set of fields with optional conditions to subscribe to.
· An optional maximum age (null) of the historical data that is subscribed to. Since we don't subscribe to historical data, we can leave this as null.
· An optional minimum interval time (null), setting a limit on how fast messages can be sent to us.
· An optional maximum interval time (1 minute), making sure we receive messages at least this frequently.
· If an immediate request is desired (true), sensor data will be sent immediately as soon as the subscription has been accepted.
· A triple of security tokens representing the service, device, and unit. This can be used for extended identification with the provisioning server or if the subscription is a result of an external request and the identity of the requester is forwarded. We leave these as empty strings since the subscription is made directly from the controller.
· A callback method to call when the sensor data has been received as a result of the subscription.
· A state object to pass on to the callback method.
Tip
If you only want data once, you can use the RequestData method instead of the SubscribeData method. It takes similar parameters.
Handling incoming sensor data
Sensor data will have been parsed correctly before being passed on to the callback method provided. It will be available in the event arguments, as shown in the next code:
private static void NewSensorData (object Sender,SensorDataEventArgs e)
{
FieldNumeric Num;
FieldBoolean Bool;
In theory, sensor data can be reported in a sequence of messages, depending on how the sensor reads and processes field values and also the amount of values reported. The callback method will be called once for every message. The Done property lets you know whether the message is the last message in a sequence. Field values in the most recent message will be available in the RecentFields property, while the sum of all the fields during the readout is available in the TotalFields property. In our case, it is sufficient to loop through the the fields reported in the most recent message:
if (e.HasRecentFields)
{
foreach (Field Field in e.RecentFields)
{
Checking incoming fields is straightforward:
if (Field.FieldName == "Light" &&
(Num = Field as FieldNumeric) != null &&
Num.Unit == "%" && Num.Value >= 0 && Num.Value <= 100)
lightPercent = Num.Value;
else if (Field.FieldName == "Motion" &&
(Bool = Field as FieldBoolean) != null)
motion = Bool.Value;
We end by checking the control rules as follows to see whether the state of the system has changed:
}
hasValues = true;
CheckControlRules ();
}
}
Setting up a controller client interface
Communicating with the actuator is simply done using the XmppControlClient class with the help of a controller interface:
xmppControlClient = new XmppControlClient (xmppClient);
Controlling parameters can be done in two ways: either through a control form or individual parameter set operations. The control form will contain all the controllable parameters and can also be used to see whether a parameter exists, what type it has, and what its boundary values are. It can also be used to set a group of parameters at once.
During the initialization of our actuator interface, we request the control form as follows:
private static void InitActuator (string Jid)
{
xmppControlClient.GetForm (Jid, ControlFormResponse, Jid);
}
We handle the response in the following manner. If the Form property is null in the event arguments, an error will be reported:
private static void ControlFormResponse (object Sender, ControlFormEventArgs e)
{
string Jid = (string)e.State;
if (e.Form != null)
{
...
}
else
Log.Error (e.ErrorMessage, EventLevel.Major, Jid);
}
We will use the form mainly to know what parameters are available in the actuator and use individual set operations to control them. Both individual set operations and a group parameter set operation, which use a control form, are done using the overloaded versions of the Set method in the XmppControlClient class. The version that is used depends of the data type of the value parameter passed to the method. Setting up our digital output in the form of our integer control parameter is done as follows:
if (i >= 0 && xmppControlForm.ContainsField ("Digital Outputs"))
xmppControlClient.Set (Jid, "Digital Outputs", i);
Setting up our Boolean alarm State parameter is done in the following manner:
if (b.HasValue && xmppControlForm.ContainsField ("State"))
xmppControlClient.Set (Jid, "State", b.Value);
Setting up a camera client interface
To emulate the UPnP event subscription model in XMPP, we converted our camera to a sensor. For our purposes, we need to subscribe to the camera image URL field property, together with its corresponding Width and Height field properties, when we initialize our camera interface. We do this in the same way as for the sensor, except that here we use another sequence number (-2) to keep the two apart, as mentioned in the next code:
private static void InitCamera (string Jid)
{
xmppSensorClient.SubscribeData (-2, Jid, ReadoutType.Identity, null,new FieldCondition[]
{
FieldCondition.Report ("URL"), FieldCondition.IfChanged ("Width", 1), FieldCondition.IfChanged ("Height", 1)
}, null, null, new Duration (0, 0, 0, 0, 1, 0), true, string.Empty, string.Empty, string.Empty, NewCameraData, null);
}
Parsing this data is also done in the same way as we did in the sensor project.
Fetching the camera image over XMPP
The URL provided by the camera will differ from the URL provided over normal UPnP in that it will use the httpx URI scheme. In our case, the URL to the camera image will be something like httpx://camera.learningiot@thingk.me/camera. In order to be able to use thehttpx URI scheme, we have to tell the framework which XMPP client to use. This is done by registering it with the HttpxUriScheme class, which is defined in the Clayster.Library.Internet.URIs namespace, as follows:
HttpxUriScheme.Register (xmppClient);
Once the XMPP client has been registered, the system will treat the httpx URI scheme as it would treat any other registered URI scheme, such as the http and https URI schemes. We get the image by calling the static HttpSocketClient.GetResource method with the URL, and it will figure out what to do. We embed the content of the response, as we did with the images that were fetched using UPnP:
Response = HttpSocketClient.GetResource(Url);
Msg.EmbedObject ("cam1img" + j.ToString (), Response.Header.ContentType, Response.Data);
Identifying peer capabilities
When things connect to the controller, they need to figure out what they can do, or what interoperability contracts they can publish so we can know what they are. As there is an interoperability server class, there is also an interoperability client class, as shown in the following code, that we can use for this purpose:
xmppInteroperabilityClient = new XmppInteroperabilityClient (
xmppClient);
We will create a method that will be used to figure out what is behind a specific Jid by requesting its interoperability interfaces or contracts, as follows:
private static void CheckInterfaces (string Jid)
{
xmppInteroperabilityClient.RequestInterfaces (Jid,
(Interfaces, State) =>
{
...
xmppSettings.UpdateIfModified ();
}, Jid);
}
The ellipsis ("…") in the preceding code corresponds to the different checks we do on the list of interfaces reported by the device. If we are not already connected to a sensor and a new thing with the corresponding light and motion interfaces are available, we remember the Jid (which is available in the State parameter as shown in the next code) for use as the sensor in our application:
if (string.IsNullOrEmpty (xmppSettings.Sensor) && Array.IndexOf<string> (Interfaces, "Clayster.LearningIoT.Sensor.Light") >= 0 && Array.IndexOf<string> (Interfaces, "Clayster.LearningIoT.Sensor.Motion") >= 0)
{
xmppSettings.Sensor = (string)State;
InitSensor (xmppSettings.Sensor);
}
In the same way, the actuator and camera are identified in a similar manner.
Reacting to peer presence
Now that we have a method to identify what peers are, we need to trigger the method somehow. To be able to communicate with a peer, we will need the full JID, not just the bare JID, which we have when negotiating friendship relationships. The full JID requires the reception of a presence message from the device, showing it is online. To avoid triggering the method every time a device goes online, we first keep an internal list of peers that have been newly accepted as friends. This can be done with the following code:
Dictionary<string,bool> NewlyAdded = new Dictionary<string, bool> ();
In the OnPresenceReceived event handler, when a Subscribed presence stanza has been received, confirming a new friendship, we store away the bare JID in the list, as follows:
case PresenceType.Subscribed:
lock (NewlyAdded)
{
NewlyAdded [XmppClient.StripResource (
Presence.From).ToLower ()] = true;
}
break;
As shown in the next code snippet, we also add a default clause to catch presence stanzas of types other than Subscribe, Subscribed, Unsubscribe, and Unsubscribed. If not offline, we will consider that the peer is about to go online:
default:
string s = XmppClient.StripResource
(Presence.From).ToLower ();
if (Presence.Status != PresenceStatus.Offline)
{
First we need to check whether the device corresponds to a device the controller already uses. If this is the case, we need to reinitialize our subscriptions and get a new control form from the actuator since these might have been changed while offline. This can be done with the following code:
if (!string.IsNullOrEmpty (xmppSettings.Sensor) &&
XmppClient.CompareJid (xmppSettings.Sensor, Presence.From))
InitSensor (Presence.From);
else if (!string.IsNullOrEmpty (xmppSettings.Actuator) &&
XmppClient.CompareJid (xmppSettings.Actuator, Presence.From))
InitActuator (Presence.From);
else if (!string.IsNullOrEmpty (xmppSettings.Camera) &&
XmppClient.CompareJid (xmppSettings.Camera, Presence.From))
InitCamera (Presence.From);
If not an already known device, we check whether we need to have a look at the capabilities at all with the following code. If the controller has already identified the devices it uses, it doesn't need to analyze new friends:
else if (string.IsNullOrEmpty (xmppSettings.Sensor) ||
string.IsNullOrEmpty (xmppSettings.Actuator) ||
string.IsNullOrEmpty (xmppSettings.Camera))
{
lock (NewlyAdded)
{
if (!NewlyAdded.ContainsKey (s))
break;
NewlyAdded.Remove (s);
}
CheckInterfaces (Presence.From);
}
}
break;
Detecting rule changes
If the owner of a thing involved in a network changes the rules, it will ask the corresponding devices involved in the rule to clear their provisioning caches. This cache locally stores responses to previous provisioning questions, which might now be incorrect. The clearing of the cache is handled by our provisioning server class. But we can add an event handler to the OnClearCache event, which is raised whenever the cache is cleared, to reinitialize our connections, including event subscriptions and control forms. This event makes sure that the new rules that apply are taken into account. The following code is used in order to reinitialize our connections:
xmppProvisioningServer.OnClearCache += (Sender, e) =>
{
if (!string.IsNullOrEmpty (xmppSettings.Sensor))
InitSensor (xmppSettings.Sensor);
if (!string.IsNullOrEmpty (xmppSettings.Actuator))
InitActuator (xmppSettings.Actuator);
if (!string.IsNullOrEmpty (xmppSettings.Camera))
InitCamera (xmppSettings.Camera);
};
Connecting it all together
The XMPP implementation is now done. To access the complete source code, please download the example projects.
Since we have used a generic security model, based on identity creation and delegated trust to a provisioning server, our devices do not know who their owners are or with whom they can connect and communicate. To make everything work, we need to provide this information to the devices through the provisioning server. You can do this in the following way if you use the provisioning server at http://thingk.me/:
1. First, create an account on the Dashboard page.
2. Download a smart phone app to register your devices. This app is called Registration Unit or Thing Registrar. You can find the relevant instructions on the API page.
3. Run the app and create an XMPP account somewhere. You can use the XMPP server at thingk.me. This JID will be used when claiming ownership of the devices that would use the app. The JIDs will be reported to the corresponding devices, as the owner's JID.
4. On the Registration page, you can add your registration unit. This connects the app with the account. When adding a registration unit, you need to provide its JID. The server will send a message with a PIN code to your app to verify you have the right to use that JID. You need to confirm the receipt of this PIN code before you accept the unit as yours. You can use multiple registration units for each account.
5. From the app, you can now claim your things by taking photographs of their corresponding QR code. A list of claimed things will be shown on the Things page.
6. As soon as something new happens to your things, such as new friendship requests, readout requests, or control requests, the provisioning server will automatically recommend the thing to reject the corresponding request. But it will also notify you of the corresponding event. The Dashboard page will show any events you have pending, or send you an e-mail if you're not online. Follow the instructions in each notification and tell the server how you want it to respond the next time a similar request is made.
7. From the Things page, you can access all the information about each thing, reset and edit rules, recommend friendships, and also try to read and control them. It is from this page that you can connect the controller with the sensor, actuator, and camera by recommending new friendships to the controller.
8. You can connect normal chat clients to all your things as well. All devices have chat interfaces, so make sure to try this out.
9. You're welcome to contact thingk.me through the Contact page.
Summary
In this chapter, we covered the basics of the XMPP protocol and some of its strengths and weaknesses. We saw how we can use it in our sensor, actuator, and controller projects as a simple means to create IoT applications. We also used the flexibility of the XMPP protocol to add an additional layer of security to each project using the pattern of delegated trust.
This chapter concludes with an overview of the different protocols used in IoT. For a comprehensive comparison between the protocols, listing features and perceived strengths and weaknesses of each in a table format, please refer to the paper Biotic - Executive Summary at http://biotic-community.tumblr.com/.
In the next chapter, we will introduce you to the use of platforms for IoT, and what additional features they provide when developing applications for IoT.
All materials on the site are licensed Creative Commons Attribution-Sharealike 3.0 Unported CC BY-SA 3.0 & GNU Free Documentation License (GFDL)
If you are the copyright holder of any material contained on our site and intend to remove it, please contact our site administrator for approval.
© 2016-2026 All site design rights belong to S.Y.A.