Learning Internet of Things (2015)
Chapter 5. The MQTT Protocol
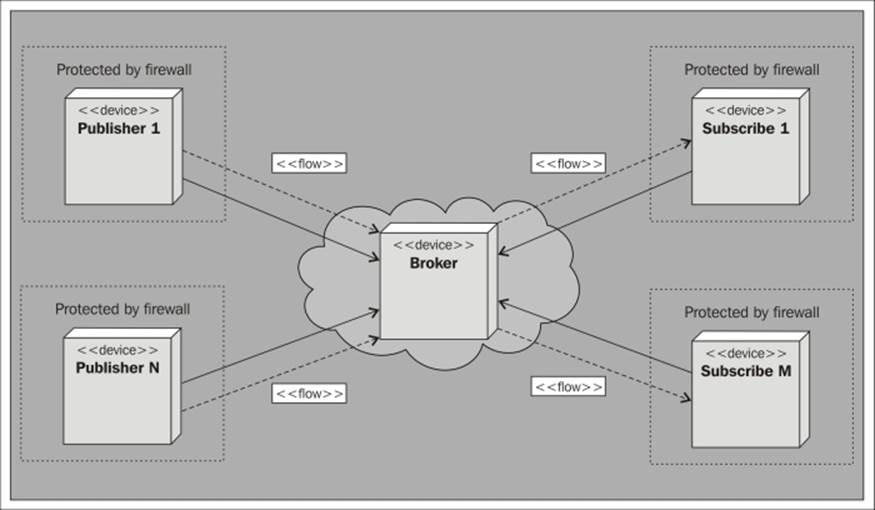
One of the major problems we encountered when we looked at the HTTP, UPnP, and CoAP protocols is how to cross firewall boundaries. Firewalls not only block incoming connection attempts, but they also hide a home or office network behind a single IP address. Unless the firewall blocks outgoing connections, which it does only if explicitly configured to do so, we can cross firewall boundaries if all the endpoints in a conversation act as clients to a common message broker that lies outside of the firewall and is therefore accessible to everybody. The message broker acts as a server, but all it does is relay messages between clients. One protocol that uses message brokers is the Message Queue Telemetry Transport (MQTT) protocol.
In this chapter, you will learn the following concepts:
· The basic operations available in MQTT
· How to publish data using MQTT topics
· How to subscribe to MQTT topics
· How to implement MQTT in the sensor, actuator, and controller
Tip
All of the source code presented in this book is available for download. The source code for this chapter and the next one can be downloaded from
https://github.com/Clayster/Learning-IoT-MQTT
Publishing and subscribing
The MQTT protocol is based on the publish/subscribe pattern, as opposed to the request/response and the event subscription patterns studied in the previous chapters. The publish/subscribe pattern has three types of actors:
· Publisher: The role of the publisher is to connect to the message broker and publish content
· Subscriber: They connect to the same message broker and subscribe to content that they are interested in
· Message broker: This makes sure that the published content is relayed to interested subscribers
Content is identified by topic. When publishing content, the publisher can choose whether the content should be retained by the server or not. If retained, each subscriber will receive the latest published value directly when subscribing. Furthermore, topics are ordered into a tree structure of topics, much like a filesystem. The forward slash character (/) is used as a delimiter when describing a topic path. When subscribing to content, a subscriber can subscribe to either a specific topic by providing its path, or an entire branch using the hash wildcard character (#). There's also a single-level wildcard character: the plus character (+). As an example, to illustrate topic semantics, our sensor will publish measured temperature on the Clayster/LearningIoT/Sensor/Temperature topic. Subscribing to Clayster/+/Sensor/# will subscribe to all the subbranches of the Sensor class that start with Clayster/, then any subtopic, which in turn will have a Sensor/ subtopic.
The architecture of MQTT is shown in the following diagram:
There are three Quality of Service levels in MQTT available while publishing content. The lowest level is an unacknowledged service. Here, the message is delivered at most once to each subscriber. The next level is an acknowledged service. Here, each recipient acknowledges the receipt of the published information. If no receipt is received, the information can be sent again. This makes sure the information is delivered at least once. The highest level is called the assured service. Here, information is not only acknowledged but sent in two steps. First it is transmitted and then delivered. Each step is acknowledged. This makes it possible to make sure that the content is delivered exactly once to each subscriber.
Tip
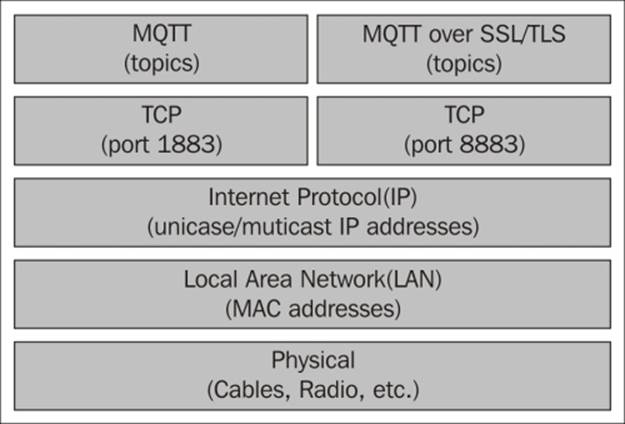
The support for user authentication in MQTT is weak. Plain text username and password authentication exists, but it provides an obvious risk if the server is not hosted in a controlled environment. To circumvent the most obvious problems, MQTT can be used over an encrypted connection using SSL/TLS. In this case, it is important for clients to validate server certificates else user credentials may be compromised.
Other methods, not defined in the MQTT protocol itself, include the use of client-side certificates or preshared keys to identify clients, instead of using the username and password option provided by the protocol. Proprietary methods of encrypting the contents can also be used to make sure only receivers with sufficient credentials can decrypt the contents. Even though this method works, it reduces interoperability and provides an additional load on each device, which is contrary to the stated goal of the protocol.
As the MQTT protocol itself does not consider security, it is very important for developers to consider security themselves. Furthermore, user credentials must be managed manually or by using proprietary out-of-band methods.
Adding MQTT support to the sensor
To add MQTT support to our sensor, we will use the MqttClient class defined in the Clayster.Library.Internet.MQTT namespace. We start by adding the following namespace to our using section in the code:
using Clayster.Library.Internet.MQTT;
Communication with the MQTT server will be done from a separate thread in our example. This is to assure that we avoid timing problems with the measurement logic. When new values are available, we flag this fact to the MQTT thread using auto-reset event objects. So, we need the following static variables:
private static Thread mqttThread = null;
private static AutoResetEvent mqttNewTemp = new AutoResetEvent(false);
private static AutoResetEvent mqttNewLight = new AutoResetEvent(false);
private static AutoResetEvent mqttNewMotion = new AutoResetEvent(false);
The application will then publish values to MQTT topics if a significant change has occurred, or when the given time has passed since its last publication. So, we can create variables for the last published value as well as the time when the last publication occurred.
private static double mqttLastTemp = 0;
private static double mqttLastLight = 0;
private static bool mqttLastMotion = false;
private static DateTime mqttLastTempPublished = DateTime.MinValue;
private static DateTime mqttLastLightPublished = DateTime.MinValue;
private static DateTime mqttLastMotionPublished = DateTime.MinValue;
Controlling the thread life cycle
Before the main loop, we start the MQTT thread in the usual manner, making sure to set the thread priority to BelowNormal so that it does not affect the way it is normally executed:
mqttThread = new Thread (MqttThread);
mqttThread.Name = "MQTT";
mqttThread.Priority = ThreadPriority.BelowNormal;
mqttThread.Start();
Note
We create our thread using the thread priority just below the normal (BelowNormal) priority. This means the thread will not interfere with normal operation in case the device CPU usage reaches 100 percent. When CPU usage is below 100 percent, this thread will work as a normal thread. Since communication is normally dropped when this happens, this does not imply loss of real functionality.
When we close the application, we must also make sure the thread is closed properly. We use the Abort() method on the thread to accomplish this:
if(mqttThread != null)
{
mqttThread.Abort ();
mqttThread = null;
}
Flagging significant events
In the SampleSensorValues() method where we sample new sensor values, we need to detect significant events that the MQTT thread needs to react to. We can start with the motion detector. After it notifies any CoAP subscribers, we also need to signal the MQTT thread that the Boolean value has changed:
if (MotionChanged)
{
if (motionTxt != null)
motionTxt.NotifySubscribers ();
mqttNewMotion.Set ();
mqttLastMotionPublished = Now;
mqttLastMotion = motionDetected;
However, we also need to republish the value if it has been a long time since a value was published, which can be done with the following code:
}
else if((Now - mqttLastMotionPublished).TotalMinutes >= 10)
{
mqttNewMotion.Set ();
mqttLastMotionPublished = Now;
mqttLastMotion = motionDetected;
}
Significant events for Boolean values are easy to define. But what is a significant event for a numerical value? In our implementation, a significant event is if the temperature change is more than half a degree centigrade or if more than ten minutes has passed. Here, what constitutes the word "significant" depends on what type of temperature we are measuring. This limit could be configurable if the context is not clear.
In the same way, we define a significant event for the light sensor as a change in one unit of a percent or ten minutes since it was last published, whichever comes first:
if ((Now - mqttLastLightPublished).TotalMinutes >= 10 || System.Math.Abs (lightPercent - mqttLastLight) >= 1.0)
{
mqttNewLight.Set ();
mqttLastLightPublished = Now;
mqttLastLight = lightPercent;
}
Tip
Since the request/response pattern is difficult to implement using MQTT (you would have to invent separate topics to send requests on), you need a method to notify subscribers of the current status of the sensor as well as tell them that you are alive and well. One way to accomplish this is to, with some regularity, publish the current status, even if the change from the last published value is not great or doesn't exist at all.
Connecting to the MQTT server
From our communication thread, we use the MqttClient class to communicate with the MQTT server:
MqttClient Client = null;
In the following example, we will use a publicly available MQTT server hosted by eclipse.org. It allows anybody to connect and publish information, so we simply provide a username for appearance's sake and leave the password empty. The last Boolean parameter specifies whether we want to use SSL/TLS encryption or not. In our case, we will not bother with encryption of the connection since the data will be publicly available on the Internet anyway:
if (Client == null)
{
Client = new MqttClient ("iot.eclipse.org", MqttClient.DefaultPort, "LearningIoTSensor", string.Empty, false);
Tip
If you want to follow the communication, you can register a LineListener with the MQTT client object as follows:
Client.RegisterLineListener (
new ConsoleOutLineListenerSink (
BinaryFormat.Hexadecimal));
We then open the connection and log in to the server. In the CONNECT() method, you need to specify the keepalive time in seconds and whether the connection is a clean connection or not. A clean connection discards any pending notifications stored on the server. If you wish to reconnect to the server, you can choose not to use a clean connection. The server will then send you any notifications it has stored in the session, while you were not connected, if the session has not been timed out and removed.
Client.Open ();
Client.CONNECT (20, true);
Finally, it's a good idea to log an event in the event log indicating that the MQTT connection is active:
Log.Information ("Publishing via MQTT to " + "Clayster/LearningIoT/Sensor @ ", EventLevel.Minor, Client.Host + ":" + Client.PortNumber.ToString ());
}
Note
You can install and host your own MQTT message brokers if you want to. You can find several of these to choose from via https://github.com/mqtt/mqtt.github.io/wiki/servers.
Publishing the content
The application flags significant events to consider using event objects. So we first need to create an array of the available events to monitor:
WaitHandle[] Events = new WaitHandle[]
{
mqttNewTemp, mqttNewLight, mqttNewMotion
};
In our infinite loop, we then wait for any of the events to occur:
switch (WaitHandle.WaitAny (Events, 1000))
{
}
We begin by publishing temperature information, if such an event is detected. Here we publish the current temperature using the acknowledged message service as a string with one decimal, suffixed by a space and the unit C:
case 0:// New temperature
Client.PUBLISH("Clayster/LearningIoT/Sensor/Temperature", FieldNumeric.Format (temperatureC, "C", 1), MqttQoS.QoS1_Acknowledged, true);
break;
Tip
MQTT is a binary protocol, and it does not support the encoding or decoding of content. We must keep track of encoding and decoding ourselves. The MqttClient library provides you with a PUBLISH() method that allows you to publish binary content. It also has overrides that allow you to publish text and XML content using simple UTF-8 encoding.
Similarly, we will publish the current light density as a string with one decimal suffixed by a space and a percent character (%):
case 1:// New light
Client.PUBLISH ("Clayster/LearningIoT/Sensor/Light", FieldNumeric.Format (lightPercent, "%", 1),MqttQoS.QoS1_Acknowledged, true);
break;
The motion detector only contains a Boolean value. We publish this value as either a string containing the digit 1 if motion is detected or 0 if not.
case 2:// New motion
Client.PUBLISH ("Clayster/LearningIoT/Sensor/Motion", motionDetected ? "1" : "0", MqttQoS.QoS1_Acknowledged, true);
break;
Tip
One of the strengths of MQTT is that it allows you to send large amounts of data to one topic in one message. The size limit for topic content in MQTT is 256 megabytes. This makes it possible to post multimedia content without having to break up the content into segments or use streaming.
Adding MQTT support to the actuator
The actuator will act as a subscriber in the MQTT network by subscribing to the commands published on specific command topics. Before we enter the main loop, we create an MQTT client connection in the same way we did for the sensor:
MqttClient MqttClient = new MqttClient("iot.eclipse.org", MqttClient.DefaultPort,"LearningIoTActuator", string.Empty, false);
MqttClient.Open();
MqttClient.CONNECT(20, true);
Initializing the topic content
We can take advantage of this opportunity to also publish the current (or saved) states of the actuator output to the topics we will soon subscribe to. This is to make sure that the output and topic contents are consistent. Let's have a look at the following code:
MqttClient.PUBLISH("Clayster/LearningIoT/Actuator/ao",
state.Alarm ? "1" : "0", MqttQoS.QoS1_Acknowledged, true);
MqttClient.PUBLISH("Clayster/LearningIoT/Actuator/do",
wsApi.GetDigitalOutputs().ToString(),
MqttQoS.QoS1_Acknowledged, true);
for (i = 1; i <= 8; i++)
MqttClient.PUBLISH
("Clayster/LearningIoT/Actuator/do" + i.ToString (),
wsApi.GetDigitalOutput (i) ? "1" : "0",
MqttQoS.QoS1_Acknowledged, true);
Here we publish a subtopic named ao to control the analog output, subtopics from do1 to do8 for individual digital output, and a compound subtopic named do that can be used to control all the eight digital output in one go.
Subscribing to topics
Subscribing to events in MQTT is simple. You just call the SUBSCRIBE() method with the set of topics (including wildcards) you are interested in, together with their corresponding Quality of Service level, by providing the quality of service level you wish to support. In our case, we only subscribe to one branch in the topic tree:
MqttClient.SUBSCRIBE (new KeyValuePair<string, MqttQoS> ("Clayster/LearningIoT/Actuator/#",MqttQoS.QoS1_Acknowledged));
Tip
To unsubscribe from topics currently subscribed to, you simply need to call the UNSUBSCRIBE() method, providing the set of topics to unsubscribe.
Whenever data is published to any topic in the Clayster/LearningIoT/Actuator/ branch, the OnDataPublished event on the MQTT client object will be raised. We add an event handler for the event as follows:
MqttClient.OnDataPublished += OnMqttDataPublished;
We also make sure to log an informative event stating that the actuator will now receive commands over MQTT:
Log.Information ("Receiving commands via MQTT from " + "Clayster/LearningIoT/Actuator @ ", EventLevel.Minor, MqttClient.Host + ":" + MqttClient.PortNumber.ToString ());
Tip
Make sure to add the event handler before you subscribe to the topics; otherwise, you might lose the retained information the broker sends you immediately upon subscribing.
Receiving the published content
The event arguments of our event contain both the topic and binary data for all of the content that is published to a topic we have subscribed to. We must handle the decoding of content ourselves, but since we only accept string content, we can begin our event handler as follows:
private static void OnMqttDataPublished (object Sender, DataPublishedEventArgs e)
{
string Topic = e.Topic;
if (!Topic.StartsWith ("Clayster/LearningIoT/Actuator/"))
return;
string s = System.Text.Encoding.UTF8.GetString (e.Data);
Topic = Topic.Substring (30);
switch (Topic)
{
// Topic data to be processed here.
}
}
When you enter the switch statement, you'll find that the Topic variable contains the name of the subtopic with the new published value and the s string contains the actual string value.
Decoding and parsing content
Handling incoming content is now straightforward. Since we cannot check from where a command is issued, unless it is encoded into the content payload, we must always make sure to check that the content published is correctly formatted and we discard erroneous publications. The handling of the do subtopic, which controls all the eight digital outputs in one go, is done as follows:
case "do":
int IntValue;
if(int.TryParse(s, out IntValue) && IntValue >= 0 && IntValue <= 255)
{
int i;
bool b;
for(i = 0; i < 8; i++)
{
b = (IntValue & 1) != 0;
digitalOutputs [i].Value = b;
state.SetDO(i, b);
IntValue >>= 1;
}
state.UpdateIfModified();
}
break;
Controlling the Boolean alarm output is implemented in a similar manner:
case "ao":
bool BoolValue;
if(XmlUtilities.TryParseBoolean(s, out BoolValue))
{
if(BoolValue)
{
AlarmOn();
state.Alarm = true;
}
else
{
AlarmOff();
state.Alarm = false;
}
state.UpdateIfModified();
}
break;
Individual digital output is controlled by different topics. To set it correctly, we need to parse both the topic and content properly, as follows:
default:
if (Topic.StartsWith("do") && int.TryParse(Topic.Substring(2), out IntValue) && IntValue >= 1 && IntValue <= 8 && XmlUtilities.TryParseBoolean(s, out BoolValue))
{
digitalOutputs [IntValue - 1].Value = BoolValue;
state.SetDO(IntValue - 1, BoolValue);
state.UpdateIfModified();
}
break;
Adding MQTT support to the controller
As you have seen, all endpoints in MQTT connect to the broker in the same way as MQTT clients. The same is true for the controller, which subscribes to the information published by the sensor and publishes commands to the actuator, as shown in the following code:
Client = new MqttClient ("iot.eclipse.org", MqttClient.DefaultPort,"LearningIoTController", string.Empty, false);
Client.Open ();
Client.CONNECT (20, true);
Handling events from the sensor
To handle events from the sensor, we need to register an event handler, as we did for the actuator; this time, we will register it as a lambda function for the sake of simplicity. This means we will provide the code to handle events before we could actually perform the subscription.
Client.OnDataPublished += (Sender, e) =>
{
string Topic = e.Topic;
if(!Topic.StartsWith ("Clayster/LearningIoT/Sensor/"))
return;
string s = System.Text.Encoding.UTF8.GetString(e.Data);
PhysicalMagnitude Magnitude;
bool b;
Topic = Topic.Substring(28);
switch(Topic)
{
// Topic data to be processed here.
}
};
Decoding and parsing sensor values
When a new light value is reported, we make sure to parse it and flag the event, as we have done previously for other protocols. We use the PhysicalMagnitude class defined in Clayster.Library.Math to help us parse a numerical value suffixed by a physical unit:
case "Light":
if(PhysicalMagnitude.TryParse (s, out Magnitude) && Magnitude.Unit == "%" && Magnitude.Value >= 0 && Magnitude.Value <= 100)
{
lightPercent = Magnitude.Value;
if(!HasLightValue)
{
HasLightValue = true;
if(HasMotionValue)
hasValues = true;
}
CheckControlRules();
}
break;
In a similar manner, we parse incoming changes reported by the motion detector and report it to the underlying control logic:
case "Motion":
if(!string.IsNullOrEmpty(s) && XmlUtilities.TryParseBoolean(s, out b))
{
motion = b;
if(!HasMotionValue)
{
HasMotionValue = true;
if(HasLightValue)
hasValues = true;
}
CheckControlRules();
}
break;
Subscribing to sensor events
We can now subscribe to the events published by the sensor similar to the way the actuator subscribed to control commands:
Client.SUBSCRIBE(new KeyValuePair<string, MqttQoS> ("Clayster/LearningIoT/Sensor/#", MqttQoS.QoS1_Acknowledged));
Log.Information("Listening on MQTT topic " + "Clayster/LearningIoT/Sensor @ ", EventLevel.Minor,Client.Host + ":" + Client.PortNumber.ToString());
Controlling the actuator
Now that we have received sensor data and calculated the desired control actions, all the controller needs to do is publish the corresponding control commands on the topics listened to by the actuator. To highlight the fact that we use binary data in MQTT and control encoding and decoding ourselves, we will first define a UTF-8 encoder that will encode strings to a binary format without using a byte order mark or preamble:
UTF8Encoding Encoder = new UTF8Encoding (false);
Controlling the LED output
The final step is to publish commands as they occur by encoding the corresponding command strings and publishing them on the corresponding command topics. We begin by the command to update the LEDs of the actuator:
switch(WaitHandle.WaitAny(Handles, 1000))
{
case 0:// Update LEDS
int i;
lock(synchObject)
{
i = lastLedMask;
}
Client.PUBLISH("Clayster/LearningIoT/Actuator/do",Encoder.GetBytes(i.ToString ()), MqttQoS.QoS1_Acknowledged, true);
Even though it is not needed for our immediate control needs, we will also publish individual control commands. Since content is retained by the message broker, content on the topics will be consistent if the actuator reboots and receives the latest control commands from the broker. Since the subtopics do1 to do8 correspond to the bits of the compound subtopic do, we simply loop through the bits in do and publish each one to its corresponding subtopic. This is performed with the following code:
for (int j = 1; j <= 8; j++)
{
Client.PUBLISH("Clayster/LearningIoT/Actuator/do" + j.ToString (), Encoder.GetBytes ((i & 1).ToString ()), MqttQoS.QoS1_Acknowledged, true);
i >>= 1;
}
break;
Controlling the alarm output
We control the alarm output in the same way as we control the LED output. We wait for the event and publish the corresponding control command on the corresponding control topic:
case 1:// Update Alarm
bool b;
lock(synchObject)
{
b = lastAlarm.Value;
}
Client.PUBLISH("Clayster/LearningIoT/Actuator/ao", Encoder.GetBytes (b ? "1" : "0"), MqttQoS.QoS1_Acknowledged, true);
After we publish the control command, we also need to start the SendAlarmMail thread if the alarm is activated:
if(b)
{
Thread T = new Thread (SendAlarmMail);
T.Priority = ThreadPriority.BelowNormal;
T.Name = "SendAlarmMail";
T.Start ();
}
break;
Finally, we must not forget to update any camera subscriptions we maintain on the UPnP network:
default:// Timeout
CheckSubscriptions (30);
break;
}
Our controller is now ready to operate, together with the sensor and the actuator using MQTT as the control protocol. This means that all the three can reside in separate networks protected by individual firewalls. The only restriction to network topology we have is that any cameras used by the controller need to be in the same local area network as the controller itself.
If we have access to a tool that can be used to visualize MQTT topics, we can monitor how our devices operate. You can find many tools and applications for this purpose at https://github.com/mqtt/mqtt.github.io/wiki/tools.
In the following example, visualized by Clayster Management Tool, each topic in the topic tree is visualized as a node. Even if it cannot be seen in the print version of the book, the topics that publish Boolean properties are colored red and green depending on whether 1 or 0 is published. The numerical topics related to the light are colored from black to white, depending on how much light is reported. The temperature on the other hand is colored blue if cold (15 degree Celsius). If warmer, it is blended to green (about 20 degree Celsius) and finally blended to red if hot (25 degree Celsius). Colors here assume it is an in-door temperature we are measuring. A colored version of the image is available for download at the Packt Publishing website.
The topic tree is shown in the following screenshot:

Summary
In this chapter, we covered the basics of the MQTT protocol and some of its strengths and weaknesses. We have seen how we can use it in our sensor, actuator, and controller projects as a simple means to cross firewall boundaries.
In the next chapter, we will introduce the XMPP protocol and some of the new communication patterns it allows such as federation, global identity, presence, friendship, authorization, delegation of trust, provisioning, and so on. We will also show how these patterns can help us build a secure architecture for Internet of Things.
All materials on the site are licensed Creative Commons Attribution-Sharealike 3.0 Unported CC BY-SA 3.0 & GNU Free Documentation License (GFDL)
If you are the copyright holder of any material contained on our site and intend to remove it, please contact our site administrator for approval.
© 2016-2026 All site design rights belong to S.Y.A.