From Zero to Blogger in 30 days (2015)
Choosing and Setting Up a Domain Name
The domain name you choose will influence the rest of your business for as long as you’re in business. It completely colors how someone sees your website. Could you imagine if Match.com was called “bestdatingsite.com”? They may never have reached the level of success they’re at today!
Your domain name is your brand online. It’s what customers will remember you by. It’s what goes on your business cards and your marketing materials. It’s what you tell people you meet at an event. It shapes and defines your blog’s whole identity.
That’s why it’s so important to come up with a fantastic domain name. Here’s a step by step guide to coming up with a good name, then registering that name and setting it up with your hosting account.
Step 1: Brainstorm Potential Domain Names
This process should take several days and should involve multiple people. Try to come up with as many good possible names as you can think of. Talk to others in the industry, talk to your peers, talk to your family members, and talk to your friends.
Whenever you have an idea, jot it down. Here are a few guidelines to follow:
1) Only register domain names that you can get .coms for unless your business is a strictly local business in which case a co.uk, .eu or .us is acceptable.
2) The fewer words the better.
3) Don’t use hyphens or underlines.
4) Don’t use numbers. You don’t want to have to say “that’s 36, in numbers” every time you say your website to someone.
5) Don’t use a word that’s awkward to spell… unless you are prepared to buy every possible variation on that name.
6) Pick a name you can grow into. A name that’ll work just as well 5 years from now as today. Don’t pick “TommysTeddies.com” if you might expand into other lines of toys, for example. “TommysToys.com” might work better.
7) Don’t use your own name as the domain name. If you are setting up your WordPress website with business in mind, at some point you will exit the business. When the domain is your name it becomes harder to sell and a business liability rather than an asset.
8) Avoid trademarks – names of other businesses like Twitter and Facebook are trademarked, so you may have to take your site down and cancel your domain if you use a trademark.
9) If your name is taken then try adding blog to it ie sarkemediablog.com
10) Come up with a lot of possible names, and then pick the best one.
You’re probably going to have to come up with two or three word domain names. Some people recommend having a keyword in your domain name, but there is no advantage for having your domain as your exact keyword.
Single word domains are almost always going to be taken. You may occasionally be able to pick up a single word domain name from Sedo’s Great Domains auction or from various domain name forums, but you won’t be able to register it from scratch unless you’ve made the word up.
Jot all your possible domain names down in a text file.
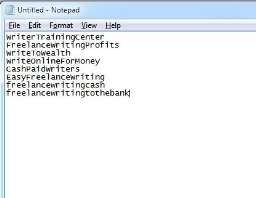
Step 2: Check for Availability
There are two ways to check for domain availability on GoDaddy. If you’re just checking one domain off the cuff, you can just type it into the box on the main page.

But if you’re typing in a large batch of potential domain names, you’ll want to use the bulk domain search. Just click the “Bulk Domain Search” button in the lower right corner.
Paste all your potential domain names into the box, then check which extensions you want to check for. This mass checking tool will allow you to check all your ideas in one fell swoop.
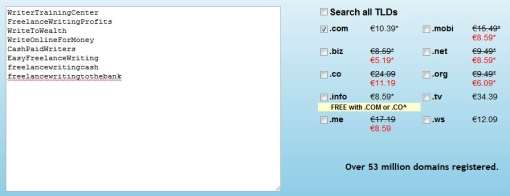
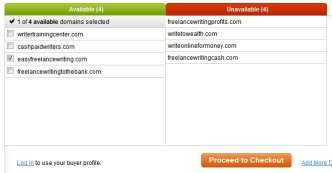
Step 3: Choose the One You Want
GoDaddy will tell you which of the domains you entered is available. Choose the one you want to use, then click “Proceed to Check out.”
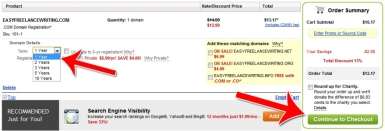
Step 4: Choose Registration Length
Choose how long you want your domain name for. By default, GoDaddy registers you for two years. If you don’t want to pay for two years upfront, you can change it to one year. Alternatively, you can register for 5 years if you want a discount.
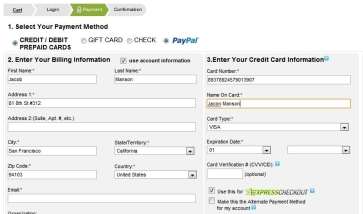
Step 5: Complete Checkout
Enter your payment details to complete the checkout process.
Once your payment goes through, you’ll have your receipt. Congratulations! You’re now a proud owner of your brand new domain name.
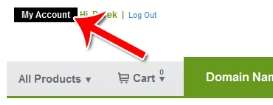
Step 6: Access Your Domain
Once you own your domain, you need to point your domain’s nameservers towards your hosting account. This links your domain to your hosting so people who type in your domain name will be able to access your website.
To get started, you need to go to your domain’s control panel. Start by clicking “My Account” in the upper left corner.
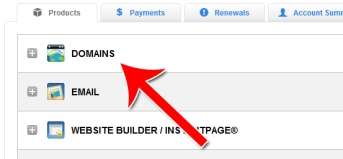
Then click on “Domains.”
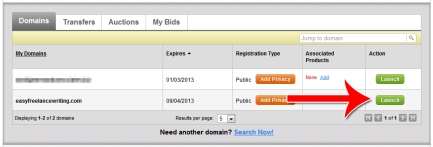
Choose the domain name you want to edit and click “Launch.”
Step 7: Set Your Nameservers
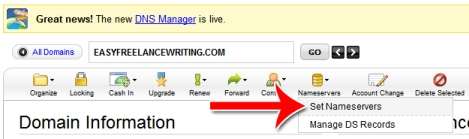
Your nameservers are like a digital street address. It tells GoDaddy where to send your traffic when people type in your domain name. To set your nameservers, click on “Nameservers” at the top of the GoDaddy domain menu.
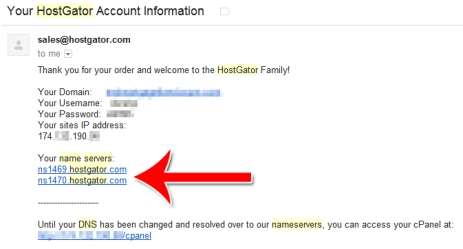
Get your nameserver information from your hosting company. This is usually in your registration email, but could be located somewhere in your cPanel.
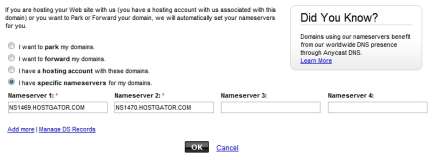
Enter your nameservers into your domain setup screen.
Some notes on website hosting.
When you choose your hosting package it will probably be shared hosting, this means you rent your hosting space with a lot of other people.
As your WordPress website becomes popular you will find you need to increase your bandwidth with your hosting company that you will need to increase the amount of disk space that you lease from them and so on. If you don’t upgrade your hosting package as your traffic increases you will find that you are throttled by your host, that your site is slow and unresponsive and that you cannot do all the things you want to do with your website.
Remember as you become more successful with your website and blogging activity then your costs will increase. The good news is that if you need to upgrade you should have the revenue to cover the costs.
That’s all there is to it! You now know how to brainstorm for domain names, how to choose a good domain name, how to check your domain names en mass, how to register your domain and how to set your nameservers. Your new domain name is ready to go and you are ready to install WordPress!
All materials on the site are licensed Creative Commons Attribution-Sharealike 3.0 Unported CC BY-SA 3.0 & GNU Free Documentation License (GFDL)
If you are the copyright holder of any material contained on our site and intend to remove it, please contact our site administrator for approval.
© 2016-2026 All site design rights belong to S.Y.A.