Facebook All-in-One For Dummies, 2nd Edition (2014)
Book II. Connecting with Others
Chapter 11. Managing Connections Gone Awry
In This Chapter
![]() Unfriending or hiding a friend’s updates
Unfriending or hiding a friend’s updates
![]() Blocking a person
Blocking a person
![]() Leaving groups and Unliking business pages
Leaving groups and Unliking business pages
![]() Blocking unwanted apps
Blocking unwanted apps
![]() Removing timeline content
Removing timeline content
![]() Fixing a compromised account
Fixing a compromised account
While you’re building connections and reaching out to new people, your name starts to show up in more places as you share mutual friends or interact by commenting on a friend’s post. You should find more people reaching out to you. Maybe some of your newfound friends invite you into their groups, or invite you to strangers’ birthday bashes, or ask you to play games with them as they post tons of updates about their latest win in AquaVille. Sometimes, you'll find yourself with Facebook connections that turn bad.
If you need to purge your social connections, hope is available. In this chapter, we help you to navigate through Facebook to remove connections and keep your social sphere in order. We also illustrate how to remove content from your own timeline if you find that you’ve shared some things that you may want to keep out of the wrong hands.
The last thing we cover is Facebook viruses. In most cases, viruses can be avoided — and we explain how. And if your Facebook account has been infected with a virus, we tell you how to fix your account.
Unfriending or Hiding
When you first sign up for Facebook, it’s easy to get excited about adding every friend you’ve ever had since preschool. This becomes an issue when you find that some of these long-lost friends are overzealous with their sharing, inviting, and gaming. As you accumulate friends, you may find that you need to purge your friends list. Here are a few reasons why you may want to do this:
· A friend frequently shares offensive or defamatory updates.
· A friend inappropriately comments on your posts.
· You want to maintain a higher level of privacy.
· You want a more easily managed friends list.
· You’re entering the witness protection program.
All kidding aside, sometimes you just find that you have to make some changes to your Facebook friends list. In some cases, you may want to unfriend someone; in other cases, you may want to hide someone’s updates but keep them as a friend. No problem. The next few sections explain how to do both.
Hiding updates from a friend or business page
 If you don’t want to see the updates of a particular person or business, whether because the updates are offensive or simply boring, hiding those updates is an alternative to unfriending. You can hide all updates or a single update from any friend or business page right from your news feed by clicking the arrow in the upper-right corner.
The people who show up in your news feed are those to whom you are friends with or follow. To hide updates from someone, follow these steps:
1. In your news feed, find an update from the person to whom you want to unfollow.
2. Move your mouse pointer to the right side of the update and click the arrow icon that appears.
The drop-down list shown in Figure 11-1 appears. The options are related to what updates you see from this friend or business page in your news feed. Click I Don’t Want to See This to hide this single update.
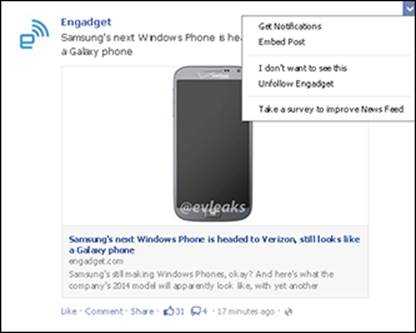
Figure 11-1: Hide updates from a friend or a business page.
3. To never see updates from this friend or business page in your news feed, click Unfollow [Name].
You still have this person as a connection (or friend), but you will no longer see the person's updates in your news feed. If you unfollow a business page, you will no longer be connected to them.
 Unfollowing a friend’s updates only removes the person's updates from your news feed. The person can still see your updates and comment on your posts. If you would like to comment on that person's posts, go directly to the person's timeline by typing his or her name in the search text box at the top of your home page.
Removing someone as a friend
When you unfriend someone on Facebook, you prevent the person from commenting on your posts (unless they are shared publicly) or seeing any pictures or updates that you have not made public. And because you’re no longer friends, you can’t see that person's private content either.
Former friends will not receive any notice that you have unfriended them. They will only be able to see that you aren’t connected by going to your timeline and seeing the +1 Add Friend button or looking through their friends list.
Remove someone from your friends list by following these steps:
1. Go to the friend’s timeline.
Click the friend's name in your news feed or begin typing the friend's name in the search text box and select the name from the list that appears. Or you can click the Friends link, below your cover photo, and select the name from the list that appears.
2. From the friend's profile, click the Friends button (on the bottom right of their cover photo). Or from your friend's timeline, click the Friends button to the right of the picture.
A drop-down list appears as soon as you move your mouse over it, as shown in Figure 11-2.
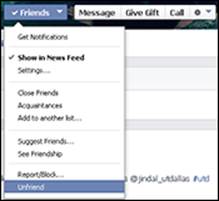
Figure 11-2: Unfriending a friend.
3. Click Unfriend.
Currently, Facebook doesn’t allow you to unfriend a group of users. If you have multiple people you would like to unfriend, you have to visit each person’s timeline and unfriend them one by one.
Blocking Someone
If things have really gone bad, and you want to ensure that a certain person does not have the ability to send friend requests, send messages, or see your information, you can block that person. This feature is helpful if someone is spammy or malicious.
To block someone, follow these steps:
1. Go to the friend’s timeline.
Click the friend's name in your news feed, type the friend's name in the search text box, or click the Friends link below your cover photo.
2. Click the gear or silhouette icon under the cover photo and choose Report/Block from the drop-down list, as shown in Figure 11-3.
Or from your friend's timeline, select Friends and then select Report/Block from the drop-down list.
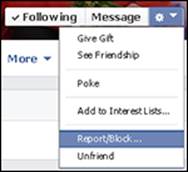
Figure 11-3: Blocking someone.
3. In the dialog box that appears, select the Block [Name] option, as shown in Figure 11-4.
4. (Optional) If you believe the person's content is spam or inappropriate, select the appropriate reporting option.
5. Click Confirm.
After you click Confirm, you have blocked the individual and can no longer communicate with that person on Facebook (and that person can’t communicate with you). You also see a confirmation dialog box, with a link to the Family Safety Center, which offers information on how to handle harassment.
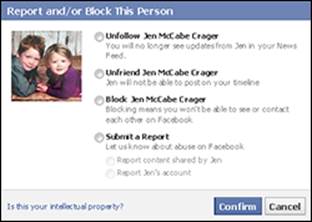
Figure 11-4: Additional options to block or report someone.
 Only report a person when absolutely necessary. What you believe to be inappropriate may not violate the Facebook terms. If you're offended by something that someone has posted, send the person a message about it directly or unfriend the person. If you’re certain that the content violates Facebook terms, select the appropriate option in the Report and/or Block This Person dialog box.
When you block someone, that action is between you and the person you blocked. Blocking doesn’t remove the person from Facebook or report the person to the Facebook compliance team. Blocking only prevents you and the individual from being able to communicate on Facebook. If you find that you made a mistake, you can edit your block list in your privacy settings. (See Book I, Chapter 3 for information about finding and choosing your privacy settings.)
Leaving Groups
The creator or administrator of a group can add any Facebook friend to the group — even if the person didn't want to be a member. That person is then included in all updates in that group.
If you've become a part of a group that you would rather remove yourself from, follow these steps:
1. On the left side of your home screen, click the More link by the Groups section, as shown in Figure 11-5.
(To see the More link, hover your cursor over this area.) You see all the groups of which you are a member.
2. Click the pencil icon to the left of the group name.
You have the options to add the group to your favorites, edit settings, or leave the group.
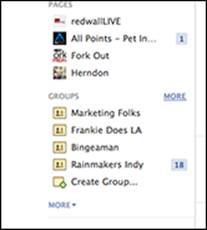
Figure 11-5: Click More to view all the groups you are in.
3. Click Leave Group.
You are no longer a member of the group and will no longer receive updates from the group.
Unliking Business Pages
Business pages are opt-in, which means you have to Like the business page to see the page's updates in your news feed. Sometimes you lose interest in a business page. Perhaps the business page is posting too much or not posting enough, or maybe you don't find the content interesting. In those cases, you may want to Unlike the business page — and that’s an easy task.
To Unlike a business page, go to the business page. Under the cover photo, click the gear icon to see the drop-down list shown in Figure 11-6 and click Unlike. Or click the Liked button next to the gear icon and then click Unlike. You will no longer see updates from the business page in your news feed.
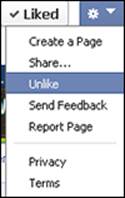
Figure 11-6: Unliking a business page.
Unliking multiple business pages at a time is not possible with Facebook’s current design.
Blocking Apps
To use an app, you have to permit it access to your personal timeline. Often, especially with games, the app will prompt you to invite others to participate. Your friends may (without even realizing it) be inviting you to the same game repeatedly, whether or not you've previously declined an app’s invitation. To stop receiving invitations or announcements from an app, you can block it.
When you receive an invitation from an app that you’d like to block, click X, to the right of the app, and then click the Block App Name link.
If you want to unblock an app or just review which apps you’ve blocked, follow these steps:
1. Click the gear icon on the top blue bar and choose Settings from the list.
2. In the left sidebar, click Blocking.
The Manage Blocking page appears, as shown in Figure 11-7. At the bottom of the page you can view which apps you’ve blocked.
3. To unblock an app, go to the Block Apps section and click the Unblock link next to the app's title.
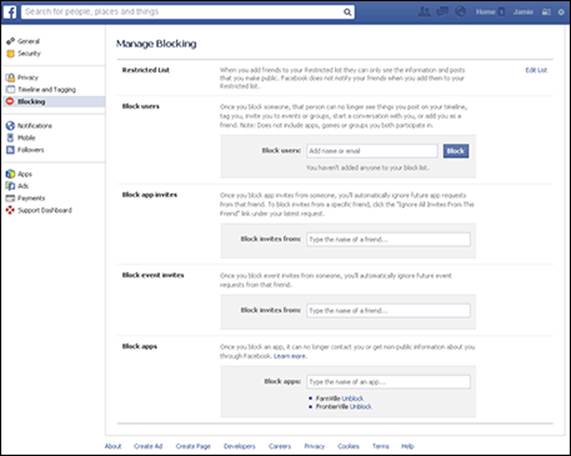
Figure 11-7: View and manage blocked apps.
Removing Content from Your Timeline
If someone has spammed you or posted inappropriate content on your personal timeline, you will most certainly want to remove those posts. To do this, just move your cursor over the post and click the arrow icon that appears at the top right, as shown in Figure 11-8.
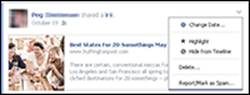
Figure 11-8: Removing content from your timeline.
A menu appears; click Report/Remove Tag or Hide from Timeline to remove the post from your timeline.
When you have posted content that you want to remove, you have the option to delete the entire post as well as hide it from the timeline.
Avoiding Facebook Viruses
A virus is malicious code that can wreak havoc on your (and your friends’) Facebook account. You can get a virus only by clicking a link and downloading something (usually an .exe file) or clicking a link and allowing an infected application to access your Facebook account. When your Facebook account is infected with a virus, the virus will access your account and post infected updates to your friends’ timelines and make it difficult for you to use Facebook. As you can imagine, it’s best to avoid them.
Spotting a virus
The reason Facebook viruses spread so quickly is that they are hard to discern from regular status updates, and they appear to be shared by people you trust. Many times, the virus link piques your interest and you almost can’t help yourself because you can’t believe someone would share that information online. That morbid curiosity is exactly what the hackers are counting on.
One of the most popular viruses contains a link that claims to tell you who has been looking at your Facebook personal timeline. Although you may be interested to see who’s been looking at your timeline, Facebook doesn’t share that information with anyone. There is no app that allows you to see who has looked at your timeline, so you know it’s a fake link.
Another popular trick is to use a link that allows you to watch a video of something “you won’t believe!” or even a supposed video of you doing something funny or humiliating. If it’s a legitimate video, it will play when you click it. If you’re asked to download anything or allow an app to have access to your account, it’s probably not a legitimate link and you should cancel immediately.
Facebook apps ask you to allow them to access your personal timeline information. (See Book VI for a full explanation of Facebook apps and how they work.) For instance, after you enter a giveaway or contest on a business page, the application for the promotion may ask if you’d like to share the link with your friends. To share the link, you have to allow the application to have access to your personal timeline. Or if you want to buy something from the Payvment Shopping Mall on Facebook (www.facebook.com/payvment), the Payvment app asks permission to access your account. In both instances, you must allow the application access to your account to complete your task, and the app is from a legitimate company.
If you click a video, photo, or sales link and are asked to allow an app to complete a transaction, you may want to research the company further or click away from that page. Knowing which Facebook applications to allow and which to click away from can be tricky.
One way to avoid getting a dreaded virus is to pay attention to what’s showing up in your news feed. Many times, a virus will become so prolific that all your friends seem to be sharing the same link.
To avoid Facebook viruses, consider the following questions:
· Does the link have a questionable image? If you see an inappropriate picture with the status update, the link is probably a virus. Facebook is strict about pornography and shuts down pages that are considered adult.
· Is this the type of link my friend usually shares? If not, don’t click. If you’re tempted to click, first hover your cursor over the link and look in the lower-left corner of your browser. You see the URL attached to that link. If it’s not a URL you’re familiar with, don’t click the link. Many virus links use .info in the URL.
· Is this link related to a hot topic or current event? You can expect a new rash of viruses when important current events occur.
· Do I know the person who claims to have tagged me in a photo or video? Beware of any message, link, or video claiming that someone has tagged or commented on a photo of you. Look to see if you know the person who supposedly tagged you. If you don’t know the person, don’t click the link. If you do click the link and you see a blank page, change your password immediately. If you’re asked to allow an app to do something, do not click the Allow button — just click away from the page.
· Am I on a legitimate Facebook page? Occasionally, you may mistype the main Facebook URL and end up on a fake Facebook login page. If you type in your login information and click Submit, that page takes your information and accesses your Facebook account (technically this isn’t a virus; it’s called phishing). Always double-check that your browser is pointed to www.facebook.com/index.php before you type your login information.
If you ever end up on a page that says your Facebook session has timed out, do not type in your login information. Facebook sessions don’t time out. Instead, point your browser to www.facebook.com/index.php and log in as necessary.
Fixing your account
The first thing to do when you discover that you have a Facebook virus is to change your Facebook password. To do that, follow these instructions:
1. Log in to your Facebook account.
2. Click the gear icon on the blue bar and choose Settings.
The General Settings page appears.
3. Click the Edit link on the Password row.
Three text boxes appear, labeled Current, New, and Re-type New.
4. In the Current text box, type your current password.
5. In the New text box, type a new password.
6. In the Re-type New text box, type the new password again.
7. Click the Save Changes button.
Now that you’ve changed your password, write a status update alerting your friends that you clicked a bad link and had a Facebook virus. Tell your friends not to click any links that appear to be from you — and refrain from posting links for a while so people don’t worry about which links are good or bad.
If you know specific people who received a viral link from you, head over to their Facebook timelines and delete the message if you can. Also tell them not to click the link.
Finally, check to be sure that the application carrying the virus isn’t lurking on your account. It’s probably not, but it’s best to be sure. Plus, now is a good time to clean out the apps you’re not using anymore.
To check the apps connected to your account, follow these steps:
1. Log in to your Facebook account.
2. Click the gear icon on the blue bar and choose Settings.
The General Settings page appears.
3. In the left sidebar, click the Apps link.
The Apps Settings page appears.
4. Click the Edit link next to any apps you don’t remember installing or that you don’t use regularly.
The app information expands to give a full overview of the app.
5. Click the Remove App link.
A confirmation dialog box appears.
6. Click the Remove button.
The app is now removed from your account.
If you don’t see an app that looks like it’s related to the virus, that’s okay. It may not be there. Changing your password is what really matters; checking for the app and removing it are just insurance.