Salesforce.com For Dummies, 5th Edition (2014)
Part VII. Designing the Solution with Force.com
Chapter 22. Migrating and Maintaining Your Data
In This Chapter
![]() Understanding your migration options
Understanding your migration options
![]() Executing your migration plan
Executing your migration plan
![]() Organizing your data
Organizing your data
![]() Getting help
Getting help
If you’re a system administrator, often your greatest headache isn’t configuring or customizing the system but getting your data in and maintaining it so that it’s useful. Nothing hurts a rollout more than complaints from users that their data isn’t in Salesforce, that information is duplicated in several records, or even worse, that the information is wrong. Your end user adoption suffers if you don’t maintain your records after the rollout. If you’re not diligent, you can find yourself in the same mess that drove you to Salesforce in the first place.
If data maintenance is giving you nightmares, use the data management tools in Salesforce to easily import leads, accounts, and contacts. If you have in-house expertise or engage a Salesforce partner, you can migrate other critical data (such as opportunities, cases, and activities) by using proven third-party tools. When your data is stored in Salesforce, you can rely on a variety of tools to help you manage and maintain your database.
In this chapter, we first discuss your options for data import. Then, we show you how to use Salesforce tools to manage your data (including mass-transferring, deleting, and reassigning data). Finally, we touch on advanced concepts, such as mass-transferring and mass-deleting your data. Complex data migration and updates of data between your data sources and Salesforce are beyond the scope of this book, but we make sure to point you in the right direction.
Understanding Your Options for Data Migration
Salesforce has easy-to-use wizards that step you through importing your campaign updates, leads, accounts, contacts, and custom objects. If you’re a system administrator or have the right profile permissions, you can perform these tasks for your users. For other legacy data (such as opportunities, cases, and activities) that you want to have in Salesforce, you have to enter information manually or use the Data Loader, which is an included ETL (extract, transform, and load) tool that comes with Enterprise and Performance Editions to automatically migrate data into Salesforce. Professional and Group Edition users can enlist the help of salesforce.com professional services.
Using import wizards
Import wizards for leads, accounts, contacts, solutions, and custom objects are conveniently located under the Data Management heading in the Administration Setup section of Setup. If you’re an administrator, you also see links to the import wizards in the Tools section of certain tab home pages. For example, if you want to import your company’s leads, click the Leads tab, and then click the Import Leads link in the Tools section. Steps and tips for each of the import wizards are detailed in relevant chapters of this book, as follows:
· Import leads: Only a user with the Import Leads permission can perform this operation. See Chapter 9.
· Import contacts and accounts: Salesforce provides one wizard that can take you through importing contacts and/or accounts. Individual users also have the ability to import their personal contacts and accounts. See Chapters 4 and 5.
· Import campaign leads or update contacts or leads linked to a campaign: Salesforce provides a Campaign Member Import Wizard to update marketing statuses for leads and contacts. See Chapter 13.
Investigating the Data Loader
Data migration is a tricky matter. The Data Loader is a small client application that helps bulk-import or -export data in comma-separated value (.csv) format. You access this tool by choosing Setup⇒Administer⇒Data Management⇒Data Loader. With this tool, you can move data into and out of any type of record in Salesforce, including opportunities and custom objects. The Data Loader supports inserting, updating, deleting, and extracting Salesforce records.
Several vendors also provide proven ETLs that enable you to migrate records to (or from) Salesforce and append those records where appropriate.
Without getting too technical, experts link data by using the Force.com API (application program interface) to enable your technical resource to access data programmatically. Force.com (http://developer.force.com) is the platform used to customize or integrate Salesforce to do even snazzier things than what you can do with it out of the box. And before you suffer from jargon overload, a platform is basically a collection of rules and commands that programmers can use to tell a program — Salesforce, in this case — to do certain things. To access the Force.com API, though, you must have Enterprise or Performance Edition.
Migrating Your Legacy Data
During the preparation phase of your implementation, you need a well-thought-out and documented plan for your data migration strategy. That plan needs to include details on objectives, resources, contingencies, and timelines based on the different steps in your plan. In the following sections, we discuss some of the steps that you should consider.
Determining your data sources
The companies we’ve worked with typically have some type of existing contact management tool, a variety of spreadsheets with other customer data, and often, contact information living in users’ Microsoft Outlook applications (not to mention Word documents and sticky notes). As you go through your preparation, assess what and how much information needs to be in Salesforce. Here are some tips for this step:
· Garbage in, garbage out. When you move into a new home, you usually look through your old home’s closets and decide what to haul with you and what to throw away. Moving data requires the same type of evaluation.
· Make a list. Catalog the different data sources, including what types of records, what range, and how many.
· Design a storage plan. Work with your customer relationship management (CRM) project team to determine where different information should go — and why.
· Think about the timing and the sequence of the import. For example, many companies create user records first, then import accounts and contacts, and finally, migrate and append opportunities.
· Keep it simple, if possible. The more complicated you make the migration, the greater the impact on your timeline. Assess the level of effort versus the potential value of the effort.
Preparing your data
Clean it now, or clean it later. Some project teams like to “scrub” data before importing it into Salesforce. Identifying and merging duplicates make finding the right record easier. Fixing inconsistencies in your data, such as ensuring that all State/Province fields hold two-character abbreviations, makes reports more accurate. If your legacy system doesn’t make cleanup easy, you might prefer to bring all the records into Salesforce first and then use the Salesforce data management tools to clean data later. Regardless of when you do it, cleaning data is not glamorous work, but it’s gotta be done.
Here are a few tips as you prepare your data:
· Export to a simple format. Oftentimes, it’s easiest to export data to applications like Microsoft Access or Excel, with which you can delete columns, sort rows, and make global changes.
· Strive to use standard naming conventions. If different data sources refer to accounts by different names (for example, IBM versus International Business Machines), now is a good time to standardize naming.
· Edit or add fields in Salesforce to support the migration. For example, if your pipeline reports track margin per opportunity, you need to build a custom Opportunity field to support margin data. Read more about this in Chapter 20.
· If your existing data source has unique record IDs, migrate those IDs to a custom field. You can always delete or hide the field at a later stage. Not only can this help you verify the accuracy of your migration, but those IDs might also come in handy for integration (especially if you don’t plan to shut down the other data source).
· Map your data columns to field names in Salesforce. For example, the Company field in Microsoft Outlook typically maps to the Account field in Salesforce. Some system administrators even rename the column headers in migration files so that they exactly match field names in Salesforce. Doing this minimizes the migration madness.
· Conform your data to fit Salesforce standards (or the other way around). Each field in Salesforce has certain properties that might include size limitations, decimal points, date formats, and so on.
· Add a Data Source column to your import file and map it to a custom field in Salesforce. By doing this, you can defend where data came from.
· Assign the correct owners to records wherever possible. If you don’t have all records assigned, the owner defaults to whichever administrator is executing the migration.
· Gain acceptance from stakeholders of the files you’ve prepared. At least, if you offer them the chance to review, you avoid surprises.
Testing the import
Test before you execute the final migration. Often, you discover things that you missed or could improve. For example, fields can be mapped incorrectly, or you might just need to create some extra ones. Here are a couple of tips:
· Select a small sample of significant records. The more high-profile the records, the better — especially when reviewed by a stakeholder.
· Review page layout. Consider adjusting the page layouts to make validating the data import easier. Put fields in Salesforce in similar screen locations to those of your legacy systems.
Analyzing the test data results
When your test data is in Salesforce, compare it carefully with your test file to ensure accuracy and completeness. Here are a few tips on how to productively analyze the test data results:
1. Build: Build a custom report that allows you to look at the record data collectively.
2. Compare: Open a record, if necessary, and compare it against the import file. Confirm that the record’s fields show what you think they should show.
3. View: Build a custom view from a relevant tab home page to see your imported data laid out in columns on a list page. Users could go to a report, but a view keeps them focused.
4. Validate: Validate the data with selected stakeholders to get their feedback and support that the test data results look correct. It’s not enough that you think the test import was accurate. Your end users are the ultimate test.
5. Tweak: Adjust your process or make changes to the import file or Salesforce based on the results of the test import. For example, maybe you forgot to map a field, or the data didn’t import correctly because of a field’s properties.
Migrating your final data
After you successfully analyze the test data results, you’re ready to import your file or files. (Yes, that’s a simplification of what could be a complicated set of tasks, but the overall process is tried and true.)
Here are a few suggestions for this step:
· Communicate expectations with your users. If you’re moving from one system to another, you might have a lapse in which data must be updated prior to going live.
· Do it during downtime. If you have significant data, consider running the migration during nonworking hours. Especially if the system is live for some groups of users already, this might avoid confusion.
· Build yourself some cushion for error. Don’t try to execute the migration the day before sales training. Something unanticipated could happen that prevents successful completion.
Validating and augmenting your data
Similar to analyzing results of the test data (see the section “Analyzing the test data results,” earlier in this chapter), when the data has been loaded, run reports to validate a cross-sampling of records to ensure accuracy and completeness. If you can, compare screens in Salesforce with those of your legacy system. Make sure that data is stored in the correct fields and that values make sense. If you see an address in a phone field, you need to clean your data or fix your field mapping. Strive for perfectly imported data — but expect less than that, too.
Prior to rolling out Salesforce, take the extra step of manually or automatically updating some records to wow users and drive more success. When giving a demonstration or training, show users these fully entered examples and let them know the potential for Salesforce.
Managing Your Salesforce Database
After you implement Salesforce, you need to make sure that you create processes for periodically updating and backing up your data. If you don’t, human error can lead to frustration and heartache. Duplicate records, dead leads, records that need to be transferred when a user leaves the company — these are just a few examples of data that needs to be updated.
Most of the data maintenance tools are accessible from the Data Management heading located under the Administrative Setup heading on the sidebar of Setup. (See Chapters 4, 5, and 9 for details on de-duplicating accounts, contacts, and leads.)
Backing up your data
If you have Performance, Enterprise, or Professional Edition, Salesforce offers a weekly export service of all your data that you can use to create a backup.
To export and back up your data, follow these steps:
1. Choose Setup⇒Administer⇒Data Management. Click the Data Export link.
The Weekly Export Service page appears.
2. Click the Export Now button.
3. Select the appropriate export file encoding from the Export File Encoding drop-down list and select the check boxes if you want to include files and replace carriage (hard) returns with spaces.
If you live in the United States or Western Europe, you don’t have to change the Export File Encoding selection.
4. Specify which Salesforce objects you want to export, or just leave the default Include All Data check box selected.
5. When you’re done, click the Data Export button.
The Weekly Export Service: Export Requested page appears. You’ll receive an e-mail from Salesforce with a link to a page where you can retrieve zipped .csv files of all your data. You have 48 hours to download your data, after which time the data files are deleted.
6. When you receive the e-mail entitled Your Organization Data Export Has Been Completed, click the title to open the e-mail.
The e-mail appears with a link to the page in which you can retrieve your data export. The file is only available for 48 hours, not indefinitely, so make sure you get the file from the link as soon as you can.
7. Click the link and log in to Salesforce, if required.
The Weekly Export Service page appears, as shown in Figure 22-1.
You can also access the Weekly Export Service page by choosing Setup⇒Application Setup⇒Data Management⇒Data Export.
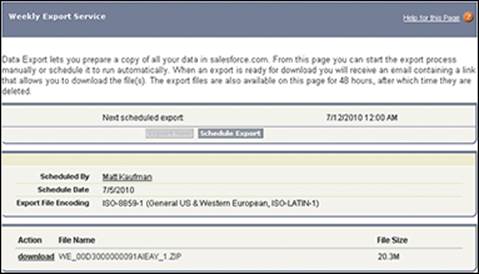
Figure 22-1: Downloading your data export file.
8. Click download link.
A dialog box appears, allowing you to open or save your Zip file to a location accessible from your computer.
Although not required, we recommend that you schedule a routine data export of your data by clicking the Schedule Export button on the Weekly Export Service page (see Figure 22-1). This option follows the same steps as an immediate backup, but it also allows you to select when you want your backup to automatically occur.
Mass-transferring records
A sales rep leaves. Sales territories get readjusted. You imported a file but forgot to assign records to the right owners in advance. These are just a few examples of when you might have to transfer records. Salesforce allows you to mass-transfer lead, account, and custom object records — and the processes for all three types are very similar.
When transferring leads or accounts, Salesforce automatically transfers certain linked records on the detail page.
· For both leads and accounts: All open activities owned by the current owner transfer to the new owner.
· For accounts: All notes, contacts, and open opportunities owned by the existing owner transfer to the new owner.
· For custom object records: No linked records are transferred.
To mass-transfer records, follow these steps:
1. Choose Setup⇒Administer⇒Data Management⇒Mass Transfer Records.
A Mass Transfer Records page appears.
2. Click the Transfer link for the appropriate type of record, depending on your needs.
A Mass Transfer page appears with a set of filtering options to help you search for records. You can use the filters to specify the set of data that you want to transfer, for example, all Accounts with San Francisco in the Billing City field.
3. In the Transfer From and Transfer To fields, use the Lookup icons to find the appropriate users.
With leads, you can also transfer to or from queues. See Chapter 9 for details on lead queues.
4. If you’re mass-transferring accounts, select the check boxes to specify whether you want to transfer types of opportunities, cases, and teams.
5. Define additional criteria to filter your search by using the drop-down lists and fields provided.
You do this by selecting a field from the first drop-down list, selecting an operator from the second drop-down list, and then typing a value in the field. For example, if you want to transfer all of one sales rep’s New York City accounts to a new rep, your criteria would be
· Field: City
· Operator: Equals
· Value: New York
6. When you’re satisfied with your settings and filters, click the Find button.
The Mass Transfer page reappears with a list of results.
7. Use the check boxes to select the records that you want to transfer.
8. When you’re done, click the Transfer button.
The Mass Transfer page reappears when the transfer is complete.
Mass-deleting records
If you’re the administrator, you might want or need to mass-delete records. A couple of typical examples include deleting dead leads and eliminating accounts that haven’t had any activity. Salesforce allows you to mass-delete leads, accounts, contacts, activities, cases, solutions, and products — and the processes are very similar.
To mass-delete records, follow these steps:
1. Choose Setup⇒Administer⇒Data Management⇒Mass Delete Records.
The Mass Delete Records page appears.
2. Click one of the Mass Delete links, depending on the type of standard record that you want to mass-delete.
The Mass Delete Records page appears with a three- to five-step wizard for mass-deleting. The three-step wizard is shown in Figure 22-2. The Mass Delete Accounts page has two extra steps based on opportunities that are closed/won or that aren’t owned by you. The Mass Delete Products page has one extra step to archive products with line items on opportunities.
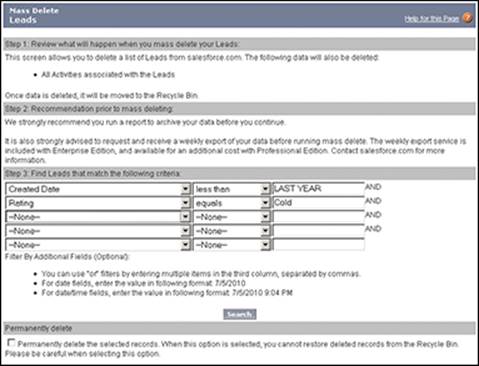
Figure 22-2: Select records for mass deletion.
3. Review the Salesforce warnings in Step 1 of the wizard.
4. Back up relevant data by generating a report and exporting it to Excel as part of Step 2 of the wizard.
See Chapter 17 for details on building and exporting reports.
5. Use the filters in Step 3 of the wizard to define criteria for the search.
You do this by selecting a field from the first drop-down list, selecting an operator from the second drop-down list, and typing a value in the field.
You can see an example of this in the preceding section.
6. Click the Search button.
The Mass Delete page reappears with a list of possible records at the bottom of the page. Do the following:
If you’re mass-deleting accounts, you can do two things:
· Select the check box in Step 4 of the wizard if you want to delete accounts that have Closed/Won opportunities.
· Select the check box to delete accounts with another owner’s opportunities.
If you’re mass-deleting products, select the check box if you want to archive products with line items on opportunities.
If you’re mass-deleting another object, proceed to Step 7.
7. Use the Action column to select records to be deleted.
8. When you’re satisfied, click the Delete button.
A dialog box appears to confirm the deletion.
9. Click OK.
The Mass Delete page reappears, minus the records that you deleted.
Getting Help with Complex Data Tasks
This chapter shows you some of the basic operations that you can perform to import and manage your data in Salesforce. For many companies that have complex data needs, this might be an oversimplification. If you need help with your data, here are some resources you can turn to:
· Talk with your Customer Success Manager or account executive. These folks can help define your needs and point you to the appropriate solution or resource.
· Go outside. If you’re looking for outside help, contact a salesforce.com consulting partner. Your Customer Success Manager or account rep can put you in touch.
· Check out offerings by partners on the AppExchange. Go to www.appexchange.com and search using the phrase “Data Cleansing” in the search bar.
· Talk to developers. On the Developerforce site (http://developer.force.com), click the Boards tab to talk to a community of developers who have wrestled or are familiar with your data challenges. These boards are of a technical nature, but if this is what you’re looking for, you might find it here.