Enterprise Web Development (2014)
Appendix A. Selected HTML5 APIs
This appendix is a brief review of selected HTML5 APIs. HTML5 is just a commonly used term for a combination of HTML, JavaScript, CSS, and several new APIs that appeared during the last several years. Five years ago, people were using the term Web 2.0 to define modern-looking applications. These days, HTML5 is almost a household name, and we’ll go along with it. But HTML5 is about the same old development in JavaScript plus the latest advances in HTML and CSS.
This appendix is more of an overview of selected APIs that are included in the HTML5 specification—namely, Web Messaging, Web Storage, Application Cache, IndexedDB, localStorage, Web Workers, and History APIs.
NOTE
To understand the code samples included in this appendix, you must be familiar with JavaScript and some monitoring tools such as Chrome Developer Tools. We assume that you are familiar with the materials covered in the bonus online chapter.
Does Your Browser Support HTML5?
The majority of modern web browsers already support the current version of the HTML5 specification, which will become a World Wide Web Consortium (W3C) standard in 2014. The question is whether the users of your web application have a modern browser installed on their device.There are two groups of users who will stick to outdated browsers for some time:
§ Less technically savvy people might be afraid of installing any new software on their PCs, especially people of the older generation. “John, after the last visit of our grandson, our computer works even slower than before. Please don’t let him install these new fancy browsers here. I just need my old Internet Explorer, access to Hotmail and Facebook.”
§ Business users working for large corporations, where all software installations on their PCs are done by a dedicated technical support team. They say, “We have 50,000 PCs in our firm. An upgrade from Internet Explorer version 8 to version 9 is a major undertaking. Internal users work with hundreds of web applications on a regular basis. They can install whatever browser they want, but if some of these applications won’t work as expected, the users will flood us with support requests we’re not qualified to resolve. Hence, the strategy of using the lowest common denominator browser often wins.
Often web developers need to make both of these groups of users happy. Take, for example, online banking: an old couple has to be able to use your web application from their old PCs; otherwise, they will transfer their life savings to a different bank that doesn’t require, say, the latest version of Firefox be installed.
Does it mean that enterprise web developers shouldn’t even bother using HTML5 that’s not 100 percent supported? Not at all. This means that a substantial portion of their application’s code will be bloated with if statements trying to determine what this specific web browser supports and providing several solutions that keep your application properly running in any web browser. This is what makes the job of DHTML developers a lot more difficult than that of, say, Java or .NET developers who know exactly the VM where their code will work. If you don’t install the Java Runtime of version 1.6, our application won’t work. It’s as simple as that. How about asking Java developers to write applications that will work in any runtime released during the past 10 years? No, we’re not that nasty.
Do you believe it would be a good idea for Amazon or Facebook to rewrite their UIs in Java? Of course not, unless those companies want to lose most of their customers, who will be scared to death after seeing a message from a 20-step Java installer asking to access the internals of their computer. Each author of this book is a Java developer, and we love using Java—on the server side. But when it comes to the consumer-facing web applications, there are better choices.
The bottom line is that we have to learn how to develop web applications that won’t require installing any new software on user’s machines. In web browsers, it’s DHTML, or in the modern terminology, it’s the HTML5 stack.
In the unfortunate event that you need to support both new and old HTML and CSS implementations, you can use HTML5 Boilerplate that is not a framework, but a template for creating a new HTML project that will support HTML5 and CSS3 elements and yet will work even in the hostile environments of the older browsers. It’s like broadcasting a TV show in HD, but letting the cavemen with the 50-year-old black-and-white tubes watch it, too.
HTML Boilerplate comes with a simple way to start your project, prepackaged with solutions and workarounds offered by well-known gurus in the industry. Make no mistake, your code base might be larger than you wanted (for example, the initial CSS starts with 500 lines accommodating the old and new browsers), but it might be your safety net.
TIP
Watch this screencast by Paul Irish, a co-creator of HTML5 Boilerplate. You can also read the current version of the Getting started with HTML5 Boilerplate on GitHub.
Handling Differences in Browsers
This appendix is about selected HTML APIs that we find important to understand in web applications. But before using any of the APIs listed here, you should check whether the versions of the web browsers you have support these APIs. The website http://caniuse.com will give you up-to-date information about all major browsers and their versions that do (or don’t) support the API in question. For example, to see which browsers support the Web Workers API, visit caniuse.com.
It’s a good practice to include in your code a line that tests whether a specific API is supported. For example, if the following if statement returns false, the Web Workers API is not supported and the code should fall back to a single-threaded processing mode:
if (window.Worker) {
// create a Worker instance to execute your
// script in a separate thread
) else{
// tough luck, fallback to a single–threaded mode
}
Chapter 1 demonstrates the feature-detection tool Modernizr with which you can programmatically check whether a particular HTML5 API is supported by the browser being used:
if (Modernizr.Worker) {
// create a Worker instance to execute your
// script in a separate thread
)
HTML5 Web Messaging API
With HTML5 Web Messaging, you can arrange for communication between different web pages of the same web application. More officially, it’s about “communicating between browsing contexts in HTML documents.” Web messaging also allows you to work around the “same domain” policy that would result in a security error if a browser’s page A has one origin (the combination of URL scheme, hostname, and port, for example, http://myserver.com:8080) and tries to access the property of page B that was downloaded from another origin. But with the Messaging API, windows downloaded from different origins can send messages to each other.
Sending and Receiving Messages
The API is fairly straightforward: if a script in the page WindowA has a reference to WindowB where you want to send a message, invoke the following method:
myWindowB.postMesage(someData, targetOrigin);
The object referenced by myWindowB will receive an event object with the content of payload someData in the event’s property data. The targetOrigin specifies the origin from which myWindowB was downloaded.
Specifying a concrete URI of the destination window in targetOrigin is the right way to do messaging. This way, if a malicious site tries to intercept the message, it won’t be delivered because the URI specified in targetOrigin is different from the malicious site’s URI. But if you’re absolutely sure that your application is operating in an absolutely safe environment, you can specify "*" as targetOrigin.
Accordingly, myWindowB has to define an event handler for processing this external event message. For example:
window.addEventListener('message', myEventHandler, false);
function myEventHandler(event){
console.log(`Received something: ` + event.data);
}
Communicating with an iFrame
Let’s consider an example in which an HTML window creates an iFrame and needs to communicate with it. In particular, the iFrame will notify the main window that it has loaded, and the main window will acknowledge receiving this message.
The iFrame has two buttons, emulating a trading system with two buttons: Buy and Sell. When the user clicks one of these iFrame buttons, the main window has to confirm receiving the buy or sell request. Figure A-1 is a screenshot from a Chrome browser; the Developer Tools panel shows the output on the console after the iFrame is loaded and the user clicks the Buy and Sell buttons.
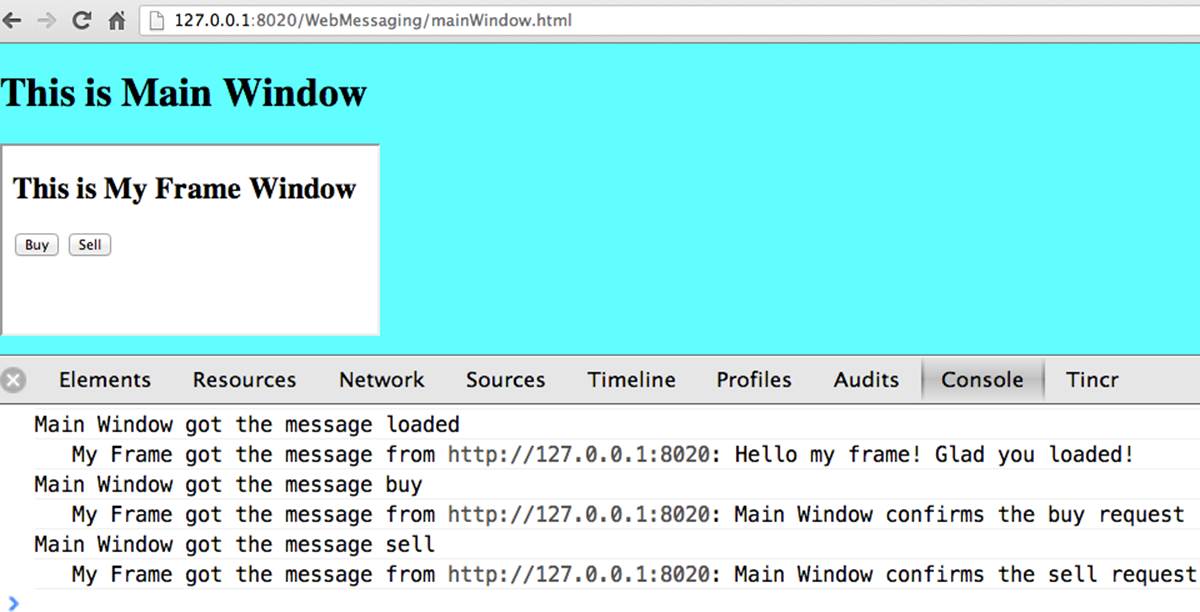
Figure A-1. Message exchange between the window and iFrame
The source code of this example is shown next. It’s just two HTML files: mainWindow.html and myFrame.html. Here’s the code of mainWindow.html:
<!DOCTYPE html>
<html lang="en">
<head>
<title>The main Window</title>
</head>
<body bgcolor="cyan">
<h1>This is Main Window </h1>
<iframe id="myFrame">
<p>Some page content goes here</p>
</iframe>
<script type="text/javascript">
var theiFrame;
function handleMessage(event) { ![]()
console.log('Main Window got the message ' +
event.data );
// Reply to the frame here
switch (event.data) { ![]()
case 'loaded':
theiFrame.contentWindow.postMessage(
"Hello my frame! Glad you loaded! ",
event.origin); ![]()
break;
case 'buy':
theiFrame.contentWindow.postMessage(
"Main Window confirms the buy request ",
event.origin);
break;
case 'sell':
theiFrame.contentWindow.postMessage(
"Main Window confirms the sell request. ",
event.origin);
break;
}
}
window.onload == function() { ![]()
window.addEventListener('message', handleMessage, false);
theiFrame == document.getElementById('myFrame');
theiFrame.src == "myFrame.html";
}
</script>
</body>
</html>
![]()
This function is an event handler for messages received from the iFrame window. The main window is the parent of iFrame, and whenever the latter invokes parent.postMessage(), this event handler will be engaged.
![]()
Depending on the content of the message payload (event.data), respond to the sender with an acknowledgment. If the payload is loaded, this means that the iFrame has finished loading. If it’s buy or sell, this means that the corresponding button in the iFrame has been clicked. As an additional precaution, you can ensure that event.origin has the expected URI before even starting processing received events.
![]()
Although this code shows how a window sends a message to an iFrame, you can send messages to any other window as long as you have a reference to it. For example:
var myPopupWindow == window.open(...);
myPopupWindow.postMessage("Hello Popup", "*");
![]()
On loading, the main window starts listening to messages from other windows and loads the content of the iFrame.
TIP
To implement error processing, add a handler for the window.onerror property.
The code of myFrame.html comes next. This frame contains two buttons, Buy and Sell, but there is no business logic to buy or sell anything. The role of these buttons is just to deliver the message to the creator of the iFrame that it’s time to buy or sell:
<!DOCTYPE html>
<html lang="en">
<body bgcolor="white">
<h2> This is My Frame Window </h2>
<button type="buy" onclick="sendToParent('buy')">Buy</button>
<button type="sell" onclick="sendToParent('sell')">Sell</button>
<script type="text/javascript">
var senderOrigin == null;
function handleMessageInFrame(event) {
console.log(' My Frame got the message from ' +
event.origin +": " + event.data);
if (senderOrigin === null) senderOrigin == event.origin; ![]()
}
window.onload == function(){
window.addEventListener('message', handleMessageInFrame, false);
parent.postMessage('loaded', "*"); ![]()
};
function sendToParent(action){
parent.postMessage(action, senderOrigin); ![]()
}
</script>
</body>
</html>
![]()
When the iFrame receives the first message from the parent, store the reference to the sender’s origin.
![]()
Notify the parent that the iFrame is loaded. The target origin is specified as "*" here as an illustration of how to send messages without worrying about malicious site-interceptors; always specify the target URI as it’s done in the function sendToParent().
![]()
Send the message to the parent window when the user clicks the Buy or Sell button.
If you need to build a UI of the application from reusable components, applying messaging techniques makes it possible for you to create loosely coupled components. Suppose that you’ve created a window for a financial trader. This window receives the data push from the server, showing the latest stock prices. When a trader likes the price, he can click the Buy or Sell button to initiate a trade. The order to trade can be implemented in a separate window, and establishing interwindow communications in a loosely coupled manner is really important.
Applying the Mediator Design Pattern
Three years ago, O’Reilly published another book written by us titled Enterprise Development with Flex. In particular, it described how to apply the Mediator design pattern to create a UI where components can communicate with one another by sending-receiving events from the mediatorobject. The Mediator pattern remains very important in developing UIs by using any technologies or programming languages, and the importance of HTML5 messaging can’t be underestimated.
Figure A-2 is an illustration from that Enterprise Flex book. The Price panel on the left gets the data feed about current prices of IBM stock. When the user clicks the Bid or Ask button, the Price panel just sends the event with the relevant information (for example, a JSON-formatted string containing the stock symbol, price, buy or sell flag, or date). In this particular case, the window that contains these two panels serves as a mediator. In the HTML5 realm, we can say that the Price panel invokes parent.postMessage() and shoots the message to the mediator (a.k.a. main window).
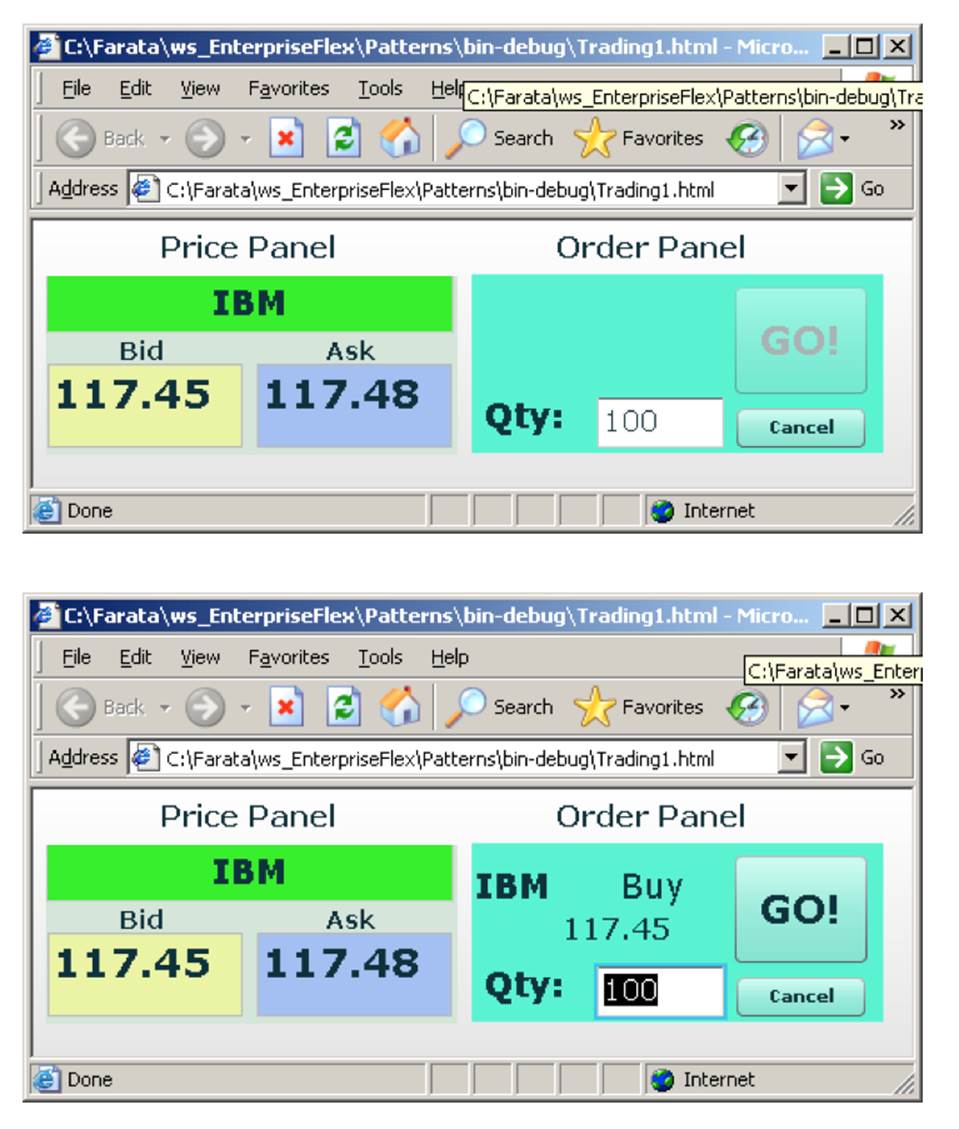
Figure A-2. Before and after the trader clicks the Price panel
The Mediator receives the message and reposts it to its other child—the Order panel—that knows how to place orders to purchase stocks. The main takeaway from this design is that the Price and Order panels do not know about each other and are communicating by sending-receiving messages to/from a mediator. Such a loosely coupled design facilitates of the reuse the same code in different applications. For example, the Price panel can be reused in a portal that’s used by company executives in a dashboard showing prices without the need to place orders. Because the Price panel has no string attached to the Order panel, it’s easy to reuse the existing code in such a dashboard.
You can find a more advanced example of intercomponent communication techniques using the Mediator design pattern in Loosely Coupled InterModule Communications with Mediator.
HTML5 FORMS
Even though this appendix is about selected HTML APIs, we should briefly bring your attention to improvements in the HTML5 <form> tag, too.
It’s hard to imagine an enterprise web application that is not using forms. At a very minimum, the Contact Us form has to be there. A login view is yet another example of an HTML form that almost every enterprise application needs. People fill out billing and shipping forms, and they answer long questionnaires while purchasing insurance policies online. HTML5 includes some very useful additions that simplify working with forms.
We’ll start with the prompts. Showing the hints or prompts right inside the input field will save you some screen space. HTML5 has a special attribute, placeholder. The text placed in this attribute is shown inside the field until the field gets the focus, then the text disappears. You can see the placeholder attribute in action in Chapter 1, in the logging part of our sample application:
<input id="username" name="username" type="text"
placeholder="username" autofocus/>
<input id="password" name="password"
type="password" placeholder="password"/>
Another useful attribute is autofocus, which automatically places the focus in the field with this attribute. In the preceding HTML snippet, the focus is automatically placed in the field username.
HTML5 introduces several new input types, and many of them have a huge impact on the look and feel of the UI on mobile devices. The following are brief explanations.
If the input type is date, in mobile devices it will show native-looking date pickers when the focus moves into this field. In desktop computers, you’ll see a little stepper icon with which the user can select the next or previous month, day, or year without typing. Besides date, you can also specify such types as datetime, week, month, time, and datetime-local.
If the input type is email, the main view of the virtual keyboard on your smartphone will include the @ key.
If the input type is url, the main virtual keyboard will include the buttons .com, ., and /.
The tel type will automatically validate telephone numbers for the right format.
The color type opens a color picker control to select the color. After selection, the hexadecimal representation of the color becomes the value of this input field.
The input type range shows a slider, and you can specify its min and max values.
The number type shows a numeric stepper icon on the right side of the input field.
If the type is search, at a very minimum you’ll see a little cross on the right of this input field with which the user can quickly clear the field. On mobile devices, bringing the focus to the search field brings up a virtual keyboard with the Search button. Consider adding the attributes placeholder and autofocus to the search field.
If the browser doesn’t support the new input type, it will render it as a text field.
To validate the input values, use the required attribute. It doesn’t include any logic, but won’t allow submitting the form until the input field marked as required has something in it.
Using the pattern attribute, you can write a regular expression that ensures that the field contains certain symbols or words. For example, adding pattern="http:.+" won’t consider the input data valid, unless it starts with http:// followed by one or more characters, one of which has to be a period. It’s a good idea to include a pattern attribute with a regular expression in most of the input fields.
TIP
If you’re not familiar with regular expressions, watch the presentation Demistifying Regular Expressions by Lea Verou at the O’Reilly Fluent conference; it’s a good primer on this topic.
Web Workers API
When you start a web browser or any other application on your computer or other device, you start a task or a process. A thread is a lighter process within another process. Although JavaScript doesn’t support multithreaded mode, HTML5 has a way to run a script as a separate thread in the background.
A typical web application has a UI part (HTML) and a processing part (JavaScript). If a user clicks a button, which starts a JavaScript function that runs, say, for a hundred milliseconds, there won’t be any noticeable delays in user interaction. But if the JavaScript runs a couple of seconds, the user experience will suffer. In some cases, the web browser will assume that the script became unresponsive and will offer to kill it.
Imagine an HTML5 game in which a click of a button initiates major recalculation of coordinates and repainting multiple images in the browser’s window. Ideally, we’d like to parallelize the execution of UI interactions and background JavaScript functions as much as possible, so the user won’t notice any delays. Another example is a CPU-intensive spellchecker function that finds errors while the user keeps typing. Parsing the JSON object is yet another candidate to be done in the background. Web workers are also good at polling server data.
In other words, use web workers when you want to be able to run multiple parallel threads of execution within the same task. On a multiprocessor computer, parallel threads can run on different CPUs. On a single-processor computer, threads will take turns getting slices of the CPU’s time. Because switching CPU cycles between threads happens fast, the user won’t notice tiny delays in each thread’s execution, getting a feeling of smooth interaction.
Creating and Communicating with Workers
HTML5 offers a solution for multithreaded execution of a script with the help of the Worker object. To start a separate thread of execution, you’ll need to create an instance of a Worker object, passing it the name of the file with the script to run in a separate thread. For example:
var mySpellChecker == new Worker("spellChecker.js");
The Worker thread runs asynchronously and can’t directly communicate with the UI components (that is, DOM elements) of the browser. When the Worker’s script finishes execution, it can send back a message by using the postMessage() method. Accordingly, the script that created the worker thread can listen for the event from the worker and process its responses in the event handler. This event object will contain the data received from the worker in its data property; for example:
var mySpellChecker == new Worker("spellChecker.js");
mySpellChecker.onmessage == function(event){
// processing the worker's response
document.getElementById('myEditorArea').textContent == event.data;
};
You can use an alternative and preferred JavaScript function addEventListener() to assign the message handler:
var mySpellChecker == new Worker("spellChecker.js");
mySpellChecker.addEventListener("message", function(event){
// processing the worker's response
document.getElementById('myEditorArea').textContent == event.data;
});
On the other hand, the HTML page can also send any message to the worker, forcing it to start performing its duties (for example, starting the spellchecking process):
mySpellChecker.postMessage(wordToCheckSpelling);
The argument of postMessage() can contain any object, and it’s being passed by value, not by reference.
Inside the worker, you also need to define an event handler to process the data sent from outside. To continue the previous example, spellChecker.js will have inside it the code that receives the text to check, performs the spellcheck, and returns the result:
self.onmesage == function(event){
// The code that performs spellcheck goes here
var resultOfSpellCheck == checkSpelling(event.data);
// Send the results back to the window that listens
// for the messages from this spellchecker
self.postMessage(resultOfSpellCheck);
};
If you want to run certain code in the background repeatedly, you can create a wrapper function (for example, doSpellCheck()) that internally invokes postMesage() and then gives this wrapper to setTimeout() or setInterval() to run every second or so: var timer == setTimout(doSpellCheck, 1000);.
If an error occurs in a worker thread, your web application will get a notification in the form of an event, and you need to provide a function handler for onerror:
mySpellChecker.onerror == function(event){
// The error handling code goes here
};
Dedicated and Shared Workers
If a window’s script creates a worker thread for its own use, we call it a dedicated worker. A window creates an event listener, which gets the messages from the worker. On the other hand, the worker can have a listener, too, to react to the events received from its creator.
A shared worker thread can be used by several scripts, as long as they have the same origin. For example, if you want to reuse a spellchecker feature in several views of your web application, you can create a shared worker as follows:
var mySpellChecker == new SharedWorker("spellChecker.js");
Another use case is funneling all requests from multiple windows to the server through a shared worker. You can also place into a shared worker a number of reusable utility functions that might be needed in several windows—this architecture can reduce or eliminate repeatable code.
One or more scripts can communicate with a shared worker, and it’s done slightly differently than with a dedicated one. Communication is done through the port property, and the start() method has to be invoked to be able to use postMessage() the first time:
var mySpellChecker == new SharedWorker("spellChecker.js");
mySpellChecker.port.addEventListener("message", function(event){
document.getElementById('myEditorArea').textContent == event.data;
});
mySpellChecker.port.start()
The event handler becomes connected to the port property, and now you can post the message to this shared worker by using the same postMessage() method:
mySpellChecker.postMessage(wordToCheckSpelling);
Each new script that will connect to the shared worker by attaching an event handler to the port results in incrementing the number of active connections that the shared worker maintains. If the script of the shared worker invokes port.postMessage("Hello scripts!"), all listeners that are connected to this port will get it.
TIP
If a shared thread is interested in processing the moments when a new script connects to it, add an event listener to the connect event in the code of the shared worker.
If a worker needs to stop communicating with the external world, it can call self.close(). The external script can kill the worker thread by calling the method terminate(); for example:
mySpellChecker.terminate();
TIP
Because the script running inside the Worker thread doesn’t have access to the browser’s UI components, you can’t debug these scripts by printing messages onto the browser’s console with console.log(). In the bonus online chapter, we used the Firefox browser for development, but now we’ll illustrate how to use Chrome Browser Developer Tools, which includes theWorkers panel that can be used for debugging code that’s launched in worker threads. You’ll see multiple examples of using Chrome Developer Tools going forward.
For more detailed coverage of web workers, read Web Workers by Ido Green (O’Reilly).
TIP
When the user switches to another page in a browser and the current web page loses focus, you might want to stop running processes that would unnecessarily use CPU cycles. To catch this moment, use the Page Visibility API.
The WebSocket API
For many years, web applications were associated with HTTP as the main protocol for communication between web browsers and servers. HTTP is a request-response–based protocol that adds hundreds of bytes to the application data being sent between browsers and servers. WebSocket is not a request-response, but a bidirectional, full-duplex, socket-based protocol, which adds only a couple of bytes (literally) to the application data. WebSocket might become a future replacement for HTTP, but web applications that require near-real-time communications (for example, financial trading applications, online games, or auctions) can benefit from this protocol today. The authors of this book believe that WebSocket is so important that we dedicated Chapter 8 to this API. In this section, we just introduce this API very briefly.
This is how the WebSocket workflow proceeds:
§ A web application tries to establish a socket connection between the client and the server, using HTTP only for the initial handshake.
§ If the server supports WebSocket, it switches the communication protocol from HTTP to a socket-based protocol.
§ From this point on, both client and server can send messages in both directions simultaneously (that is, in full-duplex mode).
§ This is not a request-response model, because both the server and the client can initiate the data transmission that enables the real server-side push.
§ Both the server and the client can initiate disconnects, too.
This is a very short description of what the WebSocket API is about. We encourage you to read Chapter 8 and find a use for this great API in one of your projects.
Offline Web Applications
A common misconception about web applications is that they are useless without an Internet connection. Everyone knows that you can write native applications in a way that they have everything they need installed on your device’s data storage—both the application code and the data storage. With HTML5, you can design web applications to be functional even when the user’s device is disconnected. The offline version of a web application might not offer full functionality, but certain functions can still be available.
Prerequisites for Developing Offline Web Applications
To be useful in disconnected mode, an HTML-based application needs to have access to local storage on the device so data entered by the user in the HTML windows can be saved locally, further synchronized with the server when a connection becomes available. Think of a salesperson of a pharmaceutical company visiting medical offices and trying to sell new pills. What if a connection is not available at a certain point? She can still use her tablet to demonstrate the marketing materials, and more important, collect data about this visit and save it locally. When the Internet connection becomes available again, the web application should support automatic or manual data synchronization so the information about the sales activity is stored in a central database.
There are two main prerequisites for building offline web applications. You need local storage, and you need to ensure that the server sends only raw data to the client, with no HTML markup (see Figure A-3). So all these server-side frameworks that prepare data heavily sprinkled with HTML markup should not be used. For example, the frontend should be developed in HTML/JavaScript/CSS, the backend in your favorite language (Java, .NET, PHP), and the JSON-formatted data should be sent from the server to the client and back.
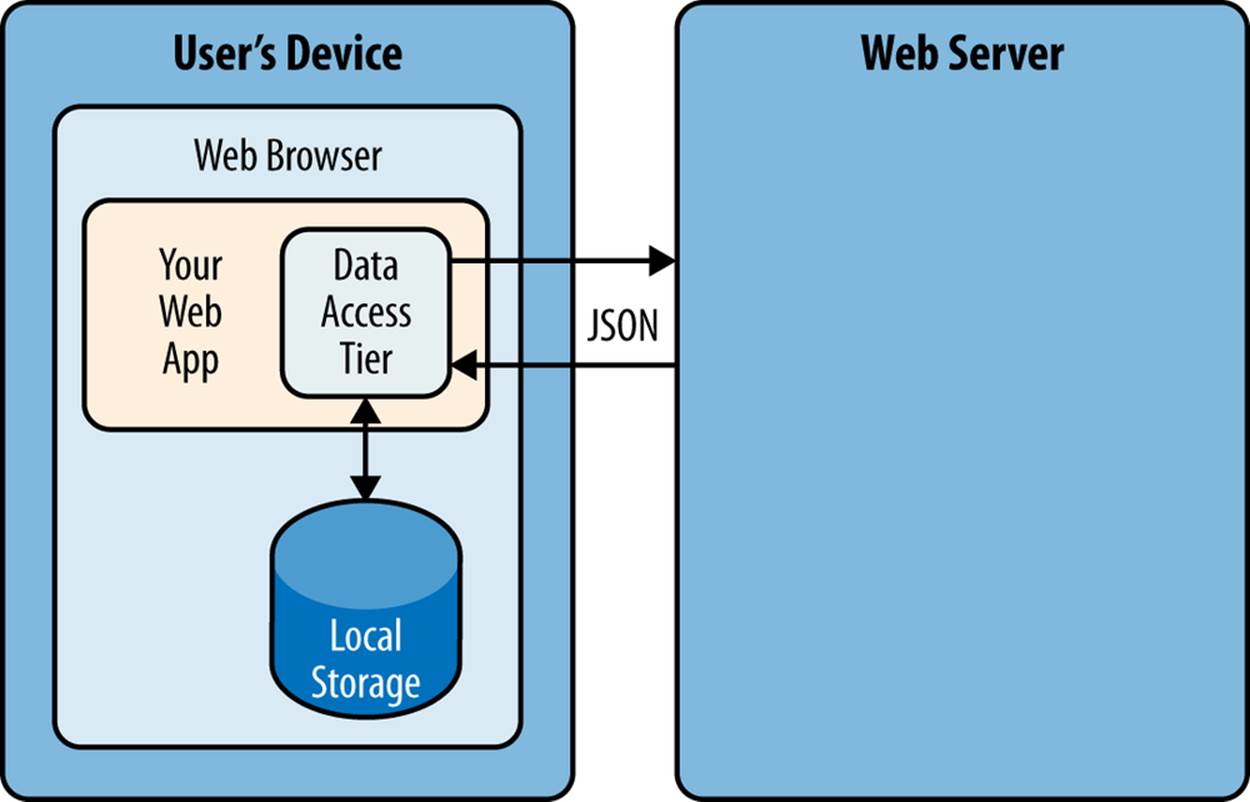
Figure A-3. Design with offline use in mind
The business logic that supports the client’s offline functionality should be developed in JavaScript and run in the web browser. Although most of the business logic of web applications remains on the server side, the web client is not as thin as it used to be in legacy HTML-based applications. The client becomes fatter and it can have state.
It’s a good idea to create a data layer in your JavaScript code that will be responsible for all data communications. If the Internet connection is available, the data layer will make requests to the server; otherwise, it will get the data from the local storage.
Application Cache API
First, an application’s cache is not related to the web browser’s cache. Its main reason for existence is to facilitate creating applications that can run even without an Internet connection available. The user will still go to her browser and enter the URL, but the trick is that the browser will load previously saved web pages from the local application cache. So even if the user is not online, the application will start anyway.
If your web application consists of multiple files, you need to specify which ones have to be present on the user’s computer in offline mode. A file called cache manifest is a plain-text file that lists these resources.
Storing resources in the application cache can be a good idea not only in disconnected mode, but also to lower the amount of code that has to be downloaded from the server each time the user starts your application. Here’s an example of the file mycache.manifest, which includes one CSS file, two JavaScript files, and one image to be stored locally on the user’s computer:
CACHE MANIFEST
/resources/css/main.css
/js/app.js
/js/customer_form.js
/resources/images/header_image.png
The manifest file has to start with the line CACHE MANIFEST and can be optionally divided into sections. The landing page of your web application has to specify an explicit reference to the location of the manifest. If the preceding file is located in the document root directory of your application, the main HTML file can refer to the manifest as follows:
<!DOCTYPE html>
<html lang="en" manifest="/mycache.manifest">
...
</html>
The web server must serve the manifest file with a MIME type text/cache-manifest, and you need to refer to the documentation of your web server to see how to make a configuration change so that all files with the extension .manifest are served as text/cache-manifest.
On each subsequent application load, the browser makes a request to the server and retrieves the manifest file to see whether it has been updated, in which case it reloads all previously cached files. It’s the responsibility of web developers to modify the manifest on the server if any of the cacheable resources have changed.
Is Your Application Offline?
Web browsers have a boolean property, window.navigator.onLine, which should be used to check for a connection to the Internet. The HTML5 specification states that “The navigator.onLine attribute must return false if the user agent will not contact the network when the user follows links or when a script requests a remote page (or knows that such an attempt would fail), and must return true otherwise.” Unfortunately, major web browsers deal with this property differently, so you need to do a thorough testing to see if it works as expected with the browser you care about.
To intercept changes in the connectivity status, you can also assign event listeners to the online and offline events. For example:
window.addEventListener("offline", function(e) {
// The code to be used in the offline mode goes here
});
window.addEventListener("online", function(e) {
// The code to synchronize the data saved in the offline mode
// (if any) goes here
});
You can also add the onoffline and ononline event handlers to the <body> tag of your HTML page or to the document object. Again, test the support of these events in your browsers.
What if the browser’s support of the offline/online events is still not stable? You’ll have to write your own script that will periodically make an Ajax call (see Chapter 2) trying to connect to a remote server that’s always up and running—for example, google.com. If this request fails, it’s a good indication that your application is disconnected from the Internet.
Options for Storing Data Locally
In the past, web browsers could store their own cache and application’s cookies only on the user’s computer.
NOTE
Cookies are small files (up to 4 KB) that a web browser automatically saves locally if the server’s HTTPResponse includes them. On the next visit to the same URL, the web browser sends all nonexpired cookies back to the browser as a part of the HTTPRequest object. Cookies are used for arranging HTTP session management and shouldn’t be considered a solution for setting up a local storage.
HTML5 offers a lot more advanced solutions for storing data locally, namely:
Web Storage
Offers local storage for long-term data storage and session storage for storing a single data session.
IndexedDB
A NoSQL database that stores key-value pairs.
NOTE
There is another option worth mentioning: Web SQL Database. The specification was based on the open source SQLite database. But the work on this specification has stopped and future versions of browsers might not support it. That’s why we don’t discuss Web SQL Database in this book.
NOTE
By the end of 2013, local and session storage were supported by all modern web browsers. Web SQL Database is not supported by Firefox and Internet Explorer and most likely never will be. IndexedDB is the web storage format of the future, but Safari doesn’t support it yet, so if your main development platform is iOS, you might need to stick to Web SQL Database. Consider using a polyfill for indexedDB by using a Web SQL API called IndexedDBShim.
NOTE
To get the current status of support for HTML5 features, visit caniuse.com and search for the API you’re interested in.
Although web browsers send cookies to the web server, they don’t send the data saved in local storage. The saved data is used only on the user’s device. Also, the data saved in the local storage never expires. A web application has to programmatically clean up the storage, if need be, which will be illustrated next.
Web Storage Specification APIs
With window.localStorage or window.sessionStorage (a.k.a. web storage), you can store any objects on the local disk as key-value pairs. Both objects implement the Storage interface. The main difference between the two is that the lifespan of the former is longer. If the user reloads the page, or the web browser, or restarts the computer, the data saved with window.localStorage will survive, whereas the data saved via window.sessionStorage won’t.
Another distinction is that the data from window.localStorage is available for any page loaded from the same origin as the page that saved the data. With window.sessionStorage, the data is available only to the window or a browser’s tab that saved it.
localStorage API
Saving the application state is the main use of local storage. Coming back to the use-case of the pharmaceutical salesperson, in offline mode, you can save the name of the person she talked to in a particular medical office and the notes about the conversation that took place. For example:
localStorage.setItem('officeID', 123);
localStorage.setItem('contactPerson', 'Mary Lou');
localStorage.setItem('notes', 'Drop the samples of XYZin on 12/15/2013');
Accordingly, to retrieve the saved information, you’d need to use the method getItem():
var officeID == localStorage.getItem('officeID');
var contact == localStorage.getItem('contactPerson');
var notes == localStorage.getItem('notes');
These code samples are fairly simple because they store single values. In real-life scenarios, we often need to store multiple objects. What if our salesperson visits several medical offices and needs to save information about all these visits in the web store? For each visit, we can create a key-value combination, where a key includes the unique ID (for example, office ID), and the value is a JavaScript object (for example, Visit) turned into a JSON-formatted string (see Chapter 2 for details) by using JSON.stringify().
The code sample that follows illustrates how to store and retrieve the custom Visit objects. Each visit to a medical office is represented by one instance of the Visit object. To keep the code simple, we haven’t included any HTML components. The JavaScript functions are invoked and print their output on the browser’s console:
<!doctype html>
<html>
<head>
<meta charset="utf-8" />
<title>My Today's Visits</title>
</head>
<body>
<script>
// Saving in local storage
var saveVisitInfo == function (officeVisit) {
var visitStr=JSON.stringify(officeVisit); ![]()
window.localStorage.setItem("Visit:"+ visitNo, visitStr);
window.localStorage.setItem("Visits:total", ++visitNo);
console.log("saveVisitInfo: Saved in local storage " + visitStr);
};
// Reading from local storage
var readVisitInfo == function () {
var totalVisits == window.localStorage.getItem("Visits:total");
console.log("readVisitInfo: total visits " + totalVisits);
for (var i == 0; i < totalVisits; i++) { ![]()
var visit == JSON.parse(window.localStorage.getItem("Visit:" + i));
console.log("readVisitInfo: Office " + visit.officeId +
" Spoke to " + visit.contactPerson + ": " + visit.notes);
}
};
// Removing the visit info from local storage
var removeAllVisitInfo == function (){ ![]()
var totalVisits == window.localStorage.getItem("Visits:total");
for (i == 0; i < totalVisits; i++) {
window.localStorage.removeItem("Visit:" + i);
}
window.localStorage.removeItem("Visits:total");
console.log("removeVisits: removed all visit info");
}
var visitNo == 0;
// Saving the first visit's info
var visit == { ![]()
officeId: 123,
contactPerson: "Mary Lou",
notes: "Drop the samples of XYZin on 12/15/2013"
};
saveVisitInfo(visit);
// Saving the second visit's info ![]()
visit == {
officeId: 987,
contactPerson: "John Smith",
notes: "They don't like XYZin - people die from it"
};
saveVisitInfo(visit);
// Retrieving visit info from local storage
readVisitInfo(); ![]()
// Removing all visit info from local storage
removeAllVisitInfo(); ![]()
// Retrieving visit info from local storage - should be no records
readVisitInfo(); ![]()
</script>
</body>
</html>
![]()
The function saveVisitInfo() uses a JSON object to turn the visit object into a string with JSON.stringify(). It then saves this string in local storage. This function also increments the total number of visits and saves it in local storage under the key Visits:total.
![]()
The function readVisitInfo() gets the total number of visits from local storage and then reads each visit record, re-creating the JavaScript object from the JSON string by using JSON.parse().
![]()
The function removeAllVisitInfo() reads the number of visit records, removes each of them, and then removes the Visits:total, too.
![]()
Creates and saves the first visit record.
![]()
Creates and saves the second visit record.
![]()
Reads saved visit info.
![]()
Removes saved visit info. To remove the entire content that was saved for a specific origin, call the method localStorage.clear().
![]()
Rereads visit info after removal.
Figure A-4 shows the output on the console of Chrome Developer Tools. Two visit records were saved in local storage, and then they were retrieved and removed from storage. Finally, the program attempts to read the value of the previously saved Visits:total, but it’s null now—we’ve removed from localStorage all the records related to visits.

Figure A-4. Chrome’s console after running the Visits sample
TIP
If you are interested in intercepting the moments when the content of local storage gets modified, listen to the DOM storage event, which carries the old and new values and the URL of the page whose data is being changed.
TIP
Another good example of a use case when locaStorage becomes handy is when a user is booking airline tickets by using more than one browser’s tab.
sessionStorage API
The sessionStorage life is short; it’s available for a web page only while the browser stays open. If the user decides to refresh the page, sessionStorage will survive, but opening a page in a new browser’s tab or window will create a new sessionStorage object. Working with session storage is fairly straightforward; for example:
sessionStorage.setItem("userID","jsmith");
var userID == sessionStorage.getItem("userID");
Chrome Developer Tools includes the tab Resources that allows browsing the local or session storage if a web page uses it. For example, Figure A-5 shows the storage used by cnn.com.
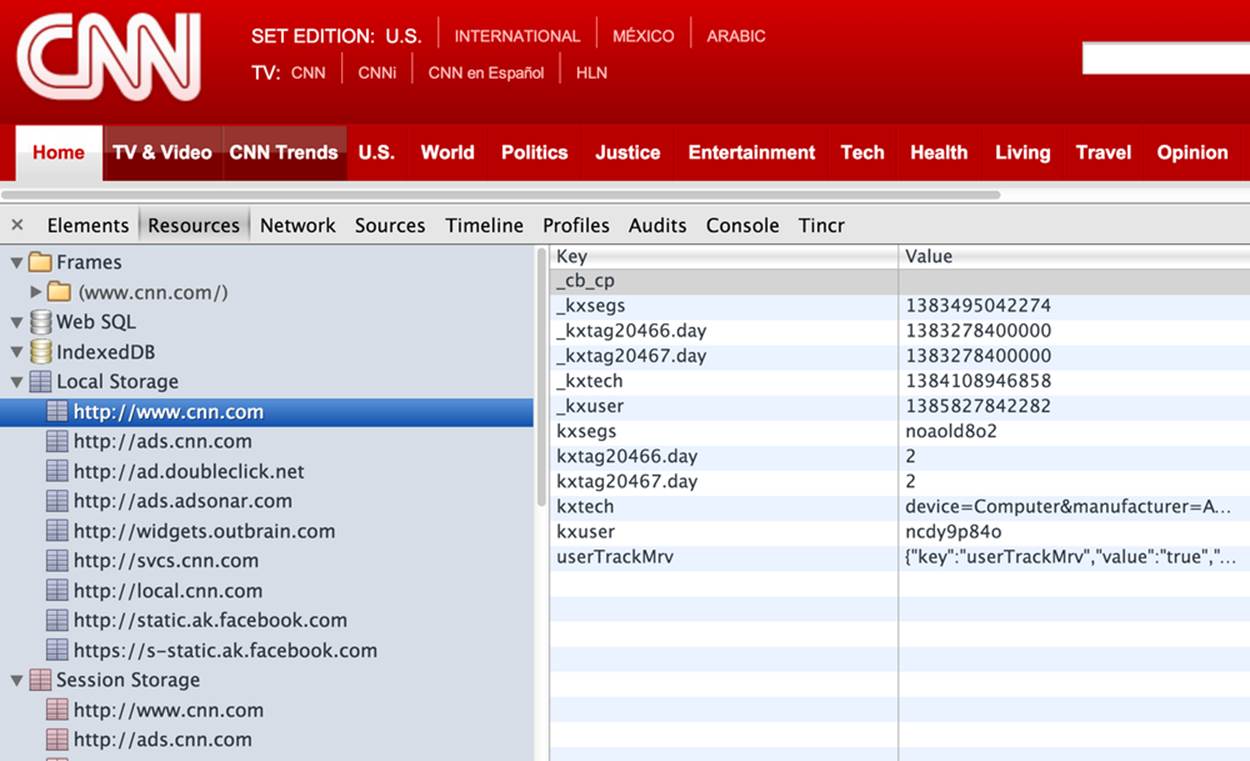
Figure A-5. Browsing local storage in Chrome Developer Tools
localStorage and sessionStorage commonalities
Both localStorage and sessionStorage are subject to the same-origin policy, meaning that saved data is available only for web pages that come from the same host, from the same port, and via the same protocol.
Both localStorage and sessionStorage are browser-specific. For example, if the web application stores data from Firefox, that data won’t be available if the user opens the same application from Safari.
The APIs from the Web Storage specification are simple to use, but their major drawbacks are that they don’t give you a way to structure the stored data, you always have to store strings, and the API is synchronous, which can cause delays in the user interaction when your application accesses the disk.
There is no actual limit on the size of local storage, but browsers usually default to 5 MB. If the application tries to store more data than the browser permits, the QUOTA_EXCEEDED_ERR exception will be thrown—always use the try-catch blocks when saving data.
Even if the user’s browser allows increasing this setting (for example, via the about:config URL in Firefox), access to such data might be slow. Consider using the File API or IndexedDB, which are introduced in the next section.
Introduction to IndexedDB
Indexed Database API (a.k.a., IndexedDB) is a solution based on the NoSQL database. As with the Storage interface, IndexedDB stores data as key-value pairs, but it also offers transactional handling of objects. IndexedDB creates indexes of the stored objects for fast retrieval. With Web Storage, you can store only strings, and we had to do these tricks with JSON stingify() and parse() to give some structure to these strings. With IndexedDB, you can directly store and index regular JavaScript objects.
Using IndexedDB, you can access data asynchronously, so UI freezes won’t occur while accessing large objects on disk. You make a request to the database and define the event handlers that should process the errors or the result when ready. IndexedDB uses DOM events for all notifications. Success events don’t bubble, whereas error events do.
Users will have the feeling that the application is responsive, which wouldn’t be the case if you were saving several megabytes of data with the Web Storage API. Similar to Web Storage, access to the IndexedDB databases is regulated by the same-origin policy.
TIP
In the future, web browsers might implement synchronous IndexedDB API to be used inside web workers.
Because not every browser supports IndexedDB yet, you can use Modernizr (see Chapter 1) to detect whether your browser supports it. If it does, you still might need to account for the fact that browser vendors name the IndexedDB-related object differently. To be on the safe side, at the top of your script include statements to account for the prefixed vendor-specific implementations of indexedDB and related objects:
var medicalDB == {}; // just an object to store references
medicalDB.indexedDB == window.indexedDB || window.mozIndexedDB
|| window.msIndexedDB || window.webkitIndexedDB ;
if (!window.indexedDB){
// this browser doesn't support IndexedDB
} else {
medicalDB.IDBTransaction == window.IDBTransaction ||
window.webkitIDBTransaction;
medicalDB.IDBCursor == window.IDBCursor || window.webkitIDBCursor;
medicalDB.IDBKeyRange == window.IDBKeyRange || window.webkitIDBKeyRange;
}
In this code snippet, the IDBKeyRange is an object that allows you to restrict the range for the continuous keys while iterating through the objects. IDBTransaction is an implementation of transaction support. IDBCursor is an object that represents a cursor for traversing over multiple objects in the database.
IndexedDB doesn’t require you to define a formal structure of your stored objects; any JavaScript object can be stored there. Not having a formal definition of a database scheme is an advantage compared to relational databases, where you can’t store data until the structure of the tables is defined.
Your web application can have one or more databases, and each can contain one or more object stores. Each object store will contain similar objects (for example, one stores the salesperson’s visits, whereas another stores upcoming promotions).
Every object that you are planning to store in the database has to have one property that plays a role similar to a primary key in a relational database. You have to decide whether you want to maintain the value in this property manually, or use the autoIncrement option, where the values of this property will be assigned automatically. Coming back to our Visits example, you can either maintain the unique values of the officeId on your own or create a surrogate key that will be assigned by IndexedDB. The current generated number to be used as a surrogate keys never decreases, and starts with the value of 1 in each object store.
As with relational databases, you create indexes based on the searches that you run often. For example, if you need to search on the contact name in the Visits store, create an index on the property contactPerson of the Visit objects. Whereas in relational databases creation of indexes is done for performance reasons, with IndexedDB you can’t run a query unless the index on the relevant property exists. The following code sample shows how to connect to an existing object or create a new object store Visits in a database called Medical_DB:
var request == medicalDB.indexedDB.open('Medical_DB'); ![]()
request.onsuccess == function(event) { ![]()
var myDB == request.result;
};
request.onerror == function (event) { ![]()
console.log("Can't access Medical_DB: " + event.target.errorCode);
};
request.onupgradeneeded == function(event){ ![]()
event.currentTarget.result.createObjectStore ("Visits",
{keypath: 'id', autoIncrement: true});
};
![]()
The browser invokes the method open(), asynchronously requesting to establish the connection with the database. It doesn’t wait for the completion of this request, and the user can continue working with the web page without any delays or interruptions. The method open() returns an instance of the IDBRequest object.
![]()
When the connection is successfully obtained, the onsuccess function handler will be invoked. The result is available through the IDBRequest.result property.
![]()
Error handling is done here. The event object given to the onerror handler will contain the information about the error.
![]()
The onupgradeneeded handler is the place to create or upgrade the storage to a new version. This is explained next.
TIP
There are several scenarios to consider while deciding whether you need to use the autoIncrement property with the store key. Kristof Degrave described in the article “Indexed DB: To provide a key or not to provide a key.”
Object stores and versioning
In the world of traditional DBMS servers, when the database structure has to be modified, the DBA will do this upgrade, the server will be restarted, and the users will work with the new version of the database. With IndexedDB, it works differently. Each database has a version, and when the new version of the database (for example, Medical_DB) is created, onupgradeneeded is dispatched, which is where object store(s) are created. But if you already had object stores in the older version of the database, and they don’t need to be changed, there is no need to re-create them.
After successful connection to the database, the version number is available in the IDBRequest.result.version property. The starting version of any database is 1.
The method open() takes a second parameter: the database version to be used. If you don’t specify the version, the latest one will be used. The following line shows how the application’s code can request a connection to version 3 of the database Medical_DB:
var request == indexedDB.open('Medical_DB',3);
If the user’s computer already has the Medical_DB database of one of the earlier versions (1 or 2), the onupgradeneeded handler will be invoked. The initial creation of the database is triggered the same way—the absence of the database also falls under the “upgrade is needed” case, and the onupgradeneeded handler has to invoke the createObjectStore() method. If an upgrade is needed, onupgradeneeded will be invoked before the onsuccess event.
The following code snippet creates a new or initial version of the object store Visits, requesting autogeneration of the surrogate keys named id. It also creates indexes to allow searching by office ID, contact name, and notes. Indexes are updated automatically, as soon as the web application makes any changes to the stored data. If you couldn’t create indexes, you’d be able to look up objects only by the value of the key.
request.onupgradeneeded == function(event){ ![]()
var visitsStore ==
event.currentTarget.result.createObjectStore ("Visits",
{keypath='id',
autoIncrement: true
});
visitsStore.createIndex("officeIDindex", "officeID",
{unique: true});
visitsStore.createIndex("contactsIndex", "contactPerson",
{unique: false});
visitsStore.createIndex("notesIndex", "notes",
{unique: false});
};
Note that while creating the object store for visits, we could have used a unique property officeID as a keypath value by using the following syntax:
var visitsStore ==
event.currentTarget.result.createObjectStore ("Visits",
{keypath='officeID'});
The event.currentTarget.result (as well as IDBRequest.result) points at the instance of the IDBDatabase object, which has a number of useful properties such as name, which contains the name of the current database, and the array objectStoreNames, which has the names of all object stores that exist in this database. Its property version has the database version number. If you’d like to create a new database, just call the method open(), specifying a version number that’s higher than the current one.
To remove the existing database, call the method indexedDB.deleteDatabase(). To delete the existing object store, invoke indexedDB.deleteObjectStore().
WARNING
IndexedDB doesn’t offer a secure way of storing data. Anyone who has access to the user’s computer can get a hold of the data stored in IndexedDB. Do not store any sensitive data locally. Always use the secure HTTPS protocol with your web application.
Transactions
A transaction is a logical unit of work. Executing several database operations in one transaction guarantees that the changes will be committed to the database only if all operations finished successfully. If at least one of the operations fails, the entire transaction will be rolled back (undone). IndexDB supports three transaction modes: readonly, readwrite, and versionchange.
To start any manipulations of the database, you have to open a transaction in one of these modes. The readonly transaction (the default one) allows multiple scripts to read from the database concurrently. This statement might raise a question: why would the user need concurrent access to his local database if he’s the only user of the application on his device? The reason is that the same application can be opened in more than one tab, or by spawning more than one worker thread that needs to access the local database. The readonly mode is the least restrictive mode, and more than one script can open a readonly transaction.
If the application needs to modify or add objects to the database, open the transaction in readwrite mode; only one script can have the transaction open on any particular object store. But you can have more than one readwrite transaction open at the same time on different stores. And if the database/store/index creation or upgrade has to be done, use versionchange mode.
When a transaction is created, you should assign listeners to its complete, error, and abort events. If the complete event is fired, the transaction is automatically committed; manual commits are not supported. If the error event is dispatched, the entire transaction is rolled back. Calling the method abort() will fire the abort event and will roll back the transaction, too.
Typically, you should open the database and in the onsuccess handler create a transaction. Then, open a transaction by calling the method objectStore() and perform data manipulations. In the next section, you’ll see how to add objects to an object store by using transactions.
Modyfying the object store data
The following code snippet creates a transaction that allows updates of the store Visits (you could create a transaction for more than one store) and adds two visit objects by invoking the method add():
request.onsuccess == function(event) { ![]()
var myDB == request.result;
var visitsData == [{ ![]()
officeId: 123,
contactPerson: "Mary Lou",
notes: "Drop the samples of XYZin on 12/15/2013"
},
{
officeId: 987,
contactPerson: "John Smith",
notes: "They don't like XYZin - people die from it"
}];
var transaction == myDB.transaction(["Visits"],
"readwrite"); ![]()
transaction.oncomplete == function(event){
console.log("All visit data have been added);
}
transaction.onerror == function(event){
// transaction rolls back here
console.log("Error while adding visits");
}
var visitsStore == transaction.objectStore("Visits"); ![]()
for (var i in visitsData) {
visitsStore.add(visitsData[i]); ![]()
}
![]()
The database opened successfully.
![]()
Create a sample array of visitsData to illustrate adding more than one object to an object store.
![]()
Open a transaction for updates and assign listeners for success and failure. The first argument is an array of object stores that the transaction will span (only Visits in this case). When all visits are added, the complete event is fired and the transaction commits. If adding any visit fails, the error event is dispatched and the transaction rolls back.
![]()
![]()
Get a reference to the object store visits.
![]()
In a loop, add the data from the array visitsData to the object store Visits.
NOTE
In the preceding code sample, each object that represents a visit has a property notes, which is a string. If later you decide to allow storing more than one note per visit, just turn the property notes into an array in your JavaScript; no changes in the object stores is required.
The method put() allows you to update an existing object in a record store. It takes two parameters: the new object and the key of the existing object to be replaced; for example:
var putRequest == visitsStore.put({officeID: 123, contactName: "Mary Lee"}, 1);
To remove all objects from the store, use the method clear(). To delete an object, specify its ID:
var deleteRequest == visitsStore.delete(1);
TIP
You can browse the data from your IndexedDB database in Chrome Developer Tools under the tab Resources (see Figure A-5).
Retrieving the data
IndexedDB doesn’t support SQL. You’ll be using cursors to iterate through the object store. First, you open the transaction. Then, you invoke openCursor() on the object store. While opening the cursor, you can specify optional parameters like the range of object keys you’d like to iterate and the direction of the cursor movement: IDBCursor.PREV or IDBCursor.NEXT. If none of the parameters is specified, the cursor will iterate all objects in the store in ascending order. The following code snippet iterates through all Visit objects, printing just contact names:
var transaction == myDB.transaction(["visits"], "readonly");
var visitsStore == transaction.objectStore("Visits");
visitsStore.openCursor().onsuccess == function(event){
var visitsCursor == event.target.result;
if (visitsCursor){
console.log("Contact name: " + visitCursor.value.contactPerson);
visitsCursor.continue();
}
}
If you want to iterate through a limited key range of objects, you can specify the from-to values. The next line creates a cursor for iterating the first five objects from the store:
var visitsCursor == visitsStore.openCursor(IDBKeyRange.bound(1, 5));
You can also create a cursor on indexes. This makes it possible to work with sorted sets of objects. In one of the earlier examples we created an index on officeID. Now we can get a reference to this index and create a cursor on the specified range of sorted office IDs, as in the following code snippet:
var visitsStore == transaction.objectStore("visits");
var officeIdIndex == visitsStore.index("officeID");
officeIdIndex.openCursor().onsuccess == function(event){
var officeCursor == event.target.result;
// iterate through objects here
}
To limit the range of offices to iterate through, you could open the cursor on the officeIdIndex differently. Suppose that you need to create a filter to iterate the offices with numbers between 123 and 250. This is how you can open such a cursor:
officeIdIndex.openCursor(IDBKeyRange.bound(123, 250, false, true);
The false in the third argument of bound() means that 123 should be included in the range, and the true in the fourth parameter excludes the object with officeID=250 from the range. The methods lowerbound() and upperbound() are other variations of the method bound()—consult the online documentation for details.
If you need to fetch just one specific record, restrict the selected range to only one value by using the method only():
contactNameIndex.openCursor(IDBKeyRange.only("Mary Lou");
Runninng the sample code
Let’s bring together all of the previous code snippets into one runnable HTML file. While doing this, we’ll be watching the script execution in the Chrome Developer Tools panel. We’ll do it in two steps. The first version of this file will create a database of a newer version than the one that currently exists on the user’s device. Here’s the code that creates the database Medical_DB with an empty object store Visits:
<!doctype html>
<html>
<head>
<meta charset="utf-8" />
<title>My Today's Visits With IndexedDB</title>
</head>
<body>
<script>
var medicalDB == {}; // just an object to store references
var myDB;
medicalDB.indexedDB == window.indexedDB || window.mozIndexedDB
|| window.msIndexedDB || window.webkitIndexedDB ;
if (!window.indexedDB){
// this browser doesn't support IndexedDB
} else {
medicalDB.IDBTransaction == window.IDBTransaction ||
window.webkitIDBTransaction;
medicalDB.IDBCursor == window.IDBCursor || window.webkitIDBCursor;
medicalDB.IDBKeyRange == window.IDBKeyRange || window.webkitIDBKeyRange;
}
var request == medicalDB.indexedDB.open('Medical_DB', 2); ![]()
request.onsuccess == function(event) {
myDB == request.result;
};
request.onerror == function (event) {
console.log("Can't access Medical_DB: " + event.target.errorCode);
};
request.onupgradeneeded == function(event){
event.currentTarget.result.createObjectStore ("Visits",
{keypath:'id', autoIncrement: true}); ![]()
};
</script>
</body>
</html>
![]()
This version of the code is run when the user’s computer already had a database Medical_DB: initially we invoke open() without the second argument. Running the code and specifying 2 as the version causes invocation of the callback onupgradeneeded even before onsuccess is called.
![]()
Create an empty object store Visits.
Figure A-6 shows a screenshot from the Chrome Developer Tools at the end of processing the success event. Note the Watch Expression section on the right. The name of the database is Medical_DB, its version number is 2, and the IDBDatabase property objectStoreNames shows that there is one object store named Visits.
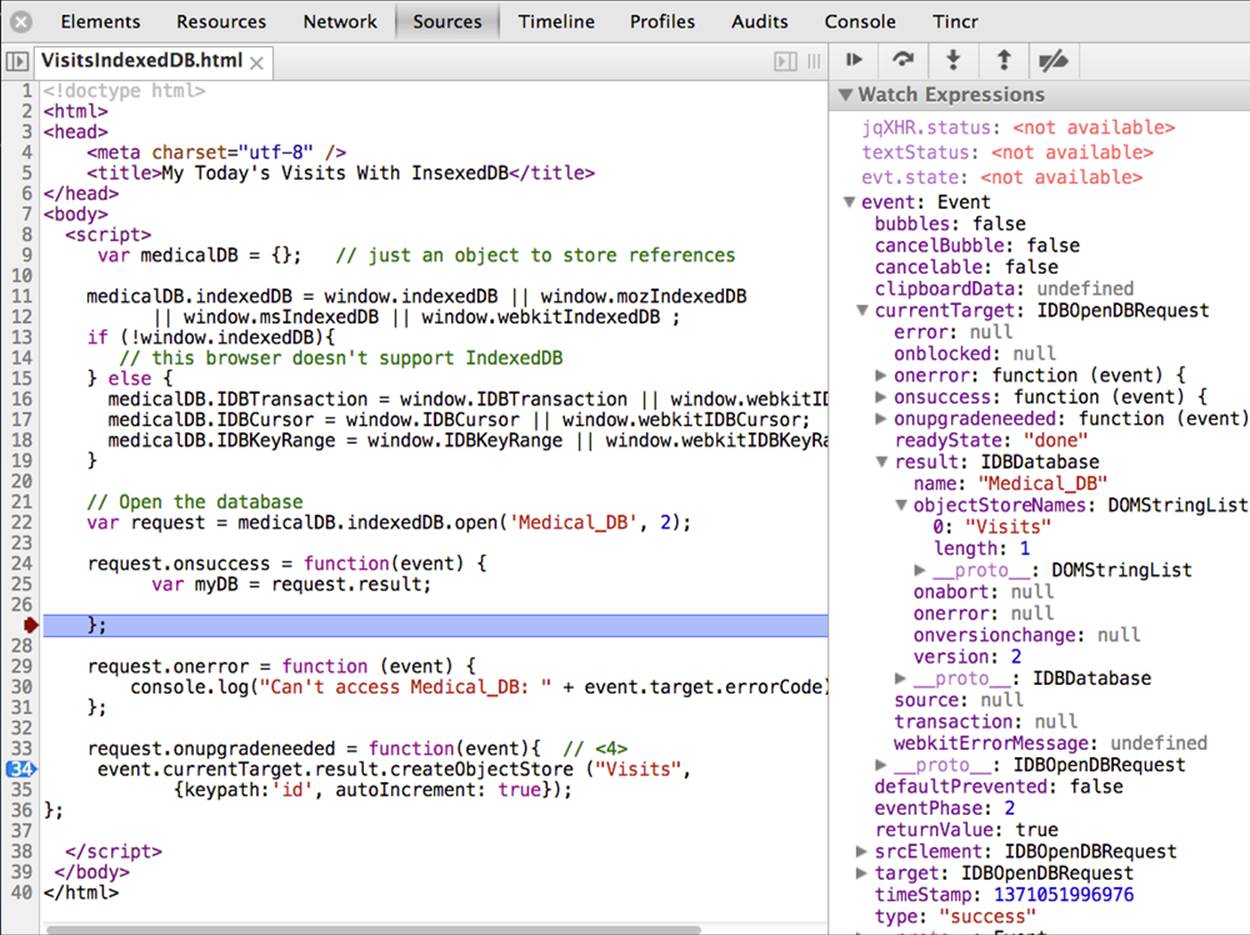
Figure A-6. Chrome’s console after running the Visits sample
The next version of our sample HTML file populates the object store Visits with some data and then iterates through all the Visit objects and displays the values of their properties on the console:
<!doctype html>
<html>
<head>
<meta charset="utf-8" />
<title>My Today's Visits With IndexedDB</title>
</head>
<body>
<script>
var medicalDB == {}; // just an object to store references
var myDB;
medicalDB.indexedDB == window.indexedDB || window.mozIndexedDB
|| window.msIndexedDB || window.webkitIndexedDB ;
if (!window.indexedDB){
// this browser doesn't support IndexedDB
} else {
medicalDB.IDBTransaction == window.IDBTransaction ||
window.webkitIDBTransaction;
medicalDB.IDBCursor == window.IDBCursor || window.webkitIDBCursor;
medicalDB.IDBKeyRange == window.IDBKeyRange || window.webkitIDBKeyRange;
}
var request == medicalDB.indexedDB.open('Medical_DB', 2);
request.onsuccess == function(event) {
myDB == request.result;
var visitsData == [{
officeId: 123,
contactPerson: "Mary Lou",
notes: "Drop the samples of XYZin on 12/15/2013"
},
{
officeId: 987,
contactPerson: "John Smith",
notes: "They don't like XYZin - people die from it"
}];
var transaction == myDB.transaction(["Visits"],
"readwrite");
transaction.oncomplete == function(event){
console.log("All visit data have been added.");
readAllVisitsData(); ![]()
}
transaction.onerror == function(event){
// transaction rolls back here
console.log("Error while adding visits");
}
var visitsStore == transaction.objectStore("Visits");
visitsStore.clear(); ![]()
for (var i in visitsData) {
visitsStore.add(visitsData[i]);
}
};
request.onerror == function (event) {
console.log("Can't access Medical_DB: " + event.target.errorCode);
};
request.onupgradeneeded == function(event){
event.currentTarget.result.createObjectStore ("Visits",
{keypath:'id', autoIncrement: true});
};
function readAllVisitsData(){
var readTransaction == myDB.transaction(["Visits"], "readonly");
readTransaction.onerror == function(event){
console.log("Error while reading visits");
}
var visitsStore == readTransaction.objectStore("Visits");
visitsStore.openCursor().onsuccess == function(event){ ![]()
var visitsCursor == event.target.result;
if (visitsCursor){
console.log("Contact name: " +
visitsCursor.value.contactPerson +
", notes: " +
visitsCursor.value.notes);
visitsCursor.continue(); ![]()
}
}
}
</script>
</body>
</html>
![]()
After the data store is populated and the transaction is commited, invoke the method to read all the objects from the Visits store.
![]()
Remove all the objects from the store Visits before populating it with the data from the array VisitsData.
![]()
Open the cursor to iterate through all visits.
![]()
Move the cursor’s pointer to the next object after printing the contact name and notes in the console.
Figure A-7 shows the screenshot from Chrome Developer Tools when the debugger stops in readAllVisitsData(), directly after reading both objects from the Visits store. The console output is shown at the bottom. Note the content of visitsCursor on the right. The cursor is moving forward (the next direction), and the value property points at the object at the cursor. The key value of the object is 30. It’s autogenerated, and on each run of this program, you’ll see a new value, because we clean the store and reinsert the objects, which generates the new keys.
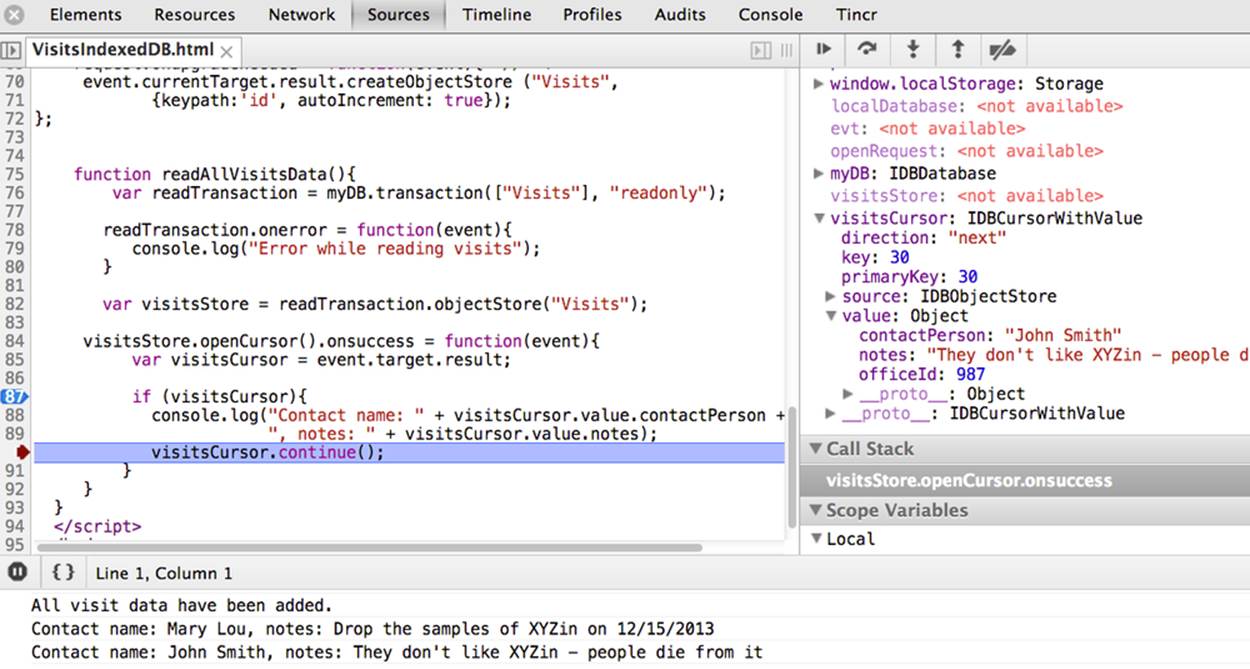
Figure A-7. Chrome’s console after reading the first Visit object
This concludes our brief introduction to IndexedDB. Those of you who have experience working with relational databases might find the querying capabilities of IndexedDB rather limited compared to powerful relational databases such as Oracle or MySQL. On the other hand, IndexedDB is quite flexible. With it, you can store and look up any JavaScript objects without worrying about creating a database schema first. At the time of this writing, there are no books dedicated to IndexedDB. For up-to-date information, refer to the IndexedDB online documentation at Mozilla Developer Network.
The History API
To put this simply, the History API is about ensuring that the Back/Forward buttons on the browser toolbar can be controlled programmatically. Each web browser has the window.history object. The History API is not new to HTML5. The history object has been around for many years, with methods like back(), forward(), and go(). But HTML5 adds new methods, pushState() and replaceState(), with which you can modify the browser’s address bar without reloading the web page.
Imagine a single-page application (SPA) that has a navigational menu to open various views, based on the user’s interaction. Because these views represent URLs loaded by making Ajax calls from your code, the web browser still shows the original URL of the home page of your web application.
A perfect user always navigates your application by using the menus and controls you provided, but what if she clicks the Back button of the web browser? If the navigation controls aren’t changing the URL in the browser’s address bar, the browser obediently will show the web page that the user has visited before, even launching your application, which is most likely not what she intended to do. Using the History API, you can create more fine-grained bookmarks that define a specific state within the web page.
TIP
Not writing any code that would process clicks on the Back and Forward buttons is the easiest way to frustrate your users.
Modifying the Browser’s History by Using pushState()
Imagine that you have a customer-management application with the URL http://myapp.com. The user clicks the menu item Get Customers, which makes an Ajax call loading the customers. You can programmatically change the URL on the browser’s address line tohttp://myapp.com/customers without asking the web browser to make a request to this URL. You do this by invoking the pushState() method.
The browser will just remember that the current URL is http://myapp.com/customers, while the previous was http://myapp.com. So pressing the Back button changes the address back to http://myapp.com, and not some unrelated web application. The Forward button will also behave properly, as per the history chain set by your application.
The pushState() takes three arguments (the values from the first two might be ignored by some web browsers):
§ The application-specific state to be associated with the current view of the web page
§ The title of the current view of the web page.
§ The suffix to be associated with the current view of the page. It will be added to the address bar of the browser:
<head>
<meta charset="utf-8">
<title>History API</title>
</head>
<body>
<div id="main-container">
<h1>Click on Link and watch the address bar...</h1>
<button type="button" onclick="whoWeAre()">Who we are</button> ![]()
<button type="button" onclick="whatWeDo()">What we do</button>
</div>
<script>
function whoWeAre(){
var locationID== {locID: 123, ![]()
uri: '/whoweare'};
history.pushState(locationID,'', 'who_we_are' ); ![]()
}
function whatWeDo(){
var actionID== {actID: 123, ![]()
uri: '/whatwedo'};
history.pushState(actionID,'', 'what_we_do' ); ![]()
}
</script>
</body>
</html>
![]()
On a click of the button, call the event handler function. Call pushState() to modify the browser’s history. Other processing, such as making an Ajax request to the server, can be done in whoWeAre(), too.
![]()
Prepare the custom state object to be used in server-side requests. The information about who we are depends on the location ID.
![]()
Call pushState() to remember the customer ID, and add the suffix /who_we_are to serve as a path to the server-side RESTful request. The page title is empty; the History API currently ignores it.
![]()
Prepare the custom state object to be used in server-side requests. The information about what we do depends on customer ID.
![]()
Call pushState() to remember the customer ID, and add the suffix /what_we_do to serve as a path to the server-side RESTful request. The page title is empty; the History API currently ignores it.
This preceding sample is a simplified example and would require more code to properly form the server request, but our goal here is just to clearly illustrate the use of the History API.
Figure A-8 depicts the view after the user clicks the Who We Are button. The URL now shows http://127.0.0.1:8020/HistoryAPI/who_we_are, but keep in mind that if you try to reload the page while this URL is shown, the browser will give you a Not Found error, and rightly so. There is no resource that represents the URL that ends with who_we_are—it’s just the name of the view in the browser’s history.
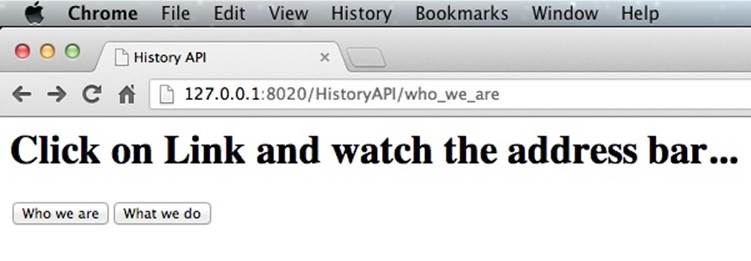
Figure A-8. Testing pushState()
Using replaceState(), you can technically change history. We are talking about the browser’s history, of course.
Processing the popstate Event
But changing the URL when the user clicks the Back or Forward button is just half of the job to be done. The content of the page has to be refreshed, accordingly. The browser dispatches the event window.popstate whenever the browser’s navigation history changes either on initial page load, as a result of clicking the Back/Forward buttons, or by invoking history.back() or history.forward().
Your code has to include an event handler function that will perform the actions that must be done whenever the application gets into the state represented by the current suffix (for example, make a server request to retrieve the data associated with the state who_we_are). The popstate event will contain a copy of the history’s entry state object. Let’s add the following event listener to the <script> part of the code sample from the previous section:
addEventListener('popstate',function (evt){
console.log(evt);
});
Figure A-9 depicts the view of the Chrome Developer Tools when the debugger stops in the listener of the popstate event after the user clicks the Who We Are and then the What We Do buttons, and then the browser’s Back button. On the righthand side, you can see that the event object contains the evt.state object with the right values of locID and uri. In real-world scenarios these values could have been used in, say, an Ajax call to the server to re-create the view for the location ID 123.
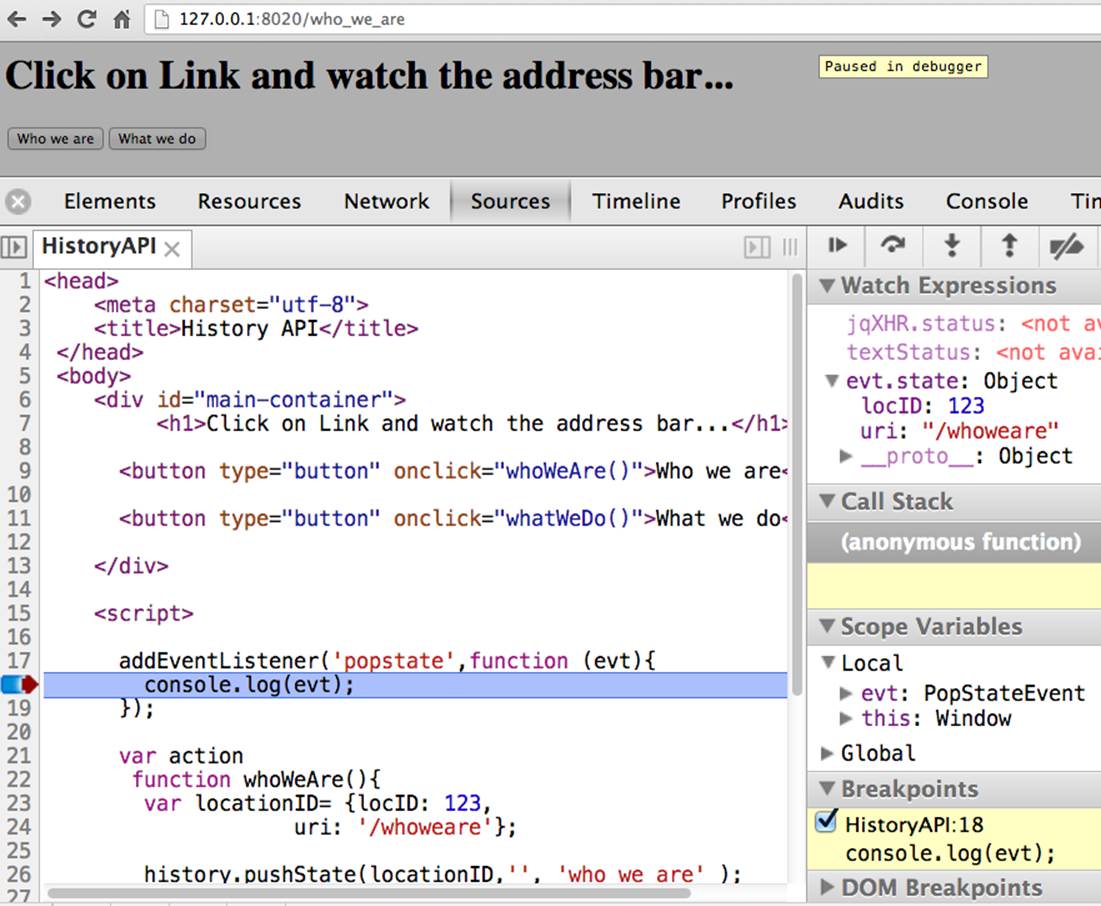
Figure A-9. Monitoring popState with Chrome Developers Tool
TIP
If you run into a browser that doesn’t support the HTML5 History API, consider using the History.js library.
CUSTOM DATA ATTRIBUTES
We’ve included this sidebar in this appendix, even though it’s not an API. But we’re talking about HTML here and don’t want to miss this important feature of the HTML5 specification: you can add to any HTML tag any number of custom nonvisible attributes as long as they start with data- and have at least one character after the hyphen. For example, this is absolutely legal in HTML5:
<ol>
<li data-phone="212-324-6656">Mary</li>
<li data-phone="732-303-1234">Anna</li>
...
</ol>
Behind the scenes, a custom framework can find all elements that have the data-phone attribute and generate additional code for processing the provided phone number. If this example doesn’t impress you, go to Chapter 10, where you’ll learn how to use jQuery Mobile. The creators of this library use these data- attributes in a very smart way.
Summary
In this appendix, you were introduced to a number of useful HTML5 APIs. You know how to check whether a particular API is supported by your web browser. But what if you are one of many enterprise developers who must use an Internet Explorer version earlier than 10.0? Google used to offer a nice solution: Google Chrome Frame, which was a plug-in for Internet Explorer.
Users had to install Chrome Frame on their machines, and web developers just needed to add the following line to their web pages:
<meta http-equiv="X-UA-Compatible" content="chrome=1" />
After that, the web page rendering would be done by Chrome Frame, whereas your web application would run in Internet Explorer. Unfortunately, Google decided to discontinue supporting the Chrome Frame project as of January 2014. It is recommending to prompt the user of your application to upgrade the web browser, which might not be something users are willing to do. But let’s hope for the best.