Implementing Cloud Storage with OpenStack Swift (2014)
Chapter 3. Installing OpenStack Swift
The previous chapter should have given you a good understanding of OpenStack Swift's architecture. Now, let's delve into the installation details of OpenStack Swift. This chapter is meant for IT administrators who want to install OpenStack Swift. The version discussed here is the Havana release of OpenStack. Installation of Swift has several steps and requires careful planning before beginning the process. A simple installation consists of installing all the Swift components in one node, and a complex installation consists of installing Swift on several proxy server nodes and storage server nodes. The number of storage nodes can be in the order of thousands across multiple zones and regions. Depending on your installation, you need to decide on the number of proxy server nodes and storage server nodes that you will configure. This chapter demonstrates a manual installation process; advanced users may want to use utilities such as Puppet or Chef to simplify the process.
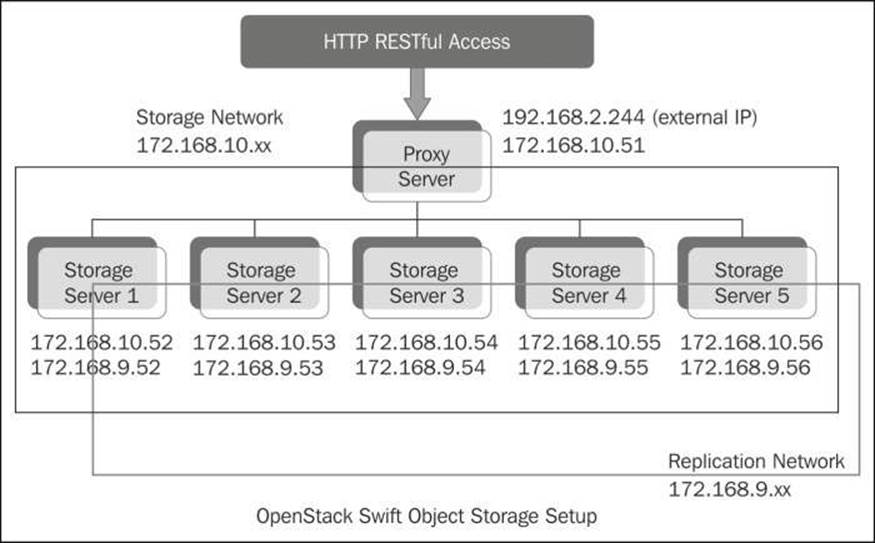
This chapter walks you through an OpenStack Swift cluster installation that contains one proxy server and five storage servers. As explained in Chapter 2, OpenStack Swift Architecture, storage servers include account, container, and object servers.
Hardware planning
This section describes the various hardware components involved in the setup (see Chapter 6, Choosing the Right Hardware, for a complete discussion on this topic). Since Swift deals with object storage, disks are going to be a big part of hardware planning. The size and number of disks required should be calculated based on your requirements. Networking is also an important component where factors such as public/private network and a separate network for communication between storage servers need to be planned. Network throughput of at least 1Gbps is suggested, while 10 Gbps is recommended.
The servers we set up as proxy and storage servers are dual quad-core servers with 12 GB of RAM.
In our setup, we have a total of 15 x 2 TB disks for Swift storage; this gives us a total size of 30 TB. However, with in-built replication (with default replica count of 3), Swift maintains three copies of the same data, and hence, the effective storage capacity for storing files/objects is 10 TB. This is further reduced due to less than 100 percent utilization. The following figure depicts the nodes of our Swift cluster configuration:
Server setup and network configuration
All the servers are installed with the Ubuntu operating system (Version 12.04).
You need to configure three networks, which are as follows:
· Public network: The proxy server connects to this network. This network provides public access to the API endpoints within the proxy server.
· Storage network: This is a private network not accessible to the outside world. All the storage servers and the proxy server will connect to this network. Communication between the proxy server and the storage servers, and communication between the storage servers, takes place within this network. In our configuration, the IP addresses assigned in this network are 172.168.10.0/172.168.10.99.
· Replication network: This also is a private network that is not accessible to the outside world. It is dedicated to replication traffic, and only storage servers connect to this network. All replication-related communication between storage servers takes place within this network. In our configuration, the IP addresses assigned in this network are 172.168.9.0 / 172.168.9.99.
Preinstallation steps
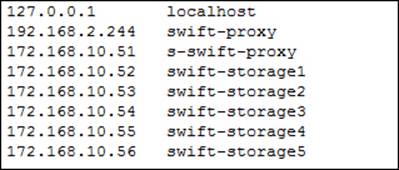
In order for the various servers to communicate easily, edit the /etc/hosts file, and add the hostnames of each server in it. This is performed on all the nodes. The following image shows an example of the contents of the / etc/hosts file of the proxy server node:
Install the NTP service on the proxy server node and storage server nodes. This helps all the nodes in synchronizing their services effectively without any clock delays. The pre-installation steps to be performed are as follows:
1. Configure the proxy server node to be the reference server for the storage server nodes to set their time from the proxy server node:
![]()
2. Add the following line to /etc/ntp.conf for NTP configuration in the proxy server node:
3. server ntp.ubuntu.com
4. For NTP configuration in storage server nodes, add the following line to /etc/ntp.conf. Comment out the remaining lines with server addresses such as 0.ubuntu.pool.ntp.org, 1.ubuntu.pool.ntp.org, 2.ubuntu.pool.ntp.org, and 3.ubuntu.pool.ntp.org:
5. server s-swift-proxy
6. Restart the NTP service on each server with the following command:
![]()
Downloading and installing Swift
The Ubuntu Cloud archive is a special repository that provides users with the capability to install new releases of OpenStack.
The steps to perform to download and install Swift are as follows:
1. Enable the capability to install new releases of OpenStack and install the latest version of Swift on each node using the following commands:
![]()
2. Now, update the OS using the following command:
![]()
3. On all the Swift nodes, we will install the prerequisite software and services using the following command:
![]()
4. Next, we create a Swift folder under /etc and give the user permission to access this folder by using the following commands:
![]()
5. Create a /etc/swift/swift.conf file and add a variable called swift_hash_path_suffix in the swift-hash section. We then create a unique hash string using Python –c "from uuid import uuid4; print uuid4()" or openssl rand –hex 10 and assign it to this variable as shown in the following command:

6. We then add another variable called swift_hash_path_prefix to the swift-hash section and assign another hash string created using the method described in the preceding step to it. These strings will be used in the hashing process to determine the mappings in the ring. The swift.conf file should be identical on all the nodes in the cluster.
Setting up storage server nodes
This section explains additional steps to set up the storage server node.
Installing services
On each storage server node, install the swift-account, swift-container, swift-object, and xfsprogs(XFS Filesystem) packages using the following command:
![]()
Formatting and mounting hard disks
On each storage server node, we need to identify the hard disks that will be used to store the data. We will then format the hard disks and mount them to a directory, which Swift will then use to store data. We will not create any RAID levels or any subpartitions on these hard disks because they are not necessary for Swift. They will be used as whole disks. The operating system will be installed on separate disks, which will be RAID-configured.
First, identify the hard disks that are going to be used for storage, and format them. In our storage server, we have identified sdb, sdc, and sdd, which will be used for storage.
We will perform the following four operations on sdb. These four steps should be repeated for sdc and sdd as well:
1. Do the partitioning for sdb and create the filesystem using the following command.

2. Then, let's create a directory in /srv/node that will be used to mount the filesystem. Give permission to the swift user to be able to access this directory. These operations can be performed by using the following commands:

3. We set up an entry in fstab for the sdb1 partition in the sdb hard disk, as follows. This will automatically mount sdb1 to /srv/node/sdb1 on every boot. Add the following command line to /etc/fstab file:
![]()
4. Mount sdb1 to /srv/node/sdb1 by using the following command:
![]()
RSYNC and RSYNCD
In order for Swift to perform replication of data, we need to set up rsync and rsyncd.conf by performing the following steps:
1. Create the rsyncd.conf file in the /etc folder with the following content:
![]()
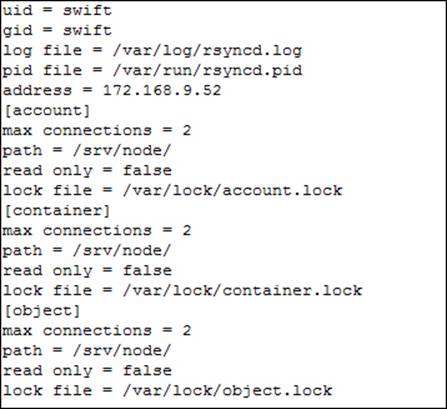
172.168.9.52 is the IP address that is on the replication network for this storage server. Use the appropriate replication network IP addresses for the corresponding storage servers.
2. We then have to edit the /etc/default/rsync file and set RSYNC_ENABLE to true using the following command:
![]()
3. We then have to restart the rsync service by using the following command:
![]()
4. Next, we create the swift recon cache directory by using the following command, and then set its permissions:
![]()
Setting permissions is done using the following command:
![]()
Repeat these steps on every storage server.
Setting up the proxy server node
This section explains the steps to set up the proxy server node, which are as follows:
1. Install the following services only on the proxy server node:
![]()
Note
Openssl has already been installed as part of the operating system installation to support HTTPS.
2. We are going to use the OpenStack Keystone service for authentication. So, we have to create the proxy-server.conf file and add the following content to it:
![]()
Add the following configuration information to the proxy-server.conf file:
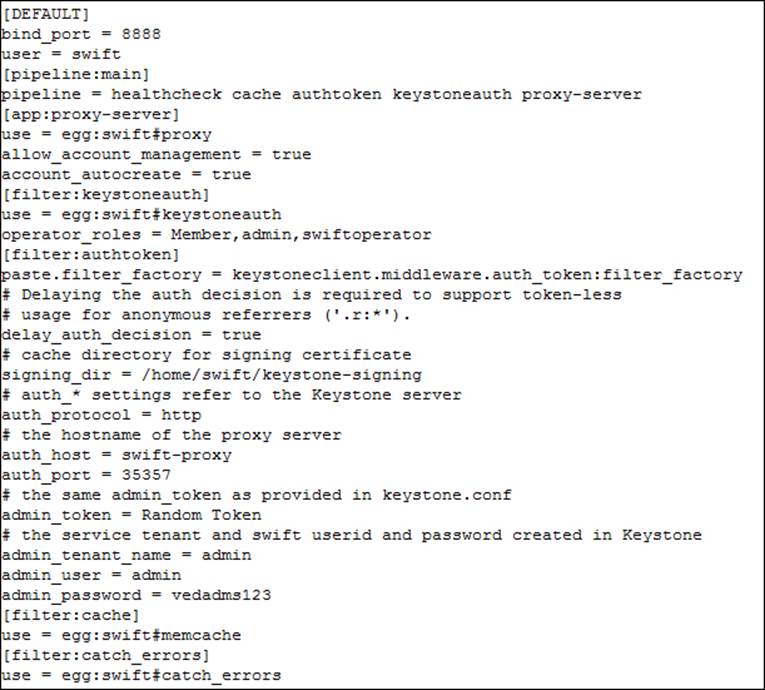
3. The proxy-server.conf file should be edited to have the correct auth_host, admin_token, admin_tenant_name, admin_user, and admin_password (refer to the following keystone setup section to see how to set up the correct credentials).
4. Next, we create a keystone-signing directory and give permissions to the swift user using the following commands:

The ring setup
As discussed in Chapter 2, OpenStack Swift Architecture, the ring (also called ring builder, or simply builder file) contains information to map the user API request information to the physical location of the account, container, or object. We will have a builder file for accounts, which will contain mapping information for the account. Similarly, we will have a builder file for containers and objects.
Builder files are created using the following commands:

The parameter 18 indicates that there can be 2 to the power of 18 partitions created to store the data. To determine the number of partitions, estimate the maximum number of disks, multiply that number by 100, and then round it up to the nearest power of two. Picking a number smaller than needed is not catastrophic; it will just result in an unbalanced cluster from a storage capacity point of view. Picking a number larger than needed will impact performance. The parameter 3 indicates that three replicas of data will be stored, and the parameter 1 is set in such a way that we don't move a partition more than once in an hour.
In Swift storage, hard disks can be grouped into zones, and rings can be set up according to the zones. Each hard disk in a storage server belongs to a particular zone. This helps Swift replicate the data to different zones in an as-unique-as-possible manner. If there is a failure in a particular zone, data can be fetched from the data copies in other zones. In a multiregion setup, if there is a failure in a particular region, then data can be fetched from other regions.
The following command syntax is used to add storage server hard disk devices to ring builder files. Please note that the region and zone the hard disk belongs to is provided as an input parameter. The weight parameter (100) indicates how much data is going to be placed on this disk compared to other disks.
Run the following commands to add the hard disks allocated for storage to the ring. In order to add mapping for the sdb1 device, we run the following commands:

In the preceding commands, 172.168.10.52 is the IP address of the storage node in the storage network that contains sdb1, and 172.168.9.52 is the IP address of the same storage node in the replication network.
We have to run the preceding commands by replacing sdb1 with sdc1 and sdd1 for this storage network IP address and replication network IP address. We have to run the same commands to add sdb1, sdc1, and sdd1 of the remaining storage servers as well by giving their storage network IP addresses and replication network IP addresses in the commands.
The final step in completing the ring builder process is creating the ring files that will be used by the Swift processes. This is done using the rebalance command, as shown:

Upon running the preceding commands, the following files will be created: account.ring.gz, container.ring.gz, and object.ring.gz. Copy these files into the etc/swift directory of all the nodes in the cluster.
Also, make sure that /etc/swift has swift user permissions on every node. Set up user permissions using the following command:
![]()
Now we can start the proxy service as follows:
![]()
Starting services on all storage nodes
Now that the storage servers have the ring files (account.ring.gz, container.ring.gz, and object.ring.gz), we can start the Swift services on the storage servers using the following commands:
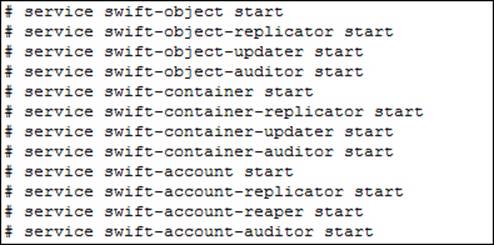
We should also start the rsyslog and memcached services on the storage servers by using the following commands:
![]()
Multiregion support
In multiregion installation, we place a pool of storage nodes in one region and the remaining in other regions. We can either have a single endpoint for all the regions or a separate endpoint for each region. During the ring builder setup, the region is specified as a parameter. Clients can access any endpoint and do the operations (create, delete, and so on), and they will be replicated across other regions. The proxy server configuration files will contain read_affinity and write_affinity in a particular region.
Our test configuration had two proxy servers and five storage nodes. Two regions were created by creating two endpoints. A list of the endpoints gives the following output, which has been truncated for better readability:
# keystone endpoint-list
+----------------------------------+--------------------+-------------------------------------------------++
|id| region | publicurl | adminurl |
+----------------------------------+--------------------+-------------------------------------------------++
| | Swift-Region2 | http://192.168.2.231:8888/v1/AUTH_%(tenant_id)s | http://192.168.2.231:8888/v1 |
| |Openstack-Identity | http://192.168.2.230:5000/v2.0 | http://192.168.2.230:35357/v2.0
| | Swift-Region1 | http://192.168.2.244:8888/v1/AUTH_%(tenant_id)s | http://192.168.2.244:8888/v1 |
+----------------------------------+--------------------+-------------------------------------------------++
Swift-Region2 and Swift-Region1 are the two regions, and Openstack-Identity is the authentication endpoint.
The Keystone service
We will be using the Keystone service for authentication. The Keystone service exposes an endpoint that a user will connect to using username and tenant credentials. After validation by the Keystone identity service, a token that will be cached and used in further API calls to various other OpenStack API endpoints is returned to the user. Within Keystone, a user is defined to have account credentials and is associated with one or more tenants. Also, a user can be given a role such as admin (metadata information), which entitles this user to more privileges than an ordinary user.
Let us consider the case where a user is connecting to a Swift endpoint to read an object. When a user initiates an API call along with a token to the Swift endpoint, this token is passed by the Swift endpoint back to Keystone for validation. Once validated by Keystone, it returns a success code back to the Swift endpoint. The Swift service will then continue processing the API to read the object.
We now show the steps necessary to install and configure the Keystone service in the following sections.
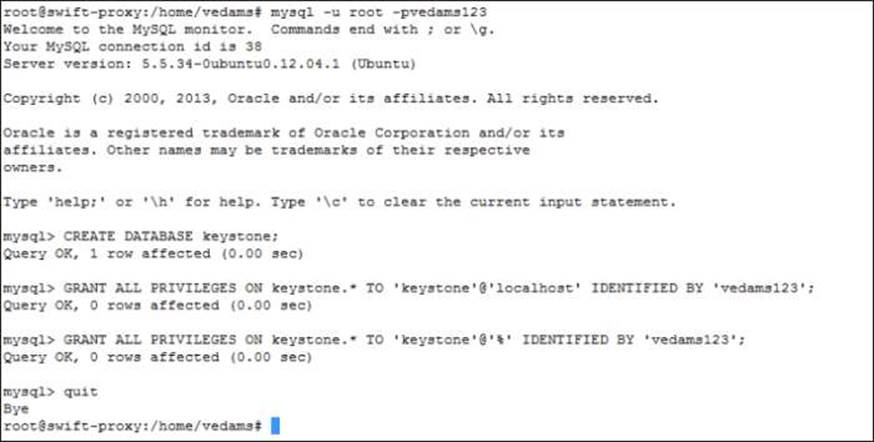
Installing MySQL
We will use MySQL for the Keystone database. The installation steps are as follows.
1. Install the MySQL database and client software on the proxy server node by using the following command:
2. root@swift-proxy:/home/vedams# apt-get install python-mysqldb mysql-server
3. Edit /etc/mysql/my.cnf in the proxy node, assigning the proxy server host name to Bind-address, as shown in following command:
4. Bind-address = swift-proxy
5. Restart the MySQL service on the proxy node by using the following command:
6. root@swift-proxy:/home/vedams# service mysql restart
7. Delete anonymous users by using the mysql_secure_installation command, as follows:
8. root@swift-proxy:/home/vedams# mysql_secure_installation
9. Respond with yes to delete anonymous user prompt.
Installing Keystone
Keystone may be installed on dedicated servers for large installations, but for this example, install Keystone service on the proxy node. The following steps describe how to install and setup the Keystone service:
1. Install the Keystone service using the following command.
![]()
2. We have to generate a random token to access the Keystone service, as shown in the following command:
![]()
3. We then edit the /etc/keystone/keystone.conf file and perform the following changes:
· Replace admin_token with the random token that gets generated, as shown in the following command line:
![]()
· Replace SQLite with a MySQL database connection using the following command:
![]()
4. Make sure that the SQLite file has been deleted after configuring MySQL; otherwise, we need to manually delete the file. Run the following command to list the contents of the /var/lib/keystone directory and delete the keystone.sqlite file if present:
5. #sudo ls –la /var/lib/keystone/
6. We then create the Keystone database user and grant permissions using the following commands:
7. Next, we check the Keystone database synchronization and restart the Keystone service by using the following commands:
![]()
8. Export the following environment variables:
![]()
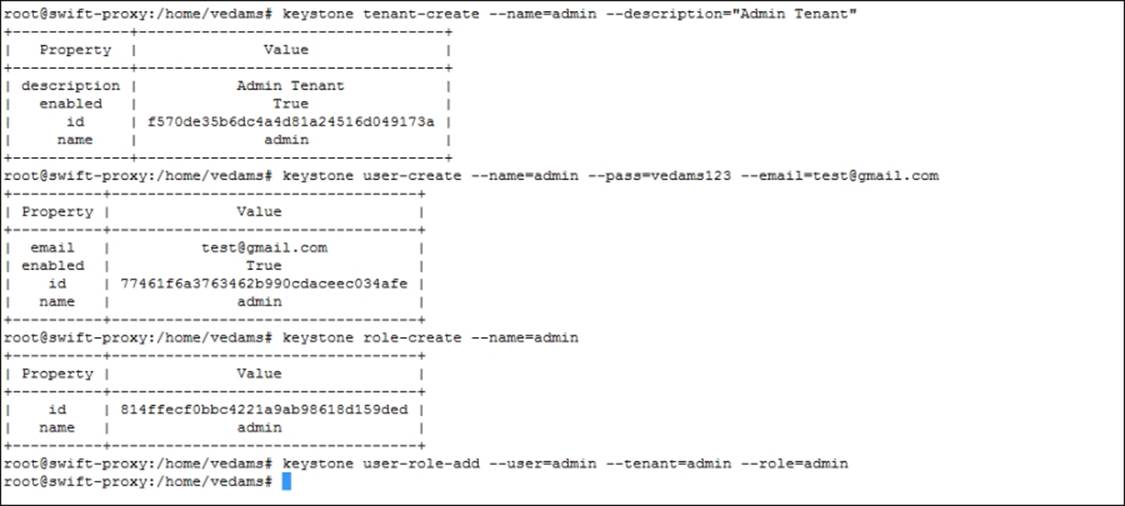
9. We then set up a tenant, user, and role to authenticate the input credentials against. Once authenticated, access to Swift services and endpoints is permitted. We then create a tenant for an administrator user, an administrator user called admin, and a role for administrative tasks. We then add an admin role to the admin user. This is shown in the following command lines:

The following screenshot shows the output of executing the preceding commands:
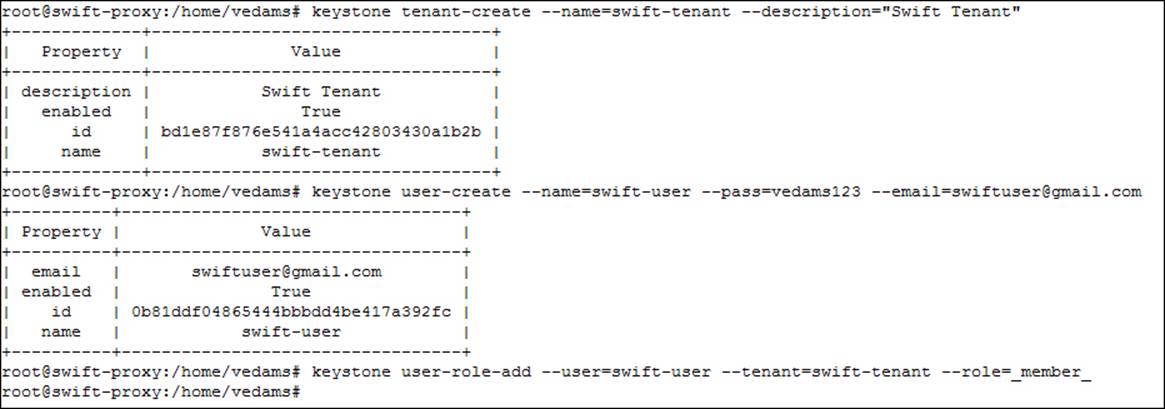
We then create another user called swift-user and add it to the tenant called swift-tenant. The user is given member access role. The following screenshot shows the creation process:
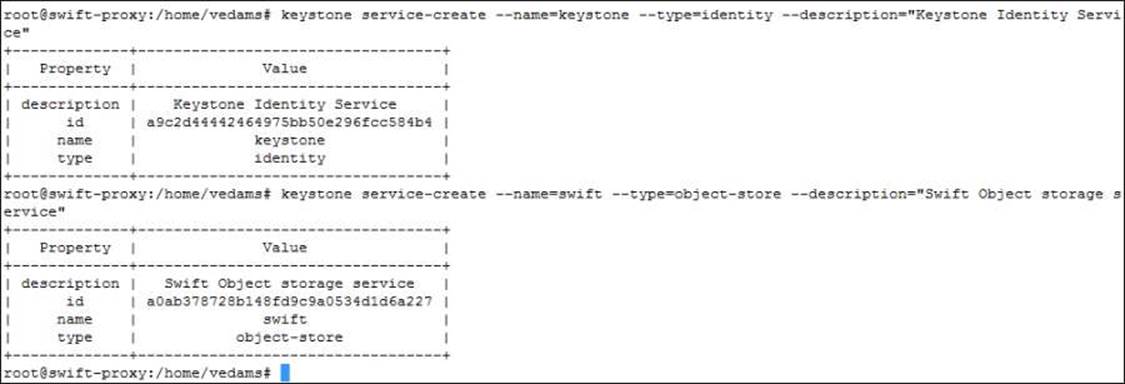
10. The Keystone service keeps track of the various OpenStack services that we have installed and also keeps track of where they are in the network. In order to keep track of the services, IDs are created for the services using keystone service-create command as shown in the following commands:

The following screenshot shows the output of executing the preceding service-create commands:
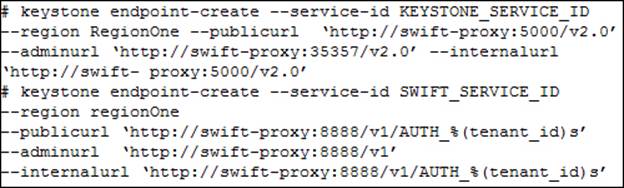
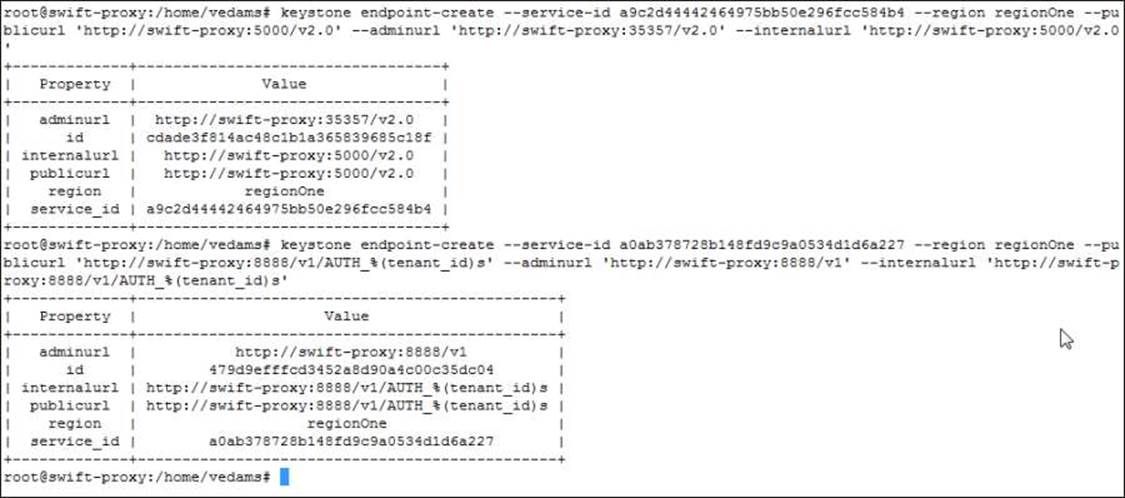
11. We then need to specify the Keystone service endpoints and Swift service endpoints to Keystone using the endpoint-create command. In the following commands, swift-proxy is the hostname of the proxy server:
The following screenshot shows the output of executing the preceding endpoint-create commands:
12. We will now unset the environment variables that we exported earlier, since we don't need them again. We will be calling the REST APIs, and providing the username and password to them along with the endpoint. Unset the environment variables as shown in the following commands:

13. We will now request an authentication token using the admin user and password. This verifies that the Keystone service is configured and running correctly on the configured endpoint.
We also verify that authentication is working correctly by requesting the token on a particular tenant as shown in the following command:
![]()
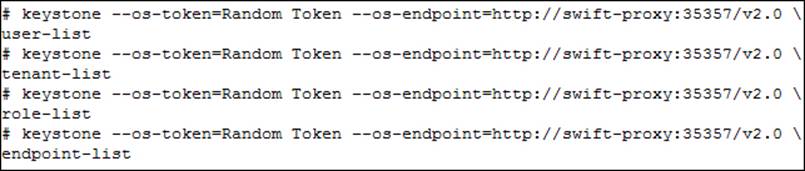
14. Finally, test the Keystone service by running the following commands below to list out the users, tenants, roles, and endpoints (the previously generated random token is named Random Token):
Summary
In this chapter, you learned how to install and set up the OpenStack Swift service to provide object storage, and install and set up the Keystone service to provide authentication for users to access Swift object store. The next chapter provides details on various tools, commands, and APIs that are available to access and use the Swift Object Store.