Responsive Web Design, Part 1 (2015)
Mastering SVG For Responsive Web Design
Creating And Exporting SVGs For The Web In Vector Authoring Tools
There are several tools for creating and editing SVGs. The three most popular are Adobe Illustrator, Inkscape, and Sketch. Most designers’ favorite editor is Illustrator, and it’s the only one I’ve worked with, so I will refer to it throughout the chapter, but most of the concepts apply to all other vector authoring tools as well.
PICKING THE RIGHT WORKFLOW WHEN DESIGNING SVGS
Sometimes, vector editors simply fail at translating an illustration into clean SVG code. Sometimes, not only does the code look bad, but the visual result looks bad, too. Here are some useful tips for creating SVGs that can help you end up with cleaner code and overall better results.
CONVERT TEXT TO OUTLINES
Converting text to outlines allows you to avoid embedding the font in the SVG. To convert your text to outlines, select your text and then go to Type → Create Outlines. This will convert the text into vector shapes that make up the text shape.
Note that converting the text to outlines will make it unsearchable and unaccessible. Decide whether the text needs to be accessible before you do that. If the text is part of a graphic that is not supposed to convey a specific text message (maybe it’s part of a logo) then you can convert to outlines without having to worry about the text’s availability to assistive technologies.
It is worth mentioning at this point that even though you can convert text to outlines while you’re editing the SVG, you can skip this step altogether because you have the option to do this when you export the SVG from Illustrator — more about this in the next section.
USE SIMPLER GEOMETRIC SHAPES
Neither convert these shapes to paths nor use paths to draw simple geometric shapes such as circles, rectangles, ellipses, and polygons, or polylines. The code required to draw geometric shapes is generally small. Drawing the same shapes using an SVG path usually requires extra path data in the code and hence increases the overall file size. The growth in file size may be insignificant, but if you have a lot of shapes and you convert all of them to paths, they add up.
Moreover, simple shapes are easier to maintain and manipulate by hand. Paths don’t come with some of the attributes simple shapes have, such as x, y, height and width. These attributes make animating simple shapes’ geometry and positions simpler; paths, on the other hand, require a more complex approach.
SIMPLIFY PATHS
The simpler the paths, the less data is needed to represent them, hence less code and smaller overall file sizes. You can simplify a path by first selecting it and then going to Object → Path → Simplify. When you do that, and while the path simplification panel is open, you can see a preview of the path and how it is affected by the simplification process. For example, suppose we have the path shown below. You can see the number of points it consists of (the small blue squares).

Screenshot showing the number of points our example path is initially made up of.
If we were to simplify the path, we could specify the amount of precision we want to preserve. Here, I reduced the number of points from 34 to 19 (see below).
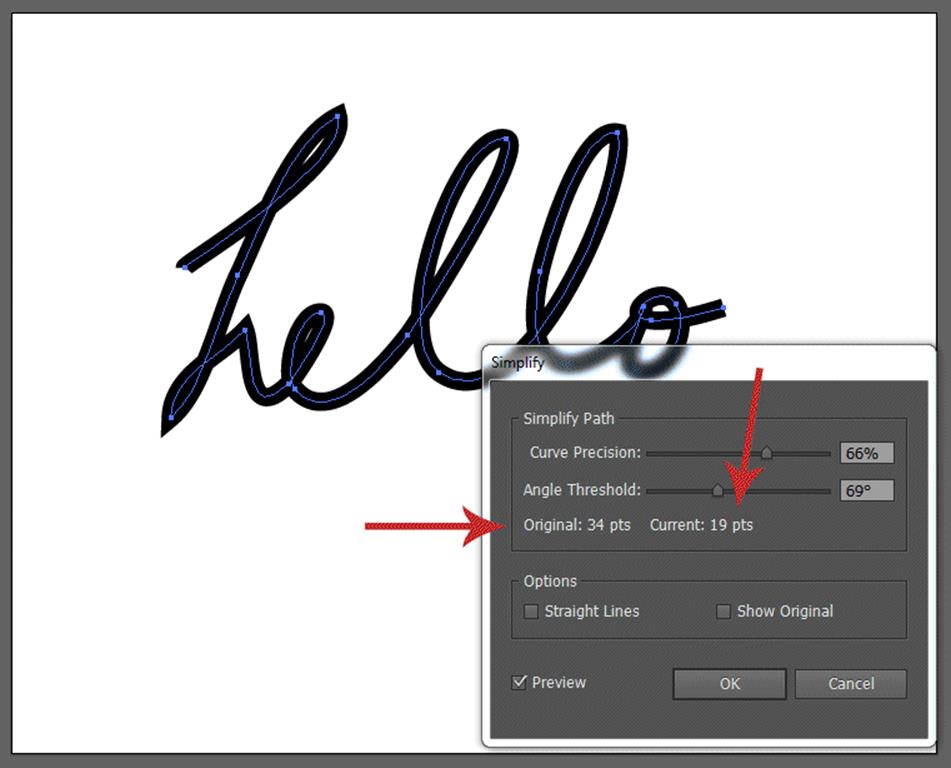
Screenshot showing the number of points the path is made up of after simplification.
Fewer points mean less path data and a smaller file size.
COMBINE OR UNITE PATHS WHEN POSSIBLE
Similar to path simplification, combining paths can reduce file size significantly depending on the illustration and how the elements inside it are drawn.
USE GOOD NAMING CONVENTIONS AND NAME FILES APPROPRIATELY
This is particularly important if you’re going to use automated workflows such as SVG sprite creation. Most of the tools out there use the SVG file names when generating new assets. That is why using good naming conventions will save you a lot of time in later stages of your work.
In addition, the layer and group names you use in Illustrator will be translated to IDs in the SVG code. Instead of ending up with editor-generated names that make absolutely no sense at all, naming your elements and layers appropriately will save you some additional manual work. You will thank yourself for this especially if you are going to use CSS and JavaScript to style and manipulate the SVG.
FIT ARTBOARD TO DRAWING
Ever worked with SVG and had to deal with extra white space around an icon that just won’t go away no matter how you manipulate the width of it? In many cases, the white space is the result of a drawing that is drawn inside an SVG viewport — the artboard in Illustrator — that is wider than the drawing itself. The white space will be hard to get rid of unless you know how to manipulate the SVG’s viewBox attribute. If you do, you can crop the SVG to the drawing. However, if you don’t want to get your hands dirty with code, you can save yourself some time by selecting your entire illustration and then going to Object → Artboards → Fit to Selected Art.
Adobe Illustrator comes with an options panel that provides you with a set of additional choices that allow you to optimize your SVGs further before you export them from the editor.
EXPORTING SVGS FOR THE WEB FROM ADOBE ILLUSTRATOR
Once you’re done editing your image, you’re ready to export it. Most editors provide several image formats to choose from.
To export your image as SVG, choose File → Save As. A panel will open with a drop-down select menu to choose the format you want to use. Select SVG. Below the select menu, there is a checkbox option labeled Use Artboards. This option can be useful when you have created several symbols (e.g. icons) that you need to export as individual files. You can use this option to easily create one artboard per symbol, and output several SVG files (one per symbol) in a single operation.
Click Save and an options panel will open. The screenshot below shows the best settings to choose for the web.
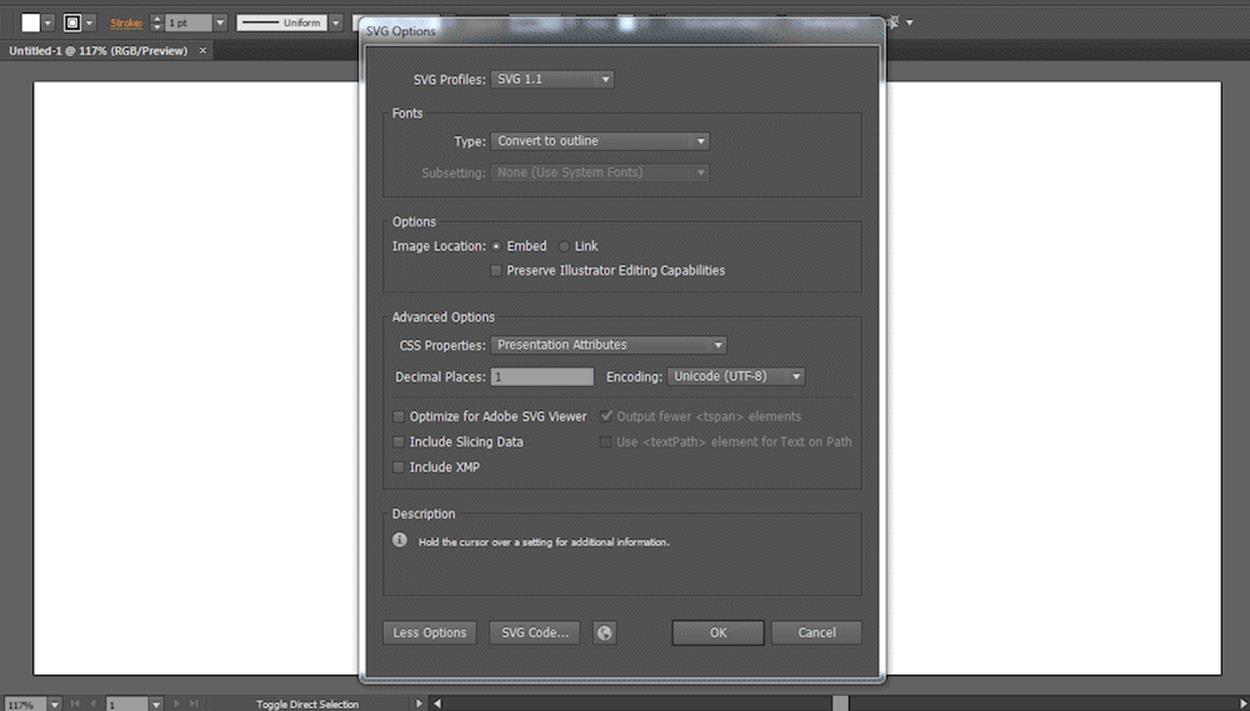
The export options panel in Illustrator with the best options for web chosen.
Michaël Chaize, a senior Creative Cloud evangelist at Adobe, wrote an article explaining what each option does and means10. Let’s go over them briefly.
•The SVG Profile drop-down allows you to select different versions of SVG. The best option is SVG 1.1 as it’s the version recommended by the W3C.
•In the Fonts section, you can choose the kind of font to use in the SVG code. There are three options: Adobe CEF, SVG and Convert to outline. The most obvious one to choose is probably the SVG type. However, it is useful to convert the fonts to outlines in order to avoid embedding web fonts. It is also worth noting that SVG fonts do not work properly in Firefox and Internet Explorer — and may never do, so you might want to stay clear of this option. Converting text to outlines has many benefits, but know that sometimes — if you’re using handwritten fonts or script typefaces, for example — converting a text to outlines may increase your file size quite a bit; you may need to test and choose what your best option is and then make sure to optimize the SVG afterward as well.
•In the Options section you can choose whether you want any images to be embedded inline inside the SVG or be exported as external bitmaps and referenced inside the SVG using an xlink:href attribute on an <image> element. Generally, you will want to stay away from bitmaps, so it is recommended to choose the Embed option.
•In the Advanced Options section, you can specify whether you want the styles to be exported and applied using Presentation Attributes or CSS Properties. Depending on how you want to use your SVG, you can choose either option — both are OK. When the styles are applied using CSS, they are embedded inside the SVG as style blocks in <style> elements. You can then change these styles just like you would in your style sheets for HTML elements. Presentation attributes, on the other hand, are literally attributes (e.g. fill="#009966") and are set on each element in the SVG as necessary.
Exporting the styles as CSS properties can be particularly useful if you have a lot of repetitive styles, in which case having any common styles inside one style block and applying them to multiple elements using CSS selectors would certainly save some bytes. Also, presentation attributes are overridden by any inline or external styles applied to an element — with the exception of inherited styles and user agent styles — so if you want to change the styles at any point, being able to find them in one style block will not only be convenient, but also helps avoid some cascade headaches.
It’s worth noting that not all SVG attributes can be set using CSS, so you may sometimes have to edit presentation attributes as well, even if you have chosen to export the styles as blocks of CSS.
•The Decimal Places option tells Illustrator how many decimal places to use for point coordinates. One decimal place is usually enough — any more will bloat your file size. Note that if you choose more than one decimal place and then use an optimization tool to reduce the number to one, you may end up breaking your SVG; it’s generally a good idea to set this value to 1 when you export the SVG.
•The remaining options in the Advanced Options section need not be checked, so you can uncheck all of them.
At this point it is worth mentioning one of Illustrator’s nicest features: you can copy any shape or group of shapes to the clipboard, from Illustrator, and then paste it into your text editor as SVG code!
After exporting the SVG, it is time to optimize it even further.