Responsive Web Design, Part 1 (2015)
Mastering SVG For Responsive Web Design
Using SVGs As An Icon Font Replacement (Or, How To Create SVG Sprites And Use Them As An Icon System)
SVGs are great candidates for icons. But are they good enough to replace icon fonts?
SVG ICONS VS. ICON FONTS
SVGs make a superior icon system and have lots of advantages over icon fonts or bitmap image sprites. Many articles have been written listing the different features and advantages of SVG as an icon system23 — here are some of the most important.
SCALABILITY AND RESOLUTION-INDEPENDENCE
SVG icons are scalable and resolution-independent, which means they won’t look blurry on high-resolution screens. Icon fonts, on the other hand, do not look as crisp because browsers see them as text and might apply anti-aliasing to them.
STYLES AND ANIMATION
SVG icons can be styled, multicolored and animated. Icon fonts can be styled like fonts can be — only their size, alignment and colors can be changed. SVG icons, on the other hand, offer finer control over individual parts of the icon, which makes it possible to create multicolor icons without having to resort to stacking techniques24. These techniques are used to make multicolor icon fonts possible, but for each colored part of the icon they require a different element, which are then stacked on top of one another.
SVGs are also animatable, using CSS, native SVG animations, or JavaScript — which opens the door for a lot of creativity with user interface icons25.
SEMANTICS
SVGs are semantic. An SVG icon is a graphic — an image — so what better way to mark up an image than to use a (scalable vector) graphic tag? An SVG element (<svg>) represents an icon simply and semantically while icon fonts usually require non-semantic markup like pseudo-elements and empty <span>s to be displayed. For people concerned about semantics and accessibility this introduces a serious issue: these elements don’t accommodate screen readers well, not to mention that the markup generally just doesn’t make much sense — if any — for an image.
SVGs, on the other hand, are not only semantic, but also accessible — even the text inside them is fully searchable, selectable and accessible, too. SVGs also contain accessibility features that allow us to make them even more useful to screen readers.
BROWSER SUPPORT
Icon fonts have inconsistent browser support issues and quirks. Zach Leatherman has undertaken and shared a lot of research on the different issues caused by icon fonts across browsers: icons not showing up, not being loaded, or not displaying consistently across browsers; not to mention those browsers that don’t support @font-face at all. He wrote an extensive article26 explaining what needs to be done to use bulletproof accessible icon fonts. With SVG, it’s an either–or situation: the SVG is either displayed or not displayed, depending on whether the browser supports SVGs or not. If the browser cannot display your SVG icons, it will degrade gracefully and display the PNG fallback you’ve provided; with icon fonts, we don’t have the advantage of falling back to an alternative image format.
EASE OF USE
SVGs are generally easier to create, use, embed and maintain. Icon fonts require a lot of work — you can either create your own icon fonts (not that simple) or use services such as Icomoon27 to create the font. Then comes the embedding part using @font-face (and all the weird browser issues that comes with); then using CSS pseudo-elements or non-semantic elements to embed them in the page; and dealing with positioning quirks, as well as the limited styling capabilities. SVGs don’t have any of these issues — they can be created and embedded more simply, and you have full control of their content.
Icon fonts present browser support and inconsistency issues that require a lot of maintenance. That said, once you have applied all the necessary fixes, they work in all browsers — even old browsers like IE6! SVGs work across all browsers that support them. Support doesn’t go as deep as for icon fonts, but fallbacks can be provided and even automated for non-supporting browsers.
Worth reading on these issues and more is Chris Coyier’s cagematch-style article28 comparing SVG icons with icon fonts.
The folks at the Filament Group have also shared an extensive browser support spreadsheet29 that shows the state of browser compatibility for icon fonts versus SVG fonts created using the Grunticon icons generator they have built (we will talk more about this generator in the next section). The spreadsheet clearly shows that SVG icon fonts have excellent browser support compared to icon fonts.
In the next section, we’ll talk about creating and using SVG sprites, and the tools used to automate our workflows and provide fallbacks.
SPRITING SVGS
Suppose you’ve reached the point where you have a set of SVG files, each representing an icon, and you want to use these icons in your page. The first things that come to mind when creating icon systems are image sprites. And SVGs can be sprited, too.
There are different SVG spriting techniques and tools to automate the workflow for each technique. Depending on whether you want to use the SVG icons as background images or foreground images, different tools can be used, and different fallback options are available.
If you want to use the icons as background images, this means they will be inserted via CSS and be included in the CSS file. An example would be to include the SVG in the CSS using data URIs:
.twitter-icon {
background-image: url('data:image/svg+xml;…');
background-repeat: no-repeat;
background-position: 10em 10em;
}
The background-position property is used to specify which part of the sprite to display. It works by positioning the sprite in the background positioning area so that only the icon we want will be visible.
SVGs used as background images are static — you cannot add any interactions or transitions to them, and only styles and animations included inside the SVG’s root element (<svg>) will work.
If you want the SVGs to be foreground images, the SVG sprite can be either present in the HTML document or external to it. The sprite would contain all individual icons, and then you can refer to these icons anywhere in the document with a <use> element; for example:
<svg class="icon twitter-icon">
<use xlink:href="#twitter-icon""></use>
</svg>
Let’s go over the different spriting techniques, each of which has its pros and cons. If any of these techniques is not for you, you can certainly imagine a whole array of similar situations in which to use SVG.
SVG ICON SYSTEM WITH ICONS AS BACKGROUND IMAGES
To create an SVG sprite for icons that are going to be referenced in CSS, we’re going to use the Grumpicon30 app by the Filament Group, or its sister command-line utility, Grunticon31. Grumpicon is the non-command-line-savvy designer’s alternative to Grunticon. Among other options (which we’ll mention later in the chapter), Grunticon generates an SVG sprite out of a set of SVG images, to be used as background images in CSS.
There are other tools32 for automating the creation of SVG sprites that are more or less similar to Grunticon, but it is the one I’m familiar with, and I usually use it when I want to use icons as background images, so it is the one I’m going to cover in this section.
The icons we’re going to see in this example are from Icomoon, an online app used to generate custom icon fonts. It allows you to pick any number of icons from a set of icon font libraries, and then download the icon font files and use them directly in your project. Icomoon also gives you an option to download the icons as images instead of fonts and has an option for downloading CSS image sprites as well.
After picking your icons, click the button that says Generate SVG/PNG at the bottom of the viewport (see below).
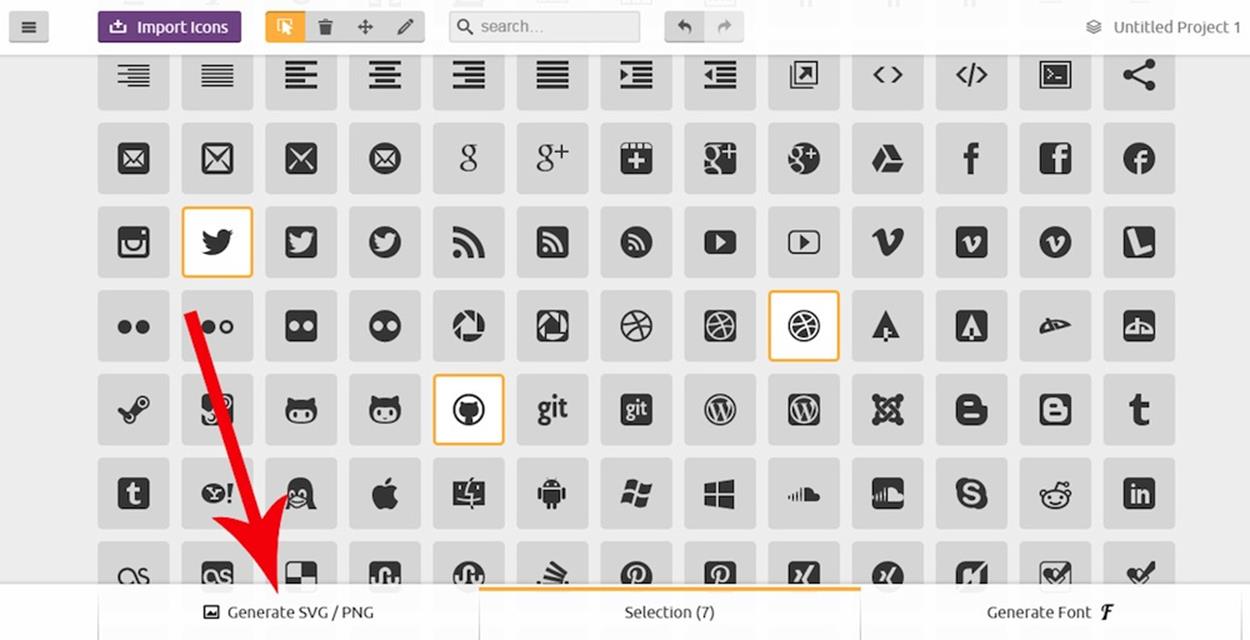
Screenshot of the Icomoon app.
A secondary screen displays a list of the icons you picked. Click the Download button at the bottom of that screen. A zipped file is downloaded containing several other files and folders — the one we’re interested in is the SVG folder. The SVG folder contains the icons you selected as separate SVG files. The downloaded icons are usually of a single color, so you may want to edit them.
The next step is to input your SVG folder into either Grumpicon or Grunticon. Make sure your SVG files have meaningful names: Grunticon and Grumpicon will use these names to generate class names in the CSS.
Using Grumpicon, all you have to do is drag and drop your SVG icons into the Grumpicon drop area (see below). The app will then take your files and run them through the same Grunticon process on the Filament Group’s server that you would locally if you had the Grunticon command-line tool installed.

Screenshot of the Grumpicon web application.
After dropping the icons, the app will then display a full list of them, and you can choose to remove any if you wish. A “Downlode it!” button appears. Click it.
Grumpicon will create a package containing a set of files and folders generated by Grunticon (see below).
Icons are output:
“…to CSS in 3 formats: svg data urls, png data urls, and a third fallback CSS file with references to regular png images, which are also automatically generated and placed in a folder. grunticon also generates a small bit of JavaScript to drop into your site, which asynchronously loads the appropriate icon CSS depending on a browser’s capabilities, and a preview HTML file with that loader script in place.”
— Grunticon GitHub repository’s readme file
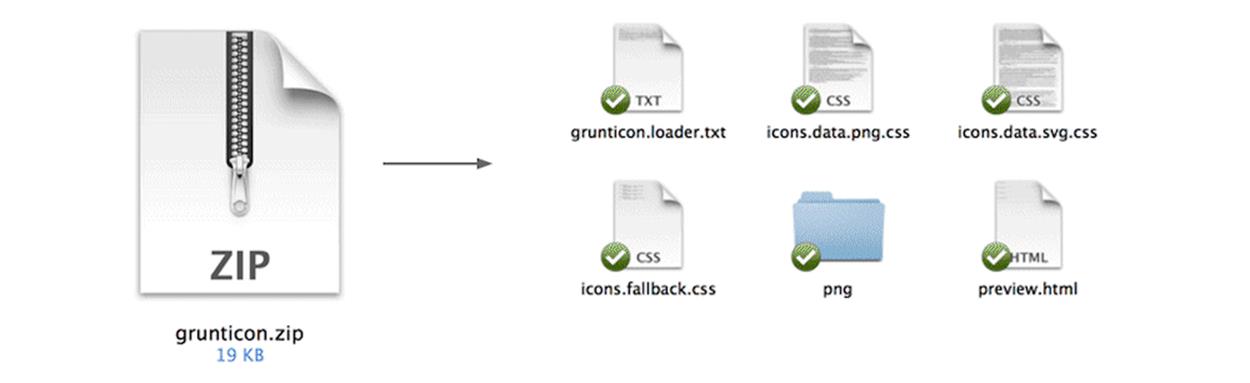
The set of files and folders generated by Grumpicon. Image credit: Todd Parker.
Before moving on to using the downloaded resources, let’s go over the Grunticon setup quickly — just in case you prefer a Grunt workflow instead of the online app. The plugin is installed and enabled just like any other Grunt plugin.
The minimal setup, according to the plugin’s repository, requires that you fill a files object for the plugin to run.
“This files object currently requires that a cwd and a dest directory are placed, and therefore, will blow up without it. This will be fixed to better fit the pattern set by Grunt for this.”
— Grunticon’s GitHub repository readme file
/* The Grunticon task configuration */
grunticon: {
myIcons: {
files: [{
expand: true,
cwd: ';example/source';,
src: [';*.svg';, ';*.png';],
dest: "Example/Output"
}],
options: {
}
}
}
The dest directory is the destination for the batched icons. If this directory already exists and contains other files with the same names as those output by Grunticon, it will overwrite the existing files. Either you make sure your icons are named uniquely or simply create a new destination directory for the icons.
After finishing the setup, Grunticon will batch your SVG files whenever you run Grunt. For a full list of customization options, refer to the plugin’s Github repository. The Grunticon plugin will output the same resources as those downloaded from Grumpicon.
Let’s go back to the package downloaded from Grumpicon. The package contains a preview.html file. This file gives you a preview of the icons and their respective CSS class names (see below).
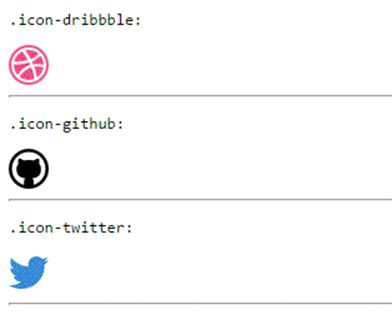
Screenshot of the embedded icons as shown in the preview.html page.
The preview.html page is a working example using the resources generated by Grunticon. If you view the page’s source code, you can get a clearer idea of how these resources are used.
To display an icon, simply add the icon’s class name in the markup. The Grunticon loader file will take care of loading the necessary CSS files that apply the icons as background images.
<div class="icon-dribbble" style="width: 32px; height: 32px;"></div>
Grunticon uses a special loader script (grunticon.loader.txt) that checks for SVG support and automatically falls back to using a PNG version if the browser does not support it. The JavaScript loader ensures that only a single style sheet is loaded instead of all three, saving bandwidth in the process. Add the loader to your page’s <head>. Make sure the paths in the code are correct. If your style sheets reside in a CSS directory, make sure you reflect that in the paths as well.
The <script> loads the icons if JavaScript is enabled. <noscript> links to the fallback style sheet for browsers without JavaScript.
You need to copy the three generated style sheets along with the PNG fallbacks folder to your CSS directory.
icons.data.svg.css contains the CSS that will load the SVG image as a background. The SVGs are added inline inside the CSS file. For example:
.icon-dribbble {
background-image: url('data:image/svg+xml;…');
background-repeat: no-repeat;
}
The ellipsis in the snippet is actually replaced by an inline SVG expressed as a data URI, which in turn has been minified and URL-encoded.
The inline SVG background image will be loaded in browsers that support it — namely all modern browsers including IE9+, Chrome, Firefox, Safari, Opera, iOS3+, Android 4.0+ and Opera Mobile.
icons.data.png.css contains the inline data URI version of the PNG images.
.icon-dribbble {
background-image: url('data:image/png;base64,…');
background-repeat: no-repeat;
}
The inline PNG data is converted into base64. These backgrounds will be loaded in browsers that don’t support SVG but do support data URIs in CSS (including IE8, Opera Mini, and Android 1.0 to 2.0). This style sheet will be loaded if the browser does not support SVG.
For browsers that support neither SVG nor data URIs in CSS, the icons.fallback.css style sheet is loaded, which references the PNG versions of the icons available in the PNG fallback folder.
.icon-dribbble {
background-image: url('png/dribbble.png');
background-repeat: no-repeat;
}
The PNG fallbacks are loaded in IE6–7 and non-JavaScript environments.
The biggest advantage of the Grunticon workflow is that it takes care of the CSS, feature detection, and fallback assets creation for you.
The SVG spriting is established by having all the SVG images inline within the same CSS file, which allows them to be cached (as the CSS is cached). The CSS is essentially a “text sprite” with all the SVGs available inside it as plain text.
The main advantage to using minified (the white space is removed), plain text SVGs as opposed to base64-encoded SVGs in the Grunticon workflow is that the former gzips better. The reason plain text SVG gzips better is that it usually contains a lot of repeated elements that gzip can easily crunch, significantly reducing file size.
If you want to use different colors or sizes of the same icon, you’ll need to export a set of SVGs for each variation in order for Grumpicon to create matching fallback PNG images. This is repetitive, of course, but necessary for universal compatibility because they are embedded as background images.
Animations also need to be defined inside the root <svg> of the original icon (the original file that Grunticon will use to generate its output) — those animations will be preserved. However, the PNG fallback will not be animated; it will be generated as though no animations were applied to the SVG.
Some Notes about SVG Data URIs
The anatomy of a resource converted into a data URI looks something like this:
data:[<mime type>][;charset=<charset>][;base64],<encoded data>
The base64 declaration is only needed if you are encoding your SVG into base64. However, as you will see in the next section, it is generally better not to encode your SVG into base64, so we will ignore this part for now.
Without the base64 portion, the data is represented using ASCII encoding for octets inside the range of URL-safe characters and using the standard %xx hex encoding (aka percent-encoding) of URLs for octets outside that range.
Percent-encoding a character is established by converting the character to its corresponding byte value in ASCII and then representing that value as a pair of hexadecimal digits. The digits, preceded by a percent sign (%) which is used as an escape character, are then used in the URI in place of the reserved character.
Unless you are using non-ASCII characters in the SVG, set the charset declaration to US-ASCII. This is the standard URI character encoding, and it is the one used in the data URI SVGs generated by Grunticon. And because it is the standard encoding, you can skip the charset declaration entirely if you are using only ASCII characters in the SVG.
US-ASCII is a subset of UTF-8, so it is generally safe to set the encoding to that as well. However, you don’t need to declare UTF-8 unless you are using non-ASCII characters in your SVG. In this case, the characters must also be percent-encoded.
Theoretically, you can just copy and paste your SVG into the URL after the character encoding (where the <encoded data> is in the data URI format) and have it work out of the box. Practically, however, it does not work as expected because some browsers have problems with certain characters being unescaped in the SVG.
For example, the following snippet applies a background to the body of the page — it is simply a green SVG circle.
body {
background: url('data:image/svg+xml,<svg xmlns="http://www.w3.org/2000/svg" width="200" height="200"><circle fill="#009966" r="100" cx="100" cy="100"/></svg>') no-repeat;
}
The snippet works in Chrome but does not work in Firefox. Firefox has a problem with the hash (#) symbol being unescaped. To make it work, the snippet above would have to be encoded like this:
body {
background: url('data:image/svg+xml,<svg xmlns="http://www.w3.org/2000/svg" width="200" height="200"><circle fill="%23009966" r="100" cx="100" cy="100"/></svg>') no-repeat;
}
Notice that the # symbol has been replaced with its percent-escaped equivalent: %23.
Both Chrome and Firefox require the above snippet to be wrapped in quotation marks to work as well. But, the quotation marks need to be single, not double, marks. The reason is that the quotation marks used in the SVG are double, so you need to use single quotation marks to wrap the entire URI in. Thus, to avoid issues with quotation marks, use only one type of quotation marks in the SVG, and wrap the URI in the other.
The above is a simple example that can be manually fixed to work in most browsers. However, Internet Explorer still requires that you URL-encode (percent-encode) the entire SVG to make sure no unsafe characters remain unencoded. According to the specification, all unsafe characters must always be encoded within a URL, and Internet Explorer adheres to the spec more strongly, requiring that you abide with that either by base64-encoding your SVG or URL-encoding it.
Therefore, it is necessary to URL-encode your SVG to make it work across all SVG-compatible browsers.
“Characters can be unsafe for a number of reasons. The space character is unsafe because significant spaces may disappear, and insignificant spaces may be introduced when URLs are transcribed or typeset or subjected to the treatment of word-processing programs. The characters ‘<’ and ‘>’ are unsafe because they are used as the delimiters around URLs in free text; the quote mark (‘"’) is used to delimit URLs in some systems. The character ‘#’ is unsafe and should always be encoded because it is used in World Wide Web and in other systems to delimit a URL from a fragment/anchor identifier that might follow it. The character “%” is unsafe because it is used for encodings of other characters. Other characters are unsafe because gateways and other transport agents are known to sometimes modify such characters. These characters are ‘{’, ‘}’, ‘|’, ‘\’, ‘^’, ‘~’, ‘[’, ‘]’, and ‘`’.”
—IETF Network Working Group Memo on Uniform Resource Locators (URL)33
URL-encoding the SVG from the previous snippet produces the following code:
body {
background: url('data:image/svg+xml,%3C%3Fxml%20version%3D%221.0%22%20encoding%3D%22utf-8%22%20standalone%3D%22no%22%3F%3E%0A%3Csvg%20xmlns%3D%22http%3A%2F%2Fwww.w3.org%2F2000%2Fsvg%22%20width%3D%22200%22%20height%3D%22200%22%3E%3Ccircle%20fill%3D%22%23009966%22%20r%3D%22100%22%20cx%3D%22100%22%20cy%3D%22100%22%2F%3E%3C%2Fsvg%3E') no-repeat;
}
As a final note, if you are inlining an SVG and you only want to reference a fragment of the SVG using an identifier (we will see examples of using fragment identifiers in SVG in upcoming sections), remember that the #identifierneeds to be included within the enclosing quotation marks, right after the closing <svg> tag’s > character (or its escaped %3E equivalent).
Using one of many URL-encoding apps available online and as standalone apps, you can encode your SVG without having to do it manually. If you use a tool like Grunticon, it will do it for you automatically.
Data URI SVG Performance Considerations
Since we’re on the subject of inlining SVGs using data URIs, it is worth spending some time looking into the performance aspects of this technique. Using data URIs in CSS as an alternative to bitmap sprites is the most typical way data URIs are being used in web design today. The performance of data URIs is important to any web designer or web application developer applying the best practice of minimizing HTTP requests.
Data URIs are most often used for small graphics that persist throughout a site. And many developers take the base64 approach to inlining graphics. However, research has shown that base64 encoded images can cause serious performance bottlenecks on mobile34; then again, those conclusions were refuted by other research35. Either way, base64 encoding needlessly inflates the content by 30%, and although gzip recovers some of this, you still end up with approximately 10% bloat for no good reason.
We also mentioned in the previous section that plain text can be a lot better than base64, so if you are ever going to use data URIs to embed SVGs, it makes sense to know why it is better not to convert them into base6436. There is no black or white to this — you will almost always have to test the performance of the assets at hand and compare them before making a decision as to which one to use.
Despite the many advantages that inlining images has (convenience being one of the main advantages to many developers), they are sometimes significantly slower than CSS image sprites, as research has shown37, and they may have a negative impact on performance — especially on mobile.
The potential performance impact of inlining images is the main reason why inlining everything is not the answer38. Guy Podjarny has done quite a bit of research in an article he shared on the Performance Calendar blog. Based on Podjarny’s and other research, it is recommended that you limit the use of inlining to small image files. According to Podjarny, “the HTTP Overhead of a request & response is often ~1KB, so files smaller than that should definitely be inlined. Our testing shows you should almost never inline files bigger than 4KB.” Complementary to Podjarny’s research, a study conducted by Peter McLachlan shows that “15–20kB for max data URI size, and no more than 3–5 instances seems like a good rule of thumb for mobile”.
Remember that the content of the page will not render before the CSS is parsed, so the bigger the CSS file (due to a possibly large amount of images in it), the longer it is going to take to render the page. Inlining inside CSS is a render-blocking procedure that can easily have a visible impact on performance that your users may definitely see and feel. That is, unless you serve the images in a style sheet that is loaded asynchronously.
At this point is it worth mentioning that the loading script used in Grunticon is asynchronous by default, so you don’t have to worry about render blocking when you use it. Also remember that CSS is usually shared across multiple pages. If your CSS-inlined images are not used across all pages, you might be delaying the rendering of the page and loading unnecessary resources in those pages.
Inline SVGs injected in the CSS have an advantage over HTML-inlined SVGs: SVGs inlined in HTML cannot be cached and will be loaded every time the page is loaded. Not to mention the overhead caused by loading the inline SVGs in browsers that may not be able to render them. CSS-inlined SVGs, on the other hand, can take advantage of browser caching along with the rest of the styles. You should keep in mind, though, that CSS-inlined SVGs will be downloaded every time the CSS changes — although this may not happen very often.
Podjarny also recommends that page images (images referenced within the page, not CSS) rarely be inlined: “Page Images tend to be big in size, they don’t block other resources in the normal use, and they tend to change more frequently than CSS and Scripts. To optimize image file loading, load images on-demand instead.”
Inlining has its advantages and disadvantages — you should be careful not to abuse it. If your images are not critical for above-the-fold rendering, they don’t need to be inlined either. If, for any reason, you do inline them, try to load them asynchronously.
HTTP/239 brings some important performance optimizations to HTTP requests. The main advantage of inlining (saving that extra HTTP request) will no longer apply because HTTP/2 enables the server to send multiple responses in parallel for a single client request — what’s known as server push. This removes the concern about the additional HTTP request from the equation. HTTP/2 server push makes inlining obsolete.
These are just notes and considerations to keep in mind when working with SVG (or other images, for that matter). Always, always test your page’s or app’s performance before settling for a particular technique. Don’t rush into prioritizing maintainability or convenience over performance.
SVG ICON SYSTEM WITH ICONS AS FOREGROUND IMAGES
In the previous section, we discussed a workflow for providing SVG icons as background images via CSS. But what if you want your icons to be document images, actually part of the HTML content? There are ways to do that, too.
When an SVG sprite is to be used in a document, it can be embedded in the document and then parts of it are referenced throughout the document, either by using fragment identifiers or the SVG <use> element.
Once more, you need a set of SVG icons, obviously. The first step is to create the SVG sprite by combining the individual icons into one <svg> and then injecting that SVG into your document.
Inside the <svg>, we’re going to define the icons using the SVG <defs> element. The <defs> element makes sure the icons are not going to be rendered unless they are referenced somewhere in the document.
Inside the <defs> element, a group is going to wrap every icon — if you have five icons, define five <g> elements. The <g> (group) element will contain the code for an individual icon; it will also get a unique ID that describes the icon.
<svg style="display: none;">
<defs>
<g id="icon-twitter">
<!-- Twitter icon markup -->
</g>
<g id="icon-github">
<!-- Github icon markup -->
</g>
<!-- more icons -->
</defs>
</svg>
An even better alternative than the above template is using the SVG <symbol> element to wrap the markup of an icon. The <symbol> element combines the features of the <defs> and <g> element, and adds to them the ability to be scaled and positioned inside any containing viewport by using its viewBox and preserveAspectRatio attributes. <symbol> can also be made accessible using SVG’s accessibility elements, <title> and <desc>, so that whenever the symbol is referenced in <use>, all its instances will also be accessible since the accessibility elements will be transferred as well. We’ll talk more about making SVGs accessible in the accessibility section later in the chapter.
Replacing the <defs> element from our previous snippet with <symbol>s means the code would look like this:
<svg version="1.1" xmlns="http://www.w3.org/2000/svg" style="display: none;">
<symbol id="icon-twitter" viewBox="0 0 35 35">
<title>Twitter</title>
<desc>Icon linking to author’s Twitter account</desc>
<!-- Twitter icon markup -->
</symbol>
<symbol id="icon-github" viewBox="0 0 35 35">
<!-- icon contents -->
</symbol>
<!-- more icons here... -->
</svg>
The inline style declaration style="display: none;" on the <svg> element is used to hide the <svg> to prevent it from being rendered. Without it, there would be an empty white area where the SVG would normally be displayed.
It is best to inject the SVG at the top of the document because doing so later may cause some weird behavior in some WebKit browsers that prevents this method from working. Until the bugs are fixed, injecting on top is the way to go.
Now that the SVG is available in the document, the icons (<symbol>s) inside it can be referenced using the <use> tag:
<svg class="icon-twitter">
<use xlink:href="#icon-twitter" />
</svg>
If you use the <defs> plus <g> approach, you will need to specify a viewBox on the <svg> containing the reference to the icon (the <use>), as opposed to specifying it on the <symbol>. Note that the value of the viewBox will depend on the size of the icon. In our example here, since each icon is 35×35px, instead of specifying the viewBox on the <symbol>, you just specify it on the root <svg> instead, and then use your icon:
<svg class="icon-twitter" viewBox="0 0 35 35">
<use xlink:href="#icon-twitter"></use>
</svg>
Creating the SVG sprite by combining the icons you have can get tedious or at least time-consuming. Fabrice Weinberg created a Grunt plugin called grunt-svgstore40 that automates the merging process. The plugin takes a folder containing a set of SVGs and merges them into an SVG file with each icon wrapped in a <symbol> with the viewBox and a generated ID prefix that you can specify in the plugin options. For example:
grunt.initConfig({
svgstore: {
options: {
prefix : 'icon-', // This will prefix each ID
svg: { // Will add and override the the default xmlns="http://www.w3.org/2000/svg" attribute to the resulting SVG
viewBox : '0 0 100 100',
xmlns: 'http://www.w3.org/2000/svg'
}
},
default : {
files: {
'icons/SVGSprite.svg': ['SVGIcons/*.svg'],
},
},
});
The plugin will merge all the icons in the SVGIcons folder into an SVG file named SVGSprite that it generated and output into the icons folder. Next step would be to inject the SVG into your document and reference the individual symbols with <use>.
Ideally, we would reference an external SVG sprite to take advantage of browser caching. Instead of referencing an SVG fragment that resides in an SVG embedded inline, we would be able to reference a fragment of an external SVG sprite. For instance, the previous example would look something like this:
<svg class="icon-twitter">
<use xlink:href="socialIcons.svg#icon-twitter"></use>
</svg>
The sprite could be hosted on a CDN somewhere, too. And you need to remember to add the xmlns attribute in this case because the SVG would no longer be inlined. This technique has one major advantage over HTML inlining: the browser will be able to cache the SVG, making subsequent loading times much faster. However, it also has one big drawback: IE does not support referencing an external SVG in <use> — and this applies to all versions of IE.
To use an external SVG sprite, you will need to provide a fallback for IE. Jonathan Neal has made a plugin called svg4everybody41 that fills the gap between SVG-capable browsers and IE. The plugin makes it possible to use an external SVG in IE9+, and provides markup for IE6–8 to fall back to a PNG version of the icons. The plugin does not automate the generation of the PNG icons, though, so you would have to take that on yourself. There’s more about svg4everybody in the fallback sections coming next.
The Grunticon plugin we used earlier for creating SVG icons as background images also comes with an option that allows you to generate one or more of those icons as foreground icons in the HTML. You can use the enhanceSVGoption to tell Grunticon that you want to generate selected icons as inline SVG embedded in the document:
grunticon: {
foo: {
files: {
// Handle files here
},
options: {
enhanceSVG: true
}
}
}
After you’ve done this, you can have any icon embedded in the page and ready for styling just by adding a data-grunticon-embed attribute to an element with that icon’s class name:
<div class="icon-burger alt" data-grunticon-embed></div>
This will generate the icon you want and embed it inside the </div> element, and then you can select and style the SVG from your CSS, and script it using JavaScript.
<div style="background-image: none;" class="icon-burger alt">
<svg class="svg-source" xmlns="http://www.w3.org/2000/svg" width="32" height="30" viewBox="170.6 12.6 32 30" enable-background="new 170.6 12.6 32 30">
<!-- SVG icon content -->
</svg>
</div>
With this option, you can generate one or many of your icons as inline SVGs in the document if you want or need to script and style them with CSS.
The above example and more information about this can be found in Grunticon’s repository on GitHub.
Styling the Icons and Applying Transitions to Them
HTML-inline SVG can be styled and animated with CSS, SMIL and JavaScript. You can select individual icons and apply styles to them. That said, this only works because the source SVG is embedded inline as well; if the SVG were referenced externally, styling the contents of each icon from the main document wouldn’t be possible.
When the source SVG sprite is not inline, and the icons are embedded in the document using <use>, styling the contents of the icons is not straightforward anymore.
When an SVG element is referenced or “copied” using <use>, the new instance and its contents are not cloned into the normal DOM — they are cloned into a shadow DOM. Selecting elements in the shadow DOM requires other approaches.
Styles applied to the <use> element will be inherited by all of its contents. This might be useful, but it does not give us the control we need over the individual shapes and contents of an icon.
To target the shadow DOM and style elements inside a <use> element, the /deep/ combinator42 can be used but does not currently have good browser support.
Fabrice Weinberg came up with a trick that uses the CSS currentColor variable along with the color property43 to leverage inheritance in SVG to “leak” upper-level styles down to the elements inside the shadow DOM. Using this trick along with other SVG attributes that can be used to style a <use> element, a limited amount of styles can be applied to the content of <use>.
Weinberg’s technique allows you to change two colors inside the contents of a <use> element by using the fill and color properties in CSS, and then using currentColor inside the original contents of the SVG element. For example, suppose you have defined a two-color logo and you want to create a modified version of that logo by changing its two colors. A good example is the Sass logo made up of a circular background and a path making up the letter “S”.
<svg style="display:none;">
<symbol id="logo">
<circle id="logo-background" cx="…" cy="…" r="…" fill="currentColor" />
<path id="logo-letter" d="…" />
</symbol>
</svg>
<svg class="logo logo--blackOnWhite"><use xlink:href="#logo" /></svg>
<svg class="logo logo--whiteOnBlack"><use xlink:href="#logo" /></svg>
By injecting the fill="currentColor" attribute inside the original logo code, we’re making sure the circle will inherit the current color specified using the color property in CSS.
Then, we’re taking advantage of the fact that when we apply a fill color to the <use> element, all the descendents of <use> will inherit that fill color as well. Then, in CSS, we specify both the fill and color values that we want:
.logo--blackOnWhite {
color: black; /* will be used as a fill value by the circle element */
fill: white; /* will be inherited by the path from use */
}
.logo--whiteOnBlack {
color: white; /* will be used as a fill value by the circle element */
fill: black; /* will be inherited by the path from use */
}
Thus, using inheritance in CSS and SVG, we’re able to change two colors inside the contents of <use> which would otherwise not be possible.
Amelia Bellamy-Royds has taken this idea of color inheritance and variables further by using CSS variables to achieve the same thing. She has written about it on the CodePen Blog44. The idea is to define some color variables in an upper level and then access those variables by using them as values for attributes like fill in the original SVG code. For example, if an icon is referenced by <use>:
<svg class="bird">
<use xlink:href="#bulbul"></use>
</svg>
…the CSS could contain something like:
use {
color: gray;
fill: currentColor; /* this will be the base fill color inherited by all elements inside <use> */
/* define variables here */
--secondaryColor: yellow;
--tertiaryColor: black;
}
Then, in the original SVG fragment being referenced (the <symbol> which contains the contents of the Bulbul bird illustration), we use the variables as values for the fill attribute:
<symbol id="bulbul" viewBox="0 0 300 200">
<path id="body" d="…" />
<path id="tail" fill="var(--tertiaryColor)" d="…" />
<path id="head" fill="var(--tertiaryColor)" d="…" />
<path id="vent" fill="var(--secondaryColor)" d="…" />
</symbol>
We’re practically injecting the styles into the shadow DOM before it becomes shadow DOM. That’s brilliant.
Bellamy-Royds’s technique only works in browsers that support CSS variables, which at the time of writing is only Firefox. And neither Weinberg’s technique with currentColor nor Bellamy-Royd’s technique with variables work on an SVG embedded as a CSS background image.
Providing and Automating Fallback for HTML-Inline SVG Sprites
There are several ways to provide fallback for SVG sprites — each way has pros and cons. Some techniques provide background images in CSS; others provide an HTML-inline fallback. Depending on your needs and the way you reference the SVG sprite, you may find any of these techniques useful.
SVG Fallback as Foreground Images
If you reference an external SVG sprite, and if you prefer providing fallback in the form of foreground images, Neil’s svg4everybody plugin is a good option.
To use svg4everybody, add it in the <head> of your document.
<script src="/path/to/svg4everybody.ie8.min.js"></script>
According to the plugin’s GitHub repository, IE6–8 require the script to run this early to “shiv” the <svg> and <use> elements.
If running the standard script in IE9–11, be sure to set X-UA-Compatible higher than IE8. This can be done with a response header or the following <meta> tag:
<meta http-equiv="X-UA-Compatible" content="IE=Edge">
Then, in SVG-capable browsers and in IE9+, the external SVG sprite can be referenced in <use>:
<svg class="icon-twitter">
<use xlink:href="socialIcons.svg#icon-twitter"></use>
</svg>
In IE6–8, the document markup is modified to fallback to PNG images.
<svg class="icon-twitter">
<img src="socialIcons.svg.codepen.png">
</svg>
Note that fallback PNGs point to the same location as their corresponding SVGs, only with the hash (#) replaced by a dot (.), and with an appended .png extension. This means that you need to make sure the PNG fallbacks follow this naming convention as well.
SVG Fallback as Background Images
If you’re going to provide the SVG fallback in the form of a background image, automating the process will be a good idea.
Yulia Bukhvalova made a Grunt plugin called svg-fallback45 that automates the generation of the PNG fallback sprite for a set of SVG icons and generates a style sheet to apply these fallbacks. The plugin also generates the SVG sprite (similar to Weinberg’s grunt-svgstore process).
The generated CSS will contain class names used to provide fallback for non-supporting browsers. For example:
.ie8 .icon { /* Load the sprite when the document has a class 'ie8' */
background-image: url(fallback-sprite.png);
}
.icon-twitter {
width: 32px;
height: 32px;
background-position: -192px 0;
}
.icon-github {
width: 32px;
height: 32px;
background-position: 0 0;
fill: green;
}
/* .etc */
The plugin is customizable and has a set of options that you can specify yourself.
With the above CSS fallback ready, the SVG sprite would be used as we saw earlier:
<svg xmlns="http://www.w3.org/2000/svg" class="icon icon-twitter">
<use xlink:href="#icon-twitter"/>
</svg>
It is important to note here that the xmlns attribute is necessary for this to work, otherwise IE will ignore the entire SVG code and not apply the fallback background at all.
If you need to reach browsers that the plugin does not cater for, then it will be necessary to do some extra browser sniffing or feature detection, and manually add other class names to the CSS — that is, unless you fork the repository and customize the plugin to your liking.
SVG Fallback Using SVG Conditional Processing (SVG Fallback as Background Image)
The SVG Document Structure specification46 defines elements and attributes — namely the <switch> element and its requiredFeatures, requiredExtensions and systemLanguage — that give us the ability to specify alternate viewing depending on the capabilities of a given user agent or the user’s language. Conditional processing attributes only affect the direct rendering of elements and do not prevent elements from being successfully referenced by other elements (such as via <use>), so they are similar to the CSS display property in that respect.
The three attributes act as tests and return either true or false results. The <switch> renders the first of its children for which all of these attributes test true. If the given attribute is not specified, then a true value is assumed.
This conditional processing feature can be used to provide inline fallback for IE, for example. David Corvoysier wrote an excellent article explaining the technique47 back in 2009 — the logic is embedded inside the <svg> and uses the <foreignObject> element to insert the non-SVG fallback. Using <switch>, SVG-capable browsers will render the first markup they understand (the SVG) and ignore the rest (the contents of the <foreignObject>). IE will do the opposite: it ignores the SVG it does not understand and renders the contents of the <foreignObject> because it is plain HTML.
<svg xmlns="http://www.w3.org/2000/svg">
<switch>
<use xlink:href="#icon-twitter"></use>
<foreignObject>
<div class="fallback icon-twitter-fallback"></div>
</foreignObject>
</switch>
</svg>
The CSS looks something like:
.icon-twitter-fallback {
background-image: url(../icons/icon-twitter.png);
/* ... */
}
The .icon-twitter-fallback <div> will be rendered in IE but not in SVG-capable browsers. However, some SVG-capable browsers will still download the fallback image or background image even if not needed.
The folk behind HighRobotics came up with an interesting technique to avoid the double download issue48. The idea is to add another <svg> in the main document containing styles that hide the fallback <div> and remove its background, thus preventing it from being rendered and its background from being downloaded.
<svg xmlns="http://www.w3.org/2000/svg" width="0" height="0" id="hide-fallback">
<style>
<![CDATA[
.fallback { background: none; background-image: none; display: none; }
>
</style>
</svg>
The above SVG would be added in the same document. This works because styles inside an <svg> can be used to style the contents of another <svg> in the same document. So, the .fallback div will neither be rendered nor its background downloaded in browsers that support SVG. IE, which does not understand SVG, will simply ignore this style declaration and will render the fallback as expected.
This technique using the extra <svg> is also useful for preventing double downloads when an SVG is embedded using <object>. Instead of providing an <img> fallback between the opening and closing <object> tags, a <div> with a background image would be used, and that <div> would be hidden and not rendered in SVG-capable browsers.
<object type="image/svg+xml" data="icon-twitter.svg">
<div class="fallback icon-twitter-fallback"></div>
</object>
In the same document, the #hide-fallback SVG would be added to make sure the fallback is not downloaded in SVG-capable browsers.
Other Fallback Techniques
An SVG might often be embedded as an image using an <img> element. Providing fallback in this case would be different.
Using Modernizr49, you can check for browser support for SVG and provide a PNG alternative in browsers that don’t support SVG, either by adding or changing markup, or by simply swapping our the image src URI. Something like the latter would be fairly simple if the SVG and PNG versions of the images are in the same folder and have the same names for each image respectively.
if (!Modernizr.svg) {
$("img[src$='.svg']")
.attr("src", fallback);
}
Alexey Ten came up with a no-JavaScript technique50 for providing fallback for SVG using an <image> element. The technique is based on research51 done by Jake Archibald that showed that browsers treat <image> and <img> almost the same, so that if you provide <image> with both an xlink:href and src attributes, SVG-capable browsers will use xlink:href and ignore src, while non-SVG browsers will do the opposite.
For example, if we have the following declaration:
<image xlink:href="svg.svg" src="svg" width="300" height="250"/>
SVG-capable browsers will read it as:
<image xlink:href="svg.svg" width="300" height="250"/>
Browsers that don’t understand SVG will read it as:
<img src="svg" width="300" height="250"/>
Using this technique to provide fallback for an inline SVG icon, for example, we could just insert the <image src="icon-twitter.png"> into the <svg> and have non-SVG browsers fall back to it.
Ten’s technique is clever and works as expected in almost all browsers, but it comes with a major drawback: both the SVG and the PNG images are requested and downloaded in IE9+, which has a direct impact on performance.
Of course, an SVG embedded as an <img> can be treated like other image formats referenced like that. Fallback can be provided using the <picture> element with an <img> element inside it — the <picture> <source> would point to the SVG, and the <img> would point to a set of PNG fallback sources (using srcset). You can read more about this in Yoav’s chapter (see part 2 of this book).
Another interesting fallback technique is one that allows you to provide fallback for an SVG used as a CSS background image, by taking advantage of the fact that all browsers supporting SVG background images also support multiple background images. Because of this, we can do the following:
.logo {
background: url('logo.png');
background: none, url('logo.svg');
}
The above snippet will display the SVG background image in browsers that support multiple background images in CSS — these same browsers also support SVG background images. SVG-capable browsers are going to display the SVG background and override the previous declaration using the PNG image. Any browser that does not support multiple background images (for instance, IE8) will display the PNG image and ignore the second background declaration. Browsers will make only one HTTP request for the image they want to display — win!
This technique was documented by Ben Schwarz52 and, in the same blog post, Schwarz shares a Sass mixin that makes reusing this technique throughout your CSS easier:
$public_path: "./";
@mixin vector-bg-with-fallback($name) {
background-image: url('#{$public_path}images/#{$name}.png');
background-image: none, url('#{$public_path}images/#{$name}.svg');
}
Note that Android 2.x browsers will not display any of the images when using this technique. This may or may not be a problem, depending on how important that background image is for your design on mobile.
BETTER SVG SPRITING USING NATIVE SVG FRAGMENT IDENTIFIERS
SVG comes with a native way to link to portions of an image using fragment identifiers. This makes using SVG sprites much easier once this feature is fully supported across browsers.
Fragment identifiers are used to link into a particular view of an SVG document. A view is a region of the SVG graphic that is bound by a view box. The box defining the view is specified using the viewBox attribute.
The idea of specifying and displaying a view in SVG is practically the same as cropping an image to a specific region and hiding the parts of the image that are clipped out.
In SVG, we can crop a graphic by changing the values of the viewBox attribute. The viewBox attribute allows us to specify the position of the top-left corner of the view and its width and height, thus defining the bounds of the view area, and then crop the SVG to that area. Using this concept, we can crop an SVG sprite to only show a particular icon inside it.
Assume we are working with the SVG sprite below:
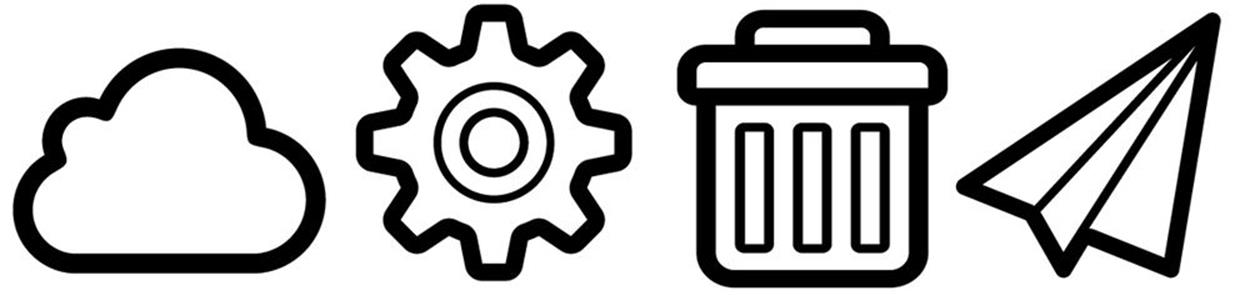
An SVG icons sprite. Icons from Icomoon.
If we want to crop the sprite to the settings icon, it would be useful to know the coordinates of the top-left corner of the icon’s bounding box, and its width and height; these values can be used to specify the viewBox that we need to crop the SVG. To determine these values we can use the Transform panel in Illustrator — the panel shows these values for each element when it is selected (see below).
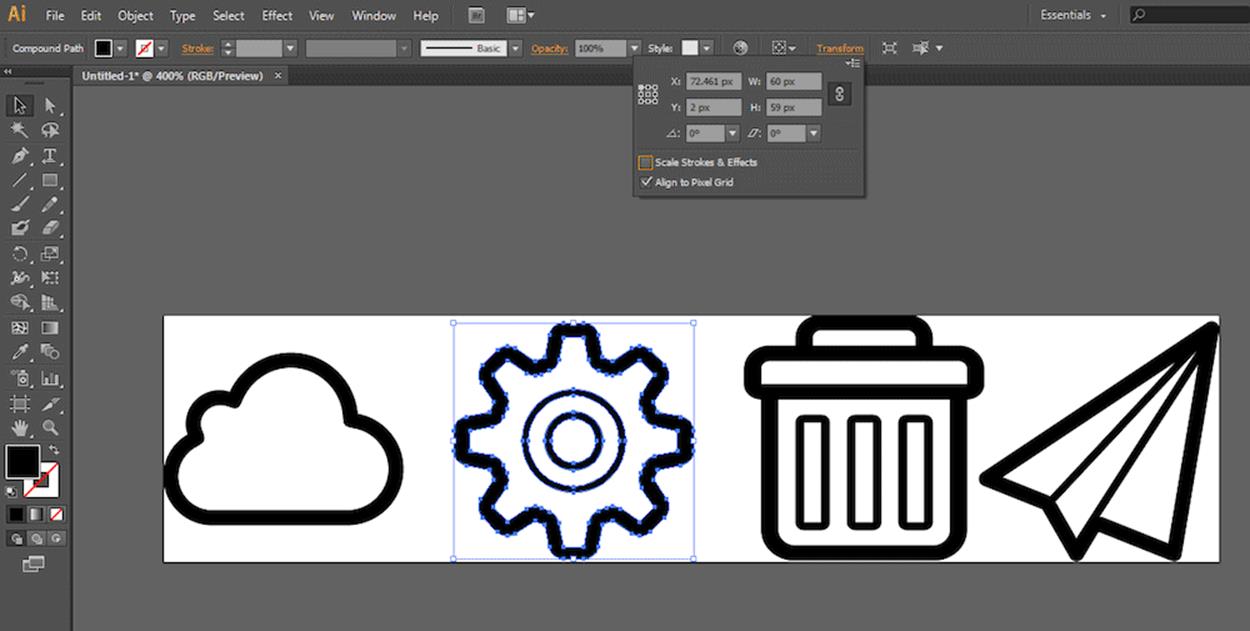
Screenshot showing the Transform panel in Illustrator. The panel shows the coordinates and dimensions of the bounding box of the icon.
Using the SVG as an image, we can then reference the settings icon by specifying its view like so:
<img src='uiIcons.svg#svgView(viewBox(72.5, 2, 60, 59))' alt="Settings icon"/>
Alternatively, you can define the views inside the SVG source code using the <view> element and the viewBox attribute. The <view> element requires at least the viewBox attribute and a unique identifier.
<view id='icon-settings' viewBox='72.5 2 60 59' />
You can then reference that view in the <img> src:
<img src='uiIcons.svg#icon-settings' alt="Settings icon" />
Note that you need to explicitly set the dimensions of the <img> to make this work — some browsers may not crop the SVG to the specified view box otherwise.
Support for SVG fragment identifiers53 is not bad, but it’s neither perfect nor reliable. At the time of writing, the technique is buggy in some browsers, and it requires a workaround to function properly in Safari. Adobe’s Bear Travis documented the issue and its solution54 in a small experiment he shared, which is worth checking out.
A similar technique to SVG views using fragment identifiers is called SVG stacks, a technique thought out by Erik Dahlstrom. It works by first giving each of your icons in the SVG file a unique ID and the same class name, adds some CSS to hide all icons and only display the one that gets selected with the :target pseudo-class. Then you could use a hash in the URL to pass the ID into the SVG file, like background: url(icon.svg#ID) (see below).
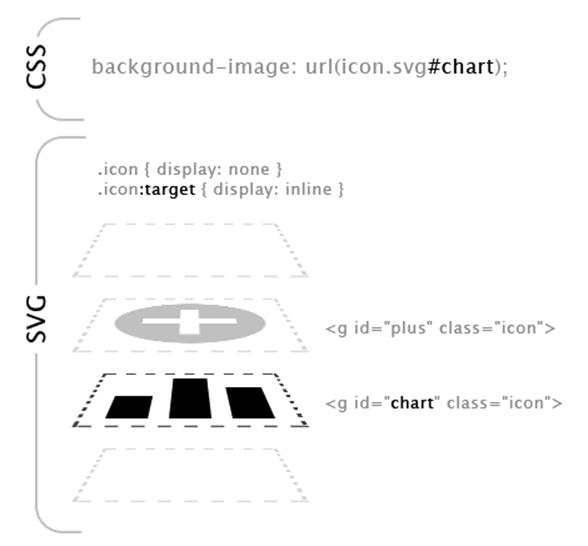
Illustration explaining how SVG stacks work. Image credit: Simon (Simurai).
SVG stacks have pretty much the same browser compatibility as SVG fragment identifiers. Simon “Simurai” wrote a blog post about the technique55 that is well worth a read if you’re interested in knowing more about it.