Teach Yourself VISUALLY Search Engine Optimization (2013)
Chapter 8. Working with Google Analytics
Google Analytics is one of the most important tools in the search engine optimization (SEO) world; it helps you obtain information about website traffic, page views, where users click when they visit a website, and where visitors live. Google Analytics enables you to analyze a website to learn more about it. You can then apply this information to optimize your website.
Create a Google Analytics Account
Install Google Analytics Code
Create a New Analytics Account
Add a New Property Website
View Website Analytics
Add Multiple Users
View Real-Time Statistics
Exclude Traffic from a Specific IP
Set Conversion Goal
Find Website Keywords
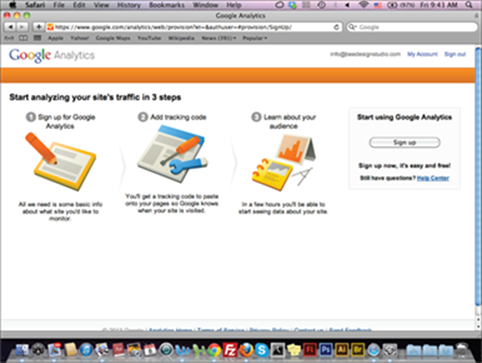
Create a Google Analytics Account
The Google account gives you access to different Google services, including Google Analytics. Each website or group of websites needs to have a Google Analytics account, which you create when you sign up. You can add one or more websites to track and analyze this account. You can also create a separate Analytics account for each website, which is known as a Property. For example, you can create a Google Analytics account for a specific website and its related sub-domains for better management. You can manage Analytics accounts and Properties from the Adminpage.
Create a Google Analytics Account
![]() Type www.google.com/analytics in your web browser and press
Type www.google.com/analytics in your web browser and press ![]() .
.
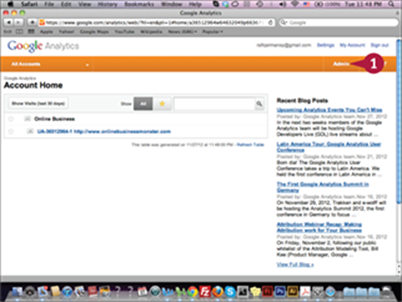
![]() Click Create an account.
Click Create an account.
The Google Analytics sign up page appears.
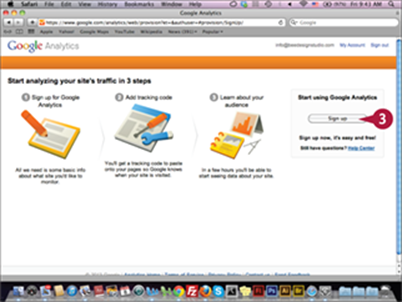
![]() Click Sign up to create a new Analytics account.
Click Sign up to create a new Analytics account.
Note: If you are signing in with an existing account, you will be transferred to the Google Analytics home page.
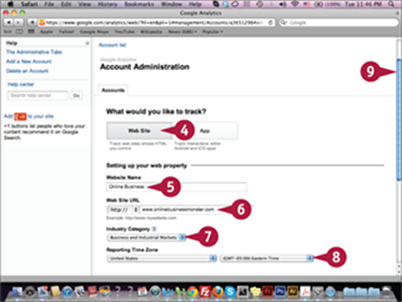
The Account Administration page appears.
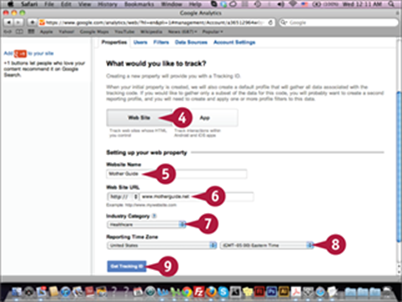
![]() Click Web Site.
Click Web Site.
![]() Type the website name to set up the name of the initial property in the account.
Type the website name to set up the name of the initial property in the account.
![]() Type the website URL.
Type the website URL.
![]() Click the Industry Category pop-up menu and select a website niche.
Click the Industry Category pop-up menu and select a website niche.
![]() Click the Reporting Time Zone pop-up menus and select a country of origin and a time zone.
Click the Reporting Time Zone pop-up menus and select a country of origin and a time zone.
![]() Scroll down the page.
Scroll down the page.
The rest of the form fields appear.
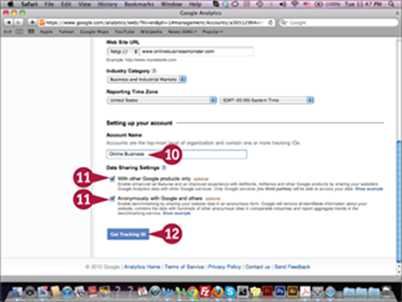
![]() Type the account name in the Account Name field.
Type the account name in the Account Name field.
![]() Click the Data Sharing Settings option (
Click the Data Sharing Settings option (![]() changes to
changes to ![]() ).
).
![]() Click Get Tracking ID.
Click Get Tracking ID.
The Google Analytics Terms of Service page appears.
![]() Click I accept to receive a Tracking ID.
Click I accept to receive a Tracking ID.
TIP
Where can I find the created accounts?
After you create the site accounts, the accounts appear on the Google Analytics home page. On this page, you can navigate through the site accounts and access any of the listed sites. You can also set specific site accounts as favorites so you can easily reach them later. You can show the account Metrics that display the statistics of each website. You can also search for sites and accounts using the Search field. This feature is very useful if you are reviewing multiple sites.
Install Google Analytics Code
Google Analytics tracking code is a snippet of code that Google assigns to each property or website to track its traffic and visitor information, such as the links visitors click, their web browser versions, their countries, and more. You can get the tracking code by clicking the Get Tracking ID button when you create a new account or property, or you can get it by accessing each account property’s information page in Analytics Admin. Then, you can copy the code and paste it into your HTML page before the </head> closing tag.
Install Google Analytics Code
![]() Click Sign in on Google Analytics.
Click Sign in on Google Analytics.

The Google Analytics Account Home page appears.
![]() Click Admin.
Click Admin.
The Account Administration page appears.
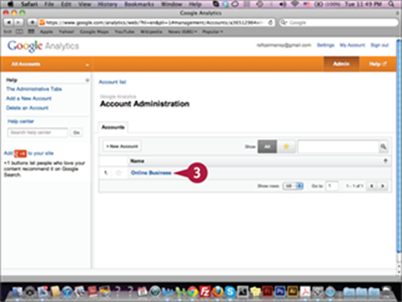
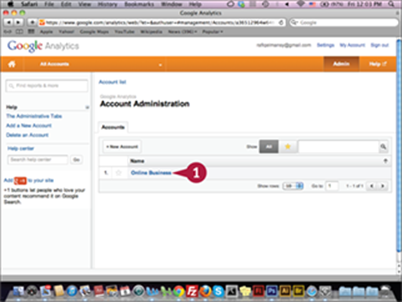
![]() Click the account; for example, Online Business.
Click the account; for example, Online Business.
The All Accounts page appears.
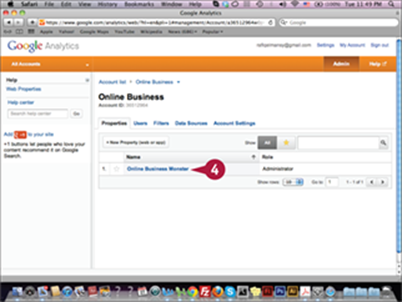
![]() Click the property name; for example, the Online Business Monster property.
Click the property name; for example, the Online Business Monster property.
TIP
Where should I add the tracking code?
The Google Analytics tracking code is used to track the pages on which it is installed. For example, if you install the code on index.html, the code will track the traffic and visitors on this specific page only. Thus, you need to add the tracking code to each HTML page in your website. In some website structures, the website header is added to a separate file that loads in index.html when you visit the website via your web browser. In this case, you can add the code only in the header file and it will track the traffic from all the website pages. Understanding the structure of your website helps you to avoid multiple insertions or duplicate code on the website.
The Google Analytics code provides a trusted way to track your website traffic and visitor information. This information is essential for the SEO process because it allows you to monitor website traffic, the high SERP (search engine results page) content, and other information. You can use this information to refine the SEO process for your website and track the progress of each optimization task to determine the best SEO techniques for your website. For example, you can use the Analytics data to figure out the SERP keywords that bring the most traffic to your website and other keywords that you can optimize to get better SERP rankings.
The Accounts Properties page appears
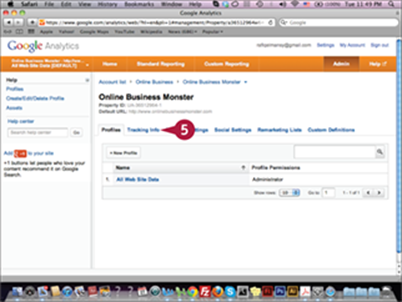
![]() Click the Tracking Info tab.
Click the Tracking Info tab.
The Tracking tab is active.
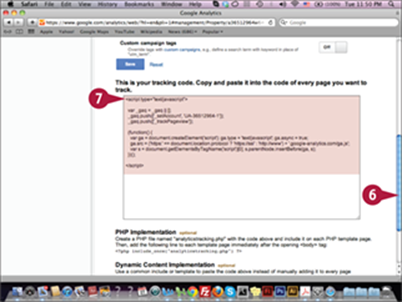
![]() Scroll down to the tracking code section.
Scroll down to the tracking code section.
![]() Click and drag to select and then press
Click and drag to select and then press ![]() +
+![]() (
(![]() +
+![]() ) to copy the tracking code.
) to copy the tracking code.
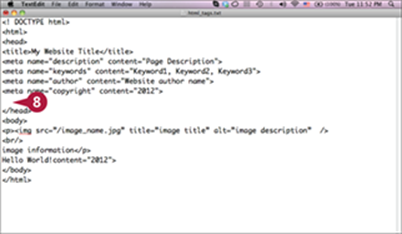
![]() In the HTML document, position the mouse pointer before the </head> closing tag.
In the HTML document, position the mouse pointer before the </head> closing tag.
![]() Press
Press ![]() .
.
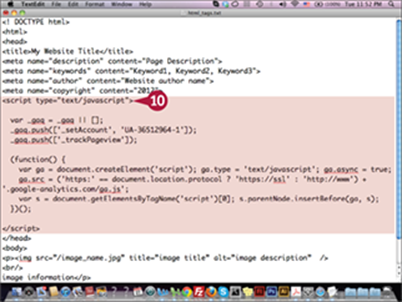
![]() Press
Press ![]() +
+![]() (
(![]() +
+![]() ) to paste the tracking code.
) to paste the tracking code.
![]() Press
Press ![]() +
+![]() (
(![]() +
+![]() ) to save the document.
) to save the document.
After the code is inserted, it takes around few days to display the website statistics.
TIPS
Why do the code results not appear right away?
When you first install the Analytics code, it takes a couple of days before you will receive a complete report for the website data. When the word “Verified” appears next to the website in the Analytics accounts page, it means the code has been installed correctly.
How do I install the code in PHP sites?
For websites that use PHP as a coding language, Analytics code is installed in a different way. In this case, you want to create a file on the server with the name analyticstracking.php. This file should include the Analytics tracking code, which you place after the opening of the <body> tag using the code <?php include_once(“analyticstracking.php”) ?>.
Create a New Analytics Account
Google Analytics allows you to create multiple accounts on your dashboard and each account can include one or more properties. You can use this option to organize your Analytics dashboard, especially when you have large list of websites to track. For example, you can create an account for a specific website and its sub-domains. The sub-domains are websites hosted under the main website server and domain name. For example, you can have the website www.sitename.com with the sub-domains http://faq.sitename.com and http://help.sitename.com. Arranging the websites help you to get better tracking for the sites and share it with your teamwork.
Create a New Analytics Account
![]() Click Admin on the Google Analytics home page.
Click Admin on the Google Analytics home page.
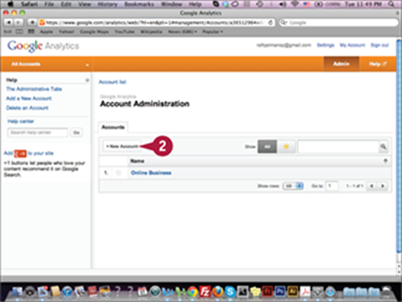
The Accounts Administration page appears.
![]() Click New Account.
Click New Account.

The New Account page appears.
![]() Click Web Site.
Click Web Site.
![]() Type the website name to set up the name of the initial property in the account.
Type the website name to set up the name of the initial property in the account.
![]() Type the website URL.
Type the website URL.
![]() Click the Industry Category pop-up menu and select a website niche; for example, Healthcare.
Click the Industry Category pop-up menu and select a website niche; for example, Healthcare.
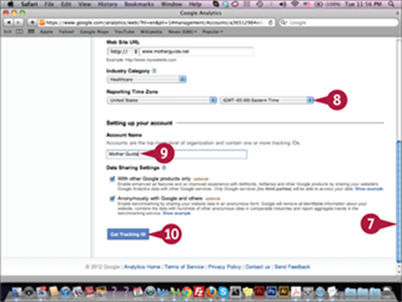
![]() Scroll down the page.
Scroll down the page.
![]() Click the Reporting Time Zone pop-up menus and select a country or origin and a time zone.
Click the Reporting Time Zone pop-up menus and select a country or origin and a time zone.
![]() Type the account name in the Account Name field.
Type the account name in the Account Name field.
![]() Click Get Tracking ID.
Click Get Tracking ID.
The Google Analytics Terms of Service page appears.
![]() Click I accept to receive a Tracking ID.
Click I accept to receive a Tracking ID.
TIP
How many site accounts can I create in Google Analytics?
Google Analytics allows you to use up to 50 site accounts to manage your websites. In each account, you can add multiple properties. In some cases, you may need to create a separate Google Analytics account for a specific website. For example, if you sell the website, the buyer will lose all the old analytics details when he adds the website to his own Google Analytics account. Therefore, in order for the buyer to preserve the old analytics, you should give the buyer your whole Google Analytics account. In this case, it is advisable to have a separate Google Analytics account for this specific website.
Add a New Property Website
Under each site account in Google Analytics, you can add one or more websites, which are known as Properties. These Properties appear under the main site account in the Admin page. Each website has its own tracking code, which you will need to install in the website in order to track the website statistics and analyze them in Google Analytics. You can use this Accounts and Properties structure to organize your sites and their related domains and sub-domains. Also, you can use it to organize related websites under the main site account.
Add a New Property Website

![]() Click Admin on the Google Analytics home page.
Click Admin on the Google Analytics home page.

The Account Administration page appears.
![]() Click an account; for example, Online Business.
Click an account; for example, Online Business.
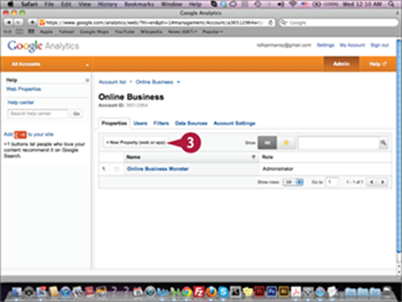
The Account page appears.
![]() Click + New Property (web or app).
Click + New Property (web or app).
The new property page appears.
![]() Click Web Site.
Click Web Site.
![]() Type the website name to set up the name of the initial property in the account.
Type the website name to set up the name of the initial property in the account.
![]() Type the website URL.
Type the website URL.
![]() Click the Industry Category pop-up menu and select a website niche.
Click the Industry Category pop-up menu and select a website niche.
![]() Click the Reporting Time Zone pop-up menus and select a country or origin and a time zone.
Click the Reporting Time Zone pop-up menus and select a country or origin and a time zone.
![]() Click Get Tracking ID.
Click Get Tracking ID.
After receiving the tracking code, you can install it on your website.
TIP
Can I track mobile application statistics?
Yes, you can create a tracking code for mobile application by clicking App from the new properties page. You can use the tracking code to get statistic information about your Android or iOS application and display it in your Google Analytics account. You can use this code with multiple versions of the application, and you can also install it to multiple applications.
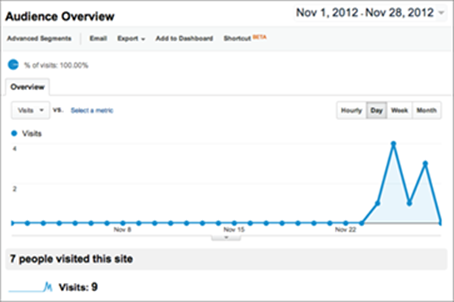
View Website Analytics
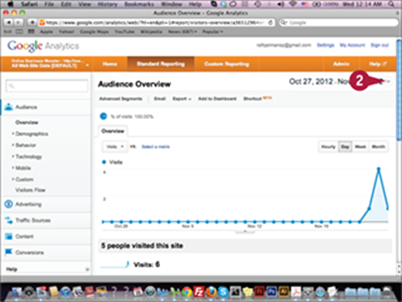
Standard Reporting appears on the Analytics page. It includes information on Unique Visitors, counted once during their visits, and New Visitors, visiting for the first time.
Page views indicates how many pages visitors view. Page/Visit shows the number of pages each user visits. Avg. Visit Duration shows how long users browse the website, and Bounce Rate indicates the percentage of users visiting the page and then leaving without viewing other pages.
View Website Analytics
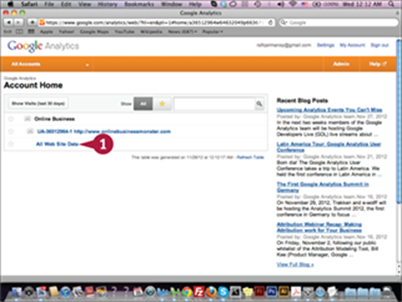
![]() Click All Web Site Data or your own profile name from the Analytics Account Home page.
Click All Web Site Data or your own profile name from the Analytics Account Home page.
The Standard Reporting page appears.
![]() Click the Data Range down arrow (
Click the Data Range down arrow (![]() ).
).
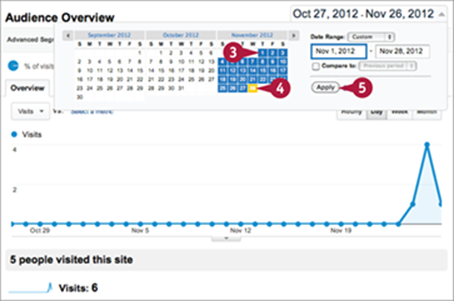
The Data Range timeline appears.
![]() Click a starting date to set the start of the data range.
Click a starting date to set the start of the data range.
![]() Click an ending date to set the end date for data range.
Click an ending date to set the end date for data range.
![]() Click Apply.
Click Apply.
The website statistics for the period chosen appear.
TIPS
What is the different between Standard and Custom Reporting?
The Standard Reporting tab displays the default information for visits, unique visitors, and page views. This view appears when you access the website analytics. The Custom Reporting tab enables you to create a new customized report with specific information. You can create multiple custom reports for different purposes and web analytics.
How can I share Google Analytics reports?
Google Analytics lets you share reports by e-mail or download them in various formats. You can click Export to save the report on your computer in CSV, TSV, TSV for Excel, and PDF formats. From the Standard Reports tab, you can click Email from the menu bar to send a report to e-mail recipients.
Add Multiple Users
Google Analytics allows you to add multiple users to specific accounts and allow them to view Account Properties statistics. Newly created users can be the User or Administrator. You can set the specific website Profile to display for the User. The Profile shows property data in a custom way; for example, it can show only the traffic from Google organic search. The Administrator account can view all the available properties for the account. The multiple users feature is very useful when you are part of a team that would like to share website statistics.
Add Multiple Users

![]() Click an account on the Account Administration page.
Click an account on the Account Administration page.
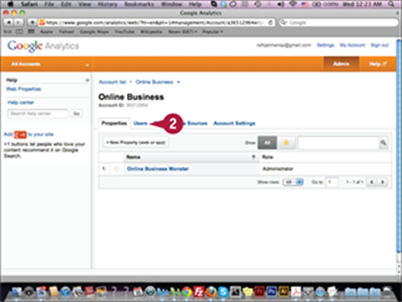
The Account page appears.
![]() Click the Users tab.
Click the Users tab.
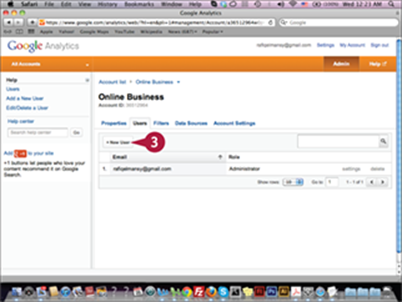
The Users page appears.
![]() Click the + New User tab.
Click the + New User tab.
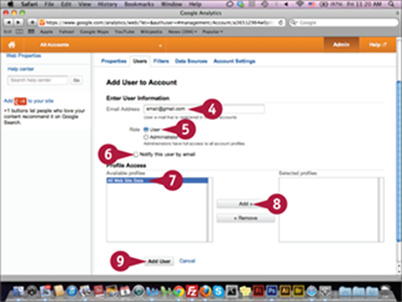
The new user form appears.
![]() Type the user’s e-mail address.
Type the user’s e-mail address.
![]() Click the User role option (
Click the User role option (![]() changes to
changes to ![]() ).
).
![]() Click the Notify this user by email check box (
Click the Notify this user by email check box (![]() changes to
changes to ![]() ).
).
![]() Click your profile name.
Click your profile name.
![]() Click Add.
Click Add.
![]() Click Add User.
Click Add User.
The user will receive a notification and then be able to see the website reports.
TIPS
Under what conditions do I choose the User or the Administrator role?
The User role has very limited capabilities in comparison with the Administrator role. The User role cannot edit the Analytics settings or add new users. The Administrator role has similar privileges as the owner. The Administrator can access all reports, modify settings, and add new users.
How can I create or edit a website profile?
On the Accounts page, click an account. Select the current profile to edit, or click +New Profile to create a new profile that will take you to the profile set up. In the new profile, you can add users, filters, custom alerts, scheduled e-mails, shortcuts, and set Goals.
View Real-Time Statistics
Real-time statistics show you live updates for website analytics. When you click the Property analytics, you get gathered information and statistics about the website. By clicking the Real-Time option on the Analytics web page, you can view live information about the website’s current number of visitors, the locations of those visitors, the traffic sources these visitors come use, and the currently visited content. You can also click the Overview link to view a summary of all live data.
View Real-Time Statistics

![]() Click All Web Site Data or your own profile name on the Google Analytics Account Home page.
Click All Web Site Data or your own profile name on the Google Analytics Account Home page.
The Website Analytics page appears.
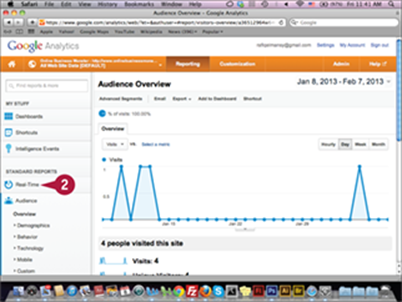
![]() Click Real-Time under Standard Reports.
Click Real-Time under Standard Reports.
The Real-Time submenu expands.
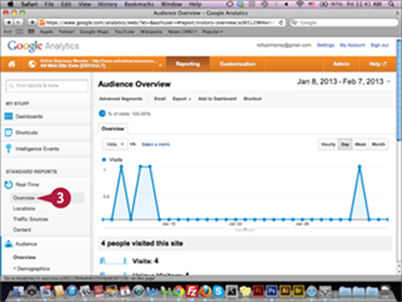
![]() Click Overview.
Click Overview.
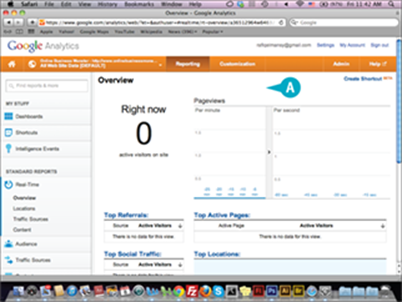
A The Real-Time Overview statistics expand, showing live information about the website visitors.
TIPS
Why are the Real-Time statistics important?
In the SEO process, you want live analytics about the website. For example, you may need to know the time when the website receives the most traffic to determine the best time to publish website content. The live statistics also give you an idea of the type of content that visitors visit through the day.
What information can I obtain from the Real-Time statistics?
From the Real-Time overview, you can check the current traffic for the website and number of page views. You can check the origin of the website traffic and location of visitors. You can also learn about the search keywords that display the website on search engine results pages.
Exclude Traffic from a Specific IP
Every Google Analytics profile allows you to add Filters, which allow you to exclude specific data from appearing in the profile. For example, you can use them to hide traffic information from your IP. The Internet Protocol (IP) address is a set of numbers assigned to each website. Usually, you need to check the website frequently while testing and developing content from your own browser setting. The analytics information about your own website visits is not important and may be misleading. Using Filters to exclude your IP data can help you to get more accurate traffic data.
Exclude Traffic from a Specific IP
![]() Click the account name in the Account Admin page.
Click the account name in the Account Admin page.
The account admin page appears.
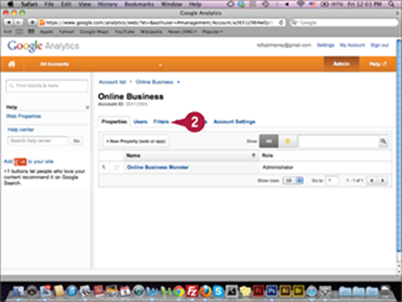
![]() Click Filters.
Click Filters.
The Filters page appears.
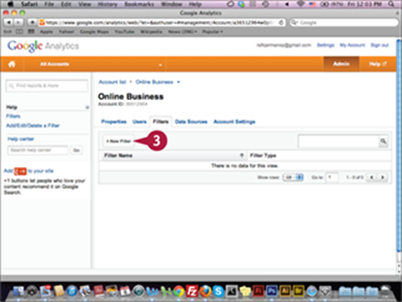
![]() Click +New Filter.
Click +New Filter.
The New Filter page appears.
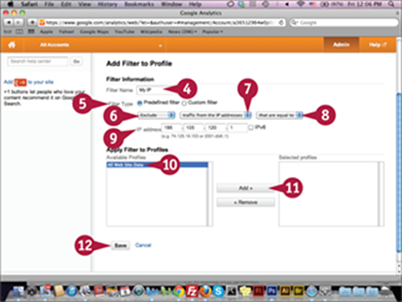
![]() Type your filter name.
Type your filter name.
![]() Click the Predefined filter option (
Click the Predefined filter option (![]() changes to
changes to ![]() ).
).
![]() Click the Filter type pop-up menu and select Exclude.
Click the Filter type pop-up menu and select Exclude.
![]() Click the pop-up menu and select traffic from the IP addresses.
Click the pop-up menu and select traffic from the IP addresses.
![]() Click the pop-up menu and select that are equal to.
Click the pop-up menu and select that are equal to.
![]() Type the IP address in the fields.
Type the IP address in the fields.
![]() Click All Web Site Data.
Click All Web Site Data.
![]() Click Add.
Click Add.
![]() Click Save.
Click Save.
The filter is added and will apply to all the web site data.
TIPS
What type of filter can I create?
The Filters options allow you to create filters based on different criteria. Each criterion can exclude or include traffic from specific sources. For example, you can choose to exclude traffic from a specific ISP domain, IP address, subdirectory of a specific website, and hostname. You can also apply multiple filters to the same profile and apply different criteria for each filter.
Can I apply the same filter for more than one profile?
Yes, you can create a filter and apply it to multiple profiles in the same account. You can do this by clicking the Filters tab in the Analytics account. This option is helpful for creating global filters that you can use with different profiles.
Set a Conversion Goal
Google Analytics’ Conversion Goals enable you to measure if you are achieving your objectives. It tracks actions giving you ideas about your progress in achieving a specific result. This goal can be the time users spend on your website or the number of page views. You set goals at the profile level and are limited to four sets of goals. Each set is limited to five goals, which means that each profile has a maximum of 20 goals. The four types of goals are URL Destination, Visit Duration, Page/View, and Event.
Set a Conversion Goal

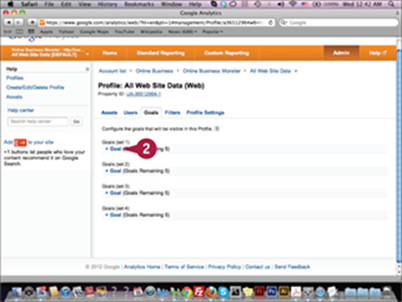
![]() Click Goals or your own profile name on the All Web Site Data page.
Click Goals or your own profile name on the All Web Site Data page.
The Goals section appears.
![]() Click +Goal under the Goals (set 1).
Click +Goal under the Goals (set 1).
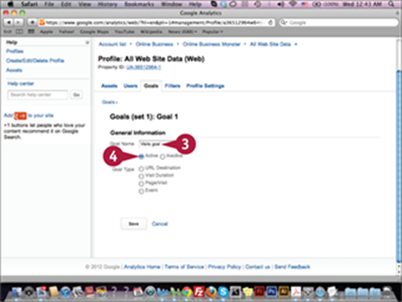
The Goal setting appears.
![]() Type your goal in the Goal Name field.
Type your goal in the Goal Name field.
![]() Click the Visit Duration option under the Goal Type section (
Click the Visit Duration option under the Goal Type section (![]() changes to
changes to ![]() ).
).
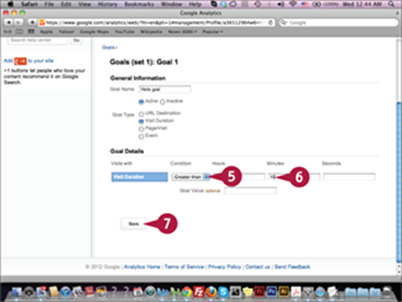
The Visit Duration setting appears.
![]() Click the Condition pop-up menu and select Greater than.
Click the Condition pop-up menu and select Greater than.
![]() Type the hours and/or minutes in the Hours and Minutes fields; for example, type 10 in the Minutes field.
Type the hours and/or minutes in the Hours and Minutes fields; for example, type 10 in the Minutes field.
![]() Click Save.
Click Save.
The goal appears in the Goals tab as one of the goals of your account and also on the Analytics home page under the Conversions section.
TIP
What is a URL Destination goal?
The URL Destination goal tracks the traffic for a specific URL. You can choose from three match types. The Head Match is a good choice for shopping pages that have parameters in the end of the URL. Exact Match matches the exact characters in the URL and it is suitable for static URLs. The Regular Expression Match uses special characters for more flexibility. You can choose one of these options based on the URL you use.
Find Website Keywords
One of the advantages of using Google Analytics is it allows you to find the keywords that give you the best ranking in different search engines. Once you identify these keywords, you can build new content that targets them to increase search engine traffic. You can also monitor new keywords to see if they increase traffic to your website. This feature is very helpful and an essential part of the SEO process, because it shows you the direct impact of keyword optimization on the website traffic.
Find Website Keywords

![]() Click All Web Site Data, or your own profile name on the Analytics Account Home page.
Click All Web Site Data, or your own profile name on the Analytics Account Home page.
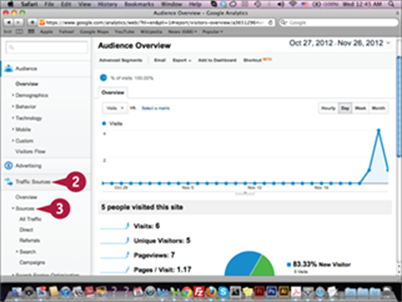
The Standard Reporting page appears.
![]() Click Traffic Sources to expand the menu.
Click Traffic Sources to expand the menu.
![]() Click Sources.
Click Sources.
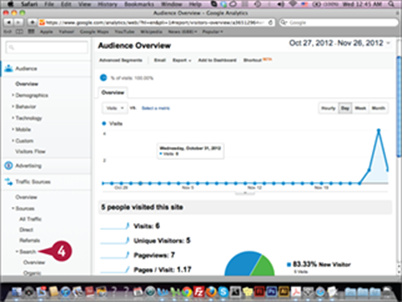
The Sources link expands.
![]() Click Search.
Click Search.
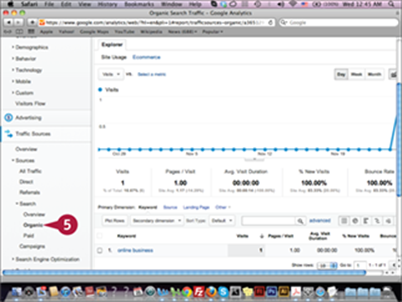
The Search link expands.
![]() Click Organic.
Click Organic.
The organic traffic appears in the statistics.
TIP
What is the Search Engine Optimization link?
In addition to the Traffic Sources data, you can maximize your knowledge of website keywords and traffic using the Search Engine Optimization link. This link allows you to link between Google Analytics and Google Webmaster Tools, which gives you more information about the website links and keyword queries. These queries are what users use to search for website pages. When you link Google Analytics with Webmasters Tools, you can check the queries in more depth. Also, you will be able to learn about website home page and where users go when they visit your website.