Adobe After Effects CC Classroom in a Book (2017 release) (2017)
12. Working with the 3D Camera Tracker
Lesson overview
In this lesson, you’ll learn how to do the following:
• Track footage using the 3D Camera Tracker.
• Add camera and text elements to a tracked scene.
• Set a ground plane and origin.
• Create realistic shadows for new 3D elements.
• Lock elements to planes using null objects.
• Adjust camera settings to match real-world footage.
• Remove rolling shutter distortions from DSLR footage.
![]()
This lesson will take approximately one and a half hours to complete. Download the project files for this lesson, following the instructions in the Getting Started section under “Accessing the lesson files and Web Edition,” if you haven’t already done so. As you work on this lesson, you’ll preserve the start files. If you need to restore the start files, download them from your Account page.
PROJECT: OPENING SEQUENCE FOR TV SHOW
The 3D Camera Tracker effect analyzes two-dimensional footage to create a virtual 3D camera that matches the original. You can use this data to add 3D objects that merge realistically with your scene.
About the 3D Camera Tracker effect
The 3D Camera Tracker effect automatically analyzes the motion present in existing 2D footage, extracts the position and lens type of the real camera that shot the scene, and creates a new 3D camera in After Effects to match it. The effect also overlays 3D track points onto the 2D footage, so you can easily attach new 3D layers onto the original footage.
These new 3D layers have the same movement and perspective changes as the original footage. The 3D Camera Tracker effect even helps create “shadow catchers,” so your new 3D layers can appear to cast realistic shadows and reflections onto the existing footage.
The 3D Camera Tracker performs its analysis in the background. Therefore, you can work on other compositions while the footage is being analyzed.
Getting started
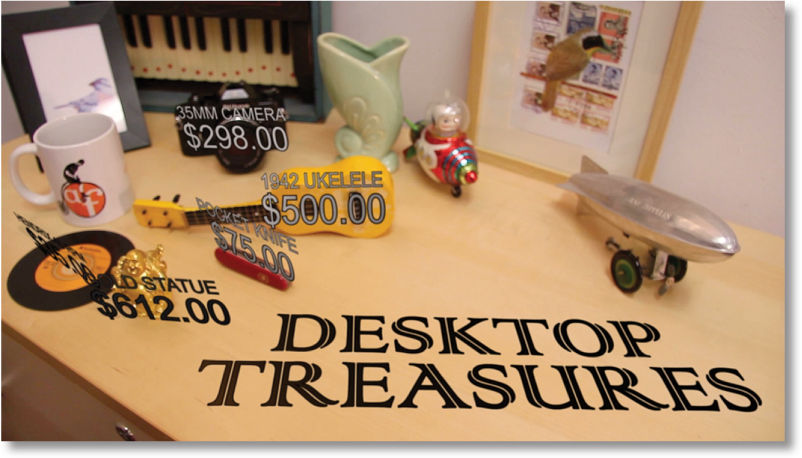
In this lesson, you’ll create the opening scene for a fictional reality show that estimates the value of everyday objects found on office desks. You’ll begin by importing the footage and tracking it with the 3D Camera Tracker effect. Then you’ll add 3D text elements that track precisely with the scene. Finally, you’ll animate the text, add audio, and enhance the footage to complete the show’s introduction.
First, you’ll preview the final movie and set up your project.
1. Make sure the following files are in the Lessons/Lesson12 folder on your hard disk, or download them from your Account page at www.peachpit.com now:
• In the Assets folder: Desktop.mov, Treasures_Music.aif, Treasures_Title.psd
• In the Sample_Movies folder: Lesson12.avi, Lesson12.mov
2. Open and play the Lesson12.avi sample movie in Windows Media Player or the Lesson12.mov sample movie in QuickTime Player to see what you will create in this lesson. When you are done, close Windows Media Player or QuickTime Player. You may delete the sample movies from your hard disk if you have limited storage space.
When you begin this lesson, restore the default application settings for After Effects. See “Restoring default preferences” on page 2.
3. Start After Effects, and then immediately hold down Ctrl+Alt+Shift (Windows) or Command+Option+Shift (Mac OS). When prompted, click OK to delete your preferences. Close the Start window.
After Effects opens to display an empty, untitled project.
4. Choose File > Save As > Save As.
5. In the Save As dialog box, navigate to the Lessons/Lesson12/Finished_Project folder.
6. Name the project Lesson12_Finished.aep, and then click Save.
Importing the footage
You need to import three footage items for this lesson.
1. Choose File > Import > File.
2. Navigate to the Lessons/Lesson12/Assets folder, Shift-click to select the Desktop.mov, Treasures_Music.aif, and Treasures_Title.psd files, and then click Import or Open.
3. Choose File > New > New Folder to create a new folder in the Project panel, or click the Create A New Folder button (![]() ) at the bottom of the panel.
) at the bottom of the panel.
4. Type Footage to name the folder, press Enter or Return to accept the name, and then drag the Desktop.mov and Treasures_Title.psd items into the Footage folder.
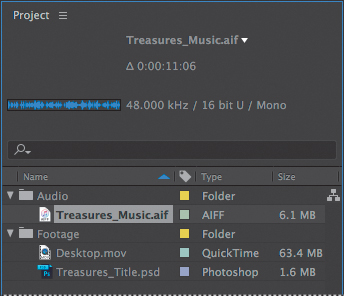
5. Make sure nothing is selected. Then create another folder, name it Audio, and drag the Treasures_Music.aif item into it.
6. Expand the folders so that you can see their contents.
Creating the composition
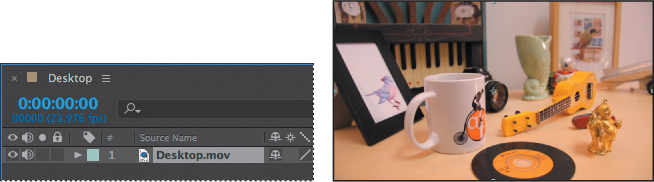
Now, you will create a new composition based on the aspect ratio and duration of the Desktop.mov file.
1. Drag the Desktop.mov item onto the Create A New Composition button (![]() ) at the bottom of the Project panel. After Effects creates a new composition named Desktop and displays it in the Composition and Timeline panels.
) at the bottom of the Project panel. After Effects creates a new composition named Desktop and displays it in the Composition and Timeline panels.
2. Drag the Desktop composition to an empty area of the Project panel to move it out of the Footage folder.
3. Drag the current-time indicator across the time ruler to preview the shot.
The camera moves around a desktop so that you can see the objects on it. You’ll add labels and dollar amounts, animated in time with background music.
4. Choose File > Save to save the file.
Repairing rolling shutter distortions
Digital cameras with CMOS sensors—including video-capable DSLRs, popular for the creation of films, commercials, and television shows—typically have what is commonly known as a “rolling” shutter, which captures a frame of video one scan line at a time. Due to time lag between scan lines, not all parts of the image are recorded at exactly the same time, causing motion to ripple down the frame. If the camera or the subject is moving, the rolling shutter can cause distortions, such as leaning buildings and other skewed images.
The Rolling Shutter Repair effect attempts to correct this problem automatically. To use it, select the problem layer in the Timeline panel, and choose Effect > Distort > Rolling Shutter Repair.

Due to a rolling shutter distortion, the pillars of the building appear

After applying the effect, the building looks much more stable. to be leaning.
The default settings usually do the trick, but you may need to change the Scan Direction or the Method being used to analyze the footage.
If you plan to use the 3D Camera Tracker effect with footage on which you’ve used the Rolling Shutter Repair effect, precompose the footage first.
Tracking the footage
The 2D footage is in place. Now you’ll have After Effects track it and interpolate where a 3D camera should be placed.
1. In the Timeline panel, click the Audio icon for the Desktop.mov layer to mute the audio.
You’ll add a soundtrack later, and you don’t want any ambient noise from this clip.
2. Right-click (Windows) or Control-click (Mac OS) the Desktop.mov layer in the Timeline panel, and choose Track Camera.
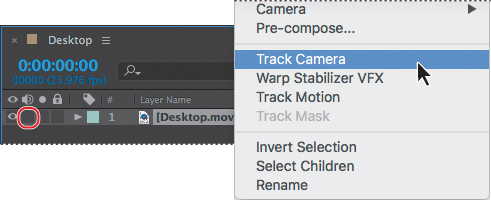
After Effects opens the Effect Controls panel and displays its progress as it analyzes the footage in the background. When the analysis is complete, many tracking points appear in the Composition panel. The size of a tracked point indicates its proximity to the virtual camera: Larger points are closer, and smaller points are further away.
The default analysis of the footage often yields satisfactory results, but you can perform a more detailed analysis to better solve the camera position.
3. In the Effect Controls panel, expand the Advanced category, and then select Detailed Analysis.
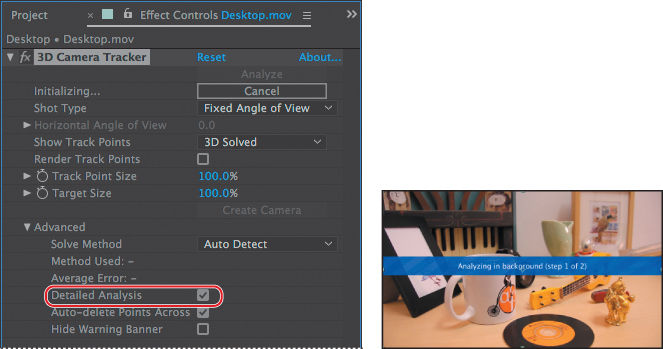
 Depending on your system, this may take a while.
After Effects analyzes the footage again. If you’re working with a slower machine and you suspect you’ll need a detailed analysis, you can save time by selecting Detailed Analysis while the 3D Camera Tracker is performing its initial analysis. The detailed analysis may take a few minutes, depending on your system. Because the analysis is performed in the background, you could work on other aspects of your project while it progresses.
4. When the analysis is complete, choose File > Save to save your work so far.
Creating a ground plane, a camera, and the initial text
You have a 3D scene, but it needs a 3D camera. You’ll add a camera when you create the first text element, and then you’ll add a second text element related to the first.
![]() Note
Note
You can also add a camera by clicking the Create Camera button in the Effect Controls panel.
1. Press the Home key, or move the current-time indicator to the beginning of the time ruler.
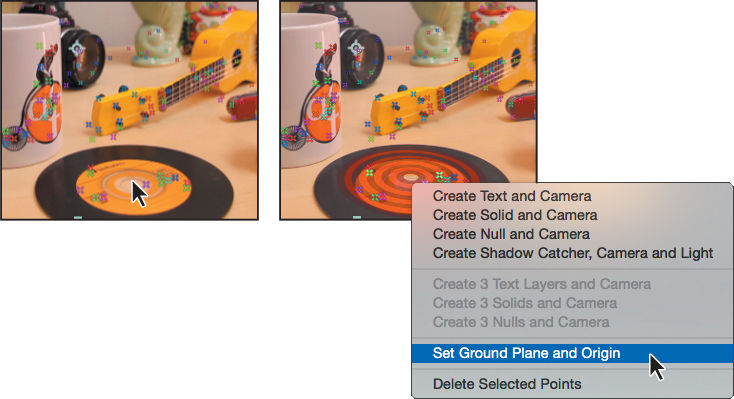
2. In the Composition panel, hover the cursor over the hole in the record on the desk until the displayed target is in line with the plane and the perspective matches. (If you don’t see the track points and target, click the 3D Camera Tracker effect in the Effect Controls panel to make it active.)
When you hover the cursor between three or more neighboring track points that can define a plane, a semitransparent triangle appears between the points. Additionally, a red target shows the orientation of the plane in 3D space.
3. Right-click (Windows) or Control-click (Mac OS) the plane, and choose Set Ground Plane And Origin.
![]() Note
Note
If the size of the target makes it difficult to see the plane, resize the target by pressing Alt or Option as you drag from the center of the target.
The ground plane and origin provide a reference point, setting a point where the coordinates are (0, 0, 0). Though nothing appears to change in the Composition panel using the Active Camera View, the ground plane and origin make it easier to change the camera’s rotation and position.
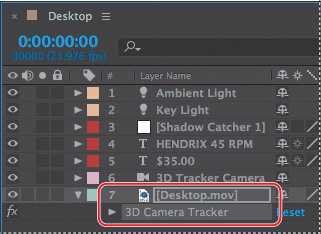
4. Right-click (Windows) or Control-click (Mac OS) the same plane, and choose Create Text And Camera.
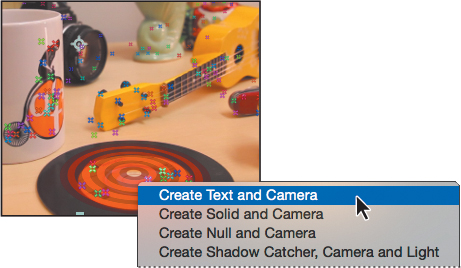
After Effects displays a large text item lying flat in the Composition panel. It also adds two layers to the Timeline panel: Text and 3D Tracker Camera. The 3D switch is enabled for the Text layer, but the Desktop.mov layer remains 2D. Because the text elements are the only ones that need to be positioned in 3D space, there is no reason to make the background footage layer a 3D layer.
5. Move the current-time indicator along the time ruler. The text remains in position, tracking with the camera. Return the current-time indicator to the beginning of the time ruler.
6. Double-click the Text layer in the Timeline panel to add the Character and Paragraph panels to the stacked panels on the right.
7. Open the Paragraph panel, and select Center Text for the alignment. The text is centered over the record.
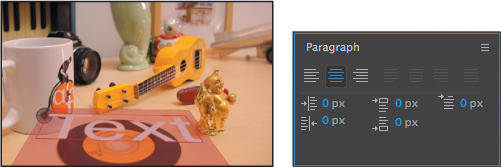
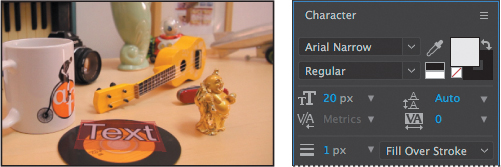
8. Open the Character panel. Change the font to a sans serif font such as Arial Narrow or Helvetica Light. Then change the font size to 20 px, the stroke width to 1 px, and the stroke type to Fill Over Stroke. Make sure the fill color is white and the stroke color is black (the default colors).
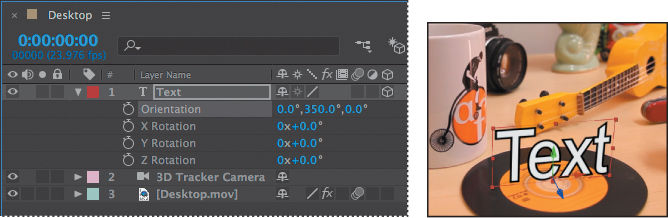
The text looks great, but you want it to stand on end. You’ll change its location in space, and then replace it with the price of the object.
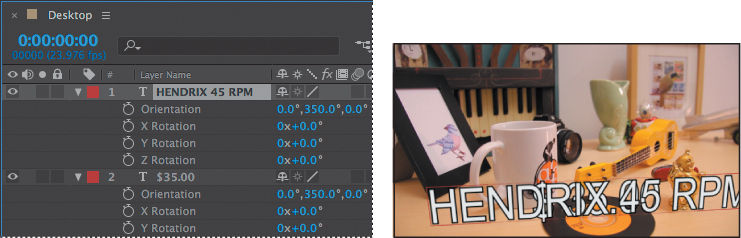
9. Select the Text layer in the Timeline panel to exit text-editing mode. Then, press the R key to display the Rotation property of the layer, and change the Orientation values to 0, 350, 0 degrees.
![]() Note
Note
Instead of entering values, you could use the Rotation tool to adjust the individual axes in the Composition panel.
Any new 3D layer you create uses the ground plane and origin to orient the layer in the scene. The Text layer was originally flat, with the Orientation of 270 degrees on the x axis. When you change that value to 0, the text becomes vertical.
10. Double-click the Text layer in the Timeline panel to make it active in the Composition panel.
When the text is editable, it appears to have a light red mask surrounding it.
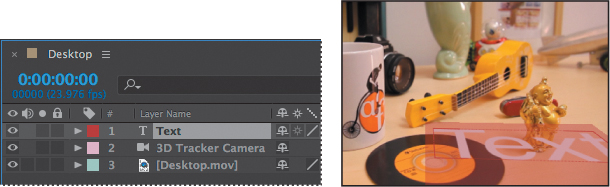
11. With the text selected in the Composition panel, type $35.00 to replace it.
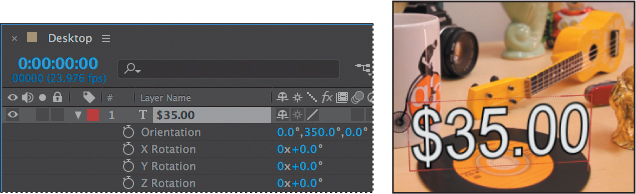
So far, so good. Next, you want to label the item, and the label needs to stay with the price as the camera moves. You’ll duplicate the layer, modify it, and then parent one layer to the other.
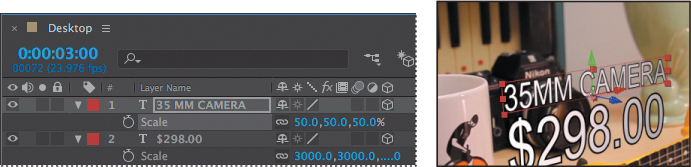
12. Select the $35.00 layer in the Timeline panel, and press Ctrl+D (Windows) or Command+D (Mac OS) to duplicate it.
13. Double-click the $35.2 layer, and type HENDRIX 45 RPM (in all capital letters) in the Composition panel.
The text is too large; it’s the same size as the price text. You’ll parent it to the $35.00 layer and then scale it.
14. Select the Hendrix 45 RPM layer in the Timeline panel, and press the P key to reveal the Position property for the layer. Drag the pick whip from the Hendrix layer to the $35.00 layer.
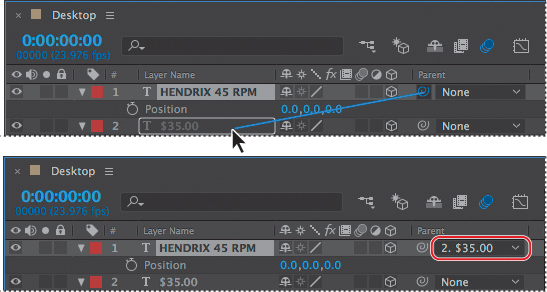
The Position value for the Hendrix layer changes to 0, 0, 0, because its position is related to the parent layer. However, you want the Hendrix layer to appear above the $35.00 layer, not in front of it.
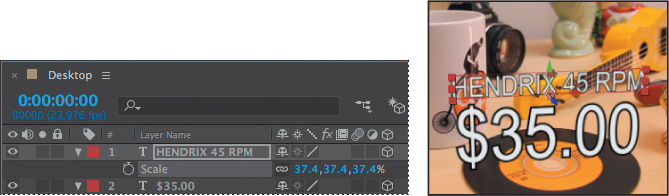
15. Change the y-axis position value to –18 to move the Hendrix label above the price text.
16. With the Hendrix layer selected, press the S key to reveal the Scale property, and change the Scale values to 37.4, 37.4, 37.4%.
17. Close the open properties, and then choose File > Save to save your work so far.
Creating realistic shadows
You’ve set up your first text elements, but unlike true 3D objects, they aren’t casting any shadows. You’ll create a shadow catcher and a light to add depth to your video.
1. Press the Home key, or move the current-time indicator to the beginning of the time ruler.
2. Select the Desktop.mov layer in the Timeline panel, press the E key to display the 3D Camera Tracker effect, and then select the 3D Camera Tracker effect.
![]() Note
Note
Be sure to select the 3D Camera Tracker effect in the DesktopC.mov layer, not the 3D Tracker Camera layer.
3. Select the Selection tool (![]() ) in the Tools panel. Then, in the Composition panel, hover until you find the same plane you used to create the text layer.
) in the Tools panel. Then, in the Composition panel, hover until you find the same plane you used to create the text layer.
4. Right-click (Windows) or Control-click (Mac OS) the target, and choose Create Shadow Catcher And Light.
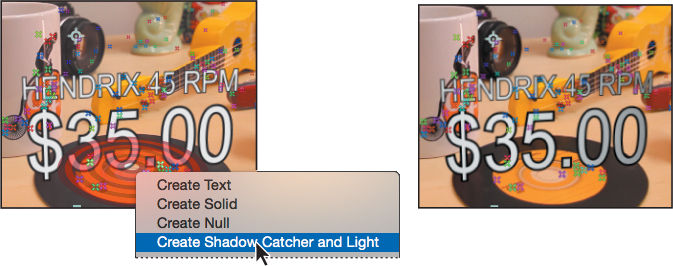
After Effects adds a light source to the scene. The default settings are applied, so a shadow appears in the Composition panel. However, you’ll need to reposition the light to match the light in the source footage. The Shadow Catcher 1 layer that After Effects adds to the Timeline panel is a shape layer that has its material options set so that it accepts shadows only from the scene.
5. Select the Light 1 layer in the Timeline panel, and press the P key to reveal the Position property for the layer.
![]() Tip
Tip
In a real-world project, it’s ideal to work with the lighting plan that was used to shoot the original 2D scene. The goal is to have the new 3D lights match the original source lighting as closely as possible.
6. Enter the following values for the Position property to reposition the light: 1900, –2500, –375.
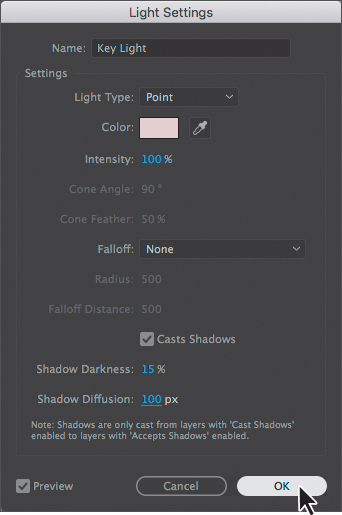
7. Choose Layer > Light Settings.
You can change the intensity, color, and other attributes of the light in the Light Settings dialog box.
8. Name the light Key Light. Choose Point from the Light Type menu, and then select a slightly red color (we used R=232, G=214, B=213) to match the slight color cast in the room. Then change the Shadow Darkness to 15% and the Shadow Diffusion to 100 px. Click OK.
9. Select the Shadow Catcher 1 layer in the Timeline panel, and press the S key to reveal the Scale property.
10. Change the Scale value to 340%.
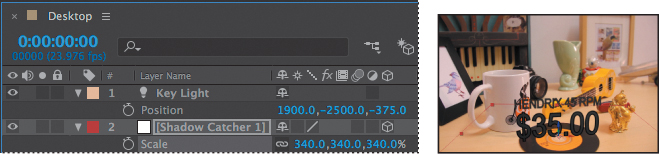
Scaling the Shadow Catcher 1 layer changes the area in which shadows can appear for the light that was created with it.
Adding ambient light
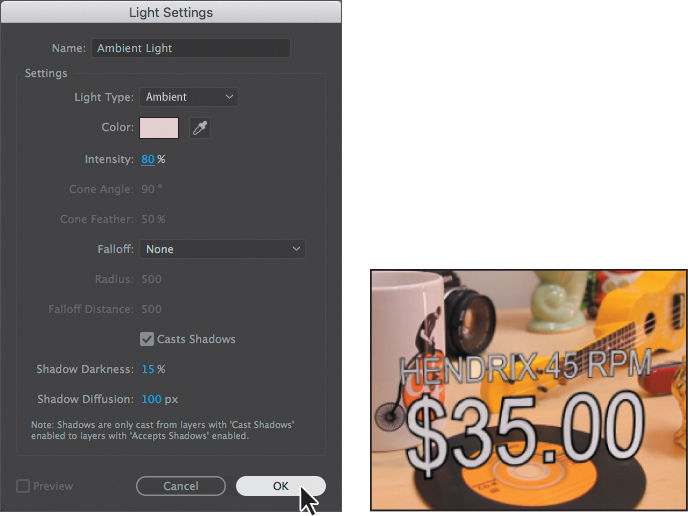
The shadow looks better after the adjustments you made to the light, but it’s now causing the text to appear black. You’ll add ambient light to address this. Unlike a point light, ambient light creates a more diffuse light throughout the scene.
1. Deselect all layers, and then choose Layer > New > Light.
2. Name the light Ambient Light, choose Ambient from the Light Type menu, and change its Intensity value to 80%. The light color should be the same as the color you selected for the point light.
3. Click OK to add the light to the scene.
4. Hide the properties for all layers in the Timeline panel, except for the Desktop.mov layer.
Creating additional text elements
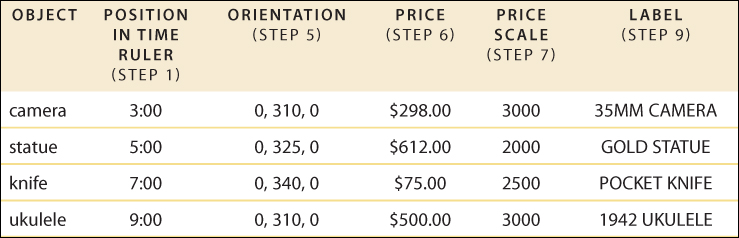
You created the label for the Hendrix record. Now you need to perform the same tasks to create labels for the camera, gold statue, pocket knife, and ukulele. You’ll use the same steps to create each label, but because the objects are in different places on the table, you’ll need to use different orientation and scaling values, as listed in the following chart. You’ll find it easiest to attach the label for each to the correct plane at different points in the time ruler.
![]() Tip
Tip
If a 3D object should be obscured by an object in the background, duplicate the background layer, move it to the top of the layer stack, and then use the Mask tool to create masks around portions of the foreground elements. You will need to animate these masks over time, but if you do it carefully, you can create a seamless composition.
1. Move the current-time indicator to get a better view of the object.
2. In the Timeline panel, select the 3D Camera Tracker (under the Desktop. mov layer) to make it active. (If you don’t see the 3D Camera Tracker, press the E key to reveal it.)
![]() Note
Note
Make sure you select the 3D Camera Tracker effect in the DesktopC.mov layer, not the 3D Tracker Camera layer.
3. Make sure the Selection tool (![]() ) is selected. Then, in the Composition panel, hover over an area so that the red target is parallel to the front of the object.
) is selected. Then, in the Composition panel, hover over an area so that the red target is parallel to the front of the object.
4. Right-click (Windows) or Control-click (Mac OS) the target, and choose Create Text.
5. Select the Text layer in the Timeline panel, and press the R key to reveal the Rotation values. Then change the Orientation values.
6. Double-click the Text layer to make it editable, and then type the price in the Composition panel.
7. Select the price layer in the Timeline panel, and press S to reveal the Scale property. Change the Scale value.
8. With the price layer selected, press Ctrl+D (Windows) or Command+D (Mac OS) to duplicate the layer.
9. Double-click the duplicate layer in the Timeline panel, and then type the label in the Composition panel.
10. Select the label layer in the Timeline panel, and press P to reveal its Position property. Then drag the pick whip from the label layer (e.g., 35MM CAMERA) to the price layer (e.g., $298.00).
11. Change the y value of the Position property for the label layer to –18 to move the label above the price.
12. Select the label layer again, and press S to reveal the Scale property. Change its Scale values to 50, 50, 50%.
![]() Note
Note
If you turn on Caps Lock to type the label, be sure to turn it off again. Otherwise, you’ll get unexpected results, and After Effects won’t be able to update the layer name.
13. Hide the properties for the layers you just created.
14. Repeat steps 1–13 to label the additional objects, using the values in the chart on the previous page.
The labels all look good, but they may overlap in places that can make them hard to read. You can reposition them as necessary.
15. If you need to adjust a label, select the price layer for the object, and then use the Selection tool to adjust its position. Because you’ve parented the label layer to the price layer, adjusting the price moves both text layers.
16. Choose File > Save to save your work so far.
![]() Note
Note
Your labels may look different from ours, depending on where you positioned each plane.
Locking a layer to a plane with a null object
The title card for the show should be flat on the table, using the same plane you used to attach text to the record. You’ll use a null object to attach the title card to that plane. The title card is an Adobe Photoshop file.
1. Press the Home key, or move the current-time indicator to the beginning of the time ruler.
2. In the Timeline panel, select the 3D Camera Tracker (under the Desktop.mov layer) to make it active. (If you don’t see the 3D Camera Tracker, press the E key to reveal it.)
3. Select the Selection tool (![]() ), and then move the cursor so that the target is lying flat over the record.
), and then move the cursor so that the target is lying flat over the record.
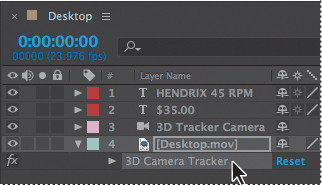
4. Right-click (Windows) or Control-click (Mac OS) the target, and choose Create Null.
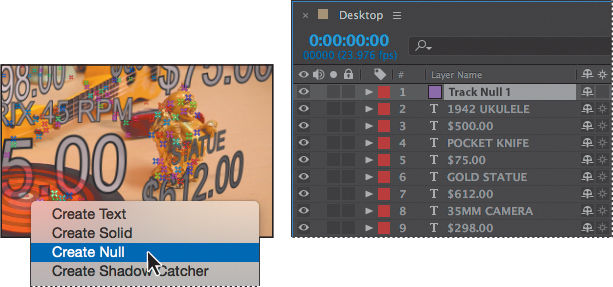
After Effects adds a Track Null 1 layer to the top of the layer stack in the Timeline panel. Because you know that the record is on the same plane as the desktop, you can use this null object to position the title of the show in the open area of the desk, and still have it move correctly in relation to other elements and the camera in the scene.
5. Select the Track Null 1 layer in the Timeline panel, press Enter or Return, and change the name to Desktop Null. Press Enter or Return again to accept the name change.
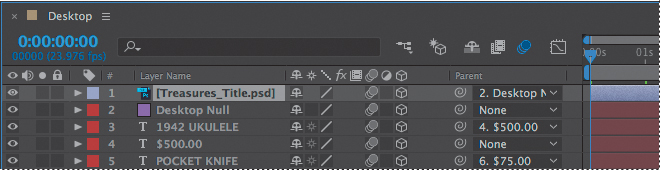
6. From the Project panel, drag the Treasures_Title.psd asset to the Timeline panel, placing it directly above the Desktop Null layer.
7. Drag the pick whip from the Treasures_Title layer to the Desktop Null layer to parent the layer.
8. Click the 3D switch for the Treasures_Title layer to make it a 3D layer.
![]() Tip
Tip
Instead of dragging the pick whip, you could choose 2. Desktop Null from the Parent menu in the Treasures_Title layer.
Because you’ve parented the title layer to the null object, when it becomes a 3D layer it is automatically oriented to be flat on the desktop.
9. Move to the end of the time ruler so you can see how the title card is positioned.
You need to move the title to the empty area of the desktop, and then rotate it and resize it.
10. Select the Treasures_Title layer in the Timeline panel, and press R to reveal its Rotation property. Then change its Z Rotation value to 305 degrees.
11. Press the S key to reveal the Scale property, and change the Scale amount to 625%.
12. With the Selection tool, move the title text into position, as in the image at the bottom of this page. If you need to resize the text, use the Selection tool to adjust the object’s corner handles.
13. Click the Toggle Switches/Modes button at the bottom of the Timeline panel. Choose Luminosity from the Mode menu for the Treasures_Title layer.
14. Click the Toggle Switches/Modes button again to return to displaying switches.
15. Choose File > Save to save your work so far.

Animating the text
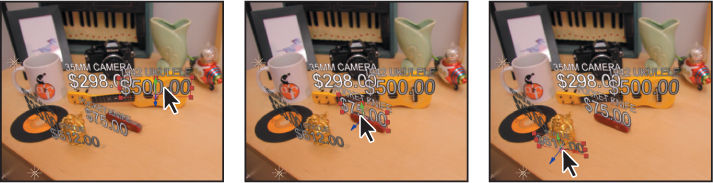
The 3D text elements, camera, and lighting are all complete, but you can make the introduction more interesting by animating the text to appear according to cues in the soundtrack. You’ll add an audio track, and then animate the labels to appear when cash register sounds occur.
Animating the first text elements
You’ll animate the record label and price to appear early in the intro, with the price cycling through characters until it arrives at the final text.
1. In the Project panel, drag the Treasures_Music.aif file from the Audio folder to the bottom of the layer stack in the Timeline panel.
2. Move the current-time indicator to the beginning of the timeline, and then press the spacebar to move the first few seconds of the composition into RAM. Press the spacebar to stop caching, go to the beginning of the time ruler, and press the spacebar again to preview what you cached.
Notice that the cash register sound occurs periodically. You’ll animate the text to appear at those points.
3. Go to 1:00, and select the $35.00 layer. Press the S key to reveal the Scale property, and then change the Scale amount to 0%. Click the stopwatch icon (![]() ) to create an initial keyframe.
) to create an initial keyframe.
4. Go to 1:08, and change the Scale amount for the $35.00 layer to 3200% so that the text is larger than its final size.
5. Go to 1:10, and change the Scale amount to 3000%, the final value for the text.

6. Go to 1:00, and press S to hide the Scale property. Then click the arrow next to the $35.00 layer to reveal all its properties.
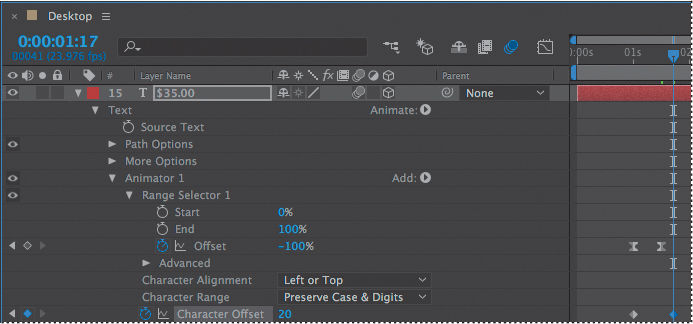
7. Next to the Text property, choose Character Offset from the Animate menu.
8. Expand Range Selector 1 in the Animator 1 properties. Then click the stopwatch next to Offset to create an initial keyframe, and make sure the value is 0%.
9. Click the stopwatch to create an initial keyframe for Character Offset (under Character Range), and make sure its value is 0.
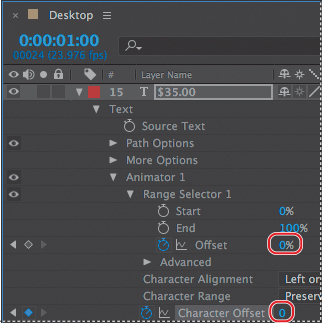
10. Go to 1:12, and change the Range Selector 1 Offset value to –100%.
11. Click the word Offset to select both keyframes, right-click (Windows) or Control-click (Mac OS) one of the keyframes, and then choose Keyframe Assistant > Easy Ease.
12. Go to 1:17, and change the Character Offset value to 20.
13. Preview the first two seconds of the composition.
The title of the record pops up as the text cycles through to the estimated price. The character offset values determine how the text cycles through characters to arrive at the final one.
Copying the animation to other text elements
Now that you’ve animated the text for the record, you can copy the animation for the other objects, placing the keyframes at the appropriate points in the time ruler.
1. Select the $35.00 layer, and press the U key to reveal only the properties that have keyframes.
2. In the time graph, drag a marquee around all the keyframes to select them.

3. Choose Edit > Copy to copy the keyframes and their values.
4. Go to 3:00, and select the $298.00 layer. Choose Edit > Paste to paste the keyframes and their values, beginning at the current time (3:00).
5. Go to 5:00, and select the $612.00 layer. Press Ctrl+V (Windows) or Command+V (Mac OS) to paste the keyframes and their values.
6. Go to 7:00, select the $75.00 layer, and press Ctrl+V (Windows) or Command+V (Mac OS).
7. Go to 9:00, select the $500.00 layer, and press Ctrl+V (Windows) or Command+V (Mac OS).
8. Hide the properties for all the layers, and then choose File > Save.
Adjusting the camera’s depth of field
The intro is looking pretty good, but you can make the computer-generated elements more closely match the source footage if you adjust the depth of field for the 3D camera. You’ll use the values that were used in the camera that shot the original footage, so the text that is further away from the camera appears to be more out of focus.
1. Select the 3D Tracker Camera layer in the Timeline panel.
2. Choose Layer > Camera Settings.
3. In the Camera Settings dialog box, do the following, and then click OK:
• Select Enable Depth of Field.
• Set the Focus Distance to 200 mm.
• Change the F-Stop value to 5.6.
• Set the Focal Length to 27.2.

4. In the Timeline panel, select all of the layers except the audio layer. Then select the Motion Blur switch for one of the layers, applying it to all selected layers.
5. Click the Enable Motion Blur button (![]() ) at the top of the Timeline panel to enable motion blur for all layers.
) at the top of the Timeline panel to enable motion blur for all layers.
6. Choose File > Save to save your project.
Rendering the composition
You’ve done some complex work to create a scene that merges the added components with an existing tableau. To see the final results, you’ll render the project. You’ll learn more about rendering in Lesson 14, “Rendering and Outputting.”
1. In the Project panel, select the Desktop composition.
2. Choose Composition > Add To Adobe Media Encoder Queue.
Adobe Media Encoder opens. Your composition is listed in the Queue panel with default output settings.
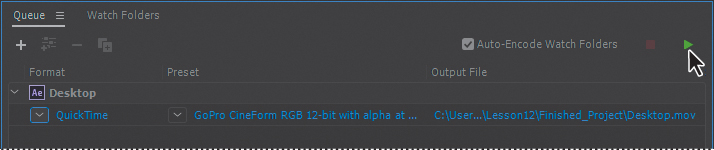
3. In the Queue panel, choose AVI (Windows) or QuickTime (Mac OS) in the Format column.
4. Choose NTSC DV Widescreen 24p in the Preset column.
5. Click the blue text in the Output File column, navigate to the Lesson12/Finished_Project folder, and click Save.
6. Click the Start Queue button (![]() ) to begin rendering.
) to begin rendering.
7. When Adobe Media Encoder has finished rendering the composition, play the movie to admire your work!
Review questions
1. What does the 3D Camera Tracker effect do?
2. How can you make an added 3D element look like it is the same size as elements that are farther from the camera?
3. What is the Rolling Shutter Repair effect?
Review answers
1. The 3D Camera Tracker effect automatically analyzes the motion present in existing 2D footage, extracts the position and lens type of the real camera that shot the scene, and creates a new 3D camera in After Effects to match it. The effect also overlays 3D track points onto the 2D footage, so you can easily attach new 3D layers onto the original footage.
2. To make an added 3D element appear to recede, so that it looks like it’s farther from the camera, adjust its Scale property. Adjusting the Scale property keeps its perspective locked with the rest of the composition.
3. The Rolling Shutter Repair effect attempts to correct the “rolling” shutter problem that commonly occurs when you use digital cameras with CMOS sensors, which capture a frame of video one scan line at a time. Due to time lag between scan lines, not all parts of the image are recorded at exactly the same time, causing motion to ripple down the frame. If the camera or the subject is moving, the rolling shutter can cause distortions, such as leaning buildings and other skewed images. To use the effect, select the problem layer in the Timeline panel, and choose Effect > Distort > Rolling Shutter Repair.